The Whistler Group SC02 200CH Desktop Radio Scanner With FM Radio User Manual USERS MANUAL
The Whistler Group 200CH Desktop Radio Scanner With FM Radio USERS MANUAL
Contents
- 1. USERS MANUAL
- 2. Users Manual
USERS MANUAL
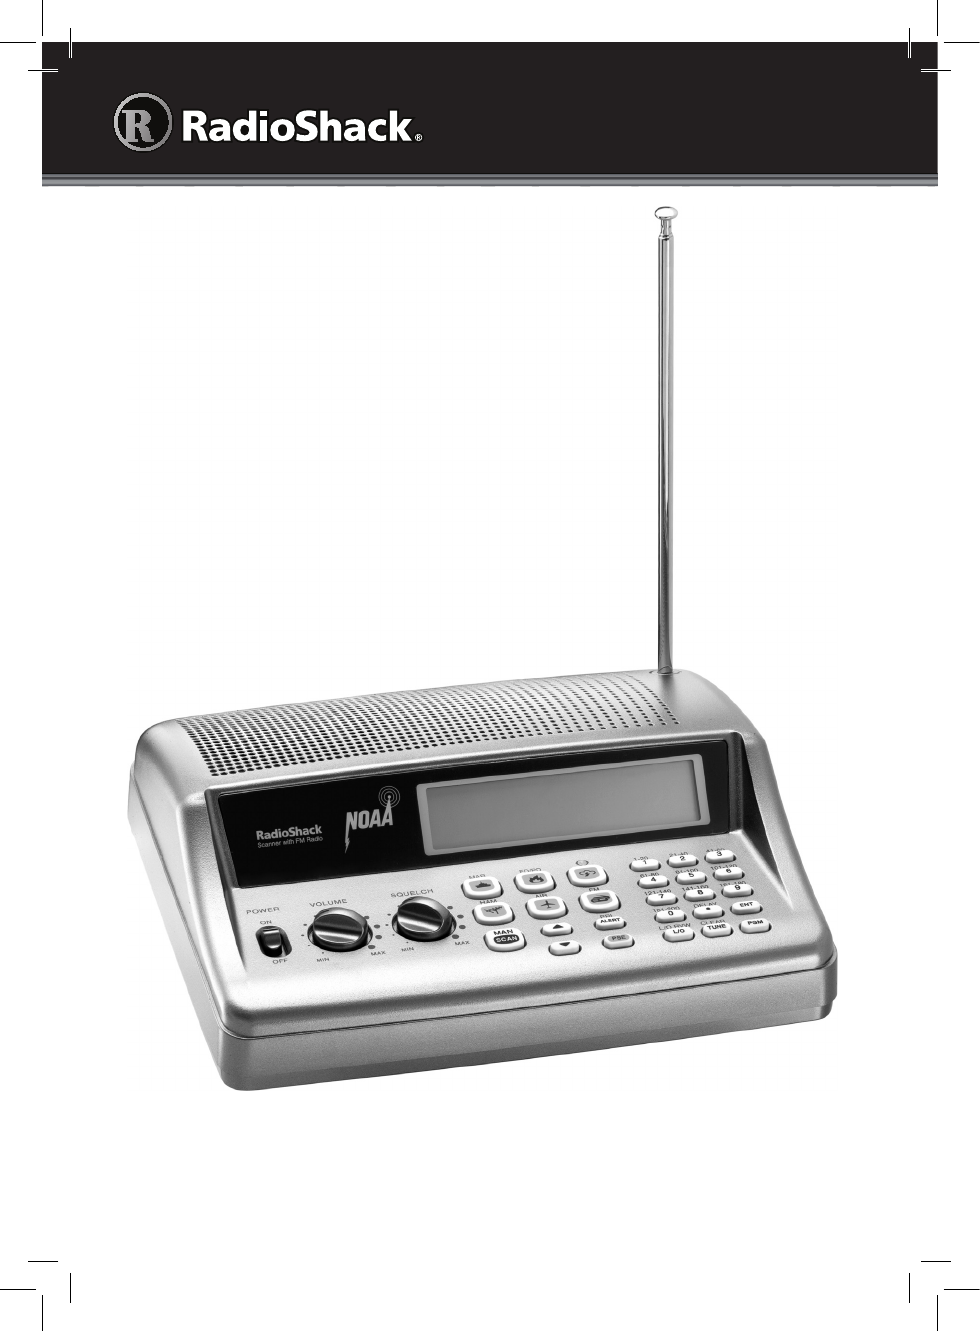
PRO-650
User’s Guide
Desktop Radio Scanner
Thank you for purchasing your Desktop
Radio Scanner from RadioShack. Please
read this user’s guide before installing,
setting up, and using your new scanner

2
Contents
Contents
Package Contents ..............................................................................................4
Features ..............................................................................................................4
Understanding Your Scanner ......................................................................................... 6
Channel Storage Banks ............................................................................................. 6
Service Banks ............................................................................................................ 6
Preprogrammed Service Bank Frequencies .................................................................. 7
Marine ....................................................................................................................... 7
Fire/Police ................................................................................................................. 8
Aircraft ...................................................................................................................... 9
Ham Amateur Radio .................................................................................................. 9
FM Broadcast ............................................................................................................ 9
Weather Channels ..................................................................................................... 9
Understanding the Keypad ......................................................................................... 10
Understanding the Display .......................................................................................... 12
Additional Display Messages .................................................................................. 13
Sub Bank Messages ................................................................................................ 13
Setup ................................................................................................................14
Powering Your Scanner ............................................................................................... 14
AC Power ................................................................................................................ 14
Vehicle Power .......................................................................................................... 14
Connecting the Antenna ............................................................................................. 15
Connecting an Outdoor Antenna ........................................................................... 15
Connecting Headphones ............................................................................................ 15
Connecting an Extension Speaker .......................................................................... 15
Basic Operation ................................................................................................ 16
Turning on the Scanner and Setting Squelch .............................................................. 16
Programming Known Frequencies into Channels ....................................................... 16
Searching for Active Frequencies ................................................................................ 17
Tune Search ............................................................................................................. 17
Service Bank Search ................................................................................................ 17
Storing Found Frequencies into Channels .................................................................. 18
Scanning the Stored Channels .................................................................................... 18
Turning Channel-Storage Banks On and Off .......................................................... 19
Monitoring a Stored Channel ...................................................................................... 19
Clearing a Stored Channel ...................................................................................... 19
Listening to the Marine Bank ...................................................................................... 20
Weather Features .............................................................................................20
Listening to a Weather Channel .................................................................................. 20
Weather Alerts............................................................................................................. 21
Receiving All Weather Alerts .................................................................................. 21

3
Contents
Receiving Alerts for Specific Areas ......................................................................... 21
Testing the Weather Alert and Beep Tone ..............................................................22
Skywarn ................................................................................................................... 22
Setting Delay ............................................................................................................... 23
Locking Out Channels and Frequencies ..................................................................... 23
Reviewing and Removing Lock-outs ....................................................................... 24
Using Priority ............................................................................................................... 25
Turning the Key Tone On and Off ............................................................................... 25
Advanced Operation ........................................................................................ 25
Cloning the Programmed Data ................................................................................... 25
Programming with a Personal Computer .................................................................... 26
Initializing the Scanner ................................................................................................ 26
Preprogrammed Frequencies ...................................................................................... 26
Preprogrammed Frequency Banks .............................................................................. 27
Additional Information .....................................................................................31
Troubleshooting .......................................................................................................... 31
Birdie Frequencies ....................................................................................................... 31
Scanning Legally .......................................................................................................... 32
Care ............................................................................................................................. 32
Specifications............................................................................................................... 32
Service and Repair .......................................................................................................34
FCC Notice .................................................................................................................. 34
Limited Warranty ......................................................................................................... 34

4
Features
Package Contents
• Scanner
• Antenna
• AC Adapter
• User’s Guide
• Quick Start Guide
Features
Your new PRO-650 Desktop Scanner lets you scan conventional transmissions
and is preprogrammed with search banks of the most common frequencies
used by public service agencies. Service Banks are accessed by pressing a
one-touch search key—no complicated programming required.
Your new scanner gives you direct access to over 26,000 frequencies, including
those used by police and fire departments, FM broadcast, ambulance services,
aircraft, and amateur radio services.
Your PRO-650 scanner also has these special features:
Service Banks – easily locate types of calls by searching preprogrammed
frequencies in separate marine, fire/police, aircraft, ham, FM broadcast, and
weather banks.
Display Backlight – makes the display easy to read in low-light situations.
Lock-out Function – skip over specified channels or frequencies when
scanning or searching.
Ten Channel-Storage Banks – group and store 20 channels in each bank (200
total channels).
Tune – tune to new and unlisted frequencies starting from a specified
frequency.
SAME/FIPS Weather Alert – displays the weather event and sounds an alert
for the specific cities or counties you choose.
Memory Backup – frequencies remain stored in memory for an extended time
even without power.
Scan Delay – delays scanning for two seconds before moving to another
channel in order to hear replies.
Priority Channel – set the scanner to check one channel every two seconds
while scanning.

5
Features
Data Cloning – transfer the programmed data to another PRO-650 scanner.
Real-time Signal Strength Indicator – shows relative strength of received
signals.
Liquid-Crystal Display (LCD) – easy to view and change programming
information.
Telescopic Antenna – provides good reception of strong local signals. You can
also connect an external antenna for improved reception of distant or weak
signals.
Your PRO-650 scanner can receive these bands:
Frequency Range Types of Transmissions
29–54 MHz 10-Meter Ham, VHF Lo, 6-Meter Ham
87.3–107.9 MHz FM Broadcast
108–136.99166 MHz Aircraft
137–174 MHz Military Land Mobile, 2-Meter Ham, VHF Hi
380–512 MHz UHF Aircraft, Federal Government, 70-cm Ham, UHF
Standard, UHF “T”
n Note: See “Specifications” on page 32 for more information about frequency
steps.

6
Features
Understanding Your Scanner
Once you understand a few simple terms used in this manual and familiarize
yourself with your scanner’s features, you can put the scanner to work for you.
Simply determine the type of communications you want to receive, then set the
scanner to scan them.
A frequency is the receiving signal location (expressed in kHz or MHz). To find
active frequencies, use the search function or consult an online resource such
as www.radioreference.com.
When you find a frequency, you can store it into a programmable memory
location called a channel, which is grouped with other channels in a channel-
storage bank. You can then scan the channel-storage banks to see if there is
activity on the frequencies stored there. Each time the scanner finds an active
frequency, it stays on that channel until the transmission ends.
Channel Storage Banks
To make it easier to identify and select the channels you want to listen to, your
scanner divides the channels into 10 banks (1 to 10) with 20 channels each,
for a total of 200 channels. You can use each channel-storage bank to group
frequencies, such as those used by the police department, fire department,
ambulance services, or aircraft.
For example, you could program the frequencies used by your local police
department starting with Channel 1 (the first channel in bank 1) and program
the fire department frequencies starting with Channel 21 (the first channel in
bank 2).
Service Banks
The scanner is preprogrammed with the frequencies allocated to marine, fire/
police, aircraft, ham radio, FM broadcast and weather services. This is handy for
quickly finding active frequencies instead of searching through an entire bank
(see “Service Bank Search” on page 17).

7
Features
Preprogrammed Service Bank Frequencies
Marine
Channel Frequency (MHz) Channel Frequency (MHz)
01 156.0500 63 156.1750
05 156.2500 64 156.2250 / 160.8250
06 156.3000 65 156.2750
07 156.3500 66 156.3250
08 156.4000 67 156.3750
09 156.4500 68 156.4250
10 156.5000 69 156.4750
11 156.5500 70 156.5250
12 156.6000 71 156.5750
13 156.6500 72 156.6250
14 156.7000 73 156.6750
15 156.7500 74 156.7250
16 156.8000 77 156.8750
17 156.8500 78 156.9250
18 156.9000 79 156.9750
19 156.9500 80 157.0250
20 157.0000 / 161.6000 81 157.0750
21 157.0500 82 157.1250
22 157.1000 83 157.1750
23 157.1500 84 157.2250 / 161.8250
24 157.2000 / 161.8000 85 157.2750 / 161.8750
25 157.2500 / 161.8500 86 157.3250 / 161.9250
26 157.3000 / 161.9000 87 157.3750 / 161.9750
27 157.3500 / 161.9500 88 157.4250
28 157.4000 / 162.0000
n Note: Both frequencies (transmission and reception) are shown for marine
channels used for duplex transmission.

8
Features
Fire/Police
Group Frequency Range (MHz) Step (kHz)
1 33.420-33.980 20
37.020-37.420 20
39.020-39.980 20
42.020-42.940 20
44.620-45.860 40
45.880 -
45.900-46.060 40
46.080-46.500 20
2 153.770-154.130 60
154.145-154.445 15
154.650-154.950 15
155.010-155.370 60
155.415-155.700 15
155.730-156.210 60
158.730-159.210 60
166.250 -
170.150 -
3 453.0375-453.9625 12.5
458.0375-458.9625 12.5
460.0125-460.6375 12.5
465.0125-465.6375 12.5

9
Features
Aircraft
Group Frequency Range (MHz) Step (kHz)
1 108.000-118.000 8.33
2 118.00833-136.99166 8.33
Ham Amateur Radio
Group Frequency Range (MHz) Step (kHz)
1 29.000-29.700 5
2 50.000-54.000 5
3 144.000-148.000 5
4 420.000-450.000 12.5
FM Broadcast
Frequency Range (MHz) Step (kHz)
87.3–107.9 100
Weather Channels
Channel Frequency (MHz)
1 162.400
2 162.425
3 162.450
4 162.475
5 162.500
6 162.525
7 162.550
10
Features
MAR (Marine)
Search the preprogrammed marine bank.
FD/PD (Fire Dept/Police Dept)
Search the preprogrammed fire/police bank.
/ (Weather / Skywarn)
- Search the seven preprogrammed weather
channels.
- Press and hold to jump to the Skywarn
channel (channel 200). You must first
program your local Skywarn frequency into
channel 200 (see page 22).
HAM
Search the preprogrammed amateur radio
bank.
AIR (Aircraft)
Search the preprogrammed aircraft bank.
FM Broadcast
Search FM radio stations.
Understanding the Keypad
POWER
Turn scanner on and off.
VOLUME
Adjust volume.
SQUELCH
- Turn counterclockwise
to listen to a weak or
distant station.
- Turn clockwise
to cut out weak
transmissions.
11
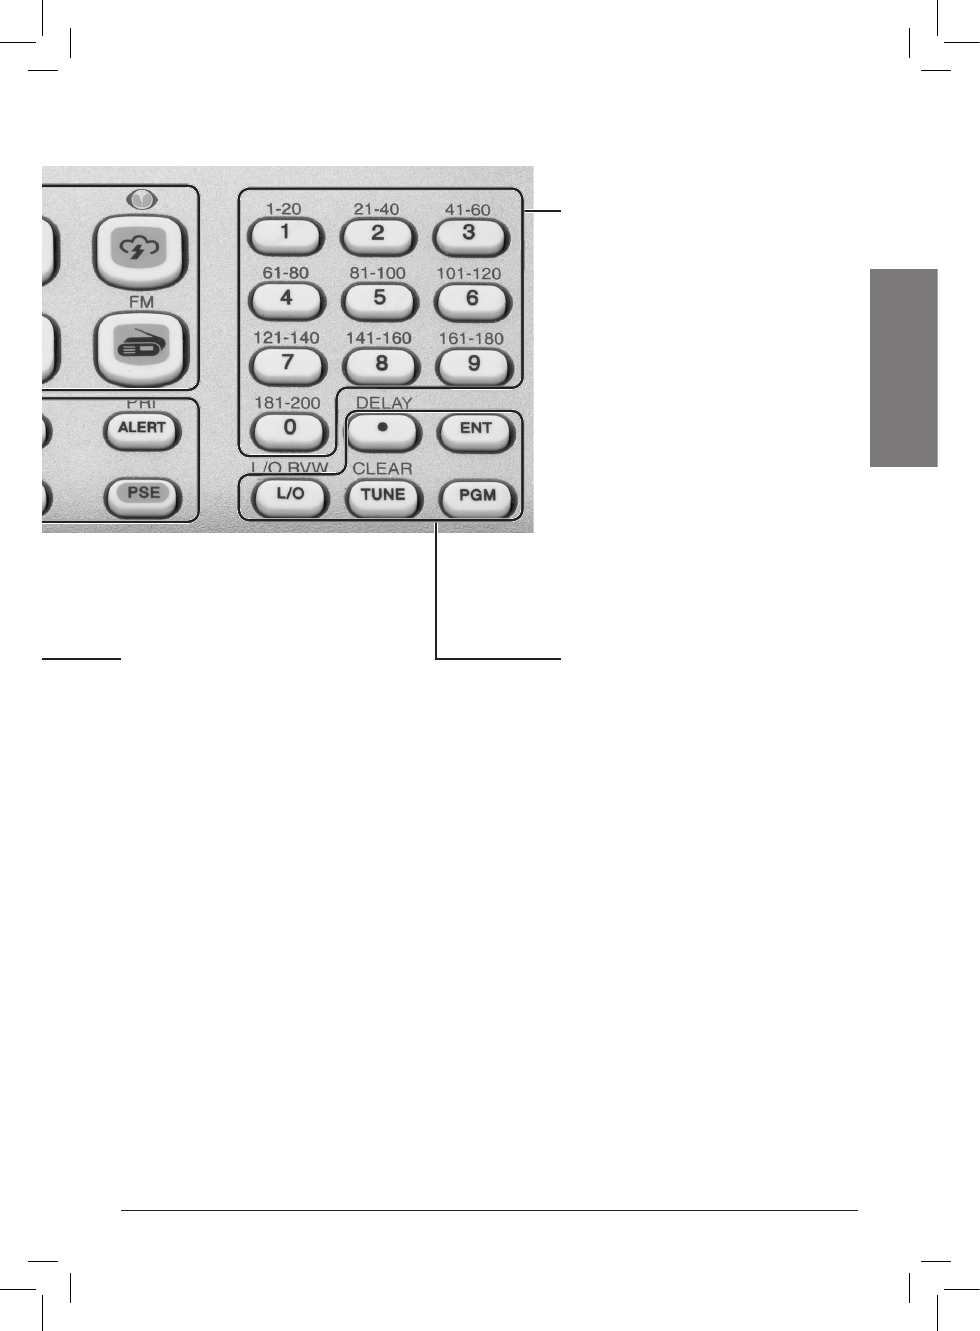
Features
0–9
- Input a number when
entering frequencies and
selecting banks (0 selects
bank 10).
- The number range above
the keys (1–20, 21–40, 41-60,
etc.) indicates the channels
stored in that bank.
SCAN / MAN (Manual)
- Enter Scan mode to scan
programmed channels.
- Enter Manual mode to stop
scanning, directly enter a
channel number, or monitor a
single channel.
e d
Select the direction for
searching and scanning.
PRI / ALERT
- Enable and disable the
priority feature.
- Enable and disable SAME
standby mode when
monitoring a weather
channel.
PSE (Pause)
Stop and restart a search or
tune.
• / DELAY
- Input a decimal point when
entering frequencies.
- Program a two-second
delay for the selected
channel.
ENT (Enter)
Complete the entry of
frequencies.
L/O
/
L/O RVW
- Lock-out selected channels
or frequencies.
- Review locked-out
frequencies.
TUNE / CLEAR
- Enter Tune search.
- Clear an incorrect entry.
PGM
Program frequencies into
channels.

12
Features
Understanding the Display
Row 1
– Skywarn channel active.
FD/PD – Searching the fire/police bank.
BANK – Appears with numbers (1–10) to indicate the scan bank. The bar
under the bank number shows banks that are turned on for scanning.
AIR – Searching the aircraft bank.
HAM – Searching the amateur radio bank.
Row 2
WX – Searching weather channels.
FM radio – Searching for FM radio stations.
000 – Channel number the scanner is tuned to.
CH – Appears with channel number (1–200) or P (priority channel).
000.0000 – Frequency the scanner is tuned to.
MAR – Searching the marine bank.
L/0 – A locked out channel/frequency is manually selected or reviewed.
Row 3
ed (Up/Down) – Search or scan direction.
PRI – Priority feature is active.
S – Signal meter; bars indicate strength of signal.
MAN – Manual mode.
SCAN – Scan mode.
SRCH – Searching a service bank.
PGM – Program mode.
DLY – Two-second delay is active.
Row 1
Row 2
Row 3

13
Features
Additional Display Messages
ALL CH L-out – All channels locked out during scan or marine band search.
b X Ch-FULL – All displayed bank channels are full.
b X StorE – Frequency programmed into displayed bank’s channel.
CLOnE – Clone mode.
-dUPL- – Frequency is already stored in another channel.
Error – Entry error.
FLo ALL- CL – All the locked-out frequencies removed during a FD/PD,
AIRCRAFT, or HAM bank search.
L-r – Review the locked-out frequencies.
L-O Fr-FULL – Maximum of 50 frequencies already locked out.
oFF tonE – Key tone deactivated.
On tonE – Key tone activated.
P – Scanner is tuned to the priority channel.
-t- – Tune mode.
Sub Bank Messages
Lo VHF – Sub-bank 1 of the fire/police bank.
Hi VHF – Sub-bank 2 of the fire/police bank.
UHF – Sub-bank 3 of the fire/police bank.
10 M – Sub-bank 1 of the HAM bank.
6 M – Sub-bank 2 of the HAM bank.
2 M – Sub-bank 3 of the HAM bank.
70CM – Sub-bank 4 of the HAM bank.

15
Setup
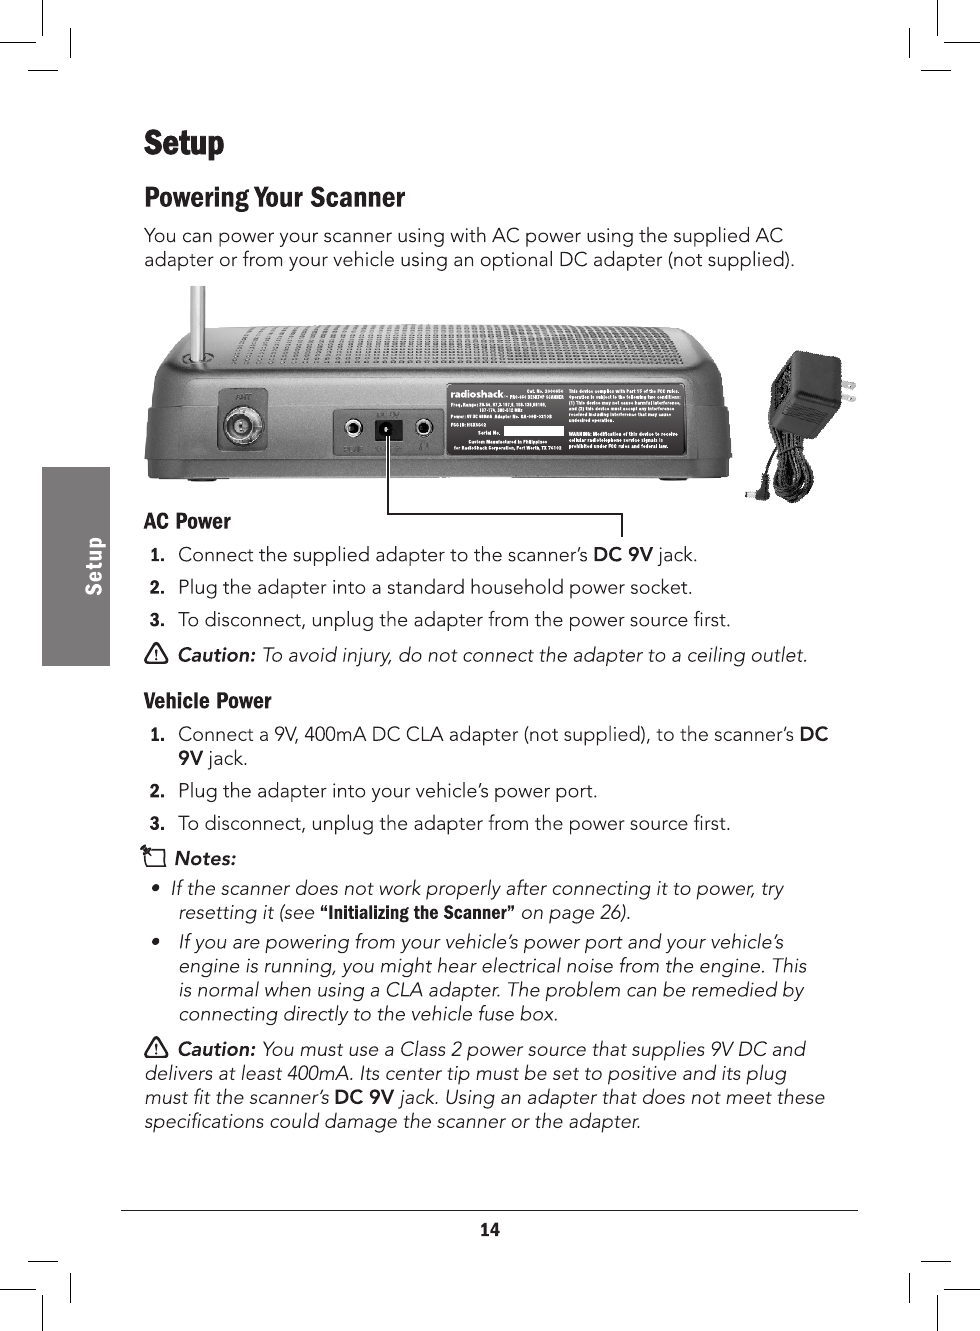
Connecting the Antenna
To attach the supplied telescopic antenna:
1. Insert the antenna in the hole on the top of the scanner.
2. Turn the antenna clockwise to tighten.
Connecting an Outdoor Antenna
To connect an external antenna, follow the installation instructions supplied
with the antenna. Use 50-ohm coaxial cable to connect your scanner to the
outdoor antenna. For lengths between 50 and 100 feet, use RG-8X low-loss
dielectric coaxial cable. For lengths over 100 feet, use RG8. You also may need
a BNC adapter (available at your local RadioShack store).
w Warning: Use extreme caution when installing or removing an outdoor
antenna. If the antenna starts to fall, let it go! It could contact overhead power
lines. If the antenna touches a power line, touching the antenna, mast, cable, or
guy wires can cause electrocution and death. Call the power company to remove
the antenna. DO NOT attempt to do so yourself.
Connecting Headphones
For private listening, you can plug Çinch (3.5 mm) mini-plug earphones or
headphones (not supplied), into the HEADPHONE jack on the back of the
scanner. This automatically disconnects the internal speaker.
Listening Safely
Do not wear headphones, earphones, or earbuds while operating a motor
vehicle or riding a bicycle. This can create a traffic hazard and could be illegal
in some areas.
To protect your hearing, follow these guidelines:
• Do not listen at high volume levels. Extended high-volume listening can
lead to permanent hearing loss.
• Set the volume to the lowest setting. Then turn on your audio device and
adjust the volume to a comfortable level.
• Avoid increasing the volume. Your ears will adapt to the volume level, so a
level that does not cause discomfort could still damage your hearing.
Connecting an Extension Speaker
In a noisy area, an amplified extension speaker (available from your local
RadioShack store or www.RadioShack.com), might provide more comfortable
listening. Plug the speaker cable’s Ç inch (3.5 mm) miniplug into your scanner’s
HEADPHONE jack.
n Note: Use an amplified speaker with this scanner. Non-amplified speakers
do not provide sufficient volume for comfortable listening.

16
Basic Operation
Basic Operation
Turning on the Scanner and Setting Squelch
1. Turn SQUELCH counterclockwise until the indicator points to MIN before
you turn on the scanner.
2. Slide POWER to ON. A welcome message appears. After about 3 seconds,
you might hear a hissing sound. Adjust VOLUME to a comfortable listening
level.
3. Turn SQUELCH clockwise, just until the hissing sound stops.
To perform a quick check of scanner operation, press . If you are near a
NOAA weather station, you should hear weather information.
n Notes:
• Make sure the scanner’s antenna is connected before you turn it on.
• To listen to a weak or distant station, turn SQUELCH counterclockwise.
• If reception is poor, turn SQUELCH clockwise to cut out weak
transmissions.
• If SQUELCH is adjusted so you always hear a hissing sound, the scanner
will not scan or search properly.
Programming Known Frequencies into Channels
1. Press PGM. PGM appears. Enter the channel number (1–200) where you
want to store a frequency, then press PGM again.
2. Use the number keys and • to enter the frequency (including the decimal
point).
3. Press ENT to store the frequency into the channel.
4. To program the next channel in sequence, press PGM and repeat Steps 2
and 3.
n Notes:
• If you made a mistake entering the frequency, Error appears and the
scanner beeps three times when you press ENT. Start again from Step 2.
• Your scanner automatically rounds the entered frequency down to the
closest valid frequency. For example, if you enter a frequency of 151.473,
your scanner accepts it as 151.470.
• If you entered a frequency that is already stored in another channel, the
scanner beeps three times and displays -dUPL- (duplicate) and the lowest
channel number where the frequency is already stored. Press ENT if you still
want to store the frequency. Press TUNE/CLEAR to cancel.
• Press •/DELAY to set a two-second delay on this channel. The scanner stores
this setting in the channel.

17
Basic Operation
If you do not have a list of frequencies in your area, use a Tune search or a
Service Bank search to find transmissions. Or refer to an online resource such as
www.radioreference.com.
Searching for Active Frequencies
Tune Search
During a tune search, the scanner tunes up or down starting from a frequency
you specify.
1. Press TUNE. The display alternates between PSE and –t–.
2. If you want to change the starting frequency, enter a new frequency and
press ENT.
3. Press PSE to start tune search. –t– appears on the display.
4. To change the tuning direction, press e or d.
n Notes:
• Press •/Delay to turn the two-second delay feature on and off.
• Press PSE to pause searching. Press PSE again to resume.
Service Bank Search
Your scanner contains groups of preset frequencies called Service Banks. You
can search for marine, fire/police, aircraft, ham, FM, and weather transmissions
even if you do not know the specific frequencies that are used in your area.
Then you can store the frequencies you find into the scanner’s channels (except
for weather and marine banks, which are already stored as channels).
1. Press , , , , , or .
MAr, FIrE POLICE, AIr, HAM, FM, or WEAtHEr appears respectively. After
about two seconds, the service search starts.
2. To search for another active frequency in the selected bank, press e or d.
See “Preprogrammed Service Bank Frequencies” on page 7 for a list of the
frequencies.
n Notes:
• Press •/Delay to turn the two-second delay feature on and off.
• Press L/O to lock-out a frequency (except Weather band).
• Press PSE to pause searching. Press PSE again to resume.
• To reverse the search direction at any time, press e or d.
• If necessary, you can select search groups using the number keys.
• The frequencies in the scanner’s Service Banks are preset. You cannot change
them.

18
Basic Operation
Storing Found Frequencies into Channels
Once you find interesting frequencies during a Tune or Service Bank search,
you can store them in the scanner’s channel-storage banks.
1. Press ENT when you find a frequency. The bank number and StorE appear.
2. If you want to change banks, enter the new bank number.
3. Press ENT to store the frequency. The channel and frequency flash twice. To
cancel the operation, press TUNE/CLEAR.
n Notes:
• The frequency is automatically stored in the first empty channel of the
selected bank.
• If the scanner displays -dUPL-, the frequency is already stored in another
channel. Press ENT if you want to continue storing the frequency. Press
TUNE/CLEAR to cancel.
• If there are no empty channels in the bank, Ch-FULL appears. You can select
another bank or clear some channels in the current bank (see “Clearing a
Stored Channel” on page 19).
• If the scanner displays -dUPL- or CH-FULL, you can store another channel
location by pressing PGM. The channel number flashes and 000.0000 (or
previous frequency) appears. Press the desired channel number then press
ENT. Repeat if needed. Press ENT again when an empty channel is found.
Scanning the Stored Channels
Press SCAN/MAN until SCAN appears to continuously scan through all
channels with stored frequencies.
If the scanner finds an active frequency, it stops and displays that channel
and frequency number, then it automatically begins scanning again when the
transmission on that frequency ends.
n Notes:
• Press e or d to reverse the scanning direction.
• Press •/DELAY to set the scanner to remain on the current channel for two
seconds after the transmission ends.
• To set the scanner to remain on the current channel, even after the
transmission stops, press SCAN/MAN at any time during the transmission
so MAN appears and SCAN disappears (see “Monitoring a Stored Channel” on
page 19).
• Press L/O to lock-out a channel.

19
Basic Operation
Turning Channel-Storage Banks On and Off
To turn a channel-storage bank on or off, press the bank’s number key (1–0,
using 0 for bank 10) during scanning. The channel-storage banks are on when
they have a bar underneath them and off when no bar appears underneath
them.
n Notes:
• The scanner does not scan any of the channels within the banks you have
turned off.
• You cannot turn off all banks; there must be at least one active bank.
• You can manually select any channel in a bank, even if the bank is turned
off.
• When you turn on a bank during scanning, the scanner moves to the
selected bank and scans it.
• If no transmission is found, the scanner continues to scan through all
selected banks.
Monitoring a Stored Channel
You can continuously monitor a specific channel without scanning. This could
be useful if you hear a transmission on a channel and do not want to miss any
details, even though there might be periods of silence.
1. Press SCAN/MAN until MAN appears.
2. Enter the channel number (1–200).
3. Press SCAN/MAN again.
Clearing a Stored Channel
To remove a frequency stored in a channel.
1. Press SCAN/MAN to stop scanning.
2. Press the number keys to enter the channel number (1–200).
3. Press PGM. PGM appears.
4. Press 0 then ENT. The frequency number changes to 000.0000 to indicate
the channel is cleared.
5. To clear another channel, use the number keys to enter that channel
number then press PGM again. Or, repeatedly press PGM until the desired
channel number appears. Repeat Step 4.

20
Basic Operation
Listening to the Marine Bank
1. Press to search the marine bank. MAr appears for about two seconds,
then the scanner starts searching from marine channel 16. To change the
search direction, press e or d.
2. Press PSE to stop searching. SRCH disappears and MAN appears.
• To change the channel manually, press e or d.
• To select a channel directly, enter the two-digit channel number. See “Marine
Service Bank” on page 7 for a list of channels.
• To lock-out a frequency, press L/O.
3. Press PSE again to restart the marine bank search.
Weather Features
The FCC (Federal Communications Commission) has allocated channels for use
by the National Oceanic and Atmospheric Administration (NOAA). Regulatory
agencies in other countries have also allocated channels for use by their
weather reporting agencies.
The NOAA and your local weather reporting agency broadcast the local
forecast and regional weather information on one or more of these channels.
Listening to a Weather Channel
Press to hear your local forecast and regional weather information. WEAthEr
appears for about two seconds, then the scanner starts searching the weather
bank.
Press PSE to stop searching the channels. SRCH disappears and MAN appears.
To change the channel manually, press e or d.
n Note: Your scanner incorporates weather alert as one of its features and
is an extremely sensitive high quality receiver on the weather frequencies.
However, the included antenna is optimized for general purpose scanning. If
you use this scanner as your only means for receiving weather alerts, please
make sure you are receiving a clear signal on the antenna or switch to an
external antenna that gives you clear reception of a local NOAA weather
broadcast.

21
Basic Operation
Weather Alerts
Receiving All Weather Alerts
To program the scanner to search for weather alerts every two seconds, set a
weather channel as the priority channel.
1. Press .
2. Select the weather channel you want to set as the priority channel.
3. Press and hold ENT then PRI/ALERT. P ChAnnEL displays momentarily.
Then PCH flashes and 000.0000 (or the previously-stored frequency) appears.
4. Press ENT to store the priority channel. The display flashes twice. Press
TUNE/CLEAR to cancel.
5. Press PRI/ALERT during scanning or searching to turn on the priority
feature. PRI appears.
If the scanner detects a 1050 Hz weather alert tone on the programmed
channel, the scanner sounds the alert tone and ALErt flashes. Press any key to
turn off the alarm.
Receiving Alerts for Specific Areas
About SAME Signals
The National Weather Service precedes each weather alert with a digitally
encoded SAME (Specific Area Message Encoding) signal, then a 1050 Hz tone.
The SAME signal includes a FIPS (Federal Information Processing Standard)
code and an event code that corresponds with the type of alert being sent.
The FIPS code format is:
Subdivisions State County
0-9
(0=entire area)
01-50
(00=all states)
XXX
(000=all counties)
Example: 048439
(0=All; 48=Texas; 439=Tarrant County)
A current list of FIPS codes is located at www.NWS.NOAA.gov/NWR.
SAME Standby Mode
In SAME Standby mode, your scanner monitors weather channels for SAME
alerts for up to seven areas you specify by entering the FIPS codes.
To program your scanner for SAME Standby mode:
1. Press .
2. Press PGM to access the FIPS code entry mode.

22
Basic Operation
3. Use e or d to select the desired FIPS code storage location.
4. Use the number keys to enter the FIPS code, then press ENT to store the
code.
5. Repeat steps 3-4 for all the FIPS codes that you wish to store.
6. Press to exit FIPS code entry mode. The scanner displays F showing that
FIPS codes are enabled.
7. Press PRI/ALERT to initiate SAME Standby mode. The scanner displays F
[1-7]CH StAndby.
The scanner will monitor weather channels for alerts with matching FIPS codes.
To exit SAME Standby mode, press PRI/ALERT again.
n Notes:
• Press L/O during step 4 to lock-out FIPS entries; L /0 appears in the display.
Press L/O again to enable FIPS entries; L/0 disappears.
• If you do not enter any FIPS codes, or if your FIPS codes are locked out,
when you enter SAME Standby mode the scanner receives alerts and
warning messages for all receivable areas.
• The scanner sounds an alert when it receives the SAME code. To stop the
alert and ready the scanner to receive a new alert signal, press any key.
• If you do not stop the alert within five minutes, the alert stops and the
scanner beeps every ten seconds. If the scanner receives a new weather
alert after five minutes, it sounds the new alert.
Testing the Weather Alert and Beep Tone
1. To test the weather alert, press and hold ENT for more than 2 seconds
while F [1-7]CH StAndby appears on the display.
The display indicates the type of message, and the scanner sounds an alert
or series of beeps. The beeps automatically change every 3 seconds.
2. Press any key to stop testing.
Skywarn
Many areas of the country have amateur radio repeaters that have been
designated as “Skywarn” repeaters. During times of severe weather, these
repeaters are used to relay reports of severe weather directly to meteorologists
at a local National Weather Service forecast office. Using the Skywarn feature
in your scanner, you can easily jump to your local Skywarn frequency and
monitor these reports, in many cases hearing about severe weather in your area
instantly as it occurs.
1. Before using this feature, you must program the Skywarn frequency into
channel 200 (see “Programming Known Frequencies into Channels” on page 16).

23
Basic Operation
2. To activate Skywarn, press and hold / for about two seconds.
3. The scanner jumps to channel 200 and displays .
n Note:
• If no frequency is programmed in the Skywarn channel, No ProG appears.
• Refer to www.radioreference.com to find Skywarn frequencies in your area.
Setting Delay
To avoid missing a reply in conversations, a two-second delay is automatically
set for each channel. The scanner stops for two seconds after a transmission
ends before it resumes scanning or searching. DLY appears on the display
when the delay function is active.
To turn delay on:
• If the scanner is scanning and stops on an active channel, quickly press
•/DELAY before it resumes.
• If the desired channel is not selected, manually select the channel, then
press •/DELAY.
• If the scanner is searching, press •/DELAY. DLY appears and the scanner
adds a two-second delay to every transmission it stops on in that bank.
To turn delay off:
Press •/DELAY while the scanner is monitoring a channel or frequency. DLY
disappears.
Locking Out Channels and Frequencies
You can increase the scanning or search speed by locking out channels or
frequencies that have a continuous transmission, such as control channels,
weather channels, or birdie frequencies.
Press L/O when the scanner stops on a channel or frequency while scanning
or searching. The scanner locks out the channel/frequency then continues
scanning/searching.
To manually lock-out a channel, select the channel then press L/O. L/0 appears
in the display.
n Notes:
• Your scanner automatically locks out empty channels.
• You can still manually select locked-out channels.
• You can lock-out a maximum of 50 frequencies during a search. If you try to
lock-out more, L-O Fr-FULL appears.

24
Basic Operation
Reviewing and Removing Lock-outs
Stored Channels
1. Hold down L/O
/
L/O RV W for about two seconds while in manual
operation. The scanner pulls up a list of locked out channels.
2. Repeatedly press and hold L/O
/
L/O RV W to show the next locked out
channel. If an error beep sounds, there are no locked out channels.
3. To remove the lock-out, press L/O
/
L/O RV W until L/0 disappears.
Marine Service Bank
1. Press PSE during the Marine Service Bank search.
2. Hold down L/O
/
L/O RV W for about two seconds. The scanner pulls up a
list of locked out channels.
3. Repeatedly press and hold L/O
/
L/O RV W to show the next locked out
channel. If an error beep sounds, there are no locked out channels.
4. To remove the lock-out, press L/O
/
L/O RV W until L/0 disappears.
Other Service Banks
1. Hold down L/O
/
L/O RV W for about two seconds during a Service Bank
search.
2. Press e or d repeatedly to scroll through the list of locked-out frequencies.
L-r and L/0 appear in the display.
3. Press L/O
/
L/O RV W to remove the lock-out. The list scrolls to the next
locked-out frequency.
n Notes:
• When you reach the highest locked-out frequency, the scanner beeps twice
and rolls to the lowest locked-out frequency.
• If the Service Bank has no locked-out frequencies, EMPty appears.
Removing Lock-outs from All Frequencies in a Service Bank
1. Hold down L/O
/
L/O RV W for about two seconds during a Service Bank
search. L-r appears.
2. While holding down TUNE/CLEAR, press L/O
/
L/O RV W. FLo ALL–CL
appears for about two seconds. Then the display alternates with YES ---Ent
and No --CLEAr.
3. Press ENT. L-r EMPty appears. The scanner clears lock-outs from all
frequencies in the Service Bank.

25
Advanced Operation
Using Priority
The priority feature sets the scanner to check one channel every two seconds
while scanning. You can program one frequency into the priority channel.
1. Press PGM, then press PRI/ALERT. PCH and 000.0000 (or the previously
stored frequency) appear.
2. Enter the frequency you want stored in the priority channel, then press ENT.
3. To turn on the priority feature, press PRI/ALERT during scanning or
searching. PRI appears. The scanner checks the priority channel every two
seconds and stays on the channel if there is activity.
• To turn off the priority feature, press PRI/ALERT. PRI disappears.
• To program a weather channel as the priority channel, see “Receiving All
Weather Alerts“ on page 21.
Turning the Key Tone On and Off
The scanner is preset to sound a tone each time you press one of its keys.
To turn the key tone on and off:
1. If the scanner is on, turn it off then back on again.
2. WELCOME SCAnnInG rECEIVEr appears.
3. While the welcome message is on the screen, press 1 to turn on the key
tone or press 2 to turn it off.
Advanced Operation
Cloning the Programmed Data
You can transfer the programmed data to and from a PRO-650 scanner using
an optional connecting cable with Ç-inch (3.5mm) stereo phone plugs on both
ends (available from your local RadioShack store or www.RadioShack.com).
1. Turn on both scanners.
2. Connect the connecting cable to each scanner’s PC/IF jack. CLOnE and UP
to SEnd appears.
3. Press e on the host scanner.
4. SEndInG appears at the host scanner.
To exit clone mode after the data transfer is complete, remove the cable.
No ConnEct appears if you try to connect to another model scanner. The PRO-
650 does not clone with other scanner models.

26
Advanced Operation
Programming with a Personal Computer
You can upload or download programmed data to or from a PC using a USB
cable available from your local RadioShack store or www.RadioShack.com.
The application software is available online. Use a search engine to find
“scanner programming software.” Follow instructions in the software package
to upload and download data.
Initializing the Scanner
If the scanner’s display locks up or does not work properly after you connect a
power source, you might need to initialize the scanner.
n Important: This procedure clears all information you stored in the scanner’s
memory. Only initialize the scanner when you are sure the scanner is not
working properly.
1. Turn off the scanner, then turn it on again. WELCOME SCAnnInG rECEIVEr
appears.
2. Press 0, then press 1 while the welcome message is on the screen. InItIAL
appears for about two seconds, then YES — Ent and No — CLEAr appear
alternately.
3. Press ENT. WAIt appears for about two seconds.
n Note: Do not turn off the scanner until the initialization is complete. When
the initialization is complete, 1CH 000.0000 appears on the display.
Preprogrammed Frequencies
Your scanner has 153 preprogrammed frequencies in the ROM. You can load
them into Channels 1 to 153.
1. Turn off the scanner and then turn it on again.
2. While WELCOME message appears, press PGM.
3. Load –Fr– appears, then YES––Ent and No––CLEAr appear alternately.
4. Press ENT to load frequencies or press CLEAR to cancel.
27
Advanced Operation
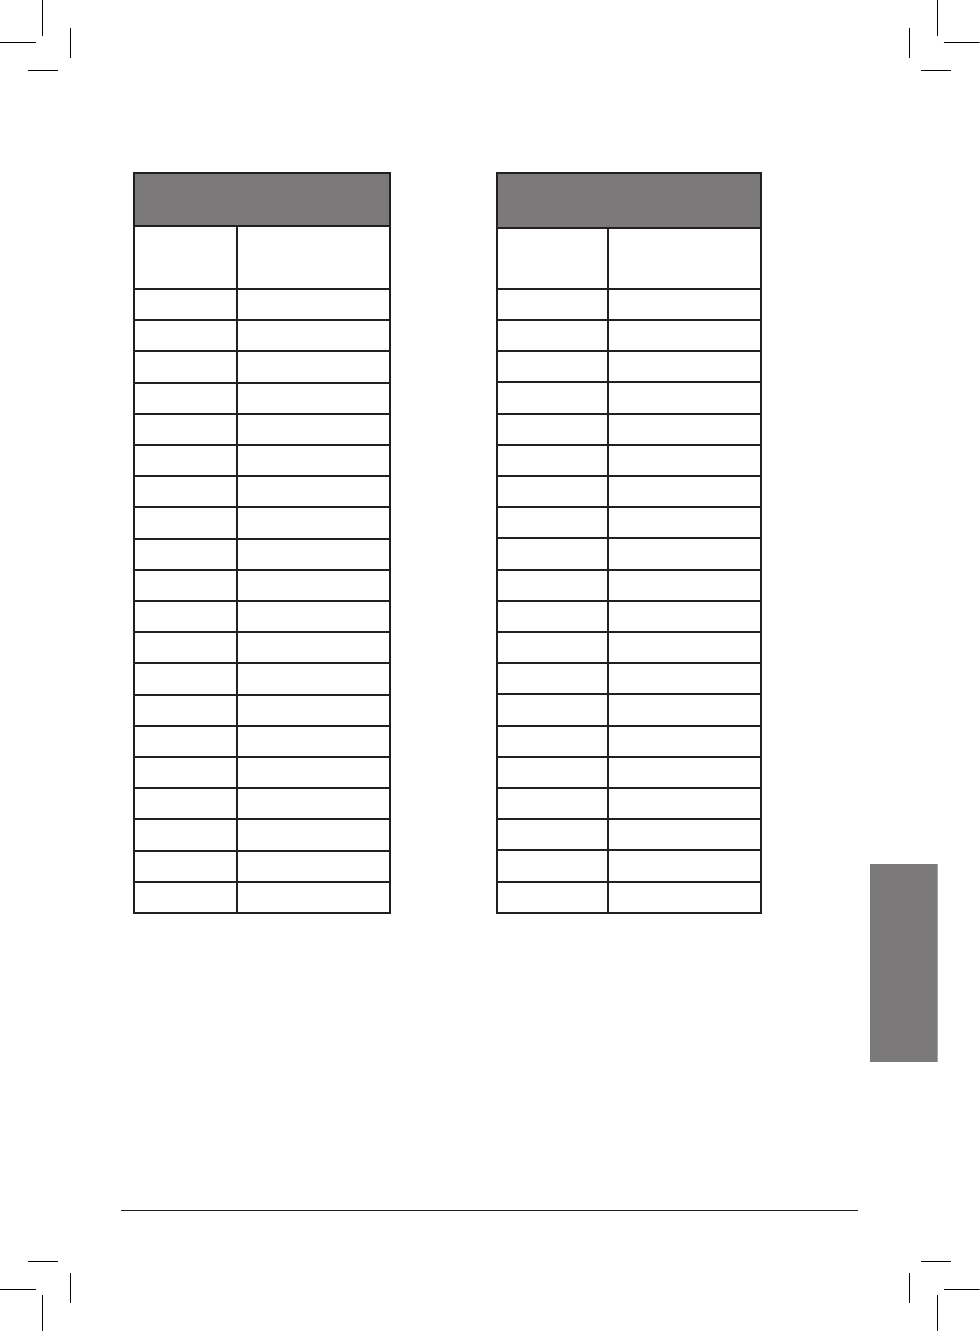
Bank 1
Channel Frequency
(MHz)
1 40.5000
2 52.5250
3 121.5000
4 122.0000
5 122.2000
6 122.7000
7 122.7500
8 122.8000
9 122.9000
10 122.9500
11 123.0000
12 123.1000
13 123.4500
14 131.4500
15 131.6750
16 146.5200
17 146.7600
18 146.8800
19 146.9400
20 148.1500
BANK 2
Channel Frequency
(MHz)
21 151.6250
22 151.8200
23 151.8800
24 151.9400
25 151.9550
26 154.0100
27 154.0700
28 154.1300
29 154.1450
30 154.1600
31 154.1750
32 154.1900
33 154.2050
34 154.2200
35 154.2350
36 154.2500
37 154.2650
38 154.2800
39 154.2950
40 154.3100
Preprogrammed Frequency Banks
28
Advanced Operation
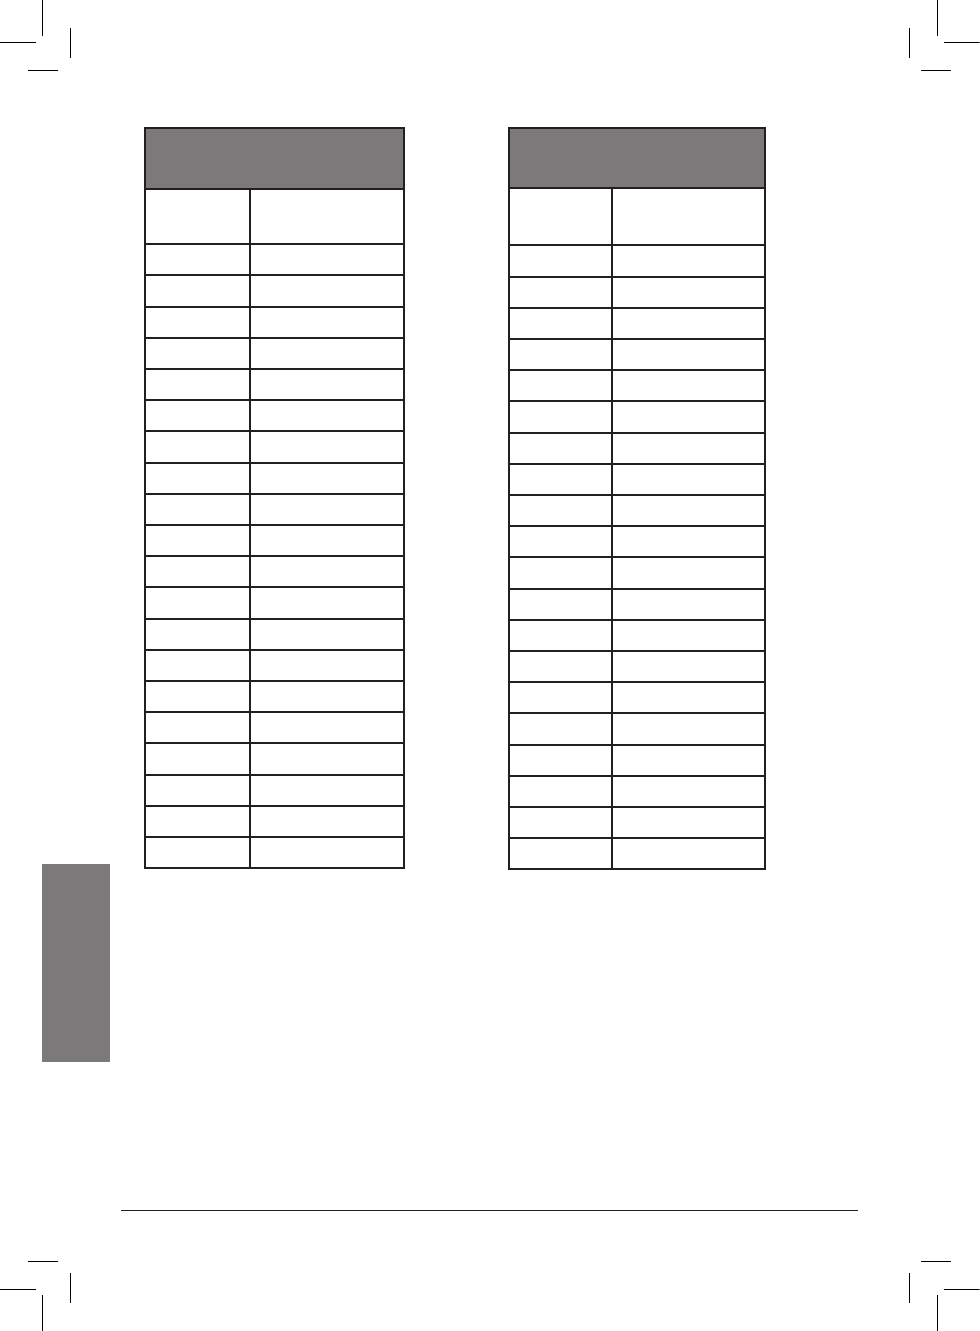
Bank 3
Channel Frequency
(MHz)
41 154.3250
42 154.3400
43 154.3550
44 154.3700
45 154.3850
46 154.4000
47 154.4150
48 154.4300
49 154.4450
50 154.5700
51 154.6000
52 155.1600
53 155.1750
54 155.2050
55 155.2200
56 155.2350
57 155.2650
58 155.2800
59 155.2950
60 155.3250
BANK 4
Channel Frequency
(MHz)
61 155.3400
62 155.3550
63 155.3700
64 155.3850
65 155.4000
66 155.4750
67 156.4250
68 156.4500
69 156.4750
70 156.5750
71 156.6250
72 156.8000
73 156.9250
74 157.0500
75 157.1000
76 157.1250
77 157.4250
78 162.3000
79 163.2000
80 415.2000
29
Advanced Operation
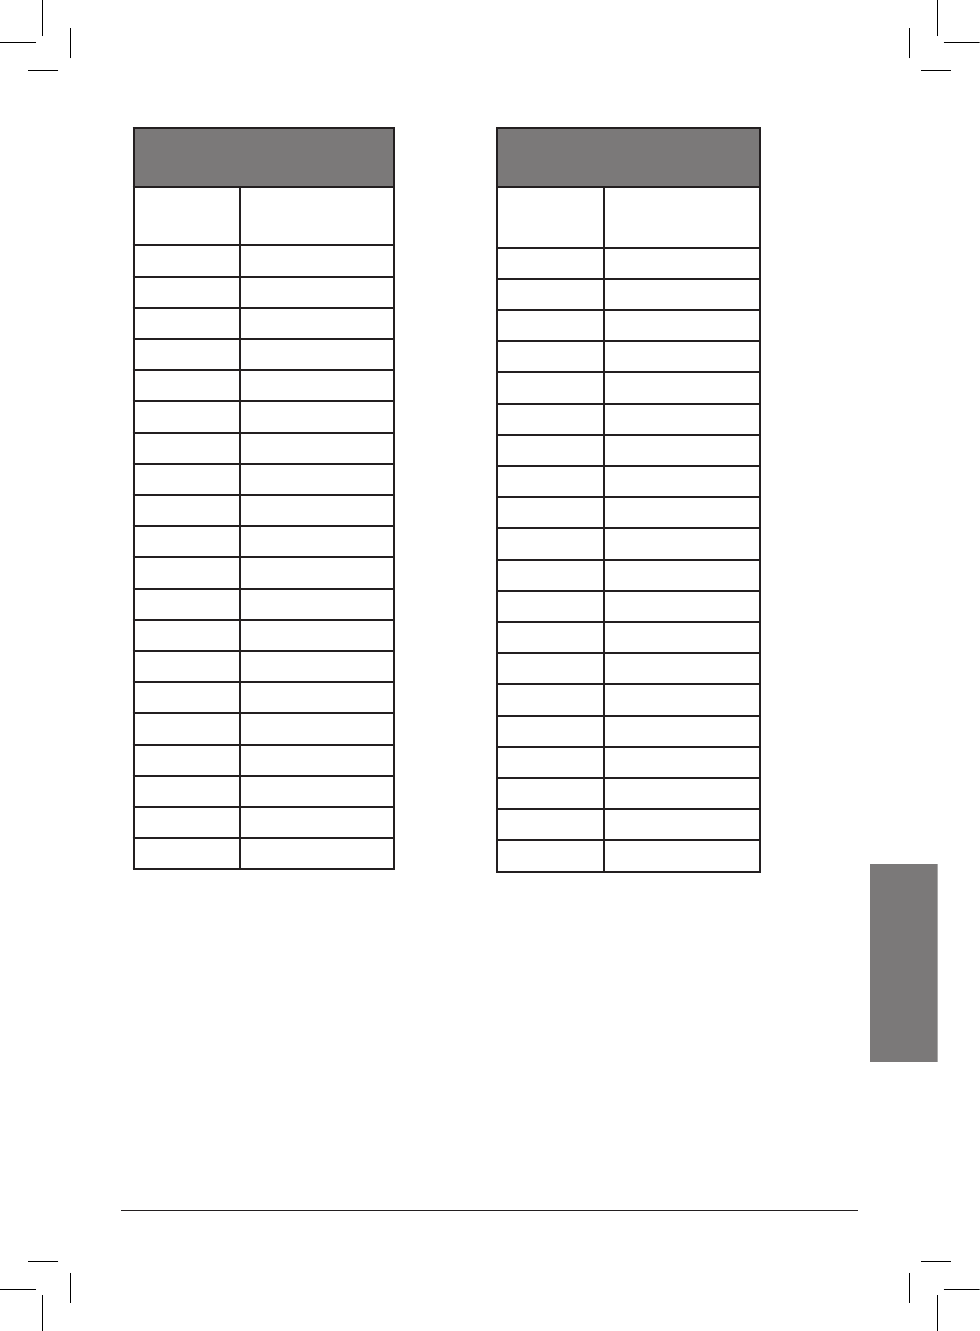
BANK 5
Channel Frequency
(MHz)
81 415.7000
82 446.0000
83 450.8000
84 454.0000
85 460.0250
86 460.0500
87 460.0750
88 460.1000
89 460.1250
90 460.1500
91 460.1750
92 460.2000
93 460.2250
94 460.2500
95 460.2750
96 460.3000
97 460.3250
98 460.3500
99 460.3750
100 460.4000
BANK 6
Channel Frequency
(MHz)
101 460.4250
102 460.4500
103 460.4750
104 460.5000
105 460.5250
106 460.5500
107 460.5750
108 460.6000
109 460.6250
110 460.6500
111 460.7000
112 460.7500
113 460.8000
114 460.8500
115 460.9000
116 460.9250
117 460.9500
118 460.9750
119 462.5500
120 462.5625
30
Advanced Operation
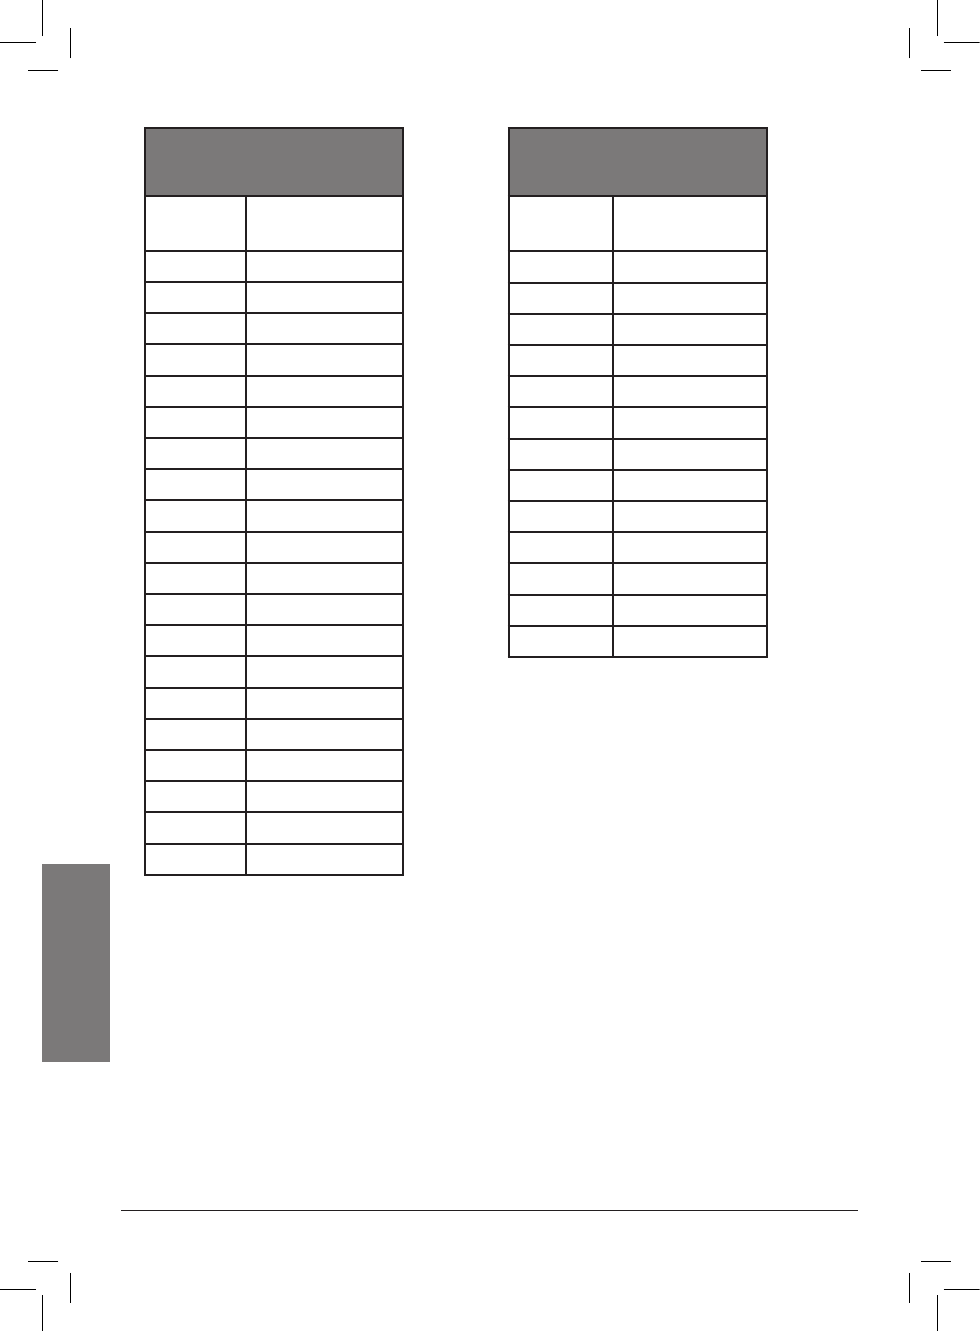
BANK 7
Channel Frequency
(MHz)
121 462.5750
122 462.5875
123 462.6000
124 462.6125
125 462.6250
126 462.6375
127 462.6500
128 462.6625
129 462.6750
130 462.6875
131 462.7000
132 462.7125
133 462.7250
134 462.9500
135 462.9750
136 464.5000
137 464.5500
138 464.8750
139 467.0625
140 467.5625
BANK 8
Channel Frequency
(MHz)
141 467.5875
142 467.6125
143 467.6375
144 467.6625
145 467.6875
146 467.7125
147 467.7625
148 467.8125
149 467.8500
150 467.8750
151 467.9000
152 469.5000
153 469.5500

31
Additional Info
Additional Information
Troubleshooting
The scanner is not working at all.
• The AC or DC adapter might not be connected. Be sure the adapter’s barrel
plug is fully inserted into the DC 9V jack. The center tip of the adapter’s
barrel plug must be set to positive.
The scanner does not receive any stations or reception is poor.
• An antenna is not connected or is connected incorrectly. Be sure an antenna
is properly connected to the scanner.
• Reception may be blocked by walls or other obstructions. Try moving to a
different area.
The scanner is on but does not scan.
• The squelch might not be adjusted correctly. Turn SQUELCH clockwise.
• Only one channel or no channels are stored. Store frequencies into more
than one channel.
The keypad does not work.
• The scanner might need to be reset or initialized. Turn the scanner off then
on again, or initialize the scanner (see “Initializing the Scanner” on page 26).
While scanning, the scanner locks on frequencies that have an unclear
transmission.
• Some frequencies programmed into the scanner might be the same as
birdie frequencies. Avoid programming birdie frequencies or only listen to
them manually.
Birdie Frequencies
Every scanner has birdie frequencies. Birdies are signals created inside
the scanner’s receiver, which may interfere with transmissions on the same
frequencies. If you program one of these frequencies, you hear only noise
on that frequency. If the interference is not severe, you might be able to turn
Squelch clockwise to omit the birdie.
To find the birdies in your scanner:
1. Disconnect the antenna and move it away from the scanner. Make sure that
no other nearby radio or TV sets are turned on near the scanner.
2. Use the Tune to search every frequency range from its lowest frequency to
the highest. Occasionally, the searching will stop as if it has found a signal,
often without any sound. This is a birdie.
3. Make a list of all the birdies in your scanner for future reference.

32
Additional Info
Scanning Legally
Your scanner covers frequencies used by many different groups including
police and fire departments, ambulance services, government agencies, private
companies, amateur radio services, military operations, pager services, and
wireline (telephone and telegraph) service providers. It is legal to listen to
almost every transmission your scanner can receive. However, there are some
transmissions you should never intentionally listen to. These include:
• Telephone conversations (cellular, cordless, or other private means of
telephone signal transmission)
• Pager transmissions
• Any scrambled or encrypted transmissions
According to the Electronic Communications Privacy Act (ECPA), as amended,
you are subject to fines and possible imprisonment for intentionally listening
to, using, or divulging the contents of such a transmission unless you have
the consent of a party to the communication (unless such activity is otherwise
illegal).
This scanner is designed to prevent reception of illegal transmissions, in
compliance with the law which requires that scanners be manufactured in such
a way as to not be easily modifiable to pick up those transmissions. Do not
open your scanner’s case to make any modifications that could allow it to pick
up transmissions that are not legal to listen to. Doing so could subject you to
legal penalties.
In some areas, mobile use of this scanner is unlawful or requires a permit.
Check the laws in your area. We encourage responsible, legal scanner use.
Care
Your scanner is not waterproof. Do not expose it to rain, moisture, or extremely
high humidity. If the scanner gets wet, wipe it dry immediately. Use and store
the scanner only in normal temperature environments. Handle the scanner
carefully; do not drop it. Keep the scanner away from dust and dirt, and wipe it
with a damp cloth occasionally to keep it looking new.
Specifications
Frequency Coverage
29-54 MHz ...................................................................................... (5 kHz steps)/FM
87.3-107.9 MHz ......................................................................(100 kHz steps)/WFM
108-136.99166 MHz ..................................................................(8.33 kHz steps)/AM
137-143.9875 MHz .................................................................... (12.5 kHz steps)/FM
144-148 MHz .................................................................................. (5 kHz steps)/FM

33
Additional Info
148.0125-150.7875 MHz ........................................................... (12.5 kHz steps)/FM
150.8-161.995 MHz ........................................................................ (5 kHz steps)/FM
162-174 MHz ............................................................................. (12.5 kHz steps)/FM
380-512 MHz ............................................................................. (12.5 kHz steps)/FM
Sensitivity (S+N)/N 20 dB
29-54 MHz ........................................................................................................ 0.5 uV
87.3-107.9 MHz ((S+N)/N 30 dB) ..................................................................... 1.0 uV
108-136.99166 MHz ......................................................................................... 1.0 uV
137-174 MHz .................................................................................................... 0.5 uV
380-512 MHz .................................................................................................... 0.7 uV
Spurious Rejection (FM @154 MHz) ................................................................ 50 dB
Selectivity
±8 kHz/±17kHz (FM/AM) ....................................................................... -6dB/-50dB
±80kHz/±180kHz (WFM) ........................................................................ -6dB/-50dB
Search Speed ............................................................................. Up to 80 Steps/Sec
Scan Speed ..........................................................................Up to 40 Channels/Sec
Delay Time ................................................................................................ 2 Seconds
IF Frequencies
1st IF ............................................................................................................10.7 MHz
2nd IF ..............................................................................................................455 kHz
IF Interference Ratio (10.7 MHz) ..................................................70 dB at 154 MHz
Squelch Sensitivity
Threshold (FM/AM) ........................................................................ Less than 0.5 uV
Threshold (WFM) ............................................................................ Less than 1.0 uV
Tight (FM) .........................................................................................(S + N)/N 25 dB
Tight (WFM) .......................................................................................(S+N)/N 60 dB
Tight (AM) ..........................................................................................(S+N)/N 20 dB
Antenna Impedance ....................................................................................50 Ohms
Audio Output Power (10% THD) ......................................................0.7 W Nominal
Built-In Speaker............................................................... 3 Inches (77 mm), 8 Ohms
Operating Temperature ....................................................32° to 110°F (0° to 43°C)
Power Requirements ...................................................... 9V AC Adapter (supplied)
................................................................................... 9V DC Adapter (not supplied)
Dimensions (HWD) ...................................................................... 8 ¼ x 6 Ê x 2 È In
.....................................................................................................(210 x 175 x 60 mm)
Weight (without antenna) .................................................................. 24.7 oz (700 g)
Specifications and depictions are subject to change and improvement without notice.
Actual product may vary from the images found in this document.

34
Additional Info
Service and Repair
If your scanner is not performing as it should, take it to your local RadioShack
store for assistance. To locate your nearest RadioShack, use the store
locator feature on RadioShack’s website (www.radioshack.com), or call
1-800-The Shack (800-843-7422) and follow the menu options. Modifying or
tampering with the scanner’s internal components can cause a malfunction and
might invalidate its warranty and void your FCC authorization to operate it.
FCC Notice
This equipment has been tested and found to comply with the limits for
a scanning receiver, pursuant to Part 15 of the FCC Rules. These limits are
designed to provide reasonable protection against harmful interference in
a residential installation. This equipment generates, uses and can radiate
radio frequency energy and, if not installed and used in accordance with the
instructions, may cause harmful interference to radio communications.
However, there is no guarantee that interference will not occur in a particular
installation. If this equipment does cause harmful interference to radio or
television reception, which can be determined by turning the equipment off and
on, the user is encouraged to try to correct the interference by one or more of the
following measures:
• Reorient or relocate the receiving antenna.
• Increase the separation between the equipment and receiver.
• Connect the equipment into an outlet on a circuit different from that to
which the receiver is connected.
This device complies with part 15 of the FCC Rules. Operation is subject to the
following two conditions: (1) This device may not cause harmful interference,
and (2) this device must accept any interference received, including
interference that may cause undesired operation.
Limited Warranty
RadioShack warrants this product against defects in materials and workmanship
under normal use by the original purchaser for one (1) year after the date of purchase
from a RadioShack-owned store or an authorized RadioShack franchisee or dealer.
RADIOSHACK MAKES NO OTHER EXPRESS WARRANTIES.
This warranty does not cover: (a) damage or failure caused by or attributable to abuse,
misuse, failure to follow instructions, improper installation or maintenance, alteration, acci-
dent, Acts of God (such as floods or lightning), or excess voltage or current; (b) improper
or incorrectly performed repairs by persons who are not a RadioShack Authorized Service
Facility; (c) consumables such as fuses or batteries; (d) ordinary wear and tear or cosmetic
damage; (e) transportation, shipping or insurance costs; (f) costs of product removal,
installation, set-up service, adjustment or reinstallation; and (g) claims by persons other
than the original purchaser.

35
Additional Info
Should a problem occur that is covered by this warranty, take the product and the
RadioShack sales receipt as proof of purchase date to any RadioShack store in the U.S.
RadioShack will, at its option, unless otherwise provided by law: (a) repair the product
without charge for parts and labor; (b) replace the product with the same or a comparable
product; or (c) refund the purchase price. All replaced parts and products, and products
on which a refund is made, become the property of RadioShack. New or reconditioned
parts and products may be used in the performance of warranty service. Repaired or
replaced parts and products are warranted for the remainder of the original warranty
period. You will be charged for repair or replacement of the product made after the
expiration of the warranty period.
RADIOSHACK EXPRESSLY DISCLAIMS ALL WARRANTIES AND CONDITIONS NOT
STATED IN THIS LIMITED WARRANTY. ANY IMPLIED WARRANTIES THAT MAY BE
IMPOSED BY LAW, INCLUDING THE IMPLIED WARRANTY OF MERCHANTABILITY AND,
IF APPLICABLE, THE IMPLIED WARRANTY OF FITNESS FOR A PARTICULAR PURPOSE,
SHALL EXPIRE ON THE EXPIRATION OF THE STATED WARRANTY PERIOD.
EXCEPT AS DESCRIBED ABOVE, RADIOSHACK SHALL HAVE NO LIABILITY OR
RESPONSIBILITY TO THE PURCHASER OF THE PRODUCT OR ANY OTHER PERSON OR
ENTITY WITH RESPECT TO ANY LIABILITY, LOSS OR DAMAGE CAUSED DIRECTLY OR
INDIRECTLY BY USE OR PERFORMANCE OF THE PRODUCT OR ARISING OUT OF ANY
BREACH OF THIS WARRANTY, INCLUDING, BUT NOT LIMITED TO, ANY DAMAGES
RESULTING FROM INCONVENIENCE AND ANY LOSS OF TIME, DATA, PROPERTY,
REVENUE, OR PROFIT AND ANY INDIRECT, SPECIAL, INCIDENTAL, OR CONSEQUEN-
TIAL DAMAGES, EVEN IF RADIOSHACK HAS BEEN ADVISED OF THE POSSIBILITY OF
SUCH DAMAGES.
Some States do not allow limitations on how long an implied warranty lasts or the
exclusion or limitation of incidental or consequential damages, so the above limitations
or exclusions may not apply to you. This warranty gives you specific legal rights, and you
may also have other rights which vary from State to State. You may contact RadioShack at:
RadioShack Customer Relations
300 RadioShack Circle, Fort Worth, TX 76102 04/08

©2009. RadioShack Corporation.
All rights reserved. RadioShack and RadioShack.com
are trademarks used by RadioShack Corporation.
Protect the environment by recyclying your used electronics. Go to
E-CyclingCentral.com to find an electronic recycling center near you.