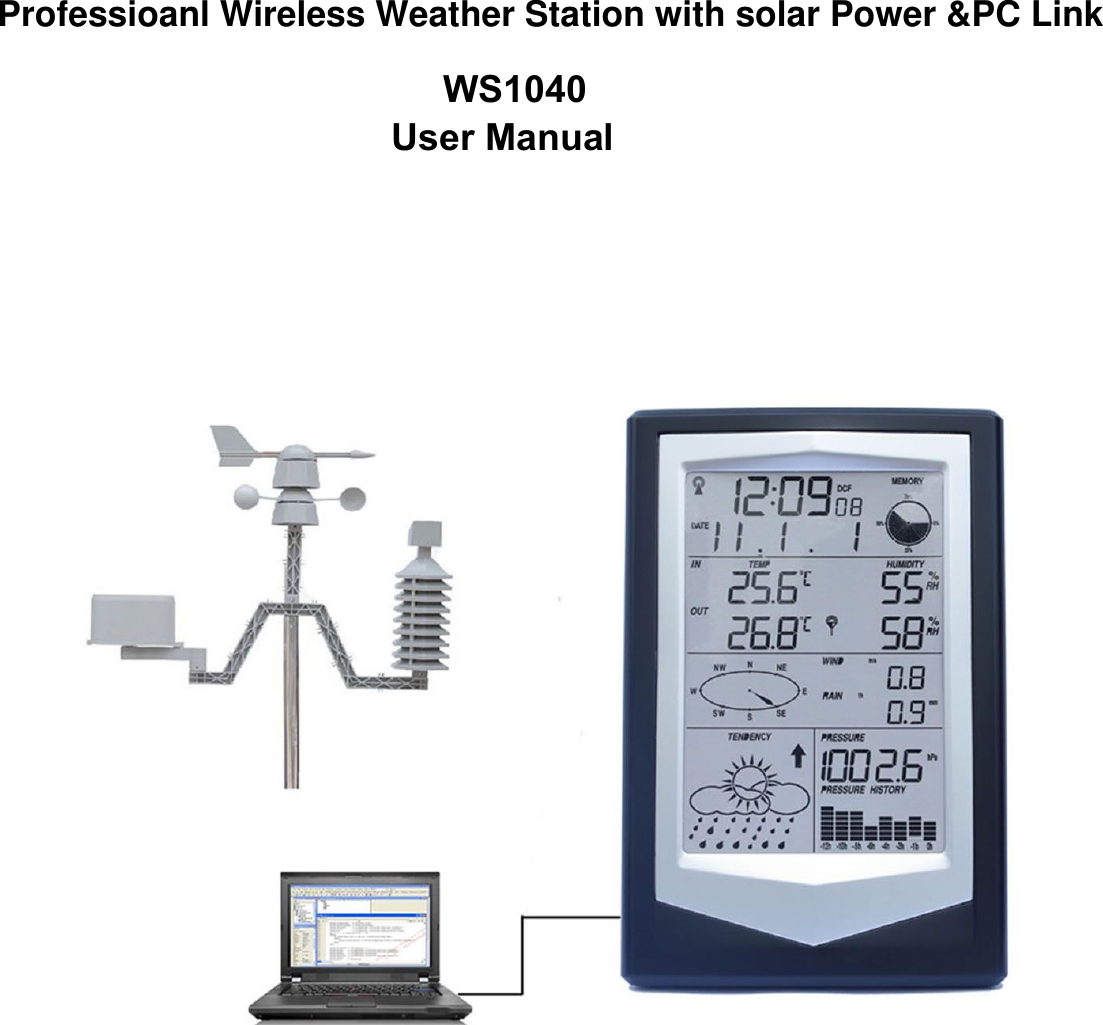
Tiankan Electronic Technology WS1040 Professional Wireless Weather Station with solar Power &PC; Link User Manual WS 1041

Shenzhen TianKan Electronic Technology Co.,Ltd Professional Wireless Weather Station with solar Power &PC; Link WS 1041

Users manual

WS1040User ManualProfessioanl Wireless Weather Station with solar Power &PC Link
ContentsDescriptions: ……………………………………………………………...1Operations: ………………………………………………………………..21. RCC ..…………………………………………………………….....22. Clock Mode ………………………………………………………...33. Date Mode ………………………………………………………….44. Wind speed Mode ………………………………………………....55. Historical record mode ……………………………………………...66. Rainfall Mode ………………………………………………………..67. Indoor Temperature Mode …………………………………………..68. Indoor Humidity Mode ……………………………………………....79. Outdoor Temperature Mode ………………………………………...810.Outdoor Humidity Mode……………………………………………...811.Weather Forecast Mode …………………………………………….912.Barometric Pressure Mode …………………………………………913.Pressure Histogram Mode ………………………………………….1014.Smart Weather software ……………………………………………….11Specification:………………………………………………………………131. Receiver …………………………………………………………132. Outdoor transmitter …………………………………………….143. Setting Up Guide ………………………………………………..14
WS1040 is a professional weather station with data save function can be stored up to two years ofmeteorological information, supporting computer software, the user can downloaded all data to PC tosave at any time for queries, very convenient and practical.Descriptions:1.The date display format can be set as: YYYY-MM-DD,MM-DD- YYYY,DD-MM-YYYY(usersetting)2.The hour display format can be set between 12 hour format or 24 hour format. The time zone canbe set from-12 to +12 (user setting);3.The RCC time function can be set as WWVB; Wireless 433 MHZ receiving. Available distance:100 meters in open field4.Alarm function: alarm sound gradually enhanced to remind user, alarm time is 2 minutes;5.Indoor humidity: relative humidity display, high humidity alarm value and low humidity alarmvalue can be set independently, you can query the maximum humidity value and the minimumhumidity values;6.Indoor temperature: relative temperature display, high temperature alarm value and lowtemperature alarm value can be set independently, you can query the maximum temperaturevalue and the minimum temperature values, ℃/℉(user setting);7.Outdoor humidity: relative humidity display, high humidity alarm value and low humidity alarmvalue can be set independently, you can query the maximum humidity value and the minimumhumidity values;8.Outdoor temperature: relative temperature display, high temperature alarm value and lowtemperature alarm value can be set independently, you can query the maximum temperaturevalue and the minimum temperature values, ℃/℉(user setting);9.Wind speed: user can set average wind speed or gust wind speed, the wind speed high alarmvalue can be set independently, you can query the corresponding maximum value, the displayunit can be set to m/s, km/h, mph, knots or bft;10.Rainfall: the user can set as time period shows hours, 24 hours, week, month rainfall or totalrainfall, hours and 24 hours of heavy rainfall alarm value can be set independently, you canquery the corresponding maximum display, units mm or inch;11.Wind direction: N, NE, E, SE, S-, SW, W, NW eight wind direction can be displayed, setting up awind as the alarm direction;12.Air pressure: the user can set to show the absolute pressure or relative pressure, canindependently set high pressure alarm values  and low pressure alarm value, the display unitcan be set to Hpa or Inhg or mmhg;13.Barometric pressure changing trends: the user can set to show 12 hours or 24 hours of changingtrend;14.Weather forecast can be sunny, cloudy, overcast, rainy, snowy, storms six states icons andweather trends;15.Low-voltage detection: If the receiver and transmitter battery voltage is low, it reminds user toreplace the batteries as soon as possible;16.Backlight: press any key or the top touch light, the backlight will be lit and duration 10 seconds;17.Buzzer: alarm duration of two minutes, the alarm clock alarm sound intensity gradually increasedof 30 seconds as units;18.Data storage: user can store up to two years of meteorological data, user can also adjust PCdata recording cycle;
Operations:Ⅰ. Power-on LCD Fully display two seconds into the normal operating mode.1. RCC ModeⅡ.Radio control clock signal: support DCF, WWVB, MSF, three wireless control clock signal mode, asfollows:(1). DCF is German wireless control clock signal standard, location of the transmitting station in Frankfurt,the transmit power is 30 kilowatts, it can cover most areas of Europe within the range of 2000 km; DCF(2).WWVB is America wireless control clock signal standard, location of the transmitting station inColorado, the transmit power is 50 kilowatts, it can cover most areas of America within the range of 2000km;(3).MSF is Britain wireless control clock signal standard, location of the transmitting station in middle ofBritain, the transmit power is 17 kilowatts, it can cover Britain within the range of 1000 km, also part ofwestern Europe and northern Europe area;Ⅲ. RF signal receiver: means this unit is able to receive outdoor sensor data sent via RF as follows:User insert the battery, the unit completed initialization, immediately began to search for the outdoor
sensor, if in three minutes no signal receiving then search fails, once receive singal the unit will only workwith the sensor establishing a data link, 48 seconds of cycle synchronization to receive the sensor data,so in order to ensure that machine can work, be sure to install outdoor sensor fistly, then mount thereceiver battery, icon in the search process will remain flashing until search the outdoor sensor orsearch fails, the search process, please do not carry out any operation of this machine;Ⅳ. Automatic Calibration time: by receiving radio control clock signal (RCC) to achieve the automaticCalibration time function, the unit will in 2:00:00 and 12:00:00 in the daily timing receiving radiocontrolled clock signal, in receiving procession icon will remain flashing until the completion ofreception at the receiver, please do not carry out any operation of this machine. If you receivesuccessfully, then Display icon, otherwise the icon will disappear, the longest time to receiveis 8 minutes.Ⅴ. Data storage: user via USB cable connect to the PC, the icon is displayed, indicating that theUSB is ready, users can query maximum/minimum on the computer, setting the alarm value, set allcorresponding kinds of parameters, the user via the computer in 5 minutes to 240 minutes to set up datalogging cycle, you can save up to two years of meteorological data, users can also downloadmeteorological data to the computer to save.Keys operationThe Machine has MODE, NEXT, SET, INC/+, DEC/- five buttons, In addition to normal mode, timemode, date mode, wind speed mode, memory historical data mode, rainfall patterns, indoor temperaturepatterns. Indoor humidity mode, outdoor temperature mode, outdoor humidity mode, weather forecastpatterns, Air pressure mode, pressure histogram mode, in any operating mode, short press MODEbutton to enter next work mode, short press NEXT button to enter next work item, if pressing key it isalarming, or outdoor sensor data is being received or is receiving the wireless control clock signal, thenpressing key just close the corresponding function and will not implement the key functions. the detailedoperation of the various operating modes are described as follows:2. Clock ModeIn normal mode, press MODE button to enter time mode, the user can carry out time-related settings inthis mode, press the NEXT button to enter the next item:(1) Time zone setting:Users according to their geographical location to adjust time zone settings, short press INC/+ buttonto increase the value of the time zone setting, short press the DEC/- button to decrease the timezone setting, press and hold INC/+ button more than 3seconds can quickly increase the time zonesetting values, press and hold the DEC/- buttons more than 3 seconds can quickly decrease thetime zone setting value;(2) Hour display format setting:User can adjust hour display format for 12 hours or 24 hours, short press INC/+ or DEC/- buttons toswitch;(3) Daylight Saving Time setting:
Daylight Saving Time set in short-circuit point selection for Europe automatically skip, onlyshort-circuit point selection for U.S version valid, according to the actual situation, short press INC/+or DEC/- button to enable or disable daylight saving time automatically adjust function;(4) hour setting:In this mode user can adjust the current hours time and short press INC/+ button to increase thehours, short press DEC/- buttons to decrease the hours, press and hold the INC/+ button over 3seconds you can quickly increase the hours, press and hold DEC/- buttons more than 3 secondsyou can quickly decrease the hours;(5) Minutes setting:In this mode user can adjust the current minutes time and short press INC/+ button to increase theminutes, short press DEC/- buttons to decrease the minutes, press and hold the INC/+ button over 3seconds you can quickly increase the minutes, press and hold DEC/- buttons more than 3 secondsyou can quickly decrease the minutes;(6) Alarm clock hours setting:User to adjust the hour setting of the alarm clock in this mode, short press SET button to enable ordisable the alarm clock, short press INC/+ button to increase the hour setting, press the DEC/-button to decrease hours set, press and hold INC/+ button over 3 seconds you can quickly increasethe hour setting, press and hold the DEC/- button more than 3 seconds can quickly decrease thehours set;(7) Alarm clock minutes setting:User to adjust the minutes setting of the alarm clock in this mode, short press SET button to enableor disable the alarm clock, short press INC/+ button to increase the minutes setting, press the DEC/-button to decrease minutes set, press and hold INC/+ button over 3 seconds you can quicklyincrease the minutes setting, press and hold the DEC/- button more than 3 seconds can quicklydecrease the minutes set;3. Date ModeIn time mode, short press MODE button to enter date mode, users can be date-related settings, pressthe NEXT button to enter the next item:(1) Contrast settingIn this mode user can adjust the display contrast, press INC/+ button to increase contrast, press theDEC/- button to decrease contrast;(2) Date display format settingsUsers can adjust Date display format settings in this mode, press INC/+ or DEC/- button to adjustthe date display format, instruction as follows:INC/+ INC/+ INC/+YYYY-MM-DD MM-DD-YYYY DD-MM-YYYYDEC/- DEC/- DEC/-YYYY-MM-DD DD-MM-YYYY MM-DD-YYYY;(3) Year settingUser can adjust the year in this mode, short press the INC/+ button to increase the year, short pressthe DEC/- button to decrease the year, hold down INC/+ button over 3 seconds you can quickly
increase the year, press and hold the DEC/- button over 3 seconds you can quickly decrease theyear;(4) Month settingUser can adjust the month in this mode, short press the INC/+ button to increase the month, shortpress the DEC/- button to decrease the month, hold down INC/+ button over 3 seconds you canquickly increase the month, press and hold the DEC/- button over 3 seconds you can quicklydecrease the month;(5) Date settingUser can adjust the date in this mode, short press the INC/+ button to increase the date, short pressthe DEC/- button to decrease the date, hold down INC/+ button over 3 seconds you can quicklyincrease the date, press and hold the DEC/- button over 3 seconds you can quickly decrease thedate;4. Wind Speed ModeIn date mode, short press MODE button to enter wind speed mode, User can be related setting of windspeed, press the NEXT button to enter the next item:(1) Wind speed display settingUsers can adjust wind speed display setting in this mode, press INC/+ or DEC/- button can switchbetween average and gust wind speed;(2) Wind speed unit settingUsers can adjust wind speed unit setting in this mode, press INC/+ increase wind speed unit value,press DEC/- button decrease wind speed unit value, instruction as follows;INC/+ INC/+ INC/+ INC/+ INC/+m/s km/h mph knots beaufortDEC/- DEC/- DEC/- DEC/- DEC/-m/s beaufort knots mph km/h(3) High wind speed alarm settingUsers can adjust the high wind speed alarm set in this mode, press the SET button to allow orprohibit the high wind speed alarm, press the INC/+ button to increase the high wind speed alarmvalue, press the DEC/- button to decrease the high wind speed alarm value, Press and hold INC/+button over 3 seconds you can quickly increase the wind speed high alarm value, press and holdthe DEC/- button more than 3 seconds you can quickly decrease the wind speed high alarm value;(4) Wind direction alarm settingUsers can adjust wind direction in this mode, press the SET button to allow or prohibit wind directionalarm, INC/+ button to increase the wind direction alarm value, press the DEC/- button to decreasethe wind direction alarm value;INC/+ INC/+ INC/+ INC/+ INC/+N NE E SE SNW W SWINC/+ INC/+ INC/+DEC/- DEC/- DEC/- DEC/- DEC/-N NW W SW S
NE E SEDEC/- DEC/- DEC/-(5) Maximum wind speed displayIn this mode you can view the maximum wind speed and time records, press and hold the SETbutton over 3 seconds to clear the maximum record;5. Historical record modeIn Wind speed mode, short press MODE button to enter the storage of historical data mode, user canproceed related operation of data memory, press the NEXT button to enter the next item:(1) Storage of historical data viewIn this mode, users can view the memory of historical data records, press the INC/+ button to view arecent historical data records, press the DEC/- button to view older historical data records;(2) Memory historical data clearIn this mode, user can clear all the historical data records in the data memory, press and hold theSET button over 3 seconds to clear all the historical data records;6. Rainfall ModeMode of memory historical data, press the MODE button to enter the rainfall pattern, user can berainfall-related settings, press the NEXT button to enter the next item:(1) Rainfall display settingUsers can adjust the rainfall display setting in this mode, short press the INC/+ button to increaserainfall display settings, press DEC/- button to decrease rainfall display settings, instruction asfollow:INC/+ INC/+ INC/+ INC/+ INC/+1h 24h week month totalDEC/- DEC/- DEC/- DEC/- DEC/-1h total month week 24h(2) Rainfall unit settingUsers can adjust rainfall unit in this mode, press the INC/+ or DEC/- button to switch between mmand inch;(3) high Rainfall alarm settingIn this mode user can adjust 1 hour or 24 hours high rainfall alarm set, if rainfall display is set for theweek, month, total, then the high rainfall alarm for 1 hour high rainfall alarm settings, press the SETbutton to allow or prohibit high rainfall alarm, press the INC/+ button to increase the high rainfallalarm value, press the DEC/- button to decrease high rainfall alarm value, press and hold INC/+button over 3 seconds you can quickly increase high rainfall alarm value, press and hold the DEC/-button more than 3 seconds you can quickly decrease high rainfall alarm value;(4) Maximum rainfall displayIn this mode user can view maximum rainfall and time records, press and hold the SET button over3 seconds to clear the maximum record;
(5) Rainfall full resetIn this mode, clear all the rainfall data from the current time, recalculated 1h, 24h, week, month, totalrainfall;7. Indoor Temperature ModeRainfall mode, short press MODE button to enter indoor temperature mode, user can be related indoortemperature setting, press the NEXT button to enter the next item:(1) Indoor temperature settingIn this mode to adjust the indoor temperature units, press the INC/+ or DEC/- button to switchbetween ℃and ℉;(2) Indoor temperature high alarm settingIn this mode user can adjust high indoor temperature alarm set, press the SET button to allow orprohibit high indoor temperature alarm, short press the INC/+ button to increase the high indoortemperature alarm values, short press the DEC/- buttons to decrease high indoor temperature alarmvalue, press and hold the INC/+ button over 3 seconds you can quickly increase the high indoortemperature alarm value, press and hold the DEC/- button more than 3 seconds you can quicklydecrease high indoor temperature alarm values;(3) Low Indoor temperature alarm settingIn this mode user can adjust low indoor temperature alarm set, press the SET button to allow orprohibit low indoor temperature alarm, short press the INC/+ button to increase the low indoortemperature alarm values   , short press the DEC/- buttons to decrease indoor low temperaturealarm value, press and hold the INC/+ button over 3 seconds you can quickly increase the lowindoor temperature alarm value, press and hold the DEC/- button more than 3 seconds you canquickly decrease low indoor temperature alarm values;(4) Maximum indoor temperature displayIn this mode, user can view the maximum indoor temperature and time records, press and hold theSET button over 3 seconds to clear the maximum record;(5) Minimum indoor temperature displayIn this mode, user can view the minimum indoor temperature and time records, press and hold theSET button over 3 seconds to clear the maximum record;8. Indoor Humidity ModeIndoor temperature mode, short press MODE button to enter indoor humidity mode, user can be relatedindoor humidity settings, press the NEXT button to enter the next item:(1) High indoor humidity alarm settingIn this mode user can adjust high indoor humidity alarm set, press the SET button to allow orprohibit high indoor humidity alarm, short press the INC/+ button to increase the high indoorhumidity alarm values   , short press the DEC/- buttons to decrease high indoor humidity alarmvalue, press and hold the INC/+ button over 3 seconds you can quickly increase the high indoorhumidity alarm value, press and hold the DEC/- button more than 3 seconds you can quicklydecrease high indoor humidity alarm values;(2) Low indoor humidity alarm settingIn this mode user can adjust low indoor humidity alarm set, press the SET button to allow or prohibitlow indoor humidity alarm, short press the INC/+ button to increase the low indoor humidity alarmvalues   , short press the DEC/- buttons to decrease low indoor humidity alarm value, press andhold the INC/+ button over 3 seconds you can quickly increase the low indoor humidity alarm value,
press and hold the DEC/- button more than 3 seconds you can quickly decrease low indoor humidityalarm values;(3) Maximum Indoor humidity displayIn this mode, user can view maximum indoor humidity and time records, press and hold the SETbutton over 3 seconds to clear the maximum record;(4) Minimum Indoor humidity displayIn this mode, user can view minimum indoor humidity and time records, press and hold the SETbutton over 3 seconds to clear the minimum record;9. Outdoor Temperature ModeOutdoor temperature mode, short press MODE button to enter Outdoor temperature mode, user can berelated Outdoor temperature settings, press the NEXT button to enter the next item:(1) Outdoor temperature settingIn this mode user can adjust outdoor temperature display settings, press the INC/+ button toincrease the value of outdoor temperature display , press the DEC/- button to decrease the value ofoutdoor temperature display, instruction as follows:INC/+ INC/+ INC/+TEMPERATURE WIND CHILL DEW POINTDEC/- DEC/- DEC/-TEMPERATURE DEW POINT WIND CHILL;(2) Outdoor temperature units settingIn this mode to adjust the outdoor temperature units, press INC/+ or DEC/- buttons to switchbetween ℃and ℉;(3) High outdoor temperature alarm settingIn this mode user can adjust the high outdoor temperature alarm setting, press SET button to allowor prohibit the high outdoor temperature alarm, press the INC/+ button to increase the highoutdoor temperature alarm values   , short press the DEC/- button to reduce high outdoortemperature alarm value, press and hold INC/+ button over 3 seconds you can quickly increase thehigh outdoor temperature alarm value, press and hold the DEC/- button more than 3 seconds youcan quickly reduce the high outdoor temperature alarm values;(4) Low outdoor temperature alarm settingIn this mode user can adjust the Low outdoor temperature alarm setting, press SET button to allowor prohibit the Low outdoor temperature alarm, press the INC/+ button to increase the Low outdoortemperature alarm values, short press the DEC/- button to reduce Low outdoor temperature alarmvalue, press and hold INC/+ button over 3 seconds you can quickly increase the Low outdoortemperature alarm value, press and hold the DEC/- button more than 3 seconds you can quicklyreduce the Low outdoor temperature alarm values;(5) Maximum outdoor temperature displayIn this mode, user can view maximum outdoor temperature and time records, press and hold theSET button over 3 seconds to clear the maximum record;
(6) Minimum outdoor temperature displayIn this mode, user can view minimum outdoor temperature and time records, press and hold theSET button over 3 seconds to clear the minimum record;10. Outdoor Humidity ModeOutdoor humidity mode, short press MODE button to enter Outdoor humidity mode, user can be relatedhumidity temperature settings, press the NEXT button to enter the next item:(1) High outdoor humidity alarm settingIn this mode user can adjust the high outdoor humidity alarm setting, press SET button to allow orprohibit the high outdoor humidity alarm, press the INC/+ button to increase the high outdoorhumidity alarm values, short press the DEC/- button to reduce high outdoor humidity alarm value,press and hold INC/+ button over 3 seconds you can quickly increase the high outdoor humidityalarm value, press and hold the DEC/- button more than 3 seconds you can quickly reduce the highoutdoor humidity alarm values;(2) Low outdoor humidity alarm settingIn this mode user can adjust the Low outdoor humidity alarm setting, press SET button to allow orprohibit the Low outdoor humidity alarm, press the INC/+ button to increase the Low outdoorhumidity alarm values, short press the DEC/- button to reduce Low outdoor humidity alarm value,press and hold INC/+ button over 3 seconds you can quickly increase the Low outdoor humidityalarm value, press and hold the DEC/- button more than 3 seconds you can quickly reduce the Lowoutdoor humidity alarm values;(3) Maximum Outdoor humidity displayIn this mode, user can view maximum outdoor humidity and time records, press and hold the SETbutton over 3 seconds to clear the maximum record;(4) Minimum Outdoor humidity displayIn this mode, user can view minimum outdoor humidity and time records, press and hold the SETbutton over 3 seconds to clear the minimum record;11. Weather Forecast ModeIn Outdoor humidity mode, short press MODE key to enter the weather prediction mode, user can berelated weather conditions setting in this mode, press the NEXT button to enter the next item:(1) Weather conditions settingIn this mode to adjust the current weather conditions, instruction as follows:INC/+ INC/+ INC/+ INC/+Sunny Cloudy Overcast RainyDEC/- DEC/- DEC/- DEC/-Sunny Cloudy Overcast Rainy(2) Weather forecast threshold value settingIn this mode to adjust the current weather conditions changing threshold settings, press INC/+button to increase the weather forecast threshold value, press DEC/- buttons to decrease theweather forecast threshold value, hold down INC/+ button more than 3seconds can quickly increasethe weather forecast threshold value, press and hold the DEC/- more than 3 seconds can quicklydecrease the weather forecast threshold value;(3) Storm alarm threshold value settings
In this mode, adjustable storm alarm threshold value settings, press the INC/+ button to increasethe storm alarm threshold value, according to the DEC/- button to decrease the storm alarmthreshold value, hold down the INC/+ button more than 3 seconds to quickly increase the stormalarm threshold value press and hold the DEC/- button over 3 seconds you can quickly decreasestorm alarm threshold value;12. Barometric Pressure ModeIn air pressure mode, short press MODE key to enter the air pressure mode, user can be relatedpressure setting in this mode, press the NEXT button to enter the next item:(1) Air pressure display settingIn this mode, user can adjust the air pressure settings, press INC/+ or the DEC/- button to switchbetween absolute pressure and relative pressure;(2) Air pressure units settingUsers can adjust the air pressure unit in this mode, short press the INC/+ button to increase thepressure unit setting value, press the DEC/- button to decrease the set value of the pressure unit,instruction as following:INC/+ INC/+ INC/+hpa inhg mmhgDEC/- DEC/- DEC/-hpa mmhg inhg(3) Relative pressure value settingRelative pressure value set in the pressure display settings is absolute air pressure automaticallyskipped, relative pressure can be adjusted in this mode, press INC/+ button to increase the relativepressure, press the DEC/- button to decrease the relative pressure, press and hold INC/+ buttonover 3 seconds you can quickly increase the relative pressure, press and hold the DEC/- buttonsmore than 3 seconds you can quickly decrease the relative air pressure;(4) High air pressure alarm settingIn this mode, adjust high air pressure alarm settings, press SET button to allow or prohibit highpressure alarm, press INC/+ button to increase high pressure alarm value, press the DEC/- buttonto decrease high pressure alarm value, Press and hold INC/+ button you can quickly increase thehigh pressure alarm value, press and hold the DEC/- button more than 3 seconds you can quicklydecrease high pressure alarm value;(5) Low air pressure alarm settingIn this mode, adjust low air pressure alarm settings, press SET button to allow or prohibit Lowpressure alarm, press INC/+ button to increase low pressure alarm value, press the DEC/- button todecrease low pressure alarm value, Press and hold INC/+ button you can quickly increase the lowpressure alarm value, press and hold the DEC/- button more than 3 seconds you can quicklydecrease low pressure alarm value;(6) Maximum air pressure displayIn this mode, user can view maximum air pressure and time records, press and hold SET buttonover 3 seconds to clear the maximum record;(7) Minimum air pressure displayIn this mode, user can view minimum air pressure and time records, press and hold SET button over3 seconds to clear the minimum record;
13. Pressure Histogram ModeIn pressure mode, press MODE button to enter the pressure histogram mode, in this modet user canproceed pressure histogram timeline set:In this mode user can adjust pressure histogram timeline settings, press INC/+ or DEC/- button canswitch in 12 hours display and 24 hours display;14. SmartWeather softwareSmartWeather software is no installation of green software, users just need to copy it to your PC,double-click the package SmartWeather.exe file can start SmartWeather software.SmartWeather software starts as follows:;If base station connect failure through USB cable to your computer, then right corner display ,if connecting successfully, you can hear computer issued a “drip” sound and right corner displayindicating communication successfully, software will read current data from base station and display onsoftware screen, also automatically download all historical data records, the bottom of the screen display
the download time of historical data and number of records historical data downloading, as following.Click the icon of , user can enter the restore default parameters confirmation screen, as shownbelow:
Note: this function only use in receiver appear abnormal conditions. After clicking ok button to chooserestore default value, continue to put receiver connected to computer, waiting for two minutes laterrestore default completed, receiver will remove previous history data.Specification:1. Receiver:(1) Temperature range: 0℃~50℃(32℉~122℉);Temperature accuracy:±1℃Temperature resolution: 0.1℃;(2) Humidity range: 20%~99%;Humidity accuracy:±5%Humidity resolution:1%(condition: temperature 25℃, humidity 50%);(3) Pressure range: 920~1080hPa;Pressure accuracy:±5hPaPressure resolution: 0.1 hPa;(4) Transmission data update: 48s;(5) Alarm: 2 minutes(6) Power: 3*1.5V AA battery;
(7) Battery life: about 12 months(8) Low battery check: power-on check, 00:00 check every day.(9) Work temperature:0℃to 50℃2. Outdoor transmitter:(1) Temperature range: -40℃~60℃(-104℉~140℉);Temperature accuracy:±1℃Temperature resolution: 0.1℃;(2) Humidity range: 20%~99%;Humidity accuracy:±5%Humidity resolution: 1%(3) Wind speed range: 0~50m/s;Wind speed resolution: 0.1 m/s;(4) Rain range: 0~9999mm;Rain resolution: 0.1mm(rainfall<1000 mm);1 mm(rainfall>1000 mm);(5) Data update: 48s;(6) Power: 2*1.5V AA battery;(7) Battery life: about 24months;(8) Low battery check: power-on check, 00:00 check evey day.(9) Work temperature:-40℃~60℃(-104℉~140℉);(10) Anti-rainySetting Up Guide:1.Insert the stainless steel pipe into the base, press a M3 screw nut into the nut slot, and then establishthem with a PM3.0*25mm screw:2.Insert the transmitter holder into the stainless steel pipe, establish them with a PM3.0*22mm screwand a M3 screw nut:3.Insert the rain gauge holder onto the short side of the transmitter holder, establish them via aPM3.0*25mm screw and a M3 screw nut. Then install the rain gauge onto the rain gauge holder, andestablish them with two PA3.0*8mm screws:
4.Press a M3 screw nut into the nut slot of the small side of the wind sensor holder, insert wind sensorholder onto the transmitter holder, establish them with a PM3.0*22mm screw:5.Insert the wind direction component into the wind speed component, and then insert the wind directionRJ45 into the 623K hole of the wind speed component. Insert a M3 screw nut into the big side of thewind sensor holder, and then install the whole wind sensor onto the holder, establish them with aPM0.3*22mm:6.Open the battery compartment, install the rechargeable batteries, then cover the battery door. Insertthe whole transmitter onto the long side of the transmitter holder, and establish them with aPM3.0*18mm screw. At last, insert the wind speed wire RJ45 into the "WIND" 623K hole of thetransmitter:7.①Put the rain gauge wire across the waterproof tower case, and then insert the RJ45 into the 623Khole of the solar component;②Put the solar wire across the waterproof tower case, and then insert the RJ45 into the "RAIN" 623Khole of the transmitter;③Insert a M3 screw nut into the top nut slot of the waterproof tower case, then insert the solarcomponent into the top of the waterproof tower case, establish them with a PM3.0*8mm screw (Note:insert the screw from the screw nut side of the solar component):
8.Suit the assembled waterproof tower case onto the assembled transmitter, and then suit the wires ontothe slots of the transmitter holder:9.Suit four green plastic screw nuts into the base, and then establish the base and ground with fourKA4.0*40mm screws:Note:1. Dew point temperature display -40 ℃, indicating dew point temperature is already very low and donot represent the actual dew point temperature;2. When battery low voltage warning, in order to protect the system, some features may not be normaluse, to prevent the system crash please replace new battery timely;3. When the battery low voltage warning, avoid connecting the unit to the PC to prevent the memorydata loss, user can replace the new battery and then connect again to guarantee reliablecommunication;4. Data communication is completed, disconnect the PC connection, in order to avoid datacommunications may be influence normal working.FCC StatementChanges or modifications not expressly approved by the party responsible for compliance could void the user's authority to operate the equipment.This equipment has been tested and found to comply with the limits for a Class B digital device, pursuant to Part 15 of the FCC Rules. These limits are designed to provide reasonable protection against harmful interference in a residential installation. This equipment generates uses and can radiate radio frequency energy and, if not installed and used in accordance with the instructions, may cause harmful interference to radio communications. However, there is no guarantee that interference will not occur in a particular installation. If this equipment does cause harmful interference to radio or television reception, which can be determined by turning the equipment off and on, the user is encouraged to try to correct the interference by one or more of the following measures:-- Reorient or relocate the receiving antenna.-- Increase the separation between the equipment and receiver.-- Connect the equipment into an outlet on a circuit different from that to which the receiver is connected.-- Consult the dealer or an experienced radio/TV technician for helpThis device complies with part 15 of the FCC rules. Operation is subject to the following two conditions (1)this device may not cause harmful interference, and (2) this device must accept any interference received, including interference that may cause undesired operation.

Navigation menu