TransCore SDCPE15N Rugged Tablet PC User Manual 1
TransCore Rugged Tablet PC 1
Contents
- 1. User guide
- 2. User Manual
User guide

DAP 7 M9020 Rugged Computing
Users Manual Rugged Tablet PCs
DAP M9020
Rugged Tablet PC
(Intel® Atom™ Dual Core N2600)
USERS Guide
Version: 1.0

DAP 7 M9020 Rugged Computing
Users Guide Rugged Table PCs
2
User and Product Safety
Do not stare into the laser or LED beam directly or shine it into eyes.
Never use strong pressure onto the screen or subject it to severe impact, as the
LCD panel could become cracked and possibility cause personal injury. If the
LCD panel is broken, never touch the liquid inside because the liquid irritates
the skin.
Although the PDT has passed the test of IP65 standard for water and dust
resistance, avoid prolonged exposure to rain or other concentrated moisture.
Such condition exceeds the IP65 standard, and could result in water or other
contaminants entering into the PDT.
Use only the original approved AC Adapter with the PDT. Use of an unapproved
AC Adapter could result in electrical problems, or even cause a fire or electrical
shock to the user.
Do not disassemble the PDT. Servicing should be done by supplier only. If the
PDT or accessories gets damaged due to wrong handling or unauthorized repair,
warranty is void. In case the warranty seals are broken, warranty is void too.
Make regularly back-up of all important data.
Under no circumstance will supplier be liable for any direct, indirect,
consequential or incidental damages baring out of the use or inability to use the
hardware and software and/or any data loss, even if supplier has been
informed about the possibility of such damages.
LASER RADIATION: DO NOT STARE INTO BEAM CLASS 2 LASER PRODUCT.

DAP 7 M9020 Rugged Computing
Users Guide Rugged Table PCs
3
Battery Safety
Lithium-ion battery packs might get hot, explode, ignite and/or cause
serious injury if exploded by abusive using. Please follow the safety
warnings listed as below:
Do not throw the battery pack in fire. Do not expose the battery to high
temperatures.
Do not connect the positive battery pack with negative battery pack to each
other with any metal object (like wire).
Do not carry or store battery pack together with metal objects.
Do not pierce the battery pack with nails or drills, strike the battery pack with
a hammer, step on the battery pack or otherwise expose it to strong impacts,
shocks or excessive force.
Do not solder onto the battery pack.
Do not expose battery pack to liquid or allow the battery contacts to get wet.
Do not disassemble or modify the battery pack. The battery pack contains
safety and protection measures, which, if damaged, may cause the battery
pack to generate heat, explode or ignite.
Do not discharge the battery pack using any device except for the specified
device. When it is used in devices other than the specified devices, the battery
pack can be damaged or its life expectancy reduced. If the device causes any
abnormal current to flow, it may cause the battery pack to become hot, explode
or ignite and cause serious injury.
In the event the battery pack leaks and the fluid gets into one’s eye, do not
rub the eye. Rinse well with water and immediately seek medical care. If left
untreated, the battery fluid could cause damage to the eye.

DAP 7 M9020 Rugged Computing
Users Guide Rugged Table PCs
4
FEDERAL COMMUNICATIONS COMMISSION
This equipment has been tested and found to comply with the limits for a
Class B digital device, pursuant to Part 15 of the FCC Rules. These limits
are designed to provide reasonable protection against harmful
interference in a residential installation. This equipment generates, uses
and can radiate radio frequency energy and, if not installed and used in
accordance with the instructions, may cause harmful interference to radio
communications. However, there is no guarantee that interference will not
occur in a particular installation. If this equipment does cause harmful
interference to radio or television reception, which can be determined by
turning the equipment off and on, the user is encouraged to try to correct
the interference by one or more of the following measures:
– Reorient or relocate the receiving antenna.
– Increase the separation between the equipment and receiver.
– Connect the equipment into an outlet on a circuit different from that to
which the receiver is connected.
– Consult the dealer or an experienced radio/TV technician for help.
CAUTION:
Any changes or modifications not expressly approved by the party
responsible for compliance could void the user's authority to operate the
equipment.
RF exposure warning
The equipment complies with FCC RF exposure limits set forth for an
uncontrolled environment.
The antenna(s) used for this transmitter must not be co-located or operating in
conjunction with any other antenna or transmitter.
RF exposure information (SAR)
This Rugged Tablet PC meets the government's requirements for exposure to
radio waves. This Rugged Tablet PC is designed and manufactured not to
exceed the emission limits for exposure to radio frequency (RF) energy set by
the Federal Communications Commission of the U.S. Government. The
exposure standard for wireless Rugged Tablet PC employs a unit of
measurement known as the Specific Absorption Rate, or SAR. The SAR limit

DAP 7 M9020 Rugged Computing
Users Guide Rugged Table PCs
5
set by the FCC is 1.6 W/kg. Tests for SAR are conducted using standard
operating positions accepted by the FCC with the Rugged Tablet PC
transmitting at its highest certified power level in all tested frequency bands.
Although the SAR is determined at the highest certified power level, the actual
SAR level of the Rugged Tablet PC while operating can be well below the
maximum value. This is because the Rugged Tablet PC is designed to operate
at multiple power levels so as to use only the poser required to reach the
network. In general, the closer you are to a wireless base station antenna, the
lower the power output. The highest SAR value for US model Rugged Tablet
PC as reported to the FCC when tested for use at the body, as described in
this user guide, is 1.184 W/kg.
Industry Canada Class B Statement
CAN ICES-3 (B)/NMB-3(B)
This device complies with Industry Canada licence-exempt RSS
standard(s).Operation is subject to the following two conditions: (1) this device
may not cause interference, and (2) this device must accept any interference,
including interference that may cause undesired operation of the device.
Le présent appareil est conforme aux CNR d'Industrie Canada applicables aux
appareils radio exempts de licence. L'exploitation est autorisée aux deux
conditions suivantes : (1) l'appareil ne doit pas produire de brouillage, et (2)
l'utilisateur de l'appareil doit accepter tout brouillage radioélectrique subi,
même si le brouillage est susceptible d'en compromettre le fonctionnement.
IEEE 802.11b or 802.11g operation of this product in the Canada is
firmware-limited to channels 1 through 11.
Déclarations d'exposition aux RF liéesAvertissement d'exposition RF:
L'équipement est conforme aux limites d'exposition aux RF établies pour un
environnement non contrôlé. L'antenne (s) utilisée pour ce
transmetteur ne doit pas être co-localisés ou fonctionnant en
conjonction avec une autre antenne ou transmetteur.

DAP 7 M9020 Rugged Computing
Users Guide Rugged Table PCs
6
Specifications
Operating System
Windows Embedded Standard 7,
Processor
Intel Atom™ N2600 1.6 GHz
Memory
2 GB DDR3 SDRAM (4 GB optional)
Display
Sunlight-viewable
Hardened touch-screen
Landscape or portrait orientation
Passive stylus or finger operation
7-inch WVGA (1024 x 600)
700 nits
Sensors
Light sensor for auto backlight adjustment
Position sensor (accelerometer) for portrait
or landscape
screen orientation
Keypad /
Buttons
Qwerty keypad
6 programmable keys
Communications
WLAN — Summit 802.11 a/b/g/n
GPS — uBlox NEO-6 series
Bluetooth — V4.0 + EDR Class II
Input / Output
Power jack
1x RS-232
1x USB 2.0
Via dock connector:
2x RS-232
2x USB 2.0
1x Ethernet
Barcode
Scanning
Standard range barcode: 2D imager
Camera: 5-MP color camera with flash
Expansion Slots
SD card slot (supports up to 32 GB)
Multi-I/O interface:
2x USB 2.0
1x power output 5V 2A
1x VGA out
2x RS-232
Audio
Speaker
Intel HD Audio
3.2 mm stereo headset jack
Software
Windows Embedded 7:
IE8, IIS 7.0, .NET 3.5, Remote Desktop,
SQL, Backup
and Restore, Boot from VHD or USB,
Power Management,
EWF and FBWF
Power
Primary internal:
Li-ion battery, 7.4 V, 3000 mAh
Secondary battery:
Li-ion battery pack, 7.4 V, 3000 mAh
Input:
10–20 VDC, 2 A
Dimensions &
Weight
9.0 (L) × 7.3 (W) × 2.3 (H) inches [230
× 185 × 60 mm]
Regulatory
Environment
Operating temperature:
-4 to +122 °F [-20 to +50 °C]
Charging temperature:
32 to +104 °F [0 to +40 °C]
Storage temperature:
-22 to +158 °F [-30 to +70 °C]
Drop:
Multiple 6-foot (1.8-meter) drops to
concrete
ESD:
15 kV air discharge, 8 kV direct discharge
Sealing:
IP67 certified
Humidity:
5%-95%, non-condensing
Vibration:
MIL-STD-810F

DAP 7 M9020 Rugged Computing
Users Guide Rugged Table PCs
7
LED Indicators
Blue LED
Indicates that batteries are charging.
Green LED
Indicates that batteries are charged
Flashing Green LED
Indicates that unit is booting, resuming, or hibernating.
RED LED
Faulty: Can’t charge.
Either Battery #1 or Battery#2 is missing
Blinking Red
<= 20% : every 5s
<= 15%: every 3s
<= 10%: every 1s
DAP 7 M9020 Rugged Computing
Users Guide Rugged Table PCs
8
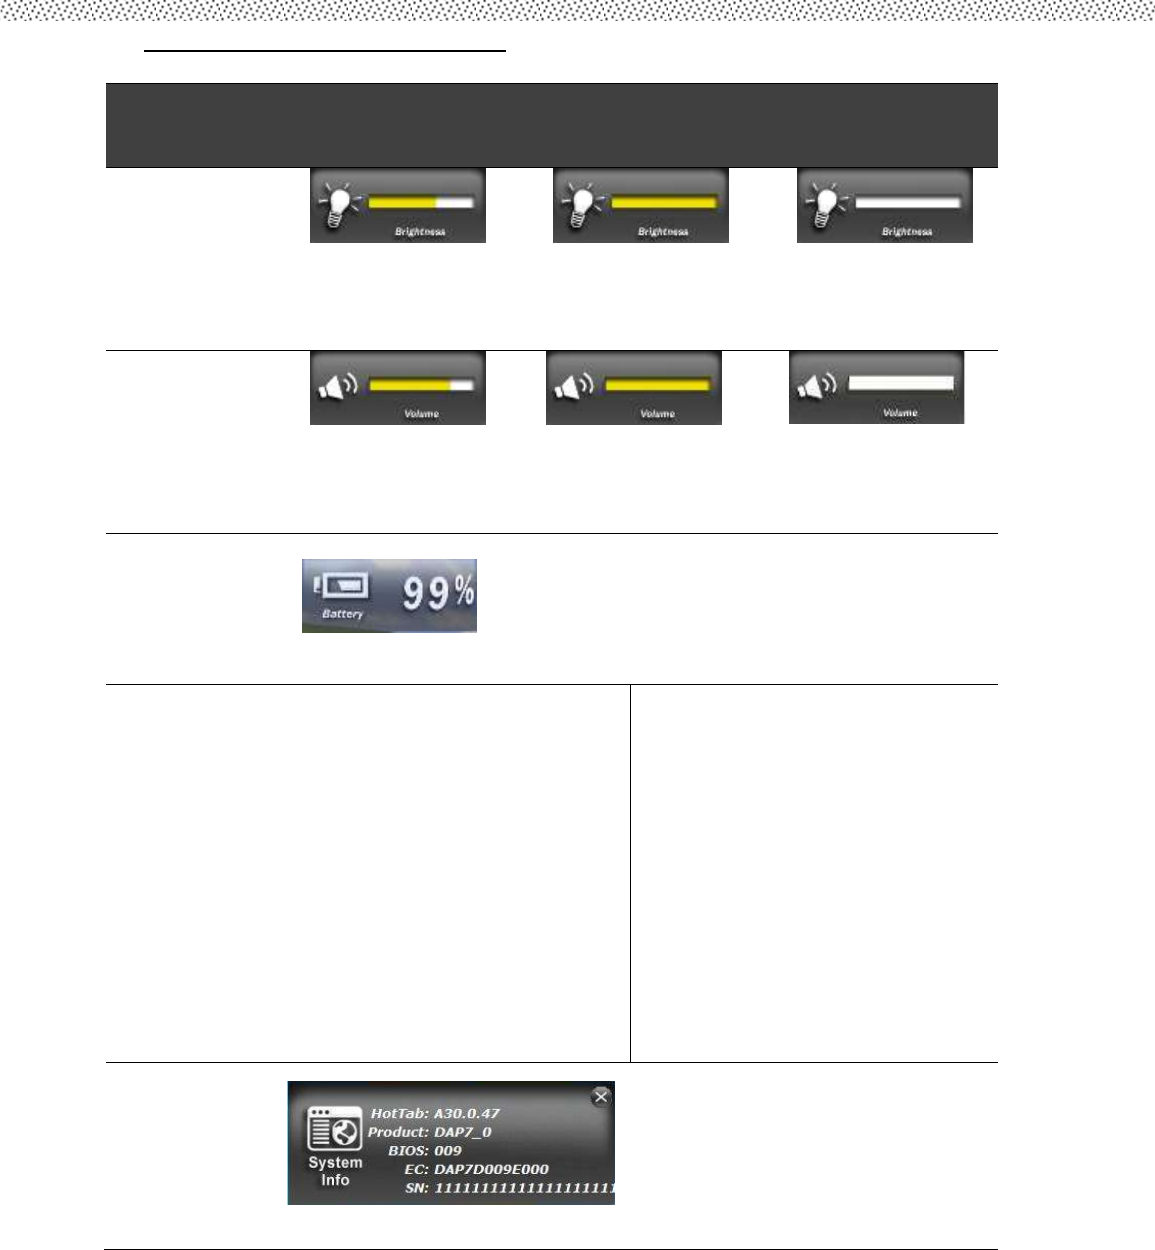
Menu Function Adjustment
#
Action
Function
Description
Funtion Adjustment
1
Push
“Menu”
button
1 Time
Show Current Brightness
Click “Fn+Up” button to
increase brightness (Or Drag
by Touch)
Click ”Fn+Down” to
decrease brightness(Or
Drag by Touch)
2
Push
“Menu”
button
2 Times
Show current Volume
Click “Fn+Right” button to
increase volume(Or Drag by
Touch)
Click ”Fn+Left” to
decrease volume(Or
Drag by Touch)
3
Push
“Menu”
button
3 Times
Show current Battery status
4
Push
“Menu”
button
4 Times
Show current on/off of
Wireless\ Bluetooth \3G \
GPS\ Camera mode and
Barcode.
1. WiFi on/off
2. Bluetooth on/off
3. GPS on/off
4. Camera On/Off
5. Barcode On/Off
5
Push
“Menu”
button 5
Times
Show current Hottab version
DAP 7 M9020 Rugged Computing
Users Guide Rugged Table PCs
9
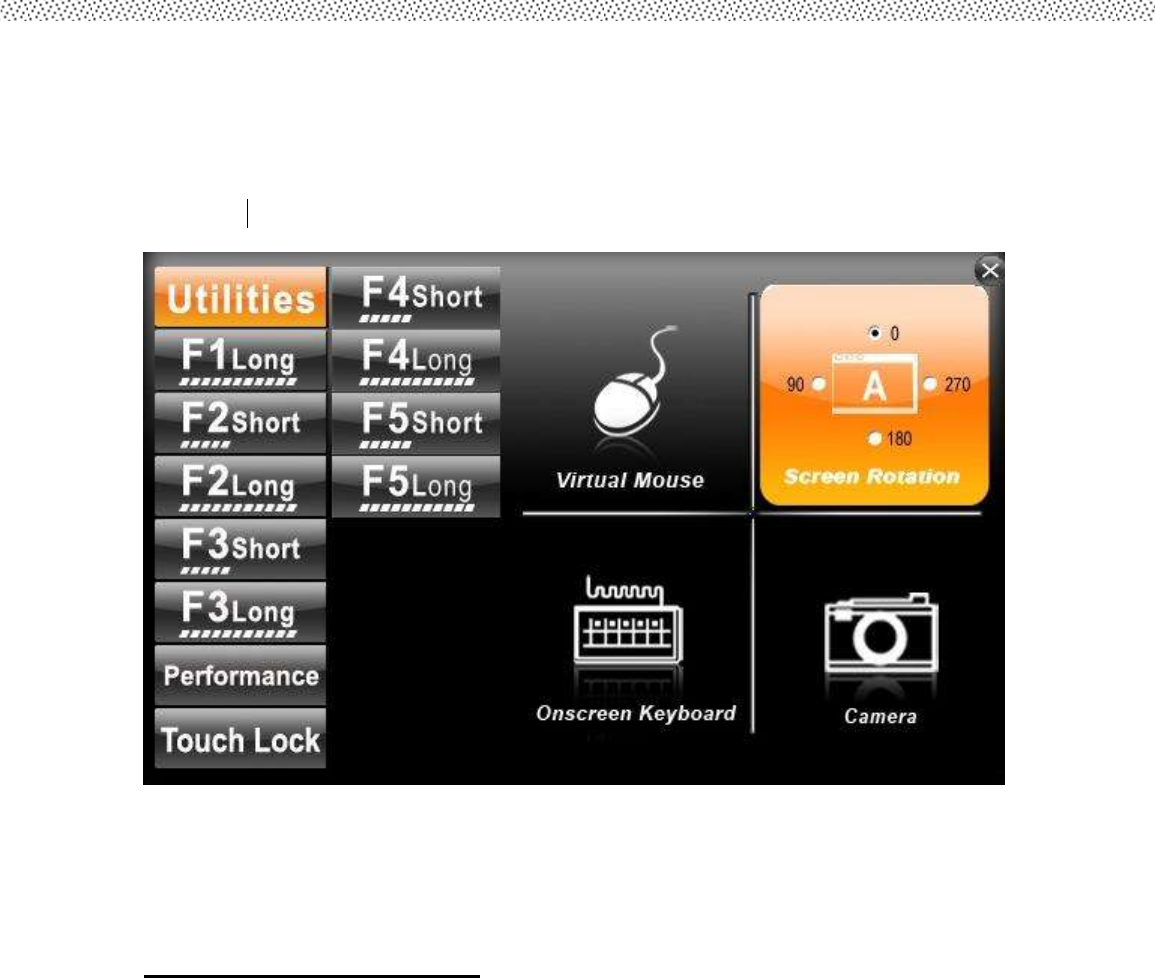
How to use HotTab Hotkey Function
From the operation system installation, we will provide you Hot-tab Hotkey
software utility. After installation, you can see the shortcut on desktop of
computer.
Click the shortcut and you can see the software application at center of
desktop.
The HotTab Hotkey software program is the Five key programmable
application software; we choose some usual applied function for default setup.
For example, User can choose his own application program very easy by
setting up the function from the setup window.
Hot-Tab Hotkey Function
Use the HotTab software utility to make it easy to program and define hot
keys by customer’s usual application.
DAP 7 M9020 Rugged Computing
Users Guide Rugged Table PCs
10
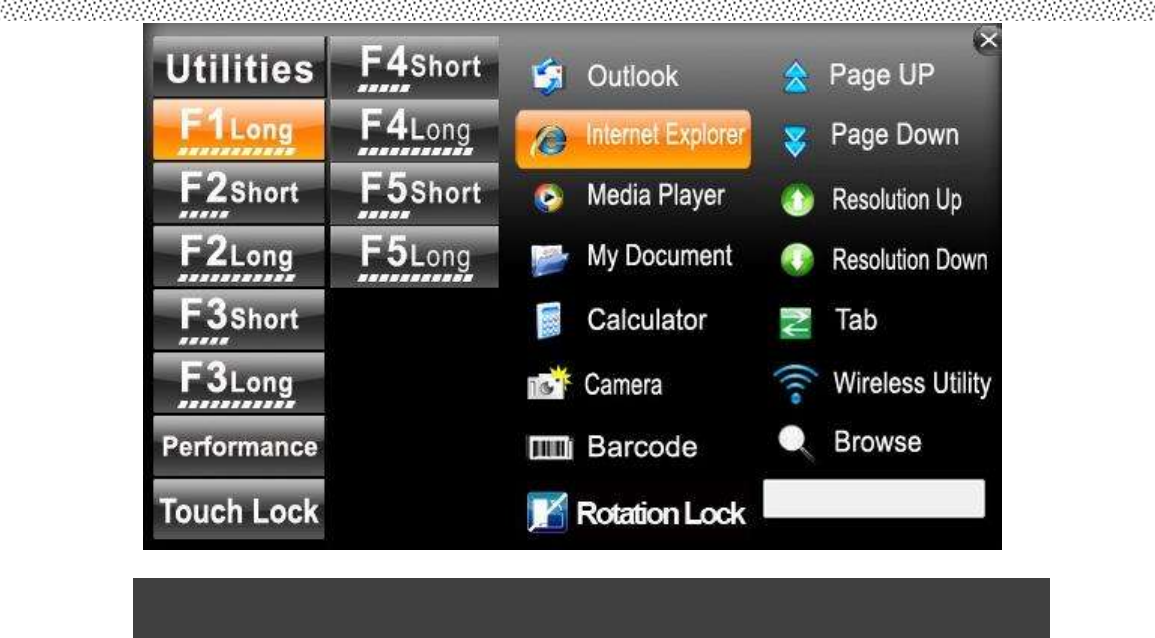
#
Action
Function Description
Funtion Adjustment
See Other Intro.
1
Press “F1”
Default:Hot TAB functions
Use “Browse” and choose
the execution program file
2
Hold “F1”
Default:Internet Explorer
Long Push:
4sec.
3
Press “F2”
Default:Internet Explorer
4
Hold “F2”
Default:Media Player
Long Push:
4sec.
5
Press “F3”
Default:My Document
6
Hold “F3”
Default:Calculator
Long Push:
4sec.
6
Press “F4”
Default:Page Up
6
Hold “F4”
Default:Page Down
Long Push:
4sec.
6
Press “F5”
Default:Rotation Lock
6
Hold “F5”
Default:Wireless Utility
Long Push:
4sec.
DAP 7 M9020 Rugged Computing
Users Guide Rugged Table PCs
11
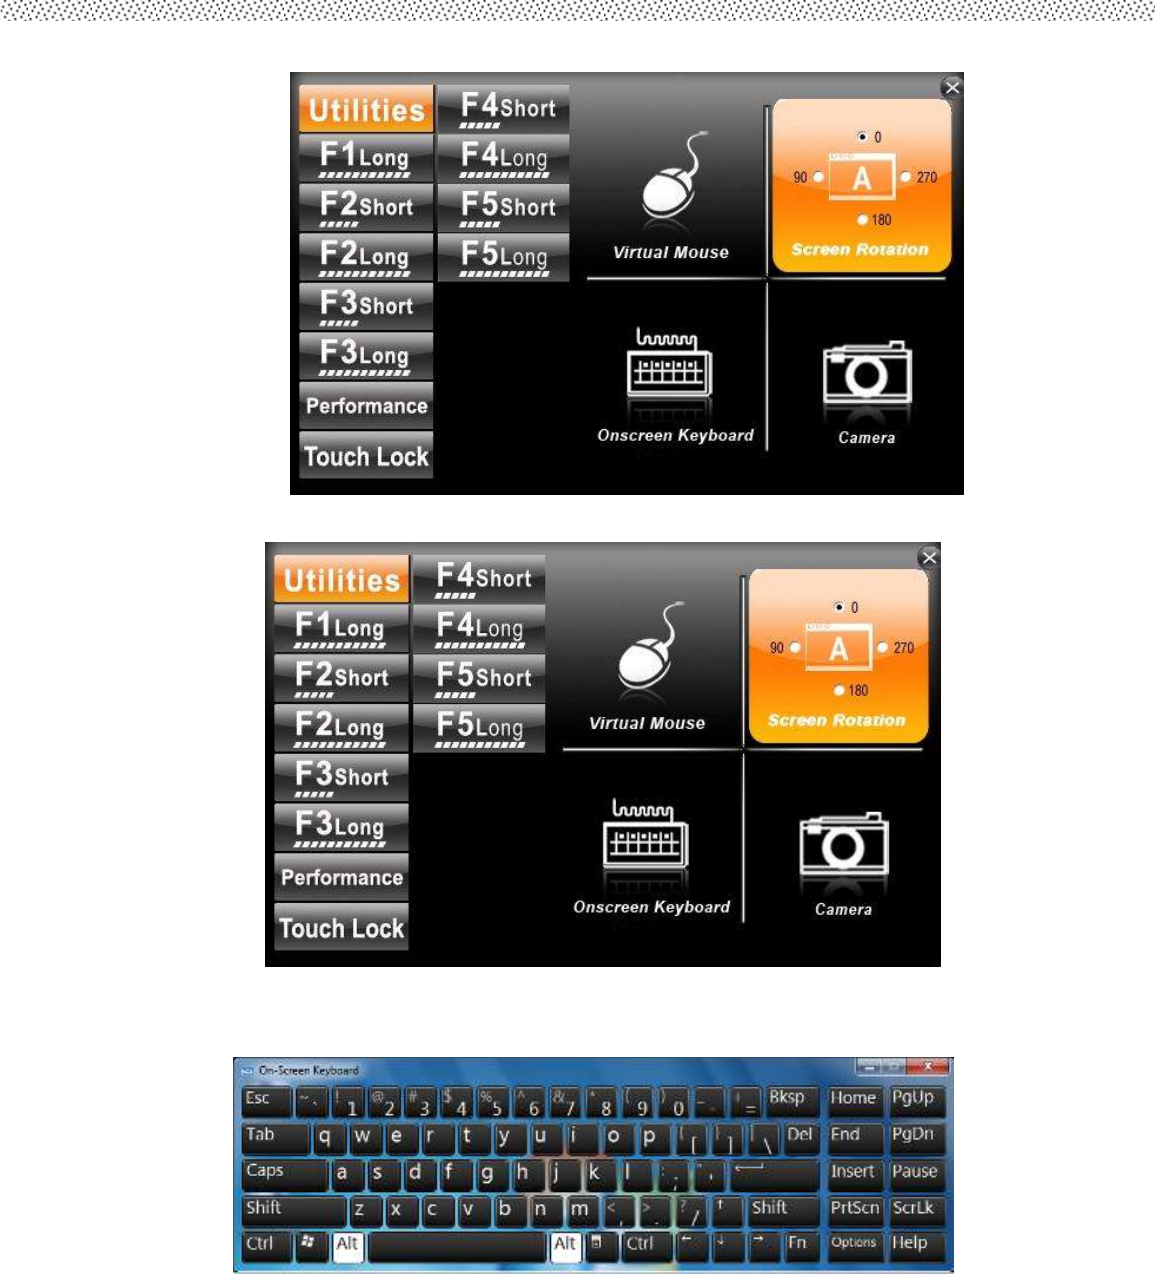
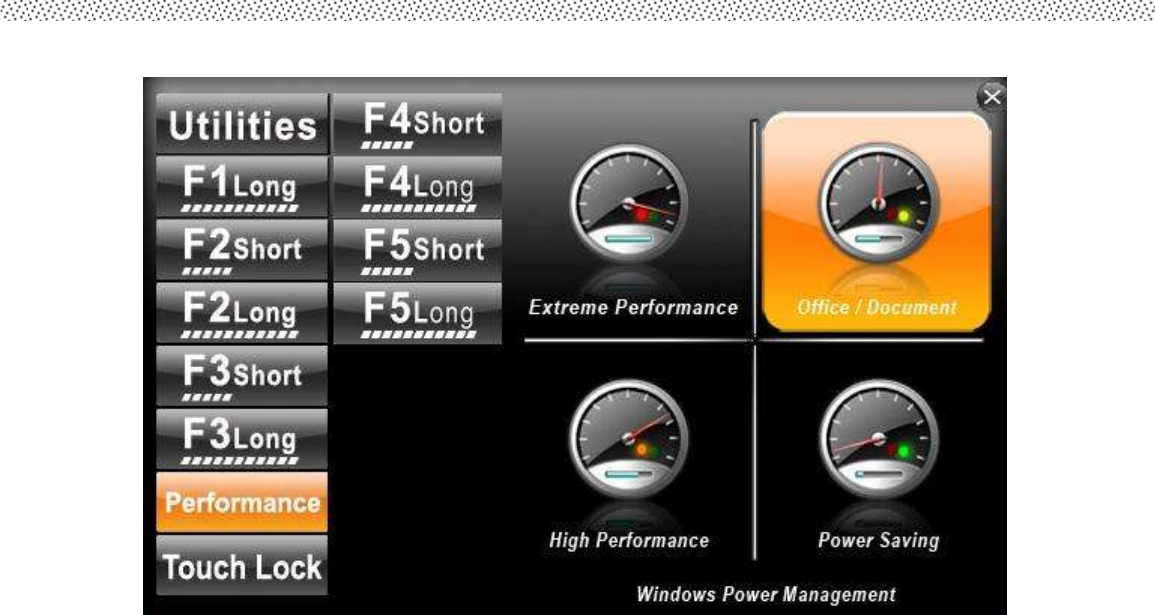
1. Hot TAB functions will show four functions
A. The first is virtual mouse
B. Screen rotation
C. Onscreen Keyboard
DAP 7 M9020 Rugged Computing
Users Guide Rugged Table PCs
12
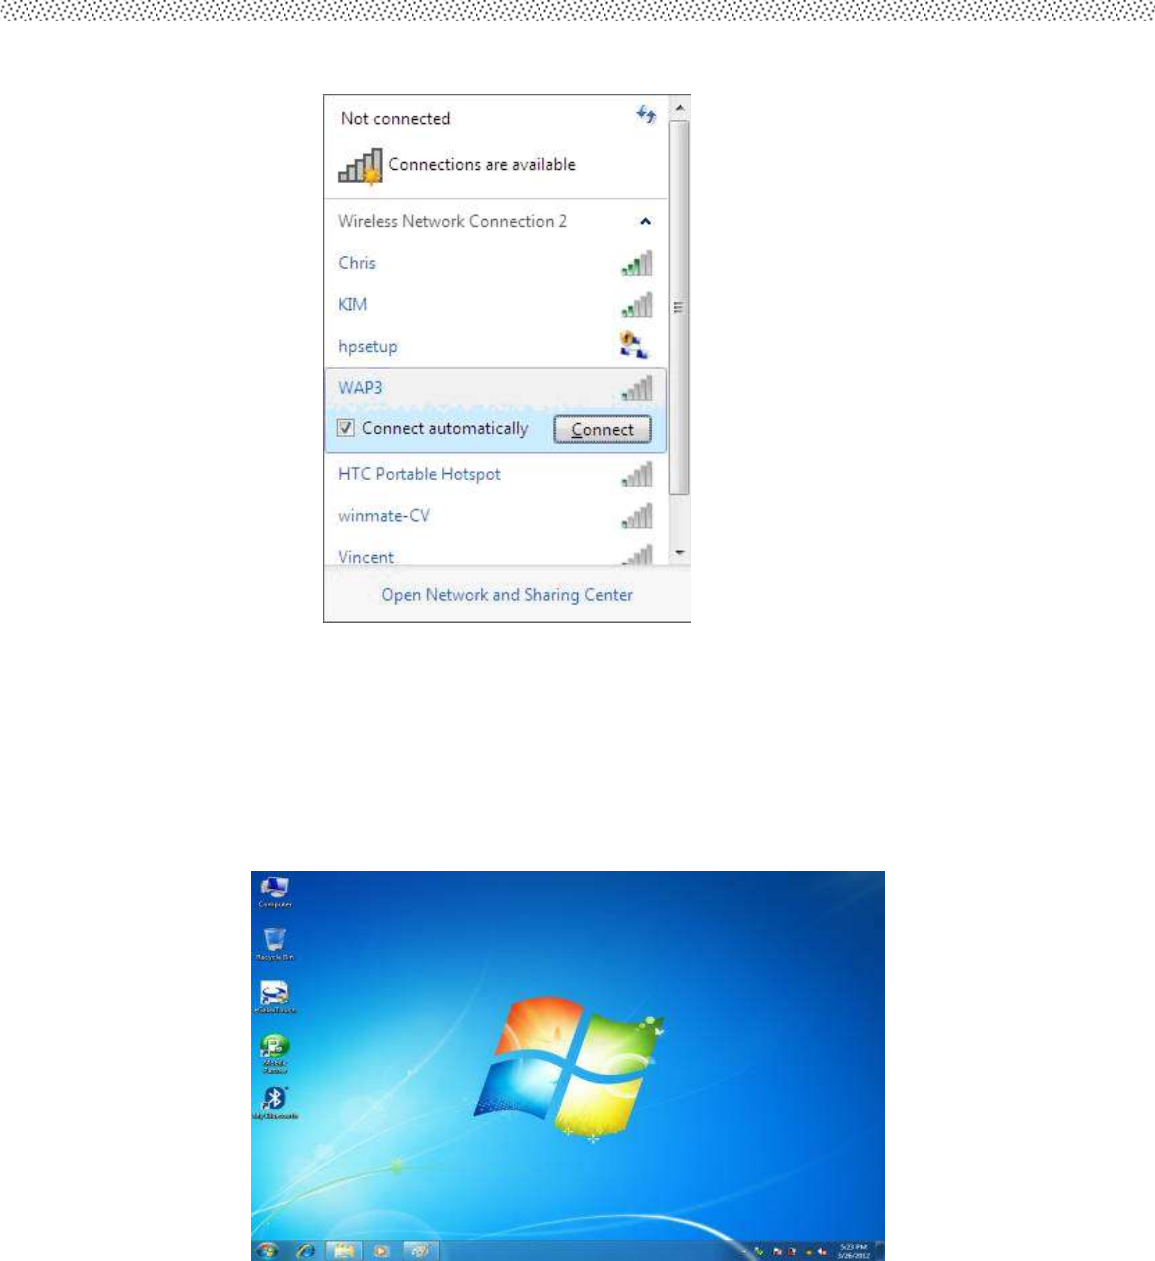
2. Power Manage function
DAP 7 M9020 Rugged Computing
Users Guide Rugged Table PCs
13
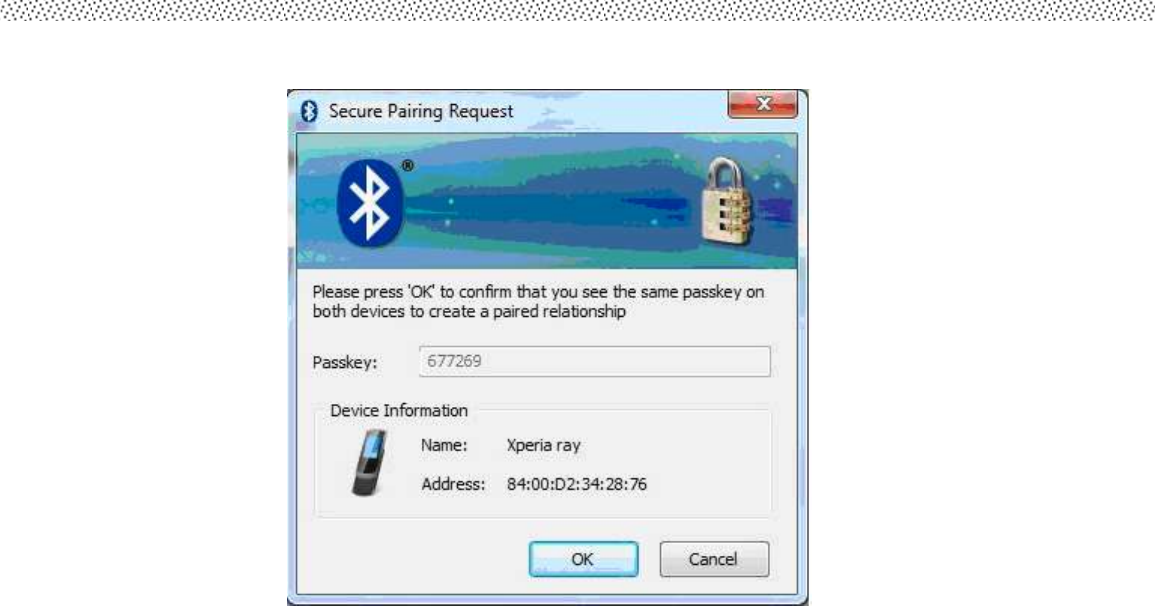
Connecting to a Wireless Network
1. Push Menu function and making sure the Wireless function is “On”.
By using the defult build-in module, the Windows Wireless Network Connection will be
enabled.
Using the Bluetooth Wireless Feature
1. Choose HotTab AP Menu function and making sure the Bluetooth function is “On”.
2. After installing the driver utility, the Bluetooth shortcut will shown on screen, double click
the shortcut and it will search any bluetooth device automatically. Or double click
“Search Devices” to search again.
DAP 7 M9020 Rugged Computing
Users Guide Rugged Table PCs
14
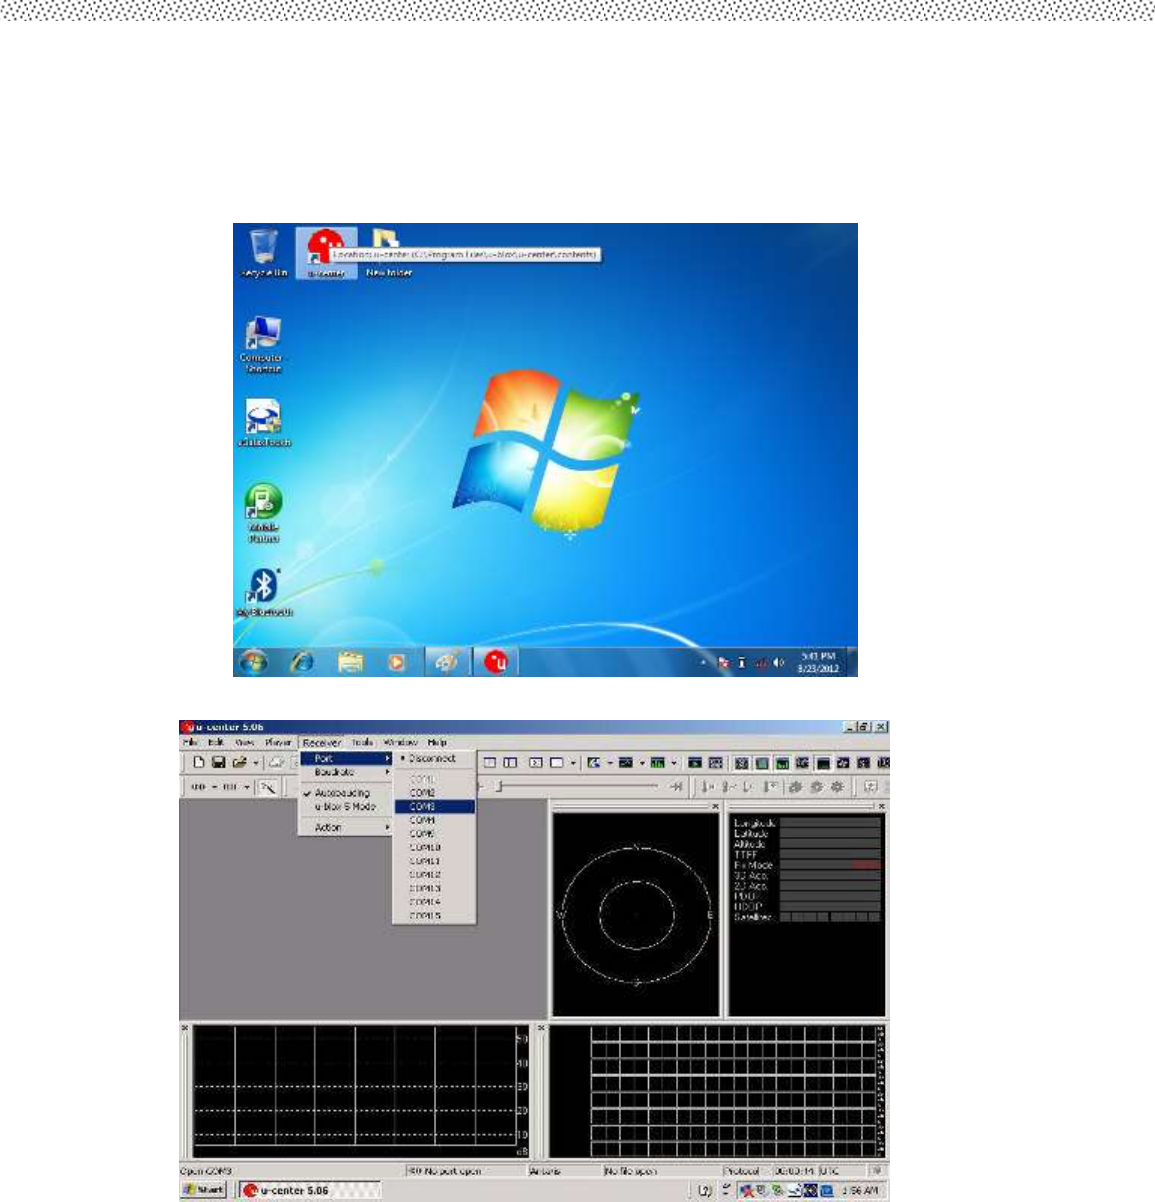
Choose the bluetooth device you want to connect, and left click to choose “Connect”. Then
the device will be connected to the module.
DAP 7 M9020 Rugged Computing
Users Guide Rugged Table PCs
15
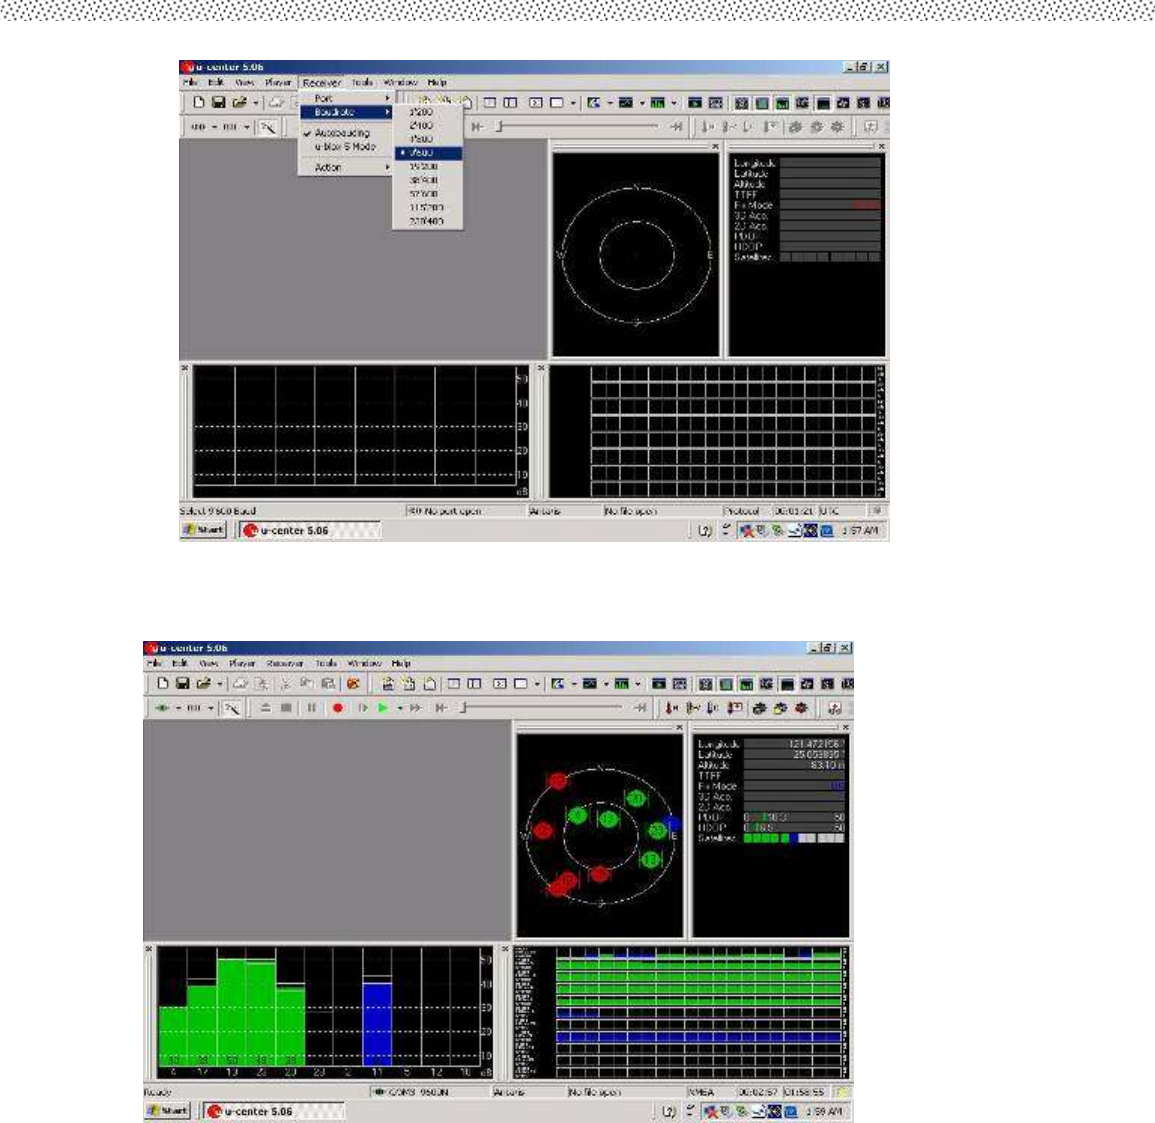
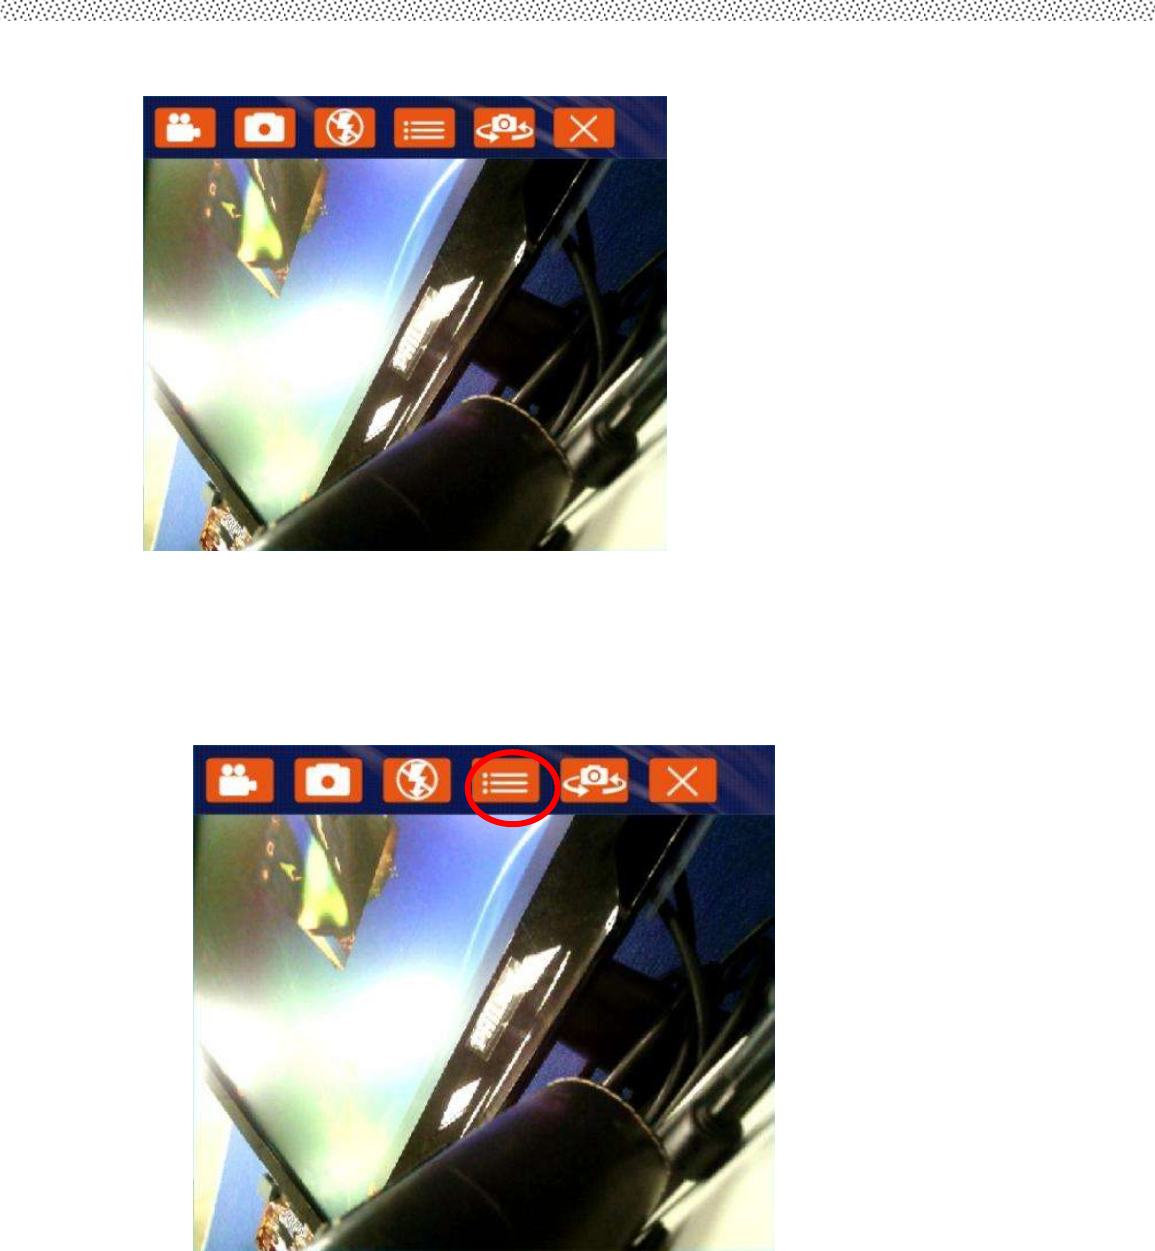
Using the GPS Feature
We apply a on board GPS module for default function of the Tablet PC series.
1. Choose HotTab AP Menu function and making sure the GPS Module is “On”.
2. Click the u-center icon to start the GPS function settings.
3. Setting the Receiver Port to COM9
DAP 7 M9020 Rugged Computing
Users Guide Rugged Table PCs
16
4. Setting the Receiver Baudrate to 9600
5. GPS Module will start Cold Start. When the positioning is complete, the Fix Mode will
appear as DR
DAP 7 M9020 Rugged Computing
Users Guide Rugged Table PCs
17
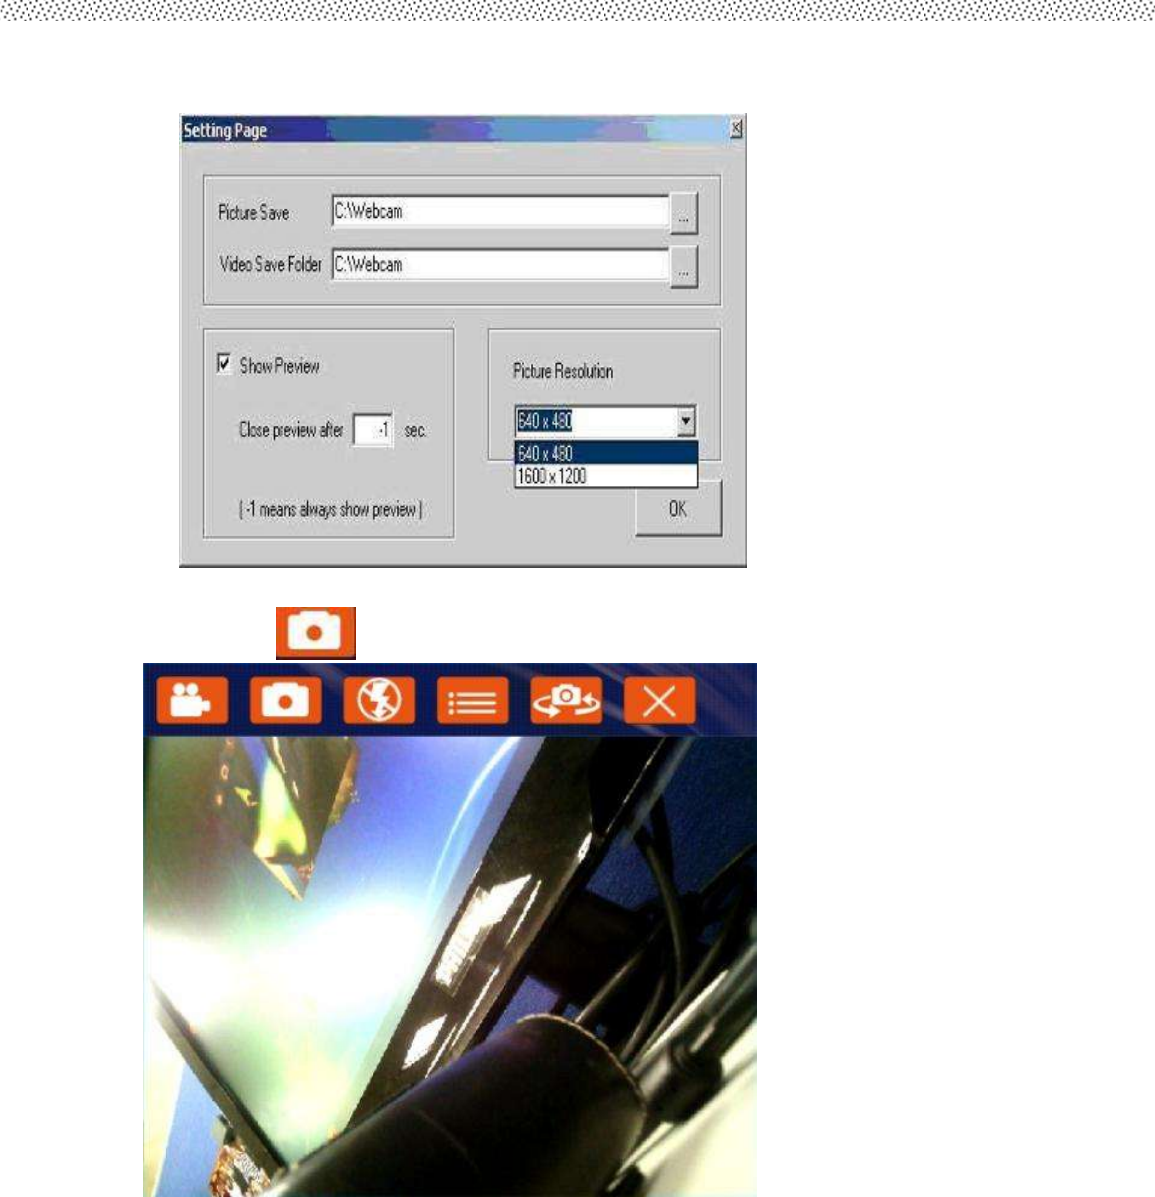
Using the Camera Feature
1. Choose HotTab AP Menu function and making sure the Camera Module is “On”
2. Press Camera button to open the camera AP.
3. Setting the image pre-view resolution .
DAP 7 M9020 Rugged Computing
Users Guide Rugged Table PCs
18
When you set the pre-view resolution to 640*480,the final picture resolution is also
640*480..
4. Click the icon to take a picture.

Users Manual Rugged Tablet PCs
How and When to Use BIOS Setup
For enter to the Tablet PC BIOS setup, you need connect to external
usb keyboarb, press “Del” key when the prompt appears on the
screen during start up. The prompt screen shows only few seconds so
need press Del key quickly.
**NOTICE
Updated BIOS version may be published after the manual is
released. Check with the latest version of BIOS on website.
You may need to run BIOS setup utility when the below status.
1. Error message on sreen indicate to check BIOS setup.
2. Restoring the factory default settings.
3. Modifing the specific hardware specification
4. Want to opttimize the specification.
To control the keyboard to select BIOS utility setup, you need
Keyboard Icon
Function Description
Selects a menu title
Selects an item or option
Enter
Go to the sub-menu when available
Opens or closes the option window when an item is
selected
Esc
To leave sub-menu and return to main menu.
**NOTICE
You can press the F1, F9, F10, –/+, and Esc keys by connecting a USB keyboard to your tablet
PC. Make sure that the item “Legacy USB Sup
Rugged Computing
Users Guide Rugged Table PCs
20
BIOS Functions
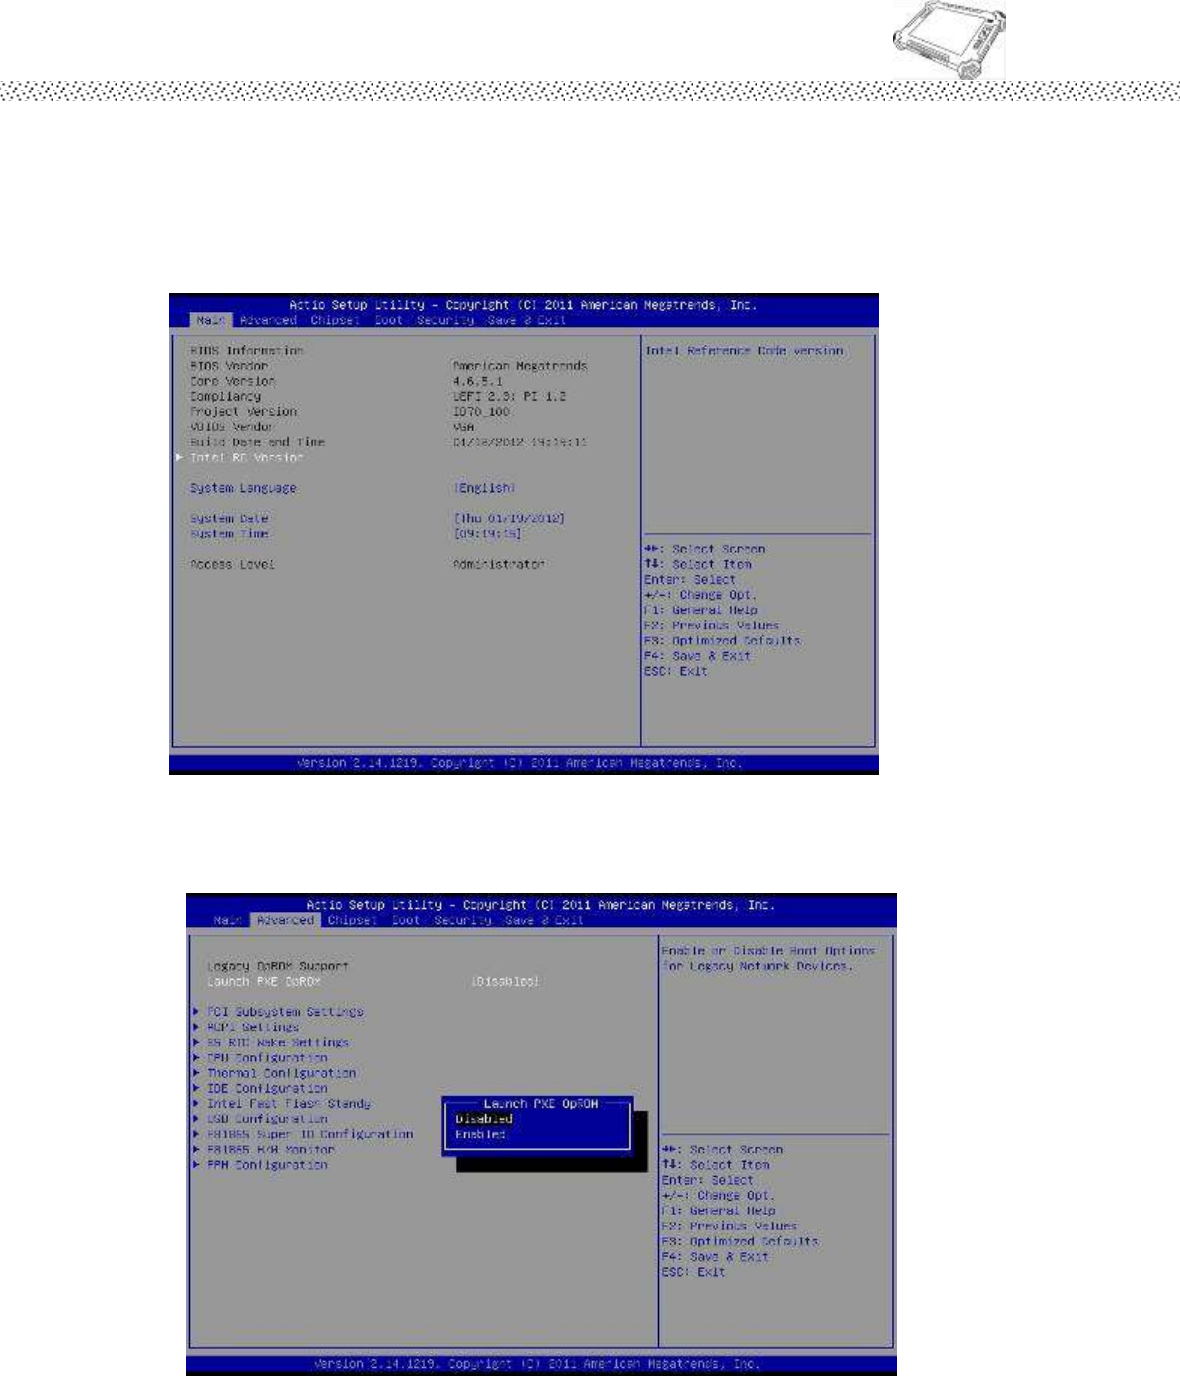
4.2.1 Main Menu
The main menu contains the information of the Tablet system
including BIOS version, processor, system memory, time, and date.
4.2.2 Advanced Menu
The advanced menu contains the configuration information of CPU.
Rugged Computing
Users Guide Rugged Table PCs
21
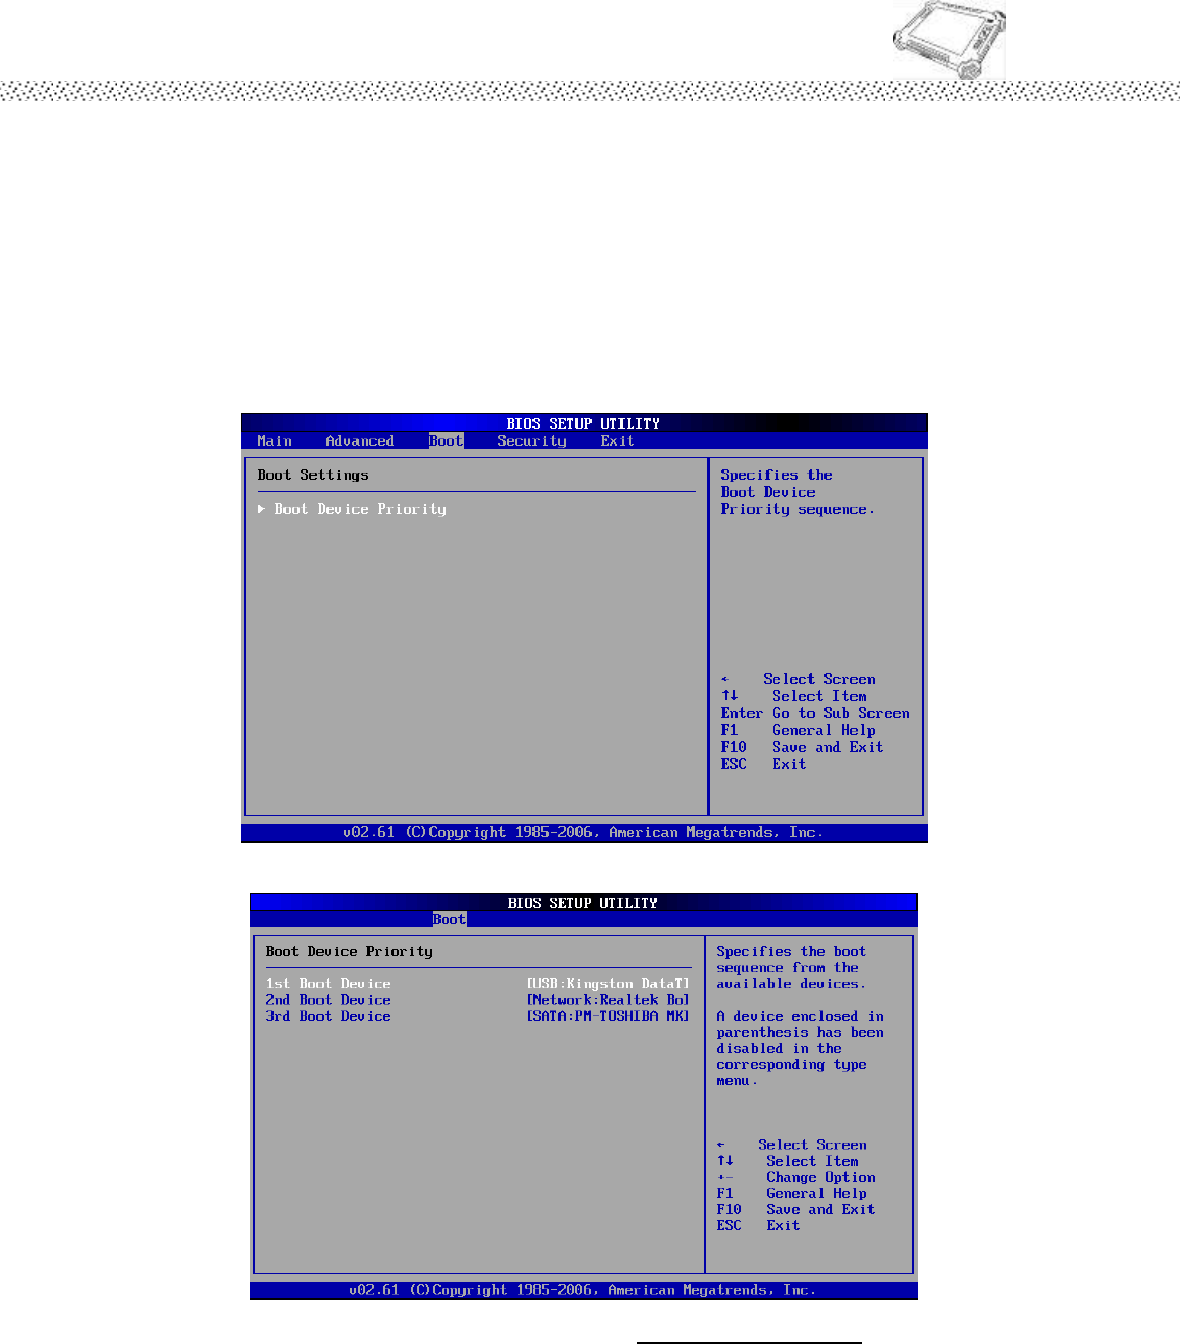
4.2.3 Boot Menu
The Boot menu sets the sequence of the devices to be searched for
the operating system.
The bootable devices will be automatically detected during POST and
shown here, allowing you to set the sequence that the BIOS uses to
look for a boot device from which to load the operating system. A brief
description of button usage is listed next:
Chck the Hard Disk Device in Hard Disk Drives.
Rugged Computing
Users Guide Rugged Table PCs
22
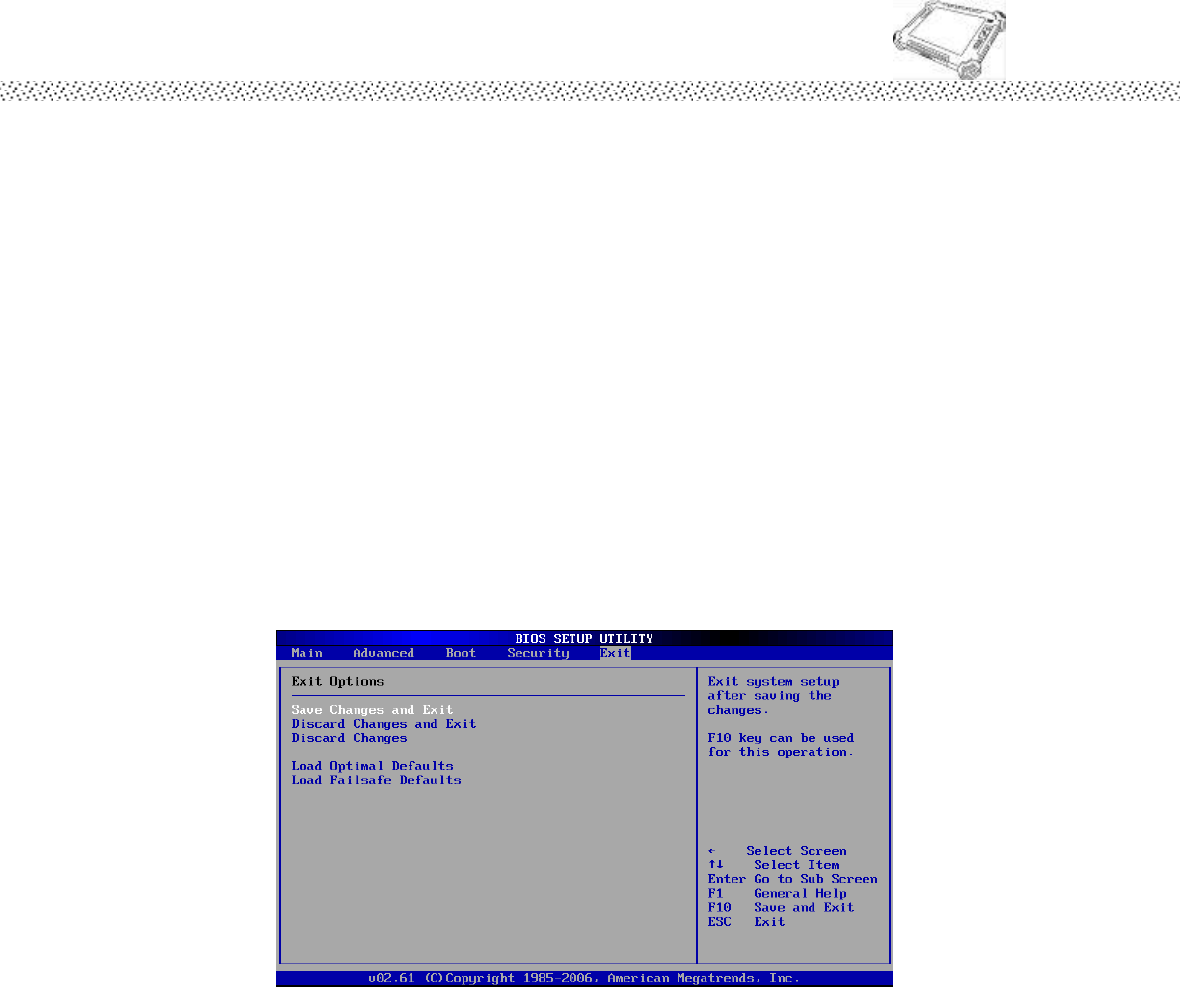
4.2.4 Exit Menu
The Exit menu displays ways of exiting BIOS Setup utility. After
finishing with your settings, you must save and exit so that the
changes can take effect.
Save Canges and Exit saves the changes you have made and exits
BIOS Setup utility.
Discarding Changes and Exit exits BIOS Setup utility without
saving the changes you have made.
Discard Changes restores the previous values for all the items.
Load Optimal Default loads the factory default values for all the
items.