UNION COMMUNITY AC-5100 Access controller User Manual AC5000 UserGuide 1 03
UNION COMMUNITY Access controller AC5000 UserGuide 1 03
UserManual.wiki
>
UNION COMMUNITY
>
AC-5100 User Manual
>
User Manual
Contents
1.
User Manual
2.
Users Manual
User Manual
Navigation menu
Upload a User Manual
Namespaces
Wiki Guide
HTML
PDF
Info
Views
User Manual
Discussion / Help
Navigation
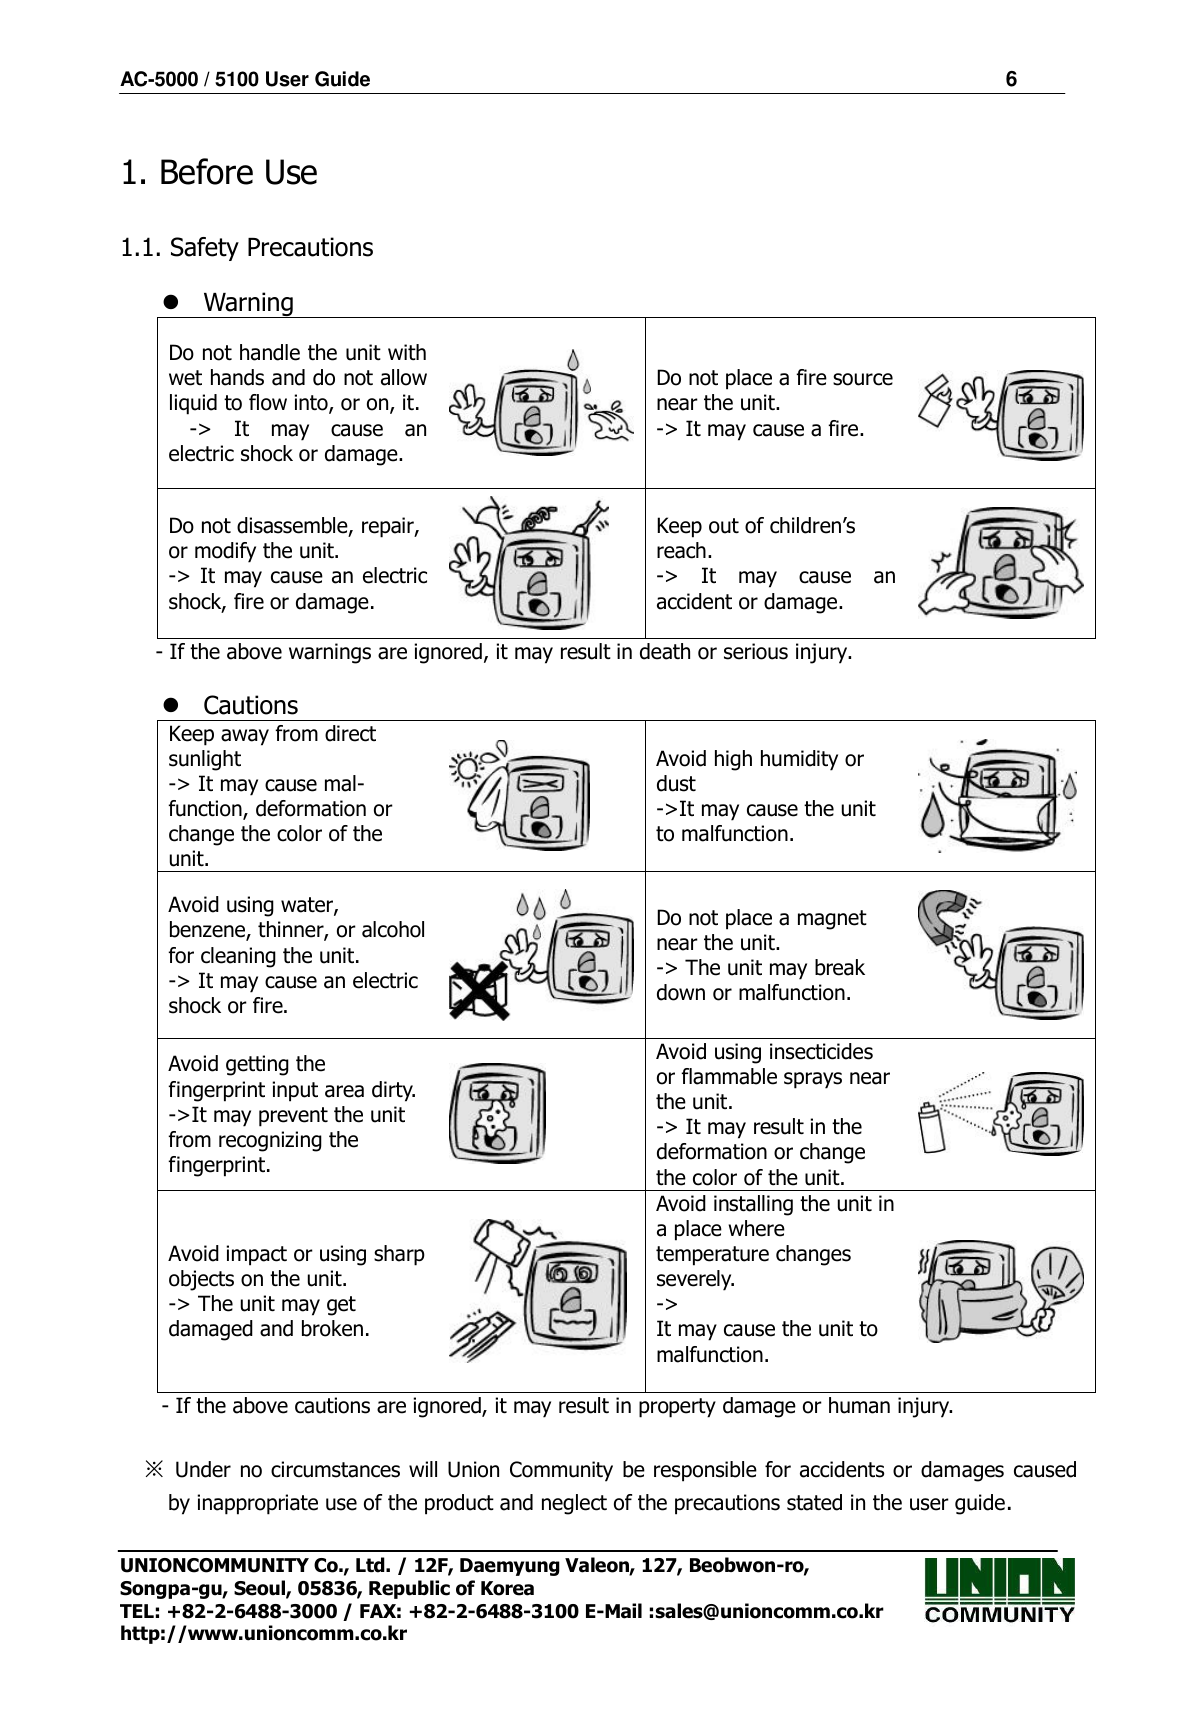
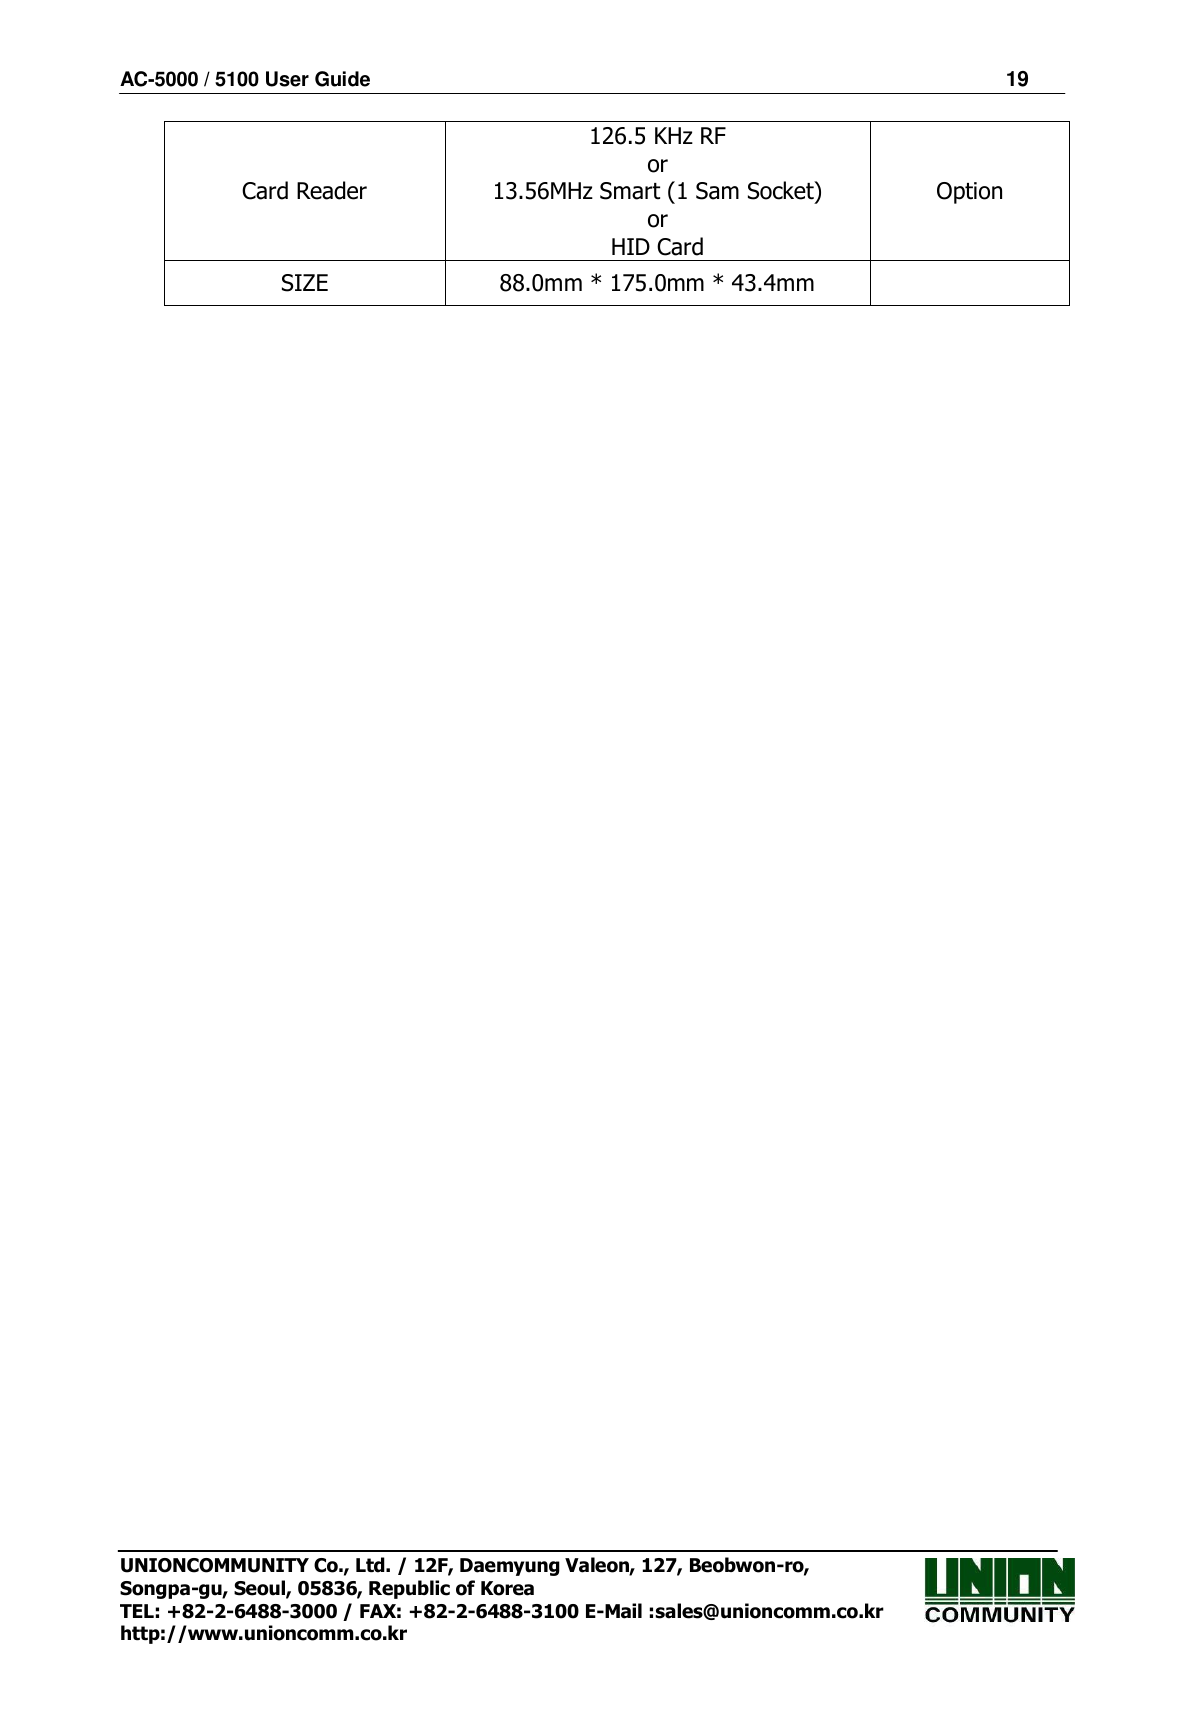
![AC-5000 / 5100 User Guide 3 UNIONCOMMUNITY Co., Ltd. / 12F, Daemyung Valeon, 127, Beobwon-ro, Songpa-gu, Seoul, 05836, Republic of Korea TEL: +82-2-6488-3000 / FAX: +82-2-6488-3100 E-Mail :sales@unioncomm.co.kr http://www.unioncomm.co.kr <Glossary> AC5000: Terminals not supported by Camera / Mobile card(BLE) AC5100: Terminals supported by both Camera / Mobile card(BLE) Admin, Administrator - A user who can enter the terminal menu mode. They are authorized to register/modify/delete terminal users and alter the operating environment by changing the settings. - If there is no administrator registered for a terminal, anyone can enter the terminal menu and change the settings. Therefore, it is recommended to register at least one administrator. - Special care is required for registration and operation, as an administrator has the rights to change important environmental settings of the fingerprint recognition unit. 1 to 1, Verification - This is a method that authenticates fingerprints together with a user ID or card. - This method is called 1:1 authentication as only the fingerprint registered for the user ID or card is used for comparison. 1 to N, Identification - This is a method that searches for a corresponding user only with fingerprint. - This method is called 1:N authentication as it searches for the identical fingerprint, from the registered fingerprints, without a user ID or card being entered 1:N. Security Level - This is the level used for fingerprint authentication, displayed from 1 to 9, depending on how both fingerprints match against each other. Authentication is only successful when the similarity between both fingerprints is higher than the preset level. - The higher the authentication level, the higher the security. Nevertheless, as it requires a relatively high match rate, self-authentication is prone to failure. - 1:1 Level: Authentication level used for 1:1 verification. - 1:N Level: Authentication level used for 1:N identification. Authentication Method - This represents the various types of authentication, including FP (fingerprint) authentication, RF (card) authentication or a combination of these methods. Example: Card or FP: Authentication with card or fingerprint. Function Keys - [F1], [F2], [F3], [F4], and [ENT] keys are available. These keys allow a user to enter the menus or change modes such as office start/leave times. LFD (Live Finger Detection) - This function allows the input of only real fingerprints and blocks the input of imitation fingerprints produced using rubber, paper, film, and silicone.](https://usermanual.wiki/UNION-COMMUNITY/AC-5100.User-Manual/User-Guide-3262633-Page-3.png)
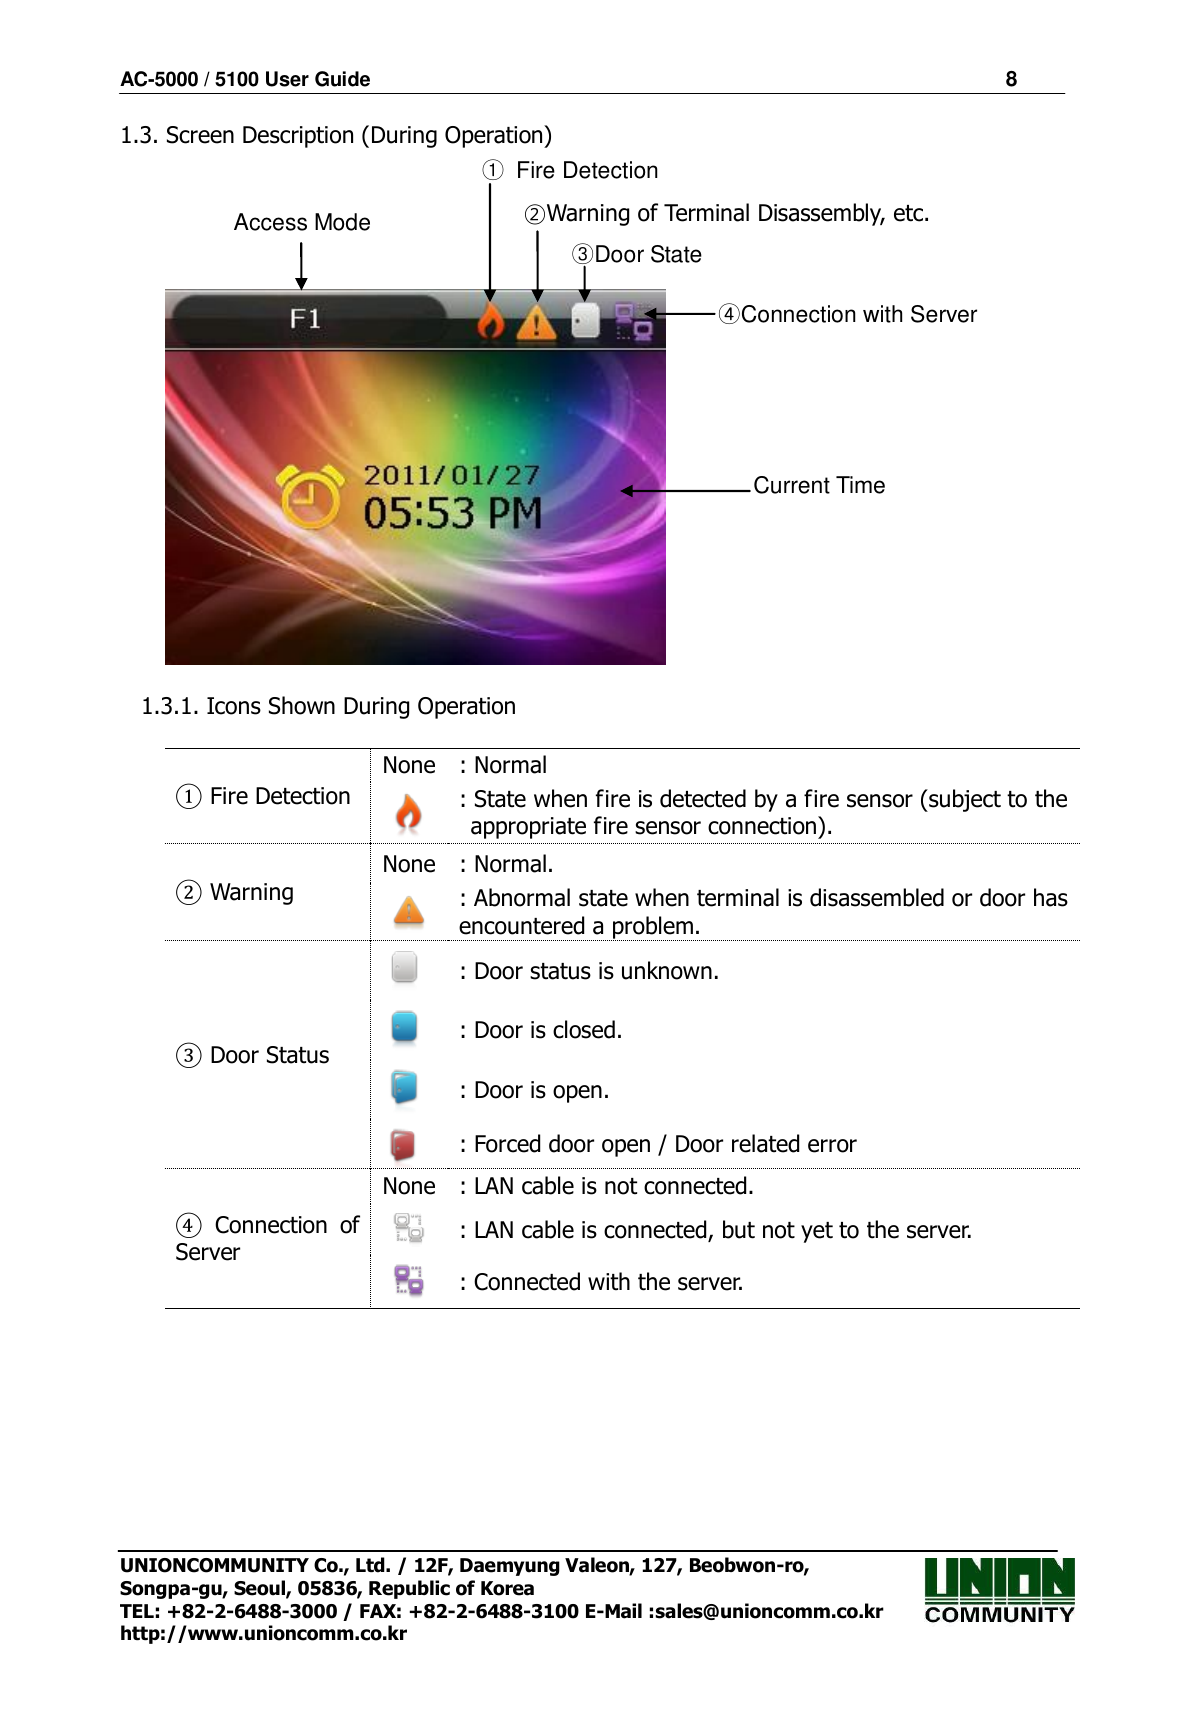
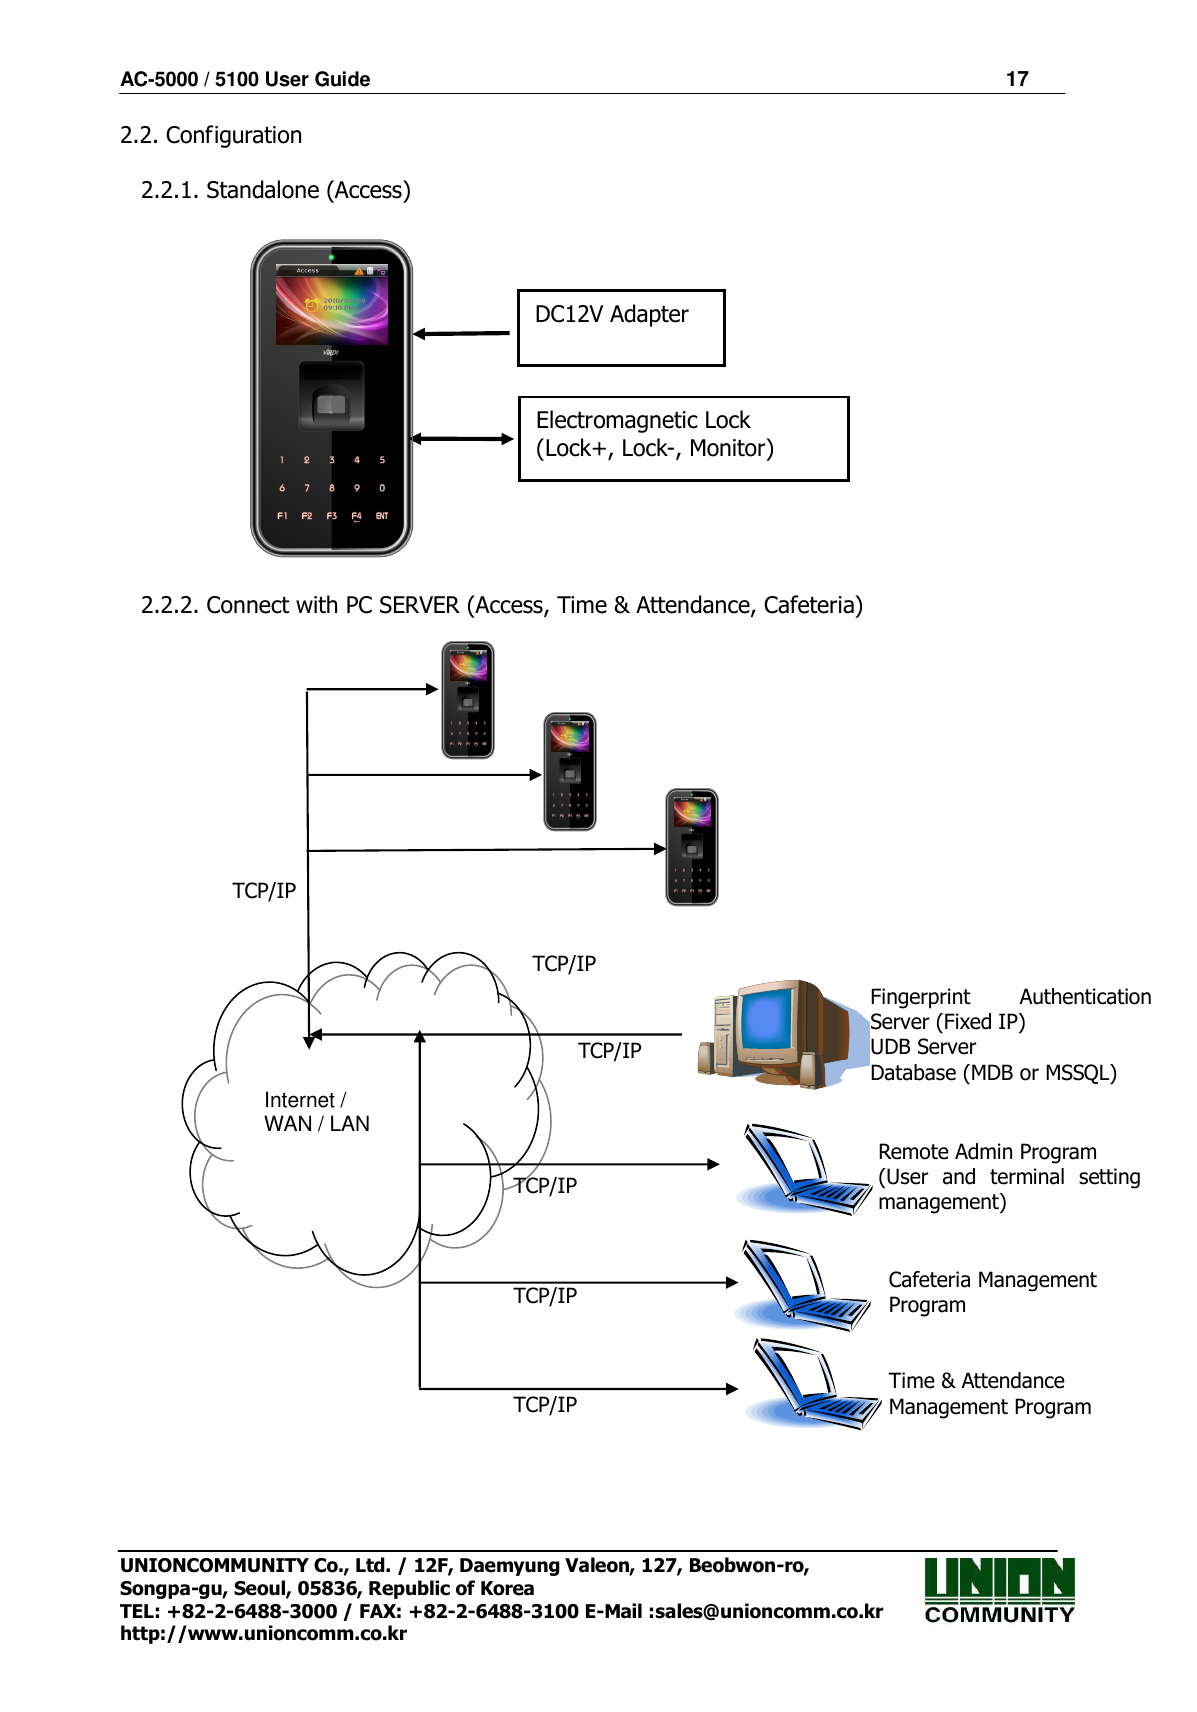
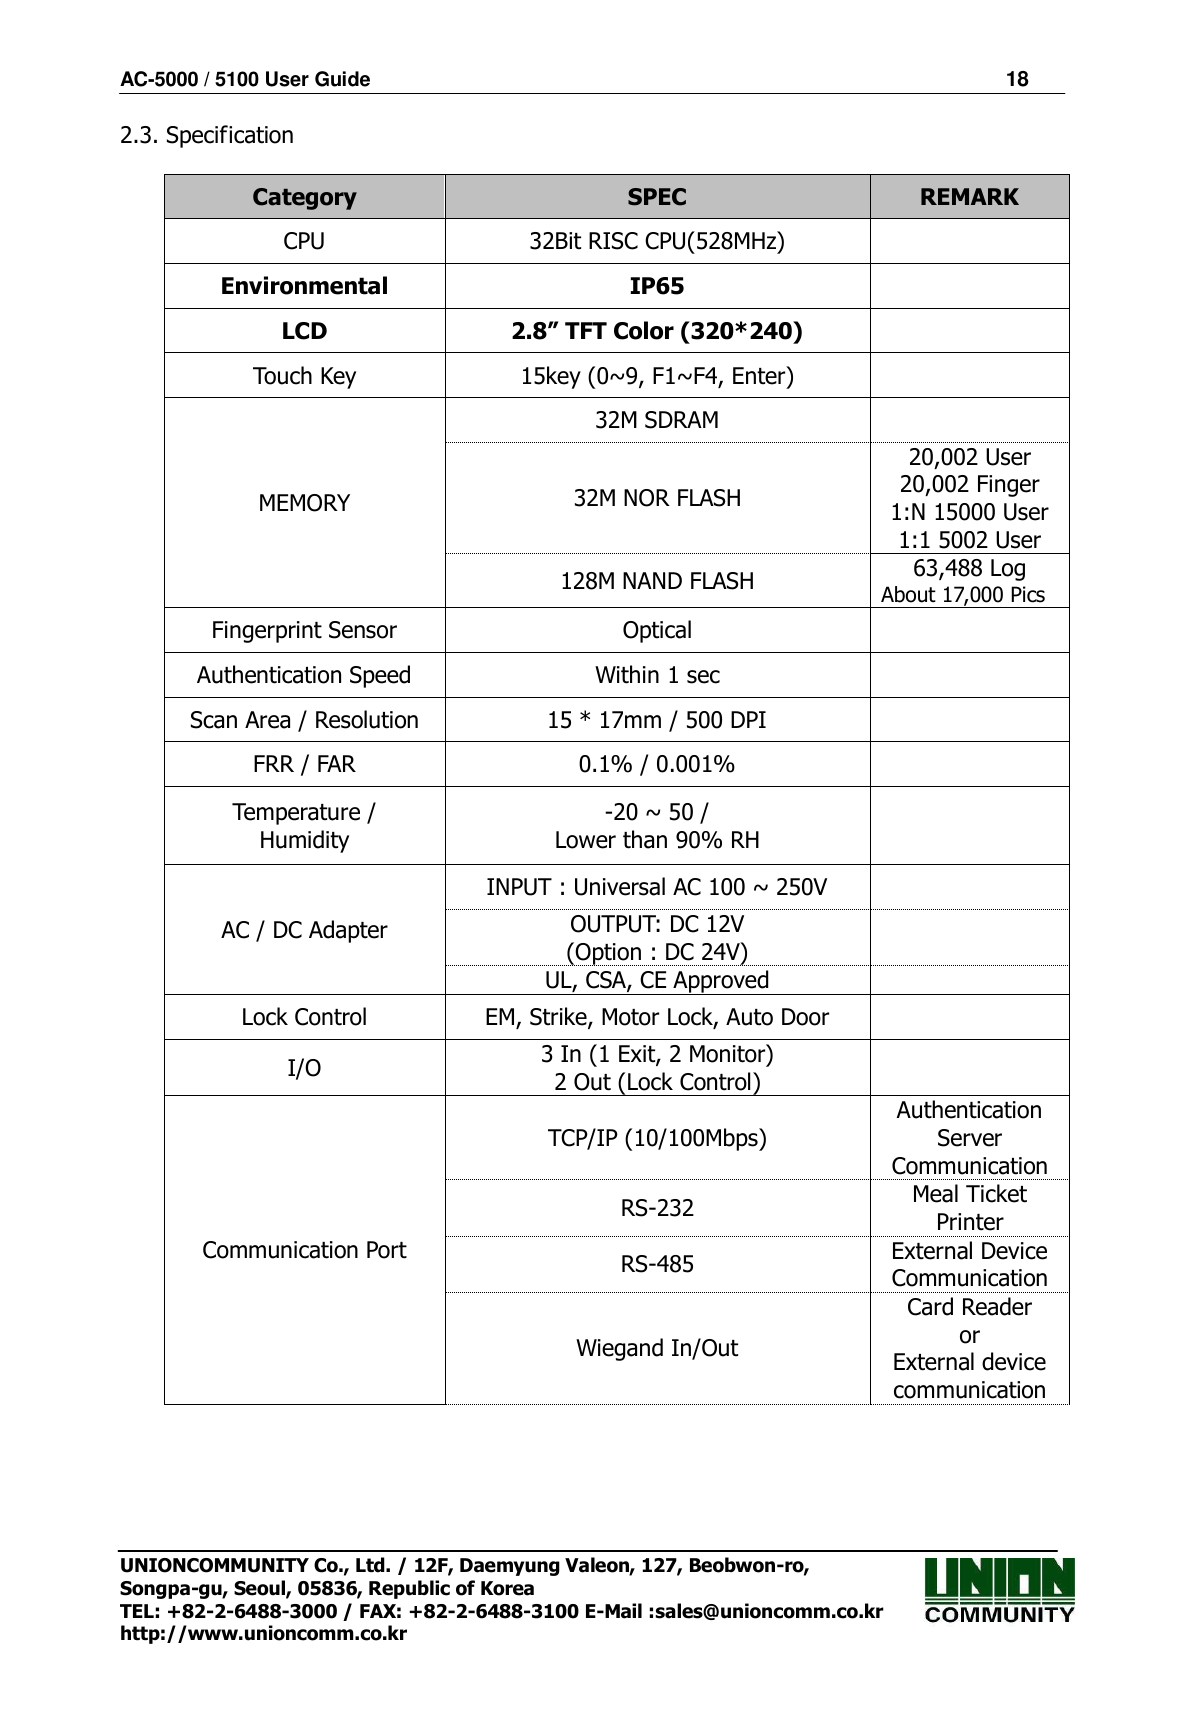
![AC-5000 / 5100 User Guide 4 UNIONCOMMUNITY Co., Ltd. / 12F, Daemyung Valeon, 127, Beobwon-ro, Songpa-gu, Seoul, 05836, Republic of Korea TEL: +82-2-6488-3000 / FAX: +82-2-6488-3100 E-Mail :sales@unioncomm.co.kr http://www.unioncomm.co.kr Table of Contents <Revison History> .................................................................................................... 2 1.2. Terminal Description ................................................................................... 2 2.1. Features ....................................................................................................... 2 2.3. Specification ................................................................................................ 2 3.2. Menu Configuration ..................................................................................... 2 3.7.7. Mobile Card Option .................................................................................. 2 3.6.1. System Setting ..................................................................................... 2 3.6.4. Language.............................................................................................. 2 3.6.2. Authentication ....................................................................................... 2 2.1. Features Various register and changing Auth Type(13->12) .................... 2 3.7.1. Terminal Option .................................................................................... 2 Big character use............................................................................................ 2 3.6.5. Data Time ............................................................................................. 2 3.4.3 Terminal ID ............................................................................................ 2 3.1.5. Save Environment Settings .................................................................. 2 1.3.1. Icons Shown During Operation ............................................................. 2 Table of Contents .................................................................................................... 4 1. Before Use ............................................................................................................ 6 1.1. Safety Precautions ...................................................................................... 6 1.2. Terminal Description ................................................................................... 7 1.3. Screen Description (During Operation) ..................................................... 8 1.3.1. Icons Shown During Operation ............................................................. 8 1.4. LED Signal Shown During Operation ...................................................... 12 1.5. Keys Used During Operation .................................................................... 12 1.6. Used Voices During Operation ................................................................. 12 1.7. Buzzer Sounds Used During Operation................................................... 13 1.8. How to Register and Input Fingerprint .................................................... 13 2. Product Introduction .......................................................................................... 15 2.1. Features ..................................................................................................... 15 2.2. Configuration ............................................................................................. 17 2.2.1. Standalone (Access) ........................................................................... 17 2.2.2. Connect with PC SERVER (Access, Time & Attendance, Cafeteria) .. 17 2.3. Specification .............................................................................................. 18 3. Environment Settings ........................................................................................ 20 3.1. To be checked before environment settings. .......................................... 20 3.1.1. Enter the Menu. .................................................................................. 20 3.1.2. How to access the menu without the Admin verification. .................... 20 3.1.3. Modify Set Values ............................................................................... 21 3.1.4. Move to page ...................................................................................... 23 3.1.5. Save Environment Settings ................................................................ 24 Press the [F4 (←)] key in the main menu screen of <Figure 3-1> to save the changed settings, and the following screen appears: ................................... 24 3.2. Menu Configuration ................................................................................... 25 3.3. User ............................................................................................................ 28 3.3. 1. Add .................................................................................................... 29 3.3.2. Delete ................................................................................................. 33 3.3.3. Modify ................................................................................................. 34](https://usermanual.wiki/UNION-COMMUNITY/AC-5100.User-Manual/User-Guide-3262633-Page-4.png)

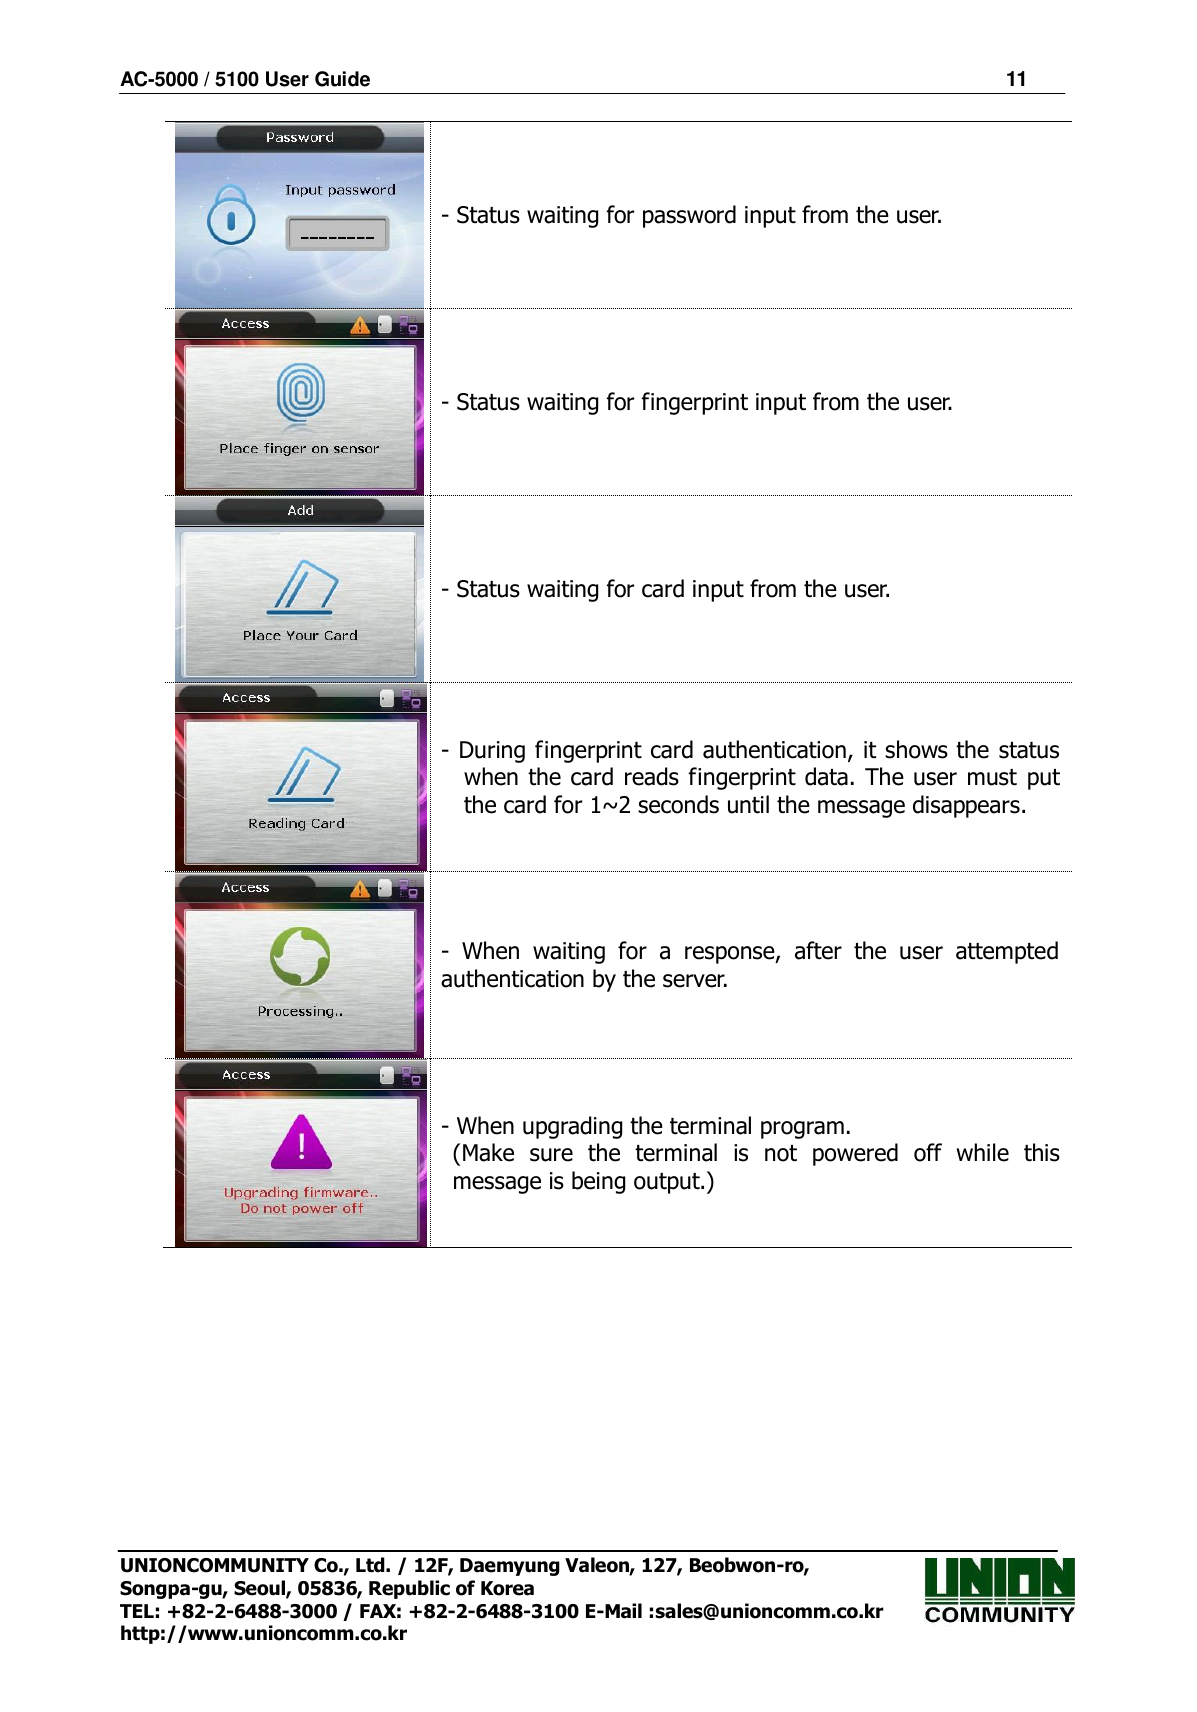
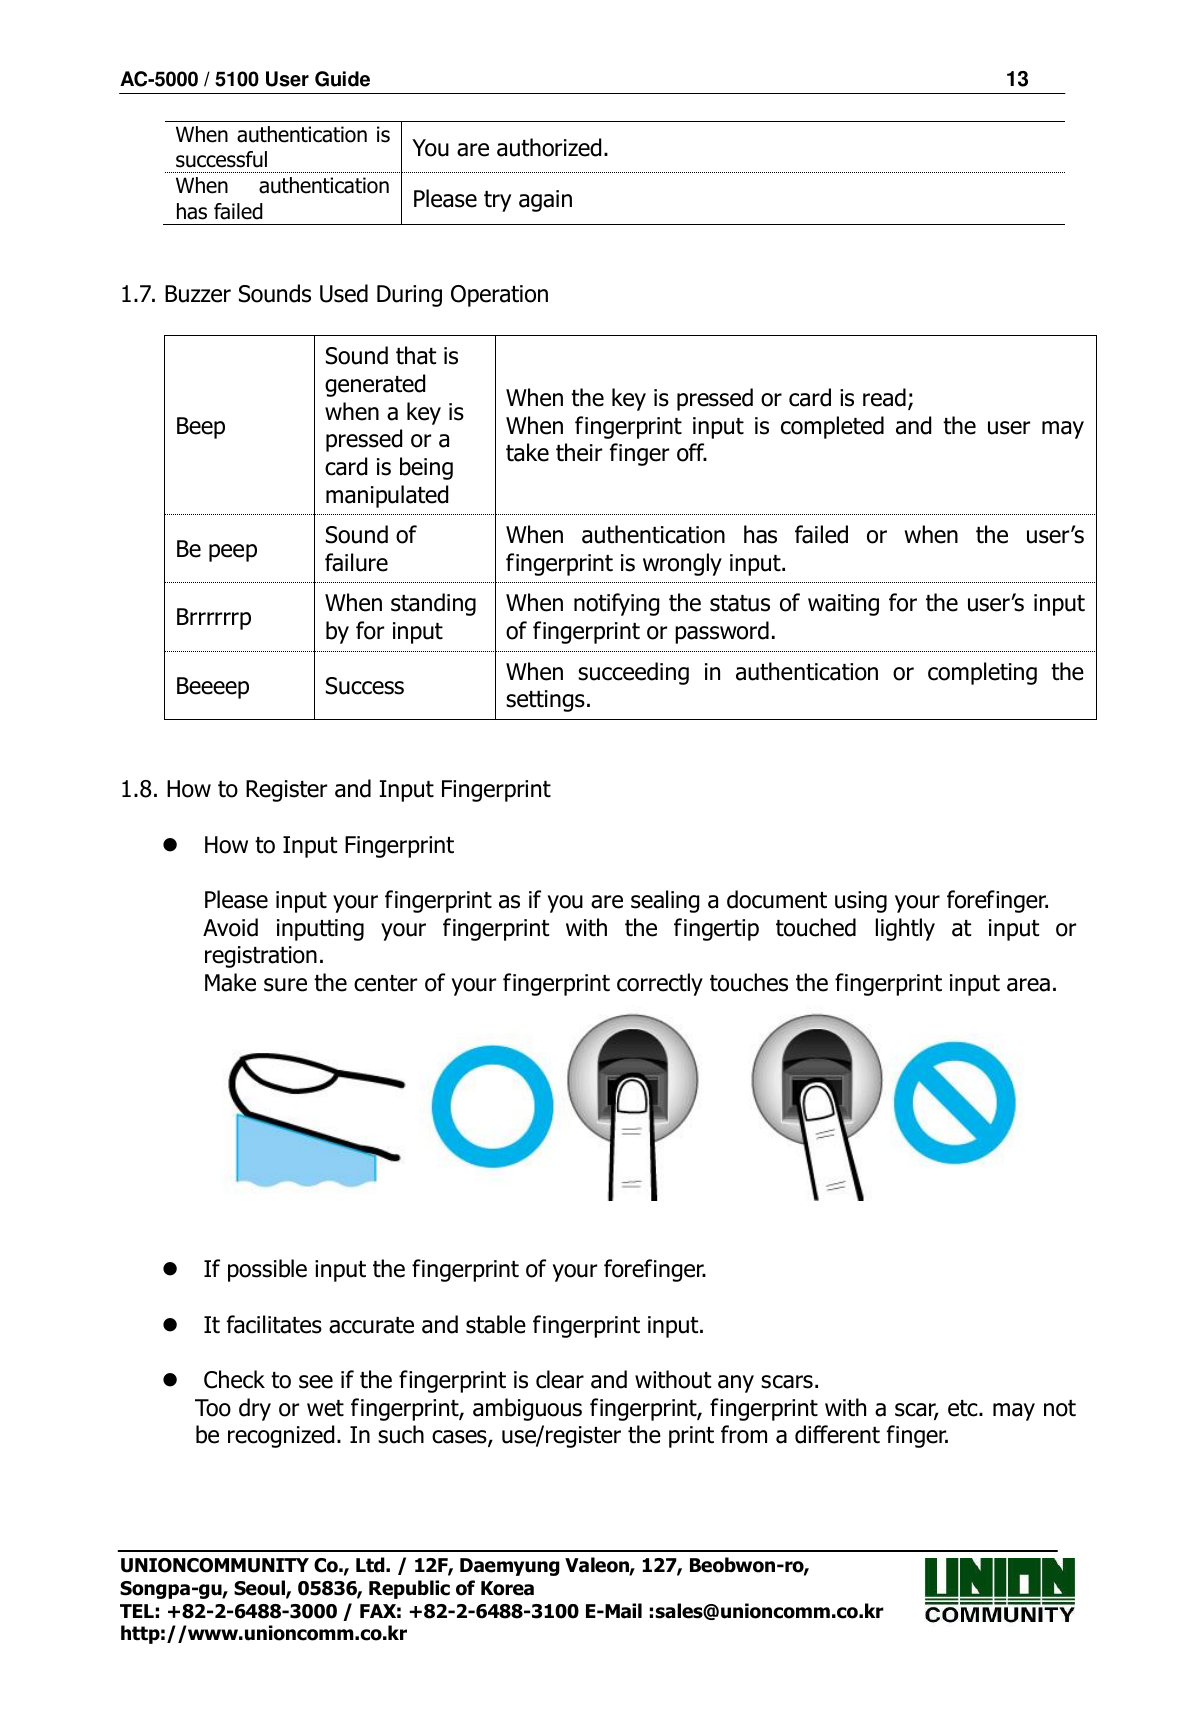
![AC-5000 / 5100 User Guide 12 UNIONCOMMUNITY Co., Ltd. / 12F, Daemyung Valeon, 127, Beobwon-ro, Songpa-gu, Seoul, 05836, Republic of Korea TEL: +82-2-6488-3000 / FAX: +82-2-6488-3100 E-Mail :sales@unioncomm.co.kr http://www.unioncomm.co.kr 1.4. LED Signal Shown During Operation ● Power Red On: Normal Flickering: When the lid is open, or there is any communication error in the connection with the LC010. ● Door Green On: Door Open Off: Door Closed Status Red+Green Blinking: Display during BLE connection 1.5. Keys Used During Operation [0]~[9] - Keys used for number input. [F1]~[F3] - Keys used for changing the authentication mode. [F4] or [←] - Used for changing the authentication mode. - Used as the Delete key for correction when numbers are input. - Used for cancelling input, and moving to a parent menu in menu mode [F4(←)~] - It means to press the [F4 (←)] key for 2 seconds or longer. - When input cursor is located in the input box, it cancels the input and exits to the parent menu if pressed and held for 2 seconds or longer. ENT [or MENU] - Used for modifying the mode. - Used for saving the values set in menu mode, or moving to the screen configuration. [ENT~] - It means to press the [ENT] key for 2 seconds or longer. - Used for accessing the menu when pressing on the initial screen - When input cursor is located in the input box, the user can exit to the parent menu with the current input value saved by pressing the button for 2 seconds or longer. - Used to apply the configuration to the current screen in menu mode and then exiting to the parent menu. 1.6. Used Voices During Operation Type of Operation Voice For fingerprint input Please enter your fingerprint](https://usermanual.wiki/UNION-COMMUNITY/AC-5100.User-Manual/User-Guide-3262633-Page-12.png)

![AC-5000 / 5100 User Guide 20 UNIONCOMMUNITY Co., Ltd. / 12F, Daemyung Valeon, 127, Beobwon-ro, Songpa-gu, Seoul, 05836, Republic of Korea TEL: +82-2-6488-3000 / FAX: +82-2-6488-3100 E-Mail :sales@unioncomm.co.kr http://www.unioncomm.co.kr 3. Environment Settings 3.1. To be checked before environment settings. 3.1.1. Enter the Menu. Press the [ENT] key and hold for two seconds or longer. The user can access to the screen for menu selection, as follows: <Figure 3-1> User can transfer to, and have access to, each sub menu by pressing the relevant number key. If the Admin User is already registered, [Verify Admin] screen appears as shown below: <Figure 3-2> In adherence with the registered authentication method, such as card, fingerprint or password, users can access each menu - subject to successful identification - after the admin verification has finished. ▶ Verify Admin appears only if there is a registered Admin User. When accessing menu mode, after being identified, the user is allowed to access all the menus until they completely exit from the main menu. 3.1.2. How to access the menu without the Admin verification.](https://usermanual.wiki/UNION-COMMUNITY/AC-5100.User-Manual/User-Guide-3262633-Page-20.png)
![AC-5000 / 5100 User Guide 21 UNIONCOMMUNITY Co., Ltd. / 12F, Daemyung Valeon, 127, Beobwon-ro, Songpa-gu, Seoul, 05836, Republic of Korea TEL: +82-2-6488-3000 / FAX: +82-2-6488-3100 E-Mail :sales@unioncomm.co.kr http://www.unioncomm.co.kr This is the way to access the menu if fingerprint authentication is impossible, or because the user forgot the admin password, or lost the card registered on the terminal, or there is no Admin. ① Remove the bracket on the rear of the terminal to open the lid. ② With the lid open, as shown in the figure below, connect pin 1 to pin 3, and pin 2 to pin 4 of connector J404. <Figure 3-3> ③ Access the menu by pressing and holding the [F4(←)] key for 2 seconds or longer. Enter Admin ID as ‘0’ on the Verify Admin screen <Figure 3-2>, and press the [ENT] key. The user can now access the menu selected and the buzzer sounds “Brrrrrrp”. ▶ After modifying the configuration, remember to remove the wires from the connected pins on the J404 connector. 3.1.3. Modify Set Values The following are the names and input methods for setting items. <Figure 3-4> ①Input Box (with highlight) ①Input Box (without highlight) ②Select Button ③Check Box](https://usermanual.wiki/UNION-COMMUNITY/AC-5100.User-Manual/User-Guide-3262633-Page-21.png)
![AC-5000 / 5100 User Guide 22 UNIONCOMMUNITY Co., Ltd. / 12F, Daemyung Valeon, 127, Beobwon-ro, Songpa-gu, Seoul, 05836, Republic of Korea TEL: +82-2-6488-3000 / FAX: +82-2-6488-3100 E-Mail :sales@unioncomm.co.kr http://www.unioncomm.co.kr ▶ ① Input Box For items where the value is directly input, such as the ‘1:1 Level’, users must delete the existing value using the [F4 (←)] key when the applicable item is highlighted. Then input the new value using the [0] ~ [9] keys. ▶ ② Select Button For items such as ‘Fake Finger Detect’, the user should modify the selection ( ) by pressing the relevant numeric key, provided the item is first highlighted. Move the highlighting in the input box by pressing the [ENT] key - if the highlight is located in the input box as shown in <Figure 3-5>. <Figure 3-5> Move Highlight (using the [ENT] key) As shown in the figure on the left, the number is displayed in reverse color when the highlight is in the input box. In the figure on the right, the applicable letters are displayed in black instead of grey when the highlight moves to ‘Fake Finger Detect’. ▶ ③ Check Box The user must select whether or not to check ‘Check Same FP’. The user can either select ( ) or release it ( ) by pressing the relevant key [5]. It’s impossible to select this item, if it’s displayed as ( ). ▶ ④ Combo Box <Fig. 3-6> Navigate to the combo box (use [ENT] key) As shown in the <Fig.3-6> above, press the [ENT] key to move the focus to the combo box in order to change the settings. To reset the default, press [1] or [2] (shown as ) to either decrease or increase the value.](https://usermanual.wiki/UNION-COMMUNITY/AC-5100.User-Manual/User-Guide-3262633-Page-22.png)
![AC-5000 / 5100 User Guide 23 UNIONCOMMUNITY Co., Ltd. / 12F, Daemyung Valeon, 127, Beobwon-ro, Songpa-gu, Seoul, 05836, Republic of Korea TEL: +82-2-6488-3000 / FAX: +82-2-6488-3100 E-Mail :sales@unioncomm.co.kr http://www.unioncomm.co.kr Press the [F4 (←)] key to cancel, while setting, and move back to the parent menu. When the highlight is located at the input box the [F4 (←)] key functions as a [DEL] key, which deletes figures one by one. Press the [F4 (←)] key for two seconds, or longer, to cancel input and exit to the parent menu. Press the [ENT] key for two seconds, or longer, to save the current configuration and move to the parent menu 3.1.4. Move to page Below is the way to go to next page / previous page. <Figure 3-5> To move to the next menu, press the [F2] button on the keypad. The next menu will appear on the screen. <Figure 3-6> To return to the previous menu, press the [F1] button on the keypad. The previous menu will appear on the screen.](https://usermanual.wiki/UNION-COMMUNITY/AC-5100.User-Manual/User-Guide-3262633-Page-23.png)
![AC-5000 / 5100 User Guide 24 UNIONCOMMUNITY Co., Ltd. / 12F, Daemyung Valeon, 127, Beobwon-ro, Songpa-gu, Seoul, 05836, Republic of Korea TEL: +82-2-6488-3000 / FAX: +82-2-6488-3100 E-Mail :sales@unioncomm.co.kr http://www.unioncomm.co.kr 3.1.5. Save Environment Settings Press the [F4 (←)] key in the main menu screen of <Figure 3-1> to save the changed settings, and the following screen appears: <Figure 3-7> Select [1. Yes] to save the new configuration or [2. No] to cancel it. Then press the [ENT] key. In this instance, if, after a period of time there is no input the system returns to the initial screen. If there is no new content, the system exits from the environment settings menu without the aforementioned “Save” process. When the settings are changed in the menu, and if there is no input after a certain period of time, the system exits from the environment setting menu. In which case, if there is any revised menu, it should pass through the “Save” process. Otherwise, it transfers to the initial screen without saving the revised settings.](https://usermanual.wiki/UNION-COMMUNITY/AC-5100.User-Manual/User-Guide-3262633-Page-24.png)
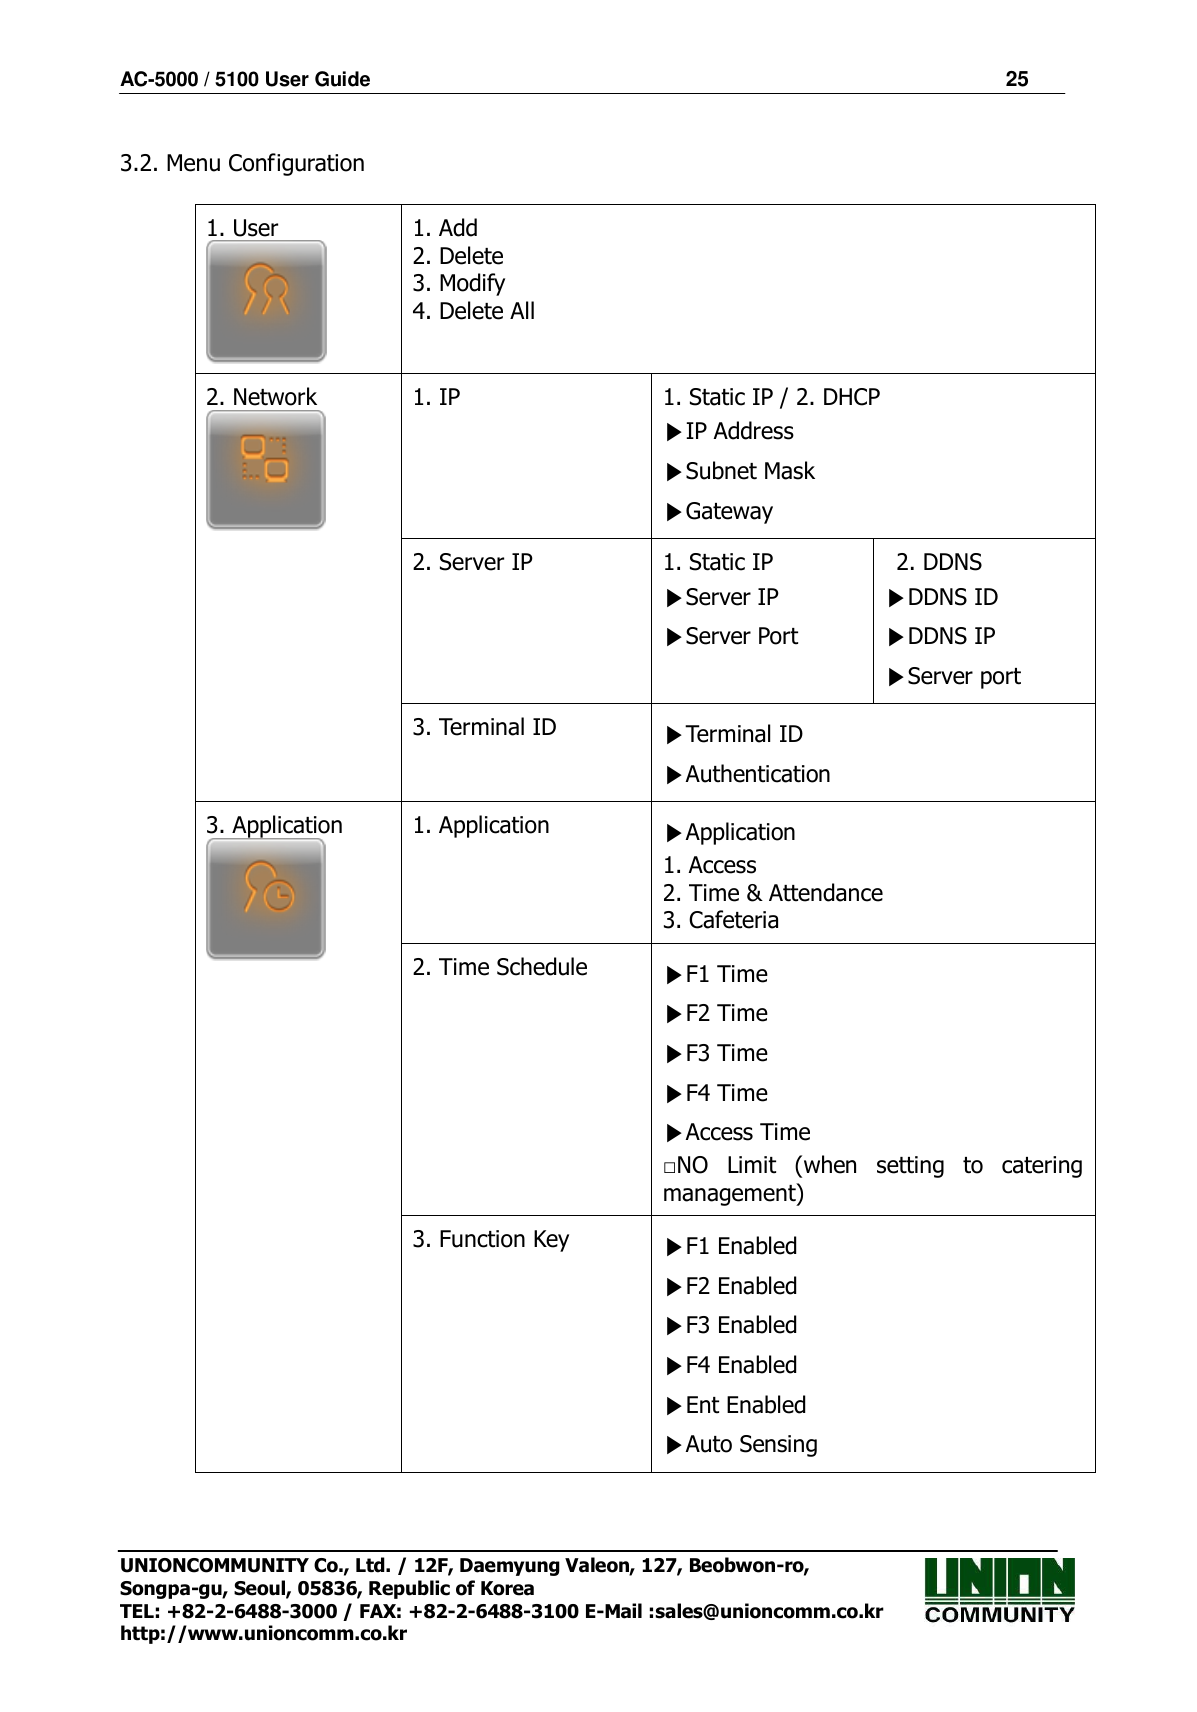

![AC-5000 / 5100 User Guide 27 UNIONCOMMUNITY Co., Ltd. / 12F, Daemyung Valeon, 127, Beobwon-ro, Songpa-gu, Seoul, 05836, Republic of Korea TEL: +82-2-6488-3000 / FAX: +82-2-6488-3100 E-Mail :sales@unioncomm.co.kr http://www.unioncomm.co.kr 4. System 1. System Setting ▶User ID Length ▶Display Option ▶Threat fingerprint alarm ▶Alarm time (sec) 2. Authentication ▶User Group IP ▶Enable 1:N ▶Card Only ▶Template On Card ▶Verify Multi-FP ▶Blocking Time (sec.) ▶NetErrTime(Sec) 3. Fingerprint ▶1:1 Level [1~9] ▶1:N Level [3~9] ▶Fake Finger Detect ▶Template types ▶Check Same FP 4. Language 5. Data Time ▶Time Sync ▶Display Time ▶Set Current Time ▶Calendar 6. Database 1. Init Config 2. Delete All Users 3. Clear Log Data 4. Initialize Terminal 5. Terminal 1. Terminal Option □Terminal Alarm □Lock Terminal □KeyLed ON □User Voice □User Text □Use Camera (AC5100 Only) 2. Volume Control ▶Voice Volume ▶Beeper Volume](https://usermanual.wiki/UNION-COMMUNITY/AC-5100.User-Manual/User-Guide-3262633-Page-27.png)
![AC-5000 / 5100 User Guide 28 UNIONCOMMUNITY Co., Ltd. / 12F, Daemyung Valeon, 127, Beobwon-ro, Songpa-gu, Seoul, 05836, Republic of Korea TEL: +82-2-6488-3000 / FAX: +82-2-6488-3100 E-Mail :sales@unioncomm.co.kr http://www.unioncomm.co.kr 3. Door ▶Lock Type ▶DM1 ▶DM2 ▶Open Duration ▶Warn Door Open 4. Wiegand □Bypass ▶Wiegand Out ▶Site Code 5. Card Reader ▶Card Format ▶Read Card NO. ▶Dummy Mode 6. External Device ▶Printer ▶Lock Controller ▶Connection Device Setting □Mode 7. Mobile Card Option (AC5100 only) ▶Use Mobile Key ▶Terminal Register ▶BLE Name 6. Information 1. System Info 2. Network Info 3. Database Info 4. View Log 5. Version Info 3.3. User Select “1. User” in the main menu, and the following screen appears: Press [1] key to register new user. [2] key to delete user. [3] key to modify user. [4] key to delete all users.](https://usermanual.wiki/UNION-COMMUNITY/AC-5100.User-Manual/User-Guide-3262633-Page-28.png)
![AC-5000 / 5100 User Guide 29 UNIONCOMMUNITY Co., Ltd. / 12F, Daemyung Valeon, 127, Beobwon-ro, Songpa-gu, Seoul, 05836, Republic of Korea TEL: +82-2-6488-3000 / FAX: +82-2-6488-3100 E-Mail :sales@unioncomm.co.kr http://www.unioncomm.co.kr 3.3. 1. Add ◆ Select [ENT~] [1. User] [1. Add] ◆ in the basic screen, and the following screen appears: Input the user ID to be registered and press the [ENT] key. Automatically shows the ID to be registered on the screen, so the user can easily perform registration. To modify the ID, press the [F4 (←)] key and delete the existing value and input the new value. If the user inputs an already registered ID, a failure message appears. The following screen appears if the ID is not yet registered. The icon on the left mean, as shown below: Authentication type. Number of Fingerprints Registered (0~10). Number of Cards Registered (0~10). Whether or not Password is Registered. ( :Registered/ :Not Registered) As shown on the screen, the user registers by pressing [2] for fingerprint, [3] for card, and [4] for password. Basically, it is registered in the name of the user. Using the keys [7] and [8], the user can modify as user or admin. Once the registration is complete, the user can press [ENT] to save it. The user must press the [F4 (←)] key to cancel the registration and exit from the menu. ※ Only a user registered as Admin can modify the operating environment of the terminal, and Add/Modify/Delete the information about all users saved in the terminal. Therefore, special care is required when registering Admin. 3.3.1.1. Authentication method](https://usermanual.wiki/UNION-COMMUNITY/AC-5100.User-Manual/User-Guide-3262633-Page-29.png)
![AC-5000 / 5100 User Guide 30 UNIONCOMMUNITY Co., Ltd. / 12F, Daemyung Valeon, 127, Beobwon-ro, Songpa-gu, Seoul, 05836, Republic of Korea TEL: +82-2-6488-3000 / FAX: +82-2-6488-3100 E-Mail :sales@unioncomm.co.kr http://www.unioncomm.co.kr Press the [F4 (←)] key to delete the existing value, enter the authentication method you want to use among the authentication methods shown on the screen, and press the [ENT] key. If you select [AND] mode, authentication will proceed normally with the authentication method. (Priority: Card -> Fingerprint -> Password) When selecting [OR] mode, only two authentication types can be selected. ※ If you do not set the authentication method after registering the card, it is necessary to be careful when registering because it is not possible to search DB when registering existing card as a new user. 3.3.1.2. FP Register ① Place finger on the sensor - refer to ‘1.8. How to register and enter fingerprint ‘. Fingerprint must be input twice, as below, according to the screen guidance. When the fingerprint sensor is lit and the message “Place Finger on sensor” is displayed, place a finger on the window for fingerprint input - for 2~3 seconds - until the light goes off. ② When the message ‘Place same Finger on sensor is displayed, enter the fingerprint once again. ※When entering the fingerprint for the second time, make sure the user has taken their finger off the fingerprint input window after the first read. ③ When input is complete, the message at the left appears, together with the images accompanied by their quality rating from 0~100. If the image is not adequate from a visual aspect, or any image shows 30 or less, the user is advised to register again. To register again, start the process from step ① by pressing [F4 (←)] key until 3 seconds elapse without input or pressing another key. After completion, the system moves to the parent menu. ※ Fingerprint registration is available for up to 10 per ID. A failure message appears when registration is attempted in excess of 10 times.](https://usermanual.wiki/UNION-COMMUNITY/AC-5100.User-Manual/User-Guide-3262633-Page-30.png)
![AC-5000 / 5100 User Guide 31 UNIONCOMMUNITY Co., Ltd. / 12F, Daemyung Valeon, 127, Beobwon-ro, Songpa-gu, Seoul, 05836, Republic of Korea TEL: +82-2-6488-3000 / FAX: +82-2-6488-3100 E-Mail :sales@unioncomm.co.kr http://www.unioncomm.co.kr If repeated failure is observed after 2~3 attempts when using the correct fingerprint registration method, the user is advised to use password or card. 3.3.1.3. Card Register When registration screen appears, put the card on it. If you want to exit without registration, press the [F4 (←)] key. 3.3.1.4. PW Register Input the password in 1~8 digits on the password input screen and press the [ENT] key. The ‘Confirm Password’ window appears. Input the same password and press the [ENT] key. Press the [F4 (←)] key for 2 seconds or longer to cancel and exit. 3.3.1.5. FP Option This is the setting related to fingerprints, and is the option that can be changed after registering the fingerprint in advance. If the user selects it with the fingerprint already registered, it only results in the failure buzzer sound.](https://usermanual.wiki/UNION-COMMUNITY/AC-5100.User-Manual/User-Guide-3262633-Page-31.png)
![AC-5000 / 5100 User Guide 32 UNIONCOMMUNITY Co., Ltd. / 12F, Daemyung Valeon, 127, Beobwon-ro, Songpa-gu, Seoul, 05836, Republic of Korea TEL: +82-2-6488-3000 / FAX: +82-2-6488-3100 E-Mail :sales@unioncomm.co.kr http://www.unioncomm.co.kr ▶’1:1 Level’ (Initial setting: ‘0’) Is the item that determines the authentication level for each registered user. By modifying this value, it is possible to determine the authentication level per registered user. When set to ‘0’, it conducts authentication using the 1:1 authentication level of the terminal. ▶Enable 1:N (Initial setting: ‘v’) When this option is checked, it’s possible to successfully authenticate using a fingerprint without any user ID or card. 3.3.1.6. Save When the registration process is complete, press [Ent] key to save it. The user settings are not saved if the user doesn’t press [Ent] key and exits by pressing the [F4 (←)] key. The following is the LCD guidance message indicating the user can exit from the registration process. When registered normally with [ENT] key pressed. When registration failed after [6. Save] key pressed. Means the user is not registered properly in accordance with the authentication method. For example, the user didn’t register any fingerprint after setting it as the authentication method, nor registered a card after setting it as the authentication method. In the case of [2. FP Register] When fingerprint image is not in a good condition or there is no fingerprint input within 10 seconds of the fingerprint sensor lamp being on. At the time of fingerprint registration, when the user didn’t input the same finger, but input a different finger.](https://usermanual.wiki/UNION-COMMUNITY/AC-5100.User-Manual/User-Guide-3262633-Page-32.png)
![AC-5000 / 5100 User Guide 33 UNIONCOMMUNITY Co., Ltd. / 12F, Daemyung Valeon, 127, Beobwon-ro, Songpa-gu, Seoul, 05836, Republic of Korea TEL: +82-2-6488-3000 / FAX: +82-2-6488-3100 E-Mail :sales@unioncomm.co.kr http://www.unioncomm.co.kr In the case of [4. PW Register] When the user inputs a different number during password confirmation. In the case of [3. Card Register] When the user tried to register a card that has already been registered. In case of [2. FP Register], when the user tried to register a fingerprint that has already been registered. ※ If the user wants to register the same fingerprint with another ID again, they must the release ‘4. System 3. Fingerprint Check Same FP’ function. This is, however, not suitable for Time & Attendance as the same fingerprints could be authenticated with different ID’s. In case of [2. FP Register] or [3. Card Register] When the user attempted registration in excess of the maximum number of allowed registrations (10 each). 3.3.2. Delete Select ◆ [ENT~] [1. User] [2. Delete] in the initial screen ◆, and the following screen appears:](https://usermanual.wiki/UNION-COMMUNITY/AC-5100.User-Manual/User-Guide-3262633-Page-33.png)
![AC-5000 / 5100 User Guide 34 UNIONCOMMUNITY Co., Ltd. / 12F, Daemyung Valeon, 127, Beobwon-ro, Songpa-gu, Seoul, 05836, Republic of Korea TEL: +82-2-6488-3000 / FAX: +82-2-6488-3100 E-Mail :sales@unioncomm.co.kr http://www.unioncomm.co.kr Input the user ID to be deleted, and then press the [ENT] key. When inputting an unregistered ID, a failure message will appear. When inputting a registered ID, a success message will appear. Deleting from the terminal doesn’t mean deletion from the server. Therefore, it is necessary to delete from the server to make the deletion complete. Special care should be taken when deleting, since deletion is performed regardless of User/Admin. In particular, the user registered in the terminal may not be restored after deletion unless registered on the network server. The following are the LCD information messages that appear during the deletion process: When deleted normally. When the user inputs an unregistered ID. 3.3.3. Modify Select ◆ [ENT~] [1. User] [3. Modify] in the initial screen ◆, and the following screen appears:](https://usermanual.wiki/UNION-COMMUNITY/AC-5100.User-Manual/User-Guide-3262633-Page-34.png)
![AC-5000 / 5100 User Guide 35 UNIONCOMMUNITY Co., Ltd. / 12F, Daemyung Valeon, 127, Beobwon-ro, Songpa-gu, Seoul, 05836, Republic of Korea TEL: +82-2-6488-3000 / FAX: +82-2-6488-3100 E-Mail :sales@unioncomm.co.kr http://www.unioncomm.co.kr Press the [ENT] key after inputting the user ID to be changed. When inputting an unregistered ID, a failure message will appear. When inputting a registered ID, the following screen appears: The icons on the left are described with their respective meanings on the right. Authentication type (FP) Number of Registered Fingerprints (1) Number of Registered Cards (0) Whether or not the Password is Registered ( : Not registered) For the method of changing, see ‘3.3.1. Add’ as it is the same as shown in the registration method. 3.3.4. Delete All Select ◆ [ENT~] [1. User] [4. Delete All] in the initial screen ◆, and the following screen appears: If the user is sure they want to delete all users, press [1. Yes] and press [ENT] key. Select [2. No] to cancel. ※When the user selects [1.Yes], both user and admin are deleted. Special care should be taken as the deleted user/admin may not be restored after deletion. 3.4. Network Select “2. Network” in the main menu, and the following screen appears:](https://usermanual.wiki/UNION-COMMUNITY/AC-5100.User-Manual/User-Guide-3262633-Page-35.png)
![AC-5000 / 5100 User Guide 36 UNIONCOMMUNITY Co., Ltd. / 12F, Daemyung Valeon, 127, Beobwon-ro, Songpa-gu, Seoul, 05836, Republic of Korea TEL: +82-2-6488-3000 / FAX: +82-2-6488-3100 E-Mail :sales@unioncomm.co.kr http://www.unioncomm.co.kr Press the applicable key that represents the item to be changed. 3.4.1. IP Select ◆ [ENT~] [2. Network] [1. IP] in the initial screen ◆, and the following screen appears: When changing IP, delete the existing values using [F4 (←)] and then input the new values. The ‘.’ in between the number sequence is created automatically. Example: input 192 168 010 50 sequentially to input ‘192.168.10.50’. Select [1] when a fixed IP address is assigned to the connected network and select [2] in cases where there is a DHCP server in the connected network which is assigning the address. Set IP, Subnet Mask, and Gateway if it is a fixed IP. There’s no need to set the address if the user selected a flexible IP address. The user can exit to the parent menu using the [ENT~] key to apply the changed values, after finishing the settings, or use the [F4 (←)] key to cancel input during setting. In this case, the user can only exit by pressing the key for 2 seconds or longer if they are inputting value in the input box. 3.4.2. Server IP Select ◆ [ENT~] [2. Network] [2. Server IP] in the initial screen ◆, and the following screen appears:](https://usermanual.wiki/UNION-COMMUNITY/AC-5100.User-Manual/User-Guide-3262633-Page-36.png)
![AC-5000 / 5100 User Guide 37 UNIONCOMMUNITY Co., Ltd. / 12F, Daemyung Valeon, 127, Beobwon-ro, Songpa-gu, Seoul, 05836, Republic of Korea TEL: +82-2-6488-3000 / FAX: +82-2-6488-3100 E-Mail :sales@unioncomm.co.kr http://www.unioncomm.co.kr Select server IP type for server IP setting. 1. Static IP: If you know the server IP and port number 2. DDNS: When connecting the server by DDNS After selecting the type, press [ENT~] key to enter detailed information. To cancel input, press [F4 (←) ~] key to exit to upper menu. 3.4.2.1. Server IP settings Select ◆ [ENT~] [2. Network] [2. Server IP] [1.StaticIP] in the initial screen ◆, and the following screen appears: Set the Server IP and Port. To change the port, move the input highlight to the server port by pressing the [ENT] key. ▶Initial Setting Server Port: ‘9870’ The default port value of the authentication server is '9870' for the UNIS server and '2201' for the Access server. Special care should be taken since if you change this value, you must change it to the same value in the server program. After finishing the setting, press [ENT ~] key to apply the changed value, or press [F4 (←) ~] key to exit the parent menu. 3.4.2.2. DDNS Select ◆ [ENT~] [2. Network] [2. Server IP] [2.DDNS] in the initial screen ◆, and the following screen appears.](https://usermanual.wiki/UNION-COMMUNITY/AC-5100.User-Manual/User-Guide-3262633-Page-37.png)
![AC-5000 / 5100 User Guide 38 UNIONCOMMUNITY Co., Ltd. / 12F, Daemyung Valeon, 127, Beobwon-ro, Songpa-gu, Seoul, 05836, Republic of Korea TEL: +82-2-6488-3000 / FAX: +82-2-6488-3100 E-Mail :sales@unioncomm.co.kr http://www.unioncomm.co.kr Set DDNS ID, DDNS IP and server port. DDNS ID can be input from 9 digits 1 to 999999999 can be input. The default value of DDNS IP is 210.116.104.058, and enter the IP of DDNS server to be connected. To change the port, press the [ENT] key to move the input focus to the server port and enter it. ▶Initial Setting Server Port: ‘9870’ The default port value of the authentication server is '9870' for the UNIS server and '2201' for the Access server. Special care should be taken since if you change this value, you must change it to the same value in the server program. After finishing the setting, press [ENT~] key to apply the changed value, or press [F4 (←) ~] key to exit the parent menu. 3.4.3. Terminal ID Select ◆ [ENT~] [2. Network] [3. Terminal ID] on the initial screen ◆, and the following screen appears: Set Terminal ID and Authentication. ▶Initial setting Terminal ID: ‘1’ Authentication: ‘2. terminal/server’ Terminal ID is the unique ID used by the authentication server for the purpose of identifying the terminal having ‘1’ as its default value. It must correspond to the entry/exit door ID set in the server program - which can be input as a maximum of 8 digits. ▶ Authentication This determines the priority for authentication between terminal and the network server. Having ‘2. Terminal/Server’ as its default value, operation is as follows in each mode: 1. Server/Terminal Authentication is made by the server when it’s connected to the network, and by the terminal when it is disconnected from the server due to network disturbance, etc.](https://usermanual.wiki/UNION-COMMUNITY/AC-5100.User-Manual/User-Guide-3262633-Page-38.png)
![AC-5000 / 5100 User Guide 39 UNIONCOMMUNITY Co., Ltd. / 12F, Daemyung Valeon, 127, Beobwon-ro, Songpa-gu, Seoul, 05836, Republic of Korea TEL: +82-2-6488-3000 / FAX: +82-2-6488-3100 E-Mail :sales@unioncomm.co.kr http://www.unioncomm.co.kr 2. Terminal/Server Authentication is made by the terminal, even if the server is connected, and authentication result transferred to the server on a real-time basis. 3. Server Only However, authentication is made by the server when the input user ID or card is not registered in the terminal (it doesn’t attempt server authentication in case of 1:N fingerprint authentication). 4. Terminal Only Although the user is registered in the terminal, authentication is made via the server. Therefore, authentication cannot be performed unless the server is connected. Flexible designation is allowed depending on the circumstance, such as the number of terminals connected to the server, the number of users authenticated, or network errors etc. It is recommended to use ‘2. Terminal/Server’ so concurrent authentications can be attempted if 10> terminals are connected to the server, or if frequent network errors occur. ※ In the server authentication mode, logs are stored in the server, not the terminal. 3.5. Application Selecting ‘3. Application’ in the main menu causes the following screen to appear: Press the applicable key representing the item to be changed. 3.5.1. Application Select ◆ [ENT~] [3. Application] [1. Application] in the initial screen ◆, and the following screen appears: Select the terminal operation type by pressing the applicable numeric key. Press the [ENT] key to apply the configuration and [F4 (←)] key to cancel it.](https://usermanual.wiki/UNION-COMMUNITY/AC-5100.User-Manual/User-Guide-3262633-Page-39.png)
![AC-5000 / 5100 User Guide 40 UNIONCOMMUNITY Co., Ltd. / 12F, Daemyung Valeon, 127, Beobwon-ro, Songpa-gu, Seoul, 05836, Republic of Korea TEL: +82-2-6488-3000 / FAX: +82-2-6488-3100 E-Mail :sales@unioncomm.co.kr http://www.unioncomm.co.kr 3.5.2. Time Schedule 3.5.2.1. Setting to Access Control / Time & Attendance Select ◆ [ENT~] [3. Application] [2. Time Schedule] in the initial screen ◆, and the following screen appears: ▶ Initial setting: Identical with the screen on the left. The user can set the time period for authentication mode; otherwise, set to ‘00:00-00:00’. Input after deleting the existing value using [F4 (←)] to change the value. Input HHMM (Hour/Minute) in order - can be set from 00:00 to23:59 In a preset time period, it’s always shown in the preset mode unless the user presses another function key. Although the user pressed the other function key to authenticate with another mode the terminal display mode automatically changes to authentication mode, which is suitable for the management of time & attendance. As shown in the example below, each time period must be set without overlapping; the mode is determined F1F2F3F4Access sequentially if they do overlap. ----------------------------------------------------------------------------------------------------------- (Example) Office start=06:00~09:59, Office leave=17:00~22:00 ----------------------------------------------------------------------------------------------------------- Exit to the parent menu to apply the changed value, after finishing the settings, by pressing the [ENT~] key. Press the [F4 (←) ~] key to cancel the input value.](https://usermanual.wiki/UNION-COMMUNITY/AC-5100.User-Manual/User-Guide-3262633-Page-40.png)
![AC-5000 / 5100 User Guide 41 UNIONCOMMUNITY Co., Ltd. / 12F, Daemyung Valeon, 127, Beobwon-ro, Songpa-gu, Seoul, 05836, Republic of Korea TEL: +82-2-6488-3000 / FAX: +82-2-6488-3100 E-Mail :sales@unioncomm.co.kr http://www.unioncomm.co.kr 3.5.2.2. Setting to Cafeteria ▶ Initial setting: Identical with the screen on the left. The user can set the time period by meal types; otherwise, set to ‘00:00-00:00’. ▶ NO Limit Clear the check box ( ), and each user is allowed one authentication by meal only. If you check the box ( ) they are allowed several authentications regardless of the existing authentication. 3.5.3. Function Key Select ◆ [ENT~] [3. Application] [3. Function Key] in the initial screen ◆, and the following screen appears: ▶ Initial setting: Identical with the screen on the left. Function key refers to the keys [F1] ~[F4], [ENT] & [Auto Sensing] used to change the authentication mode, such as office start/office leave etc. If you press a function key the authentication mode changes to the applicable mode. When a box is not checked, authentication mode does not change even if the applicable key is pressed. If the ‘6. Auto Sensing’ check box is cleared the fingerprint sensor doesn’t respond, even if the user inputs their fingerprint on the sensor. In this case, be sure to input the ID or card or fingerprint of the user. 3.5.4. Extended Key Select ◆ [ENT~] [3. Application] [4. Extended Key] in the initial screen ◆, and the following screen appears:](https://usermanual.wiki/UNION-COMMUNITY/AC-5100.User-Manual/User-Guide-3262633-Page-41.png)
![AC-5000 / 5100 User Guide 42 UNIONCOMMUNITY Co., Ltd. / 12F, Daemyung Valeon, 127, Beobwon-ro, Songpa-gu, Seoul, 05836, Republic of Korea TEL: +82-2-6488-3000 / FAX: +82-2-6488-3100 E-Mail :sales@unioncomm.co.kr http://www.unioncomm.co.kr ▶Initial setting: Identical with the screen on the left To use the Extended Key, press the [1] key and then check ‘1. Extended Key’. The number of extended keys can be set within a range of 1~40. Extended Key is a function which extends the number of additional authentication modes (up to 40 as required) in addition to the basic function keys ([F1] ~ [F4], [ENT]). The screen for selecting the extended keys, when the user presses the F4 key, is shown below. Select the applicable mode with [0] ~ [9] keys. If the number of extended keys exceeds 10, select them by changing the page with the [F1] ~ [F4] keys. ----------------------------------------------------------------------------------------------------------- Example: If the number of the extended keys is 16, press [F4] key in the initial screen, and the following screen appears If you want to select ExtMode 12, move to the next page with the [F2] key and then press the [2] key. Press the [ENT] key to exit without selecting an ExtMode. ----------------------------------------------------------------------------------------------------------- The user can exit to the parent menu using the [ENT~] key and apply the changed value. Use the [F4 (←)] key to cancel input during setting.](https://usermanual.wiki/UNION-COMMUNITY/AC-5100.User-Manual/User-Guide-3262633-Page-42.png)
![AC-5000 / 5100 User Guide 43 UNIONCOMMUNITY Co., Ltd. / 12F, Daemyung Valeon, 127, Beobwon-ro, Songpa-gu, Seoul, 05836, Republic of Korea TEL: +82-2-6488-3000 / FAX: +82-2-6488-3100 E-Mail :sales@unioncomm.co.kr http://www.unioncomm.co.kr 3.5.5. Display Select ◆ [ENT~] [3. Application] [5. Display] on the initial screen ◆, and the following screen appears: ▶Initial setting: Identical with the screen on the left ▶Background image You can change the background image shown on the initial screen by pressing the [1] and [2] keys. Also, you can set the cycle to 5 seconds or longer to have the background images saved in the terminal displayed sequentially at every preset interval (seconds) But, it is not represented in the order of setting, rather it is represented from the first ▶ Screen Saver (0,10~1800sec) If there is no input for a time you set, LCD screen turns off automatically. However, if set to 0 LCD screen always turns on. 10 seconds to 1800 seconds can be set. The user can exit to the parent menu using the [ENT~] key to apply the changed values. Use the [F4 (←)] key to cancel input during setting. 3.5.6. RS485 ID settings ▶ Basic setting: Same with the left screen ▶RS485 ID setting Click [0] ~ [7] key to set ID for RS485 communication. It can be set for the connection with the external device MCP040. When the external device is not connected, it is not operated with any value. 3.6. System Selecting ‘4. System’ in the main menu causes the following screen to appear:](https://usermanual.wiki/UNION-COMMUNITY/AC-5100.User-Manual/User-Guide-3262633-Page-43.png)
![AC-5000 / 5100 User Guide 44 UNIONCOMMUNITY Co., Ltd. / 12F, Daemyung Valeon, 127, Beobwon-ro, Songpa-gu, Seoul, 05836, Republic of Korea TEL: +82-2-6488-3000 / FAX: +82-2-6488-3100 E-Mail :sales@unioncomm.co.kr http://www.unioncomm.co.kr Press the applicable key representing the item to be changed. 3.6.1. System Setting Select ◆ [ENT~] [4. System] [1. System Setting] in the initial screen ◆, and the following screen appears: ▶ Initial setting: Identical with the screen on the left ▶ User ID Length This field sets the length of user ID, which can be changed within the range of 1~9 digits. It must be identical to the length of ID registered in the server program. For example, the user must set it to 6 if the ID registered in the server program is ‘000075’ - which is 6 digits long. ▶Display Option When set to '1. None', only the authentication result message is displayed when the authentication is successful, but when set to '2', the user ID is displayed. If set to ‘3’, user name, ‘4’, UserKey, ‘5’, User’s statement will be displayed on LCD screen, if the terminal does not store the corresponding user information, the ID is displayed. Once the registration is complete, the user can press [ENT] to apply it. Press the [F4 (←)] key to exit to the parent menu. ▶Duress FP Alarm The default setting is '2. No'. If set to 1, Yes, 12V current is output to "L2" pin when the registered threat fingerprint is authenticated. This pin will operate when you connect equipment for emergency situation detection such as siren. ▶Alarm Duration (sec) Set the time for 12V current output.](https://usermanual.wiki/UNION-COMMUNITY/AC-5100.User-Manual/User-Guide-3262633-Page-44.png)
![AC-5000 / 5100 User Guide 45 UNIONCOMMUNITY Co., Ltd. / 12F, Daemyung Valeon, 127, Beobwon-ro, Songpa-gu, Seoul, 05836, Republic of Korea TEL: +82-2-6488-3000 / FAX: +82-2-6488-3100 E-Mail :sales@unioncomm.co.kr http://www.unioncomm.co.kr 3.6.2. Authentication Select ◆ [ENT~] ([4. System] [2. Authentication]) in the initial screen ◆, and the following screen appears: ▶ Initial setting: Identical with the screen on the left ▶ User Group ID The method of authentication where the initial digit of an ID relates to a group. It completes 1:N authentication faster when more than 5,000 users are registered. When this method is checked, it authenticates the fingerprint from users whose ID starts with the same input letter. If this method is not checked, it considers the input figure as the user ID and attempts 1:1 authentication against the fingerprint of the user with the applicable ID Example: Where the user inputs ‘12’ to attempt authentication when the user ID is a 4-digit figure; If checked ( ),1:N authentication is attempted from users having ID ‘1200’~’1299’, If unchecked ( ),1:1 authentication is attempted from fingerprints of users whose ID is ‘12’. ▶ Enable 1:N If checked ( ), this option enables fingerprint only authentication without inputting user ID or card. Even if the user is registered with 1:N authentication, only 1:1 authentication is permitted in the terminal where this option is not checked. ▶ Card Only If checked ( ), this option enables card only authentication without inputting fingerprint. Even if the user is registered with (Card & FP) or (Card & PW), only authentication with card is permitted in the terminal where this option is checked. ▶ Template On Card If checked ( ), this option enables authentication with the user’s information and fingerprint recorded in the card without downloading the user in the terminal. In order for this option to be operated, SC card reader must be mounted and the server must set which terminal uses that fingerprint card.](https://usermanual.wiki/UNION-COMMUNITY/AC-5100.User-Manual/User-Guide-3262633-Page-45.png)
![AC-5000 / 5100 User Guide 46 UNIONCOMMUNITY Co., Ltd. / 12F, Daemyung Valeon, 127, Beobwon-ro, Songpa-gu, Seoul, 05836, Republic of Korea TEL: +82-2-6488-3000 / FAX: +82-2-6488-3100 E-Mail :sales@unioncomm.co.kr http://www.unioncomm.co.kr ▶ Verify Multi-FP If checked ( ), this function has all the registered fingerprints to be authenticated after the user inputs ID (or Card). When this item is set to checked, the user must, without fail, input user ID or card. In this case, Enable 1:N is automatically changed to unchecked ( ). This function is used for strict access control to special zones. For example, if the user with ID ‘0001’ is registered with 3 fingerprints they must input ID and complete the authentication for three fingerprints. In this case, the order of authentication for the 3 fingerprints is irrelevant, but the fingerprints should be repeatedly input until authentication is successful. ※ Authentication will fail on a single occurrence of authentication failure. ▶ Blocking Time (sec) This function prevents duplicate authentication for the same user within the preset time period. When set to 0, it has no restriction. However, when set to a value larger than 0, the user can be successful in re-authentication if the preset time (sec) has elapsed after the success of the previous authentication. ▶ NetErrTime(Sec) – Network error time setting (Sec) If it is the server authorization mode and the network error time is set, you can set the authorization waiting time. For example, if you set the network error time as 5 seconds, the error message occurs when there is no response of the server for 5 seconds (But, the user is considered to be failed to authorize) The user can exit to the parent menu using the [ENT~] key to apply the changed values. Use the [F4 (←)] key to cancel input during setting. 3.6.3. Fingerprint Select ◆ [ENT~] [4. System] [3. Fingerprint] in the initial screen ◆, and the following screen appears: ▶Initial setting: Identical with the screen on the left. ▶1:1 Level Authentication level used for 1:1 Fingerprint Authentication. Provided that, 1:1](https://usermanual.wiki/UNION-COMMUNITY/AC-5100.User-Manual/User-Guide-3262633-Page-46.png)
![AC-5000 / 5100 User Guide 47 UNIONCOMMUNITY Co., Ltd. / 12F, Daemyung Valeon, 127, Beobwon-ro, Songpa-gu, Seoul, 05836, Republic of Korea TEL: +82-2-6488-3000 / FAX: +82-2-6488-3100 E-Mail :sales@unioncomm.co.kr http://www.unioncomm.co.kr authentication level of the relevant user is applied for the user whose 1:1 authentication level is not set to ‘0’ (using the authentication level of the terminal). ▶1:N Level Authentication level used for 1:N Fingerprint Authentication. In case of 1:N authentication, the authentication level by users is not set and therefore always based on the authentication level of the terminal. ▶ Fake Finger Detect It presets LFD level to prevent imitation fingerprint input. Pre-setting the LFD level to a higher value tends to reinforce the function, preventing the input of imitation fingerprints produced with rubber, paper, film, silicone, etc. But when inputting a real fingerprint, it may not read well. ▶ Template type It sets the type of the fingerprint template. In this setting, all the users are deleted, and the terminal is rebooted. It selects one of the UNION, ISO_ Standard, ISO_Extended (Default- UNION). ▶ Check Same FP If checked ( ), is the function that, during registration, checks whether or not the fingerprint is already registered to prevent overlapped registration of the same fingerprint in another user ID. The user can exit to the parent menu using the [ENT~] key to apply the changed values. Use the [F4 (←)] key to cancel input during setting. 3.6.4. Language Select ◆ [ENT~] [4. System] [4. Language] in the initial screen ◆, and the following screen appears: ▶Initial setting: ‘1. English’ When changing the language settings, the default voice message and on-screen message are changed into that language set. The user can exit to the parent menu using the [ENT~] key to apply the changed values. Use the [F4 (←)] key to cancel input during setting. ※ Danish / Arvia / Persian languages are restricted by fonts, languages are shown in English, and voices are replaced by their respective languages. Also, due to the](https://usermanual.wiki/UNION-COMMUNITY/AC-5100.User-Manual/User-Guide-3262633-Page-47.png)
![AC-5000 / 5100 User Guide 48 UNIONCOMMUNITY Co., Ltd. / 12F, Daemyung Valeon, 127, Beobwon-ro, Songpa-gu, Seoul, 05836, Republic of Korea TEL: +82-2-6488-3000 / FAX: +82-2-6488-3100 E-Mail :sales@unioncomm.co.kr http://www.unioncomm.co.kr nature of fonts, some screens may not be displayed as all the languages. 3.6.5. Date Time Select ◆ [ENT~] [4. System] [5. Date Time] in the initial screen ◆, and the following screen appears: ▶Initial setting: Identical with the screen on the left. ▶ Time Sync Sets the method which synchronizes the current time of the terminal with the server. To synchronize the terminal time with the server time, set to ‘1. Auto’ to perform it automatically, while ‘2. Manual’ is for manual setting. ▶ Display Time The method of displaying the current time of the terminal set to ‘1’ for 24-hour clock and ‘2’ for AM/PM system. ▶ Set Current Time Changes the current time of the terminal. No change is required if it’s synchronized and linked with the server time and with the aforementioned Time Sync set to ‘1. Auto’. ▶ Calendar To configure a way to display the current date on the terminal. ‘5. Gregorian calendar’ is the default, but the user can manually select ‘6. Persian calendar’ if desired. [Image change required] The user can exit to the parent menu using the [ENT~] key to apply the changed values. Use the [F4 (←)] key to cancel input during setting. 3.6.6. Database Select ◆ [ENT~] [4. System] [6. Database] in the initial screen ◆, and the following screen appears:](https://usermanual.wiki/UNION-COMMUNITY/AC-5100.User-Manual/User-Guide-3262633-Page-48.png)
![AC-5000 / 5100 User Guide 49 UNIONCOMMUNITY Co., Ltd. / 12F, Daemyung Valeon, 127, Beobwon-ro, Songpa-gu, Seoul, 05836, Republic of Korea TEL: +82-2-6488-3000 / FAX: +82-2-6488-3100 E-Mail :sales@unioncomm.co.kr http://www.unioncomm.co.kr Press the following keys: [1] key to initialize the configuration. [2] key to delete all users. [3] key to initialize the authentication record. and [4] key to initialize the terminal. 3.6.6.1. Init Config Select ◆ [ENT~] [4. System] [6. Database] [1. Init Config] in the initial screen ◆, and the following screen appears: Press [1. Yes] key to initialize all configurations and select [2. No] and press [ENT] key to cancel. If no value is input for a certain period of time in this state, it returns to the initial screen instead of initialization Initializes all the configurations of the terminal except MAC (physical) address but it doesn’t delete the user and authentication record. When the configuration is successfully initialized, it proceeds to the parent menu accompanied by the success buzzer sound. 3.6.6.2. Delete All Users Select ◆ [ENT~] [4. System] [6. Database] [2. Delete All Users] in the initial screen ◆, and the following screen appears: Press the [1. Yes] key to delete all users, or select [2. No] and press the [ENT] key to cancel. If no value is input for a certain period of time in this state, it returns to the initial screen instead of deleting. Both user and administrator are deleted, and the deleted users cannot be restored after deletion.](https://usermanual.wiki/UNION-COMMUNITY/AC-5100.User-Manual/User-Guide-3262633-Page-49.png)
![AC-5000 / 5100 User Guide 50 UNIONCOMMUNITY Co., Ltd. / 12F, Daemyung Valeon, 127, Beobwon-ro, Songpa-gu, Seoul, 05836, Republic of Korea TEL: +82-2-6488-3000 / FAX: +82-2-6488-3100 E-Mail :sales@unioncomm.co.kr http://www.unioncomm.co.kr When deletion is successfully completed, it proceeds to the parent menu accompanied by the success buzzer sound. 3.6.6.3. Clear Log Data Select ◆ [ENT~] [4. System] [6. Database] [3. Clear Log Data] in the initial screen ◆, and the following screen appears: Press the [1. Yes] key to delete all the authentication records saved in the terminal, or select [2. No] and press the [ENT] key to cancel. If no value is input for a certain period of time in this state, it returns to the initial screen instead of deleting. Deletes all logs related to authentication, and the deleted logs cannot be restored after deletion. When deletion is successfully completed, it proceeds to the parent menu accompanied by the success buzzer sound. 3.6.6.4. Initialize Terminal Select ◆ [ENT~] [4. System] [6. Database] [4. Initialize Terminal] in the initial screen ◆, and the following screen appears: Press the [1. Yes] key to initialize the terminal to the factory default state, or select [2. No] and press the [ENT] key to cancel. When no value is input for a certain period of time in this state, it returns to the initial screen instead of initialization. Deletes all the configurations, users, and log information, except MAC (physical) address saved in the terminal, restoring them to factory default state. Special care should be taken as restoration is impossible after initialization. When initialization to the factory default state is successfully completed, it proceeds to the parent menu accompanied by the success buzzer sound.](https://usermanual.wiki/UNION-COMMUNITY/AC-5100.User-Manual/User-Guide-3262633-Page-50.png)
![AC-5000 / 5100 User Guide 51 UNIONCOMMUNITY Co., Ltd. / 12F, Daemyung Valeon, 127, Beobwon-ro, Songpa-gu, Seoul, 05836, Republic of Korea TEL: +82-2-6488-3000 / FAX: +82-2-6488-3100 E-Mail :sales@unioncomm.co.kr http://www.unioncomm.co.kr 3.7. Terminal Selecting ‘5. Terminal’ in the main menu causes the following screen to appear: Press the key corresponding to the item you want to change Press [F2] on the keypad to move to the next page. Press [F1] on the keypad to go to the previous page. 3.7.1. Terminal Option Select ◆ [ENT~] [5. Terminal] [1. Terminal Option] in the initial screen ◆, and the following screen appears: ▶Initial setting: Identical with the screen on the left ▶Door open Door opens when the ‘0’ key is pressed. Appears only when the terminal is locked. This option is not normally shown. ▶ Tamper Alarm If checked ( ), a warning sound is generated when the lid of the terminal is opened. ▶ Lock Terminal This is the function the administrator can directly set or release the locking of the terminal via the terminal rather than server program. If checked ( ), it is locked so no one can access until the administrator releases the setting.](https://usermanual.wiki/UNION-COMMUNITY/AC-5100.User-Manual/User-Guide-3262633-Page-51.png)
![AC-5000 / 5100 User Guide 52 UNIONCOMMUNITY Co., Ltd. / 12F, Daemyung Valeon, 127, Beobwon-ro, Songpa-gu, Seoul, 05836, Republic of Korea TEL: +82-2-6488-3000 / FAX: +82-2-6488-3100 E-Mail :sales@unioncomm.co.kr http://www.unioncomm.co.kr ▶KeyLed ON If checked ( ), Key LED is always turned ON so the Touch Keys are visible. ▶ Use of the user voices, Use of user-defined messages Based on need/preference, you can download a voice from a Wav file (16bit/8KHz) to change the voice output when authentication is successful or has failed. Additionally, you can download the image text, in a modified form, such as office start or office leave, using the specially provided resource file (Excel file). In this case, the user can apply the applicable modified contents only when the boxes of ‘6. User Voice’ and ‘7. User Text’ are checked. For the download method, see ‘3.9. Download customized file’ ▶ Camera Use If checked ( ), use camera. Camera images can be viewed via UNIS(server). (단 AC5100 only) ▶ User Text If checked ( ), when you press [F1], [F2], [F3], [F4] key, each function message will appear on the screen. Displayed only when the language is set to Hangul. The clock is locked at the bottom. ▶ Door Open This menu shows that the terminal administrator is allowed to temporarily open the door when the terminal is set to lock in the server. After setting up the user can apply the changed values using the [ENT~] key. Use the [F4 (←)] key to cancel input during setting. 3.7.2. Volume Control Select ◆ [ENT~] [5. Terminal] [2. Volume Control] in the initial screen ◆, and the following screen appears: ▶Initial setting: Identical with the screen on the left Sets Voice Volume and Beeper Volume. When set to ‘0’, no voice or buzzer sound is generated. The user can exit to the parent menu using the [ENT~] key to apply the changed values. Use the [F4 (←)] key to cancel input during setting.](https://usermanual.wiki/UNION-COMMUNITY/AC-5100.User-Manual/User-Guide-3262633-Page-52.png)
![AC-5000 / 5100 User Guide 53 UNIONCOMMUNITY Co., Ltd. / 12F, Daemyung Valeon, 127, Beobwon-ro, Songpa-gu, Seoul, 05836, Republic of Korea TEL: +82-2-6488-3000 / FAX: +82-2-6488-3100 E-Mail :sales@unioncomm.co.kr http://www.unioncomm.co.kr 3.7.3. Door Select ◆ [ENT~] [5. Terminal] [3. Door] in the initial screen ◆, and the following screen appears: ▶Initial setting: Identical with the screen on the left. ▶Lock Type Set to ‘1’ when strike type or automatic door is connected to the terminal, or ‘2’ when motorized lock is connected to the terminal. If no connection is made, it is set to ‘1’. Set to ‘3’ when connecting a warning lamp to the lock port to indicate the success or failure of authentication. ▶DM1: To connect an external contact to DM1 (Set 1 or 2 for motor locks) - ‘0. Not in use’: none in connection - ‘1. Door open NO’ or ‘2. Door open NC’: A door status monitoring pin in connection - ‘3. Fire detection NO’ or ‘4. Fire detection NC’: A fire sensor in connection - ‘5. Panic detection NO’ or ‘6. Panic detection NC’: A panic situation sensor in connection - ‘7. Emergency detection NO’ or ‘8. Emergency detection NC’: An emergency situation sensor in connection Configure NO/NC depending on the pin status upon detection - ‘9. Controller authorization result’: It sends the authorization result to the external controller. (You should connect the RED led of the controller with DM1 or DM2 through the board toward TR, and the pin should be set 9. Controller result. You should set the Wiegand Out.) ▶DM2: To connect an external contact to DM2 (Set 1 or 2 for motor locks) - ‘0. Not in use’: none in connection - ‘1. Lock status NO’ or ‘2. Lock status NC’: A lock status monitoring pin in connection - ‘3. Fire detection NO’ or ‘4. Fire detection NC’: A fire sensor in connection - ‘5. Panic detection NO’ or ‘6. Panic detection NC’: A panic situation sensor in connection - ‘7. Emergency detection NO’ or ‘8. Emergency detection NC’: An emergency situation sensor in connection Configure NO/NC depending on the pin status upon detection - ‘9. Controller authorization result’: It sends the authorization result to the external controller. (You should connect the RED led of the controller with DM1 or DM2 through the board toward TR, and the pin should be set 9. Controller result. You should set the Wiegand Out.)](https://usermanual.wiki/UNION-COMMUNITY/AC-5100.User-Manual/User-Guide-3262633-Page-53.png)
![AC-5000 / 5100 User Guide 54 UNIONCOMMUNITY Co., Ltd. / 12F, Daemyung Valeon, 127, Beobwon-ro, Songpa-gu, Seoul, 05836, Republic of Korea TEL: +82-2-6488-3000 / FAX: +82-2-6488-3100 E-Mail :sales@unioncomm.co.kr http://www.unioncomm.co.kr ▶Open Duration (0.1 sec unit) Designates the time the door is opened and closed again when authentication is successful. As it is set to 0.1 second per unit, a value of 30 is required to set it to 3 seconds. Strike type refers to the time the door is opened and closed again when authentication is complete. ▶Warn Door Open (Second Unit) This function enables the terminal to check the time the door opens, and generate a warning sound once it exceeds the preset time (min. 5 sec~ max. 30 sec). When set to ‘00’, warning doesn’t sound at all. If set between 01~04, it only starts sounding after 5 seconds have elapsed. The warning sound is also generated in cases where the door is unexpectedly not closed within the preset time; although the door should be closed. This warning allows proper action to be taken for the door to be closed. To use this function, the lock must be the one that enables the monitoring of the door door status, and the monitoring pin of the lock should be connected to the terminal. In addition, such settings are enabled only when the aforementioned Door Monitor is set to ‘4. Normal Open’ or ‘5. Normal Close’. The user can exit to the parent menu using the [ENT~] key to apply the changed values. Use the [F4 (←)] key to cancel input during setting. 3.7.4. Wiegand Select [ENT~] [5. Terminal] [4. Wiegand] in the initial screen ◆, and the following screen appears: ▶Initial setting: Identical with the screen on the left This menu configures the Wiegand Output. Used only when a separate controller, operating with Wiegand input, is mounted. Upon successful authentication, it transmits the data to the terminal’s Wiegand port in the following form: 2.None This is the normal case. Wiegand Output is not used.](https://usermanual.wiki/UNION-COMMUNITY/AC-5100.User-Manual/User-Guide-3262633-Page-54.png)
![AC-5000 / 5100 User Guide 55 UNIONCOMMUNITY Co., Ltd. / 12F, Daemyung Valeon, 127, Beobwon-ro, Songpa-gu, Seoul, 05836, Republic of Korea TEL: +82-2-6488-3000 / FAX: +82-2-6488-3100 E-Mail :sales@unioncomm.co.kr http://www.unioncomm.co.kr 3.26bit Transmits “Site code[1byte] + user ID[2byte]”, so the user ID is set to 4 digits or less. Example: For SiteCode:045(2Dh), UID:6543(198Fh), is transmitted as ‘1 00101101 0001 1001 10001111 0’ 4.34bit Transmits “Site code[1byte] + user ID[3byte]” so the user ID is set to 7 digits or less. In case of an 8-digit user ID, “user ID[4byte]” is transmitted without Site code. Example: In the case of SiteCode:001(1h), UID:123456(1E240h), is transmitted as ‘0 00000001 00000001 11100010 01000000 0’ 5. Custom Can be set in the server as the settings under the user’s definition only. The setting type can only be inquired at the terminal. However, when Bypass is checked, regardless of Wiegand Out settings, it transmits the data received by Wiegand Import at the time when authentication was successful to the Wiegand Out as it is. The user can exit to the parent menu using the [ENT~] key to apply the changed values. Use the [F4 (←)] key to cancel input during setting. 3.7.5. Card Reader Select [ENT~] [5. Terminal] [5. Card Reader] in the initial screen ◆, and the following screen appears. ▶Initial setting: Identical with the screen on the left. ▶ Read Card No. When the user puts the card on the screen, the card number is displayed on the LCD. ▶ Dummy mode If 6.RS232 is set, the authorization is not fulfilled by card reading, rather it send the card data to the RS232(Debug) Port. ▶Card Format This is the menu that sets the way the card number is displayed. As shown below, the displayed card number varies depending on the configuration. Therefore, if changing it during operation is unavoidable, after it was set during initial installation, the card should be registered again. RF card example) Card number (5byte): 08h 01h 16h 1Dh D6h Card Format Card number Method of Expression 1. Default 02207638 (3+5) digit decimal number [022(16h)+07638(1DD6h)]](https://usermanual.wiki/UNION-COMMUNITY/AC-5100.User-Manual/User-Guide-3262633-Page-55.png)
![AC-5000 / 5100 User Guide 56 UNIONCOMMUNITY Co., Ltd. / 12F, Daemyung Valeon, 127, Beobwon-ro, Songpa-gu, Seoul, 05836, Republic of Korea TEL: +82-2-6488-3000 / FAX: +82-2-6488-3100 E-Mail :sales@unioncomm.co.kr http://www.unioncomm.co.kr 2. Hexadecimal number 0801161DD6 10-digit hexadecimal number 3. Decimal number 0018226646 Last 4byte to be expressed in a 10-digit decimal number (01161DD6h) 4. Decimal number 35 02207638 Same as ‘1. Default’ 5. Hexa_1 161DD6 Displays last 3bytes as the 6-digit hexadecimal number. SC card example: Card Number (4byte): 52h 9Dh 06h E3h Card Format Card number Method of Expression 1. Default 529D06E3 Expressed as an 8-digit hexadecimal number 2. Hexadecimal number E3069D52 Expressed as an 8-digit hexadecimal number changing the order of byte 3. Decimal number 1386022627 Hexadecimal number 529D06E3 to be expressed as a 10-digit decimal number 4. Decimal number 35 3808861522 Hexadecimal number E3069D52 to be expressed as a 10-digit decimal number 5. Hexa_1 069D52 Only the first 3 bytes are placed upside down. The user can exit to the parent menu using the [ENT~] key to apply the changed values. Use the [F4 (←)] key to cancel input during setting. 3.7.6. External Device Select [ENT~] ([5. Terminal] [6. External Device]) in the initial screen ◆, and the following screen appears. Connector Settings shown as below ▶ Initial setting: Identical with the screen on the left.](https://usermanual.wiki/UNION-COMMUNITY/AC-5100.User-Manual/User-Guide-3262633-Page-56.png)
![AC-5000 / 5100 User Guide 57 UNIONCOMMUNITY Co., Ltd. / 12F, Daemyung Valeon, 127, Beobwon-ro, Songpa-gu, Seoul, 05836, Republic of Korea TEL: +82-2-6488-3000 / FAX: +82-2-6488-3100 E-Mail :sales@unioncomm.co.kr http://www.unioncomm.co.kr ▶Printer To connect a Slave Reader which uses a card or a fingerprint as a secondary authentication device. If you would like a Wiegand card reader to be connected, set ‘7’ while SR100 should be ‘8’. If authentication occurred at the Slave Reader, ‘Dummy Reader’ would be displayed under ‘External Device’ on UNIS when the user looks up log history. [Mode] indicates an authentication mode of the external device. ‘0’ means that AC5000’s authentication mode (saved as ‘1’: F1, ‘2’: F2, ‘3’: Access, ‘4’: F3, ‘5’: F4). ▶Lock controller It is set when the additional device is connected without using lock port of the terminal for the entrance control. If the lock is directly connected to the terminal, select ‘4. None’. And if the LC010 is connected, select ‘5.LC’. And if MCP040 is connected, select ‘MCP’. ▶Connection device setting It is set when connecting the slave reader using card or fingerprint to the terminal to use as the supplementary authorization device. Set ‘7’ to connect the Wiegand card reader, and set ‘8’ to connect the SR100. When the authorization is fulfilled by slave reader, the ‘Dummy reader’ is represented on the ‘External device’ of UNIS program when searching the authorization log. [Mode] represents the authorization mode which will be saved when the authorization was fulfilled by the external device. If it is set ‘0’, it is authorized with the present authorization mode of AC5000, and if it is set ‘1’, it is always saved as the set authorization mode. (Saved as ‘1’: F1, ‘2’: F2, ’3’: Access, ‘4’: F3, and ‘5’: F4). The user can exit to the parent menu using the [ENT~] key to apply the changed values. Use the [F4 (←)] key to cancel input during setting. 3.7. 7. Mobile Key Option (AC5100 only) Select [ENT~] [5. Terminal] [F2]->[7.Mobile Key Option] in initial screen ◆, and the following screen appears. ▶ Default setting: same as left screen ▶Use Mobile Key Choose whether to use mobile card. If you check the box, you will be able to use your mobile card.](https://usermanual.wiki/UNION-COMMUNITY/AC-5100.User-Manual/User-Guide-3262633-Page-57.png)
![AC-5000 / 5100 User Guide 58 UNIONCOMMUNITY Co., Ltd. / 12F, Daemyung Valeon, 127, Beobwon-ro, Songpa-gu, Seoul, 05836, Republic of Korea TEL: +82-2-6488-3000 / FAX: +82-2-6488-3100 E-Mail :sales@unioncomm.co.kr http://www.unioncomm.co.kr ▶Terminal Register You can register your device with the mobile server. You can register the terminal using APP manager of mobile phone. If registration is executed, it requests communication with the mobile phone for registration for 45 seconds. If communication is not established for 45 seconds, a failure screen is displayed. When the registration is completed, the success screen appears. ▶BLE Name The name registered on the mobile server is displayed. The administrator can check the name and access the terminal. ※ For other APP related setting and guide, please refer to Unis-B plus_ Function Manual .doc 3.8. Information Select ‘6. Information’ in the main menu and the following screen appears: Menu to view the terminal settings. Press; [1] key to view various terminal configurations. [2] key to view network configuration, such as IP. [3] key to view the user registration status, etc. [4] key to view log data. [5] key to view firmware version. 3.8.1. System Info Select ◆ [ENT~] [6. Information] [6. System Info] in the initial screen ◆ Press the [F4 (←)] key to exit to the parent menu.](https://usermanual.wiki/UNION-COMMUNITY/AC-5100.User-Manual/User-Guide-3262633-Page-58.png)
![AC-5000 / 5100 User Guide 59 UNIONCOMMUNITY Co., Ltd. / 12F, Daemyung Valeon, 127, Beobwon-ro, Songpa-gu, Seoul, 05836, Republic of Korea TEL: +82-2-6488-3000 / FAX: +82-2-6488-3100 E-Mail :sales@unioncomm.co.kr http://www.unioncomm.co.kr 3.8.2. Network Info Select ◆ [ENT~] [6. Information] [2. Network Info] in the initial screen ◆ Press the [F4 (←)] key to exit to the parent menu. 3.8.3. Database Info Select ◆ [ENT~] [6. Information] [3. Database Info] in the initial screen ◆ - Registered User: Number of registered users (including administrator). - Registered Admin: Number of registered administrators. - Max User: Maximum number of users that can be registered. - Registered FP: Number of whole fingerprints that are registered. - Max FP: Maximum number of fingerprints that can be registered. Press the [F4 (←)] key to exit to the parent menu. 3.8.4. View Log Select ◆ [ENT~] [6. Information] [4. View Log] in the initial screen ◆ - All Log: Number of logs saved in the terminal. - Max Log: Maximum number of logs that can be saved.](https://usermanual.wiki/UNION-COMMUNITY/AC-5100.User-Manual/User-Guide-3262633-Page-59.png)
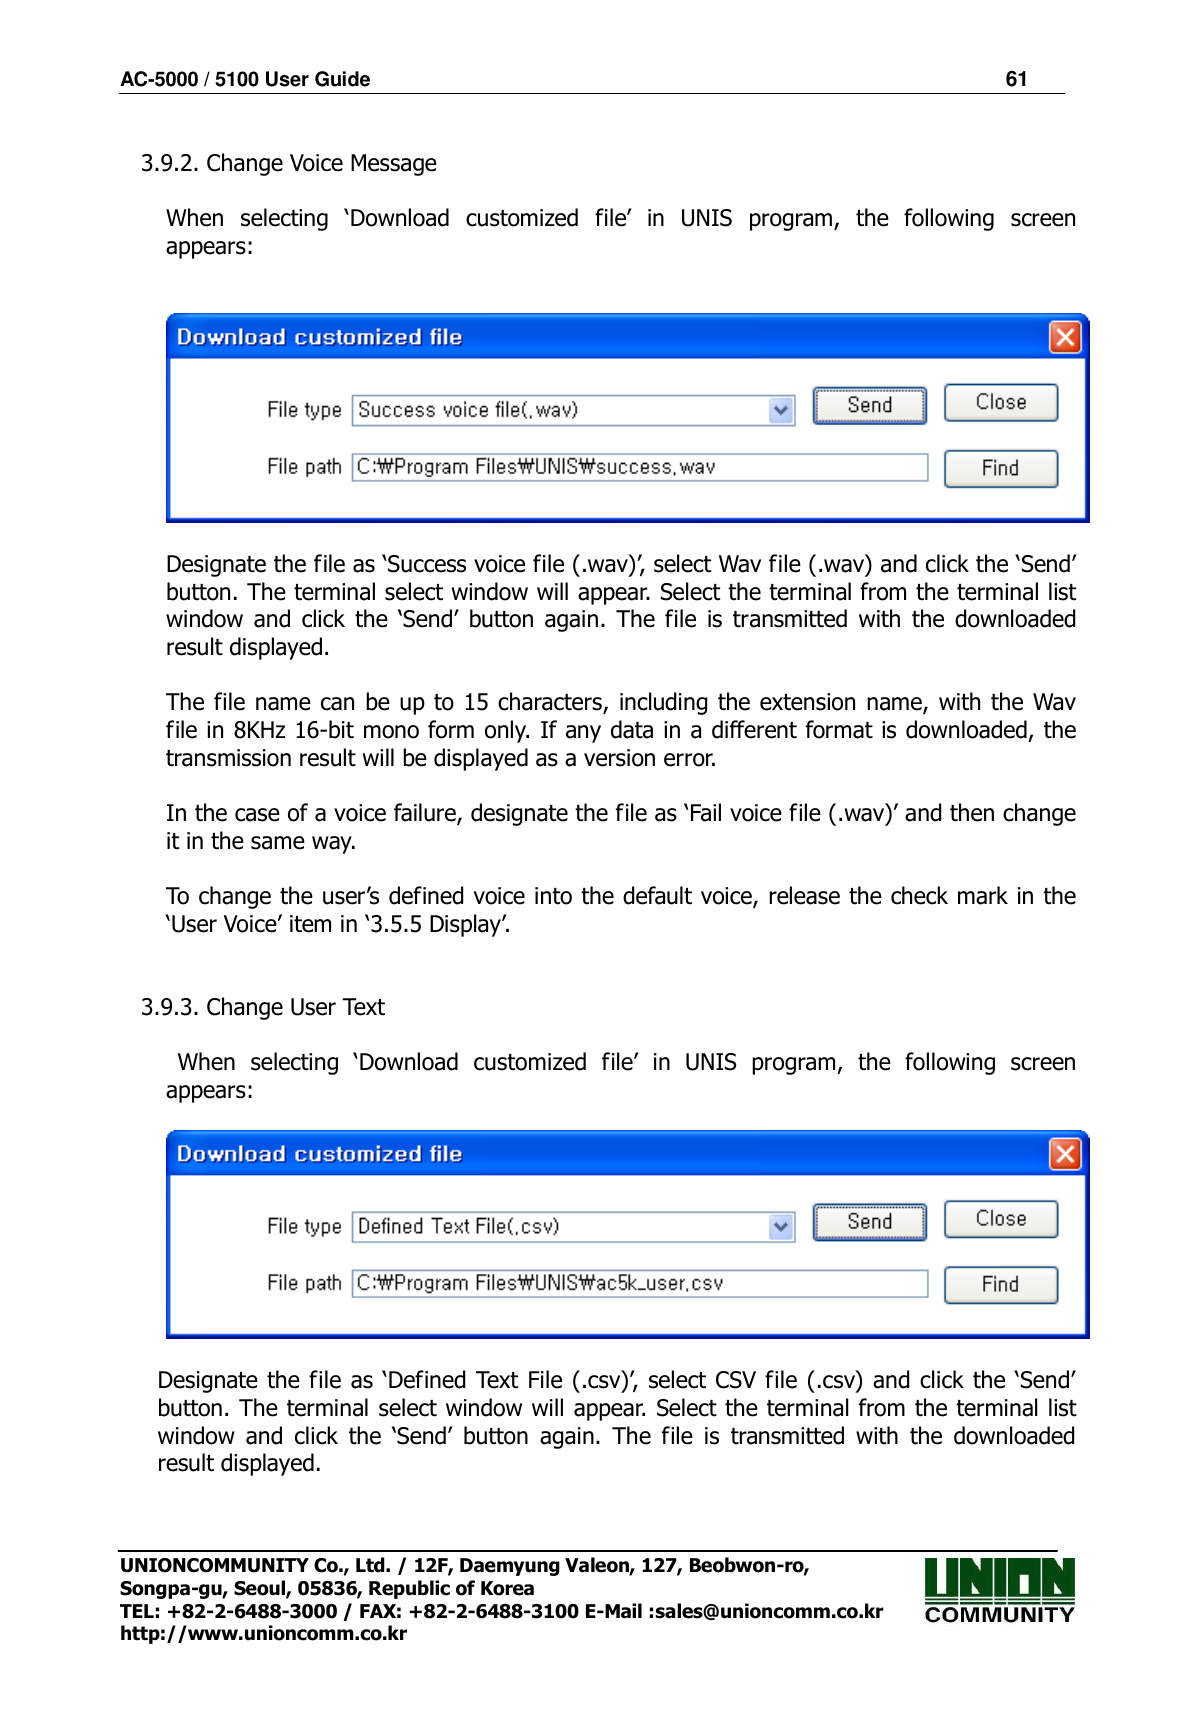
![AC-5000 / 5100 User Guide 60 UNIONCOMMUNITY Co., Ltd. / 12F, Daemyung Valeon, 127, Beobwon-ro, Songpa-gu, Seoul, 05836, Republic of Korea TEL: +82-2-6488-3000 / FAX: +82-2-6488-3100 E-Mail :sales@unioncomm.co.kr http://www.unioncomm.co.kr Press the [F4 (←)] key to exit to the parent menu. 3.8.5. Version Info Select ◆ [ENT~] [6. Information] [5. Version Info] in the initial screen ◆ Press the [F4 (←)] key to exit to the parent menu. 3.9. Downloading User’s File This function allows the user to change background image or voice message. User files can be downloaded from UNIS server program. 3.9.1. Change Background Image When selecting ‘Download customized file’ in the UNIS program, the following screen appears: Designate the file as ‘Background image file (.jpg)’, select the image file (.jpg), and click the ‘Send’ button. The terminal select window will appear. Select the terminal on the terminal list window and click the ‘Send’ button again. The file will be transmitted with the downloaded result displayed. The file name can be up to 15 characters long, including the extension name, with a jpg file size of 320*240. If any data in a different format is downloaded, the transmission result will be displayed as a version error. To change the background image, you can directly select it from ‘3.5.5 Display”.](https://usermanual.wiki/UNION-COMMUNITY/AC-5100.User-Manual/User-Guide-3262633-Page-60.png)
![AC-5000 / 5100 User Guide 63 UNIONCOMMUNITY Co., Ltd. / 12F, Daemyung Valeon, 127, Beobwon-ro, Songpa-gu, Seoul, 05836, Republic of Korea TEL: +82-2-6488-3000 / FAX: +82-2-6488-3100 E-Mail :sales@unioncomm.co.kr http://www.unioncomm.co.kr 4. How to use the Terminal 4.1. Change of Authentication Mode < Figure 4-1> Normally it’s not visible, but when the user touches their hand on the card input area - as shown in the Figure at the left – the LED’s are powered ON and the keypad appears - as shown in the Figure at the right. When the keys are visible, press the desired function key to change the authentication mode, such as office start [F1], office leave [F2], going-out [F3], return [F4], access [ENT] etc. Touch by Hand Press the Desired Mode Key](https://usermanual.wiki/UNION-COMMUNITY/AC-5100.User-Manual/User-Guide-3262633-Page-63.png)
![AC-5000 / 5100 User Guide 64 UNIONCOMMUNITY Co., Ltd. / 12F, Daemyung Valeon, 127, Beobwon-ro, Songpa-gu, Seoul, 05836, Republic of Korea TEL: +82-2-6488-3000 / FAX: +82-2-6488-3100 E-Mail :sales@unioncomm.co.kr http://www.unioncomm.co.kr 4.2. ID input Normally it’s not visible, but as shown in Figure <4-1>, when the user touches their hand on the card input area, the LED’s are powered ON and the keypad appears. In this case, ID input screen appears when the user inputs their ID. Delete with the [F4 (←)] key if a figure is wrongly input during the input process. Pressing the [ENT] key, after inputting ID, causes the fingerprint input or password input screen to appear; depending on the method of user authentication. However, authentication will fail if a card user inputs ID first. Therefore, be sure to use the card. 4.3. Authentication 4.3.1. Fingerprint Authentication When placing a fingerprint on the sensor, a buzzer sounds with the sensor lamp ON, and the fingerprint is duly input. Be sure not to take your finger off the sensor until the sensor lamp is OFF and the buzzer sounds. In the case of 1:1 authentication, input ID and press the [ENT] key which causes the fingerprint sensor to flicker. Then input the fingerprint via the sensor. 4.3.2. Card Authentication Touch the card on the figure of the card as shown in <Figure 4-1>.](https://usermanual.wiki/UNION-COMMUNITY/AC-5100.User-Manual/User-Guide-3262633-Page-64.png)
![AC-5000 / 5100 User Guide 65 UNIONCOMMUNITY Co., Ltd. / 12F, Daemyung Valeon, 127, Beobwon-ro, Songpa-gu, Seoul, 05836, Republic of Korea TEL: +82-2-6488-3000 / FAX: +82-2-6488-3100 E-Mail :sales@unioncomm.co.kr http://www.unioncomm.co.kr 4.3.3. Password Authentication Press the [ENT] key after inputting ID, and the screen for password input appears. When a wrong number is input, delete it using the [F4 (←)] key. Input the password and press the [ENT] key.](https://usermanual.wiki/UNION-COMMUNITY/AC-5100.User-Manual/User-Guide-3262633-Page-65.png)