USA 111 V4 Mobile Phone User Manual
USA111 INC. Mobile Phone Users Manual
UserManual.wiki
>
USA 111
>
V4 User Manual
>
Users Manual
Contents
1.
Users Manual
2.
User Manual
Users Manual
Navigation menu
Upload a User Manual
Namespaces
Wiki Guide
HTML
PDF
Info
Views
User Manual
Discussion / Help
Navigation
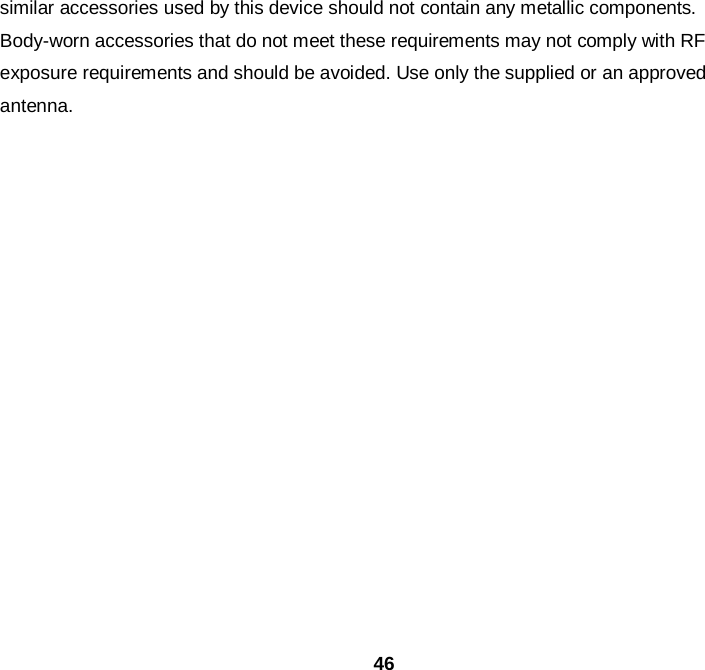
![7 2.Installation Phone has two card slots, Cato outside slot SD card slot is inside the SIM card slot. 2.1 Installing the SIM card When you subscribe to a cellular service, you will receive a SIM (Subscriber Identity Module) card, which contains your private information, such as your PIN (personal identification number), and available optional services. If the phone is switched on, turn off the phone. Press and hold the [Power key] → off 1. Hold down the left side of the phone card pin hole Cato, Cato pop. 2. Insert the SIM card placed inside Cato and ensure sim card golden contacts facing down. 3. Replace the Cato slot. Note: If the SIM card is inserted, you can only use your phone's non-network services and some features. 2.2 Battery Charge Before using the phone for the first time, you must charge the battery. You can use a travel charger or a computer provided, connected via a data line, charge the phone. Charging travel charger 1. The data lines porous plug into the phone jack. 2. Connect the other end of the data cable travel charger plug into the USB port. 3. Plug the adapter into a standard AC power outlet. 4. When the battery is fully charged, disconnect the PC data cable connected to the phone, then disconnect the travel charger from the power outlet. caveat: Do not remove the battery before removing the travel adapter. Otherwise it will](https://usermanual.wiki/USA-111/V4.Users-Manual/User-Guide-2830640-Page-7.png)
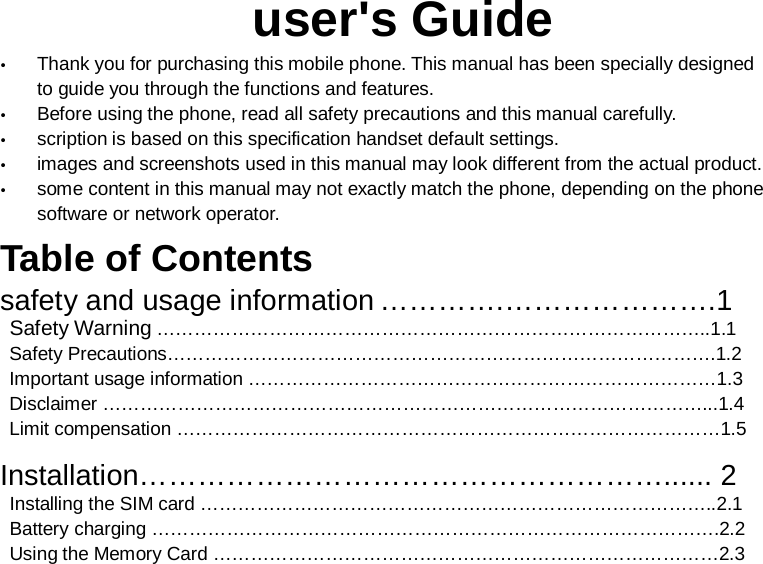
![8 damage the phone. Charging with a computer Before charging, make sure the computer is turned on. 1. The data lines porous plug into the phone's multifunction jack. 2. Connect the other end of the cable plugs into the computer's USB port. 3. When the battery is fully charged, disconnect the PC data cable connected to the phone, and then unplug it from the computer. Reduce battery consumption If you start the automatic synchronization function or WLAN in the background will consume battery faster. To save power, turn off unnecessary applications. You can also reduce the backlight time and brightness of the display. 2.3 Use a memory card Insert a memory card To store additional media files, insert a memory card. caveat: Some brands may not be fully compatible with your phone. Using an incompatible memory card may damage the phone or memory card and can corrupt data stored on the card. Note: • The phone supports only the FAT file structure of the memory card. If you insert a memory card other file structure, the phone will require reformatting the memory card. • Frequent writing and erasing of data will shorten the life of the memory card. • When the memory card into the phone, the memory card's file directory will appear in the sdcard folder. If the phone is switched on, turn off the phone. Press and hold the [Power key] → off.](https://usermanual.wiki/USA-111/V4.Users-Manual/User-Guide-2830640-Page-8.png)
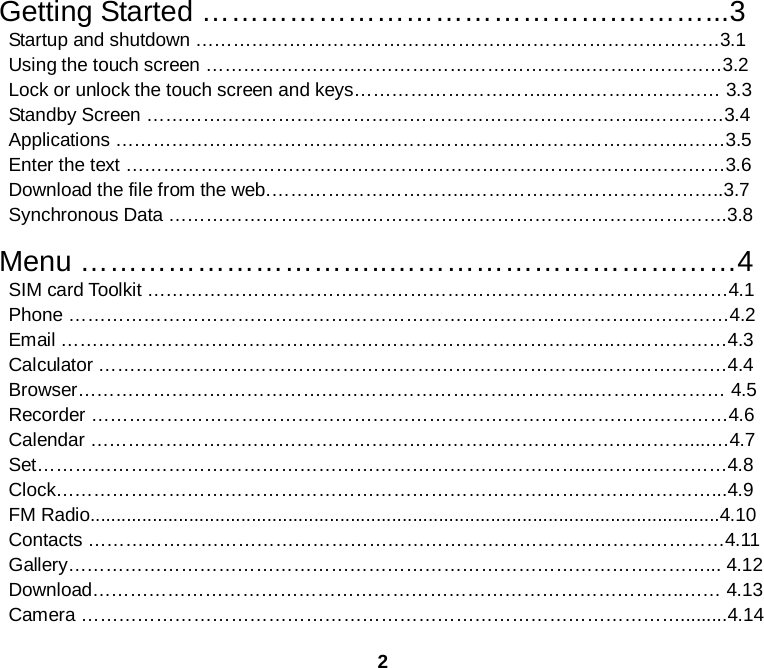
![9 1. Hold down the left side of the phone card pin hole Cato, Cato pop. 2. Insert the SD card placed outside Cato and ensure that the SD card golden contacts facing down. 3. Replace the Cato slot. Remove the memory card If the phone is switched on, turn off the phone. Press and hold the [Power key] → off. 1. Remove the Cato card pin. 2. Remove the memory card from the slot. 3. Replace Cato. caveat: When the phone is sending or accessing information, do not remove the memory card. Doing so may cause data loss or damage to the phone and memory card. Format the memory card Formatting a memory card on a PC may cause the memory card is not compatible with your phone. Please only format the memory card on the phone. Idle mode, open the application list, select Settings → Storage → Format SD card. caveat: Before formatting the memory card, remember to back up all important data to your phone. The manufacturer's warranty does not include the data resulting from user actions cause of loss. 3.Getting Started Button Features Options key Open a list of options available on the current screen.](https://usermanual.wiki/USA-111/V4.Users-Manual/User-Guide-2830640-Page-9.png)
![10 Home key Returns the default starter home (or returns the selected starter home); Open the list of recent applications (press and hold). Return key Return to the previous screen. Volume keys Adjust the phone volume. Power Boot (press and hold). 3.1 Startup and shutdown 1. Hold down the [Power button] to open the phone. 2. shut down, hold down the [power button] to bring up the handset Options dialog box, select Shut Down to shut down. Note restrictions on the use of wireless devices in the area (such as on airplanes and hospitals), please follow the instructions all the warnings and official personnel. 3.2 Using the touch screen The use of mobile phone touch screen makes it easier to select items or perform functions. Learn to use the basic operation of the touch screen. Do the following to control the touch screen: • Tap: Touch once to select or launch a menu, option, or application. • Tap and hold: Tap and hold an item for 2 seconds or more. • Double: Double-click certain items can zoom and other effects. • Drag: Tap and hold an item and move it to the desired location. • Slide: up, down, left or right to scroll through the list or screen. Note • If you do not use the phone time to reach the set length of time, the phone turns off the touch screen. To open the screen, press the [Power key]. • Adjustable backlight time. Idle mode, open the application list, select Settings →](https://usermanual.wiki/USA-111/V4.Users-Manual/User-Guide-2830640-Page-10.png)
![11 Display → Sleep. 3.3 Lock or unlock the touch screen and keys When not operating, you can lock the touch screen and keys to prevent accidental operation of the phone. • To lock, press the [power button] to turn off the screen and locks the touch screen and keys. • To give the keys and the touch screen is unlocked, press the [Power button] to open the screen, then drag the lock icon to unlock the screen. 3.4 Standby screen When the phone is in standby mode, the standby display, you can view the phone's status and access applications. The idle screen has multiple panels. Swipe left or right to select a standby panel. Add items to standby screen Can add an application or application in the project, widgets or the shortcut of the folder to customize the standby screen.If you want to add items to standby screen: Under standby mode,press [ option key ]press and hold the blank area of screen • Widget: Add widgets for analog clock, calendar, photo frame, music, etc. • Wallpaper:Select wallpaper gallery, set the background pictures. Move items on standby screen 1. Press and hold items you want to move. 2. Drag items where you need after items largen.](https://usermanual.wiki/USA-111/V4.Users-Manual/User-Guide-2830640-Page-11.png)
![12 Delete items from standby screen 1. Press and hold to delete items, items become bigger and remove the icon appears above the screen. 2. Drag the items to remove icon,loosen. Using shortcut pane Under standby mode or using apps,click on status bar and drag down his fingers to open the shortcut panel. If you would like to hide the list, please drag the border of the list • brightness:Click the icon to adjust the screen brightness. • Bluetooth/WLAN /Mobile data/Airplane mode:Click the icon to start or cancel the corresponding function. • Setting:Click the icon to set up. 3.5 Application Access application 1.Sliding around browsing application. 2.Select the application you want to access Notice • If you would like to add the application icon to the standby screen,you can press and hold icon and drag it in proper position on standby screen. 1.Press [back button] back to previous screen;Press [Home button] back to standby screen.](https://usermanual.wiki/USA-111/V4.Users-Manual/User-Guide-2830640-Page-12.png)
![13 Notice: Mobile phones have detectable in the direction of the built-in motion sensor.If in the use of some features and rotate mobile phone, mobile phone interface will switch to landscape mode automatically.If you would like to set the interface does not change with the phone,select setting→ Display,clear Auto Rotate Screen Check box next to the option. Access recently used application 1. In Settings button options,for example set long press [home] to achieve the feature,long press [home] to open the most recently used applications. 2. Select the application you want to access Use task manager Mobile phones have multitasking function, can run multiple applications at the same time. Multitasking may lead to dropped calls, freezing, storage problems and use more electricity. If you would like to avoid these problems, can use the task manager end unnecessary procedures。 1. Select Setting → Applications. 2. Select Running label.Show a mobile phone all currently running applications and processes. 3. If you would like to close an application,program selection → Stop. Notice: Also press [option key] → application management access running apps quickly.](https://usermanual.wiki/USA-111/V4.Users-Manual/User-Guide-2830640-Page-13.png)
![14 3.6 Enter text You can select a character on the virtual keyboard to enter text. Prompt: When you enter text, click on [Back key] to hide the virtual keyboard, click on the input field to display the virtual keyboard. Change the text input method: Settings → Language and input → keyboard and input method → Current input method → Keyboard → Select required input method Use Android keyboard Use Android keyboard,can input English words, Numbers, and symbols and expressions. 1. Setting→language&input.Select Current input → Android keyboard. When Android keyboard display,select virtual buttons input text.Also you can use the buttons in the following:](https://usermanual.wiki/USA-111/V4.Users-Manual/User-Guide-2830640-Page-14.png)
![16 4.Function menu Your phone supports two SIM Cards,Select Setting → SIM card telephone, message and data connection can be set up using default SIM card. 4.1 SIM card Toolkit SIM Toolkit is the presence or absence and card type, and if the card supports this feature will display some shortcuts, such as bill inquiries and flow inquiries and some other business. 4.2 Telephone You can call (you can make international calls to any telephone or domestic) and answer the phone, or you can customize and use call-related features. Dial a number 1. Select Dial,click dial icon. 2. Import area code and telephone number. 3. Click ,select SIM1 or SIM2 to make a voice call.(In the Settings - SIM card to set the default card to call) Answer the telephone 1. When incoming call,select answer. Notice • If you insert the headphones, you can press the headset button。 • When the ring tone is ring,you can press [volume key] to make phone mute. 2. If you would like to end call, select hang up.](https://usermanual.wiki/USA-111/V4.Users-Manual/User-Guide-2830640-Page-16.png)
![17 Refuse to answer a incoming call When receive a incoming call,select refuse.When refused to answer the phone,the caller will hear a busy signal。 Dial international long distance 1. Select Dial → Press 0 import + character. 2. Import the complete number(country code,area code and telephone number). 3. Click ,select SIM1 or SIM2 to make a voice call. (In the Settings - SIM card to set the default card to call) Use the options in the voice When make a voice call,can use the following options: • If you would like to adjust the voice volume,can press [volume key]. • If you would like to start a hands-free function,select Hands Free. • If you would like to close the microphone to the other party can't hear his own voice,select Mute. • If you would like to stay on the phone,select stay on. • If you would like to return to keep calling,select recover. • If you would like to call for a second,select add a call,and then call a new number. • If you would like to answer the second call,When the call waiting tone sounded,select answer.Cell phone will keep the first call,Must be tailored to waiting for the service to use this feature,and set to wait in phone setting. • If you would like to toggle between two calls,select exchange. • If you would like to for multiparty calls(conference call),call or answer the second call,and](https://usermanual.wiki/USA-111/V4.Users-Manual/User-Guide-2830640-Page-17.png)
![18 when get through second call,select merge calls.Repeat this operation can add more multiparty.Must custom-made multiparty service to use this feature. 4.3 E-mail Learn how to sent via personal or company email account or view email messages. Set up email account 1. Select E-mail, enter the account settings. 2. Import e-mail address and password,and then select Next. 3. Operating according to screen tip. Send e-mail message 1. Select E-mail → E-mail account. 2. Press [option key] → Writing. 3. Select Receiver character,import name or e-mail address. 4. Select Theme character,import theme. 5. Select Theme character,import message text. 6. If you would like to add the sound or image attachment,press[option key] → add attachment → choose file type and add. 7. Select send send e-mail. Notice: If the user is offline or not in service area,before he/her is online or enter the service area,The list of message will remain in the message session。 Check e-mail message](https://usermanual.wiki/USA-111/V4.Users-Manual/User-Guide-2830640-Page-18.png)
![19 After opening the email account, offline can view the e-mails have retrieved , or connect to email server to view the new messages.After extraction e-mails can be offline viewing. 1. Select E-mail → E-mail account. 2. Press [option key] → Refresh The new email updates to the inbox. 3. In the mailing list,press and hold a mail can choose corresponding operations in the pop-up menu.Click an e-mail,check the contain of the e-mail,can use option in the following: • If you want to answer an e-mail select answer. • If you would like to forward mail to other contacts,press [option key] → Transmit. • If you want to delete e-mail,press[option key] → Delete. • If you would like to view the pictures in email,select display picture. Delete e-mail account 1. Select E-mail. 2. Click to delete the account. 3. In the pop-up menu Delete account. Add other account Add new e-mail account 1. Select e-mail. 2. Press [option key] → Account. 3. In the account list interface press press [option key] → Add account. Set a custom email account 1. Select e-mail.](https://usermanual.wiki/USA-111/V4.Users-Manual/User-Guide-2830640-Page-19.png)
![20 2. Press [option key] → Setting of account 3. Customize the following options: General Settings • Account title:Change the account name. • Your name:Change your name. • Signature: set the e-mail signature when send e-mail. • E-mail check frequency:set e-mail check frequency. • Default account:The phone default set as the e-mail from the selected account. Notifications settings • E-mail Notifications:set wheather display new e-mail notifications on notification bar • Select ring tone:Select new e-mail messages the ring tone. • Viberation:The phone is set to viberate when receive new e-mail. Server Settings • Receive setting:Change the receiver server Settings. • Send setting:Change the outgoing server Settings. 4.4 Calculator Know how to do math. 1. Select Calculator. 2. Use the keys that correspond with the computer, it can be regarded as basic operations. Note: For advanced operation, slide the screen to the left. 4.5 browser The application can use the Internet to view various web pages, but need support WLAN or](https://usermanual.wiki/USA-111/V4.Users-Manual/User-Guide-2830640-Page-20.png)
![21 mobile data. 4.6 Recorder Learn how to use mobile phone recorder. Record voice 1. Select Recorder→ Set the recording file type →Sets the position of the recorder storage →Click Start to recording→ Speak to the microphone. 2. Click End of the recording if you want to save click finish→Confirm if you donnot want to save click give up. 3. To record more voice memos, click again 。 Play record 1.Select Music→ Play list → My record. 2.Choose record you want to play in the play list. 4.7 Calendar Use the calendar to create an event in the calendar page, click on the date at the top left corner to select the day, week, month, or schedule switch view mode. Create event 1. Select calender→ press[option key] → New event,or press view a certain time or date,in the pop-up menu select New event.(The premise is to first login account) 2. Set all contains of event→Select Finish Save the setting.](https://usermanual.wiki/USA-111/V4.Users-Manual/User-Guide-2830640-Page-21.png)

![31 3.Click on the above the bin icon to delete to delete the alarm clock. 4.10 FM Radio Learn how to listen to music and news on FM radio.If you would like to listen to FM Radio,must connect with earphone(The headset is used as the radio antenna) Listen to FM Radio 1.Insert the headset in the mobile phone. 2.Select FM Radio. 3.Press the play button to turn on/off the FM Radio. 4.Click on the mono to switch the radio broadcast mode. 5.Pull up the earphone,Press the return key to exit the FM Radio. Save radios automatically 1.Insert the headset in the mobile phone. 2.Select FM Radio. 3.Press the [option key] choose search,search channel automatically and save in all channels. 4.Select the desired radio stations from all channels,and then return to FM radio screen. Add station to the favorites list 1.Turning on the FM Radio,adjust the frequency to the desired station. 2.Click below + the current station is added to the favorites list. 4.11 Contacts](https://usermanual.wiki/USA-111/V4.Users-Manual/User-Guide-2830640-Page-31.png)
![33 matching contacts. Delete contact 1.select contacts. 2.Press [option key]→delete contact 3.Check box next to the option to delete the contact. 4.Select delete→confirm Tips:Also click want to delete the contact,Click the options button in the pop-up menu select delete. Import or export contacts In duplicate contacts between mobile phones, SIM card and memory card. 1.select contacts. 2.Press [option key]→import or export 3.Select export target→Next 4.Select import target→Next 5.Choose to export the check box next to the contacts or file Set display options You can set the address book shows the contact range. 1.select contacts. 2.Press [option key]→contact to show 3.Select the check box](https://usermanual.wiki/USA-111/V4.Users-Manual/User-Guide-2830640-Page-33.png)
![36 3. Click Finish recording.The video will be automatically saved. Shoot panorama 1. Select camera→Into a panoramic mode. 2. The camera at the subject and to adjust. 3. Click take picture,mobile phones to the left or to the right.Photos will be saved automatically. 4.15 message Learn how to create and send text messages (SMS) or MMS (MMS), and view or management has to send or receive information. Notice :In the local service area to send or receive data may lead to additional costs. For more information, contact your network operator Send message 1.Select message→write the new message→write 2.Select receiver Input the recipient phone number field 3.Select type message field to enter message,then click on the send icon button to send message. Send MMS 1.Select message→write the new message→write 2.Press[ option key] → Add theme →Select theme field enter the theme. 3.Select type message field to enter message.](https://usermanual.wiki/USA-111/V4.Users-Manual/User-Guide-2830640-Page-36.png)
![37 4.Click Add attachment,Such as photos, video, audio, electronic business CARDS, etc,then click on the send icon button to send information. Tips:In the receiver can enter multiple recipients, and mass information or MMS. Check the SMS or MMS 1.Select message,message is grouped by contact,shown as a form of dialogue. • Click on the content of information for details. • Also some live a session, in the pop-up menu, select the corresponding operation. A custom set of message 1.Select message 1.Press [option key] → Setting.Customize the following options: • Message function on/off • The default SMS application:Set the default SMS application. Storage Configuration • Delete old messages:When set to limit the number to delete old information at any time. • SMS limit:Set the maximum number of messages stored. • MMS limit:Set the maximum number of MMS storage. SMS Settings • Delivery Report:Set up the network after the message delivery notice yourself. • Management of the information in the SIM card:Management information stored in the SIM card. MMS setting • Delivery Report:Set up the network after the MMS served notice yourself.](https://usermanual.wiki/USA-111/V4.Users-Manual/User-Guide-2830640-Page-37.png)