VIA TECHNOLOGIES P650IVF02-0 60 Inch TFT-LCD Display User Manual 2
VIA Technologies, Inc. 60 Inch TFT-LCD Display Users Manual 2
Contents
- 1. Users Manual-1
- 2. Users Manual-2
Users Manual-2
48
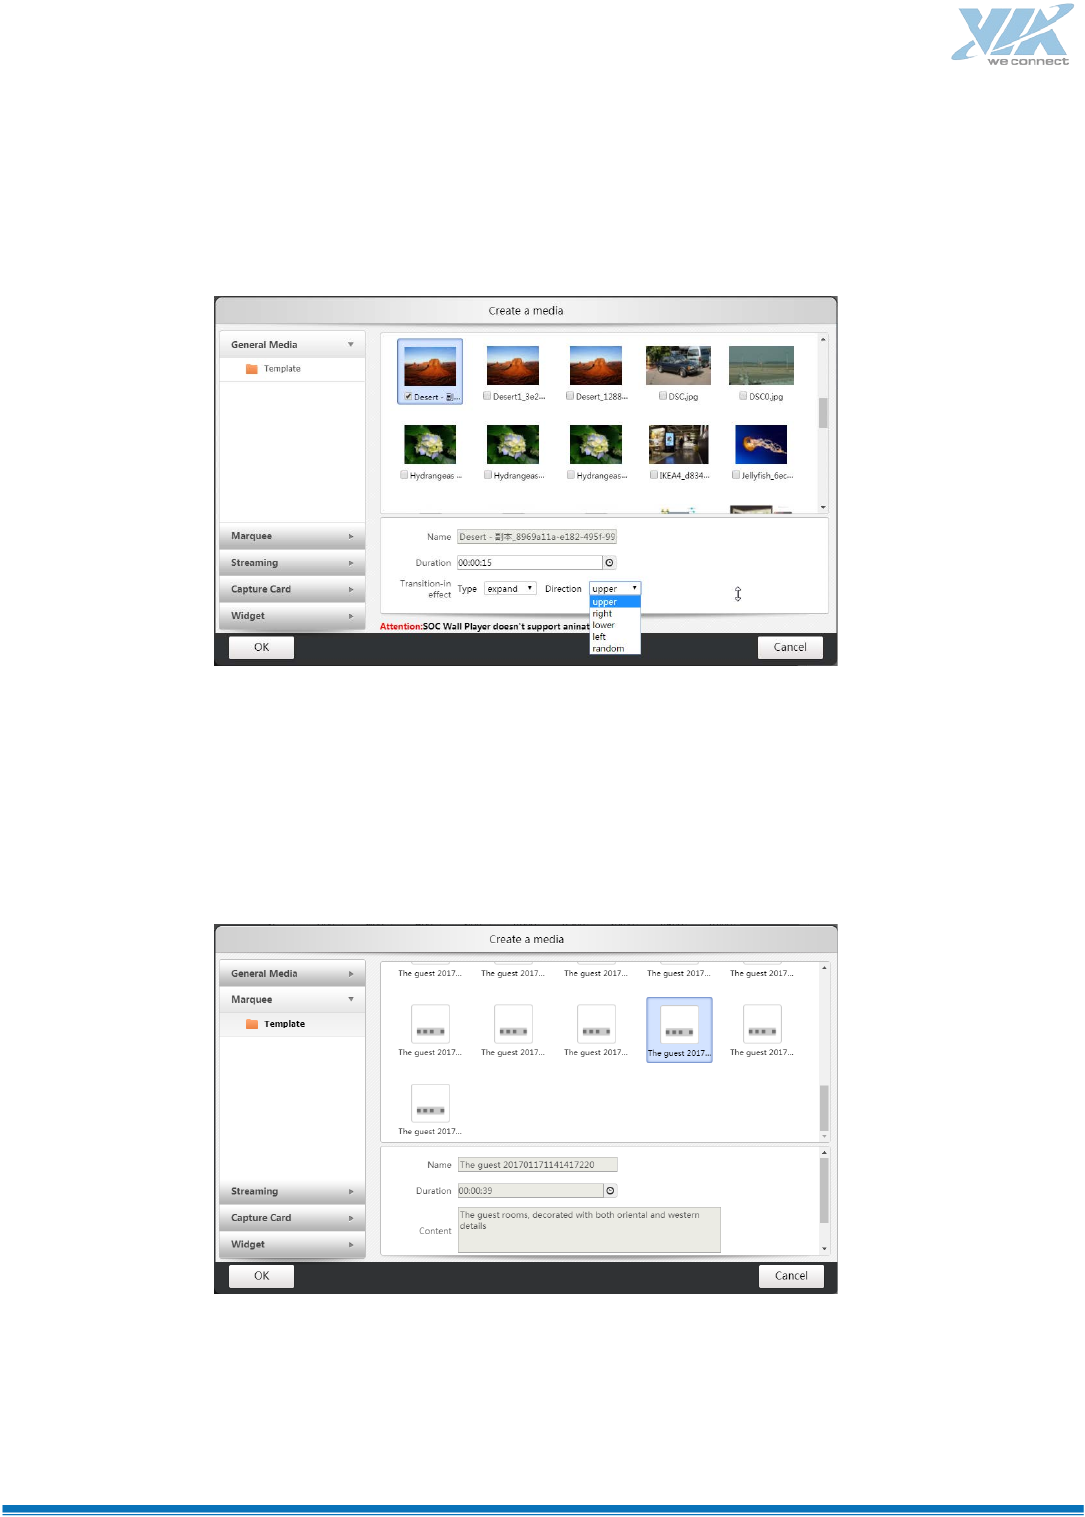
b. The pictures in the same directory can be multi-selected.
c. Transition effect. If user selects transition effect, the duration cannot be 0s.
Text:
a. Reference file: this option, said the marquee file is not modified. Do not check, said marquee can
be modified; the modified file is not synchronized to the media library, only for this playlist.
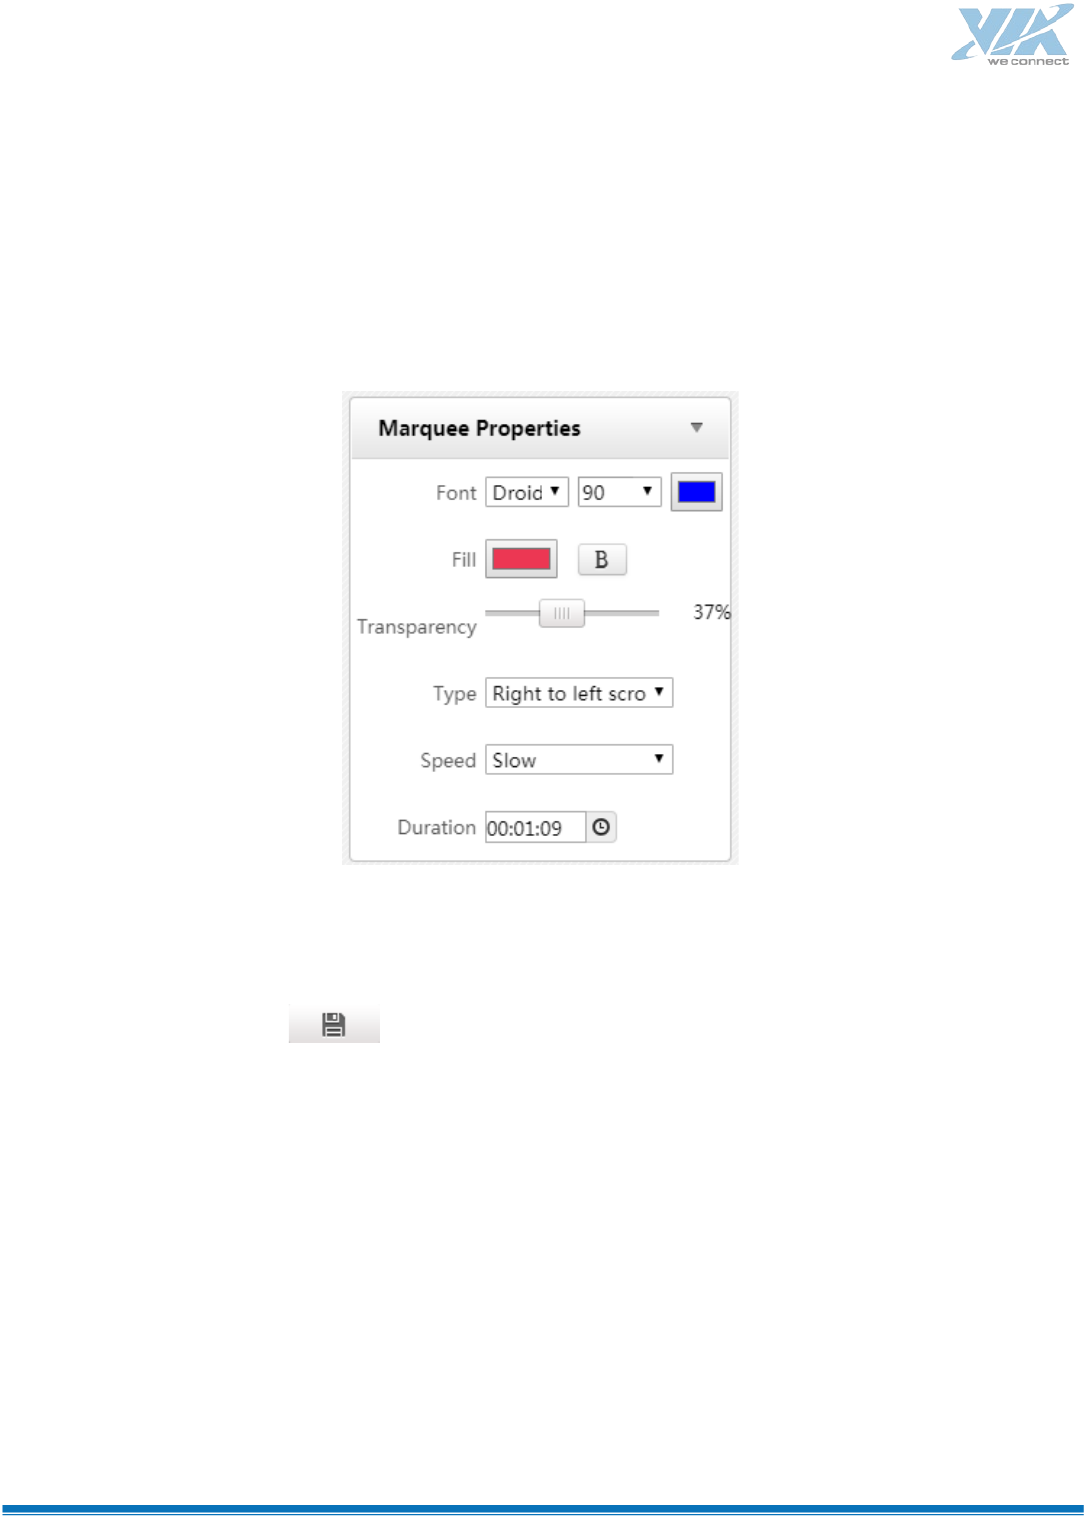
Select the marquee, and edit marquee attributes in the right area:
a. Two types of Text: static and marquee;
b. Edit the font type, size and color;
49
c. Background color;
d. Transparency;
e. The speed of marquee: Slow, Medium and Fast; user can modify the speed according to
reference time.
Note:
Change the playback order by dragging the published media file.
Step 5:Click the button to save the scene. A new scene is created.
Step 6:Add other scene again according to the above steps. A new playlist is creatd.
Schedule
Schedule is for player group, it includes layout, media, playback time, etc.
Create the schedule
50
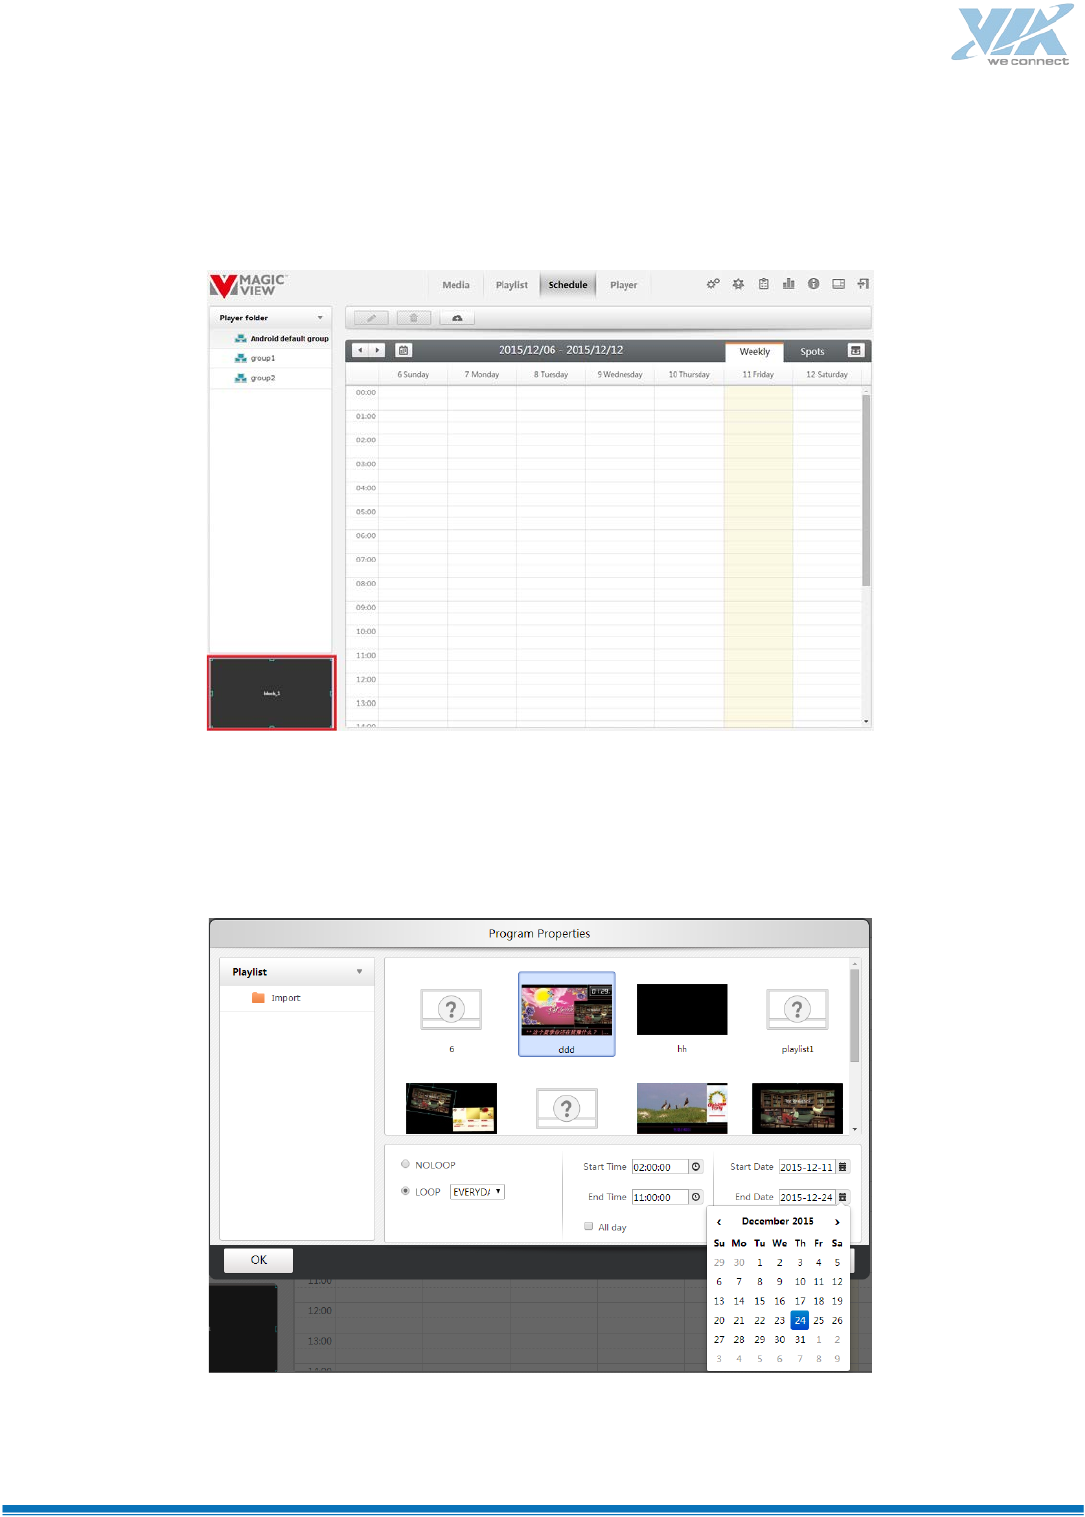
Step 1:Select the player group.
Step 2:Select the block in the layout preview. (If there is only one block in the layout, it is selected by
default.)
Step 3:Move the pointer to the calendar region. Press the right-button and drag the mouse, the following
dialog box will pop up.
Choose one playlist and set start/end time/date.
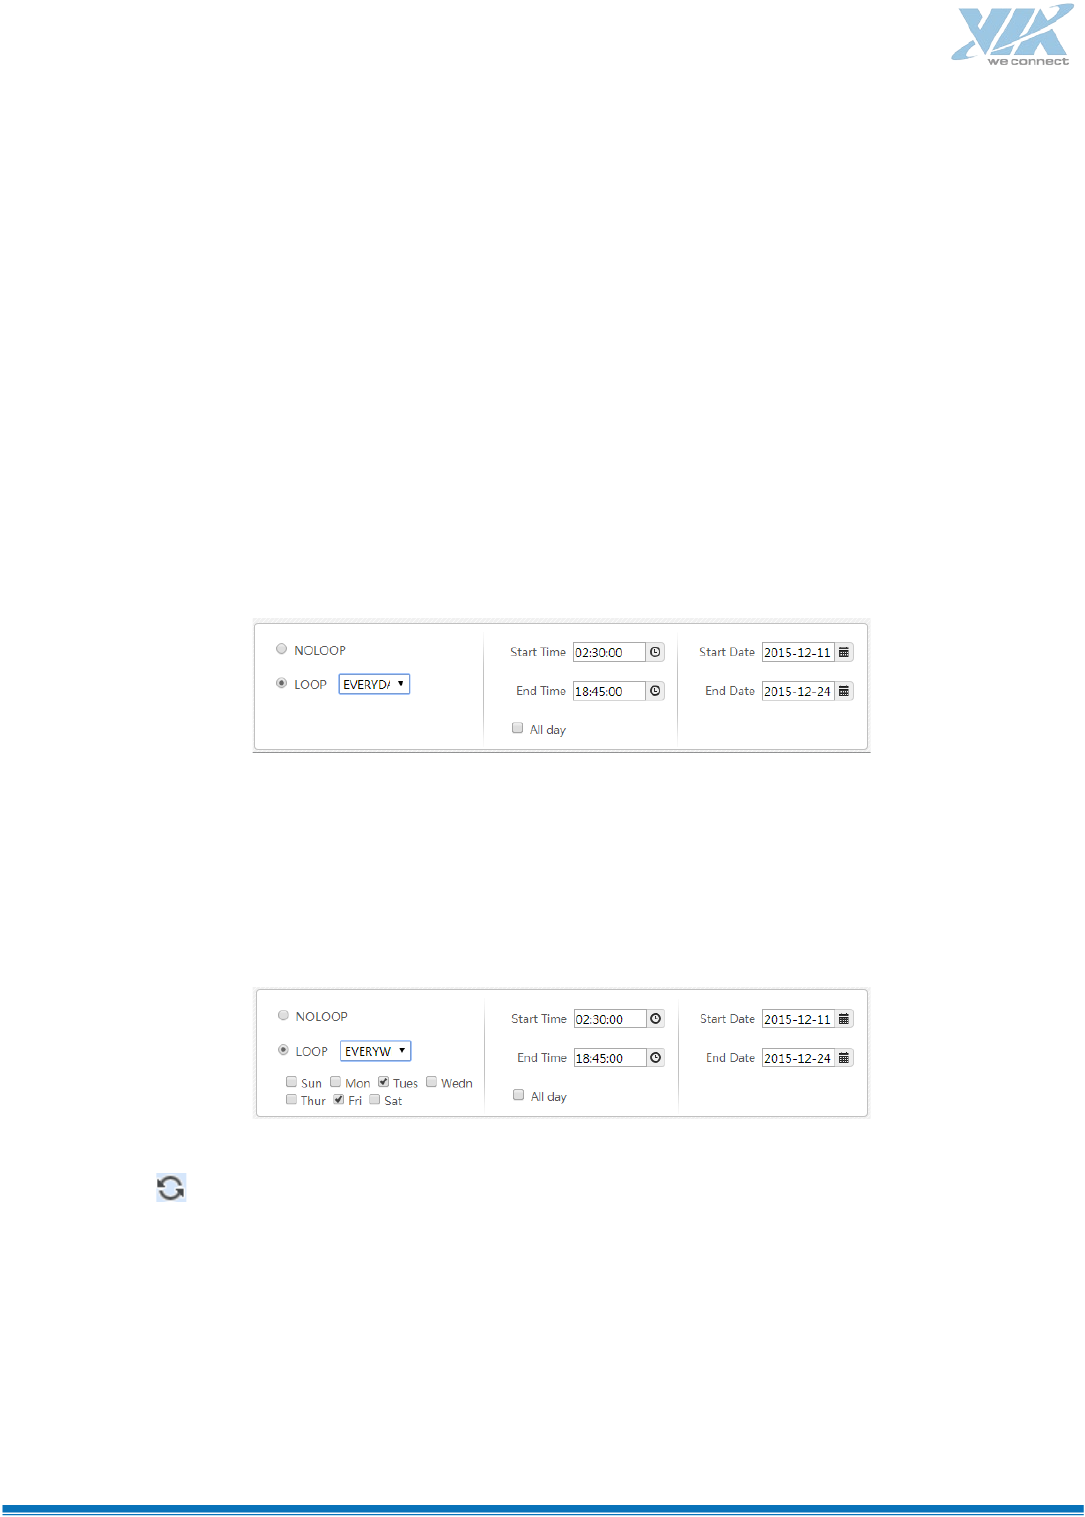
The following example is based on the following configuration:
51
Start time is set to 2:30; end time is 18:45.
Start date is Dec 11, 2015; end date is Dec 24, 2015.
Loop type:
Not loop: it means the playback time is from the start time of the start date to the end time of the
end date.
For example: It means the playlist will play from Dec 11, 2015, at 2:30 to Dec 24, 2015, at 18:45.
Loop every day.
Within the selected date, each day is fixed within a fixed time.
For example: Every day from Dec 11, 2015, at 2:30 to Dec 24, 2015, at 18:45.
Loop every week.
For example: The playlist will play from 2:30 to 18:45 every Tuesday and Friday from Dec 11, 2015 to Dec
24, 2015.
There is a " " identification of the schedule, which means that the program is a loop mode.
Step 4:Select the playlist and define the schedule, then click the button “ok” to the main window of
schedule.
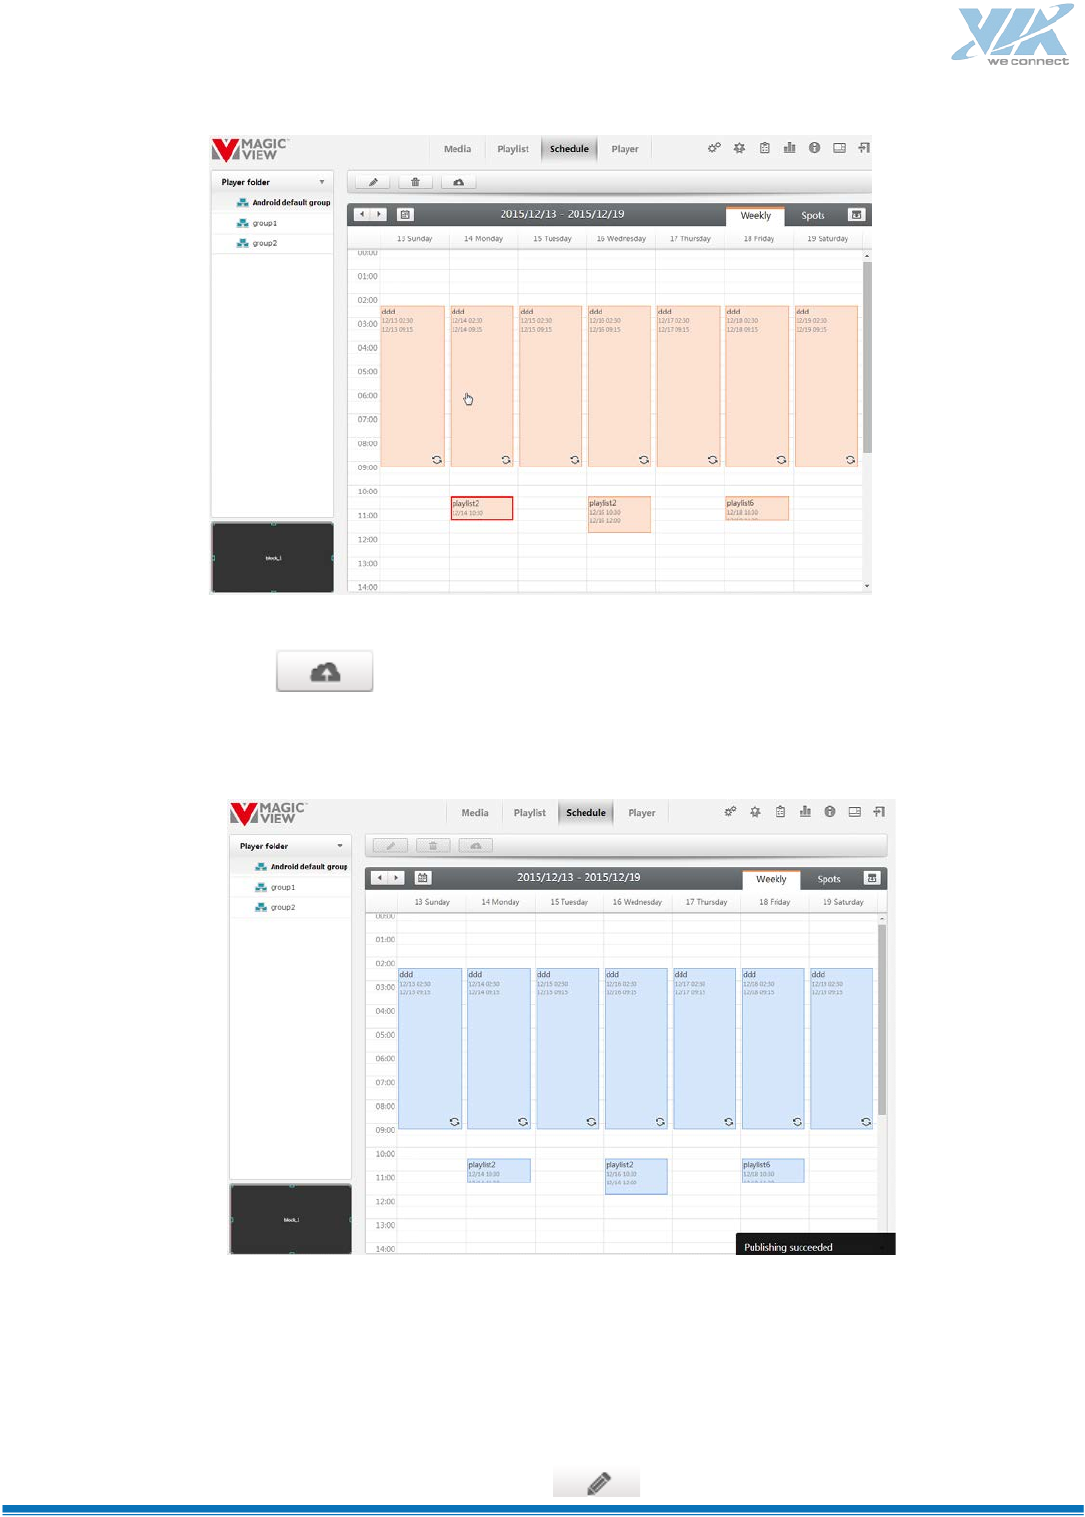
52
Step 5:Click the button to publish the schedule. The color in the schedule block will be changed
from orange to blue.
Modify the schedule
There are three ways to modify the schedule.
1. First, select the schedule, then click the button , the following dialog box will pop up;
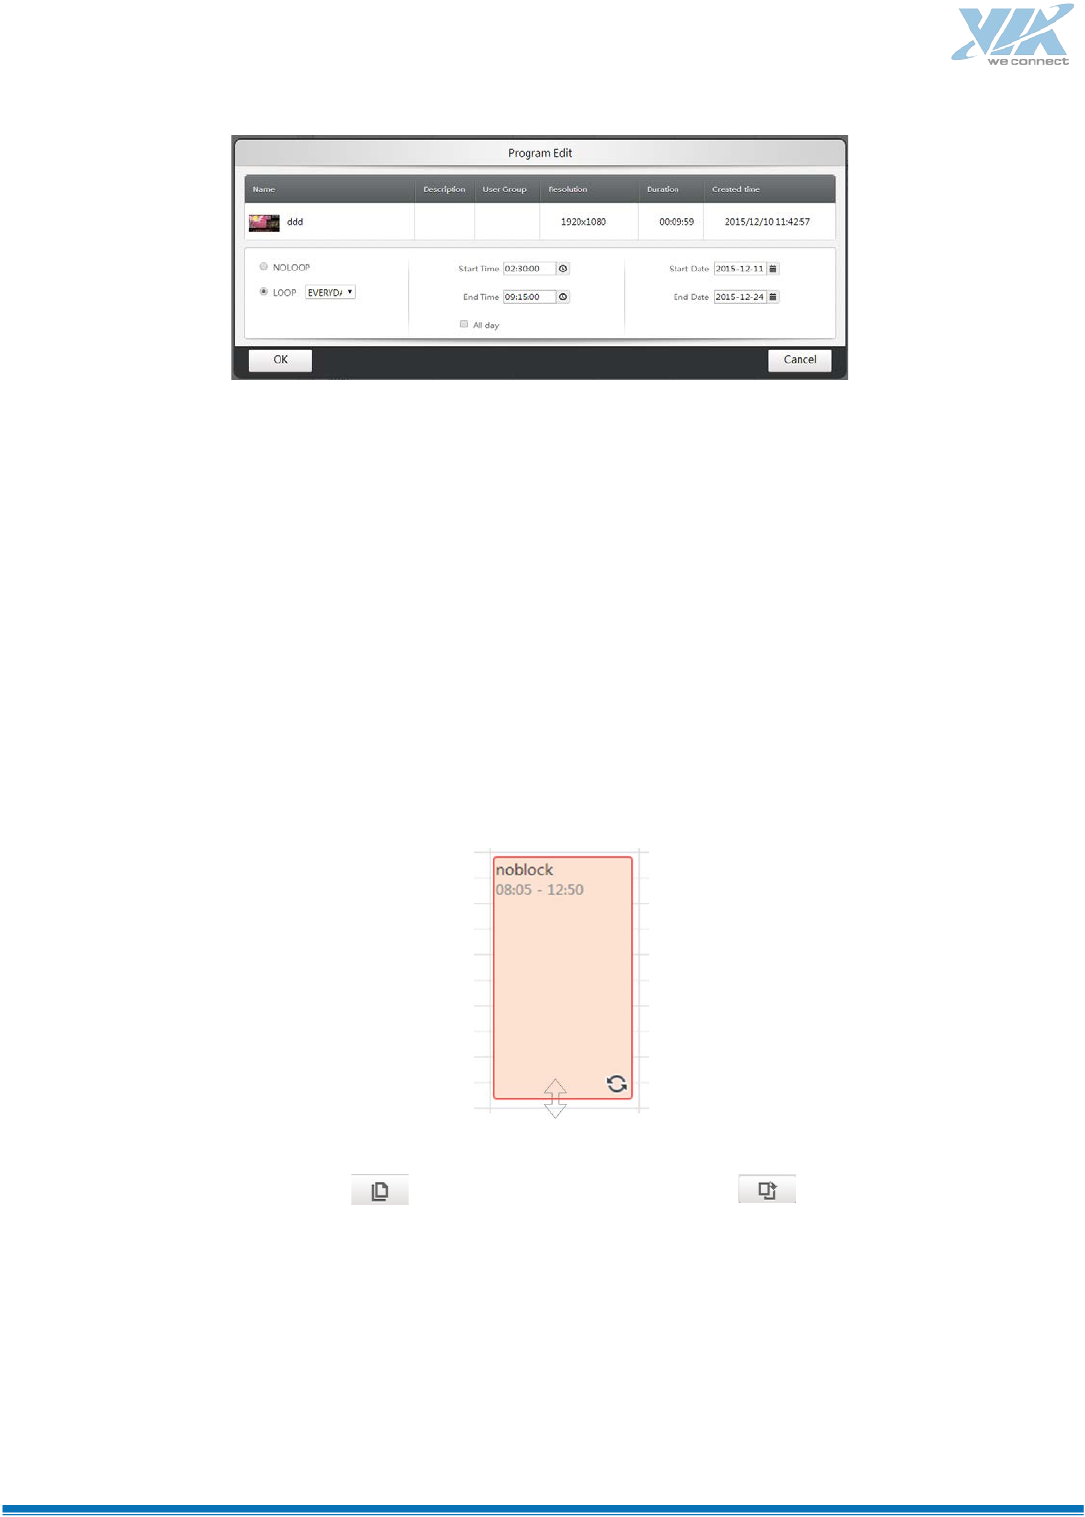
53
The way is common one. User can get the accurate schedule by redefining the start time, end time, start
date, end date and loop mode.
2. Select the schedule, then hold the left mouse and drag the rectangle to modify the start time, end
time, start date and end date. However, the loop mode and the whole playback time will stay.
3. Select the schedule, move the pointer over the top edge or bottom edge of the rectangle, it changes
to a two-way arrow. Drag the two-way arrow to modify the start time or end time. However, the start
date, end date and loop mode will stay, they cannot be modified.
4. Select the schedule, click then set another duration, click to copy:
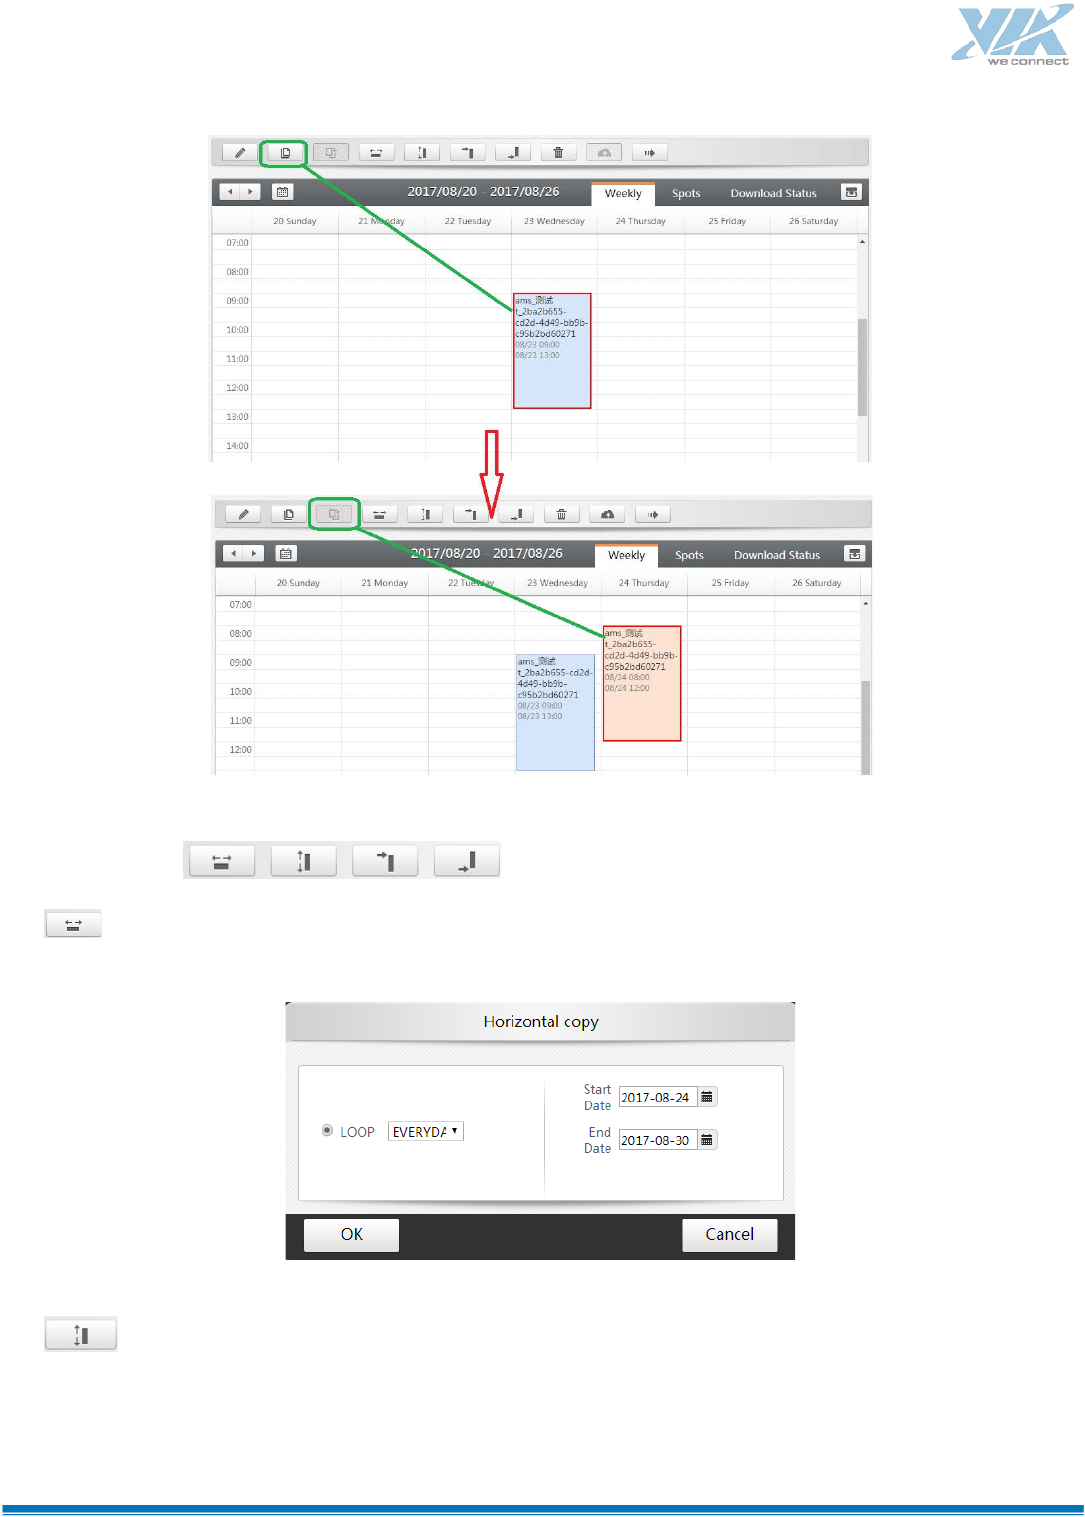
54
5. Click to modify schedule:
:Horizontal copy. User can copy date and loop mode:
:Vertical copy. User can copy start and end time.
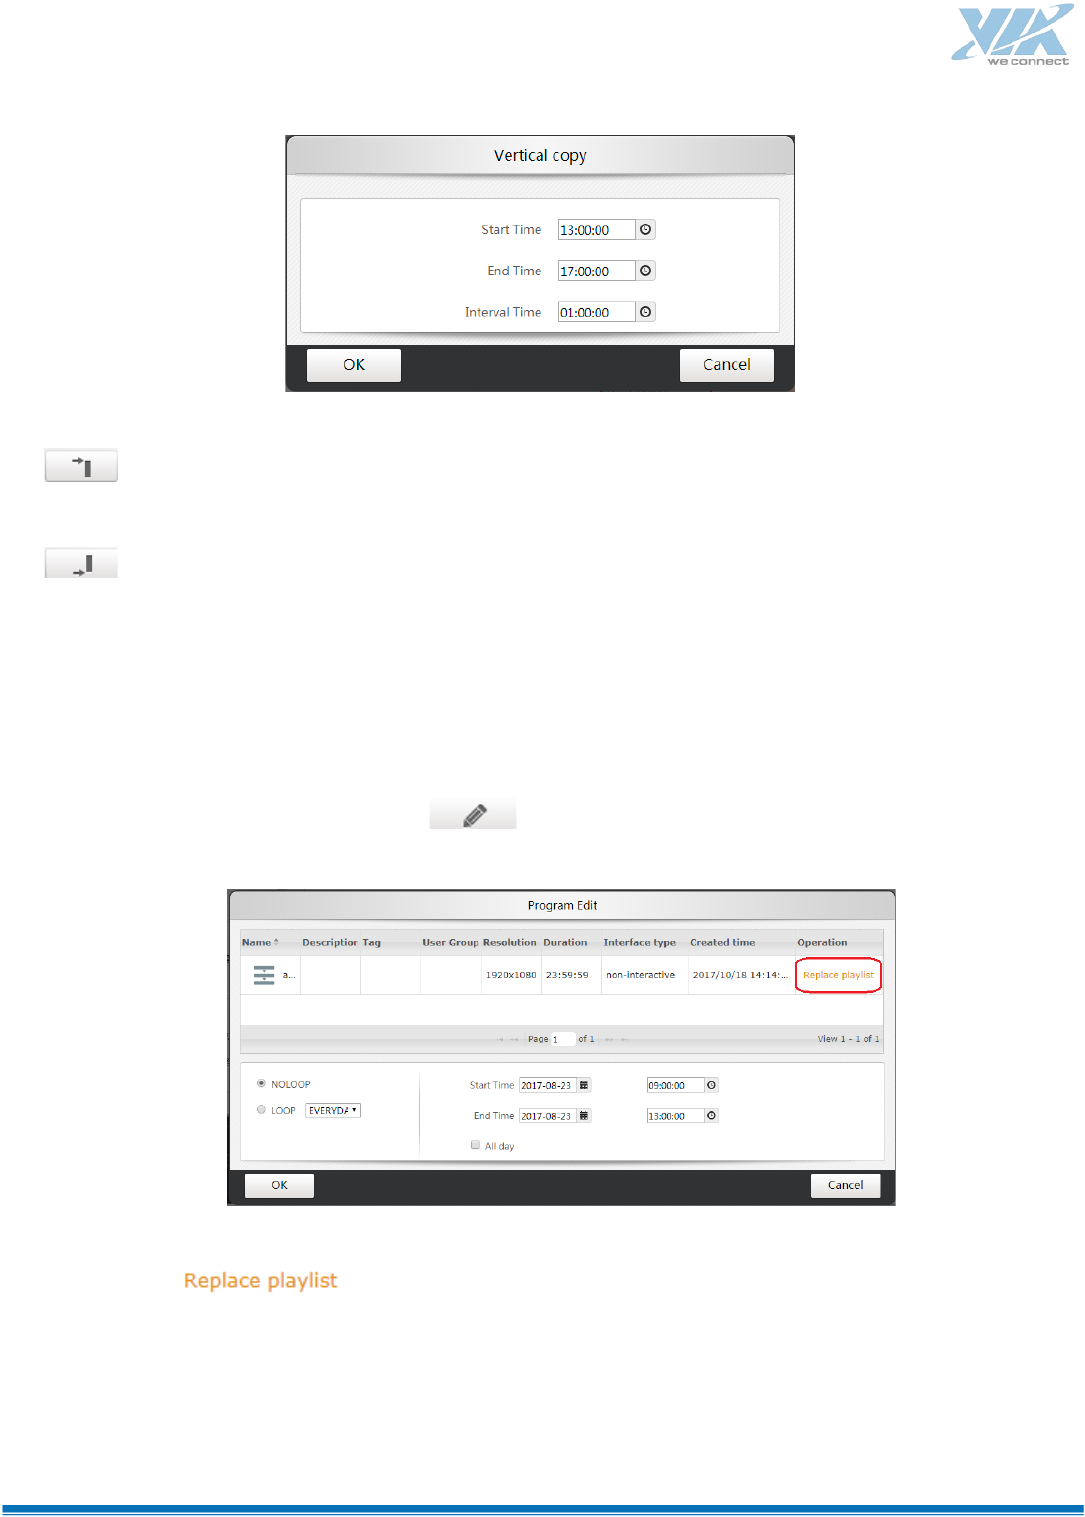
55
:Align to top. The start time is fixed to 0 a’clock. And can not change start/end date and interval
time.
:Align to buttom. The end time is fixed to 23:59. And can not change start/end date and interval
time.
Replace the schedule
Step 1: Select a published playlist, click :
Step 2: Click to select another playlist:
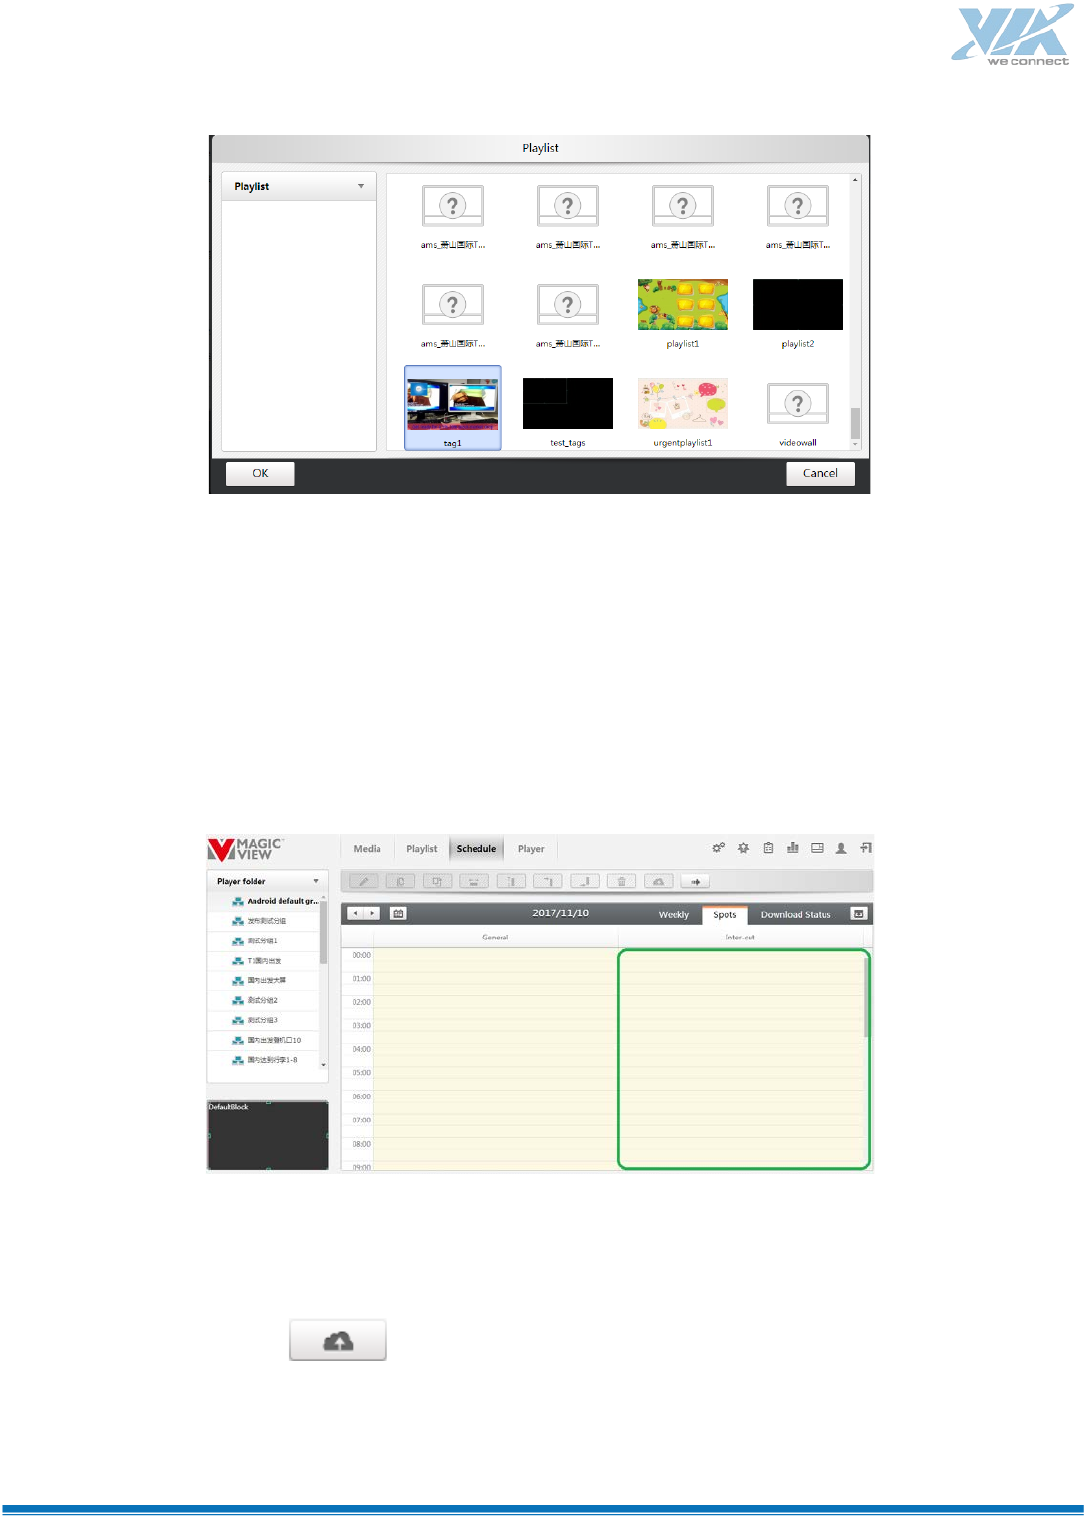
56
Spots
The priority of the spots is higher than scheduled playlist. At the same time, player will playback spot
instead of schedule playlist.
Step 1:Click the label “spots”;
Step 2:Move the pointer to the calendar region. Press the right-button and drag the mouse, the following
dialog box will pop up. Choose playlist and schedule.
Step 3:Click the button to publish the project. The color in the project block will be changed
from orange to blue.
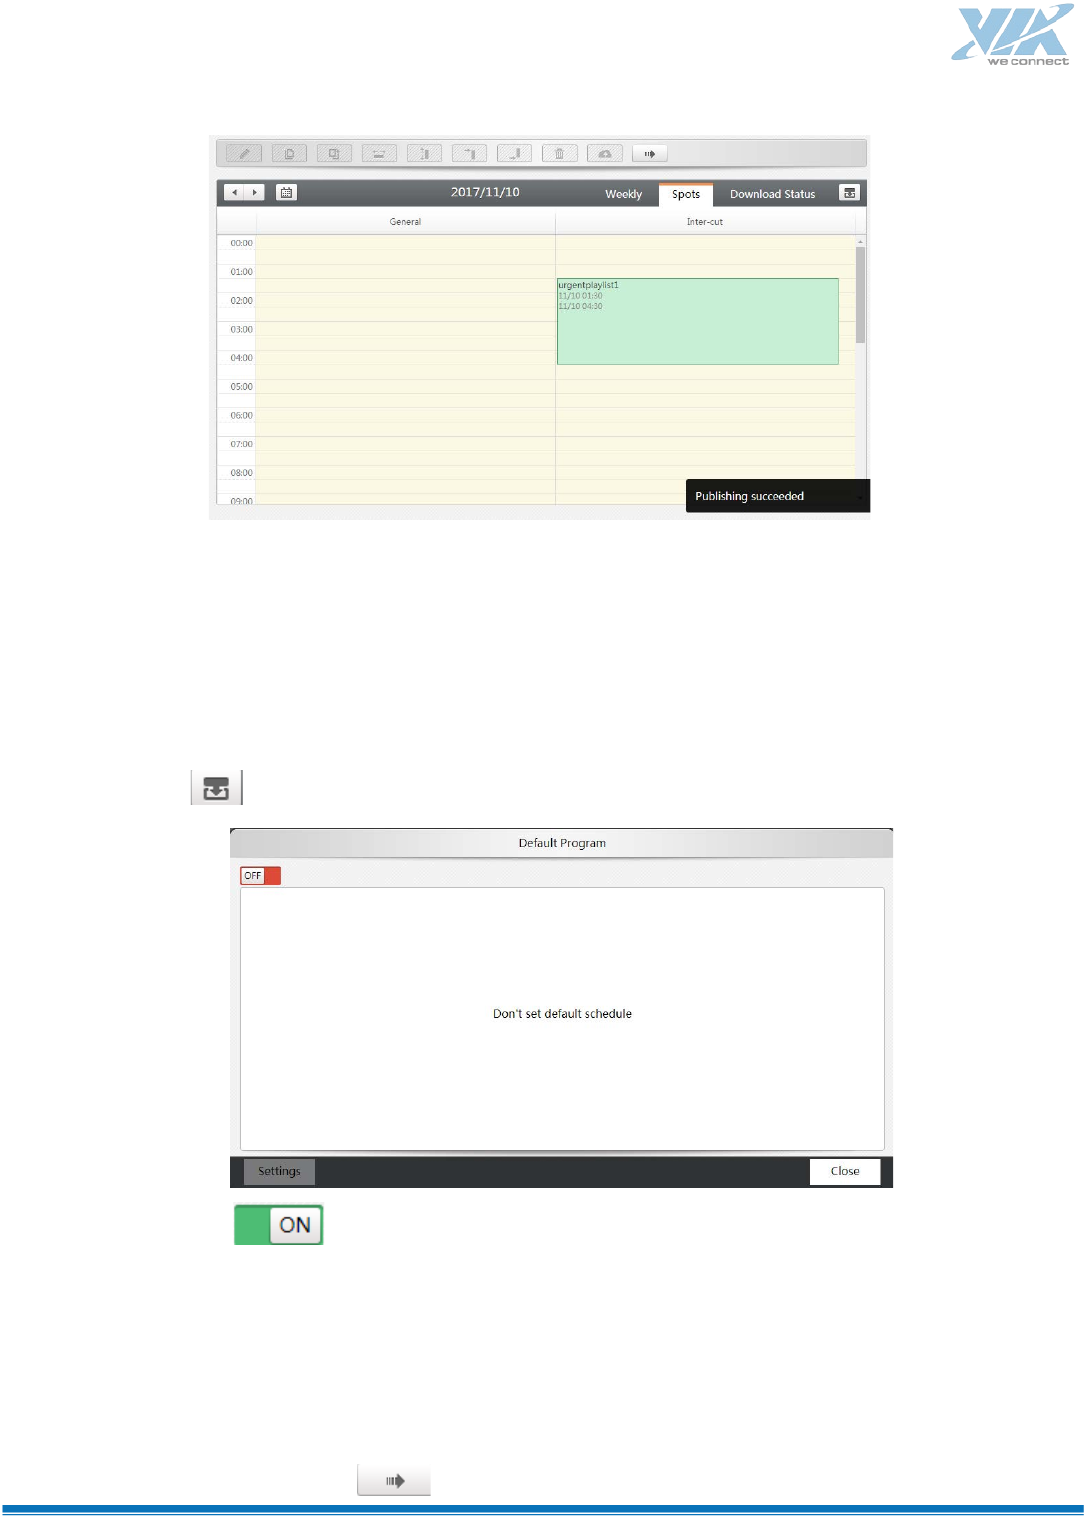
57
Default playlist
The default program can be played in any idle period to avoid the status that player hasn’t program to
playback. And users need not define playlist’s schedule and loop mode of the default program.
Step 1:Click to open the default program page.
Step 2:Switch to , click Settings and select a playlist.
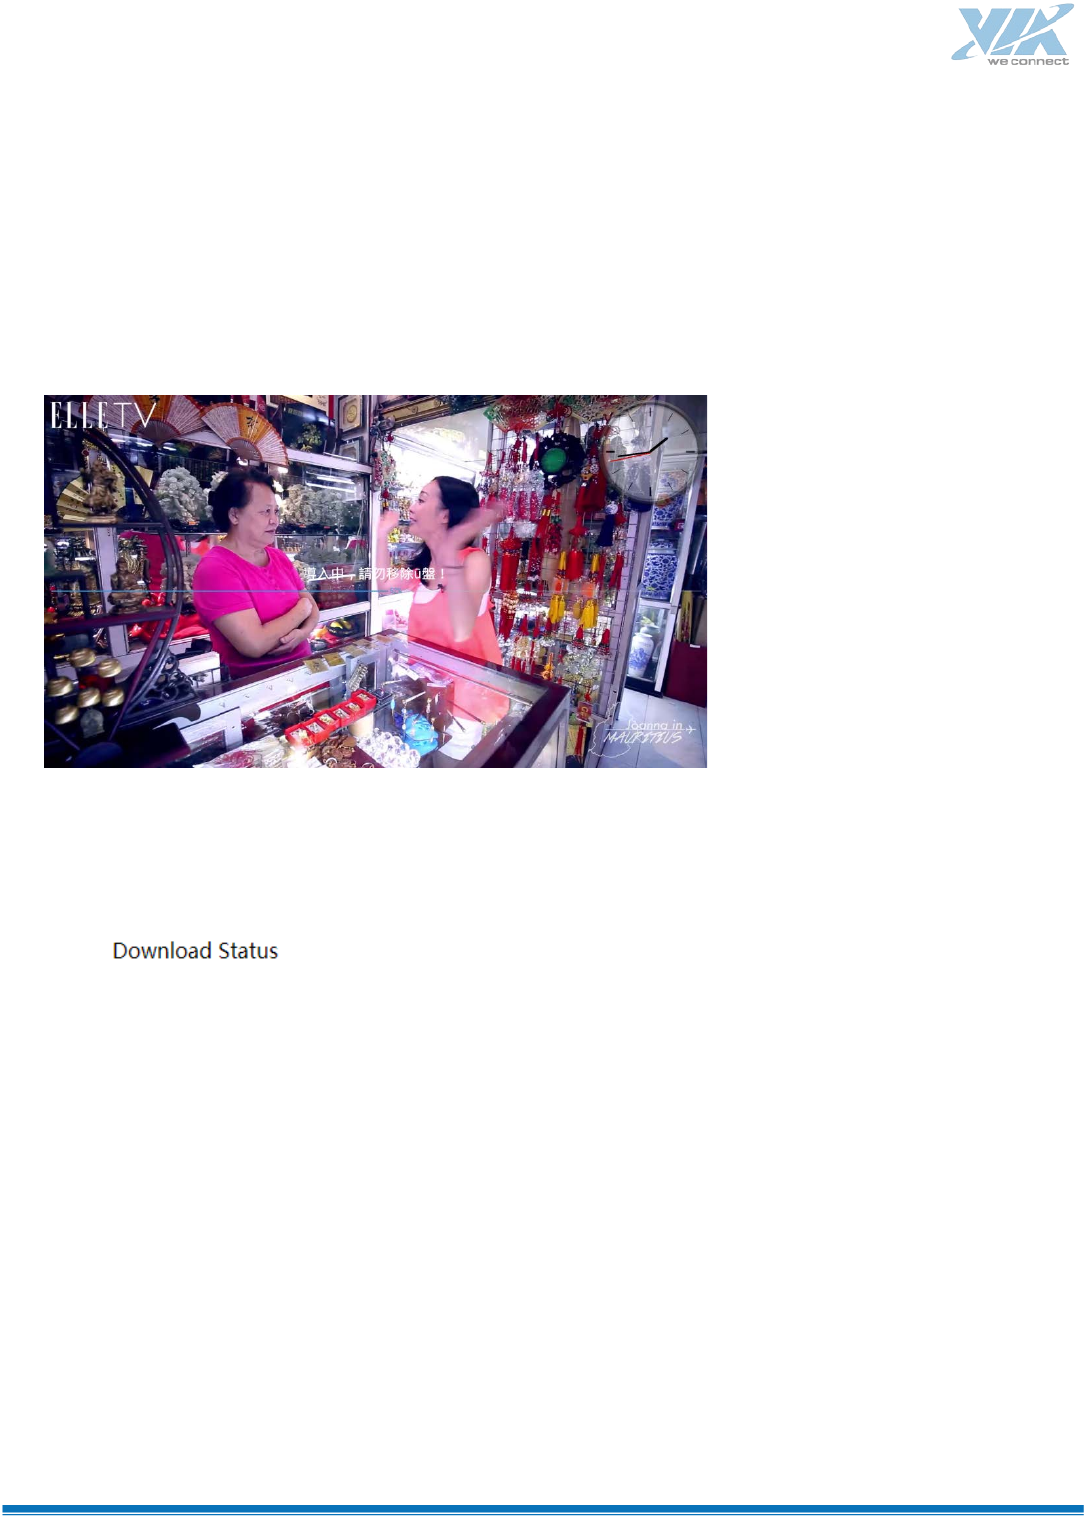
Publish Off-line Playlist
When player is off-line, users can download a playlist to USB disk and plug-in the player to playback.
Step 1:At schedule page, click , then all the scheduled playlists will be downloaded to downloads
58
folder at local machine as the zip package. Such as C:\Documents and Settings\[user name]\My
Documents\Downloads\mgv_offsch_default.zip.
Step 2:Copy the zip package to the root directory of a USB disk.
Step 3:Plug-in the sub disk to player. Player will load the zip package and auto playback according to the
schedule.
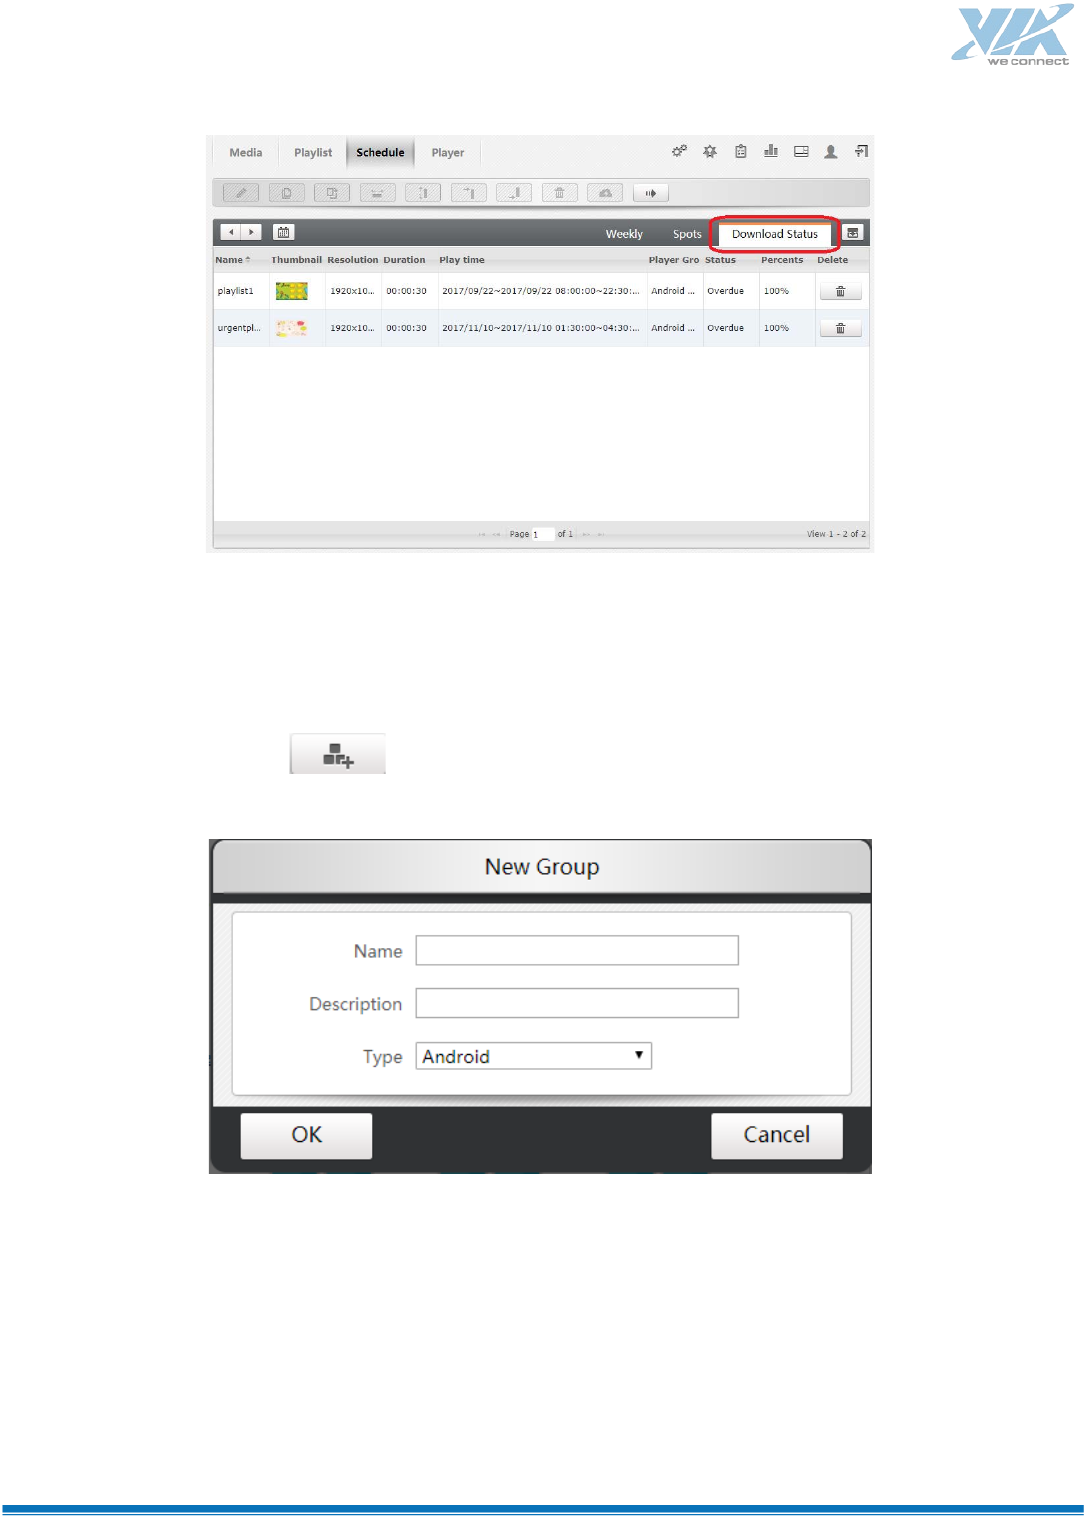
Playlist Download Status
Click to check the download processing of each playlist.
The table does not include urgent cases and preload playlists.
If the playlist’s status is “preparing”, it can not be deleted.
59
How to create a player group
Step 1:Click the button , the following dialog box will pop up.
Note:
1. There is a default group named android default group.
2. Once the player is successfully configured, it will be automatically added into the default group.
Create videowall group(Mainstreams)
60
If users want to combine the players as a videowall, please refer to (Mainstreams) Combine VideWall
Click to revert to normal group.
Create Synchronized Group
This function implements sync-playing of multi players.
Select a player group, click .
Note:
1. Videowall group can not set to synchronized group.
Player/Player Group remote power management
Choose the players or player groups to set remote power management.
:Remote reboot;
:Remote shutdown;
:WOL.
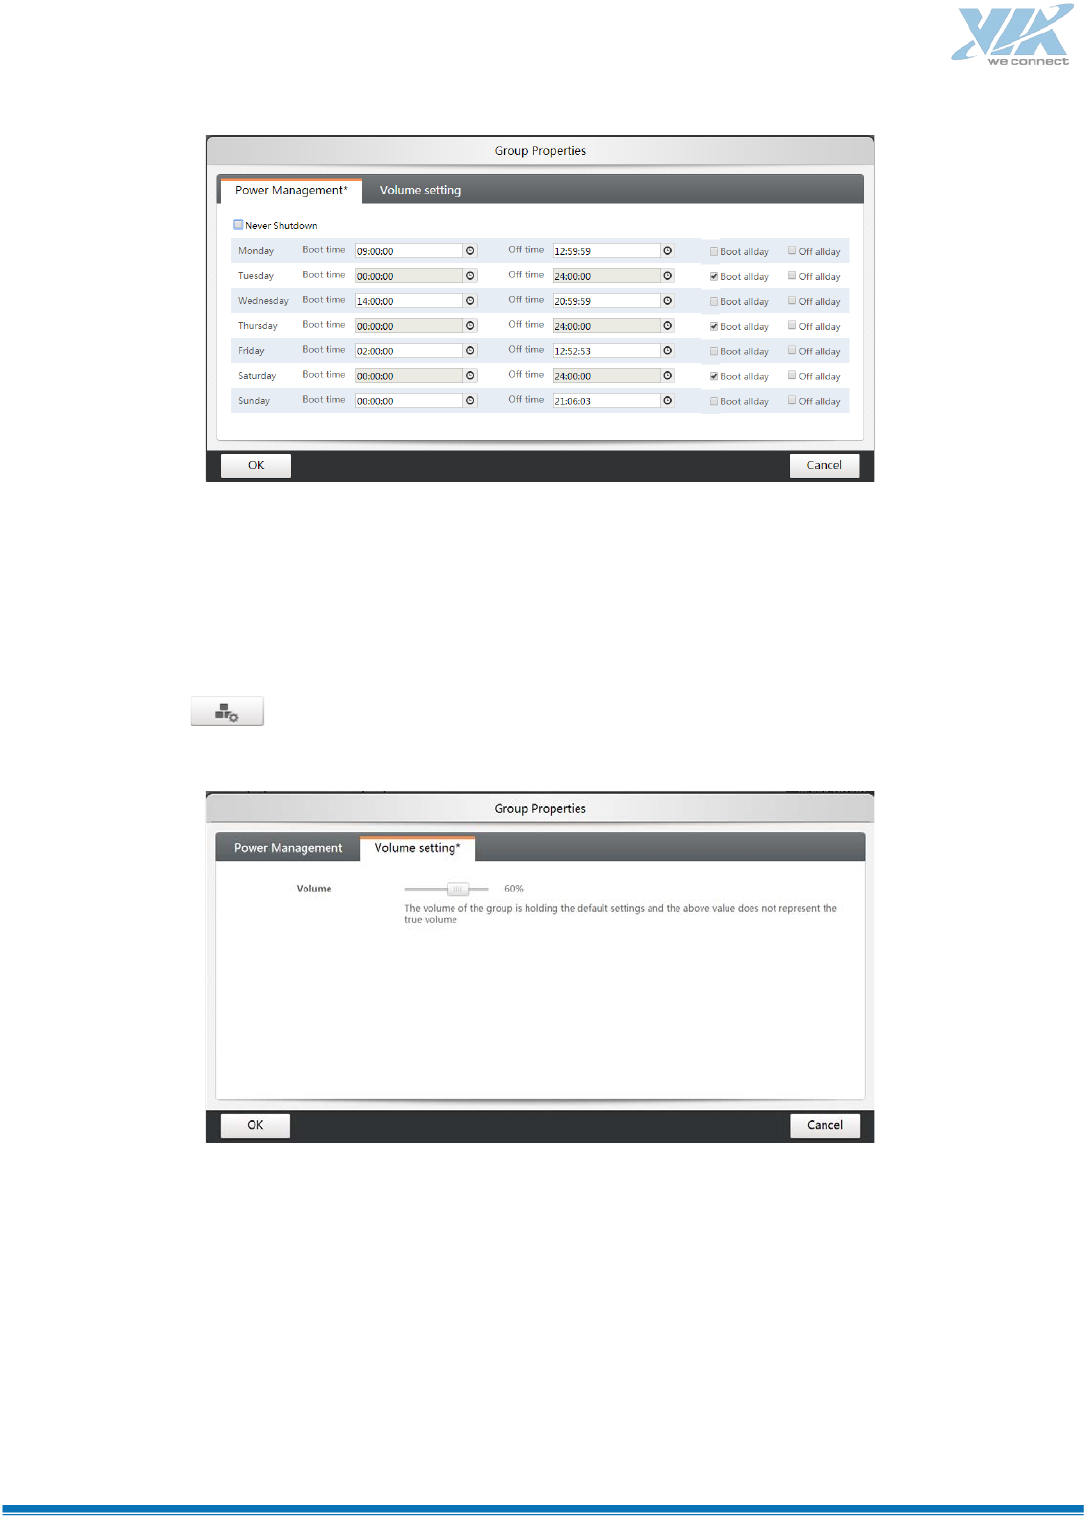
Player groups power on/off on schedule
Step 1:Choose a player group:
Step 2:Click , and set the boot/off time:
Step 3:Edit power on/off time.
61
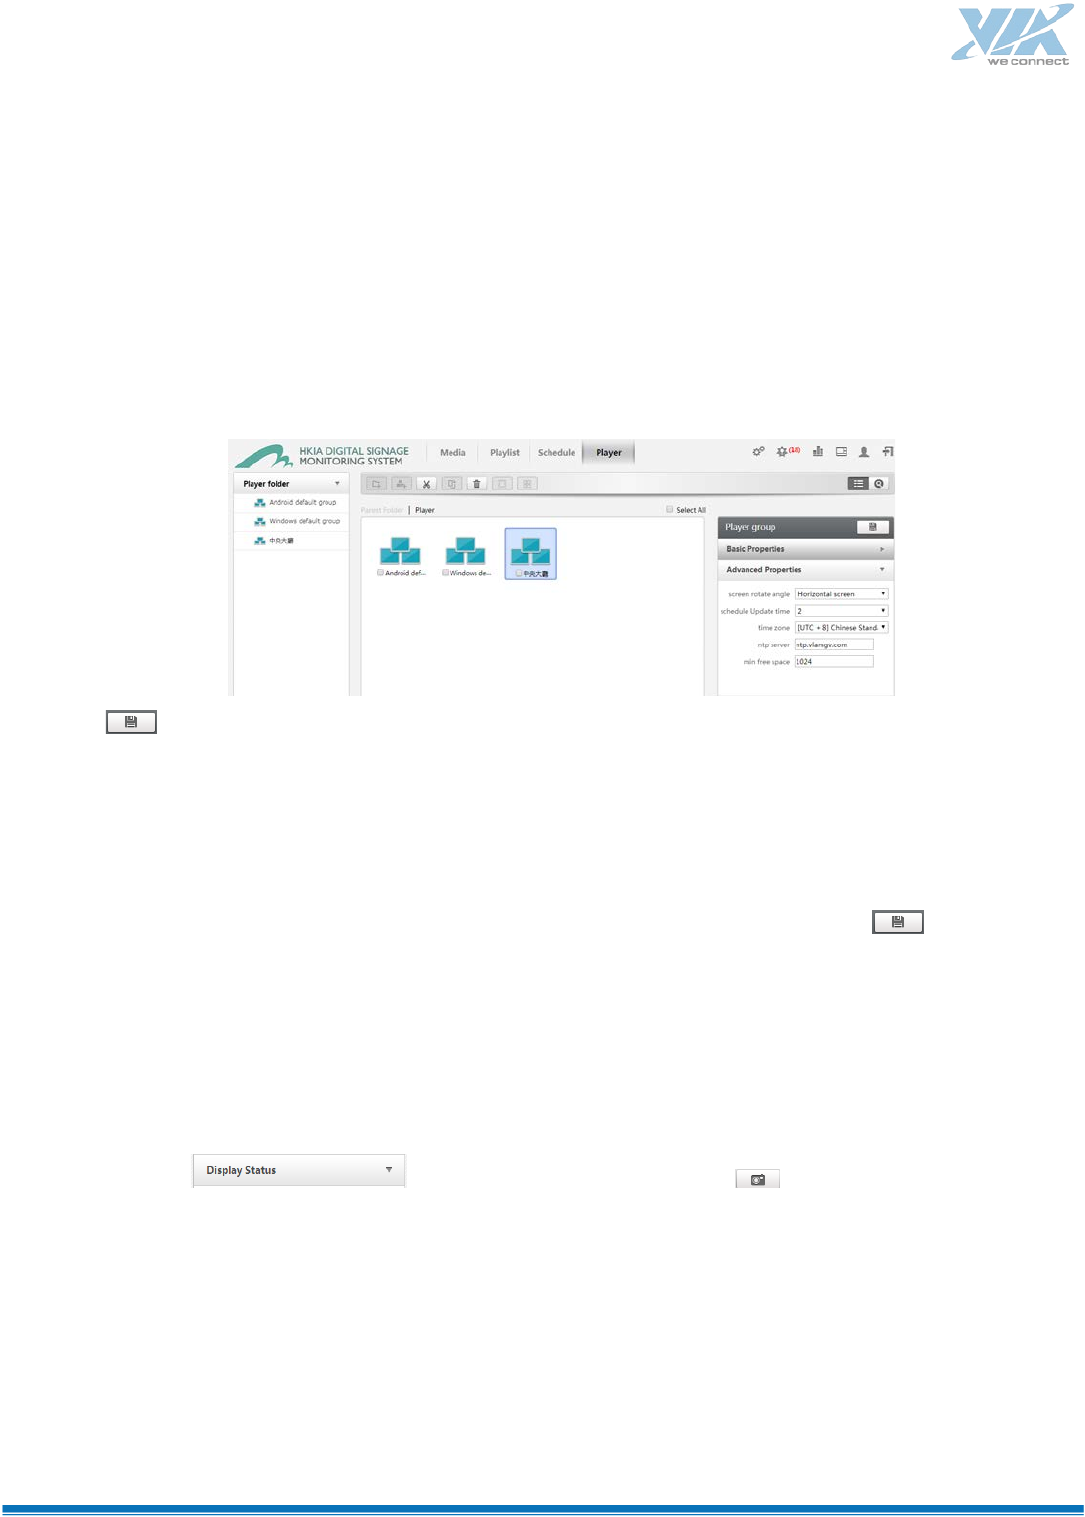
Volume Setting for Player Group
Step 1:Select a player group;
Step 2:Click :
62
Player Groups’ Advanced Properties
You can set more properties of group: screen rotation, time zone, ntp server and mini free space of player.
Schedule update time: You can set the time of updating schedule in daily, e.g. Update schedule in 2:00 am in
every day.
Click to save.
Player Basic Properties
User can modify player basic properties such as name, description and owner. Click to save.
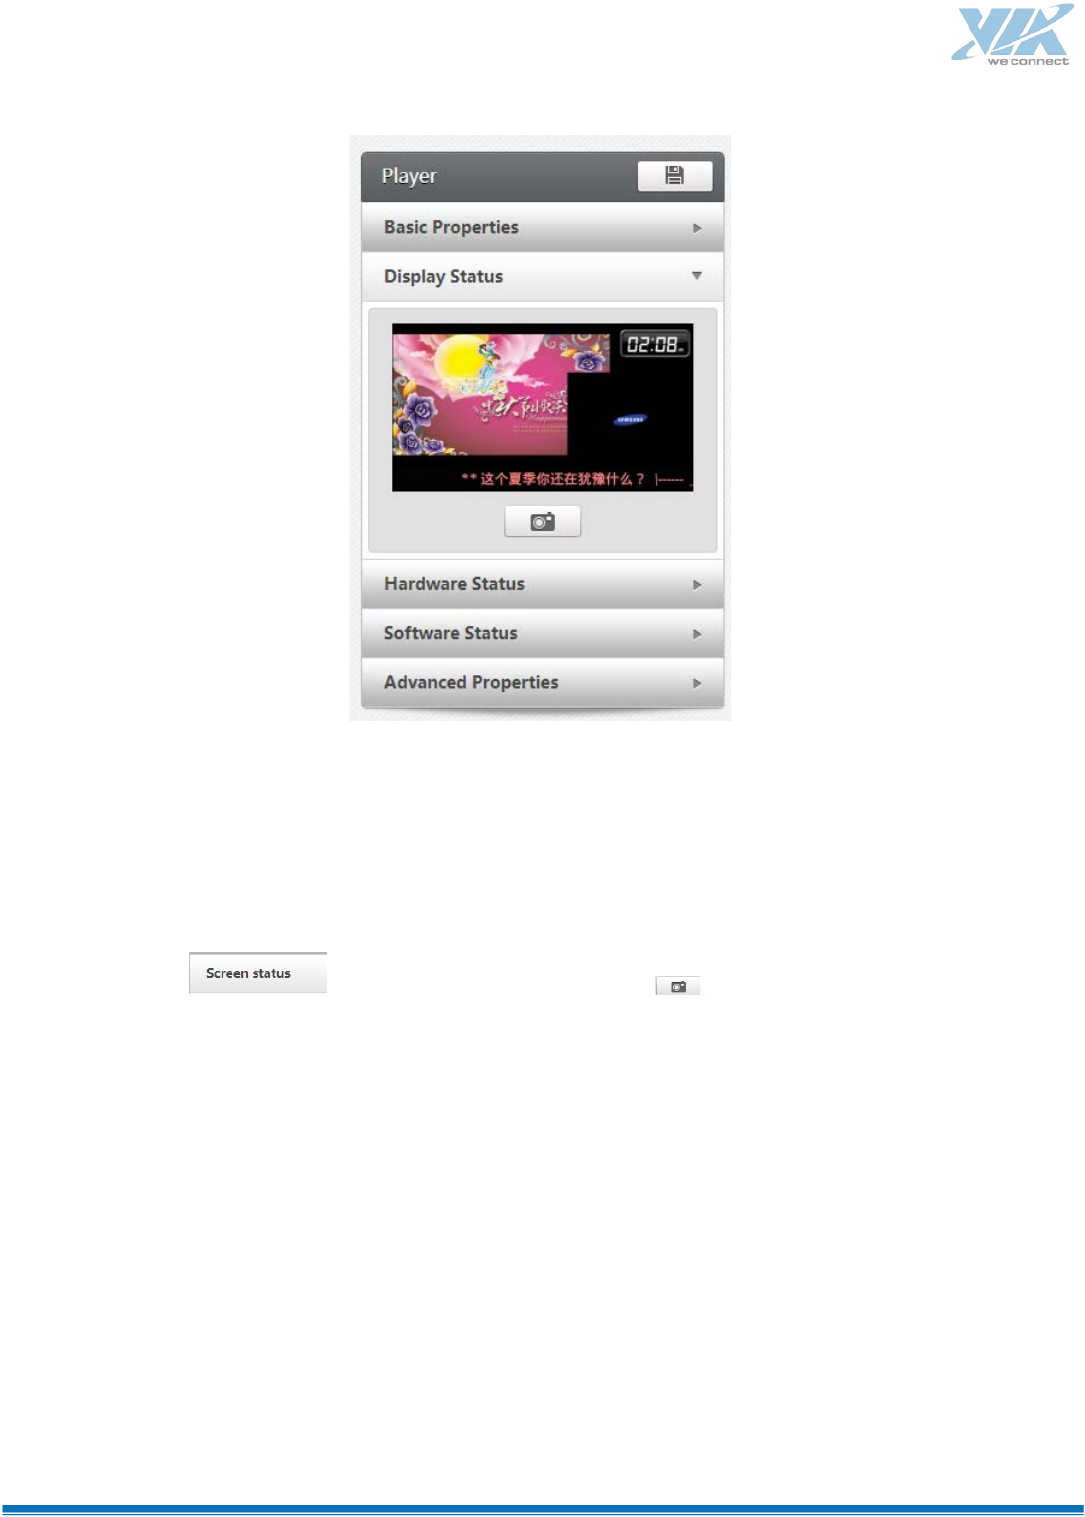
Screenshot
Step 1:Choose the player:
Step 2:Click label at right column, then click to snapshot:
63
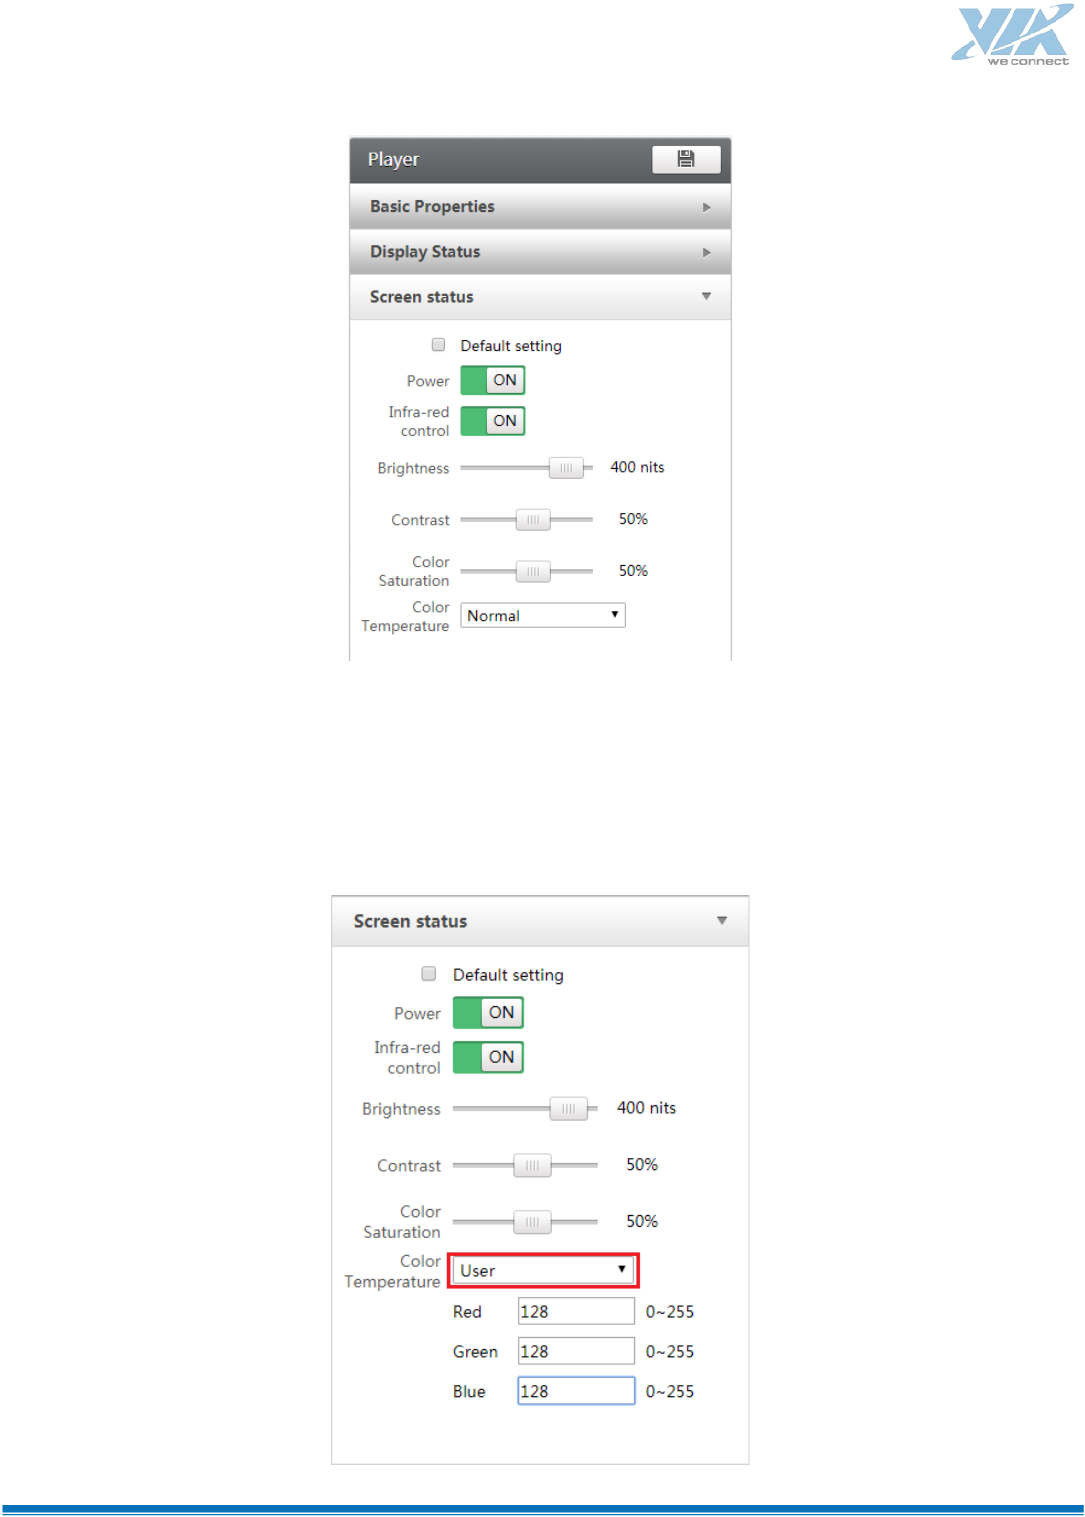
Screen Status
Step 1:Choose the player:
Step 2:Click label at right column, then click to snapshot:
64
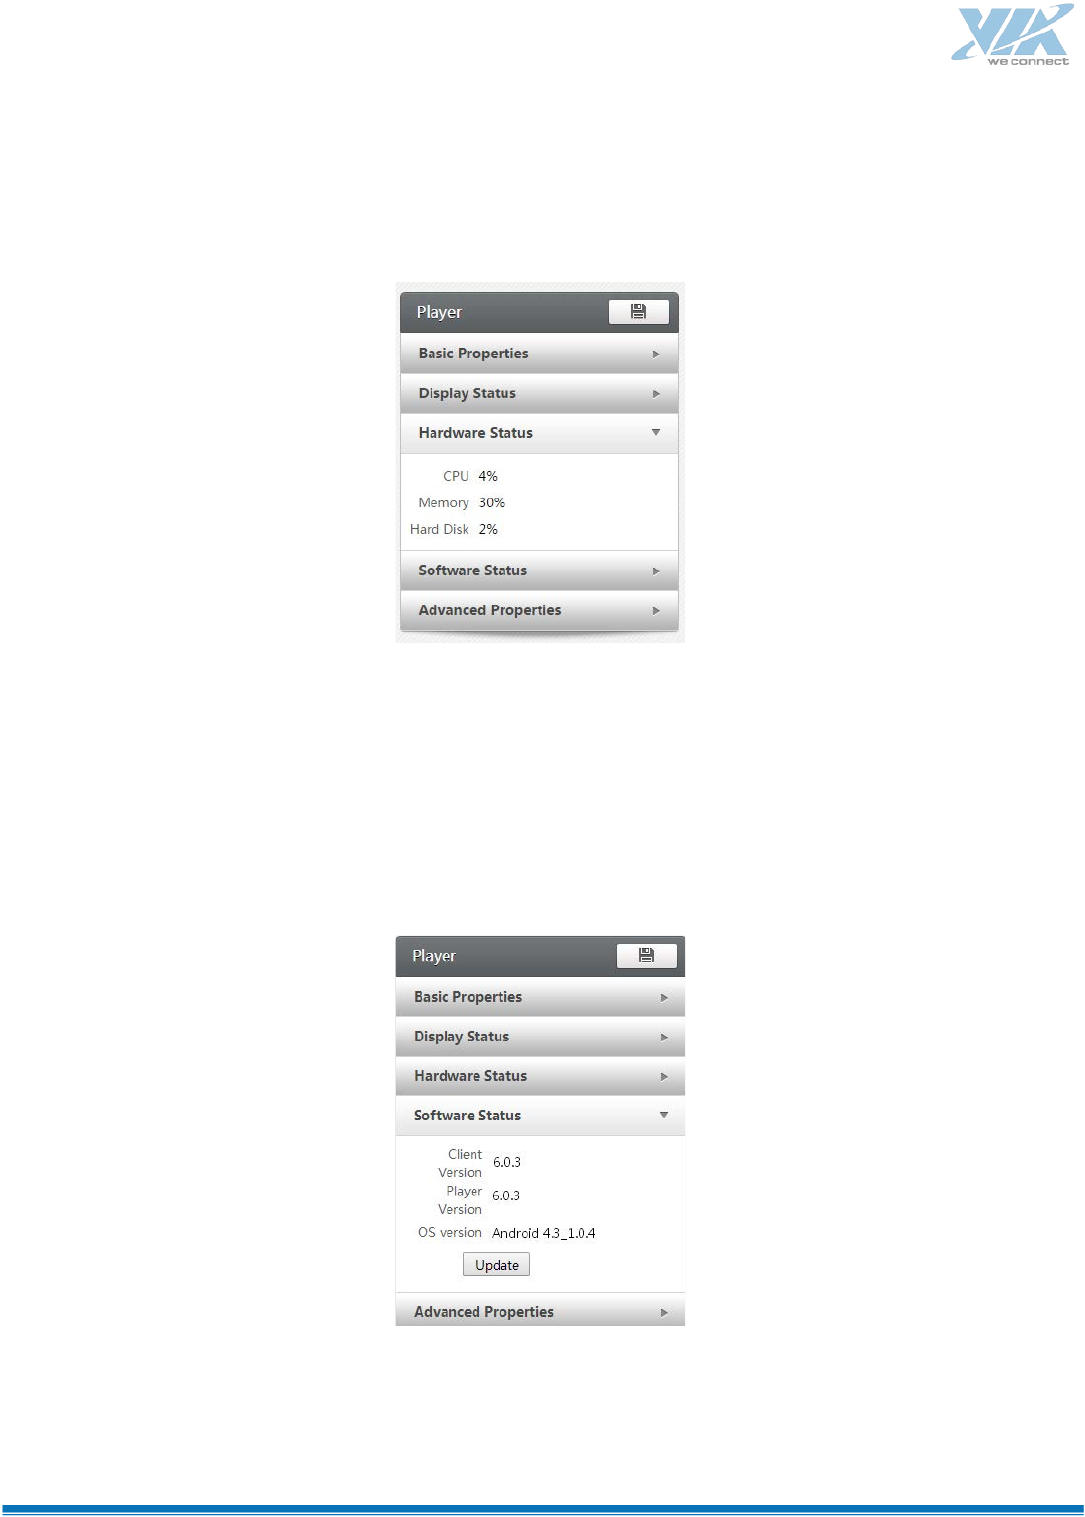
You can get/set screen brightness, contrast, color saturation and temperature, you can power on/off
screen and disable/enable infra-red control.
For color temperature, you can set customized value:
65
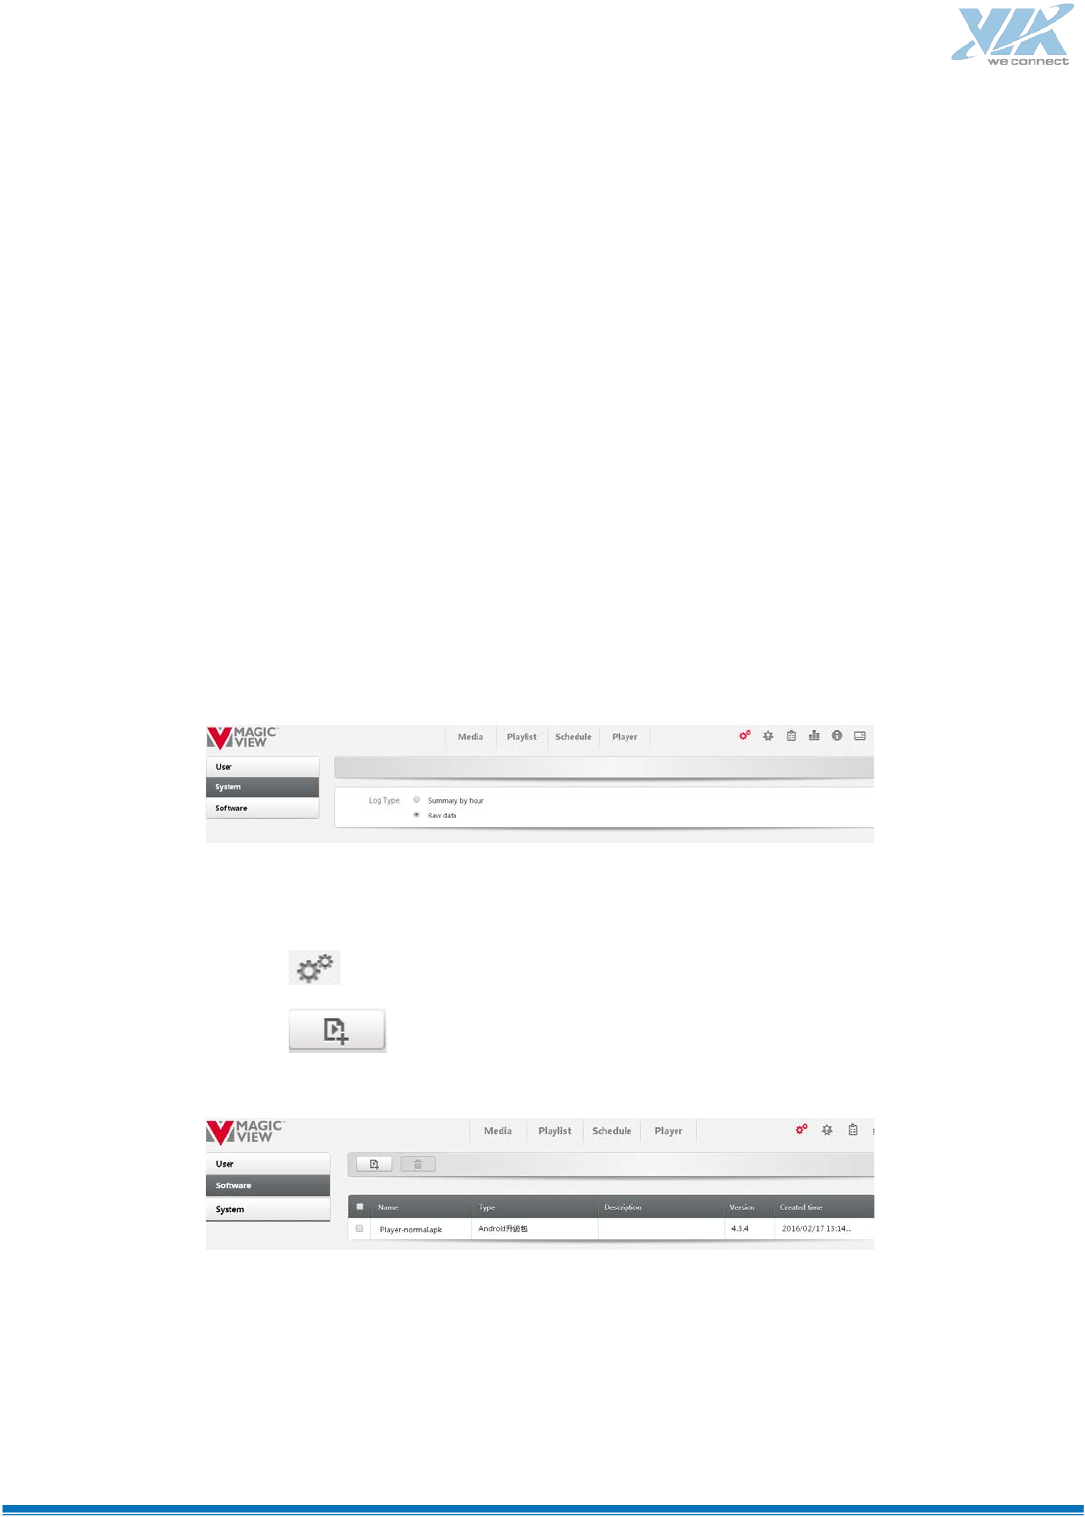
Check Hardware Status
Users can check the usage of player’s CPU, memory and Hard Disk.
Check Software Status
Users can check player’s client version, player version and OS version. If there is a new version of player
software, users can upgrade it by pressing update button.
66
Check Advanced Properties
Player’s advanced properties include:
• Mac address;
• Gateway;
• Mask;
• Command Server IP;
• Media Server IP.
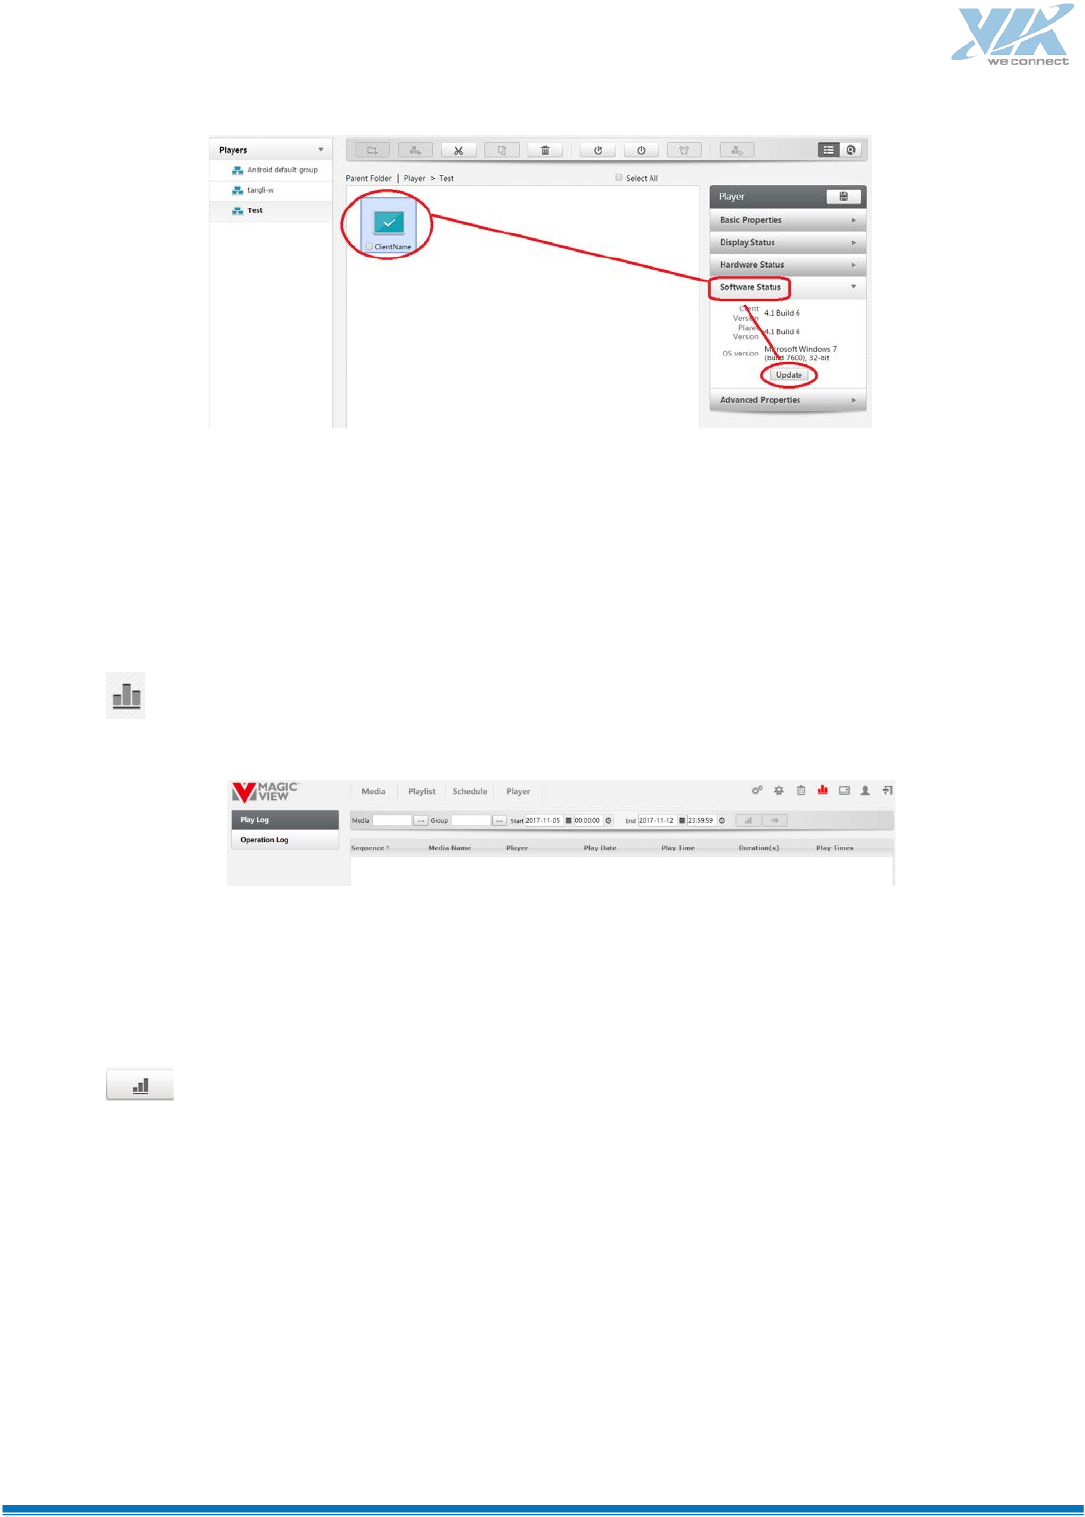
System Setting
It sets log query type:
Update Players
Step 1:Click the button to open the window of system management.
Step 2:Click the button to upload the software package.
Step 3:Select the players at Player Management Page to upgrade.
67
Log
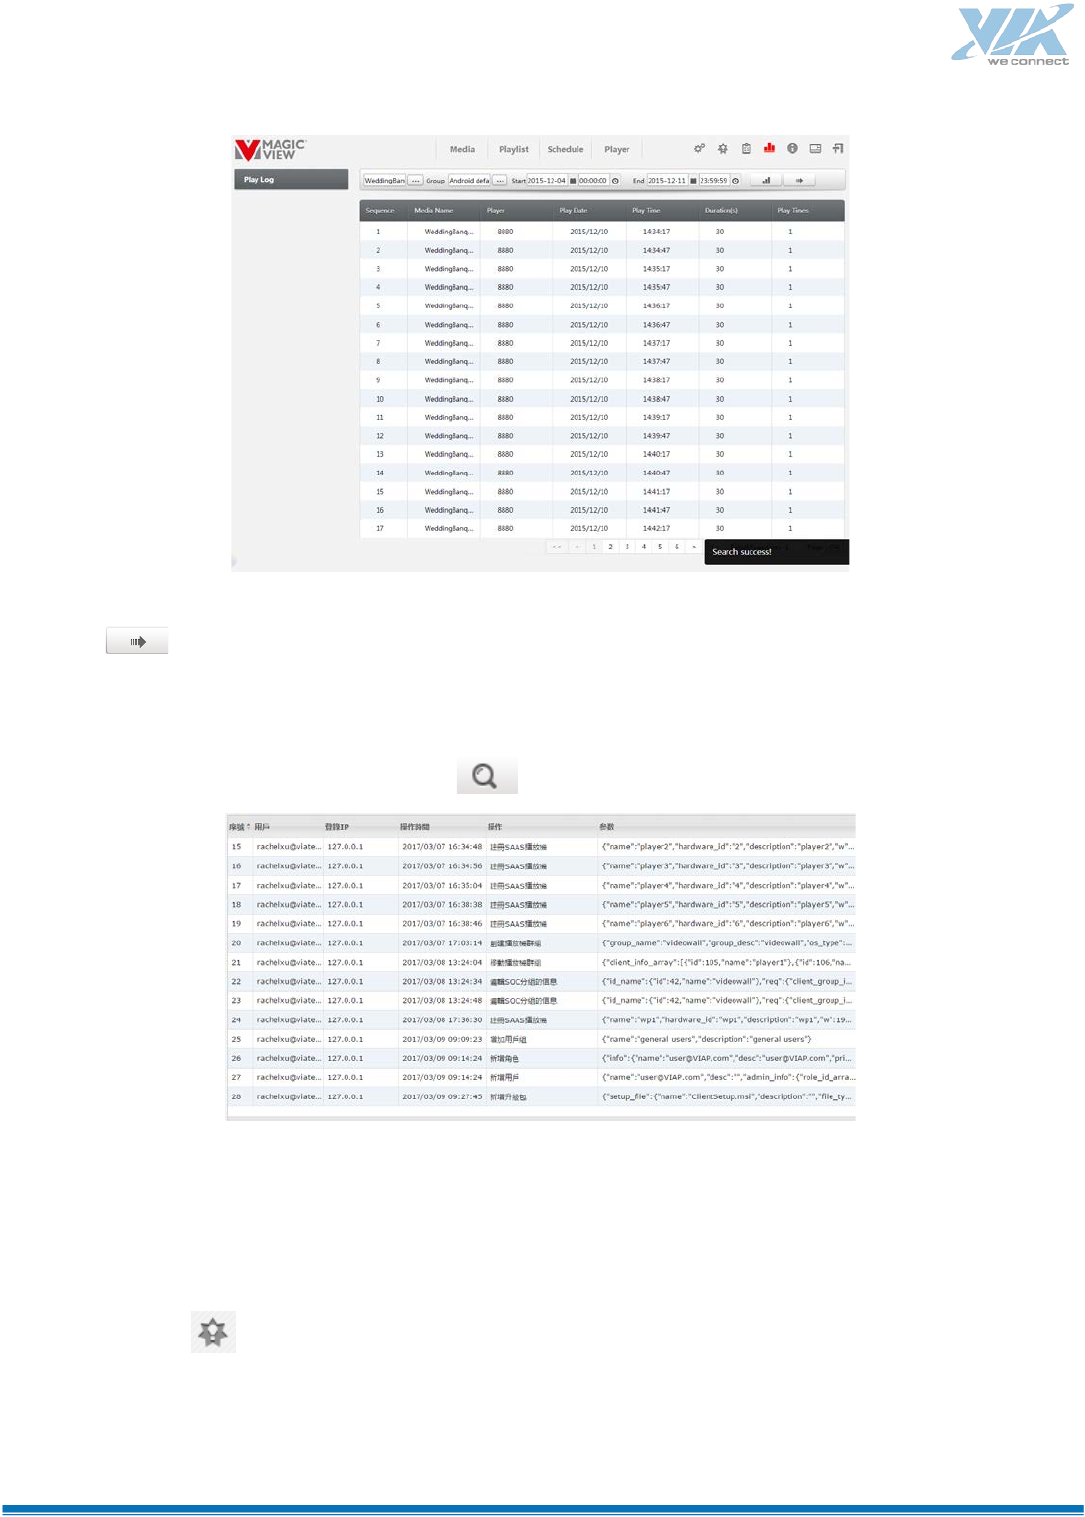
The log includes player log and operation log.
Play log:
Click to enter log page.
Choose the dedicate media file.
Choose player group.
Select start/end date and time.
Click to check the search result.
68
Click to export the results to the excel table.
Operation log:
Select user, start/end date and time, click to check the result.
Urgent Case
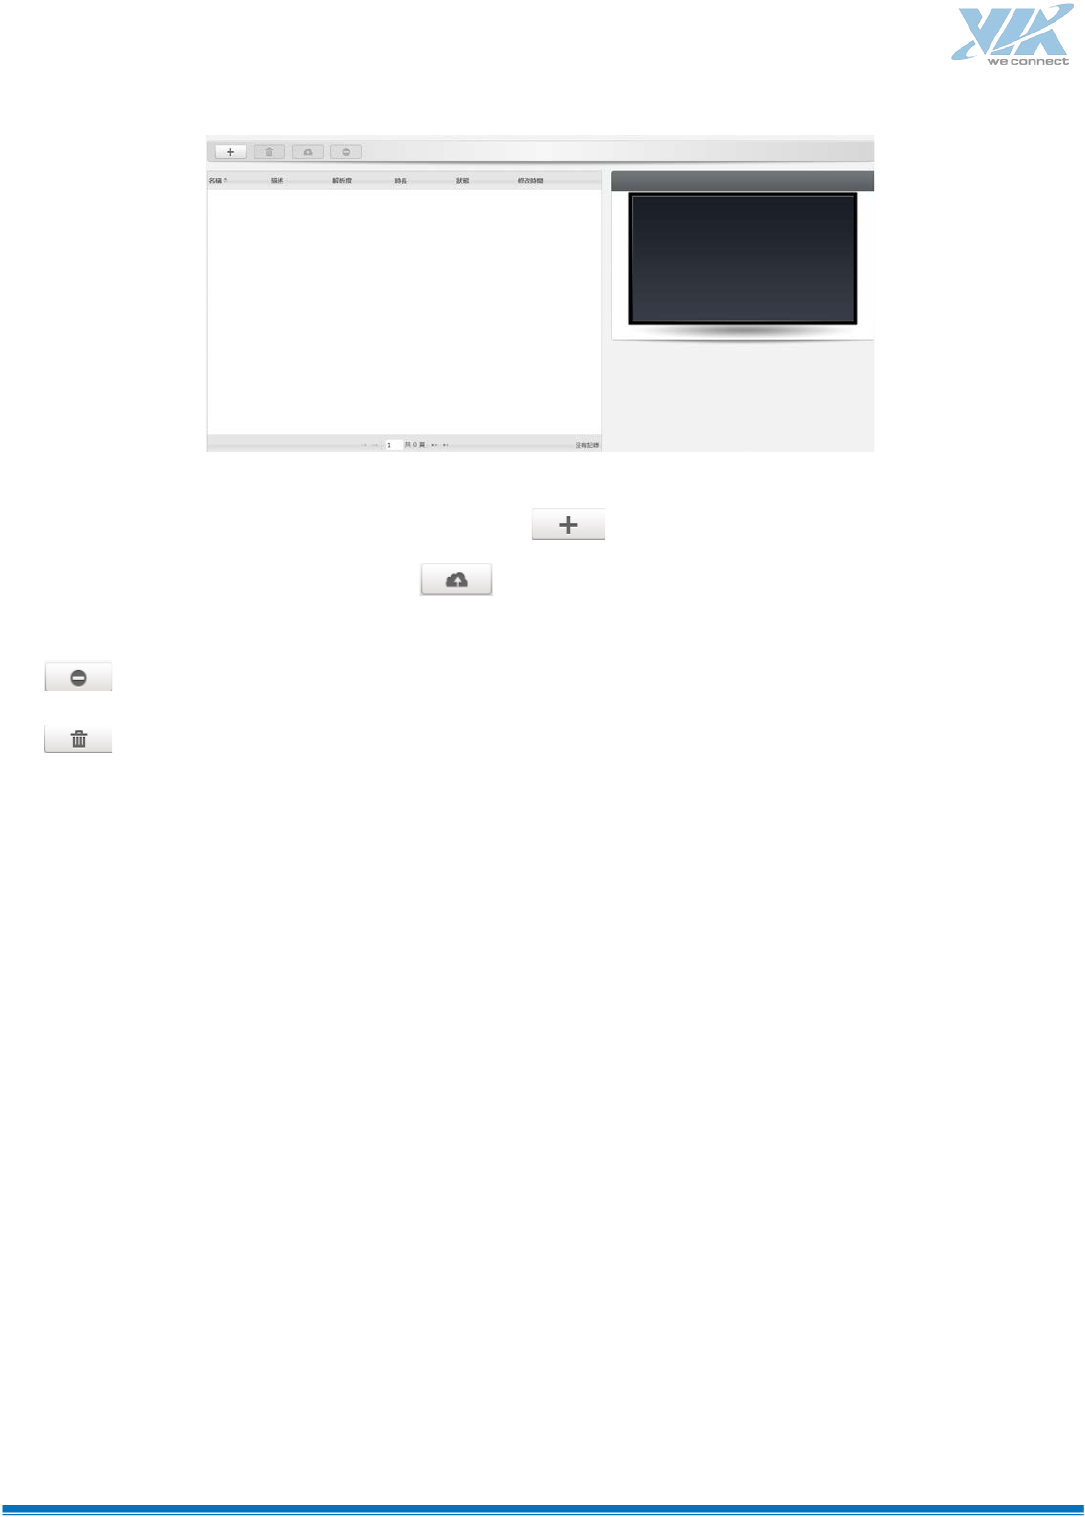
When there is an urgent need to broadcast in time, user can use the function of emergency information.
Once publishing, it will playback immediately.
Step 1:Click enter the urgent case publish page.
69
Step 2:Choose a playlist from the table or click to open playlist table to add.
Step 3:Choose an urgent case, click to publish. Choose a player group or groups and click ok.
:Stop to playback urgent case.
:Delete urgent case from table. User can not delete the case which is playbacking.

70
BIOS Setup
Introduction
The BIOS (Basic Input/Output System) installed in the ROM of your computer system supports Intel®
processors. The BIOS provides critical low-level support for standard devices such as disk drives, serial
ports and parallel ports. It also provides password protection as well as special support for detailed
fine-tuning of the chipset controlling the entire system.
BIOS Setup
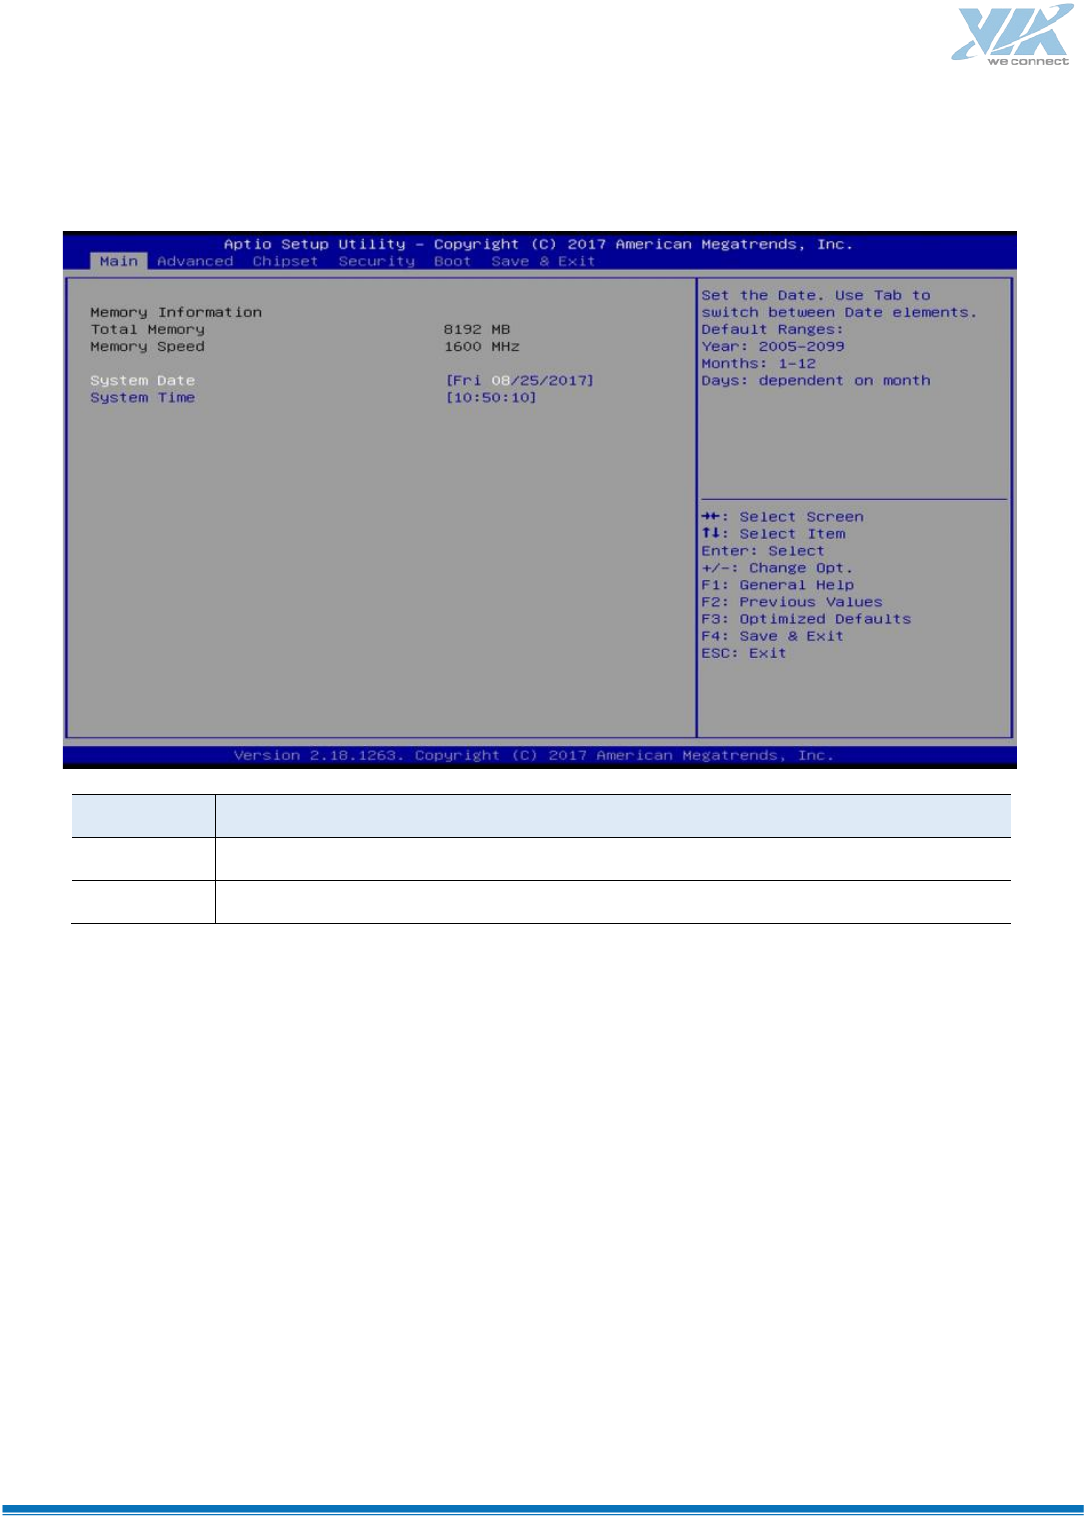
The BIOS provides a Setup utility program for specifying the system configurations and settings. The BIOS
ROM of the system stores the Setup utility. When you turn on the computer, the BIOS is immediately
activated. Press the <Del> key immediately allows you to enter the Setuputility.
BIOS default password:DS@HKAA
Warning: It is strongly recommended that you avoid making any changes to the defaults.
71
Main Settings
BIOS Setting
Description
System Date
Sets the date. Use the <Tab> key to switch between the data elements.
System Time
Set the time. Use the <Tab> key to switch between the data elements.
72
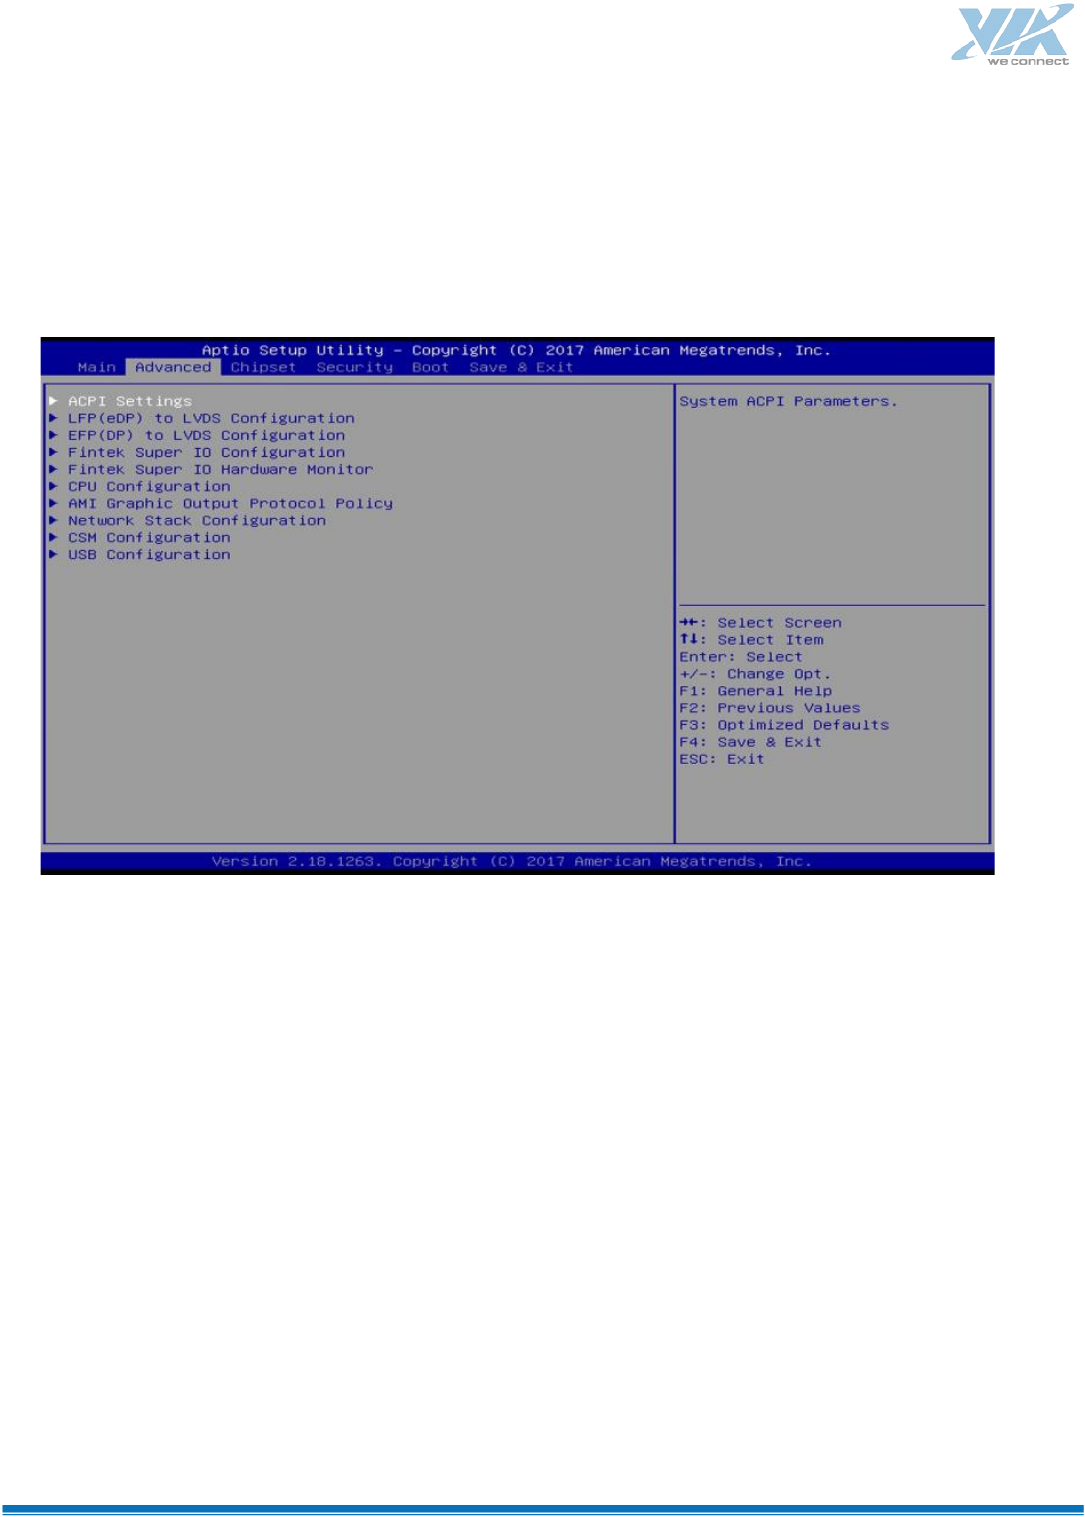
Advanced Settings
This section allows you to configure, improve your system and allows you to set up some system features
according to your preference.
73
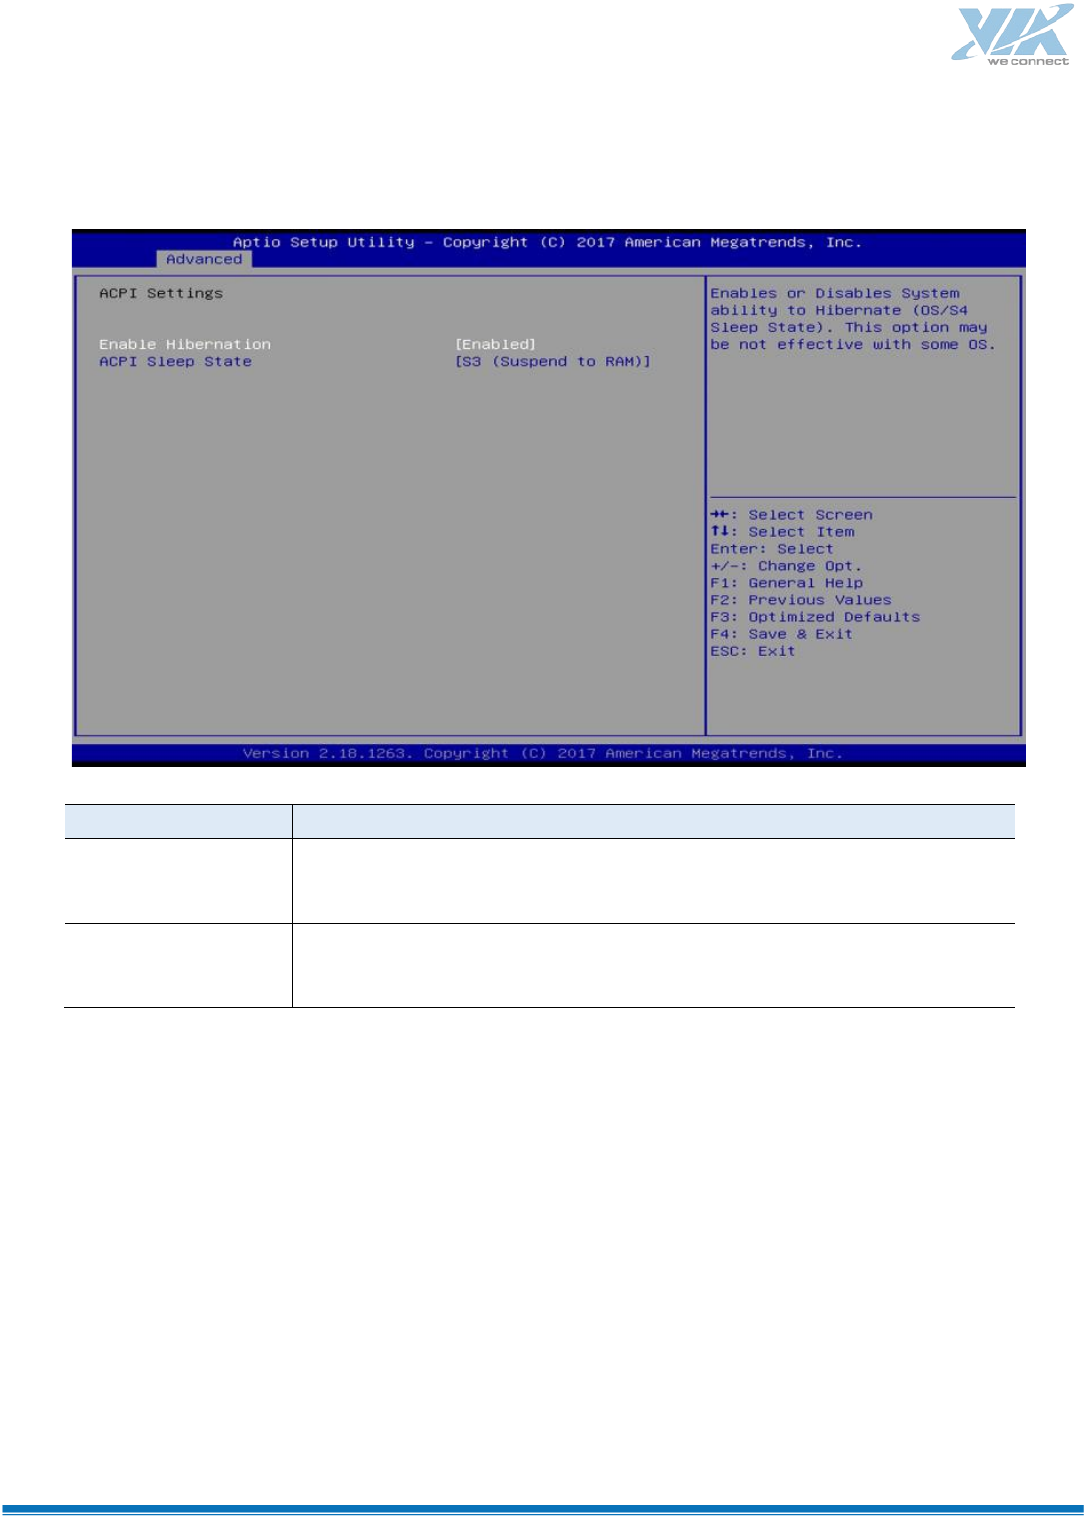
ACPI Computing
BIOS Setting
Description
Enable Hibernation
Enables / Disables the system ability to hibernate (OS/S4 Sleep State). This
option may be not effective with some OS.
ACPI Sleep State
Selects an ACPI sleep state (Suspend Disabled or S3) where the system
will enter when the Suspend button is pressed.
74
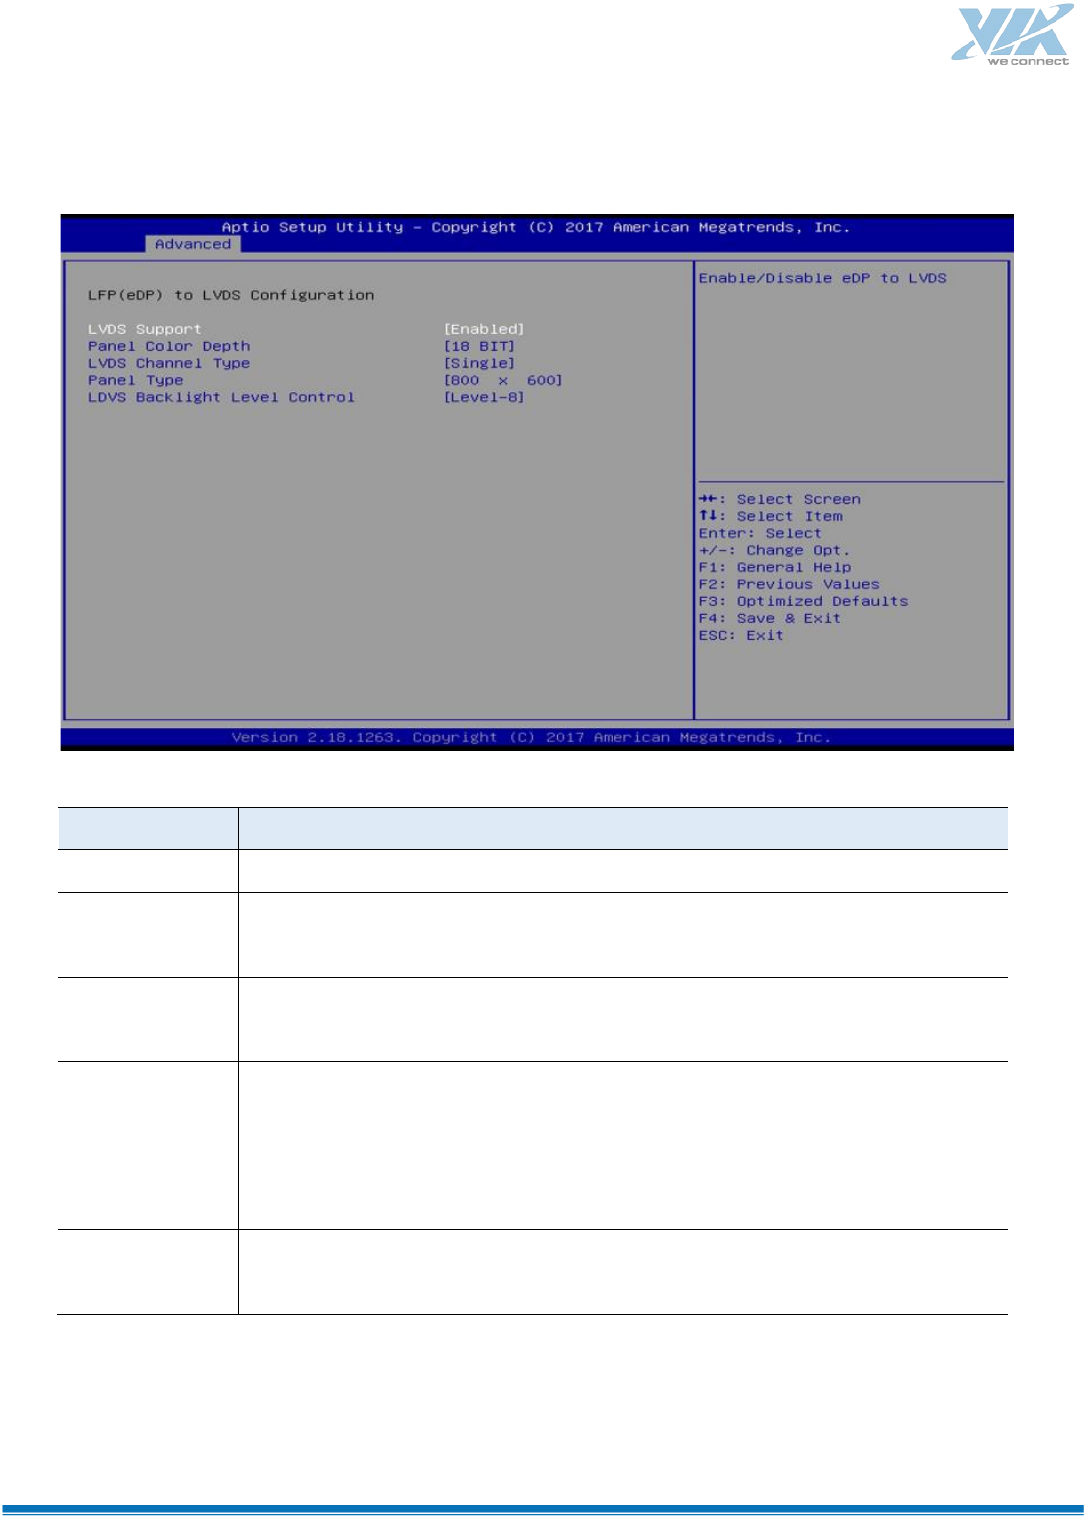
LFP (eDP) to LVDS Configuration
BIOS Setting
Description
LVDS Support
Enables / Disables eDP to LVDS.
Panel Color
Depth
Selects a panel color depth as 18 or 24 (VESA or JEIDA) bit.
LVDS Channel
Type
Sets the LVDS channel type as single or dual channel.
Panel Type
Selects a resolution that fits your panel.
Options: 800 x
600 / 1024 x 768 / 1280 x 1024 /
1366 x 768 / 1440 x 900 / 1600 x 900 / 1920 x
1080
LVDS Backlight
Level Control
Selects from Level 1 to Level 8 for the LVDS backlight.
75
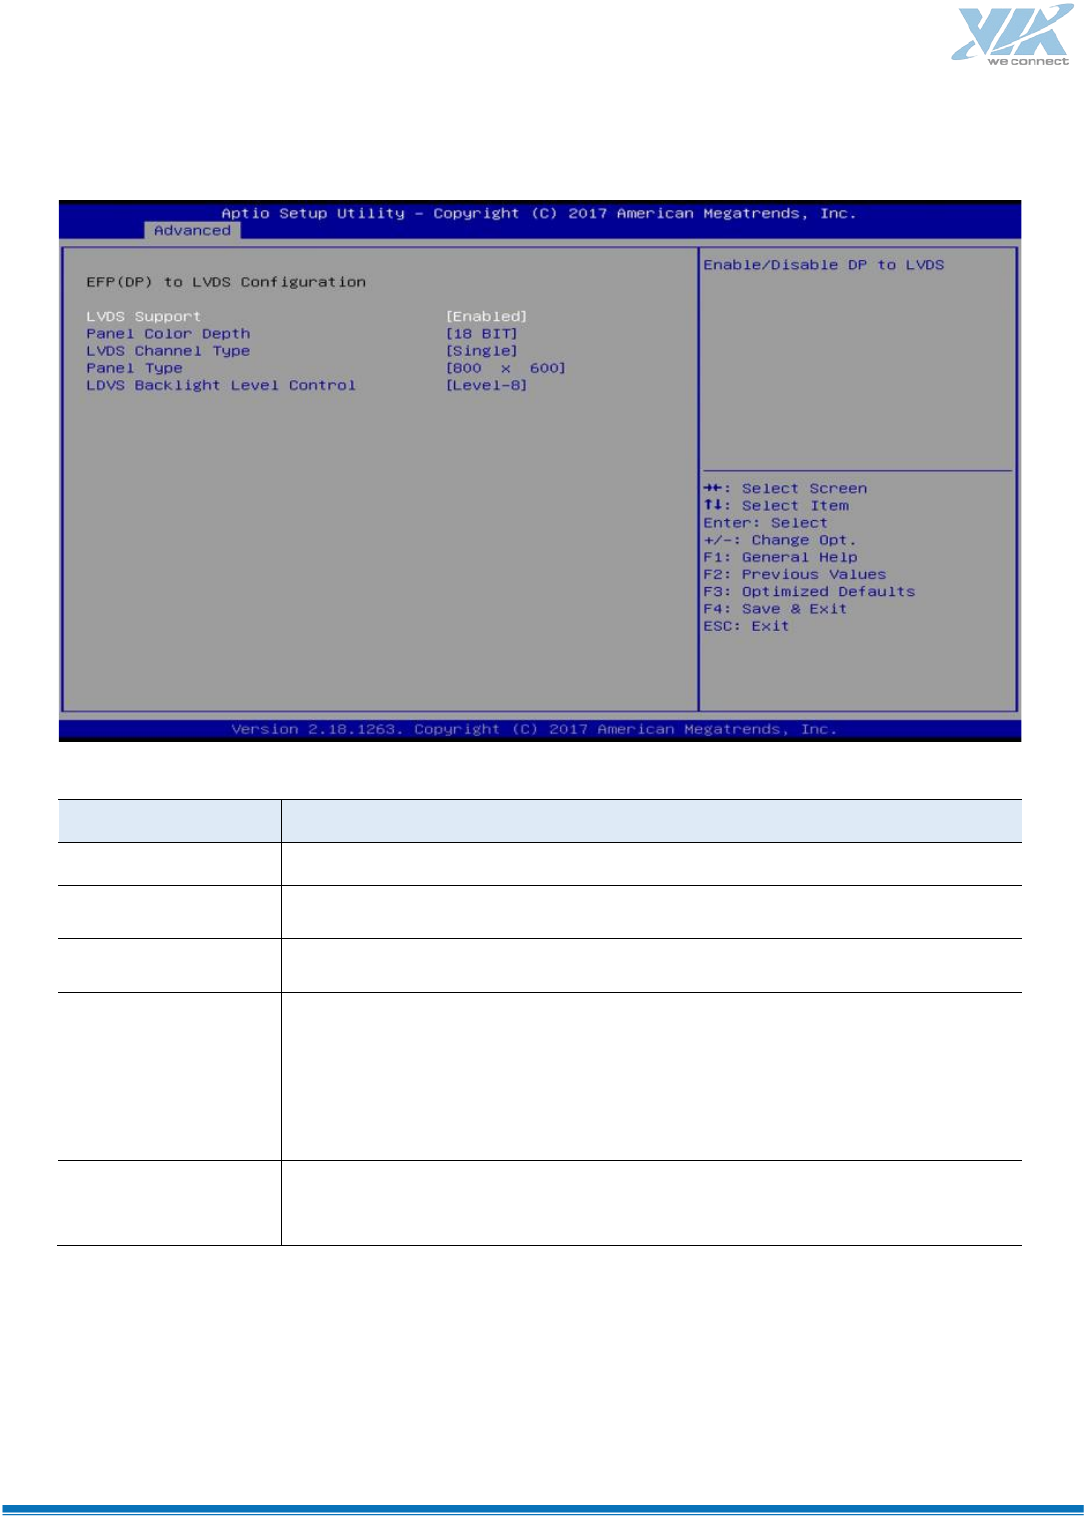
EFP (DP) to LVDS Configuration
BIOS Setting
Description
LVDS Support
Enables / Disables DP to LVDS.
Panel Color Depth
Selects a panel color depth as 18 or 24 (VESA or JEIDA) bit.
LVDS Channel Type
Sets the LVDS channel type as single or dual channel.
Panel Type
Selects a resolution that fits your panel.
Options: 800 x 600 / 1024 x
768 / 1280 x 1024 /
1366 x 768 / 1440 x 900 / 1600 x 900 / 1920 x
1080
LVDS Backlight Level
Control
Selects from Level 1 to Level 8 for the LVDS backlight.
76
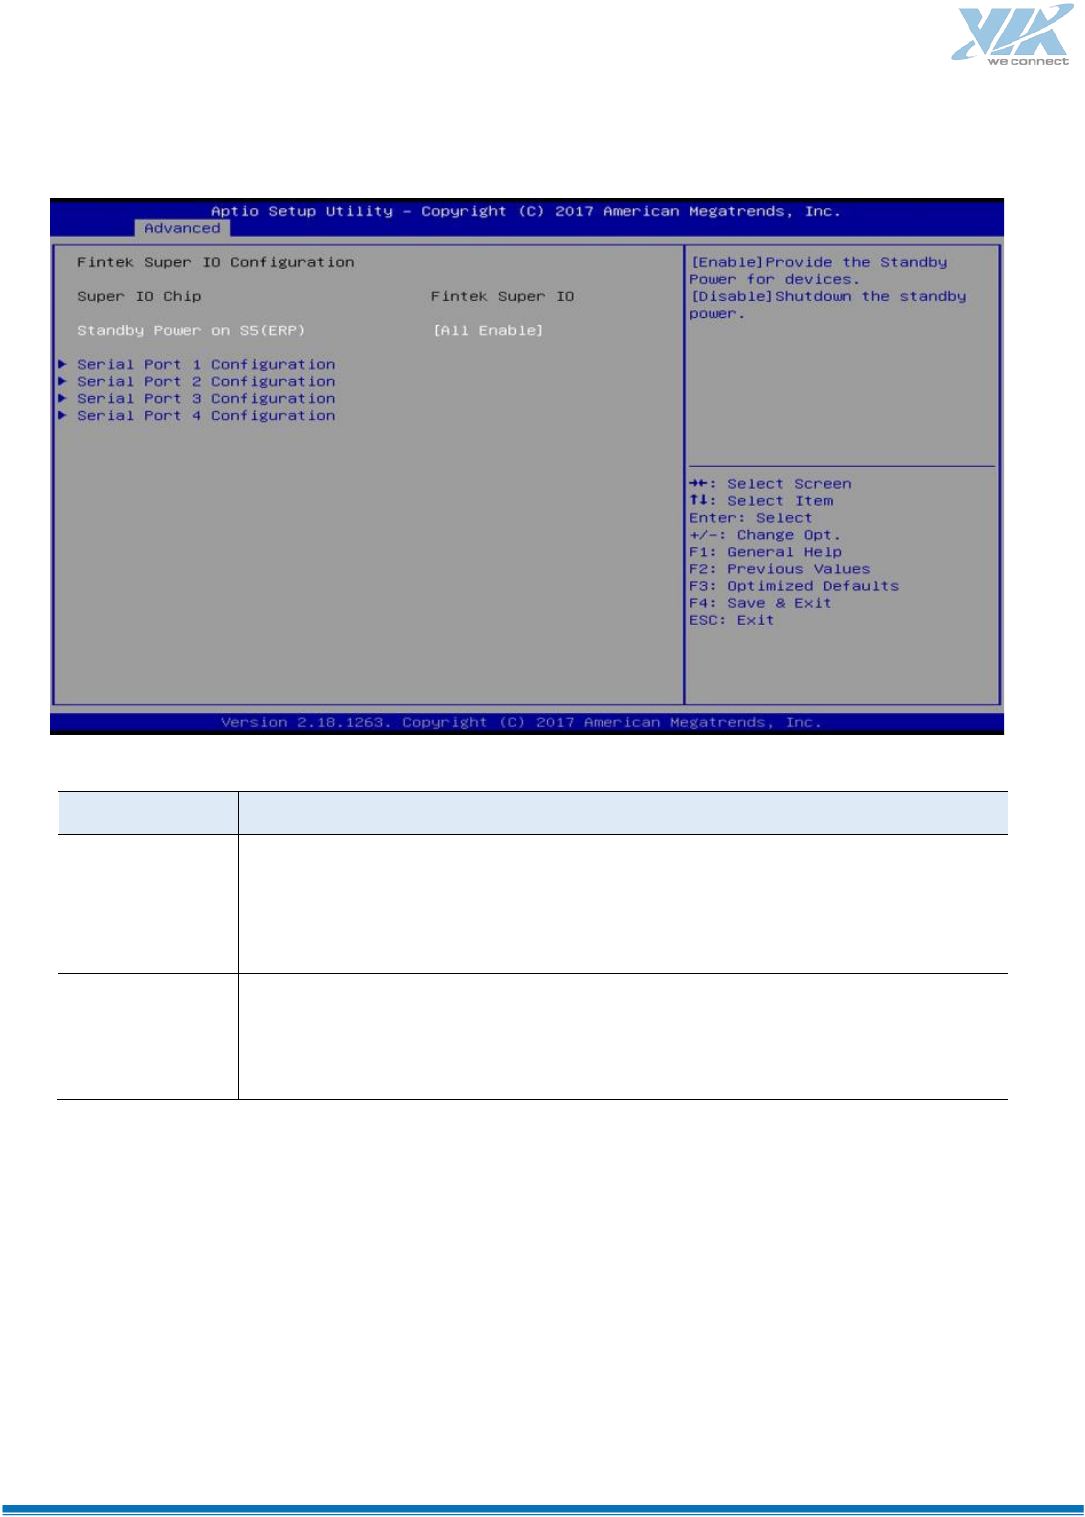
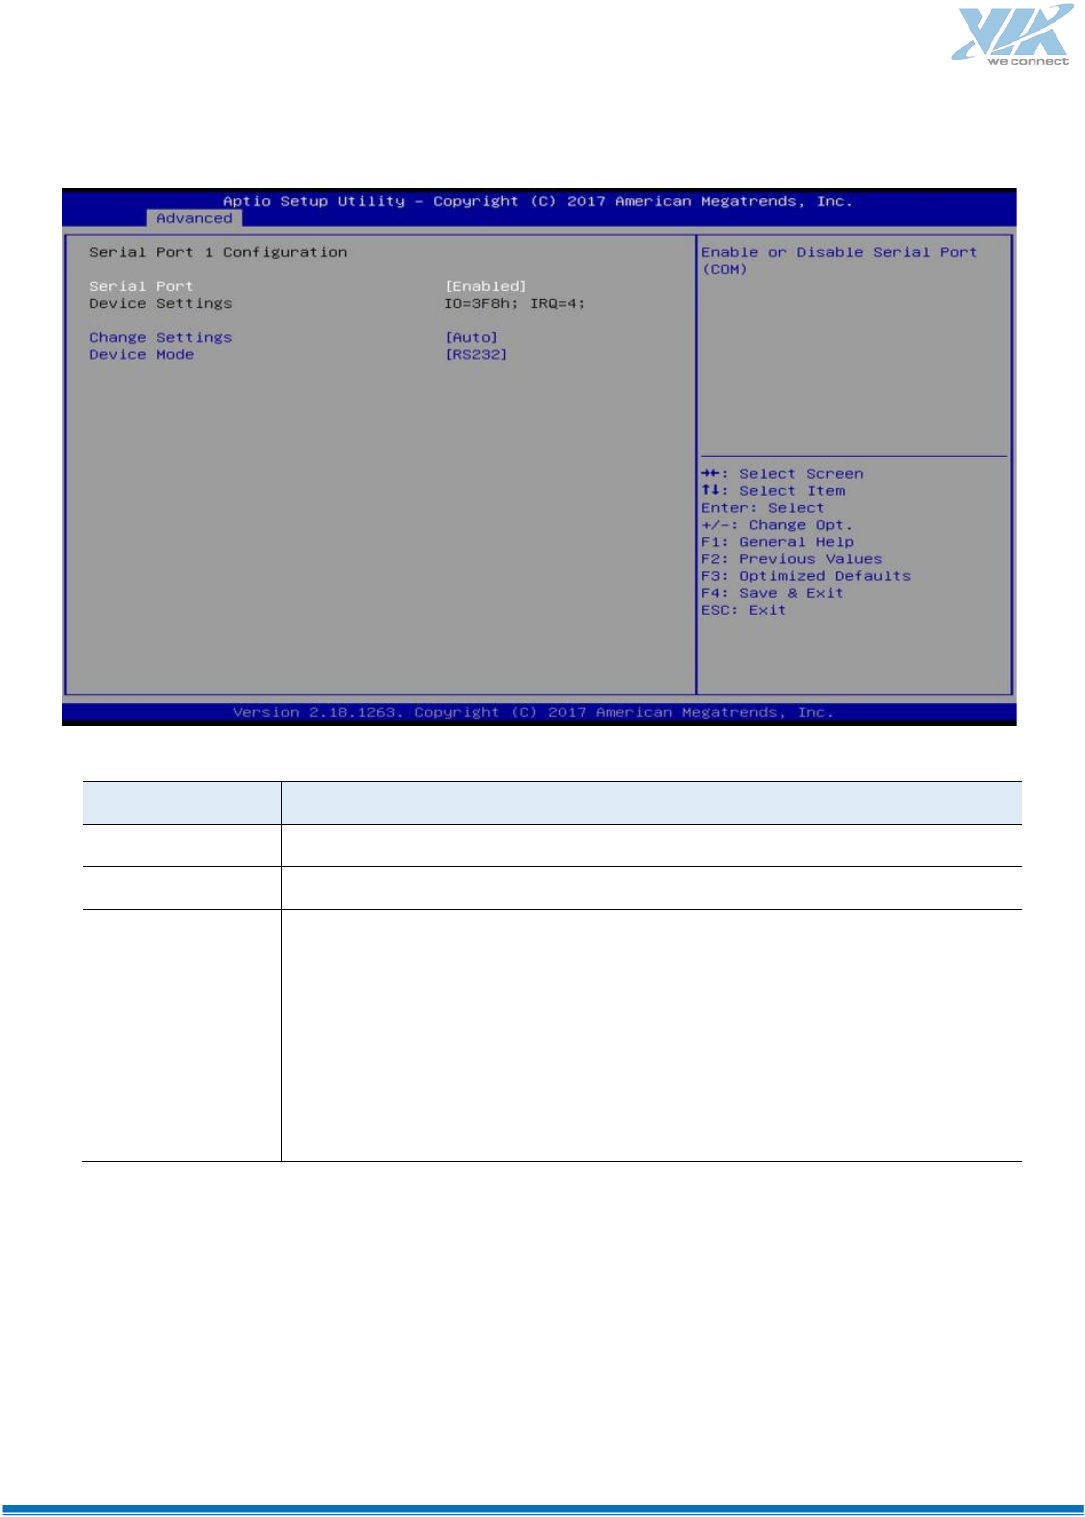
Fintek Super IO Configuration
BIOS Setting
Description
Standby Power on
S5 (ERP)
Enable the item to provide the standby power for devices.
Disable the item to shut down the standby power.
Options: All Enable / Enable Ethernet for WOL / All Disable
Serial Ports
Configuration
Sets parameters of serial ports.
Enables / Disables the serial port and select an optimal setting for the Super IO
device.
77
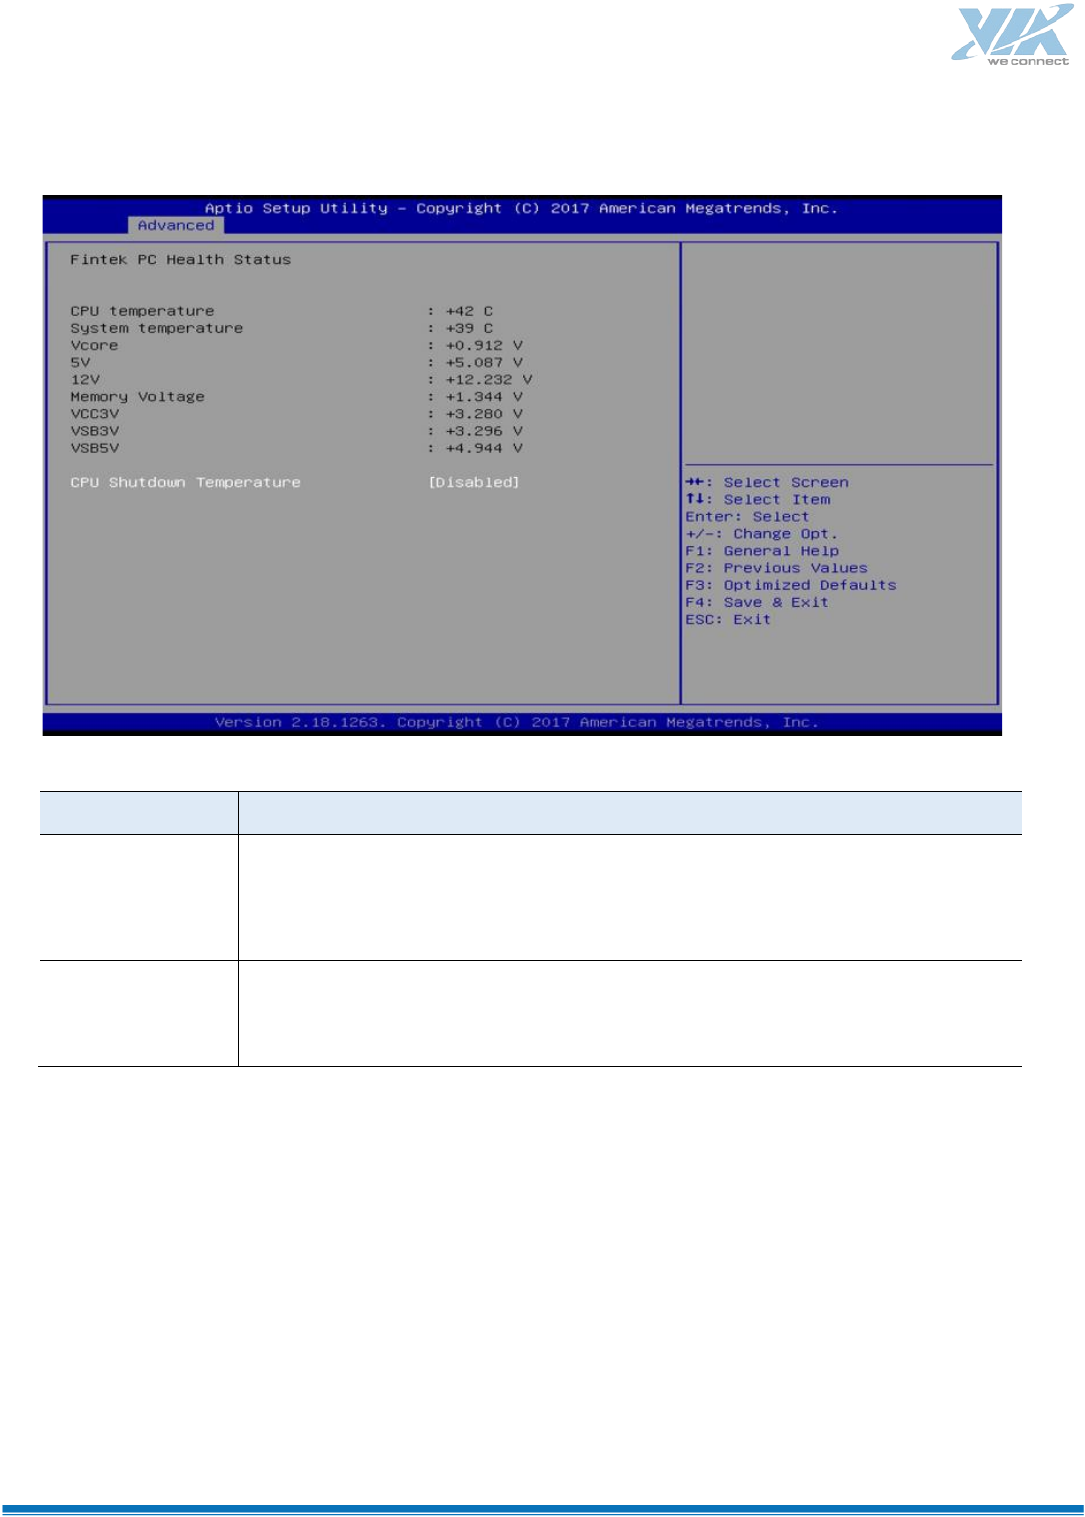
Serial Port 1 Configuration
BIOS Setting
Description
Serial Port
Enables / Disables the serial port.
Change Settings
Selects an optimal settings for Super IO device.
Device Mode
Changes the serial port mode to:
RS232
RS485 TX Low Active
RS485 with Termination TX Low Active
RS422
RS422 with Termination
78
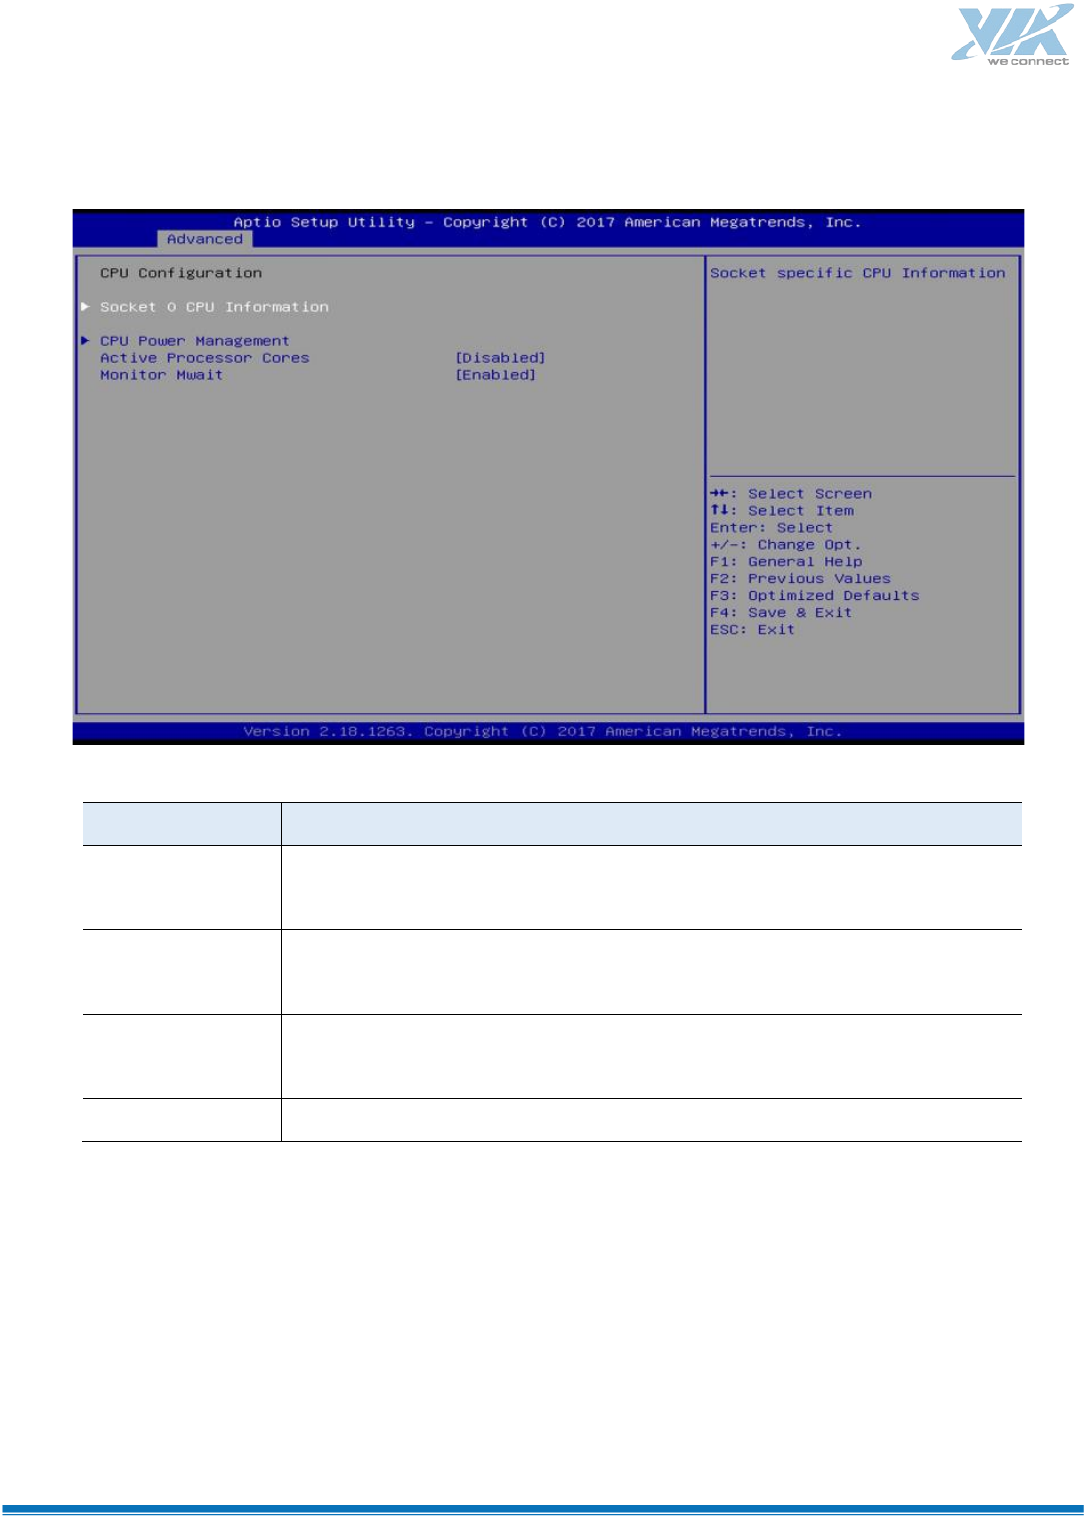
Fintek Super IO Hardware Monitor
BIOS Setting
Description
Temperatures /
Voltages
These fields are the parameters of the hardware monitoring function feature of
the motherboard. The values are read
-only values as monitored by the system
and show the PC health status.
CPU Shutdown
Temperature
Sets a threshold of temperature to shut down if CPU goes overheated.
Options: Disabled / 70
°C / 75 °C / 80 °C / 85 °C / 90 °C / 95 °C
79
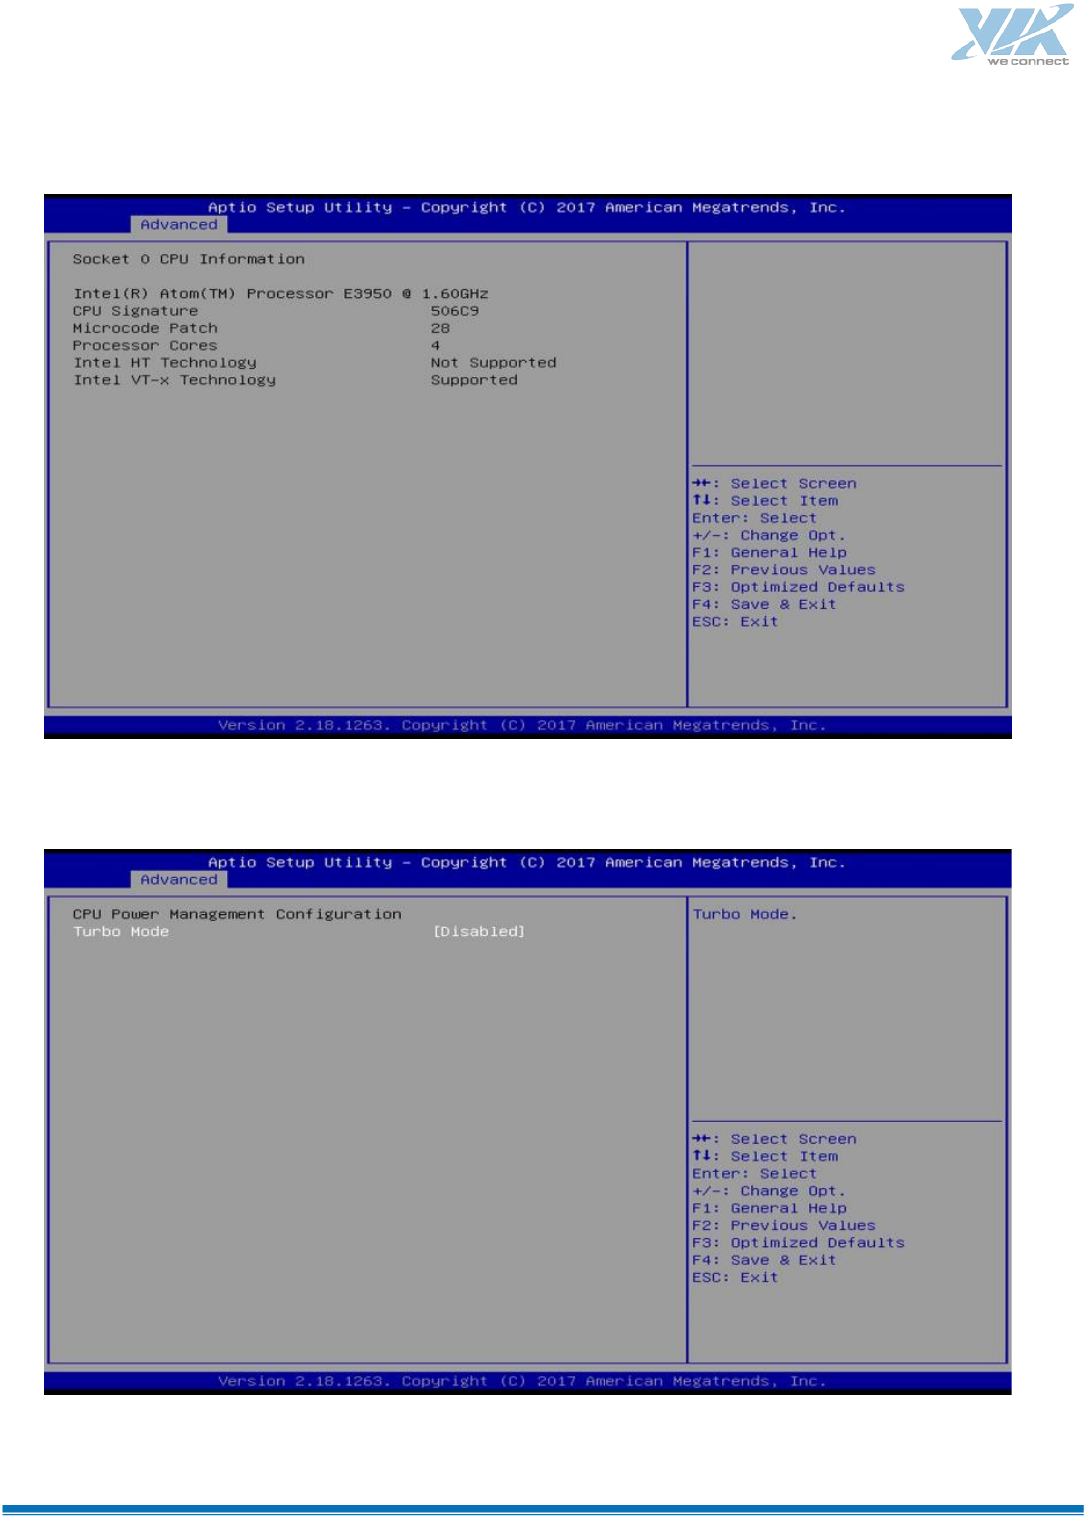
CPU Configuration
BIOS Setting
Description
Socket 0 CPU
Information
Displays the socket specific CPU information.
CPU Power
Management
Allows you to enable / disable Turbo Mode.
Active Processor
Cores
Enables / Disables the cores in the processor package.
Monitor Mwait
Enables / Disables Monitor Mwait.
80
Socket 0 CPU Information
CPU Power Management Configuration
81
BIOS Setting
Description
Turbo Mode
Enables / Disables the turbo mode.
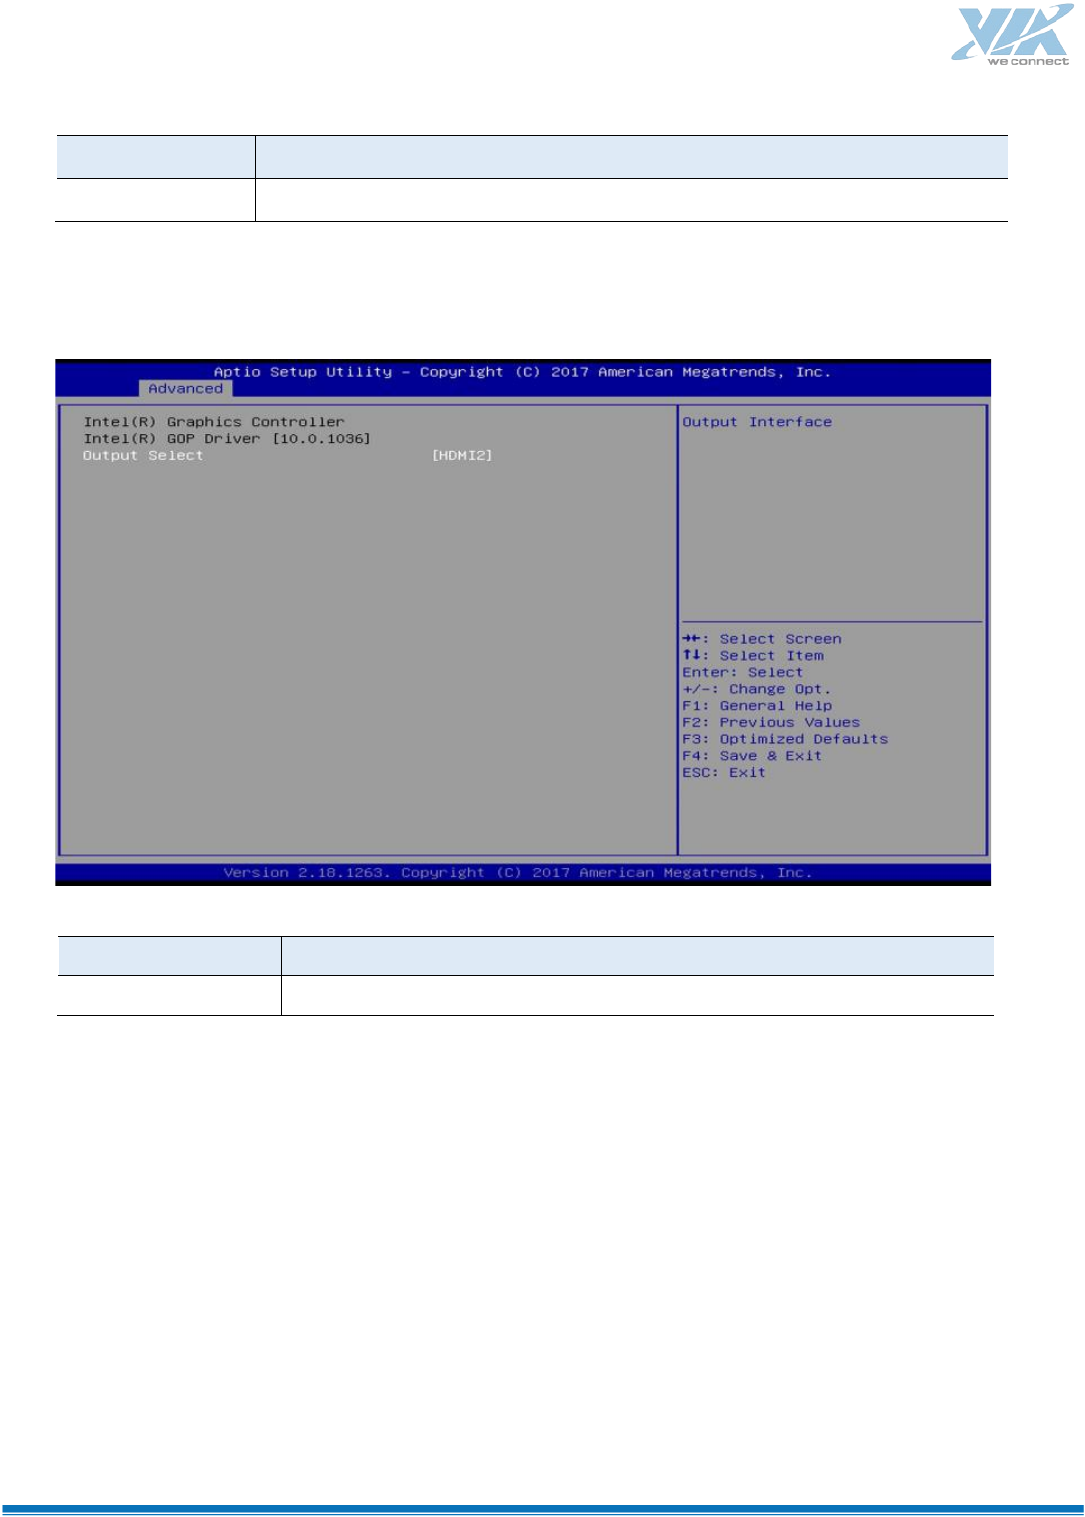
AMI Graphic Output Protocol Policy
BIOS Setting
Description
Output Select
Outputs through HDMI interface.
82
Network Stack Configuration
BIOS Setting
Description
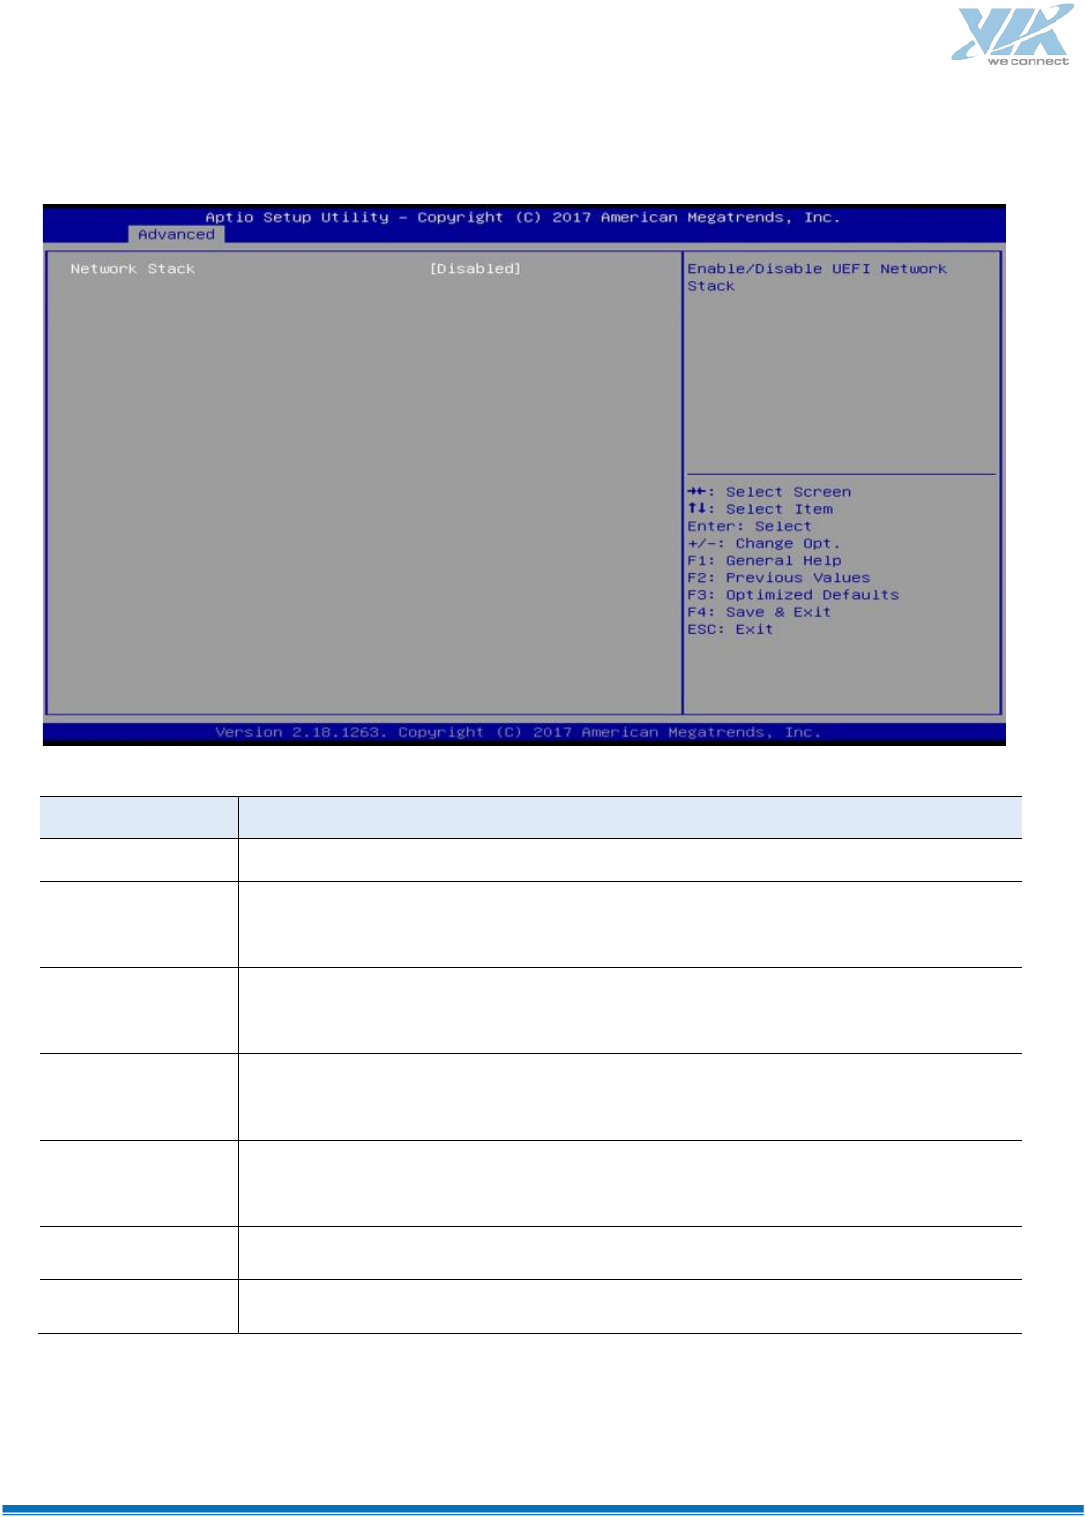
Network Stack
Enables / Disables UEFI Network Stack.
IPv4 PXE Support
Enables / Disables IPv4 PXE Boot Support.
If disabled, Ipv4 PXE boot option will not be created.
IPv4 HTTP Support
Enables / Disables IPv4 HTTP Boot Support.
If disabled, Ipv4 HTTP boot option will not be created.
IPv6 PXE Support
Enables / Disables IPv6 PXE Boot Support.
If disabled, Ipv4 PXE boot option will not be created.
IPv6 HTTP Support
Enables / Disables IPv6 HTTP Boot Support.
If disabled, Ipv4 HTTP boot option will not be created.
PXE boot wait time
Assigns a period of time to press ESC key to abort the PXE boot.
Media detect count
Assigns a number of times to check the presence of media.
83
CSM Configuration
BIOS Setting
Description
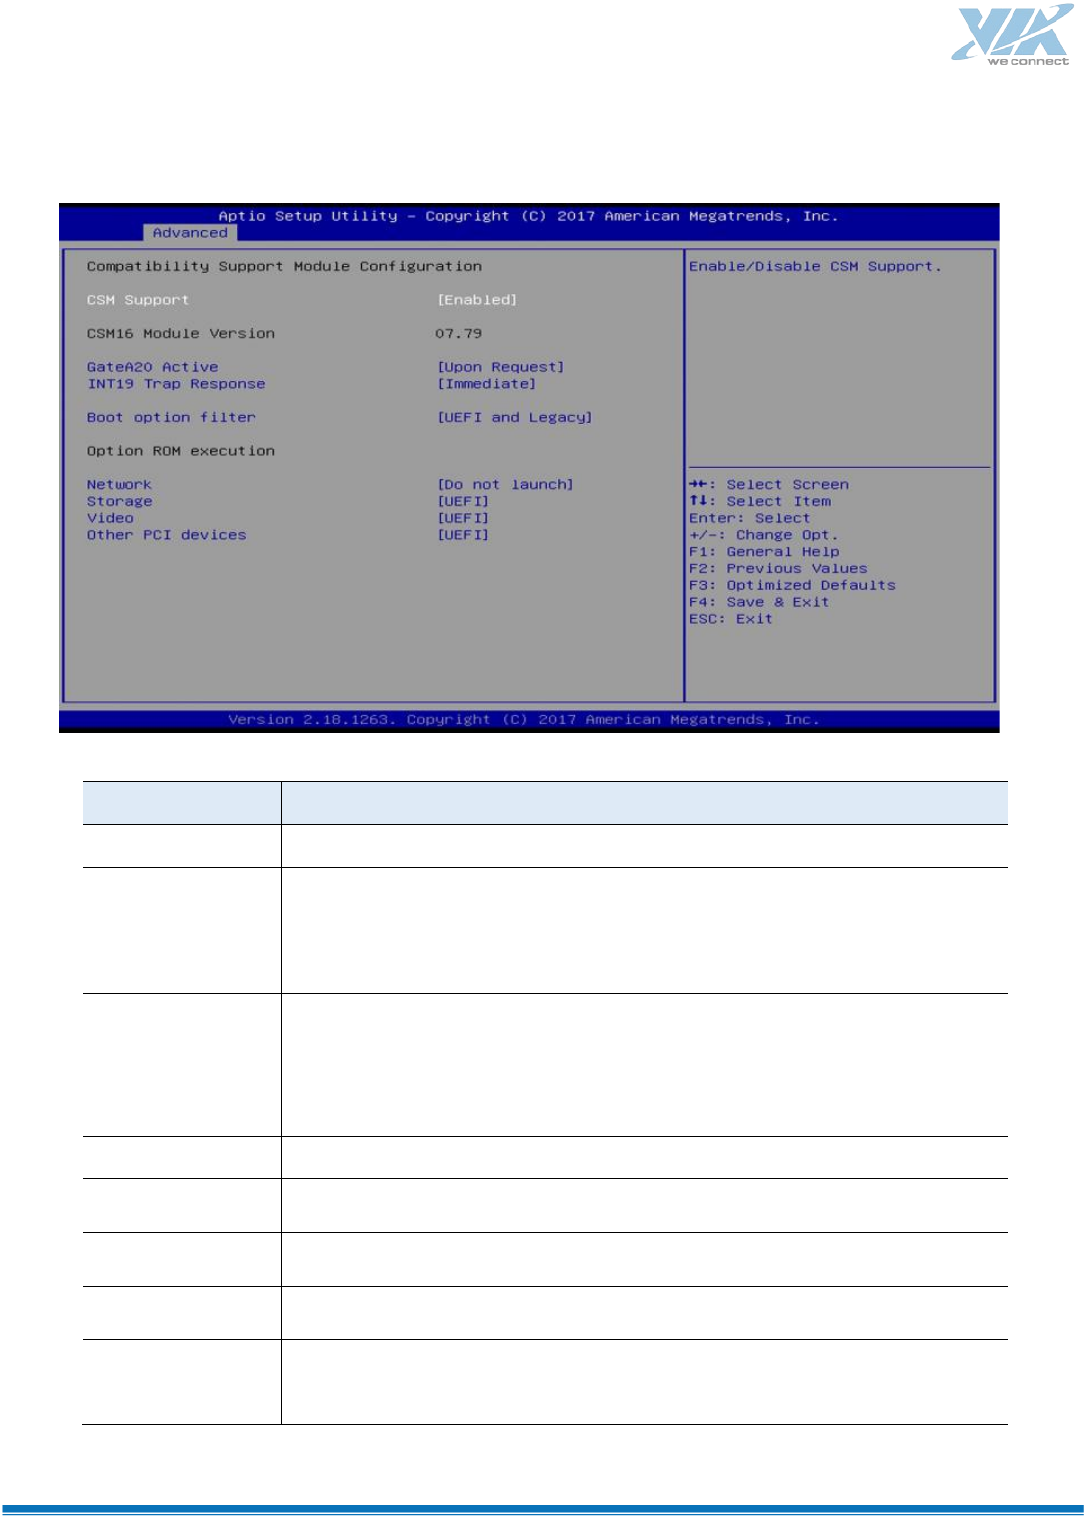
CSM Support
Enables / Disables CSM support.
GateA20 Active
Upon Request disables GA20 when using BIOS services.
Always cannot disable GA20, but is useful when any RT code is executed
above 1 MB.
INT19 Trap
Response
Sets how BIOS reacts on INT19 trap by Option ROM.
Immediate executes the trap right away.
Postponed executes the trap during legacy boot.
Boot option filter
Controls the priority of Legacy and UEFI ROMs.
Network
Controls the execution of UEFI and Legacy PXE 0pROM.
Storage
Controls the execution of UEFI and Legacy Storage OpROM.
Video
Controls the execution of UEFI and Legacy Video OpROM.
Other PCI devices
Determines OpROM execution policy for devices other than network,
storage or video.
84
USB Configuration
BIOS Setting
Description
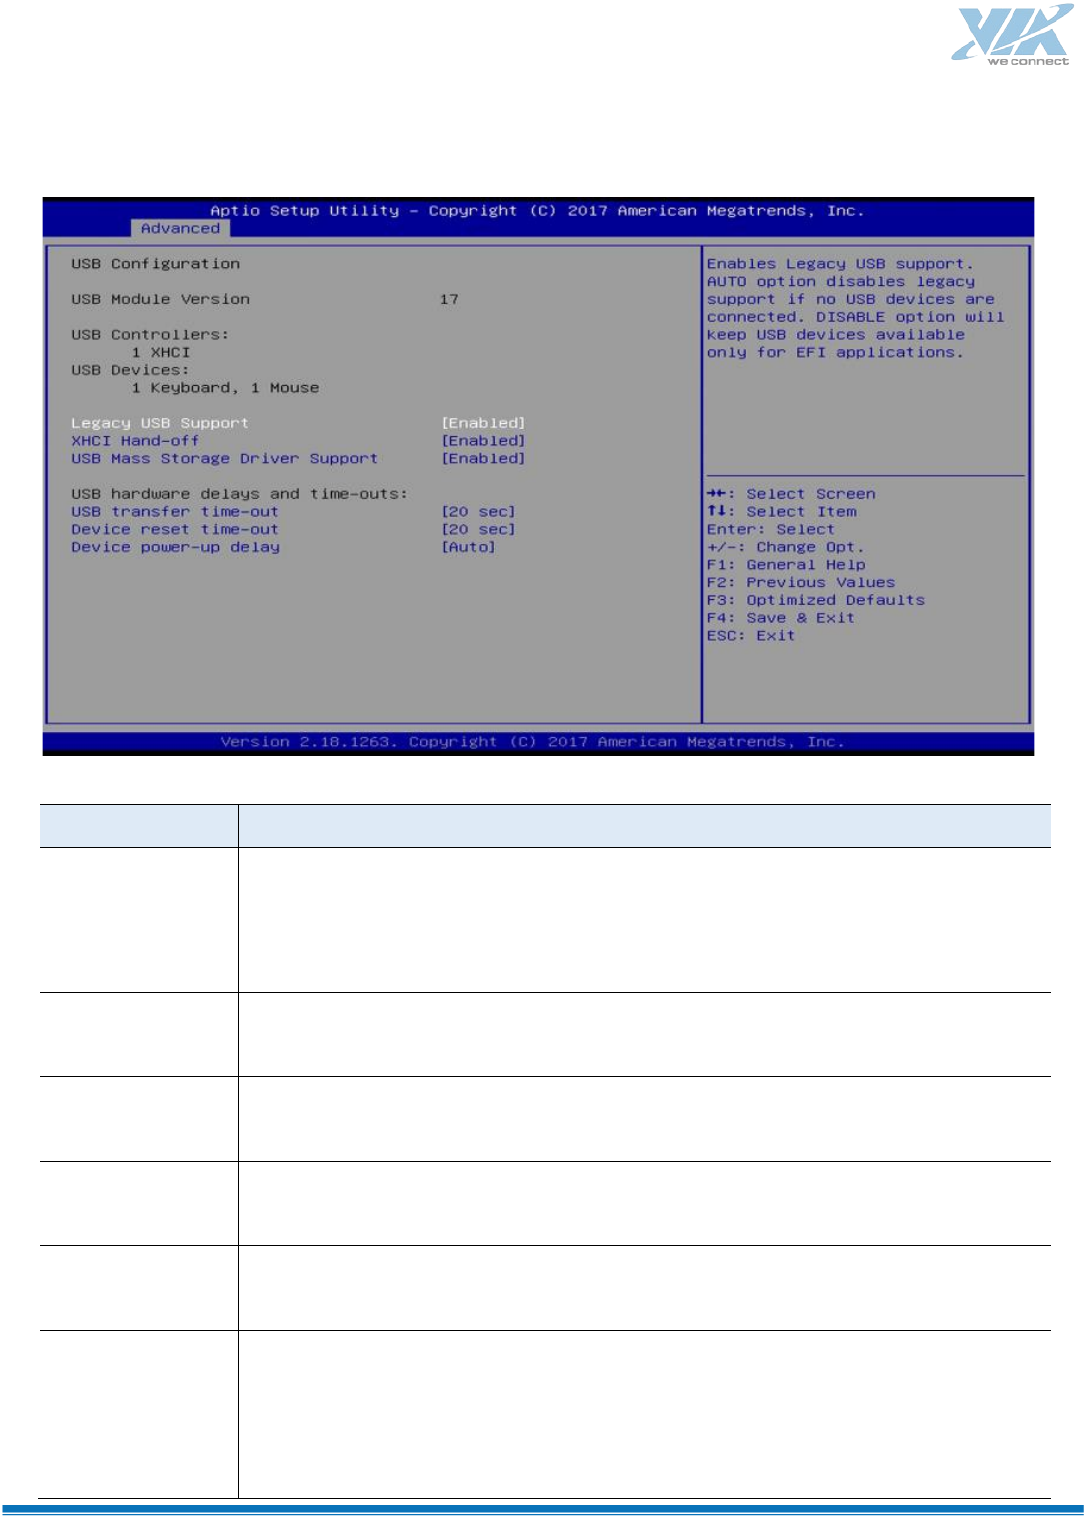
Legacy USB Support
Enabled enables Legacy USB support.
Auto disables legacy support if there is no USB device
connected.
Disabled keeps USB devices available only for EFI applications.
XHCI Hand-off
This is a workaround for OSes without XHCI hand-off support. The XHCI
ownership change should be claimed by XHCI driver.
USB Mass Storage
Driver Support
Enables / Disables the support for USB mass storage driver.
USB Transfer
time
-out
The time-out value (1 / 5 10 / 20 secs) for Control, Bulk, and Interrupt transfers.
Device reset
time
-out
Gives seconds (10 / 20 / 30 / 40 secs) to delay execution of Start Unit command to
USB mass storage device.
Device power-up
delay
The maximum time the device will take before it properly reports itself to the Host
Controller.
Auto uses default value for a Root port it is 100ms. But for a Hub port, the delay is
taken from Hub
descriptor.
85
Chipset Settings
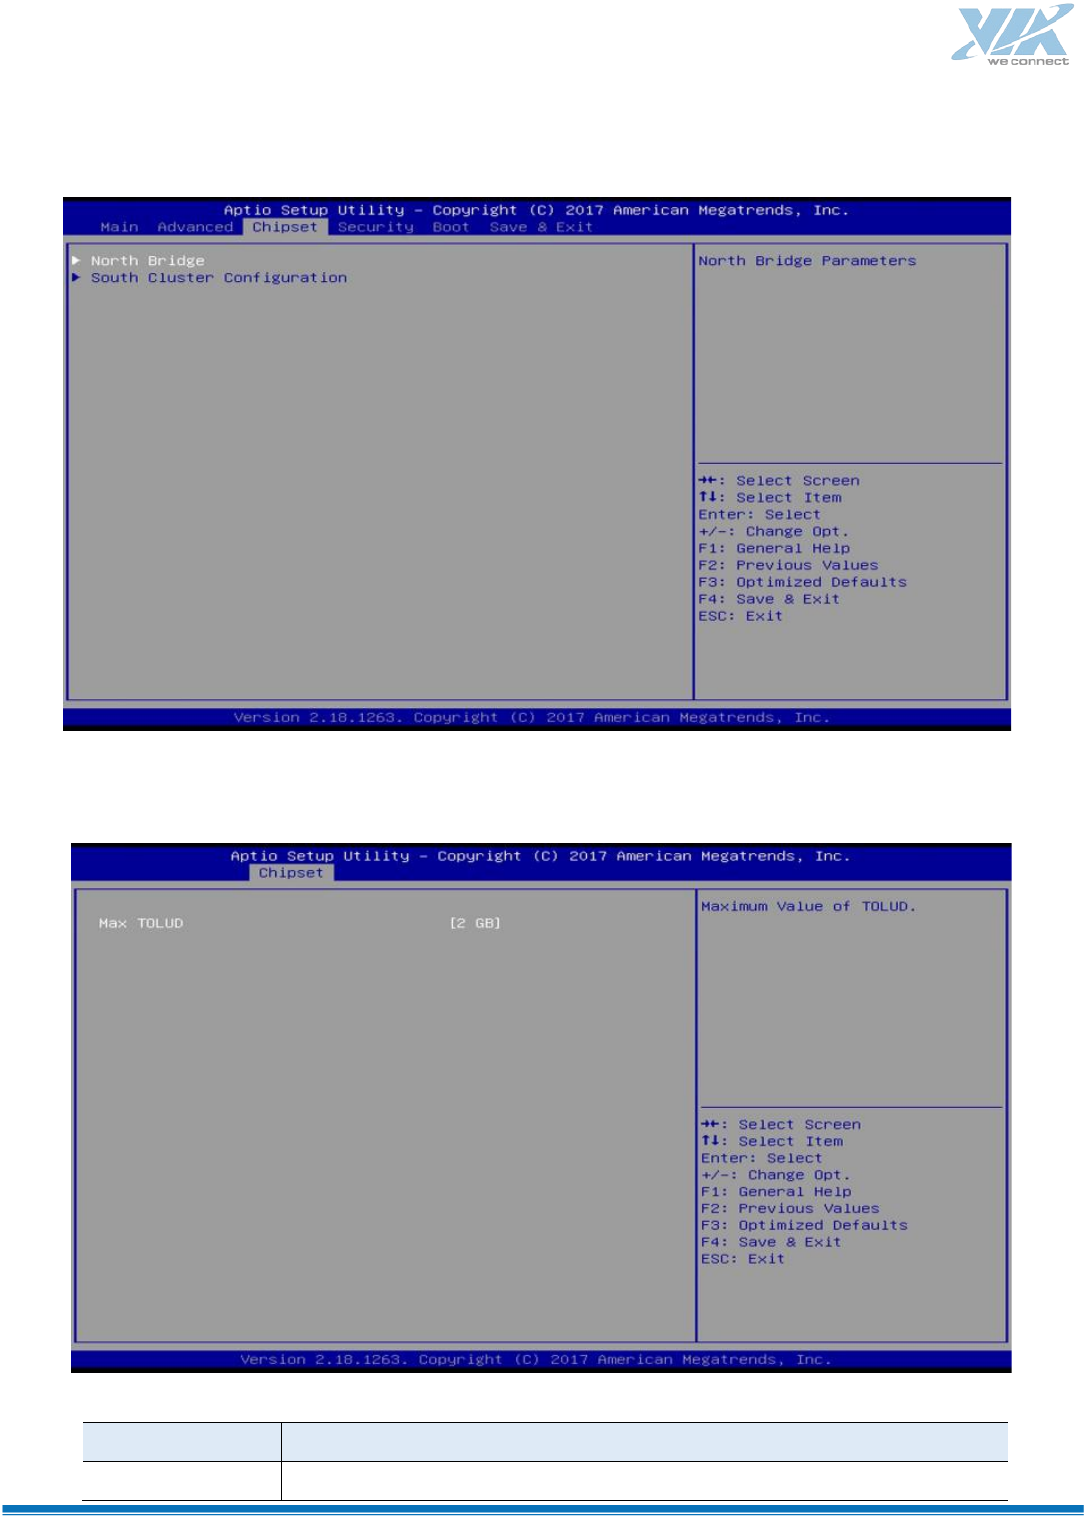
North Bridge
BIOS Setting
Description
Max TOLUD
Sets a maximum value of TOLUD.
86
South Cluster Configuration
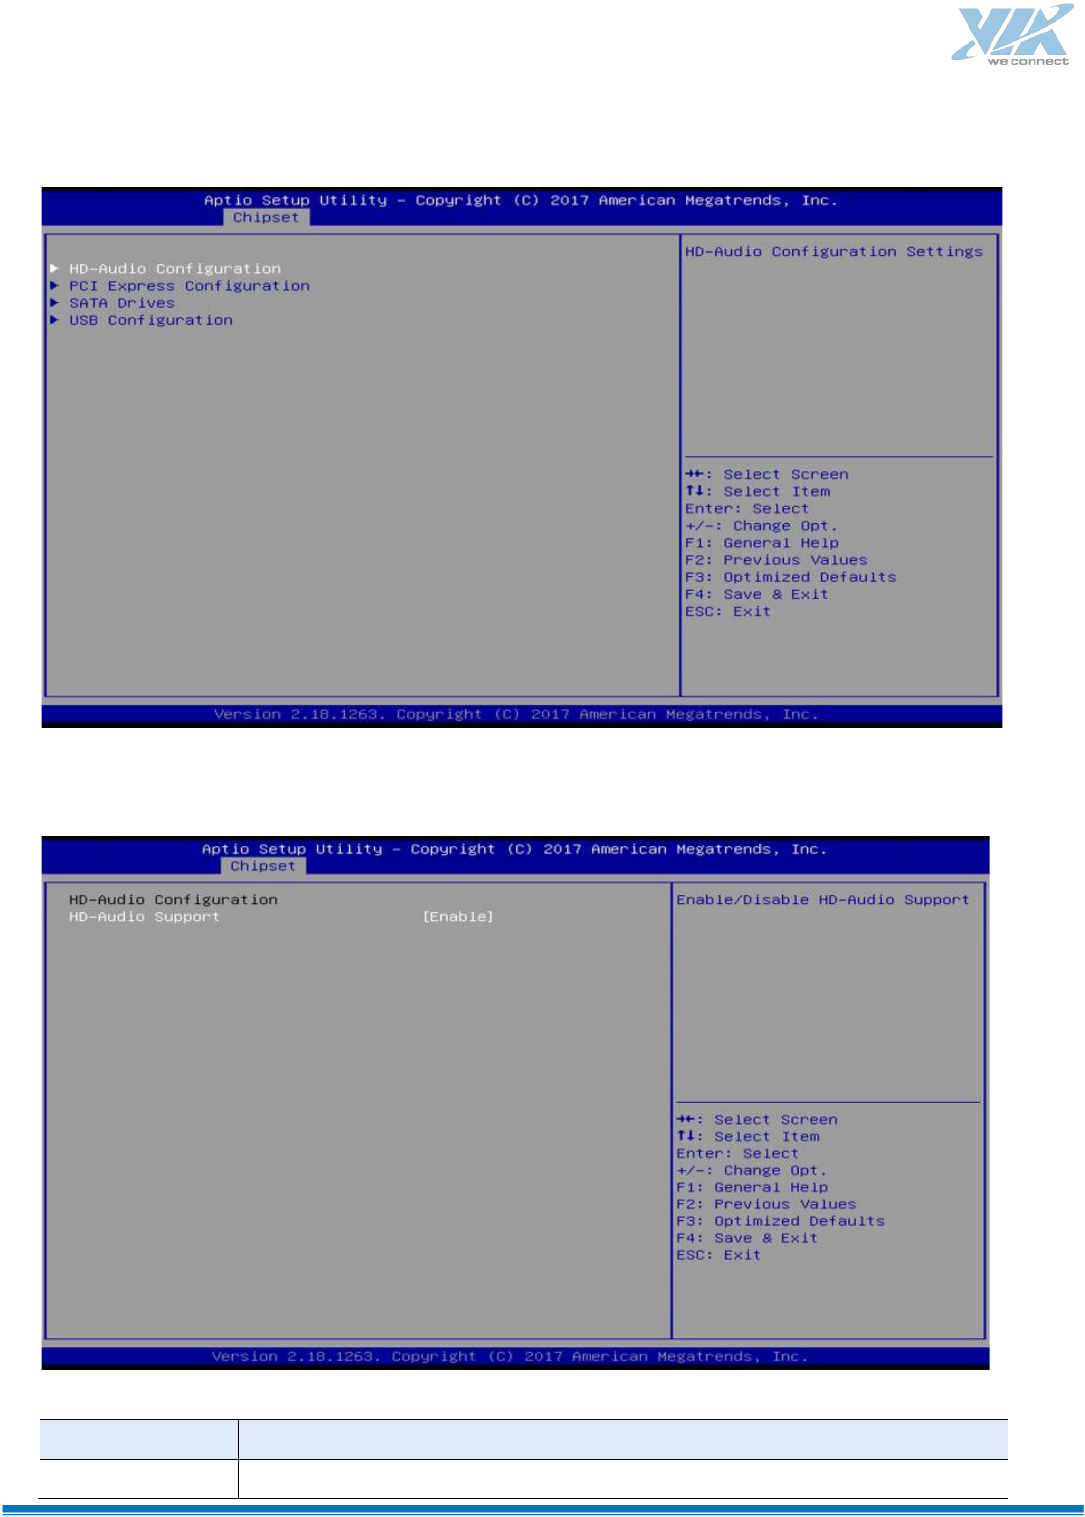
HD Audio Configuration
BIOS Setting
Description
HD-Audio Support
Enables / Disables HD-Audio support.
87
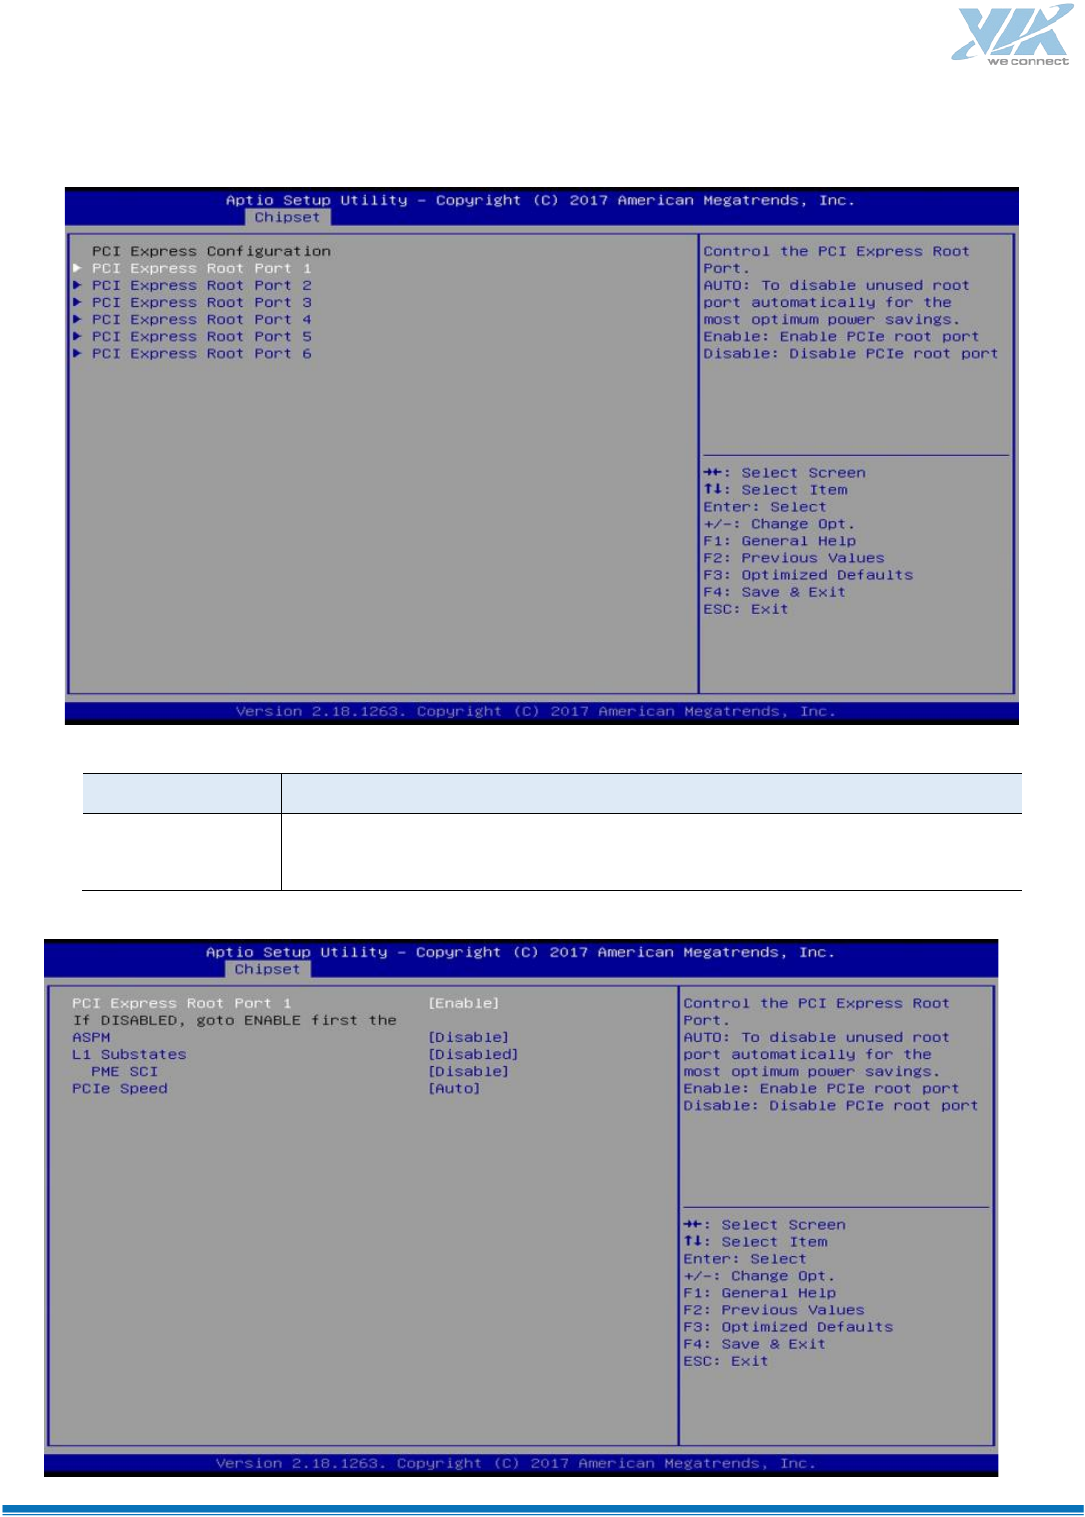
PCI Express Configuration
BIOS Setting
Description
PCI Express Root
Port 1 ~ 6
Accesses the control of the PCI Express Root Port.
88
BIOS Setting
Description
PCI Express Root
Port
Enables/ Disables the PCIe root port.
Auto allows you to disable unused root
port automatically for the most
optimum power savings.
ASPM
Sets the PCIe active state power management.
Options: Disable / L0s / L1 / L0SL1 / Auto
L1 Substates
Sets PCIe L1 substates.
Options: Disables / L1.1 / L1.2 / L1.1 & L1.2
PME SCI
Enables / Disables PME SCI.
PCIe Speed
Configures the PCIe speed.
Options: Auto, Gen1, Gen2
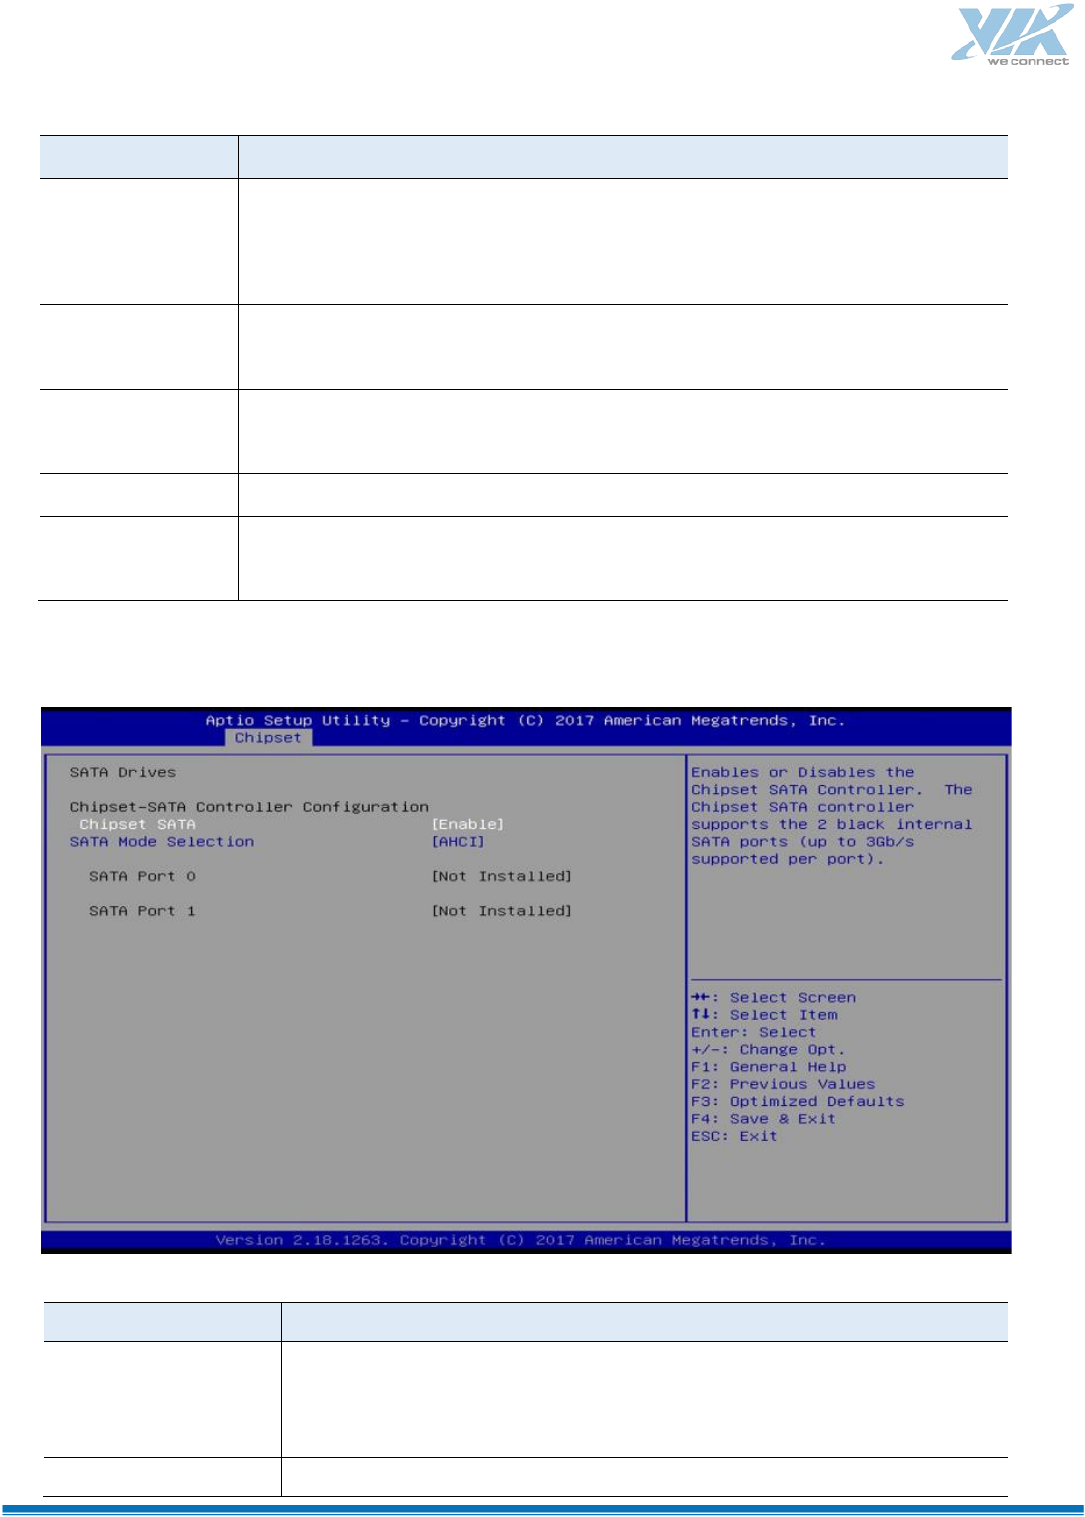
SATA Drivers
BIOS Setting
Description
Chipset SATA
Enables / Disables the Chipset SATA Controller.
The Chipset SATA Controller supports the 2 black internal SATA ports
(up to
3Gb/s supported per port).
SATA Mode Selection
Determines how SATA controller(s) operate.
89
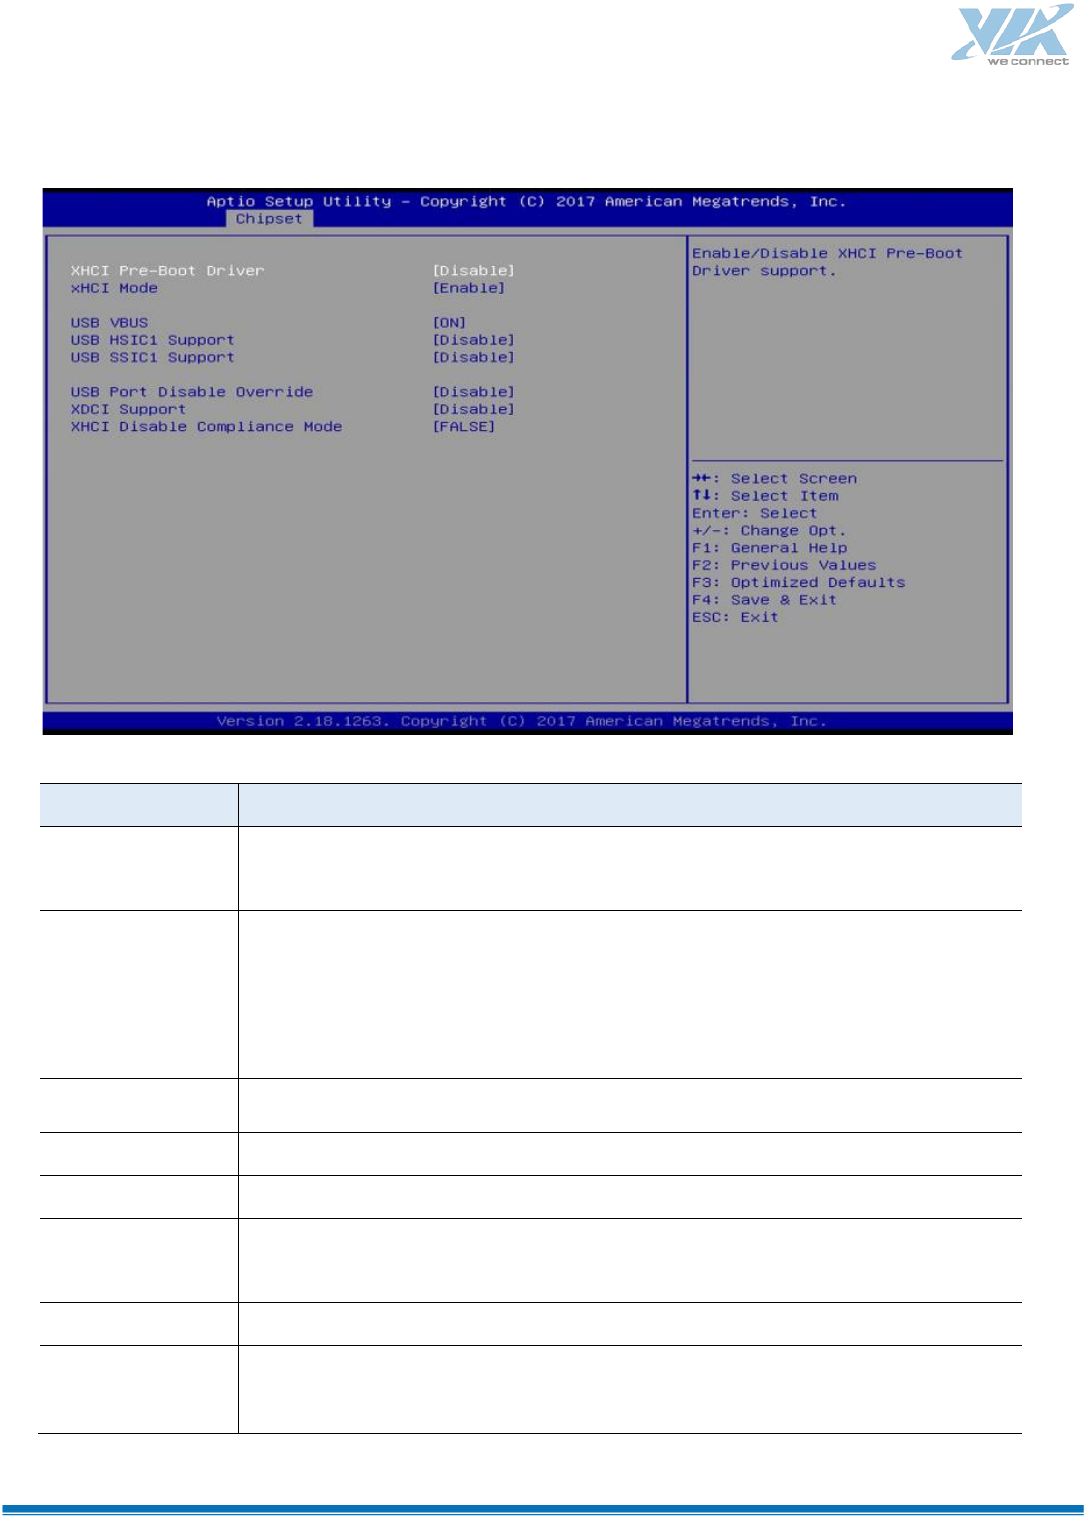
USB Configuration
BIOS Setting
Description
XHCI Pre-Boot
Driver
Enables / Disables the support for XHCI Pre-Boot Driver.
XHCI Mode
Enables / Disables XHCI mode.
If disabled, XHCI controller would be disabled, and none of the USB devices are
detectable or usable when systen is booted up in OS.
Do NOT disable it unless for debug purpose.
USB VBUS
VBUS should be ON in HOST mode. It should be OFF in OTG device mode.
USB HSIC1 Support
Enables / Disables USB HSIC1.
USB SSIC1 Support
Enables / Disables USB SSIC1.
USB Port Disable
Override
Selectively enables / disables the corresponding USB port from reporting a
device connection to the controller.
XDCI Support
Enables / Disables XDCI.
XHCI Disable
Compliance Mode
FALSE makes the XHCI Link Compliance Mode not disabled.
TRUE disables the XHCI Link Compliance Mode.
90
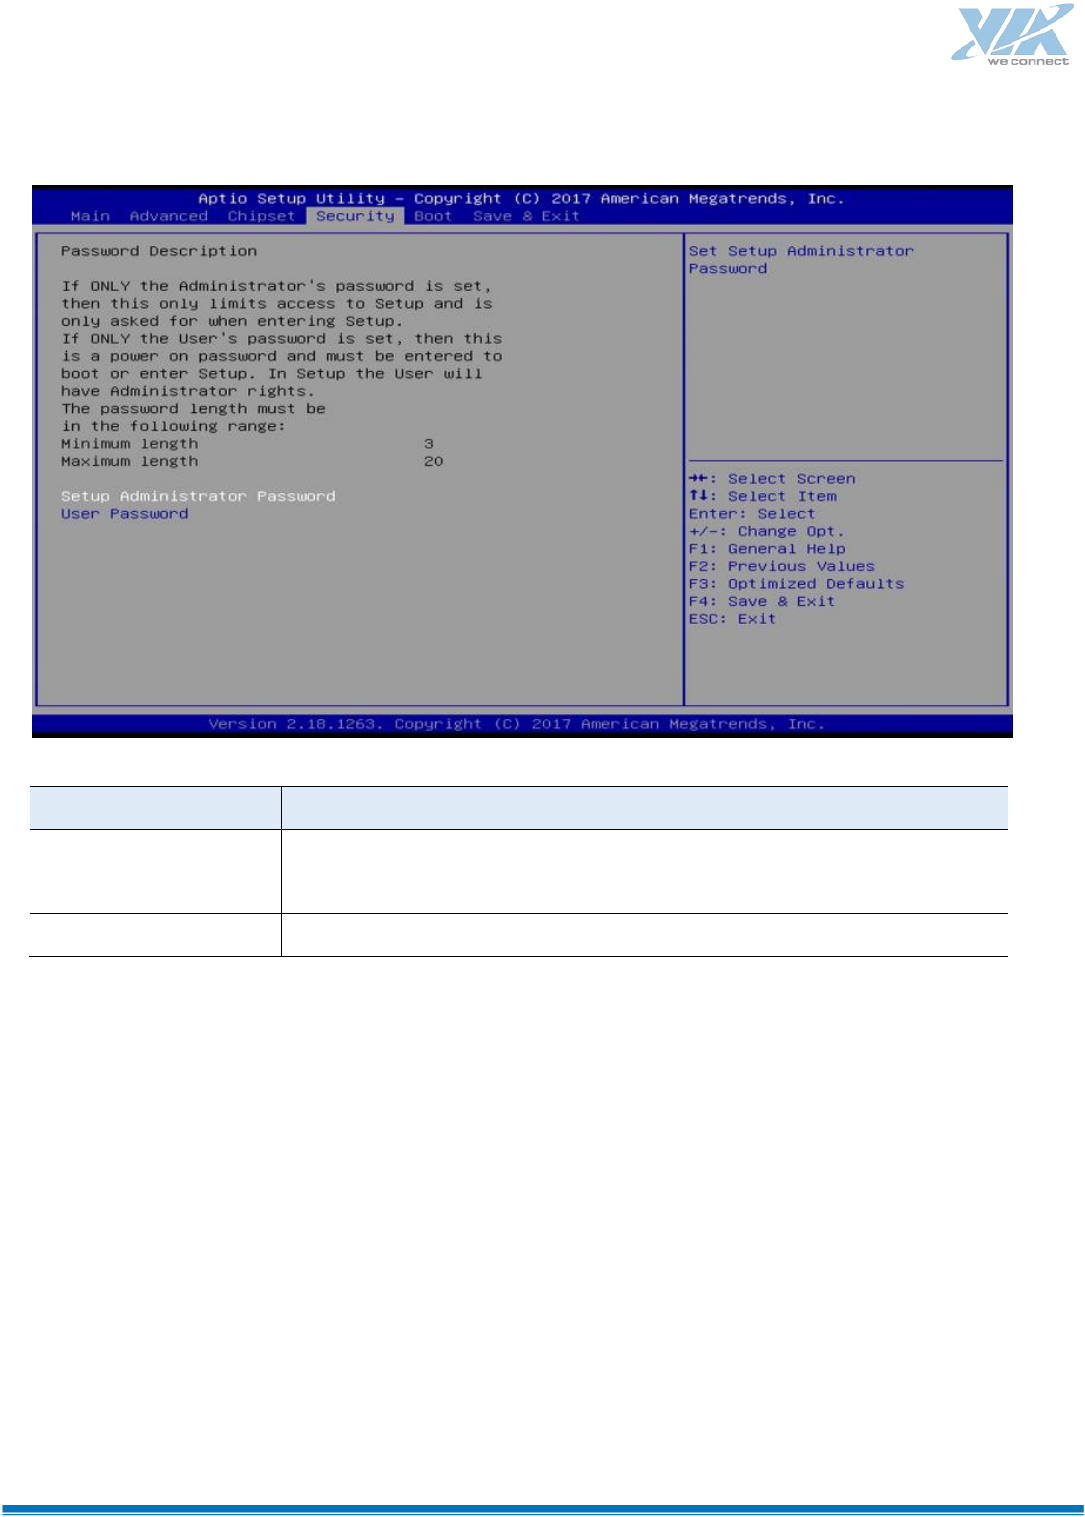
Security Settings
BIOS Setting
Description
Setup Administrator
Password
Sets an administrator password for the setup utility.
User Password
Sets a user password.
91
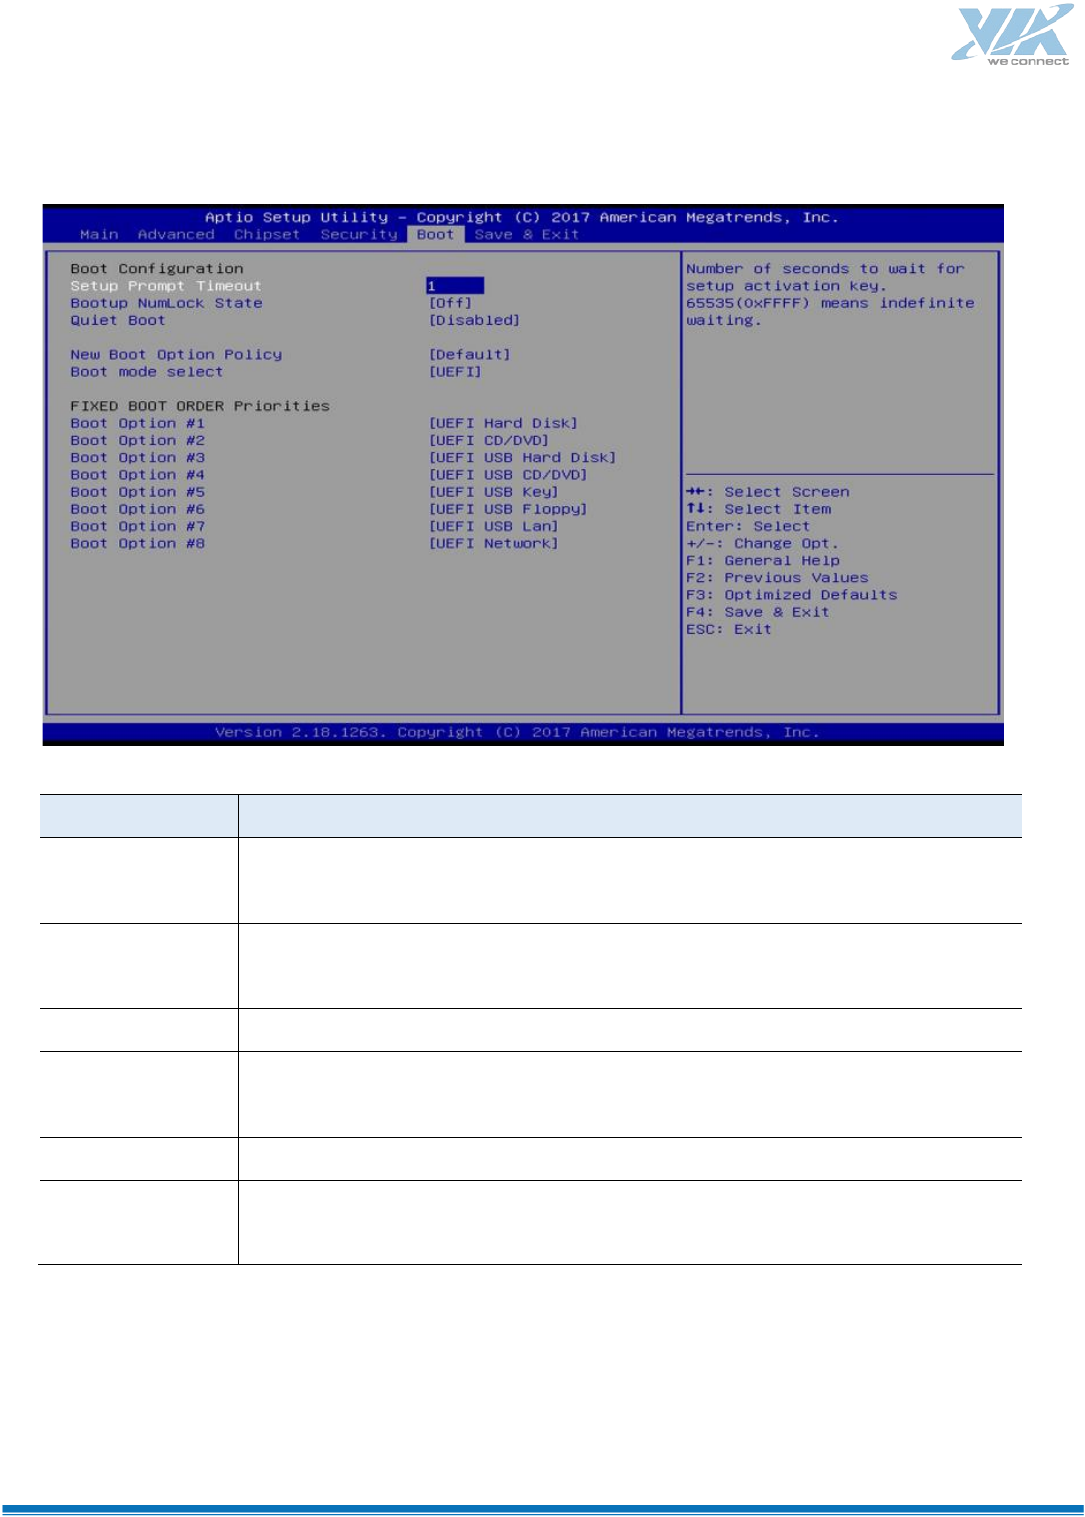
Boot Settings
BIOS Setting
Description
Setup Prompt
Timeout
Number of seconds to wait for setup activation key.
65535 (0xFFFF) means indefinite waiting.
Bootup NumLock
State
Selects the keyboard NumLock state.
Quiet Boot
Enables / Disables Quiet Boot option.
New Boot Option
Policy
Controls the placement of newly detected UEFI boot options.
Options: Default, Place First, Place Last
Boot mode select
Selects a Boot mode, Legacy / UEFI / Dual.
Boot Option
Priorities
Sets the system boot order priorities for hard disk, CD/DVD, USB, Network.
92
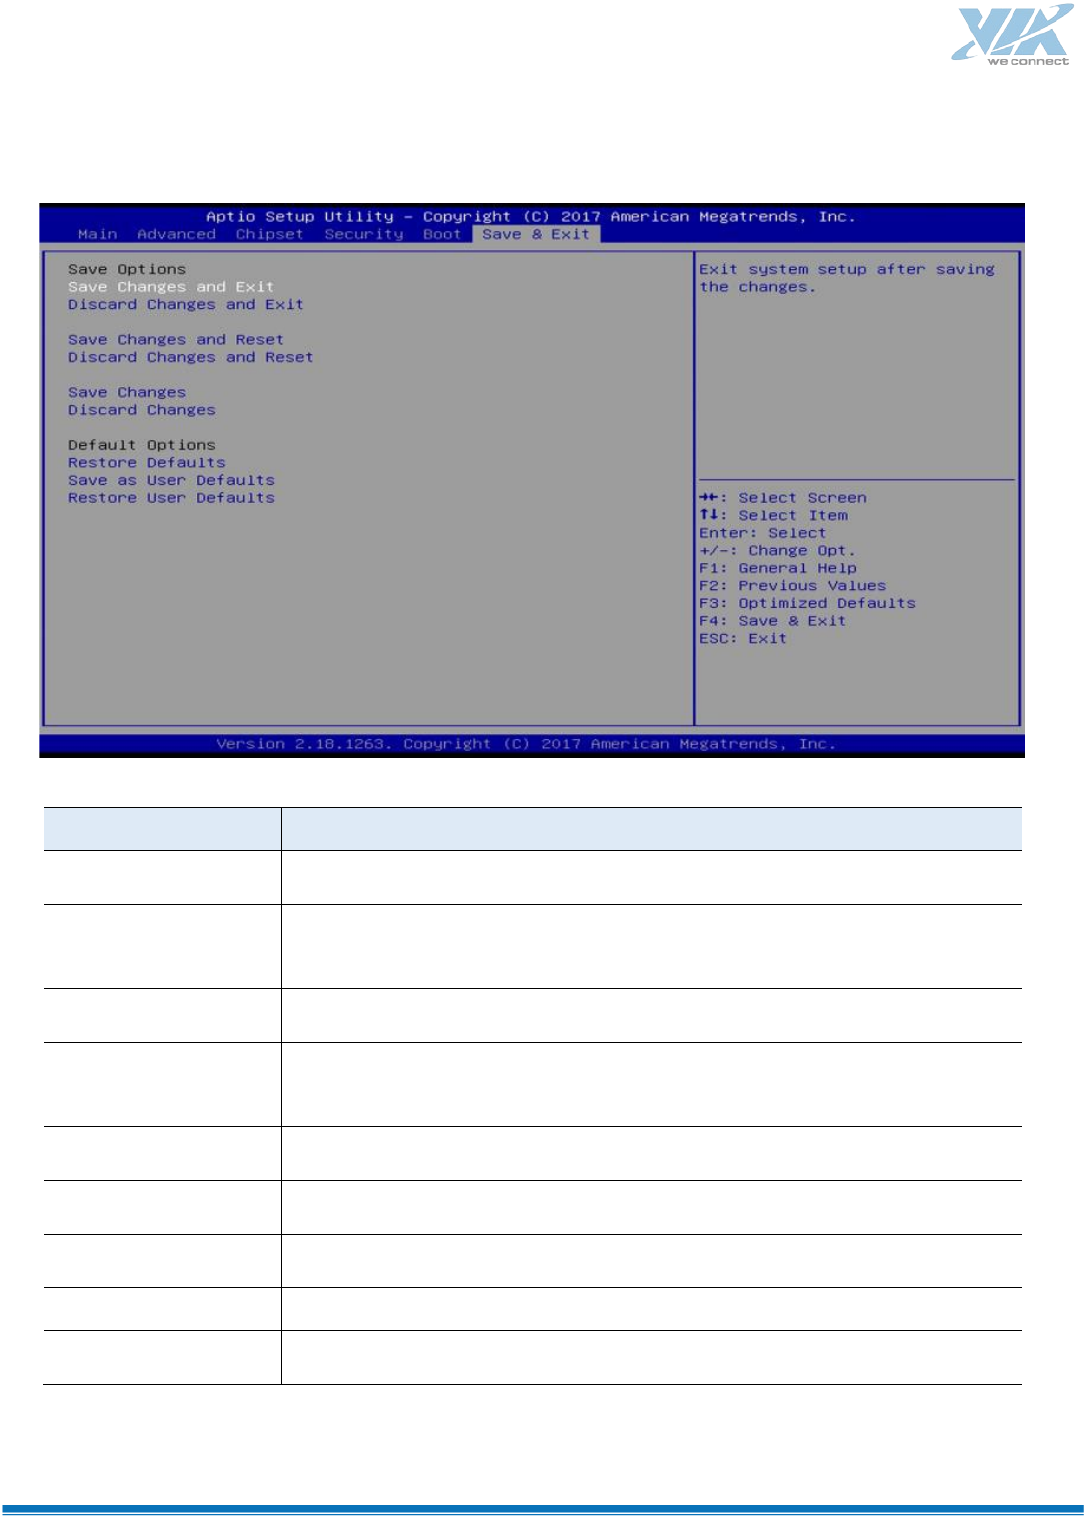
Save & Exit Settings
BIOS Setting
Description
Save Changes and Exit
Exits system setup after saving the changes.
Discard Changes and
Exit
Exits system setup without saving any changes.
Save Changes and Reset
Resets the system after saving the changes.
Discard Changes and
Reset
Resets system setup without saving any changes.
Save Changes
Saves changes done so far to any of the setup options.
Discard Changes
Discards changes done so far to any of the setup options.
Restore Defaults
Restores / Loads defaults values for all the setup options.
Save as User Defaults
Saves the changes done so far as User Defaults.
Restore User Defaults
Restores the user defaults to all the setup options.
