Vantiva USA DCI401XXXX wirelessly controlled converter box User Manual Manual Part 1
Technicolor Connected Home USA LLC wirelessly controlled converter box Manual Part 1
Contents
- 1. Manual Part 1
- 2. Manual Part 2
- 3. Manual
Manual Part 1

XFINITY TV
User Guide
XDTA OOBE SIK 1010.indd 1 9/30/10 3:03 PM

Contents
3 Welcome to XFINITY™ TV
4 Using Your Remote Control
5 Troubleshooting
6 Comcast Customer Guarantee
7 How to Read Your Bill
8-9 DTA Set-Top Box Connections
XDTA OOBE SIK 1010.indd 2 9/30/10 3:03 PM
What You Need to Know
We’re enhancing our network so you will have access to a new level of entertainment. To enjoy the great
benefits of this enhancement, you need the right digital equipment on each of your TVs — like a set-top box or
this digital adapter.
With this digital adapter, you’ll receive:
• Crispdigitalpictureandsound.
• Yourcurrentchannels,plusaccesstoadditionalchannels.
Comcast, America’s leading enhanced fiber-optic network for TV, Internet and phone.
What You Need to Do
To keep receiving the channels you’re used to, you’ll need to make sure that every TV in your home is equipped
with one of our all-digital devices (either a DTA, like the one in this kit, or a Digital Set-Top Box).
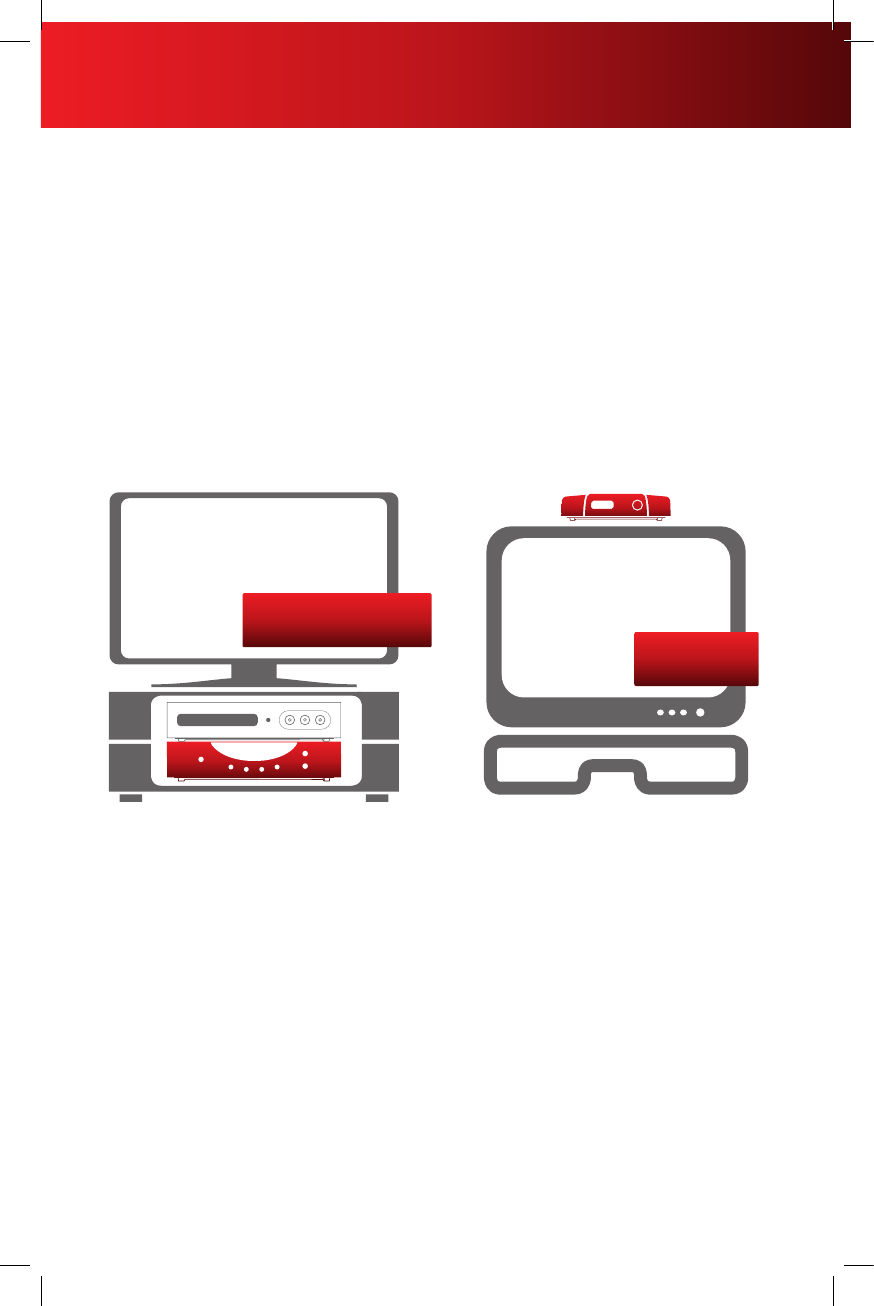
Every TV Will Need One Device
XFINITY Digital Set-Top Box Digital Transport Adapter (DTA)
An XFINITY Digital Set-Top
Box will allow you to receive the
channels you currently have as well
as On Demand programming and
our On-Screen
Channel Guide. Living Room
XFINITY Digital Set-Top Box
A DTA (like the one in this kit)
will allow you to receive the
channels you currently have.
It will not display On Demand
programming or
our On-Screen
Channel Guide.
Bedroom
DTA only
If you currently have one of our Analog Cable Boxes, you’ll need to replace it with either a DTA or a Digital Set-
Top Box. If you’re not sure what type of cable box you currently have, or have any questions related to your DTA,
please visit comcast.com/digitalnow for more information.
XFINITY service not available in all areas. Not all services available with all XFINITY packages. Comparisons to Comcast’s offerings prior to
recent network upgrades. On Demand selections subject to charge indicated at time of purchase. Compatible devices required for Mobile App
features. Airtime charges may apply. Check with your carrier.
3
Welcome to XFINITYTM TV
XDTA OOBE SIK 1010.indd 3 9/30/10 3:03 PM
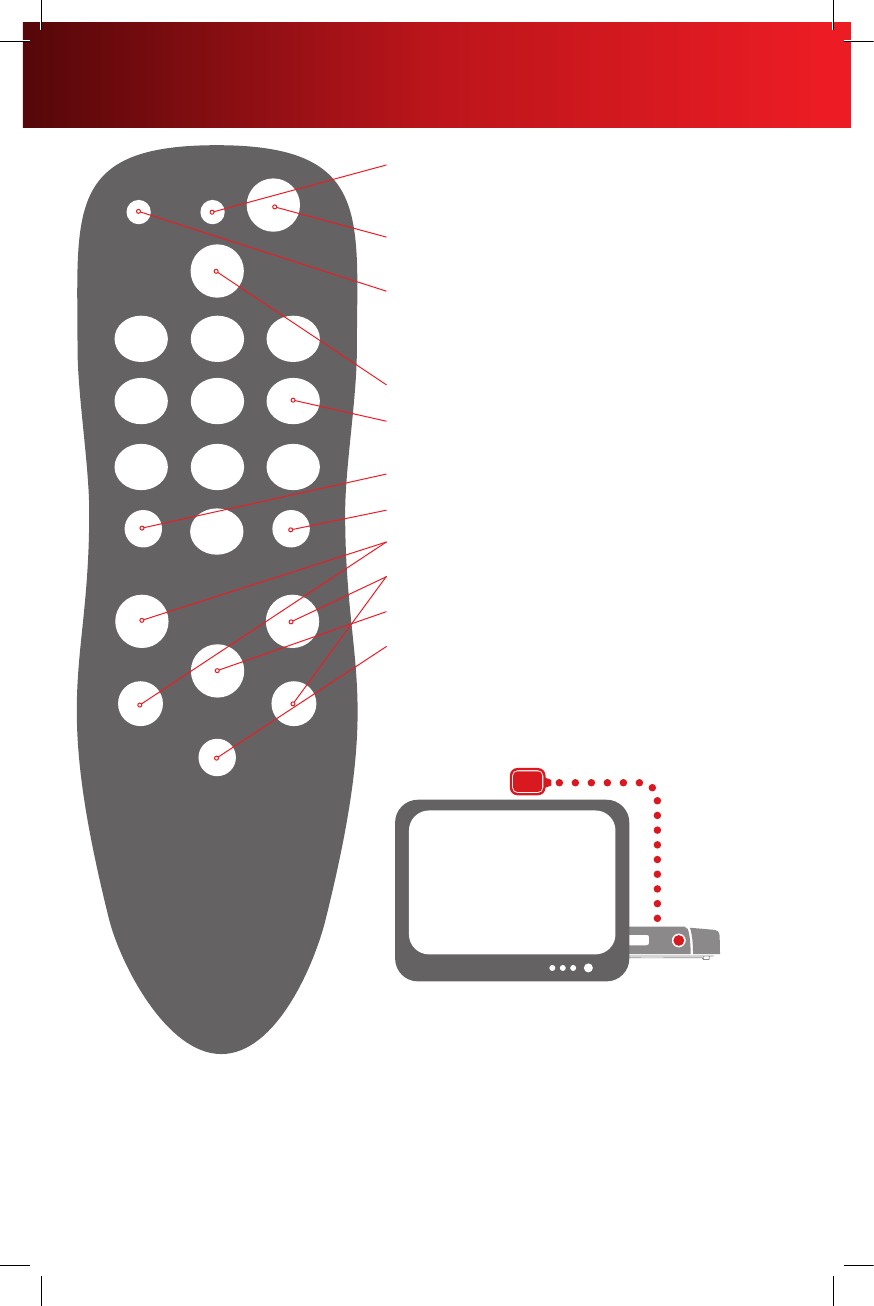
Your remote may vary slightly from the one pictured here, but the basic functions should remain the same. Some features require your remote to
be programmed for operation and may not be available in all areas.
Indicator light: This button flashes red during the
programming sequences and when any key on the remote
is pressed.
POWER: Turns your TV on or off (it will not turn your DTA
off, the DTA is always on).
SET: Programs the remote control for your TV —
programming instructions and a complete list of TV
programming codes are available at comcast.com/
digitalnow and are included with your remote.
INFO: Displays the channel number and station call letters.
Keypad (0-9): Directly selects the channel you want to
view (i.e. 09 or 025).
ENTER: Directly tunes to a channel (i.e. 1-0-9 ENTER).
LAST: Recalls the last channel watched.
VOL +/VOL – : Turns the volume up or down.
CH +/CH – : Selects the next higher or lower channel.
MUTE: Turns the sound on your TV off or on.
LANG: Switches between different languages and audio
options available for that channel. If there is not an audio
option available, it may mute the channel — if you do not
hear sound, try pressing the MUTE button first to restore
sound. If that doesn’t work, try pressing the LANG button.
Using the Remote Control Signal Receiver
If you need or want to hide the DTA behind the TV, or if the
DTA will not reach the front of the TV, you can hide it by using
the Remote Control Signal Receiver. Plug the smaller end of
the Remote Control Signal Receiver into the “IR In” port on the
back of the DTA. Position the other end of the Remote Control
Signal Receiver where it can be seen from the front of the TV.
4
Using Your Remote Control
XDTA OOBE SIK 1010.indd 4 9/30/10 3:03 PM
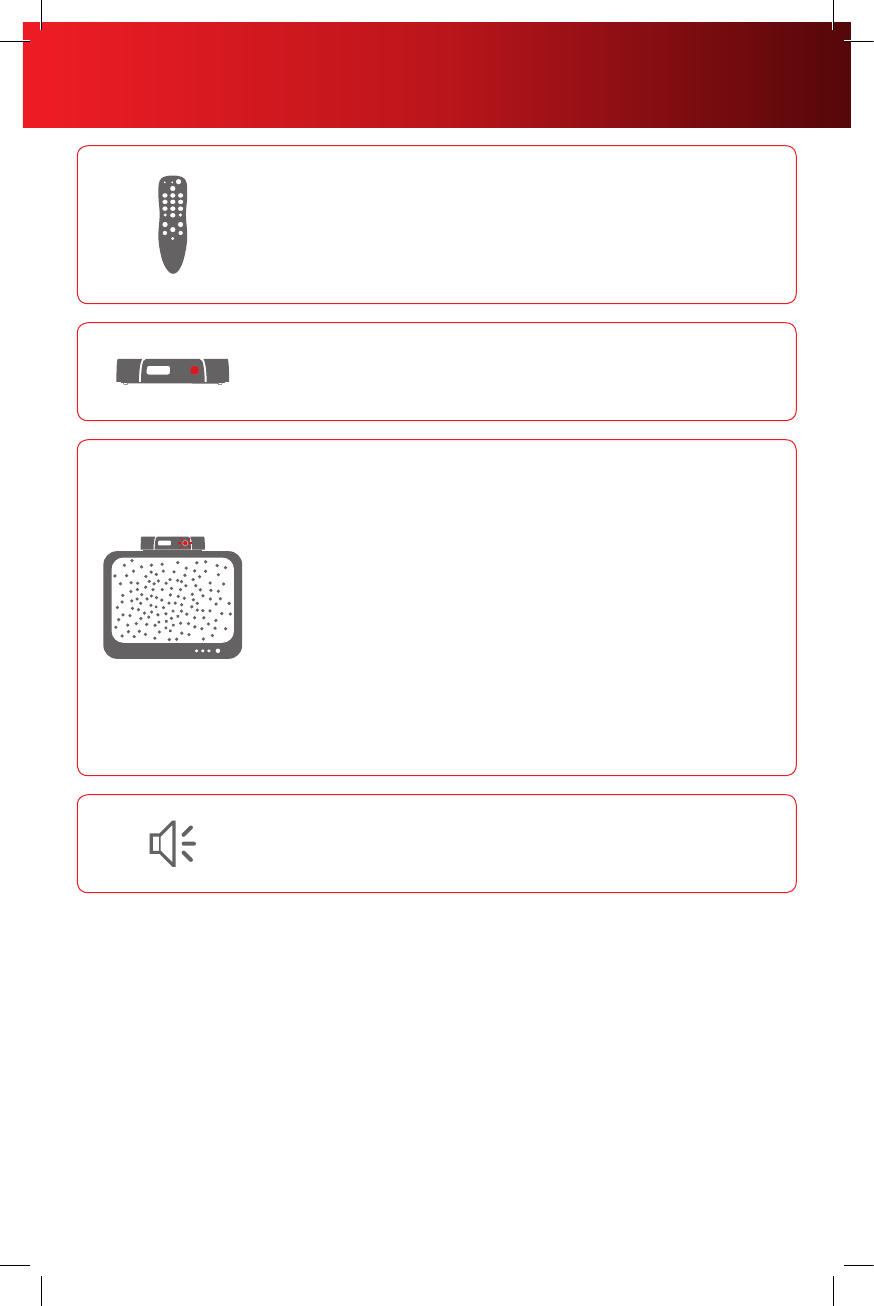
If the remote control does not work:
• Makesurethebatteriesareinsertedcorrectly.
• Makesureyourremotecan“see”thefrontoftheDTA(orthefrontofthe
Remote Control Signal Receiver).
• IfyouareusingtheRemoteControlSignalReceiver,makesureitis
connected firmly to the DTA.
If there is no light illuminated on the front of the DTA:
• MakesurethepowercordisattachedtotheDTAandpluggedintoalive
electrical outlet.
If the audio is in a language you don’t expect to hear:
• Youmayhaveaccidentlychangedittoanalternatelanguageoption.Press
the LANG button on your remote control one or two times.
If there is no picture on the TV and the light on the DTA is
blinking:
• MakesureyouhavecontactedComcasttoactivatetheDTA.
• Waitafewminutes.Ifthelightisstillblinking,callComcastat1-888-634-
4434.
If there is no picture on the TV and the light on the DTA is
solid:
• MakesuretheTVandDTAarebothsettothesamechannel(both3,or
both 4).
• TryswitchingtheTVandDTAtootherchannel(3or4).
• Ifyou’realsoconnectedtoaVCR,makesuretheVCRisturnedon.
• MakesuretheDTAisconnecteddirectlytothecablewalloutlet.
• Makesureallthecablesarermlyconnected.
If you need additional support, go to comcast.com/digitalnow or call 1-888-634-4434.
5
Troubleshooting
XDTA OOBE SIK 1010.indd 5 9/30/10 3:03 PM

*$25 credit provided in Comcast systems in Illinois.
THE COMCAST CUSTOMER GUARANTEE
We are committed to providing you with a consistently superior customer experience. If for any reason
something goes wrong, we will work to resolve the issue as quickly and professionally as we can.
1. We will give you a 30-day, money-back guarantee on all our services.
If you’re not satisfied and wish to cancel service for any reason, you can do so in the first 30 days and get your
money back. Simply return all equipment in good working order and we’ll refund the monthly recurring fee for
your first 30 days of service and any charges you paid for standard installation.
2. We will treat you and your home with courtesy and respect.
Our technicians will clearly display their Comcast identification when they arrive at your home. They will be
trained and equipped to complete the job on the first visit. Our Customer Account Executives will be courteous
and knowledgeable when you contact us.
3. We will answer your questions at your convenience.
You can contact us 24 hours a day, 7 days a week regarding any service-related issue by calling 1-800-XFINITY
or in any of the following ways:
• OnlineviaAskComcast
• LiveChatonlinewithaComcasttechnician
• OnlineCommunityForum
• Sendusanemailandreceivearesponsewithin24hours
4. We will offer easy-to-understand packages and provide you with a clear bill.
Our packages are designed to be straightforward. A call or visit to our website makes it easy to find a package
that’s right for you. We aim for the same clarity with our bills. You may view your monthly statement and service
details anytime by visiting xfinity.com.
5. We will continually offer the best and most video choices.
We’re working hard to bring more choices to our customers instantaneously by using the full power of
our advanced network and decades of television experience. We will use On Demand to bring customers
dramatically more content choices, including more movies, more sports, more kids’ programs, more network TV
shows and more HD than anyone else.
6. We will quickly address any problem you may experience.
After the first visit to your home, if we do not satisfactorily complete installation or can’t resolve a routine issue,
we will extend a complimentary service to your account. Additionally, we won’t charge you for a service visit that
results from a Comcast equipment or network problem.
7. We will schedule appointments at your convenience and be mindful of your time.
As a courtesy, we will call you before we arrive at your home. And if we fail to arrive for a scheduled visit during
the appointment window, we will credit $20 to your account.*
We’re here to help
Every Comcast employee is dedicated to meeting the commitments of our guarantee and to exceeding your
expectations. We are working very hard to serve you better and listen carefully to your feedback. If you have any
thoughts or ideas about this Guarantee or about your experience with us, we invite you to share them with us by
visiting xfinity.com.
To learn more about your XFINITY products and services, visit us online at xfinity.com/welcome for 24/7 online
support, or give us a call at 1-800-XFINITY.
6
The Comcast Customer Guarantee
XDTA OOBE SIK 1010.indd 6 9/30/10 3:03 PM

1One-Stop-Shop Box
Important information such as your account number, amount
due and date due.
2Contact Us
Chat and email support are available 24/7.
3Monthly Statement Summary
Your payments and new charges.
4New Charges Summary
A breakdown of your new charges for the current billing period.
5News From Comcast
Important information about your account, products and
services.
6Savings Information
If you are taking advantage of our promotions and discounts,
we will show you how much you are saving.
7Payment Coupon
Simply tear it off and mail it in with your check or money order.
Or go to comcast.com and sign up for automatic payments.
8Service Details
Details of all new charges for the current billing period.
9Partial Month Charges and Credits
If you add, change or remove a service during your billing cycle,
any partial month charges or credits are here, along with a
brief description of what changed.
YOUR XFINITY BILL AND PAPERLESS OPTIONS WITH
Receiving Your Bill
Each month, you will receive a bill for your XFINITY service(s). All customers are billed for services received
and payments are due on the date indicated on your bill. You can also choose to go paperless with Comcast’s
Ecobill® process by simply going to comcast.com/ecobill and signing up.
Understanding Your Bill
View the diagram below to view the key features of your XFINITY bill.
Understanding Your Payment Options
• Gotocomcast.com/ecobilltosetuparecurringpaymentfromyourbankaccount.Orchoosefromotherone-
time payment options, all without paper or stamps!
• Useyourbankorcreditunion’swebsitetopayyourbilldirectlyfromyourbankaccount.Inmanycases,you
can also view your XFINITY bill summary from your bank’s website.
• Mailyourpaymentusingthepre-addressedreturnenvelopeorbringyourpaymentintoourofce.
Please remit your payments before the due date. Payments received after this date are subject to a late
payment fee. Visit xfinity.com/welcome for 24/7 online support or call 1-800-XFINITY.
Actual bill may vary slightly.
1
2
3
4
6
5
7
8
9
7
How to Read Your Bill
XDTA OOBE SIK 1010.indd 7 9/30/10 3:03 PM
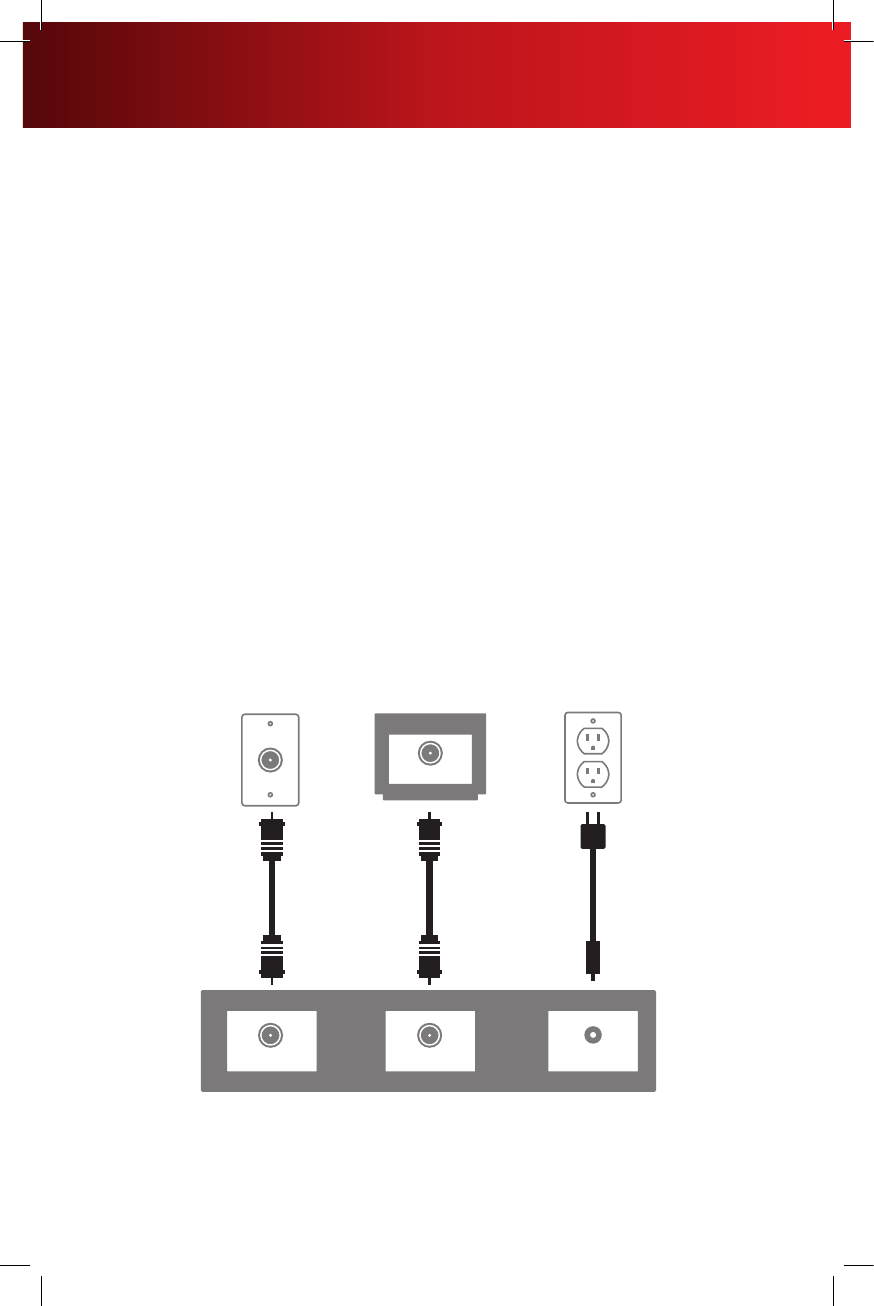
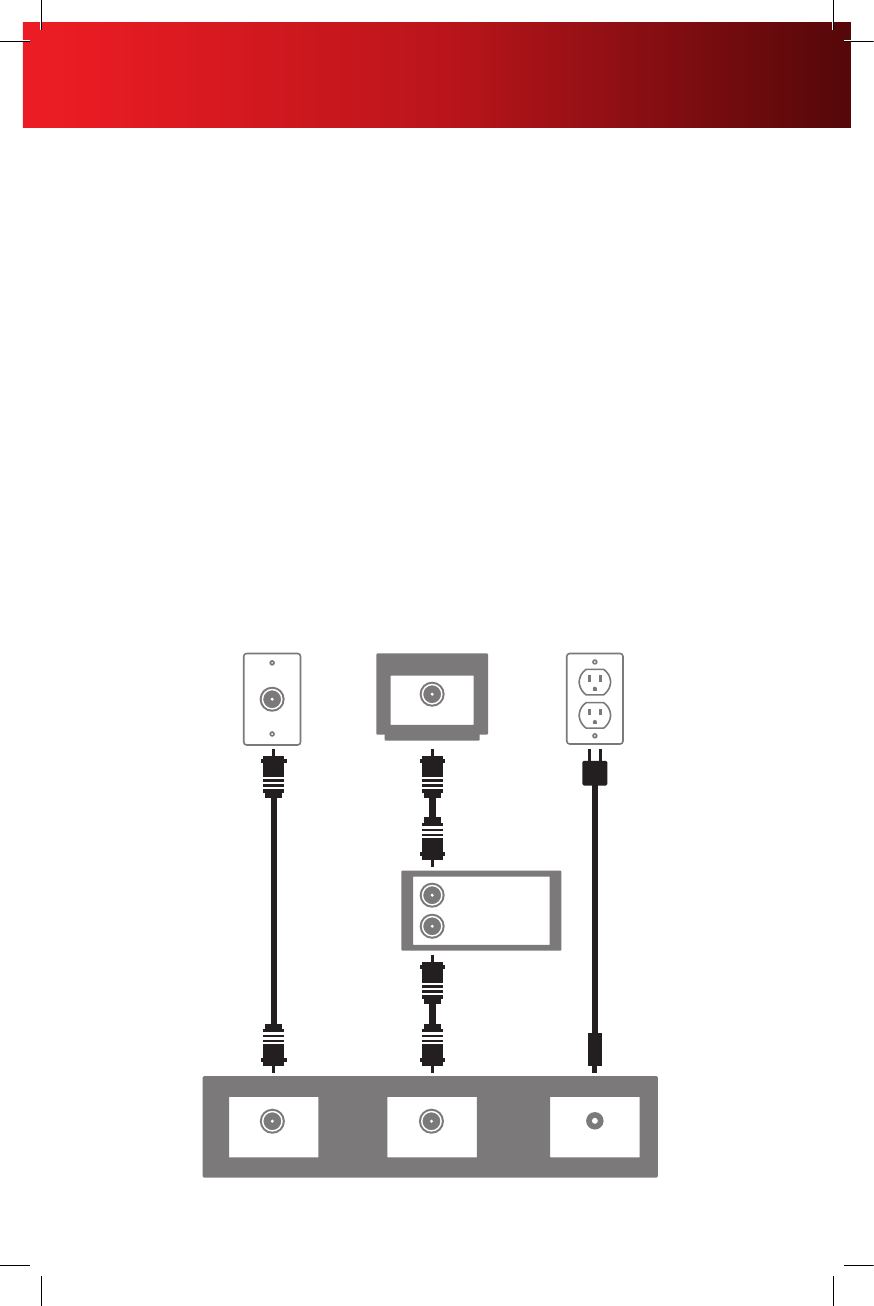
Coax Cable Connection with TV
Connect & Power Up
1. Find the coax cable that runs from the wall outlet to the back of your TV. Remove the end connected to
the back of your TV and connect it to the Cable In connection on the back of your DTA.
2. Connect the coax cable included in this kit from your DTA to the Cable In/RF In connection on the back
of your TV. Optional: Don’t like the DTA laying on top of your TV? Hide it using the Remote Control Signal
Receiver in your kit. Instructions are on the label.
Is your connection different? Information for alternate connections is available in this
section.
3. Plug the round end of the power cord into the Power input on the back of your DTA. Then plug the other
end into an electrical outlet.
4. Turn your TV on. Confirm that your TV is now on. Tune to Channel 3. Set the switch on the back of your
DTA to Channel 3.
Black screen? Switch both your TV and DTA to Channel 4.
5. Place the batteries in your Remote Control.
6. To program your Remote, locate the booklet that came with your Remote Control and follow the
instructions. You can do this now or later.
7. Do you have other kits to set up? If so, do that now.
Cable In Power
Back of DTA Set-Top Box
Back of TVCable Wall Outlet Electrical Outlet
Power CordCoax Cable Coax Cable
To TV
Cable in/RF in
8
DTA Set-Top Box Connections
XDTA OOBE SIK 1010.indd 8 9/30/10 3:03 PM
Coax Cable Connection with VCR
Connect & Power Up
1. Find the coax cable that runs from the wall outlet to the back of your VCR. Remove the end connected to
the back of your VCR and connect it to the Cable In connection on the back of your DTA.
2. Connect the coax cable included in this kit from your DTA to the Cable In/RF In connection on the back of
your VCR. Optional: Don’t like the DTA laying on top of your TV? Hide it using the Remote Control Signal
Receiver in your kit. Instructions are on the label.
3. Plug the round end of the power cord into the Power input on the back of your DTA. Then plug the other
end into an electrical outlet.
4. Turn your TV on. Confirm that your TV is now on. Tune to Channel 3. Set the switch on the back of your
DTA to Channel 3.
Black screen? Switch both your TV and DTA to Channel 4.
5. Place the batteries in your Remote Control.
6. To program your Remote, locate the booklet that came with your Remote Control and follow the
instructions. You can do this now or later.
7. Do you have other kits to set up? If so, do that now.
Cable In Power
Back of DTA Set-Top Box
Back of TVCable Wall Outlet Electrical Outlet
Power CordCoax Cable
Coax Cable
To TV
Cable in/RF in
Back of VCR
Cable out/RF out
Cable in/RF in
Coax Cable
9
DTA Set-Top Box Connections
XDTA OOBE SIK 1010.indd 9 9/30/10 3:03 PM

Notes
10
XDTA OOBE SIK 1010.indd 10 9/30/10 3:03 PM

Notes
11
XDTA OOBE SIK 1010.indd 11 9/30/10 3:03 PM

XDTA OOBE SIK 1010
XDTA OOBE SIK 1010.indd 12 9/30/10 3:03 PM