Vantiva USA H44-100A Satellite receiver set top box User Manual Manual
Technicolor Connected Home USA LLC Satellite receiver set top box Manual
Contents
- 1. Manual
- 2. Manual addendum
Manual

USER GUIDE
DIRECTV GENIE
™
& EARLIER
HD DVR RECEIVERS
P.O. Box 1079
El Segundo, CA 90245

When you see the ENERGY STAR label on your set-top box, it means that your set-top box is ENERGY STAR
qualified, giving you the benefit of saving energy and helping our environment.
However, ENERGY STAR labeled HD DVR set-top boxes qualify for ENERGY STAR only when configured
with the DIRECTV® Whole-Home DVR service. All other ENERGY STAR labeled set-top boxes, when used in
conjunction with a DIRECTV subscription, meet ENERGY STAR criteria without requiring the consumer to take
any additional steps.

3
Welcome! Now that you’re plugged in, it’s time to start enjoying access to over 285 (including over 190 full-time HD channels)
channels of live and On Demand TV programming, satellite music and a huge selection of box office hits from DIRECTV CINEMA®.
We’ll take you step by step through everything, from pushing the POWER button to searching for your favorite programs.
This User Guide applies to the DIRECTV® HD DVR and the Genie™ HD DVR and Mini Clients. Because this User Guide was designed
to accommodate several models, your Receiver, its user interface, and certain features may vary from what is shown here.
Online Manuals and Other Resources
To view the most up-to-date manuals for DIRECTV Receivers and other equipment, please visit www.directv.com/manuals or
go to www.directv.com and search for keyword “manuals”.
You can also visit www.directv.com to manage your account, and find information about DIRECTV service, programming
packages, special promotions, and much more.
Getting Connected
If a professional installed your DIRECTV™ HD DVR and any Clients, you are ready to start watching TV. If your equipment was
not professionally installed, or you just added a surround sound system or other equipment, please see Appendix 1, “Setup and
Activation”.
IMPORTANT:
• Advanced Receiver service fee is required with all HD DVRs to view the HD channels included in your programming package in
HD, and for DVR functionality.
• DIRECTV hardware, programming and Advanced Receiver service available separately. For information and pricing, please
visit directv.com.
WELCOME TO THE DIRECTV FAMILY!

4
DIRECTV HD DVR RECEIVER USER GUIDE
TABLE OF CONTENTS
Welcome to the DIRECTV Family! ............................................ 3
Safety & Care ...........................................................................6
Product Information ................................................................ 8
CHAPTER 1: USING YOUR REMOTE CONTROL
Your Remote Control ............................................................. 10
The Progress Bar .................................................................. 17
Live Buffer .............................................................................18
CHAPTER 2 - CHANNELS & PROGRAM INFO
Program Guide ...................................................................... 20
Channel Banner & TV Options ............................................... 26
Menu ......................................................................................30
CHAPTER 3: SEARCH & BROWSE
Movies, On Demand and Pay Per View .................................. 34
Sports .................................................................................... 40
TV Shows and Genie ™ Recommends ......................................41
Search Features .................................................................... 43
CHAPTER 4: RECORDINGS
Recording a Single Show ....................................................... 48
Recording a Series ................................................................ 50
Watching and Deleting Your Recorded Shows .......................52
Playlist ...................................................................................53
Manage Recordings ...............................................................57
Recording from Your Computer, Phone or Tablet ................. 61
CHAPTER 5 - EXTRAS & SPECIAL FEATURES
Extras .................................................................................... 64
Special Features ....................................................................70
DIRECTV ® Whole-Home DVR Service .................................... 74
Genie™ HD DVR & Mini ........................................................... 79
DIRECTV ™ Mobile Apps .......................................................... 80
CHAPTER 6 - SETTINGS & HELP
Settings ................................................................................. 84
Parental Controls .................................................................. 93
Favorite Channels ................................................................. 98

5
Help ....................................................................................... 99
CHAPTER 7 - GENIE™ HD DVR
Genie™ HD DVR .................................................................... 102
DIRECTV Genie Mini Back Panel Example ...........................107
CHAPTER 8 - TROUBLESHOOTING & FAQS
Troubleshooting Tips ........................................................... 110
Frequently Asked Questions ................................................113
CHAPTER 9: WARRANTY AND OTHER INFO
Limited 90-Day Warranty .................................................... 130
DIRECTV PROTECTION PLAN .............................................. 133
FCC Customer Information ................................................. 134
TERMS AND CONDITIONS FOR USE OF SOFTWARE
(“TERMS”) ........................................................................... 137
APPENDICES
Appendix 1: Setup and Activation ........................................ 148
Appendix 2: Connections to TV & Equipment ...................... 149
Appendix 3: Receiver Front and Back Panels ...................... 159
Appendix 4: Get Connected ................................................. 163
Appendix 5: About High-Definition .......................................169
Index ....................................................................................174
Icon Reference .....................................................................178

6
DIRECTV HD DVR RECEIVER USER GUIDE
SAFETY & CARE
Your DIRECTV® Receiver has been designed and manufactured to stringent quality and safety standards. You should, however, be aware of the
following important precautions for safe and optimal use of the equipment. Meaning of symbols printed on the rear panel of the product:
This symbol indicates that dangerous voltage with a risk of electric shock is present within this unit.
This symbol indicates that there are important operating and maintenance instructions in the literature accompanying this unit.
Important Safety Instructions
1. Read these instructions.
2. Keep these instructions.
3. Heed all warnings.
4. Follow all instructions.
5. Do not use this apparatus near water.
6. Clean only with dry cloth.
7. Do not block any ventilation openings. Install in accordance with the manufacturer’s instructions.
8. Do not install near any heat sources such as radiators, heat registers, stoves or other apparatus (including amplifiers) that produce heat.
9. Do not defeat the safety purpose of the polarized or grounding-type plug. A polarized plug has two blades with one wider than the other. A grounding type plug has
two blades and a third grounding prong. The wide blade or the third prong are provided for your safety. If the provided plug does not fit into your outlet, consult an
electrician for replacement of the obsolete outlet.
10. Protect the power cord from being walked on or pinched particularly at plugs, convenience receptacles and the point where they exit the apparatus.
11. Use only attachments/accessories specified by the manufacturer.
12. Use only with the cart, stand, tripod, bracket or table specified by the manufacturer, or sold with the apparatus. When a cart is used, use caution
when moving the cart/apparatus combination to avoid injury from tip-over.
13. Unplug this apparatus during lightning storms or when unused for long periods of time.
14. Refer all servicing to qualified service personnel. Servicing is required when the apparatus has been damaged in any way, such as power-supply
cord or plug is damaged, liquid has been spilled or objects have fallen into the apparatus, the apparatus has been exposed to rain or moisture,
does not operate normally, or has been dropped. Ensure proper ventilation — the vent slots on the DIRECTV® Receiver must be left uncovered to allow proper airflow
to the unit. Blocking the airflow to the unit could impair performance or damage your Receiver and other components.
15. Use only the power supply (power cord) that came with your DIRECTV Receiver. Failure to use the authorized power supply (power cord) may cause electric shock,
fire, bodily injury and/or property damage. If the power supply (power cord) becomes damaged or needs to be replaced, please contact DIRECTV Customer Service to
obtain an authorized replacement.

7
SAFETY & CARE
CAUTION: Avoid moisture to reduce the risk of fire or electric
shock. The DIRECTV® Receiver should not be used near water
(for example, kitchen sink, bathtub, pool, damp basement).
Also, never spill liquid on the Receiver. Do not place vases or
other vessels containing liquid on top of it.
WARNING: To reduce the risk of fire or electric shock, do not
expose this product to rain or moisture. The apparatus shall
not be exposed to dripping or splashing and no objects filled
with liquids, such as vases, shall be placed on the apparatus.
WARNING: Use only the power supply (power cord) that
came with your DIRECTV Receiver. Failure to use the
authorized power supply (power cord) may cause electric
shock, fire, bodily injury and/or property damage. If the
power supply (power cord) becomes damaged or needs to be
replaced, please contact DIRECTV Customer Service to obtain
an authorized replacement.
IMPORTANT: Be sure not to place your DIRECTV® Receiver
near anything WET or HOT!
If this product is rated at 240VAC, a suitable attachment
plug should be used.
TIP: We highly recommend plugging the DIRECTV® Receiver
into a surge protector to prevent damage from fluctuations in
your power supply.
CAUTION: To reduce the risk of electric shock, do not
remove cover (or back).
No user-serviceable parts inside.
Refer servicing to qualified service personnel.
CAUTION
RISK OF ELECTRIC SHOCK
DO NOT OPEN!
• Do not stack electronic components or other objects on top of the DIRECTV® Receiver. Also, do not stack the Receiver on top
of a “hot component” such as an audio power amplifier.
• Protect your components from power surges by connecting all the components before plugging any power cords into the wall
outlet. Use of a surge protector is also recommended.
• Don’t overload power outlets or extension cords, which can result in the risk of fire or shock. It’s also important to use only the
type of power source indicated on the marking label or in this manual.
• Avoid audio hum or interference by inserting all cable plugs firmly into their jacks. Also, place Audio/Video (A/V) cables to the
sides of the TV back panel rather than down the middle once connected. Try not to coil any twin-lead cables and keep them
away from A/V cables as much as possible.
• Never insert objects of any kind into any openings in the DIRECTV® Receiver (other than the DIRECTV® Access Card as
detailed in this manual).
• Place it on a flat, hard surface — do not operate the DIRECTV® Receiver on a carpet or other padded surface.
• Always unplug your DIRECTV® Receiver before moving it.
• Always unplug the DIRECTV® Receiver, TV and other equipment before you connect or disconnect any cables.
• The only way to disconnect the DIRECTV® Receiver from the power supply is to remove the power cord. The DIRECTV®
Receiver unit must therefore be installed next to the power point which must be easily accessible.
• CAUTION: Electric Shock — never attempt to disassemble the DIRECTV® Receiver yourself; always take it to a qualified
service person when repair is required. Opening or removing covers may expose dangerous voltage or other risks. Incorrect
reassembly can cause shock when Receiver is subsequently used. Attempted self-repair may also void your warranty. Changes
or modifications not expressly approved by the party responsible for compliance (by the warranty or by the manufacturer) could
void the user’s authority to operate the equipment.
• Do not drop your DIRECTV® Receiver and always move it with care.
• Have your DIRECTV® Receiver professionally serviced (do not attempt to service it yourself).
• Any changes or modifications in construction of this device which are not expressly approved by the party responsible for
compliance could void the user’s authority to operate the equipment.
• If you move your DIRECTV® Receiver between locations at different temperatures, allow it to reach room temperature before
you apply power to it.
• Do not pick up or otherwise move your DIRECTV® Receiver while it is connected to the AC power supply. If you want to move
your set-top box, first disconnect it, then wait at least 30 seconds before continuing.
• CAUTION: To reduce the risk of fire, use only No. 26 AWG or better telecommunications line cord.
• CAUTION: Replace remote control batteries with same or equivalent type. There is danger of explosion if batteries are
incorrectly replaced.
• For your information: The identification sticker for your Receiver is located behind the small door on its front panel. For your
Mini Client, the sticker can be found on the bottom or base of the unit.
• The telecommunication network voltage used is the category number 3.
Note to Satellite Dish Installer: This reminder is provided to call your attention to articles 810 and 820 of the 2005 National
Electrical Code. Refer to article 810, in particular 810-1 and 810-15, for required grounding of the metal structure of the dish
antenna. Refer also to the 810-2 which, by reference to article 820, requires that the satellite dish coaxial cable shield be
connected to the grounding system of the building as close to the point of cable entry as practical.

8
DIRECTV HD DVR RECEIVER USER GUIDE
Keep your receipt to obtain warranty parts and service and for proof of acquisition. Attach it here and record the serial and model
numbers in case you need them. *These numbers are typically located behind the card door on the front panel of your Receiver.
Model No. *
Serial No.
Acquisition Date
Dealer/Address/Phone
Access Card *
Receiver ID *
PRODUCT INFORMATION

9
CHAPTER 1 - USING YOUR REMOTE CONTROL
CHAPTER 1: USING YOUR REMOTE CONTROL
Your Remote Control ................................................................... 10
DIRECTV Genie ™ Remote Control (RC71 & Above) ..................... 10
DIRECTV Universal Remote Control (RC65 & Earlier) ............... 12
Power Button & Mode Switch ..................................................... 12
Basic Button Controls on DIRECTV Remotes ............................. 13
Screen Hint Buttons .................................................................... 13
DVR Control Buttons ................................................................... 14
Checking Remote Control Status ............................................... 16
The Progress Bar ........................................................................ 17
Live Buffer ................................................................................... 18

10
DIRECTV HD DVR RECEIVER USER GUIDE
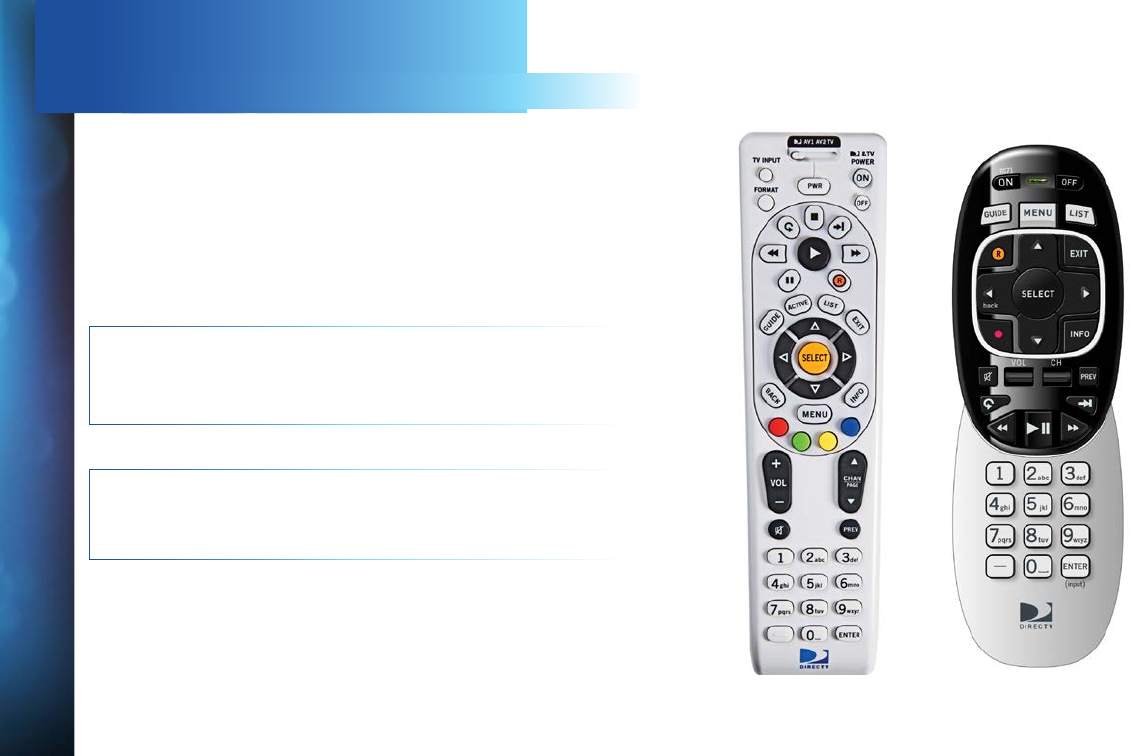
YOUR REMOTE CONTROL
DIRECTV GENIE™ REMOTE CONTROL (RC71 & ABOVE)
Introducing the DIRECTV Genie™ Remote Control
The DIRECTV Genie Remote Control (Model series RC71 and above) with
Radio Frequency (RF) technology offers improved functionality and a host
of convenient benefits. While the Genie Remote comes factory-set to Infra
Red (IR) Mode, so it works with your earlier model Receivers. You can easily
change the settings on your DIRECTV Genie HR44 Receiver, your Genie Mini
(C41 only) and Genie Wireless Mini (C41W and above) to take advantage of the
many benefits of RF like:
Improved command speed
Extended battery life (up to a year)
Reduced interference
No more “line-of-sight” operation which required that you point the
Remote directly at the Receiver or client. It even works through
cabinet doors.
During the programming process, the Genie Remote becomes paired with
the DIRECTV Receiver you want it to work with. However, you can easily pair
it with a different DIRECTV Receiver, Genie Mini or other DIRECTV® Ready
client anytime.
See next page for RF Mode and programming instructions; for the complete
button layout of the Genie Remote, go to the back cover of this manual.
NOTE: If you have upgraded to the latest DIRECTV Genie Receiver (HR44
and above) and Mini Client (C41, C41W and above), the Genie Remote is
not required – you can still use the previous generation Universal Remote
Control to operate your devices.

11
CHAPTER 1 - USING YOUR REMOTE CONTROL
YOUR REMOTE CONTROL
Programming Your Genie Remote
1. Make sure your TV is turned on.
2. Make sure the TV to which you want to program your Genie Remote is
turned on.
3. Press MENU on the Remote, then select Settings & Help from the left
menu.
4. Select Settings from the Settings & Help screen.
5. Select Remote Control from the left menu
6. Select IR/RF Setup.
7. Use the arrow keys to select IR or RF, depending on which Receiver you
wish to pair the remote with, then arrow to select Continue.
8. Follow the onscreen instructions.
For instructions on how to program your remote to an DIRECTV® Ready
Television, please visit directv.com/rvu.
If you have set your Genie Remote to RF mode, and wish to reset it to IR
mode, repeat the above steps to #6, choose IR, and follow the onscreen
instructions.

12
DIRECTV HD DVR RECEIVER USER GUIDE
DIRECTV UNIVERSAL REMOTE CONTROL (RC65 & EARLIER)
The DIRECTV Universal Remote works with your pre-Genie Receivers, as well
as the latest Genie DVRs and Mini Clients, as long as the newer devices are
programmed to operate in IR Mode.
If your DIRECTV System was installed professionally, your Remote is already
programmed to operate your Receiver and TV. To re-program the Remote for
a different TV or other audio-visual equipment, press MENU, select Settings &
Help, Settings, then Remote Control and follow the onscreen instructions.
POWER BUTTON & MODE SWITCH
Use the POWER (PWR) button and Mode Switch to turn a single component on
or off (a DVD player or surround sound system, etc.). Move the Mode Switch
to the position that matches the component you want to control, and use the
POWER button to turn it off or on. The Mode switch must always be in the far left
position to control your DIRECTV Receiver. If the Mode Switch is in a position that
has not been programmed, or if you press a button that is not supported by that
particular piece of equipment, an onscreen message will display to alert you.
NOTE: If you have one or more of DIRECTV’s previous model Universal Remote
Controls (Model RC65 or earlier), you can continue using it with your existing
Receivers (HR34 and earlier) and DIRECTV Clients (C31 and earlier).
YOUR REMOTE CONTROL
13
CHAPTER 1 - USING YOUR REMOTE CONTROL
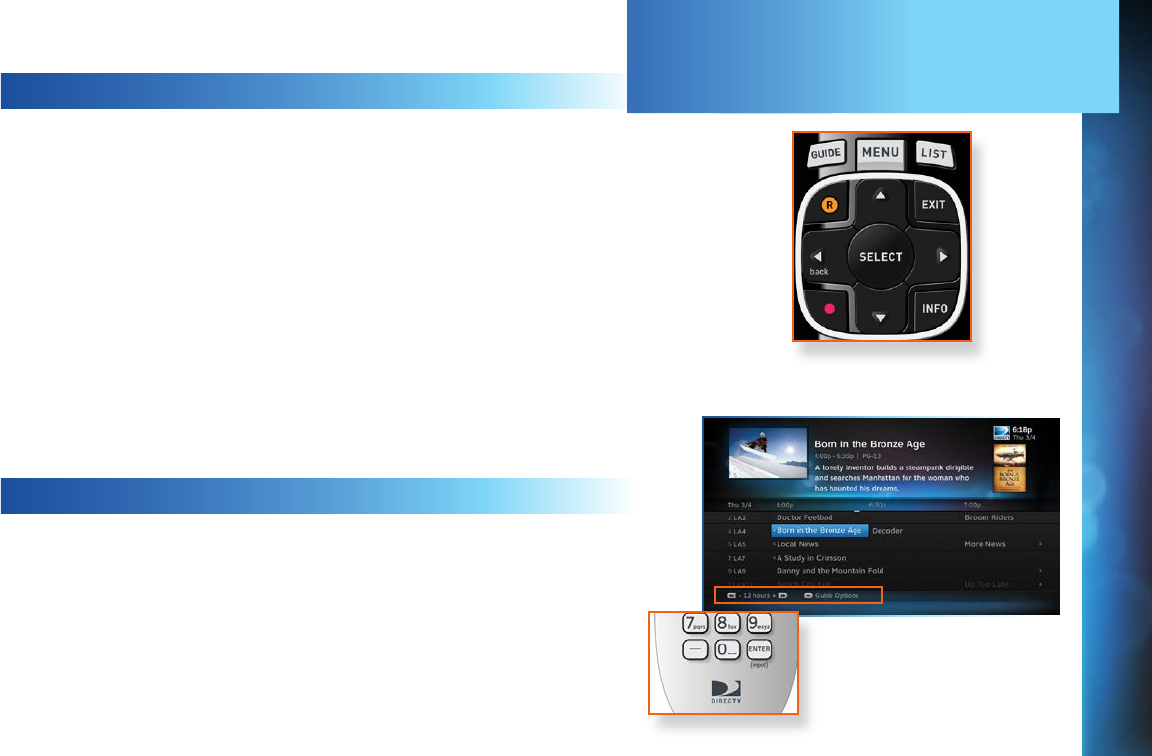
BASIC BUTTON CONTROLS ON DIRECTV REMOTES
The navigation and destination keys below are common to all models of
DIRECTV Remotes:
MENU – Evokes the main menu for access to all features in your DIRECTV
System
INFO – Displays the Channel Banner where you can get information about
your current program.
GUIDE – Accesses the Program Guide.
LIST – Accesses the Playlist screen.
EXIT – Dismisses any menu screen/box and returns you to your current
programming.
ARROW Keys & SELECT – Navigate through any menu screen or dialog box.
BACK/ Left ARROW Key – Returns you to your previous location.
SCREEN HINT BUTTONS
Both Remotes feature special buttons that offer shortcuts within the
DIRECTV interface. These buttons coincide with graphical “screen hint” icons
that display at the bottom left of your screen. The buttons include the DASH,
ENTER, and RED buttons on both the Genie and Universal Remotes, and
the ACTIVE, GREEN, YELLOW and BLUE buttons on the Universal Remote
only. Examples of the screen hints and their functionality are included in this
chapter and throughout this User Guide.
YOUR REMOTE CONTROL
14
DIRECTV HD DVR RECEIVER USER GUIDE
YOUR REMOTE CONTROL
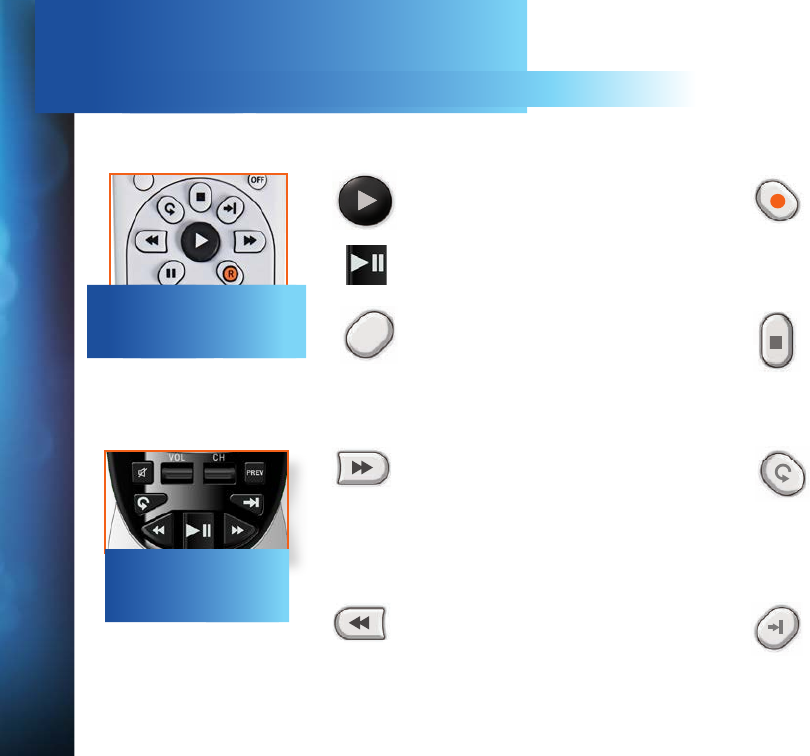
DVR CONTROL BUTTONS
Below are the DVR control buttons common to both types of Remotes with exceptions as noted.*
PLAY / SLOW MOTION
R
RECORD
Starts the recorded video or paused live TV
currently on screen. Hold button down for
slow motion.
Records programs in the Guide and live
TV. Press twice to record a series.
PAUSE / FRAME BY FRAME STOP**
Freezes the action of any live or
prerecorded TV program. While paused,
press FFWD or REW to move forward or
backward frame by frame.
Stops playback of recorded program, and
loads an Info screen with live TV displayed
at the top right of screen.
FFWD / JUMP TO TICKMARK REPLAY / JUMP TO BEGINNING OF PROGRAM
Fast-forwards recorded or live-stored
video. Press up to 4 times to fast-forward
at increasing speeds. Press ADVANCE
while fast-forwarding to go to the next
15 or 30-minute tickmark. Press PLAY to
return to normal play.
Jumps the program you’re watching
backwards 6 seconds and plays from
that point. Hold down REPLAY to jump to
program beginning.
REW / JUMP TO TICKMARK ADVANCE / JUMP TO END OF PROGRAM
Rewinds recorded or live-stored video.
Press up to 4 times to rewind at increasing
speeds. Press REPLAY while rewinding
to go to the previous 15-minute tickmark.
Press PLAY for normal play.
Jumps ahead in recorded or live-stored
video by 30 seconds. Press multiple times
to skip 30 second increments. Hold down
to continue to skip to end.
Universal Remote
RC71 Remote
II

15
CHAPTER 1 - USING YOUR REMOTE CONTROL
NOTE: For Universal Remote Only:
* The DVR buttons can also be used along with the Mode
Switch to control a DVD player or other auxiliary equipment.
** The STOP button is on Universal Remote only.
YOUR REMOTE CONTROL
16
DIRECTV HD DVR RECEIVER USER GUIDE
YOUR REMOTE CONTROL
CHECKING REMOTE CONTROL STATUS
You can access the More System Info screen to see the status of
any Remote on a Receiver or Client. Press MENU, select Settings
& Help, arrow over to Settings, then select Info & Test from the
left menu. Select More System Info from the lower right of the
screen. Using the ARROW keys, scroll down the list of information
to Remote Control to view related information. If more than one
Genie remote is paired with the Genie HR44 or other Receiver, it
will display in the listing Other Paired Remotes.
NOTE: Each time you press a button, the green light at the top of
Remote flashes. If it flashes several times with a single press, the
batteries (size AA) need to be replaced.
NOTE: For more information about the DIRECTV Remote Controls,
use our online interactive tool that details all the button functions
for both remotes. Go to directv.com/remoteguide.
17
CHAPTER 1 - USING YOUR REMOTE CONTROL
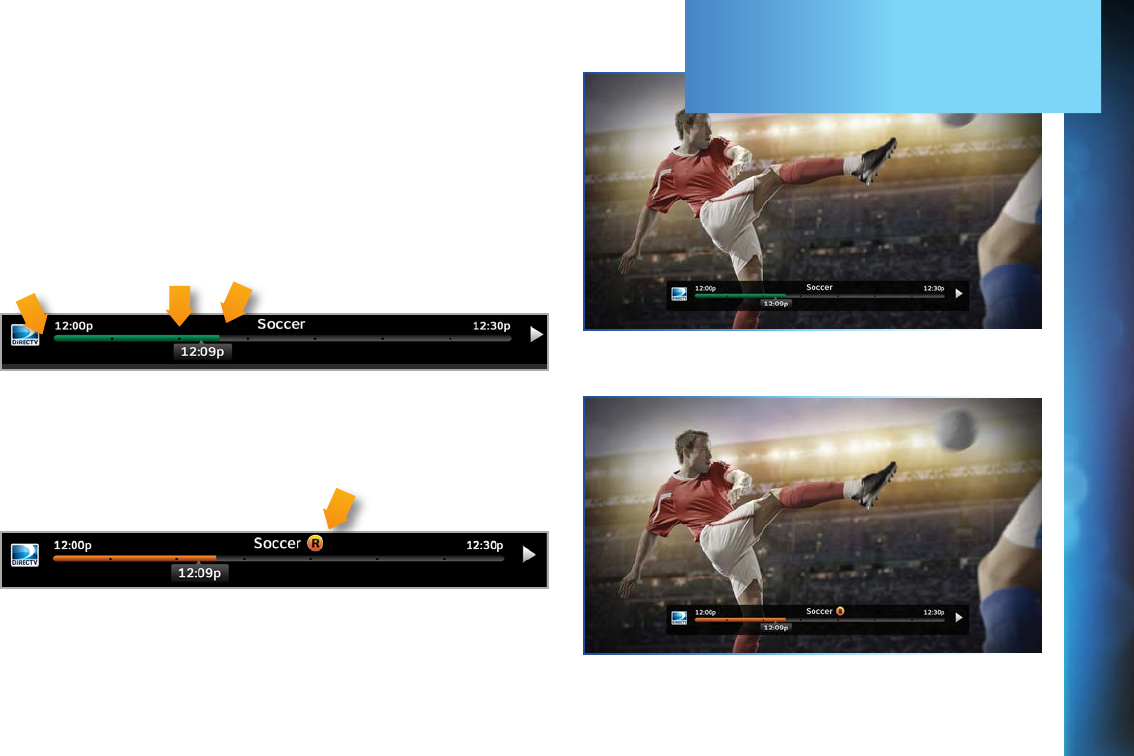
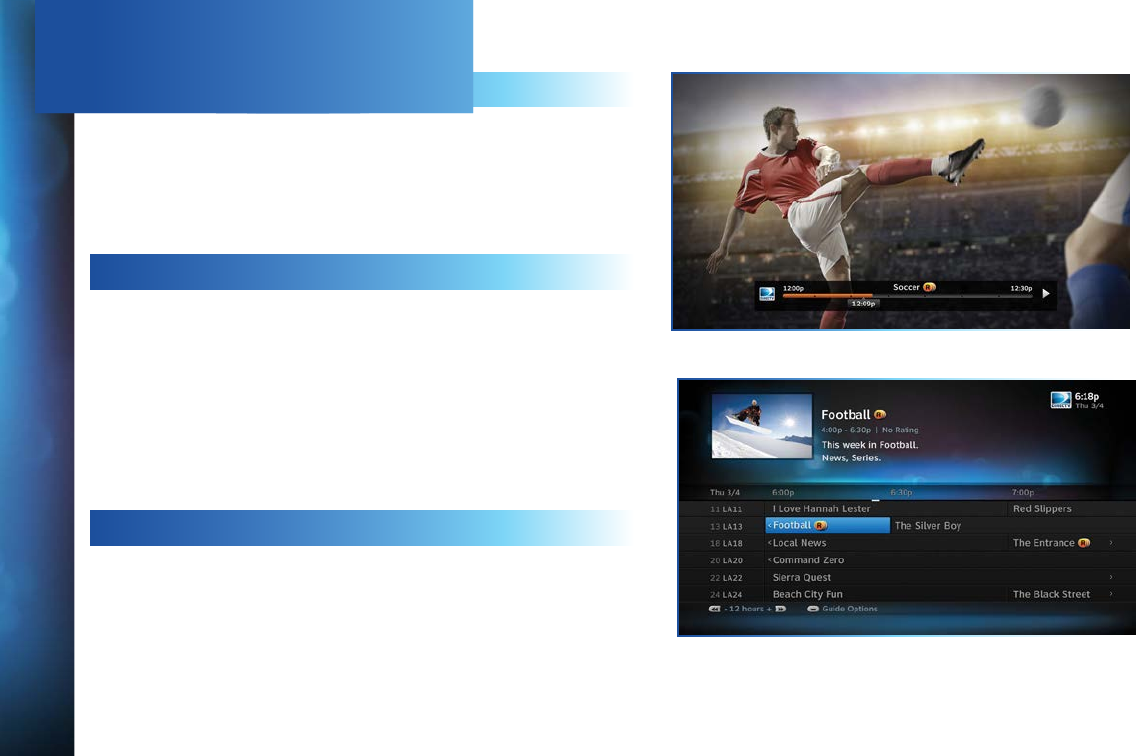
When you use the DVR control buttons, this indicator bar appears
at the bottom of the screen to show where you are in the program
and how far you can go forward or back. For live programs, the
progress bar is green and the time shown is the time of day.
The current time
shows where you
are in the program
you are viewing.
The left end of the
green bar shows
how far back in time
you can go.
The right end of the green
bar shows how far ahead
you can go.
If you press the RECORD button during a live show, the progress
bar turns orange and the orange record icon appears next to the
title of the show.
THE PROGRESS BAR

18
DIRECTV HD DVR RECEIVER USER GUIDE
Your DVR saves programs to the hard drive instantly and
continuously, while you watch. This “live buffer” lets you pause,
rewind, fast forward* or instant replay (jump back 6 seconds). If
you start watching a program late, even if it is not set to record,
you can back up to the beginning (up to 90 minutes) using REW,
as long as you haven’t changed channels since the program
started. Simply press PLAY during a show to display the progress
bar and see how far back in time you can go.
NOTE: *You cannot fast forward during live TV until you pause or
rewind a program.
Progress Bar
LIVE BUFFER

19
CHAPTER 2 - CHANNELS & PROGRAM INFO
CHAPTER 2 - CHANNELS & PROGRAM INFO
Program Guide ......................................................................... 20
Program Info .............................................................................. 20
Local Channels .......................................................................... 21
HD and SD Channels ................................................................. 21
Unsubscribed Channels ............................................................ 21
3D Channels ...............................................................................22
Interactive Channels ..................................................................22
Filtering the Guide ..................................................................... 23
Guide Options .............................................................................24
Mini Guide .................................................................................. 25
Channel Banner & TV Options .................................................. 26
Messages ................................................................................... 26
Info ..............................................................................................26
Last 4 ..........................................................................................27
Favorite Channels ...................................................................... 27
Closed Captioning ......................................................................27
Audio/Video Options ...................................................................28
Parental Controls ...................................................................... 28
Picture-In-Picture ..................................................................... 29
Menu ......................................................................................... 30
My DIRECTV ............................................................................... 30
Search & Browse ....................................................................... 30
Recordings ................................................................................. 30
Extras ......................................................................................... 31
Settings & Help ..........................................................................31
20
DIRECTV HD DVR RECEIVER USER GUIDE
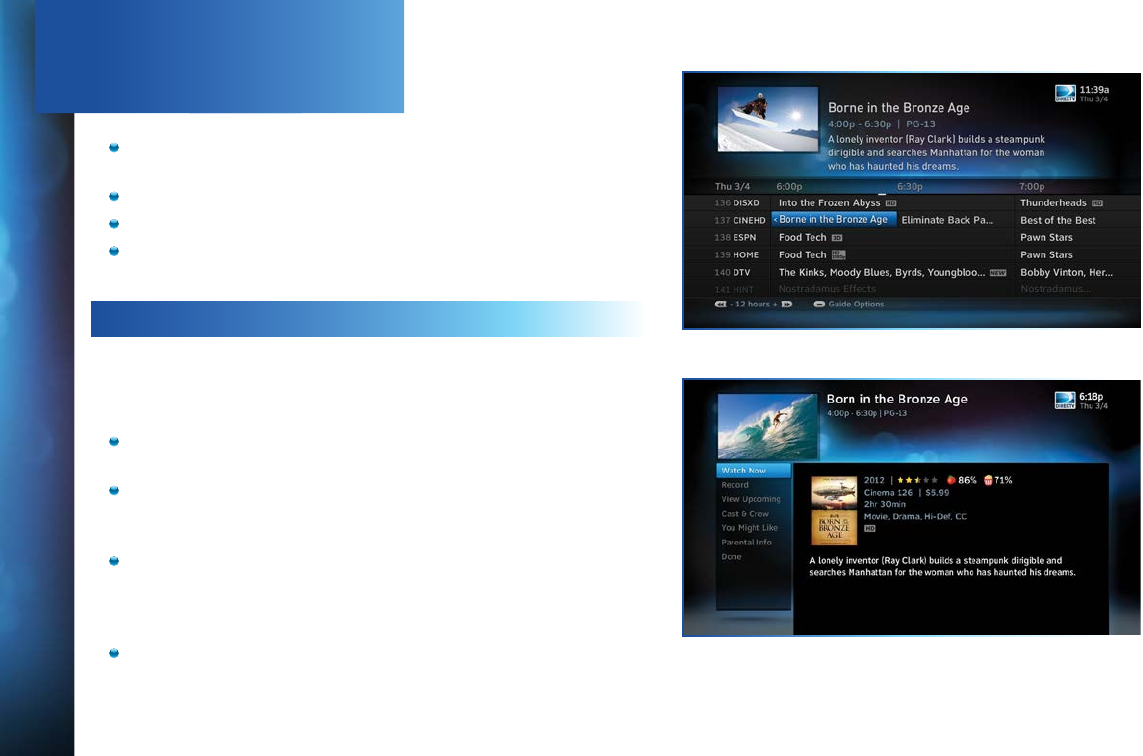
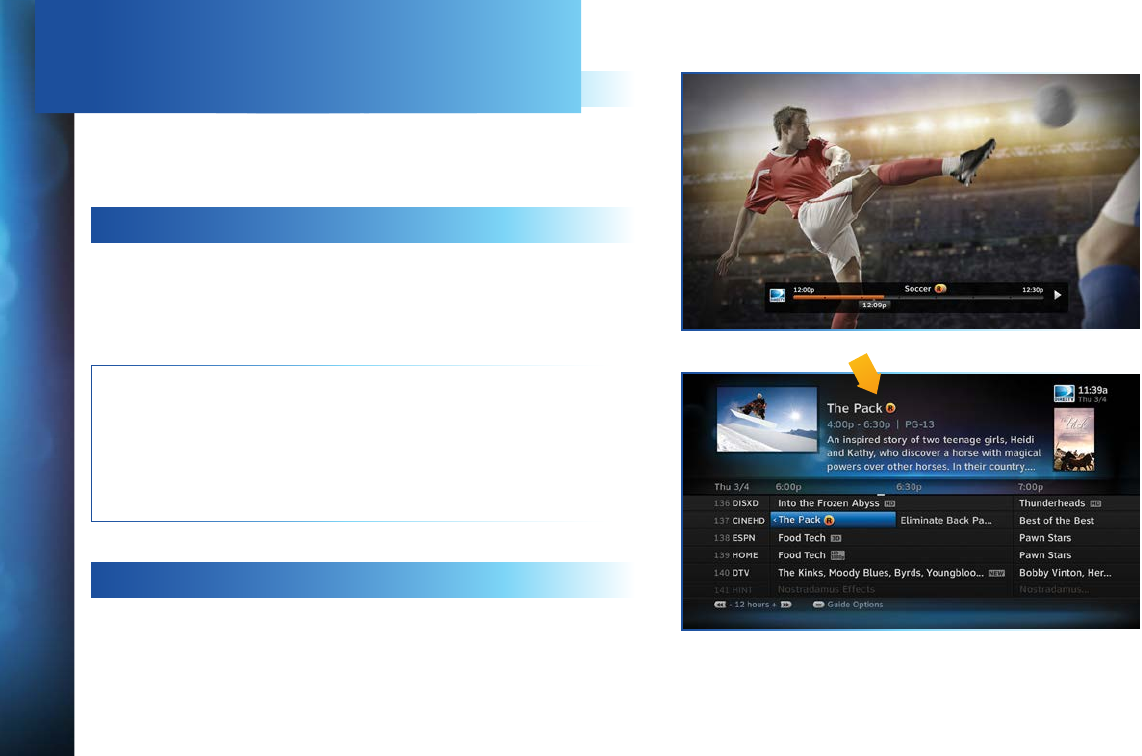
PROGRAM GUIDE
Press the GUIDE button to display the onscreen Program Guide,
with up to 14 days of programming information. Navigate in the
Guide as follows:
Use the ARROW buttons to move one cell at a time up/down/
left/right;
Use the CHAN/PAGE button to scroll up or down by page;
Input a channel number to tune directly to it.
Press the right ARROW button to scroll programming that’s
playing up to 14 days in the future on a particular channel.
PROGRAM INFO
Press INFO on any program to see its associated info screen,
which screen displays the program’s description and provides
other information and functionality:
Watch or record the program, view a list of other showings or
episodes, and more.
Rotten Tomatoes™ – This popular film/TV Critic ratings
system uses fresh or rotten tomato icons to represent critic
scores.
Flixster – This audience ratings service uses upright or
spilled popcorn icons to represent audience scores.
(A 60%+ awards the fresh tomato and upright popcorn,
respectively.)
Cast & Crew – see info on actors, directors, producers, etc.
who worked on the show or movie. Select a name to view
the “Filmography”, which is the actor or crew member’s
entertainment resume.
21
CHAPTER 2 - CHANNELS & PROGRAM INFO
PROGRAM GUIDE
You Might Like – displays shows similar to the current
program.
Parental Info – shows info from Common Sense Media, a
non-profit, independent organization that provides ratings
and reviews for TV shows and movies. You can decide
appropriate programs for your children based on program
description; details on a program’s language, violence and
sexual content; and age-appropriate indicator.
LOCAL CHANNELS
Your DIRECTV-provided local channels can be found in the
Guide from channel numbers 2 through 69.
HD AND SD CHANNELS
DIRECTV has a tremendous offering of HD channels and they
are spread throughout the Guide. They are identified by an
“HD”, look for HD after the program title in the Guide. If you
want to see only the HD version of a channel in the Guide go to
Chapter 6, “Settings: Display: Preferences”, for instructions on
how to make that setting.
UNSUBSCRIBED CHANNELS
Channels that are not part of your subscription package
are shown grayed out in the Guide. You can customize
your Guide to hide these channels. See Chapter 6,
“Settings & Help: Favorite Channels” for details.
Unsubscribed
Channel
HD
Channel
22
DIRECTV HD DVR RECEIVER USER GUIDE
PROGRAM GUIDE
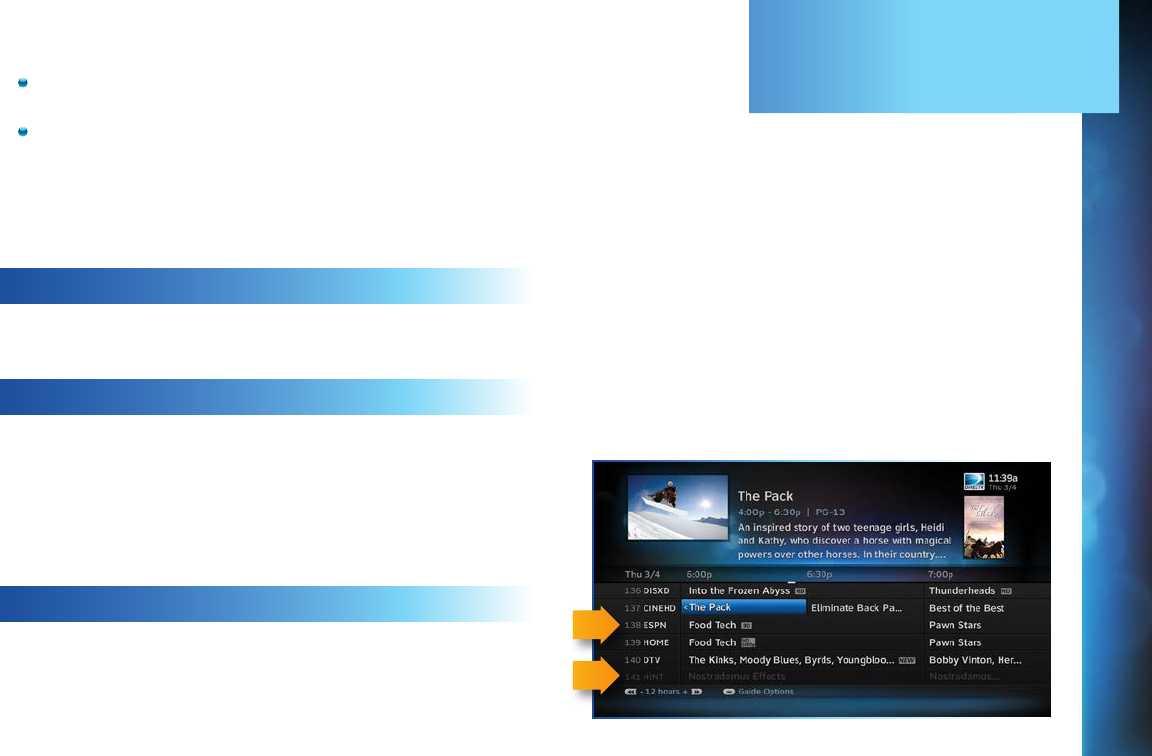
3D CHANNELS
3D channels are in the 100s series in the Guide, starting on
channel 103. For a list of 3D programs, press GUIDE, press
the DASH (—) key* and then select Sort programs by category.
Select 3D and a list of 3D programs will display.
NOTE: *If you are using the DIRECTV Universal Remote, press
GUIDE, the YELLOW button, and follow the same instructions
as above for 3D channel list.
INTERACTIVE CHANNELS
Interactive Channels allow you to interact with what you see
onscreen. When accessing these channels, it may take a few
seconds for the software to download.
To access the ACTIVE™ Channel, press MENU, select
Extras, then arrow over to the Active icon†. The channel is
ready to interact when the yellow highlight box appears.
To exit an interactive channel, press GUIDE and select
another channel, or just directly input the numbers of
the destination channel on your Remote while still on the
ACTIVE Channel.
Other interactive channels, such as Sports Mix let
customers with a qualifying programming package see up
NOTE: There is no separate 3D fee, but DIRECTV 3D
programming is broadcast in HD and requires HD
Access, an HD Receiver (HR21, H21, HR34, HR44 or
later) compatible 3D HDTV and 3D glasses. CHOICE™
package or higher required for ESPN 3D. For more
information, visit directv.com/3D.
NOTE: †Press the ACTIVE button on the DIRECTV
Universal Remote to tune to the ACTIVE Channel.

23
CHAPTER 2 - CHANNELS & PROGRAM INFO
PROGRAM GUIDE
to eight of the most popular channels on one screen. These
channels are distributed among your regular channels; see
the Program Guide. Move the yellow highlight box using the
direction arrows on your Remote to hear the audio associated
with each channel. If you want to see a channel full-screen,
move the yellow highlight box over it and press SELECT.
FILTERING THE GUIDE
There may be times when you want to temporarily minimize the
channels shown in the Guide, filtering them by program type. For
example, you may want to see just sports or news:
Press GUIDE twice to display the Guide Filter.
Highlight your desired category and press SELECT.
The Guide will display only channels in your desired category, which
is labeled at the bottom right of the Guide.
NOTE: Since the filtering is temporary, it only lasts as long as
you keep the Program Guide on the screen. Look to the
right to
see how the
Guide is
being
filtered.
24
DIRECTV HD DVR RECEIVER USER GUIDE
PROGRAM GUIDE
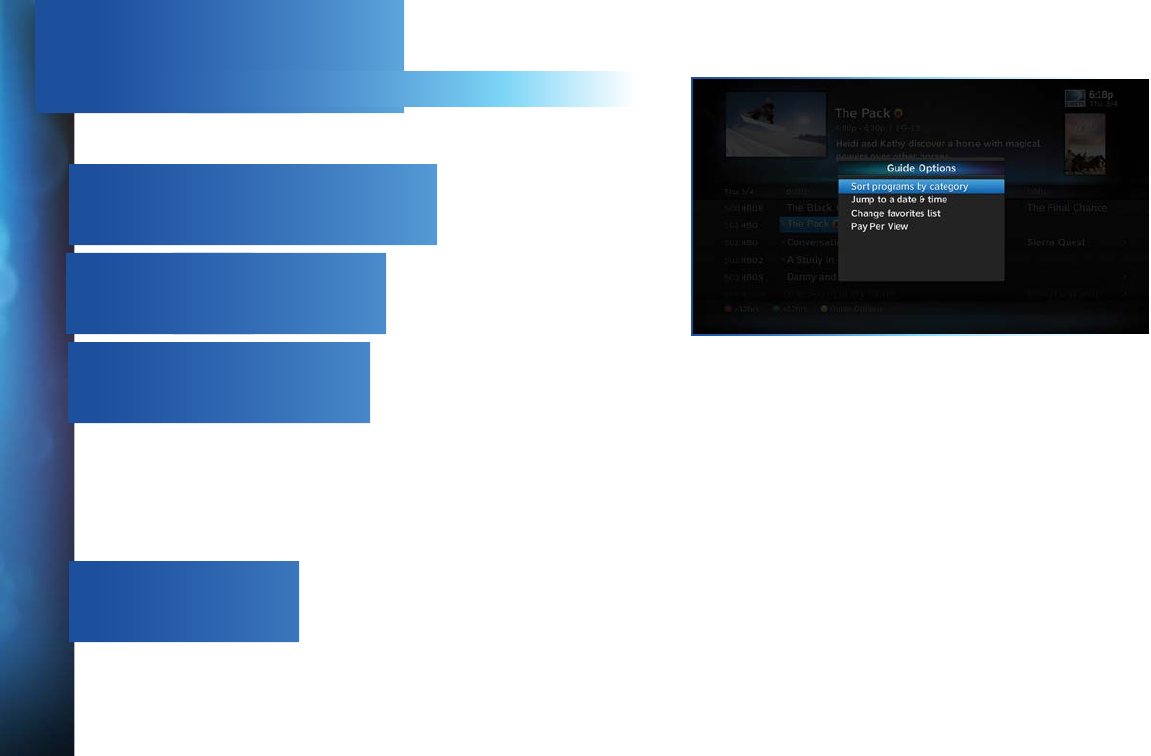
GUIDE OPTIONS
From the Program Guide, press the DASH key [—] to display the
Guide Options menu.
Sort programs by category:
Select Sort programs by category, then select a category to see a
list of shows in chronological order that match your sort criteria.
Jump to a date & time:
Select Jump to a date & time to quickly go to a future date and
time in the Guide.
Change favorites list:
By default, your Program Guide displays all channels offered
by DIRECTV, some of which may not be in your programming
package. Change favorites list allows you to toggle the channels
displayed in your Guide among the following: All Channels,
Channels I Get (channels you subscribe to) or a custom list of
channels you have defined. The Edit Settings option allows you to
modify the channels in your custom list. See Chapter 6, “Settings
& Help: Favorite Channels” for details.
Pay Per View:
Select Pay Per View then select a program type. The Receiver will
search for featured movies, sports or events that are available
for “rent” from DIRECTV ’s vast Pay Per View offerings. More
programs are available through the Movies, On Demand TV
Shows and Adults Only destinations (See Chapter 3.)
25
CHAPTER 2 - CHANNELS & PROGRAM INFO
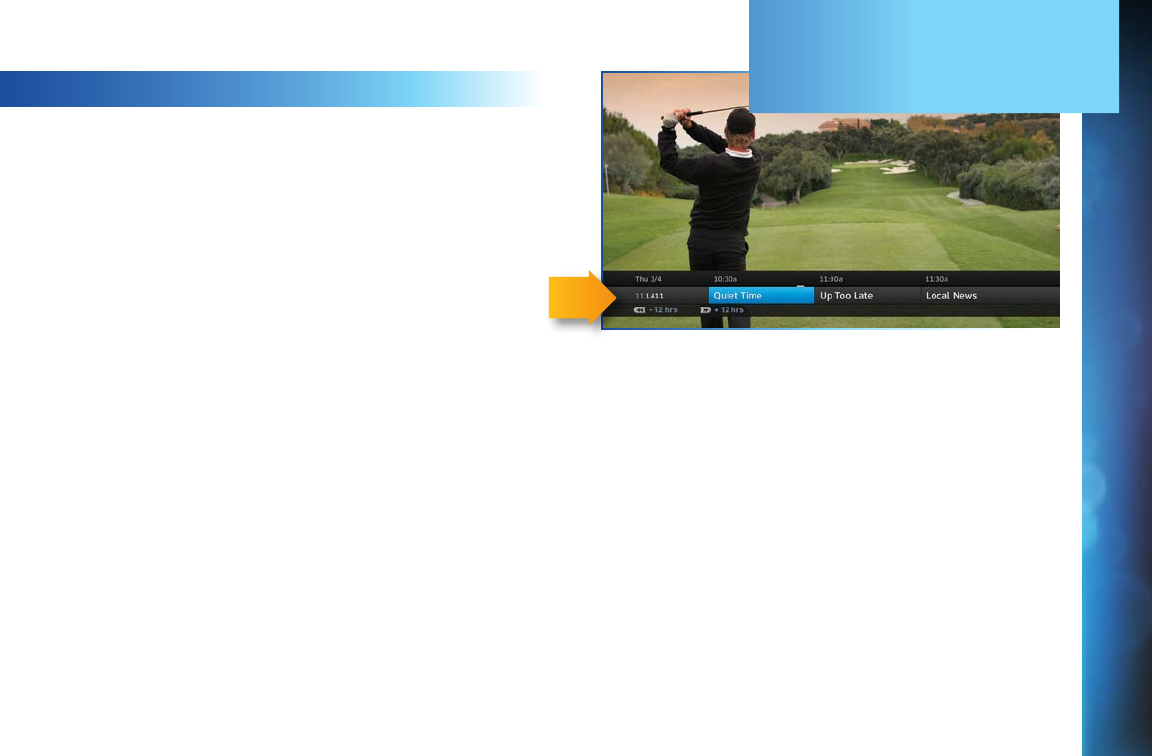
MINI GUIDE
If you are watching a show and want a quick look at what’s on next,
press ENTER to display a one-line mini Program Guide. Use it for
the channel you’re currently watching or type in a new channel
number to see what’s airing next there. Look for the channel or
time you want using the Up, Down, Left & Right arrows. Press
SELECT on the new show to go to that channel.
Mini-
Guide
PROGRAM GUIDE
26
DIRECTV HD DVR RECEIVER USER GUIDE
When you find a currently airing show in the Guide you want to
watch, press SELECT and the Receiver changes to that channel.
The Channel Banner briefly displays at the top of the screen with
program title, channel number, date, time and other information.
Select More Info for detailed program information and other
options.
You can also press INFO to display the Channel Banner while
watching a program.
The Channel Banner also provides easy access to Messages,
the last four channels you watched, Favorite Channels, Closed
Captioning, Audio and Video options, and Parental Controls. Use
the ARROW keys to highlight an option, then press SELECT.
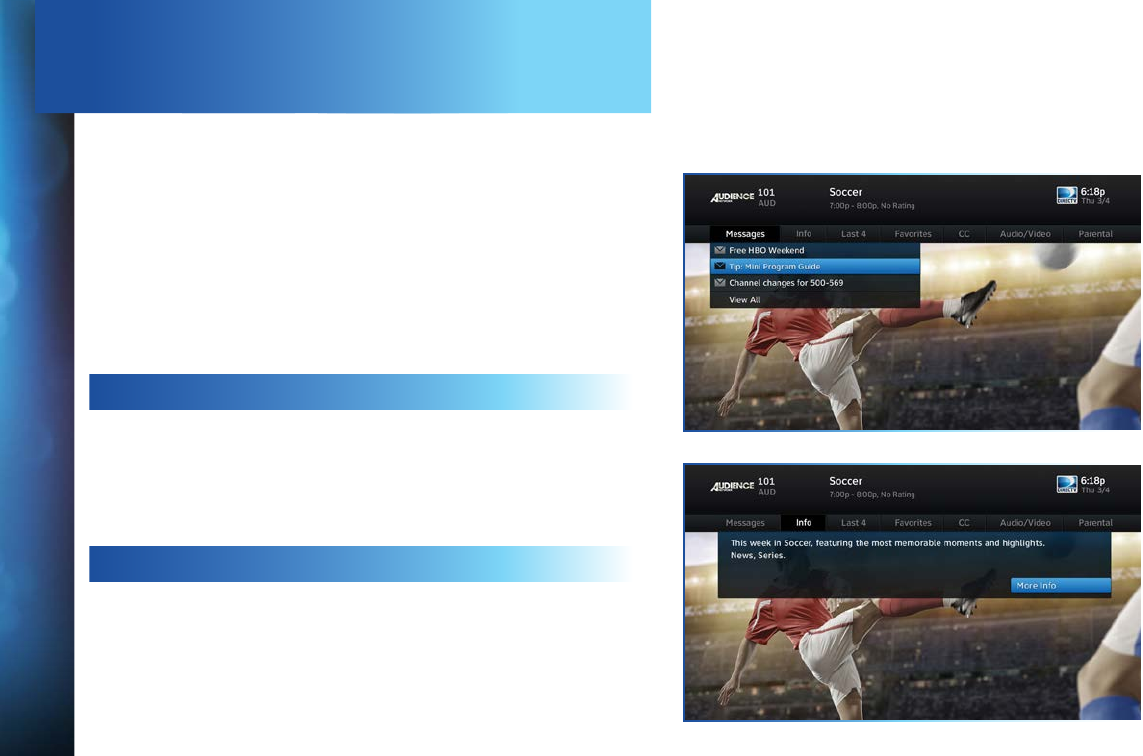
MESSAGES
Select Messages, to see your messages. DIRECTV sends
messages to you for important news items or special promotions.
When you have new mail, an envelope icon appears in the
Channel Banner.
INFO
Select Info to read a brief description of the program. For detailed
program information and other options select More Info.
CHANNEL BANNER & TV OPTIONS
27
CHAPTER 2 - CHANNELS & PROGRAM INFO
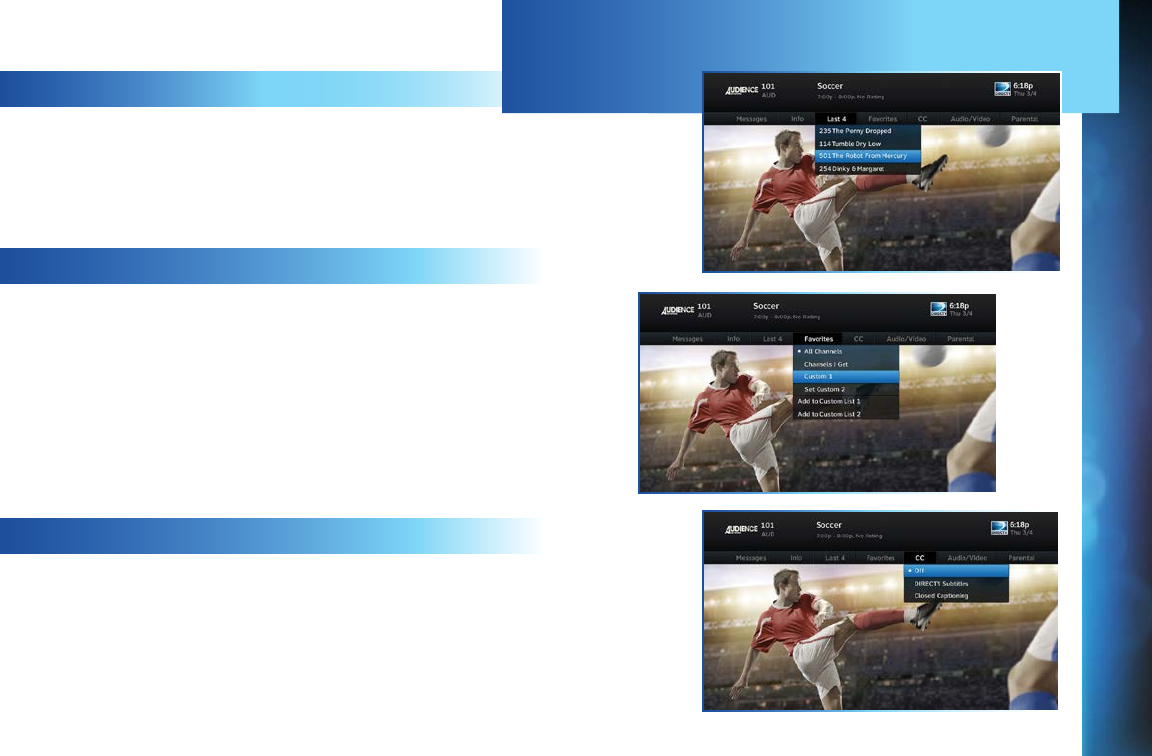
LAST 4
Select Last 4 to see a list of previous channels you’ve watched
(up to 4). When you select a channel from this list, the Receiver
will tune to that channel. This is an easy way to toggle among the
channels you watch most often.
FAVORITE CHANNELS
Select Favorites to update the Program Guide to show only the
channels you want to see. You have four options to choose from
such as, All Channels, Channels I Get, Custom 1 and Custom
2. Channels I Get displays only the channels you subscribe to.
Custom 1 and 2 are self-created lists of your favorite channels.
If one of your self-created lists is active, select the Add... or
Remove... option to add or remove the current channel from that
list.
CLOSED CAPTIONING
Select the CC option, then select either DIRECTV Subtitles or
Closed Captioning. Both options display the same text so only one
or the other can be ON at a time. The display format is the only
difference so check out both to determine your preference. Select
OFF to turn the display of subtitles or closed captioning off.
CHANNEL BANNER & TV OPTIONS
28
DIRECTV HD DVR RECEIVER USER GUIDE
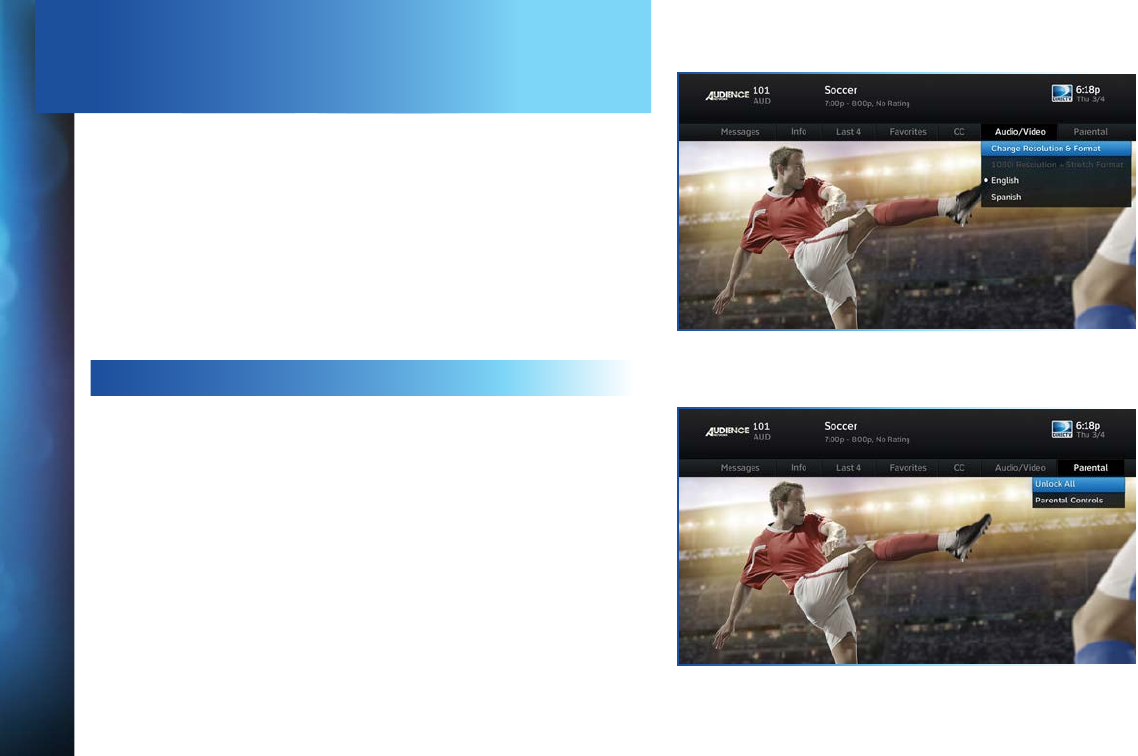
AUDIO/VIDEO OPTIONS
Select Audio/Video to change the resolution and format of your
display and to change audio to an alternate language, when
available. Select Change Resolution & Format to change the
display settings; each press of SELECT toggles to the next
available option. The current settings are shown in gray text. (See
“Appendix 5: About High Definition” for more information about
screen resolution and format.)
You may also select a language from the options listed. Not all
programs have alternate languages.
PARENTAL CONTROLS
Select Parental to quickly lock or unlock your Receiver. You can
also customize your Parental Controls settings by selecting
Parental Controls. For more information on Parental Controls
settings, see the “Parental Controls” section in Chapter 6.
CHANNEL BANNER & TV OPTIONS

29
CHAPTER 2 - CHANNELS & PROGRAM INFO
PICTURE-IN-PICTURE
Watch two programs, live or recorded, at the same time. While
watching one program, press the INFO button on your remote.
Select PIP. The program you’re currently watching moves
into a smaller window on your screen. The larger video is the
active program and can be controlled by your remote. To switch
between programs, press the DOWN ARROW.
To change the position of the smaller window, press INFO on
your remote. Select PIP and choose a position from the
options provided.
NOTE: The Picture-in-Picture feature is only available on the TV
connected directly to a Genie HD DVR (models HR34, HR44
and above).
CHANNEL BANNER & TV OPTIONS
30
DIRECTV HD DVR RECEIVER USER GUIDE
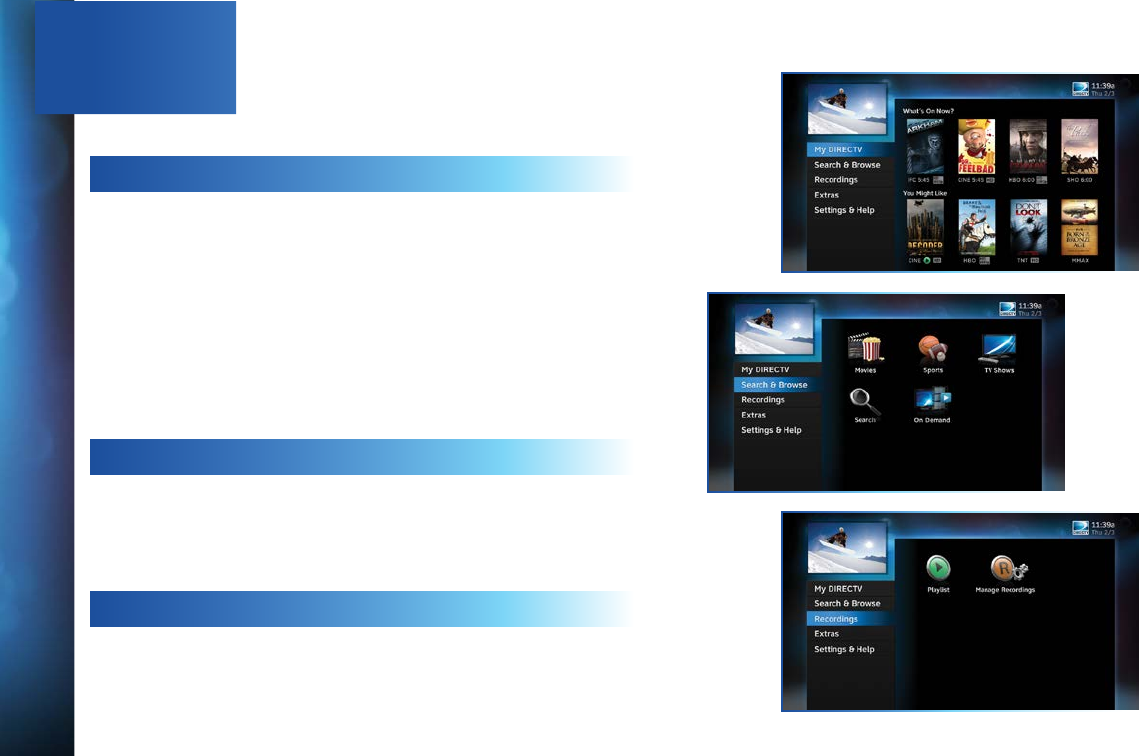
The DIRECTV Menu is your main point of access to My DIRECTV,
Search & Browse, Recordings, Extras, and Settings & Help. Press
MENU on your remote to see your options.
MY DIRECTV
My DIRECTV gives you quick access to programs/channels you
watch frequently, as well as recommended programs based on
your past viewing history. Use the ARROW keys to highlight a title
you are interested in, then press SELECT for program information.
If you have a DIRECTV Genie™ HD DVR (HR34, HR44 and above),
and have the Genie Recommends feature enabled, you can also
access the your Genie Recommends programming from the My
DIRECTV screen. For more information, please see Chapter 3,
“Genie Recommends”.
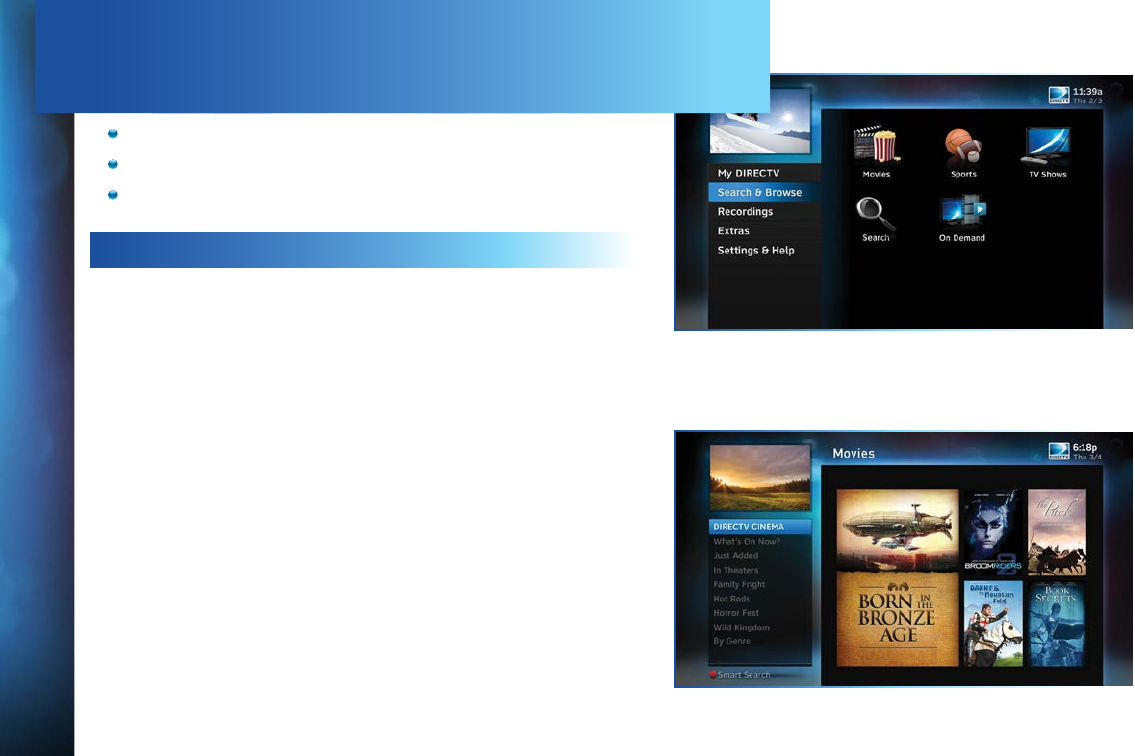
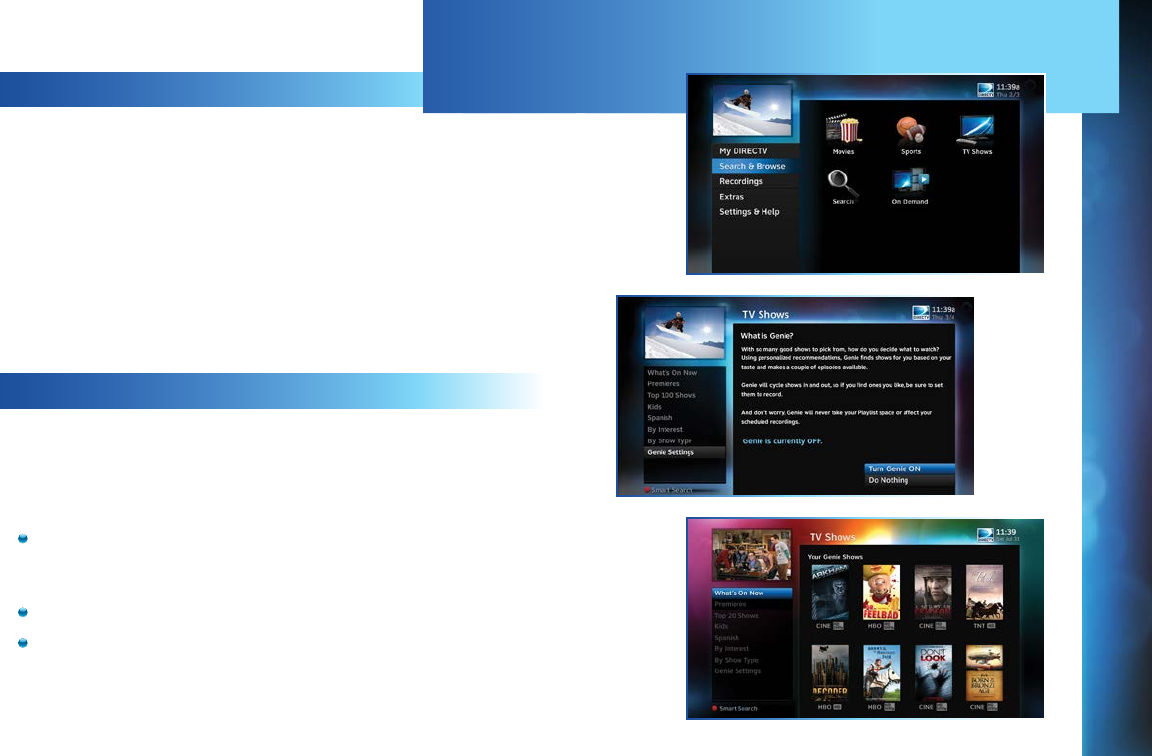
SEARCH & BROWSE
The Search & Browse screen lets you access Smart Search,
Movies, On Demand, TV Shows and Adults Only. See Chapter 3
“Search & Browse” for more information.
RECORDINGS
Recordings option provides access to the Playlist and Manage
Recordings features. For additional information, see
Chapter 4, “Recordings”.
MENU
31
CHAPTER 2 - CHANNELS & PROGRAM INFO
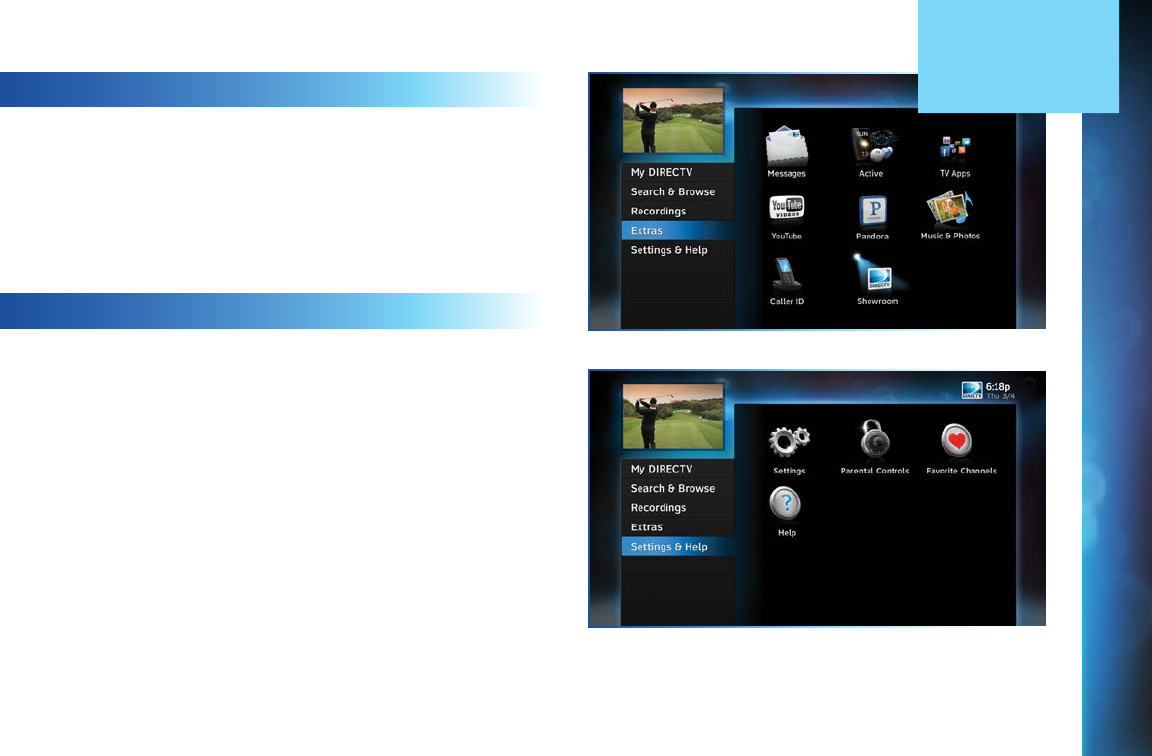
EXTRAS
Use the Extras option to access Messages, the DIRECTV Active
Channel, TV Apps, Pandora, Showroom, and, if you have an
Internet-connected receiver, YouTube. Depending on your
setup, it may also include the Caller ID feature. For additional
information, see Chapter 5, “Extras & Special Features”.
SETTINGS & HELP
The Settings & Help screen contains Settings, Parental
Controls, Favorite Channels and Help. For detailed information
on each of these topics, see Chapter 6, “Settings & Help”.
MENU

32
DIRECTV HD DVR RECEIVER USER GUIDE

33
CHAPTER 3: SEARCH & BROWSE
Movies, On Demand and Pay Per View ..................................... 34
Movies ........................................................................................ 34
On Demand ................................................................................ 35
Recording From Movies or On Demand ....................................36
Pay Per View Events .................................................................. 39
Sports ....................................................................................... 40
TV Shows and Genie ™ Recommends ......................................... 41
TV Shows .................................................................................... 41
Genie Recommends Feature .....................................................41
Search Features ....................................................................... 43
Smart Search ............................................................................. 43
YouTube Search ......................................................................... 44
DIRECTV ™ Voice Search ............................................................ 45
CHAPTER 3 - SEARCH & BROWSE
34
DIRECTV HD DVR RECEIVER USER GUIDE
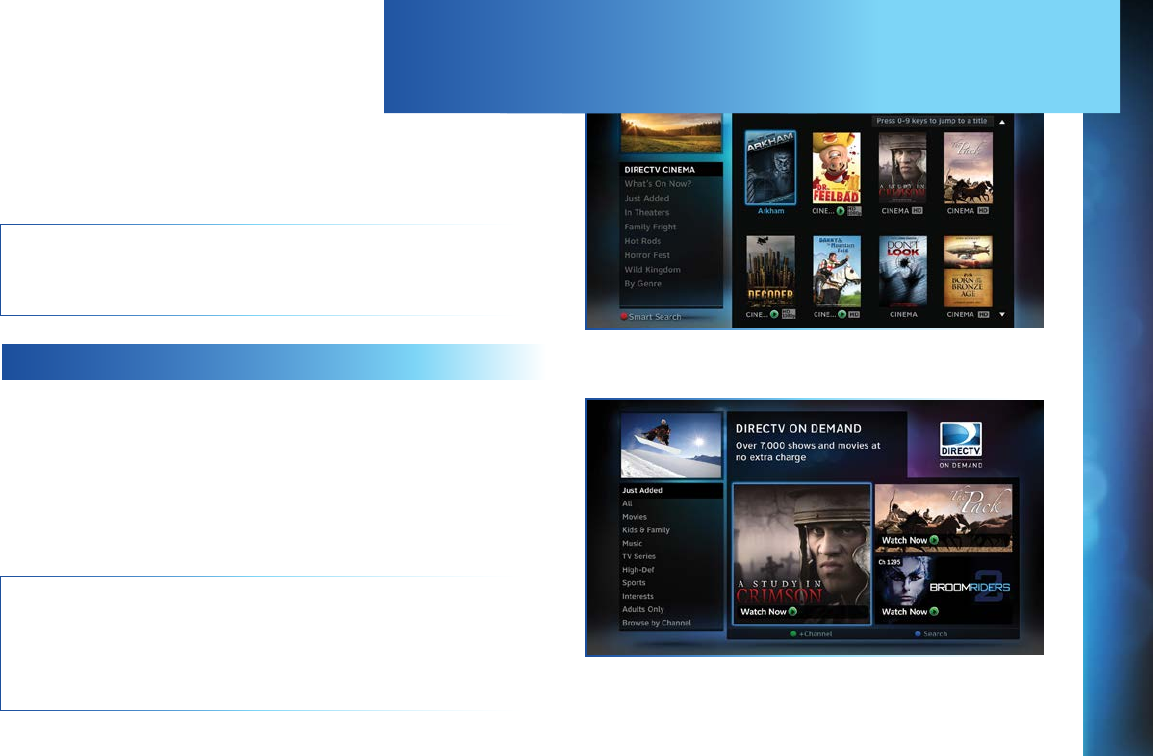
To see what movies and On Demand content are available, press
MENU, select Search & Browse, then select from the following:
Movies
On Demand
TV Shows
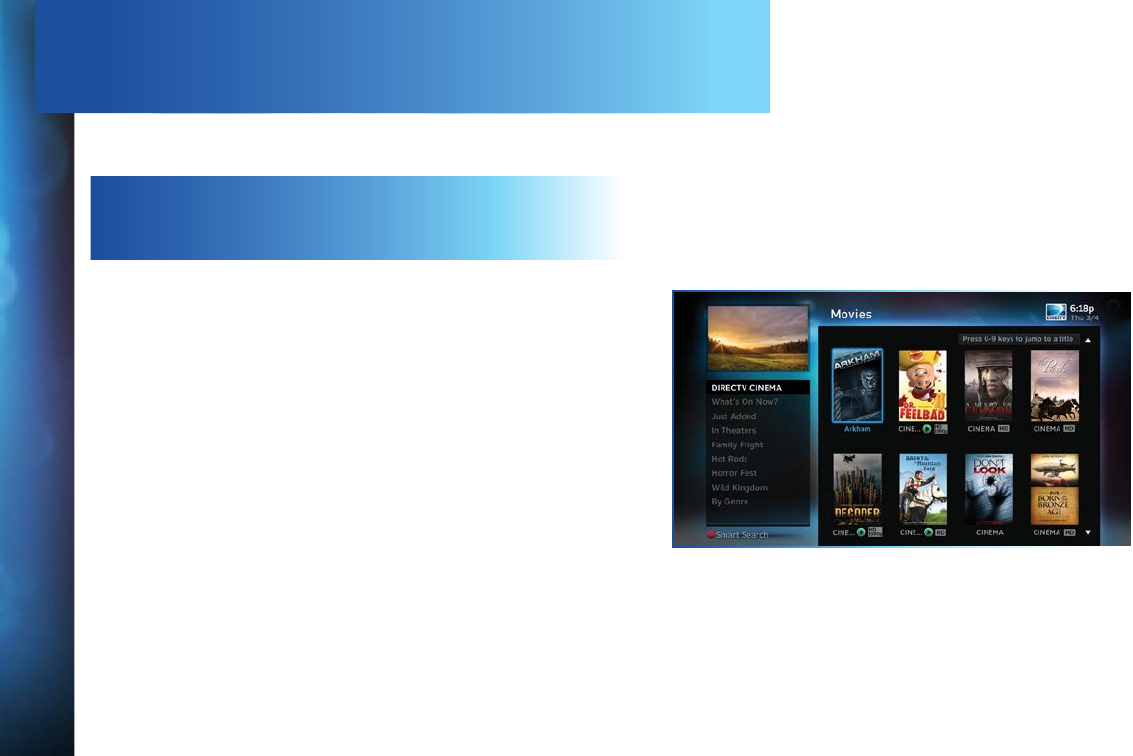
MOVIES
Movies offers an easy, one-stop way to find ANY movie on
DIRECTV, including broadcast channels, premium channels,
latest releases, In Theaters, Pay Per View, and On Demand. This
includes both free and premium movies.
Press MENU, select Search & Browse, then select Movies. The
latest movies are also available in the Program Guide starting at
channel 125.
A few of the categories include:
Just Added - New titles available every week.
What’s On Now? - Movies that you can either watch instantly or
that will start in the next 30 minutes.
In Theaters - Movies coming soon. Read a description of the
movie and schedule it to record as soon as it’s available.
Select a category and browse the titles using the arrow keys on
your remote or the Page Up/Down buttons. Alternatively, you can
search for a movie by typing in your search term using the number
keys on your remote like a cell phone.
MOVIES, ON DEMAND AND PAY PER VIEW
35
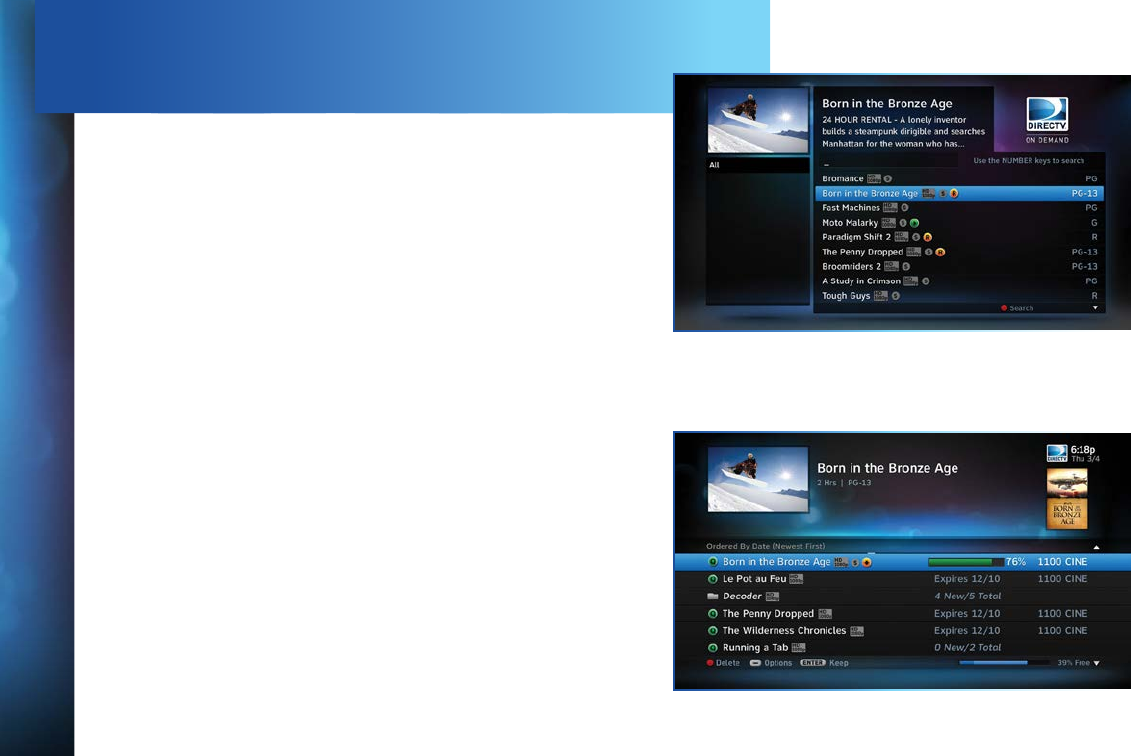
You can record or order movies from the Movies screen. Any
movie with a green Play icon is available to order and watch
immediately. Select the movie, select the Play option, then follow
the onscreen instructions.
Within the first five minutes, you can still cancel your purchase.
Press INFO, select More Info, then select Cancel PPV.
NOTE: As long as your Receiver is connected to a land-based
phone line or the Internet, you can use your remote to order.
Otherwise, order on directv.com.
ON DEMAND
If your DIRECTV HD DVR is connected to the Internet, DIRECTV
On Demand lets you enjoy hundreds of additional box office
hits available for purchase as well as thousands of movies and
TV shows that can be downloaded to your Receiver at no extra
charge. Browse the listings by category such as, Movies, Kids &
Family, TV Series, etc. On Demand titles will download to your
DIRECTV Receiver over the Internet.
NOTE: In order to download programs to your DIRECTV HD
DVR over the Internet, you need broadband Internet service
with a connection speed of 750 Kbps or higher (DSL or cable).
Please refer to Appendix 4 for details regarding connecting your
DIRECTV HD DVR to the Internet.
MOVIES, ON DEMAND AND PAY PER VIEW
CHAPTER 3 - SEARCH & BROWSE
36
DIRECTV HD DVR RECEIVER USER GUIDE
VIEWER’S TIP: You can also check out your favorite programmer’s
home page for previews and missed episodes. Simply add a “1” in
front of the regular DIRECTV channel number. For example, A&E
is on channel 265. The homepage is channel 1265.
RECORDING FROM MOVIES
OR ON DEMAND
When your HD DVR is connected to the Internet, you get the most
out of your DIRECTV service, with the broadest selection possible
to choose from. You can record from both Movies and On Demand.
However, if your HD DVR is not connected to the Internet you can
still record from Movies.
When your Receiver is NOT connected to the
Internet:
To record a program, highlight a title and press the orange REC
(Record) button on your remote. For Pay Per View and On Demand
programs, an orange “Q” next to the title indicates it’s been
scheduled. (Regular broadcast programs, an orange “R” icon.) You
can also record by highlighting the title, pressing SELECT, then
selecting Add to Queue.
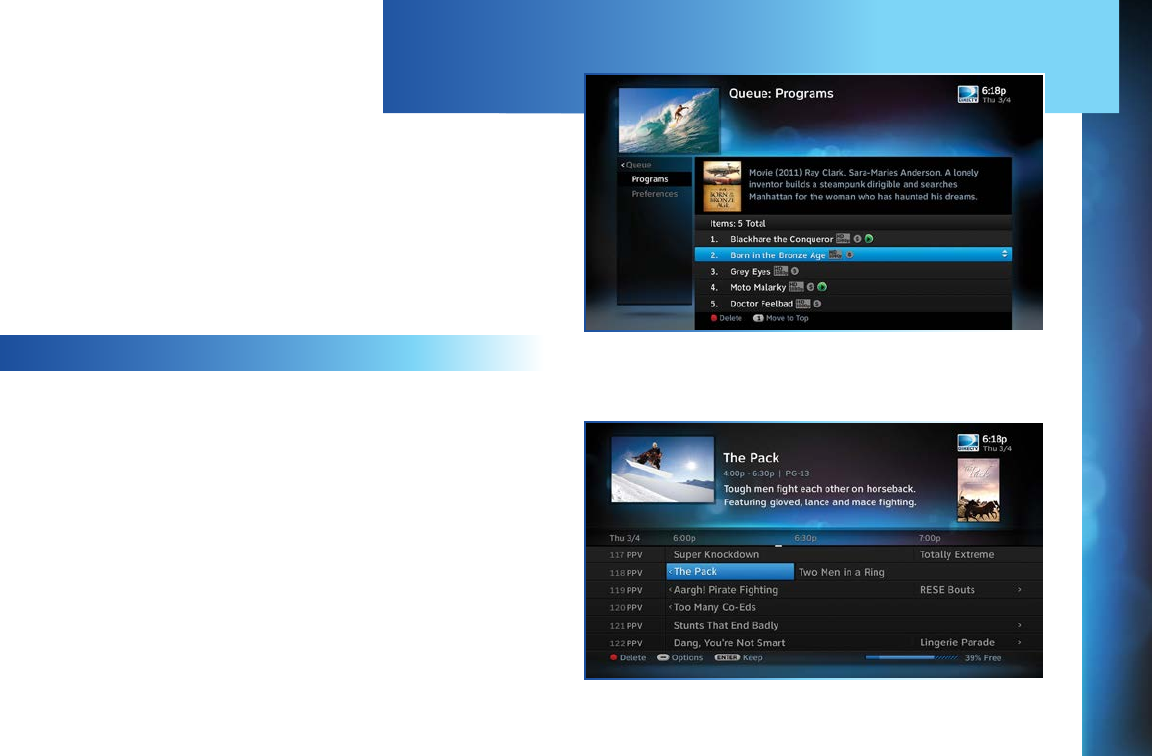
All movie requests are stored in your Queue. To access the Queue,
press MENU, select Recordings, then Manage Recordings and
then select Queue. You can prioritize your Queue, but movies may
become available to watch in a different order.
MOVIES, ON DEMAND AND PAY PER VIEW

37
When a movie becomes available to watch,it moves to your
Playlist. Your Receiver has a default limit of 5 movies that will
move from the Queue to the Playlist. Watch or delete one of these
movies to receive more. You can also change the default limit by
pressing MENU on your remote and selecting Recordings, then
Manage Recordings, Queue, then Preferences.
To watch a movie, press the LIST button on your remote to access
the Playlist. Highlight a title and press the PLAY button. If it’s a
premium title, a confirmation message with the price of the movie
will display, prompting you for confirmation to play the movie.
To delete a movie from your Playlist, highlight the title and press
the RED button on your remote. To keep a movie, highlight the
title and press ENTER* on your remote. This ensures the movie
will not be deleted by the Receiver as your disk drive fills up.
WARNING: Setting too many programs to “Keep” may fill up your
disk and not allow new programs to be recorded.
NOTE: *If you are using a Universal Remote, press the BLUE
button to keep a program in your Playlist.
MOVIES, ON DEMAND AND PAY PER VIEW
CHAPTER 3 - SEARCH & BROWSE
38
DIRECTV HD DVR RECEIVER USER GUIDE
MOVIES, ON DEMAND AND PAY PER VIEW
When your Receiver IS connected to the Internet:
You can record from both Movies and On Demand menus. To
record a program, highlight a title, then press the orange REC
(Record) button. An orange “R” icon next to the title indicates it’s
scheduled to record/download.
All scheduled records/downloads (with the exception of In
Theaters titles), as well as those that are ready to watch, are
displayed in the Playlist.
Press LIST on any DIRECTV Remote to display the Playlist.
Programs are downloaded in the order they were scheduled. If
a movie is currently downloading, it appears at the top of your
Playlist with a progress bar displaying the % complete. You
can start watching the movie while it’s downloading after the
download progress bar turns green. Movies scheduled, but
waiting to record/download, are labeled Pending Download.
To watch a movie, highlight the title and press the PLAY button
on any remote. If it’s a pay title, a confirmation message with the
price of the program will display, asking if you‘re sure you want to
watch it. Delete or cancel a title from your Playlist by highlighting
the title and pressing the RED button on your remote.
39
MOVIES, ON DEMAND AND PAY PER VIEW
All In Theaters titles are stored in your Queue. To access the
Queue press MENU, select Recordings, then Manage Recordings
and then select Queue. When a movie is available to watch, you
will find it in your Playlist. Your Receiver has a default limit of 5
movies that will move from the Queue to the Playlist. Watch or
delete one of these movies to receive more. You can also change
the default limit by pressing MENU on your remote and selecting
Recordings, then Manage Recordings, Queue, then Preferences.
PAY PER VIEW EVENTS
Special events like UFC, Boxing, WWE and more are listed in
the Program Guide starting around channel 117. (Actual channel
number may vary depending on current offerings.)
Ordering PPV events works the same way as ordering DIRECTV
On Demand movies from the Program Guide. See previous
section for details.
CHAPTER 3 - SEARCH & BROWSE
40
DIRECTV HD DVR RECEIVER USER GUIDE
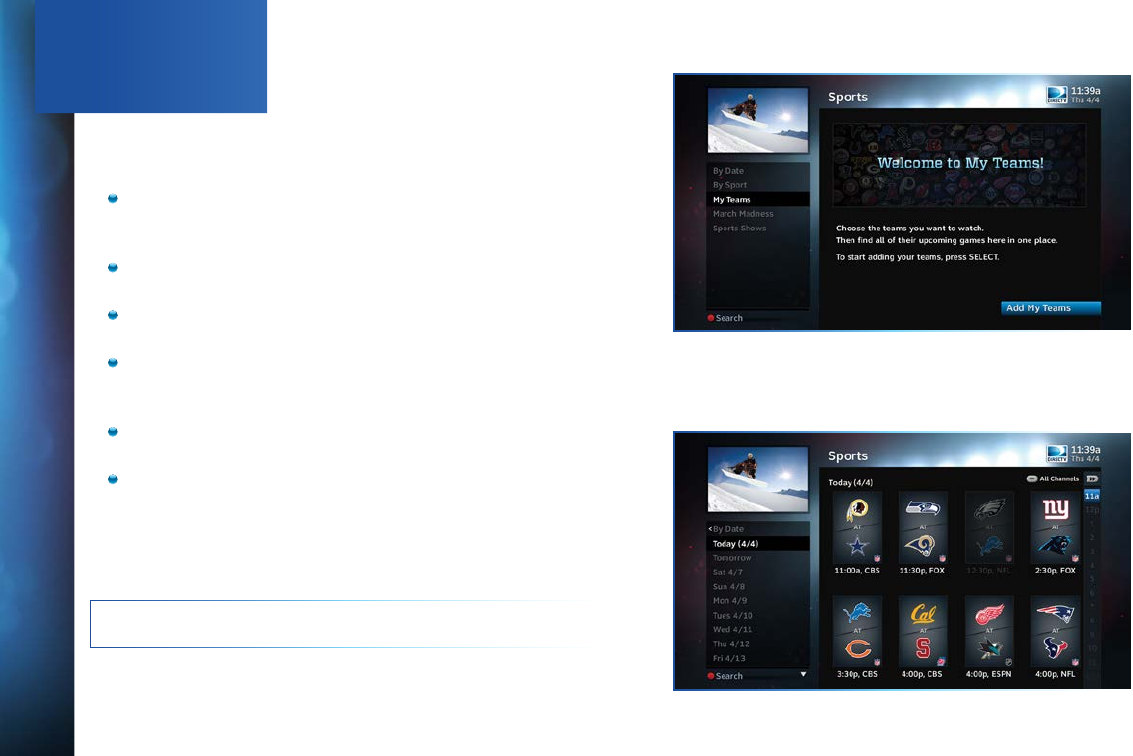
SPORTS
Spend less time searching and more time watching your favorite
sports. With the Sports feature, you can find tune-in info for all
your sporting events in one location, at the press of a button.
It’s like having an on-screen Guide dedicated to all your sports
programming.
Get the complete lineup of all the games and events airing on
TV now through the next 14 days, including Pay Per View, UFC,
boxing and WWE events.
Create a list of up to 20 of your favorite teams so related
programming always appears at the top of your list.
Set your DVR to record every available game for any team, as
well as an entire series and multi-day tournaments.
Season Record lets you set recordings for your favorite
teams and events automatically, year after year, across all
channels in your package and sports subscriptions.*
Browse by your preferred criteria—by sport, date or time.
Also, filter by the channels included in your program package.
Dovetails with DIRECTV’s ScoreGuide TV App, sharing the
info from your My Team list.
No more searching channel by channel to get to the sports
programs you want most! To access Sports, press MENU, select
Search & Browse, then Sports.
NOTE: Genie HR34, HR44 HD DVR or above is required.
*Blackout restrictions and other conditions apply. Only the channels corresponding
to your programming package and sports subscription(s) are available for viewing
and recording. Additional charges may apply for viewing PPV content.
41
TV SHOWS
TV Shows* is your destination dedicated to TV programming,
where you can find content that’s airing now, or to record for
watching later. Browse shows by genre or seasonal and special
categories to find content that suits your interests faster. TV
Shows is also the point of access for the Genie Recommends
feature, which matches suggested programs to your viewing
preferences. (See below.)
To access TV Shows, press MENU, select Search & Browse, then
select TV Shows.
GENIE RECOMMENDS FEATURE
Accessible via TV Shows in the Search & Browse screen, the
Genie Recommends feature enhances your viewing experience
by giving you full control over how, what and when
you watch:
Suggests TV programs and makes sample shows available
for you to watch now, based on your tastes and what’s
popular.
Lets you easily convert any show to series recording.
Can start your favorite shows from the beginning, even if
you tune in late†.
To start using Genie Recommends, press MENU, select Search &
Browse, TV Shows, then Genie Settings.
TV SHOWS AND GENIE™ RECOMMENDS
CHAPTER 3 - SEARCH & BROWSE

42
DIRECTV HD DVR RECEIVER USER GUIDE
TV SHOWS AND GENIE™ RECOMMENDS
NOTE: *TV Shows and the Genie Recommends feature are only
available on the Genie HD DVR (model HR34, HR44 and above)
and Genie Minis (model C31, C41, C41W and above).
NOTE: †The DIRECTV start-from-the-beginning feature can
only be used if the tuner was pre-set to your show’s channel,
or someone else in a Genie-networked household was
watching the show from the start.

43
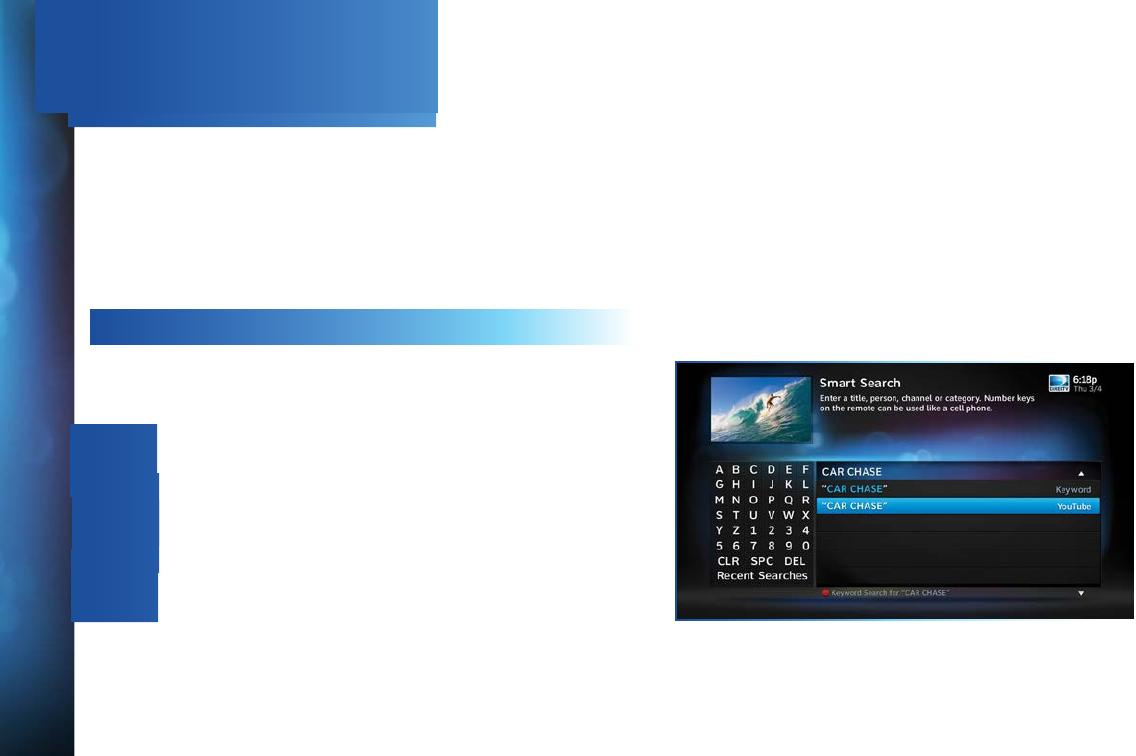
SEARCH FEATURES
SMART SEARCH
Find Your Show Faster
Smart Search finds all matching content within the 14-day Guide
and beyond (see Far in Advance below), as well as within the
movie library. It anticipates your search entry and delivers more
relevant results faster.
Press MENU on your Remote, select Search & Browse, then
Smart Search. Before you start typing, check out Suggested
Searches to the right of the keypad for trending new content
and more.
Enter your search term using the onscreen keypad, or with your
remote number/letter buttons— results will appear as soon
as you start typing. Select a result for more information and
recording options.
Far in Advance
The DIRECTV Far in Advance tool lets you search for upcoming TV
series scheduled to air more than 14 days into the future. Type
your program name into the Smart Search keypad, and choose
from the results list. You can view episode information for select
shows up to a year in advance of air date, and even opt to record
the episode or series.* Never miss the new season of your favorite
show, or a series premiere again! See Chapter 4, “Recording,” for
more information on recording programs.
NOTE: *Far in Advance displays information provided by our
content partners, and may not be available for all shows.
CHAPTER 3 - SEARCH & BROWSE
44
DIRECTV HD DVR RECEIVER USER GUIDE
Keyword & Recent Searches
A Keyword Search targets all programs based on a specific word.
Type a keyword in the search screen and press the RED button
on your Remote. Select a category to narrow your results. Select
individual programs or Autorecord to automatically record all
programs matching your keyword search.
Smart Search remembers your recent searches. Edit or repeat
your previous searches by selecting Recent Searches at the
bottom of the onscreen keypad.
YOUTUBE SEARCH
If your HD DVR is connected to the Internet, you can search for
and watch YouTube content on your TV.
For connected DVRs:
1. Press MENU, and select Search & Browse, then Smart
Search.
2. Enter your search term.
3. Select the YouTube-labeled item that displays at the bottom of
the results list.
4. A list of YouTube videos matching your search term will
display. To launch a video, press SELECT on the desired
result. Or, highlight the title and press INFO for a description
of the video and other options.
SEARCH FEATURES

45
DIRECTV™ VOICE SEARCH
Download the DIRECTV Mobile App for your smart phone and
use the app’s voice-activated search feature to browse the
Guide on your TV. You simply tell it what you’re looking for! To
learn more, please see the DIRECTV Mobile Apps section in
Chapter 5, Extras & Special Features.
SEARCH FEATURES
CHAPTER 3 - SEARCH & BROWSE

46
DIRECTV HD DVR RECEIVER USER GUIDE

47
CHAPTER 4: RECORDINGS
Recording a Single Show .......................................................... 48
From Live TV .............................................................................. 48
From the Guide .......................................................................... 48
Changing a Record Option .........................................................48
Stopping an In-progress Recording .......................................... 49
Recording a Series ................................................................... 50
From Live TV .............................................................................. 50
From the Guide .......................................................................... 50
Changing a Record Option .........................................................50
Stopping an In-Progress Recording ..........................................51
Watching and Deleting Your Recorded Shows .......................... 52
Playlist ...................................................................................... 53
Playlist Options .......................................................................... 54
Managing My Playlist .................................................................55
To Do List ................................................................................... 57
Manage Recordings .................................................................. 57
Series Manager ......................................................................... 58
Queue ......................................................................................... 58
History ........................................................................................ 59
Purchases .................................................................................. 59
Manual Recordings ....................................................................59
Record Defaults ......................................................................... 59
Recording from Your Computer, Phone or Tablet .................... 61
From a Computer ...................................................................... 61
From a Phone or Tablet ............................................................. 62
CHAPTER 4 - RECORDINGS
48
DIRECTV HD DVR RECEIVER USER GUIDE
FROM LIVE TV
To record a show you are currently watching, simply press
RECORD once.
FROM THE GUIDE
You don’t have to be watching a show to record it. Simply find
it in the Program Guide and press the RECORD button. The
orange record icon appears to confirm that your show is being
recorded or is scheduled to record.
NOTE: If you have a Genie HD DVR (HR34, HR44 & above), you
can record up to five shows simultaneously. Otherwise, you can
record two shows at the same time on previous model DIRECTV
DVR. You can record two shows at the same time with your
DIRECTV DVR, if you have made the proper connections to your
satellite dish.
CHANGING A RECORD OPTION
Some live events and even a few TV shows run past their
allotted time slot. Although your DVR is very smart, it sets up
all recordings based on the start and stop times the content
partners provide give us for the Program Guide.
RECORDING A SINGLE SHOW
49
If you are watching while recording, and you think your show
might go into the next time slot, press INFO on the remote, then
select More Info and Recording from the onscreen choices to see
the recording options for that show. Once there, you can change
the stop time or any other option. To save your changes, select
Save Changes.
If your show is set to record in the future, it will appear in the
Guide or To Do list. Press INFO to display the Info screen. To
change a recording option for that one show, select Episode
Options and choose whichever option or options you want to
change. If you want to change a recording option for every show
in the series, select Series Options and then choose the options
you want to change.
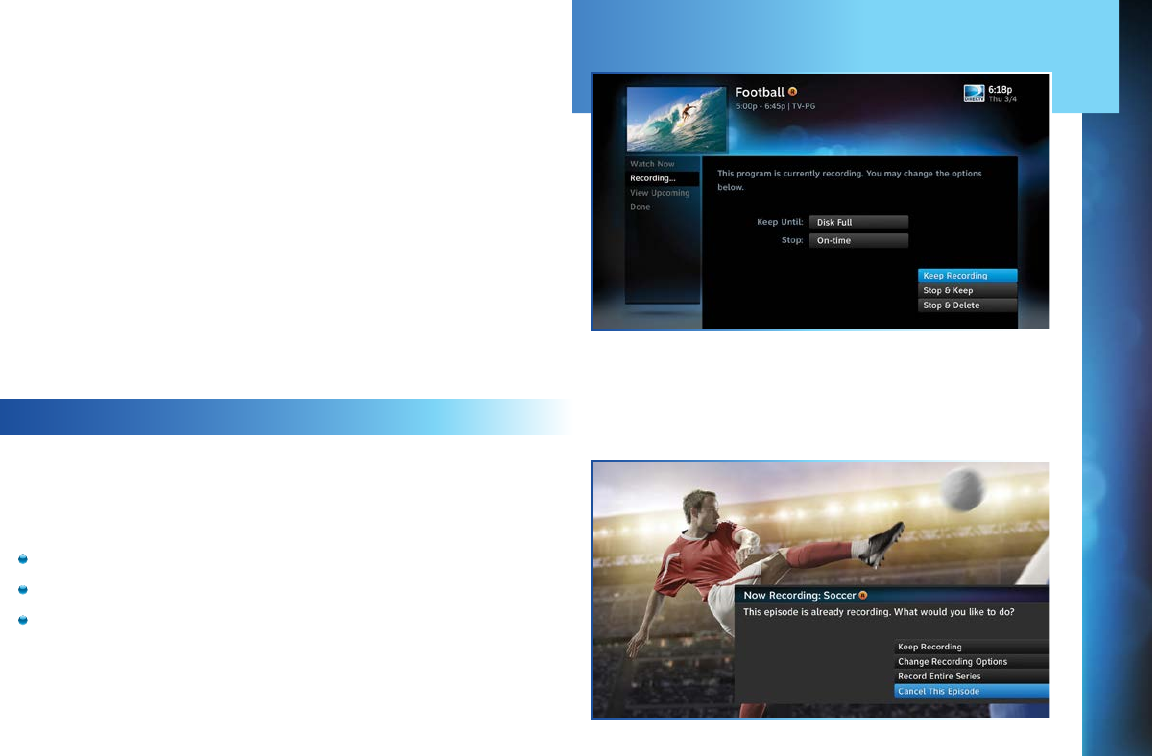
STOPPING AN IN-PROGRESS RECORDING
If you press the RECORD button a second time on a single
show (like a movie), an onscreen message will appear with the
following options:
Keep Recording
Change Recording
Stop Recording (cancels the recording)
RECORDING A SINGLE SHOW
CHAPTER 4 - RECORDINGS
50
DIRECTV HD DVR RECEIVER USER GUIDE
FROM LIVE TV
If the show you are currently watching is a series and not a
single event (like a movie), simply press the RECORD button
twice to automatically record every episode of the series. The
RECORD icon is now a repeated circle R to let you know that this
is a series and not a single recording.
FROM THE GUIDE
As mentioned previously, you don’t have to be watching a series
to record it. Simply find it in the Program Guide and press the
RECORD button twice to record all episodes of it.
If recording a sports program from the Guide, you can also
choose the Season Record option that will appear if available for
the game, event, or other serialized or repeated sports related
content you want to record. Please see SPORTS in Chapter 3 for
more information on Season Record.
CHANGING A RECORD OPTION
If you are currently watching a series show and need to extend
the recording time or change any other recording option, press
INFO on the remote, select More Info and then Series Options
from the onscreen choices. If you see a series set to record in
the future in the Program Guide or the To Do List, to change a
record option, press INFO and select Series Options.
RECORDING A SERIESRECORDING A SERIES

51
STOPPING AN IN-PROGRESS RECORDING
If you press the RECORD button a third time on a series, an
onscreen message will appear giving you the choice to Keep
Recording, Change Recording Options, or Stop Recording.
RECORDING A SERIES
CHAPTER 4 - RECORDINGS
52
DIRECTV HD DVR RECEIVER USER GUIDE
Press LIST on the remote to see a list of recorded shows. Or,
press MENU and select Recordings, then Playlist. Use the
arrow keys to highlight the desired show, press SELECT, then
select Play (or Resume if you’ve already watched part of the
show) to start the show.
You can use any of the DVR control buttons (PAUSE, FFWD,
REW, etc.) while watching your recorded show from select
channels. If you press STOP, the show will stop and an
information screen with various options will appear. The last
channel viewed in live TV will appear in the upper-left corner of
the screen. To return to full-screen live TV, press EXIT or
select Done.
WATCHING AND DELETING YOUR RECORDED SHOWS
53
The Playlist screen displays all your recorded programs. To
get to the Playlist screen directly, press LIST on the remote,
or press MENU and select Recordings, then Playlist. Titles
you have yet to view are shown in bright, white letters, while
viewed titles (partially or completely) are light grey.
The time, date and channel of each recorded program is
displayed to the right of the program title. Icons identifying
program status are displayed to the left of the program title
(for example, a circle K for Keep Until I Delete). See page 178
for a list of all the icons.
Highlighting a program title in the Playlist displays the
program description. If you press SELECT or INFO on a
program, an Info screen is displayed for the program that
offers several actions including Play, Keep, Delete and others.
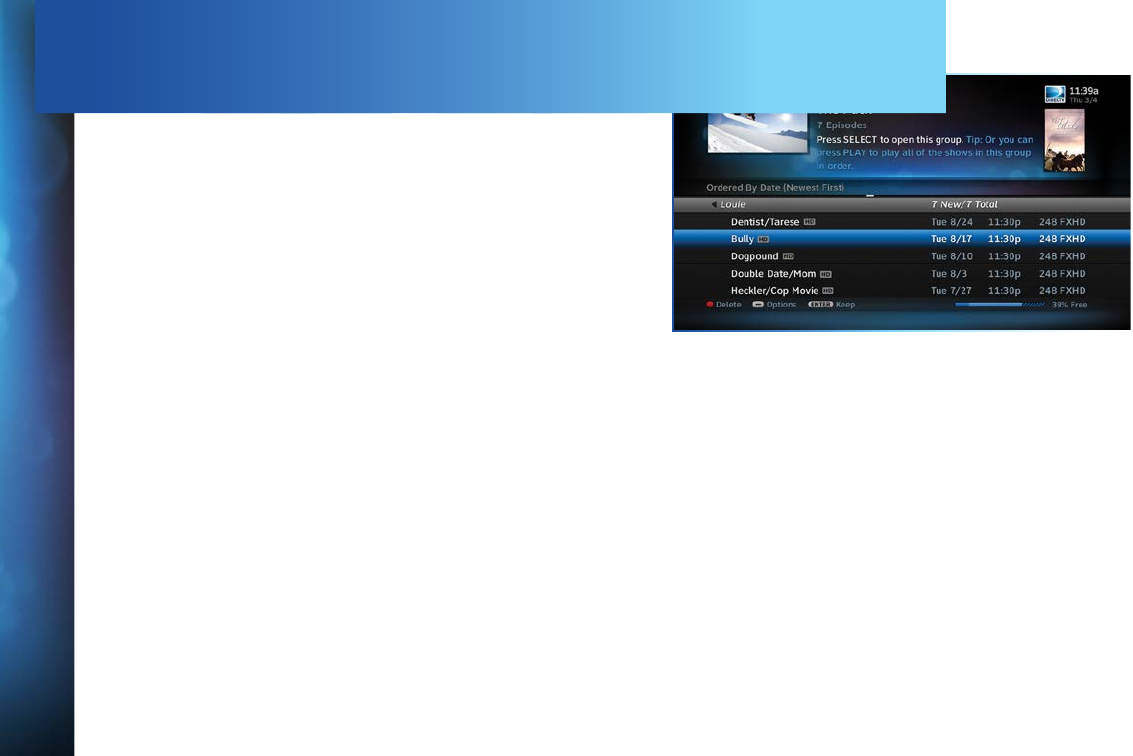
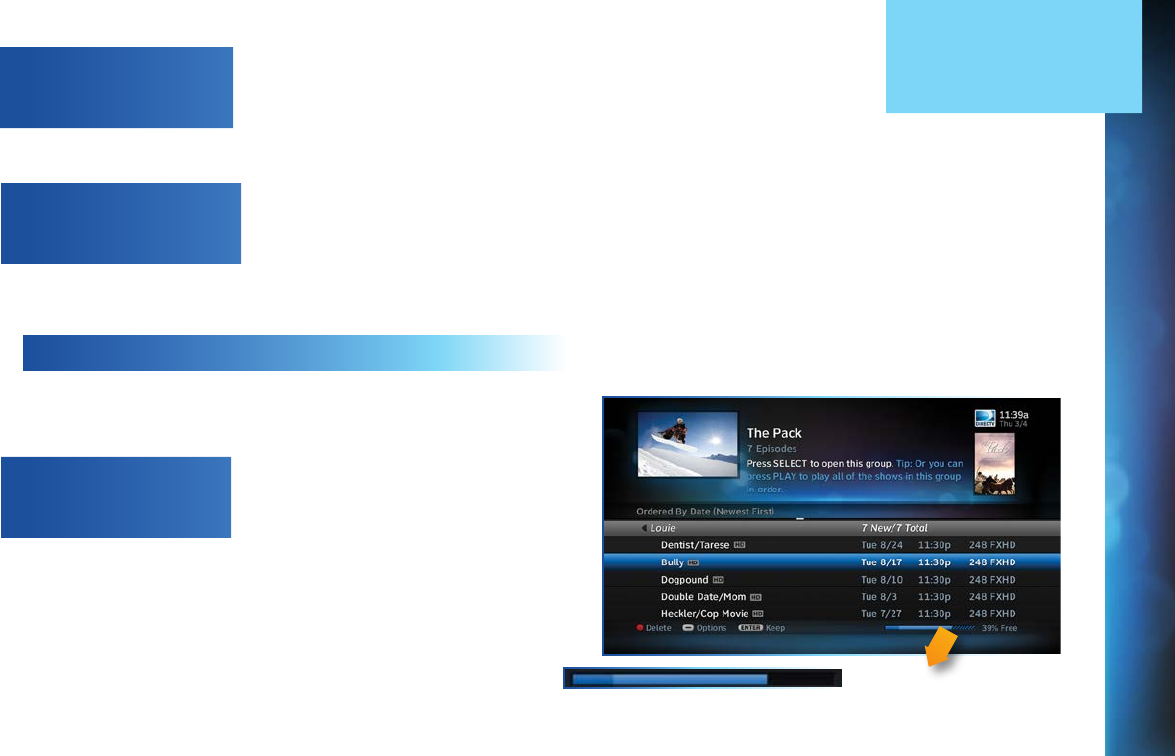
Series programs are identified in the list with a folder icon.
For example, if you record a weekly comedy series, the title for
that series is shown with a folder icon. Press SELECT on the
series title to see the recorded episodes for that series. The
number of new (not viewed) programs and total programs for
each series is displayed to the right of the series name; for
example, “2 New/5 Total”. Press PLAY on a series to play all
the episodes in the folder, in order from oldest to newest.
PLAYLIST
CHAPTER 4 - RECORDINGS
54
DIRECTV HD DVR RECEIVER USER GUIDE
PLAYLIST
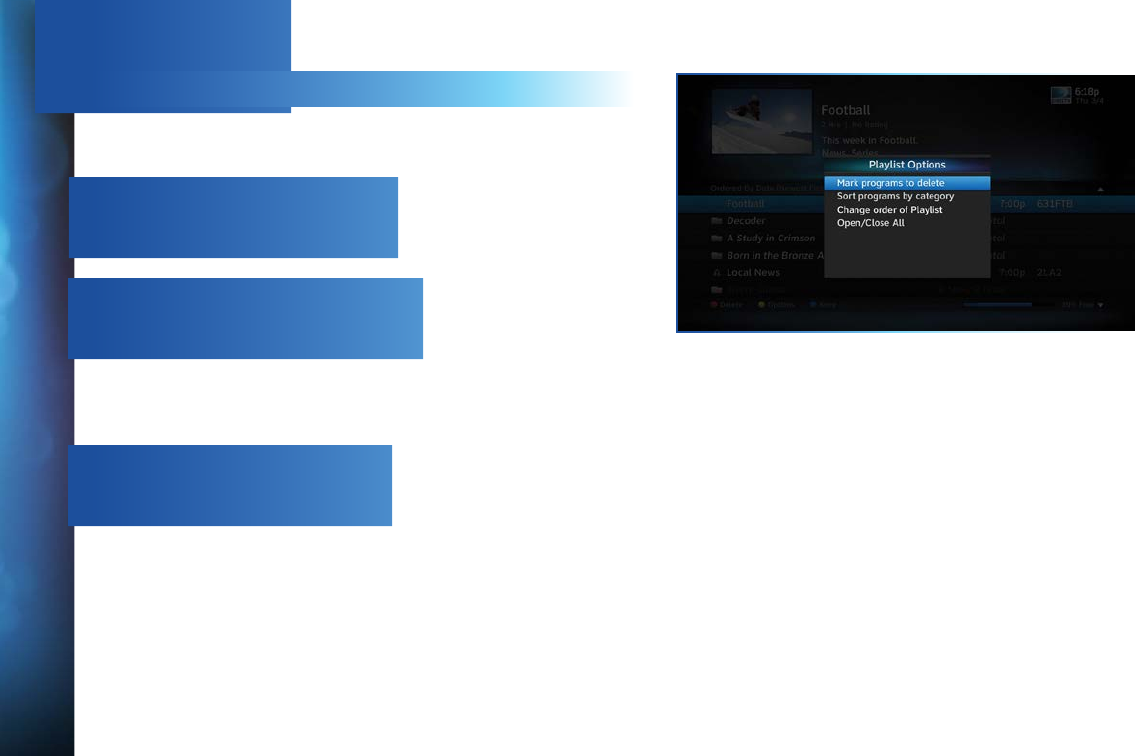
PLAYLIST OPTIONS
From the Playlist screen, press the ENTER button to display
Playlist Options.
Mark Programs to Delete
Select Mark programs to delete if you want to delete two or more
programs at once.
Sort Programs by Category
Select Sort programs by category and then select Movies, Sports,
News, Kids, etc., to filter the playlist as desired. This option will
help you find what you want faster, once you start to record a lot of
programs. This is just a temporary filter for your list, so just press
the left arrow or BACK to see your full Playlist again.
Change Order of Playlist
Select Change order of Playlist to rearrange the order of your
recorded shows. You can sort by date with the newest at the top
(the factory default setting), the oldest at the top, or alphabetically
in ascending (A to Z) or descending order (Z to A).
55
39% Free
PLAYLIST
Open/Close All
The series episodes you have recorded are grouped in folders in
your Playlist. Select Open/Close All to open all of your folders so
you can see each episode without having to select each series
individually. You can also use this option to close them all.
Filter by Playlist
If you are set up on a Whole-Home DVR or Genie network, this
option lets you select whether to see all available titles from all
Receivers, or just those on the “local” Receiver.
MANAGING MY PLAYLIST
Your DVR has a lot of recording space but it is possible to fill up
the hard drive if you record regularly. A quick way to check how
much space you have available is the Disk Space Bar.
Disk Space Bar
The Disk Space bar is at the bottom of your Playlist. It shows the
approximate amount of space available on your disk at any given
time.
The Disk Space bar shows programs you have designated Keep
Until I Delete in dark blue, programs subject to expiration or
automatic deletion in light blue, and the remaining unused disk
space that is available for recording in black.
When your disk is full, the oldest programs (viewed or not) are
automatically deleted to make room for new ones.
CHAPTER 4 - RECORDINGS
56
DIRECTV HD DVR RECEIVER USER GUIDE
Keep
If you have a program you would like to prevent from being
automatically deleted when your disk is full, highlight the show
you want to keep and press ENTER on your remote. A blue, K icon
will appear next to the program title indicating it will be kept until
you delete it. You may be tempted to make all of your recordings
Keep Until I Delete, but if your hard drive reached capacity, new
recordings will not be possible.
Another way to manage your Playlist is to delete recordings you
no longer want.
Delete
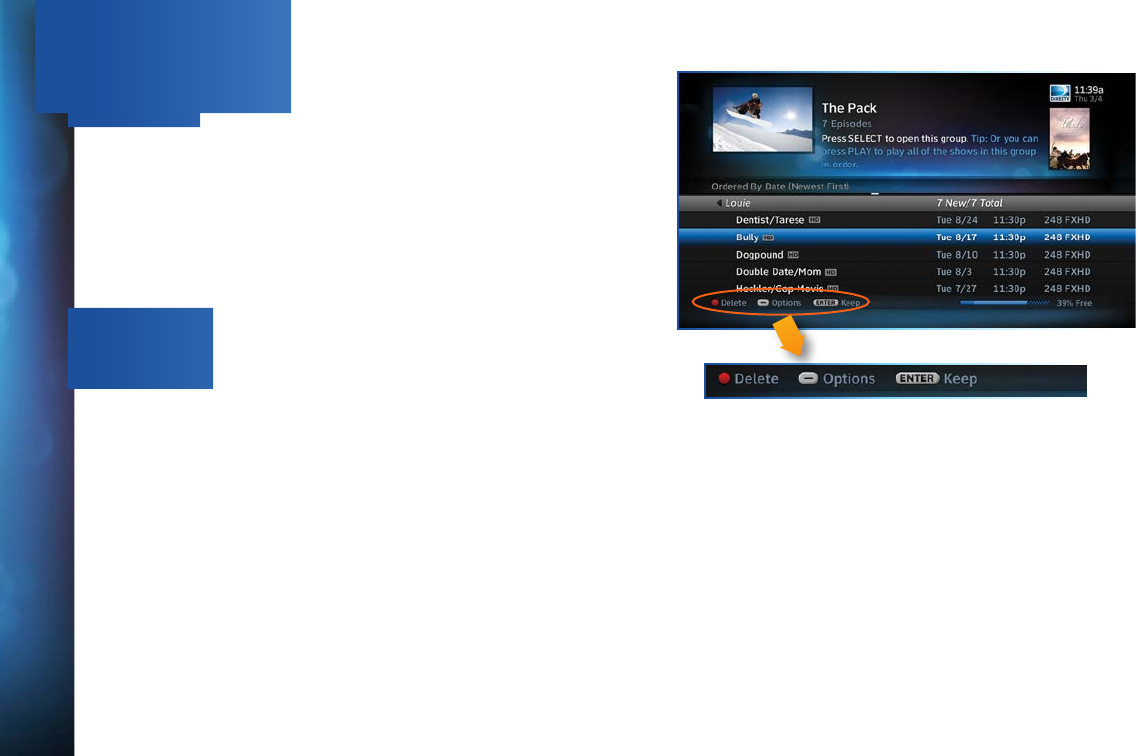
Highlight a single show or a series (indicated by a folder icon)
and press the RED button to delete it. If you delete a folder,
all episodes of that series will be deleted. Don’t worry about
pressing the RED button accidentally. You will always see a
confirmation message before you delete anything.
Note that HD programs take up more disk space than standard
definition (SD). So, you may want to record your favorite content in
HD, while recording other shows in SD to optimize your use of the
available recording capacity.
PLAYLIST
57
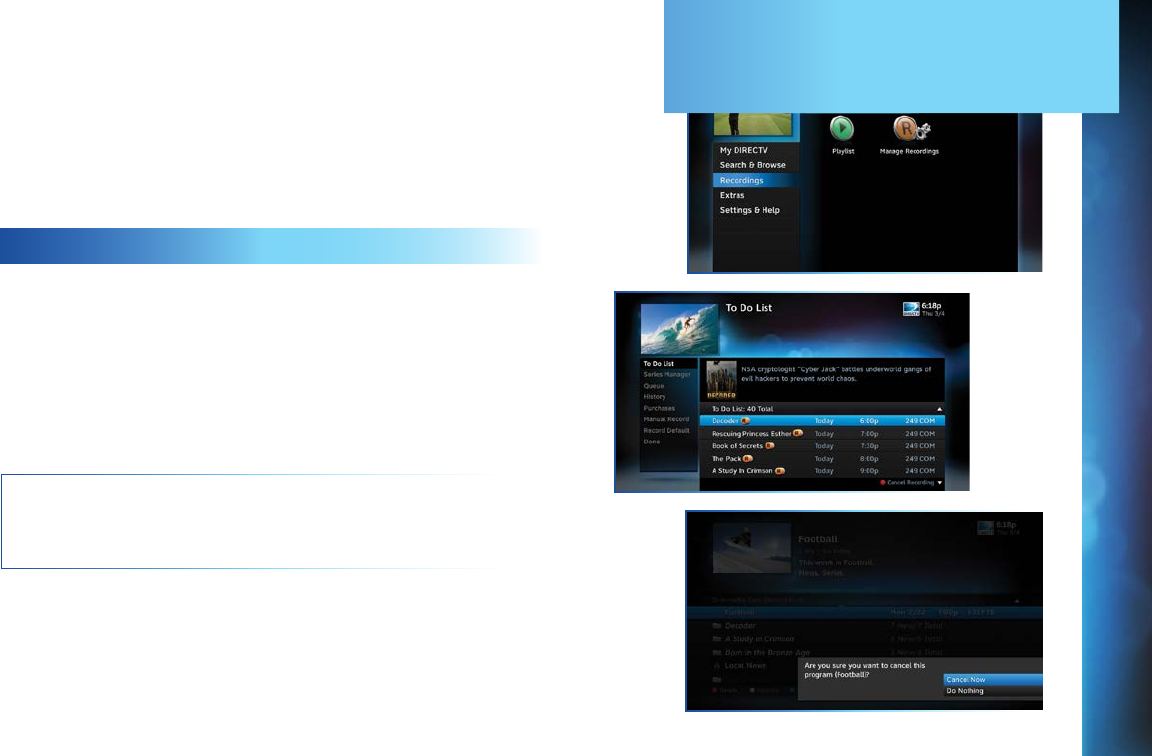
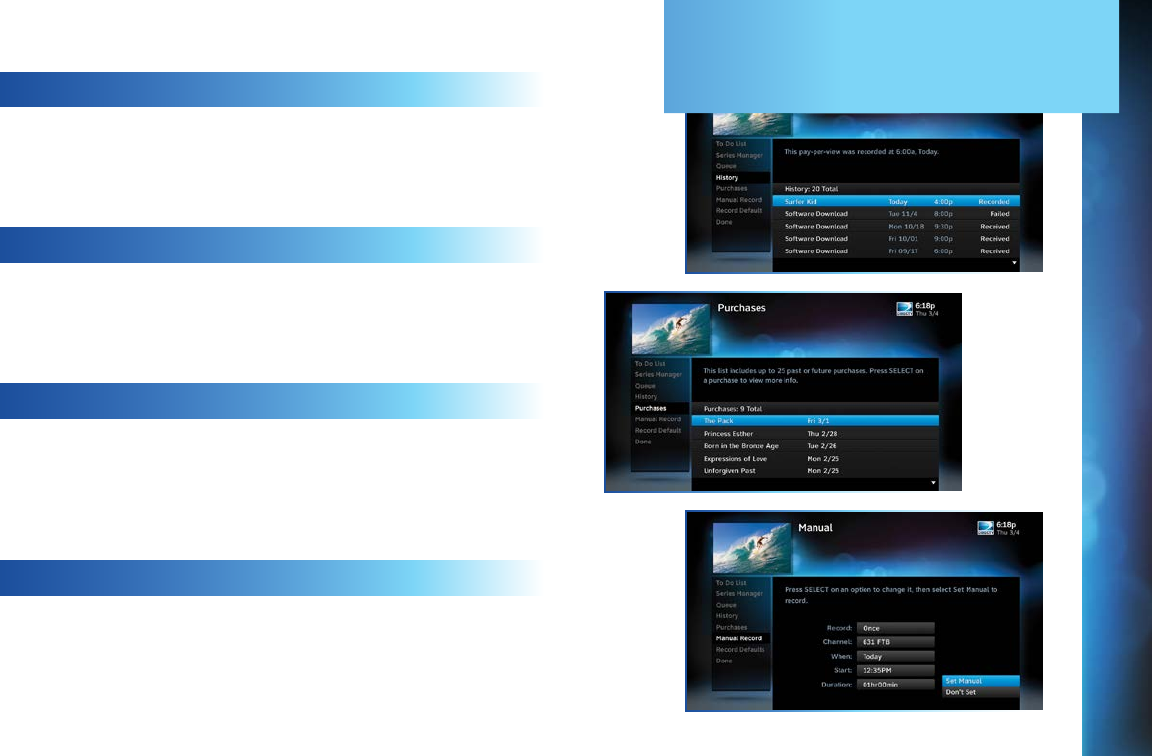
Once you have scheduled recordings, you can find the status
and history of those recordings by pressing MENU and selecting
Recordings, then Manage Recordings to see the following
options: To Do List, Series Manager, Queue, History, Purchases,
Manual Record and Record Defaults. These features are
described on the next few pages.
TO DO LIST
The To Do List displays recordings your DVR is scheduled to
make in the future. Icons next to the titles indicate whether the
recording is a single event, part of a series, or an autorecord
based on a person or keyword search. The list is ordered by time
with the next recordings at the top and the most distant future
recordings at the bottom. You can use this screen to ensure your
recordings are properly scheduled, or to delete future scheduled
recordings you no longer want to record.
NOTE: DIRECTV On Demand programs that are scheduled to
download via the Internet are shown in the Playlist, not the
To Do List.
Deleting single shows is easy: Simply highlight the show you
want to delete and press the RED button on the remote. A
confirmation message will appear before you can delete the
show. If you want to delete an entire series from the To Do List,
select the show, select Series Options, then select Cancel Series.
MANAGE RECORDINGS
CHAPTER 4 - RECORDINGS
58
DIRECTV HD DVR RECEIVER USER GUIDE
SERIES MANAGER
The Series Manager screen displays a prioritized list of all the
series you’ve scheduled to record. If there is a series recording
conflict and the Receiver must choose which show to record,
it uses this list to determine the priority. As you set up series
recordings, the most recent series goes to the bottom of the list
in last priority. You can change the order of the priority at any
time by selecting Series Manager, selecting the show you want
to move, moving the highlight to the right, then using the arrow
keys to promote or demote the series.
There are a couple of key short cuts on this screen as well. Use
the RED button to delete an entire series. Press “1” on the
numeric keypad of your remote on the numeric keypad of your
remote to move a highlighted show to the top of the list in one
press.
You can also adjust the recording options used for a particular
series from this screen. Select the series you want, then select
Series Options and change the recording options as desired.
QUEUE
The Queue screen displays movie titles that are in the queue
awaiting delivery to your hard drive. See Chapter 3, “Movies, On
Demand and Pay Per View: Ordering Programs” for details.
MANAGE RECORDINGS
59
HISTORY
Provides status information for every recording scheduled,
whether they were completed, canceled or deleted. If you think
something should have been recorded, but wasn’t, check here to
look for an explanation.
PURCHASES
Provides status information for all Pay Per View programs that
were bought on the Receiver you are currently using, and, if
viewed, the date and time. To see purchase activity for other
Receivers or Clients on your account, you must view it locally.
MANUAL RECORDINGS
To set up a recording based on channel, time and date, select
Manual Record and enter all of your preferred options, including
whether you want this to be a one-time or recurring recording (i.e.
every Tuesday), channel, day and date, start time and duration. You
can schedule a manual recording up to 14 days in advance.
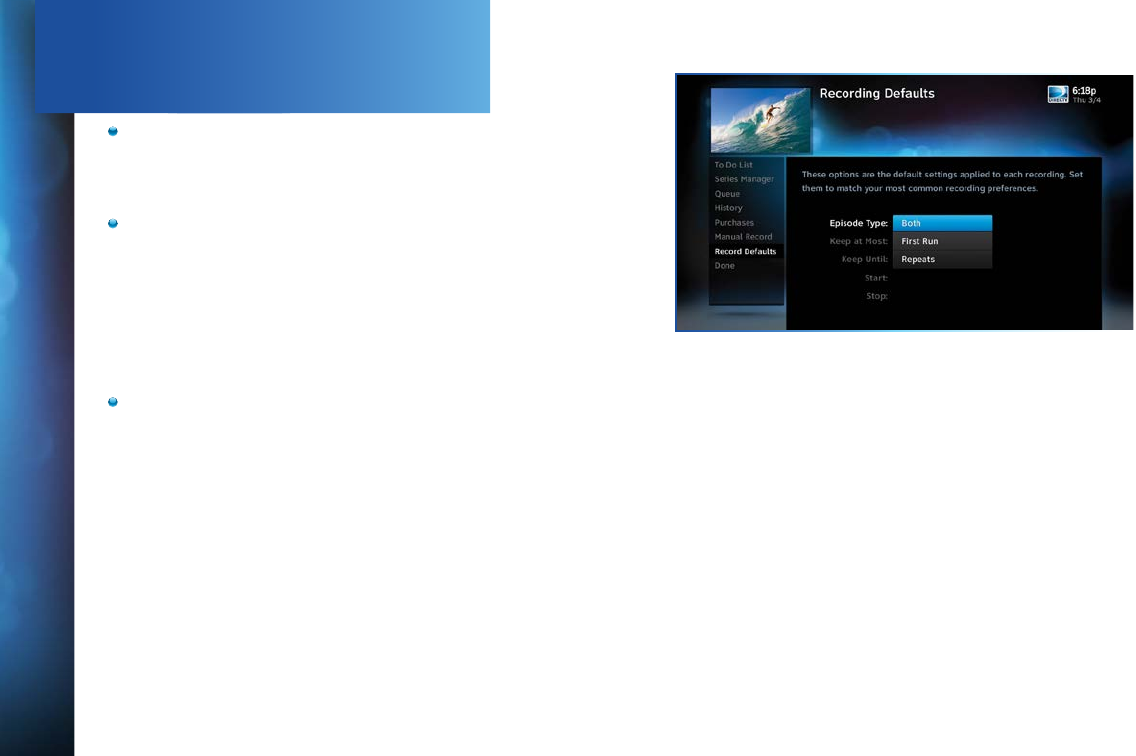
RECORD DEFAULTS
The Record Defaults screen lets you set the recording options
you want the Receiver to use each time it records. The Receiver’s
default settings work best in most cases, but you may want to
change them to your personal preferences.
MANAGE RECORDINGS
CHAPTER 4 - RECORDINGS
60
DIRECTV HD DVR RECEIVER USER GUIDE
When recording a series, the Episode Type gives you the
option to record first run only, repeats only, or both.
The Keep at Most option lets you decide how many
episodes you want to keep: 1, 2, 3, 4, 5, 10 or All. If you
select All Episodes for a show that appears multiple times
in the Guide, it may use up disk space rapidly.
The Keep Until option lets you keep a recording until you
delete it or until the disk is full, in which case the DVR can
delete it automatically if the disk fills up. A recording that
is labeled Keep Until I Delete will never be deleted until
you do it manually. If all of your recordings are labeled
that way and the disk fills up, no new recordings will occur
until you manually delete some of your Keep Until I Delete
recordings.
The Start and Stop options let you adjust the times of your
recordings to ensure you don’t miss anything. Keep in mind
that starting early and ending late on all of your recordings
may create more recording conflicts than if you started
and stopped on-time (according to the Program Guide
schedule). If you find a particular series runs habitually
late or early, it is better to adjust that series using the
program’s Info screen, rather than set the recording
defaults, which would affect all of your DVR recordings.
Press MENU, select Manage Recordings, then select
Series Manager. Select the program you want to adjust,
then select Series Options.
MANAGE RECORDINGS
61
Have you ever forgotten to set a recording and wished you could
do it remotely from work or while on the go? You can with
directv.com, and DIRECTV Mobile Apps.
NOTE: You must have an account on directv.com to use
remote scheduling /Mobile Apps.
FROM A COMPUTER
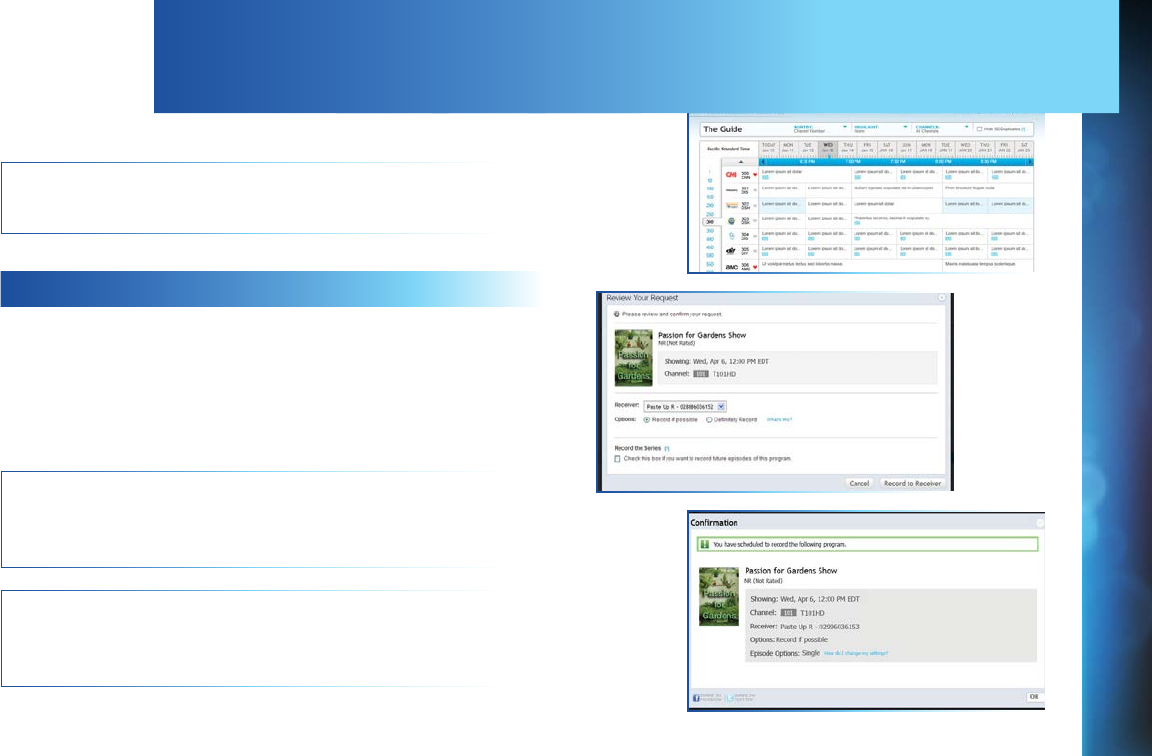
To schedule a recording from your computer, go to directv.com/
tvlistings to see an online version of the Program Guide. Select
a show and click Record. If you have more than one DVR in your
home, choose the DVR you want to record to and then click
Record to Receiver.
NOTE: If you have a mix of HD and SD DVRs in your home, make
sure not to pick an HD movie for your SD DVR. It will
not record.
NOTE: Remote connections may vary. In rare instances,
scheduled recording(s) may not be recognized. Only available on
certain receivers. Visit directv.com/dvrscheduler for details.
RECORDING FROM YOUR COMPUTER, PHONE OR TABLET
CHAPTER 4 - RECORDINGS
62
DIRECTV HD DVR RECEIVER USER GUIDE
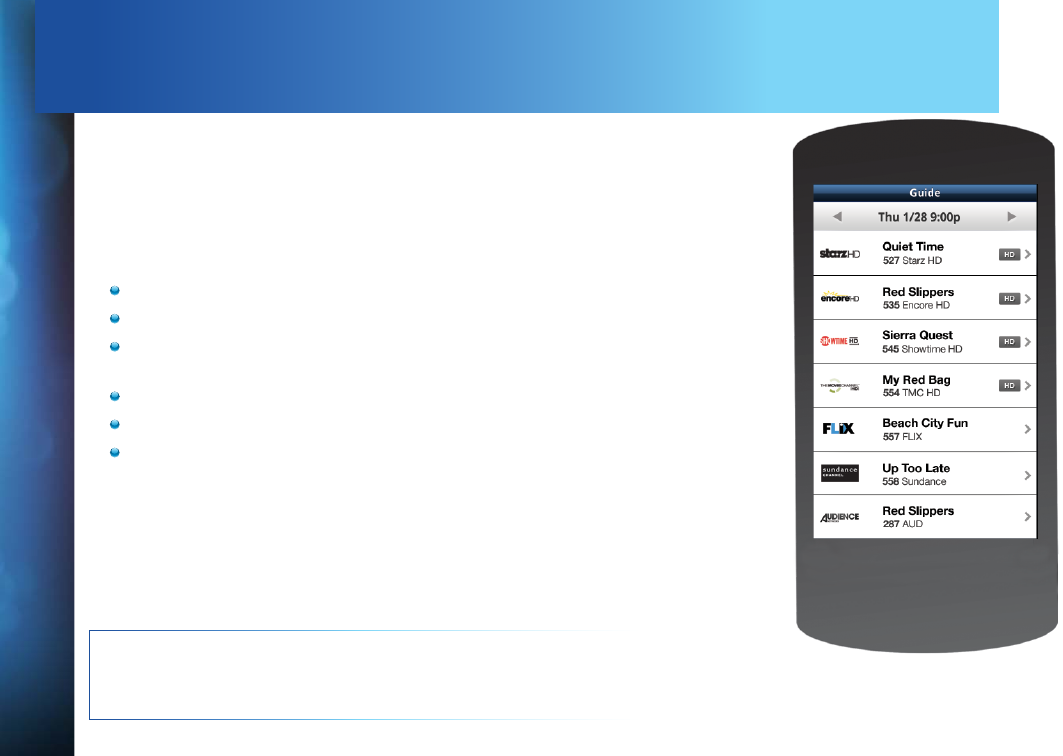
FROM A PHONE OR TABLET
Forget to set your home DVR to record a must-see show? Now you
can use your iPhone®, iPad®, iPod®, or Android™ phone or Android™
tablet to schedule a recording from anywhere. A feature of the
DIRECTV Mobile App, the remote scheduling function even lets you
set your DVR to record select movies that are still in theaters when
they become available on DIRECTV.*
Features:
Search for any television show up to 14 days in advance.
Browse programs by channel, or date & time.
Get program information instantly, including description, length
and rating.
Record a single episode or an entire series.
Set start and end time extensions to your record requests.
Order DIRECTV CINEMA® right on your tablet or phone and
record to any DIRECTV DVR in your home.
Go online to directv.com/mobileapps for downloads and instructions.
You can also learn all about DIRECTV Everywhere, the mobile app
that brings the DIRECTV viewing experience to your phone or tablet.
Please see Chapter 5, “Extras & Special Features: DIRECTV Mobile
Apps”.
NOTE: *Requires Internet access via mobile device and directv.com
login. Remote connections may vary. In rare instances, scheduled
recordings may not be recognized. Only available on certain receivers.
RECORDING FROM YOUR COMPUTER, PHONE OR TABLET

63
CHAPTER 5 - EXTRAS & SPECIAL FEATURES
Extras ......................................................................................... 64
Messages .................................................................................... 64
DIRECTV Active Channel ............................................................ 64
Music & Photos ........................................................................... 65
Caller ID ...................................................................................... 67
Showroom ................................................................................... 68
Pandora ....................................................................................... 68
YouTube ....................................................................................... 69
Special Features .........................................................................70
DIRECTV ® DoublePlay ™ ............................................................... 70
GameSearch ™ .............................................................................. 71
QuickTune ................................................................................... 71
TV Apps ....................................................................................... 72
DIRECTV ® Whole-Home DVR Service ......................................... 74
Get Your Network Set Up ............................................................ 74
Genie™ HD DVR & Mini ................................................................ 79
DIRECTV ™ Mobile Apps ............................................................... 80
Key Benefits & Features ............................................................ 80
Sports on the Go ......................................................................... 81
DIRECTV ™ Voice Search ............................................................. 82
CHAPTER 5 - EXTRAS & SPECIAL FEATURES
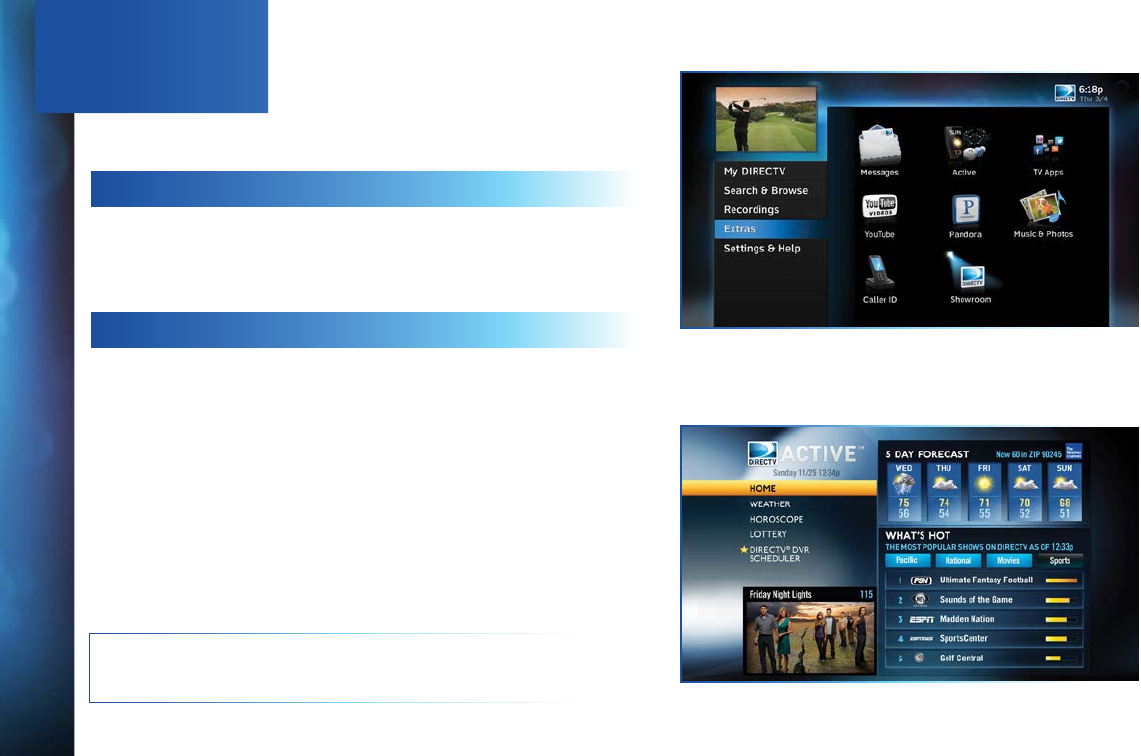
64
DIRECTV HD DVR RECEIVER USER GUIDE
Use the Extras option to access Messages, the DIRECTV Active™
channel, TV Apps, Music & Photos, Pandora and, if your Receiver
is Internet-connected, YouTube. Depending on your setup, it may
also include the Caller ID feature.
MESSAGES
Press MENU, select Extras and then Messages to view your
messages from DIRECTV, which may include important news
special offers, and more.
DIRECTV ACTIVE CHANNEL
Press MENU, then select Extras, then Active to access the
DIRECTV Active channel, or simply press the ACTIVE key on your
remote.
The DIRECTV Active Channel provides a variety of interactive
services, including daily and extended weather forecasts, daily
horoscopes, lottery results, and a quick list of the most popular
shows on DIRECTV at any given time. For local weather on
demand, press ACTIVE and select the Weather option. You’ll be
required to enter your local ZIP code. View information for up to
five cities through the My Cities menu item. To exit Active, press
GUIDE or enter a channel number.
NOTE: Because it is an interactive channel, the DIRECTV Active
screen may take a few moments to load. Please be patient.
EXTRAS
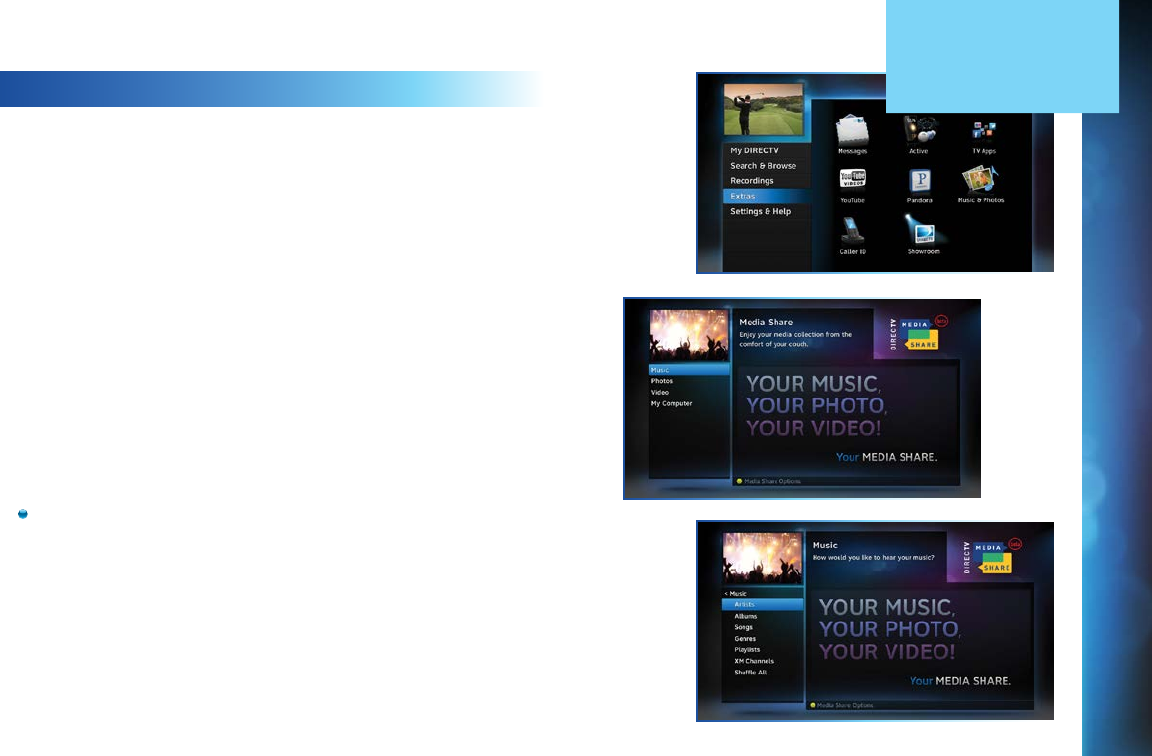
65
MUSIC & PHOTOS
Music & Photos is an optional item in the Extras menu, only
shown when your DVR is connected to a home network.
Compatible models include the DIRECTV HD DVR (models HR20,
HR34, HR44 or later) or DIRECTV Plus® DVR (model R22). Other
models may support DIRECTV™ Media Share in the future.
Your DIRECTV Receiver can be connected to your home network
to show photos and, play music and videos that you have saved
on your personal computer. You must have at least one personal
computer running a media server (e.g. TVersity, Windows Media
Player, Intel Viiv) in your network for this service to work. For
help on setting up Music & Photos, visit
directv.com/mediashare.
Once your DVR is properly connected to the media server on
your home network, press MENU and select Extras then Music
& Photos. The DIRECTV Media Share screen
will display.
Select Music to access music by Artist, Album, Song,
Playlists and Channel. Your favorite music will play as you
watch TV or view photos from your PC. Once the desired
songs are selected, the song’s information will display on
the Progress bar.
EXTRAS
CHAPTER 5 - EXTRAS & SPECIAL FEATURES
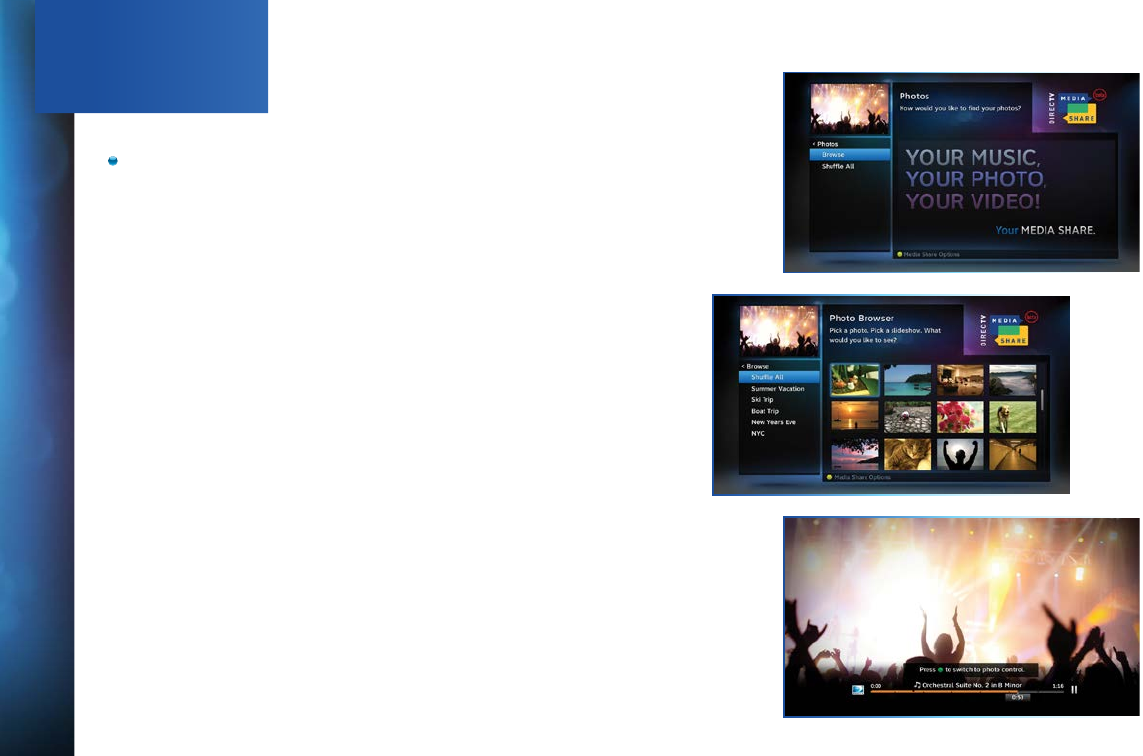
66
DIRECTV HD DVR RECEIVER USER GUIDE
Select Photos to go to the Photos submenu. Select Browse
to see several photos at once.
The DVR controls on your remote allow you to stop, play or
skip through your music and photos. Press ENTER on your
remote to toggle among music, photos and video control
modes. Pressing the STOP button while in music control
mode stops the music from playing, and the audio from the
current channel is then heard. Pressing the STOP button
while in photo control mode stops the display of photos and
displays the video from the current channel.
EXTRAS
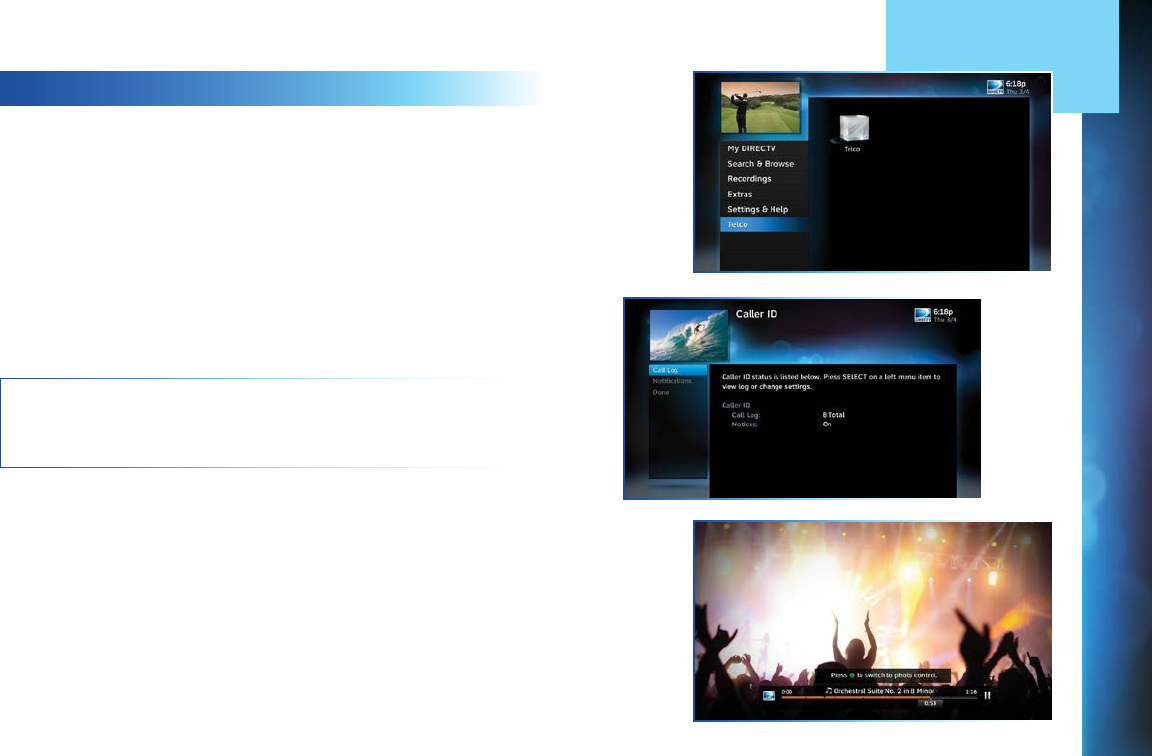
67
EXTRAS
CHAPTER 5 - EXTRAS & SPECIAL FEATURES
CALLER ID
Depending on your phone company, the Caller ID option may be
labeled in the format Telco Caller ID where Telco is your phone
company’s name; or it may appear in the Extras option when
you press MENU.
To set up your Receiver to display an onscreen notice whenever
you receive a call, press MENU and select Caller ID, then select
Turn on Notices. This will toggle the option to now read Turn off
Notices.
Note: In some areas, you must press MENU, then select Extras,
then select Caller ID, then Turn on Notices or Turn off Notices.
NOTE: You must subscribe to caller ID service through your
phone company and your DIRECTV Receiver must be connected
to the phone line.
You can review your 25 most recent calls in the call log at any
time. To see your call log, press MENU, select Caller ID then
select Call Log. Highlight and select a name to delete that
listing from your log.
Note: In some areas, you must press MENU, then select Extras,
then select Caller ID, then Call Log.
68
DIRECTV HD DVR RECEIVER USER GUIDE
SHOWROOM
Showroom offers you DIRECTV content such as instructional
videos, behind-the-scenes clips and video extras, information
about Sports subscriptions, special offers, trailers
and more.
PANDORA
Pandora is personalized Internet radio designed to help you
discover new music you’ll love, mixed in with music you already
know. To use Pandora, your Receiver must be connected to the
Internet and you must have a Pandora account set up online. To
access Pandora, press MENU on your remote. Select Extras then
Pandora.
You can listen to various stations and create, edit and personalize
stations.
To listen to Pandora while watching a program: While listening to
Pandora, press EXIT on your remote and select Yes, Play Pandora
to display video onscreen. Your remote buttons now control your
music. To switch to video control, press ENTER on your remote to
change programs. To exit Pandora and go back to TV, press EXIT
and select No, Stop Pandora.
EXTRAS

69
CHAPTER 5 - EXTRAS & SPECIAL FEATURES
YOUTUBE
Watch millions of Internet videos on your TV.
If your DIRECTV HD DVR is connected to the Internet, you
can search for and watch YouTube content on your TV. (See
Appendix 4 for connection instructions.)
If you’re already connected, follow these simple steps:
1. Press MENU on your remote and select Extras, then select
YouTube.
2. Enter your search term using the onscreen keypad, or use
the numbers on your remote to “triple tap” the words.
3. A list of YouTube videos matching your search term will
display. Play a video from this screen by highlighting a title
and pressing SELECT. Otherwise, highlight the title and
press INFO for a description of the video and other options.
EXTRAS
70
DIRECTV HD DVR RECEIVER USER GUIDE
Your DIRECTV HD DVR supports these special features that can
be accessed without going through a menu.
DIRECTV® DOUBLEPLAY™
With DoublePlay, you can easily switch between two programs
on at the same time without missing a minute of either. Your
HD DVR stores up to 90 minutes of live TV on two channels. If
you tune to a new channel (a third channel), the saved portion
on the original channel is cleared. DoublePlay expires after two
hours of non-use.
1. While watching one program, press the DOWN arrow on
your remote. A message displays confirming DoublePlay
has started.
2. Press the DOWN arrow again and tune to the second
program.
3. Now use the DOWN arrow to switch back and forth between
the two programs.
4. You can pause, rewind, fast forward*, slow-mo or instant
replay both.
NOTE: *You cannot fast forward during live TV until you pause
or rewind a program.
Watching
Program 1
Press DOWN button
on remote
Program 2
Watching
Program 2
Program 1
Program 2
Program 2
Program 1
SPECIAL FEATURES

71
CHAPTER 5 - EXTRAS & SPECIAL FEATURES
GAMESEARCH™
Sports blackouts, a long-time source of frustration and confusion
for sports fans, occur when a sporting event is not televised in a
certain area. But thanks to DIRECTV’s cutting-edge technology,
whenever you tune to a channel with a blacked-out game,
GameSearch™ detects the blackout and immediately looks to see
if the game is on another channel. If a broadcast of the game is
found, GameSearch displays an onscreen message that gives you
the option to tune to that channel. If it can’t find an accessible
broadcast, an onscreen message will state that the game is
unavailable.
QUICKTUNE
Use QuickTune to get to your nine “must see” channels fast! While
watching live TV, press the UP arrow on your remote control. A
display with fields for 9 channels will appear on screen. To fill in
the fields, press the ENTER button on your remote control. The
channel you are currently viewing will be added to the currently
highlighted field in the QuickTune display. After you’ve made all
your picks, press the UP arrow whenever you want to bring up the
application. Use the arrow keys to highlight the channel you want
to watch and then press SELECT.
SPECIAL FEATURES
72
DIRECTV HD DVR RECEIVER USER GUIDE
TV APPS
With DIRECTV’s free TV Apps, you can check your local weather,
get the latest sports scores, track your NFL fantasy standings,
and discover trending shows – all without missing a second of
what you’re watching on TV. To enjoy TV Apps, your DIRECTV HD
DVR must be connected to the Internet. (See Appendix 4, “Get
Connected”, for instructions.)
TV Apps include:
ScoreGuide™ - See updated scores, stats & standings for
all major sports (including college conferences), results
for games you missed and game schedules up to 7 days in
advance. ScoreGuide can also be launched while watching a
sports channel like ESPN or MLB Network by pressing the
RED button on your remote.
Weather - Get hourly weather updates and advisories, the
10-day forecast and more for your local area. Store up to 5
favorite cities for local conditions at a glance.
NFL.COM Fantasy Football TV App - Track standings,
scores, and stats for your NFL fantasy team. Plus, NFL
SUNDAY TICKET lets you tune to any game in progress from
the app so you won’t miss the live action.*
What’s Hot - See what’s trending on DIRECTV in real-time
and discover new shows.
Social - Connect to social media right from your TV to see
what your friends are watching and share your own favorites.
SPECIAL FEATURES

73
CHAPTER 5 - EXTRAS & SPECIAL FEATURES
DIRECTV TV Apps are FREE and easy to use. Just press the
Right ARROW button on your Remote to launch the TV Apps
dock and select the app you want.
NOTE: *The NFL.COM Fantasy Football TV App will begin
functioning two weeks before the start of the NFL season, and
will stop one week after season close.
SPECIAL FEATURES

74
DIRECTV HD DVR RECEIVER USER GUIDE
DIRECTV® WHOLE-HOME DVR SERVICE
DIRECTV’s Whole-Home DVR service is like having a DVR in every
room. Now even rooms with HD Non-DVR Receivers or Clients
can schedule and show recorded programs. Whole-Home provides
more flexibility to the whole household with these benefits:
Watch recorded shows in any room.
Start watching in one room, finish in another.
Record or delete shows from any room.
Record two shows at once, while watching two shows from
your Playlist.
Set your DVR from any mobile phone, tablet or computer.
GET YOUR NETWORK SET UP
Networking your HD DVR, HD Non-DVR Receivers and/or Clients
enables them to share content. This is typically done by a DIRECTV
installer during your installation appointment. To learn more about upgrade and eligibility requirements, go to directv.com/
wholehome. To get a quick understanding of how recorded content is shared by your household, skip to step 6.
NOTE: To access DIRECTV® Whole-Home DVR service functionality, you need a DIRECTV HD DVR Receiver (models HR20-HR23 with
DECA, HR24, HR34, HR44), an additional Whole-Home-capable Receiver (models H21 with DECA H24, H23 with DECA, R22 with
DECA, HR20-HR23 with DECA, H25, HR24, HR34, HR44) or Client (DIRECTV C31, C41, C41W; or other brand DIRECTV® Ready Client)
for each TV, a SWiM network, HD Access, DVR service and DIRECTV® Whole-Home DVR service. There is a limit of one remote
viewing per DVR at a time. For Whole-Home DVR to function, your Receivers should never have an Ethernet cable connected, unless
it is connected to a DECA. H24, H25, HR24, HR34, and HR44 Receivers should never have a DECA installed.
75
DIRECTV® WHOLE-HOME DVR SERVICE
CHAPTER 5 - EXTRAS & SPECIAL FEATURES
After your system is set up, see the following steps to personalize
your Whole-Home experience and take advantage of its many
great features and functionality.
1. Activate DIRECTV® Whole-Home DVR Service:
Once DIRECTV® Whole-Home DVR service is activated on your
account, press the LIST button on your Remote. The service
confirmation message at right will display. Select Continue.
2. Name Your Locations:
Now, give each Receiver or Client a name. We refer to this as
Location. The name must be 14 characters or less , and should
be easy to remember or associate with its location, such as
“Living Room.” You must be at the Receiver or Client to assign
its name.
To change a Location Name, press MENU, select Settings &
Help, then Settings, Whole-Home and then Name Location.
3. Set Playlist Sharing Options (HD DVR only):
If the Receiver is an HD DVR, you’ll be prompted to set the
following Playlist sharing options during initial setup:
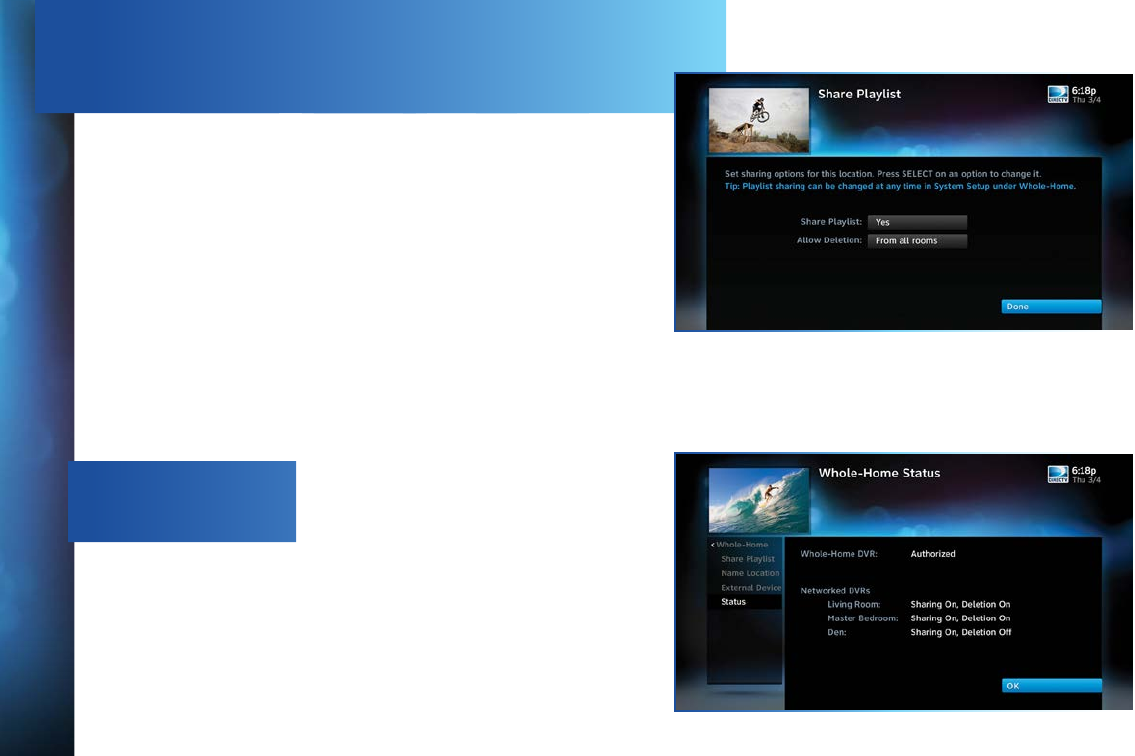
76
DIRECTV HD DVR RECEIVER USER GUIDE
DIRECTV® WHOLE-HOME DVR SERVICE
Share Playlist
You can share the Playlist with other Receivers and Clients, or
not. For example, the HD DVR in your Den, can be set to share its
Playlist with the Mini Client in your Master Bedroom, but not with
the HD Non-DVR in your Kitchen.
Allow Deletion
Your HD DVR can be set to prevent another location from deleting
programs that were recorded by that HD DVR. In our previous
example, if the DVR in the Den is set to allow deletion From this
room only, any attempt to delete a program (recorded in the Den)
from the Master Bedroom or Kitchen would be prevented.
You can change sharing options at any time. Press MENU, select
Settings & Help, then Settings, Whole-Home and then Share
Playlist.
4. View Status:
To view the Whole-Home status for all your connected HD DVRs,
press MENU, select Settings & Help, Settings, Whole-Home then
Status. This screen displays if DIRECTV® Whole-Home DVR service
status, as well as the Share Playlist settings for all networked HD
devices.

77
DIRECTV® WHOLE-HOME DVR SERVICE
CHAPTER 5 - EXTRAS & SPECIAL FEATURES
TIP: Adding a second HD DVR to your DIRECTV®
System increases your recording capacity. Don’t worry
about having to remember on which DVR you recorded
your shows. Whole-Home DVR service keeps things
simple by giving you a single, unified playlist of all your
recordings on any connected TV.
5. Record Programs:
If you’re in a room with an HD DVR, and you’ve authorized
DIRECTV® Whole-Home DVR service, the program recording
process is unchanged.
If you’re in a room with an HD Non-DVR Receiver, once you
authorize DIRECTV® Whole-Home DVR service, you’ll be able to
request programs to record.
To record the show you’re currently watching, or to record
a highlighted program in the Guide, press the orange REC
(record) button. A message displays onscreen asking you to
select the HD DVR you would like to record on; then select
either Record Once to record the current episode, Record
Series to record the entire series or Do Nothing to cancel
your request.
NOTE: Non-DVR Receivers do not recognize the Remote
Control shortcut commands Record Series (press REC
button two times) or Cancel Recording (press REC
three times).
You can also schedule a recording from a program’s Info
screen. To record the program you’re currently watching, or
to record a highlighted program in the Guide, press the INFO
button and select Record Once or Record Series.
If your recording (requested from a Non-DVR Receiver)
conflicts with other recordings already scheduled on the
target DVR, a message will display stating that your program
cannot be recorded.
78
DIRECTV HD DVR RECEIVER USER GUIDE
DIRECTV® WHOLE-HOME DVR SERVICE
NOTE: Only two locations can access a recorded
program at the same time (the HD DVR on
which the program was recorded and one other
location). If a third location tries to playback a
recording, a message will display explaining that
the program is not available.
Recordings can be deleted from any connected Receiver or
Client that has been set up to Allow Deletion. However, to
check the status of scheduled recordings on the To Do List or
to change the priority of a series you’ve scheduled to record,
go to the HD DVR, press MENU and select Recordings, then
Manage Recordings for options.
6. Watch Recorded Programs:
By networking your devices, the recordings from all the HD DVRs
in your household are combined into a “shared” Playlist. The
shared Playlist is accessible by all networked Receivers and
Clients, including non-DVRs. To access the Playlist, press the
LIST button on the remote control, or press MENU, then select
Recordings, then Playlist. Highlight a show and press SELECT to
play. If you’ve already watched part of the show in another room,
you can select Resume to pick up where you left off. You can use
any of the DVR control buttons such as PAUSE, FFWD, ADVANCE,
etc, while watching your recorded show.
You can limit access to programs with Parental Controls.
See “Parental Controls” in Chapter 6 for details. Your Parental
Control settings restrict access to both recorded and live
programs. Parental controls must be set at each Receiver.
To delete a program from your Playlist, use the arrow keys to
highlight the desired show and press the RED button. You’ll then
be asked to confirm the deletion.
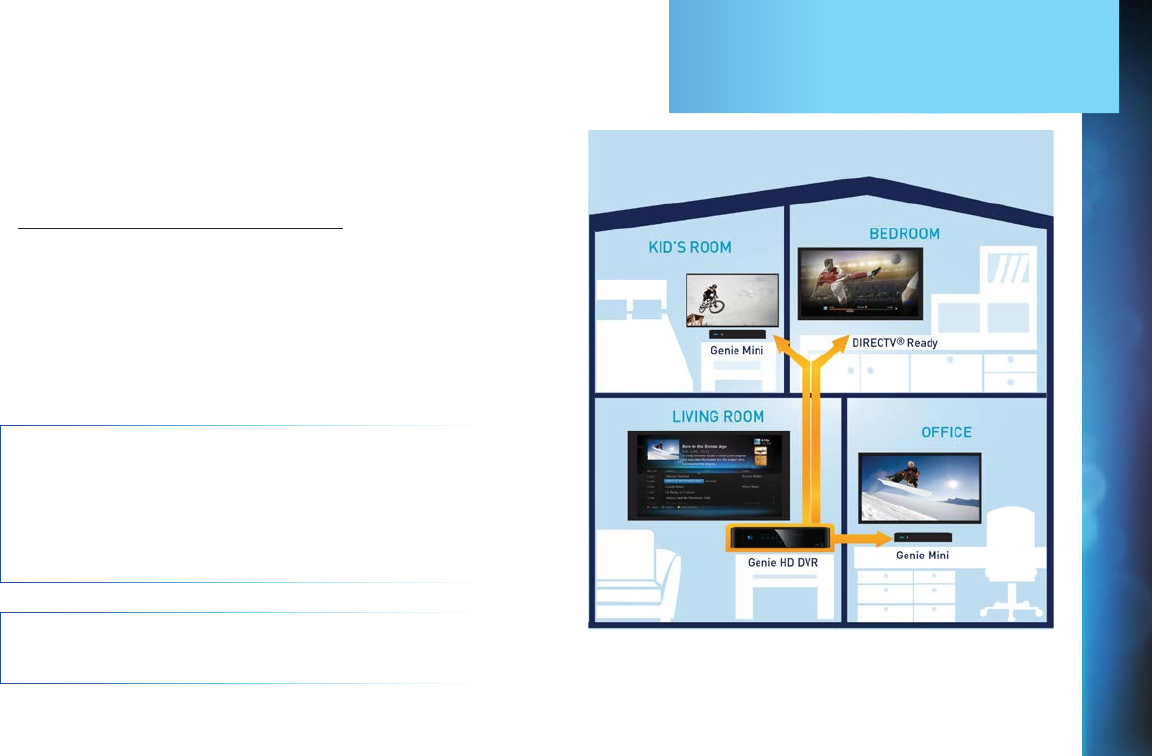
79
GENIE™ HD DVR & MINI
CHAPTER 5 - EXTRAS & SPECIAL FEATURES
The DIRECTV Genie family of HD DVRs and Clients delivers the
most advanced, versatile and cost effective HD experience from
DIRECTV. The Genie HD DVR (HR34, HR44 and above), together
with the Genie Minis (wired and wireless) and/or DIRECTV® Ready
TVs, can serve your entire home, and allows you the flexibility to
watch TV however and wherever you choose.
Genie Enhances Your Whole-Home Setup
Adding a Genie HD DVR to your Whole-Home network will extend
its features and functionality. When connected to other HD
Receivers as the main Receiver of your Whole-Home network,
the Genie HD DVR can stream recordings to four active rooms
simultaneously (with up to three Clients).*
For more information about the Genie family of HD DVRs and Minis
Clients, please see Chapter 7, “Genie HD DVR”.
NOTE: *The Genie HD DVR will work with any other DIRECTV
HD DVRs, HD Receivers and Clients that are connected to and
compatible with Whole-Home service, so you can play, pause,
rewind and delete recorded content that’s on your Genie DVR from
any room in the house. However, you will not be able to record
content to the Genie from another HD DVR.
NOTE: For a complete list of compatible DIRECTV Ready devices,
Receivers, Clients and required services, visit directv.com/Genie.
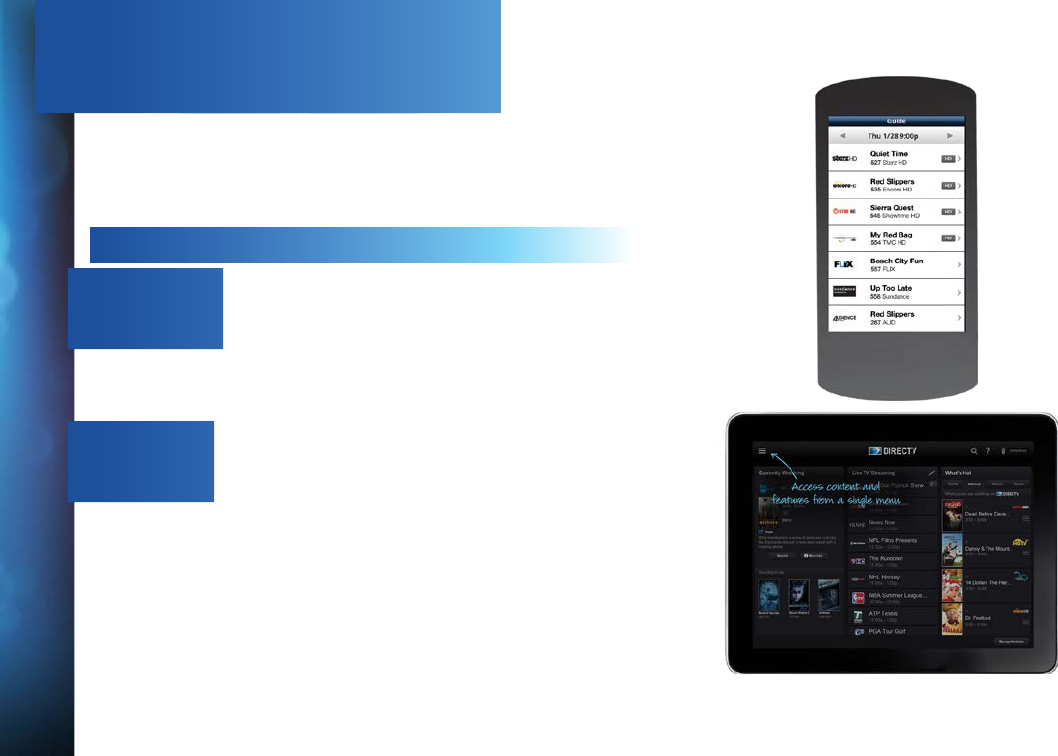
80
DIRECTV HD DVR RECEIVER USER GUIDE
DIRECTV™ MOBILE APPS
With DIRECTV Mobile Apps, your favorite TV shows, movies
and more are just a tap away on your iPhone®, iPad®, Android™
Phone or Android™ Tablet. Get more options for enjoying your
entertainment beyond the TV, in and out of your home. All you
need is an Internet-connected HD DVR and a DIRECTV online
account.
KEY BENEFITS & FEATURES
Browse
Browse thousands of PPV and On Demand titles available on
your TV and mobile devices, and scan the interactive Guide
without interrupting your current show. Use Smart Search on
your mobile device just like you do on your Receiver.
Watch
Stream live TV channels on your device in any room of
your home, and stream a selection of content while on the
go.* Stream On Demand programs from HBO®, STARZ®,
SHOWTIME® and other networks. Order PPV programs from
your mobile device to watch wherever you like.
*Only select networks available for live streaming functionality and are subject
to change at any time.
Please refer to the “NOTE” on page 82 for more details.
iPad is a registered trademark of Apple, Inc.
Android is a trademark of Google Inc.
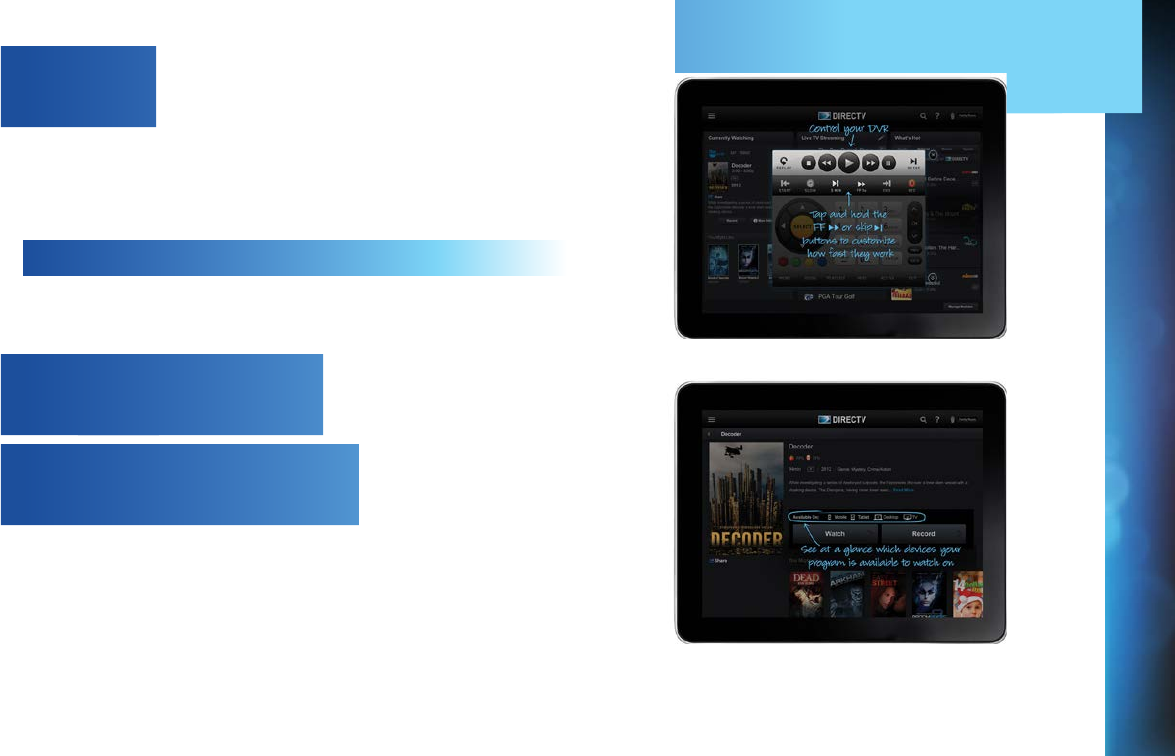
81
DIRECTV™ MOBILE APPS
CHAPTER 5 - EXTRAS & SPECIAL FEATURES
Control
Use your mobile device as a remote control for your DVR and set
recordings from anywhere. (See Chapter 4, “Recordings”.) Use
your mobile device to access your Shared Playlist across all your
DVRs with Whole-Home service.
SPORTS ON THE GO
DIRECTV’s special sports-optimized features and dedicated
football app keep sports fans entertained and informed, wherever
they are.
Special Sports Features
View scores & stats, and custom-filter the teams and sports you
follow.
NFL SUNDAY TICKET App
For subscribers of NFL SUNDAY TICKET MAX, this free app
allows you to watch games live, get scores & stats, track your
NFL.com fantasy league and favorite players, and receive
customized highlight alerts, all on your tablet or mobile phone.
Please refer to the “NOTE” on page 82 for more details.

82
DIRECTV HD DVR RECEIVER USER GUIDE
DIRECTV™ MOBILE APPS
DIRECTV™ VOICE SEARCH
Discover content and control your entertainment experience
on your smart phone using your voice. Part of the DIRECTV for
iPhone® and the DIRECTV for Android™ Phone apps, DIRECTV’s
voice-activated search understands what you mean and finds
what you’re looking for. Simply tell it what you want, whether it’s
searching for a movie or show, scheduling a recording, sending
Remote commands or other tasks.
For complete details, downloads, a list of compatible devices
(sold separately), and instructions for DIRECTV Mobile Apps and
the NFL SUNDAY TICKET mobile app, please visit
directv.com/mobileapps.
Visit directv.com/voice for a complete list of phones (sold
separately) and operating system versions supported for the
DIRECTV Voice feature.
NOTE: Functionality varies by compatible device and
location. Only select networks corresponding to your
package selection are available for live streaming and may
vary by location and device. Additional charges may apply.
In-home live-streaming feature requires home-based Wi-Fi
connection and Internet-connected HD DVR.
Out-of-home viewing requires high-speed internet
connection. All functions and programming subject to
change at any time. Data charges may apply.
Certain remote mobile device control functions require
a standard DIRECTV remote. Tablet remote control
functionality requires a home WiFi connection. The mobile
App requires Internet access and directv.com login.
Internet connections may vary. In rare instances, scheduled
recordings may not be recognized. Visit directv.com/
mobileapps for complete details.
Use of the DIRECTV mobile apps are licensed under
DIRECTV’s current End User License Agreement.
Use of the DIRECTV mobile apps are also subject to
DIRECTV’s privacy policy and other legal policies, including
DIRECTV’s Customer Agreement for users who are
DIRECTV customers.
Supported receivers: H21 and above, R22, and HR20
and above.

8383
CHAPTER 6 - SETTINGS & HELP
Settings .................................................................................... 84
Info & Test .................................................................................. 84
Display ........................................................................................84
Audio .......................................................................................... 88
Network Setup ........................................................................... 88
Remote Control ..........................................................................89
Satellite ...................................................................................... 90
Whole-Home .............................................................................. 91
Power Saving ............................................................................. 91
Reset .......................................................................................... 92
Parental Controls ..................................................................... 93
Lock Now ................................................................................... 94
Unlock Now ................................................................................94
Ratings Limits ............................................................................95
Adult Channels .......................................................................... 96
Channel Blocks ..........................................................................96
Web Videos ................................................................................. 96
Spending Limits ......................................................................... 97
Viewing Hours ............................................................................ 97
Favorite Channels .................................................................... 98
Help .......................................................................................... 99
CHAPTER 6 - SETTINGS & HELP
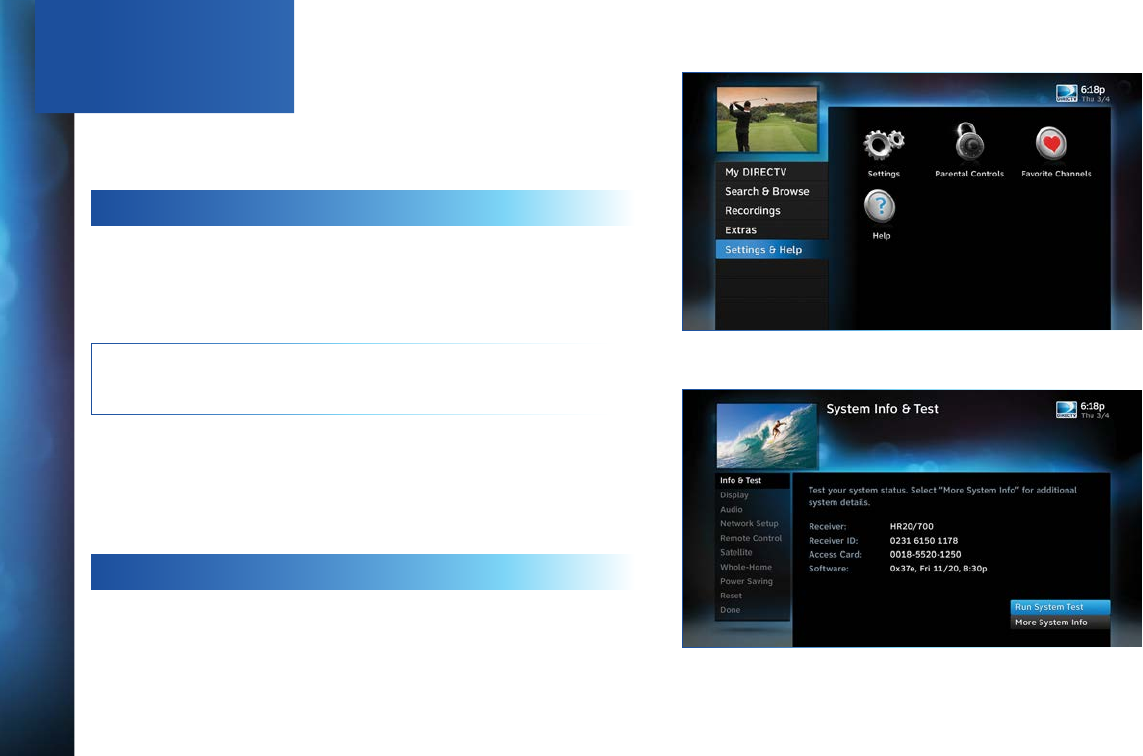
84
DIRECTV HD DVR RECEIVER USER GUIDE
Press MENU, select Settings & Help, then Settings to review or
change your system settings. These include: audio options, video
format, TV resolution, network setup, remote control setup and
more.
INFO & TEST
Select Info & Test to display the System Info & Test screen. Select
Run System Test to initiate a test of the tuners, Receiver ID and
phone line.
NOTE: Running the System Test will interfere with live TV and any
current recordings.
Select More System Info to review your basic system information
such as Receiver model, Receiver ID, access card number,
software version, etc.… as well as, current Receiver settings. This
information can be useful during troubleshooting.
DISPLAY
Select Display to access the following options: Preferences,
Video, TV Ratio, TV Resolution, Captioning or Clock. Before you
get started, you may want to review Appendix 5, “About High-
Definition”, which describes HD formats and resolutions.
SETTINGS
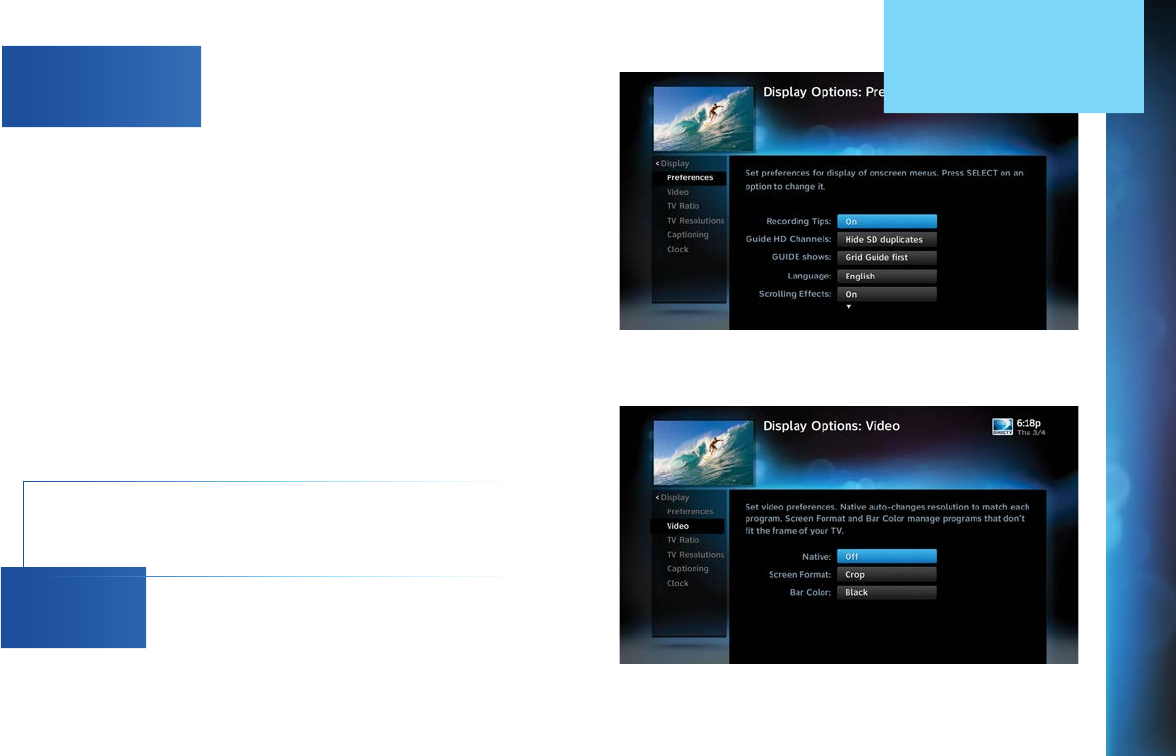
8585
Preferences
These are user interface display settings which include:
Recording Tips: Turn On or Off helpful tips that display onscreen
whenever you schedule a recording.
Guide HD Channels: Choose whether you want the Guide to show
HD channels and their duplicate SD channels or to hide the SD
duplicates.
Guide shows: Select whether you want the first press of the
GUIDE button to take you directly to the Program Guide or to go to
the category filter first.
Language: Select your preferred onscreen text language.
Scrolling Effects: Turn scrolling effects ON or OFF. This affects
the appearance of large text areas when they scroll.
Banner Time: Set the Channel Banner time to determine how
quickly the banner disappears after moving to a new channel.
NOTE: To change your screen format and resolution temporarily,
press INFO on your remote, select Audio/ Video from the Channel
Banner and select Change Resolution & Format.
Video
Set your preference for the following screen options: Native,
Screen Format and Bar Color.
Native: You can turn Native Mode ON or OFF. When Native Mode
is ON, your TV auto-changes to match the resolution of the
SETTINGS
CHAPTER 6 - SETTINGS & HELP
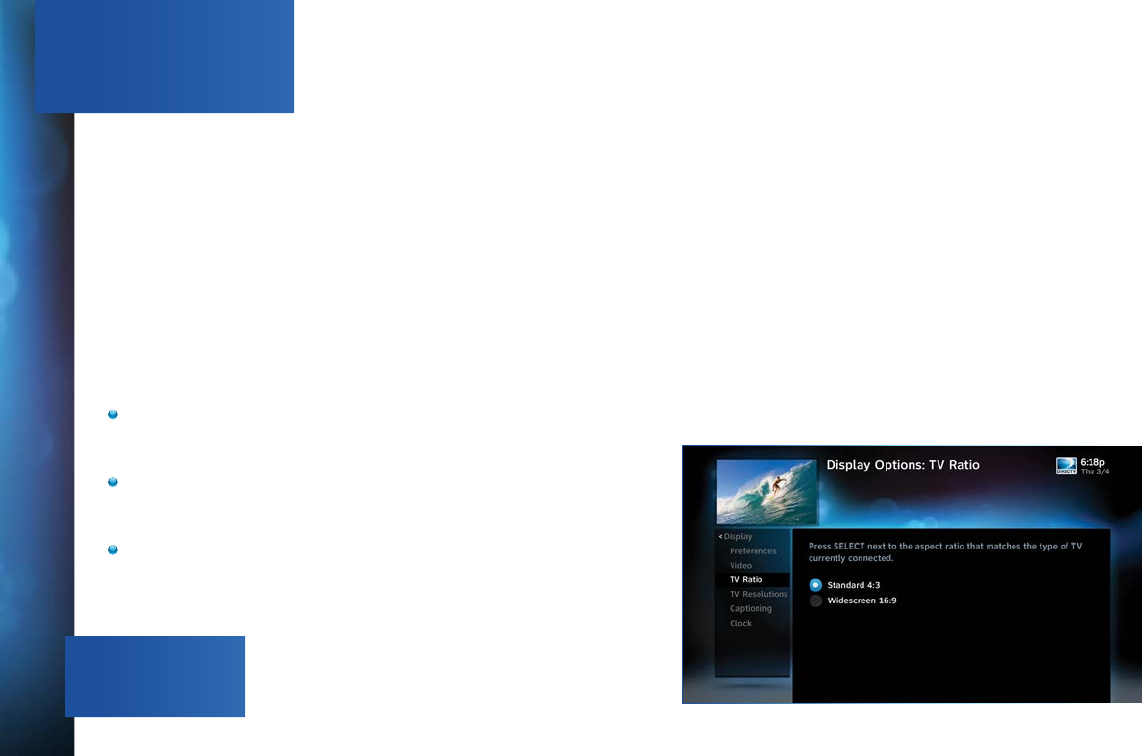
86
DIRECTV HD DVR RECEIVER USER GUIDE
program coming into the Receiver. For example, if Native Mode is
ON and a program is being broadcast in 480p, your High-Definition
Receiver prompts the TV to show it in that same format. If the next
program changes to 1080i, the Receiver tells the TV to change to
that format. Native Mode slows down the system’s response time to
channel changes since the Receiver and TV must adjust the picture
resolution at every channel change. Because of this, the default
setting is OFF. When Native Mode is OFF, your Receiver will display
the program at the highest resolution set on the TV Resolutions
screen.
Screen Format: When a program is broadcast in a format that does
not exactly fit your TV screen, your Receiver will automatically size
the picture. Screen Format options include Original Format, Pillar
Box (Widescreen 16:9 HDTVs only), Letterbox (Standard 4:3 TVs only),
Stretch and Crop:
If you’re watching a widescreen movie on a Standard 4:3 TV, you
may want to choose Letterbox which places bars on the top and
bottom of the screen.
If your HDTV is 4:3 aspect ratio, you may want to Crop or cut
off the content at the left and right side of the screen while
preserving the proportion of the picture that remains.
You can also Stretch the picture vertically or horizontally to fill up
the screen.
Bar Color: Select the Bar Color option to set the color of the bars
displayed when you view programming in Letterbox or Pillar Box
modes.
TV Ratio
Set the aspect ratio that matches your TV. Options are Standard 4:3
or Widescreen 16:9.
SETTINGS
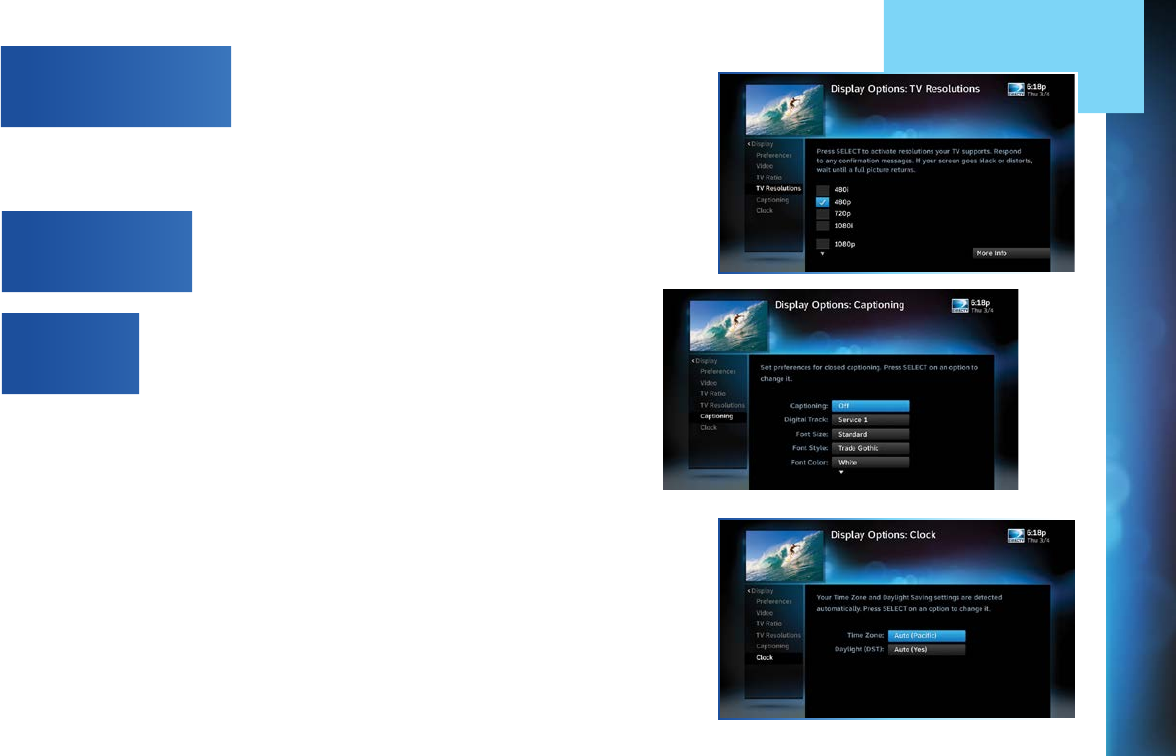
8787
TV Resolutions
Select the resolutions your TV can support so your Receiver can
pass the proper signal. To find the resolutions your TV supports,
check the User’s Guide that came with your TV. If you select a
resolution your TV doesn’t support, the Receiver will reset the
resolution after a few seconds.
Captioning
Select Captioning to turn closed captioning ON or OFF, and to
select the font style, size and color for the display of captions.
Clock
Select Clock to set your time zone and whether you want the
Receiver to show Daylight Savings time or not.
SETTINGS
CHAPTER 6 - SETTINGS & HELP
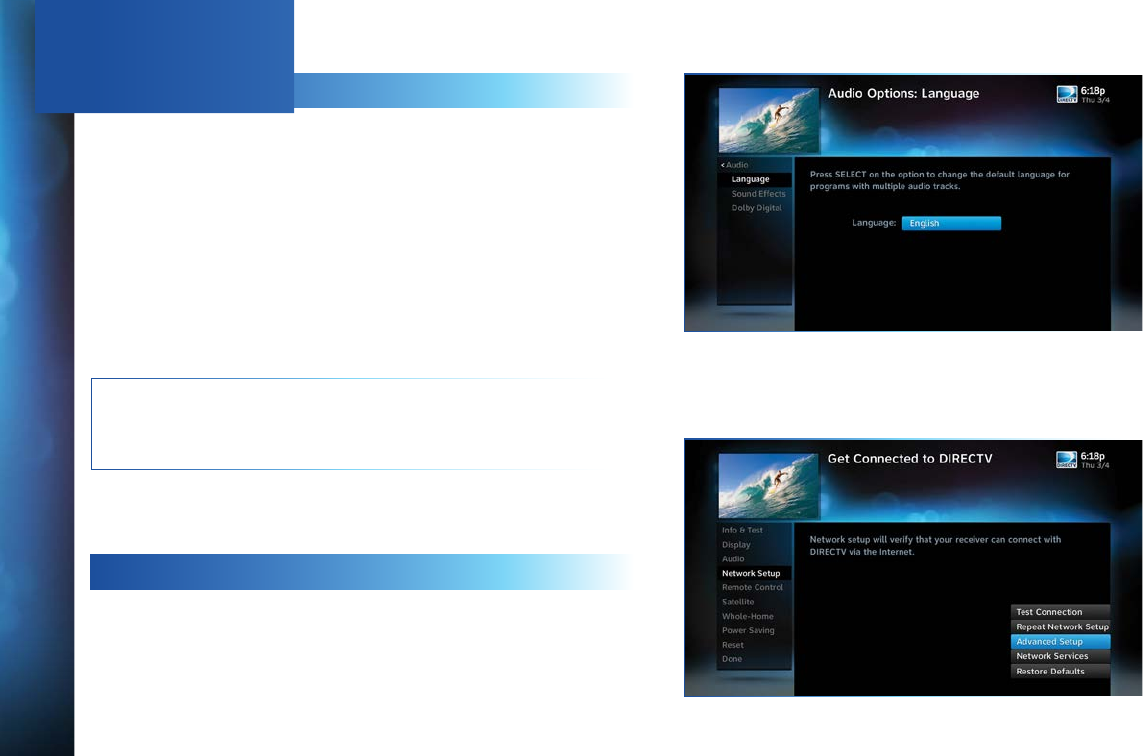
88
DIRECTV HD DVR RECEIVER USER GUIDE
AUDIO
Select Audio to make a persistent change to your audio settings.
Audio options include:
Language: Select your preferred audio language, i.e. English,
Spanish, Chinese, etc.
Sound Effects: Select the volume of sound effects.
Dolby® Digital*: Select ON or OFF for Dolby Digital audio output
to enable or disable a surround sound system.
HD Channels include 5.1 surround sound when available from the
programmer. Additional equipment is required and sold separately.
NOTE: Not all TV programs deliver Dolby Digital 5.1 audio. Look
for the Dolby Digital icon in the program description and Channel
Banner.
* Manufactured under license from Dolby Laboratories. Dolby and the double-D
symbol are trademarks of Dolby Laboratories.
NETWORK SETUP
Select Network Setup to set up and test your DVR’s connection to
the Internet. See Appendix 4, “Get Connected” for details.
SETTINGS
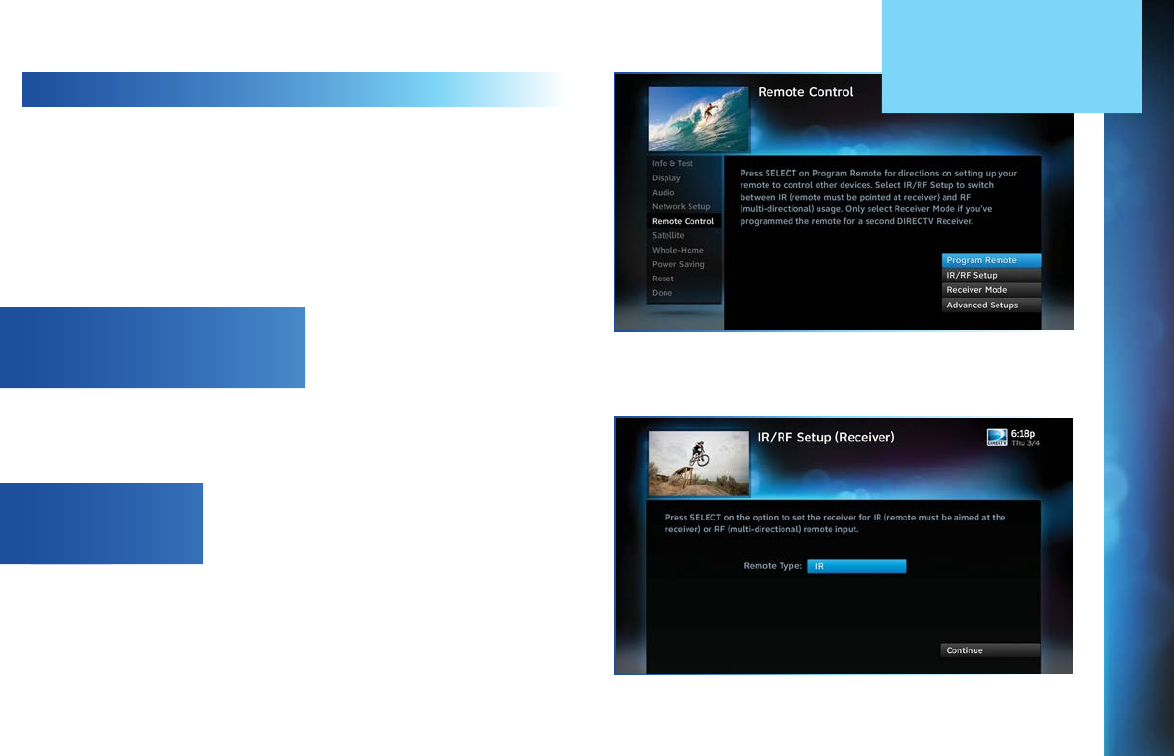
8989
REMOTE CONTROL
Select Remote Control to display the Remote Control setup
screen. Then select from the Program Remote, IR/RF Setup,
Receiver Mode and Advanced Setups options.
For DIRECTV Universal Remotes only: When the MODE switch
on your Remote is in the left-most position, it controls your
DIRECTV Receiver. However, you can also program the AV1, AV2
and TV positions to control other equipment such as your TV,
DVD, VCR or Stereo.
Program Your Remote
Follow the step-by-step instructions to set your Remote to
control your TV or other A/V equipment, such as a DVD player
or surround sound system. For best results, it is helpful to
know the model number and brand of your equipment. To clear
current AV1, AV2 and TV settings, select Program Remote and
then Reset Remote.
IR/RF Setup
Certain remote control models feature Radio Frequency (RF)
capability. DIRECTV’s new Genie Remote (black & white design)
is both Infra Red (IR) and RF capable, but you must select the
mode you want. Otherwise, you will need to refer to the model
number printed on the top left corner of your DIRECTV Remote
Control to confirm its Remote type. A letter “R” at the end of the
model number (which may be followed by other letters) indicates
that the remote supports RF. If no letters follow the number, the
SETTINGS
CHAPTER 6 - SETTINGS & HELP
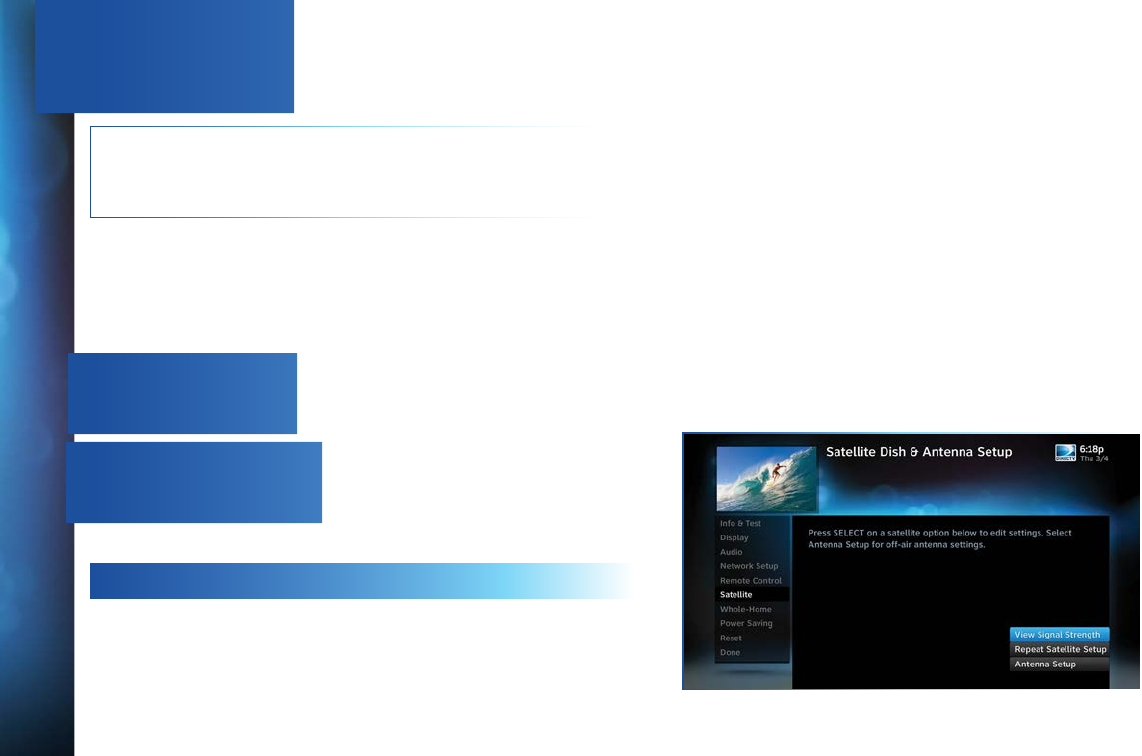
90
DIRECTV HD DVR RECEIVER USER GUIDE
remote works in IR mode only. Please refer back to Chapter 1,
“Using Your Remote Control” for detailed information.
NOTE: While the newer Genie (HR34, HR44 and above) HD DVRs
are RF-capable, previous model DIRECTV Receivers may also be
RF-capable.
To change your remote method of transmission from IR signals
to RF, select Settings, then Remote Control and then IR/RF
Setup. While IR transmission requires a clear line of sight to
the front of the Receiver, RF transmission lets you put your
Receiver inside a cabinet or behind solid doors and still be able
to command it from up to 200 feet away.
Receiver Mode
Select Receiver Mode if you want to use one remote to command
a second DIRECTV® Receiver.
Advanced Setups
Use this option to set up your remote to control 3 or more
Receivers in one room.
SATELLITE
This option is used by installers when your system is initially
set up; you should not have to use it. However, you can use this
screen to view your Receiver’s satellite signal strength\or to
repeat the satellite setup procedure.
SETTINGS
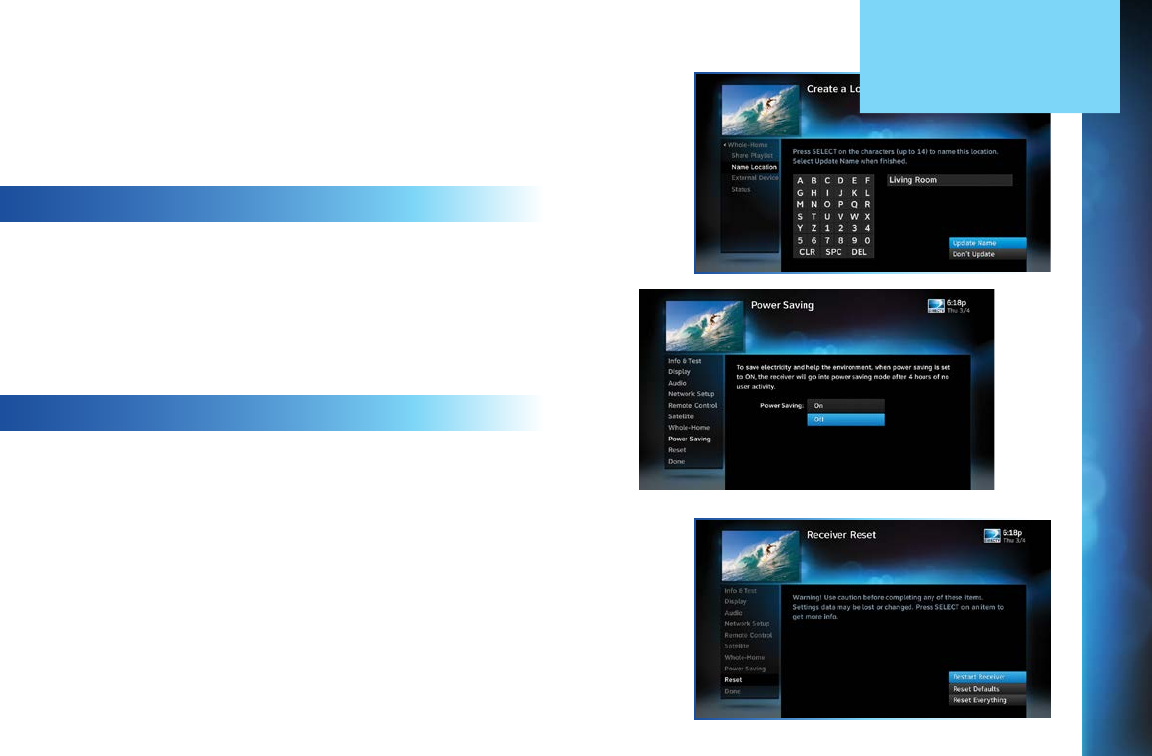
9191
The Antenna Setup option can be used to display channels
received via your off-air antenna in the Guide. You must have an
off-air (terrestrial) antenna connected to your HD DVR Receiver.
Not all HD DVR’s have a built-in off-air tuner.
WHOLE-HOME
If you’re using DIRECTV® Whole-Home DVR Service, you can use
the Whole-Home settings to set or change your Playlist Sharing
preferences, or to create or change the names of each Receiver
or Client location. To learn more, read “DIRECTV® Whole-Home
DVR Service” in Chapter 5 or “Genie HD DVR” in Chapter 7,
respectively.
POWER SAVING
Some DIRECTV Receivers are Energy Star certified, meaning
they include features that reduce power consumption. The Power
Saving option automatically puts these Receivers into Standby
mode when there is no activity on your Remote for 4 hours. When
the feature is ON, a message will display to warn you before the
Receiver goes into Standby mode.
SETTINGS
CHAPTER 6 - SETTINGS & HELP

92
DIRECTV HD DVR RECEIVER USER GUIDE
RESET
The Reset screen lets you Restart the Receiver, reset to factory
defaults, or reset everything.
Restart Receiver is the same function as pressing the red reset
button behind the access card door on the front of the Receiver.
This option does not affect your settings and scheduled recordings.
Reset Defaults erases all of your personal preference items,
such as Parental Controls, Favorites, language and scheduled
recordings. It restores the Receiver configuration to factory
settings.
Reset Everything completely erases everything from system
memory, except for satellite dish settings, and starts up like a
new Receiver.
WARNING: All your recordings will be erased from the hard
drive!
NOTE: If Parental Controls are locked, you must enter your
password to reset the Receiver.
SETTINGS
9393
PARENTAL CONTROLS
To review or update your Parental Controls settings, press
MENU, select Settings & Help, then Parental Controls. You can
also access Parental Controls by pressing INFO, then selecting
Parental, then Parental Controls.
Parental Controls enable restrictions to be placed on
programming as well as certain actions, and requires a
passcode to change the restrictions. Whether you want to block
access to mature content, limit spending amounts, or restrict the
number of TV viewing hours, you have total control for the whole
household. The system default is “unlocked” for all categories.
CHAPTER 6 - SETTINGS & HELP
94
DIRECTV HD DVR RECEIVER USER GUIDE
LOCK NOW
After setting the restrictions you want (see below for options),
choose Lock Now from the left menu. You’ll be asked to create
a passcode. This passcode will be your entry to unlocking and
adjusting the limits in the future.
UNLOCK NOW
When Parental Controls are locked, a message appears if you
try to tune to a restricted program, explaining why the program
is blocked. To temporarily unlock a particular program, select
Unlock Now and enter your passcode. Multiple entries aimed at
guessing the passcode are thwarted by a time delay; each invalid
passcode entered lengthens the delay for subsequent entry by
one second.
For more unlock options, press MENU, select Settings & Help
then select Parental Controls. Various options for removing
restrictions temporarily or permanently will appear. Select one
and enter your passcode. You can also unlock Parental Controls
by pressing INFO while watching TV. Select Parental then Unlock
All and enter your passcode.
NOTE: If you have Parental Controls set and temporarily
unlocked, turning the Receiver off will turn Parental Controls
back on.
PARENTAL CONTROLS
9595
RATINGS LIMITS
Set rating limits for Movies, TV and Other (unrated) shows. From
the left menu, select Rating Limits then select either Movies, TV
or Other.
Movies
Select the button next to the overall ratings limit you wish
to impose. Brief descriptions of the ratings appear for your
guidance.
TV Programs
Highlight and select the TV ratings limit you desire. In addition
to allowing or blocking shows by TV rating (i.e. TV-MA), you
can also set ratings limits for particular types of content such
as Fantasy Violence (FV), Dialogue (D), Language (L), Sexual
Content (S) and Violence (V). A description of each content type
displays when highlighted.
Other Shows
Highlight and select the box to toggle the setting between Allow
No Rating and Block No Rating. If you choose Block No Rating,
programming that has no rating, such as news and sports, will
not display.
PARENTAL CONTROLS
CHAPTER 6 - SETTINGS & HELP
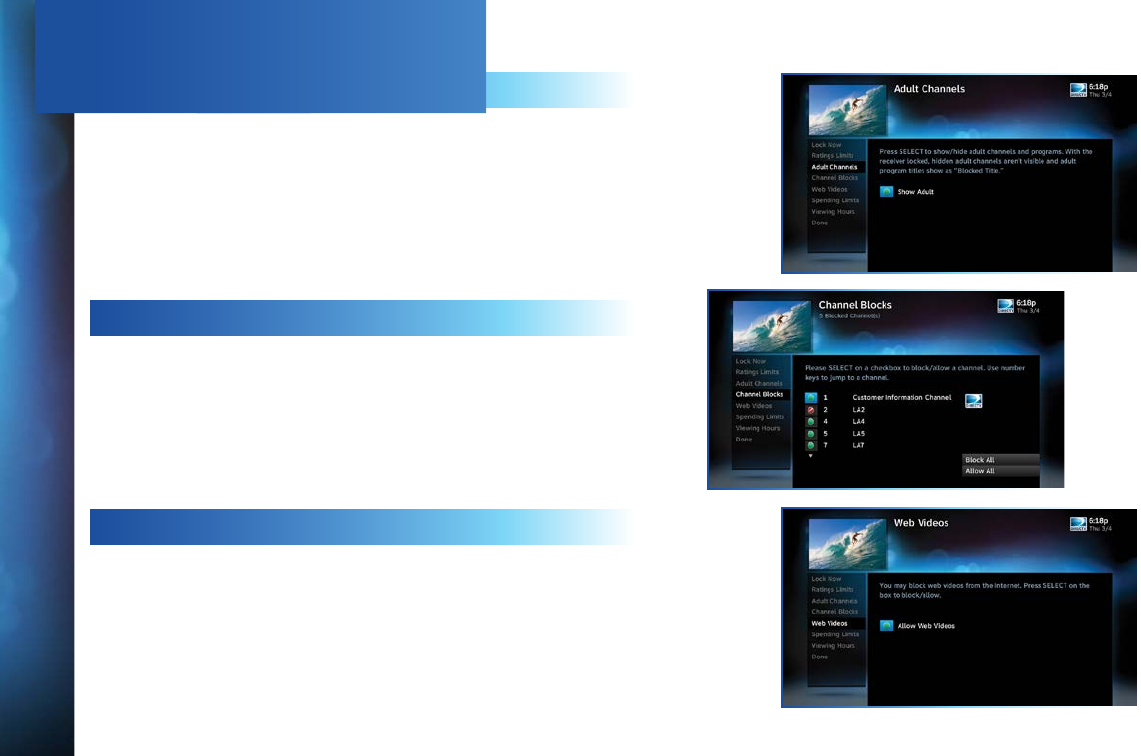
96
DIRECTV HD DVR RECEIVER USER GUIDE
ADULT CHANNELS
Hide adult channels in the Program Guide, Manage Recordings
screens, and when channel surfing. Select Adult Channels, then
highlight and select the box to toggle between Hide Adult and
Show Adult. This action also hides the Adults Only icon in the
Search & Browse screen.
CHANNEL BLOCKS
Prevent children from viewing pre-selected channels with the
Channel Blocks feature. Scroll down the channel list and select
those you wish to block. You can also key in channel numbers or
use Block All or Allow All to save time.
WEB VIDEOS
Prevent children from viewing videos from the Internet. Select
Web Videos, then highlight and select the box to toggle between
Block Web Videos and Allow Web Videos.
PARENTAL CONTROLS
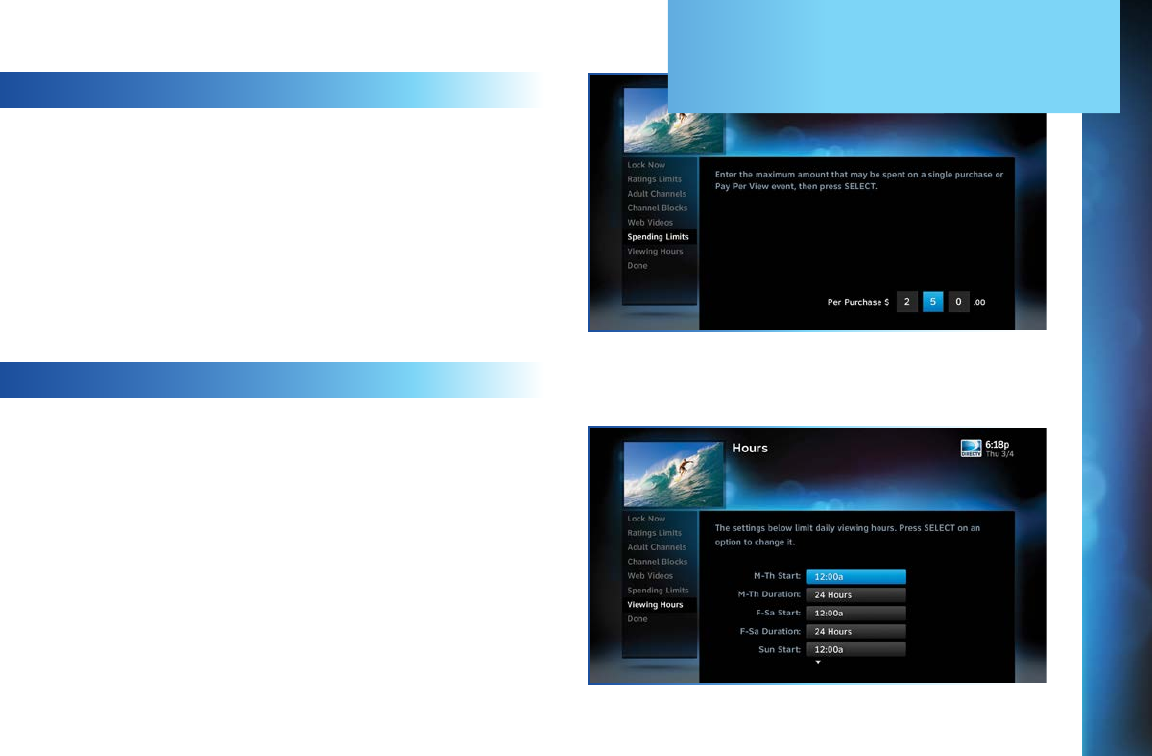
9797
SPENDING LIMITS
Limit the amount that can be spent on each Pay Per View
purchase. Select Spending Limits. Then enter your preferred
spending dollar limit using the numbers on your Remote.
VIEWING HOURS
Specify days and times when TV watching is allowed in your
household. Select Viewing Hours, then select the start times and
durations for viewing. You can set hours based on “school nights”
— Monday-Thursday – and/or weekend nights—Friday-Saturday,
and Sunday.
PARENTAL CONTROLS
CHAPTER 6 - SETTINGS & HELP
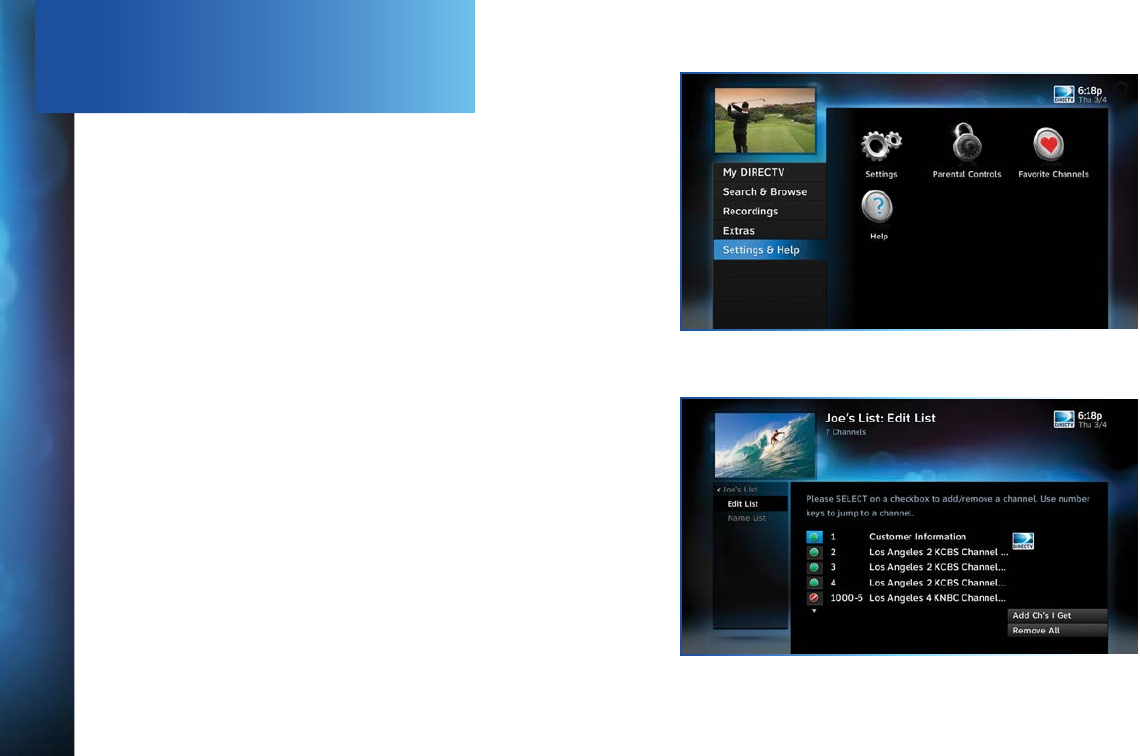
98
DIRECTV HD DVR RECEIVER USER GUIDE
Create lists of your favorite channels. Use your list to see only
those specific channels listed in the Guide as well as when you’re
channel surfing in live TV. You can create up to two custom lists
on your Receiver. You can also choose Channels I Get to see only
the channels that are in your DIRECTV programming package.
Press MENU on your remote, select Settings and Help then
Favorite Channels. If you haven’t created a Favorites list, the
Setup Custom 1 and Setup Custom 2 options will be displayed.
Select the one you want and follow the onscreen instructions to
create and name your list.
Selecting a Favorites list makes it active and hides the display of
all other channels in the Guide. From the Guide, press the DASH
key on your Remote, select Favorites and then select the list you
want to make active. The name of the currently selected Favorites
list is displayed in the bottom left of the Guide screen so you
always know which list you are using. To restore the display of all
channels, press the DASH key while in the Guide, select Change
favorites list, then select All Channels.
FAVORITE CHANNELS
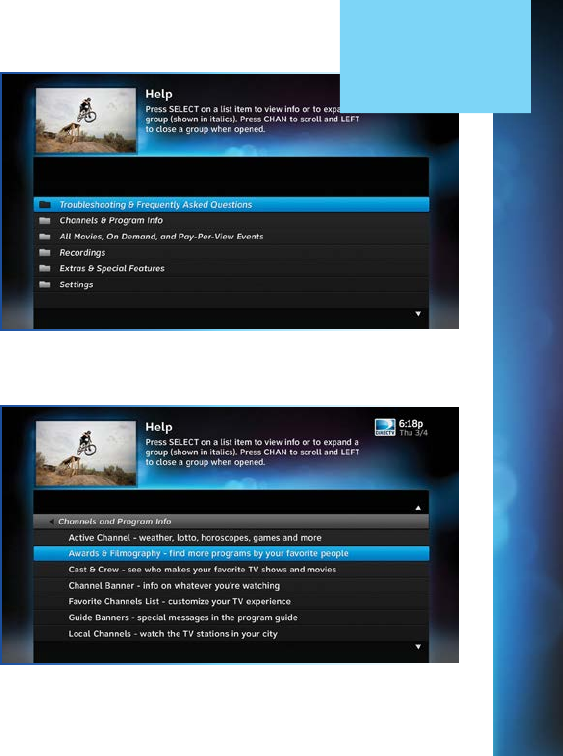
9999
HELP
HELP provides information about your Receiver and its
functionality, features, and more, as well as step-by-step
instructions and frequently asked questions (FAQs). Press MENU,
select Settings & Help, then select Help.
Select a category folder to view its contents, then select a topic
from the list for detailed information.
You can also view self-help videos on Channel 1 and find
answers to all your questions on DIRECTV’s Online Answer
Center at www.support.directv.com.
CHAPTER 6 - SETTINGS & HELP

100
DIRECTV HD DVR RECEIVER USER GUIDE

101
CHAPTER 7 - GENIE™ HD DVR
Genie™ HD DVR .......................................................................... 102
Genie HD DVR - Key Features ................................................... 102
Genie Mini - Key Features ......................................................... 103
Share Programs Between Rooms ............................................ 104
Genie as a Media Server ............................................................ 105
Connecting Clients .................................................................... 106
DIRECTV Genie Mini Back Panel Example ................................. 107
CHAPTER 7 - GENIE™ HD DVR
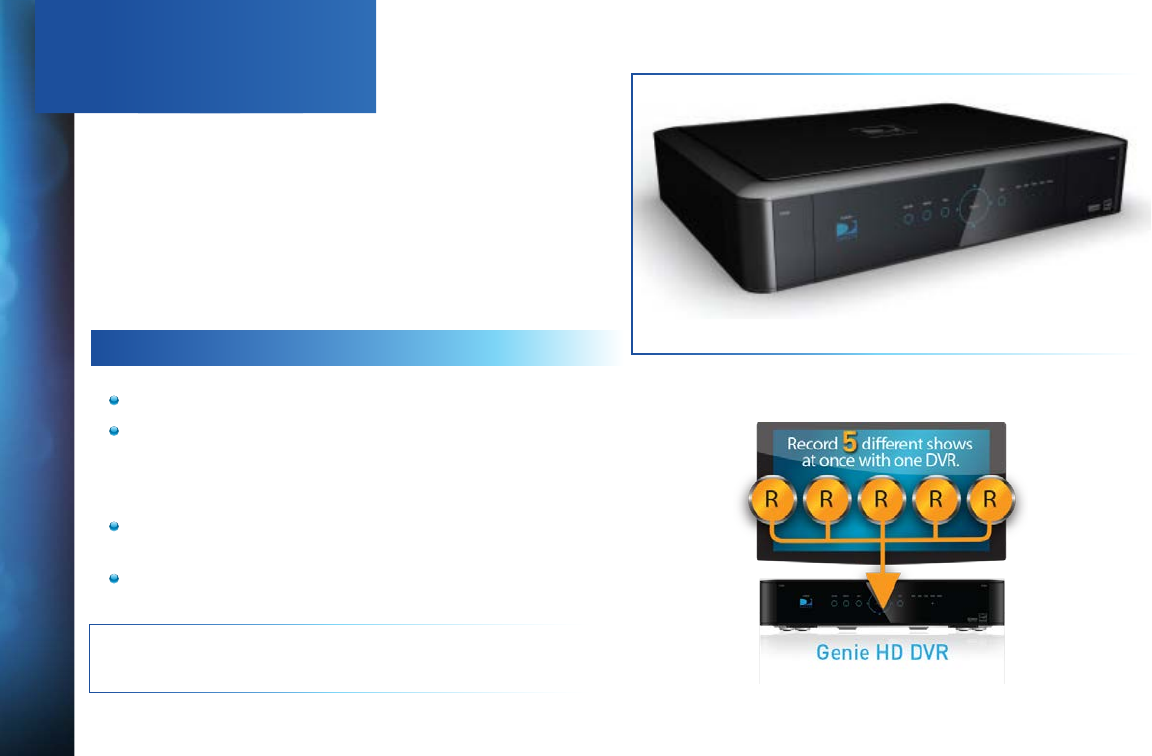
102
DIRECTV HD DVR RECEIVER USER GUIDE
GENIE™ HD DVR
The DIRECTV Genie HD DVR is the most comprehensive and
flexible DVR experience from DIRECTV. It introduces a new
industry standard that provides HD DVR service in every room
without requiring additional HD DVRs. The Genie HD DVR
(models HR34, HR44 and above), together with Genie Minis
(C31, C41, C41W and above) or DIRECTV® Ready TVs, can
serve your entire home, and provides you and your family the
flexibility to watch the content of your choice, on your own
schedules.
Use this chapter to learn about all the great features of
DIRECTV Genie HD DVR and Genie Minis.
GENIE HD DVR - KEY FEATURES
Record up to five programs simultaneously.
Store up to 200 hours of HD programming and 800 hours
of SD total on the 1TB (terabyte) hard drive. (Actual
recording capacity varies based on type of programming
being recorded.)
Watch two shows at the same time with Picture In
Picture.*
View live or recorded programming in up to four different
rooms simultaneously (Genie Minis required).
NOTE: *Picture in Picture is only available on the TV connected
directly to the Genie HD DVR.
Genie HD DVR
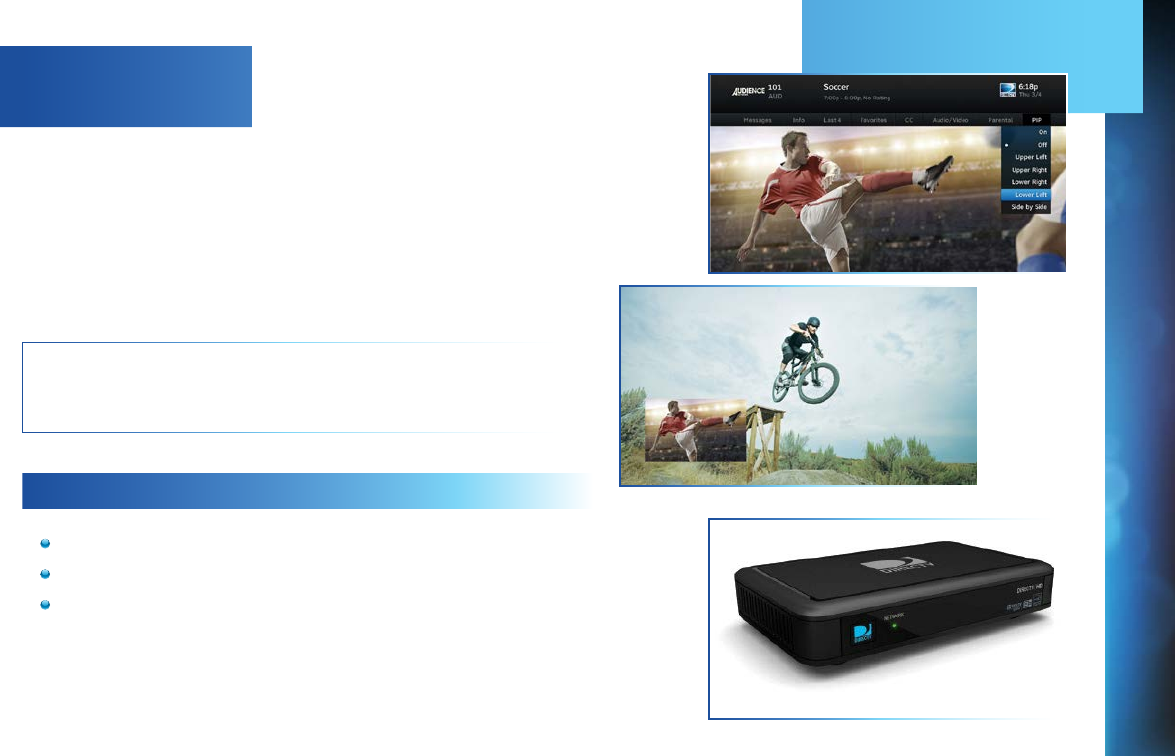
103
Picture In Picture
Genie lets you watch two programs on the same TV, live or
recorded, at the same time. While watching one program, press
the INFO button on your remote. Select PIP. The program you’re
currently watching moves into a smaller window on your screen.
The larger video is the active program and can be controlled
by your remote. To switch between programs, press the DOWN
ARROW.
To change the position of the smaller window, press INFO on
your remote. Select PIP and choose a position from the options
provided.
NOTE: Picture in Picture is only available on the TV that is
connected directly to the Genie HD DVR (models HR34, HR44
and above).
GENIE MINI - KEY FEATURES
Watch and manage recorded programming from any room.
Pause and rewind live or recorded TV from any room.
Access On Demand content, TV Apps and other HD DVR
features from any room.
GENIE™ HD DVR
Genie Mini Client
CHAPTER 7 - GENIE™ HD DVR

104
DIRECTV HD DVR RECEIVER USER GUIDE
GENIE™ HD DVR
SHARE PROGRAMS BETWEEN ROOMS
The Genie HD DVR can be configured two ways to share content
across your home:
1. As part of a Whole-Home DVR network - Genie enhances
your current Whole-Home setup. When connected to
other HD Receivers as the hub of your Whole-Home DVR
experience, Genie allows you to stream recordings to four
active rooms simultaneously (up to three Whole-Home
Clients).*
2. In a Client-Server setup - with Genie Minis, DIRECTV® Ready
TVs or other RVU-capable devices in your home. RVU is a
technology that allows you to connect certain TVs, devices,
and DIRECTV Clients to your Genie HD DVR, without adding
a full-featured DIRECTV Receiver. Please see next page for
details.
NOTE: *The Genie Receiver will work with any other DIRECTV
HD DVRs, HD Receivers and Clients that are compatible with
Genie and Whole-Home service, so you can play, pause, rewind
and delete recorded content that’s on your Genie HD DVR from
any room in the house. However, you will not be able to record
content to the Genie from another HD DVR.
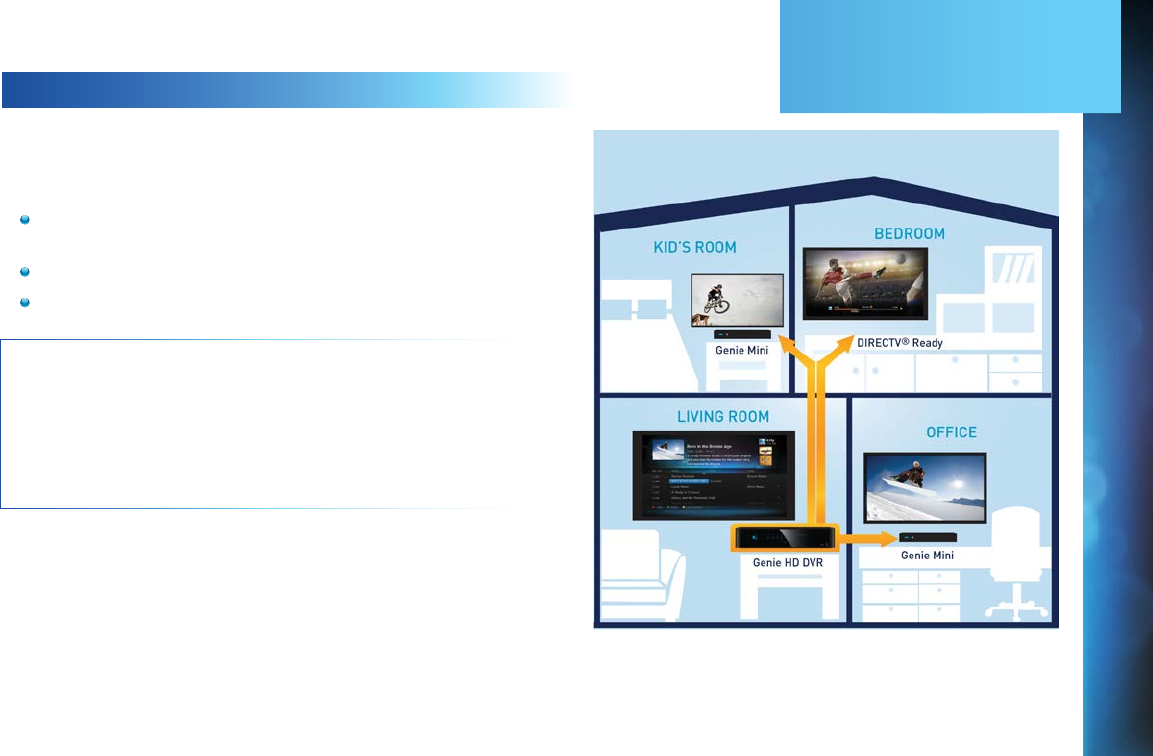
105
GENIE AS A MEDIA SERVER
You can use your Genie HD DVR as a media server. Any DIRECTV
Genie Mini, or DIRECTV® Ready TV or RVU-enabled device lets
you watch TV via your Whole-Home DVR Network.
Start watching a show in one room, press EXIT on your
remote, then resume watching in another.
Pause or rewind live programming in any connected room.
Schedule, watch or prioritize recordings from any room.
NOTE: Your Genie HD Receiver includes five (5) tuners. A tuner
is used whenever you watch or record a program. For example,
if two rooms are watching live TV, three tuners are available for
recording. Watching a recorded program does not require
a tuner.
Limit of three remote viewings per Genie HD DVR at a time.
See your DIRECTV Ready TV’s User Guide for more information
on connecting to the Genie HD DVR. You will need to activate the
DIRECTV Ready TV by calling DIRECTV at 1.800.531.5000.
GENIE™ HD DVR
CHAPTER 7 - GENIE™ HD DVR
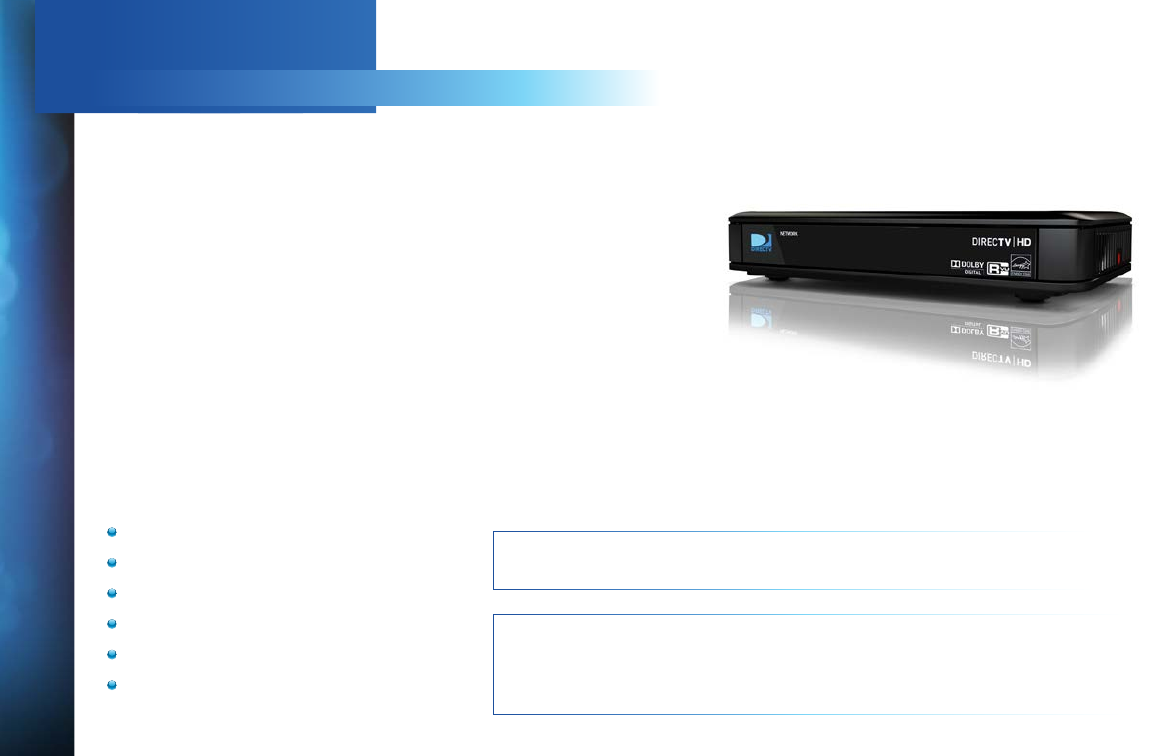
106
DIRECTV HD DVR RECEIVER USER GUIDE
GENIE™ HD DVR
CONNECTING CLIENTS
You may register up to eight Clients per Genie HD DVR; these may be Genie
Minis (C41, C31, C41W and above), or DIRECTV® Ready TVs.
Before connecting and activating Clients, your Genie HD DVR must be set
up, activated, and functioning.
To begin, connect, plug in and turn on the Client. Once it detects the Genie
HD DVR, it will prompt you to enter a PIN. On your DIRECTV HD DVR, press
MENU, then select Settings & Help, then Settings. Select Whole-Home
from the left menu, then select Manage Clients. Note the PIN shown on the
Manage Clients screen, and do not exit the screen!
On the Client, enter the PIN you received from the Genie HD DVR using the
remote. Select Done on the confirmation screen. The Create a Location
screen displays. You may add a new location, or replace a location. Select
the appropriate option and follow the onscreen instructions.
Once the location has been set up, you have a choice of copying settings
from another location or accepting the DIRECTV defaults.
The following settings are copied from a server or Client to another Client:
Parental Control Settings
Favorite Channels
Display Settings
Clock
Language
Sound Effects
NOTE: The settings from any Client can also be copied to the Genie HD DVR.
NOTE: For more information on setting up, adding and moving Genie Minis
and other DIRECTV® Ready Clients, do a search on the DIRECTV online
Answer Center at http://support.directv.com/ or call 1.800.531.5000.
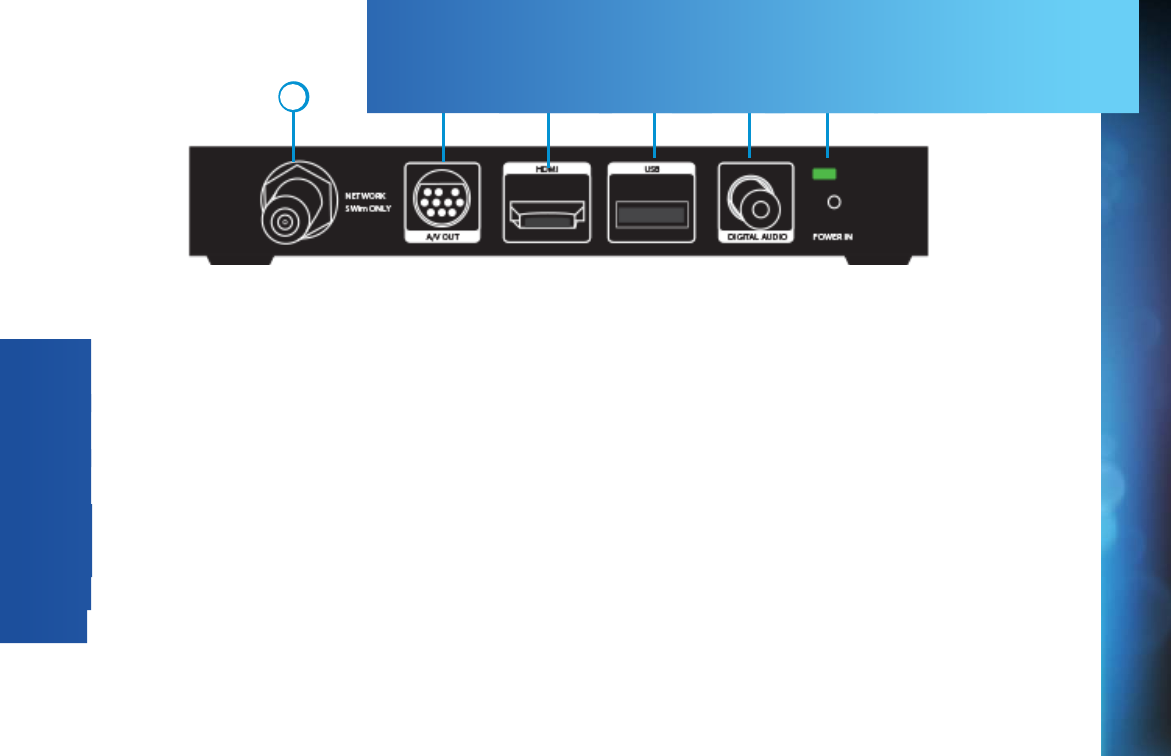
107
12 3 5 64
1. NETWORK SWM ONLY (models C41 and C31 only) – Connect a cable from a Single Wire Multi-Switch (SWM) to this port. This
is your SAT-IN connection.
2. A/V OUT – A combined 10-pin output that supports both audio and video. Your Genie Mini client comes with an A/V Out cable
for Component Video and RCA audio. An A/V Out cable for Composite Video and RCA audio can be purchased separately.
3. HDMI – Use this combination digital video and audio connector for the best picture quality. This is the recommended
connector for HD TV.
4. USB – USB 2.0 Port (For future use.)
5. DIGITAL AUDIO OUT COAXIAL – Use this digital audio connection for sound.
6. POWER – Your Receiver must be plugged in at all times to function properly.
WARNING: Use only the power supply (power cord) that came with your DIRECTV Receiver or Client. Failure to use the authorized
power supply may cause electric shock, fire, bodily injury and/or property damage. If the power supply becomes damaged or needs
to be replaced, please contact DIRECTV Customer Service to obtain an authorized replacement.
Your equipment may not look exactly like the model illustrated. This image has enlarged features for the purpose of clarity.
DIRECTV Genie™ Mini (C41, C31, C41W and above)
DIRECTV GENIE MINI BACK PANEL EXAMPLE
CHAPTER 7 - GENIE™ HD DVR

108
DIRECTV HD DVR RECEIVER USER GUIDE

109
CHAPTER 8 - TROUBLESHOOTING & FAQS
Troubleshooting Tips ................................................................ 110
Reset Your Receiver .................................................................. 110
Reauthorize Your Receiver ....................................................... 110
System Software Updates ........................................................ 111
Onscreen Messages ................................................................. 111
Run the System Test ................................................................. 112
Frequently Asked Questions .....................................................113
CHAPTER 8 - TROUBLESHOOTING & FAQS

110
DIRECTV HD DVR RECEIVER USER GUIDE
TROUBLESHOOTING TIPS
RESET YOUR RECEIVER
A simple reset of the DIRECTV® HD DVR can solve many issues.
If you experience frozen audio or video, or a blank screen, or
the Receiver won’t respond to remote or front panel button
commands, try resetting your Receiver as follows:
Press the red RESET button behind the access card panel
door on the front of the your Receiver, then wait a few
minutes for Program Guide information to be acquired.
If you reset a Genie Mini and the problem persists, try
resetting the Receiver.
If the problems persist, try unplugging the power cord of the
Receiver for 15 seconds, then plug it in again.
REAUTHORIZE YOUR RECEIVER
If your Receiver displayed the message “722 - Service Expired,”
try reauthorizing your Receiver. On a computer, go to
directv.com/reauthorize, log in to your account, and follow the
onscreen instructions. You will need to be logged into your
account on directv.com to complete this process.
Running the System Test (at the end of this section) can also
help you diagnose and solve many common problems.
NOTE: Resetting your Receiver twice in a row will clear all
Guide data. It could take 48+ hours to reacquire all of it.
Reset Button
(Your equipment may not look exactly like the model illustrated.)

111
TROUBLESHOOTING TIPS
SYSTEM SOFTWARE UPDATES
DIRECTV sends system automatic software updates to your
Receiver to improve performance and upgrade features and
functions. The Receiver will give you the option to download
software “now” or “later.” Software downloads take just a few
minutes and should be allowed to proceed when possible. When
a download is in progress, your system will temporarily become
unavailable. After the download, the Receiver may reset itself,
after which, you can resume using your DIRECTV system.
ONSCREEN MESSAGES
You may see an onscreen message similar to the one on the
right occasionally. The top line of the message provides a brief
description of the message purpose, while the second line
displays instructions to follow. Most onscreen messages contain
an error code in parentheses. Go to directv.com/troubleshooting
and select the corresponding onscreen error message for
solutions.
The sample message at the right displays when you try to view
to view a channel that is not in your programming package. In
this case, you must, call Customer Service at 1.800.531.5000 and
mention the error code number when prompted.
CHAPTER 8 - TROUBLESHOOTING & FAQS

112
DIRECTV HD DVR RECEIVER USER GUIDE
RUN THE SYSTEM TEST
The System Test runs a basic diagnostics check on your DVR.
First make sure that:
1. All connections — jacks, cables, etc. — are in place correctly. See Appendix 2, “Connections for TV and Equipment” for
more information.
2. Remote control has working batteries.
3. The access card is inserted in the DIRECTV® Receiver.
Then follow these steps:
1. Turn on your TV and the DVR (if you have the Universal Remote, slide the MODE switch to DIRECTV position).
2. Press MENU, then select Settings & Help.
3. Select Settings then Info & Test.
4. Select Run System Test.
5. If your system does not pass the System Test, check any of these potential trouble areas: cabling, satellite dish position,
phone connection and access card.
6. If you continue to have problems, call DIRECTV Customer Service at 1.800.531.5000.
NOTE: Occasional fluctuations in the phone line or satellite signal can give temporary false readings, therefore we recommend
running a system test several times before concluding there is a problem.
TROUBLESHOOTING TIPS
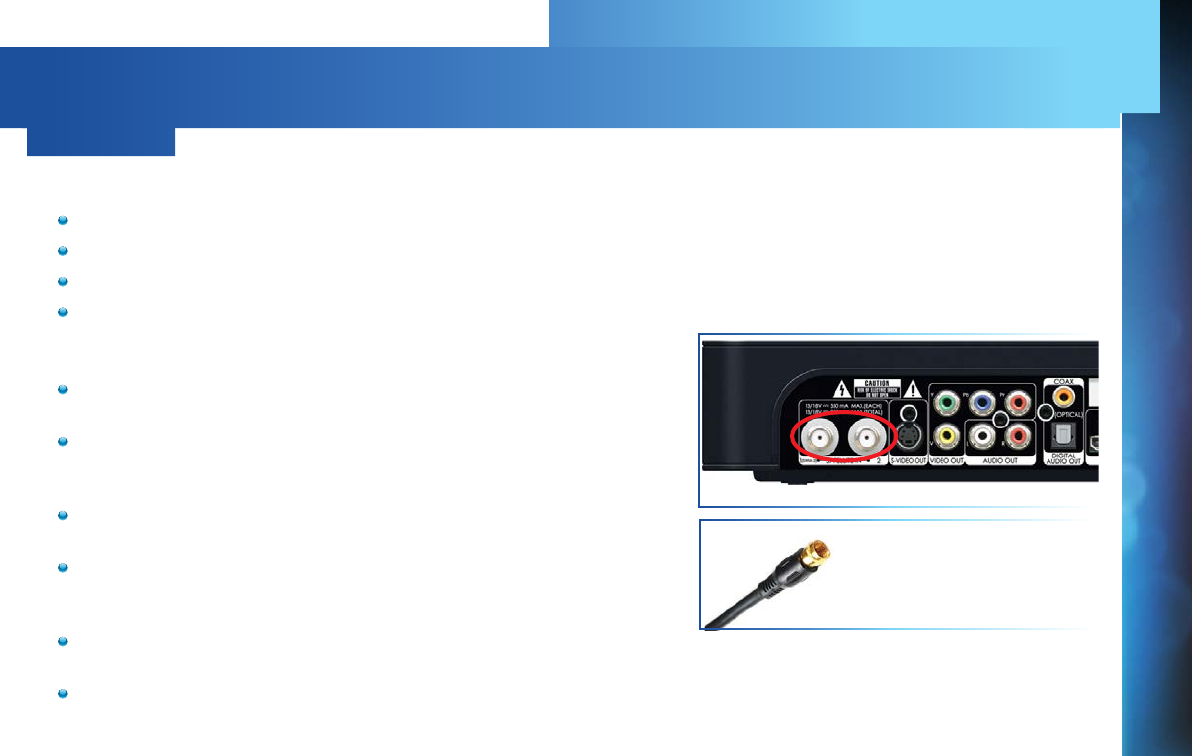
113
FREQUENTLY ASKED QUESTIONS
Q: What to do about temporary loss of satellite signal, “frozen” picture, or picture breaking into blocks /
pixels?
The image on your screen is frozen, blocky, or you see a message that says, “Searching for Satellite Signal (x 771)”.
Possible Causes:
Severe weather (rain, snow, hail etc.) may cause this issue.
There may be an obstruction to your dish (debris, snow, ice, etc.) or a building or tree that blocks your line of sight to the satellite.
There may be a problem with the cables running from your satellite dish to your DIRECTV® Receiver.
If the picture is frozen, blocky, or pixelated, there may be a problem with the transmission from the source.
Solution:
Weather issues are usually temporary. Wait for the weather to clear and
your signal should return to normal.
If there are no weather problems in your area, reset your DIRECTV DVR
using the red RESET button behind the door on the front of the Receiver or
by unplugging the Receiver for 15 seconds and then plugging it back in.
Check all the connections on the back of your Receiver, starting with the
SAT-IN connection, and make sure they’re secure.
If the problem originates from the program source (for example, you see
the problem on one channel, but not on any others), wait for the channel to
resolve the issue.
If there are obstructions blocking the dish’s path to the satellite, you should
contact a professional to remove them, or a DIRECTV installer at 1.800.531.5000 to relocate your dish.
If your signal strength is lower than 70 (60 or lower on HD Receivers) in good weather, contact a professional installer to
realign your dish, or call DIRECTV at 1.800.531.5000.
Check Satellite (SAT-IN) Connections
Coaxial Satellite Cable
CHAPTER 8 - TROUBLESHOOTING & FAQS

114
DIRECTV HD DVR RECEIVER USER GUIDE
FREQUENTLY ASKED QUESTIONS
Q: Why is my screen blue, black, gray or snowy?
Your TV displays a blue, black, gray or snowy screen.
Possible Causes:
Your TV and/or your Receiver are not powered on.
The DIRECTV® Receiver and most TVs and VCRs let you toggle between different video sources. Your TV may be on a different
input source than what you are trying to view.
Your TV may not support the selected HD resolution from your Receiver.
Solution:
Check that the DIRECTV® Receiver and TV are both powered on.
If you don’t see the DIRECTV picture, verify your current TV input by turning the TV on and off. Most TVs display the input in the
upper right- or left-hand corner. If the input is set to something other than your DIRECTV Receiver, toggle through the inputs
with the input button on the DIRECTV Remote (if programmed) or TV Remote a your picture displays. (If the DIRECTV Remote is
not working for the TV, it may need to be programmed.)
If the TV Remote is not available:
1. Find the Input or Source button on your TV and press it. It may be on the front panel, sides, bottom, or top edges of your TV.
2. Slowly set the TV to each input option, one at a time. Sometimes it takes a second or two for the input to switch, so don’t
proceed too quickly.
3. Set the TV to whichever input displays a picture.
If you see a snowy screen and are using a coax connection to connect to the TV, make sure your TV is on channel 3 or 4.
Press the TV/VCR button on the VCR Remote or on the VCR’s front panel.
If problems persist, turn off all equipment connected to your TV, wait a few minutes, then turn the DIRECTV® Receiver back on.
Check your connections and cables.
115
FREQUENTLY ASKED QUESTIONS
Check the HD output resolutions and deselect those not supported by your TV. For 1080p programs, some TVs do not
support the 24 frame-per-second rate DIRECTV provides. Press the RES button on your Receiver’s front panel to change the
resolution to one your TV supports.
Q: Why doesn’t my remote work?
Possible Causes:
Weak batteries are the most common problem.
Trying to operate equipment other than your DIRECTV Receiver.
Remote sensor on the Receiver could be blocked.
Solution:
For the DIRECTV Universal Remote Control (RC65 and earlier models):
Check that nothing is between the Remote Control and the remote sensor.
Make sure the Remote is in DIRECTV mode. Slide the MODE switch on the Remote to the DIRECTV position so the Remote will
control the DIRECTV® Receiver.
If you are trying to operate a device other than the DIRECTV DVR
that you have programmed the Remote to control, make sure you
first slide the MODE switch to the mode that is programmed for that
device (AV1 or AV2). The indicator light for the component you’re
trying to control should light up when you press a valid key for that
component. If it doesn’t, make sure the MODE switch is in the correct
position.
For All Remote Controls:
Check the batteries in the Remote. They may be weak, dead or installed incorrectly. Try replacing batteries.
If you’re entering a channel number that is less than four digits long, the Receiver might wait two seconds before tuning to
Remote Sensor
Remote Battery Compartment
CHAPTER 8 - TROUBLESHOOTING & FAQS

116
DIRECTV HD DVR RECEIVER USER GUIDE
the channel. Press ENTER after entering a channel number to tune immediately.
Make sure the device you are trying to control has been programmed to your DIRECTV Remote Control. See Chapter 6,
“Settings & Help: Settings: Remote Control” for instructions on how to program your remote to control other devices.
If the indicator lights on the remote control start flashing, the batteries in the remote control are running low and should be
replaced soon. You may also see an onscreen message that the batteries are low. Note that when you replace the batteries,
you should not have to reprogram your remote to control other devices unless the batteries have been completely dead for a
month or more.
Q: Why won’t my DIRECTV® Receiver or Client turn on?
Your Receiver or Client won’t turn on with either the Remote or from the front panel.
Possible Causes:
Remote batteries have an insufficient charge.
Receiver / Client or power strip is not plugged in to a power source, or power cord is not plugged in to the Receiver.
Wall outlet is not providing power.
Solution:
If your Receiver or Client won’t turn on, the problem may be with the device itself, or with the remote control. Please try the
following:
To Check the Receiver or Client (C31, C41, C41W and above):
Verify the detachable power cord is plugged into the back of the DIRECTV® Receiver or Client and the wall outlet.
Check the outlet or power strip to make sure it is “live” by plugging in something else.
Try plugging Receiver or Client into a different wall outlet.
Make sure the outlet is not controlled by a wall switch.
Unplug Receiver or Client for five minutes, and then plug it in again.
FREQUENTLY ASKED QUESTIONS

117
If your Receiver or Client is plugged into a power strip, check the power strip and reset by pressing its reset button. Make
sure the Receiver or Client is plugged into a power strip outlet that has continuous power. Some power strips have energy
saving ports that only operate when a device is plugged in and powered on.
To Check the Remote:
Press the power button on the front panel. If your device turns on, the issue is with the Remote.
For the Universal Remote, make sure the MODE switch is in the left-most position (DIRECTV Mode), and press PWR (power
key) or press POWER button on the front panel of the Receiver. On the Genie Remote, this step is not necessary. See the
next bullet for more info.
Make sure remote batteries have sufficient charge. For the Universal Remote, the green light should be solid green when
you press its PWR button. If the light blinks several times slowly, replace the batteries. If there is no light, make sure
batteries are inserted with the positive and negative ends in the proper positions. Otherwise, replace batteries. For the
Genie Remote, a low battery indicator is displayed on your Receiver when the batteries need to be replaced.
Make sure nothing is blocking the IR sensor on the Receiver. Remote must be pointed at Receiver, unless it is capable of RF
(as is the case with the Genie Remote) and has been set up as RF.
I see a message on my TV screen that says, “Please Call Customer Service x721.” What’s going on?
Possible Causes
The channel you’re trying to watch may not be included in your programming package.
Your DIRECTV® Receiver may not have the programming information for this channel.
Solutions
If the channel is part of your programming package, try resetting your Receiver by turning it off and unplugging it. Wait 15
seconds, then plug it back in and turn it on.
If the channel is not part of your programming package, you can change your package online or call 1.800.531.5000.
Finally, try reauthorizing your Receiver. On a computer, go to directv.com/reauthorize and follow the onscreen instructions. You
will need to be logged into your account on directv.com to complete this process.
FREQUENTLY ASKED QUESTIONS
CHAPTER 8 - TROUBLESHOOTING & FAQS

118
DIRECTV HD DVR RECEIVER USER GUIDE
Q: Why does my Progress Bar freeze while acquiring Guide data / data from satellite?
While the Acquiring Guide Data or Acquiring Data From Satellite message is on the screen, progress freezes during download.
Possible Causes:
This may be normal. After five minutes, the screensaver will display.
Press any key on the remote to see the progress bar again.
This may happen if your satellite dish isn’t adjusted properly.
Solution:
If satellite data acquisition still does not move forward, press the RESET
button behind the access panel door on the front of the DIRECTV®
Receiver and wait for Program Guide information to be acquired.
Q: Why are my video and audio out of sync?
The audio track does not match the lip movements on the screen.
Possible Causes:
Problem with how the program was produced or how it was sent to DIRECTV for broadcast.
Your surround sound system may be out of sync, or may be set up incorrectly.
Solution:
Change the channel on your DIRECTV® Receiver. This may re-sync the audio.
Rewind the program for about 5 seconds, then fast forward to live programming.
Try replacing or switching the cables between your surround sound system and your DIRECTV Receiver. Refer to your
surround sound system’s manual for assistance.
FREQUENTLY ASKED QUESTIONS
Reset Button

119
If the issue continues, reset your DIRECTV Receiver. Press the RESET button behind the access panel door on the front of the
DIRECTV Receiver. You can also press MENU, press SELECT Settings & Help, then Settings. Select the Reset item from the
left menu and follow the onscreen instructions.
Q: Why is there no audio with picture?
You can see a picture from your DIRECTV® Receiver, but there is no sound.
Possible Causes:
A setting (such as mute or volume) may have changed on the Receiver or your TV.
The cables between your TV and the Receiver may not be connected properly, or there may be a problem with an external
stereo or surround sound system.
Verify that your surround sound system is working, if applicable.
Your TV may not support the selected HD resolution from your Receiver.
Solution:
Verify that the MUTE button is not activated on your Remote.
Raise or lower the volume. Did volume meter display on TV?
Test sound on your TV by changing the input to another source, such as a DVD player, game box, or antenna.
If connected to stereo or surround sound system, verify components are on and set to the correct mode, and that audio
cables are secure and connected correctly.
If the issue continues, reset your DIRECTV® Receiver. Press the RESET button behind the access panel door on the front of
the DIRECTV® Receiver. You can also press MENU, select Settings & Help, then Settings. Select the Reset item from the left
menu and follow the onscreen instructions.
Check the HD output resolutions and deselect those not supported by your TV. For 1080p programs, some TVs do not support
the 24 frame-per-second rate DIRECTV provides. Also, many TVs do not support 480i. You may have to press the RES button
on your Receiver’s front panel to set the resolution to one your TV supports.
FREQUENTLY ASKED QUESTIONS
CHAPTER 8 - TROUBLESHOOTING & FAQS

120
DIRECTV HD DVR RECEIVER USER GUIDE
Q: What to do about partial programming loss; channels missing from Guide; channel is in the Guide but I
can’t tune to it?
Your Program Guide is missing channels, or you are unable to use the Guide to tune to a channel.
Possible Causes:
The channels might be excluded from the Favorites list currently in use.
Your satellite dish may be incorrectly configured.
Your Receiver information may need to be refreshed.
Solution:
To change your Favorites List, press GUIDE on the Remote, then press the DASH [—] button and select Change Favorites List,
then All Channels.
Enter the channel number using the number pad on the remote control.
Check the dish type set in your Receiver’s preferences: Press MENU, select Settings & Help, Settings, Info & Test, then More
System Info. Check the Satellite Dish Type shown on the System Setup screen to see if it is correct. If not, select Satellite
from the left menu, then select Repeat Satellite Setup. Follow the steps. From the Satellite Dish Type screen, make sure the
proper dish type is selected.
To refresh your Receiver information, go to directv.com/reauthorize. You will need to be logged into your account on
directv.com to begin this process.
FREQUENTLY ASKED QUESTIONS

121
Q: Why does my DIRECTV® Receiver turn off while playing?
Your Receiver turns off unexpectedly.
Possible Causes:
Excessive heat may have caused the Receiver to go into a standby state.
Electronic protection circuit may have been activated due to a power surge.
You may have blown a circuit breaker or be experiencing a power outage.
Parental viewing limits may have been activated on your DIRECTV® Receiver.
Solution:
Ensure that your Receiver has plenty of ventilation and that nothing is on top of the Receiver.
Wait 30 seconds for internal circuits to reset, then turn Receiver back on.
Consider using a line conditioner or surge protector.
Consult an electrician if the problem is frequent or severe, especially if other household appliances or electronics are affected.
If parental limits are active, turn your DIRECTV® Receiver on again and enter your parental lock code when prompted.
Q: Why does my DIRECTV DVR turn on or change channels unexpectedly?
Your Receiver changes to a different channel without a Remote command.
Possible Causes:
A scheduled recording may be about to begin, so the Receiver is changing channels to record the show as requested.
Your TV’s timer may have been activated.
FREQUENTLY ASKED QUESTIONS
CHAPTER 8 - TROUBLESHOOTING & FAQS

122
DIRECTV HD DVR RECEIVER USER GUIDE
Solution:
Check your To Do List to see if there are other scheduled recordings. Press MENU, select Recordings, then Manage
Recordings, then To Do list.
Check your TV owner’s manual to turn off the TV’s timer.
Q: Why is my screen blank?
There is no viewable video or image on the screen. Screen could be black, blue, grey or seem like the TV is off.
Possible Causes:
Your TV and/or your Receiver are not powered on.
Your Receiver may be hooked up to the TV incorrectly.
You may be on the wrong video source for your DIRECTV® Receiver.
You may be tuned to a channel that is not currently broadcasting, or that you don’t subscribe to.
Solution:
Check that DIRECTV DVR and TV are both powered on.
Read Appendix 2, “Connections to TV and Equipment” for instructions about connecting your Receiver.
Press the INPUT button on the white TV remote control to change video source. If you are using the Black & Universal Remote,
press ENTER and hold for three (3) seconds to bring up the TV INPUT to change the video source.
Try another channel and see if you have live video.
Press the POWER button on the front panel of the DIRECTV® Receiver.
Press the red RESET button behind the door on the front panel of the Receiver.
The program may have been blocked by Parental Locks.
FREQUENTLY ASKED QUESTIONS

123
Q: Why is Caller ID not working?
Caller ID information isn’t showing on your TV screen when phone calls come in.
Possible Causes:
You don’t subscribe to Caller ID service through your local phone company.
The Caller ID feature in your DIRECTV® Receiver is turned off. See “Caller ID” in Chapter 5.
You are using a wireless phone jack, which usually will not transmit Caller ID information.
Solution:
Contact your local phone company to subscribe to Caller ID service.
Turn on Caller ID notification. Press MENU, select Extras, then Caller ID, then Turn On Notices.
Verify that your wireless phone jack transmits Caller ID information. If not, connect a standard phone cable to your Receiver
or replace your wireless phone jack.
Q: Why didn’t a program I tried to record show up in the My Playlist screen?
You wanted to record a program to watch later, but it is not listed in your Playlist.
Possible Causes:
Someone else may have prevented the recording or erased the program after it recorded.
The recording may have been cancelled due to a conflict with another program with higher priority in the Prioritizer.
The program may have been blocked by Parental Locks.
You may have deleted a Series recording. If you delete a Series by pressing RECORD on an episode in the Guide, you cancel
the entire series, not just the highlighted episode.
FREQUENTLY ASKED QUESTIONS
CHAPTER 8 - TROUBLESHOOTING & FAQS

124
DIRECTV HD DVR RECEIVER USER GUIDE
Solution:
To see if the program was recorded then deleted, press MENU, select Recordings, then Manage Recordings, then in the left
menu, select History.
If the recording was cancelled due to a scheduling conflict, you will need to record the program again and if necessary you
will need to adjust the programming priority. See the “Manage Recordings: Series Manager” section in Chapter 4 for details.
Check the Parental Locks on your Receiver and TV. Adjust the content ratings, if necessary.
Q: I wanted to record a program, but I got an error message saying it conicted with another scheduled
record. What do I do?
Your DIRECTV DVR can record up to two programs at once, or it can record one program while you watch another live program.
Possible Causes:
You tried to record three programs at the same time or tried to watch a live program while recording two others at the same time.
There was an overlap in the programs you tried to record.
Solution:
If you tried to record three programs at once, or watch a live TV program with two others recording, you will need to decide
which recording to cancel.
If the overlap is a couple of minutes (for example, some networks occasionally start programs at 8:59 instead of 9:00 p.m.),
adjust your recording start and end time Recording Options. See the “Changing a Record Option” section in Chapter 4.
Someone else manually deleted the program.
The hard drive on your DVR is full. The program may not have recorded.
FREQUENTLY ASKED QUESTIONS

125
Q: I recorded a program but the recording stopped just before the end so I missed the last bit of the
program. Why?
Your recording stopped before the program or event ended.
Possible Causes:
The program you were trying to record may have started or ended early.
If you were trying to record a sporting event, the event may have run over its allotted time.
You may have had a recording conflict with a higher priority program.
Someone may have manually ended the recording.
Solution:
Try setting the end time of the recording in the Record Options so the recording ends one or two minutes later (or more, if
necessary). You may be able to record the same program again later in the week. Check the Program Guide for additional
showings.
For sporting events, you may want to extend the recording stop time 15 minutes or more to protect against overtime games.
If you had a priority conflict, try adjusting your start and end times. You may need to choose a different time slot to record a
program if the conflict continues.
Q: Why was a program I recorded displayed in the My Playlist screen, but deleted before I could watch it?
Your recording(s) were deleted before you had a chance to view them.
Possible Causes:
Someone else manually deleted the program.
The hard drive on your DVR is full. The program may not have recorded.
The Receiver may have deleted older recordings to make room for newer ones.
FREQUENTLY ASKED QUESTIONS
CHAPTER 8 - TROUBLESHOOTING & FAQS

126
DIRECTV HD DVR RECEIVER USER GUIDE
You exceeded the allotted purchase or viewing time on a Pay Per View movie or event.
Bad weather may have caused a loss in signal. Your Receiver will automatically delete these incomplete programs.
Solution:
Delete some of the content on your DVR to make room for new recordings.
Change your recording options to keep programs until you delete them manually. See “Recording a Single Show” or
“Recording a Series” in Chapter 4 for details.
You can also change a recording you’ve already made to Keep Until I Delete. See “Managing My Playlist” in Chapter 4.
To avoid this in the future, you can change settings for recordings that you’ve set to occur in the future, but haven’t recorded
yet. Press MENU, select Recordings, then Manage Recordings, then To Do List, choose the show you want to change and
select it, select RECORD, press SELECT on Keep…, press SELECT on the Keep Until box to change it to I Delete, use the
ARROW button to move over to Update and press SELECT.
If you recorded a DIRECTV CINEMA movie or Pay Per View event, but did not watch it, the time which you are allowed to
purchase or watch it may have expired. To avoid this in the future, check your Pay Per View recordings in the My Playlist
screen for expiration dates.
Q: I’ve set up a series recording. Why do I get reruns and multiple copies of the same program?
Your DVR is getting full of duplicate recordings of the same program, or old episodes of the chosen show.
Possible Causes:
Your series is set to record both First Run and Repeat episodes.
The programmer may not provide enough details in the program description for your Receiver to determine whether the
program is a repeat.
Solution:
When you set up a series, make sure you select only the “First Run” option. This is the default for one-touch recording unless
you have changed your default recording settings.
FREQUENTLY ASKED QUESTIONS
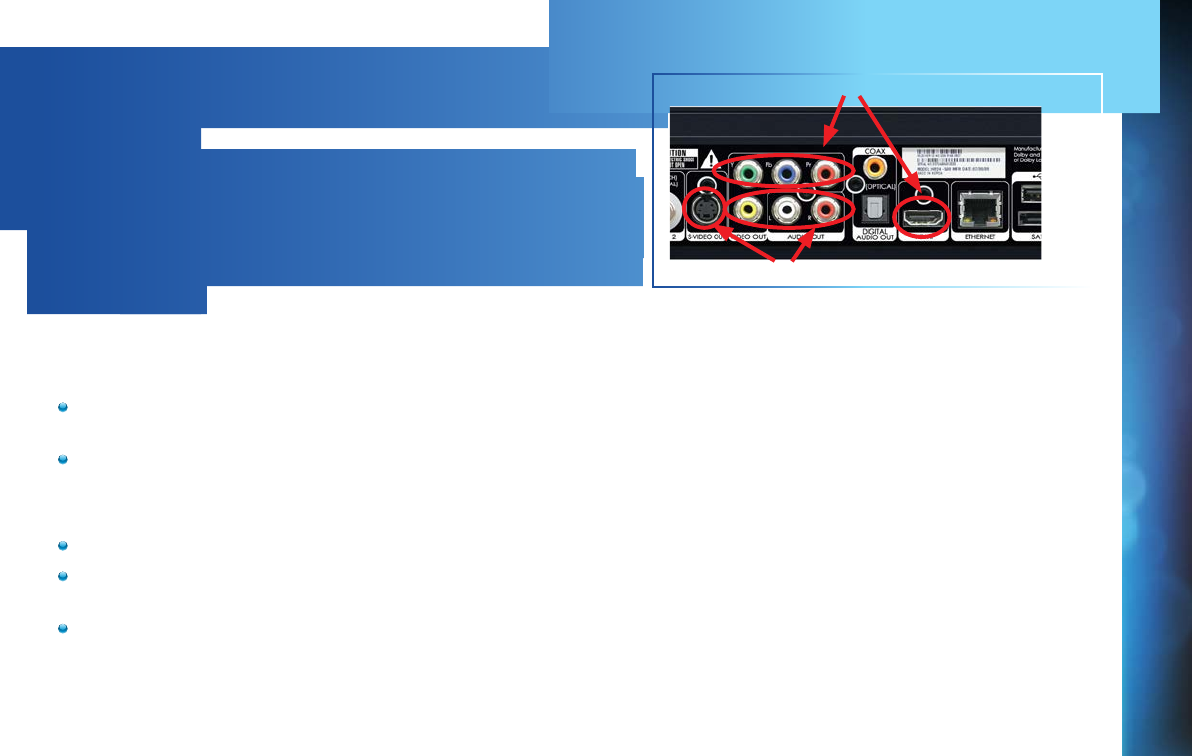
127
Q: Why are the DIRECTV menus/screens not displaying on
my TV?
OR
Why do I see this message: “This TV or its cables are
not HD. To see screen graphics, press the RES key on
the front of the Receiver until this message no longer
appears”.
When the Receiver resolution is set to 720p, 1080i, or 1080p, DIRECTV
screens and menus (user interface) will not appear on Standard Definition (SD) outputs. A message is displayed to notify you that
the resolution setting needs to be changed.
Possible Causes:
You have connected your Receiver to your TV using both a High Definition output (HDMI) and Standard Definition (SD) outputs
(S-Video, Component (Red/Yellow/White), or Coaxial) on the same Receiver.
You are using SD outputs (S-Video, Component (Red/Yellow/White), or Coaxial) and have the Receiver set to HD resolutions
such as, 720p, 1080i or 1080p.
Solutions:
Change the Receiver resolution to 480i or 480p by pressing the RES button on the front Receiver panel until 480i or 480p is selected.
Uncheck all resolutions except 480i or 480p on the TV Resolutions menu. Press MENU, select Settings, HDTV and then TV
Resolutions. Follow the onscreen instructions.
Turn Native Off. Press MENU, select Settings, HDTV, Video, then Native, and follow the onscreen instructions.
FREQUENTLY ASKED QUESTIONS
SD Video Outputs
HD Video Outputs
CHAPTER 8 - TROUBLESHOOTING & FAQS

128
DIRECTV HD DVR RECEIVER USER GUIDE

129
CHAPTER 9: WARRANTY AND OTHER INFO
Limited 90-Day Warranty ............................................................. 130
Who is Covered? ........................................................................... 130
What is Covered? .......................................................................... 130
What is Excluded? ........................................................................ 131
Make Sure You Keep... .................................................................. 131
Before Requesting Repair Service... ............................................ 131
To Get Warranty Service ................................................................ 132
To Get Out-of-Warranty Service... ................................................ 132
DIRECTV PROTECTION PLAN ....................................................... 133
FCC Customer Information .......................................................... 134
TERMS AND CONDITIONS FOR USE OF SOFTWARE (“TERMS”) ..137
CHAPTER 9 - WARRANTY AND OTHER INFORMATION

130
DIRECTV HD DVR RECEIVER USER GUIDE
LIMITED 90-DAY WARRANTY
DIRECTV warrants your DIRECTV HD DVR (Model Number: HR20, HR21, HR22, HR23, HR24) or Advanced Whole-Home HD DVR
(Model Numbers: HR34, HR44 and above) and any included accessories against defects in material or workmanship for a period of
ninety (90) days after the date of acquisition.
WHO IS COVERED?
You must have proof of acquisition to receive warranty service. A receipt or other document showing that you acquired the product
is considered proof of acquisition. THIS LIMITED WARRANTY EXTENDS ONLY TO THE ORIGINAL CONSUMER ACQUIRER OR ANY
PERSON RECEIVING THE DIRECTV HD DVR AS A GIFT FROM THE ORIGINAL CONSUMER ACQUIRER AND TO NO OTHER ACQUIRER
OR TRANSFEREE. THIS WARRANTY DOES NOT EXTEND TO COMMERCIAL USERS. THIS PRODUCT IS NOT AUTHORIZED FOR USE
OUTSIDE THE UNITED STATES AND ANY SUCH USE VOIDS THIS WARRANTY.
WHAT IS COVERED?
Warranty coverage begins the day you acquire the product. For ninety (90) days from the acquisition date, at the option of DIRECTV,
the DIRECTV HD DVR will be repaired or replaced with a new, repaired, refurbished or comparable product (whichever is deemed
necessary) if it becomes defective or inoperative. This exchange is done without charge to you for parts and labor. You will be
responsible for the cost of shipping to and from the location designated by DIRECTV. If DIRECTV cannot reasonably repair or replace
the Receiver then DIRECTV may, at its sole discretion, refund the price you paid for the product or the current retail price of the
product.
All products, including replacement products, are covered only for the original warranty period. When the warranty on the original
product expires, the warranty on the replacement product also expires. After ninety (90) days from the date of acquisition, you pay
for the replacement of all parts, and for all labor charges.
SOME STATES DO NOT ALLOW LIMITATIONS ON HOW LONG AN IMPLIED WARRANTY LASTS, SO THE ABOVE LIMITATION MAY NOT
APPLY TO YOU.

131
LIMITED 90-DAY WARRANTY
WHAT IS EXCLUDED?
Your warranty does NOT cover:
Labor charges for installation or setup of the product.
Installation, performance of, or repair of: audio/video cabling, telephone line, or accessory attachments used with the product.
Product replacement because of misuse, accident, lightning damage, unauthorized repair, or other cause not within the control
of DIRECTV. Incidental or consequential damages resulting from the product. SOME STATES DO NOT ALLOW THE EXCLUSION
OF INCIDENTAL OR CONSEQUENTIAL DAMAGES, SO THE ABOVE EXCLUSION MAY NOT APPLY TO YOU. Any modifications or
other changes to the product, including but not limited to software or hardware modification in any way other than as expressly
authorized by DIRECTV will void this limited warranty. Except in the case of hardware or software provided by DIRECTV, installing
software modifications, “hacks” or utilizing service access or “back doors” will void this limited warranty.
Reception transmission problems caused by signal conditions, telephone line, or cable or antenna systems outside the unit. A
product that has been modified or adapted to enable it to operate in any country other than the country for which it was designed,
manufactured, approved and/or authorized, or repair of products damaged by these modifications. A product used for commercial
or institutional purposes.
DIRECTV makes no warranty that the access connection will be a local (not long distance) phone call.
The continued provisioning of any of the programming and other services delivered through the Receiver including but not limited
to television programming, show information, Program Guide data, and scheduling information.
MAKE SURE YOU KEEP...
Please keep your receipt or other document showing proof of acquisition. Attach it to this User Guide (see page 10) and keep both
nearby. Also keep the original box and packing material in case you need to return your product.
BEFORE REQUESTING REPAIR SERVICE...
Please check the troubleshooting section of this Guide. This may save you a call to DIRECTV Customer Care.
CHAPTER 9 - WARRANTY AND OTHER INFORMATION

132
DIRECTV HD DVR RECEIVER USER GUIDE
TO GET WARRANTY SERVICE...
Warranty service will be provided by DIRECTV. If you believe you need service for your Receiver, contact DIRECTV at 1-800-DIRECTV.
A representative will go through a diagnostic checklist with you. If it is determined that the product needs to be returned for service
or exchanged, you will receive a return authorization number. The representative will give you complete shipping details.
TO GET OUT-OF-WARRANTY SERVICE...
To obtain out-of-warranty service contact DIRECTV at 1-800-DIRECTV for information on the possibility of and any costs for repair or
replacement of out-of-warranty products.
ALL WARRANTIES IMPLIED BY LAW, INCLUDING ANY IMPLIED WARRANTIES OF MERCHANTABILITY AND FITNESS FOR A
PARTICULAR PURPOSE ARE EXPRESSLY LIMITED TO THE DURATION OF THIS EXPRESS LIMITED WARRANTY.
WITH THE EXCEPTION OF ANY WARRANTIES IMPLIED BY THE LAW OF ANY STATE OF THE U.S.A., THIS EXPRESS LIMITED
WARRANTY IS EXCLUSIVE AND IN LIEU OF ALL OTHER WARRANTIES, GUARANTEES, AGREEMENTS AND SIMILAR OBLIGATIONS
OF DIRECTV. REPAIR OR REPLACEMENT AS PROVIDED IN THIS LIMITED WARRANTY IS THE EXCLUSIVE REMEDY UNDER THIS
LIMITED WARRANTY. IN NO EVENT WILL DIRECTV BE LIABLE FOR ANY AMOUNT GREATER THAN THE RETAIL PRICE OF THE
DIRECTV® Receiver. DIRECTV SHALL NOT BE LIABLE FOR ANY INCIDENTAL OR CONSEQUENTIAL DAMAGES FOR BREACH OF ANY
EXPRESS OR IMPLIED WARRANTY ON THE DIRECTV® Receiver.
SOME STATES DO NOT ALLOW LIMITATIONS ON WARRANTIES, SO THE ABOVE LIMITATIONS MAY NOT APPLY TO YOU. THIS
WARRANTY GIVES YOU SPECIFIC LEGAL RIGHTS. YOU MAY HAVE OTHER RIGHTS WHICH VARY FROM STATE TO STATE.
DIRECTV
2230 E. Imperial Hwy
El Segundo, CA 90245
1-800-DIRECTV
LIMITED 90-DAY WARRANTY

133
Safeguard your DIRECTV® System with the ultimate in professional technical service. For a low monthly fee, the DIRECTV
PROTECTION PLAN covers the components of your entire DIRECTV® System, giving you affordable peace of mind and
comprehensive support to ensure that you and your family enjoy nonstop DIRECTV® entertainment.
DIRECTV PROTECTION PLAN Benets
Your DIRECTV Limited Warranty provides certain remedies for this Receiver during the stated coverage term. The DIRECTV
PROTECTION PLAN provides comprehensive coverage for your DIRECTV® System, including*:
*Limitations and exclusions apply. Please visit www.directv.com/protection.
The DIRECTV PROTECTION PLAN is offered by Asurion Service Plans, Inc. in all states except Florida (in which Asurion Service
Plans of Florida, Inc offers the plan) and underwritten by Continental Casualty Company. Pricing, terms and conditions of the
DIRECTV PROTECTION PLAN are subject to change. Full terms and conditions will be mailed to you prior to service billing.
DIRECTV PROTECTION PLAN
YOUR BENEFITS INCLUDE:
• COMPLETE SYSTEM COVERAGE. Every DIRECTV Receiver in your home... plus remotes, satellite antenna wiring,
connectors, switches, and dish antenna alignments.
• Power surge protection.
• No hassles, service around the clock. Call 24 hours a day, 7 days a week... our technical specialists are ready and
are dedicated exclusively to you!
• Fast and convenient repair service when you need it. Save money should you need a service technician to come to
your house.
• Professional expertise and experience, on the phone and in your home... whenever you need us.
CHAPTER 9 - WARRANTY AND OTHER INFORMATION

134
DIRECTV HD DVR RECEIVER USER GUIDE
This device complies with Part 15 of the FCC Rules. Operation is subject to the following two conditions: (1) this device may not cause
harmful interference, and (2) this device must accept any interference received, including interference that may cause undesired operation.
Responsible Party:
DIRECTV
2230 E. Imperial Hwy
El Segundo, CA 90245
1-800-DIRECTV
• Trade Name: DIRECTV
• Type of Equipment: DIRECTV Satellite Receiver
• Model Number: HR34, HR42, HR44, C31, C41, C41W and above
Federal Communications Commission (FCC): This equipment complies with both Part 15 and Part 68 of the FCC rules.
This equipment has been tested and found to comply with the limits of a Class B digital device, pursuant to part 15 of the FCC Rules.
These limits are designed to provide reasonable protection against harmful interference in a residential installation.
This equipment generates, uses, and can radiate radio frequency energy and, if not installed and used in accordance with the
instructions, may cause harmful interference to radio communications. However there is no guarantee that interference will not
occur in a particular installation. If this equipment does cause harmful interference to radio or television reception, which can be
determined by removing and applying power to the equipment, the user is encouraged to try to correct the interference by one or
more of the following measures:
• Reorient or relocate the receiving satellite dish antenna.
• Increase the separation between the equipment and the DIRECTV Receiver.
• Connect the equipment into an outlet on a circuit different from that to which the DIRECTV Receiver is connected.
• Consult the dealer or an experienced radio/TV technician for help.
FCC CUSTOMER INFORMATION

135
• CAUTION: Changes or modifications not expressly approved by the manufacturer responsible for compliance could void the
user’s authority to operate the equipment.
The user may find the following booklet, prepared by the Federal communications Commission, helpful: “How to Identify and
Resolve Radio and TV Interference Problems”. This booklet is available from the U.S. Government Printing Office, Washington,
DC. To meet FCC requirements, only peripherals (computer input/output devices, terminals, printers, etc.) certified to comply with
Class B limits may be attached to this device. Operation with non-certified peripherals is likely to result in interference to radio and
TV reception. To meet FCC requirements, shielded cables are required to connect the device to a personal computer, peripheral, or
other Class B certified device.
This equipment complies with Part 68 of the FCC Rules and the requirements adopted by ACTA. On the back of this equipment is a
label that contains a product identifier in the format US:AAAEQ##TXXXX.
If requested, this information must be provided to your telephone company. This equipment uses the following USOC Jack: RJ11C.
A plug and jack used to connect this equipment to the premises’ wiring and telephone network must comply with the applicable
FCC Part 68 rules and requirements adopted by ACTA. A compliant telephone cord and modular plug is provided with this product.
It is designed to be connected to a compatible modular jack that is also compliant.
See installation instructions for details.
The REN (Ringer Equivalence Number) is used to determine the number of devices that may connect to a telephone line. Excessive
RENs on a telephone line may result in the devices not ringing in response to an incoming call. In most but not all areas, the sum
of the RENs should not exceed five (5.0).
To be certain of the number of devices that may be connected to a line, as determined by the total RENs, contact your local
telephone company. The REN for this product is part of the product identifier that has the format US: AAAEQ##TXXXX. The digits
represented by ## are the REN without the decimal point (e.g., 03 is a REN of 0.3).
If this DIRECTV® Receiver causes harm to the telephone network, the telephone company will notify you in advance that temporary
discontinuance of service may be required. But if advance notice isn’t practical, the telephone company will notify the customer as
soon as possible. Also, you will be advised of your right to file a complaint with the FCC if you believe it is necessary.
The telephone company may make changes in its facilities, equipment, operations or procedures that could affect the proper
functioning of your equipment. If they do, you will be notified in advance in order for you to make necessary modifications to
FCC CUSTOMER INFORMATION
CHAPTER 9 - WARRANTY AND OTHER INFORMATION

136
DIRECTV HD DVR RECEIVER USER GUIDE
maintain uninterrupted service. Connection to party line service is subject to state tariffs. Contact the state public utility commission,
public service commission or corporation commission for information.
If trouble is experienced with this unit, for repair or warranty information, please contact DIRECTV Customer Care at the address
and phone number listed below. If the equipment is causing harm to the network, the telephone company may request that you
disconnect the equipment until the problem is resolved.
DIRECTV
2230 E. Imperial Hwy
El Segundo, CA 90245
1-800-DIRECTV
If your home has specially wired alarm equipment connected to the telephone line, ensure the installation of this DIRECTV Satellite
Receiver does not disable your alarm equipment. If you have questions about what will disable alarm equipment, consult your alarm
company, telephone company or a qualified installer.
DO NOT DISASSEMBLE THIS EQUIPMENT. It does not contain any user-serviceable components.
We recommend the installation of an AC surge arrester in the AC outlet to which this equipment is connected. Telephone companies
report that electrical surges, typically lightning transients, are very destructive to customer terminal equipment connected to AC
power sources.
FCC RF Radiation Exposure Statement
MPE/SAR/RF Exposure Information. This equipment complies with FCC RF radiation exposure limits set forth for an uncontrolled
environment.
This equipment was verified for RF exposure and found to comply with Council Recommendation 1999/519/EC and FCC OET-65 RF
exposure requirements.
WARNING: While this equipment is in operation, a separation distance of at least 20 centimeters (equal to 8 inches) must be
maintained between the antenna inside the equipment and the bodies of all persons exposed to the antenna in order to meet
the FCC RF exposure guidelines. Making changes to the antenna or the equipment is not permitted. Doing so may result in the
equipment exceeding the FCC RF exposure guidelines. This equipment must not be co-located or operated in conjunction with any
other antenna or radio transmitter.
FCC CUSTOMER INFORMATION

137
THE DIRECTV® RECEIVER INCORPORATES SOFTWARE WHICH IS OWNED BY DIRECTV OR ITS THIRD PARTY LICENSORS (the
“Software”). BEFORE USING THE RECEIVER PLEASE READ THESE TERMS. IF YOU DO NOT AGREE TO THESE TERMS, YOU MAY
NOT USE THE RECEIVER AND SHOULD IMMEDIATELY RETURN THE RECEIVER TO DIRECTV OR YOUR SUPPLIER. THESE TERMS
ALSO APPLY TO ANY MODIFICATIONS, UPDATES OR SUPPLEMENTS TO THE SOFTWARE PROVIDED
TO YOU.
A. License Grant and Conditions
DIRECTV grants you a non-exclusive, non-transferable, limited license to use the Software solely in executable code form and
solely as integrated with, incorporated into, and in conjunction with the Receiver. You must ensure that the copyright, trademark
and other protective notices contained in the Software are maintained and not altered or removed. The Software is protected
by copyright and other laws and international copyright and other treaties. All title and intellectual property rights in and to the
Software and all modifications, updates, enhancements and derivative works of the Software are owned exclusively by DIRECTV
or its licensors and you agree to execute any document reasonably requested by DIRECTV to evidence such ownership rights.
Certain third party software used in connection with the Receiver may be made directly available to you by the providers thereof.
The source code to certain software subject to the GNU GPL and other open source licenses that is used in connection with the
Receiver is made available to you by DIRECTV following the written request to DIRECTV. Use of such Software is also subject to
the terms of any applicable agreement between you and each such provider. DIRECTV reserves the right to modify, supplement,
update and otherwise alter the Software via software download or other modification procedures, and these terms will apply to
such Software as modified, supplemented, updated, and otherwise altered.
B. License Restrictions
You may not copy, modify or transfer the Software, or any copy thereof, in whole or in part. You may not reverse engineer,
disassemble, decompile or translate the Software, or otherwise attempt to derive the source code of the Software, except to the
extent allowed under any applicable law. Any attempt to transfer any of the rights, duties or obligations of this license agreement
is void. You may not rent, lease, load, resell for profit or distribute the Software, or any part thereof. You may not export, transfer
or re-export the Software in violation of any applicable law. The Software may include some components that are covered by
“free software” licenses, open source licenses and other similar license use rights, which require such components to be used,
modified and/or distributed only under the terms of such licenses. Any such components are subject only to the terms of such
licenses, and not these Terms.
TERMS AND CONDITIONS FOR USE OF SOFTWARE (“TERMS”)
CHAPTER 9 - WARRANTY AND OTHER INFORMATION

138
DIRECTV HD DVR RECEIVER USER GUIDE
C. Ownership of Software and Reservation of Rights
The Software is licensed, not sold, to you for use only under the terms of this license agreement, DIRECTV is NOT transferring title
or any ownership rights in the Software to you and DIRECTV and its suppliers reserve all rights not expressly granted to you. Except
as stated above, this license agreement does not grant to you any intellectual property rights in the Software.
D. Termination
These Terms are effective until terminated. You may terminate these Terms by returning the Receiver to DIRECTV or your supplier.
These Terms will terminate automatically without notice if you fail to comply with these Terms or any other agreement between you
and DIRECTV. Upon termination you must return the Receiver to DIRECTV or your supplier.
E. Disclaimer
THE SOFTWARE IS (TO THE EXTENT PERMITTED BY LAW) SUPPLIED “AS IS”. NEITHER DIRECTV NOR ANY OF ITS LICENSORS
EXPRESSLY MAKES OR PASSES ON TO YOU ANY WARRANTY OR REPRESENTATION ON BEHALF OF DIRECTV OR ITS LICENSORS
WITH RESPECT TO THE SOFTWARE, INCLUDING BUT NOT LIMITED TO ANY WARRANTIES, EXPRESS OR IMPLIED, INCLUDING
(BUT NOT LIMITED TO) ANY IMPLIED WARRANTIES OF MERCHANTABILITY, SATISFACTORY QUALITY, FITNESS FOR A PARTICULAR
PURPOSE, TITLE OR NON-INFRINGEMENT OF THIRD PARTY RIGHTS.
IN NO EVENT WILL DIRECTV OR ITS LICENSORS BE LIABLE TO YOU WITH RESPECT TO THE SOFTWARE FOR ANY DIRECT,
INDIRECT, CONSEQUENTIAL, SPECIAL, PUNITIVE OR INCIDENTAL DAMAGE (INCLUDING LOSS OF PROFITS, LOST SAVINGS, LOSS
OF DATA OR THE COST OF PROCUREMENT OF SUBSTITUTE GOODS, TECHNOLOGY OR SERVICES) ARISING OUT OF THE USE
OR THE INABILITY TO USE THE SOFTWARE, EVEN IF DIRECTV OR ITS LICENSORS HAVE BEEN ADVISED OF THE POSSIBILITY OF
SUCH DAMAGES, OR FOR ANY CLAIM BY A THIRD PARTY. Some states or jurisdictions do not allow the exclusion or limitation of
incidental, consequential or special damages, so the above limitations may not apply to you.
F. Third Party Beneciaries
DIRECTV’S LICENSORS AND SUPPLIERS SHALL BE THIRD PARTY BENEFICIARIES OF THESE LICENSE TERMS, AS APPLICABLE.
YOUR USE OF THE RECEIVER CONSTITUTES YOUR ACKNOWLEDGEMENT THAT YOU HAVE READ THESE TERMS AND AGREE TO BE
BOUND HEREBY.
TERMS AND CONDITIONS FOR USE OF SOFTWARE (“TERMS”)

139
G. Additional Information
Certain additional terms and information for the Software and certain third party software (including the text of licenses applicable
to any free, open source and other similar software that may be included in the Software) may be found in the DIRECTV website
located at www.directv.com, and the GNU website located at www.gnu.org.
H. GNU GPL and Open Source Software
Certain components of the Software may be subject to the GNU General Public Licence, Version 2, June 1991 (“GPL”), “free
software” licenses and other open source software licenses. The foregoing components of the Software are not and may not
be subject to the License Restrictions in Section B above. In compliance with the GPL, DIRECTV, its suppliers, or its third party
licensors, upon written request, will make the source code of the software, libraries and associated utilities it uses, together with
its modifications (if any), available to the public in source code form. You are free to use, modify and distribute the software and
any modifications as long as you comply with the terms of the GPL referred to above and other open source software licenses.
The license terms applicable to the GPL may be found in the DIRECTV website located at www.directv.com, and the GNU website
located at www.gnu.org, specifically at (http://www.gnu.org/licenses/old-licenses/gpl-2.0.html). To request a copy of the applicable
source code please write to DIRECTV at:
Attention: Vice President, STB Engineering
DIRECTV
2230 E. Imperial Highway
El Segundo, CA 90245
GNU GENERAL PUBLIC LICENSE
Version 2, June 1991
Copyright © 1989, 1991 Free Software Foundation, Inc.,
51 Franklin Street, Fifth Floor, Boston, MA 02110-1301 USA
Everyone is permitted to copy and distribute verbatim copies
of this license document, but changing it is not allowed.
TERMS AND CONDITIONS FOR USE OF SOFTWARE (“TERMS”)
CHAPTER 9 - WARRANTY AND OTHER INFORMATION

140
DIRECTV HD DVR RECEIVER USER GUIDE
Preamble
The licenses for most software are designed to take away your freedom to share and change it. By contrast, the GNU General Public
License is intended to guarantee your freedom to share and change free software--to make sure the software is free for all its users.
This General Public License applies to most of the Free Software Foundation’s software and to any other program whose authors
commit to using it. (Some other Free Software Foundation software is covered by the GNU Lesser General Public License instead.)
You can apply it to your programs, too.
When we speak of free software, we are referring to freedom, not price. Our General Public Licenses are designed to make sure
that you have the freedom to distribute copies of free software (and charge for this service if you wish), that you receive source code
or can get it if you want it, that you can change the software or use pieces of it in new free programs; and that you know you can do
these things.
To protect your rights, we need to make restrictions that forbid anyone to deny you these rights or to ask you to surrender the rights.
These restrictions translate to certain responsibilities for you if you distribute copies of the software, or if you modify it.
For example, if you distribute copies of such a program, whether gratis or for a fee, you must give the recipients all the rights that
you have. You must make sure that they, too, receive or can get the source code. And you must show them these terms so they
know their rights.
We protect your rights with two steps: (1) copyright the software, and (2) offer you this license which gives you legal permission to
copy, distribute and/or modify the software.
Also, for each author’s protection and ours, we want to make certain that everyone understands that there is no warranty for this
free software. If the software is modified by someone else and passed on, we want its recipients to know that what they have is not
the original, so that any problems introduced by others will not reflect on the original authors’ reputations.
Finally, any free program is threatened constantly by software patents. We wish to avoid the danger that redistributors of a free
program will individually obtain patent licenses, in effect making the program proprietary. To prevent this, we have made it clear that
any patent must be licensed for everyone’s free use or not licensed at all.
The precise terms and conditions for copying, distribution and modification follow.
TERMS AND CONDITIONS FOR USE OF SOFTWARE (“TERMS”)

141
GNU GENERAL PUBLIC LICENSE
TERMS AND CONDITIONS FOR COPYING, DISTRIBUTION AND MODIFICATION
0. This License applies to any program or other work which contains a notice placed by the copyright holder saying it may
be distributed under the terms of this General Public License. The “Program”, below, refers to any such program or work,
and a “work based on the Program” means either the Program or any derivative work under copyright law: that is to say, a
work containing the Program or a portion of it, either verbatim or with modifications and/or translated into another language.
(Hereinafter, translation is included without limitation in the term “modification”.) Each licensee is addressed as “you”.
Activities other than copying, distribution and modification are not covered by this License; they are outside its scope. The act of
running the Program is not restricted, and the output from the Program is covered only if its contents constitute a work based on
the Program (independent of having been made by running the Program). Whether that is true depends on what the Program does.
1. You may copy and distribute verbatim copies of the Program’s source code as you receive it, in any medium, provided that you
conspicuously and appropriately publish on each copy an appropriate copyright notice and disclaimer of warranty; keep intact all
the notices that refer to this License and to the absence of any warranty; and give any other recipients of the Program a copy of this
License along with the Program.
You may charge a fee for the physical act of transferring a copy, and you may at your option offer warranty protection in exchange
for a fee.
2. You may modify your copy or copies of the Program or any portion of it, thus forming a work based on the Program, and copy and
distribute such modifications or work under the terms of Section 1 above, provided that you also meet all of these conditions:
a) You must cause the modified files to carry prominent notices stating that you changed the files and the date of any change.
b) You must cause any work that you distribute or publish, that in whole or in part contains or is derived from the Program or any
part thereof, to be licensed as a whole at no charge to all third parties under the terms of this License.
c) If the modified program normally reads commands interactively when run, you must cause it, when started running for such
interactive use in the most ordinary way, to print or display an announcement including an appropriate copyright notice and a
notice that there is no warranty (or else, saying that you provide a warranty) and that users may redistribute the program under
these conditions, and telling the user how to view a copy of this License. (Exception: if the Program itself is interactive but does not
normally print such an announcement, your work based on the Program is not required to print an announcement.)
TERMS AND CONDITIONS FOR USE OF SOFTWARE (“TERMS”)
CHAPTER 9 - WARRANTY AND OTHER INFORMATION

142
DIRECTV HD DVR RECEIVER USER GUIDE
These requirements apply to the modified work as a whole. If identifiable sections of that work are not derived from the Program,
and can be reasonably considered independent and separate works in themselves, then this License, and its terms, do not apply to
those sections when you distribute them as separate works. But when you distribute the same sections as part of a whole which
is a work based on the Program, the distribution of the whole must be on the terms of this License, whose permissions for other
licensees extend to the entire whole, and thus to each and every part regardless of who wrote it.
Thus, it is not the intent of this section to claim rights or contest your rights to work written entirely by you; rather, the intent is to
exercise the right to control the distribution of derivative or collective works based on the Program.
In addition, mere aggregation of another work not based on the Program with the Program (or with a work based on the Program)
on a volume of a storage or distribution medium does not bring the other work under the scope of this License.
3. You may copy and distribute the Program (or a work based on it, under Section 2) in object code or executable form under the
terms of Sections 1 and 2 above provided that you also do one of the following:
a) Accompany it with the complete corresponding machine-readable source code, which must be distributed under the terms of
Sections 1 and 2 above on a medium customarily used for software interchange; or,
b) Accompany it with a written offer, valid for at least three years, to give any third party, for a charge no more than your cost of
physically performing source distribution, a complete machine-readable copy of the corresponding source code, to be distributed
under the terms of Sections 1 and 2 above on a medium customarily used for software interchange; or,
c) Accompany it with the information you received as to the offer to distribute corresponding source code. (This alternative is
allowed only for noncommercial distribution and only if you received the program in object code or executable form with such an
offer, in accord with Subsection b above.)
The source code for a work means the preferred form of the work for making modifications to it. For an executable work, complete
source code means all the source code for all modules it contains, plus any associated interface definition files, plus the scripts
used to control compilation and installation of the executable. However, as a special exception, the source code distributed need not
include anything that is normally distributed (in either source or binary form) with the major components (compiler, kernel, and so
on) of the operating system on which the executable runs, unless that component itself accompanies the executable.
If distribution of executable or object code is made by offering access to copy from a designated place, then offering equivalent
access to copy the source code from the same place counts as distribution of the source code, even though third parties are not
compelled to copy the source along with the object code.
TERMS AND CONDITIONS FOR USE OF SOFTWARE (“TERMS”)

143
4. You may not copy, modify, sublicense, or distribute the Program except as expressly provided under this License. Any attempt
otherwise to copy, modify, sublicense or distribute the Program is void, and will automatically terminate your rights under this License.
However, parties who have received copies, or rights, from you under this License will not have their licenses terminated so long
as such parties remain in full compliance.
5. You are not required to accept this License, since you have not signed it. However, nothing else grants you permission to modify
or distribute the Program or its derivative works. These actions are prohibited by law if you do not accept this License. Therefore,
by modifying or distributing the Program (or any work based on the Program), you indicate your acceptance of this License to do
so, and all its terms and conditions for copying, distributing or modifying the Program or works based on it.
6. Each time you redistribute the Program (or any work based on the Program), the recipient automatically receives a license from
the original licensor to copy, distribute or modify the Program subject to these terms and conditions. You may not impose any
further restrictions on the recipients’ exercise of the rights granted herein. You are not responsible for enforcing compliance by
third parties to this License.
7. If, as a consequence of a court judgment or allegation of patent infringement or for any other reason (not limited to patent
issues), conditions are imposed on you (whether by court order, agreement or otherwise) that contradict the conditions of this
License, they do not excuse you from the conditions of this License. If you cannot distribute so as to satisfy simultaneously your
obligations under this License and any other pertinent obligations, then as a consequence you may not distribute the Program at
all. For example, if a patent license would not permit royalty-free redistribution of the Program by all those who receive copies
directly or indirectly through you, then the only way you could satisfy both it and this License would be to refrain entirely from
distribution of the Program.
If any portion of this section is held invalid or unenforceable under any particular circumstance, the balance of the section is
intended to apply and the section as a whole is intended to apply in other circumstances.
It is not the purpose of this section to induce you to infringe any patents or other property right claims or to contest validity of
any such claims; this section has the sole purpose of protecting the integrity of the free software distribution system, which
is implemented by public license practices. Many people have made generous contributions to the wide range of software
distributed through that system in reliance on consistent application of that system; it is up to the author/donor to decide if he or
she is willing to distribute software through any other system and a licensee cannot impose that choice.
TERMS AND CONDITIONS FOR USE OF SOFTWARE (“TERMS”)
CHAPTER 9 - WARRANTY AND OTHER INFORMATION

144
DIRECTV HD DVR RECEIVER USER GUIDE
This section is intended to make thoroughly clear what is believed to be a consequence of the rest of this License.
8. If the distribution and/or use of the Program is restricted in certain countries either by patents or by copyrighted interfaces,
the original copyright holder who places the Program under this License may add an explicit geographical distribution limitation
excluding those countries, so that distribution is permitted only in or among countries not thus excluded. In such case, this License
incorporates the limitation as if written in the body of this License.
9. The Free Software Foundation may publish revised and/or new versions of the General Public License from time to time. Such
new versions will be similar in spirit to the present version, but may differ in detail to address new problems or concerns. Each
version is given a distinguishing version number. If the Program specifies a version number of this License which applies to it and
“any later version”, you have the option of following the terms and conditions either of that version or of any later version published
by the Free Software Foundation. If the Program does not specify a version number of this License, you may choose any version ever
published by the Free Software Foundation.
10. If you wish to incorporate parts of the Program into other free programs whose distribution conditions are different, write to
the author to ask for permission. For software which is copyrighted by the Free Software Foundation, write to the Free Software
Foundation; we sometimes make exceptions for this. Our decision will be guided by the two goals of preserving the free status of all
derivatives of our free software and of promoting the sharing and reuse of software generally.
NO WARRANTY
11. BECAUSE THE PROGRAM IS LICENSED FREE OF CHARGE, THERE IS NO WARRANTY FOR THE PROGRAM, TO THE EXTENT
PERMITTED BY APPLICABLE LAW. EXCEPT WHEN OTHERWISE STATED IN WRITING THE COPYRIGHT HOLDERS AND/OR OTHER
PARTIES PROVIDE THE PROGRAM “AS IS” WITHOUT WARRANTY OF ANY KIND, EITHER EXPRESSED OR IMPLIED, INCLUDING, BUT
NOT LIMITED TO, THE IMPLIED WARRANTIES OF MERCHANTABILITY AND FITNESS FOR A PARTICULAR PURPOSE. THE ENTIRE
RISK AS TO THE QUALITY AND PERFORMANCE OF THE PROGRAM IS WITH YOU. SHOULD THE PROGRAM PROVE DEFECTIVE, YOU
ASSUME THE COST OF ALL NECESSARY SERVICING, REPAIR OR CORRECTION.
12. IN NO EVENT UNLESS REQUIRED BY APPLICABLE LAW OR AGREED TO IN WRITING WILL ANY COPYRIGHT HOLDER, OR
ANY OTHER PARTY WHO MAY MODIFY AND/OR REDISTRIBUTE THE PROGRAM AS PERMITTED ABOVE, BE LIABLE TO YOU FOR
DAMAGES, INCLUDING ANY GENERAL, SPECIAL, INCIDENTAL OR CONSEQUENTIAL DAMAGES ARISING OUT OF THE USE OR
INABILITY TO USE THE PROGRAM (INCLUDING BUT NOT LIMITED TO LOSS OF DATA OR DATA BEING RENDERED INACCURATE OR
LOSSES SUSTAINED BY YOU OR THIRD PARTIES OR A FAILURE OF THE PROGRAM TO OPERATE WITH ANY OTHER PROGRAMS),
TERMS AND CONDITIONS FOR USE OF SOFTWARE (“TERMS”)

145
EVEN IF SUCH HOLDER OR OTHER PARTY HAS BEEN ADVISED OF THE POSSIBILITY OF SUCH DAMAGES.
END OF TERMS AND CONDITIONS
How to Apply These Terms to Your New Programs
If you develop a new program, and you want it to be of the greatest possible use to the public, the best way to achieve this is to
make it free software which everyone can redistribute and change under these terms.
To do so, attach the following notices to the program. It is safest to attach them to the start of each source file to most effectively
convey the exclusion of warranty; and each file should have at least the “copyright” line and a pointer to where the full notice is found.
<one line to give the program’s name and a brief idea of what it does.>
Copyright (C) <year> <name of author>
This program is free software; you can redistribute it and/or modify it under the terms of the GNU General Public License as
published by the Free Software Foundation; either version 2 of the License, or (at your option) any later version.
This program is distributed in the hope that it will be useful, but WITHOUT ANY WARRANTY; without even the implied warranty of
MERCHANTABILITY or FITNESS FOR A PARTICULAR PURPOSE. See the GNU General Public License for more details. You should
have received a copy of the GNU General Public License along with this program; if not, write to the Free Software Foundation, Inc.,
51 Franklin Street, Fifth Floor, Boston, MA 02110-1301 USA.
Also add information on how to contact you by electronic and paper mail. If the program is interactive, make it output a short notice
like this when it starts in an interactive mode:
Gnomovision version 69, Copyright (C) year name of author
Gnomovision comes with ABSOLUTELY NO WARRANTY; for details type `show w’. This is free software, and you are welcome to
redistribute it under certain conditions; type `show c’ for details.
The hypothetical commands `show w’ and `show c’ should show the appropriate parts of the General Public License. Of course,
the commands you use may be called something other than `show w’ and `show c’; they could even be mouse-clicks or menu
items--whatever suits your program.
You should also get your employer (if you work as a programmer) or your school, if any, to sign a “copyright disclaimer” for the
program, if necessary. Here is a sample; alter the names:
TERMS AND CONDITIONS FOR USE OF SOFTWARE (“TERMS”)
CHAPTER 9 - WARRANTY AND OTHER INFORMATION

146
DIRECTV HD DVR RECEIVER USER GUIDE
Yoyodyne, Inc., hereby disclaims all copyright interest in the program `Gnomovision’ (which makes passes at compilers) written by
James Hacker.
<signature of Ty Coon>, 1 April 1989
Ty Coon, President of Vice
This General Public License does not permit incorporating your program into proprietary programs. If your program is a subroutine
library, you may consider it more useful to permit linking proprietary applications with the library. If this is what you want to do, use
the GNU Lesser General Public License instead of this License.
TERMS AND CONDITIONS FOR USE OF SOFTWARE (“TERMS”)

147
APPENDICES
Appendix 1: Setup and Activation .............................................. 148
Guided Setup ............................................................................. 148
Activate Your DIRECTV ® Service ................................................ 148
Appendix 2: Connections to TV & Equipment ............................ 149
Your Phone Connection ............................................................. 149
Your Internet Connection ........................................................... 149
Connections For Auxiliary Equipment ...................................... 150
HD TV Connections .................................................................... 153
SD TV Connections .................................................................... 155
Audio Connections ..................................................................... 157
Connections to Other Equipment .............................................. 158
Appendix 3: Receiver Front and Back Panels ............................ 159
Appendix 4: Get Connected ....................................................... 163
Accounts Without Whole-Home Service ................................... 164
Appendix 5: About High-Definition .............................................169
Screen Format & Resolution .................................................... 169
Supported Resolutions .............................................................. 171
Wide-Screen vs. Standard Formats .......................................... 172
APPENDICES

148
DIRECTV HD DVR RECEIVER USER GUIDE
APPENDIX 1: SETUP AND ACTIVATION
GUIDED SETUP
If your Receiver was not professionally installed, or you have had to reset your Receiver for any reason, you will need to follow the
guided setup screens before starting DIRECTV service.
1. For the Universal Remote, make sure the MODE switch at the top of the Remote is set to DIRECTV, which is the far-left
position.
2. Press ON. The DIRECTV® Receiver will turn on. (Make sure your TV is also turned on!)
3. The first screen will allow you to select a language. Using the arrow keys on the remote control, move to the language you
prefer and press SELECT.
4. Follow the onscreen instructions.
After these setup procedures are complete, you’ll see a message onscreen that says, “Acquiring Satellite Info”, as the Receiver
gathers information from the satellite for the onscreen Program Guide. Next, you’ll be given the opportunity to program your
remote to control other equipment such as your TV and/or DVD player. Just follow the screen instructions and you’ll be ready to
watch in no time!
ACTIVATE YOUR DIRECTV® SERVICE
Once all the setup processes are complete, all that’s left to do is activate your DIRECTV® service. Be sure to:
1. Have on hand your service address, social security number and a valid major credit card.
2. Note your Receiver ID and access card numbers. The Receiver ID is on a sticker behind the access card door on the front of the
Receiver, while the card number is on the access card itself. Use the Product Information page to note this information.
3. When you’re ready, call 1.800.531.5000 to choose the programming package that’s right for you and subscribe to
DIRECTV service.

149
APPENDIX 2: CONNECTIONS TO TV & EQUIPMENT
YOUR PHONE CONNECTION
Connecting your Receiver to a land-based telephone line saves you money. It allows you to purchase Pay Per View movies and
special events without calling DIRECTV® to order. It is required for sports package subscriptions and is also used to enhance
features on interactive channels. The Receiver uses a toll-free number once a month for a few minutes duration and is designed
not to interfere with your regular phone service. You will need an RJ11-type modulator jack (the most common type of phone jack).
If you disconnect the phone line, the Receiver will be unable to transact PPV purchases, and some interactive channel features will
be limited. If your Receiver is connected to the Internet, either directly or via a DIRECTV Home Network connection, you do not need
to be connected to a phone line. See “Your Internet Connection” below.
WARNING: Do not connect your Receiver to a digital PBX phone system — doing so may permanently damage your equipment and
void your warranty.
YOUR INTERNET CONNECTION
Connecting your DIRECTV Receiver to the Internet and your home network gives you access to the full range of DIRECTV features
and content like:
Thousands of free and premium On Demand titles, some almost a month before they are available on Netflix and other
streaming services.
TV Apps, including ScoreGuide, Weather, Social TV, and What’s Hot.
Pandora, Music & Photos, YouTube and more.
The instructions for connecting to a network vary depending on whether you have Whole-Home DVR Service or not. Please see
Appendix 4 for more information.
NOTE: For the most current options, benefits and instructions for connecting your Receiver to the Internet,
go to directv.com/getconnected.
APPENDICES

150
DIRECTV HD DVR RECEIVER USER GUIDE
CONNECTIONS FOR AUXILIARY EQUIPMENT
If you upgrade your TV, or DIRECTV® Receiver, or add new equipment such as a surround sound system, DVD player or burner, you
have various options for connecting your equipment. All of the video and audio outputs on your Receiver offer good quality. Pick a
video and audio output from the following lists based on the connectors your Receiver and TV support; they are listed in order, with
the highest quality options at the top of each list. Not all connectors are available on all Receivers and TV models.
NOTE:
Not all cables come with your Receiver; you may need to purchase additional cables depending on your setup. HDMI cables are
available from DIRECTV at a nominal charge. Contact DIRECTV customer service for more information.
Never connect an IN to an IN or an OUT to an OUT. All A/V jacks and inputs are color-coded. Always match the color of the plug to
the same color of the jack.
To obtain the best picture quality, make sure the Receiver is connected directly to the TV.
Due to restrictions imposed by copyright holders, certain programming may include content protection measures that may
restrict viewing or recording with certain consumer electronics equipment attached to the Receiver. Please contact the
manufacturer of such equipment for additional information.
WARNING: Use only the power supply (power cord) that came with your DIRECTV Receiver. Failure to use the authorized power
supply (power cord) may cause electric shock, fire, bodily injury and/or property damage. If the power supply (power cord) becomes
damaged or needs to be replaced, please contact DIRECTV Customer Service to obtain an authorized replacement.
WARNING: Do not connect your Receiver (or any other equipment, such as a TV or VCR) to the AC power supply until you have
properly connected all the other cables.
APPENDIX 2: CONNECTIONS TO TV & EQUIPMENT

151
The table below shows the benefits and disadvantages of each type of available video connector:
HDMI Component S-Video RCA
High Def (HD) 4 4 6 6
HD 1080p 4666
3D 4666
Built-in Audio 4666
Standard Def 4444
HD Video Connections
HDMI [High-Definition Multimedia Interface] provides the best digital video and digital audio in one connector. HDMI is the
only recommended cable, and is required for the highest quality 1080p signal and 3D TV.
Component Video Output (YPbPr) provides high-quality HD video, but does not provide audio. You will need to connect audio
separately using the digital audio or RCA audio connectors. Newer Receivers have an “A/V Out” connector that provides
Component Video and RCA audio output in a single, custom cable. Component cables do not provide 1080p or 3D TV.
SD Video Connections
These cables are provided for convenience only, and do not present an HD picture. They are useful if you have to connect your
DIRECTV® HD DVR to an older CRT TV, a VCR, or other non-HD device.
S-Video provides good video, but does not provide audio. You will need to connect audio separately using the digital audio or
RCA audio connectors. (Not all Receivers have S-Video outputs.)
RCA output (composite video) provides good video and usually comes bundled with three cables for one video and two
audio channels.
APPENDIX 2: CONNECTIONS TO TV & EQUIPMENT
APPENDICES

152
DIRECTV HD DVR RECEIVER USER GUIDE
Audio Connections
HDMI [High-Definition Multimedia Interface] provides the best digital video and audio in one connector.
Digital Audio Optical provides excellent quality digital audio and is often used on newer surround sound and DVD equipment.
Digital Audio Coax provides high quality digital audio and is also found on newer surround sound and DVD equipment.
RCA outputs provide good audio quality and are found on older auxiliary equipment.
Because so many makes and models of TVs and auxiliary equipment are available, we cannot fully describe all of the possible
connections with your Receiver. Refer to the manuals for that equipment to see the connection options specific to each make
and model. The following images show examples of how your Receiver may be connected using the supported video and audio
connections for the TV, the surround sound, and the DVD player/burner. Several models of DIRECTV Receivers are shown, giving you
a variety of connection options to your TV and other equipment.
APPENDIX 2: CONNECTIONS TO TV & EQUIPMENT
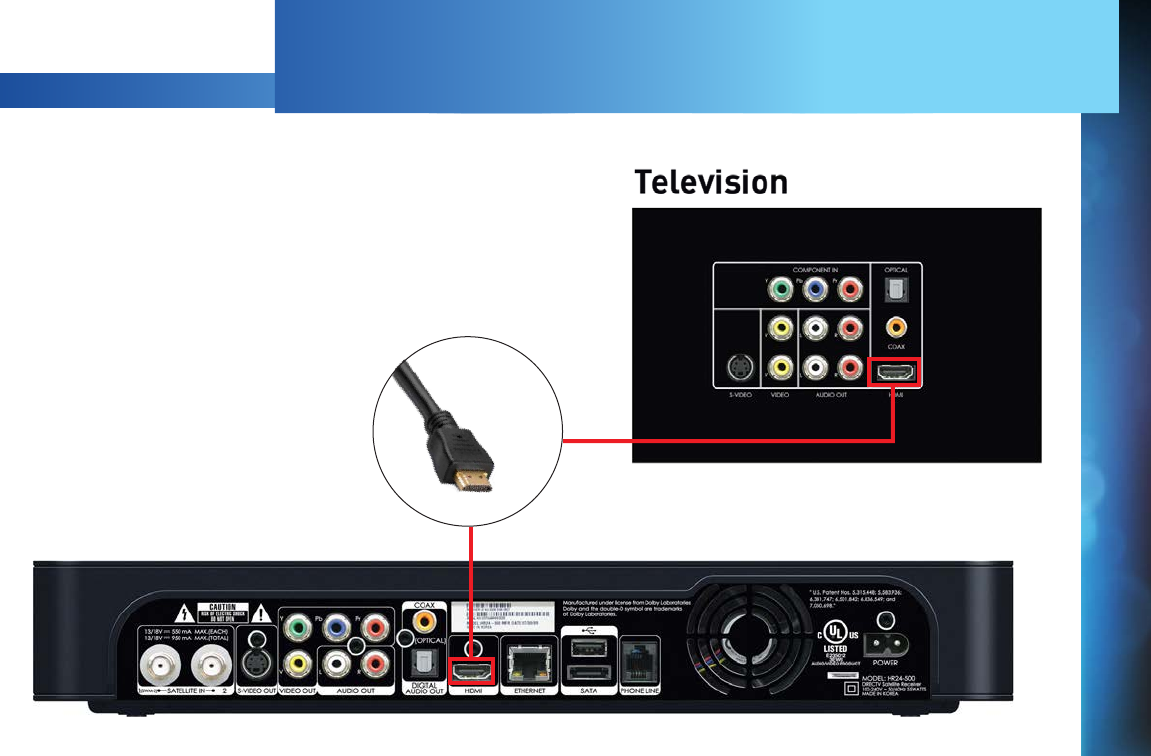
153
Example: TV with HDMI Connector - RECOMMENDED
Here is an example using a TV that has an HDMI connector as the
best video/audio input.
Note: Only an HDMI connection provides a 1080p picture and 3D TV.
HD TV CONNECTIONS
HDMI Cable
APPENDIX 2: CONNECTIONS TO TV & EQUIPMENT
APPENDICES
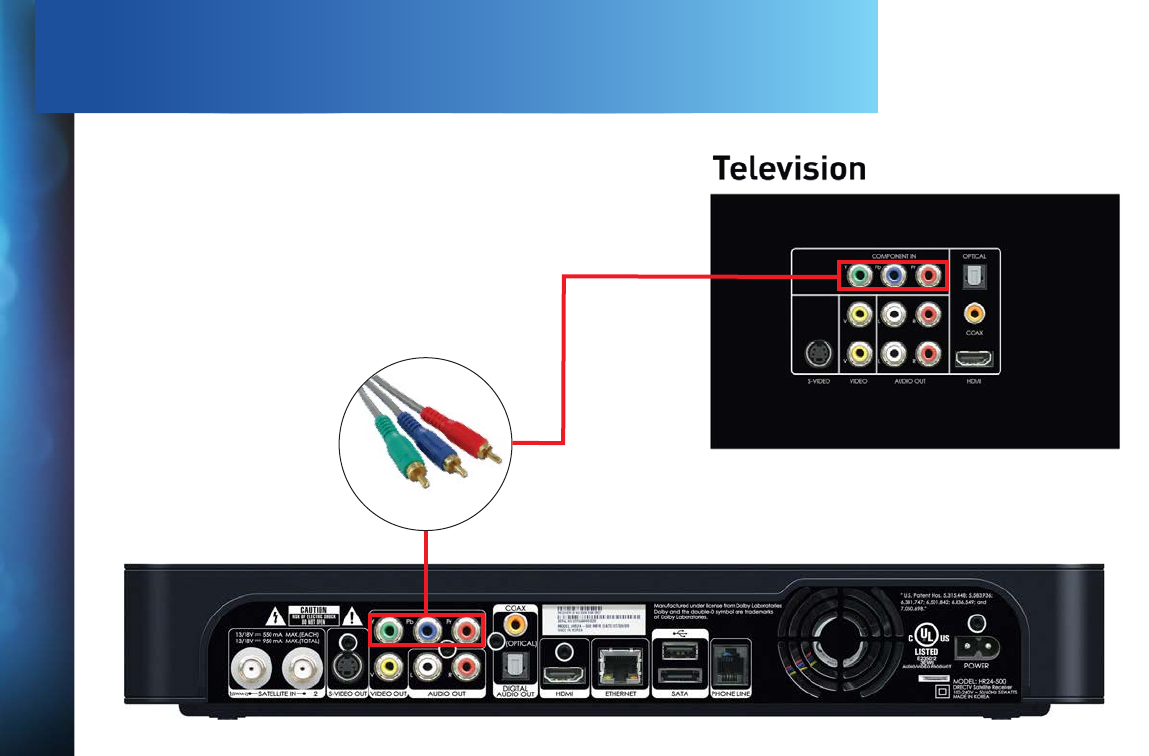
154
DIRECTV HD DVR RECEIVER USER GUIDE
Example: TV with Component Video Connectors
Here is an example using a TV that has component video connectors
as the best video input.
Note: A Component Video connection will not provide a 1080p
picture nor 3D TV.
Component Video requires a separate audio connection.
HD TV CONNECTIONS
Component
Video
APPENDIX 2: CONNECTIONS TO TV & EQUIPMENT
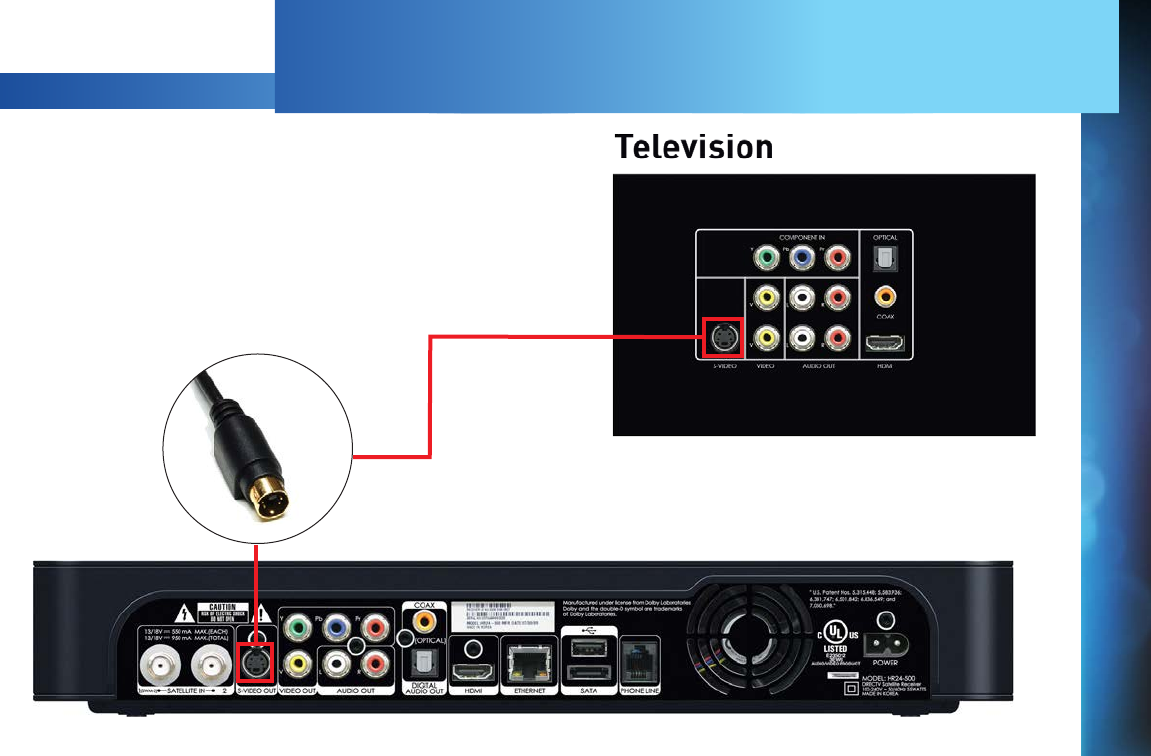
155
(This connection does not provide an HD picture.)
Example: TV with RCA Connectors
Here is an example of a TV that has an S-Video connector
as the best video input (Not all Receivers have an S-Video
connector.)
S-Video requires a separate audio connection.
SD TV CONNECTIONS
S-Video
Cable
APPENDIX 2: CONNECTIONS TO TV & EQUIPMENT
APPENDICES

156
DIRECTV HD DVR RECEIVER USER GUIDE
(This connection does not provide an HD picture.)
Example: TV with RCA Connectors
Here is an example of a TV that has RCA connectors as the best
video input.
RCA cables are often bundled as a three-way cable with one
video and two audio connections. You can also purchase a
single-connection RCA video cable, and a separate cable for
audio.
SD TV CONNECTIONS
RCA Video
and Audio
APPENDIX 2: CONNECTIONS TO TV & EQUIPMENT
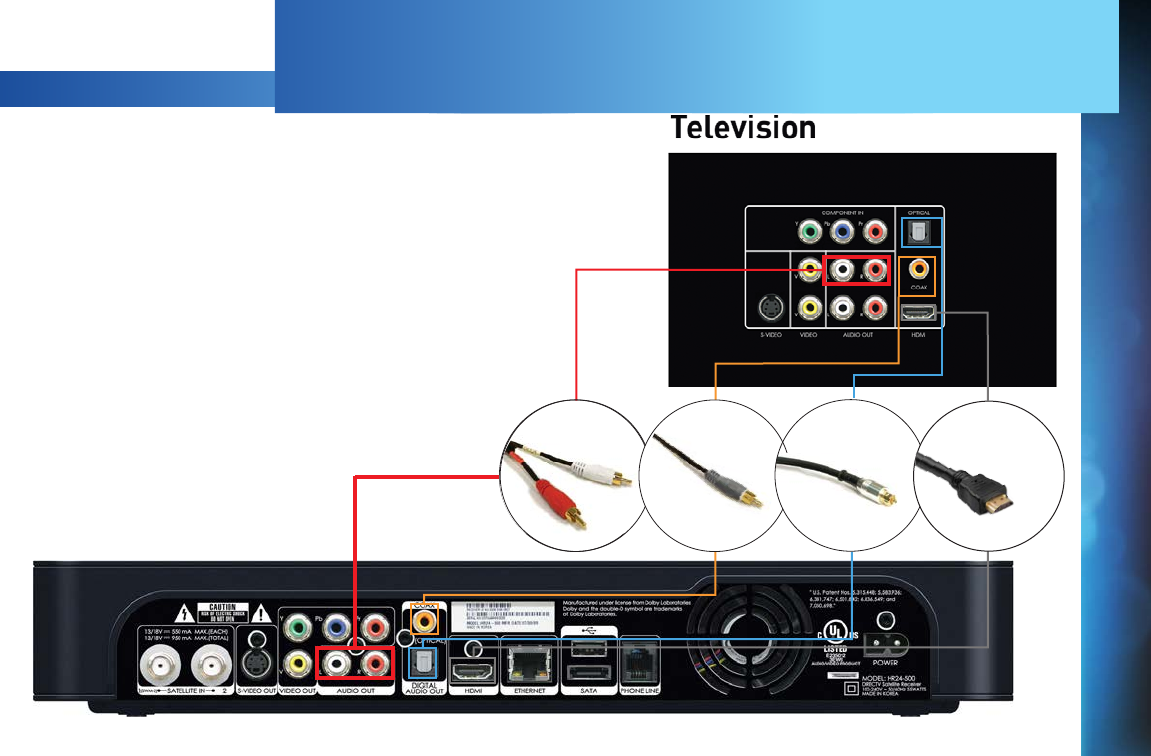
157
Of all the video connections, only HDMI provides an audio signal
with the video. The other connections all require a separate
audio cable. Of these, your best quality signal will be from the
Digital Audio Out/Optical connector, followed by the Digital
Coax connector, followed by the RCA Audio Out connector.
The connector you end up using may be determined by the
equipment you are connecting to. (For example, your home
theater system may support only the Digital Audio Out/Optical
connector.)
The red and white RCA audio out connectors are so common, it
is possible you may have one of these cables already. However,
these cables provide an analog signal, so you will be missing
out on the benefits of digital quality sound.
AUDIO CONNECTIONS
RCA Audio Digital Coax Digital Optical HDMI Cable
APPENDIX 2: CONNECTIONS TO TV & EQUIPMENT
APPENDICES
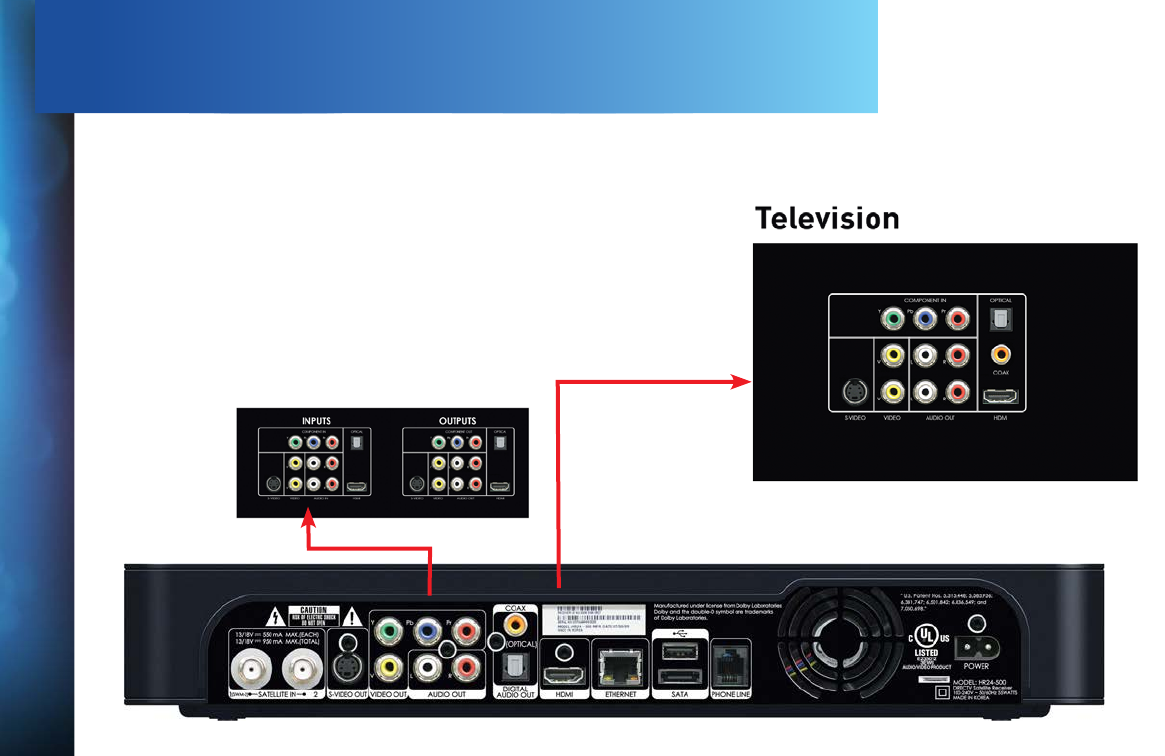
158
DIRECTV HD DVR RECEIVER USER GUIDE
CONNECTIONS TO OTHER EQUIPMENT
In addition to your TV, you may wish to connect other devices,
such as a BluRay Player, DVD burner, or even a second TV
to your DIRECTV® Receiver. For the best-quality picture, it
is recommended you do not use a pass-through connection
from your TV or other equipment as an input to a DVD burner.
Instead, use an available connection from your DIRECTV
Receiver. For example, if you use the HDMI connection on
your DIRECTV Receiver to connect to your TV, you can use the
Component Video, Composite Video RCA, or S-Video Out to
connect to your DVD burner or second TV.
APPENDIX 2: CONNECTIONS TO TV & EQUIPMENT
DVD Player
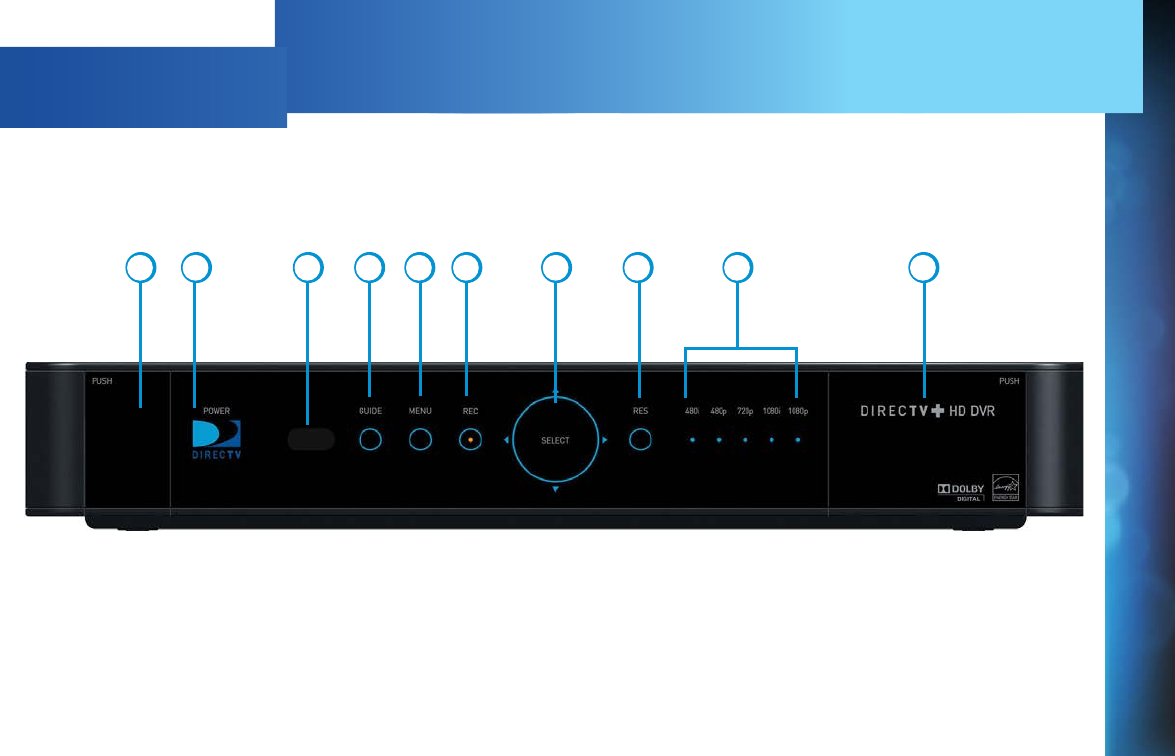
159
Your equipment may not look exactly like the model illustrated.
12 3 5 6 7 8 9 104
APPENDIX 3: RECEIVER FRONT AND BACK PANELS
Front Panel Example
The buttons on the front panel perform the same functions as like-named buttons on the Remote. You can use the front panel
buttons at any time, but they are especially useful if you misplace your Remote or the batteries die.
APPENDICES

160
DIRECTV HD DVR RECEIVER USER GUIDE
1. DOOR PANEL, USB PORT – For future use. USB 2.0 Host (FRONT/REAR EACH 5V = 500mA)
2. POWER – Turns your DIRECTV® Receiver on or off. Your DIRECTV Receiver still records and receives messages when powered
off. The power light flashes when you press a key on the remote to let you know it has received the command.
3. REMOTE SENSOR – The infrared sensor picks up commands from the remote control. You cannot have any opaque object
between the remote and this sensor or else the command will not get through. If you have an optional RF remote, this sensor
is not used. With an optional RF remote, you can place your Receiver inside a cabinet or any non-metal enclosure and it will
receive the remote control commands up to 200 feet away.
4. GUIDE – Displays the onscreen Program Guide.
5. MENU – Brings up the Main Menu to access features, settings and services.
6. RECORD – This button lights orange when a recording is in progress.
7. SELECT – Selects the item highlighted.
8. RES (RESOLUTION) – The RES key switches the output resolution of the DIRECTV Receiver. Each time you press the key, it
cycles to the next available resolution: 480i, 480p, 720p, 1080i and 1080p (supported on some models). Note: The RESOLUTION
button on the front panel only changes the resolution. It does not change the screen format (crop, stretch, letterbox, pillarbox).
The FORMAT button on the remote control cycles through all of the screen formats and resolutions. See Appendix 5 for
details.
9. RESOLUTION INDICATORS – Lights indicate the current resolution setting. 480i is the old analog TV setting. 480p is Enhanced
Definition TV, which is less than HD. 720p is the first level of HDTV. 1080p is the highest level of HDTV provided by the Receiver.
To get the best out of HD, you should be using 720p or higher resolution for your HDTV.
10. DOOR / PANEL, ACCESS CARD – The access card slot, RESET button, and Receiver ID and model number are located behind
the door panel.
APPENDIX 3: RECEIVER FRONT AND BACK PANELS
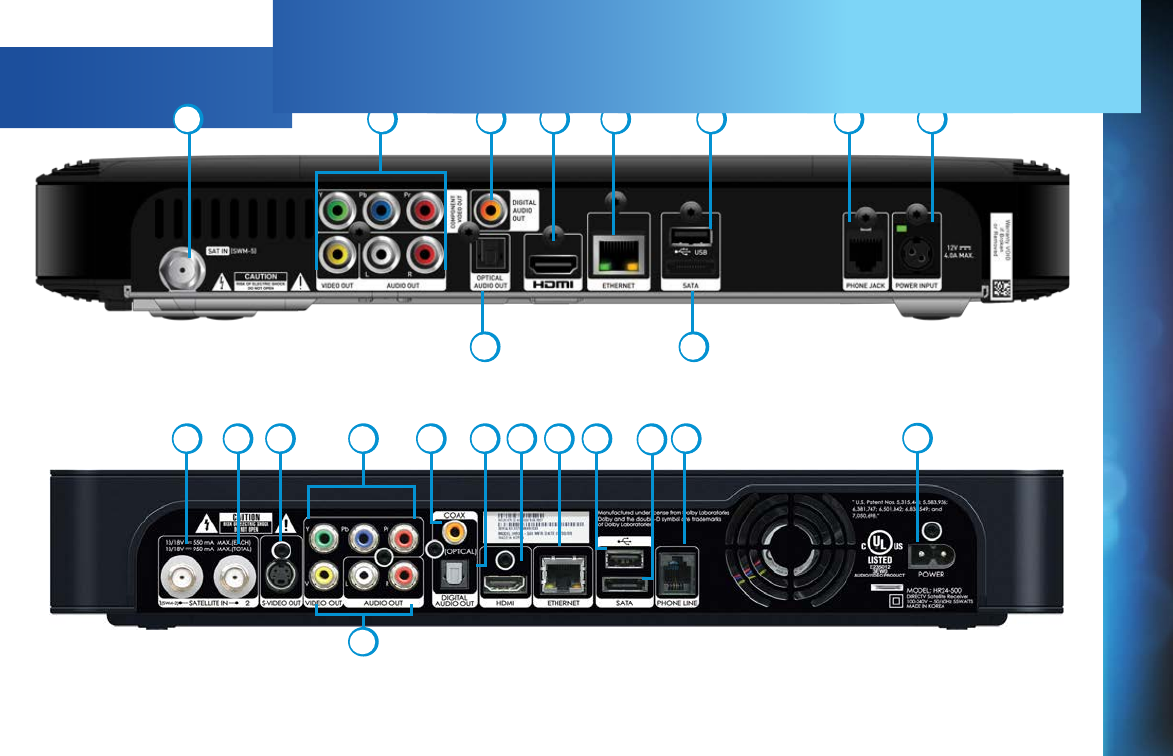
161
Back Panel Examples
Your equipment may not look exactly like the model illustrated.
GENIE™ HD DVR (HR44)
DIRECTV® HD DVR (HR2x Series)
15 6 8 910
11
12 13
12 3 6 7
7
8 9 10 11 12 13
5
4
APPENDIX 3: RECEIVER FRONT AND BACK PANELS
APPENDICES

162
DIRECTV HD DVR RECEIVER USER GUIDE
1. SATELLITE IN 1 – Connect one line from your satellite dish here. A Single Wire Multi-Switch (SWM) connection, if applicable, is
made to this satellite in port.
2. SATELLITE IN 2 – Connect the second line from your satellite dish here.
3. S-VIDEO OUT – A Standard-Definition video output.
4. RCA-Audio/Video Jacks – Standard-Definition output. You can use the entire row of RCA connectors (yellow, white and red) to
feed a VCR or DVD player/burner.
5. COMPONENT VIDEO OUT – Use this block to connect up component video cables (green, blue, red); use the white and red RCA
connectors below it for analog audio out. These connectors provide an HD picture, but do not support 1080p or 3D.
6. DIGITAL AUDIO OUT COAXIAL – Use this digital audio connection for sound.
7. DIGITAL AUDIO OUT OPTICAL – Use this digital audio connection for sound.
8. HDMI – Use this combination digital video and audio connector for the best picture quality. This is the recommended
connector for HD TV.
9. ETHERNET – Please refer to Appendix 4 for information on networking options on your HD DVR before connecting anything to
the Ethernet port.
10. USB – For future use. USB 2.0 Host (FRONT/REAR EACH 5V = 500mA)
11. SATA – Use this connector to add an external hard drive to your Receiver.
12. PHONE JACK – Connect your phone line here to enable Pay Per View purchasing and Caller ID (if your phone service package
includes it).
13. POWER – Your Receiver must be plugged in at all times to function properly.
14. IR RECEIVE – Connect an IR (infrared) extender or repeater here when your Receiver is in a cabinet or otherwise not “visible”
to your remote control.
APPENDIX 3: RECEIVER FRONT AND BACK PANELS

163
Connecting your HD DVR to the Internet means getting access to thousands of titles and shows across the entire DIRECTV library. To
connect your DIRECTV® HD DVR to your home network, you will need:
A DIRECTV HD DVR model HR20, HR34, HR44 or later, or DIRECTV Plus® DVR (model R22)
A broadband Internet connection, with a connection speed of 750 kbps or higher (DSL or cable).
A network router with an open Ethernet port, and/or wireless capability.
Connection instructions vary based on the type of DIRECTV service you have. Please see the appropriate sections that follow.
If you have Whole-Home service:
Professionally Installed DIRECTV CINEMA® Connection Kit (CCK): Schedule a professional installation appointment at
directv.com/getconnected.
Wireless Self-Installed DIRECTV CCK: If you already connect to the Internet via WiFi, you can order the wireless CCK at
directv.com or by calling 1.800.531.5000 and connect it yourself with the instructions provided with the equipment.*
If you do not have Whole-Home service:
Wired: The fastest, most reliable connection is a wired configuration. Requires running an Ethernet cable from a network
router to your DIRECTV HD DVR.
Wireless: This is the easiest method if you already connect to the Internet via WiFi. However, a wireless connection may be
slower and less reliable than wired. You can order the DIRECTV Wireless CCK from directv.com, or at 1.800.531.5000.
For information for accounts without Whole-Home service, please see the instructions on the pages that follow.
NOTE: *If you have the DIRECTV Genie HR44 Receiver, the DIRECTV CINEMA Connection Kit is not required to connect to the
Internet. Please see page 165 later in this Appendix for special instructions for connecting your Genie HR44 HD DVR Receiver
to the Internet.
For the most current information on connecting your Receiver to the Internet, visit directv.com/getconnected.
APPENDIX 4: GET CONNECTED
APPENDICES
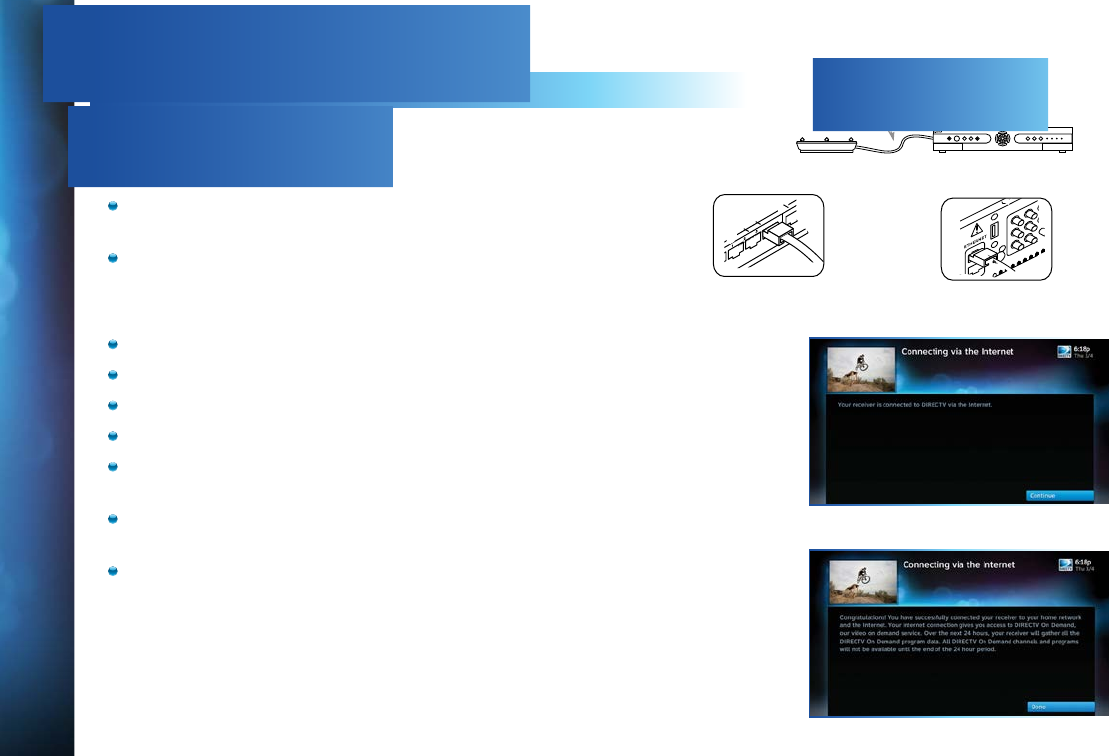
164
DIRECTV HD DVR RECEIVER USER GUIDE
ACCOUNTS WITHOUT WHOLE-HOME SERVICE
For a Wired Connection
Step 1 - Connect your DIRECTV HD DVR to your router:
Connect one end of your Ethernet cable to the Ethernet port on the
back of your router.
Connect the other end of the Ethernet cable to the Ethernet port on
the back of your DIRECTV® HD DVR.
Step 2 - Verify that you are connected:
Press MENU on your DIRECTV Remote
Select Settings & Help
Select Settings
Select Network Setup
Choose Connect Now (or Test Connection if you have connected
previously)
Select Continue after successfully connecting to DIRECTV via the
Internet (See Figure A).
Select Done to complete the setup process (See Figure B).
If your DIRECTV HD DVR does not immediately recognize the network
connection, you will get the option to choose the connection method.
Choose Wired. Follow the onscreen instructions.
APPENDIX 4: GET CONNECTED
Ethernet cable
connects to an
unused port on
the router
Ethernet
cable plugs
into Receiver
Router DVR Receiver
Ethernet Cable
Figure A
Figure B
Direct Connection
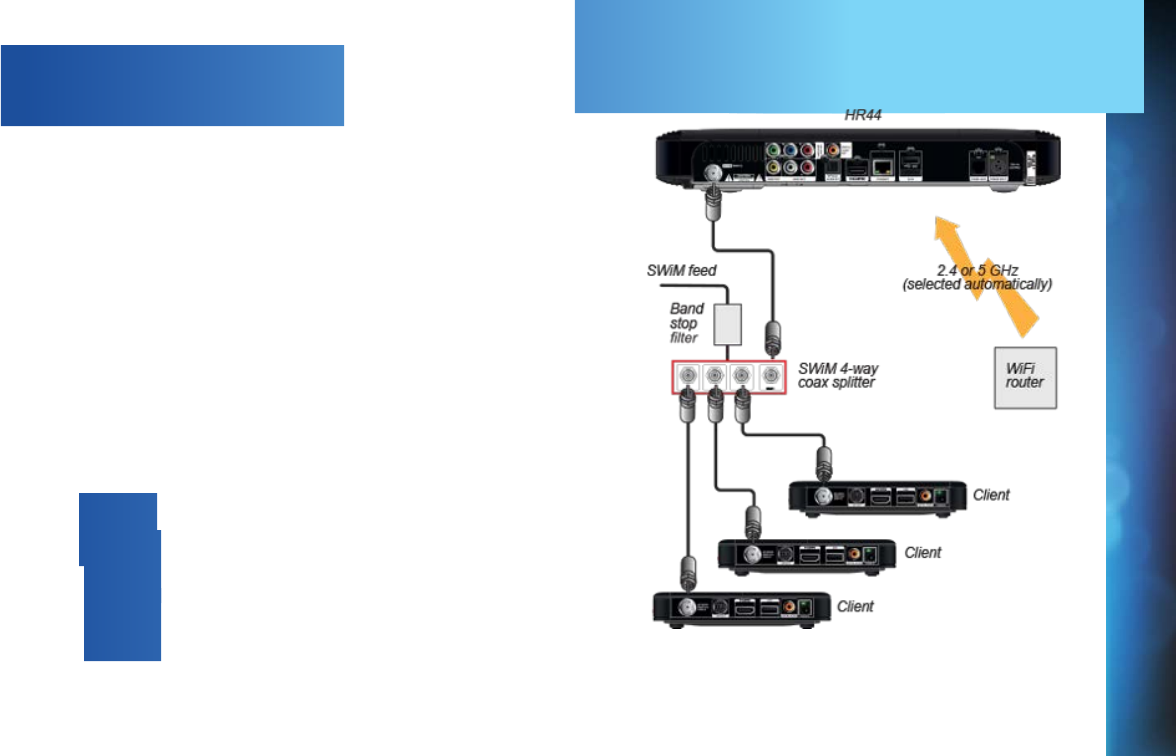
165
For a Wireless Connection
Create a wireless connection between your wireless router and your
DIRECTV HD DVR. As with a wired Internet connection, you’ll have access
to thousands of free and premium On Demand titles, TV Apps, Pandora and
other features and content available only with an Internet connection.
For HR44 HD DVR & Later Receiver Models
The DIRECTV® Genie™ HR44 HD DVR has a built-in wireless transceiver,
which will pair with your existing wireless router to connect to your home
broadband WiFi service. It eliminates the need for the external DIRECTV
CINEMA® Connection Kit (CCK). However, if you do have a CCK already
configured from a previous DIRECTV Receiver, the Genie HR44 will
automatically detect your network settings and connect to the Internet.
In addition to the Network Requirements outlined earlier in this Appendix,
you will need a wireless router set up and initialized for your home Internet
service before you start the Internet connection sequence for your Genie
HR44 HD DVR.
Get connected with the following steps:
Step 1 - Be sure that your TV and DIRECTV Genie HR44 Receiver are on.
Step 2 - Using the DIRECTV Genie Remote that came with your HR44
Receiver, or the Universal Remote, press MENU.
Step 3 - Select Settings & Help, then Settings, then Network Setup.
APPENDIX 4: GET CONNECTED
APPENDICES

166
DIRECTV HD DVR RECEIVER USER GUIDE
Step 4 - Select Connect Now, then Continue; the Setup:
Wireless Connection screen will display.
Step 5 - If supported by your WiFi router, choose Push Button
Setup (also known as WPS) and the connection will complete;
otherwise go to Step 5a below for Manual Setup.
Step 5a - Manual Setup Option
From the Setup: Wireless Connection screen, select Manual
Setup. Your HR44 will detect wireless networks within range
and list them on the screen. (This can take a few minutes.)
Select the target network that displays in the list.
Use the RIGHT ARROW button and select Continue.
Input your wireless router’s password.
Use the RIGHT ARROW button and select Continue.
The wireless connection between your wireless router and
your DIRECTV® HR44 HD DVR should now be active.
Select Done to complete the manual setup process.
NOTE: If you experience difficulty connecting to the Internet, or
need more information, visit www.directv.com/getconnected.
APPENDIX 4: GET CONNECTED
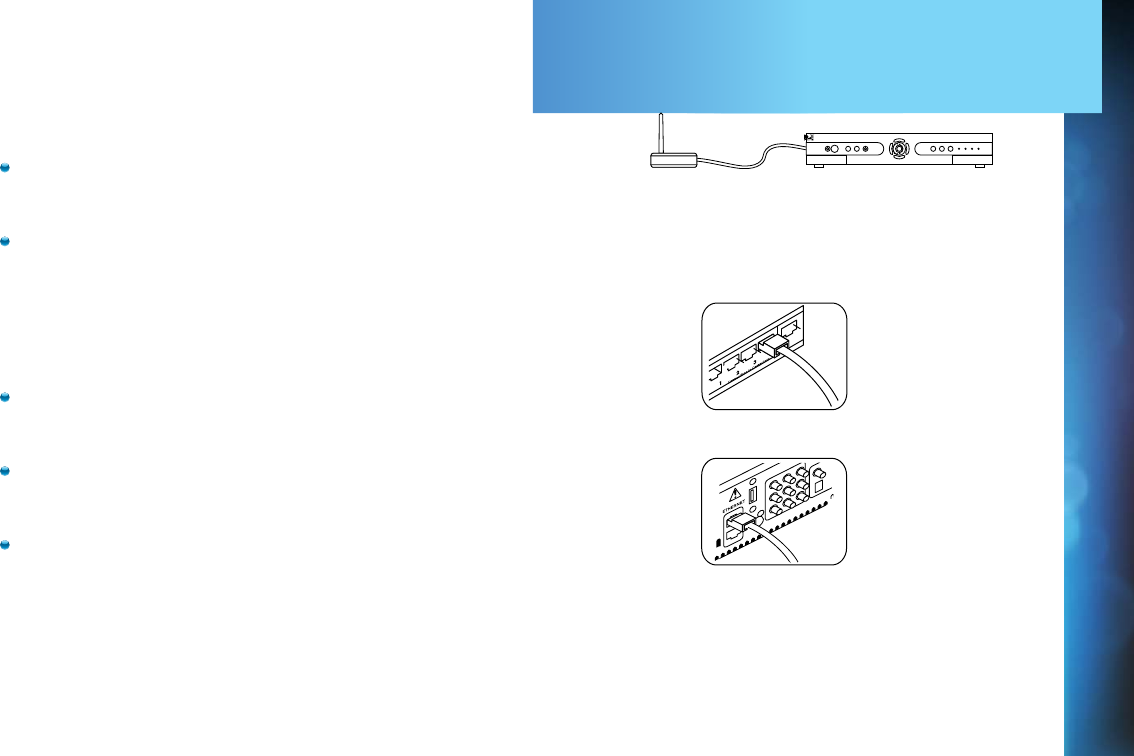
167
For HR34 HD DVR & Earlier Receiver Models
In addition to the Network Requirements previously outlined, you
will need:
A wireless adapter that uses an Ethernet port to connect to
a media device, preferably the Wireless DIRECTV CINEMA
Connection Kit – (CCK-W).
A wireless router set up and initialized for your home Internet
service before you start the Internet connection sequence for
your HR34 HD DVR or earlier Receiver model.
Step 1 - Connect your DIRECTV HR34 HD DVR (or earlier) to the
wireless adapter:
Connect one end of the Ethernet cable to the back of the
wireless adapter and connect the other end of the cable to the
back of your HD DVR.
If using the DIRECTV CCK-W, follow connection instructions in
the device user manual (or go to directv.com/getconnected) to
determine proper connection.
Plug your wireless adapter in to an electrical outlet.
APPENDIX 4: GET CONNECTED
Ethernet cable plugs
into your HD DVR
Ethernet cable
connects to the
Ethernet port of the
wireless adapter.
Ethernet Cable
Wireless Adapter DVR Receiver
APPENDICES

168
DIRECTV HD DVR RECEIVER USER GUIDE
Step 2 - Ensure the wireless adapter is recognized by your home
network:
Once your router detects the wireless adapter, it will prompt
you to configure the two devices. Select Set Up Now.
Highlight your wireless network and press SELECT to display
a blue dot next to your network. Then select Continue.
Follow the onscreen instructions to complete the set-up
process of the wireless adapter.
Step 3 - Verify that you are connected:
Press the MENU button on your DIRECTV Remote.
Select Settings & Help, then Settings, then Network Setup.
Choose Connect Now (or Test Connection, if you have
connected previously).
Select Continue after successfully connecting to DIRECTV via
the Internet (See Figure A).
Select Done to finish the setup process (See Figure B).
If your DIRECTV HD DVR does not immediately recognize the
network connection, you will have the option to choose the
connection method. Choose Wireless (See Figure C) and follow the
onscreen instructions.
APPENDIX 4: GET CONNECTED
Figure A
Figure B
Figure C

169
SCREEN FORMAT & RESOLUTION
In addition to resolution and interlacing, a television picture is also defined by its aspect ratio—aspect ratio equals the ratio of the
screen’s width to its height.
Analog TV (i.e., non-digital, conventional TV):
Aspect ratio = 4 units wide by 3 units high (4:3).
SDTV & EDTV = 4:3 or 16:9.
HDTV = 16:9 (nearly twice as wide as it is tall.)
HDTV’s aspect ratio is approximately the shape of theatrical movie screens, which makes HD an ideal format for viewing
movies on TV.
To optimize the display of programs on your television:
Press INFO, then ARROW Right to Audio/Video and select Change Resolution & Format.
Press SELECT until you see the settings you want.
OR, using the RES (Resolution) key on the front panel of the DIRECTV HD DVR (HR25, HR34, HR44 and above) to change the
resolution, but not the screen format, press RES and cycle through the options until you see the indicator light illuminate on
the front of the Receiver for the resolution you want.
NOTE: In Native mode, the Receiver automatically adjusts the resolution to match individual TV programs as they are tuned. To
confirm your Receiver’s Native setting, press MENU, select Settings & Help, then select Settings, then Display, then Video. Press
SELECT on the Native field to toggle this setting On or Off.
APPENDIX 5: ABOUT HIGH-DEFINITION
APPENDICES

170
DIRECTV HD DVR RECEIVER USER GUIDE
FORMAT Key on the Universal Remote
Alternately, if you are using a DIRECTV Universal Remote (RC6x series), you can use the FORMAT key on your remote to cycle the
resolutions settings supported by your TV, as well as the screen formats in conjunction with each individual resolution. Available
screen formats such as crop, stretch or letter/pillar box, are based on the TV Ratio setting. With each press, an onscreen message
will indicate the current resolution/format setting is.
If Native is turned on, the FORMAT key cycles through the following formats for the current program’s native resolution:
Stretch
Letter
Crop
The FORMAT key allows you to easily cycle all resolution and format settings with a single key until the picture displays the way
you like it.
NOTE: If pressing this key causes a loss of video and audio, continue pressing it until the picture returns. (Wait a second between
presses to allow the Receiver to change the resolution.) This can happen if your settings include a resolution that your TV
doesn’t support.
To correct this: Press MENU, select Settings & Help, Settings, HDTV and then TV Resolutions. Mark or unmark the TV
Resolutions to display the resolutions supported by your television.
APPENDIX 5: ABOUT HIGH-DEFINITION

171
SUPPORTED RESOLUTIONS
The following table shows the resolutions that can be output from each type of connection:
Output Connection Available Resolutions
HDMI 1080i, 1080p, 720p, 480p
Component Video (YPbPr) 1080i, 720p, 480i, 480p
S-Video 480i
Video (RCA Type/Yellow) 480i
NOTE: 720p, 1080i and 1080p are HD formats: 480i and 480p are not. S-Video and RCA outputs display all resolutions as 480i.
APPENDIX 5: ABOUT HIGH-DEFINITION
APPENDICES
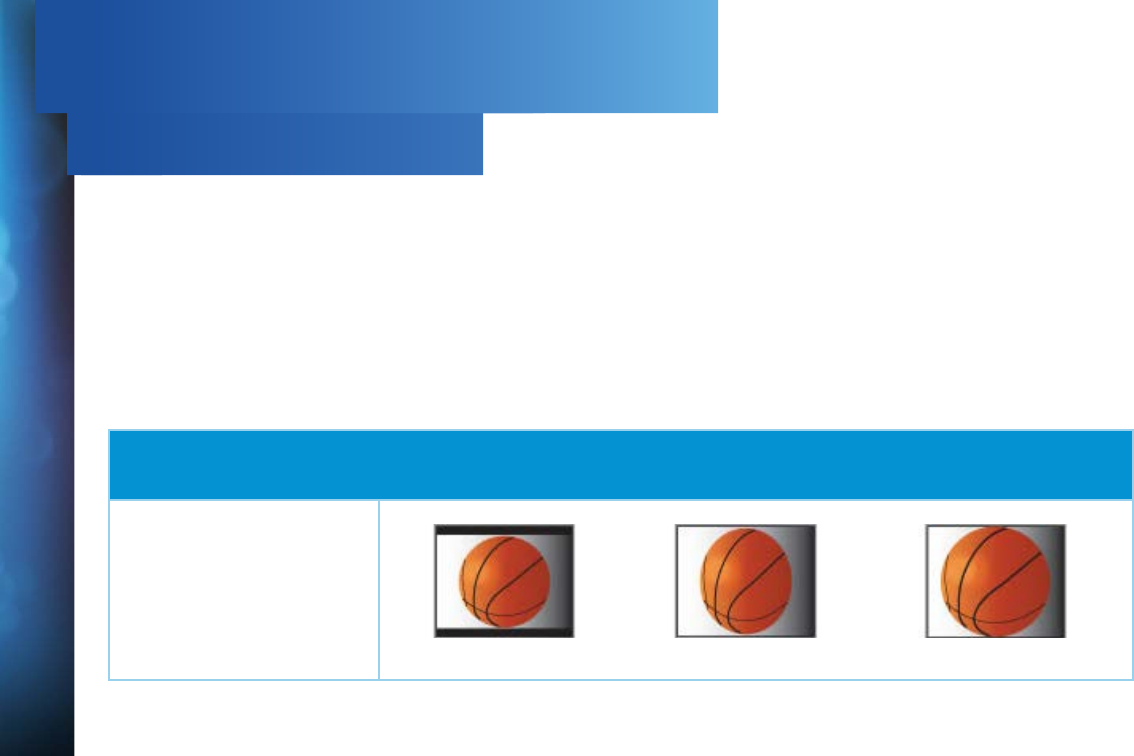
172
DIRECTV HD DVR RECEIVER USER GUIDE
WIDE-SCREEN VS. STANDARD FORMATS
4:3 TVs Showing 16:9 Programing
A standard 4:3 TV is too narrow to a wide screen program. To correct this, choose:
Letterbox: This format, shrinks the 16.9 image until the entire width of the program fits on your TV. Since the aspect ratio of the
program is maintained, the image is no longer tall enough to fill your screen, so gray or black bars are seen at the top and bottom of
the screen. To change the bar color, press MENU, select Settings & Help, Settings, and then Video. Arrow right and down to the Bar
Color field, then scroll through the color options to select your desired bar color. See your TV’s owner’s manual for information on
the best color for your set.
Stretch: In the Stretch setting, instead of adding bars to the top and bottom, the 16:9 program image is stretched vertically until it’s
tall enough to fill the screen. Your entire screen will be full, but the program images are stretched to compensate.
Crop: This format crops (cuts off) the left and right portions of the 16:9 frame so it fits the 4:3 screen.
If your display is a 4:3 format TV or monitor, your format options include these:
For 16:9 program signals:
Letterbox Stretch Crop
APPENDIX 5: ABOUT HIGH-DEFINITION
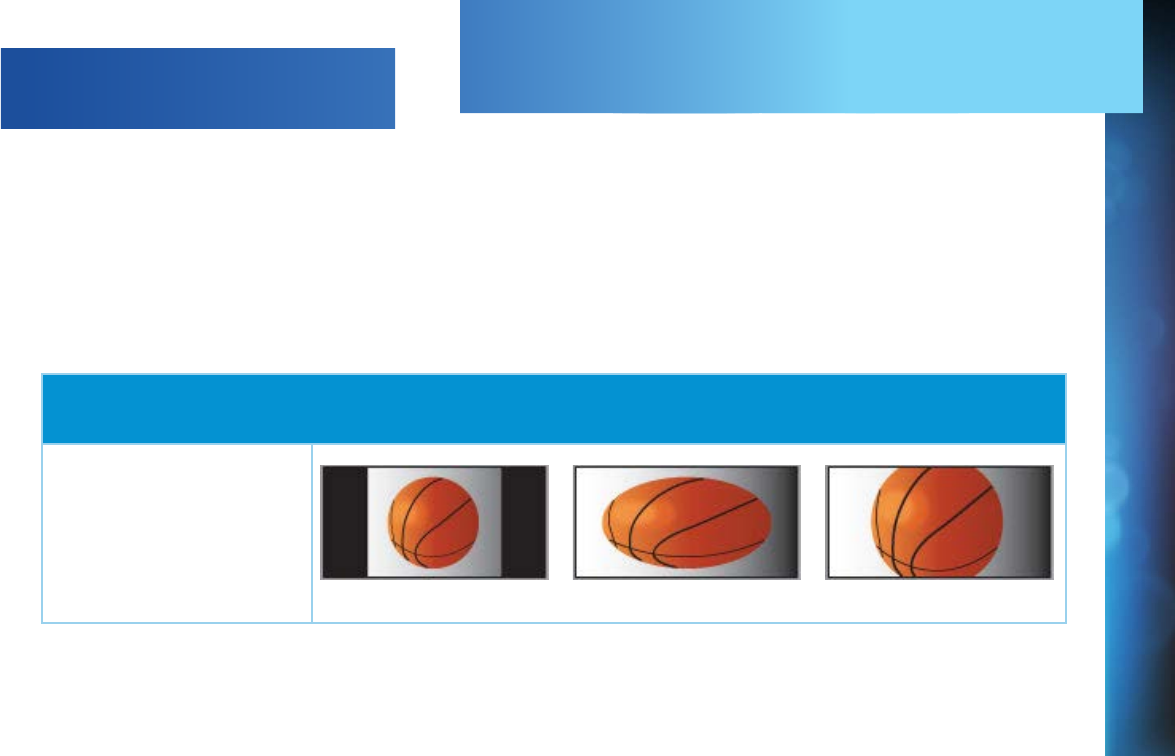
173
16:9 TVs Showing 4:3 Programs
For a wide screen 16:9 TV showing a standard 4:3 TV program, the program is too tall to fit the screen. Your choices here include:
Pillar Box: Here the 4:3 image is shrunk until the entire height of the program fits on your TV. Since the aspect ratio is maintained,
the image is no longer wide enough to fill the screen, so gray or black bars are seen at the left and right edges. To change the bar
color, press MENU, select Settings & Help, Settings, and then Video. Select the desired bar color option. See your TV’s owner’s
manual for information on the best color for your set.
Stretch: In this setting, instead of adding bars to the sides, the 4:3 program image is stretched horizontally until it’s wide enough to
fill the screen. Your entire screen will be full, but the images are a little stretched to compensate.
Crop: This format crops (cuts off) the top and bottom of a 4:3 frame, keeping the 4:3 ratio intact.
If your display is a 16:9 format TV or monitor, your format options include these:
For 4:3 program signals:
Pillar Box Stretch Crop
APPENDIX 5: ABOUT HIGH-DEFINITION
APPENDICES

174
DIRECTV HD DVR RECEIVER USER GUIDE
A
Access Card - 7, 8, 84, 92, 110, 112, 148,
160
Adult Channels - 83, 96
Advance - 14, 78, 183, 184
Advanced Whole-Home HD DVR - 130
Album - 65
Apps - 4, 31, 45, 61, 62, 63, 64, 72, 73, 80,
81, 82, 103, 149, 165
Artist - 65
Aspect Ratio - 86, 169, 172, 173
Audio Connections - 103, 157
Audio Options - 84, 88
Audio Sync - 118
Autorecord - 44, 57, 178
Auxiliary Equipment - 15, 150, 152
B
Back Panel - 161, 162
Batteries - 7, 16, 115, 116, 117, 159
C
Cables - 7, 74, 103, 107, 112, 113, 114,
118, 119, 123, 127, 131, 135, 150, 151,
156, 157, 162, 163, 164
Caller ID - 31, 64, 67, 103, 123, 162
Call Log - 67
Cast & Crew - 20
Channel Banner - 26, 27, 28, 29, 85
Clients - 3, 12, 74, 76, 78, 79, 104, 106
Clock - 87, 106
Closed Captioning - 26, 87
Component Video Out - 162
Component Video Output - 151
Connections - 48, 112, 113, 114, 122,
149, 150, 152 - 158, 163
Customer Care - 131, 136
D
3D - 22, 151, 153, 154, 162
3D Channels - 22
Date & Time - 24, 62
Defaults - 59, 60, 92, 106
Deleting - 51, 57
Digital Audio - 107, 152, 157, 162
DIRECTV Active Channel - 31, 64, 103,
183
DIRECTV CINEMA - 126, 163, 179
DIRECTV Customer Care - 136
DIRECTV® DoublePlay™ - 70, 74
DIRECTV Everywhere™ - 62
DIRECTV Mode - 115, 117
DIRECTV Protection Plan - 103, 133
DIRECTV® Ready TVs - 79, 102, 106
DIRECTV SUNDAY TICKET - 82
DIRECTV™ Mobile Apps - 80, 81, 82
DIRECTV™ Voice Search - 45, 82
DIRECTV® Whole-Home DVR Service -
74, 75, 77, 91
Disk Space Bar - 55
Display - 21, 84, 106
Dolby Digital - 88, 103
Download - 22, 35, 38, 57, 118, 137
DVD burner - 158
DVR control buttons - 14, 17, 52, 78
E
Episodes - 36, 50, 53, 56, 60, 126, 178,
179
Erase - 38, 92
Error Message - 111, 124
Ethernet - 74, 162, 163, 164
Exit - 52, 68, 105, 183, 184
Extras - 30, 31, 62, 64, 65, 123
F
FAQs - 99, 113, 114, 115, 116, 117, 118,
119, 120, 121, 122, 123, 124, 125, 126,
127
Far in Advance - 43
Favorite Channels - 21, 24, 26, 27, 31,
98, 106
FCC Customer Information - 134, 135,
136
Filtering the Guide - 23
Folders - 53, 55
Front Panel - 8, 114, 115, 116, 117, 119,
122, 159, 160, 169, 178
INDEX

175
G
GameSearch™ - 71
Genie Clients - 42, 102, 107
Genie HD DVR - 102, 106
Genie Minis - 42, 79, 102, 106
Genie Recommends - 41
Genie Remote Control - 10, 11, 16, 89,
117
Guide - 20, 22, 85, 120, 160, 183, 184
channel types - 20, 21, 22
customize - 21, 28
customizing - 24
filtering - 23
guided setup - 148
jump to a date & time - 24
H
HDMI - 107, 127, 151, 152, 153, 157, 158,
162, 171
Help - 12, 21, 24, 30, 31, 75, 76, 84, 93,
94, 98, 99, 106, 116, 119, 120, 164, 165,
168, 170, 172, 173
History - 30, 57, 59, 124
Home Page - 36
I
Icons - 57, 178, 179
Info - 20, 26, 29, 35, 49, 50, 53, 69, 77, 84,
85, 93, 94, 103, 183, 184
Interactive Channels - 22
Internet Connection - 149
Internet radio - 68
In Theaters - 34, 38, 39
J
Just Added - 34
K
Keep - 37, 55
Keyword Search - 57
L
Language - 28, 85, 88, 95, 106
Live Buffer - 18
Live TV - 18, 48, 50, 52, 70, 71, 84, 98,
105, 124, 183
Local Channels - 21
Lock - 92
M
Mail - 26
Manual Recordings - 59
Mark & Delete - 54
Media Server - 65, 105
Media Share - 65
Menu - 12, 30, 183, 184
Messages - 26, 31, 64, 111
Mini Clients - 3, 12
Mini Guide - 25
Mobile Apps - 61, 80, 81, 82
Model Number - 130, 134
Mode Switch - 12, 89, 115, 117, 148, 183
Movies - 23, 24, 34, 35, 36, 37, 38, 39, 54,
62, 95, 149, 169
Movies Ratings - 95
Music & Photos - 64, 65
Mute - 119, 183
My Playlist - 53, 55, 56, 75, 123, 125, 126
N
Network - 7, 65, 74, 82, 84, 104, 135, 136,
149, 163, 164, 165, 166, 168
New Movie Releases - 34
NFL SUNDAY TICKET - 72, 81
O
On Demand - 24, 30, 35, 58, 103
Onscreen Messages - 111
Ordering Programs - 39
Other Ratings - 95
P
Pandora - 64, 68
Parental Controls - 26, 31, 78, 92, 93, 94,
95, 96, 97, 178
adult channels - 96
channel blocks - 96
INDEX
INDEX

176
DIRECTV HD DVR RECEIVER USER GUIDE
hours (viewing) - 97
passcode - 93, 94, 179
rating limits - 95
spending - 97
web videos - 96
Password - 92, 93, 166
Pay Per View - 34, 35, 36, 37, 38, 39, 40,
58, 59, 97, 126, 149, 162
Phone - 8, 35, 45, 62, 67, 74, 80, 81, 82,
84, 112, 123, 131, 136, 149
Phone Connection - 112, 149
Picture In Picture - 29, 102, 103
Playlist - 30, 37, 38, 39, 53, 54, 56, 57, 75,
76, 78, 91, 123, 125, 126, 183, 184
change order - 54
filter - 55
managing - 55
mark and delete - 54
open/close all - 55
options - 54
sharing options - 75, 76
sort - 54
Power - 3, 7, 12, 107, 110, 116, 117, 122,
134, 150, 160, 162, 183, 184
Power Outage - 121
Power Saving - 91
Power Surge - 121
Press and Hold Buttons - 183
Previous Channels - 27
Product Information - 8, 148
Program Guide - 13, 20, 21, 22, 23, 24, 25,
27, 34, 39, 48, 50, 60, 61, 85, 96, 118, 120,
125, 131, 148, 160, 183
Program Info - 26
Progress Bar - 17, 18, 118
Protection Plan - 10, 101, 103, 107, 110
Purchases - 57, 59
Q
Queue - 36, 37, 39, 57, 58, 179
QuickTune - 71
R
RC71 Remote - 10, 14
RCA Connectors - 155, 156, 162
Rear Panel - 6, 161, 162
Reauthorize Your Receiver - 109, 110
Recordings - 30, 36, 37, 39, 40, 48, 51, 53,
56, 57, 58, 59, 60, 61, 77, 78, 79, 82, 92, 96,
122, 124, 126
a series - 50
a single show - 48
changing a record option - 48, 50
defaults - 59
from a computer - 61
from a phone or tablet - 62
from Live TV - 50
from the guide - 50
history - 59
managing - 58, 59, 60
manually - 59
purchases - 59
remote - 62
stopping an in-progress - 49, 51
watching and deleting - 51, 52
Remote Control - 7, 10, 11, 12, 13, 14,
15, 16, 71, 78, 84, 89, 90, 115, 116, 120,
122, 148, 159, 160, 162, 179
advanced setups - 90
buttons - 10, 12, 14, 16, 17, 183
IR/RF setup - 89
modes - 12
problems - 115
program remote - 89
receiver mode - 90
Remote Recording - 61, 62
Repair - 131, 132
Reset - 87, 92, 110, 113, 117, 119, 121,
148
Resolution - 28, 84, 85, 86, 87, 114, 115,
119, 127, 160, 169, 170, 171
Resolution Indicator - 160
Restart - 92
RF Remote - 89
RVU - 105
S
Satellite - 3, 7, 48, 90, 112, 113, 118, 120,
134, 136, 148, 162
Satellite Data Acquisition - 118
INDEX

177
Satellite Signal Strength - 90
Scheduler - 178
ScoreGuide™ - 72, 184
Search & Browse - 30
Serial Number - 8
Series - 35, 40, 41, 43, 49, 50, 51, 53, 55,
56, 57, 58, 60, 62, 123
Series Manager - 57, 58, 60, 124
Settings - 10, 11, 31, 59, 84, 85, 88, 89,
90, 91, 92, 106, 164, 165
Setup - 84
Showroom - 31, 68
Smart Search - 30, 43
Social - 72
Software - 22, 84, 111, 131, 137, 138,
139, 140, 142, 143, 144, 145
Song - 65
Sort - 24, 54
Sort Programs by Category - 54
Sound Effects - 88, 106
Spending Limits - 97
Sports - 4, 22, 33, 40, 54, 68, 71, 81
Surround Sound - 3, 12, 88, 89, 118, 119,
150, 152
S-Video - 127, 151, 155, 158, 171
System Info - 84, 120
System Messages - 26, 31, 64, 111
System Software Updates - 111
System Test - 84, 110, 112
T
Tablet - 4, 47, 61, 62, 80, 82
Temporarily Unlock - 94
Terms & Conditions for Use of Software
- 137, 138 - 146
Tickmark - 14
To Do List - 50, 57, 78, 122, 126
Troubleshooting - 84, 110, 111, 112
TV Apps - 31, 72, 103
NFL.COM Fantasy Football TV App -
72
ScoreGuide™ - 72
Social - 72
Weather - 72
What’s Hot - 72
TV Problems - 114, 117, 118, 119, 122
TV Ratings - 95
TV Shows - 34, 41, 42
U
Universal Remote Control - 9, 10, 12,
115
Unlock - 94
Unsubscribed Channels - 21
V
VCR - 89, 114, 162, 183
Video - 84, 85, 96, 110, 114, 118, 122,
162, 170, 171
Voice Search - 45, 82
W
Warranty - 8, 130, 131, 132, 133
Watching and Deleting Your Recorded
Shows - 51
Weather - 72
Web Videos - 83, 96
What’s Hot - 72
What’s On Now? - 34
Whole-Home DVR service - 74, 75, 76,
77
Wired Connection - 163, 164
Y
You Might Like - 21
YouTube Search - 44
INDEX
INDEX
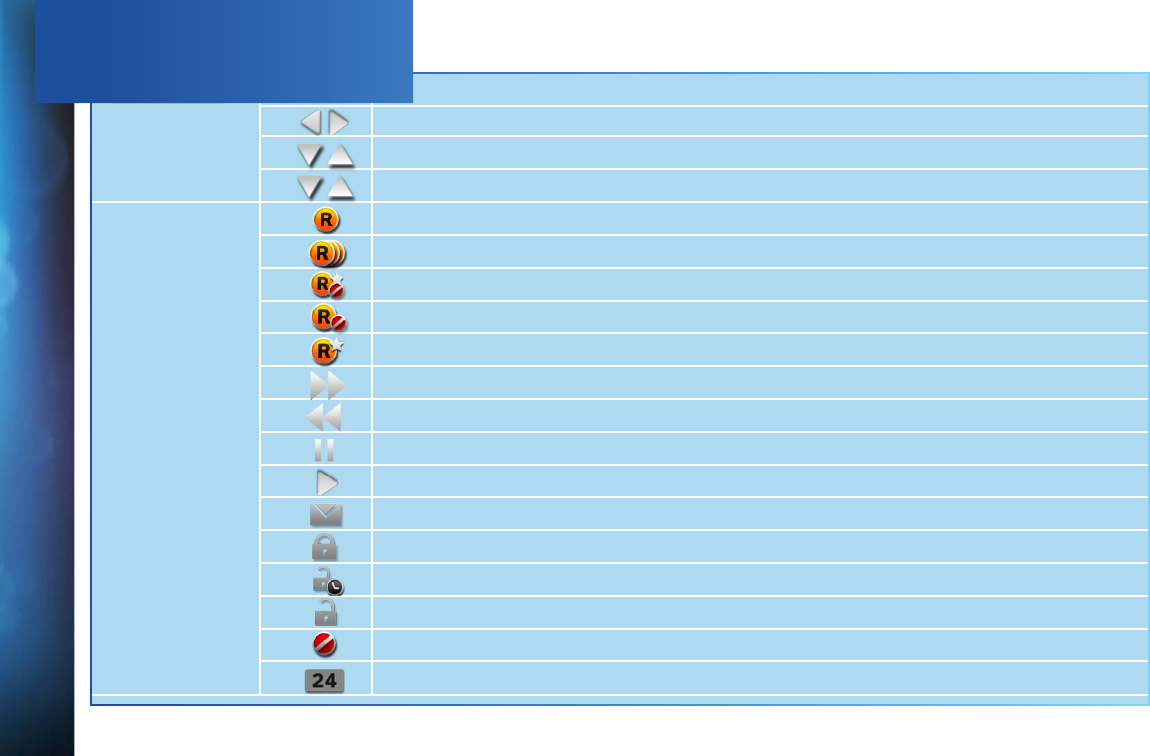
178
DIRECTV HD DVR RECEIVER USER GUIDE
Arrow Icons
Indicate that a show’s start or end time is earlier or later than is visible in the Guide program cell.
LEFT and RIGHT arrows on the remote offer special functionality.
Objects are scrollable above or below the visible window.
UP and DOWN arrows on the Receiver front panel offer special functionality.
Other Icons
Indicates a program is set to record.
Indicates record has been set for all episodes of an ongoing program.
Indicates showing that was set by the user conflicts with another showing.
Indicates showing that was set by the user was canceled by the scheduler due to an unexpected conflict.
Shows Autorecord has been set for matching programs in a Search.
Indicates a recorded or live-stored video is fast forwarding at normal speed.
Indicated a recorded or live-stored video is rewinding at normal speed.
Indicates current video is paused.
This key plays current video when paused; it displays the control bar when already playing.
Indicates one or more new messages are in the Inbox.
Shows that Parental Control limits are currently “locked”.
Shows that limits are temporarily unlocked.
Shows that there are no current limits imposed.
Indicates a rating level or channel that is blocked via Parental Controls.
All Day Ticket indicates that the program is rented for 24 hours starting when you first view the program.
ICON REFERENCE
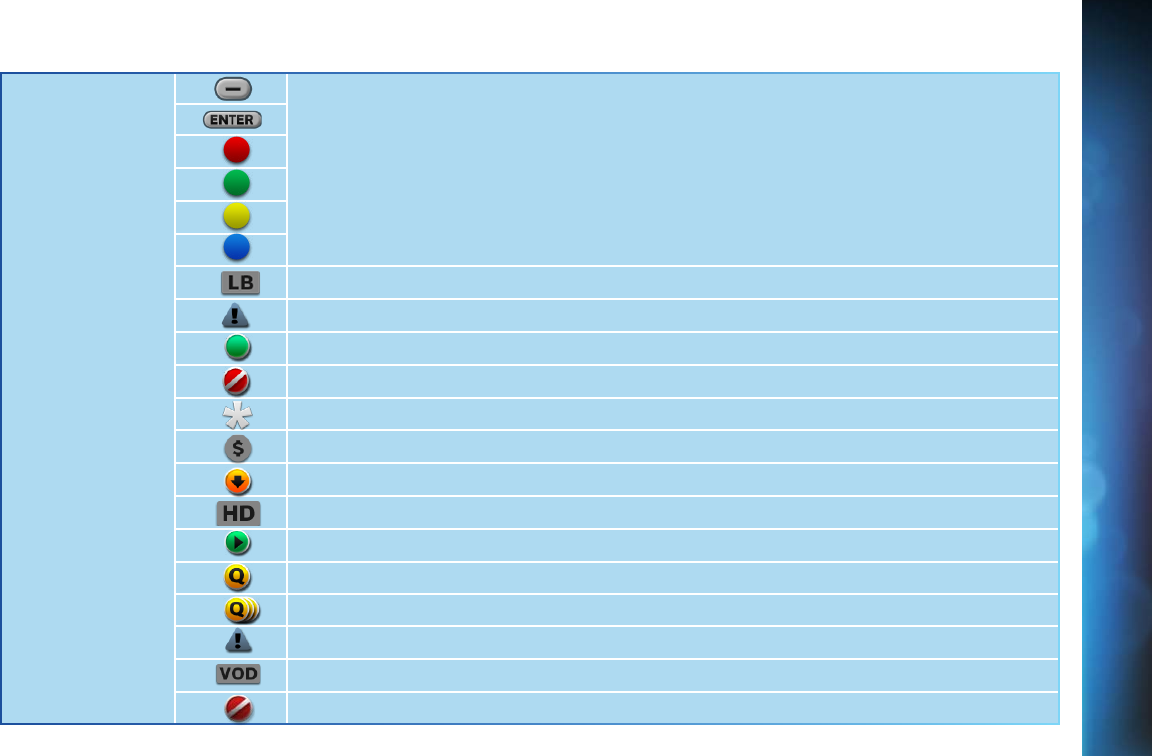
179
Other Icons
Screen hints indicating a special function, activated by pressing the related button on
the remote control.
Indicates program shown in letterbox format.
Denotes an error condition has occurred.
Appears when at least one rating or channel is allowed.
Appears when at least one rating or channel is blocked.
Used to create/enter passcodes in Parental Controls.
Indicates the scheduled PPV is set to purchase.
Program is currently downloading.
Indicates the program is/will be broadcast in High-Definition format.
Indicates program is ready to watch.
Indicates a Program is in the Queue.
All episodes of an ongoing programs are in the Queue.
Indicates a program is about to expire
Indicates that the programs comes from DIRECTV CINEMA.
Indicates a recorded program is not available for viewing.

180
DIRECTV HD DVR RECEIVER USER GUIDE
V1.5GENIEHR44HR34HR2X26NOV2013
ACTIVATION OF PROGRAMMING SUBJECT TO CREDIT APPROVAL. CREDIT CARD REQUIRED (except in MA and
PA). Programming subject to change. DIRECTV services not available outside the U.S. DIRECTV programming is available
separately and independently of DIRECTV System hardware. A valid programming subscription is required to operate
DIRECTV System hardware. Activate your DIRECTV programming today at 1.800.531.5000. ©2013 DIRECTV. DIRECTV
and the Cyclone Design logo, DIRECTV Active, DIRECTV INTERACTIVE, DIRECTV PLUS, GENIE, HomePlug and the
DIRECTV Plus DVR and DIRECTV HD DVR logos are trademarks of DIRECTV. All other trademarks and service marks are
the property of their respective owners.
This item incorporates copy protection technology that is protected by U.S. patents and other intellectual property rights of
Rovi Corporation. Reverse engineering and disassembly are prohibited.
Due to restrictions imposed by copyright holders, certain programming may include content protection measures that may
restrict viewing in high-denition and/or recording with certain consumer electronics equipment attached to the Receiver.
Please contact the manufacturer of such equipment for additional information.
THIS PRODUCT IS LICENSED UNDER THE AVC PATENT PORTFOLIO LICENSE FOR THE PERSONAL AND NON-
COMMERCIAL USE OF A CONSUMER TO (i) ENCODE VIDEO IN COMPLIANCE WITH THE AVC STANDARD
(“AVC VIDEO”) AND/OR (ii) DECODE AVC VIDEO THAT WAS ENCODED BY A CONSUMER ENGAGED IN
A PERSONAL AND NON-COMMERCIAL ACTIVITY AND/OR WAS OBTAINED FROM A VIDEO PROVIDER
LICENSED TO PROVIDE AVC VIDEO. NO LICENSE IS GRANTED OR SHALL BE IMPLIED FOR ANY OTHER USE.
ADDITIONAL INFORMATION MAY BE OBTAINED FROM MPEG LA, L.L.C. SEE HTTP://WWW.MPEGLA.COM
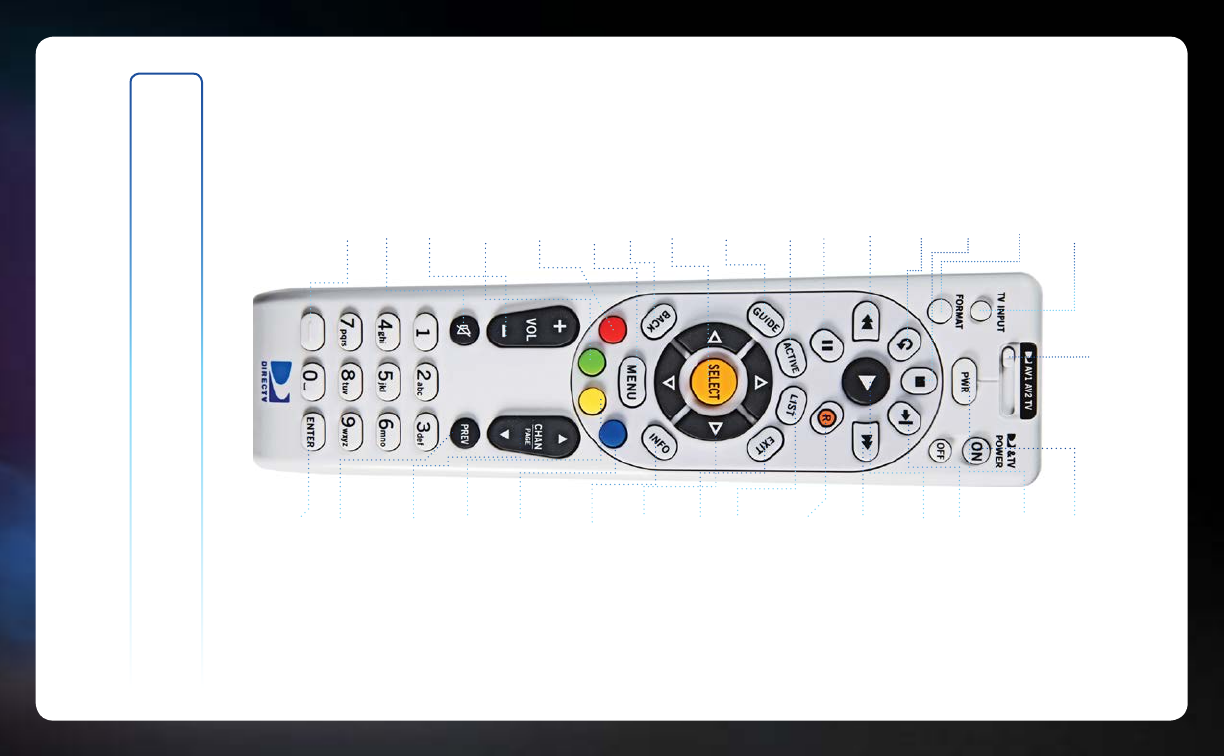
181
MODE SWITCH
Changes remote to control other
equipment, for example a DVD Player.
DIRECTV & TV POWER ON
Turns your DIRECTV® Receiver and TV, together,
on or off.
POWER
Turns on /off whichever equipment the MODE
switch is set to.
ADVANCE*
Jumps ahead 30 seconds. Hold down to jump
forward to the end.
PLAY*
Play current video; press and hold
for slow motion.
FFWD*
Press up to four times to fast forward
at increasing speeds.
RECORD*
Press once to record a live TV program or
the program highlighted in the Program Guide.
Press twice to record a series.
LIST
Displays the Playlist.
EXIT
Exits any menu and returns to last channel
viewed.
ARROWS
Moves the highlight (up, down, left, right)
within a menu.
INFO
Displays information about the program
you are watching or that is highlighted in
the Program Guide.
BLUE
In live TV, displays the Mini Guide; Function varies
on other screens - look for onscreen hints.
YELLOW
Displays various options while viewing the Guide
or the Playlist.
CHAN/PAGE
In live TV, changes channel up or down;
in a menu, such as the Guide, scrolls page
up and down.
PREV
Tunes to previous channel viewed.
ENTER
Activates channel number entries quickly.
Keys in orange text can be programmed to function with your VCR, DVD player or other stand alone equipment.
* These descriptions apply to DIRECTV HD DVRs. Other equipment may behave differently.
TV INPUT
Changes the “source” - the piece of equipment
whose signal is displayed on your TV.
FORMAT
Cycles through screen formats (crop, stretch,
pillar box, letter box) and resolutions.
STOP*
Stops Recorded Video
REPLAY*
Jumps back 6 seconds. Hold down to jump
back to the beginning.
REWIND*
Press up to four times to rewind
at increasing speed.
PAUSE*
Pauses current video.
ACTIVE
Displays the DIRECTV Active Channel
-local weather and more!
GUIDE
Press once to see the Program Guide.
Press twice to see programs by category.
SELECT
Selects any highlighted item.
BACK
Takes you back one menu screen.
MENU
Display a menu of settings
and services.
RED
In Guide, jumps 12 hours back; other
functions vary - look for hint onscreen.
GREEN
In Guide, jumps 12 hours forward; Function varies
on other screens - look for onscreens hints.
VOLUME
Raises or lowers volume.
MUTE
Toggles sound volume on/off.
NUMBERS & DASH
Tune to a channel directly;
also input numbers when needed
in onscreen menus.
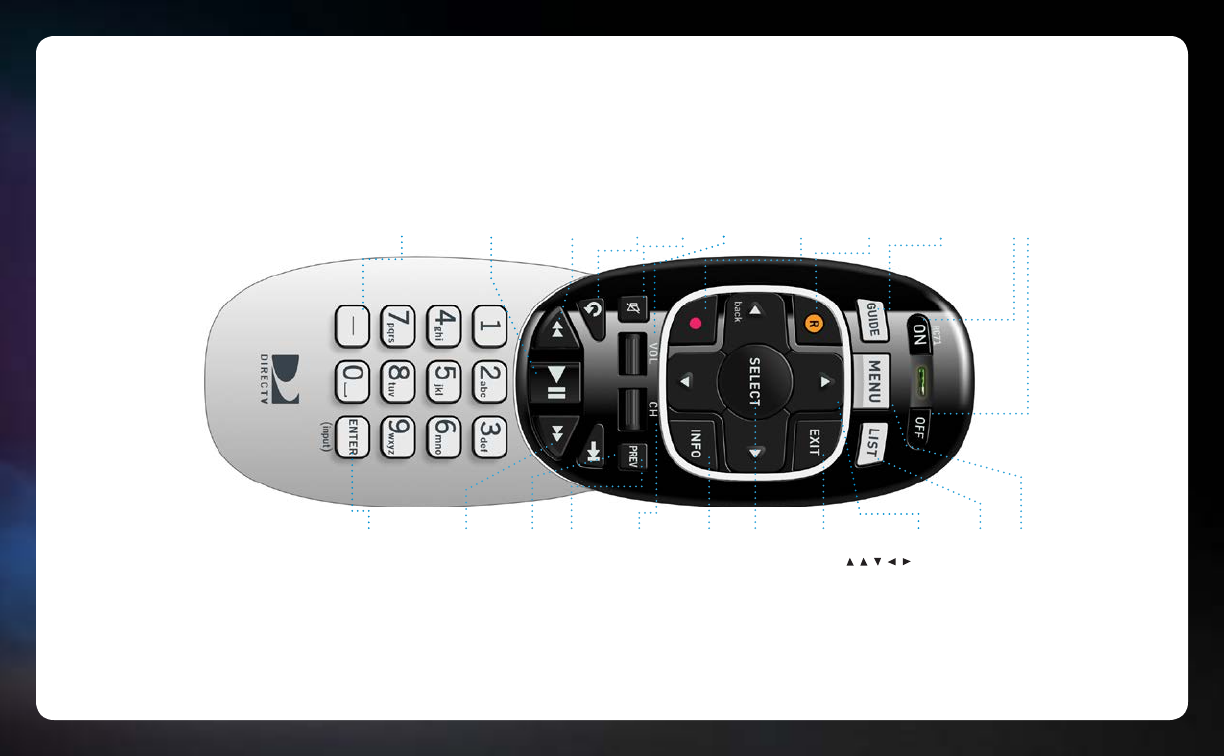
MENU
Display the MENU.
LIST
Display the LIST of your recorded
programs.
ARROWS
Press to move up within a menu.
Press to move down within a menu.
Press to move right within a menu.
Press to move left within a menu.
Press to go back within menus.
EXIT
EXIT the menu and return to previous
channel viewed. Stop playback while
viewing recorded content.
SELECT
SELECT item highlighted on-screen.
INFO
Display INFORMATION about the program
now playing or highlighted in the
On-Screen Guide.
CH
Change TV CHANNELS.
Scroll a full page while viewing the
On-Screen Guide.
PREV
Return to PREVIOUS channel viewed.
ADVANCE
ADVANCE 30 seconds.
Press and hold to jump ahead to the end
of a recorded program.
FAST-FORWARD
FAST-FORWARD at increasing speeds—
press up to four times. Press and hold to
jump to next tick mark. Jump ahead 12
hours while viewing the On-Screen Guide.
ENTER
Press for Mini Guide while viewing your
program and dismissed with EXIT.
ENTER also replaces TV INPUT button:
To cycle through the equipment
connected to your TV, press and hold for
three seconds until LED light at top turns
green. Then scroll through inputs by
pressing ENTER again.
ON/OFF
Turns both DIRECTV® Receiver and TV ON
or OFF at the sema time. (Remote must
be programmed for TV. DVR Receiver still
records when off).
GUIDE
Press once for On-Screen Guide. Press
twice for programming grouped into
categories.
RECORD
RECORD program now playing or
highlighted in the On-Screen Guide.
Press twice to record the entire series.
RED CIRCLE BUTTON
Jump back 12 hours while viewing the
On-Screen Guide. Access ScoreGuide™
while viewing any sports channel.
VOL
Increase or decrease the VOLUME level.
MUTE
MUTE the sound.
REPLAY
REPLAY previous six seconds.Press and
hold to jump back to the beginning of a
recorded program
REWIND
REWIND at increasing speeds— press up
to four times. Press and hold to jump to
previous tick mark. Jump back 12 hours
while viewing the On-Screen Guide..
PLAY/PAUSE
PLAY current program. Press once while
program is playing to PAUSE. Press
and hold while program is playing for
slow motion.
DASH
Press for Guide Options while viewing
On-Screen Guide. Press twice to delete
recorded shows from your playlist.
Press to display last 6 digits of Receiver
ID, Satellite signal type (SWiM or
Multiswitch) and internet status.
V1.5GENIEHR2X26NOV2013