Verathon 0570-0174 Scanpoint Remote, P/N 0570-0174 User Manual 0900 1442 01 60
Verathon Scanpoint Remote, P/N 0570-0174 0900 1442 01 60
Verathon >
Contents
- 1. User manual part 1 of 4
- 2. User manual part 2 of 4
- 3. User manual part 3 of 4
- 4. User manual part 4 of 4
User manual part 1 of 4

Copyright © 2007 by Verathon, Inc. All rights reserved. No part of this User’s Manual may be copied or transmitted by any
method without the express written consent of Verathon, Inc..
FloPoint®, ScanPoint®, QuickPrint®, Sontac®, VMODE®, Verathon® and Verathon Medical® are registered trademarks, and
Premium Warranty - Total Customer CareSM Plan is a service mark of Verathon, Inc..
Adobe®, Acrobat®, and Reader® are registered trademarks of Adobe Systems Incorporated in the United States and/or
other countries.
Apple® and Macintosh® are registered trademarks of Apple Incorporated in the United States and/or other countries.
Microsoft®, Internet Explorer®, Windows®, and .NET Framework® are registered trademarks of Microsoft Corporation in
the United States and/or other countries.
All other brand and product names are trademarks or registered trademarks of their respective owners.
The ScanPoint® technology described in this manual is protected by U.S. Patent 6,569,097. Other international patents
pending.
Information in this User’s Manual may change at any time without notice. For the most up-to-date information, you can
access an online version of this manual at http://www.verathon.com/manuals.htm. Examples described or illustrated in
this User’s Manual are fictitious and do not in any way represent real patient or exam data.
Verathon, Inc. Corporate HQ: (US and Canada)
20001 North Creek Parkway
Bothell, WA 98011
USA
800.331.2313 (Canada and US)
425.867.1348
Fax: 425.883.2896
Verathon Medical (Europe) B.V.
Boerhaaveweg 1
3401 MN lJsselstein
The Netherlands
+31.30.68.70.570
Fax: +31.30.68.70.512
Verathon Medical (Japan) K.K.
Executive Tower Azabudai 7F
1-4-3 Azabudai
Minato-ku
Tokyo, Japan 106-0041
+81.03.3560.3501
Fax: +81.03.3560.3502
Verathon Medical (United Kingdom) Ltd.
The Granary Manor Farm Courtyard
Aston Sandford, Aylesbury
Buckinghamshire, HP17 8JB
United Kingdom
+44.1844.299.207
Fax: +44.1844.299.218
Verathon Medical (France) Sarl
Office Address:
Espace Europeen de l’Entreprise
2 allée d’Oslo
67300 Schiltigheim
France
+33.03.88.60.14.12
Fax: +33.03.88.60.46.87
Postal Address:
BP 10039
F-67012 Strasbourg Cedex
France
PN: 0900-1442-01-60

FloPoint® Elite Uroflow System Table of Contents
User’s Manual page 7
Table of Contents
Important Information...............................................................................................................................13
Product Description .................................................................................................................................13
Intended Use Warnings and Cautions.....................................................................................................13
Statement of Prescription ....................................................................................................................13
Statement of Intended Use..................................................................................................................13
Contraindications .................................................................................................................................14
Introducing the FloPoint® Elite Uroflow System....................................................................................16
Product Description .................................................................................................................................16
FloPoint® Elite Uroflow System Parts and Features................................................................................16
ScanPoint® Label Writer (Optional Printer) .............................................................................................17
ScanPoint® Online...................................................................................................................................18
ScanPoint® Premium Warranty Total Customer CareSM Plan..............................................................19
Getting Started ..........................................................................................................................................20
Required Equipment................................................................................................................................20
Getting Started ........................................................................................................................................20
Step 1: Unpack the Box and Check the Components.............................................................................21
ScanPoint® Label Writer ......................................................................................................................24
Step 2: Attach the Mounting Bracket to the wall and attach the FloCharger to the mounting bracket. ..25
Step 3: Installing Adobe® Acrobat® Reader.............................................................................................26
Step 4: Install ScanPoint® with QuickPrint ..............................................................................................26
Installing ScanPoint® with QuickPrint Software ...............................................................................27
Step 5: Setting ScanPoint® User Preferences.........................................................................................33
About User Profiles..............................................................................................................................38
Step 6: Installing FloPoint® Elite Devices................................................................................................39
Installing the ScanPoint® Docking Station ...........................................................................................39
Setting up the ScanPoint® Label Writer...............................................................................................42
Connecting the Label Writer to Power .............................................................................................42
Installing a Roll of Labels .................................................................................................................42
Connect the Label Writer to Your Computer....................................................................................44
Step 7: Charge the Batteries...................................................................................................................44
Charging the ScanPoint® Remote Battery...........................................................................................44
Charging the FloSensor Battery ..........................................................................................................45
Displays, Controls, and Indicators..........................................................................................................46
ScanPoint® Remote Display Icons ..........................................................................................................46
ScanPoint® Remote Buttons....................................................................................................................48

Table of Contents FloPoint® Elite Uroflow System
page 8 User’s Manual
ScanPoint® Remote Audio Cues.............................................................................................................48
FloSensor Indicators................................................................................................................................49
FloCharger Indicators..............................................................................................................................50
Performing an Exam .................................................................................................................................51
Preparing for the Exam............................................................................................................................51
Performing an Exam................................................................................................................................51
Recording a Voice Annotation.................................................................................................................54
Cleaning and Maintenance.......................................................................................................................55
FloSensor Cleaning Procedures .............................................................................................................55
Quick Clean Procedure........................................................................................................................55
Solid Material Cleaning Procedure ......................................................................................................56
FloCharger Cleaning Procedure..............................................................................................................57
ScanPoint® Remote Cleaning Procedure................................................................................................57
Label Writer Cleaning and Maintenance .................................................................................................57
Cleaning the Exterior and Interior of Your Printer................................................................................57
Regular Inspections and Maintenance....................................................................................................58
Weekly Inspections..............................................................................................................................58
Repairing FloPoint® Elite Devices ...........................................................................................................58
Device Disposal.......................................................................................................................................58
Managing Exam Results in ScanPoint® with QuickPrint ......................................................................59
Starting ScanPoint® with QuickPrint........................................................................................................59
ScanPoint® with QuickPrint Windows Icons............................................................................................59
Using Multiple ScanPoint® Docking Stations.......................................................................................60
The Message Indicator ........................................................................................................................60
Completing an Unannotated Exam .........................................................................................................60
If You Did Not Enter a Voice Annotation .............................................................................................60
Reprinting an Exam.................................................................................................................................62
To Reprint the Most Recent Exam Results .........................................................................................63
Completing a Voice-Annotated Exam .....................................................................................................63
Viewing Exam Results in ScanPoint® Online ..........................................................................................66
Starting ScanPoint® Online..................................................................................................................66
Viewing Exam Results .........................................................................................................................66
Viewing Past Exams ............................................................................................................................68
FloPoint® Elite Reports in ScanPoint® with QuickPrint............................................................................69
Report Type Samples..............................................................................................................................71
Changing Your Preferences....................................................................................................................77
Exiting QuickPrint or Hiding the QuickPrint Window...............................................................................80

FloPoint® Elite Uroflow System Table of Contents
User’s Manual page 9
Closing the QuickPrint Window without Closing ScanPoint®...............................................................80
To Exit QuickPrint Completely.............................................................................................................80
Calibration..................................................................................................................................................81
Determining the Number of Days Until Required Calibration..................................................................81
Calibrating the FloSensor using ScanPoint® with QuickPrint..................................................................83
If the Calibration was Successful.........................................................................................................84
If the Calibration was Unsuccessful.....................................................................................................84
Completing Calibration ........................................................................................................................84
Troubleshooting........................................................................................................................................86
Help Resources.......................................................................................................................................86
Diagnosing Problems ..............................................................................................................................88
ScanPoint® Problems...........................................................................................................................88
ScanPoint® Remote Problems.............................................................................................................89
Error Messages....................................................................................................................................90
Error Codes..........................................................................................................................................91
Application Log........................................................................................................................................92
Warranty.....................................................................................................................................................94
Disclaimer of Additional Warranties ........................................................................................................94
Contacting Verathon®...............................................................................................................................95
Clinical Application...................................................................................................................................96
Definitions, Indications, and Output.........................................................................................................96
Definitions ............................................................................................................................................96
Indications............................................................................................................................................96
Clinical Condition or History Suggestive Of: ....................................................................................96
Specific Signs and Symptoms:.........................................................................................................96
FloPoint® Elite Output ..........................................................................................................................96
FloPoint® Interpretation ...........................................................................................................................97
Limitations and Specific Clinical Applications......................................................................................97
Quantitative Measurements.................................................................................................................97
Flow Rates...........................................................................................................................................97
Measurements Related to FloPoint® Elite Curve Patterns ..................................................................99
Continuous/Regular Patterns:..........................................................................................................99
Irregular Patterns ...........................................................................................................................101
Clinical Significance...........................................................................................................................102
Artifactual Causes..............................................................................................................................102
Using Flow Time and Voiding Time to Help Identify the Curve Pattern ............................................103

Table of Contents FloPoint® Elite Uroflow System
page 10 User’s Manual
Summary of Diagnostic Significance .................................................................................................103
Artifacts and Pitfalls ...........................................................................................................................104
“Spikes” or Rapid Fluctuations in the Curve ..................................................................................104
Low and High Voided Volumes......................................................................................................105
Test Technique......................................................................................................................................106
Reimbursement Information ..................................................................................................................106
Physician Participation Requirement.................................................................................................106
Procedure Codes...............................................................................................................................106
Diagnosis Codes................................................................................................................................106
REFERENCES......................................................................................................................................108
Parts and Accessories............................................................................................................................109
FloPoint® Elite Uroflow System Components........................................................................................109
FloPoint® Elite Uroflow System Accessories.........................................................................................110
Other FloPoint® Elite Uroflow System Accessories...............................................................................112
Specifications..........................................................................................................................................114
Symbol Directory ...................................................................................................................................114
Standards and Regulations Compliance...............................................................................................114
Electromagnetic Effects .....................................................................................................................115
Health Insurance Portability and Accountability Act ..........................................................................116
FloCharger.............................................................................................................................................116
FloSensor ..............................................................................................................................................117
ScanPoint® Remote...............................................................................................................................117
ScanPoint® Docking Station ..................................................................................................................117
Accuracy Specifications.........................................................................................................................118
Operating Conditions.............................................................................................................................118
Storage Conditions................................................................................................................................119
Radio Specifications..............................................................................................................................119
Computer Hardware and Software Requirements ................................................................................119
Operating System and Software Requirements ................................................................................120
Label Writer Specifications....................................................................................................................120
Mounting Bracket and Related Equipment Specifications ....................................................................121
Glossary...................................................................................................................................................122

FloPoint® Elite Uroflow System Table of Figures
User’s Manual page 11
Table of Figures
Figure 1. FloPoint® Elite Uroflow System Components and Features........................................................16
Figure 2. ScanPoint® Label Writer Parts and Features...............................................................................18
Figure 3. The ScanPoint® Docking Station has a USB Connector. ............................................................39
Figure 4. Connecting the ScanPoint® Printer to Power...............................................................................42
Figure 5. Loading a Roll of Labels on the Spool Spindle............................................................................43
Figure 6. Inserting a Label into the Label Feed Slot...................................................................................44
Figure 7. ScanPoint® Remote Battery Icon.................................................................................................45
Figure 8. FloSensor Components...............................................................................................................56
Figure 9. QuickPrint Window with Status Box and Message Icon..............................................................59
Figure 10. Patient Detail Dialog ..................................................................................................................61
Figure 11. New Exams Results Window.....................................................................................................64
Figure 12. New Exam Results Dialog .........................................................................................................64
Figure 13. Patient details added to an exam record...................................................................................65
Figure 14. New Exam Results Page...........................................................................................................67
Figure 15. Exam Details Page ....................................................................................................................67
Figure 16. New Exam Results.....................................................................................................................68
Figure 17. Patient Exams History screen - Search by Patient ID ...............................................................69
Figure 18. Patient Exams History Search Results......................................................................................69
Figure 19. ScanPoint® Online Detail Report ...............................................................................................72
Figure 20. ScanPoint® Online Detail Report Preview .................................................................................73
Figure 21. ScanPoint® Online Summary Report Preview ...........................................................................74
Figure 22. QuickPrint Full Page Detail Report............................................................................................75
Figure 23. Quick Print Full Page Summary Report.....................................................................................76
Figure 24. QuickPrint Detail Label Report ..................................................................................................76
Figure 25. QuickPrint Summary Label Report ............................................................................................77
Figure 26. FloPoint® Elite Calibration Fluid and Calibration Quick Reference Card...................................81
Figure 27. ScanPoint® Calibration Warning Message ................................................................................82
Figure 28. Instrument Details Dialog...........................................................................................................83
Figure 29. Calibration Report......................................................................................................................85
Figure 30. ScanPoint® Diagnostics .............................................................................................................87
Figure 31. Application Log Request............................................................................................................93
Figure 32. Application Log Data..................................................................................................................93

Table of Figures FloPoint® Elite Uroflow System
page 12 User’s Manual
Figure 33. Measurements Taken From the FloPoint® Elite Curve A. Measurements of the continuous
uroflow curve. Average flow rate (not shown) is calculated by divided total volume voided by flow time. B.
Measurements of flow time and voiding time from an intermittent uroflow curve.......................................98
Figure 34. Normal Uroflow Curve .............................................................................................................100
Figure 35. Superflow Pattern ....................................................................................................................100
Figure 36. "Flat Top" Obstructive Flow Pattern The peak on the spike at the end of the trace might have
been misinterpreted by the uroflowmetry as the peak flow.......................................................................101
Figure 37. Rounded Top Obstructive Flow Pattern ..................................................................................101
Figure 38. Fluctuating Pattern Caused by Abdominal Straining...............................................................102
Figure 39. Abnormal Intermittent Pattern, Caused By Detrusor Sphincter Dyssynergia..........................102
Figure 40. Artificial Fluctuating Pattern The patient creates this pattern by repeatedly moving his stream
across the commode outlet.......................................................................................................................103
Figure 41. Artificial "Squeezing" Pattern The patient creates this pattern by repeatedly obstructing urine
flow by squeezing his foreskin or penis. ...................................................................................................103
Figure 42. Artifactual uroflow peak produced by a spike The (black arrow) identifies an artifactual spike
that the uroflowmetry reads as the flow peak. The correct peak flow (open arrow) must be read manually
by the interpreter.......................................................................................................................................105

FloPoint® Elite Uroflow System Important Information
User’s Manual page 13
Important Information
Product Description
The study of urine discharge rate, or uroflowmetry, is recognized by the medical
community to be valuable in the determination of comparative urological function.
The advanced technology in the FloPoint® Elite Uroflow System provides an accurate
and convenient method to help assess bladder function. The FloSensor contains a disk
that spins at a constant speed. When a flow of urine hits the disk, the motor must work
harder to maintain the disk spinning at that same speed with the added weight of the
urine. The FloSensor measures the amount of power needed to maintain the disk’s
original speed and uses that measurement to calculate the urine flow rate. The FloSensor
also records the total amount of urine discharged by the patient. This data can be
analyzed using the ScanPoint® with QuickPrint software to determine how quickly or
slowly the patient urinated, any interruptions or changes in the flow, and the total volume
of the patient’s bladder.
Intended Use Warnings and Cautions
The FloPoint® Elite Uroflow System should be used only by individuals who have been
trained and authorized by a physician or the institution providing patient care. All users
must read this entire User’s Manual prior to using the FloPoint® Elite Uroflow System.
Do not attempt to operate this instrument until you thoroughly understand all instructions
and procedures in this manual. Failure to comply with these instructions may compromise
the performance of the device and the reliability of its measurements. For the most
current version of this User’s Manual please visit the Verathon® web site at:
http://www.verathon.com/manuals.htm.
Statement of Prescription
United States federal law restricts the FloPoint® Elite Uroflow System to use by, or on the
order of, a physician. This statement is required per 21 Code of Federal Regulations
(CFR) 801.109.
NOTE: It is standard practice to have medical staff authorize the use of the FloPoint®
Elite Uroflow System within its intended use throughout an institution. Individual
prescriptions for use are not required.
Statement of Intended Use
The FloPoint® Elite system is intended for uroflowmetry exams: the measurement and
analysis of urine discharge rate and volume. The FloSensor is placed in a toilet bowl with
a disposable funnel placed on top which directs the urine flow into the sensor. The patient
may void into the sensor from either a standing or sitting position. Uroflowmetry data
gathered by the FloSensor is transmitted to the ScanPoint® Remote via wireless radio
link. When used in conjunction with ScanPoint® with QuickPrint software, a report
containing the ICS values for uroflowmetry may be generated for the patient’s medical
record.
Important Information

Important Information FloPoint® Elite Uroflow System
page 14 User’s Manual
Contraindications
None
To assure safe and reliable operation for the use and the patient, please read and heed
the following warnings and cautions.
WARNINGS and CAUTIONS:
To assure safe use and accurate results when using the FloPoint® Elite Uroflow System
be aware of the following conditions:
Read and understand all procedures prior to use.
Before using the FloPoint® Elite Uroflow System, you must read and understand all the
instructions and procedures in this User’s Manual. Failure to comply with the instructions
may affect the safety of the patient, clinician, and/or the accuracy of the exam results. For
the most up-to-date version of the User’s Manual, go to
http://www.verathon.com/manuals.htm.
Clean after every use.
To ensure the reliability of the FloSensor, it is imperative that you clean the FloSensor
with a typical disinfecting bathroom cleaner after every use.
When cleaning FloPoint® Elite Uroflow System components, do not use any
products containing ammonia.
Sterilization.
Do not sterilize this instrument.
Power Supply.
Only connect the FloPoint® Elite AC adapter to power sources consistent with the input
specifications shown on the adaptor label.
Risk of fire and/or explosion.
Do not use the FloPoint® Elite Uroflow System in the presence of flammable anesthetics.
Risk of device damage:
Do not allow any foreign objects fall onto or into the device. Only expose the unit to fluids
as directed for uroflow measurements and cleaning.
Do not subject the FloPoint® Elite Uroflow System to mechanical vibration, dust, or shock.
Do not store or use the FloPoint® Elite Uroflow System near heat sources such as
radiators. Do not operate this device in temperatures below 10ºC (50ºF) or above 35ºC
(104ºF). Do not store this device in temperatures below -10ºC (14ºF) or above 35ºC
(95ºF).
Assure that the FloPoint® Elite Uroflow System is situated in an area with proper
ventilation.
To comply with IEC 60601-1 and national electrical codes, the FloCharger must be wall-
mounted as described in this manual.
Never cover the FloCharger or FloSensor with any cloth or other object that might
interfere with proper ventilation.
Do not store or operate the FloPoint® Elite Uroflow System near equipment or devices
that generate strong electro-magnetic fields.
Do not place any heavy objects on top of the FloSensor or FloCharger.

FloPoint® Elite Uroflow System Important Information
User’s Manual page 15
Hazardous materials present. Assure proper disposal.
The FloPoint® Elite Uroflow System may contain lead, batteries, and other
environmentally hazardous materials. When the FloPoint® Elite Uroflow System has
reached the end of its useful service life, return the device, and related accessories to a
Verathon® Service Center for proper disposal. Alternatively, follow your local protocols for
hazardous waste disposal.
Assure proper computer system configuration.
When using the FloPoint® Elite Uroflow System with ScanPoint® software, your computer
must be minimally certified to EN / IEC / CSA / UL 60950 or 60101-1 standards. This
configuration ensures that compliance to the EN/IEC 60601-1-1 system standard is
maintained. Anyone connecting additional equipment to the FloPoint® Elite Uroflow
System signal input port or signal output port configures a medical system, and is
therefore responsible for ensuring that the system complies with IEC 60950 or
EN/IEC 60601-1-1 (if in the vicinity of patients). If you need assistance, contact your
biomedical staff, Verathon Medical® representative, or the Verathon® Medical Customer
Care Department at 1.800.331.2313.
Assure proper distance from patient.
When transmitting data to or from your computer, make sure that the FloPoint® Elite,
accessories, and computer are outside the patient vicinity (more than six feet (2 meters)
from the patient). Refer to EN/IEC 60601-1 for the definition of patient vicinity.
Risk of injury or device damage.
Keep long hair and loose clothing away from the FloSensor. Keep foreign materials such
as toilet paper and metal out of the FloSensor.
Do not flush FloPoint® Elite funnels down the toilet. Dispose of them as you would
other medical waste.
Service.
The FloPoint® Elite Uroflow System should be serviced by authorized service personnel
when:
The AC power cord or plug has been damaged.
Objects have become trapped in the instrument.
The instrument has been exposed to rain or moisture other than that consistent
with use as directed.
The instrument does not appear to operate normally or exhibits a marked change
in performance.
The instrument has been dropped or the enclosure damaged.
The FloPoint® Elite Uroflow System does not contain any user-serviceable components.
The user should not attempt to service the instrument beyond the procedures provided in
this manual, unless directed by Verathon® service personnel. All other servicing should
be referred to authorized service personnel.
If at any time you require assistance with your FloPoint® Elite Uroflow System, contact
Verathon Medical® Customer Care at 800.331.2313 (Canada and US only) or
425.867.1348.

Introducing the FloPoint® Elite Uroflow System FloPoint® Elite Uroflow System
page 16 User’s Manual
Introducing the FloPoint® Elite Uroflow System
Product Description
FloPoint® Elite Uroflow System measures and records a patient’s pattern of urinary flow,
allowing physicians to quickly assess the mechanics of flow and to diagnose
abnormalities in voiding patterns (e.g., obstructed or restricted flow, superflow, etc.).The
advanced technology in the FloPoint® Elite Uroflow System provides an accurate and
convenient method to assess bladder function. The FloSensor rapidly and accurately
records both the flow rate and the total amount of urine discharged by the patient. These
measurements are transmitted via radio link to a remote handset which in turn interfaces
with ScanPoint® with QuickPrint allowing data storage, diagnostic analysis, and report
generation.
The FloPoint® Elite Uroflow System has a small footprint, making it easy and unobtrusive
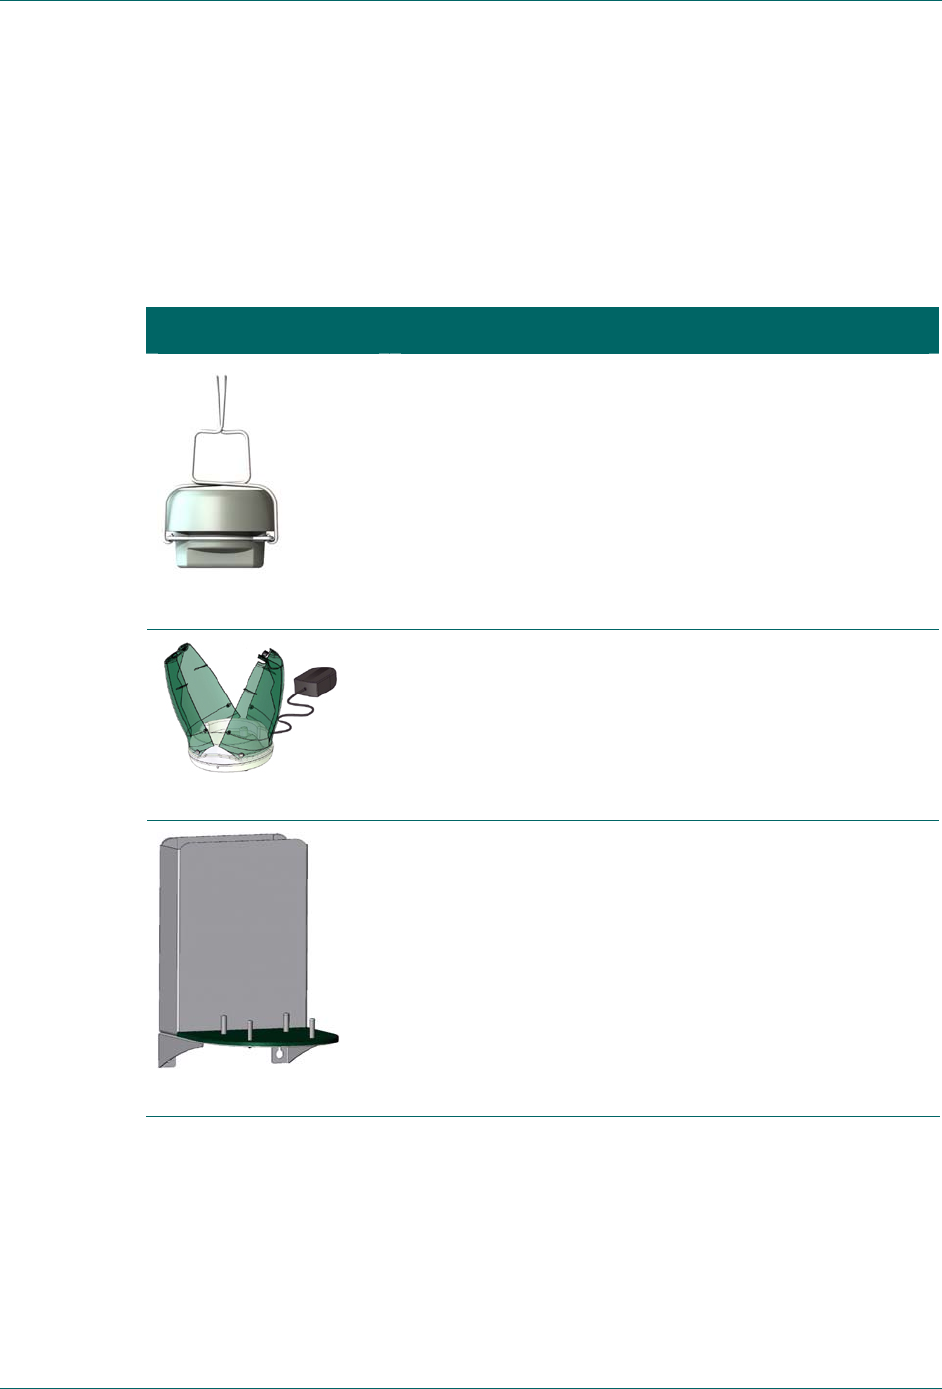
to use and store. The FloSensor, the heart of the FloPoint® Elite system, is lightweight
and designed to fit in a standard toilet bowl during an exam. Between uses, it stows
discreetly in the FloCharger, which also recharges the FloSensor battery.
FloPoint® Elite Uroflow System Parts and Features
The main features of the FloPoint® Elite Uroflow System and ScanPoint® Remote are
illustrated in Figure 1.
Figure 1. FloPoint® Elite Uroflow System Components and Features
Introducin
g
the FloPoint®Elite Uroflow S
y
stem
Handles
FloCharger LED
FloSenso
r
Microphone
LCD display
Start
button
FloCharge
r
Latch
ScanPoint
®
Remote in the
ScanPoint® Docking Station
Reset
button
Clamshell
FloPoint
®
Elite
Mounting
Bracket
Funnel Box

FloPoint® Elite Uroflow System Introducing the FloPoint® Elite Uroflow System
User’s Manual page 17
The FloSensor fits into a standard toilet bowl and measures a patient’s urine flow rate
and volume. The ScanPoint® Remote gathers patient data measured by the FloSensor
and transmits it to the ScanPoint® host computer allowing further analysis and reporting
options. The Remote also tracks other diagnostic information about the internal
functioning of the FloSensor.
Part Name Purpose
Handles Provide a means for carrying the FloSensor, suspend the
FloSensor in the toilet bowl, and support the disposable funnel.
FloSensor Measures urine volume and flow rate.
Latch Allows the FloCharger housing to be closed securely.
Clamshell Protects the FloSensor and FloCharger from dust and
contaminants when not in use.
FloCharger Recharges the FloSensor battery
FloPoint® Elite
Mounting Bracket Attaches to the wall, securely holding the FloCharger and a
funnel box 3 feet (0.914 m) or more above the floor.
Funnel Box Contains 40 disposable funnels for attachment to FloSensor
during uroflow exams.
ScanPoint®
Remote Acts as a remote control for starting/stopping the FloSensor. Its
LCD display communicates exam and device status to the user.
The FloSensor transmits exam data to the Remote via a wireless
radio link. The Remote, in turn, downloads this data to a
computer with ScanPoint® with QuickPrint software.
Start/Stop button Starts/stops FloSensor functions for exams and calibration.
LCD display Displays measurement data and device status.
Microphone Records voice annotations.
Reset button A recessed button on the back of the Remote that re-activates
the Remote when it doesn’t self-activate. Occasionally when the
Remote battery has been completely discharged, you may need
to reset the Remote before it can be used again.
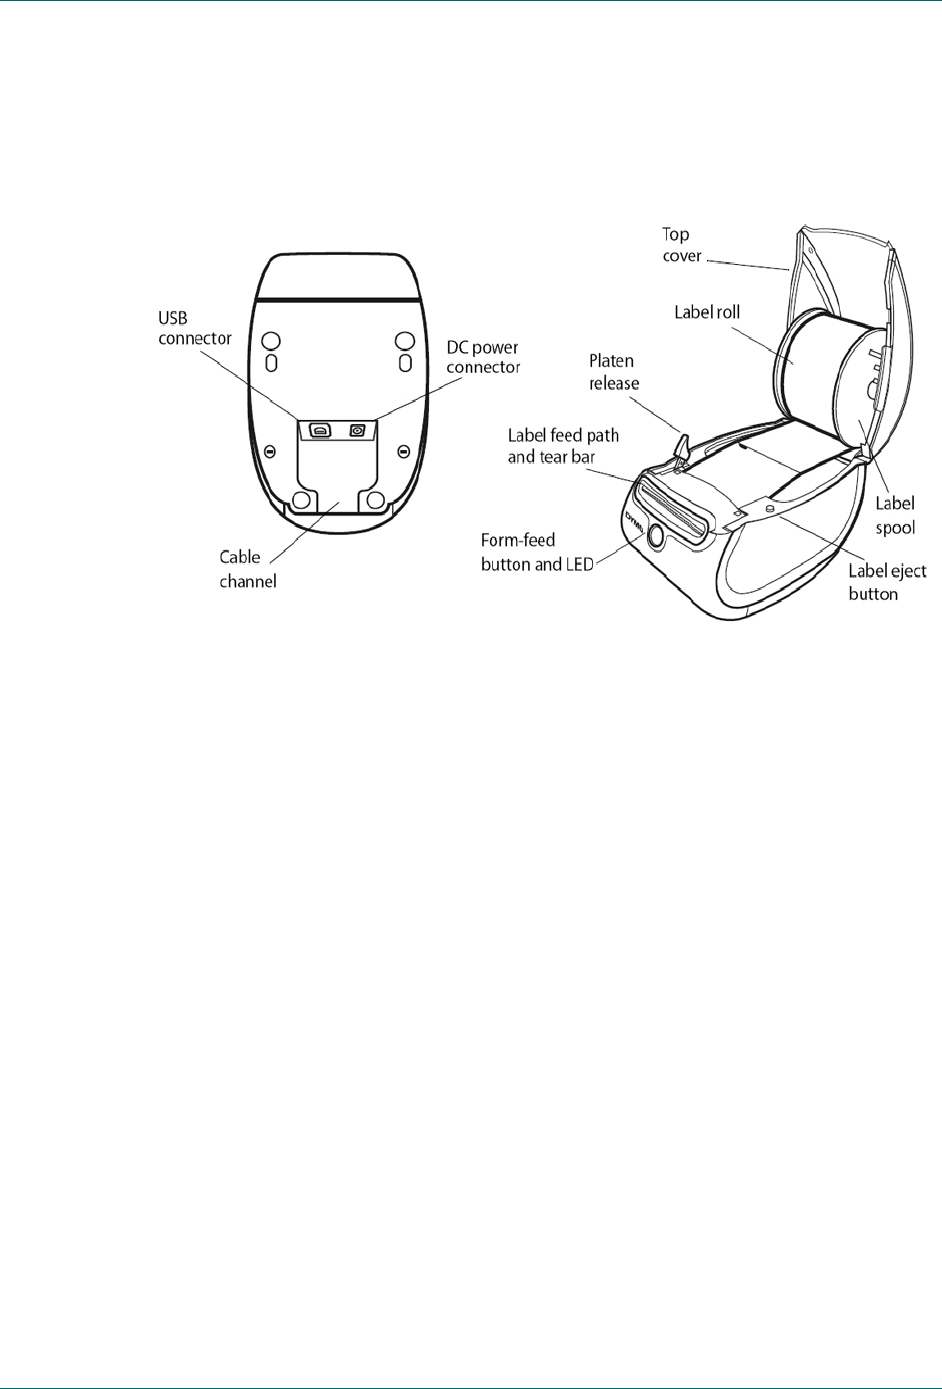
ScanPoint® Label Writer (Optional Printer)
The ScanPoint® Label Writer is an optional component of the FloPoint® Elite System. It
prints patient exam data on self-adhesive labels (approximately 2.5” x 6”) that can be
attached to a patient record. The parts and features of the ScanPoint® Label Writer are
shown in (Figure 2).
Introducing the FloPoint® Elite Uroflow System FloPoint® Elite Uroflow System
page 18 User’s Manual
Figure 2. ScanPoint® Label Writer Parts and Features
The ScanPoint® Label Writer is a direct thermal printer and does not use toner, ink
cartridges, or a ribbon. Instead, it uses heat from a thermal print head to print on specially
treated labels.
The Form-feed button on the front of the printer advances a single label.
The Label eject button is used to remove labels from the printer when changing
rolls.
The LED status light allows you to visually determine the current state of the
printer:
o Solid blue - Power is on and the printer is ready.
o Flashing blue - Labels are not loaded properly or label spool is empty.
ScanPoint® Online
ScanPoint® with QuickPrint software is included with your FloPoint® Elite system. During
an exam, data is gathered from the FloSensor by the ScanPoint® Remote. The Remote,
in turn, downloads this data to the ScanPoint® host computer allowing patient record
storage, further diagnostic analysis, and report generation.
ScanPoint® Online is an innovative service that enhances and expands the capabilities of
the FloPoint® Elite Uroflow System.
ScanPoint® Online allows you to:
Bottom View Top/Side View

FloPoint® Elite Uroflow System Introducing the FloPoint® Elite Uroflow System
User’s Manual page 19
View exam measurements and graphs from patient exams.
Print exam results for patient records and for reimbursement (if applicable) using
your choice of report format.
Save a PDF copy of the exam report that can be imported into other electronic
medical record systems.
Save and store images online - allowing you to access patient records from any
Internet-enabled computer (HIPAA compliant).
Take advantage of ScanPoint® automatic file backup service.
Ensure the optimum accuracy of your FloPoint® Elite system by calibrating
online, in a matter of minutes, and as often as you wish.
Take advantage of automatic software upgrades.
ScanPoint® Premium Warranty Total Customer CareSM Plan
The Premium Warranty Total Customer CareSM Plan includes ScanPoint® Online, insures
your device against damage, theft and loss, provides free next-day loaners, and pays all
shipping charges.

Getting Started FloPoint® Elite Uroflow System
page 20 User’s Manual
Getting Started
The previous section provided introductory information about the FloPoint® Elite Uroflow
System. This section provides information on how to set up your FloPoint® Elite Uroflow
System prior to first use.
Required Equipment
In addition to the components included with your FloPoint® Elite system (see “FloPoint®
Elite Uroflow System Parts and Features” beginning on page 16), highly recommended
equipment includes:
A Windows® computer with a high speed Internet connection. (Computer
hardware, software and operating system requirements can be found on
page 119.)
NOTE: To use ScanPoint® Online, a Windows computer with an Internet
connection is required.
Adobe® Acrobat® Reader®, for viewing and printing reports (see “Step 3:
Installing Adobe® Acrobat® Reader” on page 25).
Getting Started
To assure successful set up and operation of your FloPoint® Elite Uroflow System, follow
these seven steps in the order given:
Step 1. Unpack the FloPoint® Elite components and related accessories. Instructions
begin on page 21.
Step 2. Attach the Mounting Bracket to the wall and attach the FloCharger to the
Mounting Bracket. Instructions begin on page 25.
Step 3. Install Adobe Acrobat Reader. Instructions begin on page 26.
Step 4. Install ScanPoint® with QuickPrint software on your PC. Instructions begin on
page 26.
Step 5. Set your ScanPoint® with QuickPrint user preferences. Instructions begin on
page 33.
Step 6. Install FloPoint® devices (ScanPoint® Docking Station and optional Label
Writer) using the Windows Install New Hardware Wizard. Instructions begin
on page 39.
Step 7. Charge the ScanPoint® Remote and FloSensor batteries. Instructions begin
on page 44. NOTE: The FloSensor and the Remote should arrive from the
factory already charged.
Getting Started
FloPoint® Elite Uroflow System Getting Started
User’s Manual page 21
Step 1: Unpack the Box and Check the Components
Set the shipping container right side up and carefully open the top flaps (do not insert
anything sharp through the top of the box). Remove the contents and verify that you have
received everything listed below. If anything is missing or damaged, notify your
authorized Verathon Medical® representative or Verathon Medical® Customer Care
Department at 1.800.331.2313.
Part and Part Number Name and Description
0570-0175
FloSensor with Handles:
Measures urine volume and flow rate. The Handles
suspend the FloSensor inside the toilet.
0570-0176
FloCharger with Clamshell:
Stores the FloSensor and recharges the batteries.
0800-0337
FloPoint® Elite Mounting Bracket:
Attaches to the wall, securely holding the FloCharger and a
funnel box 3 feet (0.914 m) or more above the floor.
Getting Started FloPoint® Elite Uroflow System
page 22 User’s Manual
Part and Part Number Name and Description
0570-0174
ScanPoint® Remote:
Acts as a remote control to start and stop the FloSensor,
displays information on flow measurements and device
status, records voice annotations, and transmits data to a
ScanPoint® host computer when placed in the ScanPoint®
Docking Station (below).
0570-0168
ScanPoint® Docking Station:
Transmits data from the ScanPoint® Remote to the
ScanPoint® host computer and recharges the Remote
batteries.
0900-1238
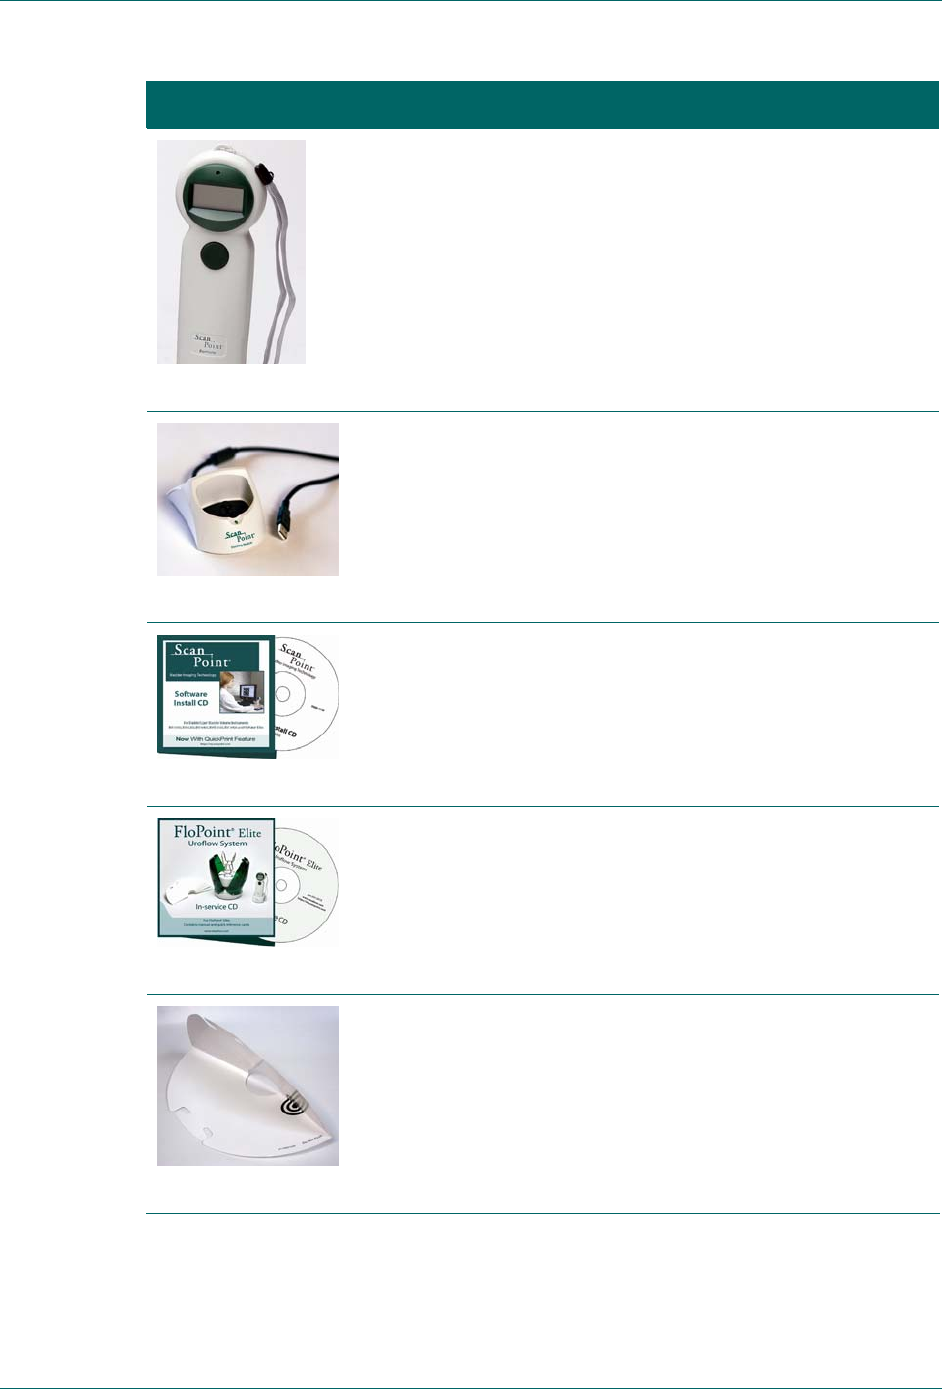
ScanPoint® with QuickPrint Installation CD:
Produces reports based on the data gathered during an
exam and submitted by the ScanPoint® Remote.
0900-1445
FloPoint® Elite In-Service CD:
Includes FloPoint® Elite User’s Manual and Quick
Reference Cards.
0800-0297
Box of Paper Funnels:
Help direct the urine flow toward the FloSensor.
Box contains 40 funnels.
FloPoint® Elite Uroflow System Getting Started
User’s Manual page 23
Part and Part Number Name and Description
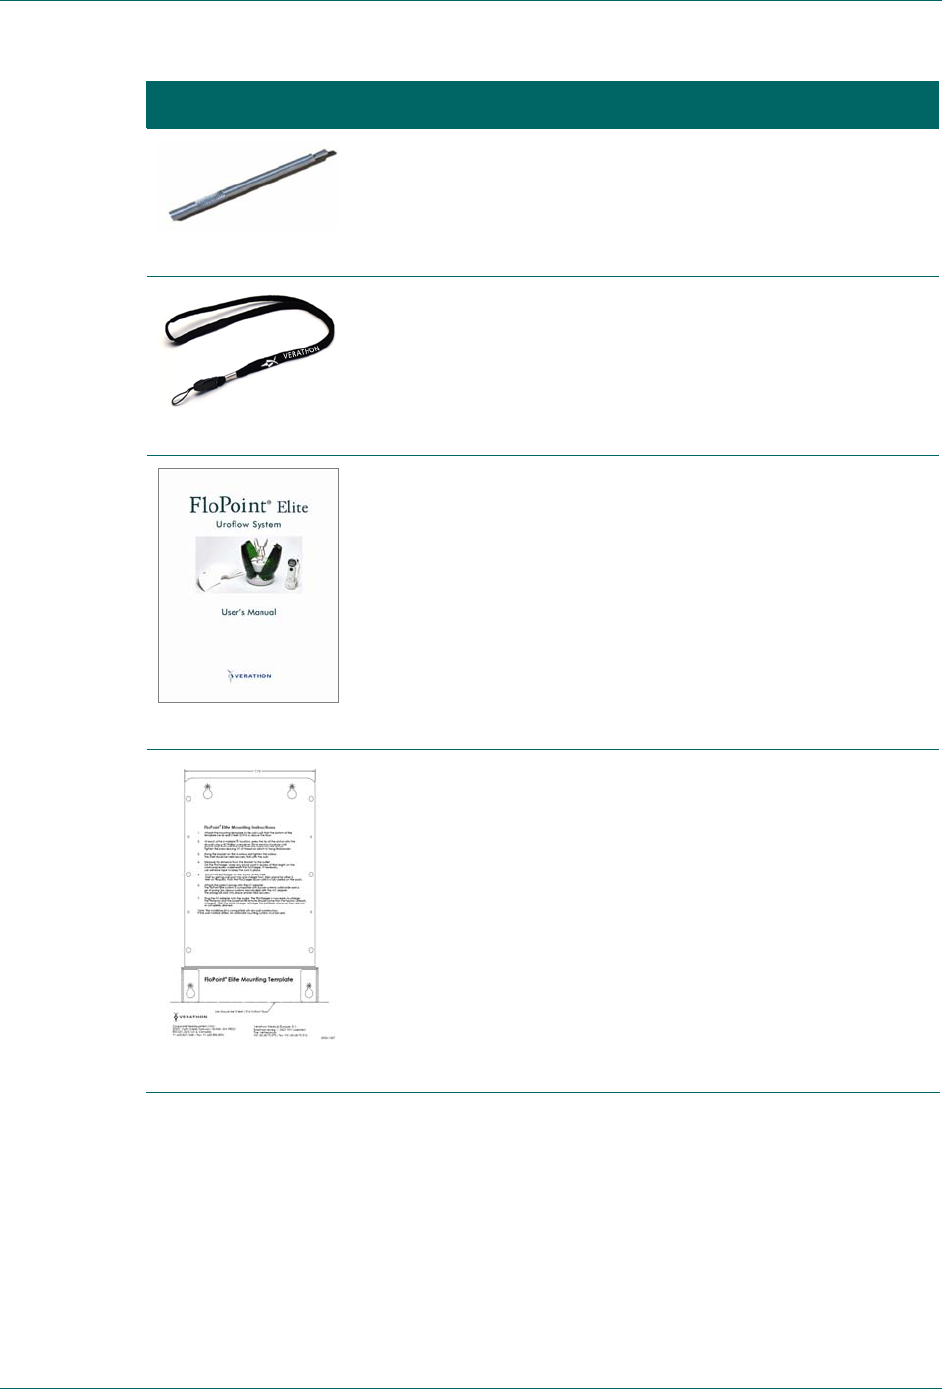
0130-0181
Activation Tool:
Use to press the Reset button on the ScanPoint® Remote if
the Remote needs to be reactivated.
0264-0008
Lanyard:
Attaches to the ScanPoint® Remote, if desired, to assist
with placement of the Remote in proximity to the
FloSensor.
0900-1442
User’s Manual
FloPoint® Elite Uroflow System User’s Manual (this
manual).
0900-1557
FloPoint® Elite Mounting Bracket Template
Aids in attaching the Mounting Bracket to the wall.
Getting Started FloPoint® Elite Uroflow System
page 24 User’s Manual
Part and Part Number Name and Description
0900-1443
FloPoint® Elite Quick Reference Card:
Provides a summary of essential user instructions.
0900-1444
FloPoint® Elite Calibration Quick Reference Card:
Provides instructions for the FloPoint® Elite calibration
procedure.
ScanPoint® Label Writer
If you ordered a ScanPoint® Label Writer, the following items are included:
Part and Part Number Name and Description
0570-0178
ScanPoint® Label Writer:
Prints exam results on adhesive label media.
0600-0233
USB Cable:
Connects the ScanPoint® Label Writer to the ScanPoint®
host computer.
FloPoint® Elite Uroflow System Getting Started
User’s Manual page 25
Part and Part Number Name and Description
0600-0232
Label Writer Power Cord
Connects the Label Writer power adaptor to a wall outlet.
0275-0002
Power Supply:
Connects the power cord to the Label Writer.
0125-0446
Roll of Labels:
Labels in roll format properly sized for the ScanPoint® Label
Writer.
Step 2: Attach the Mounting Bracket to the wall and attach the FloCharger to the
Mounting Bracket.
For an installation of the FloCharger in the patient vicinity to comply with IEC 60601-1
and the National Electric Code in the United States and the Canadian Electric Code
in Canada, no part of the FloCharger cord must be lower than 3 feet above the floor.
Use the cord wrap underneath the FloCharger to protect the unused portion of the
cord. Any other installation method will jeopardize compliance of the FloPoint® Elite
system with IEC 60601-1 and the NEC or CEC and will therefore void any warranties
(implied or otherwise) offered by Verathon Medical® for the instrument.
WARNING: Install the FloCharger Mounting Bracket at a height of at least 3 feet (10
meters) above the floor.
WARNING: Use the cord wrap underneath the FloCharger to protect the unused
portion of the cord.
WARNING: Installation of a FloCharger that does not use the Mounting Bracket or
alternate protection of the cord will not be compliant with the Medical-Electrical Safety
Standard (IEC 60601-1). Alternate protection requires that the cord be 3 feet (10
meters) above the floor and not easily accessible by a patient.

Getting Started FloPoint® Elite Uroflow System
page 26 User’s Manual
NOTE: The installation kit is compatible with dry-wall construction. If the wall material
differs, an alternate mounting system must be used.
1. Attach the Mounting Template to the wall such that the bottom of the template is level
and 3 feet (914 cm) above the floor.
2. At each of the 4 marked locations, press the tip of the anchor into the drywall using a
#2 Phillips screwdriver. Drive anchor clockwise until anchor stops flush with the wall.
Insert the screw into the anchor. Tighten the screw leaving 1/4" of thread exposed on
which to hang the bracket.
3. Hang the bracket on the 4 screws and tighten the screws. The Mounting Bracket
should be held securely flush with the wall.
4. Measure the distance from the bracket to the outlet. On the FloCharger, wrap any
power cord in excess of that length on the cord-wrap recess underneath the
FloCharger. If necessary, use adhesive tape to keep the cord in place.
5. Mount the FloCharger on the 4 posts of the Mounting Bracket. Start by getting one
post into one charger foot, then place the other 3 feet on the posts. Push the
FloCharger down until it is fully seated on the posts.
6. Attach the correct prongs into the AC adapter. The FloPoint® Elite system is
compatible with power systems world-wide and a set of prongs for various systems
are included with the AC adapter. The prongs will click into place and be held
securely.
7. Plug the AC adapter into the socket. The FloCharger is now ready to charge. The
FloSensor and the ScanPoint® Remote should come from the factory already
charged. After the initial charge, recharge the batteries whenever they are low or
completely drained.
Step 3: Installing Adobe® Acrobat® Reader
ScanPoint® with QuickPrint uses Adobe Acrobat Reader (version 6.0 or higher) to print
labels and patient reports. If Acrobat Reader software is not already installed on your
computer, you can obtain a free copy at the Adobe Web site: http://www.adobe.com.
Follow the links for Acrobat Reader. After installing the Acrobat Reader software, you
must run the program once to accept the End User License Agreement in order to use
Acrobat Reader for printing reports.
Step 4: Install ScanPoint® with QuickPrint
IMPORTANT! You must have Administrator privileges to install ScanPoint® with
QuickPrint.
The dialog boxes displayed on your computer may differ slightly from
those illustrated in the following procedures. If so, follow the instructions
in the dialog boxes displayed on your screen.

FloPoint® Elite Uroflow System Getting Started
User’s Manual page 27
To use the ScanPoint® Online service, you need to install the ScanPoint® with QuickPrint
software included on the installation CD. The software creates links on your Start menu
and desktop to ScanPoint® with QuickPrint, ScanPoint® online help, the ScanPoint®
online manual, and the Verathon® Web site.
NOTE: Review the following information before beginning installation of the ScanPoint®
with QuickPrint software.
Verify that your computer meets the minimum requirements for this software
installation. (See “Computer Hardware and Software Requirements” on
page 119.)
You must have Administrator privileges on your computer to install this software.
The dialog boxes displayed on your screen may differ slightly from those
illustrated in the following steps. In this case, follow the instructions in the dialog
boxes displayed on your screen.
Do not plug in any new hardware devices (Label Writer, Docking Station, etc.)
before installing ScanPoint® with QuickPrint. If you have already plugged one in,
cancel the Add New Hardware dialog box and disconnect the device(s) before
proceeding.
Important: Make sure you have the latest service pack and critical updates for
the version of Windows that you are running. To find recent security updates,
visit Windows Update. (From your Internet Explorer browser window, select
Tools > Windows Update.
Installing ScanPoint® with QuickPrint Software
1. To begin, place the installation CD into your computer’s CD drive. The Install
Shield Wizard should start automatically.
NOTE: If the Install Shield Wizard does NOT open automatically:
a) Double click the My Computer icon on your desktop.
b) Double click your CD drive icon or name.
2. The Preparing to Install screens will open.
Getting Started FloPoint® Elite Uroflow System
page 28 User’s Manual
Followed by the ScanPoint® with QuickPrint InstallShield Wizard dialog box.
Click NEXT.
FloPoint® Elite Uroflow System Getting Started
User’s Manual page 29
3. The ScanPoint® with QuickPrint license agreement is displayed. You must accept
the agreement to continue with installation.
Click the I ACCEPT THE TERMS IN THE LICENSE AGREEMENT radio button.
Click NEXT.
4. The Setup Type dialog box is displayed.
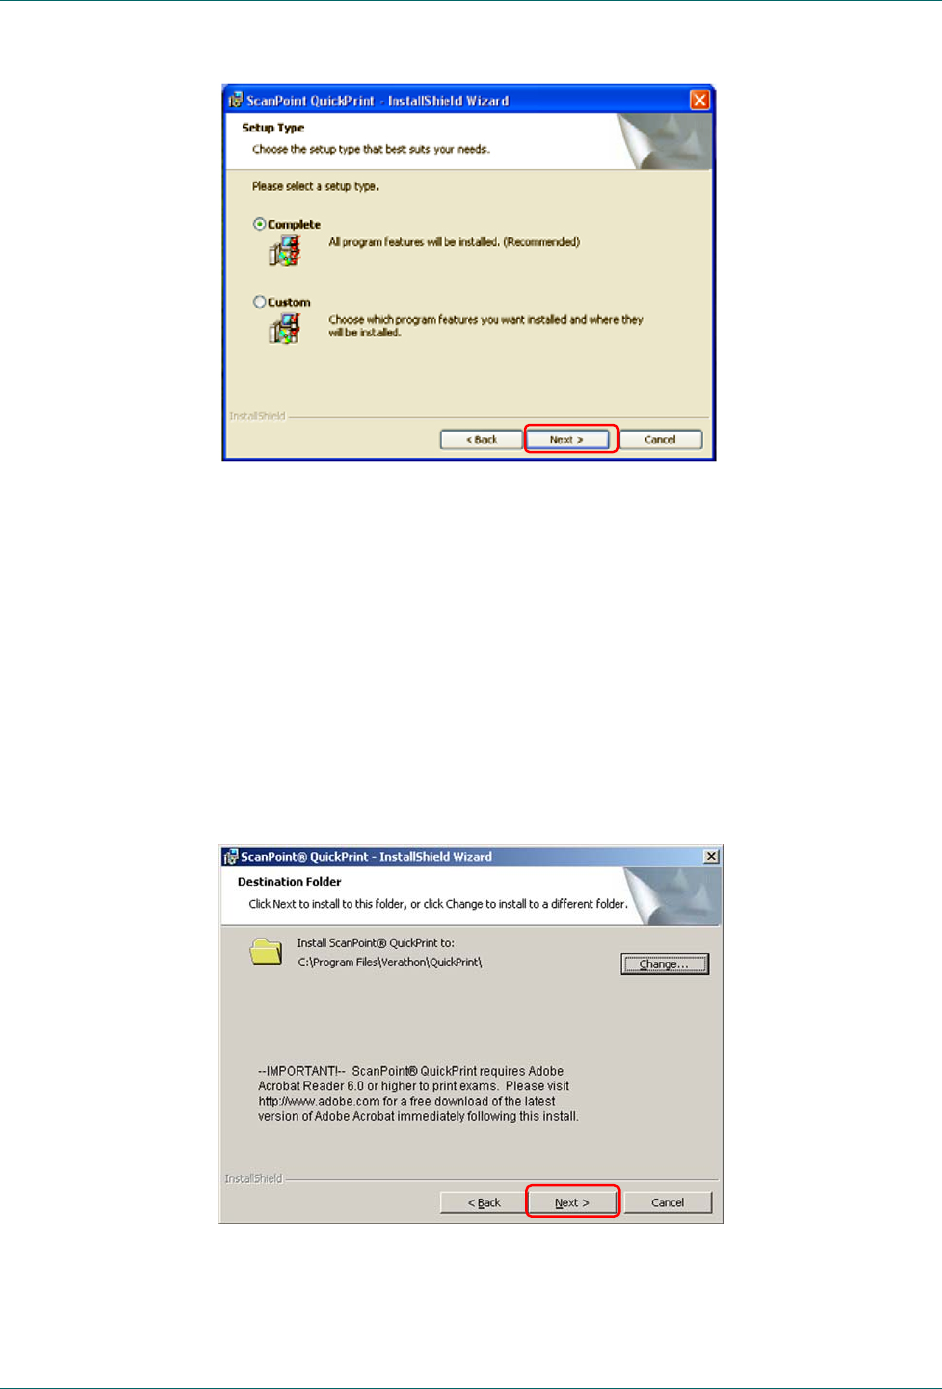
Getting Started FloPoint® Elite Uroflow System
page 30 User’s Manual
If you have a ScanPoint® Label Writer: Select the COMPLETE radio button.
If you do not have a ScanPoint® Label Writer: Select the CUSTOM radio button.
The next dialog box lists the features that will be installed. Clear the check for
installing the Label Writer.
Click NEXT.
5. The Destination Folder dialog is displayed. You may:
Accept the default location (no action is required).
Change the location: Click the CHANGE button. Enter or browse to the
desired location and click OK to return to the Destination Folder dialog.
Click NEXT.
NOTE: ScanPoint® with QuickPrint requires Adobe® Acrobat® Reader 6.0 or
higher to print exams. Please visit http://www.adobe.com for a free download of
FloPoint® Elite Uroflow System Getting Started
User’s Manual page 31
the latest version of Adobe® Acrobat® immediately following the installation of the
ScanPoint® with QuickPrint software.
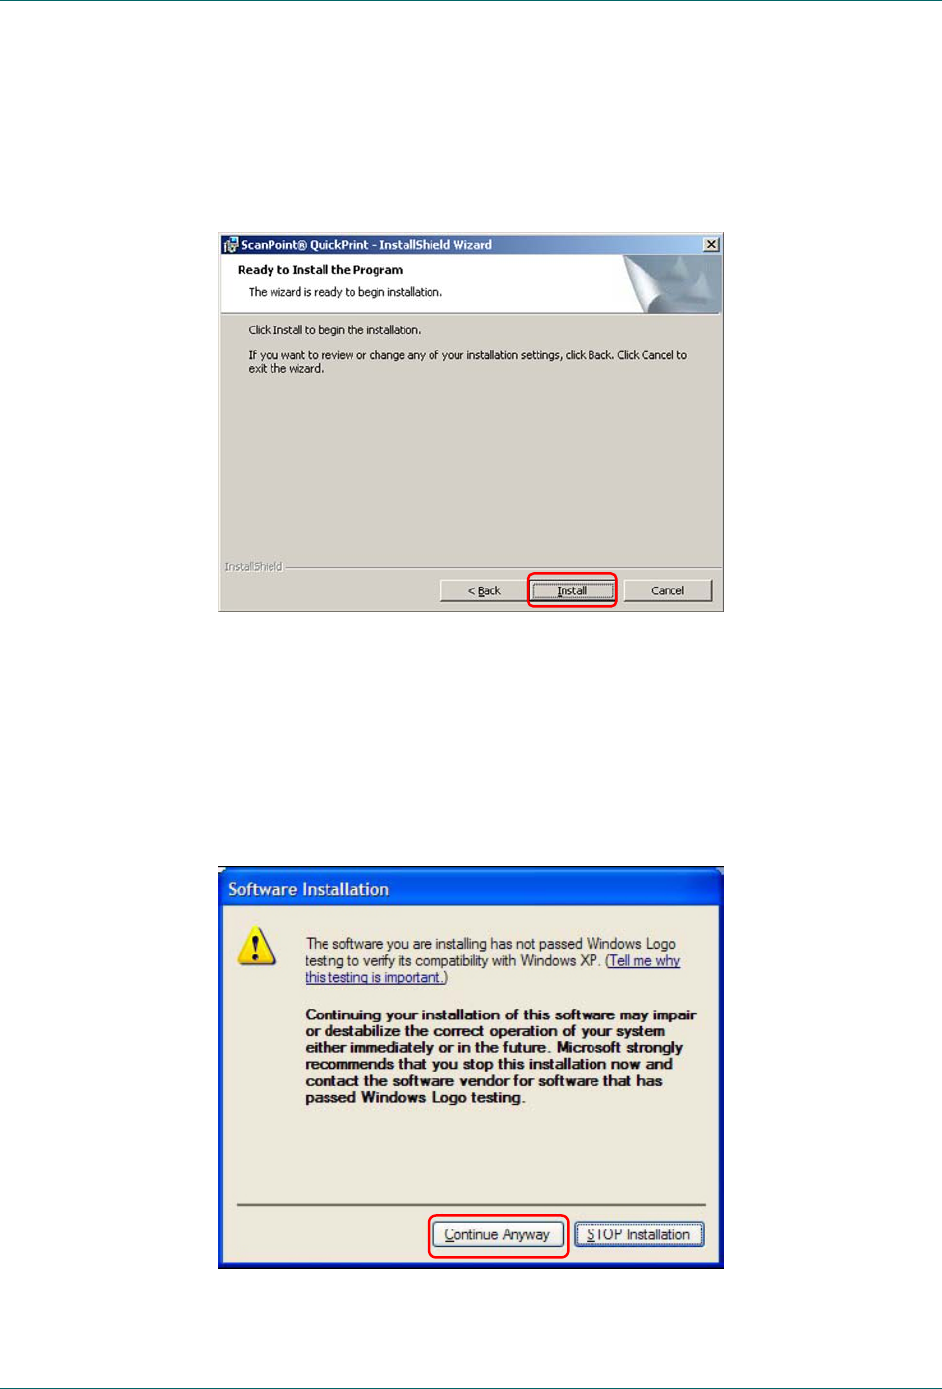
6. The Ready to Install the Program dialog is displayed. Click INSTALL.
During installation, a Microsoft Warning dialog box is displayed stating that
Microsoft has not yet tested this software for compatibility with the Windows® XP
and Windows 2000 operating systems. However, Verathon® has tested the
ScanPoint® with QuickPrint software and hardware drivers rigorously and is
confident that they are fully compatible with both Windows XP and
Windows 2000.
Click CONTINUE ANYWAY if this dialog is displayed.
Getting Started FloPoint® Elite Uroflow System
page 32 User’s Manual
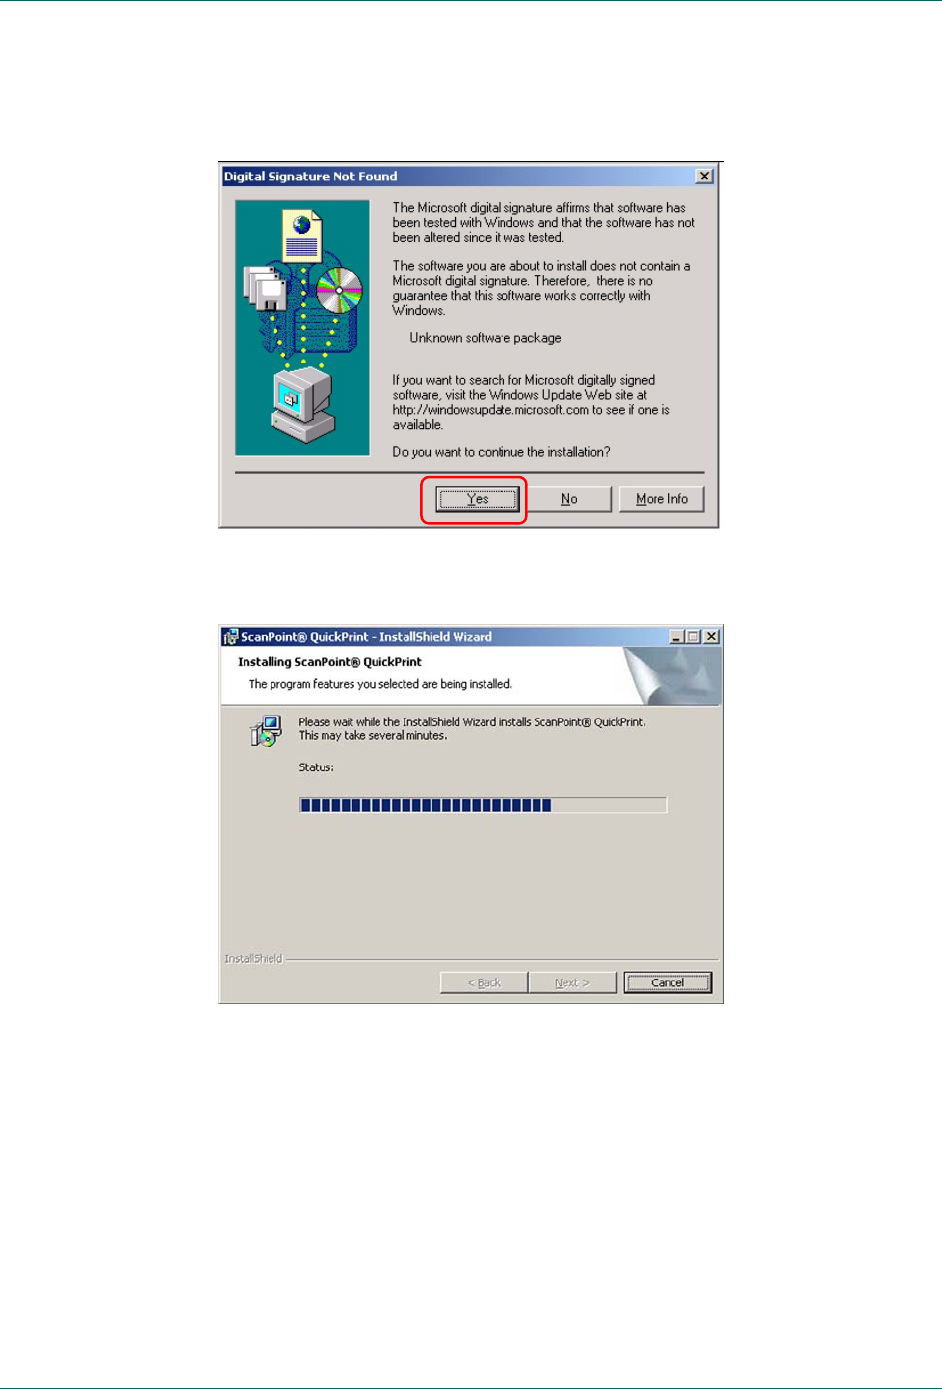
7. The Digital Signature dialog is displayed (Windows 2000 only).
Click YES to continue installation.
8. The Installing ScanPoint® with QuickPrint screen is displayed.
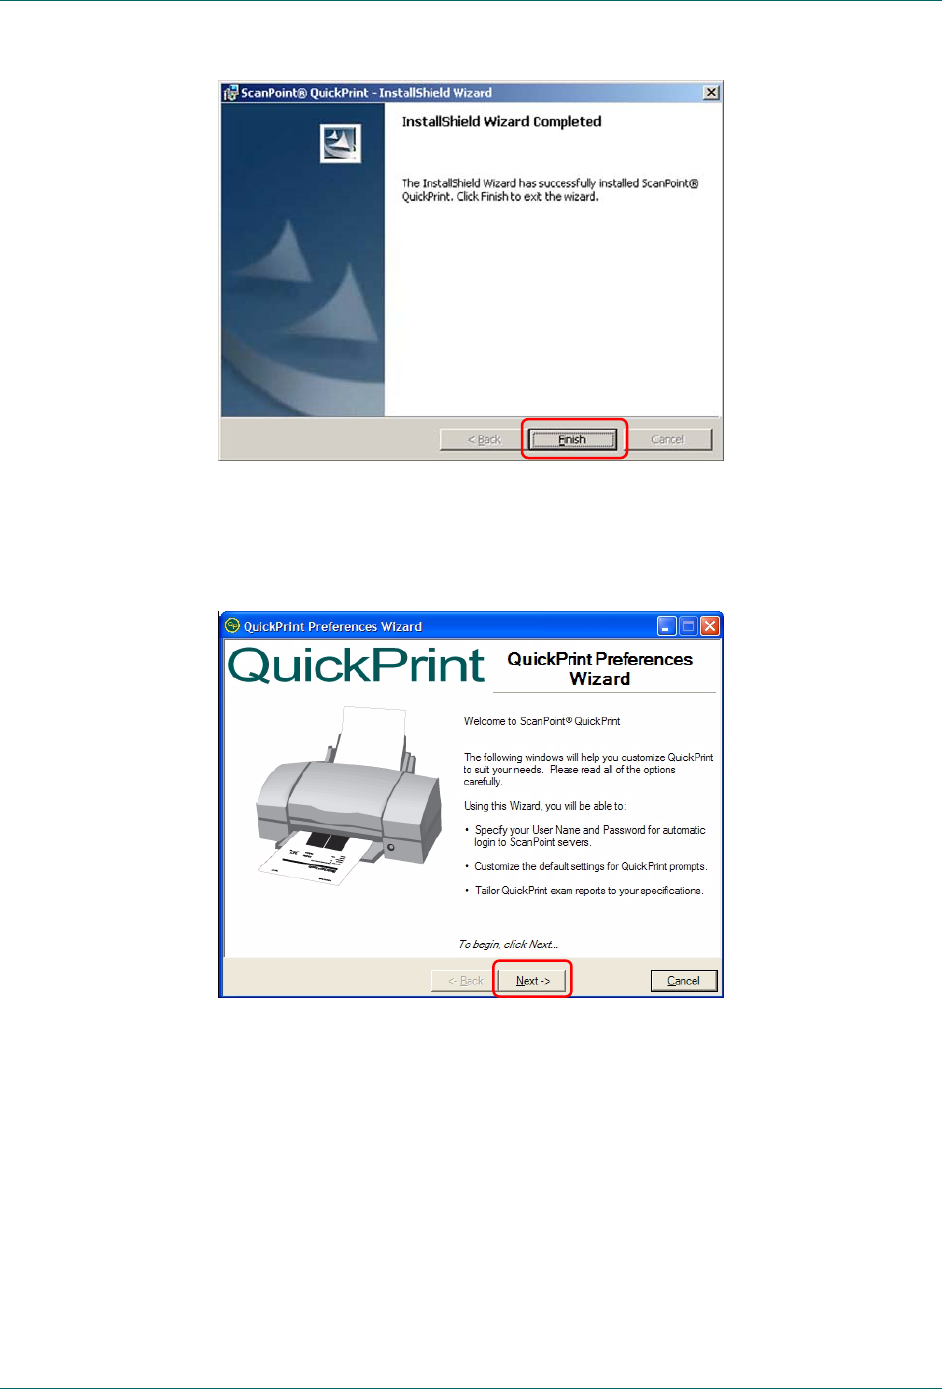
9. When the installation is complete, the InstallShield Wizard Completed dialog box
is displayed. Click FINISH.
FloPoint® Elite Uroflow System Getting Started
User’s Manual page 33
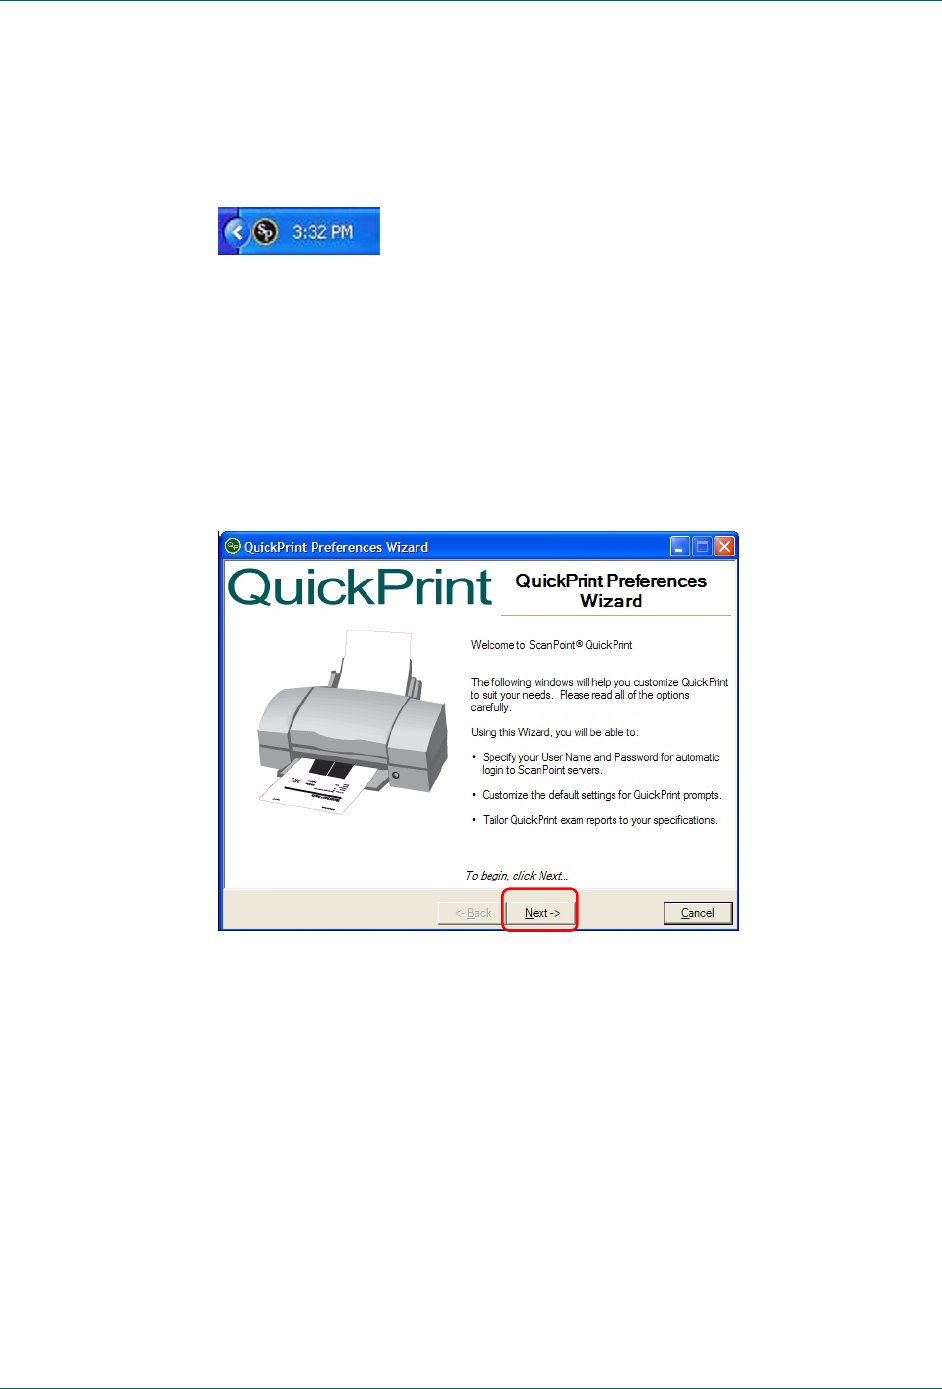
10. The ScanPoint® with QuickPrint software installation is complete. ScanPoint®
with QuickPrint starts automatically and the QuickPrint Preferences Wizard
opens.
Click NEXT to set your ScanPoint® user preferences.
Step 5: Setting ScanPoint® User Preferences
Once you have installed ScanPoint® with QuickPrint, and your FloPoint® Elite devices,
you can use the QuickPrint Preferences Wizard to customize QuickPrint settings.
The following procedure shows you how to use the Preferences Wizard to set up your
initial preferences. If at any time you want to change a specific setting, go to the Tools
menu, select PREFERENCES, and click on the appropriate tab. For information on the
Preferences dialog boxes, see “Changing Your Preferences” on page 77.
Getting Started FloPoint® Elite Uroflow System
page 34 User’s Manual
To set up your user preferences:
1. Open ScanPoint® with QuickPrint by double-clicking the ScanPoint® icon in your
system tray (the area next to your clock in the bottom right corner of your
screen).
If ScanPoint® with QuickPrint is not running, double-click the ScanPoint® with
QuickPrint icon on your desktop, or click the START button and select
Programs > Verathon® > ScanPoint® with QuickPrint > ScanPoint® with
QuickPrint.
2. The first time you run ScanPoint® with QuickPrint, the Preferences Wizard will
start automatically. Otherwise, from the Tools menu, select “Preferences Wizard”
to open the first dialog box.
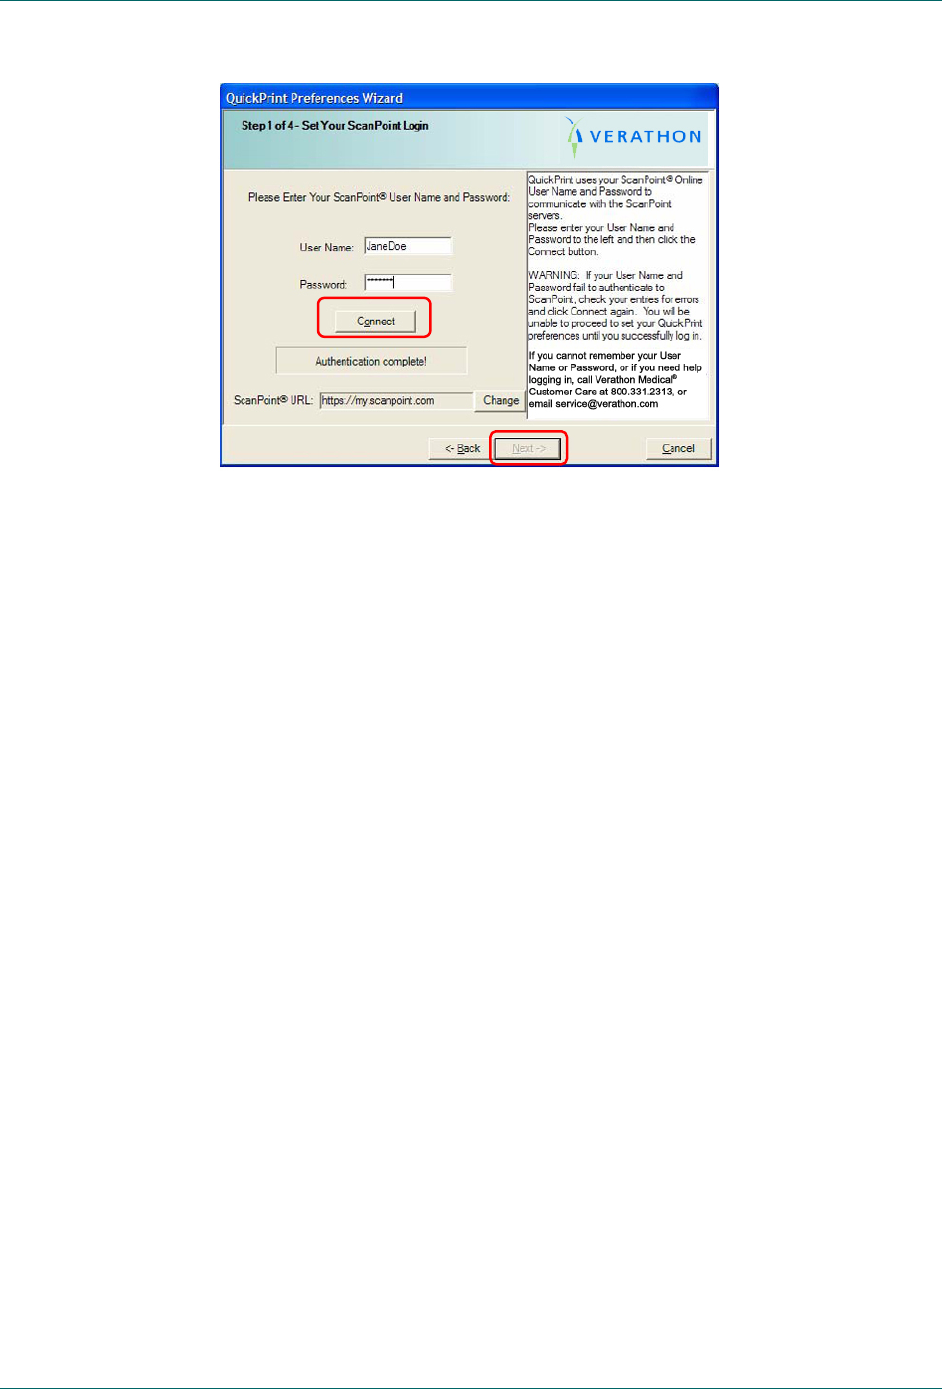
3. Click NEXT to open the Set Your ScanPoint® Login dialog.
4. Enter the User Name and Password provided to you by Verathon® and click
CONNECT.
NOTE: If you did not receive a ScanPoint® User Name and Password, please
contact Verathon Medical® Customer Care at 1.800.331.2313.
In a few moments, the status box will indicate that ScanPoint® authentication is
complete.
FloPoint® Elite Uroflow System Getting Started
User’s Manual page 35
5. Click NEXT to open the Customize QuickPrint Prompts dialog.
NOTE: Do not change the default ScanPoint® URL in this dialog unless
requested to do so by the Verathon Medical® Customer Care Department.
NOTE: This ScanPoint® User Name and Password will apply every time you log
in to Windows using your current user account. There is no time-out period: the
User Name and Password you enter will remain active until you change them.
For information on changing your ScanPoint® user profile, see “Changing Your
Preferences” on page 77.
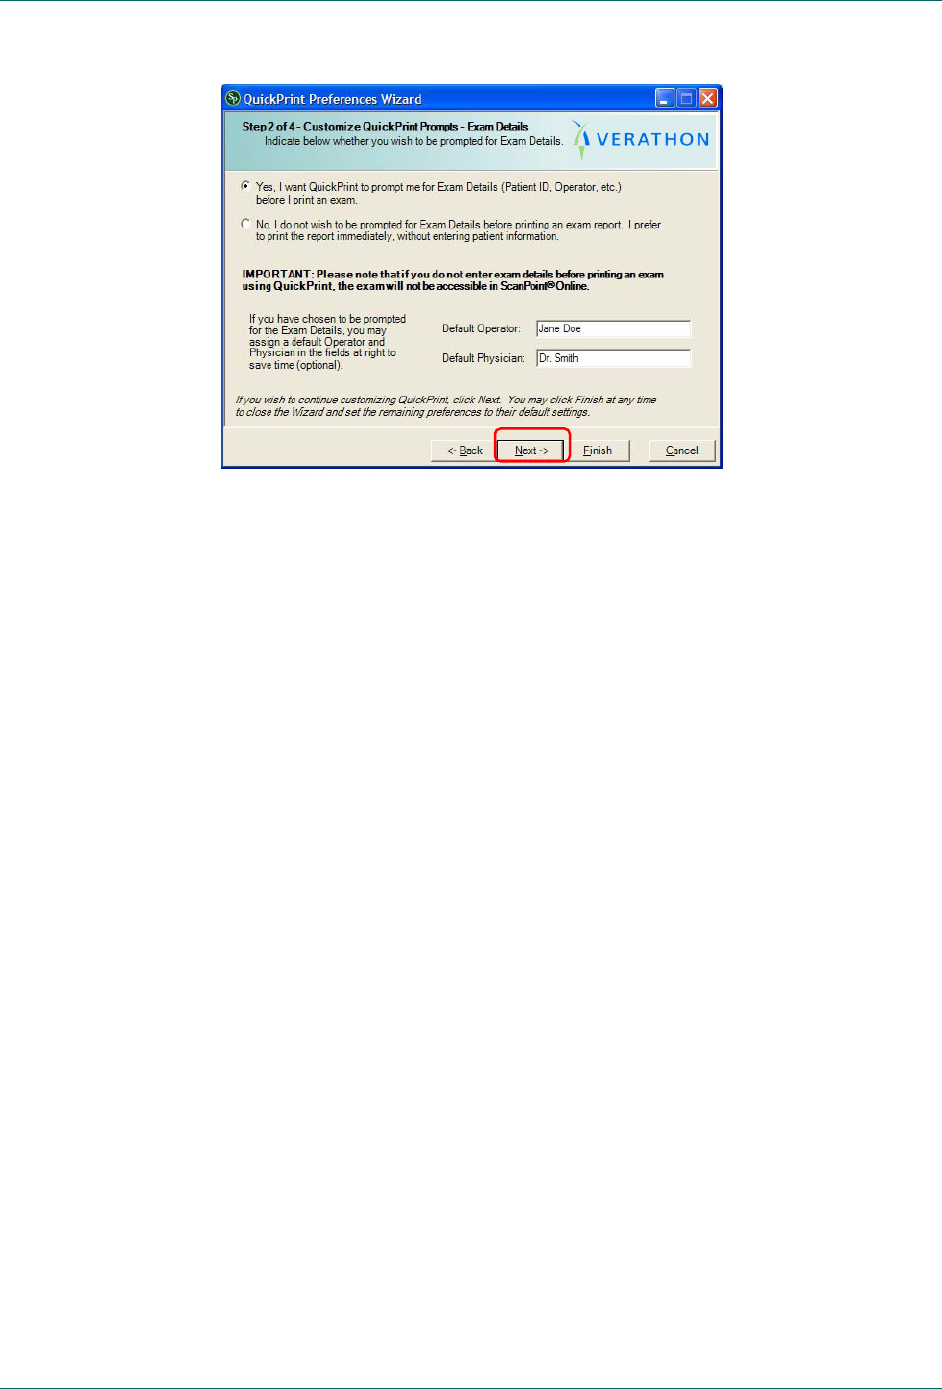
6. Indicate whether you want QuickPrint to prompt you for exam details (Patient ID,
Patient Name, Gender, Position, Normal Void, Operator, and Physician) before
transmitting exam results.
If you choose to be prompted for exam details, you can enter default
names for the operator (who performed the exam) and physician (who
ordered the exam) in the Default Operator and Default Physician text
boxes. The names you enter will automatically appear in the Operator
and Physician text fields after each exam. You will be able to overwrite
the default names before printing the exam results.
If you choose not to be prompted for exam details, QuickPrint will
automatically print each exam without prompting you for exam details.
Blank spaces will appear in the printed exam report for you to fill in the
Patient ID, Patient Name, Gender, Position, Normal Void, Operator, and
Physician.
NOTE: These exams will not be available for future access in
ScanPoint®.
Getting Started FloPoint® Elite Uroflow System
page 36 User’s Manual
When you finish filling in the dialog box, click NEXT to open the Customize Your
Report Types dialog.
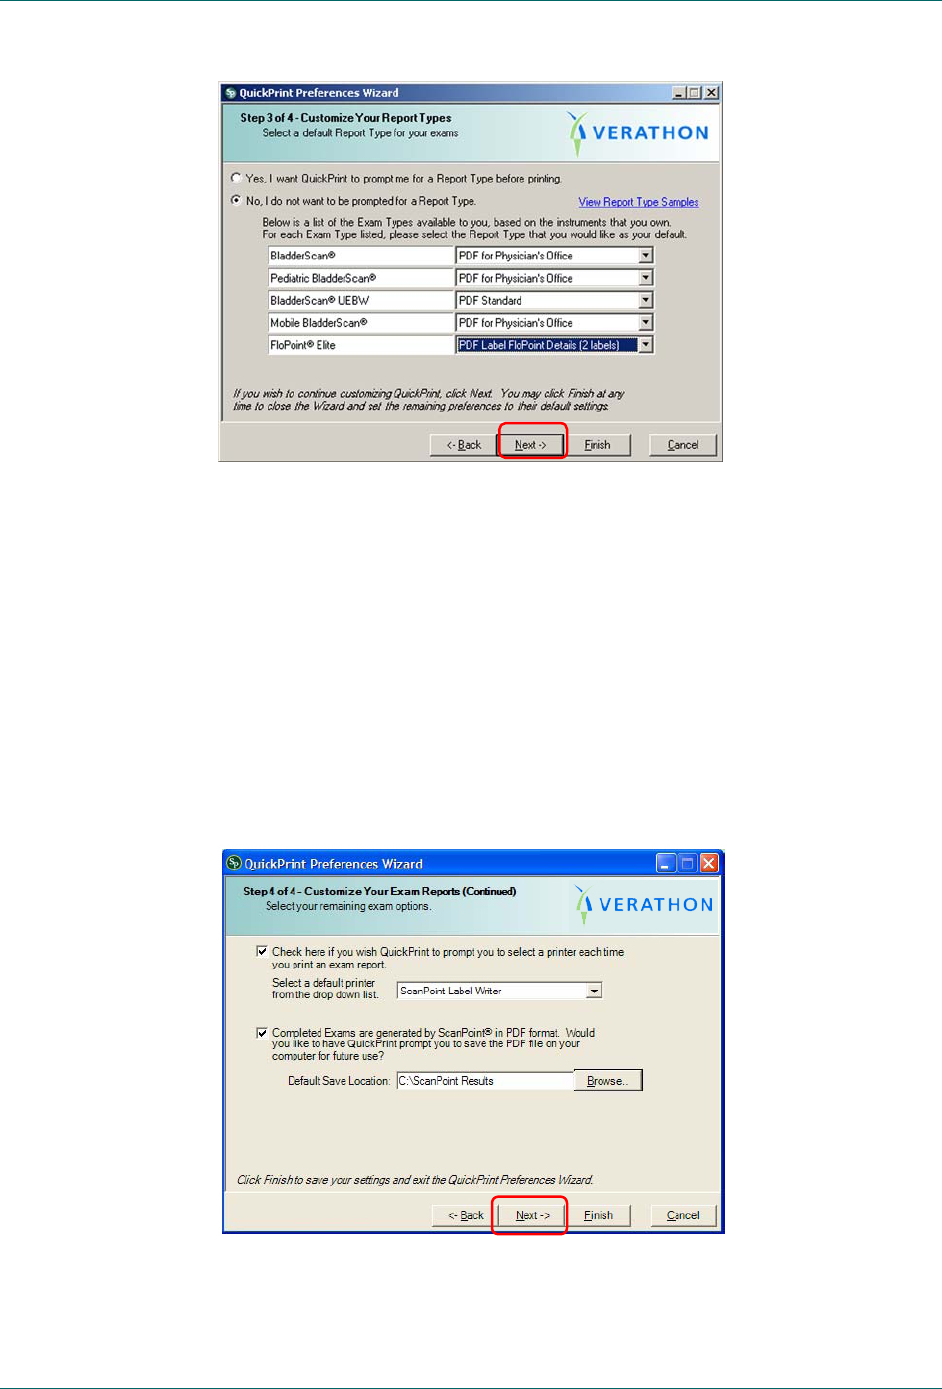
7. Choose whether you want QuickPrint to prompt you to choose a report type each
time an exam is performed. To view samples of each report type, click the VIEW
REPORT TYPE SAMPLES link on the right side of the dialog box.
To have QuickPrint prompt you to choose a report type each time an exam is
performed, choose the YES, I WANT QUICKPRINT TO PROMPT ME FOR A REPORT
TYPE BEFORE PRINTING radio button.
If you do not want to be prompted to choose a report type each time you print
an exam, choose the NO, I DO NOT WANT TO BE PROMPTED FOR A REPORT TYPE
radio button.
8. Choose the default report type you want to use from the drop-down menus.
Important! If you do not enter the Patient ID and Operator before printing an
exam, you will not be able to access the exam later in ScanPoint®.
FloPoint® Elite Uroflow System Getting Started
User’s Manual page 37
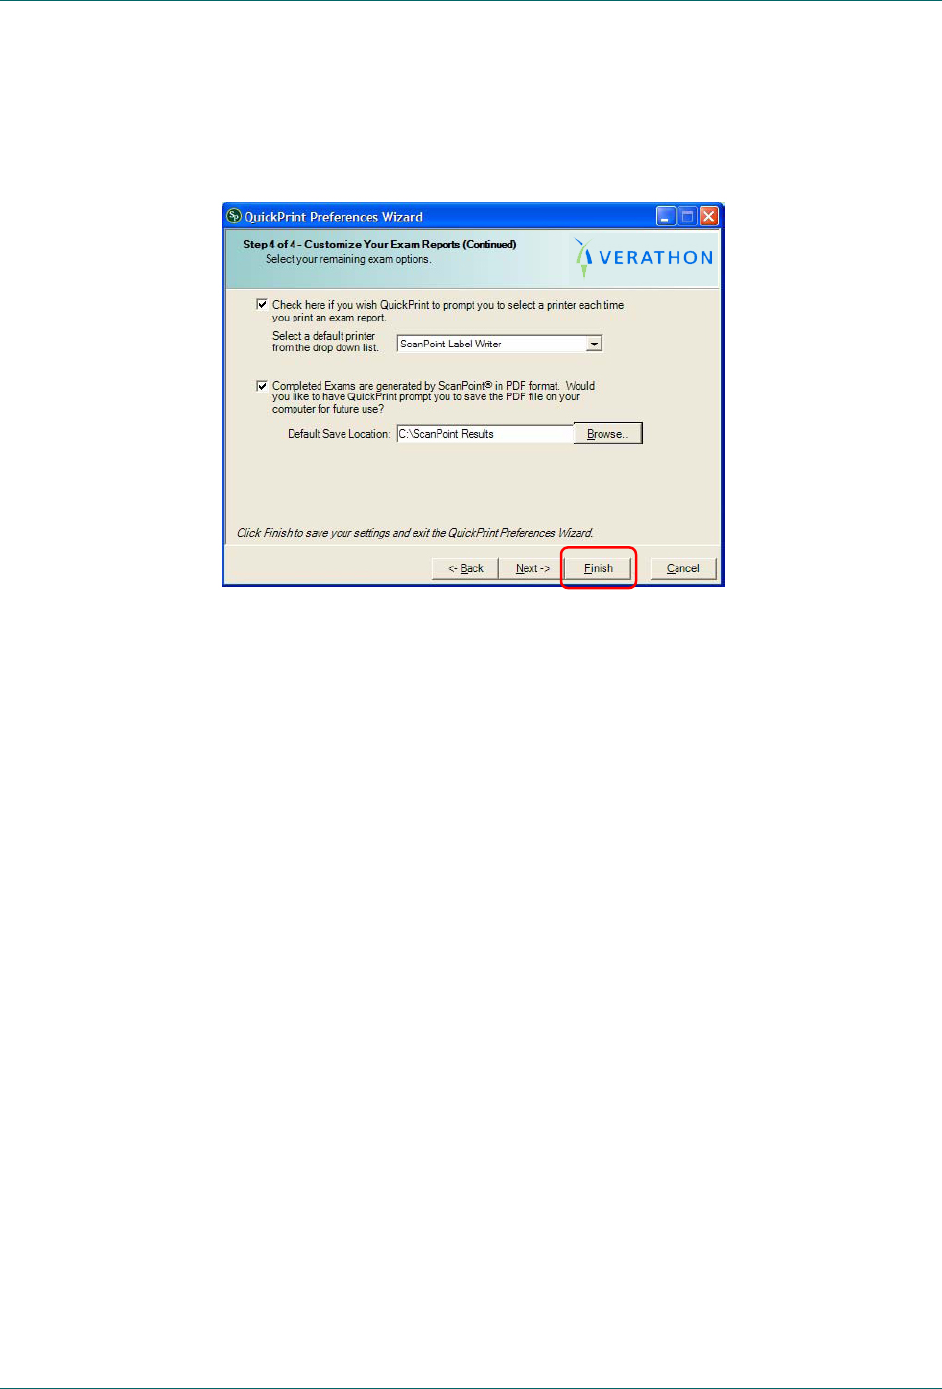
Click NEXT to open the last Customize Your Exam Reports dialog.
9. If you want QuickPrint to ask you to specify the printer each time you print an
exam report, click the top radio button.
Select a default printer from the options in the drop-down menu.
If you want QuickPrint to save the exam report in PDF format (opened in Adobe
Acrobat Reader) each time it prints an exam, place a check mark in the bottom
check box. The PDF can be incorporated into a patient’s electronic medical
record.
If you wish, enter a default location on your computer for saving exams in the
Default Save Location text box. You will always be able to specify a different
location to save a specific exam.
Click NEXT. The Preferences Wizard Complete dialog box is displayed.
Getting Started FloPoint® Elite Uroflow System
page 38 User’s Manual
10. Click FINISH to exit the Preferences Wizard. For more information on Preferences
settings, see “Changing Your Preferences” on page 77.
About User Profiles
Your User Name and Password are associated with the User Profile you requested from
Verathon® when you purchased your FloPoint® Elite instrument. The ScanPoint® features
available to you depend on your user profile.
There are three common types of ScanPoint® user profiles:
Administrative Users have access to all ScanPoint® features. Administrative
users can prepare new exams, upload exam results, accept or reject exam
results, view past exams, and calibrate FloPoint® Elite instruments.
Clinical Users can prepare new exams, upload exam results, accept or reject
exam results, and view past exams. Clinical users cannot calibrate FloPoint®
Elite instruments.
Technical Users can calibrate FloPoint® Elite instruments, but cannot prepare
new exams, upload exam results, accept or reject exam results, or view past
exams.
Each time a user logs in to a Windows computer with ScanPoint®, QuickPrint
automatically connects to ScanPoint® using the user profile they entered in the
Preferences Wizard or Preferences dialog box. To prevent unauthorized access to
patient data in the ScanPoint® system, Verathon® recommends setting a screen saver
password, or locking the computer when not in use. For more information on
recommended security precautions, go to the ScanPoint® with QuickPrint Help menu and
choose SECURITY BEST PRACTICES.
FloPoint® Elite Uroflow System Getting Started
User’s Manual page 39
If you need to change user profiles or assign new users at any time, please contact your
Verathon Medical® representative or the Verathon Medical® Customer Care Department
at 1.800.331.2313.
Step 6: Installing FloPoint® Elite Devices
In order for your FloPoint® Elite peripheral devices (ScanPoint® Docking Station and
optional Label Writer) to function properly, they must be installed using the Microsoft
Found New Hardware Wizard.
You will need to complete a separate wizard for each device.
IMPORTANT! The dialog boxes displayed on your computer may differ slightly from
those illustrated in the following procedures. If so, follow the instructions
in the dialog boxes displayed on your screen.
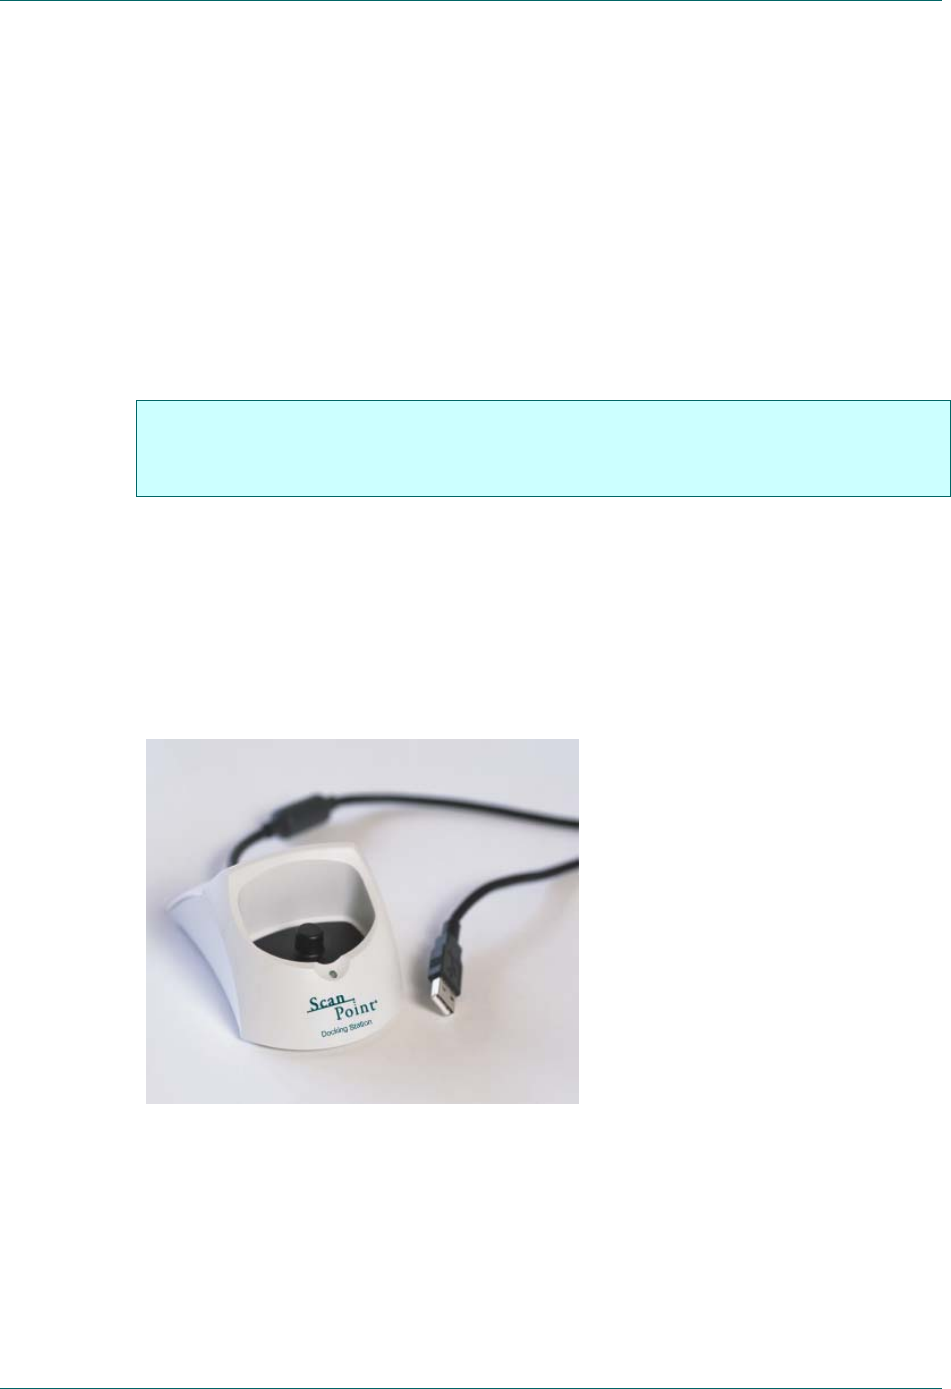
Installing the ScanPoint® Docking Station
NOTE: The ScanPoint® Docking Station has a USB connector (Figure 3). To make sure
that you have the ScanPoint® Docking Station, check that it has a USB connector and
that the label on the bottom says, “ScanPoint® Docking Station.”
Figure 3. The ScanPoint® Docking Station has a USB Connector.
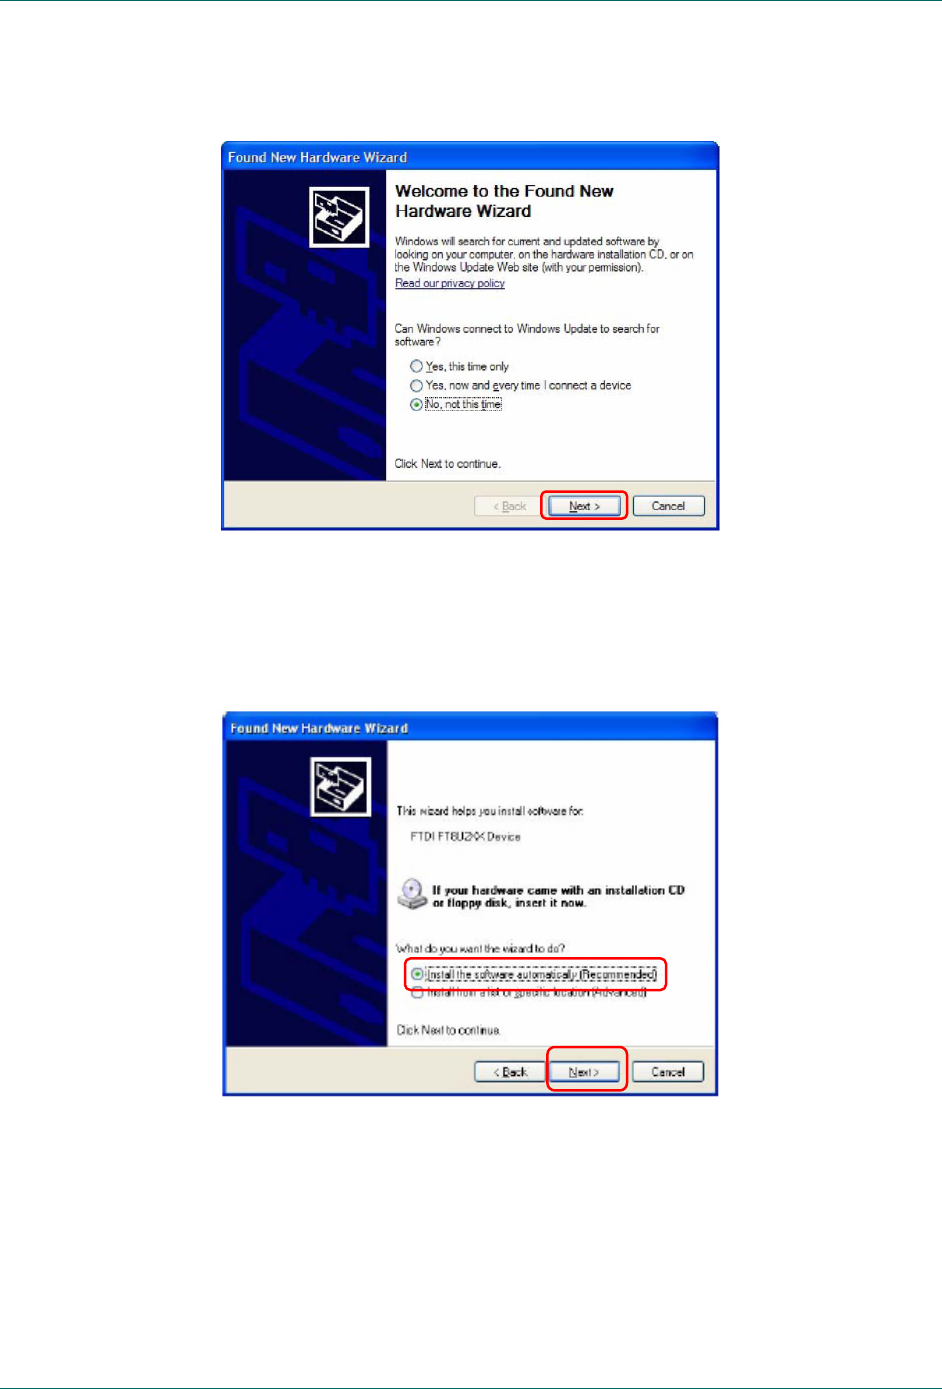
1. Turn the computer on. Plug the ScanPoint® Docking Station into any available
USB connector on your computer.
The Found New Hardware Wizard is displayed.
Getting Started FloPoint® Elite Uroflow System
page 40 User’s Manual
Click NEXT.
2. The second New Hardware Wizard screen is displayed.
Select the INSTALL THE SOFTWARE AUTOMATICALLY radio button and click NEXT to
install the drivers for the hardware automatically.
FloPoint® Elite Uroflow System Getting Started
User’s Manual page 41
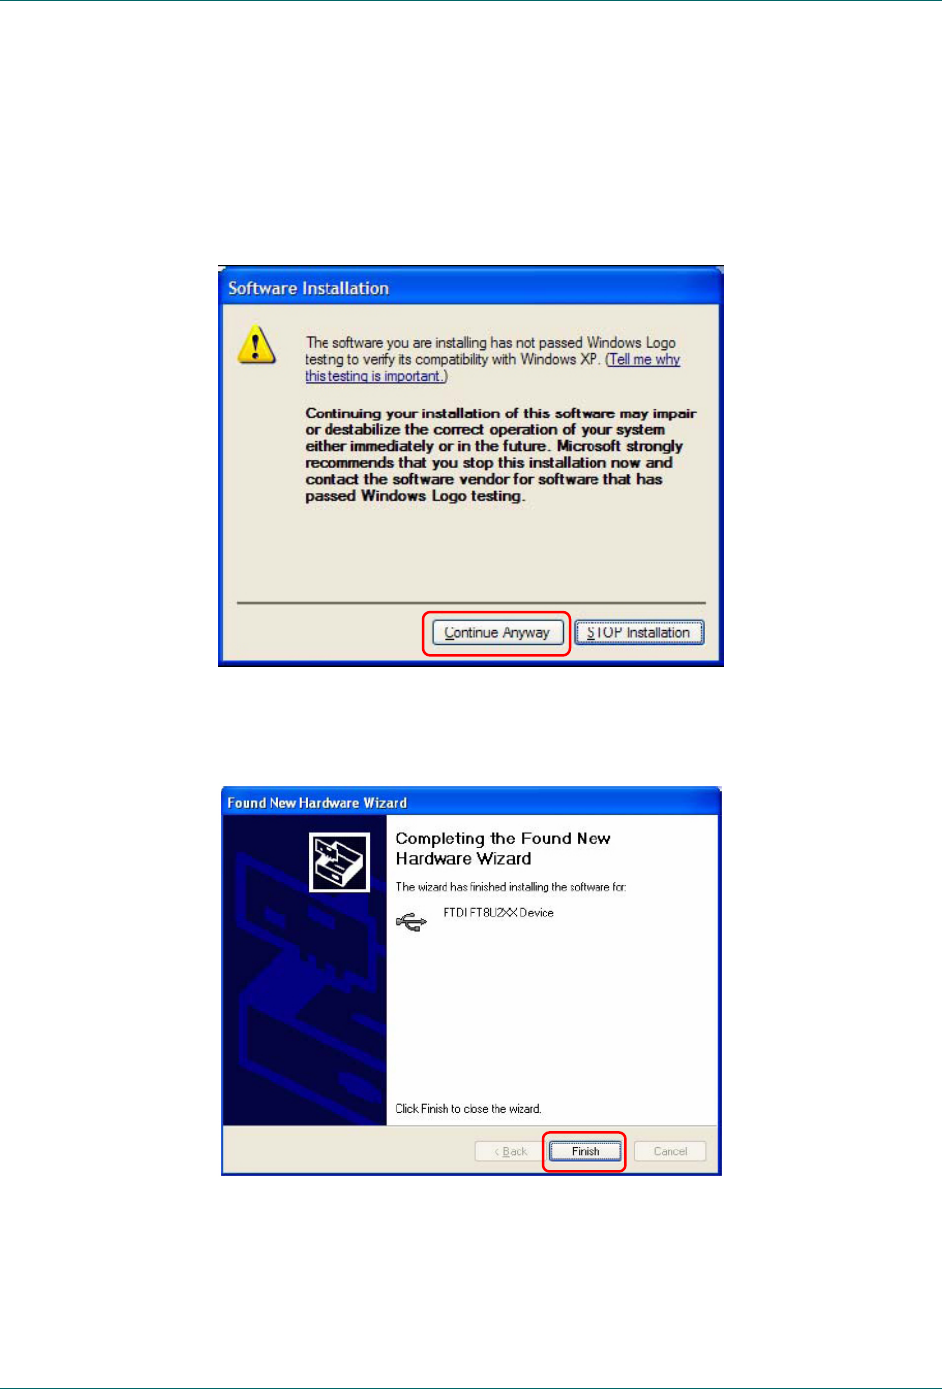
3. A warning is displayed stating that Microsoft has not yet tested this software for
compatibility with the Windows XP and Windows 2000 operating systems.
However, Verathon® Inc. has tested the ScanPoint® with QuickPrint software and
hardware drivers rigorously and is confident that they are fully compatible with
both Windows XP and Windows 2000.
Click CONTINUE ANYWAY.
4. When driver installation is complete, a dialog box is displayed to tell you the
installation was successful. Click FINISH.
Getting Started FloPoint® Elite Uroflow System
page 42 User’s Manual
Setting up the ScanPoint® Label Writer
NOTE: This procedure is required only if your order includes the ScanPoint® Label
Writer.
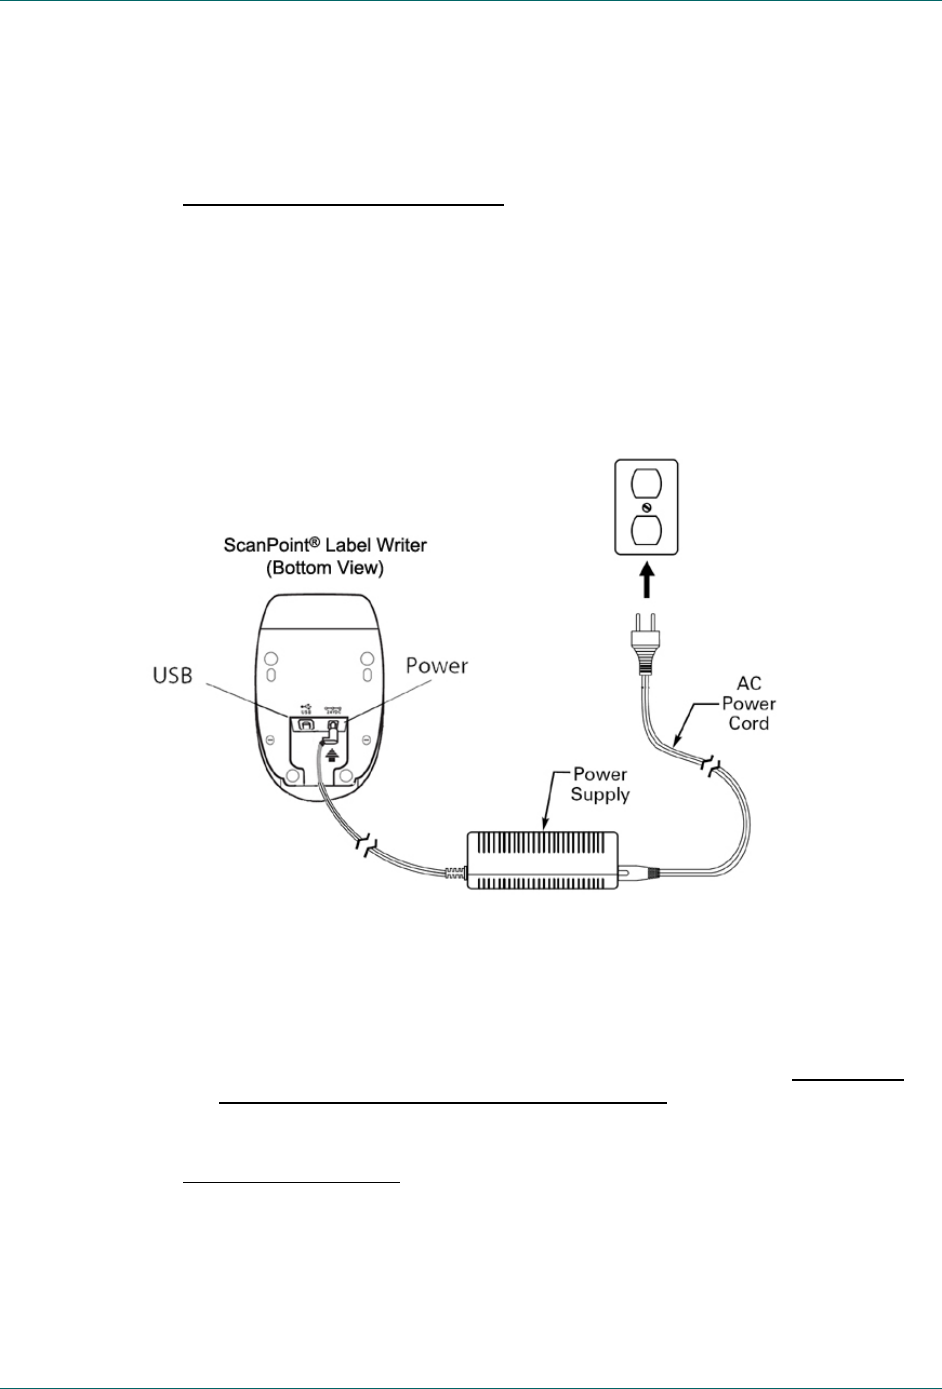
Connecting the Label Writer to Power
Refer to Figure 4
1. Plug the power cord into the power supply.
2. Plug the power supply into the power connector on the bottom of the printer.
3. Plug the other end of the power cord into a power outlet near the ScanPoint®
host computer.
Figure 4. Connecting the ScanPoint® Printer to Power
4. Plug the USB cable into the USB port on the bottom of the printer.
5. Insert the power and USB cables through the cable channel and set the printer
down.
6. Connect USB cable to any available USB port on your computer ONLY when
prompted to do so during software installation.
Installing a Roll of Labels
1. Press the form-feed button to eject the labels that protected the Label Writer
during shipment.
2. Open the top cover and remove any packing material inside the label
compartment.
FloPoint® Elite Uroflow System Getting Started
User’s Manual page 43
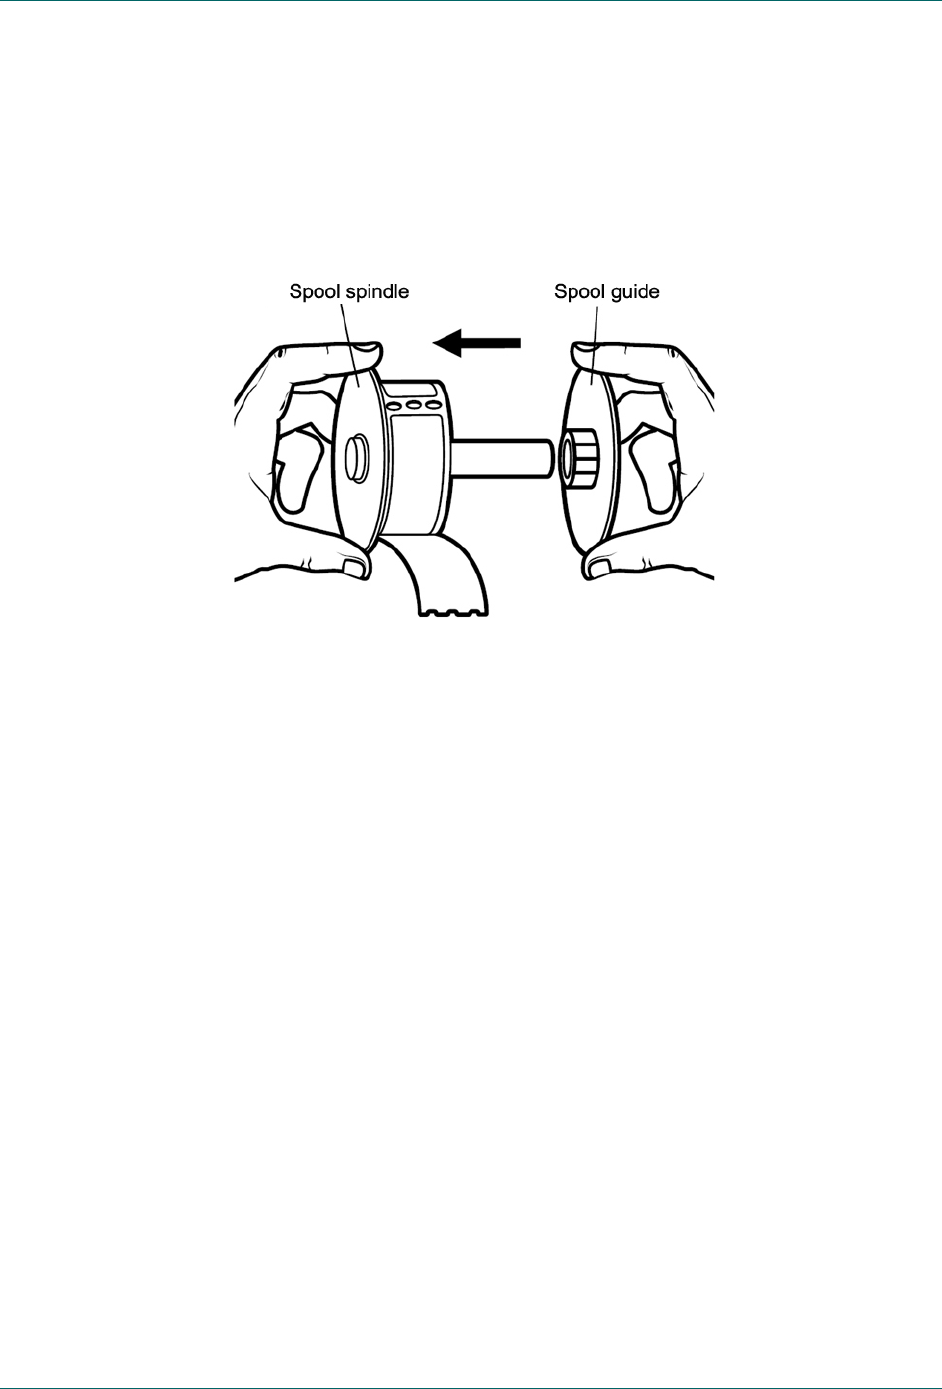
3. Remove the label spool.
4. Hold the spool spindle in your left hand and place the label roll on the spindle so
that the labels feed from underneath and the left edge of the label roll is flush
against the side of the spool (Figure 5).
Figure 5. Loading a Roll of Labels on the Spool Spindle
5. Place the spool guide onto the right side of the spool and press the guide tightly
against the label roll, leaving no gap between the roll and the spool.
NOTE: The roll of labels must fit snugly against both sides of the label spool, with
no gaps, so that the labels do not become misaligned as they feed through the
printer.
6. Align the left edge of the label with the left edge of the label feed slot and insert
the label into the slot (Figure 6).
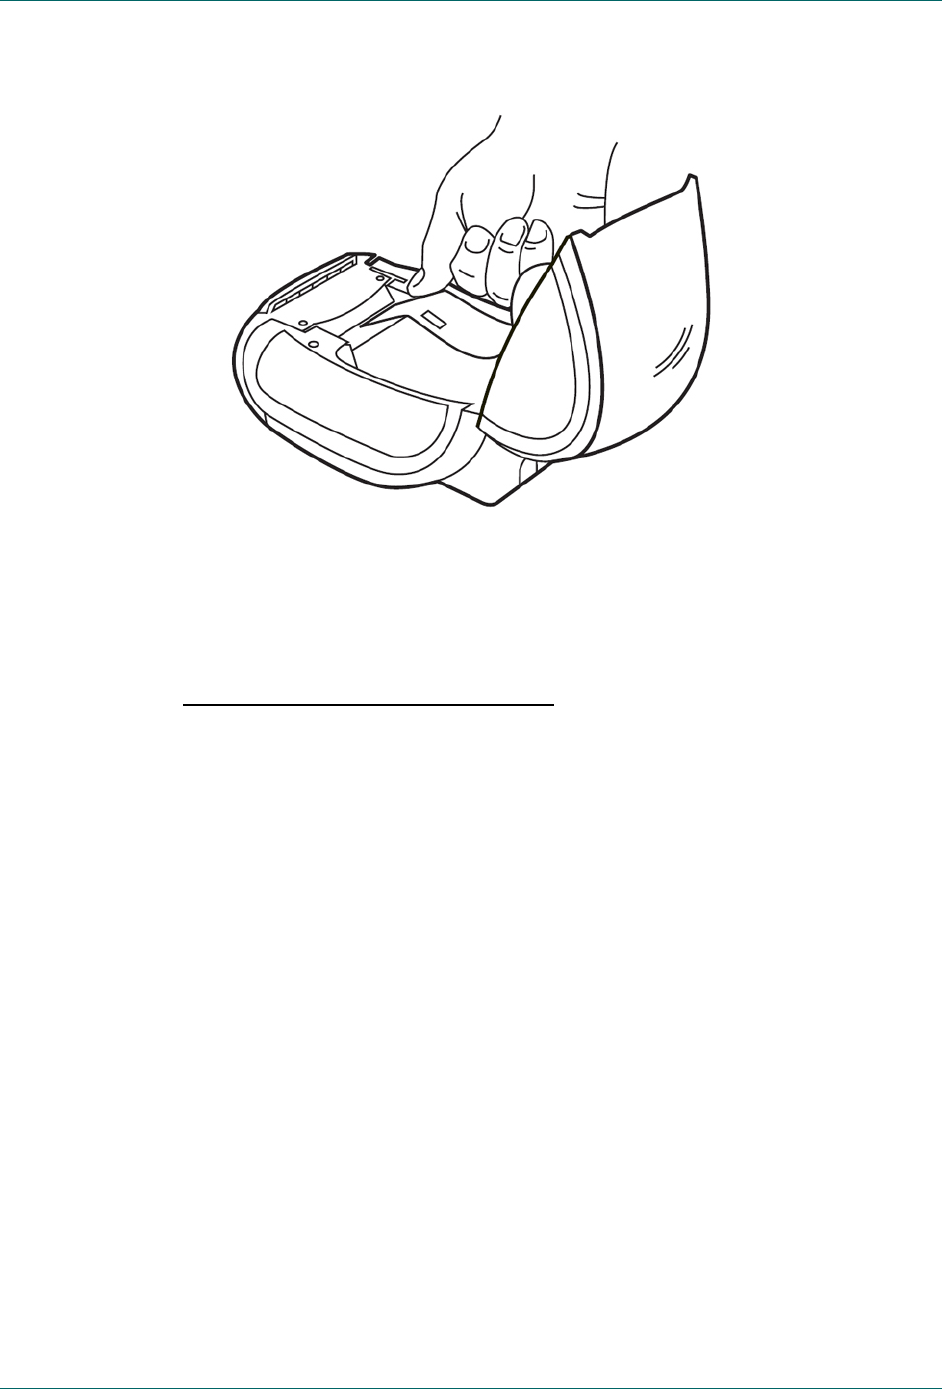
Getting Started FloPoint® Elite Uroflow System
page 44 User’s Manual
Figure 6. Inserting a Label into the Label Feed Slot
7. The Label Writer feeds the labels, stopping at the beginning of the first label. If
the Label Writer stops without feeding the label, make sure the label is fully
inserted and then press the form-feed button. Close the top cover.
Connect the Label Writer to Your Computer
1. Make sure that:
The Label Writer is set up and plugged into a power outlet as described in
the previous paragraphs.
Your computer is turned on and the ScanPoint® Installation CD is in your
computer’s CD drive.
2. Plug the Label Writer’s USB connector into any available USB connector on your
computer. The Install New Hardware Wizard will start up automatically.
3. Follow the on-screen directions for installing new hardware as with the
ScanPoint® Docking Station.
Step 7: Charge the Batteries
The FloSensor and the ScanPoint® Remote should come from the factory already
charged. After the initial charge, recharge the batteries whenever they are low or
completely drained.
Charging the ScanPoint® Remote Battery
Use the ScanPoint® Docking Station to charge the ScanPoint® Remote.
The ScanPoint® Docking Station is a dual-purpose device:
FloPoint® Elite Uroflow System Getting Started
User’s Manual page 45
It transmits exam data stored in the Remote to the ScanPoint® host computer via
a USB connection.
It charges the Remote battery (NOTE: To charge the Remote, the computer must
be turned on).
To charge the ScanPoint® Remote battery:
NOTE: The ScanPoint® software and ScanPoint® Docking Station drivers must
already be installed. See “Step 4: Install ScanPoint® with QuickPrint” on page 26 for
instructions on performing those tasks.
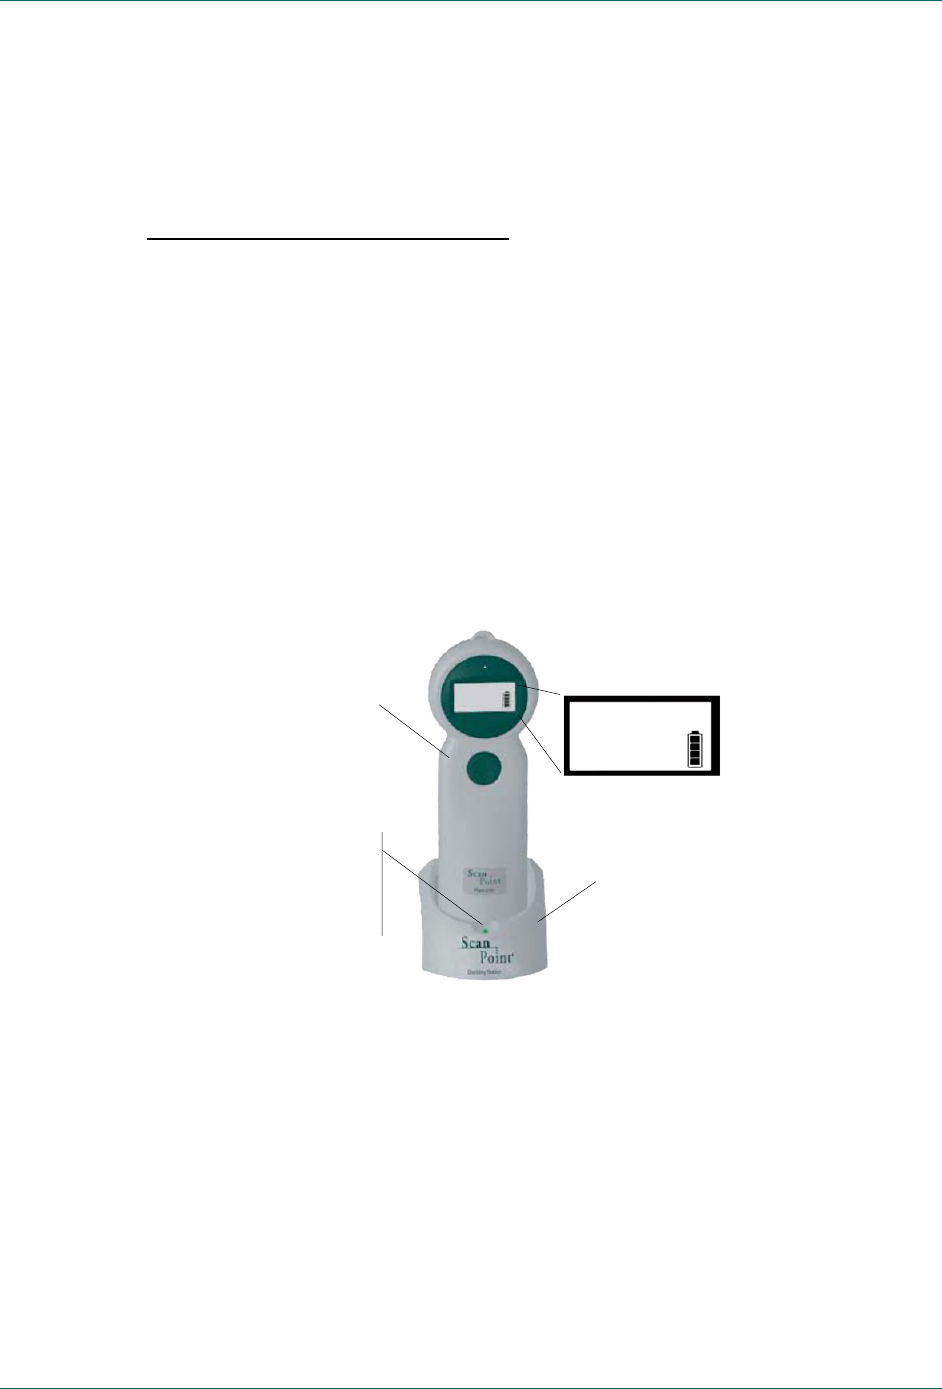
1. Make sure the ScanPoint® Docking Station is connected to the ScanPoint® host
computer via its USB connector and that the computer is turned on.
2. Set the Remote in the Docking Station. The battery icon on the Remote display
will scroll from empty to free to indicate that the Remote is charging.
3. Leave the Remote in the Docking Station until the battery icon displays a
minimum of two segments.
NOTE: Fully charging the battery may take up to 6 hours.
Figure 7. ScanPoint® Remote Battery Icon
Charging the FloSensor Battery
1. Make sure the FloCharger AC adapter has been plugged into a wall outlet.
2. Seat the FloSensor on the FloCharger base. The FloCharger LED will alternate
orange and green to indicate that the FloSensor battery is charging.
3. When the FloCharger LED is solid green, the FloSensor battery is fully charged
and the FloSensor is ready for use.
NOTE: Fully charging the FloSensor battery may take up to 6 hours.
ScanPoint
®
Docking Station
LED lights steady
green when the
Remote
is fully charged
Remote
Battery icon
shows a fully
charged battery