Virtualtek WXR-PG Portable WiMax CPE User Manual XMR 300 manual UQ ENG

Virtualtek Corp. Portable WiMax CPE XMR 300 manual UQ ENG

Contents

user manual

Safety PrecautionsPlacing the ProductMake sure to use the product on a level surface.Use the product in a clean area with no excessive dust.Power Adapter and ChargingDo not pull the power adapter by its cord--always hold the adapter itself tightly when plugging into or removing from an electric outletLeave the adapter unplugged when lightning.Plug in the adapter to the outlet firmly.Use the product in the environment with no electronic interference.Do not place the product on top of a wet surface.Do not expose the product under the direct sun ray.Do not leave the power cord hanging in an area where there is a lot of traffic.Do not use the product around a magnetic object.Do not handle the product with a wet hand. If the adapter is wet, let it dry before using it.Leave the adapter unplugged when not in use.Handling the ProductMake sure the product is not exposed to rattling and shaking when carrying the product.Do not insert any foreign object into the ventilation holes.When used nearby an electronic product the frequency interference may cause the unit to produce noise.ypqy y pUnplug all cables when moving the product.Do not expose the product in high temperature or heat the unit--the integrated battery may explode.Avoid exposing the product to the direct sun ray. Avoid any hot, damp place, and always keep the product in a cool, well-ventilated areaAlways use the certified power adapter.Do not open, or modify the unit--doing so will void the warranty.Make sure the charging plug does not touch any metal object.Always use the certified accessories.The WiMAX and Wi-Fi signals are subject to surrounding environment.The manufacturer or the service engineer may not perform any life-critical service for the unit’s signal may interfere with other devices.In the BoxWXR-PG Main UnitUser’s Instructional Manual(with the manufacturer’s warranty)Quick User’s GuidePower AdapterNote
* The supplied accessories are subject to change without notice.* Always use the supplied power adapter to charge.* The supplied power adapter may not be used to charge a mobile phone.IndexChapter 1Product Information and Specifications1.1 About the Product* The WXR-PG Portable Access PointBy default, this product is set to serve up to three users or three Wi-Fi devices; however, the maximum number of users who can connect to theInternet via WXR-PG is 252, and this setting can be modified by the user. The connection is not lost even when on the move.* Minimum System RequirementsThe Web Connection Manager is best viewed under the following environment: Internet Explorer 5.0 or newer, and the display resolution of* NetworkThe WXR-PG receives a dynamic IP address from the WiMAX signal, and switches it to form three (3) IP addresses by default and 252 IPaddresses max through Wi Fiaddresses max, through Wi-Fi.Picture diagram of WiMAX connectivity scenario1.2 Things to RememberFeaturesFrontThere are three LED status indicators.[Image: Product image showing the LED indicators](1)
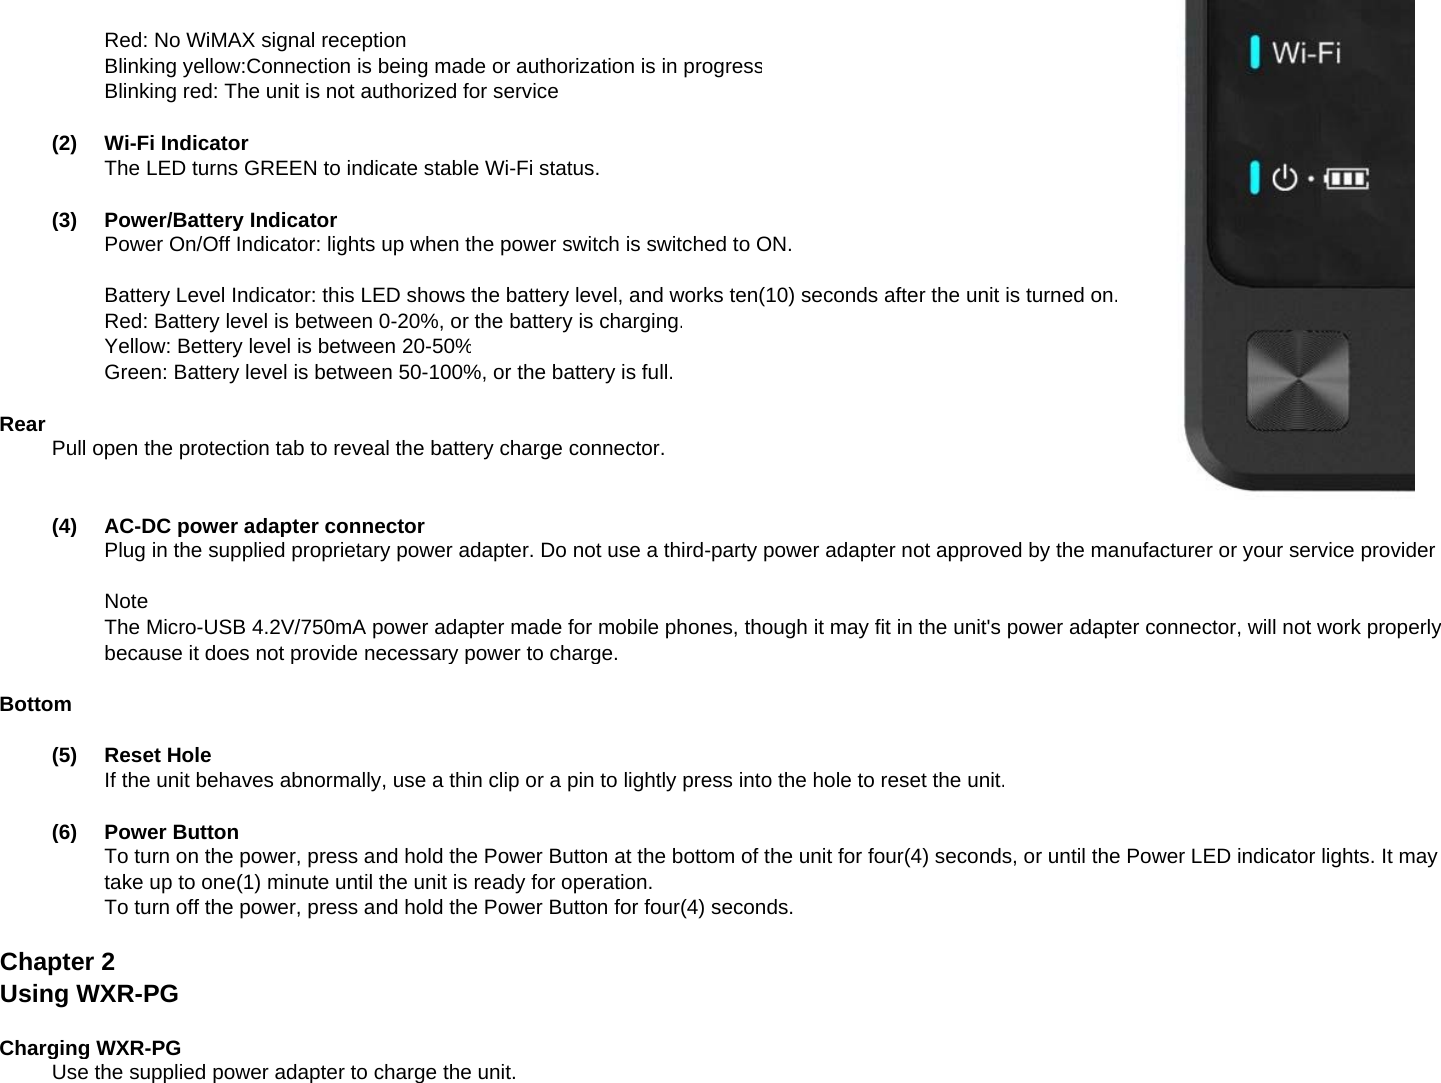
WiMAX Status IndicatorDisplays WiMAX signal strength in colors.Yellow: Bad to poor WiMAX signal receptionGreen: Good to excellent WiMAX signal reception
Red: No WiMAX signal receptionBlinking yellow:Connection is being made or authorization is in progressBlinking red: The unit is not authorized for service(2)Wi-Fi IndicatorThe LED turns GREEN to indicate stable Wi-Fi status.(3)Power/Battery IndicatorPower On/Off Indicator: lights up when the power switch is switched to ON.Battery Level Indicator: this LED shows the battery level, and works ten(10) seconds after the unit is turned on.Red: Battery level is between 0-20%, or the battery is charging.Yellow: Bettery level is between 20-50%Green: Battery level is between 50-100%, or the battery is full.RearPull open the protection tab to reveal the battery charge connector.(4)AC-DC power adapter connectorPlug in the supplied proprietary power adapter. Do not use a third-party power adapter not approved by the manufacturer or your service providergppppypp pyppppy y pNoteThe Micro-USB 4.2V/750mA power adapter made for mobile phones, though it may fit in the unit's power adapter connector, will not work properlybecause it does not provide necessary power to charge.Bottom(5)Reset HoleIf the unit behaves abnormally, use a thin clip or a pin to lightly press into the hole to reset the unit.(6)Power ButtonTo turn on the power, press and hold the Power Button at the bottom of the unit for four(4) seconds, or until the Power LED indicator lights. It maytake up to one(1) minute until the unit is ready for operation.To turn off the power, press and hold the Power Button for four(4) seconds.Chapter 2Using WXR-PGCharging WXR-PGUse the supplied power adapter to charge the unit.
(1)Plug in the power adapter into the connector as shown below.[Picture]* The battery/charge indicator turns red when the unit is charging.* The battery/charge indicator turns green if the unit is fully charged.(2)Charge time (via supplied power adapter)Fast charge time: about 80 minutes (charges up to 80% of battery capacity)Full-charge time: 150 minutes(3)Usage time (when fully charged)When used continuously: 600 minutes or 10 hoursWhen in stand-by: 720 minutes or 12 hoursNote* Charge time may vary according to the user environment.* The above charge time is measured with the supplied power adapter.* The battery life and capacity are subject to your usage behavior and the service territory.* The battery life and capacity, although by unnoticeably small amount, naturally decreases after time.(4)Cover the slots with the protection tap when not charging the unit.2.2 Powering on WXR-PGg(1) To turn on the power, press and hold the Power Button at the bottom of the unit for four(4) seconds, or until the Power LED indicator lights. It maytake up to one(1) minute until the unit is ready for operation.(2) The Power Indicator and the WiMAX Indicator LEDs blink as the unit initializes, and when it has been activated successfully, the Wi-Fi indicator turnsgreen.(3)Simply select the Wi-Fi network created by the unit to connect to the Internet.NoteIf the unit fails to initialize, press Reset at the bottom of the unit to restart the unit.WarningFactory resetNever perform factory reset unless there is a certain problem with the unit or when you have lost/forgotten your PIN.To perform factory reset: First, power off the unit. After the unit powers off, press and hold the Power button for twenty (20) seconds. The product isset to factory default when the unit is turned on next time.2.3 Readying your computer for Wi-Fi networkIMPORTANTWXR-PG's network name is [WXR-PG-XXXXX] by default, where XXXXX indicates the last five digits of the product serial number. Keepthis network name in mind before proceeding to the instructions below.
Connecting to the Internet via WXR-PG is as easy as selecting WXR-PG in the Wi-Fi wireless network list; however, setting up your computer to beready for Wi-Fi wireless network is different, depending on your computer setup and environment.Carefully follow the below instructions if you are not already familiar with setting up the Wi-Fi network connections.For Windows XP(1)Press [Start]Choose [Control Panel] in the Start Menu.Find and select [Network Connections]Select [Wireless Network Connection](2)Select [View available wireless networks]Double-click on WXR-PG's Network Name.Enter network password. The factory default password is "XMRXXXXX" where XXXXX is the last 5 digit of your product serial number. Refer to thedefault network name to check these numbers.For Windows Vista(1)Select in this order: [Start] - [Control Panel] - [Network and Internet] - [View Network Status] - [Connect to a network](2)In the [Network Connection] window, choose WXR-PG's Network Name, then click on [Connect](3)A window will prompt that the computer is attempting to connect to the network, followed by a connection success window.(4) If you want your computer to automatically sign on to WXR-PG network, check [Save this network] and also check [Automatically connect to thisnetwork]]To see connection status, click on the wireless network icon in the Task Tray at the bottom right of the screen.NoteMicrosoft Windows Vista supports both Internet Protocol Version 4(TCP/IPv4) and Version 6(TCP/IPv6). WXR-PG has no support for TCP/IPv6 atthis time.For MacOS(1)Click on the Airport Icon on top right side of the screen.(2)  Select [Turn AirPort On]. List of available networks will soon display.(3)Select WXR-PG's Network Name.NoteThe default network ID for this product is "WXR-PG-XXXXX" where XXXXX is the last 5 digits of the product serial number.2.4 Changing WXR-PG's ConfigurationsTo change or modify WXR-PG's configurations, you must use Web CM.Web CM can be accessed via any Web browser.Connecting to Web CM
(1)Open a Web browser in the computer or a terminal with Web browser support.(2)Type in http://192.168.1.1/ in the address bar, and press Enter.(3) Choose the User ModeType [user] in the User Name field,and [user] in the Password field. Press [OK] to continue.Note that the user name and the password are case sensitive,and the password may be changed once inside Web CM.Note* The factory default user name and password are "user" and "user" respectively. Please change the password for security.* The look and functionalities of Web CM can be changed without notice.Main ScreenThe main screen of Web CM lists minimum security-related options.(1)You can change WXR-PG's network name and modify its security setting.* Network Name: This option sets WXR-PG's Wi-Fi network name.The factory default network name is set as "WXR-PG."* Security Setting : This option is set to [Disabled] by default,and if you opt to change this setting,This setting will NOT be applied until you press the [Apply and Save] buttonThis setting will NOT be applied until you press the [Apply and Save] button.(2) Wi-Fi Setting* Mode : This option sets XMR-1000L's Wi-Fi Access Mode.* Channel Setting : This option enables user to select channel.  The Default setting is "Auto" option* Channel : This option is activated by Channel Setting Menu    by choosing Manual option.* Tx Power  : This option sets Wi-Fi Tx output power.(3) Wi-Fi IP configuration* Local IP address: This is the Wi-Fi Access Point IP address.* Subnet Mask: This is the subnet mask allocated to the Wi-Fi Access Point.* DHCP Server: Shows the DHCP server value for Wi-Fi Access Point.System StatusDisplays the device, LAN, and WiMAX information.(1)Device
* Device Name/Manufacturer : Displays the device information.* Software/Hardware/WiMAX API version : Displays the version information* MAC Address : Displays the allocated MAC Address information(2)LAN Status* Displays LAN status when connected to the  device.(3)WiMAX Link Status* Displays WiMAX status when connected to the WiMAX service you subscribe to.* Device Status : Displays the WiMAX Connection status.* BSID/ NAP/ Frequency  : Displays the WiMAX service information( Radio station,etc.)* IP Address : Displays the allocated IP Address informationConfiguring NAT Setting(1) Port Forwarding* This option enables to set the Port Forwarding by choosing IP,Service Port(2)DMZ Host* This option enables to set the DMZ Host by choosing IP address.(3)Remote Admin* This option enables to set the Remote Admin by selecting Port to control.Upgrade menu(1)Manual UpgradeIn Manual Upgrade, the user must download and acquire the firmware file and perform the firmware upgrade.* Downloading most current firmwareThe most current firmware can be downloaded from UQ Web Siteat www.UQ.jp or at your service provider's Home Page.* Updating the firmware- Log into Web CM from the computer or a terminal with Web browser support.- Select [Firm Upgrade] from Web CM's menu.- Click [Browse] and select the downloaded firmware file. (Kernel file , FS file)- Web CM will display a notification when the upgrade has been completed.Click [Update] button to start Firm Upgrade.
- Verify in Web CM if the WXR-PG version number matches the firmware version.NoteThe Web Site from which you can download the latest firmware might be different from the ones described above. Please check your box or theservice contract to find the correct URL.(2)Auto UpgradeDepending on your WiMAX service provider, your WXR-PG might be set up to automatically upgrade the firmware itself.* Upgrading WXR-PG Automatically- When you turn on the unit, it checks to see if a new firmware is available. If a new firmware exists, WXR-PG automatically proceeds to downloadthe firmware file and stores it in its memory.- The next time you turn off the unit, and if the unit is connected to the power adapter charger, WXR-PG performs the upgrade process before itturns itself off. While this is going on, the WiMAX status indicator blinks blue.- Check the version number inside Web CM.WarningAuto Upgrade URL option is made for WiMAX service provider,not for subscriber.Do not turn on or off the unit and access the Internet while the unit is upgrading its firmware.(3)System Factory Reset* This option helps to go back to the Factory setting status.ppg yg* Password, ID, SSID information are recovered to the default value.AppendixSpecifications and FAQsA.1 Technical SpecificationsWiMAX* Technology standard: IEEE802.16e-2005* Signal frequency: 2.499 - 2.68675 GHz (5 MHz BW) / 2.5085 - 2.6835 GHz (10 MHz BW)* Signal accuracy: 1% Max* Signal strength: 23dBm (200mW) maxWi-Fi* Technology standard: IEEE802.11b/g/n(HT20)* Signal frequency: 2.412 - 2.462 GHz* Signal accuracy: 2% Max* Wireless signal coverage: 30 meters(outdoors); 10 meters(indoors)
* Wi-Fi Certification ID:Battery* Voltage: 3.7V, 2000mAhAntenna* Built-in, integrated antennaEnvironmental requirements* Operating temperature: -20 to 50 degrees Celcius (-4 to 122 degrees Fahrenheit)* Relative humidity: 0% to 95% noncondensingSize and weight* Dimensions: 60 x 97 x 12.2mm* Weight: 60 grams (without battery)Accessories* Power adapter charger: DC 5V/2A, Micro USB pin plug type* User's Instructional Manual (this booklet)* Quick User's GuideTYLIMITED WARRANTYProduct Designation:Model:Date purchased:Store:Manufacture number:Product warranty period:One (1) Year Limited WarrantyThe Limited Warranty Period for this product is one(1) year, commencing on the date of purchase. The date on your sales receipt is the date ofpurchase unless UQ or your reseller informs you otherwise in writing.UQ's warranty obligations are limited to the terms set forth below: UQ warrants this hardware product against defects in materials and workmanshipfor a period of ONE (1) YEAR from the date of original retail purchase. If a defect exists, at its option UQ will (1) repair the product at no charge,using new or refurbished replacement parts, (2) exchange the product with a product that is new or which has been manufactured from new orserviceable used parts and is at least functionally equivalent to the original product, or (3) refund the purchase price of the product. A replacementproduct/part assumes the remaining warranty of the original product or ninety (90) days from the date of replacement or repair, whichever provideslonger coverage for you. When a product or part is exchanged, any replacement item becomes your property and the replaced item becomes UQ'sproperty. When a refund is given, your product becomes UQ's property.
Warranty Service TableInsert "Limited Product Warranty" table hereExclusions and LimitationsThis Limited Warranty applies only to hardware products manufactured by or for UQ that can be identified by the "UQ" trademark, trade name, orlogo affixed to them. The Limited Warranty does not apply to any non-UQ hardware products or any software, even if packaged or sold with UQhardware. Non-UQ manufacturers, suppliers, or publishers may provide their own warranties. Software distributed by UQ under the UQ brand name(including, but not limited to system software) is not covered under this Limited Warranty. Refer to the UQ Software License Agreement for moreinformation. UQ and its Authorized Service Providers are not liable for any damage to or loss of any programs, data, or other information stored onany media, or any non-UQ product or part not covered by this warranty. Recovery and reinstallation of system and application software and user dataare not covered under this Limited Warranty. This warranty does not apply: (a) to damage caused by accident, abuse, misuse, misapplication, ornon-UQ products; (b) to damage caused by service (including upgrades and expansions) performed by anyone who is not an UQ Authorized ServiceProvider; (c) to a product or a part that has been modified without the written permission of UQ; or (d) if any UQ serial number has been removed ordefacedTHIS WARRANTY AND REMEDIES SET FORTH ABOVE ARE EXCLUSIVE AND IN LIEU OF ALL OTHER WARRANTIES, REMEDIES ANDCONDITIONS, WHETHER ORAL OR WRITTEN, EXPRESS OR IMPLIED. UQ SPECIFICALLY DISCLAIMS ANY AND ALL IMPLIEDWARRANTIES, INCLUDING, WITHOUT LIMITATION, WARRANTIES OF MERCHANTABILITY AND FITNESS FOR A PARTICULAR PURPOSE.IF UQ CANNOT LAWFULLY DISCLAIM IMPLIED WARRANTIES UNDER THIS LIMITED WARRANTY, ALL SUCH WARRANTIES, INCLUDINGWARRANTIES OF MERCHANTABILITY AND FITNESS FOR A PARTICULAR PURPOSE ARE LIMITED IN DURATION TO THE DURATION OFTHIS WARRANTY. No UQ reseller, agent, or employee is authorized to make any modification, extension, or addition to this warranty.UQ IS NOT RESPONSIBLE FOR DIRECT, SPECIAL, INCIDENTAL OR CONSEQUENTIAL DAMAGES RESULTING FROM ANY BREACH OFWARRANTY OR CONDITION, OR UNDER ANY OTHER LEGAL THEORY, INCLUDING BUT NOT LIMITED TO LOST PROFITS, DOWNTIME,WARRANTY OR CONDITION, OR UNDER ANY OTHER LEGAL THEORY, INCLUDING BUT NOT LIMITED TO LOST PROFITS, DOWNTIME,GOODWILL, DAMAGE TO OR REPLACEMENT OF EQUIPMENT AND PROPERTY, ANY COSTS OF RECOVERING, REPROGRAMMING, ORREPRODUCING ANY PROGRAM OR DATA STORED IN OR USED WITH UQ PRODUCTS, AND ANY FAILURE TO MAINTAIN THECONFIDENTIALITY OF DATA STORED ON THE PRODUCT. UQ SPECIFICALLY DOES NOT REPRESENT THAT IT WILL BE ABLE TO REPAIRANY PRODUCT UNDER THIS WARRANTY OR MAKE A PRODUCT EXCHANGE WITHOUT RISK TO OR LOSS OF PROGRAMS OR DATA.Some states and provinces do not allow the exclusion or limitation of incidental or consequential damages or exclusions or limitations on the durationof implied warranties or conditions, so the above limitations or exclusions may not apply to you. This warranty gives you specific legal rights, and youmay also have other rights that vary by state or province.

Navigation menu