X Wireless V50LTE 4G Smart Phone User Manual
Xwireless LLC 4G Smart Phone
Contents
- 1. User manual
- 2. User Manual
User manual
V
V
5
0
0
LT
E
E
2
PRECAUTIONS
OntheRoad
Usingadevicewhiledrivingisillegalinmanycountries.Please
refrainfromusingyourmobilewhiledriving.
NearSensitiveElectronicsorMedicalEquipment
Donotuseyourdevicenearsensitiveelectronicequipment–
particularlymedicaldevicessuchaspacemakers–asitcould
causethemtomalfunction.Itcanalsointerferewiththe
operationoffiredetectorsandotherautomatic‐control
equipment.
WhileFlying
Yourdevicecancauseinterferencewithaircraftequipment.
So,itisessentialyoufollowairlineregulationsandifairline
personnelaskyoutoswitchoffyourdevice,ordisableits
wirelessfunctions,pleasedoastheysay.
AtaGasStation
Donotuseyourdeviceatgasstations.Infact,itisalwaysbest
topoweroffyourdevicewheneveryouarenearfuels,
chemicalsorexplosives.
MakingRepairs
Nevertakeyourdeviceapart.Pleaseleavethattothe
professionals.Unauthorizedrepairscouldbreakthetermsof
yourwarranty.Donotuseyourdeviceiftheantennais
damaged,asitcouldcauseinjury.
3
AroundChildren
Keepyourmobileoutofchildren’sreach.Itshouldneverbe
usedasatoyasthisishazardous.
NearExplosives
Turnoffyourdeviceinornearareaswhereexplosivematerials
areused.Alwaysobeylocallawsandturnoffyourdevice
whenrequested.
EmergencyCalls
Tomakeanemergencycall,yourdevicemustbeturnedon
andinanareawherethereisnetworkcoverage.Dialthe
nationalemergencynumberandpress“Send”.Explain
exactlywhereyouareanddonothangupuntilhelphas
arrived.
WorkingTemperature
Theworkingtemperatureforthedeviceisbetween32and
104degreesFahrenheit(0and40degreesCelsius).Pleasedo
notusethedeviceoutsidethisrange.Usingthedeviceunder
toohighortoolowtemperaturesmightcause problems.
AudioVolumeWarning
Ataveryhighvolume,prolongedlisteningtoamobiledevice
candamageyourhearing.
4
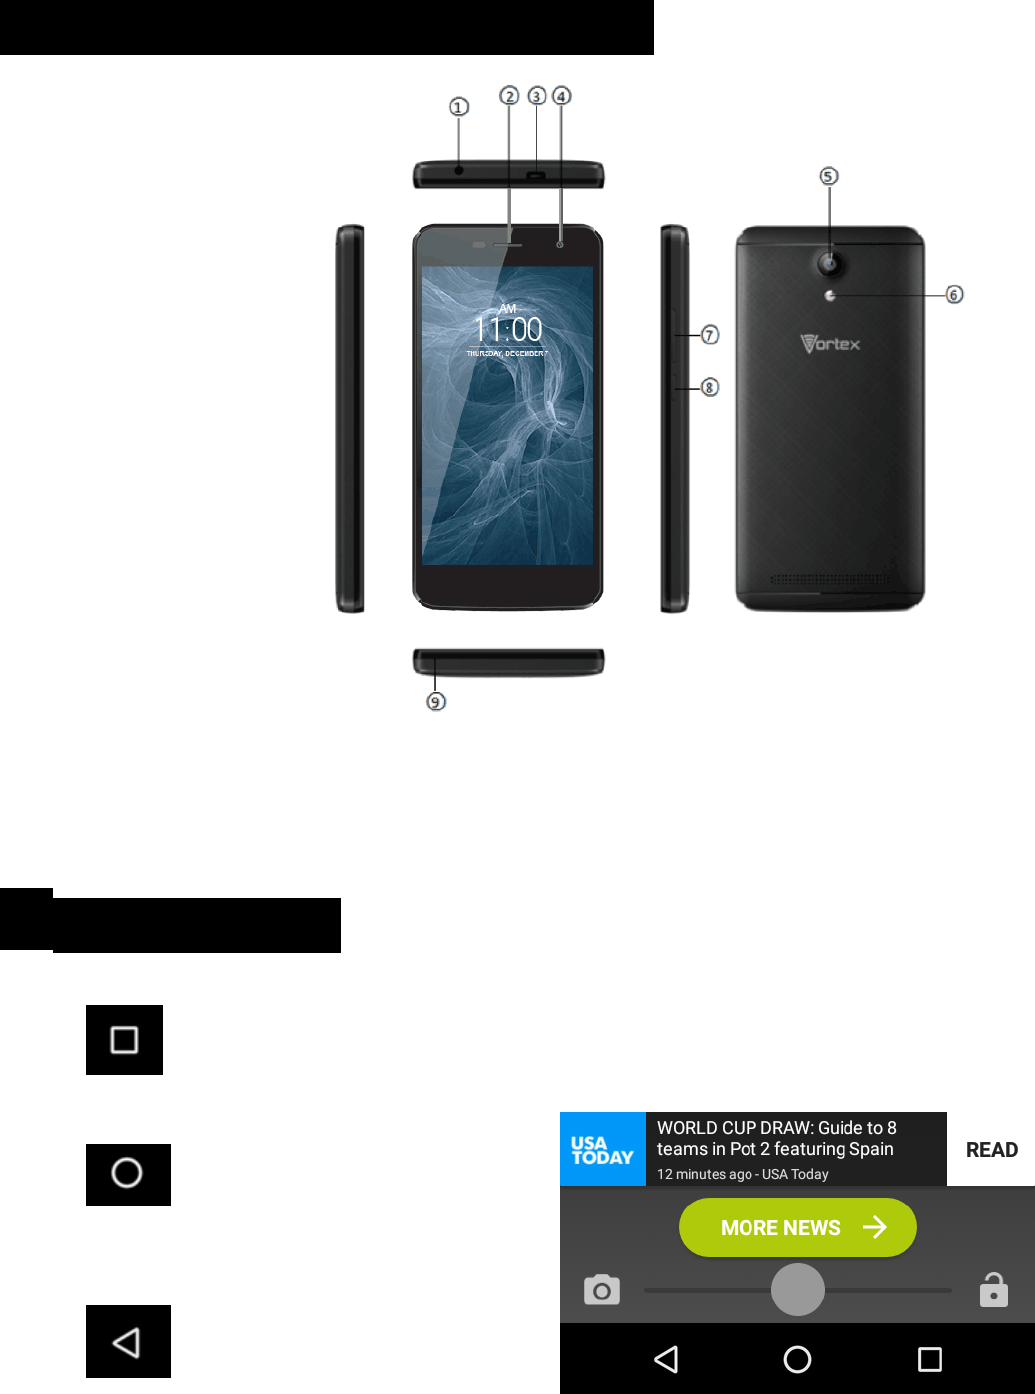
1.PARTSANDBUTTONSOFTHEDEVICE
1.
Earphonejack
2.
Receiver
3.
MicroUSB
4.
Frontcamera
5.
Rearcamera
6.
Flash
7.
Volumebutton
8.
Powerbutton
9.
Mic
2. TOUCHBUTTONS
The buttondisplaysamenuofrecentlyopenedapplications.
The buttonreturns
immediatelytothemainscreen.
The buttonmovesback
onesteptotheprevious
5
menu/page.
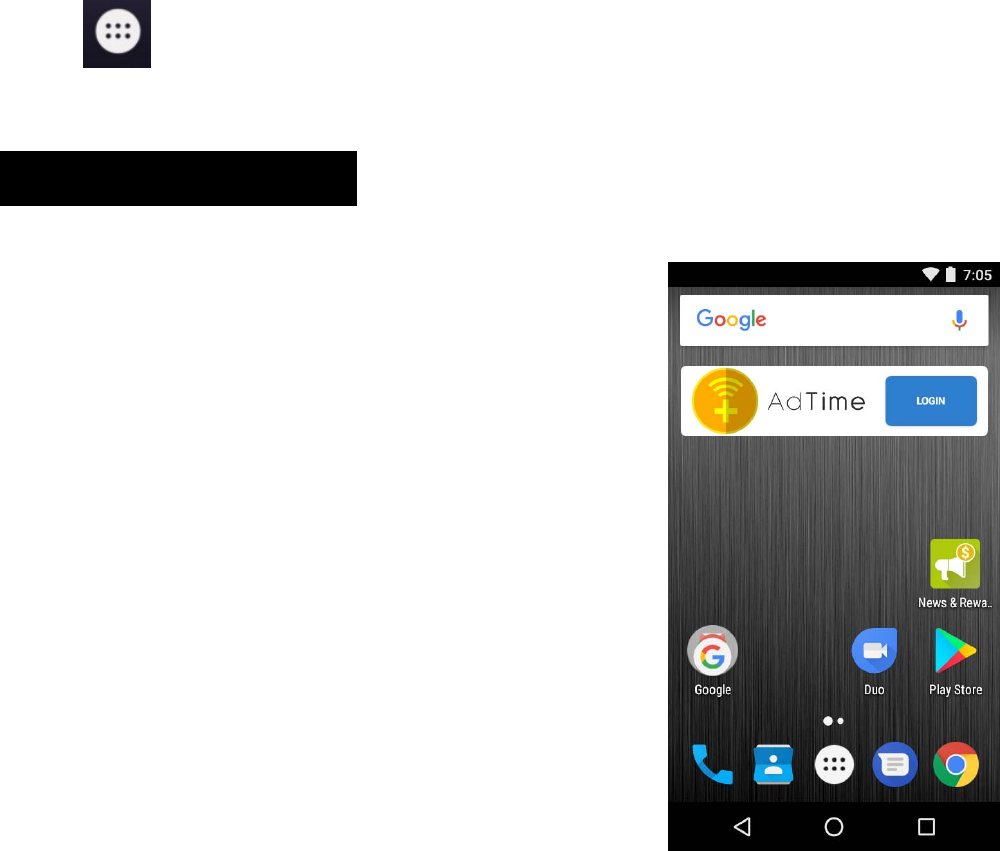
The buttonwilllaunchtheapplicationsandsettingsmenu.
3. GETTINGSTARTED
ChargingtheBattery
Yourphonehasabuilt‐inrechargeable
Li‐ionbattery
1.
Tocharge,connecttheACpower
adaptertothemicroUSBjackonthe
topsideofthephone.
2.
Thebatteryiconshowsthe
batteryandchargingstatus.
3.
Thephonecanbeusedevenifthe
batteryisbeingcharged.
4.
Donotattempttoreplacethebatteryyourself,please
contactanauthorizedrepairer.Caution!Li‐Ionbatteries
containhazardousandFlammablematerial,handlewith
care.
6
5.
Rechargethephoneforatleasthalfanhourifthephone
hasbeeninidleforalongtimeandfailstoturnon.
6.
Regularlyrechargeiatleastonceamonth.
DisposalofBatteries
Thebatterycontainspollutingmaterial.Pleaseturnitintoa
recyclingcentertodispose.
PowerON/OFF
ON
PressthePOWERbuttonforacontinuous5secondsuntilthe
phoneturns“ON”.
OFF
PressthePOWERbuttonforacontinuous5seconds.A
selectionmenuwillappear.
Select“OFF”topower“OFF”.
Otherselectionsare“REBOOT”torestartthemobile
and“AIRPLANEMODE”toputthemobileinflight
mode.
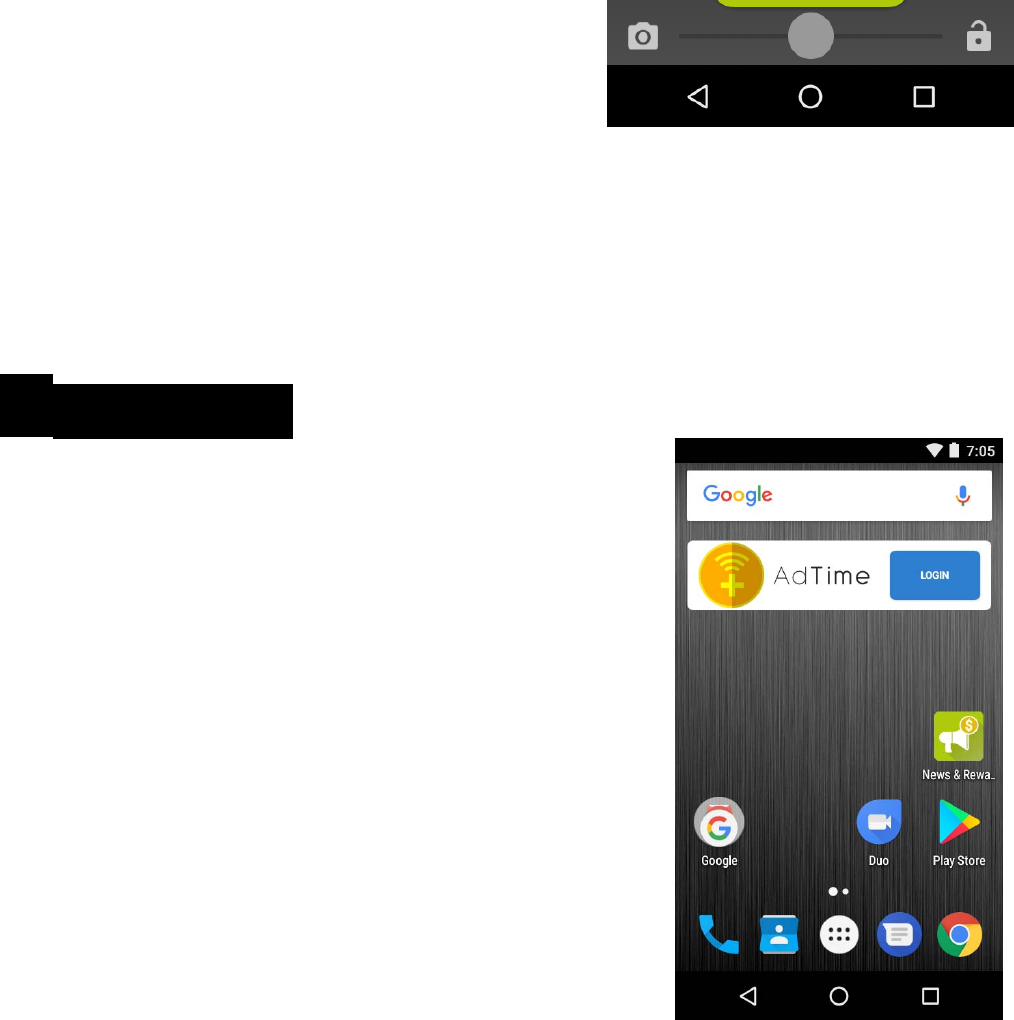
ScreenLock
Tolockthephone’sscreen,simplypressthe“POWERBUTTON”.
ScreenWakeup
7
Whenthephoneisinidlemode,press
the“POWERBUTTON”oncetowake
upthephone.
ScreenUnlock:
Tounlock,swiperightasillustrated:
4. HOMESCREEN
Thehomescreenwilllooklikethe
picturetotheright.
Toswitchbetweenscreens,simplyslide
yourfingerleftorrightacrossthe
display.
Thehomescreencontainsshortcutsto
yourmost‐usedapplicationsand
widgets.
Thestatusbardisplayssystem
information,suchascurrenttime,
wirelessconnectivityandbatterycharge
8
status.
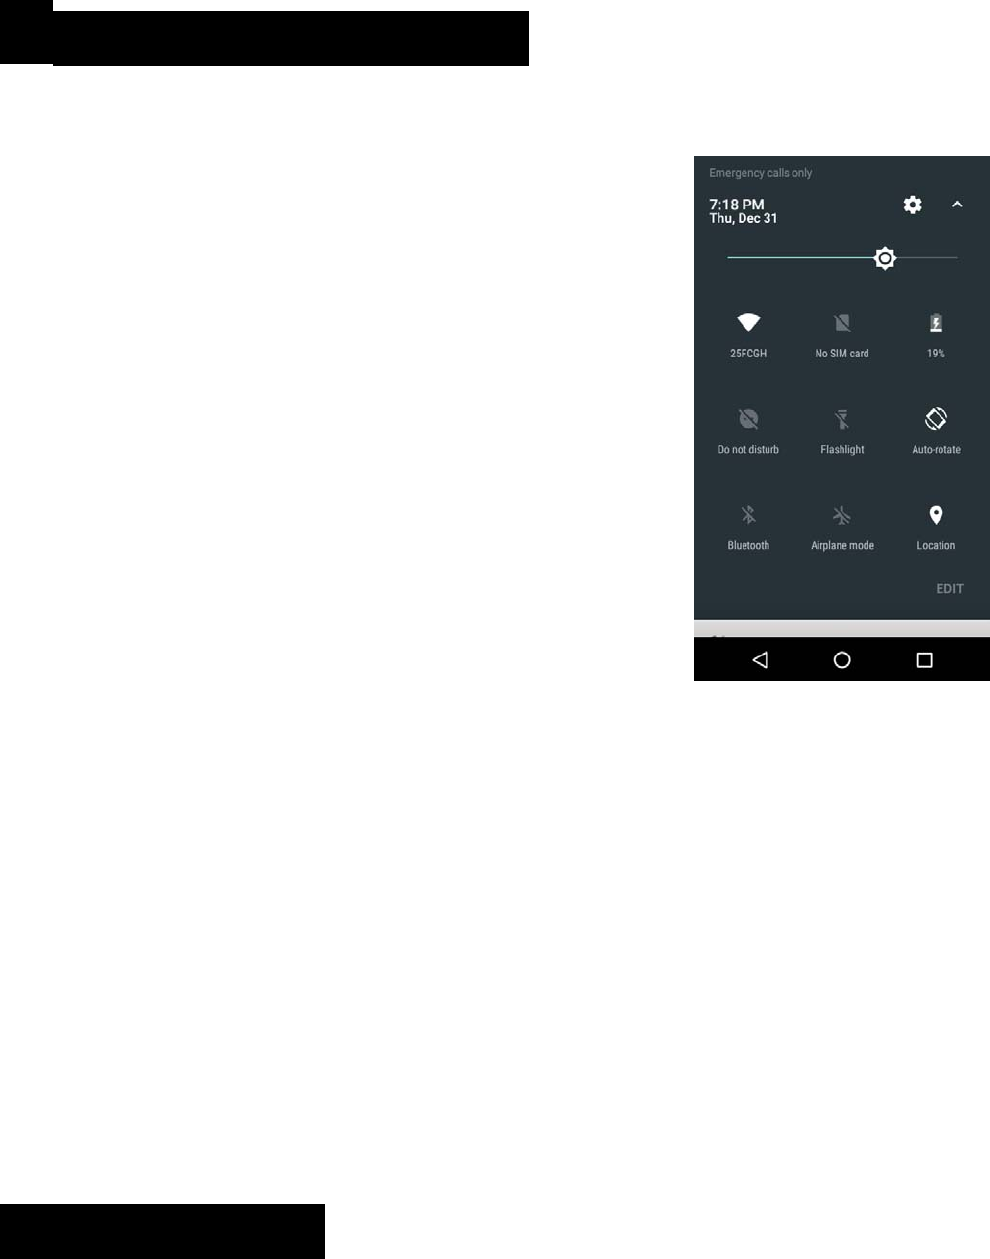
5. QUICKNOTIFICATIONPANEL
Whenyoureceiveanotification,youcan
Quicklyviewitbyfollowingthebelow
instructions:
Slideyourfingerfromthetopofthe
screenDowntothecentertoaccess
NotificationPaneltoseeyour
notifications.
Dragthenotificationmenudownto
displaythesecondfastaccessmenu,the
menuwilllooklikeimageontheright:
Throughthismenu,itispossibletomodify
thefunctionssuchasbrightness,autorotation,
Wi‐Fi,Bluetoothandmore.
6. SETTINGSMENU

9
ThesettingsmenuallowsyoutoadjusttheSystemConfiguration.
ToChangeSettings:
1.
Touchthe“Settings” menuicononthe
Applicationmenu.TheSettingsmenuwillopen.
2.
Touchacategorytitletoviewfurtheroptionsontheright
sideofthescreen.
•
Wi‐Fi–Connectto/disconnectfromwireless
networks,viewconnectionstatus
•
Datausage–Enable/disablemobiledata,viewcurrent
usage,setmobiledatalimit
•
Bluetooth–ConnectordisconnectBluetoothdevices
•
Display–Adjustdisplaysettings
•
SmartGesturesettings–“ON”/“OFF”
•
AudioProfiles–Adjustthedifferentaudiosettingssuchas
ringtones
•
Promptsandnotifications–Adjustdifferentnotification settings
•
Storage–Viewyourphone’sinternalandexternalstorage
settings
•
Battery–Viewthestatusofyourbatteryandadjust
powerconsumption
•
Apps–Alistofallappsdownloadedandrunning
•
Deleteapplications–Selectappstodelete

10
•
Locationservices–Changeapproximatelocationdetection,
improvesearchresults,GPSsatellites
•
Security–Adjustthephone’ssecuritysettings
•
Accounts–AddorremoveemailandGoogleTMaccounts
suchasGmail
•
LanguageandInputSelectlanguage–addtothe
dictionary,editon‐screenkeyboardsettings,vocalsearch,
etc.
•
Backupandreset–Backupandrestoredata,perform
factoryreset,etc.
•
Dateandtime–Setdate,timezone,time,clockformatetc.
•
Accessibility–Setuplargetext,auto‐rotatescreen,speak
passwordetc.
•
AboutPhone–Displaysinformationaboutyourphone
7.INSERTING/REMOVINGSIM CARDS
1.
Whenthephoneispoweredoff,insertaSIMcardby
removingtheSIMcover.Insertyourfingerintheindent
locatednearthechargingportanduncliptheSIMcover,
theninserttheSIMcard.Pleasetakenoteofthedirectionof
insertionfollowingthediagramonthephone’sSIMport.
2.
AfterinsertingaSIMcard,turnonthephoneandwaitafew
minutesforyourphonetodisplayNetworkinformation.
11
InsertingandRemovingSDCard
NB:PleaseensurewheninsertinganSDcardyourphoneis
powered“OFF”
1.
InserttheSDcardintotheSDcardslotlocatedunderthe
SIMcardcoverasexplainedintheInserting/RemovingSIM
cardsection.GentlypushSDcardintoslotuntilitclicksinto
place.
2.
Apromptwillappearonthescreenstating“PreparingSD card”.
RemovingSDCard
1.
Closeallapplicationsanddocumentswhichhavebeen
openedfromtheSDcard.
2.
Select“Settings”andfind“Storage”thenclick“UnmountSD
card”.
3.
Apromptwillbeseenonthescreenstating“SDcardsafeto
remove”.
4.
GentlypresstheSDcardtoremoveandpullouttheSD card.
12
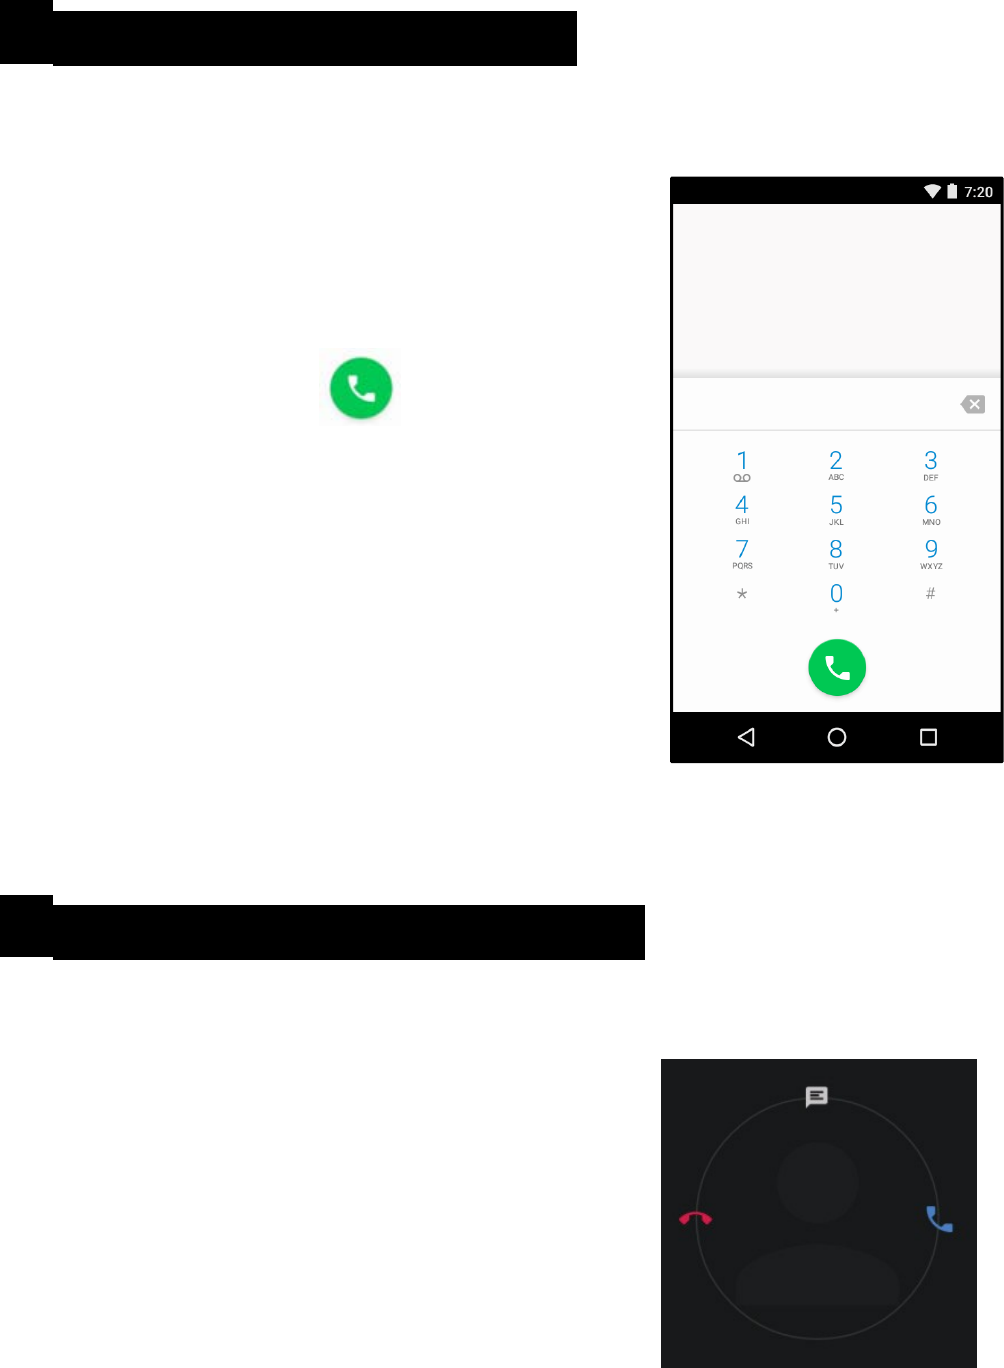
8. MAKINGANDRECEIVINGCALLS
Once your SIM cards are installed turn
onyourphoneandwaitafewminutes
foryourphonetofindanetwork.
ThenselecttheCall icon.Here
youcandialanumberorselectacontact
from your
storedcontactslisttocall.Youcanalso
viewoutgoingandincomingcallsthat
havebeenmade,aswellasaddingor
removingcontacts.
9. ANSWERINGANDREJECTINGCALLS
Toansweracall–Slideyourfinger
totheblueCallAnswerkey.
TorejectaCall–Slideyourfinger
totheRedCallEndkey.

13
Tomessage–touchthemessageicon.
10. SOFTWAREKEYBOARD
Thephonehasasoftwarekeyboardwhich
automaticallydisplayswhenyoutapthe
placeonscreenwhereyouwanttextor
numberstobeentered,thensimplystart
typing.
Touchscreen
Thetouchscreenrespondstofingertouch.
Note:
•
Don’tplaceanyobjectonthetouchscreenforitmay
damageorcrushthescreen.
SingleClick:Singleclickoneicontochoosetheiconoroptionyou
want.
LongPress:Pressandholdanicontodeleteormoveaniconorapp.
Drag:Presstheiconanddragittoadifferentscreen.
11. HOWTOCONNECTTOACOMPUTER

14
Note:
•
TurnonyourphonebeforeconnectingthephonetoaPCbyUSB
cable.
1.
UseaUSBcabletoconnectthephonewithacomputer.The
phonewillautomaticallydetectaUSBconnection.
2.
AnotificationwillpopuponthescreendisplayingUSB
connected,thenselectthedesiredUSBoperation.
3.
TheUSBconnectionhasbeensuccessful.
12.CONNECTIONTOINTERNET
Wireless:
1.
Select“Settings”.
2.
Select“Wi‐Fi”andslideOFFtoONstatus.
3.
Alldetectedwirelessnetworksintheareawillbelisted.Click
toselectdesiredwirelessconnection.
4.
Enternetworkkeyifnecessary.
5.
Onceconnectedtoawirelessnetwork,settingswillbesaved.
6.
Wirelessiconwillappearonthetaskbarwhenconnected
successfully.
13. MOBILEDATAANDINTERNET
15
PleaseNote:CellDatamaybeturned“OFF”asafactory
setting,toallowdatatoflowthroughyournetworkprovider
pleaseturnCellData“ON”eitherfromyourquickdrop-
downmenuorin>Settings>CellData,youwillnotbeable
toaccesstheInternetwhenCellDatais“OFF”andnot
connectedtoWi‐Fi.
NB:MobileDatachargesapplywhenthissettingis“ON”–
Datawillbepassedthroughyournetworkprovider.
Note:
•
Whenthephonedetectsthesamewirelessnetworkinthe
future,thedevicewillconnectto
Thenetworkautomaticallywiththesamepasswordrecord.
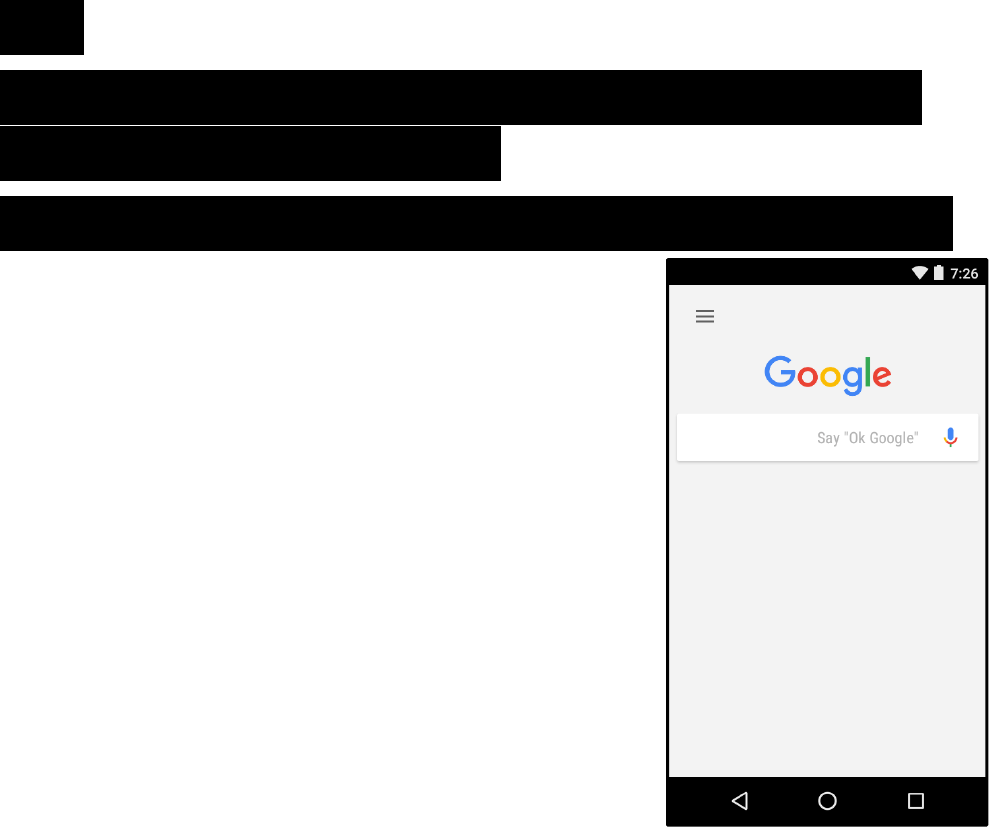
WebBrowsing
ConnecttotheInternetandlaunch
thebrowser.
TypeinthedesiredbrowsingURL.

16
14. BLUETOOTH
Select“Settings”,selectBluetoothfrom“OFF”to“ON”.
Searchforthedeviceyouwouldliketopairwithand
select“PAIR”.Youwillseeamessage“Connected
Successfully”.
15. CAMERA
Touchtheicon toentercameramodeandtheinterface
isshownasfollows:
1.
Touchtheicon totakeaphoto.
2.
Touchtheicon tostart
camerarecording.
3.
Touchtheicon onthetoprighttoseethepreviouspicture
andtodelete,shareorsetitasawallpaper.
Clickthereturnbuttontoexitcamerainterface.
17
4.
Touchtheicontoswitchfromfronttobackcamera.
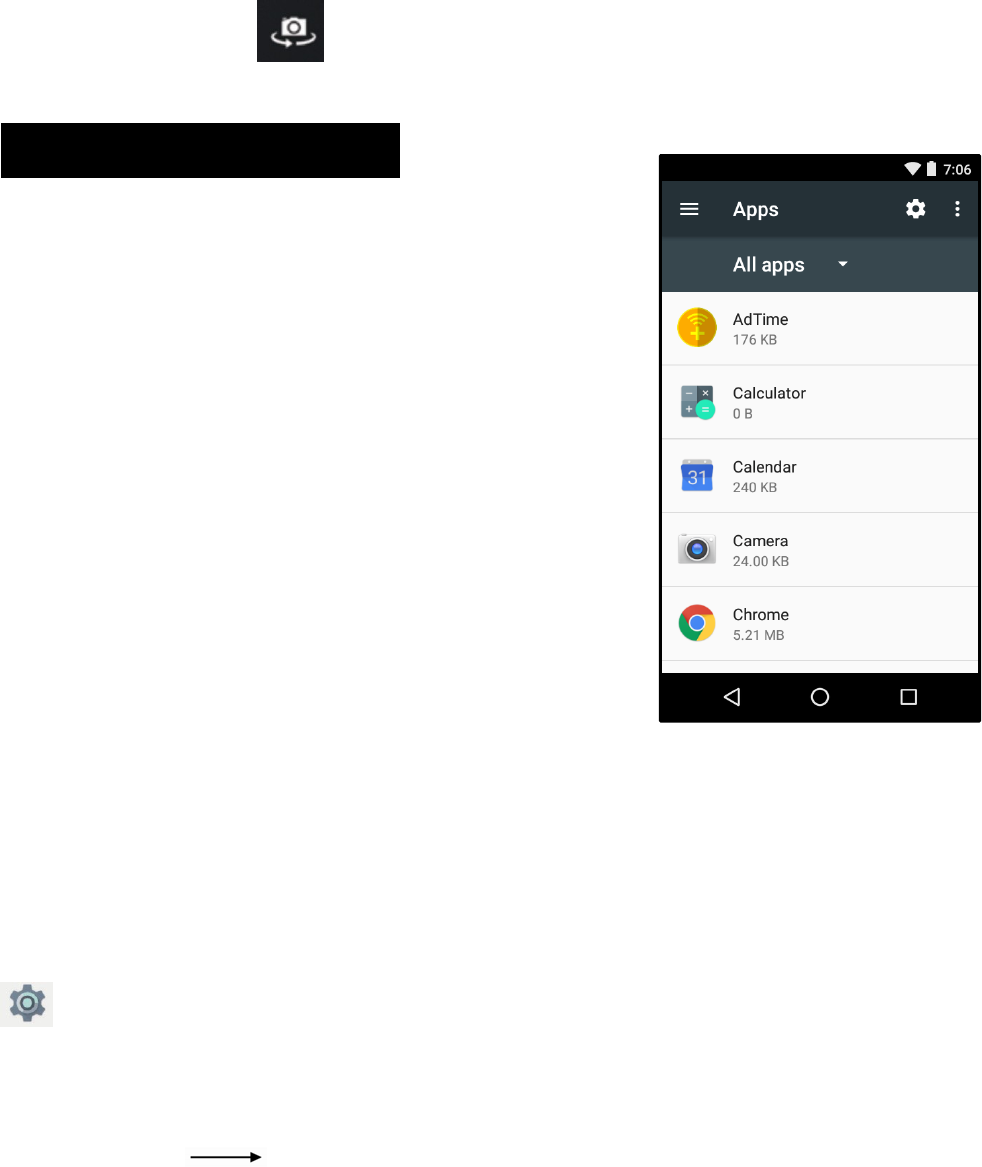
16.TROUBLESHOOTING
HowtoCloseApplications
Whenanapplicationisnot
responding,youcanmanuallyshut
theappdownin“RunningServices”
menu.Thiswillensurethesystem
respondsasdesired.Pleaseshut
downallidleapplicationstorelease
memoryandgetthesystemspeedback
to normal.
Toclosetheapplication,clicktheicon
ontheshortcutbartoenterthe
systemconfigurationinterface.Select
Application Runningandthe
interfaceisshownasfollows:
Taptheapplicationyouwanttoclose.Apop‐upwindowwillbe

18
displayed.Tap“Stop”toclosethatapplication.
Power“OFF”/Restart/ResetthePhone
1.
Pressandholdthepowerbuttonfor5secondsandthe
devicewillbepowereddown.
2.
Presstheresetbuttonlocatedunderthepowerbutton
withasharpobjectandthedevicewillbeforcedtorestart.
RestoreDefaultSetting
Ifyouwanttoresetthephonetofactorysettingsanderaseall
materials,pleasepress
Settings Backupandreset Factorydatareset.
WARNING:
FactoryDataResetsettingwilldeleteALLyourdataand
systemconfiguration
aswellasanydownloadedapps.Pleaseusethisfunction
carefully.
Google,Android,GooglePlayandothermarksaretrademarksof
GoogleLLC.
FCCWarning:
Thisdevicecomplieswithpart15oftheFCCRules.Operationis
subjecttothefollowingtwoconditions:
(1)Thisdevicemaynotcauseharmfulinterference,and(2)this
devicemustacceptanyinterferencereceived,including
interferencethatmaycauseundesiredoperation.AnyChanges
ormodificationsnotexpresslyapprovedbytheparty
responsibleforcompliancecouldvoidtheuser'sauthorityto
operatetheequipment.
Note:Thisequipmenthasbeentestedandfoundtocomply
withthelimitsforaClassBdigitaldevice,pursuanttopart15
oftheFCCRules.Theselimitsaredesignedtoprovide
reasonableprotectionagainstharmfulinterferenceina
residentialinstallation.Thisequipmentgenerates,usesandcan
radiateradiofrequencyenergyand,ifnotinstalledandusedin
accordancewiththeinstructions,maycauseharmful
interferencetoradiocommunications.However,thereisno
guaranteethatinterferencewillnotoccurinaparticular
installation.Ifthisequipmentdoescauseharmfulinterference
toradioortelevisionreception,whichcanbedeterminedby
turningtheequipmentoffandon,theuserisencouragedtotry
tocorrecttheinterferencebyoneormoreofthefollowing
measures:
—Reorientorrelocatethereceivingantenna.
—Increasetheseparationbetweentheequipmentandreceiver.
—Connecttheequipmentintoanoutletonacircuitdifferent
fromthattowhichthereceiverisconnected.
—Consultthedealeroranexperiencedradio/TVtechnicianfor
help.
SpecificAbsorptionRate(SAR)information:
SARtestsareconductedusingstandardoperating
positionsacceptedbytheFCCwiththephonetransmittingat
itshighestcertifiedpowerlevelinalltestedfrequencybands,
althoughtheSARisdeterminedatthehighestcertifiedpower
level,theactualSARlevelofthephonewhileoperatingcanbe
wellbelowthemaximumvalue.Beforeanewmodelphoneisa
availableforsaletothepublic,itmustbetestedandcertified
totheFCCthatitdoesnotexceedtheexposurelimit
establishedbytheFCC,testsforeachphoneareperformedin
positionsandlocations(e.g.attheLimbandwornonthebody),
asrequiredbytheFCC.Forbodywornoperation,thismodel
phonehasbeentestedandmeetstheFCCRFexposure
guidelineswhenusedwithanaccessorydesignatedforthis
productorwhenusedwithanaccessorythatcontainsnometal
andthatpositionsthehandsetaminimumof10mmfromthe
body.Non-compliancewiththeaboverestrictionsmayresultin
violationofRFexposureguideline.