ZEBEX Z-900XBT Portable Data Collector User Manual
Zebex Industries Inc Portable Data Collector
ZEBEX >
User Manual
Important Notice
No warranty of any kind is made in regard to this material, including, but not limited
to, implied warranties of merchantability or fitness for a particular purpose. We are
not liable for any errors contained herein or incidental or consequential damages in
connection with furnishing, performance or use of this material.
No part of this document may be reproduced, transmitted, stored in a retrieval
system, transcribed, or translated into any language or computer language in any
form or by any means electronic, mechanical, magnetic, optical, chemical, manual or
otherwise, without express written consent and authorization.
We reserve the right to make changes in product design without reservation and
without notification. The material in this guide is for information only and is subject
to change without notice.
All trademarks mentioned herein, registered or otherwise, are the properties of their
various respective owners.
For CE-Countries
This scanner is in conformity with CE standards. Please note that an approved,
CE-marked power supply unit should be used in order to maintain CE conformance.
Laser Safety
The laser scanner complies with safety standard IEC 60825-1 for a Class 2 laser
produce.
Laser Light Viewing: The scan window is the only aperture through which laser light
may be observed from this product. A failure of the scanner motor, while the laser
diode continues to emit a laser beam, may cause emission levels to exceed those for
safe operation. The scanner has safeguards to prevent this occurrence. If,
however, a stationary laser beam is emitted, the failing scanner should be
disconnected from its power source immediately.
CAUTION
Danger of explosion if battery is incorrectly replaced. Replace only with same or
equivalent type.
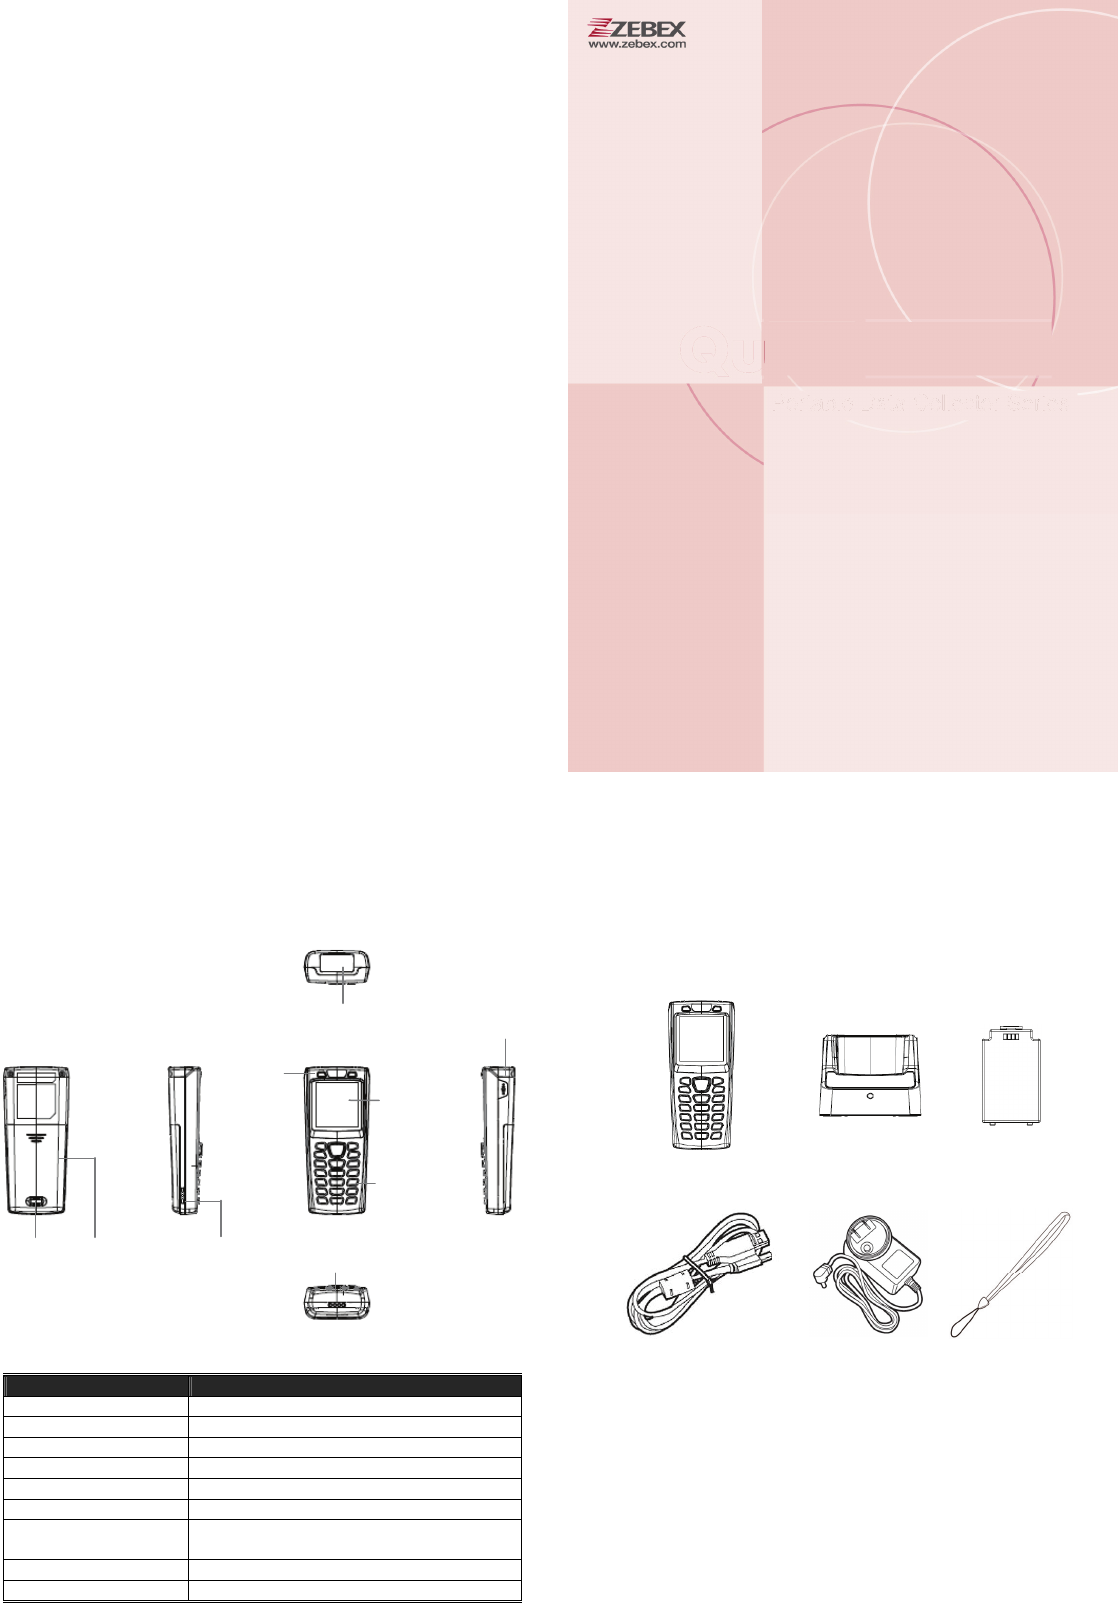
Scanner Outline
Description Function
Scan Window Emits a red beam for barcode reading
Battery Compartment Batteries are stored here
Battery Lock Secures the battery compartment
Hand Strap Hole Used to attach hand straps
LED Indicator Indicates the scanning status
LCD Screen Display various data when a program is being run
Keypad A total of 21 keys are provided to the power and
other function keys
Battery Contacts For charging battery
Buzzer Emits audible indication sounds
Package Contents
Items contain in the package may vary depending on the model of the data collector.
Data Collector Cradle Li-ion Battery
USB Cable Power Adapter Hand Strap
Z-900XBT
Quick Guide
Scan Window
Buzzer
LED
Indicator LCD
Screen
Keypad
Hand Strap
Battery Battery Battery Contacts
Lock Compartment
Federal Communication Commission Interference Statement
This equipment has been tested and found to comply with the limits for a Class B
digital device, pursuant to Part 15 of the FCC Rules. These limits are designed to
provide reasonable protection against harmful interference in a residential installation.
This equipment generates, uses and can radiate radio frequency energy and, if not
installed and used in accordance with the instructions, may cause harmful interference
to radio communications. However, there is no guarantee that interference will not
occur in a particular installation. If this equipment does cause harmful interference
to radio or television reception, which can be determined by turning the equipment off
and on, the user is encouraged to try to correct the interference by one of the
following measures:
zReorient or relocate the receiving antenna.
zIncrease the separation between the equipment and receiver.
zConnect the equipment into an outlet on a circuit different from that to which
the receiver is connected.
zConsult the dealer or an experienced radio/TV technician for help.
15.21
FCC Caution: Any changes or modifications not expressly approved by the party
responsible for compliance could void the user's authority to operate this equipment.
15.19
This device complies with Part 15 of the FCC Rules. Operation is subject to the
following two conditions: (1) This device may not cause harmful interference, and (2)
this device must accept any interference received, including interference that may
cause undesired operation.
FCC RF Radiation Exposure Statement:
1. This Transmitter must not be co-located or operating in conjunction with any other
antenna or transmitter, except in accordance with FCC multi-transmitter RF exposure
procedures.
2. This equipment complies with FCC RF radiation exposure limits set forth for an
uncontrolled environment.

Europe - EU Declaration of Conformity
This device complies with the essential requirements of the R&TTE Directive 1999/5/ EC with
essential test suites as per standards:
EN 300 328:
Electromagnetic compatibility and Radio Spectrum Matters (ERM); Wideband transmission systems;
Data transmission equipment operating in the 2.4 GHz ISM band and using spread spectrum
modulation techniques
EN 301 489-17:
Electromagnetic compatibility and Radio Spectrum Matters (ERM); Electro Magnetic
Compatibility (EMC) standard for radio equipment and services;
Part 17: Specific conditions for 2.4 GHz wideband transmission systems and 5 GHz
high performance RLAN equipment
EN 60950-1:
Safety of information technology equipment, including electrical business equipment
EN 62311:
Assessment of electronic and electrical equipment related to human exposure restrictions for
electromagnetic fields (0 Hz – 300 GHz)
Translated Statements of Compliance
Hereby, declares that this product is in compliance with the essential require-ments and other
relevant provisions of Directive 1999/5/EC.
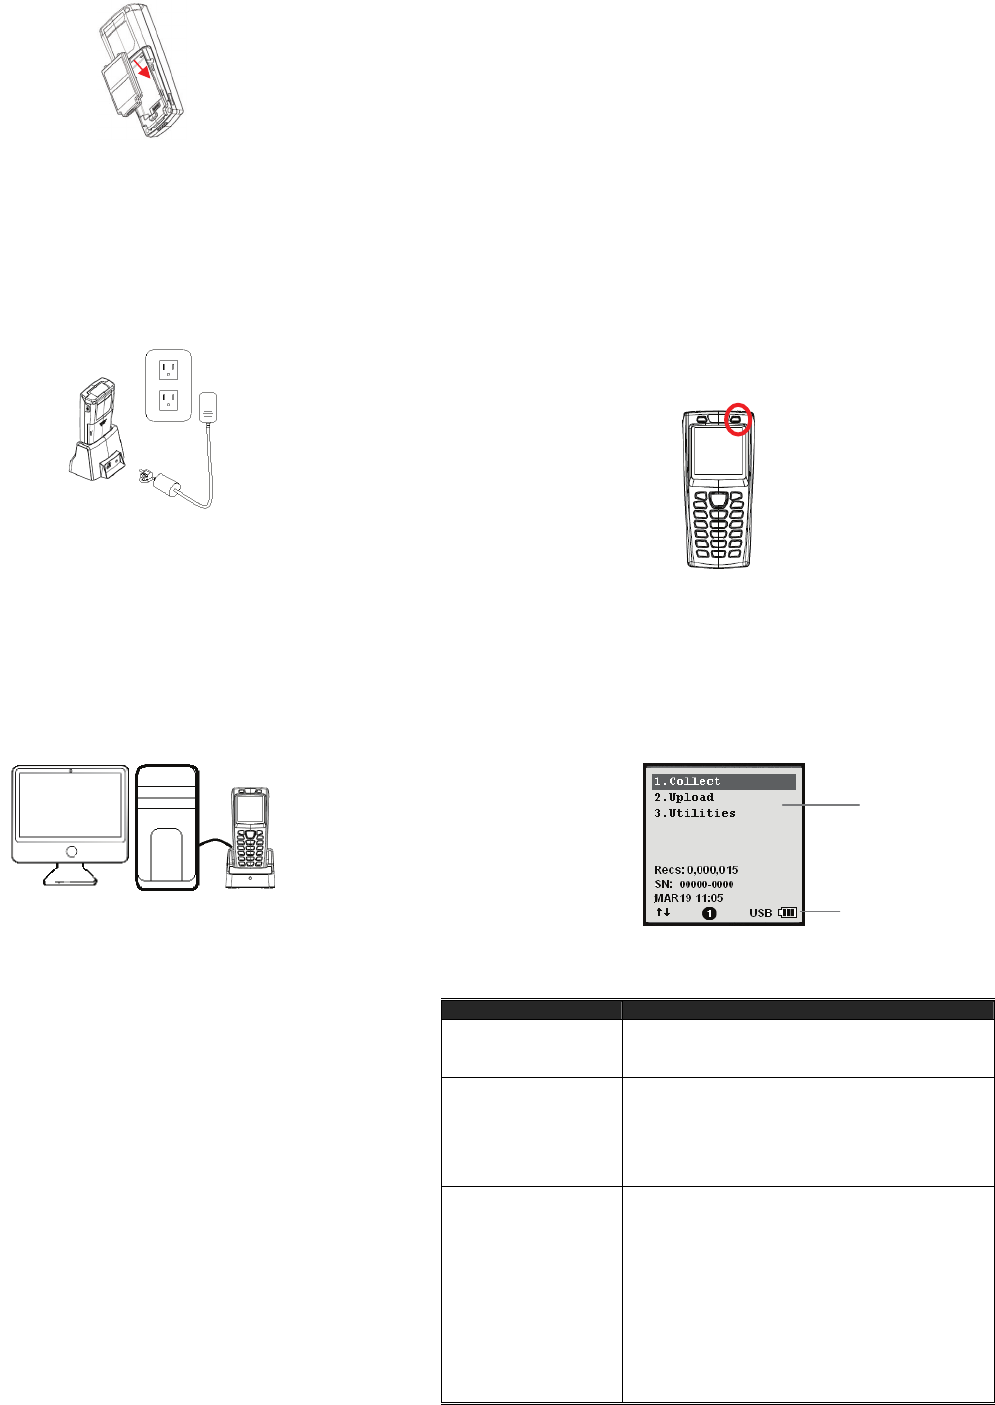
Inserting Battery
1. Push the lock lever to unlock the battery lock.
2. Remove the battery cover from the data collector.
3. Insert the battery with the top side in first then the side with battery
contact. The battery is held in place by a small lock on the bottom of the
compartment. Push the battery in until it clicks into place.
4. Slide the battery cover back on to secure the battery.
Charging Battery
1. Connect the power adapter to the cradle and to a wall outlet.
2. Place Z-9000 on the cradle. The screen indicates the status of battery
charge.
3. Charge the batteries until the battery indicator turns full.
To extend the life of the battery to its maximum, please allow the initial
charge to be at least 12 hours.
Please do not completely discharge battery as lost of data may occur.
Wireless Connection
1. To set the device to wireless mode, select “3.Utilities”, “1.Settings”,
“2.Download Port” (or “1.Upload Port”) from the device menu and select SPP
Master or SPP Slave modes.
For SPP Master mode, please select “3.Utilities”, “1.Settings”, next
page, “4.Wireless Menu”, ” 6.Master Connect” and enter the host
MAC address.
For SPP Slave mode, no additional action is necessary.
2. Select “3.Utilities”, “6.Load Application” (or “8.Load Lookup”; upload lookup
files please select “2. Upload”) and wait for the device to connect. An error
message may appear if you fail to enter the correct MAC address in SPP Master
Mode.
3. Start using ZAC for your applications. For more details please see the ZAC User's
Manual.
Using the Device with PC
1. Install and run ZAC on your PC. Please download the latest version from
our website and refer to ZAC User’s Manual for instructions.
2. Make sure the virtual COM port driver is installed.
3. Start using ZAC for your applications. For more details please see the ZAC
User’s Manual.
Power On the Device
Press and hold the power button to turn the power on or off.
Connection to Host
To connect the data collector to a PC via cradle:
1. Place the data collector on the cradle and connect the cradle to PC by using
the USB cable.
2. The PC should auto-detect the device as a COM device and ask for the driver
when connecting the first time.
3. Please download and install the driver from ZEBEX website. The system
should assign a COM port to the device after the driver installation.
To install USB driver:
1. Connect the device to your computer via USB cradle.
2. A window appears in the bottom right-hand corner of Windows that says
“Found new hardware”. In a few seconds a "Found New Hardware Wizard"
window opens up. Double click the found new hardware icon to pull up
the window if it does not appear automatically. Select "No, not this time"
to continue.
3. Click "Next" to continue installation.
4. Click “Install from a list or specific location (Advanced)” and click “Next”.
5. Check the “Include this location” option and use “Browse” to locate the
driver in your computer. Click “Next” to go to the next step.
6. Click “Next” and “Finish” when the installation is done.
Check the COM and LPT section in the device manager for the assigned
COM port. The data collector should appear as a virtual com device.
Working with Menus
• Press the or buttons or the number keys to move the cursor
to the desired option.
• Press the Enter key to enter the menu option.
• Press ESC to go to the previous screen.
Menu Description
Menu Description
Collect Select this option to start recording data. You can scan
barcodes or enter the data manually.
Upload
Select this option to:
Upload Data file
Upload lookup file
Upload all files 1 by 1
Upload all files as append
Utilities
Select this option for:
1. Settings
2. Browse Data
3. Delete Data
4. Reader Test
5. Set Date/Time
6. Load Application
7. Memory & Power
8. Calculator
9. Load Lookup (when lookup is available this option
becomes option 8 and calculator becomes option 9)
Menu selection
Keypad/USB/Battery
status