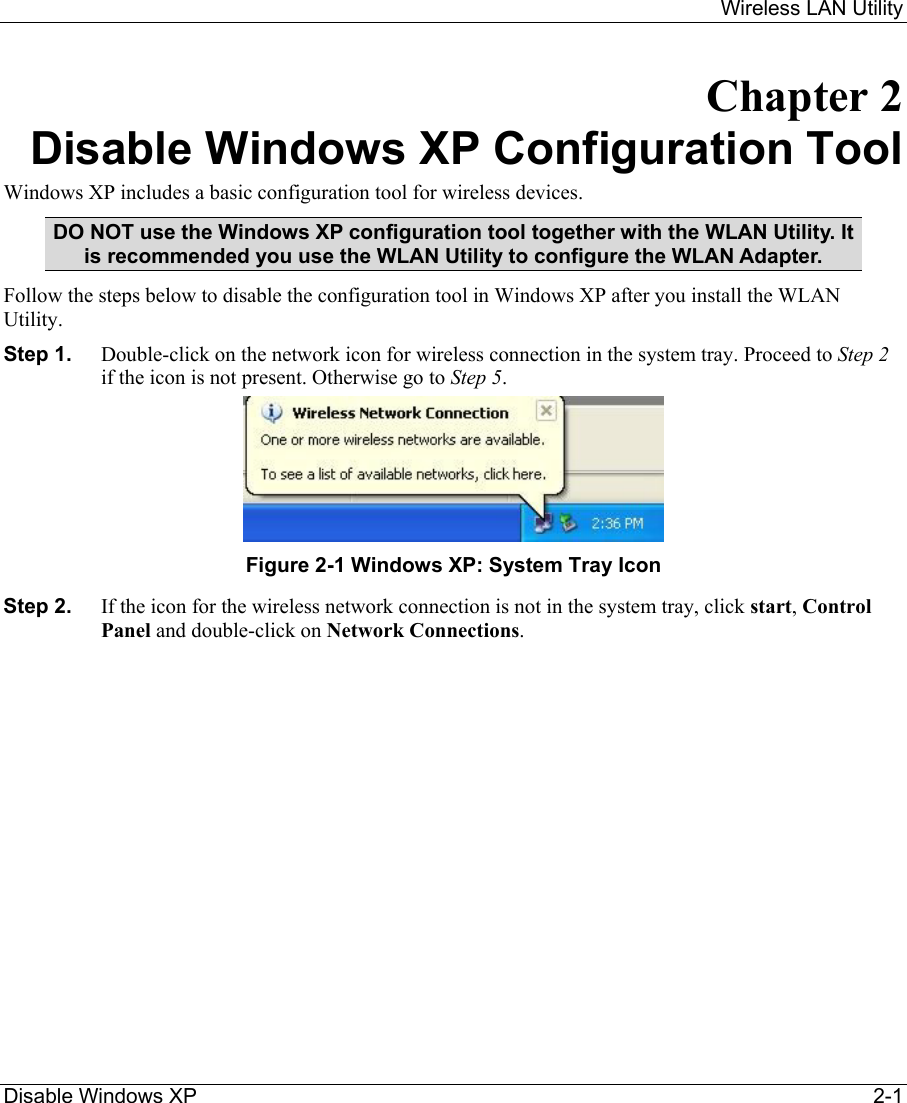
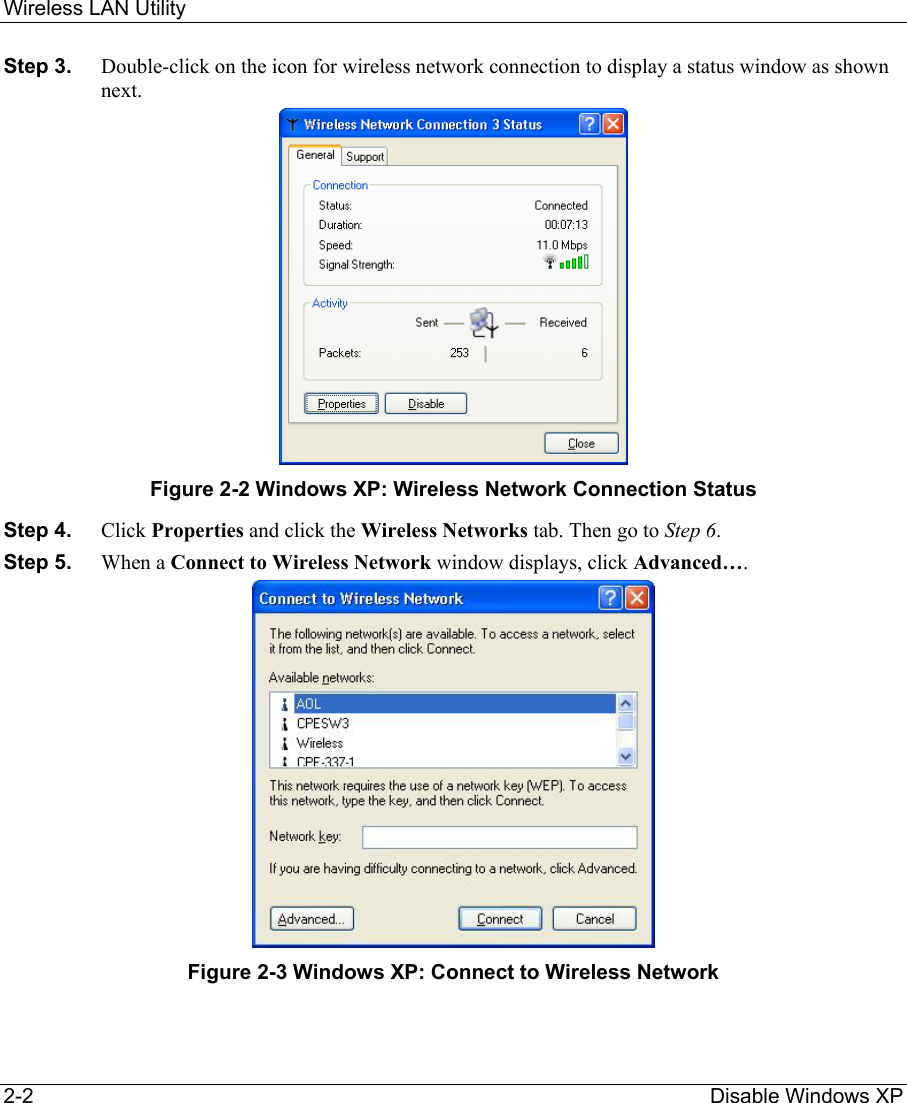
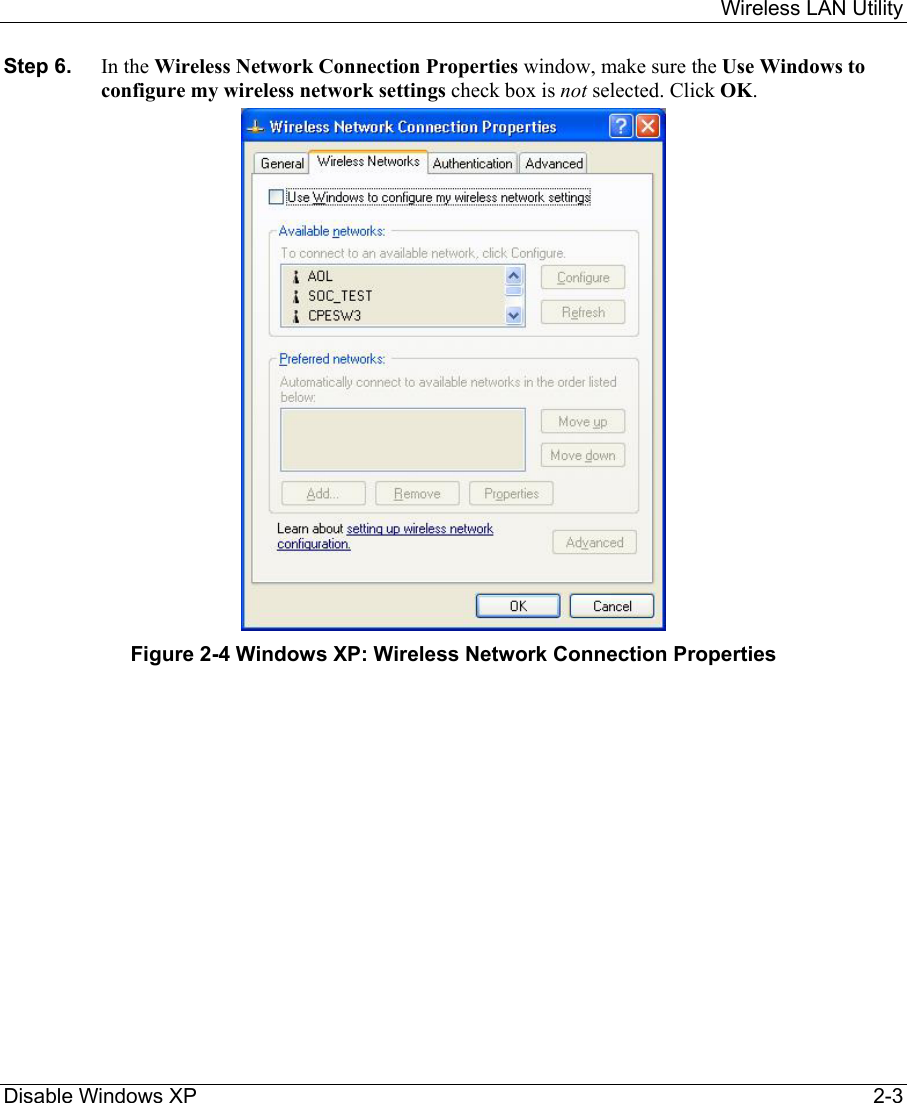
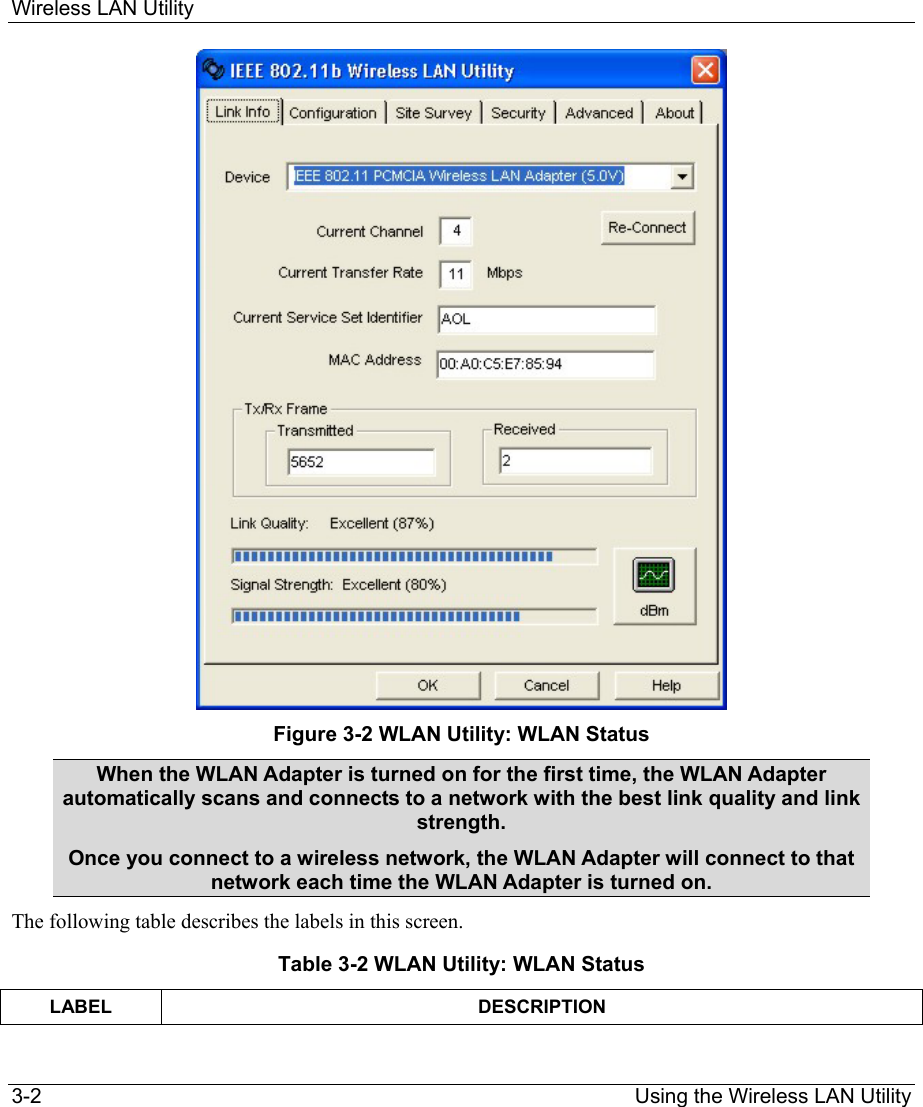
ZyXEL Communications B-120 802.11b Mobile Module User Manual ZyAIR Wireless Utility OEM

ZyXEL Communications Corporation 802.11b Mobile Module ZyAIR Wireless Utility OEM

Revised Installation Guide

    Wireless LAN Utility    User's Guide  Version 2.0 September 2003     Note to OEMs: ZyXEL provides this document as a sample User’s Guide. This User’s Guide may require customization to reflect your own company name, product name and/or document style.  Possible words you may want to change: OEM, WLAN Adapter, WLAN Utility
Wireless LAN Utility ii  Copyright Copyright Copyright ©2003 by the Original Equipment Manufacturer (OEM) The contents of this publication may not be reproduced in any part or as a whole, transcribed, stored in a retrieval system, translated into any language, or transmitted in any form or by any means, electronic, mechanical, magnetic, optical, chemical, photocopying, manual, or otherwise, without the prior written permission of the OEM. Published by the OEM. All rights reserved. Disclaimer The OEM does not assume any liability arising out of the application or use of any products, or software described herein. Neither does it convey any license under its patent rights nor the patents' rights of others. The OEM further reserves the right to make changes in any products described herein without notice. This publication is subject to change without notice. Trademarks Trademarks mentioned in this publication are used for identification purposes only and may be properties of their respective owners.
    Wireless LAN Utility  Limited Warranty    iii Limited Warranty
Wireless LAN Utility iv    Information for Canadian Users Information for Canadian Users The Industry Canada label identifies certified equipment. This certification means that the equipment meets certain telecommunications network protective operation and safety requirements. The Industry Canada does not guarantee that the equipment will operate to a user's satisfaction. Before installing this equipment, users should ensure that it is permissible to be connected to the facilities of the local telecommunications company. The equipment must also be installed using an acceptable method of connection. In some cases, the company's inside wiring associated with a single line individual service may be extended by means of a certified connector assembly. The customer should be aware that compliance with the above conditions may not prevent degradation of service in some situations. Repairs to certified equipment should be made by an authorized Canadian maintenance facility designated by the supplier. Any repairs or alterations made by the user to this equipment, or equipment malfunctions, may give the telecommunications company cause to request the user to disconnect the equipment. For their own protection, users should ensure that the electrical ground connections of the power utility, telephone lines, and internal metallic water pipe system, if present, are connected together. This precaution may be particularly important in rural areas. Caution Users should not attempt to make such connections themselves, but should contact the appropriate electrical inspection authority, or electrician, as appropriate. Note This digital apparatus does not exceed the Class B limits for radio noise emissions from digital apparatus set out in the radio interference regulations of Industry.
    Wireless LAN Utility  FCC Statement    v Federal Communications Commission (FCC) Interference Statement This device complies with Part 15 of FCC rules. Operation is subject to the following two conditions: 1.  This device may not cause harmful interference. 2.  This device must accept any interference received, including interference that may cause undesired operations. This equipment has been tested and found to comply with the limits for a CLASS B digital device pursuant to Part 15 of the FCC Rules. These limits are designed to provide reasonable protection against harmful interference in a commercial environment. This equipment generates, uses, and can radiate radio frequency energy, and if not installed and used in accordance with the instructions, may cause harmful interference to radio communications. If this equipment does cause harmful interference to radio/television reception, which can be determined by turning the equipment off and on, the user is encouraged to try to correct the interference by one or more of the following measures: •  Reorient or relocate the receiving antenna. •  Increase the separation between the equipment and the receiver. •  Connect the equipment into an outlet on a circuit different from that to which the receiver is connected. •  Consult the dealer or an experienced radio/TV technician for help. Caution This device is intended only for OEM integrators under the following conditions: 1.  This equipment complies with FCC radiation exposure limits set forth for an uncontrolled environment. In order to avoid the possibility of exceeding the FCC radio frequency exposure limits, human proximity to the antenna (installed to end product) shall not be less than 20 cm (8 inches) during normal operation.  2.  This Transmitter must not be co-located or operating in conjunction with any other antenna or transmitter  As long as the 2 conditions above are met, further transmitter testing will not be required. However, the OEM integrator is still responsible for testing their end-product for any additional compliance requirements required with this module installed (for example, digital device emission, PC peripheral requirements, etc.). Notice 1 Changes or modifications not expressly approved by the party responsible for compliance could void the user's authority to operate the equipment. Additional Information to OEM Integrators
Wireless LAN Utility vi  FCC Statement The end user should NOT be provided any instructions on how to remove or install the device. End Product Labeling This transmitter module is authorized only for use in devices where the antenna may be installed such that 20 cm may be maintained between the antenna and users (for example access points, routers, wireless ASDL modems, and similar equipment).  The final end product must be labeled in a visible area with the following:  Contains TX FCC ID:  I88B-120 IMPORTANT NOTE 1.  In the event that these conditions can not be met  (for example certain laptop configurations or co-location with another transmitter), then the FCC authorization is no longer considered valid and the FCC ID can not be used on the final product.  In these circumstances, the OEM integrator will be responsible for re-evaluating the end product (including the transmitter) and obtaining a separate FCC authorization. 2.  To comply with FCC RF exposure compliance requirements, the antenna used for this transmitter must be installed to provide a separation distance of at least 20 cm from all persons and must not be co-located or operating in conjunction with any other antenna or transmitter." Certifications Refer to the product page at OEM web site.
    Wireless LAN Utility  Customer Support    vii Customer Support When contacting your Customer Support Representative, please have the following information ready:  Product model and serial number.  Warranty Information.  Date you received your product.  Brief description of the problem and the steps you took to solve it.  METHOD   LOCATION E-MAIL  SUPPORT/SALES TELEPHONE/FAX WEB SITE/ FTP SITE  REGULAR MAIL
    Wireless LAN Utility  Table of Contents     ix Table of Contents Copyright.......................................................................................................................................................ii Limited Warranty........................................................................................................................................iii Information for Canadian Users.................................................................................................................iv Federal Communications Commission (FCC) Interference Statement.................................................... v Customer Support.......................................................................................................................................vii List of Figures...............................................................................................................................................xi List of Tables ................................................................................................................................................xi Preface..........................................................................................................................................................xii Chapter 1 Wireless Network Basics .........................................................................................................1-1 1.1 Introduction..................................................................................................................................1-1 1.2 Benefits of a Wireless LAN .........................................................................................................1-1 1.3 Applications .................................................................................................................................1-1 1.3.1 Ad-hoc..................................................................................................................................1-1 1.3.2 Infrastructure........................................................................................................................1-2 Chapter 2 Disable Windows XP Configuration Tool..............................................................................2-1 Chapter 3 Using the Wireless LAN Utility...............................................................................................3-1 3.1 Accessing the WLAN Utility .......................................................................................................3-1 3.2 Viewing Current Configuration ...................................................................................................3-1 3.2.1  Common Screen Command Buttons ....................................................................................3-3 3.3 The About Screen.........................................................................................................................3-3 3.4 Wireless LAN Parameters............................................................................................................3-5 3.4.1 SSID.....................................................................................................................................3-5 3.4.2 Channel ................................................................................................................................3-5 3.4.3 Tx Rate.................................................................................................................................3-5 3.5 Wireless Network Type................................................................................................................3-5 3.5.1 Ad-Hoc (IBSS).....................................................................................................................3-5 3.5.2 Infrastructure........................................................................................................................3-6 3.6 Roaming.......................................................................................................................................3-7 3.7 The Site Survey Screen ................................................................................................................3-8 3.7.1 Connecting to a Network....................................................................................................3-10 3.8 Configuring the Wireless Parameters.........................................................................................3-11 3.9 Network Configuration Profile Setting ......................................................................................3-12 3.9.1  Resetting to Factory Default Values ..................................................................................3-12 3.9.2  Saving the Current Setting to a Profile...............................................................................3-13 3.9.3  Using a Pre-configured Profile...........................................................................................3-13 3.9.4 Deleting a Profile ...............................................................................................................3-13 Chapter 4 Wireless LAN Security ............................................................................................................4-1 4.1 Introduction..................................................................................................................................4-1 4.2 Data Encryption with WEP..........................................................................................................4-1
Wireless LAN Utility x    Table of Contents 4.2.1 Authentication Mode ...........................................................................................................4-1 4.2.2 Configuring the WEP Encryption ........................................................................................4-1 Chapter 5 Advanced Configuration.........................................................................................................5-1 5.1 Overview......................................................................................................................................5-1 5.1.1 Threshold Control ................................................................................................................5-1 5.1.2 Authentication Mode ...........................................................................................................5-2 5.1.3 Preamble Type .....................................................................................................................5-2 5.2  The Advanced Screen ..................................................................................................................5-3 Chapter 6 Removing and Upgrading the WLAN Utility........................................................................6-1 6.1 Removing the WLAN Utility.......................................................................................................6-1 6.2 Upgrading the WLAN Utility ......................................................................................................6-1 Chapter 7 Troubleshooting .......................................................................................................................7-1 7.1  Problems Starting the WLAN Utility Program............................................................................7-1 7.2  Problems Communicating With Other Computers ......................................................................7-2 7.3 Problem with the Link Status.......................................................................................................7-2 Index ............................................................................................................................................................. A
    Wireless LAN Utility  List of Figures/Tables      xi List of Figures Figure 1-1 Ad-hoc Application Example .....................................................................................................1-2 Figure 1-2 Infrastructure Application Example............................................................................................1-2 Figure 2-1 Windows XP: System Tray Icon.................................................................................................2-1 Figure 2-2 Windows XP: Wireless Network Connection Status ..................................................................2-2 Figure 2-3 Windows XP: Connect to Wireless Network..............................................................................2-2 Figure 2-4 Windows XP: Wireless Network Connection Properties............................................................2-3 Figure 3-1 WLAN Utility System Tray Icon................................................................................................3-1 Figure 3-2 WLAN Utility: WLAN Status ....................................................................................................3-2 Figure 3-3 WLAN Utility: About.................................................................................................................3-4 Figure 3-4 Ad-hoc Network Example ..........................................................................................................3-6 Figure 3-5 BSS Example..............................................................................................................................3-6 Figure 3-6 Infrastructure Network Example ................................................................................................3-7 Figure 3-7 Roaming Example ......................................................................................................................3-8 Figure 3-8 WLAN Utility: Site Survey ........................................................................................................3-9 Figure 3-9 Site Survey Warning.................................................................................................................3-10 Figure 3-10 WLAN Utility: Network Configuration .................................................................................3-11 Figure 4-1 WLAN Utility: Security .............................................................................................................4-2 Figure 5-1 RTS Threshold............................................................................................................................5-1 Figure 5-2 WLAN Utility: Advanced...........................................................................................................5-3  List of Tables Table 3-1 System Tray Icon Description......................................................................................................3-1 Table 3-2 WLAN Utility: WLAN Status......................................................................................................3-2 Table 3-3 Common Screen Command Buttons............................................................................................3-3 Table 3-4 WLAN Utility: About ..................................................................................................................3-4 Table 3-5 WLAN Utility: Site Survey..........................................................................................................3-9 Table 3-6 Color Indicator for Link Quality/Link Strength .........................................................................3-10 Table 3-7 WLAN Utility: Network Configuration.....................................................................................3-12 Table 4-1 WLAN Utility: Security...............................................................................................................4-2 Table 5-1 WLAN Utility: Advanced ............................................................................................................5-4 Table 7-1 Troubleshooting Starting WLAN Utility Program .......................................................................7-1 Table 7-2 Troubleshooting Communication Problems.................................................................................7-2 Table 7-3 Troubleshooting Link Quality......................................................................................................7-2
Wireless LAN Utility xii  Preface Preface Congratulations on the purchase of your new Wireless LAN Adapter!   About This User's Guide A practical and comprehensive tool, this guide provides information about the Wireless LAN Utility operation.  This guide is for wireless devices that uses the Wireless LAN Utility program, thus the model name shown in the screens may vary from what you actually purchased.  Familiarize yourself with the Syntax Conventions listed for better and faster understanding. Related Documentation  Support Disk Refer to the included CD for support documents and device drivers.   Quick Installation Guide Our Quick Installation Guide is designed to help you get your Wireless LAN Adapter up and running right away. It contains a detailed easy-to-follow connection diagram and information on installing your Wireless LAN Adapter.  Glossary and Web Site Please refer to OEM web site for an online glossary of networking terms and additional support documentation. Syntax Conventions •  “Type” or “Enter” means for you to type one or more characters. "Select" or "Choose" means for you to use one of the predefined choices. •  Window and command choices are in Bold Times New Roman font. Predefined field choices are in Bold Arial font. •  The Wireless LAN Adapter is referred to as the WLAN Adapter or, simply, as the Adapter in this guide. •  The Wireless LAN Utility may be referred to as the WLAN Utility in this guide.
    Wireless LAN Utility  Wireless Network Basics    1-1 Chapter 1 Wireless Network Basics This chapter gives you an overview of what a wireless network is, its advantages and applications. 1.1 Introduction A wireless LAN (WLAN) provides a flexible data communication system that you can use to access various services (navigating the Internet, email, printer services, etc.) on the wired network without additional expensive network cabling infrastructure. In effect, a wireless LAN environment provides you the freedom to stay connected to the wired network while moving in the coverage area. 1.2  Benefits of a Wireless LAN   Access to network services in areas otherwise hard or expensive to wire, such as historical buildings, buildings with asbestos materials and classrooms.   Doctors and nurses can access a complete patient’s profile on a handheld or notebook computer upon entering a patient’s room.   It allows flexible workgroups a lower total cost of ownership for networks that are frequently reconfigured.   Conference room users can access the network as they move from meeting to meeting- accessing up-to-date information that facilitates the ability to communicate decisions “on the fly”.   It provides campus-wide networking coverage, allowing enterprises the roaming capability to set up easy-to-use wireless networks that transparently covers an entire campus. 1.3 Applications Unlike wired networks, you can set up wireless networks in two different modes: infrastructure and ad-hoc. Set up your wireless network depending on your network needs. The following sections describe each network mode.   1.3.1 Ad-hoc  An ad-hoc network consists of two or more computers communicating with one another through the wireless network. No access points (APs) or existing wired networks are needed. An access point acts as a bridge between the wireless and wired networks
Wireless LAN Utility 1-2    Wireless Network Basics  Figure 1-1 Ad-hoc Application Example  1.3.2 Infrastructure When wireless clients wish to access and share resources on the wired network, they should use infrastructure mode. Wireless clients may move from one coverage area to another seamlessly without network interruption. This is called roaming.   The figure below depicts an infrastructure network example   Figure 1-2 Infrastructure Application Example
    Wireless LAN Utility  Disable Windows XP     2-1 Chapter 2 Disable Windows XP Configuration Tool Windows XP includes a basic configuration tool for wireless devices.  DO NOT use the Windows XP configuration tool together with the WLAN Utility. It is recommended you use the WLAN Utility to configure the WLAN Adapter.  Follow the steps below to disable the configuration tool in Windows XP after you install the WLAN Utility. Step 1.  Double-click on the network icon for wireless connection in the system tray. Proceed to Step 2 if the icon is not present. Otherwise go to Step 5.   Figure 2-1 Windows XP: System Tray Icon Step 2.  If the icon for the wireless network connection is not in the system tray, click start, Control Panel and double-click on Network Connections.
Wireless LAN Utility 2-2    Disable Windows XP  Step 3.  Double-click on the icon for wireless network connection to display a status window as shown next.   Figure 2-2 Windows XP: Wireless Network Connection Status Step 4.  Click Properties and click the Wireless Networks tab. Then go to Step 6.  Step 5.  When a Connect to Wireless Network window displays, click Advanced….   Figure 2-3 Windows XP: Connect to Wireless Network
    Wireless LAN Utility  Disable Windows XP     2-3 Step 6.  In the Wireless Network Connection Properties window, make sure the Use Windows to configure my wireless network settings check box is not selected. Click OK.   Figure 2-4 Windows XP: Wireless Network Connection Properties
    Wireless LAN Utility  Using the Wireless LAN Utility    3-1 Chapter 3 Using the Wireless LAN Utility This chapter shows you basic wireless LAN configuration using the Wireless LAN Utility. Install the WLAN Adapter before you proceed. Refer to the Quick Installation Guide.  For Windows XP users: disable the Windows XP wireless configuration tool first before you proceed. Refer to Chapter 2. Screen shots for Windows XP are shown unless otherwise specified. 3.1  Accessing the WLAN Utility  After the Wireless LAN Utility is installed, an icon appears in the system tray. If the WLAN Utility system tray icon displays, the WLAN Adapter is installed properly.  Figure 3-1 WLAN Utility System Tray Icon The color of the WLAN Utility system tray icon indicates the status of the WLAN Adapter. Refer to the following table for details.  Table 3-1 System Tray Icon Description COLOR DESCRIPTION Yellow  The WLAN Adapter is working properly but is not connected to any AP or wireless station.  Green  The WLAN Adapter is connected to a wireless network.  Double click on the Wireless LAN Utility icon in the system tray to open the WLAN Utility.  3.2  Viewing Current Configuration  When the WLAN Utility starts, the WLAN Status screen displays, showing the current configuration of your WLAN Adapter.
Wireless LAN Utility 3-2                                                                Using the Wireless LAN Utility  Figure 3-2 WLAN Utility: WLAN Status When the WLAN Adapter is turned on for the first time, the WLAN Adapter automatically scans and connects to a network with the best link quality and link strength.  Once you connect to a wireless network, the WLAN Adapter will connect to that network each time the WLAN Adapter is turned on.  The following table describes the labels in this screen. Table 3-2 WLAN Utility: WLAN Status LABEL DESCRIPTION
    Wireless LAN Utility  Using the Wireless LAN Utility    3-3 Table 3-2 WLAN Utility: WLAN Status LABEL DESCRIPTION Device  Select an available wireless card from the drop-down list menu if you have more than one wireless cards in your computer.  Re-Connect  Click Re-Connect to re-establish connection to the wireless device whose SSID is shown in the Current Service Set Identifier field.  Current Channel  This field displays the radio channel the WLAN Adapter is currently using.  Current Transfer Rate This field displays the current transmission rate of the WLAN Adapter in megabits per second.  Current Service Set Identifier This field displays the name of the wireless device to which the WLAN Adapter is associated.  Tx/Rx Frame   Transmitted  This field displays the number of data frames transmitted. Received  This field displays the number of data frames received.  Link Quality  The status bar and the percentage number show the quality of the signal.  Link Strength  The status bar and the percentage number or a number in dBm show the strength of the signal.  Percent/dBm  Click this button to display either percentages in the Link Quality and Link Strength fields or a number in dBm in the Link Strength field. 3.2.1  Common Screen Command Buttons The following table describes common command buttons on all WLAN Utility screens.  Table 3-3 Common Screen Command Buttons BUTTON DESCRIPTION OK  Click OK to save all changes and close the WLAN Utility.  Cancel   Click Cancel to discard changes and close the WLAN Utility.  Help  Click Help to display the on-line help window.  3.3 The About Screen The About screen displays related version numbers of the WLAN Adapter. You may click Help to view related help topics.
Wireless LAN Utility 3-4                                                                Using the Wireless LAN Utility  Figure 3-3 WLAN Utility: About The following table describes the read-only labels in this screen. Table 3-4 WLAN Utility: About FIELD DESCRIPTION Driver Version  This field displays the version number of the WLAN Adapter’s driver.  Utility Version  This field displays the version number of the WLAN Utility. Firmware Version This field displays the version of the firmware on which the driver and the utility are based.
    Wireless LAN Utility  Using the Wireless LAN Utility    3-5 3.4 Wireless LAN Parameters This section describes each wireless LAN parameter.  3.4.1 SSID  The SSID (Service Set IDentity) is a unique name shared among all wireless devices in a wireless network. Wireless devices must have the same SSID to communicate with each other. 3.4.2 Channel A range of radio frequencies used by IEEE 802.11b wireless devices is called a channel.  3.4.3 Tx Rate The WLAN Adapter provides various transmission (data) rate options for you to select. Options include Fully Auto, 1 M bit/sec, 2 M bit/sec, 5.5M bit/sec and 11M bit/sec. In most networking scenarios, the factory default Fully Auto setting proves the most efficient. This setting allows your WLAN Adapter to operate at the maximum transmission (data) rate. When the communication quality drops below a certain level, the WLAN Adapter automatically switches to a lower transmission (data) rate. Transmission at lower data speeds is usually more reliable. However, when the communication quality improves again, the WLAN Adapter gradually increases the transmission (data) rate again until it reaches the highest available transmission rate. If you wish to balance speed versus reliability, you can select any of the above options 11M bit/sec or 5.5M bit/sec is used in a networking environment where you are certain that all wireless devices can communicate at the highest transmission (data) rate. 1M bit/sec or 2M bit/sec are used often in networking environments where the range of the wireless connection is more important than speed. 3.5 Wireless Network Type Wireless LAN works in either of the two modes: ad-hoc and infrastructure. To connect to a wired network within a coverage area using Access Points (APs), set the WLAN Adapter’s operation mode to Infrastructure. An AP acts as a bridge between the wireless stations and the wired network.  In case you do not wish to connect to a wired network, but prefer to set up a small independent wireless workgroup without an AP, use the Ad-hoc (IBSS) (Independent Basic Service Set) mode. 3.5.1  Ad-Hoc (IBSS)  Ad-hoc mode does not required an AP or a wired network. Two or more wireless clients communicate directly to each other. An ad-hoc network may sometimes be referred to as an Independent Basic Service Set (IBSS).
Wireless LAN Utility 3-6                                                                Using the Wireless LAN Utility  Figure 3-4 Ad-hoc Network Example To set up an ad-hoc network, configure all wireless clients in ad-hoc network type and use the same SSID and channel.  3.5.2  Infrastructure When a number of wireless clients are connected using a single AP, you have a Basic Service Set (BSS).   Figure 3-5 BSS Example A series of overlapping BSS and a network medium, such as an Ethernet forms an Extended Service Set (ESS) or infrastructure network. All communication is done through the AP, which relays data packets to other wireless clients or devices connected to the wired network. Wireless clients can then access resource, such as the printer, on the wired network.
    Wireless LAN Utility  Using the Wireless LAN Utility    3-7  Figure 3-6 Infrastructure Network Example 3.6 Roaming In an infrastructure network, wireless clients are able to switch from one AP to another as they move between the coverage areas. During this period, the wireless client maintains uninterrupted connection to the network. This is roaming. As the wireless client moves from place to place, it is responsible for choosing the most appropriate AP depending on the signal strength, network utilization or other factors. The following figure depicts a roaming example. When Wireless Client B moves to position X, the WLAN Adapter in Wireless Client B automatically switches the channel to the one used by Access Point 2 in order to stay connected to the network.
Wireless LAN Utility 3-8                                                                Using the Wireless LAN Utility  Figure 3-7 Roaming Example  3.7  The Site Survey Screen Use the Site Survey screen to scan for and connect to a wireless network automatically.
    Wireless LAN Utility  Using the Wireless LAN Utility    3-9  Figure 3-8 WLAN Utility: Site Survey The following table describes the fields in the Available Network table.  Table 3-5 WLAN Utility: Site Survey FIELD DESCRIPTION SSID  This field displays the SSID (or name) of each wireless network.  BSSID  This field displays the MAC address of the wireless network. Channel  This field displays the channel number used by each wireless network. Signal   This field displays the signal strength of each wireless network.
Wireless LAN Utility 3-10                                                                Using the Wireless LAN Utility Table 3-5 WLAN Utility: Site Survey FIELD DESCRIPTION WEP   This field shows whether the WEP data encryption is activated (Enable) or inactive (Disable).  Search   Click Search to scan for available wireless device within transmission range.  Connect  Click Connect to associate to the selected wireless device.  The following table describes the colors used for the entries in the Site Survey screen. Table 3-6 Color Indicator for Link Quality/Link Strength COLOR DESCRIPTION  Green  Excellent link quality or link strength. Blue  Good link quality or link strength. Red  Poor link quality or link strength.  3.7.1  Connecting to a Network Follow the steps below to connect to a network.   Step 1.  Click Rescan to scan for all available wireless networks within range.  Step 2.  To join a network, either click an entry in the Available Network table to select a wireless network and then click Connect or double-click an entry.   Step 3.  If the WEP Status field is Enable for the selected wireless network, the following screen displays.        Figure 3-9 Site Survey Warning Step 4.  Click OK to display the Security screen and refer to Section 4.2 to set up WEP keys. Otherwise click Cancel and connect to another wireless network without WEP encryption.
    Wireless LAN Utility  Using the Wireless LAN Utility    3-11 Step 5.  To verify that you have successfully connected to the selected network, check the network information in the Link Info screen.  3.8 Configuring the Wireless Parameters Click Network Configuration in the WLAN Utility program to display the Network Configuration screen as shown next.   Figure 3-10 WLAN Utility: Network Configuration  Follow the instructions in the table below to configure the wireless LAN related parameters. Refer to the next section for Profile field descriptions.
Wireless LAN Utility 3-12                                                                Using the Wireless LAN Utility Table 3-7 WLAN Utility: Network Configuration FIELD DESCRIPTION Configuration Operating Mode  Select Infrastructure(BSS) or Ad-Hoc(IBSS) from the drop-down list box.  Select Infrastructure(BSS) to associate to an AP.  Select Ad-Hoc(IBSS) to associate to a peer ad-hoc computer.  Refer to the Wireless Network Type section for more information. Service Set Identifier (SSID) Enter the SSID of the AP or the peer ad-hoc computer to which you want to associate in this field.  To associate to an ad-hoc network, you must enter the same SSID as the peer ad-hoc computer.  Enter Any to associate to or roam between any infrastructure wireless networks. This is the default setting.  Transfer Rate  Select a transmission speed from the drop-down list box. Choose from Fully Auto (default), 1M bit/sec, 2M bit/sec, 5.5M bit/sec and 11M bit/sec.  Channel  Select the channel number from the drop-down list box.  To associate to an ad-hoc network, you must use the same channel as the peer ad-hoc computer.  Power Saving Mode Select Enable from the drop-down list menu to save power (especially for laptop computers). This forces the WLAN Adapter to go to sleep mode when it is not transmitting data. When you select Disable, the WLAN Adapter will never go to sleep mode.   Restore Default  Click Restore Default to reset all fields back to factory default values.  Undo Changes  Click Undo Changes to start configuring the fields again. Apply Changes   Click Apply Changes to save the changes back to WLAN Adapter.  3.9  Network Configuration Profile Setting The Profile in the Configuration screen allows you to save the wireless network settings in the Configuration screen, use one of the pre-configured network profiles or reset the settings in the Configuration screen to the factory default values.  3.9.1  Resetting to Factory Default Values To reset the fields in the Configuration screen back to factory default values select Default from the drop-down list menu and click Activate.
    Wireless LAN Utility  Using the Wireless LAN Utility    3-13 3.9.2  Saving the Current Setting to a Profile To save the current settings in the Configuration screen to a new profile enter a descriptive name in the field provided and click Create. 3.9.3  Using a Pre-configured Profile To use a previously saved network profile select the profile file name from the drop-down list box and click Activate. 3.9.4 Deleting a Profile To delete an existing wireless network configuration select a profile from the drop-down list box and click Remove.
    Wireless LAN Utility  Wireless LAN Security    4-1 Chapter 4 Wireless LAN Security This chapter shows you how to set up the wireless LAN security available in the WLAN Adapter.  4.1 Introduction Wireless LAN security is vital to your network to protect wireless communication between wireless clients and the wired network. Configure the wireless LAN security using the Security screen. If you do not enable any wireless security on your WLAN Adapter, communication between the WLAN Adapter and the wired network is accessible to any wireless networking device that is in the coverage area. 4.2  Data Encryption with WEP WEP (Wired Equivalent Privacy) encryption scrambles the data transmitted between the WLAN Adapter and the AP or other wireless stations to keep network communications private. It encrypts unicast and multicast communications in a network. Both the wireless clients and the access points must use the same WEP key for data encryption and decryption.  Your WLAN Adapter allows you to configure up to four 64-bit or 128-bit WEP keys but only one key can be enabled at any one time.  4.2.1 Authentication Mode The IEEE 802.11b standard describes a simple authentication method between the wireless clients and AP. Three authentication modes are defined: Auto, Open and Shared. Open authentication mode is implemented for ease-of-use and when security is not an issue. The wireless station and the AP do not share a secret key. Thus the wireless stations can associate with any AP and listen to any data transmitted plaintext.  Shared authentication mode involves a shared secret key to authenticate the wireless station to the AP. This requires you to enable a security feature and specify a shared secret key (usually the WEP encryption and WEP key) on both the wireless station and the AP. Auto authentication mode allows the WLAN Adapter to switch between the open and shared key authentication modes automatically. Use the auto mode if you do not know the authentication mode of the other wireless clients.  4.2.2  Configuring the WEP Encryption Click the Security tab to display the Security screen as shown below.
Wireless LAN Utility 4-2                                                                Wireless LAN Security  Figure 4-1 WLAN Utility: Security  Follow the instructions in the table to configure the WEP encryptions. Table 4-1 WLAN Utility: Security FIELD DESCRIPTION Encryption (WEP)  Select either 64 Bits or 128 Bits from the drop-down list box to activate WEP encryption and then fill in the related fields. Select Disable to deactivate the WEP encryption.  WEP Key Entry The WEP keys are used to encrypt data before it is transmitted. The values for the keys must be set up exactly the same on the APs or other peer ad-hoc wireless computers as they are on the WLAN Adapter. Key Type  Select either the HEX or ASCII WEP key type.
    Wireless LAN Utility  Wireless LAN Security    4-3 Table 4-1 WLAN Utility: Security FIELD DESCRIPTION Key 1 … 4  Enter the WEP keys in the fields provided. If you select 64 Bits in the Encryption field.    Enter either 10 hexadecimal digits in the range of “A-F”, “a-f” and “0-9” (e.g. 11AA22BB33) for HEX key type  or    Enter 5 printable ASCII characters (case sensitive) ranging from “a-z”, “A-Z” and “0-9” (e.g. MyKey) for ASCII key type.  If you select 128 Bits in the Encryption field,    Enter either 26 hexadecimal digits in the range of “A-F”, “a-f” and “0-9” (for example, 00112233445566778899AABBCC) for HEX key type  or    Enter 13 printable ASCII characters (case sensitive) ranging from “a-z”, “A-Z” and “0-9” (for example, MyKey12345678) for ASCII key type. You must configure all four WEP keys the first time you use the WLAN Adapter.  ASCII WEP keys are case sensitive.  Restore Default  Click Restore Default to reset all fields back to factory default values.  Undo Changes  Click Undo Changes to start configuring the fields again. Apply Changes   Click Apply Changes to save the changes back to WLAN Adapter.
    Wireless LAN Utility  Advanced Configuration    5-1 Chapter 5 Advanced Configuration This chapter shows you how to configure advanced features of the WLAN Adapter. 5.1 Overview The following sections introduce the advanced features you can configure. 5.1.1 Threshold Control Fragmentation Threshold A Fragmentation Threshold is the maximum data fragment size (between 256 and 2432 bytes) that can be sent in the wireless network before the WLAN Adapter will fragment the packet into smaller data frames. A large Fragmentation Threshold is recommended for networks not prone to interference while you should set a smaller threshold for busy networks or networks that are prone to interference. If the Fragmentation Threshold value is smaller than the RTS/CTS Threshold value (see previously) you set then the RTS (Request To Send)/CTS (Clear to Send) handshake will never occur as data frames will be fragmented before they reach RTS/CTS Threshold size. RTS/CTS Threshold A hidden node occurs when two stations are within range of the same access point, but are not within range of each other. The following figure illustrates a hidden node. Both stations are within range of the access point (AP) or wireless gateway, but out-of-range of each other, so they cannot “hear” each other, that is they do not know if the channel is currently being used. Therefore, they are considered hidden from each other.   Figure 5-1 RTS Threshold
Wireless LAN Utility 5-2                                                                Advanced Configuration When station A sends data to the AP, it might not know that the station B is already using the channel. If these two stations send data at the same time, collisions may occur when both sets of data arrive at the AP at the same time, resulting in a loss of messages for both stations. RTS/CTS Threshold is designed to prevent collisions due to hidden nodes. An RTS/CTS Threshold defines the biggest size data frame you can send before an RTS (Request To Send)/CTS (Clear to Send) handshake is invoked.  When a data frame exceeds the RTS/CTS Threshold value you set (between 0 to 2432 bytes), the station that wants to transmit this frame must first send an RTS (Request To Send) message to the AP for permission to send it. The AP then responds with a CTS (Clear to Send) message to all other stations within its range to notify them to defer their transmission. It also reserves and confirms with the requesting station the time frame for the requested transmission. Stations can send frames smaller than the specified RTS/CTS Threshold directly to the AP without the RTS (Request To Send)/CTS (Clear to Send) handshake.  You should only configure RTS/CTS Threshold if the possibility of hidden nodes exists on your network and the “cost” of resending large frames is more than the extra network overhead involved in the RTS (Request To Send)/CTS (Clear to Send) handshake.  If the RTS/CTS Threshold value is greater than the Fragmentation Threshold value (see next), then the RTS (Request To Send)/CTS (Clear to Send) handshake will never occur as data frames will be fragmented before they reach RTS/CTS Threshold size. Enabling the RTS Threshold causes redundant network overhead that could negatively affect the throughput performance instead of providing a remedy. 5.1.2 Authentication Mode The IEEE 802.11b standard describes a simple authentication method between the wireless clients and AP. Three authentication modes are defined: Auto, Open and Shared. Open authentication mode is implemented for ease-of-use and when security is not an issue. The wireless station and the AP do not share a secret key. Thus the wireless stations can associate with any AP and listen to any data transmitted plaintext.  Shared authentication mode involves a shared secret key to authenticate the wireless station to the AP. This requires you to enable a security feature and specify a shared secret key (usually the WEP encryption and WEP key) on both the wireless station and the AP. Auto authentication mode allows the WLAN Adapter to switch between the open and shared key authentication modes automatically. Use the auto mode if you do not know the authentication mode of the other wireless clients.  5.1.3 Preamble Type A preamble is a signal used to synchronize the transmission timing in your wireless network. There are two preamble modes: Long and Short.
    Wireless LAN Utility  Advanced Configuration    5-3 Long preamble mode allows more processing time for each transmitted data packet. Short preamble mode allows less processing time for the transmitted data packets.  Using short preamble mode may minimize overhead and maximize network throughput. However, short preamble mode is supported by IEEE 802.11b compliant wireless devices, thus wireless stations using short preamble mode cannot communicate with wireless stations using the original IEEE 802.11 standard.   5.2 The Advanced Screen To set the advanced features on the WLAN Adapter, click the Advanced tab.  Figure 5-2 WLAN Utility: Advanced The following table describes the fields in this screen.
Wireless LAN Utility 5-4                                                                Advanced Configuration Table 5-1 WLAN Utility: Advanced FIELD DESCRIPTION Transmit Threshold Control Fragmentation Threshold The threshold (number of bytes) for the fragmentation boundary for directed messages. It is the maximum data fragment size that can be sent.  Move the slider to set the fragmentation threshold.  RTS/CTS Threshold  Data with its frame size larger than this value will perform the RTS/CTS handshake. Setting this attribute to be larger than the maximum MSDU (MAC service data unit) size turns off the RTS/CTS handshake. Setting this attribute to zero turns on the RTS/CTS handshake.  Move the slider to set the RTS/CTS threshold.  Security Shared Mode (Authenticate Access Point) Select this checkbox to use a shared key to authenticate the access point.  Refer to Section 5.1.2 for more information.  Preamble Type  Select a preamble type from the drop-down list menu. Choices are Long Preamble, Short Preamble and Auto.  The default setting is Auto.  Refer to Section 5.1.3 for more information.  Restore Default  Click Restore Default to reset all fields back to factory default values.  Undo Changes  Click Undo Changes to start configuring the fields again. Apply Changes   Click Apply Changes to save the changes back to WLAN Adapter.
    Wireless LAN Utility  Removing and Upgrading the WLAN Utility    6-1 Chapter 6 Removing and Upgrading the WLAN Utility This chapter describes how to uninstall or upgrade the WLAN Utility. 6.1  Removing the WLAN Utility Follow the steps below to remove (or uninstall) the WLAN Utility from your computer.  Step 1.  Click Start, Programs, IEEE 802.11bWireless LAN Utility, Uninstall IEEE 802.11b Package. Step 2.  When prompted, click Yes to remove the driver and the utility software.  Step 3.  When prompted to restart your computer, click Yes and then click Finish. 6.2  Upgrading the WLAN Utility The WLAN Utility continually improves and changes with new driver upgrades. Visit OEM web site to find the most recent upgrades and information.  Before you uninstall the driver, save the current network configuration. To perform the upgrade, follow the steps below. Step 1.  Download the latest version of the driver save the file on your computer. Step 2.  Follow the steps in the Removing the WLAN Utility section to remove the current WLAN Utility from your computer.  Step 3.  Restart the computer when prompted. Step 4.  After restarting, refer to the procedure in the Quick Installation Guide to install the new utility software. Step 5.  Check the version numbers in the About screen to make sure the new driver is installed properly.
    Wireless LAN Utility  Troubleshooting   7-1 Chapter 7 Troubleshooting This chapter covers potential problems and the possible remedies. After each problem description, some instructions are provided to help you to diagnose and to solve the problem. 7.1  Problems Starting the WLAN Utility Program Table 7-1 Troubleshooting Starting WLAN Utility Program Make sure the WLAN Adapter is properly inserted and the LED(s) is on. Refer to the Quick Installation Guide for the LED descriptions.   Use the Device Manager to check for possible hardware conflicts. Click Start, Settings, Control Panel, System, Hardware and Device Manager. Verify the status of the WLAN Adapter under Network Adapter.  (Steps may vary depending on the version of Windows). Install the WLAN Adapter in another computer.  Cannot start the WLAN Utility.   If the error persists, you may have a hardware problem. In this case, you should contact your local vendor.
Wireless LAN Utility 7-2                                                                Troubleshooting 7.2  Problems Communicating With Other Computers Table 7-2 Troubleshooting Communication Problems PROBLEM CORRECTIVE ACTION The WLAN Adapter computer cannot communicate with the other computer.   A.  Infrastructure   Make sure that the AP and the associated computers are turned on and working properly.  Make sure the WLAN Adapter computer and the associated AP use the same SSID. Make sure that the computer and the AP share the same security option and key.  Verify the settings in the Security screen.  B.  Ad-Hoc (IBSS)   Verify that the peer computer(s) is turned on. Make sure the WLAN Adapter computer and the peer computer(s) are using the same SS ID and channel.  Make sure that the computer and the peer computer(s) share the same security option and key. Change the wireless clients to use another radio channel if interference is high.  7.3  Problem with the Link Status Table 7-3 Troubleshooting Link Quality PROBLEM CORRECTIVE ACTION The Link Quality bar indicator is red all the time. Move your computer closer to the AP or the peer computer(s) within the transmission range. There is too much radio interference (for example microwave) around your wireless network.  Relocate or reduce the radio interference. The Link Strength bar indicator is red all the time.  Move your computer closer to the AP or peer computer(s) within the transmission range. There is too much radio interference (for example microwave) around your wireless network.  Relocate or reduce the radio interference.
    Wireless LAN Utility  Troubleshooting   7-3 Table 7-3 Troubleshooting Link Quality PROBLEM CORRECTIVE ACTION The Survey screen displays all entries in red.  Move your computer closer to the AP or peer computer(s) within the transmission range. There is too much radio interference (for example microwave) around your wireless network.  Relocate or reduce the radio interference.
    Wireless LAN Utility  Index   A Index A Access Point....................................................1-1 Accessing the WLAN Utility..........................3-1 Additional Information to OEM Integrators .....vi Advanced Configuration .................................5-1 AP .............................................See Access Point Applications Ad-hoc ........................................................1-1 Infrastructure...............................................1-2 Authentication Mode............................... 4-1, 5-2 Auto .................................................... 4-1, 5-2 Open.................................................... 4-1, 5-2 Shared ................................................. 4-1, 5-2 Auto authentication mode ....................... 4-1, 5-2 B Basic Service Set.................................... See BSS BSS .................................................................3-6 C Certifications.....................................................vi Common Screen Command Buttons...............3-3 Communication Problem ................................7-2 Ad-hoc(IBSS) .............................................7-2 Infrastructure...............................................7-2 Connecting to a Network ..............................3-10 Copyright ...........................................................ii Disclaimer......................................................ii Trademarks ....................................................ii CTS (Clear to Send .........................................5-2 Customer Support ............................................vii D Data encryption...............................................4-1 E End Product Labeling........................................vi ESS..................................................................3-6 Extended Service Set...............................See ESS F FCC ....................................................................v Federal Communications Commission (FCC) Interference Statement....................................v Fragmentation Threshold ................................5-1 H Hidden node ....................................................5-1 I IBSS ................................................................3-5 Important Note ..................................................vi IMPORTANT NOTE........................................vi Independent Basic Service Set .............. See IBSS Information for Canadian Users........................iv Caution..........................................................iv Note...............................................................iv N Network Configuration Profile......................3-12 Reset to factory defaults............................3-12 Saving........................................................3-13 Using pre-configured profile.....................3-13 Network Type .................................................3-5 Ad-Hoc(IBSS).............................................3-5 Infrastructure...............................................3-6 Notice.................................................................v
Wireless LAN Utility B                                                                Index O Open authentication mode .......................4-1, 5-2 Operating Mode......................See Network Type P Power Saving Mode...................................... 3-12 Preamble Mode............................................... 5-2 Long............................................................ 5-3 Short............................................................ 5-3 Preface ............................................................. xii problem description ........................................ 7-1 Profile Network Configuration ............................. 3-12 R Rate Transmission............................................... 3-5 Related Documentation.................................... xii Roaming Example...................................................... 3-7 RTS (Request To Send) ..................................5-2 RTS/CTS handshake....................................... 5-2 RTS/CTS Threshold ....................................... 5-1 S Shared authentication mode.....................4-1, 5-2 Site Survey...................................................... 3-9 Syntax Conventions......................................... xii System tray Icon Color Description................ 3-1 T Transfer Rate ................................................ 3-12 Transmission Speed...................................... 3-12 Troubleshooting.............................................. 7-1 Checking Hardware Conflict ...................... 7-1 Communication problems........................... 7-2 Radio interference................................7-2, 7-3 Starting the WLAN Utility .........................7-1 Survery........................................................7-3 U Using the WLAN Utility.................................3-1 Note.............................................................3-1 V Viewing Current Configuration ......................3-2 W Warranty ...........................................................iii WEP................................................................4-1 WEP Data Encryption Configuring.................................................4-1 WEP Data Encryption with.............................4-1 WEP Key ........................................................4-2 Type ............................................................4-2 Wired Equivalent Privacy..................... See WEP Wireless LAN .................................................1-1 Applications................................................1-1 Benefits .......................................................1-1 Wireless LAN Parameters...............................3-5 Channel .......................................................3-5 Configuring...............................................3-11 Network Type .............................................3-5 SSID............................................................3-5 Tx Rate........................................................3-5 Wireless LAN Security...................................4-1 Data Encryption with WEP.........................4-1 WLAN ....................................See Wireless LAN WLAN Utility About ..........................................................3-4 Before you upgrade.....................................6-1 Remove and Upgrade..................................6-1 Removing....................................................6-1 Site Survey..................................................3-9 Upgrading ...................................................6-1 WLAN Status..............................................3-2

Navigation menu