Adobe Using RoboHelp Server 10 Robo Help 10.0 Instructions For En
User Manual: adobe RoboHelp Server - 10.0 - Instructions for Using Free User Guide for Adobe RoboHelp Software, Manual
Open the PDF directly: View PDF ![]() .
.
Page Count: 43
- Using RoboHelp Server 10
- Getting started
- About RoboHelp Server
- Resources
- Activation
- Help and support
- What’s new in Adobe RoboHelp Server 10
- System requirements
- Installation
- Installation overview
- Configure RoboHelp Server
- Accessing RoboHelp Server Web Administrator
- (Optional) Configure Tomcat with an external Web server
- Install and configure Apache HTTP Server and Tomcat
- Install Apache HTTP Server
- Download sample workers.properties
- Download the mod_jk module
- Modify the <apache httpd install>\conf\httpd.conf file
- Enable Apache auto-configure
- Include the auto-generated file in Apache’s httpd.conf file
- Restart the Apache HTTP server
- Enable UTF-8 encoded URLs
- Set up Tomcat for HTTPS
- Configure Apache for IPv6
- Install and configure Microsoft IIS with Tomcat
- Install and configure Apache HTTP Server and Tomcat
- Configuration Manager
- Set up and publish projects on RoboHelp Server 10
- Administering the server
- Administrator and end user tasks
- Web Administrator tasks
- About the Web Administrator
- Open the Web Administrator interface
- Enable user authentication
- About RoboAdmin group
- Managing Users
- Managing areas
- Managing projects
- Scheduling databases
- Specify moderation settings for Adobe AIR Help comments
- Exporting Setup for RoboHelp Server
- Troubleshooting
- Reports
- Access context-sensitive Help
- REST web services
- Legal notices
September 11, 2017
Using RoboHelp Server 10

i ADOBE ROBOHELP SERVER 10
Contents
Getting started . . . . . . . . . . . . . . . . . . . . . . . . . . . . . . . . . . . . . . . . . . . . . . 1
About RoboHelp Server . . . . . . . . . . . . . . . . . . . . . . . . . . . . . . . . . . . . . . . . 1
RoboHelp Server features . . . . . . . . . . . . . . . . . . . . . . . . . . . . . . . . . . . . . . 1
Tracking and reporting . . . . . . . . . . . . . . . . . . . . . . . . . . . . . . . . . . . . . . . 1
Automatic project merging . . . . . . . . . . . . . . . . . . . . . . . . . . . . . . . . . . . . . 2
Support for languages other than English . . . . . . . . . . . . . . . . . . . . . . . . . . . . . 2
Resources . . . . . . . . . . . . . . . . . . . . . . . . . . . . . . . . . . . . . . . . . . . . . . . . . 2
Activation . . . . . . . . . . . . . . . . . . . . . . . . . . . . . . . . . . . . . . . . . . . . . . . . 3
Help with installation . . . . . . . . . . . . . . . . . . . . . . . . . . . . . . . . . . . . . . . . 3
Register . . . . . . . . . . . . . . . . . . . . . . . . . . . . . . . . . . . . . . . . . . . . . . . . 3
Help and support . . . . . . . . . . . . . . . . . . . . . . . . . . . . . . . . . . . . . . . . . . . . 3
Community Help . . . . . . . . . . . . . . . . . . . . . . . . . . . . . . . . . . . . . . . . . . . 3
Other resources . . . . . . . . . . . . . . . . . . . . . . . . . . . . . . . . . . . . . . . . . . . . 3
What’s new in Adobe RoboHelp Server 10 . . . . . . . . . . . . . . . . . . . . . . . . . . . . . . 4
Publishing enhancements . . . . . . . . . . . . . . . . . . . . . . . . . . . . . . . . . . . . . . 4
Enhanced database support . . . . . . . . . . . . . . . . . . . . . . . . . . . . . . . . . . . . . 4
Technical enhancements . . . . . . . . . . . . . . . . . . . . . . . . . . . . . . . . . . . . . . . 4
Reporting enhancements . . . . . . . . . . . . . . . . . . . . . . . . . . . . . . . . . . . . . . 4
Configuration Manager enhancements . . . . . . . . . . . . . . . . . . . . . . . . . . . . . . 5
Search-related enhancements . . . . . . . . . . . . . . . . . . . . . . . . . . . . . . . . . . . . 5
System requirements . . . . . . . . . . . . . . . . . . . . . . . . . . . . . . . . . . . . . . . . . . 5
Hardware requirements . . . . . . . . . . . . . . . . . . . . . . . . . . . . . . . . . . . . . . . 5
Supported operating systems . . . . . . . . . . . . . . . . . . . . . . . . . . . . . . . . . . . . 5
Prerequisites for installing RoboHelp Server 10 . . . . . . . . . . . . . . . . . . . . . . . . . . 6
Supported browsers . . . . . . . . . . . . . . . . . . . . . . . . . . . . . . . . . . . . . . . . . 6
Supported Web servers . . . . . . . . . . . . . . . . . . . . . . . . . . . . . . . . . . . . . . . 6
Supported database management systems . . . . . . . . . . . . . . . . . . . . . . . . . . . . . 6
Supported databases . . . . . . . . . . . . . . . . . . . . . . . . . . . . . . . . . . . . . . . . . . . . . . . . . . . . . . . . . . . 6

ADOBE ROBOHELP SERVER 10 ii
Install a database management system . . . . . . . . . . . . . . . . . . . . . . . . . . . . . . . . . . . . . . . . . . . . 7
Installation . . . . . . . . . . . . . . . . . . . . . . . . . . . . . . . . . . . . . . . . . . . . . . . . 8
Installation overview . . . . . . . . . . . . . . . . . . . . . . . . . . . . . . . . . . . . . . . . . 8
Configure RoboHelp Server . . . . . . . . . . . . . . . . . . . . . . . . . . . . . . . . . . . . . 9
Accessing RoboHelp Server Web Administrator . . . . . . . . . . . . . . . . . . . . . . . . . 10
(Optional) Configure Tomcat with an external Web server . . . . . . . . . . . . . . . . . . . 10
Install and configure Apache HTTP Server and Tomcat . . . . . . . . . . . . . . . . . . . . . . . . . . . 10
Install and configure Microsoft IIS with Tomcat . . . . . . . . . . . . . . . . . . . . . . . . . . . . . . . . . . 13
Configuration Manager . . . . . . . . . . . . . . . . . . . . . . . . . . . . . . . . . . . . . . . . . 14
Create contexts or multiple websites . . . . . . . . . . . . . . . . . . . . . . . . . . . . . . . . 14
Create a context using Configuration Manager . . . . . . . . . . . . . . . . . . . . . . . . . . . . . . . . . . . 15
Delete a context . . . . . . . . . . . . . . . . . . . . . . . . . . . . . . . . . . . . . . . . . . . . . . . . . . . . . . . . . . . . . . 15
Configure a database . . . . . . . . . . . . . . . . . . . . . . . . . . . . . . . . . . . . . . . . . 16
Select a database and connect to it . . . . . . . . . . . . . . . . . . . . . . . . . . . . . . . . . . . . . . . . . . . . . .16
Set up an admin account for RoboHelp Server . . . . . . . . . . . . . . . . . . . . . . . . . . 16
Specify LDAP settings . . . . . . . . . . . . . . . . . . . . . . . . . . . . . . . . . . . . . . . . 17
Specify search settings . . . . . . . . . . . . . . . . . . . . . . . . . . . . . . . . . . . . . . . . 18
Migrate context data . . . . . . . . . . . . . . . . . . . . . . . . . . . . . . . . . . . . . . . . . 18
Migrate data from RoboHelp Server 9 to RoboHelp Server 10 . . . . . . . . . . . . . . . . . . . . . . 19
Import Settings . . . . . . . . . . . . . . . . . . . . . . . . . . . . . . . . . . . . . . . . . . . . 20
Set up and publish projects on RoboHelp Server 10 . . . . . . . . . . . . . . . . . . . . . . . . . 21
Setup RoboHelp Server . . . . . . . . . . . . . . . . . . . . . . . . . . . . . . . . . . . . . . . 21
Publish projects from RoboHelp . . . . . . . . . . . . . . . . . . . . . . . . . . . . . . . . . . 21
Publish projects from RoboHelp 2017 and 2015 release . . . . . . . . . . . . . . . . . . . . . 21
Publish projects from RoboHelp 11, 10, 9, 8 . . . . . . . . . . . . . . . . . . . . . . . . . . . . 22
Publish projects from FrameMaker 2017 and 2015 release . . . . . . . . . . . . . . . . . . . 23
Administering the server . . . . . . . . . . . . . . . . . . . . . . . . . . . . . . . . . . . . . . . 24
Administrator and end user tasks . . . . . . . . . . . . . . . . . . . . . . . . . . . . . . . . . . . 24
Server administrator tasks . . . . . . . . . . . . . . . . . . . . . . . . . . . . . . . . . . . . . . 24
Your tasks . . . . . . . . . . . . . . . . . . . . . . . . . . . . . . . . . . . . . . . . . . . . . . . 24
Web Administrator tasks . . . . . . . . . . . . . . . . . . . . . . . . . . . . . . . . . . . . . . . . 25
About the Web Administrator . . . . . . . . . . . . . . . . . . . . . . . . . . . . . . . . . . . 25
Open the Web Administrator interface . . . . . . . . . . . . . . . . . . . . . . . . . . . . . . 25
Enable user authentication . . . . . . . . . . . . . . . . . . . . . . . . . . . . . . . . . . . . . 25
Authenticate LDAP users . . . . . . . . . . . . . . . . . . . . . . . . . . . . . . . . . . . . . . . . . . . . . . . . . . . . . . 25
Authenticate users via HTTP request . . . . . . . . . . . . . . . . . . . . . . . . . . . . . . . . . . . . . . . . . . . . 27
About RoboAdmin group . . . . . . . . . . . . . . . . . . . . . . . . . . . . . . . . . . . . . . 28
Managing Users . . . . . . . . . . . . . . . . . . . . . . . . . . . . . . . . . . . . . . . . . . . . 28
Managing areas . . . . . . . . . . . . . . . . . . . . . . . . . . . . . . . . . . . . . . . . . . . . 29
Managing projects . . . . . . . . . . . . . . . . . . . . . . . . . . . . . . . . . . . . . . . . . . 29
Scheduling databases . . . . . . . . . . . . . . . . . . . . . . . . . . . . . . . . . . . . . . . . . 30
Scanning documents . . . . . . . . . . . . . . . . . . . . . . . . . . . . . . . . . . . . . . . . . . . . . . . . . . . . . . . . . . 31
Specify moderation settings for Adobe AIR Help comments . . . . . . . . . . . . . . . . . . 31
Exporting Setup for RoboHelp Server . . . . . . . . . . . . . . . . . . . . . . . . . . . . . . .31
Troubleshooting . . . . . . . . . . . . . . . . . . . . . . . . . . . . . . . . . . . . . . . . . . . 32

iii ADOBE ROBOHELP SERVER 10
Reports . . . . . . . . . . . . . . . . . . . . . . . . . . . . . . . . . . . . . . . . . . . . . . . . . 32
About Reports . . . . . . . . . . . . . . . . . . . . . . . . . . . . . . . . . . . . . . . . . . . . . . . . . . . . . . . . . . . . . . . 32
Available reports . . . . . . . . . . . . . . . . . . . . . . . . . . . . . . . . . . . . . . . . . . . . . . . . . . . . . . . . . . . . . 33
View reports . . . . . . . . . . . . . . . . . . . . . . . . . . . . . . . . . . . . . . . . . . . . . . . . . . . . . . . . . . . . . . . . . 34
Customize reports . . . . . . . . . . . . . . . . . . . . . . . . . . . . . . . . . . . . . . . . . . . . . . . . . . . . . . . . . . . . 34
Access context-sensitive Help . . . . . . . . . . . . . . . . . . . . . . . . . . . . . . . . . . . . 35
REST web services . . . . . . . . . . . . . . . . . . . . . . . . . . . . . . . . . . . . . . . . . . 36
Send a search query to RoboHelp server . . . . . . . . . . . . . . . . . . . . . . . . . . . . . . . . . . . . . . . . . 36
Search . . . . . . . . . . . . . . . . . . . . . . . . . . . . . . . . . . . . . . . . . . . . . . . . . . . . . . . . . . . . . . . . . . . . . . 37
Get a RoboWindow . . . . . . . . . . . . . . . . . . . . . . . . . . . . . . . . . . . . . . . . . . . . . . . . . . . . . . . . . . . 38
Legal notices . . . . . . . . . . . . . . . . . . . . . . . . . . . . . . . . . . . . . . . . . . . . . . . 39
1
ABOUT ROBOHELP SERVER
CHAPTER 1 GETTING STARTED
Getting started
About RoboHelp Server
Adobe RoboHelp Server is a server-based Help solution that provides real-time end-user feedback on
your Help and knowledgebase. RoboHelp Server gathers and logs data about what questions users ask
while searching content and how users navigate through topics. Results are displayed in an easy-to-view
graphical format for quick interpretation. Your Help system resides on a server (for example, Adobe Help
Resource Center), and you can make instant updates to your Help system content.
RoboHelp Server contains the back-end processes, database functionality, and JDBC connections neces-
sary to integrate it. RoboHelp Server works with the authoring tool, so authors can edit content, set
master project options, maintain windows, and view reports.
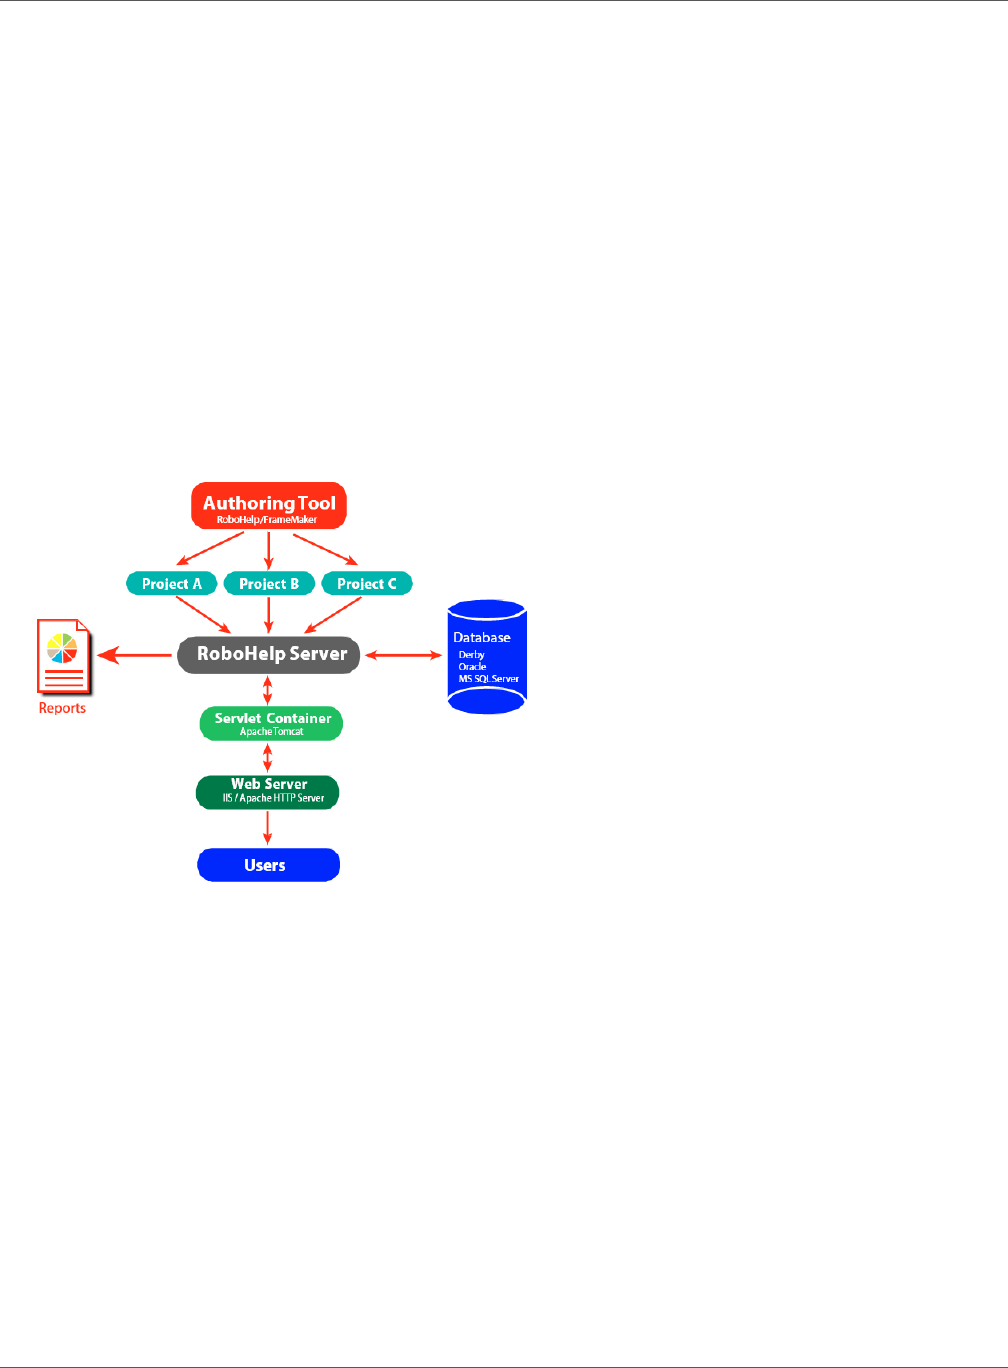
RoboHelp Server interaction with different components
NOTE: With RoboHelp Server, you can install your database server on a separate machine or use any of
the existing database servers.
RoboHelp Server features
Tracking and reporting
Adobe RoboHelp Server provides end users with the ability to find information when they have ques-
tions. Users can view content using any standard browser and operating system. Any number of users
can access the published documents.
NOTE: You can define the maximum number of database connections for Oracle and Microsoft SQL Server
database management systems through the maxload property in the robohelp_server.properties file.
RoboHelp Server tracks the following types of data:

2
RESOURCES
CHAPTER 1 GETTING STARTED
• Where users request assistance: Identifies the location where users make repeated requests for
specific information.
• How users search: Searches that users perform repeatedly. This data can be mined to move
frequently searched information to a more prominent position in the content for easier access. You
can also use this information to find information gaps and to improve heading titles for more intu-
itive navigation.
• How users navigate online content: Tracks how users seek information in online content and how
frequently they access particular information such as headings and articles. This information is
available at a topic level.
• RoboHelp Server tracks the entire operating system and browser details. You can use this informa-
tion to improve the content quality for browsers preferred by users.
Automatic project merging
Concurrently work on multiple projects and merge them into a single project at run time.
While building an online information system, authors can develop and publish their content according to
their own schedules. RoboHelp Server provides automatic project merging, so authors can work on
different parts of a project at the same time, and publish them to the same server. When end users view
the content, they see one seamless online information system. Do not worry about sharing source or
depending on a single author or project—all the separate projects are merged when users access the
content. Users can navigate across all the projects using the Index, Contents, and Search buttons.
By default, projects are added to the Table of Contents in the order they are published to the server. You
can customize this order in the Projects page of the Web Admin interface. When you merge projects,
each project file in the authoring tool remains intact, but the keywords from the indexes and glossary
terms are combined at run time, or when end users access the system from the server.
Support for languages other than English
The runtime interface (including Table of Contents, index, glossary, and search) can be automatically
localized, and authors can publish projects written in various languages to the same server. RoboHelp
Server supports localization for French, German and Japanese languages. You can change the display text
on the user interface of the online system to another language, including text on the Contents, Index,
and Search buttons.
In addition, end users can perform a full-text search of online content in their native language. This flex-
ibility allows authors to develop content in languages other than English and take advantage of
server-based online information systems.
Resources
Before you begin working with your software, take a few moments to read an overview of activation and
the many resources available to you. You have access to instructional videos, plug-ins, templates, user
communities, seminars, tutorials, RSS feeds, and much more.

3
ACTIVATION
CHAPTER 1 GETTING STARTED
Activation
To review complete system requirements and recommendations for your Adobe RoboHelp Server 10
software, see System requirements section in this document.
Help with installation
For help with installation issues, contact Adobe Support.
Register
Register your product to receive complimentary installation support, notifications of updates, and other
services.
NOTE: Register only once for RoboHelp Server 10.
To register, follow the on-screen instructions in the Registration dialog box, which appears after you
install the software.
Help and support
Community Help
Community Help is an integrated environment on Adobe.com that gives you access to community-gener-
ated content moderated by Adobe and industry experts. Comments from users help guide you to an
answer. Search Community Help to find the best content on the Web about Adobe products and tech-
nologies, including these resources:
• Videos, tutorials, tips and techniques, blogs, articles, and examples for designers and developers.
• Complete online Help, which is updated regularly and is more complete than the Help delivered
with your product. If you are connected to the Internet when you access Help, you automatically
see the latest online Help rather than the set delivered with your product.
• All other content on Adobe.com, including knowledgebase articles, downloads and updates, Adobe
Developer Connection, and more.
Use the Help search field in your product’s user interface to access Community Help. You can search for
content within the Adobe.com site and also in websites that have useful information about your product.
Moderators continue to identify most relevant Web content for your product. You can add comments to
online Help and view comments added by other users. For a video of Community Help, see Adobe
Community help page.
Other resources
Adobe RoboHelp Server Support page also includes a link to the complete, updated PDF version of Help.

4
WHAT’S NEW IN ADOBE ROBOHELP SERVER 10
CHAPTER 1 GETTING STARTED
Visit the Adobe Support website at www.adobe.com/support to learn about free and paid technical
support options.
What’s new in Adobe RoboHelp Server 10
Publishing enhancements
RoboHelp Server supports Responsive HTML5 output published from both RoboHelp (2017 release) and
FrameMaker (2017 release). Along with WebHelp Pro and FlashHelp Pro, you can also publish Responsive
HTML5 output on RoboHelp Server and perform tracking, reporting, and project merging for various proj-
ects.
NOTE: If you are using 2015 version of RoboHelp and FrameMaker, then this feature is available with
update 3 or later of RoboHelp (2015 release) and update 3.1 or later of FrameMaker (2015 release).
Enhanced database support
RoboHelp Server supports Apache Derby version 10.7.1 as its default database. You don't have to install
Apache Derby manually, as RoboHelp Server's installer installs Apache Derby on your system.
Technical enhancements
• Support for JDBC Connectivity - RoboHelp Server uses a database to store usage reports, users and
group information, and Air Help comments. Database connection architecture has been enhanced
in RoboHelp Server to support external databases using JDBC connectivity.
• LDAP sub-container lookup - RoboHelp Server supports integration with LDAP server which enables
users to login to RoboHelp Server using their LDAP credentials. To integrate RoboHelp Server with
LDAP, administrator has to provide base search node for users or groups in the LDAP tree. Till Robo-
Help Server 9, only the users or groups which were directly under the specified nodes, could be
authenticated from RoboHelp Server. Starting from RoboHelp Server 10, all users or groups which
are in different sub-nodes within the base node can also be authenticated.
• Data Migration from RoboHelp Server 9 - RoboHelp Server 10 supports migration of content from
RoboHelp Server 9. Migrating an older version of Microsoft SQL or Oracle server database will
require the user to enter JDBC details for that server. In case you are migrating data from MS
Access, then you must have MS Access Runtime installed on the destination machine (where Robo-
Help Server 10 is installed). For more information see Migrate context data.
Reporting enhancements
RoboHelp Server 10 delivers new and enhanced reports that will help you better optimize the value of
your Help content:
• New Dynamic filter tag usage report

5
SYSTEM REQUIREMENTS
CHAPTER 1 GETTING STARTED
NOTE: To know more about Dynamic filters, see “Generate dynamic content output” section in the
Generating Output chapter of the RoboHelp user Guide.
• Enhanced browser report
• Enhanced operating system report
• Enhanced Topic, search, and page visit reports for HTML5
Configuration Manager enhancements
You can now perform the following additional tasks using the RoboHelp Server Configuration Manager:
• Migrate context data from RoboHelp Server 9 to RoboHelp Server 10
• Define JDBC and database settings
• Import RoboHelp Server 10 setup for any given context using the new Import Settings feature
Search-related enhancements
Enhanced server-side search indexing is provided in RoboHelp Server 10. In RoboHelp Server Web
Administrator, if the option for merging same type of projects is selected in the Projects tab, then the
search items will appear aligned as per the projects. The search is now faster and more intuitive.
System requirements
Hardware requirements
• Intel Pentium 4 or faster processor
• 1 GB of RAM (2 GB is recommended)
• 6 GB of available hard-disk space; additional free hard-disk space may be required during installa-
tion
• 1024x768 screen resolution (1280x800 recommended)
NOTE: RoboHelp Server installation is not supported on flash storage devices.
Supported operating systems
Adobe RoboHelp Server 10 is supported on the following 64-bit architecture of the Microsoft Windows
operating system:
• Windows Server 2012 R2
• Windows Server 2008 R2
• Windows 10
6
SYSTEM REQUIREMENTS
CHAPTER 1 GETTING STARTED
Prerequisites for installing RoboHelp Server 10
• JRE 7 u51 or later
• Apache Tomcat 8.0.32 (64-bit) or later
NOTE: RoboHelp Server requires Apache Tomcat to run. Tomcat is a servlet container that can also
work as a Web server.
• JDBC Drivers (for external database)
NOTE: The .jar files given below are just recommendations.
Supported browsers
• Microsoft Internet Explorer 11 and 10
• Microsoft Edge 20 or later
• Mozilla Firefox 44 or later
• Google Chrome 48 or later
Supported Web servers
You can configure Tomcat with an external Web server. Using an external Web server offers ease and
flexibility while configuring settings, such as proxy server and filtering rules. RoboHelp Server supports
the following Web servers in combination with Tomcat:
• Apache HTTP Server 2.4 and 2.2
• Microsoft IIS 8.5 and 8.0
Supported database management systems
You can use the built-in Apache Derby database or select an external database to store reports and
authentication information for RoboHelp Server. The following external database management systems
are supported:
• Oracle 12c and 11g R2
• Microsoft SQL Server 2014 Express Edition
• Microsoft SQL Server 2014, 2012, and 2008 R2
Supported databases
RoboHelp Server connects to Apache Derby, Oracle (12c and 11g R2), Microsoft SQL Server, or Microsoft
SQL Server Express Edition database management systems.
Oracle12c driver jar file ojdbc7.jar
Oracle11g R2 driver jar file ojdbc6.jar
Microsoft SQL 2008/2012/2014 sqljdbc41.jar (Version 4.1)

7
SYSTEM REQUIREMENTS
CHAPTER 1 GETTING STARTED
Apache Derby
It is an open source relational database created in Java. A full-fledged Derby system consists of a
system directory, zero or more databases, and a system-wide configuration. For RoboHelp Server,
the Derby system directory is set as <RHS-Install-Path>\database.
Microsoft SQL Server
Microsoft SQL Server is a relational database management system capable of handling large
amounts of data and many concurrent users. When a client application requests data, the server
retrieves or updates the data. Microsoft SQL Server can roll back transactions. It does not commit
a partially entered record to the database.
Oracle
The Oracle database management system provides for the definition, storage, and management of
data in a centralized area. It supports client-server environments, large databases, space manage-
ment, concurrent database users, high transaction-processing performance, openness, compliance
with industry standards, manageable security, portability, compatibility, and connectivity.
Microsoft SQL Server Express Edition
Microsoft SQL Server Express Edition is a relational database management system (RDBMS)
produced by Microsoft. Its primary query languages are MS-SQL and T-SQL.
Install a database management system
To install a supported database management system, refer to the relevant documentation given below:
DBMS 64-bit installation instructions
Oracle 12c Oracle documentation
Oracle 11g R2 Oracle documentation
Microsoft SQL Server 2014
Express Edition
Microsoft documentation
Microsoft SQL Server 2014 Microsoft documentation
Microsoft SQL Server 2012 Microsoft documentation
Microsoft SQL Server 2008 R2 Microsoft documentation
Apache Derby 10.7.1 Apache Derby documentation (built-in for RoboHelp Server
10)

8
INSTALLATION
CHAPTER 1 GETTING STARTED
Installation
Installation overview
Installing RoboHelp Server involves the following steps:
1) Close any other Adobe application running on your computer.
2) Uninstall any previous version of RoboHelp Server installed on your computer.
You cannot install RoboHelp Server 9 and RoboHelp Server 10 together on the same system. There‐
fore, uninstall RoboHelp Server 9 before installing RoboHelp Server 10. However, if you want to mi‐
grate data from RoboHelp Server 9 to RoboHelp Server 10, ensure that you back up the following
files available in the [RHS-installation-directory]\web-inf folder before uninstalling
RoboHelp Server 9:
– robohelp_general_prop.properties
– robohelp_rh_areas.xml
– robohelp_server.properties
– robohelp_settings.properties
3) Install JRE 7 u51. For more information, see Java SE documentation.
4) Install Tomcat 8.0.32 as a Windows service. Download the 64-bit Windows Service Installer from
the ApacheTomcat page. Run the installer and follow the on-screen instructions to complete the
installation.
5) To verify that the Tomcat server is running, open the Tomcat home page in a browser window. To
do so, enter http://<server-name>:<port-number> in the address bar of the browser
window.
NOTE: By default, Tomcat installs on port 8080. On your local machine the server name will be local-
host.
If you see the Tomcat home page, it confirms successful installation of Tomcat. To resolve any in‐
stallation and configuration issues, visit Apache Tomcat website. Consider the following points to
configure Tomcat:
– If necessary, in <tomcat-install-folder>\conf\server.xml, change the port
number to a desired port number.
– Change the minimum heap space allotted to the Java Virtual Machine (JVM):
a) Run the .exe file given at
6) <tomcat-install-folder>\bin\tomcat8w.exe
a) On the Java tab in the Apache Tomcat Properties dialog, specify 256 as the value for the Initial
Memory Pool and Maximum Memory Pool.
b) Re-start Tomcat service.
7) (Optional) Install a supported database system. Apache Derby is the default database that is in-built
in the RoboHelp Server 10 package. To work with other supported databases, see Supported data‐
base management systems.

9
INSTALLATION
CHAPTER 1 GETTING STARTED
8) Install RoboHelp Server 10. You can download the installers from Adobe RoboHelp Server 10 page.
During installation, you can either enter the license number to install the licensed version of the
product, or install the trial version for 30 days.
9) Once the installation is complete, start the RoboHelp Server Configuration Manager (Start > All
Programs > Adobe RoboHelp Server 10 > Configuration Manager). If prompted, select the
server.xml file for the Tomcat servlet container (RoboHelp Server supports Tomcat 8.0.32)
installed on your system.
Configure RoboHelp Server
1) Start Tomcat service by performing any one of the following steps:
– At the Run prompt, enter services.msc. From the Windows services dialog box, start the
Tomcat service.
– Double-click the Apache Tomcat icon from the status bar and click Start in the Apache Tomcat
Properties dialog box.
– Open the <tomcat-install-folder>\bin folder and double-click tomcat8w.exe to
start Tomcat.
2) Start the RoboHelp Server Configuration Manager (Start > All Programs > Adobe RoboHelp Server
10 > Configuration Manager). If prompted, select the server.xml file for the Tomcat servlet
container installed on your system.
3) Click File > New Context to create a new context in Configuration Manager. Once the context is
created, you see a success message, “New context has been successfully created”. For more infor-
mation, see Create contexts or multiple websites.
4) Configure the database or select the option to use the built-in database. See Configure a database
for more information.
5) Configure LDAP settings if you want to use LDAP authentication. See Specify LDAP settings for more
information.
6) Verify that RoboHelp Server is running by accessing the RoboHelp Server Web Administrator link in
the browser window. Log in to the server at:
7) http://<server-name>:<port-number>/<context-name>/admin by using the
default user ID (admin) and password (admin).
8) Using the configured server details, publish projects to RoboHelp Server from RoboHelp or
FrameMaker.
NOTE: Using the Configuration Manager is the recommended way of changing the default user ID
and password. However, you can also change the default credentials by editing the
robohelp_server.properties file in the <server-install-folder>\WEB-INF folder.
To do so, change the DefAdminUid and DefAdminPwd properties in this file and restart Tomcat.
NOTE: As an administrator, you can create users and assign them various rights (Publishing, Report
viewing, and Admin rights) for the server.
9) To view projects, open the browser and type the project URL in the address bar. For Example:
http://<server-name>:<port-number>/<context-name>/server?prj=<project
-name>

10
INSTALLATION
CHAPTER 1 GETTING STARTED
Accessing RoboHelp Server Web Administrator
To access RoboHelp Server Web Administrator, perform the following steps:
• In the Web browser, type http://<server-name>: <port-number>/<context-name>.
A message showing “RoboHelp Server has been successfully created” is displayed.
•Now type http://<server-name>: <port-number>/<context-name>/admin to
access the login page for the Web Administrator. Enter the default user name (admin) and pass-
word (admin) to sign in.
• The RoboHelp Server Web Administrator page is displayed. To view your published projects, go to
Projects tab.
(Optional) Configure Tomcat with an external Web server
Configuring Tomcat with an external Web server is optional. However, using an external Web server
offers ease and flexibility while configuring settings, such as proxy and filtering rules
Install and configure Apache HTTP Server and Tomcat
Install Apache HTTP Server
1) Download the Windows binary distribution (.msi file) from
http://archive.apache.org/dist/httpd/binaries/win32/.
2) Run the MSI file that you downloaded.
3) By default, the Apache HTTP Server is installed on port 80. If some other server is using port 80, you
must change the port on which Apache listens for requests in the <apache-httpd-
install>\conf\httpd.conf file. Search for the directive Listen in the configuration file
and change the port number by changing this directive to <new-port-num>.
4) Ensure that the Apache HTTP server is working correctly. To do so, enter the URL for the Apache
server (http://<hostname>:<port-number>) in a Web browser. The server should display a
page in the browser that says, “It Works!”.
Download sample workers.properties
Download sample workers.properties from this page, place it in the <apache-httpd
-install>\conf folder. Now, modify the following variables:
•workers.tomcat_home: Set to the Tomcat installation directory.
•workers.java_home: Set to the JDK path.
Download the mod_jk module
1) Download the mod_jk module for Apache from
https://archive.apache.org/dist/tomcat/tomcat-connectors/jk/binaries/win
32/jk-1.2.23/. This module exists as mod_jk-apache-2.2.4.so.
2) Place the module in the <apache-httpd-install>\modules\ folder.

11
INSTALLATION
CHAPTER 1 GETTING STARTED
Modify the <apache httpd install>\conf\httpd.conf file
1) Add the mod_jk module by appending the following line of text to the <apache-httpd
-install>\conf\httpd.conf file:
LoadModule jk_module modules/mod_jk-apache-2.2.4.so
2) Using the JkMount command, add the context names that you want to direct to Tomcat:
JkMount /robohelp/* ajp13 JkMount /robohelp ajp13
Enable Apache auto‐configure
1) In theserver.xml for Tomcat (<tomcat-install-folder>\conf\server.xml), enable
Apache auto-configure. Tomcat automatically generates the files required for using mod_jk with
an Apache HTTPS Web server.
<Engine>
......
<Host>
................
</Host>
<Listener className="org.apache.jk.config.ApacheConfig"
modJk=<apache-install-folder>\modules\<mod_jk_module>
workersConfig=<apache install folder>\conf\workers.properties />
</Engine>
modJK and workersConfig must have appropriate values. For example:
<Listener className="org.apache.jk.config.ApacheConfig"
modJk="C:\Program Files\Apache Software
Foundation\Apache2.2\modules\mod_jk-apache-2.2.4.so"
workersConfig="C:\Program Files\Apache Software
Foundation\Apache2.2\conf\workers.properties" />
2) Stop the Apache HTTP Web server if it is running.
3) Restart Tomcat. The <tomcat-install-folder>\conf\auto\mod_jk.conf file is gener-
ated. This file decides which URLs Apache passes to Tomcat.
NOTE: In mod_jk.conf, Tomcat creates a <VirtualHost> XML tag whose argument is the name of the
<Host> tag just before the <Listener> (for modJK) tag in server.xml of Tomcat. Change the value of the
name attribute of the <Host> tag to the server name.
Include the auto‐generated file in Apache’s httpd.conf file
Add“Include <tomcat-install-folder>\conf\auto\mod_jk.conf” at the start of the
httpd.conf file.
Restart the Apache HTTP server
If the Apache HTTP server service does not start due to some error, do the following:
1) Run the command prompt.
2) Go to <apache-install-folder>\bin.
3) Run httpd.exe to check for errors.

12
INSTALLATION
CHAPTER 1 GETTING STARTED
Enable UTF‐8 encoded URLs
Modify <tomcat-install-folder>\conf\server.xml and enable UTF-8 encoded URLs in all
connector tags:
..............
<Connector port="9090" protocol="HTTP/1.1" connectionTimeout="20000"
redirectPort="8443" URIEncoding="UTF-8" />
............
<Connector port="8009" protocol="AJP/1.3" redirectPort="8443"
URIEncoding="UTF-8" />
............
Set up Tomcat for HTTPS
1) At the command prompt, change to the [JAVA_HOME]\bin directory.
NOTE: The JAVA_HOME environment variable usually points to the Java installation directory.
2) Run the following command:
keytool -genkeypair -alias tomcat -keyalg RSA -keystore key1 -validity
30
A new keystore file is created in the home directory of the user who runs the command. To specify
a different location or file name, modify the command to add the -keystore parameter followed
by the complete path of the keystore file. You will also need to specify this new path in the
server.xml configuration file, as described in Step 6.
3) Enter the keystore password.
4) Enter the appropriate values when prompted for your personal and organization information.
5) When prompted, enter the Tomcat key password.
6) Modify the server.xml file for your Tomcat server and add the following text, replacing the bold
text with appropriate values for your system:
<Connector port=[port number] protocol="HTTP/1.1" SSLEnabled="true"
maxThreads="150" scheme="https" secure="true"
clientAuth="false"
strategy="ms"
address="${jboss.bind.address}"
keystoreFile="${jboss.server.home.dir}/conf/THE_KEYSTORE_NAME"
keystorePass="PASSWORD_FOR_THE_KEYSTORE"
truststoreFile="${jboss.server.home.dir}/conf/THE_KEYSTORE_NAME"
truststorePass="PASSWORD_FOR_THE_KEYSTORE"
sslProtocol="TLS"/>
7) Restart Tomcat.

13
INSTALLATION
CHAPTER 1 GETTING STARTED
Configure Apache for IPv6
1) To enable Apache to work with IPv6 addresses, download IPv6-enabled Apache from
http://win6.jp/Apache22/index.html, unzip it, and follow the instructions in
README.v6.txt.
2) Open <apache-httpd-install>\conf\httpd.conf, and locate the Listen directive.
Add the directive to make Apache listen on all inbound IP v6 and v4 addresses on any identified
port.
Listen 80
3) Modify the VirtualHost tag in <tomcat-install-folder>\conf\auto\mod_jk.conf
to enable it to accept all IP v6 and v4 requests by specifying the following:
<VirtualHost *:port no>
....
....
</VirtualHost>
Install and configure Microsoft IIS with Tomcat
1) Download isapi_redirect.dll from
https://archive.apache.org/dist/tomcat/tomcat-connectors/jk/binaries/
win32/.
2) Place isapi_redirect.dll in the $<tomcat_home>\bin\win32\i386 directory.
3) Download the sample workers.properties file from this URL, set the following variables in the
file, and place it in the $<tomcat_home>\conf directory:
workers.tomcat_home
Set to the Tomcat installation directory
workers.java_home
Set to the JDK path (JAVA_HOME)
4) Create a text file and save it as uriworkermap.properties in the
$<tomcat_home>\confdirectory. In this file, specify the URLs to map to Tomcat. The following
sample file contains an entry for the default RoboHelp Server context, robohelp:
# URI patterns matching the criteria on the left (of the = sign) in the
lines
# below are redirected to the workers specified on the right.
/robohelp/*=ajp13
/robohelp=ajp13
Create a similar entry in the uriworkermap.properties file for every RoboHelp Server context.
5) Launch the Windows Registry Editor. To do so, type regedit at the command prompt and press
Enter.
6) In the registry, create a registry key named "HKEY_LOCAL_MACHINE\SOFTWARE\Apache
Software Foundation\Jakarta Isapi Redirector\1.0"

14
CONFIGURATION MANAGER
CHAPTER 1 GETTING STARTED
7) Add a string value with the name extension_uri and a value of
/jakarta/isapi_redirect.dll
8) Add a string value with the name log_file and a value pointing to where you want your log file to be
(for example,$<tomcat_home>\logs\isapi.log).
9) Add a string value with the name log_level and a value for your log level (debug, info, error,
or emerg).
10) Add a string value with the name worker_file and a value that is the full path to your workers.prop-
erties file (for example, $<tomcat_home>\conf\workers.properties)
11) Add a string value with the name worker_mount_file and a value that is the full path to your
uriworkermap.properties file (for example,
$<tomcat_home>\conf\uriworkermap.properties)
12) Using the IIS management console, add a new virtual directory to your IIS website. The name of the
virtual directory must be jakarta. Its physical path is the directory where you placed the
isapi_redirect.dll file (for example, <tomcat_home>\bin\win32\i386). While
creating this new virtual directory, assign it with execute access.
13) Using the IIS management console, add isapi_redirect.dll as a filter in the IIS website. The
name of the filter reflects its task (for example, jakarta), and its executable must be
$<tomcat_home>\bin\win32\i386\isapi_redirect.dll
14) Restart IIS. Make sure that the jakarta filter is marked with a green up arrow.
Configuration Manager
The RoboHelp Server Configuration Manager enables you to perform the following actions:
• Manage contexts or multiple websites
• Configure a built-in or external database
• Set up an admin account for RoboHelp Server
• Configure LDAP settings
• Configure search indexing settings
• Import Settings
• Migrate data from RoboHelp Server 9 to RoboHelp Server 10
You can create or open existing contexts using the Configuration Manager. The default User ID and pass-
word required to connect to the server and the database are admin and admin respectively. You do not
need a password to connect to the Derby database as it is the default database.
Create contexts or multiple websites
You can host different Help systems by creating multiple contexts in Tomcat. Contexts refer to websites,
where a project can be published. You can configure different instances of RoboHelp Server (on a single
installation) to run on each of these contexts. These contexts run on the same IP address and port
number but with different context names.

15
CONFIGURATION MANAGER
CHAPTER 1 GETTING STARTED
By default, RoboHelp Server creates a single context called robohelp. You can create another context
using the Configuration Manager.
Create a context using Configuration Manager
You can create contexts to publish projects from RoboHelp or FrameMaker.
1) Select Start > All Programs > Adobe RoboHelp Server 10 > Configuration Manager.
2) Select File > New Context.
3) Do one of the following:
– If you want to deploy the new context in the root context, select Deploy in root context option
and enter a Directory Name.
NOTE: The root context is a special, empty context path. If an application is deployed in the
root context, it listens for requests on the http://<host-name>:<port-number> URL,
instead of a sub-URL.
– Specify a new Context Name and Directory Name. For example, you can have robohelp2 as
the new context name and rh2 as the directory name.
NOTE: To open an existing context, select File > Open Context.
4) Click OK.
NOTE: After creating a context, Configuration Manager re-starts the Tomcat service.
Update uriworkermap.properties for IIS
If you have configured Tomcat to run with IIS, update uriworkermap.properties to map the new
context path to the ajp connector.
/robohelp/*=ajp13
/robohelp=ajp13
/robohelp2/*=ajp13
/robohelp2=ajp13
NOTE: With Tomcat configured with Apache, if you configure Tomcat to auto-generate the mapping file,
mapping for new context is automatically added to <tomcat-path>\conf\auto\mod_jk.conf.
RELATED LINKS:
Web Administrator tasks
Delete a context
• Click File > Open Context.
• In the Open Context Settings dialog, select the context that you want to delete and click OK.
• In the main Configuration Manager window, click Delete. When prompted for confirmation, click
Yes.
NOTE: When you delete a context, all project data associated with the context is deleted. However, the
database associated with the context is deleted only if it is a Derby database. For Microsoft SQL
Server/SQL Server Express Edition and Oracle, you need to manually delete the database.

16
CONFIGURATION MANAGER
CHAPTER 1 GETTING STARTED
Configure a database
You can select the Derby database (built-in) or an external Oracle or Microsoft SQL Server/SQL Server
Express Edition database to store user feedback and troubleshoot any Help content issues.
Select a database and connect to it
You can use the Configuration Manager to select and configure a database.
1) In the Configuration Manager window, select one of the following options:
– Built-in Database
– Oracle 12c or 11g R2/Microsoft SQL Server/Microsoft SQL Server Express Edition
If you selected Oracle 12c or 11g R2/Microsoft SQL Server/SQL Server Express Edition, follow these steps:
1) Enter the Database URL.
2) Enter the Database Username and Database Password.
3) Enter the JDBC Driver Class and click the browse button to choose the JDBC Driver Path.
4) Specify the Connection Pool Size. The Connection Pool Size determines the maximum number of
concurrent connections to the database.
5) Click Test Connection to check if the connection has been setup.
Set up an admin account for RoboHelp Server
1) Do one of the following:
– If you do not want to use database authentication for RoboHelp Server, leave the Use LDAP
Authentication option unselected. Now, specify the user name and password for a new admin
account in the Default Admin Account for Web Administrator section.
– If you want to use LDAP authentication for RoboHelp Server, follow these steps:
i) Select Use LDAP Authentication.
ii) Specify the necessary LDAP settings. See Specify LDAP settings.
iii) Specify an LDAP user name in the Default Admin Account for Web Administrator
section. This user will be prompted for the LDAP password when it attempts to log in to
Web Administrator.
NOTE: For LDAP, you are required to enter the fully-qualified distinguished name.
2) Close the Configuration Manager window. RoboHelp Server automatically restarts the Tomcat
service.
17
CONFIGURATION MANAGER
CHAPTER 1 GETTING STARTED
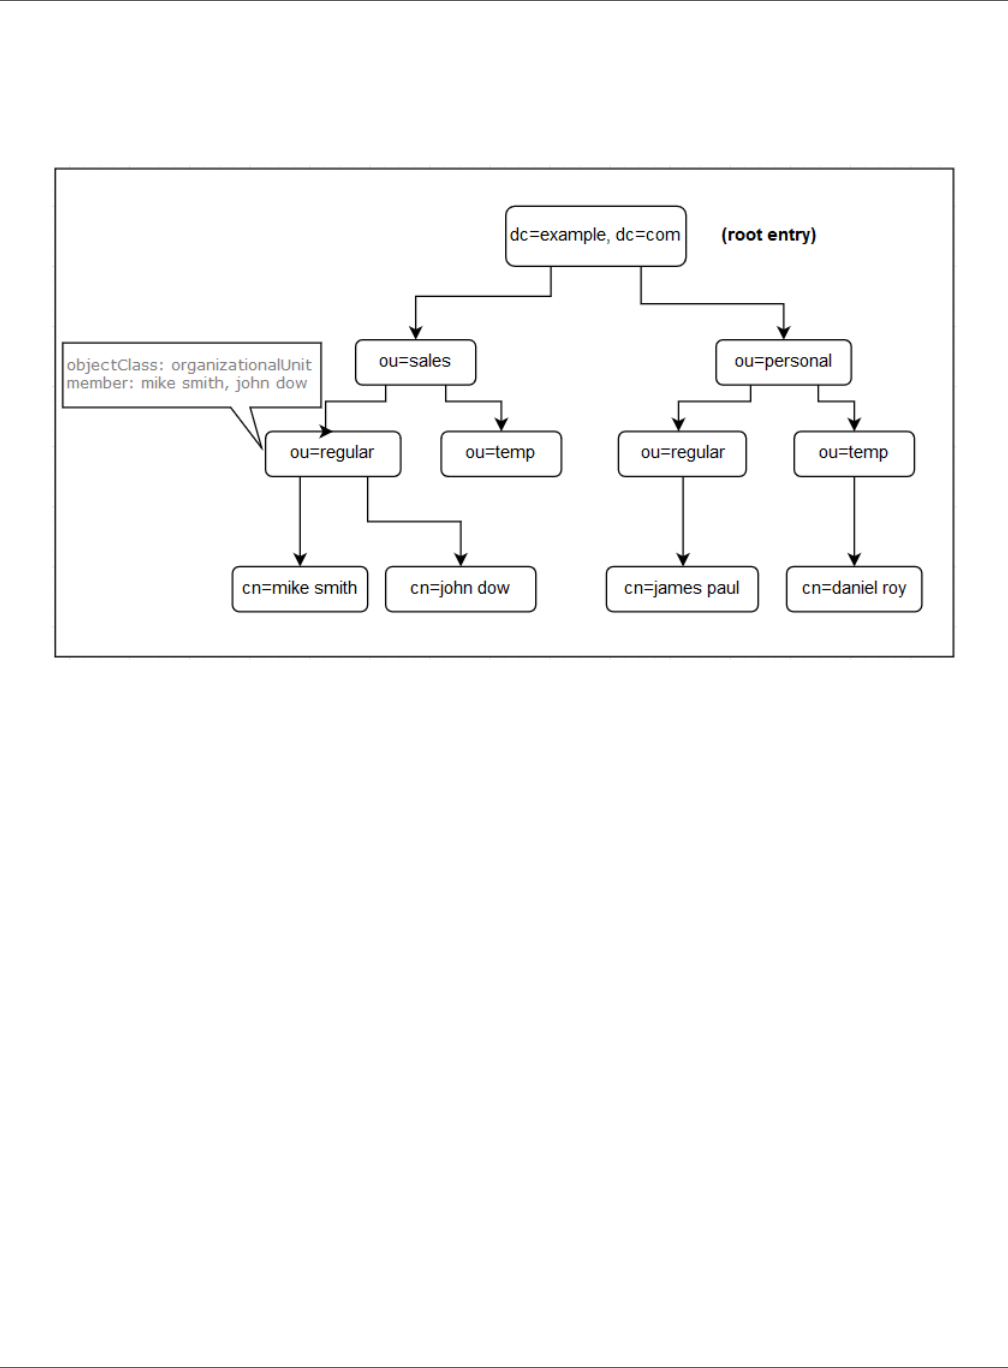
Specify LDAP settings
If you want to use LDAP authentication for RoboHelp Server, specify the settings in the LDAP section of
the Configuration Manager. For clear understanding of these settings, consider the following LDAP direc-
tory structure example:
LDAP Server URL
The URL of your organization's LDAP server. This URL includes the scheme, host name, and port
number; for example ldap://myladpurl:389.
Base Node For User Search
The LDAP base node within which you want to find users. For example, If you want to search for
regular employees within the sales department, then specify the value for this parameter as:
ou=regular,ou=sales,dc=example,dc=com.
Base Node For Group Search
The LDAP base node within which you want to find groups. For example, if you want to search for
groups within the personal department, then specify the value for this parameter as:
ou=personal,dc=example,dc=com.
User ID Attribute Name
The LDAP node attribute that determines the user ID. In the given LDAP directory structure
example, this attribute is defined as cn. The value of this attribute depends on the implementation
of your LDAP directory structure.

18
CONFIGURATION MANAGER
CHAPTER 1 GETTING STARTED
Group ID Attribute Name
The LDAP node attribute that determines the group name. In the given LDAP directory structure
example, this attribute is defined as ou.
Group Member Attribute
The attribute of the LDAP group node that determines the members of the group. For example, if
you want to set this to regular employee group in the sales department, then specify the value as:
member.
Specify search settings
You can select the following search options in Configuration Manager:
Reindex Documents At Server
Lucene reindexes the published projects on RoboHelp Server. The index published with RoboHelp
or FrameMaker project is ignored.
Substring Search Is Enabled For Client Index
(Applicable only for WebHelp Pro) Enables substring search for client-side indexing on RoboHelp
Server. Substring search is enabled only for client-side indexing, since it is not supported for
server-side indexing. For more information about substring search, see RoboHelp search basics in
Using RoboHelp (2017 release).
Migrate context data
You can migrate context data from RoboHelp Server 9 to RoboHelp Server 10 for one or more contexts.
The following data is migrated:
• Published RoboHelp projects
• Information about areas
• Information about users and groups
• User/group permissions on areas
• Usage data and statistics for reports
NOTE: Usage data for RoboHelp projects is migrated only if you choose to migrate the corresponding
projects.
IMPORTANT: While migrating RoboHelp Server 9 analytics data, operating system and browser data
is not migrated to RoboHelp Server 10.
Note that Oracle and Microsoft SQL Server databases are not replicated during migration. Instead, the
schema for these databases is updated, such that it becomes compatible with RoboHelp Server 10. Once
the database schema has been updated, the database can no longer be used with the previous RoboHelp
Server versions.

19
CONFIGURATION MANAGER
CHAPTER 1 GETTING STARTED
During migration, you can choose the contexts whose data you want to migrate to RoboHelp Server 10.
For example, you can choose to migrate data for production contexts while not migrating the data for
transient/test contexts.
You can migrate data for only RoboHelp Server 9 contexts to RoboHelp Server 10. Migration from earlier
RoboHelp Server versions is not supported. Note that if you are migrating data from MS Access, then you
must have it installed on the machine where RoboHelp Server 10 is deployed. You can download MS
Access Runtime from here .
NOTE: As part of migration planning, evaluate if you want to migrate RoboHelp projects to RoboHelp
Server 10 or upgrade them from previous RoboHelp versions to RoboHelp (2017 release). Upgrading the
projects lets you benefit from the new authoring features in RoboHelp (2017 release).
Migrate data from RoboHelp Server 9 to RoboHelp Server 10
NOTE: Do not install RoboHelp Server 9 and RoboHelp Server 10 on the same machine. Uninstall RoboHelp
Server 9 from the machine before installing RoboHelp Server 10. However, if you want to migrate context
data from RoboHelp Server 9, ensure that you do not manually remove data from the RoboHelp Server
directory after uninstallation.
1) In Configuration Manager, select File > Migrate Legacy Data.
2) Browse and select the RoboHelp Server 9 installation path. Specify a network path if RoboHelp
Server 9 is installed on a machine different from the machine on which you’re installing RoboHelp
Server 10.
3) In the Contexts area, select one or more contexts to migrate.
NOTE: The existing contexts in RoboHelp Server 10 are displayed in the existing RoboHelp Server 10
Contexts box. If you choose to migrate a context with the same name as an existing context, all data
in the existing RoboHelp Server 10 context is overwritten.
4) Specify the following Database details:
Database URL
The URL of the database to which the content is to be migrated.
Database Username
The Username required to log into the database.
Database Password
The Password required to log into the database.
JDBC Driver Class
JDBC Driver class (in case of external database).
JDBC Driver Path
JDBC Driver Path (in case of external database).
5) Specify the following Migration Settings:

20
CONFIGURATION MANAGER
CHAPTER 1 GETTING STARTED
Migrate All Projects
Migrate all RoboHelp projects published to the selected contexts.
Migrate Usage Data
Migrate project usage data and statistics along with the projects.
Migrate All Users/Groups And Their Permissions
Migrate information about users/groups and their permissions from RoboHelp Server 9 to Robo-
Help Server 10.
6) Specify the Server URL in the given format
http://<server‐name>:<port‐number>/<context‐name>/server.
7) Click Start Migration.
NOTE: If the migration of one or more contexts fails, RoboHelp Server continues migrating the other
contexts that you selected in Step 3.
8) Review the Migration Log. When migration is complete, click OK.
9) If RoboHelp Server 9 is installed on a machine different from the machine on which you are
installing RoboHelp Server 10, recreate the settings for Oracle or Microsoft SQL Server database
management systems.
10) Close the Configuration Manager window. RoboHelp Server automatically restarts the Tomcat
service.
Import Settings
Select Import Settings to import the settings from an existing context on to your Robohelp Server instal-
lation instance. These settings are imported from a Setup zip file.
NOTE: For more details about the Setup zip file, see Exporting Setup for RoboHelp Server.
NOTE: As an admin, you need to have the Setup zip file on the system having RoboHelp server installation
to which the setup has to be imported. The Setup zip file must not be renamed during copy.
To import, follow the steps given below:
1) In Configuration Manager, select File > Import Settings.
2) Browse and select the Setup zip file in the Source section.
3) In the Destination section, select the context to which you want to import the settings.
4) All the project and area settings of the existing context is replaced by the data from the Setup zip
file.
5) Enter the Server URL in the format
http://<server-name>:<port-number>/<context-name>/server.
6) Click Import. Once the import is completed, click OK.
RoboHelp Server automatically restarts the Tomcat service.

21
SET UP AND PUBLISH PROJECTS ON ROBOHELP SERVER 10
CHAPTER 1 GETTING STARTED
Set up and publish projects on RoboHelp Server 10
Follow the procedure given below to setup RoboHelp Server and publish projects from RoboHelp and
FrameMaker.
Setup RoboHelp Server
After you install RoboHelp Server and the system or network administrator completes the configuration
using Configuration Manager, you need to complete the following steps in RoboHelp:
1) Open RoboHelp.
2) Go to Projects > Pods > RoboHelp Server.
The RoboHelp Server setup page appears.
3) Click Setup.
4) Enter the server name in the format
http://<server-name>:<port-number>/<context-name>/server. If the connection
is successful, RoboHelp Server Web Administrator flash page is displayed.
NOTE: Adobe Flash Player should be installed on the machine to view the Web Administrator flash
page.
5) Login using your credentials (default user name and password are admin/admin).
6) Close the RoboHelp Server pod.
To publish projects on RoboHelp Server 10, follow the procedure given below.
Publish projects from RoboHelp
The following procedure helps you publish projects from RoboHelp 2017 and 2015 release, and Robo-
Help 11, 10, 9, and 8.
Publish projects from RoboHelp 2017 and 2015 release
1) Create or edit Responsive HTML5, WebHelp Pro, or FlashHelp Pro layout.
2) Do one of the following:
– Right-click the Responsive HTML5, WebHelp Pro, or FlashHelp Pro layout in the Single Source
Layouts pod and select Properties.
– Double-click the Responsive HTML5, WebHelp Pro, or FlashHelp Pro layout in the Single
Source Layouts pod.
3) Depending on the layout you are working with, perform one of the following steps:
– For Responsive HTML5 layout, select the Publish option from the left panel to open Servers
settings.
– For WebHelp Pro or FlashHelp Pro, click Next to go to the Servers settings.

22
SET UP AND PUBLISH PROJECTS ON ROBOHELP SERVER 10
CHAPTER 1 GETTING STARTED
4) In the Servers setting dialog, click New to create a RoboHelp Server destination to publish projects.
In the New Destination dialog box, provide Descriptive Name, Server Name, User ID, and Password
to connect and authenticate to the RoboHelp Server.
5) Click the Refresh button to get the updated list of areas from the server. If you do not select an area,
the project is published at the default area.
NOTE: To publish to the default context (robohelp), enter the server name in the
http://<server-name>:<port-number> format. RoboHelp appends
/robohelp/server to it. Else, to publish to a context other than robohelp, specify a complete
URL in the format http://<server-name>:<port-number>/<context-
name>/server
6) Click OK to save the server configurations and close the New Destination dialog.
7) Click Save and Generate to generate the output.
8) Once the output is generated, click Publish to publish the project to RoboHelp Server.
NOTE: To view the project on the server, go to RoboHelp Server Web Administrator and in the Projects tab,
select the area where you have published the project.
Publish projects from RoboHelp 11, 10, 9, 8
1) Create or edit WebHelp Pro or FlashHelp Pro layout.
2) Do one of the following:
– Double-click the WebHelp Pro or FlashHelp Pro layout in the Single Source Layouts pod.
– Right-click the WebHelp Pro or FlashHelp Pro layout in the Single Source Layouts pod and
select Properties.
3) In the Options dialog box, click Next to go to the server selection screen.
4) Click New to create a RoboHelp Server destination to publish projects.
5) In the New Destination dialog box, provide Descriptive Name, Server Name, User ID, and Password
to connect and authenticate to the RoboHelp Server.
6) Click the Refresh button to refresh the list of areas from the server. If you do not select an area, the
project is published at the default area.
NOTE: To publish to the default context (robohelp), enter the server name in the
http://<server-name>:<port-number> format. RoboHelp appends
/robohelp/server to it. Else, to publish to a context other than robohelp, specify a complete
URL in the format http://<server-name>:<port-number>/<context-
name>/server.
7) Click OK to save the server configurations and close the New Destination dialog.
8) Click Save and Generate to generate the output.
9) Once the output is generated, click Publish to publish the project to RoboHelp Server.
NOTE: To view the project on the server, go to RoboHelp Server Web Administrator and in the Projects
tab, select the area where you have published the projects.

23
SET UP AND PUBLISH PROJECTS ON ROBOHELP SERVER 10
CHAPTER 1 GETTING STARTED
Publish projects from FrameMaker 2017 and 2015 release
1) Select the file (.fm or .xml) or book (.book or .ditamap) that you want to publish.
2) Select File > Publish.
3) In the Publish pod, right-click Responsive HTML5 and select Edit Settings.
The Output tab appears with the Responsive HTML5 selected by default.
4) Select the Server tab.
5) Click New to create a RoboHelp Server destination to publish projects. In the New Destination
dialog, provide Descriptive Name, Server Name, User ID, and Password to connect and authenticate
to the RoboHelp Server.
6) Click the Refresh button to refresh the list of areas from the server. If you do not select an area, the
project is published in the default area.
NOTE: To publish to the default context (robohelp), enter the server name in the
http://<server-name>:<port-number> format. FrameMaker appends
/robohelp/server to it. Else, to publish to a context other than robohelp, specify a complete
URL in the format http://<server-name>:<port-number>/<context-name>/server.
7) Click OK to save the server configurations and close the New Destination dialog.
The new server destination can be seen in the Servers dialog.
8) Click Save and Close to close the Publish Settings dialog.
9) To publish the project to the server, right-click Responsive HTML5 in the Publish pod and click
Publish to Server.
10) Click Publish in the Publish Result dialog.
11) You can view the files published on the server in the Statistics window.
NOTE: To view the project on the server, go to RoboHelp Server Web Administrator and in the Projects
tab, select the area where you have published the projects.

24
ADMINISTRATOR AND END USER TASKS
CHAPTER 2 ADMINISTERING THE SERVER
Administering the server
Administrator and end user tasks
The Adobe RoboHelp Server software uses projects created in RoboHelp and FrameMaker and stores
information to create end-user reports. It generates reports based on how end users navigate and use
online Help systems.
You can share these reports and analyze them to optimize the value of your content. In addition, Robo-
Help Server reports help you identify the key areas of your Help content that need to be updated or
enhanced on priority.
End users can view the online content using a browser.
Use the authoring tool to create content, and publish output. You can use a web browser to view the
content on the RoboHelp server.
Server administrator tasks
• Configure the server or website.
• Host the Help site.
• Set user permissions.
• Provide the URL and Help site port number to the documentation manager.
Your tasks
• Obtain the server’s URL.
• Connect to the server from the authoring tool project.
• Publish the project from the authoring tool.
• Create protected areas on the server.
• Manage user groups.
• Assign permissions to the relevant groups.
• Test the system on the server.
• View reports and web administration.
• Work with a developer to call context-sensitive Help (if needed).

25
WEB ADMINISTRATOR TASKS
CHAPTER 2 ADMINISTERING THE SERVER
Web Administrator tasks
About the Web Administrator
The Web Administrator is a browser-based server interface. It lets administrators or documentation
managers maintain permissions for users without going through a network administrator. It enables you
to maintain databases by letting you delete old data from the Web Admin interface.
TIP: The Web Administrator is an Adobe Flash-based interface. Therefore, you can press the Space key as
an alternative to the mouse click.
Open the Web Administrator interface
1) Do one of the following in your browser:
– If RoboHelp Server is not installed on the same computer, use the Web Administrator URL:
http://<IP address or server-name>/<context-name>/admin/
– If RoboHelp Server is installed on the same computer, use this Web Administrator URL:
http://localhost:<port-number>/<context-name>/admin/
2) Enter the user name and the password as admin and admin respectively.
3) Click Sign in.
NOTE: You must have the Apache Tomcat server running before starting RoboHelp Server 10.
Enable user authentication
The Web Administrator interface enables you to segregate the Help content published on the server into
protected and public areas. Only authenticated users can view the content published in protected areas,
but no authentication is required to view content published in public areas.
NOTE: You do require authentication to publish content to public or protected areas.
By default, RoboHelp Server creates a public area, general.
IMPORTANT: You cannot mark the general area as protected and it cannot be deleted.
To make an area protected, you can select the Protected area option in the Areas page of the Web Admin
interface. You can define several sets of privilege groups and assign different rights to different users.
These rights include view only, publish, admin rights, and viewing reports. You can manage the groups
and their privileges from RoboHelp Server Web Admin pages. RoboHelp Server 10 provides user authen-
tication through both database and LDAP. You can also use HTTP request and response mechanism to
authenticate users, see Authenticate users via HTTP request for more information.
Authenticate LDAP users
IMPORTANT: The recommended way of configuring LDAP settings is through the Configuration Manager.
See Specify LDAP settings.

26
WEB ADMINISTRATOR TASKS
CHAPTER 2 ADMINISTERING THE SERVER
You can use the <context-name>_server.properties file to authenticate an LDAP user or an
administrator. Do the following:
• Comment the authtype = db property, specify your LDAP user name in the
DefaultAdminUid property, and do not specify your LDAP password in the DefAdminPwd
property.
• Uncomment and specify your organization LDAP details:
authtype = ldap
ldapURL = ldap://ldapserver:389
usersearchbase = ou=people,o=org
rolesearchbase = ou=groups,o=org
useridkey = uid
rolename = cn
rolesearch = uniqueMember
• Restart the Tomcat service to log in as an LDAP user.
The following table lists the properties stored in the <context-name>_server.properties file:
Property Name Description Property Value Required (Yes/No)
DatabaseType Specifies the database used
(supported types are oracle/sql)
oracle/sql (Apache
derby by default)
Yes
authtype Specifies the authentication
mechanism used.
db/ldap Yes
LDAP Server
URL
The URL of your organization’s
LDAP server
If authtype is ldap
usersearchbase The LDAP base node within which
you want to find users. For
example, dc=company,dc=com.
URL of LDAP Server
of the organization
If authtype is ldap
rolesearchbase The LDAP base node within which
you want to find groups. For
example,
dc=company,dc=com.
If authtype is ldap
useridkey The LDAP node attribute that
determines the user ID.
user ID key If authtype is ldap
rolename The LDAP node attribute that
determines the group name.
role name key If authtype is ldap
rolesearch The attribute of the LDAP group
node that determines the
members of the group
role attribute name If authtype is ldap

27
WEB ADMINISTRATOR TASKS
CHAPTER 2 ADMINISTERING THE SERVER
IMPORTANT: The recommended way of editing properties is through the Configuration Manager.
Authenticate users via HTTP request
You can use the HTTP request and response mechanism to authenticate users in RoboHelp Server 10.
This method is used to access protected pages on the server. The authentication session is managed by
the server and browser, and the authentication parameters are supplied in XML format. You can also use
the HTTP-based authentication mechanism to authenticate LDAP users.
To authenticate users via HTTP request, perform the following steps:
1) Change the help topic URL to include the authentication mechanism, as shown in the following
example:
Original help topic URL:
http://<server-name>:<port>/robohelp/server?prj=<project-name>&area=<prot
ected-area>&tpc=<-topic-.htm>
Modified help topic URL:
http://<server-name>:<port>/robohelp/server?prj=<project-name>&area=<prot
ected-area>&tpc=<-topic-.htm>&mgr=auth
DefAdminUID When server is started for the first
time, server is not connected to
the database. Therefore, access
permissions for a given user
cannot be verified. Provide a
default user ID which has the
admin rights and can access the
web admin.
User ID which has
admin access to
RoboHelp Server by
default.
Yes
DefAdminPwd User ID which has admin access to
RoboHelp Server by default. For
LDAP authentication, password for
the DefAdminUid is verified from
the LDAP server. For database
authentication, provide the
default password for the default
user ID.
Default Admin
password
if authtype is db
maxload Specifies maximum number of
open concurrent database
connections depending on the
database used for report logging.
maximum number of
open connections
database can handle.
ProjectsURLBas
e
Context path of the Help projects
on the Tomcat server.
ProjectsDirBase Top-level directory of Help
projects

28
WEB ADMINISTRATOR TASKS
CHAPTER 2 ADMINISTERING THE SERVER
NOTE: In the modified help topic URL, the authentication mechanism is specified as mgr=auth.
2) Send HTTP POST request to the modified help topic URL.
3) Provide authentication parameters in XML SOAP Envelope, as shown below:
4) <?xml version="1.0" encoding="UTF-8"?><SOAP-ENV:Envelope
xmlns:SOAP-ENV="http://schemas.xmlsoap.org/soap/envelope/"
SOAP-ENV:encodingStyle="http://schemas.xmlsoap.org/soap/encoding/"><S
OAP-ENV:Header /><SOAP-ENV:Body> <login> <UID name="username"></UID>
<PWD name="password"></PWD>
</login></SOAP-ENV:Body></SOAP-ENV:Envelope>
5) When this request reaches RoboHelp Server, the server decodes the user credentials from the XML
Soap Envelope and authenticates the user.
If successful, RoboHelp Server sends HTTP response in XML format as shown below and redirects
user to the requested page:
6) <?xml version='1.0' encoding='UTF-8'?><redirect> <-Encoded Redirect
URL of the Help Topic-> </redirect>
In case of any error, it sends HTTP response in XML format as shown below:
7) <?xml version='1.0' encoding='UTF-8'?><error> <-Error Message->
</error >
About RoboAdmin group
By default, RoboHelp Server creates an Admin group called RoboAdmin. The RoboAdmin group has the
following permissions:
• Creation and deletion of areas.
• Publishing and viewing projects in all the areas.
• Viewing reports for all the areas.
• Creation and deletion of groups.
• Assigning and removing users from groups.
• Assigning and removing publishing or viewing access and report viewing to an area.
RoboHelp Server adds the default user specified in the configuration file as a member of RoboAdmin
group. You can use the Configuration Manager to change the default user ID and then restart the server.
On restarting the server, RoboHelp Server adds the new user ID as a member of the RoboAdmin group.
But the earlier user still exists as a member of the RoboAdmin group. If you want to remove the earlier
user ID from the RoboAdmin group, log in with the new admin ID and remove the earlier user ID from
the Users page.
Managing Users
When you sign in to the Web Admin interface, the Users page opens. In this page, you can create groups
and assign users to them. You can also select existing groups and add or delete users from the group.
Consider the following while managing groups or users:

29
WEB ADMINISTRATOR TASKS
CHAPTER 2 ADMINISTERING THE SERVER
• A user ID or a group cannot have special characters and cannot be blank.
• As an administrator, you can remove users from a group but you cannot remove yourself from the
Admin group.
• Depending on the type of authentication that is LDAP or database, enter a user name and a pass-
word.
NOTE: If you are logged in as an LDAP administrator, you get an additional option of adding a new
LDAP user or an existing LDAP group. For example, your LDAP group can include all the people in
HR or Finance department.
• If you are logged in as a user, you cannot remove yourself from your group.
NOTE: Click Users to access the Users page from some other page.
Managing areas
You can manage areas from the Areas page of the Web Admin interface. Click Areas to create or delete
areas and assign permissions to areas.
• You can click the Add button next to the Areas list to create an area. Select the option to make the
area protected or leave it deselected to make it public.
• The request to add an area goes to the server. If the area name exists or if you have not entered
any area name, an error message appears.
NOTE: By default, RoboHelp Server creates a default area, general.
• You cannot delete the default area.
• You can add a user group to an area to assign it viewing, publishing, or report viewing rights.
• Public areas do not have viewing restrictions and thus, the Viewing option for the public areas is
always disabled.
• You can select a user group from the Add new group pop-up menu and add it to a selected area. If
the group is already assigned to the selected area, a message appears.
NOTE: As an administrator, you can select the Protected option and change a public area to protected.
Click Apply after making the necessary changes.
Managing projects
To manage projects on a server, you can click Projects in the Web Admin interface. The list of projects
listing name, type, and published dates of the projects and the name of the authors. This default project
is used to resolve name conflicts among windows, context IDs, topics, and so on. Other Help projects use
the default project settings on the server.
Areas
Displays the list of areas defined on the server.
NOTE: The areas list shows all the areas only if you have admin rights assigned to you. If you have user
rights, you can view the areas for which you have the viewing rights.

30
WEB ADMINISTRATOR TASKS
CHAPTER 2 ADMINISTERING THE SERVER
Project List
Determines the default project if you have several projects merged based on the project order. The
first project listed is the default (Master).
View Project
Displays the contents of a project.
Delete
Deletes the selected project. Error messages appear in the Adobe RoboHelp error log if other users
attempt to access a deleted project.
NOTE: This button is visible only if you have logged in as an administrator.
Move Up/Move Down
Reorder projects.
NOTE: This button is visible only if you have logged in as an administrator.
Automatically Merge Projects of Same Type
Merges projects of the same type (Responsive HTML5, WebHelp Pro or FlashHelp Pro).
NOTE: Merging all projects from within RoboHelp Server ignores project merging information set in the
RoboHelp HTML application.
You can access area-specific projects using the following URL:
http://<server-name>:<port-number>/<context-name>/server?prj=<project-name>
&area=<area-name>
If you do not specify an area attribute, the default area is considered. You must have project viewing
permissions to the area.
Scheduling databases
Select Settings on the Web Administrator interface to select options for data in the database and to
select options for scheduling search indexing on the server.
To make database-specific changes, select Databases in the Settings list. The Database section shows the
following options:
Delete All Data Over
Select to delete user actions and server errors older than the number of days specified. Specify the
time at which the process takes place.
Delete All Data Now
Select if you want to delete the data right now.

31
WEB ADMINISTRATOR TASKS
CHAPTER 2 ADMINISTERING THE SERVER
Delete All Data Over Days Now
Select to delete the data, older than the specified period right away.
Keep All Data
Select to keep all data.
NOTE: You cannot delete user information, AIR Help comments, or statistics because they are reused and
were not created on a specific date. When you delete database data, the size of the database is reduced
when you shrink or compress it.
Scanning documents
Regular scanning of documents updates the search index on a regular basis. You can schedule scanning
of documents at a weekly, daily, or hourly basis. With every scheduled scanning, the RoboHelp server
reads all the published projects. The server recreates indexes only if you have set the re-index property
in the server.properties file to true. By default, the re-index property is set to true. The search setting
pane is not visible if the re-index property is set to false. The indexing takes place only at scheduled inter-
vals of rescanning and when a project is published on a server.
Specify moderation settings for Adobe AIR Help comments
1) In RoboHelp Server Web Administrator, click Settings > Moderation.
2) Select Allow Post Anonymous if you want to let users comment anonymously on Help content.
3) Select Mark New Comments As Pending if you want to display user comments on Help content only
after a moderator approves them.
4) Click Apply.
Exporting Setup for RoboHelp Server
RoboHelp Server Web Administrator lets you export the server-setup for a given context to another
instance of RoboHelp Server 10 installation on a different machine. This is required:
• When you have created a staging setup on a machine and once it is certified, you want to move the
setup to a production machine.
• When you want to create a duplicate RoboHelp Server setup which can be used as a backup in case
the primary setup fails.
NOTE: You should have admin rights to export the setup file.
The setup is exported as a setup zip file. It consists of:
• Areas created in the context
• Project merging option for each area
• Context wide settings like search schedule settings, database cleanup settings, and moderation
settings
• Authentication mechanism (database/LDAP)

32
WEB ADMINISTRATOR TASKS
CHAPTER 2 ADMINISTERING THE SERVER
• Information about users, groups and permissions
• Published projects
• Usage data captured
• AIR comments or topic ratings
To export, follow the steps given below:
1) In RoboHelp Server Web Administrator, click Settings > Export Setup.
2) In the Export Setup section, select what you want to export. You can choose to export projects,
usage data, or AIR comments and ratings.
3) Click Export.
4) Click Yes on the Setup Export confirmation dialog box.
5) Export is initiated.
6) Click OK once the export is completed.
The Setup zip file is exported at the location <RHS-Install- Path>\web-INF\SetupExport\ as a
<context-name>.zip file. The setup zip file contains the following folders:
• database - This folder contains the .CSV files which contain the data exported from the database.
• WEB-INF - This folder contains all the settings files for the exported setup.
• projects - This will contain all the projects published to this context.
Troubleshooting
Click Troubleshooting if you are an administrator or if you have report access to some areas. The Trou-
bleshooting page displays errors generated in a selected area. You can select an error and click More Info
to view detailed information on the error generated in an area. Click Delete to delete error messages
generated in an area or Delete All to delete all the error messages for the specified area.
Errors can occur due to various reasons such as absence of a default topic, missing TOC, index, or a glos-
sary file, missing topic, missing context ID, or missing window. The error information helps you to review
the Help content and fix issues.
Reports
About Reports
Use reports to understand user needs and then update your Help content. Reports show you where users
enter the system, what questions they ask, and which of their questions are left unanswered.
RoboHelp Server generates reports based on how end users navigate and use your Help content. You can
share these reports and analyze them to optimize the value of your content. In addition, RoboHelp Server
reports help you identify the key areas of your Help content that need to be updated/enhanced on
priority.
Reports are available area wise. You can also get a consolidated report of all the areas for which you have
the access permissions.

33
WEB ADMINISTRATOR TASKS
CHAPTER 2 ADMINISTERING THE SERVER
Report data includes the following:
Where users request assistance
The location where repeated requests take place.
How users search
Searches that users perform repeatedly.
How users navigate content
The user navigation and frequency.
Available reports
Search Terms with No Results
Search terms that returned no results and the number of times users searched for them.
Frequently Searched Terms
Frequently-searched keywords and how many times users searched for them.
Frequently Accessed CSH
Frequently-accessed context-sensitive Help topics and how many times they are accessed. The
report is arranged by the context IDs of the CSH topics.
Frequently Viewed Topics
Report on Topics that end users view most often.
Usage Statistics
Chronological graphical report of the number of hits to the Help system as a whole. Pages searched
for and not opened reflect in this list. The usage statistics report has four additional tabs.
- Page Views
Number of pages viewed over a given window of time. The window of time is determined by the
labels along the X axis.
- Pages Per Visit
Number of pages viewed per visit. Every instance when a user opens the project is considered as a
separate visit. Visits from different Web browsers are counted separately.
- Browser
Comparative data about the Web browsers in which users viewed the Help content
- OS
Comparative data about the operating systems on which users viewed the Help content

34
WEB ADMINISTRATOR TASKS
CHAPTER 2 ADMINISTERING THE SERVER
Search Trends
The percentage of search terms that returned no results. The detailed view of this report gives the
total number of search terms and how many of them returned results/no results.
Help System Errors
Error messages encountered by the current logged-in user
NOTE: You can filter any report by area or view a consolidated report for all areas.
Frequently Used Dynamic Filters
Comparative data about the dynamic filters that end users use most often and probably find most
useful.
View reports
1) In the Web Administrator, click Reports.
2) On the Reports page, select a report and click View Report.
NOTE: To fetch fresh report data from the server, click Reload.
Customize reports
Customizing reports facilitates easier viewing and interpretation. Some useful options that you can
specify while viewing reports are as follows:
Area
Instead of viewing a consolidated report for all areas, you can filter the report by area. Viewing
area-specific reports facilitates interpretation.
Report
Use the drop-down to switch to a different report.
CSV
Click the Export To CSV icon in the bottom-right corner of the report area to export the report data
as a CSV file.
Add/Remove Columns
Click the Wrench icon to add/delete available columns from the data table in the bottom-half of the
report screen.
Max Results
Number of results you want RoboHelp Server to display per page.
Date Range
Filter the report by time window.

35
WEB ADMINISTRATOR TASKS
CHAPTER 2 ADMINISTERING THE SERVER
Update
Fetch the latest report data from the RoboHelp Server.
Bar Chart or Pie Chart
Use buttons to switch between viewing a pie chart instead of the default bar chart.
Access context-sensitive Help
Using context-sensitive Help, you can associate context IDs with topics. Using CSH API, you can retrieve
topics associated with a given context ID from the server. You can use the CSH API of the server to call a
context-sensitive Help topic from Responsive HTML5, WebHelp Pro, FlashHelp Pro projects in RoboHelp
HTML. You can access CSH for Responsive HTML5, WebHelp Pro and FlashHelp Pro projects from the CSH
tool and the browser window.
Using the CSH tool, specify a URL and Map Number as follows:
• For Responsive HTML5, specify
http://<server-name>/<context-name>/server?project=<project
name>&area=<area-name> in the Help URL and context ID in the map number.
• For WebHelp Pro, specify
http://<server-name>/<context-name>/server?project=<project
name>&area=<area-name> in the Help URL and context ID in the map number.
• For FlashHelp Pro, specify the Help URL as
http://<server-name>/<context-name>/server?project=<projectname>&type
=flashhelp&area=<area-name> and context ID in the map number.
To access context-sensitive Help using the browser window:
• Specify the URL as
http://<server-name>/<context-name>/server?project=<project
name>&ctxid=<ctx id>&type=responsivehelp&area=<area-name> for Responsive
HTML5 projects.
• Specify the URL as
http://<server-name>/<context-name>/server?project=<project
name>&ctxid=<ctx id>&area=<area-name> for WebHelp Pro projects.
NOTE: The default value of type attribute is webhelp, so you need not specify the type attribute
for WebHelp Pro projects.
• Specify the URL as
http://<server-name>/<context-name>/server?project=<project
name>&ctxid=<ctx id>&type=flashhelp&area=<area-name> for FlashHelp Pro proj-
ects.
You can use CSH API to access Help using a topic name. Enter the URL
http://<server-name>/<context-name>/server?project=<project
name>&tpc=<relative topic path>&area=<area-name>[&type=flashhelp]

36
WEB ADMINISTRATOR TASKS
CHAPTER 2 ADMINISTERING THE SERVER
REST web services
The REST web services enable you to perform a search on the content and return results for the
context-sensitive Help. Using the REST services, you can send GET and POST requests to the RoboHelp
server and get results in the XML format. You can format the data and present it in another format in a
RoboWindow. A RoboWindow is a set of window properties that are published by RoboHelp as part of
Responsive HTML5, FlashHelp Pro and WebHelp Pro projects.
When you install RoboHelp Server 10, some sample project files are stored at Program
files/Adobe/Adobe RoboHelp/CSH API/RoboHelp.NET/[sample folder name].
RoboHelp Server provides sample files in four languages: Visual Basic, VC++, C#, and JavaScript. All the
sample files in different languages, other than JavaScript, are stored in different folders. For example, a
Visual Basic folder is named Sample_RoboHelp_CSH_VB. All the language-specific sample folders also
contain solution files (.sln files) to open and run them in Visual Studio. Using these samples, you can
perform search and RoboWindow service from REST services on the projects published on the RoboHelp
Server. The result of the query is responded in XML format. You can use the results to be displayed in
different formats or for scripting purposes. In the samples, the search results are displayed in a table
format. The columns display rank, title, the URL, and the summary links to the relevant topics of the spec-
ified project.
To get a RoboWindow using the REST web services, select one of the following options:
• To get the window properties and Help URL for a context ID, use the HTTP GET method and send
the query in the following format:
URL:
http://<server-name>/<context-name>/rest/robowindow?wtype=ctx&project=<p
roject-name>&context=<context-id>&area=<area-name>[&type=flashhelp]
• To get the window properties and Help URL for a given window name, use the HTTP GET method
and send your query in the following format:
URL:
http://<server-name>/<context-name>/rest/robowindow?wtype=prj&project=<p
roject-name>&wnd=<window-name>&area=<area-name>[&type=flashhelp]
NOTE: The method to get the RoboWindow is same for both public and protected areas.
The RoboHelp Server sends the response for both public and private areas in the same format:
<Window Name="{wnd-name}" UseProp="{0/1}" URL="string"> <Style
Toolbar="{0/1}" Location="{0/1}" Status="{0/1}" Menubar="{0/1}"
Resizable="{0/1}"/> <Location Left="{int}" Top="{int}" Width="{int}"
Height="{int}" LeftType="{0/1}" TopType="{0/1}" WidthType="{0/1}"
HeightType="{0/1}"/> </Window>
Send a search query to RoboHelp server
• Public area
When you send a search request to a public area, use the HTTP GET method. You can use the follow‐
ing format for your search query:

37
WEB ADMINISTRATOR TASKS
CHAPTER 2 ADMINISTERING THE SERVER
URL :
http://<server-name>:<port-number>/<context-name>/rest/search?project=<p
roject-name>&area=<area-name>&quesn=<search-query>[&type=flashhelp]
The server sends the response in the following XML format:
<?xml version=“1.0” encoding="utf-8" ?> <ftstdata> <topic
name="{topic-name}" url="{url of topic}" summary="{summary}"
rank="{rank}" /> </ftstdata>
• Protected area
To send a query request to a protected area, use the HTTP POST method. Use the following format
for your search query:
URL : http://<server-name>:<port-number>/<context-name>/rest/search
For the query request to a protected area, enter a Request body.
<?xml version=“1.0” encoding="utf-8" ?> <rest> <UID name="{User ID}" />
<PWD name="{Password}" /> <PRJ name="{ProjectName}" /> <AREA
name="{AreaName}" /> <QUESN name="{Search Query}" /> [<TYPE
name=“flashhelp" />] </rest>
The RoboHelp server sends the response in the following format:
<?xml version=“1.0” encoding="utf-8" ?> <ftstdata> <topic
name="{topic-name}" url="{url of topic}" summary="{summary}"
rank="{rank}" /> </ftstdata>
NOTE: To perform a search, you must have project viewing access to that area as a user. If you specify
incorrect credentials or if you do not have access permissions, the server sends an error response in the
XML format.
<error>error-message </error>
Search
1) Double-click a solution file from \\Program files\Adobe\Adobe RoboHelp\CSH
API\RoboHelp.NET\[sample folder name].
2) Language-specific code displays in Visual Studio.
3) Run the code. A language-specific sample project executable file opens. For example, for Visual
Basic code, the CSH_VB_Sample dialog box appears.
4) To perform search, specify the URL as http://<server-name>/<context-name>/rest.
5) Specify the project name.
6) Enter a search keyword in the Question box.
7) Specify an area, in which the project is published, general or otherwise.
NOTE: If you do not specify an area, the default area, general is selected.
8) Select Responsive HTML5, WebHelp Pro, or FlashHelp Pro (which specifies the type of project).
9) Click Search.
The search results are displayed in a table format that lists the rank, title, URL, and summary of the rele-
vant topics of the specified project.

38
WEB ADMINISTRATOR TASKS
CHAPTER 2 ADMINISTERING THE SERVER
Get a RoboWindow
1) Double-click a solution file from \\Program files\Adobe\Adobe RoboHelp\CSH
API\RoboHelp.NET\[sample file folder name]. Language-specific code displays in Visual
Studio.
2) Run the code. A language-specific sample project executable file opens. For example, for Visual
Basic code, the CSH_VB_Sample dialog box appears.
3) Specify the URL as http://<server-name>/<context-name>/rest.
4) Specify the Project Name.
5) Specify the local Help URL to display if server communication is not possible. This URL can pertain
to WinHelp (.HLP file), HTML Help (.chm file), or Web Help (.HTML file).
6) Specify the area in which the project is published.
7) Select Responsive HTML5, WebHelp Pro, or FlashHelp Pro (to indicate the type of project).
8) Select the parameter Context, TOC, index, Search, or Window.
9) Specify the parameter value, Context ID in case of context parameter, and Window name if window
is selected as parameter type.
10) Click Search Help.
The relevant window with the given parameter value is displayed.

