Cyberlink AudioDirector Help Audio Director 8.0 User’s Guide EN
User Manual: cyberlink AudioDirector - 8.0 - User’s Guide Free User Guide for Cyberlink AudioDirector Software, Manual
Open the PDF directly: View PDF ![]() .
.
Page Count: 145 [warning: Documents this large are best viewed by clicking the View PDF Link!]
- Contents
- Introduction
- AudioDirector Workspace
- Importing Media
- AudioDirector Projects
- Basic Audio Editing
- Adjusting Audio
- Applying Audio Effects
- Using Dynamic Range Control
- Adding Delays
- Adding Reverb
- Creating a Phase Effect
- Creating a Flange Effect
- Adding a Chorus Effect
- Adding an Echo Effect
- Transforming Vocals
- Using the Equalizer
- Using the Stereo Expander
- Applying the Radio Effect
- Applying the Phone Effect
- Applying a Noise Gate
- Removing Vocals in Music
- Applying VST Effects
- Restoring Audio
- Mix Room
- Producing the Audio
- Sharing and Backing Up Audio
- Creating CDs
- AudioDirector Preferences
- AudioDirector Hotkeys
- Licensing and Copyright Information
- Technical Support
- Index

User's Guide
AudioDirector
CyberLink
Copyright and Disclaimer
All rights reserved.
To the extent allowed by law, AudioDirector IS PROVIDED “AS IS”,
WITHOUT WARRANTY OF ANY KIND, EITHER EXPRESS OR IMPLIED,
INCLUDING WITHOUT LIMITATION ANY WARRANTY FOR
INFORMATION, SERVICES, OR PRODUCTS PROVIDED THROUGH OR IN
CONNECTION WITH AudioDirector AND ANY IMPLIED WARRANTIES OF
MERCHANTABILITY, FITNESS FOR A PARTICULAR PURPOSE,
EXPECTATION OF PRIVACY, OR NON-INFRINGEMENT.
BY USING THIS SOFTWARE, YOU AGREE THAT CYBERLINK WILL NOT BE
LIABLE FOR ANY DIRECT, INDIRECT, OR CONSEQUENTIAL LOSS
ARISING FROM THE USE OF THIS SOFTWARE OR MATERIALS
CONTAINED EITHER IN THIS PACKAGE.
The terms and conditions here under shall be governed and
construed in accordance with the laws of Taiwan.
AudioDirector is a registered trademark along with other company
and product names mentioned in this publication, used for
identification purposes and remain the exclusive property of their
respective owners.
Manufactured under license from Dolby Laboratories. Dolby and the
double-D symbol are registered trademarks of Dolby Laboratories.
Confidential unpublished works. Copyright 1995-2005 Dolby
Laboratories. All rights reserved.
International Headquarters
Mailing Address CyberLink Corporation
15F., No. 100, Minquan Rd., Xindian Dist.
New Taipei City 231, Taiwan (R.O.C.)
Web Site https://wwws.cyberlink.com
Telephone 886-2-8667-1298
Fax 886-2-8667-1385
Copyright © 2017 CyberLink Corporation. All rights reserved.

i
Contents
..................................................1
Introduction
................................................................................................1Welcome
.................................................................................................1Latest Features
.................................................................................................2DirectorZone and CyberLink Cloud
.................................................................................................2AudioDirector Versions
................................................................................................4System Requirements
..................................................5
AudioDirector Workspace
................................................................................................5AudioDirector Rooms
................................................................................................6Media Library
.................................................................................................6Sorting Media in the Library
................................................................................................7Adjustments and Effects Panel
................................................................................................7AudioDirector Timeline
.................................................................................................8Audio Channels
.................................................................................................10Range Selection
.................................................................................................11Timeline View
.................................................................................................12Timeline Markers
.................................................................................................13Timeline Zoom
.................................................................................................13Determine Tempo/Metronome
................................................................................................15AudioDirector Quick Bar
................................................................................................16Playback Controls
.................................................................................................17Video File Playback
.................................................................................................20Audio Level Meter
................................................................................................21Audio Output (Codec) Preview
................................................................................................22Expanding the Workspace

CyberLink AudioDirector Help
ii
................................................................................................24Keyframes Panel
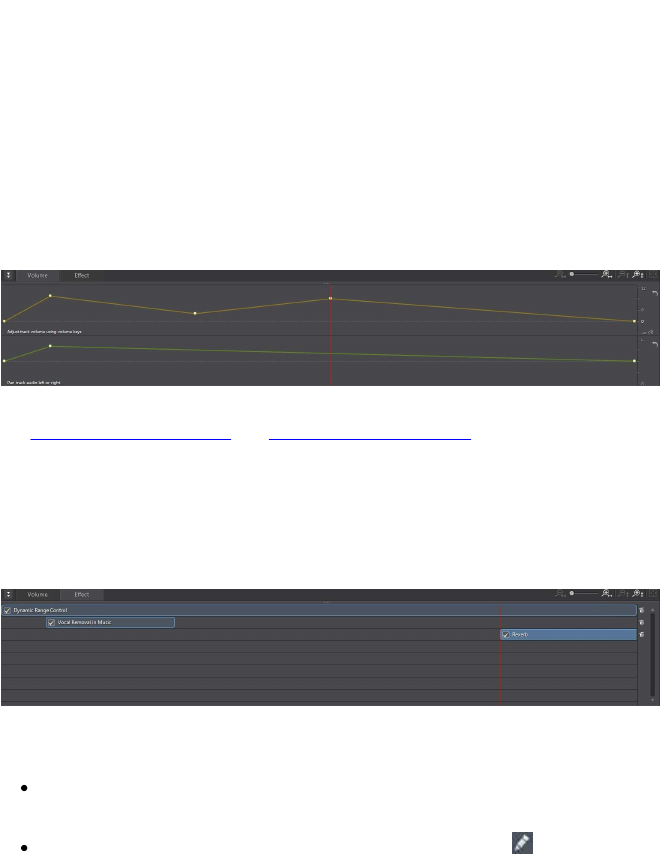
.................................................................................................24Volume Tab
.................................................................................................24Effect Tab
..................................................26
Importing Media
................................................................................................26Importing Audio and Video Files
.................................................................................................26Supported Formats
................................................................................................27Downloading Sound Clips and Media Files
.................................................................................................27Downloading Sound Clips from DirectorZone
.................................................................................................28Downloading Media Files from CyberLink Cloud
.................................................................................................29Sound Clips Library
................................................................................................29Recording Audio
.................................................................................................30Record Audio Settings
.................................................................................................31Using Loop Recording to Record Audio
..................................................33
AudioDirector Projects
................................................................................................33Exporting Projects
................................................................................................34CyberLink Cloud Projects
..................................................35
Basic Audio Editing
................................................................................................35Converting Audio Profiles
................................................................................................36Using the Editing Tools
................................................................................................36Normalizing Audio
..................................................38
Adjusting Audio
................................................................................................38Boosting Audio Volume
................................................................................................39Applying Fades
................................................................................................41Trimming Audio
................................................................................................42Adjusting Length (Change Speed)
................................................................................................43Shifting Pitch
................................................................................................44Using the Pitch Bender
................................................................................................45Inserting Silence

iii
................................................................................................46Inserting Noise
................................................................................................46Reversing Audio
................................................................................................47Ambience Match
.................................................................................................48Adding Ambience
.................................................................................................48Extracting Ambience
................................................................................................50Adjusting the Master Volume
................................................................................................51Panning Audio Left/Right
..................................................53
Applying Audio Effects
................................................................................................53Using Dynamic Range Control
................................................................................................54Adding Delays
................................................................................................56Adding Reverb
................................................................................................57Creating a Phase Effect
................................................................................................58Creating a Flange Effect
................................................................................................60Adding a Chorus Effect
................................................................................................61Adding an Echo Effect
................................................................................................63Transforming Vocals
................................................................................................64Using the Equalizer
................................................................................................65Using the Stereo Expander
................................................................................................66Applying the Radio Effect
................................................................................................67Applying the Phone Effect
................................................................................................68Applying a Noise Gate
................................................................................................69Removing Vocals in Music
................................................................................................70Applying VST Effects
..................................................71
Restoring Audio
................................................................................................71Using Visual Repair
.................................................................................................71Regional Selection Tools
.................................................................................................82Repairing the Audio

CyberLink AudioDirector Help
iv
................................................................................................84Using Noise Reduction
.................................................................................................85Auto Denoise
.................................................................................................85Noise Reduction
................................................................................................87Using Clipping Removal
................................................................................................88Using Click Removal
................................................................................................88Using Hum Removal
.................................................................................................89Simple Mode
.................................................................................................90Advanced Mode
................................................................................................92Using Hiss Removal
................................................................................................93Using Plosive Removal
..................................................95
Mix Room
................................................................................................95Creating an Audio Mix
.................................................................................................97Configuring Audio Profile Settings
.................................................................................................97Adding Media to Your Mix
.................................................................................................98Mixing Audio
.................................................................................................104Using Audio Transitions
.................................................................................................107Applying Adjustments in the Mix Room
................................................................................................109Using Automated Dialogue Alignment
..................................................113
Producing the Audio
................................................................................................113Supported Output Formats
................................................................................................113Producing Audio
................................................................................................115Producing Video
..................................................117
Sharing and Backing Up Audio
..................................................119
Creating CDs
..................................................121
AudioDirector Preferences
................................................................................................121General Preferences
................................................................................................122File Preferences
................................................................................................122Project Preferences

v
................................................................................................123DirectorZone Preferences
................................................................................................123Audio Settings Preferences
................................................................................................124Hardware Acceleration Preferences
................................................................................................124CyberLink Cloud Preferences
..................................................126
AudioDirector Hotkeys
..................................................128
Licensing and Copyright
Information
..................................................129
Technical Support
................................................................................................129Before Contacting Technical Support
................................................................................................130Web Support
................................................................................................130Help Resources

1
CyberLink AudioDirector Help
Introduction
Chapter 1:
This chapter introduces the CyberLink AudioDirector program and includes an
overview of its features. It also outlines the recommended system requirements for
running the program.
Note: this document is for reference and informational use only. Its content
and the corresponding program are subject to change without notice.
Welcome
Welcome to the CyberLink family of digital software programs. CyberLink
AudioDirector lets you record, trim, cut, restore, and enhance digital audio from
both imported audio files or the audio track in your videos. You can also apply
effects to audio, save audio in different formats, and mix the audio from multiple
sources into one file.
Latest Features
This section outlines some of the latest features within the CyberLink AudioDirector
program.
Record from multiple devices at once in the Mix room.
Adds support for 360º viewer mode for 360º video.
Remove thumps/pops in audio with Plosive Removal.
Add background ambience to audio clips with Ambience Match, or extract it
from existing clips.
Use audio output preview to hear audio adjustments in real-time with a
selected codec applied.
Remix audio clips to make them longer or shorter.
Adds support for VST3 plugins.
2
Introduction
DirectorZone and CyberLink Cloud
You can upload/download sound clips, and back up media, preferences, projects,
and more with the DirectorZone and CyberLink Cloud features.
DirectorZone
DirectorZone is a web service that lets you download sound clips created by other
users, so you can use them in your audio. You may also share your own custom
sound clips by uploading them to DirectorZone.
To access the benefits of DirectorZone, you can sign in by clicking the button at
the top of the window to open the AudioDirector preferences, and then on the
DirectorZone tab. See DirectorZone Preferences for more information.
Also, be sure to periodically click the button to check out the latest
DirectorZone Bulletin. Just click in this section in the Notifications window to view
the bulletin. Or go to https://directorzone.cyberlink.com to find out more
information on the features and benefits of the DirectorZone web service.
CyberLink Cloud
CyberLink Cloud is a cloud storage service from CyberLink where users can upload
and download their sound clips, AudioDirector projects, produced media clips, and
more. CyberLink Cloud allows users to back up media, preferences, projects, etc.,
and ensure their working environment is the same on multiple computers.
Note: CyberLink Cloud is a subscription cloud storage service that is
included with some CyberLink products, and is available for purchase
through our web site. For more detailed information, see
https://www.cyberlink.com/products/cyberlink-cloud/.
AudioDirector Versions
The features that are available in CyberLink AudioDirector are completely
dependent on the version you have installed on your computer. Click the
AudioDirector logo in the top right to determine the version and build number for
your copy of CyberLink AudioDirector.

3
CyberLink AudioDirector Help
AudioDirector Live
AudioDirector Live is a subscription based version of CyberLink AudioDirector that
provides all the audio editing features you expect, and adds the CyberLink Cloud
storage service and more.
With a AudioDirector Live subscription, you get:
All the advanced audio editing features of the Ultra version of CyberLink
AudioDirector.
The ability to back up program preferences, projects, and sound clips on the
cloud storage space CyberLink Cloud.
Guaranteed updates to the latest versions of CyberLink AudioDirector Ultra.
AudioDirector Live is the must-have solution for on-the-go audio editors who want
easy access to their media and the latest up-to-date editing technologies.
Updating AudioDirector
Software upgrades and updates (patches) are periodically available from CyberLink.
CyberLink AudioDirector automatically prompts you when either is available.
Note: you must connect to the Internet to use this feature.
To update your software, do this:
1. Click the button to open the Notifications window.
2. Check the N ew U pdates and Upgrade Info sections.
3. Select an item in these sections to open your web browser, where you can
purchase product upgrades or download the latest patch update.
4
Introduction
System Requirements
The system requirements listed below are recommended as minimums for running
CyberLink AudioDirector.
Note: to ensure you can enjoy all the features within CyberLink
AudioDirector, make sure your computer meets or exceeds the minimum
system requirements.
Minimum System Requirements
Operating
System
Microsoft Windows 10, 8/8.1, 7 (64-bit OS recommended)
Processor (CPU)
Multi-core Intel processor with 64-bit support
Graphics
Processor
(GPU)
128 MB VGA VRAM or higher
Memory
2 GB required (6 GB or above recommended)
Hard Disk
Space
1 GB required
Screen
Resolution
1024 x 768, 16-bit color or above
Sound Card
Windows compatible sound card is required
Internet
Connection
Internet connection also required for initial software and
file formats activation
5
CyberLink AudioDirector Help
AudioDirector Workspace
Chapter 2:
This chapter provides a complete overview of the CyberLink AudioDirector
workspace. It also takes you through the settings used to customize the program to
your preference.
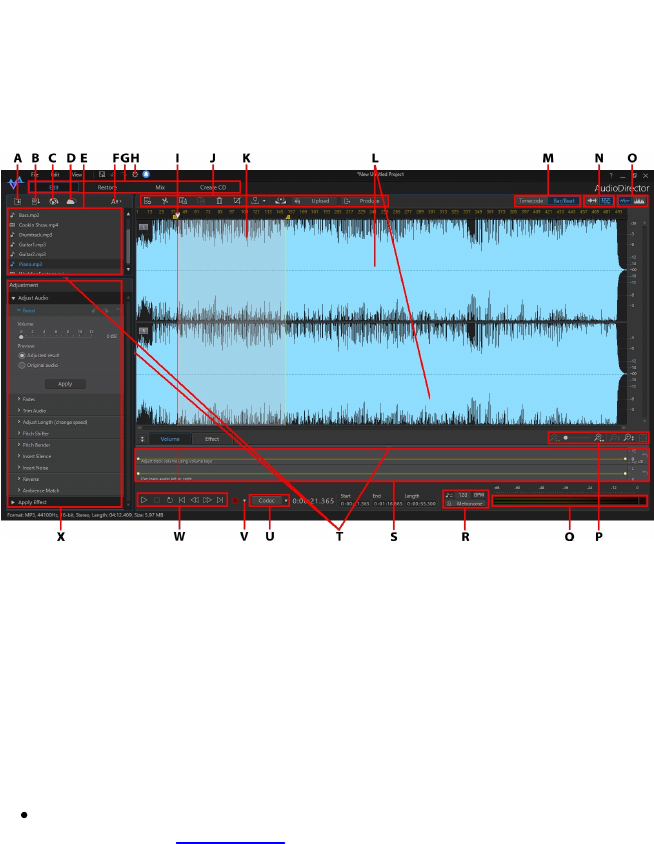
A - Import Media, B - Open Sound Clips Library, C - Download Sound Clips From DirectorZone, D -
Download Your Audio Files From DirectorZone/CyberLink Cloud, E - Media Library, F - Sort Media, G
- AudioDirector Rooms, H - AudioDirector Preferences, I - Timeline Slider, J - AudioDirector Quick Bar,
K - Range Selection, L - Audio Channels, M - Timebase Display (Timecode/Tempo), N - Channel
Selection, O - Toggle Timeline View, P - Timeline Zoom Controls, Q - Audio Level Meter, R - Determine
Tempo/Metronome, S - Keyframe Panel, T - Expand Workspace, U - Audio Output (Codec) Preview, V -
Record Audio, W - Playback Controls, X - Adjustments and Effects Panel
AudioDirector Rooms
CyberLink AudioDirector has the following main rooms: the Edit, Restore, Mix, and
Create CD rooms.
Edit: in this room you can adjust, trim, cut, and enhance digital audio, and
much more. See Editing Audio for more information.
6
AudioDirector Workspace
Restore: in this room you can repair audio clips using the Click Removal,
Clipping Removal, and Noise Reduction features, or manually fix audio using
the Visual Repair. See Restoring Audio for more information.
Mix: in this room you can record and mix multiple audio tracks into one
customized file. See Mixing Audio for more information.
Create CD: in this room you can use the media in the library to create CDs in
the audio CD format. See Creating CDs for more information.
The workspace within each CyberLink AudioDirector room is different, but do
contain common features and areas. All the rooms have the audio library, as well as
the AudioDirector quick bar you use to edit and add audio as required.
Media Library
When you import media into CyberLink AudioDirector, it is available in the media
library. You can freely edit, restore, and apply effects to all of the media in the
media library, or use the media in the Mix room.
You can import audio and also video files into the media library, as CyberLink
AudioDirector lets you edit and restore the audio track of videos you import.
See Importing Media into the Library for more information on importing audio and
videos files into the media library.
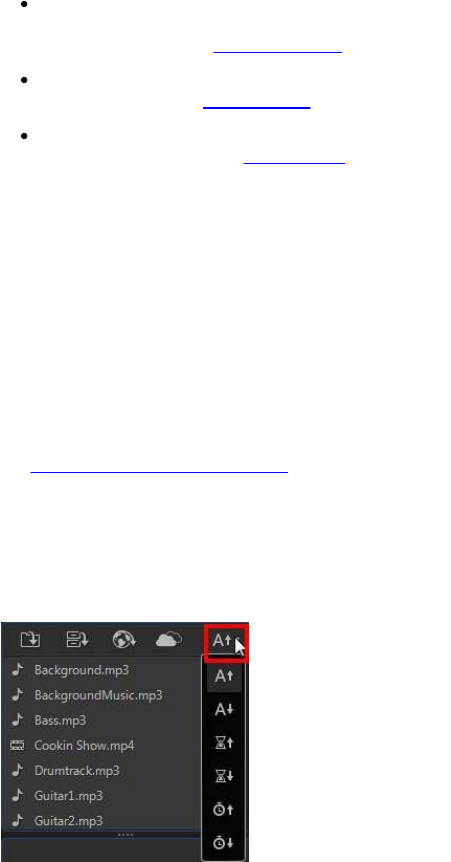
Sorting Media in the Library
You can easily sort the media in the AudioDirector library by selecting a sort option
from the list.
7
CyberLink AudioDirector Help
You have the option of sorting the media in ascending or descending order by file
name, duration, or the date the media was created.
Adjustments and Effects Panel
The adjustments and effects panel is where you set the edits you want to make to
your audio clips and apply effects. The adjustments and effects that are displayed
depends on which room you are in.
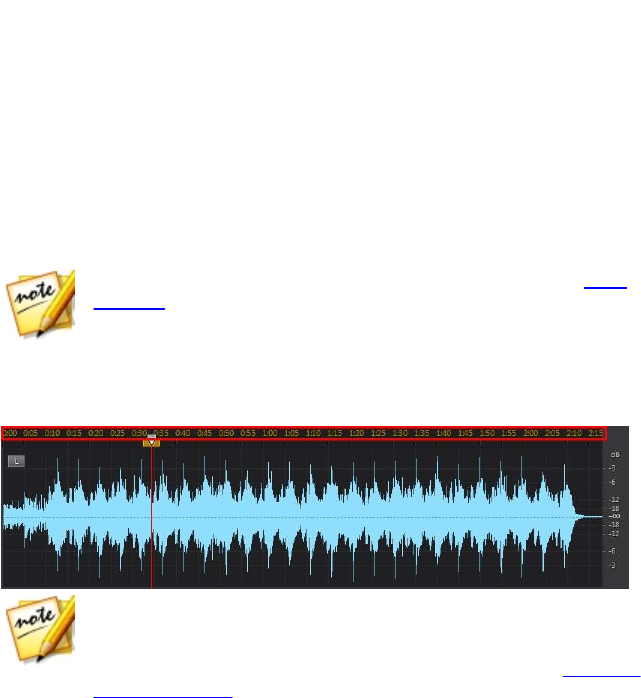
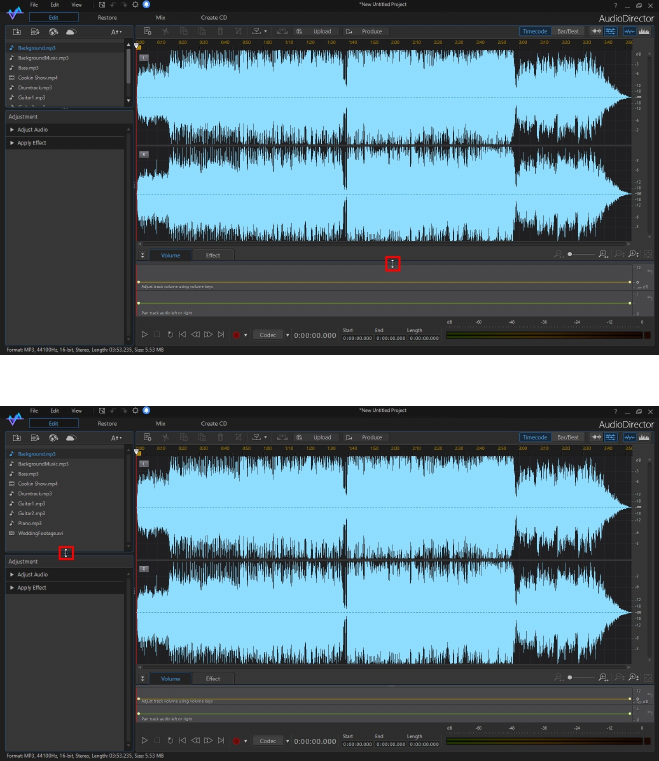
AudioDirector Timeline
The timeline is a visual representation of the digital audio files selected in the media
library. When a media file is selected, CyberLink AudioDirector displays each of its
audio channels separately in the timeline.
Note: the timeline can display up to 8 channels (7.1 channel). See Audio
Channels for more information.
The values along the top of the timeline display either the audio file's playback time
(timecode) or tempo (bar/beat), depending on your selected timebase display
preference.
Note: you can change the timebase display (the values along the top of the
timeline) by clicking either the Timecode or Bar/Beat button above the
timeline. Timecode displays the audio by playback time, while Bar/Beat
displays the audio by beats per minute (BPM) or its tempo. See Determine
Tempo/Metronome for more information on using Bar/Beat as your timebase
display.
The values along the right of the timeline indicate the audio intensity, or loudness,
measured in decibels.
8
AudioDirector Workspace
Note: you can switch the view of the timeline by clicking the buttons in the
top right corner of the program. See Timeline View for more information.
The timeline is available in the Edit, Restore, and Mix rooms of CyberLink
AudioDirector, and is where you work on editing, restoring, and mixing your audio
files.
When you click the play button, the timeline slider begins to move, indicating the
current playback position. If required, you can click and drag the timeline slider to
any position if you want to jump forward in the audio.
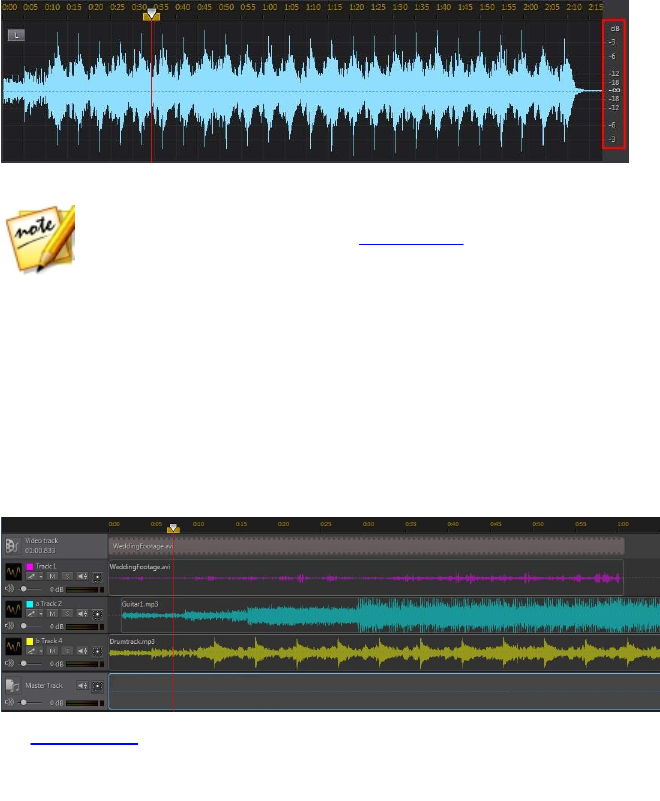
In the Mix room there are multiple tracks in the timeline. Each file you add, adds
another layer of audio onto the final outputted media represented by the Master
Track.
See Mixing Audio for information on mixing audio in CyberLink AudioDirector.
Audio Channels
When a media file is selected in the library, CyberLink AudioDirector displays all of
its audio channels in the timeline. The timeline can display up to eight channels,
and supports the following audio channel configurations:

9
CyberLink AudioDirector Help
7.1 surround sound (8 channels).
5.1 surround sound (6 channels).
stereo (2 channels).
mono (1 channel).
Note: CyberLink AudioDirector supports the import and edit of audio and
video files with 5.1 channel audio. It also supports the import of audio and
video files with 7.1 channels, but only for .WAV audio files are all 8 channels
displayed in the program and available for editing. For video files with 7.1
channel audio, two of the audio channels (BL/BR) are hidden and unavailable
for editing.
Multi-Channel Display
When a media file has more than one audio channel, each audio channel is labeled
in the top left corner. The following table defines the terminology for all the
possible audio channel types available in a selected media file and the possible
availability for the various audio channel configurations:
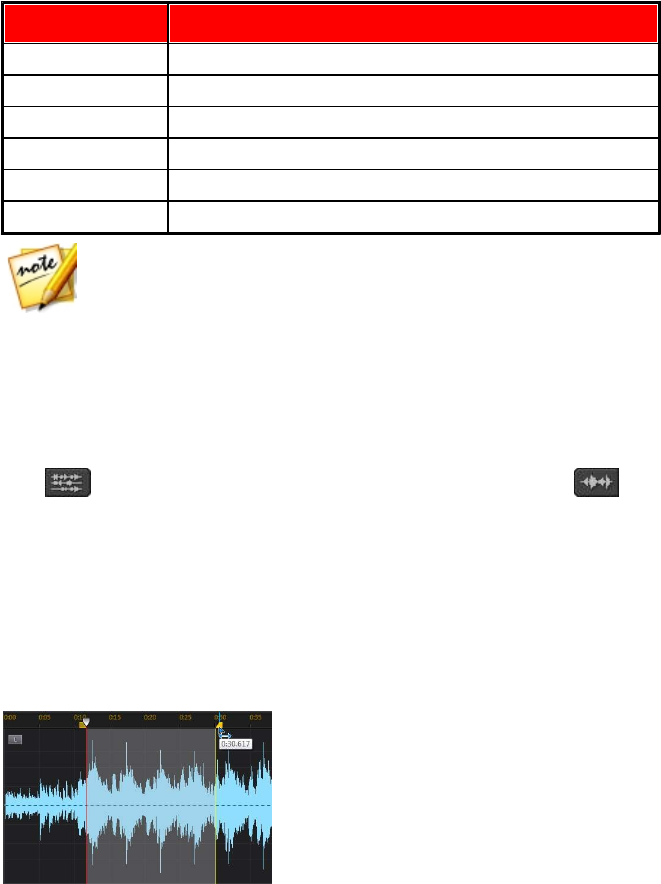
Channel Label
Channel Type
L
Front left
R
Front right
C
Center
LFE
Low-frequency effects
Lb
Back left
Rb
Back right
Lc
Front left of center
Rc
Front right of center
BC
Back center
Ls
Side left
Rs
Side right
TpC
Top center
10
AudioDirector Workspace
Channel Label
Channel Type
TpFL
Top front left
TpFC
Top front center
TpFR
Top front right
TpBL
Top back left
TpBC
Top back center
TpBR
Top back left
Note: the type of channel that is available in the selected media file is
completely dependent on the audio configuration of the file.
Selecting Channels for Editing
When you are editing and restoring audio in CyberLink AudioDirector, you can
choose to apply the edits, effects, fixes, etc. to all the channels, or just one single
channel.
Click if you want to apply the edits to all of the audio channels, or to
make edits on one specific channel only. Once selected, just click the channel you
want to apply the edits to in the timeline.
Range Selection
When editing and restoring audio, drag the timeline slider to a position in the
timeline (or use the playback controls to find the position), and then click and drag
one of the yellow nodes on either side of the timeline slider to select a range of the
audio.
11
CyberLink AudioDirector Help
You can also click and drag on the waveform directly to select a range of the audio.
Note that when you select a range of the audio, the editing tools on the
AudioDirector quick bar become active. See Using the Editing Tools for detailed
information about using each of these tools.
Details about the selected range are indicated in the Start, End, and Length fields
below the timeline. Once you have a range of an audio file's wave form selected,
you can then preview, cut, copy, delete or crop it as required.
Timeline View
When a file is selected in the media library in the Edit or Restore rooms, CyberLink
AudioDirector by default displays the waveform view for each channel in the
timeline.
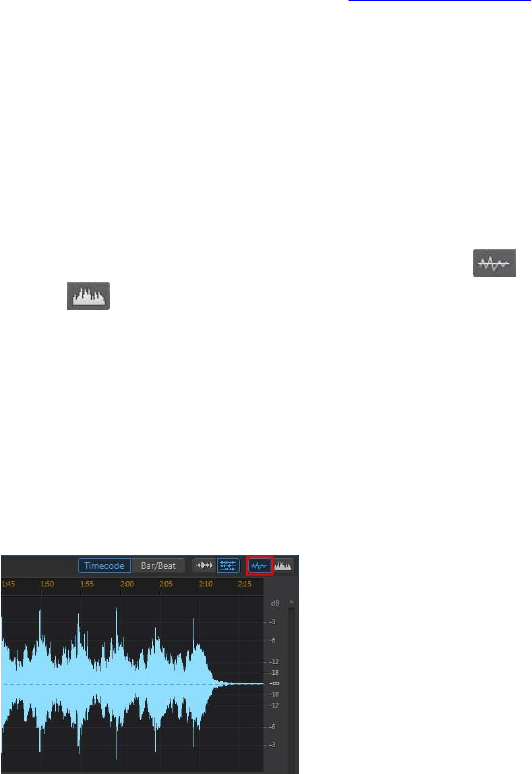
There are two available timeline views to choose from: click for the waveform
view, or for spectral frequency view.
Click the buttons in the top right corner of the timeline to switch between the two
available views.
Waveform View
When a file is selected in the media library, CyberLink AudioDirector by default
displays the waveform information for each channel in the timeline. The waveform
view is a visual representation of both the time and the audio intensity (or loudness,
measured in decibels) of the audio in each channel.
12
AudioDirector Workspace
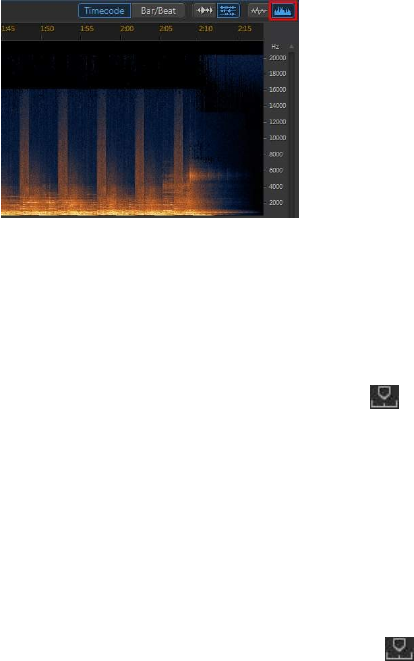
Spectral Frequency View
The spectral frequency view is a graphical representation of the audio in each
channel, and is ideal when using the Visual Repair feature. The colored graph you
see in this view is a three dimensional illustration of the audio attributes in the
selected media file.
The graph shows playback time along the top, and the frequency (relative pitch) of
the audio (measured in hertz) along the right. The colors on the graph indicate the
amplitude or strength of the audio at the point in time. The lighter the color, the
louder the audio is at that frequency and time.
Timeline Markers
When editing, restoring, or mixing audio, click to add a timeline marker at the
current position of the timeline slider. Markers are used to mark the positions in
your audio files where you might want to edit the audio file or start an effect from.
In the Mix room, use markers when adding audio clips as they will snap to the
timeline markers.
Adding Timeline Markers
To add a timeline marker, do this:
1. Use the playback controls to find, or drag the timeline slider to the position
where you want the marker, and then click .
2. Input a Description for the new timeline marker, if required.
13
CyberLink AudioDirector Help
3. Click on OK to add the new timeline marker.
Note: you can double-click on a time marker to edit its properties, if
required.
Timeline Zoom
When editing, restoring, or mixing audio on the timeline, use the controls to zoom
in on the audio timeline to make your editing more precise. There are two types of
zooming available: horizontal zoom and vertical zoom.
Note: when using the zoom controls, you can click the button at any to
time to zoom all the way back out for a full view of the audio waveform.
Horizontal Zoom
The horizontal zoom controls let you increase/decrease the time magnification of
the audio in the timeline.
Use these zoom controls if you want to, for example, zoom in on a specific two
seconds in an audio clip.
Vertical Zoom
Vertical zoom lets you increase/decrease the intensity magnification of the audio in
the timeline.
Use these zoom controls if you want to, for example, zoom in on a specific noise to
get a closer look at the waveform.
Determine Tempo/Metronome
When your timebase display is set to Bar/Beat, if required, you can determine your
audio file's tempo or enable the metronome for assistance.
14
AudioDirector Workspace
Note: CyberLink AudioDirector does not automatically calculate the tempo of
audio clips in the timeline. The Bar/Beat timebase display is just a guideline
for tempo you can use in your audio and video editing.
Determining Tempo
If you are not sure what the tempo of an audio file is, click the BPM button at the
bottom of the Edit, Restore, and Mix rooms to open the Determine Tempo window.
You can also access this window in General preferences by clicking the Tempo
button.
Note: if you know the tempo of the audio or you want to manually set the
tempo used in the timebase display, you can click in the field next to the
icon and enter it. It must be a number between 1 and 1280.
To determine the tempo of an audio file, do this:
1. Start the playback of the audio you want to determine the tempo of.
2. Click the BPM button at the bottom of the Edit, Restore, or Mix room to open
the Determine Tempo window.
3. When ready, click the Tap button (or the T key on your keyboard) to the beat
of music. Tap several quarter notes, as the more taps your provide, the more
precise it will be in determining the tempo.
4. When you are done, click OK to set the detected tempo as the timebase
display.
Note: before closing the Determine Tempo window, you can click Preview
to hear the tempo you set. You can also use the metronome to hear the
tempo during audio playback.
Metronome
When using the Bar/Beat timebase display, you can click the Metronome button to
enable the metronome during playback. Once you click play to start the audio
playback, the metronome will accurately play tapping sounds to the set tempo.
Use this to check that the set tempo is precise, and make any adjustments if
required. You can change the set tempo by clicking in the field next to the icon
and entering it, or by clicking the BPM button to determine it manually. See
Determining Tempo for more information.
15
CyberLink AudioDirector Help
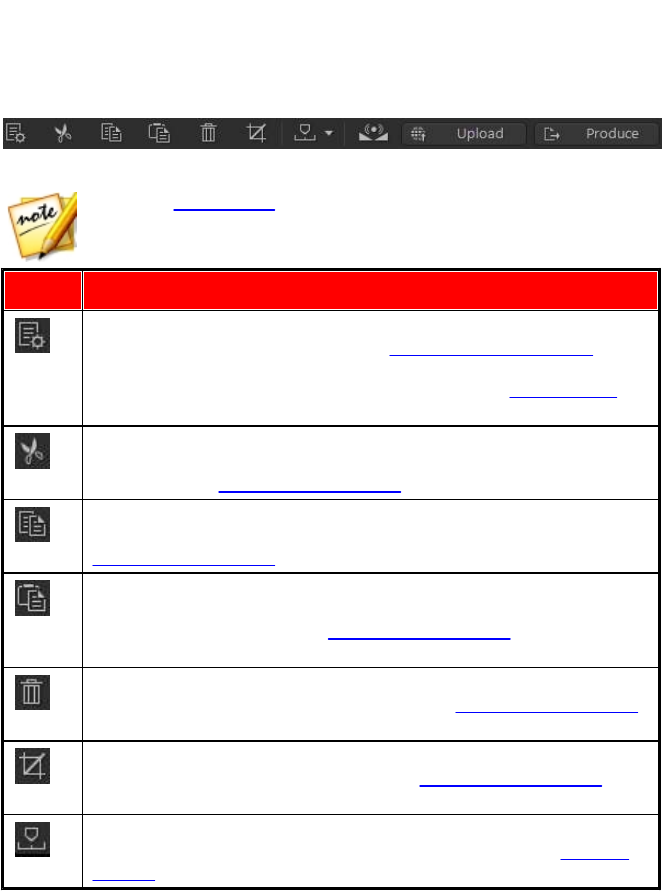
AudioDirector Quick Bar
The AudioDirector quick bar offers you several tools you can access in all the
rooms. Depending on which room you are in, the buttons on the quick bar differ.
The available functions on the AudioDirector quick bar are as follows:
Note: see Creating CDs for a description of the tools on the quick bar in the
Create CD room.
Button
Function
If in the Edit or Restore room, click this button to change the profile or
quality of the selected media file. See Converting Audio Profiles for
more information. If you're in the Mix room, click it to configure the
profile settings of the mixed audio you produce. See Mixing Audio for
more detailed information
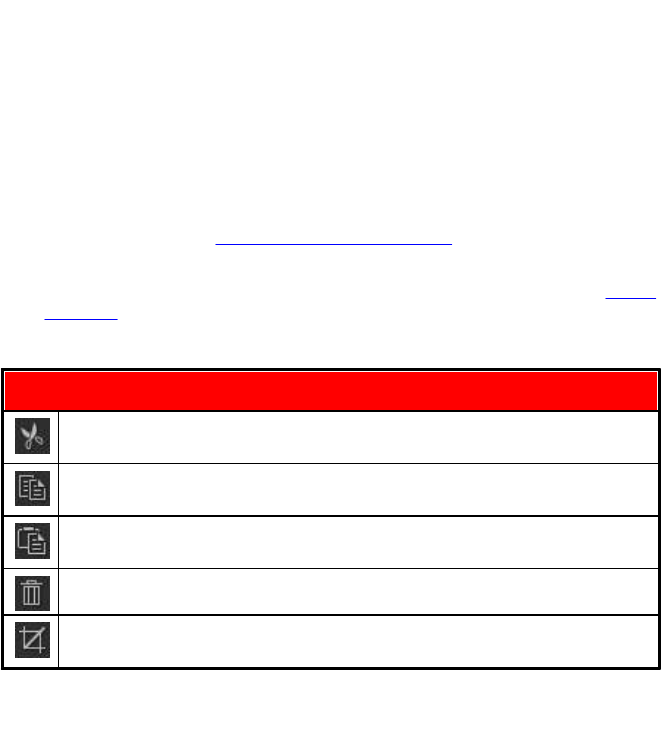
In the Edit, Restore, and Mix rooms you can click on this button to cut
a selected portion out of the audio file, and place it on your clipboard
for pasting. See Using the Editing Tools for more detailed information.
In the Edit, Restore, and Mix rooms you can click on this button to
make a copy of a selected portion on your clipboard for pasting. See
Using the Editing Tools for more detailed information.
In the Edit, Restore, and Mix rooms you can click on this button to
paste the audio wave form you cut or copied to the right of the
current timeline position. See Using the Editing Tools for more
detailed information.
In the Edit, Restore, and Mix rooms you can click on this button to
delete a selected portion of the audio file. See Using the Editing Tools
for more detailed information.
In the Edit and Restore rooms you can click on this button to crop to
the selected portion of the audio file. See Using the Editing Tools for
more detailed information.
In the Edit, Restore, and Mix rooms you can click this button to add
timeline markers at the current timeline slider position. See Timeline
Markers for more detailed information.
16
AudioDirector Workspace
In the Edit, Restore, and Mix rooms you can click this button to
normalize the selected audio. See Normalizing Audio for more
information.
In the Edit, Restore, and Mix rooms you can click this button to share
the selected audio file on DirectorZone. See Sharing Audio on
DirectorZone for more detailed information.
In the Edit, Restore, and Mix rooms you can click this button to
produce the selected audio or video file, exporting it with all the edits
you made applied. See Producing Audio for more detailed
information.
Click this button in the Mix room to add a mix track to the timeline.
See Mixing Audio for more detailed information.
Click this button in the Mix room to split an audio file that is selected
on a mix track into two separate parts. See Mixing Audio for more
detailed information.
If you have a video clip that has audio recorded in a noisy
environment, click this button to use Automated Dialogue Alignment
to replace the audio. See Using Automated Dialogue Alignment for
more information.
Playback Controls
While adjusting, editing, and mixing audio in CyberLink AudioDirector, use the
available playback controls to preview the audio. To preview the audio, use the
controls as follows:
Playback Controls
Click to play the audio from the current position to the end of the track.
Click to pause playback.
Click to stop playback.
If is displayed, the current audio file plays to the end of the track. If
is displayed, the audio will loop continuously until you click pause or stop.
Click to toggle between the two available audio playback behaviors.
17
CyberLink AudioDirector Help
Click to make the timeline slider jump to the beginning of the current
selected audio track or selected range of the audio waveform.
During playback, click and hold this button to rewind through the current
audio track.
During playback, click and hold this button to fast forward through the
current audio track.
Click to make the timeline slider jump to the end of the current selected
audio track or selected range of the audio waveform.
Click to record custom audio in CyberLink AudioDirector. See Recording
Audio for detailed information on recording custom audio in the
program.
Video File Playback
When you import video files into the library, a small video preview displays in the
bottom left corner of the CyberLink AudioDirector window when it is selected.
When you click play, the video plays with the audio for added reference when
editing the video file's audio track.
During playback, you can:
click to minimize the video preview window. Click to restore it.
18
AudioDirector Workspace
click to undock the preview window if you would like a larger preview
that you can resize to your preference. You can also double-click on the
undocked window's title bar to go to full screen, if required.
the video preview window also includes slightly different playback controls,
that include the and buttons you can use to step backwards or
forwards one frame when the video is paused.
click to re-dock the preview window to the bottom left.
360º Videos
When 360º video files are imported into CyberLink AudioDirector, you can click the
button to view it in the 360º mode.
19
CyberLink AudioDirector Help
360 Controls
When playing 360° video files, there are extra 360° controls available in the preview
window.
20
AudioDirector Workspace
When viewing or playing a 360° video file, you can click and drag on the preview
window to pan around the 360° environment or use the controls to pan left,
right, up, or down. Note that you can click the in the middle of the controls at
any time to reset to the default viewing position.
Note: you can also use your mouse's scroll wheel to zoom in and out within
the 360° view.
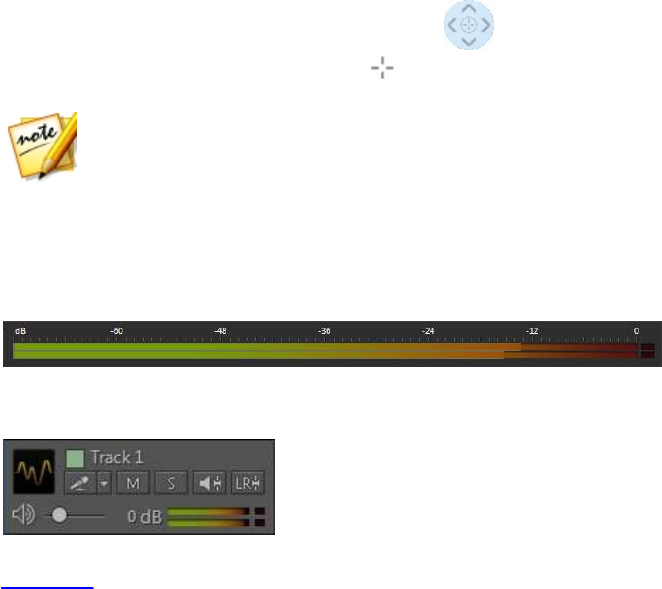
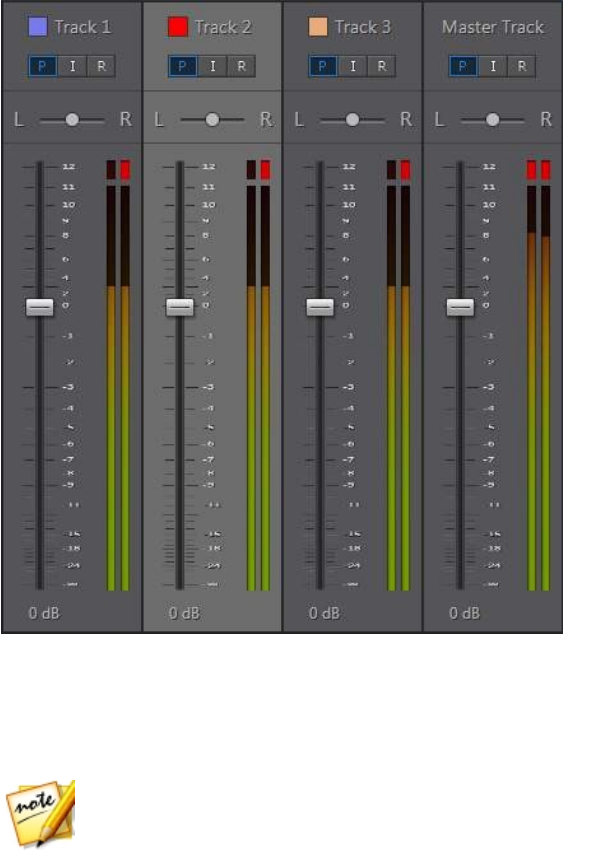
Audio Level Meter
Use the audio level meter to view the audio level, or loudness in decibels, of the
current clip at different moments in time during playback. If the audio levels rise to
the red levels, you can adjust the master volume to lower the audio level.
In the Mix room, each mix track has its own audio level meter. Just use the volume
slider to the left of the track to adjust the audio level as necessary.
There are also audio level meters for each track in the Mix room's mixer panel. See
Mixer Panel for more information.
21
CyberLink AudioDirector Help
Audio Output (Codec) Preview
Before you adjust, edit, and mix audio in CyberLink AudioDirector, you can click the
Codec button below the timeline to enable audio output preview. Enabling this
allows you to preview your audio with a selected codec in real-time while you work.
Note: when previewing a video file's audio with a selected codec, the video is
not available.
22
AudioDirector Workspace
Click the next to the Codec button to change the audio output preview options
as follows:
Format: select the format you want to use in the audio preview from the
drop-down.
Bitrate/Compression level: if required, set the bitrate for the audio preview by
selecting it from the drop-down.
Sample rate: set the sample rate of the audio preview by selecting it from the
drop-down.
Note: the audio output preview options you set, will be used in the default
profile settings when you produce the audio.
Expanding the Workspace
You can adjust the CyberLink AudioDirector workspace to fit your editing
requirements. For example, you can expand out the adjustment and effects panel
to get better look at all the available controls, if required.
23
CyberLink AudioDirector Help
You can also expand the keyframe panel for a better view when adjusting the
master volume and panning audio left or right. Doing so, reduces the width of the
audio tracks in the timeline.
If you have lots of media in the library, you can expand it to view all the files.
24
AudioDirector Workspace
Keyframes Panel
The keyframes panel provides powerful and precise editing tools in the Edit room.
On the Volume tab you can adjust the master volume of audio, or pan audio to the
left or right channel. On the Effect tab, you can precisely apply multiple effects to a
single audio clip.
Volume Tab
On the Volume tab on the keyframes panel, you can adjust the master volume and
pan audio the left or right.
See Adjusting Master Volume and Panning Audio Left/Right for more detailed
information on the use of these editing features.
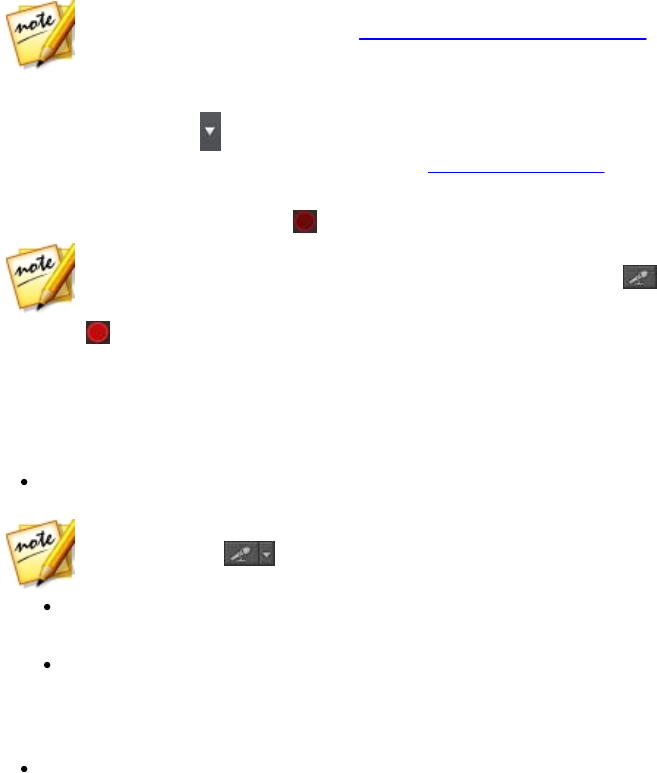
Effect Tab
The Effect tab shows you precisely where effects you applied are located in the
audio clip you are editing.
On this tab you can perform the following on the effects:
deselect an effect to disable it and preview the audio without the effect
applied. Reselect it to reapply it.
hover your mouse over the effect on the tab and then click to edit the
effect in the effects panel.

25
CyberLink AudioDirector Help
to remove effects, hover your mouse over the effect on the tab and then click
on the individual effect. Click to the right of the panel to remove all the
similar effects from the entire timeline.

26
Importing Media
Importing Media
Chapter 3:
You can import both audio and video files from your hard drive or from a
removable device, into CyberLink AudioDirector. You can also record your own
custom audio, or download sound clips from DirectorZone directly into the library.
Note: when media is imported into the library, CyberLink AudioDirector
creates a temp working file for each file. It uses the file to log the edits and
changes you want to make to the original files. The changes are not applied
to the original file, as you must produce the audio and output it as a new file
to apply them.
Importing Audio and Video Files
To import audio or video from your hard drive or a removable device, click ,
browse to its location, and then click on Open. You can import multiple files into
the library at once and then work on them all in CyberLink AudioDirector.
When importing video files you must make sure that Video files is selected from the
format type drop-down so that the files you are trying to import are visible.
Once imported, use the playback controls to preview both the audio and video. See
Playback Controls for more information.
Supported Formats
CyberLink AudioDirector supports the import of audio and video files in the
following formats:
Audio: AIF, AIFF, APE, CAF, DSD Audio, FLAC, MP3, M4A (AAC, ALAC), OGG, WAV,
WMA**.
Note: ** CyberLink AudioDirector does not support the editing of WMA audio
files with DRM file protection.
Video: 3GPP2, AVI, DivX (on Windows 7), DV-AVI, DVR-MS, HD MPEG-2, M2T (H.264
AVC, H.265 HEVC), MKV (H.264 AVC, H.265 HEVC), MOD, MOV, MOV (H.264 AVC), MP4
(H.264 AVC, H.265 HEVC), MPEG-1, MPEG-2, TOD, VOB, VRO, WMV, WMV-HD.

27
CyberLink AudioDirector Help
Note: CyberLink AudioDirector supports the import and edit of audio and
video files with 5.1 channel audio. It also supports the import of audio and
video files with 7.1 channels, but only for .WAV audio files are all 8 channels
displayed in the program and available for editing. For video files with 7.1
channel audio, two of the audio channels (BL/BR) are hidden and unavailable
for editing.
Downloading Sound Clips and
Media Files
You can download audio and video files from CyberLink Cloud, and sound clips
from DirectorZone. Sound clips downloaded from DirectorZone are stored in the
Downloaded Sound Clips Library of CyberLink AudioDirector.
Downloading Sound Clips from
DirectorZone
You can download sound clips from DirectorZone that were shared by other
CyberLink AudioDirector users. Sound clips are audio files that are up to 30 seconds
in length.
To download sound clips from DirectorZone, do this:
1. Click on . CyberLink AudioDirector launches DirectorZone in your default
web browser.
2. You must first sign in to DirectorZone to download content. If you don't have
an account, click the Sign up link at the top of the page to get one for free.
3. If required, select the Produc ts > AudioDirector to display all the available
sound clips you can download.
4. Find a sound clip that you want to download, and then click the Download
button.
5. Click Download again.
6. Save the sound clip to your computer. Find the location on your computer
where you saved it, and then double-click on it to install it in the Sound Clips
Library.

28
Importing Media
My DirectorZone Sound Clips
If required, you can easily download the sound clips that you previously uploaded
to DirectorZone and re-import them into the sounds clips library. You can also
access and download sound clips from your DirectorZone download history and
also your favorite sound clips.
To download My DirectorZone sound clips, do this:
1. Click on the button.
2. Click the My D irec torZone tab.
3. Filter the sound clips by My Uploads, Download History, or My Favorites, or
enter a search keyword in the field provided.
4. Select all of the sound clips you want to download.
5. Click Download to download them to your computer and import them into
the sound clips library.
Downloading Media Files from CyberLink
Cloud
If you have a CyberLink Cloud subscription you can download the audio and video
files you previously backed up to CyberLink Cloud. Once downloaded, these media
files are stored in the download folder specified in CyberLink Cloud Preferences,
and imported into the media library.
To download media files from CyberLink Cloud, do this:
1. From the menu, select File > Download Media from CyberLink Cloud.
2. Click the Video tab to download your video files, or Music to download your
audio files.
3. Select all of the media files you want to download.
4. Click Download to download them to your computer and import them into
the media library.

29
CyberLink AudioDirector Help
My CyberLink Cloud Audio
If required, you can also download the CyberLink Cloud audio files from within the
media library.
To download audio files from CyberLink Cloud, do this:
1. Click on button.
2. Click the My CyberLink Cloud tab.
3. Filter the audio files by selecting a collection from the drop-down, or enter a
search keyword in the field provided.
4. Select all of the audio files you want to download.
5. Click Download to download them to your computer and import them into
the media library.
Sound Clips Library
Click the button to open the sound clips library of CyberLink AudioDirector. In
the sound clips library you can manage and organize the clips you downloaded
from DirectorZone and CyberLink Cloud*.
Note: * CyberLink Cloud is a cloud service from CyberLink that is currently
only available to users who have a subscription to AudioDirector Live.
In the sound clips library you can:
view sound clips by category.
preview the sound clips in the library.
import the selected sound clips into your current project.
Recording Audio
In CyberLink AudioDirector you can record your own custom audio in the WAV
format, which is added directly into the timeline when in the Edit, Restore, or Mix
room. The audio that is recorded is placed onto any existing audio in the timeline.
30
Importing Media
You can record using a connected microphone, or select the What You Hear option
to loop back record audio coming from an audio device that is connected to your
computer.
Note: in the Mix room you can use loop recording to perform multiple
recording takes in succession. See Using Loop Recording to Record Audio
for more information.
To record audio, do this:
1. If required, click on to open and configure the settings for recording,
including setting the recorded audio source. See Record Audio Settings for
detailed information.
2. To begin recording audio, click .
Note: if you are recording audio in the Mix room, you must first enable the
track in the mix's timeline that you want to record the audio to. Click the
button on the track where you want the recording to be placed.
3. Click again to stop recording and save/import the recorded file into the
CyberLink AudioDirector library.
Record Audio Settings
Configure the settings for recording audio as follows:
Devices: select the import source, or audio device, you want to use to record
audio with by doing one of the following:
Note: in the Mix room you can record audio from multiple devices at the
same time. Click to select each device for the specific Mix room
track.
Microphone: select this option and then the microphone from the list if
you want to record from a connected microphone.
What You Hear: select this option to loop back and record the audio that
you are hearing on your computer. Just select from the devices connected
to your computer that is the source of the audio, i.e. sound card, speakers,
etc.
Channels: select the channel (or Stereo if you want it recorded in both
channels) you want the audio recorded to.

31
CyberLink AudioDirector Help
Sample rate: set the sample rate of the recorded file by selecting it from the
drop-down.
Bit depth: set the bit depth of the recorded file by selecting it from the drop-
down.
Monitor input: set this option to On if you want to hear the import source
during the recording. If set to Off, you cannot hear the input source during
recording.
Countdown timer: select this option to enable a countdown before CyberLink
AudioDirector begins recording audio. Set the length of the countdown
(maximum 30 seconds) in the field provided.
Click OK to save any changes you make to the recording settings.
Using Loop Recording to Record Audio
When in the Mix Room you can use loop recording to record multiple takes in
succession. This can help you when recording song verses, voice overs, etc. in a
mix, allowing you to choose the best take when you are done.
To use loop recording, do this:
1. In the Mix room, click on next to the record button underneath the
timeline.
2. Select the Loop recording option and then configure the available settings as
follows:
Record to new track: select this option if you want each recorded take to be
added to a new track in the Mix room timeline. This allows you to review each
recorded take once the recording is finished. If you don't select this option,
each new take is recorded over the previous one.
Pre-roll: select this option to enable a pre-roll before the recording starts.
Once enabled, enter in the amount of time in seconds you want the other
audio in the mix to play before recording starts.
Post-roll: select this option to enable a post-roll after the recording stops.
Once enabled, enter in the amount of time in seconds you want the other
audio in the mix to play after the recording stops before it loops back to the
beginning.

32
Importing Media
Countdown timer: select this option to enable a countdown before CyberLink
AudioDirector begins recording audio. Set the length of the countdown
(maximum 30 seconds) in the field provided.
3. Click OK to close the Recording settings.
4. In the Mix room timeline, click the button to enable recording on the
track where you want the recording to be placed. Click to configure the
recording settings by selecting the import source for the recorded audio, and
whether you want to monitor the input. See Recording Settings for more
information.
Note: if you selected to add each looped recording on a new track,
CyberLink AudioDirector automatically adds the new track underneath the
enabled track in the timeline.
5. Use range selection to select where you want the recording to begin and end,
i.e. its length. See Range Selection for more information.
6. Click to record. After the pre-roll (if enabled), start recording as required.
The recorded content will be added to the selected range on the enabled
track.
7. Repeat your recording until you are satisfied you got the right take, and then
click to stop recording.
8. Once you have finished recording, you can preview each take as required and
remove any recorded files from the mix timeline and the library.
33
CyberLink AudioDirector Help
AudioDirector Projects
Chapter 4:
When editing, restoring, and mixing audio in CyberLink AudioDirector, click the
button to save your work as a project in the .ads file format, which is used
exclusively by CyberLink AudioDirector.
Note: a CyberLink AudioDirector project (.ads) file essentially contains a
list of the audio and video files in the library, and that you are editing or
mixing. The project file maintains a log of all the edits and effects you want
to apply to audio, as well as a list of the audio for mixing and other use
preferences (volume levels, timeline markers, etc.). Project files do not
include the audio and video clips in them.
Use the options in the File menu to save, create new, or open existing projects in
CyberLink AudioDirector. If you have a CyberLink Cloud subscription you can also
upload saved projects and more to CyberLink Cloud. See CyberLink Cloud Projects
for more information.
Note: when you create a new project, CyberLink AudioDirector resets your
library. If you are in the Mix room and you want to create a new mix using
the same media that's currently in your library, select File > New
Workspace.
The changes you make to your audio clips in CyberLink AudioDirector do not affect
the original audio files you imported into the program. Since your edits are all
saved in the project file, you can edit and make adjustments to your clips, but still
keep your original files on your hard drive, untouched. So let yourself get creative. If
you end up changing things too drastically, you can always start over.
Exporting Projects
You can export your CyberLink AudioDirector projects by packing all the materials
in a folder on your computer's hard drive or CyberLink Cloud*. Exported projects
can then be imported into another computer running CyberLink AudioDirector.
To export your project, select File > Export/Pack Project Materials. If you are a
AudioDirector Live subscriber you can select File > Pack Project Materials and
Upload to CyberLink Cloud to back up all the media files, and the project file, in a
folder on CyberLink Cloud.

34
AudioDirector Projects
Note: * CyberLink Cloud is a cloud service from CyberLink that is currently
only available to users who have a subscription to AudioDirector Live.
CyberLink Cloud Projects
If you have a CyberLink Cloud subscription you can select File > Upload Project to
CyberLink Cloud to store project files on the CyberLink Cloud service from
CyberLink.
To open a project that was saved on CyberLink Cloud, including projects that were
packed in a folder with their media (materials), select Download Project from
CyberLink Cloud from the File menu. In the window that displays, select a project
and then click Download.
Note: when you open a packed project stored on CyberLink Cloud, the
project file and all the project media is downloaded to your local computer
and stored in the download folder specified in CyberLink Cloud
Preferences.
35
CyberLink AudioDirector Help
Basic Audio Editing
Chapter 5:
While adjusting, restoring, mixing, or applying effects to audio, there may be some
basic audio editing you need to do. This includes converting the audio, cropping,
trimming it and more.
Note: the changes to the audio are not applied to the original file, as you
must produce it as a new file in the Produce window. See Producing the
Audio for more information.
Converting Audio Profiles
CyberLink AudioDirector lets you convert the audio profile of a media (audio or
video) file by adjusting its sample rate, bit depth, and the number of audio channels
it contains.
To covert the audio profile of a media file, do this:
1. In the Edit and Restore room, select the media file in the library that you want
to convert.
2. Click the button above the audio timeline.
3. As required, change the following audio profile settings:
Sample rate: select the new sample rate you want the media file to have. A
higher sample rate increases audio quality and file size.
Bit depth: select the new bit depth you want the media file to have. A higher
bit depth also increases the audio quality and file size.
Channels: set the number of channels you want the media file to have. Note
that added channels are left empty, allowing you to further edit them in
CyberLink AudioDirector later.
CyberLink TrueTheater Surround: if you want to increase the number of
channels in the audio, select this option to use CyberLink TrueTheater
Surround to enhance the quality of the expanded audio. You can choose from
Living Room, Theater, or Stadium.
4. Click OK to apply the changes.
36
Basic Audio Editing
Using the Editing Tools
Use the editing tools on the AudioDirector quick bar to crop, trim, and even add
portions (using the paste function) to your audio.
To edit an audio file, do this:
1. In the Edit, Restore, or Mix room, select the media file in the library that you
want to edit.
2. Decide whether you want to perform the edits on all the available channels, or
just one channel. See Selecting Channels for Editing for more information on
selecting channels.
3. Use range selection to select the portion of audio you want to edit. See Range
Selection for more information on selecting a range of an audio file.
4. Use the editing tools to perform edits on your audio files as follows:
Editing Tools
Click to cut the selected portion out of the audio file, and place it on your
clipboard for pasting.
Click to make a copy of the selected portion on your clipboard for
pasting.
Click to paste the audio wave form you cut or copied to the right of the
timeline slider's current position.
Click to delete the selected portion of the audio file.
Click to crop out the selected portion of the audio file, removing the parts
of the audio file that are not selected.
Normalizing Audio
If you find that audio on some channels is much louder than on other channels
when editing or restoring it, you can normalize the volume across all channels.
Normalizing is the process of applying a constant amount of gain to your audio file
to bring the average or peak amplitude (volume levels) to a same level. You also use
this feature in the Mix room to ensure all the audio in your mix has the same
volume levels.

37
CyberLink AudioDirector Help
To normalize the audio channels for a media file, do this:
Note: this section is for normalizing the audio across all channels in the Edit
and Restore rooms. For information on normalizing the audio in the Mix
room see Normalizing Audio Across Multiple Tracks.
1. In the Edit or Restore room, select the media file in the library that has the
audio channels you want to normalize.
2. If required, use range selection to select the portion of audio you want to
normalize. See Range Selection for more information on selecting a range of
an audio file.
Note: be sure to select the entire audio file's waveform if you want to
normalize the audio in the entire track.
3. Click the button to normalize the volume of the selected audio.

38
Adjusting Audio
Adjusting Audio
Chapter 6:
Once you have imported media into the library, you can start using the features in
the adjustments and effects panel to modify the audio to fit your requirements. To
begin, select the media you want to adjust and then click Adjust Audio to display
all the available adjustment options.
Note: when you make adjustments to audio, they are not applied to the
original file until you produce it in the Produce window. See Producing the
Audio for more information.
Boosting Audio Volume
Use the Boost feature to increase the volume of audio. You can boost the volume
by up to 12 decibels.
To boost audio volume, do this:
1. Select the media file in the library that you want to adjust.
2. Click the Edit button, or Mix if you are in the Mix room, and then Boost under
the Adjust Audio section.
3. Decide whether you want to boost the audio's volume on all the available
channels, or just one channel. See Selecting Channels for Editing for more
information on selecting channels.
4. Use range selection to select the portion of audio you want to boost. See
Range Selection for more information on selecting a range of an audio file.
Note: the entire audio file's waveform is selected by default when this feature
is opened. If you want to apply this feature to the entire audio file, you do not
need to use range selection when the entire waveform is selected.
5. Drag the Volume slider, boosting the selected range of audio the desired
decibels.
6. If required, you can preview how the adjusted audio will sound by selecting
Adjusted result and then clicking the play button on the playback controls.
Select Original audio if you want to play the original audio.
7. Click Apply to apply the boost.
39
CyberLink AudioDirector Help
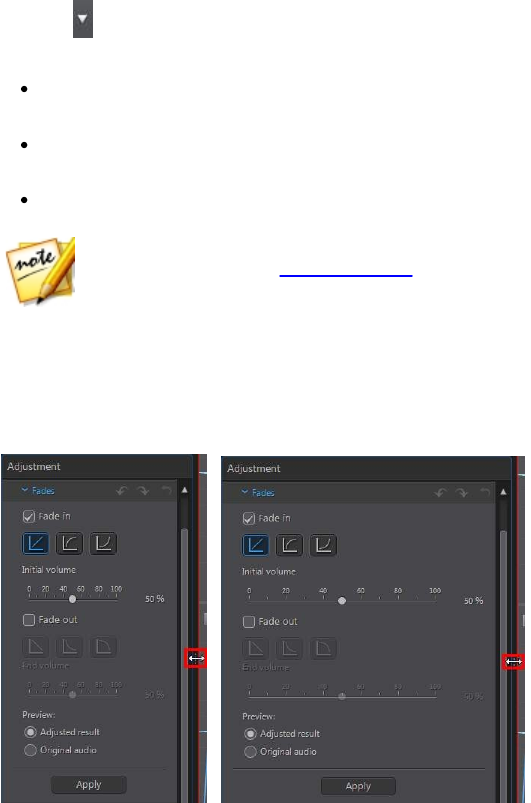
Applying Fades
Use the Fades feature to apply fades to audio. You can make the audio fade in or
out in a variety of ways.
To apply a fade to audio, do this:
1. Select the media file in the library that you want to adjust.
2. Click the Edit button, or Mix if you are in the Mix room, and then Fades under
the Adjust Audio section.
3. Decide whether you want to apply the fade on all the available channels, or
just one channel. See Selecting Channels for Editing for more information on
selecting channels.
4. To fade the audio in from the beginning of the clip, select the Fade in option
and then set the following:
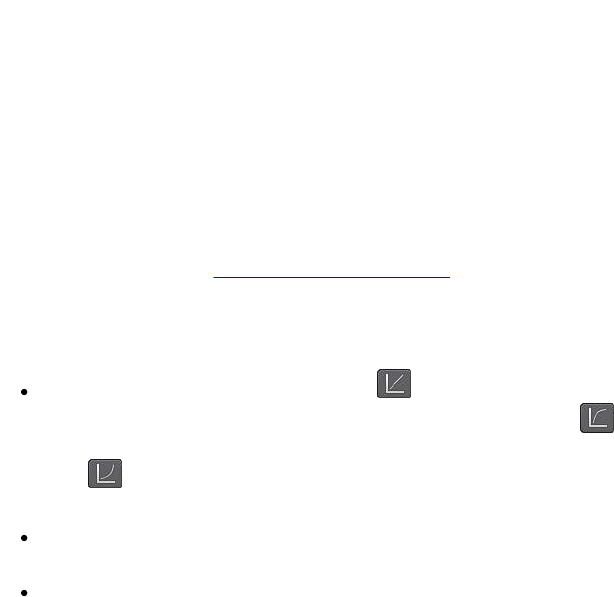
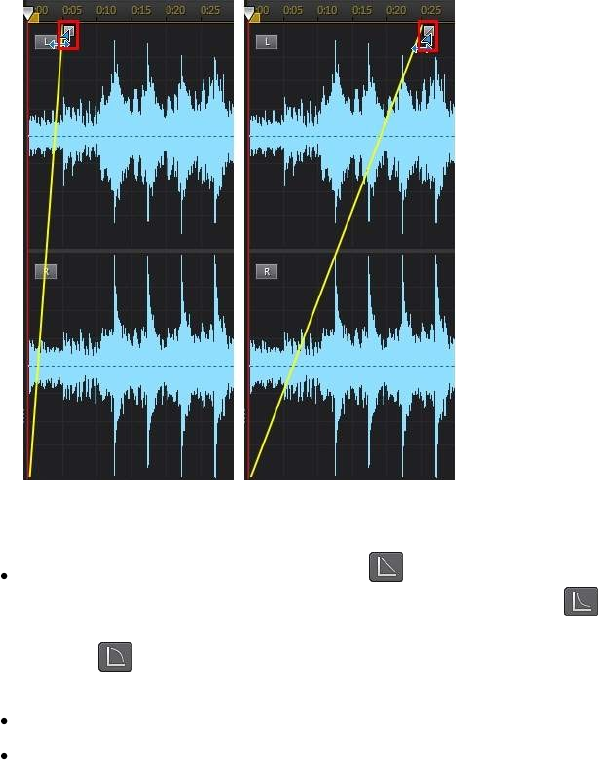
select from one of the three fade in types: - a gradual fade in that
increases the volume proportionately during the length of the fade; -
fades audio in dramatically at first, and then tapers off towards the end of the
fade; - exponentially increases the audio as it progresses through the
length of the fade.
Initial volume: set the level of the audio's volume at the beginning of the fade
in.
by default the fade in duration is 5 seconds. To change the duration, click and
drag the grey square to the desired time you want the fade to end, i.e the
audio to be at full volume.
40
Adjusting Audio
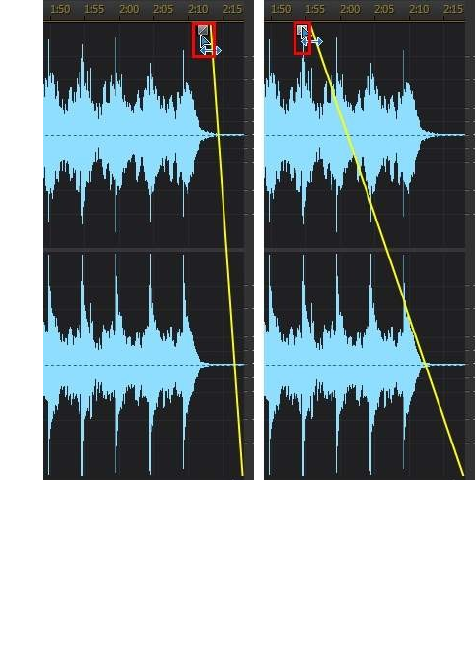
5. To fade the audio out at the end of the clip, select the F ade out option and
then set the following:
select from one of the three fade out types: - a gradual fade out that
decreases the volume proportionately during the length of the fade; -
fades audio out dramatically at first, and then tapers off towards the end of
the fade; - exponentially decreases the audio as it progresses through the
length of the fade.
End volume: set the level of the audio's volume at the end of the fade out.
by default the fade out duration is 5 seconds. To change the duration, click
and drag the grey square to the desired time you want the audio to begin
fading out.
41
CyberLink AudioDirector Help
6. If required, you can preview how the adjusted audio will sound by selecting
Adj usted r esult and then clicking the play button on the playback controls.
Select Original audio if you want to play the original audio.
7. Click Apply to apply the fade.
Trimming Audio
Use the Trim Audio feature to trim out unwanted portions from your media clip's
audio.
To trim audio, do this:
1. Select the media file in the library that you want to trim.
2. Click the Edit button, or Mix if you are in the Mix room, and then Trim Audio
under the Adjust Audio section.
42
Adjusting Audio
3. Decide whether you want to perform the trim on all the available channels, or
just one channel. See Selecting Channels for Editing for more information on
selecting channels.
4. Use range selection to select the portion of audio you want to trim. See Range
Selection for more information on selecting a range of an audio file.
5. Select the Mode of trimming you want to perform as follows:
Remove selected part: select if you want to trim out the part you selected in
the previous step.
Keep selected part: select if you want to keep the part you selected in the
previous step, removing the portions on either side.
Note: if required, click to use the Mark in and M ark out previews to
listen to the audio a few seconds before and after the trim points to ensure
you are trimming the audio you want.
6. Click Apply to trim the audio.
Adjusting Length (Change
Speed)
Use the Adjust Length (change speed) feature to change the length of audio by
speeding it up, or by slowing it down.
To adjust the length of audio, do this:
1. Select the media file in the library that you want to adjust.
2. Click the Edit button, or Mix if you are in the Mix room, and then Adjust
Length (change speed) under the Adjust Audio section.
3. Decide whether you want to perform the adjustment on all the available
channels, or just one channel. See Selecting Channels for Editing for more
information on selecting channels.
4. If required, use range selection to select the portion of audio you want to
adjust the length of. If you don't select a range, the adjustment is applied to
the entire audio file. See Range Selection for more information on selecting a
range of an audio file.

43
CyberLink AudioDirector Help
Note: the entire audio file's waveform is selected by default when this feature
is opened. If you want to apply this feature to the entire audio file, you do not
need to use range selection when the entire waveform is selected.
5. To adjust the length of the audio, do one of the following:
Manually enter the New audio length in the field provided. Use this feature if
you want the audio to be an exact specified length.
Use the Speed multiplier slider to speed the audio up by up to 10X, or slow it
down up to 0.1X. Dragging it left to slows down and lengthens the clip.
Dragging it right speeds it up and shortens the clip.
Note: if required, you can use both the New audio length and Speed
multiplier features together to adjust the length of the audio.
6. Select the Keep pitch option to have CyberLink AudioDirector maintain the
pitch of the original audio, so that the adjusted result does not sound sped up
or slowed down.
Note: Keep pitch is only available if the change to the audio's length is
between 0.5X and 2X.
7. If required, you can preview the adjusted audio by selecting Adjusted result
and then clicking the play button on the playback controls. Select Original
audio if you want to play the audio at its original length.
8. Click Apply to adjust the length of the audio.
Shifting Pitch
Use the Pitch Shifter feature to change the pitch of the audio. The resulting effect is
audio that sounds like it is sped up or slowed down, without changing the length of
the audio.
To shift the pitch of audio, do this:
1. Select the media file in the library that you want to adjust.
2. Click the Edit button, and then Pitch S hifter under the Adjust Audio section.
3. Decide whether you want to perform the adjustment on all the available
channels, or just one channel. See Selecting Channels for Editing for more
information on selecting channels.

44
Adjusting Audio
4. If required, use range selection to select the portion of audio you want to
adjust the pitch in. If you don't select a range, the adjustment is applied to the
entire audio file. See Range Selection for more information on selecting a
range of an audio file.
Note: the entire audio file's waveform is selected by default when this feature
is opened. If you want to apply this feature to the entire audio file, you do not
need to use range selection when the entire waveform is selected.
5. Drag the Semitones slider to adjust the pitch up or down as required.
Note: increasing/decreasing by one semitone is equivalent to changing the
overall the pitch up/down one musical note in a 12-tone scale. For example,
C to C# (sharp) or C to Cb (flat).
6. If required, you can preview how the adjusted audio will sound by selecting
Adjusted result and then clicking the play button on the playback controls.
Select Original audio if you want to play the audio at its original pitch.
7. Click Apply to adjust the pitch of the audio.
Using the Pitch Bender
Use the Pitch Bender to bend the pitch of the audio by changing its tempo.
To bend the pitch of audio, do this:
1. Select the media file in the library that you want to adjust.
2. Click the Edit button, and then Pitch B ender under the Adjust Audio section.
3. Decide whether you want to perform the adjustment on all the available
channels, or just one channel. See Selecting Channels for Editing for more
information on selecting channels.
4. If required, use range selection to select the portion of audio you want to
bend the pitch in. If you don't select a range, the adjustment is applied to the
entire audio file. See Range Selection for more information on selecting a
range of an audio file.
Note: the entire audio file's waveform is selected by default when this feature
is opened. If you want to apply this feature to the entire audio file, you do not
need to use range selection when the entire waveform is selected.
5. Select a preset from the Presets drop-down. Select the preset that best suits
the sound you want to achieve.
45
CyberLink AudioDirector Help
Note: the purple line, or envelope, that displays on the timeline is a visual
representation of the change in tempo in the audio.
6. If required, you can manually adjust the tempo at a point in the audio by
clicking and dragging on the envelope on the timeline. Drag it up to increase
the tempo, or down to decrease it.
7. If required, click to modify the advanced settings as follows:
Spline curves: when selected, this option enables a change in tempo that is
more gradual with the use of a spline curve. Deselect this option if you want
the change in tempo to be more sudden, i.e. a straight line.
Range (Semitone): drag the this slider to adjust the range of the envelope.
Drag it left to decrease the length of the envelope (and the new audio), or
right to increase it.
Note: once you are done modifying the advanced settings, you can click
to save your changes as a new preset. The new preset will be available
in the Presets drop-down so you can use it on future audio files.
8. If required, you can preview how the adjusted audio will sound by selecting
Adjusted result and then clicking the play button on the playback controls.
Select Original audio if you want to play the audio at its original pitch.
9. Click Apply to bend the pitch of the audio.
Inserting Silence
Use the Insert Silence feature to add a specified amount of silence into audio clips.
To insert silence into audio, do this:
Note: you can also silence a range of audio by selecting it, right clicking on
the selection, and then selecting Silence Selected. This does not insert a
range of silence, but rather silences the selected audio.
1. Select the media file in the library that you want to add silence to.
2. Click the Edit button, and then I nser t S ilence under the Adjust Audio section.
3. Decide whether you want to perform insert the silence on all the available
channels, or just one channel. See Selecting Channels for Editing for more
information on selecting channels.

46
Adjusting Audio
4. Drag the timeline slider to the position in the audio clip where you want to
insert the silence.
5. Enter the duration, in seconds, of the silence to be inserted in the field
provided.
6. Click Apply to insert the silence.
Inserting Noise
Use the Insert Noise feature to add a specified amount of generated noise, or static,
into audio clips.
To insert noise into audio, do this:
1. Select the media file in the library that you want to add noise to.
2. Click the Edit button, and then I nser t N oise under the Adjust Audio section.
3. Decide whether you want to perform insert the noise on all the available
channels, or just one channel. See Selecting Channels for Editing for more
information on selecting channels.
4. Drag the timeline slider to the position in the audio clip where you want to
insert the noise.
5. Select one of the following types of noise from the Noise type drop-down:
Normal: common white noise, or static, which can be quite loud to the
listener.
Pink: static like noise that sounds softer and quieter than normal white noise.
Brown: a lower frequency static like noise, which is quite quiet compared to
the others.
6. Enter the duration, in seconds, of the noise to be inserted in the field
provided.
7. Click Apply to insert the noise.
Reversing Audio
Use the Reverse feature to make a selected audio clip play in reverse.
To reverse audio, do this:

47
CyberLink AudioDirector Help
1. Select the media file in the library that you want to reverse.
2. Click the Edit button, or Mix if you are in the Mix room, and then Reverse
under the Adjust Audio section.
3. Decide whether you want to perform reverse the audio on all the available
channels, or just one channel. See Selecting Channels for Editing for more
information on selecting channels.
4. If required, use range selection to select the portion of audio you want to
reverse. If you don't select a range, the adjustment is applied to the entire
audio file. See Range Selection for more information on selecting a range of
an audio file.
Note: the entire audio file's waveform is selected by default when this feature
is opened. If you want to apply this feature to the entire audio file, you do not
need to use range selection when the entire waveform is selected.
5. If required, you can preview how the reversed audio will sound by selecting
Adjusted result and then clicking the play button on the playback controls.
Select Original audio if you want to play the original audio.
6. Click Apply to reverse the audio in the selected clip.
Ambience Match
Use the Ambience Match feature to add ambience, or background noise, into your
audio and video clips. You can also use this feature to extract the ambience from a
clip.
To use Ambience Match on audio, do this:
1. Select the media file in the library that you want to use.
2. Click the Edit button, or Mix if you are in the Mix room, and then Ambience
Match under the Adjust Audio section.
3. Select one of the following options:
Add Ambience: select this option if you want add background noise into an
existing video or audio clip. See Adding Ambience for more information.
Extract Ambience: select this option to extract the background noise in a
media clip. See Extracting Ambience for more information.
4. If required, use range selection to select the portion of audio you want to add
or extract ambience. See Range Selection for more information on selecting a

48
Adjusting Audio
range of an audio file. If you don't select a range, the entire audio clip will be
used.
Note: the entire audio file's waveform is selected by default when this feature
is opened. If you want to apply this feature to the entire audio file, you do not
need to use range selection when the entire waveform is selected.
5. If required, you can preview how the resulting audio will sound by selecting
Adjusted result and then clicking the play button on the playback controls.
Select Original audio if you want to play the original audio.
6. Click Apply to add/extract the ambience in the selected clip.
Adding Ambience
To add ambience to selected audio, do this:
1. Click the Edit button, or Mix if you are in the Mix room, and then Ambience
Match to open the Ambience Match window.
2. Select the Add Ambience button.
3. Select a type of ambience from the drop down.
Note: click the Ambience button to listen to a preview of each ambience in
the drop down lost.
4. Use the Level slider to set the volume level of the added ambience, as
required.
5. If required, you can preview the audio with the added ambience by selecting
Adjusted result and then clicking the Preview button. Select Original audio if
you want to play the original audio.
6. Click Apply to add the ambience.
Extracting Ambience
The extract ambience feature can be used to:
extract the ambience from a media clip and then save it as a preset. This
ambience preset can be added to other clips as required.
extract the ambience from a selected range, and then apply it to another
range in the same clip.

49
CyberLink AudioDirector Help
Saving Ambience as a Preset
To extract ambience from selected audio and save it as a preset, do this:
1. Click the Edit button, or Mix if you are in the Mix room, and then Ambience
Match to open the Ambience Match window.
2. Select the Extract Ambience button.
3. Click the Analyze button.
Note: click the Ambience button to listen to a preview of the extracted
ambience.
4. Use the Level slider to set the volume level of the extracted ambience, as
required.
5. Click the Save as Preset.
6. Enter a name for the new ambience preset and then click OK.
7. Click the Cancel button to exit the Ambience Match window.
Extracting and Applying Ambience to Same
Clip
To extract ambience from selected range and then apply it to the same clip, do this:
1. Click the Edit button, or Mix if you are in the Mix room, and then Ambience
Match to open the Ambience Match window.
2. Select the Extract Ambience button.
3. Use range selection to select the portion of audio where you want to extract
the ambience. See Range Selection for more information on selecting a range
of an audio file.
4. Click the Analyze button.
Note: click the Ambience button to listen to a preview of the extracted
ambience.
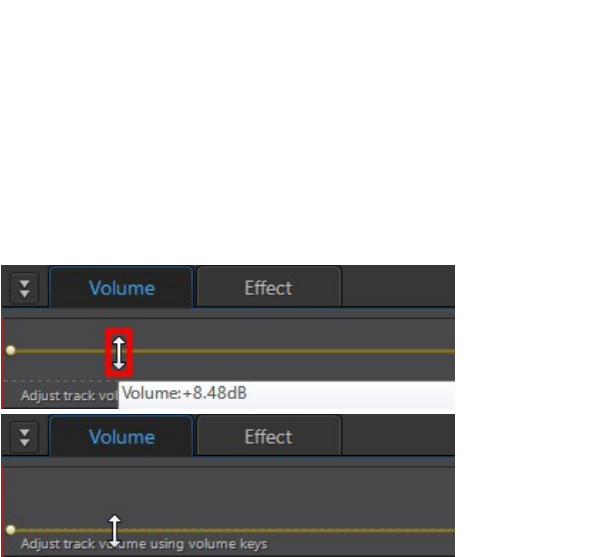
50
Adjusting Audio
5. Use the Level slider to set the volume level of the extracted ambience, as
required.
6. Use range selection to select a different portion of audio where you want to
apply the extracted ambience.
7. If required, you can preview the audio with the applied ambience by selecting
Adjusted result and then clicking the Preview button. Select Original audio if
you want to play the original audio.
8. Click Apply to apply the extracted ambience on the selected range.
Adjusting the Master Volume
On the Volume tab in the keyframe panel, you can manually adjust the volume
level of an audio file at any point in the timeline.
Adjusting Volume for Entire Clip Duration
To adjust the volume level for the entire duration of a clip in the timeline, just click
and drag the audio level line up or down as required. Dragging the line up increases
the volume. Dragging it down decreases the volume.

51
CyberLink AudioDirector Help
Using Volume Keyframes to Mix Audio Level
If you want to use volume keyframes to mix audio in the timeline, hold down the
Ctrl key on your keyboard and then click on the audio level line at the point where
you want to change the audio level. Drag the volume keyframe up to increase the
volume, or down to decrease the volume.
Note: to remove a volume keyframe, drag it outside the border of the volume
keyframe area.
Preview your edited audio and once you are satisfied with the result, you are ready
to save/produce it as a new audio file. See Producing Audio for more information.
Panning Audio Left/Right
On the Volume tab in the keyframe panel, you can manually balance audio by
panning it to the left or right channel, reducing the volume of the audio in the
respective channel.
Note: when panning 5.1 or 7.1 audio, the center channels are not affected.
Panning Audio for Entire Clip Duration
To pan the audio level for the entire duration of a clip in the timeline, just click and
drag the pan audio line up or down as required. Dragging the audio level line up
pans the audio left. Dragging it down pans it right.
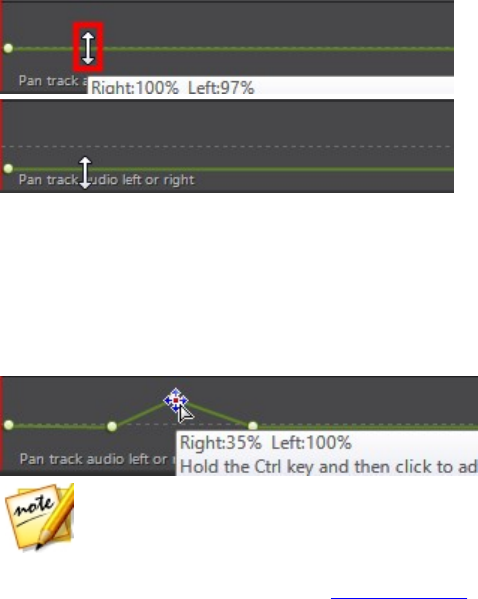
52
Adjusting Audio
Using Volume Keyframes to Pan Audio
If you want to use volume keyframes to pan audio in the timeline at specific
intervals, hold down the Ctrl key on your keyboard and then click on the pan audio
line at the point where you want to pan the audio. Drag the volume keyframe up to
pan the audio left, or down to pan it right.
Note: to remove a volume keyframe, drag it outside the border of the pan
audio keyframe area.
Preview your edited audio and once you are satisfied with the result, you are ready
to save/produce it as a new audio file. See Producing Audio for more information.

53
CyberLink AudioDirector Help
Applying Audio Effects
Chapter 7:
In CyberLink AudioDirector you can choose from a number of default effects and
apply them to your audio files. You can also import custom VST plugin effects that
you downloaded and apply them to your audio.
Note: when you apply effects to audio, they are not applied to the original file,
as you must produce it as a new file in the Produce window. See Producing
the Audio for more information.
Using Dynamic Range Control
Use Dynamic Range Control to adjust the shaping of the dynamics in your audio.
To use dynamic range compression on audio, do this:
1. Select the media file in the library that you want to use dynamic range
compression on.
2. If required, use range selection to select the portion of audio you want to
apply the effect to. See Range Selection for more information on selecting a
range of an audio file. If you don't select a range, the effect is applied to the
entire audio clip.
Note: the entire audio file's waveform is selected by default when this feature
is opened. If you want to apply this feature to the entire audio file, you do not
need to use range selection when the entire waveform is selected.
3. Decide whether you want to apply the effect on all the available channels, or
just one channel. See Selecting Channels for Editing for more information on
selecting channels.
4. Click the Edit button, or Mix if you are in the Mix room, and then Dynamic
R ange Control under the Apply Effect section.
5. Use the Output Gain slider to adjust the output gain for the processed file to
make up for a decrease in the audio's volume.
6. Use the control sliders as follows:
Note: see Common Dynamic Range Controls below of a description of what
each available slider does in the Dynamic Range Control window.

54
Applying Audio Effects
Limiter: adjust these sliders to aggressively limit high level signals. You can
use the limiter to prevent clipping or distortion.
Compressor: use these sliders to apply more gentle dynamic control to
medium level signals and peaks.
Gate/Expander: use these sliders to boost (expand) the level of soft signals.
Note that the expander can have a ratio greater or less than 1.0. When the ratio
is greater than 1, it is operating as a gate and any signals below the threshold
will be decreased in volume.
7. If required, you can preview how the applied effect will sound by selecting
Adj usted r esult and then clicking the Preview button. Select Original audio if
you want to preview the original audio.
8. Click Apply to apply the dynamic range control.
Note: if required, click on the Effect tab to see the applied effect in the edit
panel. See Effect Tab for more information.
Common Dynamic Range Controls
When using the Dynamic Range Control sliders, adjusting these common control
sliders will have the resulting effects:
Threshold: use to set the point where the dynamics processing takes place.
Ratio: use to set the ratio for its respective dynamics section. Higher ratios will
result in more extreme compression, limiting or expansion.
Attack: use to set how quickly the compressor, limiter or expander/gate reacts
(in milliseconds) to an incoming signal when the signal passes the specified
threshold.
Release: use to set how quickly the module stops applying compression,
limiting or expansion/gating when the signal falls below the threshold.
Adding Delays
Use the Delay effect to add analog and tape-style echoes to your tracks. This
vintage gear-inspired delay unit has unique features, including a delay meter that
lets you see and adjust the level and spacing of each echo generated.

55
CyberLink AudioDirector Help
To add a delay to audio, do this:
1. Select the media file in the library that you want to add the delay to.
2. If required, use range selection to select the portion of audio you want to
apply the effect to. See Range Selection for more information on selecting a
range of an audio file. If you don't select a range, the effect is applied to the
entire audio clip.
Note: the entire audio file's waveform is selected by default when this feature
is opened. If you want to apply this feature to the entire audio file, you do not
need to use range selection when the entire waveform is selected.
3. Decide whether you want to apply the effect on all the available channels, or
just one channel. See Selecting Channels for Editing for more information on
selecting channels.
4. Click the Edit button, or Mix if you are in the Mix room, and then Delay under
the Apply Effect section.
5. Select a delay preset from the Presets drop-down. Select the preset that best
suits the sound you want to achieve.
6. If required, click to modify the advanced settings as follows:
Delay Time: sets the delay time in milliseconds by default.
Dry Out: sets the output gain of the dry signal without delay added to the
signal.
Wet Out: sets the output gain of the wet/delayed signal.
Feedback: sets the gain of the delay feedback. Higher values will result in
longer audible feedback times, i.e. more repeats.
Note: once you are done modifying the advanced settings, you can click
to save your changes as a new preset. The new preset will be available
in the Presets drop-down so you can use it on future audio files.
7. If required, you can preview how the applied effect will sound by selecting
Adjusted result and then clicking the Preview button on the playback
controls. Select Original audio if you want to play the original audio.
8. Click Apply to add the delay to the audio.
Note: if required, click on the Effect tab to see the applied effect in the edit
panel. See Effect Tab for more information.

56
Applying Audio Effects
Adding Reverb
Use Reverb to apply an effect that reverberates the original audio, i.e. applies an
echo-like effect to it.
To add reverb to audio, do this:
1. Select the media file in the library that you want to apply the reverb effect to.
2. If required, use range selection to select the portion of audio you want to
apply the effect to. See Range Selection for more information on selecting a
range of an audio file. If you don't select a range, the effect is applied to the
entire audio clip.
Note: the entire audio file's waveform is selected by default when this feature
is opened. If you want to apply this feature to the entire audio file, you do not
need to use range selection when the entire waveform is selected.
3. Decide whether you want to apply the effect on all the available channels, or
just one channel. See Selecting Channels for Editing for more information on
selecting channels.
4. Click the Edit button, or Mix if you are in the Mix room, and then Reverb
under the Apply Effect section.
5. Select a reverb preset from the Presets drop-down. Select the preset that best
suits the sound you want to achieve.
6. If required, click to modify the advanced settings as follows:
use the Sparkle slider to add a grainy sound to the audio. The more sparkle
applied, the grainier it will sound.
use the Room width slider to widen a stereo audio signal without disturbing
the low frequencies. This allows you to control the perceived location of the
sound, ranging from a more centered source to one that is wider left and
right.
use the Room size slider to add reverberation to the audio signal, simulating it
being played in a room. Larger values will simulate a larger room.
use the Dry-Wet mix slider to set the ratio between the dry (original direct
sound) and wet (reflected sound) audio. Adjusting the mix can help change
the perceived distance of the audio from the listener, giving the audio spatial
depth.

57
CyberLink AudioDirector Help
Note: once you are done modifying the advanced settings, you can click
to save your changes as a new preset. The new preset will be available
in the Presets drop-down so you can use it on future audio files.
7. If required, you can preview how the applied effect will sound by selecting
Adjusted result and then clicking the play button on the playback controls.
Select Original audio if you want to play the original audio.
8. Click Apply to add the reverb effect to the audio.
Note: if required, click on the Effect tab to see the applied effect in the edit
panel. See Effect Tab for more information.
Creating a Phase Effect
Use the Phaser to create a phase effect, which is produced by splitting an audio
signal and then filtering it by shifting the signal's phase to and from the audio's
frequency. This modified (wet) audio signal is then mixed back together with the
original (dry) audio, giving the audio a watery or sweeping sound.
To add a phase effect to audio, do this:
1. Select the media file in the library that you want to apply the phase effect to.
2. If required, use range selection to select the portion of audio you want to
apply the effect to. See Range Selection for more information on selecting a
range of an audio file. If you don't select a range, the effect is applied to the
entire audio clip.
Note: the entire audio file's waveform is selected by default when this feature
is opened. If you want to apply this feature to the entire audio file, you do not
need to use range selection when the entire waveform is selected.
3. Decide whether you want to apply the effect on all the available channels, or
just one channel. See Selecting Channels for Editing for more information on
selecting channels.
4. Click the Edit button, or Mix if you are in the Mix room, and then Phaser under
the Apply Effect section.
5. Select a phaser preset from the Presets drop-down. Select the preset that best
suits the sound you want to achieve.
6. If required, click to modify the advanced settings as follows:
58
Applying Audio Effects
Stage count: from the drop-down, select the number of stages, or phase
shifting filters, that are applied to the audio signal. The more stages you
select, the more dense sounding the phase effect will be.
Delay depth: use the slider to set how much the filters sweep below the source
frequency. The larger the delay depth, the more of a trembling effect it will
have on the audio.
Modulation rate: use the slider to control how quickly (measured in hertz, or
cycles per second) the filters sweep to and from the source frequency of the
audio.
Feedback: use the slider to set the percentage of the phaser output that is fed
back in to the original audio. A negative value will invert the phase waveform
before feeding the audio back, reducing the loudness of the audio.
Dry-Wet mix: use the slider to set the ratio between the dry (original audio)
and wet (modified/filtered sound) audio. Dragging the slider to the left
provides more of the original audio in the mix, while to the right adds more of
the modified audio.
Note: once you are done modifying the advanced settings, you can click
to save your changes as a new preset. The new preset will be available
in the Presets drop-down so you can use it on future audio files.
7. If required, you can preview how the applied effect will sound by selecting
Adj usted r esult and then clicking the play button on the playback controls.
Select Original audio if you want to play the original audio.
8. Click Apply to add the phase effect to the audio.
Note: if required, click on the Effect tab to see the applied effect in the edit
panel. See Effect Tab for more information.
Creating a Flange Effect
The flange effect is a time delay effect that is created by mixing two audio channels
together, after performing a phase shift on one of the channels and then slightly
delaying its signal. This produces a subtle swirling or psychedelic sound effect in
the audio.
To add a flange effect to audio, do this:
1. Select the media file in the library that you want to apply the flange effect to.

59
CyberLink AudioDirector Help
2. If required, use range selection to select the portion of audio you want to
apply the effect to. See Range Selection for more information on selecting a
range of an audio file. If you don't select a range, the effect is applied to the
entire audio clip.
Note: the entire audio file's waveform is selected by default when this feature
is opened. If you want to apply this feature to the entire audio file, you do not
need to use range selection when the entire waveform is selected.
3. Decide whether you want to apply the effect on all the available channels, or
just one channel. See Selecting Channels for Editing for more information on
selecting channels.
4. Click the Edit button, or Mix if you are in the Mix room, and then Flanger
under the Apply Effect section.
5. Select a flanger preset from the Presets drop-down. Select the preset that best
suits the sound you want to achieve.
6. If required, click to modify the advanced settings as follows:
Initial delay time: use this slider to set how far behind, in milliseconds, the
audio with the flange effect applied will start behind the original audio signal.
Delay depth: use this slider to control the depth of the pitch that is applied to
the effect.
Phase diff: use this slider to set the phase difference between the two channels
(0~360 deg).
Feedback: use the slider to set the percentage of the delayed output that is
fed back in to the original audio. Adjusting this option can greatly intensify
the effect.
Modulation rate: use the slider to control how quickly (measured in hertz, or
cycles per second) the filters sweep to and from the source frequency of the
audio.
Shape: select the shape of the transition from the initial delay time to final
delay, and then back again. Sine makes the transition follow a sine wave,
while Triangle makes it follow a triangle wave.
Dry-Wet mix: use the slider to set the ratio between the dry (original audio)
and wet (delayed flanged audio signal) audio. Dragging the slider to the left
provides more of the original audio in the mix, while to the right adds more of
the modified audio.
60
Applying Audio Effects
Note: once you are done modifying the advanced settings, you can click
to save your changes as a new preset. The new preset will be available
in the Presets drop-down so you can use it on future audio files.
7. If required, you can preview how the applied effect will sound by selecting
Adj usted r esult and then clicking the play button on the playback controls.
Select Original audio if you want to play the original audio.
8. Click Apply to add the flange effect to the audio.
Note: if required, click on the Effect tab to see the applied effect in the edit
panel. See Effect Tab for more information.
Adding a Chorus Effect
In CyberLink AudioDirector you can make your audio sound richer by adding a
chorus effect to it. This is done by adding some delays and feedback, so it sounds
as if multiple audio sources, voices, or instruments are playing together.
To add a chorus effect to audio, do this:
1. Select the media file in the library that you want to apply the chorus effect to.
2. If required, use range selection to select the portion of audio you want to
apply the effect to. See Range Selection for more information on selecting a
range of an audio file. If you don't select a range, the effect is applied to the
entire audio clip.
Note: the entire audio file's waveform is selected by default when this feature
is opened. If you want to apply this feature to the entire audio file, you do not
need to use range selection when the entire waveform is selected.
3. Decide whether you want to apply the effect on all the available channels, or
just one channel. See Selecting Channels for Editing for more information on
selecting channels.
4. Click the Edit button, or Mix if you are in the Mix room, and then Chorus under
the Apply Effect section.
5. Select a chorus preset from the Presets drop-down. Select the preset that best
suits the sound you want to achieve.
6. If required, click to modify the advanced settings as follows:

61
CyberLink AudioDirector Help
Voices count: use this slider if you want to increase the perceived number of
voices in the audio. As you drag the slider right, the number of voices heard in
the audio increases.
Initial delay time: use this slider to set how far behind, in milliseconds, the
audio with the chorus effect applied will start behind the original audio signal.
Delay depth: use this slider to control the range of sweeping in each
modulation period.
Modulation rate: use the slider to control how quickly (measured in hertz, or
cycles per second) the filters sweep to and from the source frequency of the
audio.
Decay: use the slider to set the amount of decay on the effect, or the relative
strength/amplitude (to the original) of the copied effect. Adjusting this option
can greatly intensify the effect.
Dry: use this slider to set the amount of original audio that will be in the
adjusted audio.
Wet: use the slider to set the amount of wet (audio with chorus effect applied)
audio that will be in the adjusted audio.
Note: once you are done modifying the advanced settings, you can click
to save your changes as a new preset. The new preset will be available
in the Presets drop-down so you can use it on future audio files.
7. If required, you can preview how the applied effect will sound by selecting
Adj usted r esult and then clicking the play button on the playback controls.
Select Original audio if you want to play the original audio.
8. Click Apply to add the chorus effect to the audio.
Note: if required, click on the Effect tab to see the applied effect in the edit
panel. See Effect Tab for more information.
Adding an Echo Effect
In CyberLink AudioDirector you can add an echo to your audio, by adding a series
of delayed and decaying sources of the original audio to it.
To add an echo effect to audio, do this:
1. Select the media file in the library that you want to apply the echo effect to.
62
Applying Audio Effects
2. If required, use range selection to select the portion of audio you want to
apply the effect to. See Range Selection for more information on selecting a
range of an audio file. If you don't select a range, the effect is applied to the
entire audio clip.
Note: the entire audio file's waveform is selected by default when this feature
is opened. If you want to apply this feature to the entire audio file, you do not
need to use range selection when the entire waveform is selected.
3. Decide whether you want to apply the effect on all the available channels, or
just one channel. See Selecting Channels for Editing for more information on
selecting channels.
4. Click the Edit button, or Mix if you are in the Mix room, and then Echo under
the Apply Effect section.
5. In the window that displays, select the echo preset from the Presets drop-
down. Select the preset that best suits the sound you want to achieve.
6. If required, click to modify the advanced settings as follows:
Initial delay time: use this slider to set how far behind, in milliseconds, the
audio with the echo effect applied will start behind the original audio signal.
Feedback: use this slider to set the ratio that determines how long the echoed
sound will last. Dragging the slider left produces less of an echo, while
dragging it right can produce an echo that never seems to fade out.
Equalizer: use these sliders to adjust the room characteristics where the audio
is being reflected to create the echo. More reflective surfaces create a brighter
sound, while a room with absorbent walls creates an echo that is a lot darker.
Note: once you are done modifying the advanced settings, you can click
to save your changes as a new preset. The new preset will be available
in the Presets drop-down so you can use it on future audio files.
7. If required, you can preview how the applied effect will sound by selecting
Adj usted r esult and then clicking the play button on the playback controls.
Select Original audio if you want to play the original audio.
8. Click Apply to add the echo effect to the audio.
Note: if required, click on the Effect tab to see the applied effect in the edit
panel. See Effect Tab for more information.
63
CyberLink AudioDirector Help
Transforming Vocals
Use the Vocal Transformer effect to transform the voice in a media clip.
To transform the voice in a media clip, do this:
Note: for the best results, it is recommended that the audio only contains the
sound of voice, as the effect can affect the other audio harmonics in the clip.
1. Select the media file in the library that you want to transform the vocals in.
2. If required, use range selection to select the portion of audio you want to
apply the effect to. See Range Selection for more information on selecting a
range of an audio file. If you don't select a range, the effect is applied to the
entire audio clip.
Note: the entire audio file's waveform is selected by default when this feature
is opened. If you want to apply this feature to the entire audio file, you do not
need to use range selection when the entire waveform is selected.
3. Decide whether you want to apply the effect on all the available channels, or
just one channel. See Selecting Channels for Editing for more information on
selecting channels.
4. Click the Edit button, or Mix if you are in the Mix room, and then Vocal
Transformer under the Apply Effect section.
5. Select one of the Presets from the drop down. Each preset provides a different
effect to the voice.
6. If required, click to modify the advanced settings as follows:
Pitch: use this slider to adjust the pitch of the transformed voice. Dragging the
slider right will make the voice higher, while dragging it left will make it
deeper.
Timbre: use this slider to adjust the tone quality of the voice. Adjusting this
slider can significantly change the characteristics of the voice.
Note: if you selected the Custom preset, you can then select Robot voice
and/or Duck voice as a starting point for the custom voice you create using
the above settings. Once you are done modifying the advanced settings, you
can click to save your changes as a new preset. The new preset will be
available in the Presets drop-down so you can use it on future audio files.

64
Applying Audio Effects
7. If required, you can preview how the applied effect will sound by selecting
Adjusted result and then clicking the play button on the playback controls.
Select Original audio if you want to play the original audio.
8. Click Apply to apply the effect to the audio.
Note: if required, click on the Effect tab to see the applied effect in the edit
panel. See Effect Tab for more information.
Using the Equalizer
Select Equalizer effect to apply preset equalizer filters on your audio. You can also
fully customize the overall sound of your audio using the available sliders.
To use the equalizer on audio, do this:
1. Select the media file in the library that you want to use the equalizer on.
2. If required, use range selection to select the portion of audio you want to
apply the effect to. See Range Selection for more information on selecting a
range of an audio file. If you don't select a range, the effect is applied to the
entire audio clip.
Note: the entire audio file's waveform is selected by default when this feature
is opened. If you want to apply this feature to the entire audio file, you do not
need to use range selection when the entire waveform is selected.
3. Decide whether you want to apply the effect on all the available channels, or
just one channel. See Selecting Channels for Editing for more information on
selecting channels.
4. Click the Edit button, or Mix if you are in the Mix room, and then Equalizer
under the Apply Effect section.
5. If required, select an equalizer preset from the Presets drop down. Equalizer
presets can enhance audio, and the preset you should select depends on the
type of audio or genre of music you are editing.
6. If required, click to modify the advanced settings by dragging the
equalizer sliders to customize the audio effect applied.
Note: once you are done modifying the advanced settings, you can click
to save your changes as a new preset. The new preset will be available
in the Presets drop-down so you can use it on future audio files.

65
CyberLink AudioDirector Help
7. If required, you can preview how the applied effect will sound by selecting
Adj usted r esult and then clicking the Preview button. Select Original audio if
you want to play the original audio.
8. Click Apply to apply the equalizer effect to the audio.
Note: if required, click on the Effect tab to see the applied effect in the edit
panel. See Effect Tab for more information.
Using the Stereo Expander
Use the Stereo Expander to expand and pan audio for better spatial sounding audio.
To use the stereo expander, do this:
1. Select the media file in the library that you want to use the stereo expander
on.
Note: you can use audio with any number of channels. However, mono audio
will be converted to stereo and only the center, left, and right channels are
affected in 5.1/7.1 channel audio.
2. If required, use range selection to select the portion of audio you want to
apply the effect to. See Range Selection for more information on selecting a
range of an audio file. If you don't select a range, the effect is applied to the
entire audio clip.
Note: the entire audio file's waveform is selected by default when this feature
is opened. If you want to apply this feature to the entire audio file, you do not
need to use range selection when the entire waveform is selected.
3. Click the Edit button, or Mix if you are in the Mix room, and then Stereo
Expander under the Apply Effect section.
4. If you're using a mono audio clip, CyberLink AudioDirector will ask you if you
want to convert it to stereo. Click Yes to proceed.
5. Select a preset from the Presets drop-down. Select the preset that best suits
the sound you want to achieve.
6. If required, click to modify the advanced settings as follows:
Pan with center channel: use this slider to pan the audio from the center
channel, left or right as required, until the audio sounds balanced.

66
Applying Audio Effects
Expand: use this slider to expand the range of the audio in the affected
channels. Drag it right to expand it wider, or left to make it narrower.
Note: once you are done modifying the advanced settings, you can click
to save your changes as a new preset. The new preset will be available
in the Presets drop-down so you can use it on future audio files.
7. If required, you can preview how the applied effect will sound by selecting
Adj usted r esult and then clicking the play button on the playback controls.
Select Original audio if you want to play the original audio.
8. Click Apply to add the echo effect to the audio.
Note: if required, click on the Effect tab to see the applied effect in the edit
panel. See Effect Tab for more information.
Applying the Radio Effect
Use the Radio effect to apply a filter to your audio that mimics the sound of a radio.
To apply the radio effect to audio, do this:
1. Select the media file in the library that you want to apply the radio effect to.
2. If required, use range selection to select the portion of audio you want to
apply the effect to. See Range Selection for more information on selecting a
range of an audio file. If you don't select a range, the effect is applied to the
entire audio clip.
Note: the entire audio file's waveform is selected by default when this feature
is opened. If you want to apply this feature to the entire audio file, you do not
need to use range selection when the entire waveform is selected.
3. Decide whether you want to apply the effect on all the available channels, or
just one channel. See Selecting Channels for Editing for more information on
selecting channels.
4. Click the Edit button, or Mix if you are in the Mix room, and then Radio under
the Apply Effect section.
5. Select the Radio type from the drop down. Each type provides a slightly
different effect to your audio.
6. If required, you can preview how the applied effect will sound by selecting
Adjusted result and then clicking the play button on the playback controls.
Select Original audio if you want to play the original audio.

67
CyberLink AudioDirector Help
7. Click Apply to apply the radio effect to the audio.
Note: if required, click on the Effect tab to see the applied effect in the edit
panel. See Effect Tab for more information.
Applying the Phone Effect
Use the Phone effect to apply a filter to your audio that mimics the sound over a
phone.
To apply the phone effect to audio, do this:
1. Select the media file in the library that you want to apply the phone effect to.
2. If required, use range selection to select the portion of audio you want to
apply the effect to. See Range Selection for more information on selecting a
range of an audio file. If you don't select a range, the effect is applied to the
entire audio clip.
Note: the entire audio file's waveform is selected by default when this feature
is opened. If you want to apply this feature to the entire audio file, you do not
need to use range selection when the entire waveform is selected.
3. Decide whether you want to apply the effect on all the available channels, or
just one channel. See Selecting Channels for Editing for more information on
selecting channels.
4. Click the Edit button, or Mix if you are in the Mix room, and then Phone under
the Apply Effect section.
5. Select the Phone type from the drop down. Each type provides a slightly
different effect to your audio.
6. If required, you can preview how the applied effect will sound by selecting
Adjusted result and then clicking the play button on the playback controls.
Select Original audio if you want to play the original audio.
7. Click Apply to apply the phone effect to the audio.
Note: if required, click on the Effect tab to see the applied effect in the edit
panel. See Effect Tab for more information.

68
Applying Audio Effects
Applying a Noise Gate
Apply the noise gate if you want to control the volume of a media file's audio signal
by blocking audio that falls below a specified threshold or decibel level. The
resulting audio can then be processed differently from the original audio.
To apply a noise gate to audio, do this:
1. Select the media file in the library that you want to apply the noise gate to.
2. If required, use range selection to select the portion of audio you want to
apply the effect to. See Range Selection for more information on selecting a
range of an audio file. If you don't select a range, the effect is applied to the
entire audio clip.
Note: the entire audio file's waveform is selected by default when this feature
is opened. If you want to apply this feature to the entire audio file, you do not
need to use range selection when the entire waveform is selected.
3. Decide whether you want to apply the effect on all the available channels, or
just one channel. See Selecting Channels for Editing for more information on
selecting channels.
4. Click the Edit button, or Mix if you are in the Mix room, and then Noise Gate
under the Apply Effect section.
5. Select a noise gate preset from the Presets drop-down. Select the preset that
best suits the sound you want to achieve.
6. If required, click to modify the advanced settings as follows:
Threshold: use this slider to determine the minimum input audio level
required to make the noise gate open and pass the audio signal through.
Attack time: use this slider to set the duration that the noise gate takes to
change from closed to open. Attack time is similar to a fade-in.
Release time: use this slider to set the duration it takes for the noise gate to
change from fully open to closed. Release time is similar to a fade-out.
Hold time: use this slider to set the duration the noise gate stays open after
the signal has fallen below the defined threshold.
Note: once you are done modifying the advanced settings, you can click
to save your changes as a new preset. The new preset will be available
in the Presets drop-down so you can use it on future audio files.

69
CyberLink AudioDirector Help
7. If required, you can preview how the applied effect will sound by selecting
Adjusted result and then clicking the play button on the playback controls.
Select Original audio if you want to play the original audio.
8. Click Apply to add the noise gate to the audio.
Note: if required, click on the Effect tab to see the applied effect in the edit
panel. See Effect Tab for more information.
Removing Vocals in Music
Use the Vocal Removal in Music effect to create a karaoke or instrumental version
of your stereo music files.
Note: this effect can only be applied to stereo (two channel) audio files, and
best works on files where the vocals are evenly distributed on both
channels, i.e. panned to the center.
To remove vocals in music, do this:
1. Select the music file in the library that you want to remove the vocals from.
2. If required, use range selection to select the portion of audio you want to
apply the effect to. See Range Selection for more information on selecting a
range of an audio file. If you don't select a range, the effect is applied to the
entire audio clip.
Note: the entire audio file's waveform is selected by default when this feature
is opened. If you want to apply this feature to the entire audio file, you do not
need to use range selection when the entire waveform is selected.
3. Click the Edit button, or Mix if you are in the Mix room, and then Vocal
Removal in Music under the Apply Effect section.
4. If required, you can preview how the applied effect will sound by selecting
Adjusted result and then clicking the play button on the playback controls.
Select Original audio if you want to play the original audio.
5. Click Apply to remove the vocals from the audio.
Note: if required, click on the Effect tab to see the applied effect in the edit
panel. See Effect Tab for more information.

70
Applying Audio Effects
Applying VST Effects
VST plug-in effects are the industry standard for audio processing software. You can
purchase, download and then import VST effects into CyberLink AudioDirector for
use.
Note: check the associated documentation for each VST plugin effect for
detailed information on using these effects.
Importing VST Effects
With VST plug-in effects you can find and add the desired custom effect you want
on your audio. VST plug-in effects are widely available for download from the
Internet, and can easily be imported into CyberLink AudioDirector.
Note: CyberLink does not guarantee the usability of downloaded VST plug-in
effects, nor the quality of the VST modules.
If you have downloaded a VST plug-in effect, do this to import it into CyberLink
AudioDirector:
1. From the menu select File > Import VST Plug-in Effects.
2. Browse to the location where the downloaded VST plugin effect is located.
Note: CyberLink AudioDirector imports VST plug-in effects that are in the
DLL and VST3 formats. If the downloaded effect is in the ZIP format, you
must first unzip it before trying to import it into the program.
3. Select the VST plugin effect and then click Open to import the effect into the
VST section of CyberLink AudioDirector.
Note: Once imported, VST effects are always available in the program every
time it is launched. Right-click on imported VST effects and then select
Remove to remove them from the CyberLink AudioDirector.

71
CyberLink AudioDirector Help
Restoring Audio
Chapter 8:
Click on the Restore button to repair audio clips using the Noise Reduction,
Clipping, Click, Hum, Hiss, or Plosive Removal features. You can also do more
precise and powerful fixing using Visual Repair.
Note: when you are repairing audio, the fixes are not applied to the original
file, as you must produce it as a new file in the Produce window. See
Producing the Audio for more information.
Using Visual Repair
If any of your audio clips have unwanted background sounds, such as sirens, car
alarms, etc., you can use the visual repair feature to remove them. CyberLink
AudioDirector provides several selection tools for you to manually find and select
the unwanted sound using the spectral frequency view. The visual repair feature
also has three different ways to repair audio - auto attenuate, manual attenuate,
and volume adjustment to remove specific unwanted sound.
To access Visual Repair, click the Restore button and then the Visual R epair option
under the Adjustment section.
Regional Selection Tools
CyberLink AudioDirector supplies you with five different selection tools that help
you to choose the regions of an audio clip you want to repair. Once selected, use
the visual repair tools to fix the audio.
Note: these regional selection tools are only available when in the spectral
frequency view. See Spectral Frequency View for more information on
selecting this view.
Time Selection
The time selection tool lets you select a vertical area of the audio clip based on
playback time. This selection tool is similar to the range selection.
To use the time selection tool, do this:

72
Restoring Audio
1. Click the Restore button and then the Visual R epair option under the
Adjustment section.
2. In Visual Repair window, click on the button.
3. Click and drag on the region of the audio clip you want to repair.
CyberLink AudioDirector vertically selects the all of the content in the region
for fixing.

73
CyberLink AudioDirector Help
Note: if you want to select more than one region of the audio clip, just hold
down the Shift key on your keyboard and repeat this step.
4. Click the button to preview only the selected content to ensure it is what
you need to fix.
5. Use the visual repair functions to repair the audio as required. See Repairing
the Audio for more information.
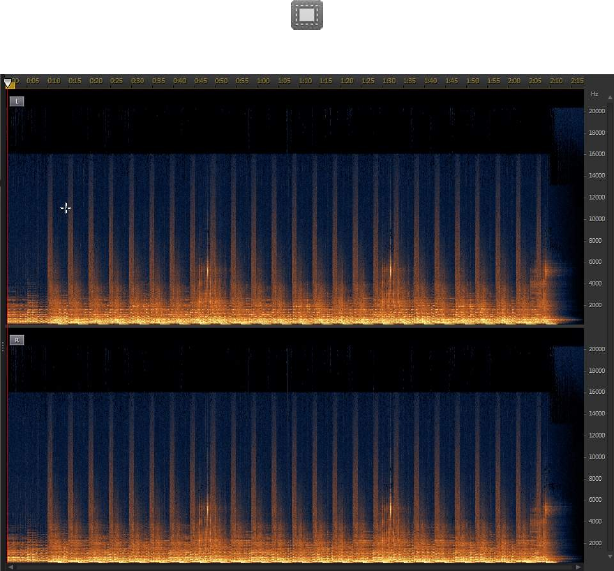
74
Restoring Audio
Time Frequency Selection
Use the time frequency selection tool to choose a more precise area of the audio,
by selecting a rectangular region for fixing.
To use the time frequency selection tool, do this:
1. Click the Restore button and then the Visual R epair option under the
Adjustment section.
2. In Visual Repair window, click on the button.
3. Click and drag on the region of the audio clip you want to repair.
CyberLink AudioDirector highlights the content in a rectangle for fixing.
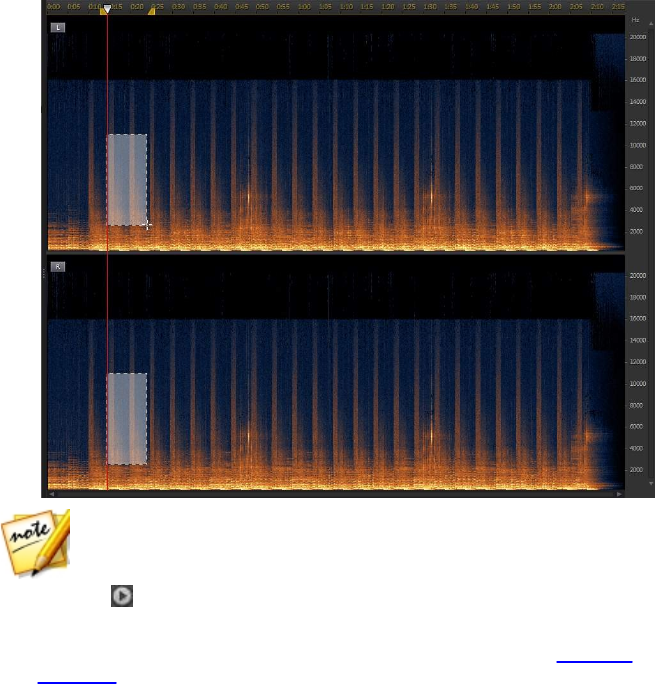
75
CyberLink AudioDirector Help
Note: if you want to select more than one region of the audio clip, just hold
down the Shift key on your keyboard and repeat this step.
4. Click the button to preview only the selected content to ensure it is what
you need to fix.
5. Use the visual repair functions to repair the audio as required. See Repairing
the Audio for more information.

76
Restoring Audio
Frequency Selection
The frequency selection tool lets you select a horizontal area of the audio clip based
on its frequency.
To use the frequency selection tool, do this:
1. Click the Restore button and then the Visual R epair option under the
Adjustment section.
2. In Visual Repair window, click on the button.
3. Click and drag on the region of the audio clip you want to repair.
CyberLink AudioDirector horizontally selects the all of the content in the
region for fixing
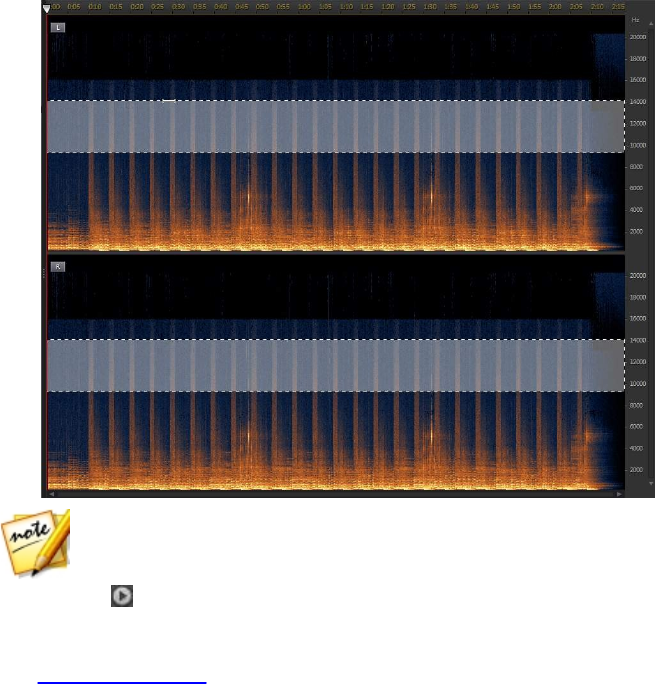
77
CyberLink AudioDirector Help
Note: if you want to select more than one region of the audio clip, just hold
down the Shift key on your keyboard and repeat this step.
4. Click the button to preview only the selected content to ensure it is what
you need to fix.
5. Use the visual repair functions to repair the audio as required. See
Repairing the Audio for more information.
78
Restoring Audio
Magic Wand Selection
The magic wand selection tool helps you to auto select similar attributes (frequency
or amplitude) in the audio clip that may be the area that requires fixing.
To use the magic wand selection tool, do this:
1. Click the Restore button and then the Visual R epair option under the
Adjustment section.
2. In Visual Repair window, click on the button.
3. Click on the region of the audio clip you want to repair.
CyberLink AudioDirector auto selects the similar attributes (frequency or
amplitude) for fixing.
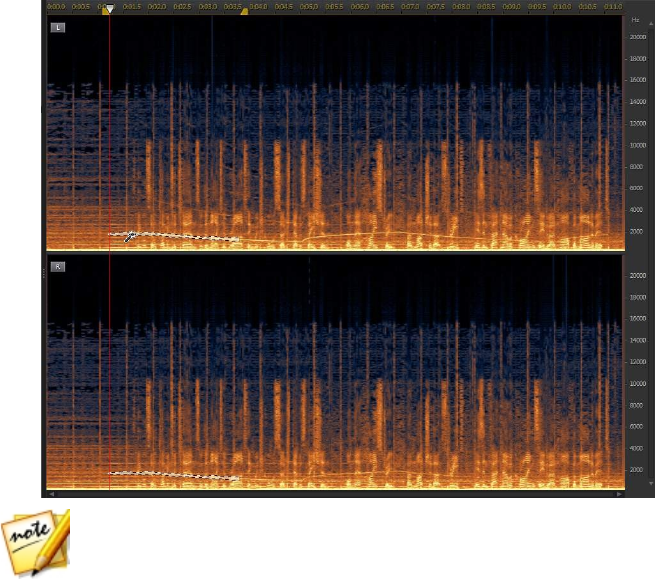
79
CyberLink AudioDirector Help
Note: if you want to select more than one region of the audio clip, just hold
down the Shift key on your keyboard and repeat this step.
4. If required, you can select the Harmonic finder option to have CyberLink
AudioDirector auto select the attributes that have similar harmonic qualities.
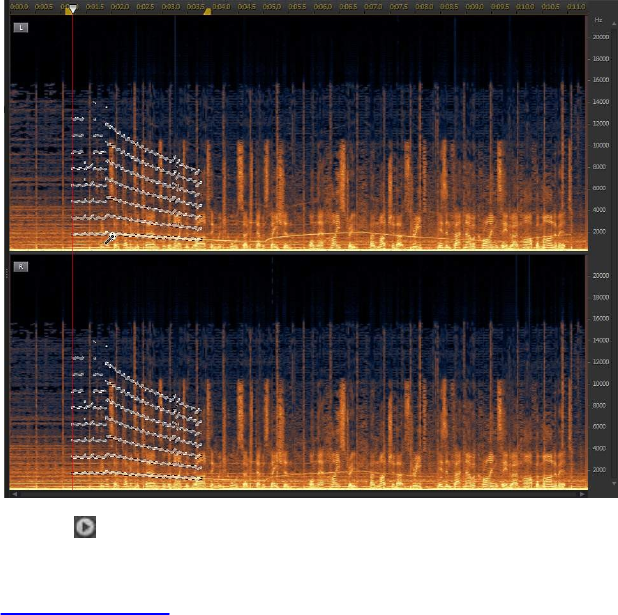
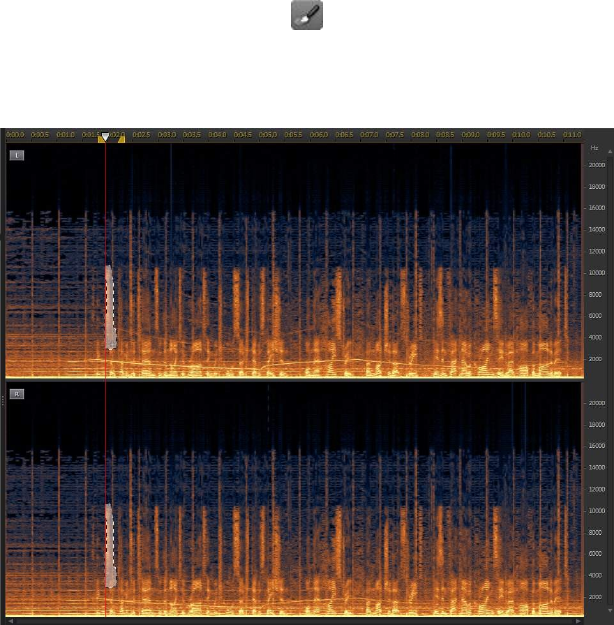
81
CyberLink AudioDirector Help
Brush Selection
You can use the brush selection tool to select, or brush, just the parts of the audio
clip you want to repair.
To use the brush selection tool, do this:
1. Click the Restore button and then the Visual R epair option under the
Adjustment section.
2. In Visual Repair window, click on the button.
3. Use the Size slider to set the width of the area selected by the brush.
4. Click, hold down the mouse button, and then drag the mouse over the all
regions of the audio clip you want to repair.
Let go of the mouse button to finalize the selected area.
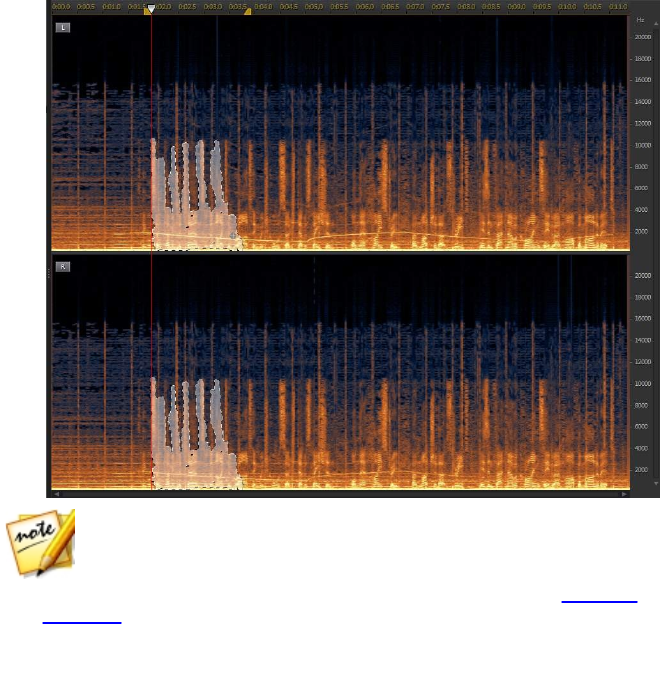
82
Restoring Audio
Note: if you want to select more regions of the audio clip after letting go of
the mouse button, just hold down the Shift key on your keyboard and repeat
this step.
5. Use the visual repair functions to repair the audio as required. See Repairing
the Audio for more information.
Repairing the Audio
Once you have selected the portion of the audio that you want to repair, use one of
the following functions to fix it as required.
Auto Attenuate
The auto attenuate function automatically levels off the selected audio so that it
has the same attributes as the surrounding audio.

83
CyberLink AudioDirector Help
To apply auto attenuate, do this:
1. Click the Restore button and then the Visual R epair option under the
Adjustment section.
2. Use a regional selection tool to select the regions you want to repair.
3. Select the Auto attenuate function.
4. If required, you can preview the repaired audio by selecting Restored
result and then clicking the play button. Select Original audio if you want
to play the original audio.
5. Click Apply to repair the selected audio.
Manual Attenuate
The manual attenuate function lets you manually level off the selected audio so
that it has the same attributes as the surrounding audio.
To apply manual attenuate, do this:
1. Click the Restore button and then the Visual R epair option under the
Adjustment section.
2. Use a regional selection tool to select the regions you want to repair.
3. Select the Manual attenuate function.
4. Use the Strength slider to set the amount of attenuation you want to apply on
the selected area.
5. In the Direction drop-down, select whether you want to level off (attenuate)
the selected area to match the attributes horizontally (above and below) or
vertically (left and right) around it.
6. If required, you can preview the repaired audio by selecting Restored result
and then clicking the play button. Select Original audio if you want to play the
original audio.
7. Click Apply to repair the selected audio.

84
Restoring Audio
Volume Adjustment
Use this function to manually repair the selected audio by adjusting the volume, or
amplitude.
To repair with volume adjustment, do this:
1. Click the Restore button and then the Visual R epair option under the
Adjustment section.
2. Use a regional selection tool to select the regions you want to repair.
3. Select the Volume adjustment function.
4. Use the Volume slider to adjust the volume of the selected area.
5. If required, you can preview the repaired audio by selecting Restored result
and then clicking the play button. Select Original audio if you want to play the
original audio.
6. Click Apply to repair the selected audio.
Using Noise Reduction
Use the Noise Reduction feature if your audio contains unwanted static, or other
background noise. There are two types of noise reduction available: Auto Denoise
and Noise Reduction.
To remove unwanted noise in your audio, do this:
1. Select the media file in the library that you want to remove audio from.
2. Decide whether you want to remove it from all the available channels, or just
one channel. See Selecting Channels for Editing for more information on
selecting channels.
3. Click the Restore button and then Noise Reduction to open the Noise
Reduction window.
4. Select one of the following options:
Auto Denoise: select this option to use audio denoise on audio that was
recorded outdoors, in a room with poor acoustics, in a car, or other noisy
locations. The audio denoise tool uses CLNR (CyberLink Noise Reduction)
technology to automatically improve your audio's quality and reduce

85
CyberLink AudioDirector Help
background noise. Also use it if you have trouble finding an audio sample in
the Noise Reduction feature. See Auto Denoise for more information.
Noise Reduction: select this option to use CyberLink's Noise Reduction
technology to reduce broadband and tonal noise for more natural-sounding
results. CyberLink AudioDirector asks you to manually select an area that
contains the noise, then through analysis helps you remove it from your
audio. See Noise Reduction for more information.
5. Click Next to proceed.
Auto Denoise
To use the Audio Denoise on audio, do this:
1. Click the Restore button and then Noise Reduction to open the Noise
Reduction window.
2. Select the Auto Denoise option.
3. Use the Sensitivity slider to adjust the degree of denoise applied to the audio.
4. Use the Dry-Wet mix slider to set the ratio between the dry (original audio
that includes the unwanted noise) and wet (audio with denoise applied) audio.
Adjusting the mix can balance the original audio and the audio with the
denoise applied, reducing a loss of quality on the audio portion you want to
keep.
5. If required, you can preview the repaired audio by selecting Restored result
and then clicking the Preview button. Select Original audio if you want to
play the original audio.
6. Click Apply to repair the audio.
Noise Reduction
To use the Noise Reduction on audio, do this:
1. Click the Restore button and then Noise Reduction to open the Noise
Reduction window.
2. Select the Noise Reduction option.
3. In step 1, do one of the following:

86
Restoring Audio
Select the first option and then select a range of the audio that only contains
the noise, i.e. devoid of the audio you want to keep in the file. See Range
Selection for more information on selecting a range of an audio file. Next,
click the Analyze button to analyze the range of audio. Doing this creates a
noise profile that CyberLink AudioDirector uses to remove the noise.
Note: you can click the Noise button to listen to the detected noise, if
required.
Select the second option and then Select a preset from the drop-down. Select
the preset that best fits the type of noise you are trying to remove.
4. Use the Sensitivity and Noise reduction level sliders to adjust the amount of
reduction applied to the selected range. If required, click the Noise button
again to listen to the noise that will be removed.
Note: when previewing the noise, if you hear portions of the audio you want to
keep, it is recommended that you reduce the Sensitivity and/or the Noise
reducti on level until you don't hear it anymore, for the best results on the
repaired audio.
5. Use the Dry-Wet mix slider to set the ratio between the dry (original audio that
includes the unwanted noise) and wet (audio with noise reduction applied)
audio. Adjusting the mix can balance the original audio and the audio with
the noise reduction applied, reducing a loss of quality on the audio portion
you want to keep.
6. Click the Next button to go to step 2.
7. Select which range of audio you want to apply the noise reduction to by
selecting one of the following:
Analyzed range only: select this option to only apply the noise reduction to
the range of audio you selected and analyzed in step 1.
Entire audio content: select this option if you want to apply the noise
reduction to the entire audio clip.
Select a different range: select this option to select a new range of audio
where you want the noise reduction applied. This range can contain both the
noise and the audio content you want to keep.
8. If required, you can preview the repaired audio by selecting Restored result
and then clicking the Preview button. Select Original audio if you want to
play the original audio.

87
CyberLink AudioDirector Help
Note: click the Save as Preset button once you are done to save the Noise
Reduction settings as a new preset. The next time you need to remove noise
from audio that was recorded in the same or similar environment, you can
just select the preset from the drop-down in step 1.
9. Click Apply to repair the audio.
Using Clipping Removal
Use Clipping Removal feature if parts of your audio's waveform is clipped off at the
top or bottom, causing distortions or loss in audio quality. This feature can restore
the waveform through attenuation, resulting in audio that is less intense, but
without distorted or lost audio parts.
To use the Clipping Removal on audio, do this:
1. Select the media file in the library that you want to repair.
2. Click the Restore button and then Clipping R em oval to open the Clipping
Removal window
3. If required, use range selection to select the portion of audio you want to
repair. See Range Selection for more information on selecting a range of an
audio file. Next, click the Analyze button to analyze the range of audio. Doing
this creates a noise profile that CyberLink AudioDirector uses to restore the
audio.
Note: the entire audio file's waveform is selected by default when this feature
is opened. If you want to apply this feature to the entire audio file, you do not
need to use range selection when the entire waveform is selected.
4. Decide whether you want to repair all the available channels, or just one
channel. See Selecting Channels for Editing for more information on selecting
channels.
5. Select the Quality amount of the clip restoration. The higher the quality
selected, the more attenuation that is applied to the audio, and the lower its
resulting intensity or loudness.
6. If required, use the Threshold slider to manually set the maximum audio
level allowed. Any parts of the audio waveform that exceed the threshold will
be attenuated.
7. If required, you can preview the repaired audio by selecting Restored result
and then clicking the play button. Select Original audio if you want to play the
original audio.

88
Restoring Audio
8. Click Apply to repair the audio.
Using Click Removal
Use the Click Removal feature if your audio clips contain unwanted clicking or
related sounds in them.
To use the Click Removal on audio, do this:
1. Select the media file in the library that you want to repair.
2. If required, use range selection to select the portion of audio you want to
repair. See Range Selection for more information on selecting a range of an
audio file. If you don't select a range, the entire audio clip is repaired.
Note: the entire audio file's waveform is selected by default when this feature
is opened. If you want to apply this feature to the entire audio file, you do not
need to use range selection when the entire waveform is selected.
3. Decide whether you want to repair all the available channels, or just one
channel. See Selecting Channels for Editing for more information on selecting
channels.
4. Click the Restore button and then Click R emov al to open the Click Removal
window.
5. If required, select a preset from the Presets drop down. These presets can auto
repair your audio for you.
6. Use the Sensitivity slider to adjust the amount of Click Removal applied to the
selected audio clip.
7. If required, you can preview the repaired audio by selecting Restored result
and then clicking the play button. Select Original audio if you want to play the
original audio.
8. Click Apply to repair the audio.
Using Hum Removal
The Hum Removal feature removes hum noise and its harmonics from audio clips.
Hum noise is usually caused by electronics (faulty microphone, electrical
interference with recording device, etc.) during the original recording.
To use Hum Removal on audio, do this:

89
CyberLink AudioDirector Help
1. Select the media file in the library that you want to repair.
2. If required, use range selection to select the portion of audio you want to
repair. See Range Selection for more information on selecting a range of an
audio file. If you don't select a range, the entire audio clip is repaired.
Note: the entire audio file's waveform is selected by default when this feature
is opened. If you want to apply this feature to the entire audio file, you do not
need to use range selection when the entire waveform is selected.
3. Decide whether you want to repair all the available channels, or just one
channel. See Selecting Channels for Editing for more information on selecting
channels.
4. Click the Restore button and then Hum Removal to open the Hum Removal
window.
5. Select one of the following options:
Simple Mode: select this option if you want CyberLink AudioDirector to
remove the hum using a selected frequency range band. See Simple Mode for
more information.
Advanced Mode: select this option to use the more advanced controls.
CyberLink AudioDirector asks you to manually select an area that contains the
hum, then through analysis helps you remove it from your audio. See
Advanced Mode for more information.
6. Click Next to proceed.
Simple Mode
Because most hum noise is in the 50Hz to 60Hz frequency range band, sometimes
the simple mode of selecting a specific frequency range band is all that is required
to remove the hum noise.
To use Hum Removal's Simple Mode, do this:
1. Click the Restore button and then Hum Removal to open the Hum Removal
window.
2. Select the Simple Mode option.
3. Select a frequency band from the list as follows:
Remove 50Hz: select this option to remove all audio that is in the 50Hz
frequency range band.

90
Restoring Audio
Remove 50Hz and the harmonics: select this option to remove all audio that
is in the 50Hz frequency range band. This option will also remove any
corresponding harmonics.
Remove 60Hz: select this option to remove all audio that is in the 60Hz
frequency range band.
Remove 60Hz and the harmonics: select this option to remove all audio that
is in the 60Hz frequency range band. This option will also remove any
corresponding harmonics.
4. Use the Reduction level slider to set the amount of attenuation applied on the
hum noise.
5. If required, you can preview the repaired audio by selecting Restored result
and then clicking the Preview button. Select Original audio if you want to
play the original audio.
6. Click Apply to repair the audio.
Advanced Mode
For hum noise that is harder to remove, the advanced mode lets you select a region
of the audio that contains the hum so CyberLink AudioDirector can detect it. Once
detected, you can then customize its removal using a series of parameters.
To use Hum Removal's Advanced Mode, do this:
1. Click the Restore button and then Hum Removal to open the Hum Removal
window.
2. Select the Advanced Mode option.
3. In step 1, do one of the following:
Select the first option and then select a range of the audio that only contains
the hum you want to remove, i.e. devoid of the audio you want to keep in the
file. See Range Selection for more information on selecting a range of an
audio file. Next, click the Analyze button to analyze the range of audio. Doing
this creates a noise profile that CyberLink AudioDirector uses to remove the
hum.
Note: you can click the Hum button to listen to the detected noise, if
required.

91
CyberLink AudioDirector Help
Select the second option and then Select a preset from the drop-down. Select
the preset that best fits the frequency of the hum you are trying to remove.
4. If required, use the following sliders to further remove the hum from the
audio:
Base frequency: use this slider to manually specify the root note of the hum
noise, if the detected hum is incorrect.
Reduction level: use this slider to set the amount of attenuation applied on
the hum noise.
Number of harmonics: select the number of harmonics the hum noise
appears to have.
Filter bandwidth: use this slider determine the width of the root frequency
and its harmonics. Dragging the slider left affects a wider range of
frequencies, while dragging it right will affect a narrower range.
Harmonic slope: use this slider to set the ratio of attenuation applied to the
harmonics.
5. Click the Next button to go to step 2.
6. Select which range of audio you want to apply the hum removal to by
selecting one of the following:
Selected range only: select this option to only apply the hum removal to the
range of audio you selected and analyzed in step 1.
Entire audio content: select this option if you want to apply the hum removal
to the entire audio clip.
Select a different range: select this option to select a new range of audio
where you want the hum removal applied. This range can contain both the
hum and the audio content you want to keep.
7. If required, you can preview the repaired audio by selecting Restored result
and then clicking the Preview button. Select Original audio if you want to
play the original audio.
Note: click the Save as Preset button once you are done to save the Hum
Removal settings as a new preset. The next time you need to remove hum
noise from audio that was recorded in the same or similar environment, you
can just select the preset from the drop-down in step 1.
8. Click Apply to repair the audio.

92
Restoring Audio
Using Hiss Removal
The Hiss Removal feature removes hiss noise from audio clips.
To use Hiss Removal on audio, do this:
1. Click the Restore button and then H iss R em oval to open the Hiss Removal
window.
2. In step 1, do one of the following:
Select the first option and then select a range of the audio that only contains
the hiss you want to remove, i.e. devoid of the audio you want to keep in the
file. See Range Selection for more information on selecting a range of an
audio file. Next, click the Analyze button to analyze the range of audio. Doing
this creates a noise profile that CyberLink AudioDirector uses to remove the
hiss.
Note: you can click the Hiss button to listen to the detected noise, if
required.
Select the second option and then Select a preset from the drop-down. Select
the preset that best fits the type of hiss (frequency) you are trying to remove.
3. If required, use the following sliders to further remove the hiss from the audio:
Noise level threshold: use this slider to manually set the minimum noise level.
Anything that falls above this threshold level will be left untouched by hiss
removal.
Reduction level: use this slider to set the amount of hiss removal applied.
Frequency smoothing: use the slider to recover any loss of quality (on the
frequency range) that was caused by the hiss removal. Dragging the slider left
will use more of the original audio, dragging to right will use more of the
audio with the hiss removed.
Temporal smoothing: use the slider to recover any loss of quality (over the
selected range of audio) that was caused by the hiss removal. Dragging the
slider left will use more of the original audio, dragging to right will use more
of the audio with the hiss removed.
Attenuation ratio: use this slider to set the amount of attenuation applied.
4. Click the Next button to go to step 2.

93
CyberLink AudioDirector Help
5. Select which range of audio you want to apply the hiss removal to by
selecting one of the following:
Selected range only: select this option to only apply the hiss removal to the
range of audio you selected and analyzed in step 1.
Entire audio content: select this option if you want to apply the hiss removal
to the entire audio clip.
Select a different range: select this option to select a new range of audio
where you want the his removal applied. This range can contain both the hiss
and the audio content you want to keep.
6. If required, you can preview the repaired audio by selecting Restored result
and then clicking the Preview button. Select Original audio if you want to
play the original audio.
Note: click the Save as Preset button once you are done to save the Hiss
Removal settings as a new preset. The next time you need to remove hiss
noise from audio that was recorded in the same or similar environment, you
can just select the preset from the drop-down in step 1.
7. Click Apply to repair the audio.
Using Plosive Removal
This feature helps you remove plosives, which are blasts of air or thumps/pops in
the audio that can occur when speaking/singing the letters b, k, p, t.
To use the Plosive Removal on audio, do this:
1. Select the media file in the library that you want to repair.
2. If required, use range selection to select the portion of audio you want to
repair. See Range Selection for more information on selecting a range of an
audio file. If you don't select a range, the entire audio clip is repaired.
Note: the entire audio file's waveform is selected by default when this feature
is opened. If you want to apply this feature to the entire audio file, you do not
need to use range selection when the entire waveform is selected.
3. Decide whether you want to repair all the available channels, or just one
channel. See Selecting Channels for Editing for more information on selecting
channels.
4. Click the Restore button and then Plosive R emoval to open the Plosive
Removal window.

94
Restoring Audio
5. If required, select a preset from the Presets drop down. These presets can auto
repair your audio for you.
6. Use the Frequency Limit slider to set the highest frequency that plosive
removal gets applied on. This prevents you from processing audio where
there are no plosives, as they are usually well below 300 Hz.
7. Use the Sensitivity slider to adjust the sensitivity of plosive detection. If you
still hear plosives after using plosive removal, try dragging the slider right to
increase the sensitivity.
8. Use the Strength slider to adjust the amount of plosive removal applied to the
selected audio clip.
9. If required, you can preview the repaired audio by selecting Restored result
and then clicking the play button. Select Original audio if you want to play the
original audio.
Note: click the Save as Preset button once you are done to save the Plosive
Removal settings as a new preset. The next time you need to remove
plosives from audio that was recorded in the same or similar environment,
you can just select the preset from the drop-down.
10. Click Apply to repair the audio.
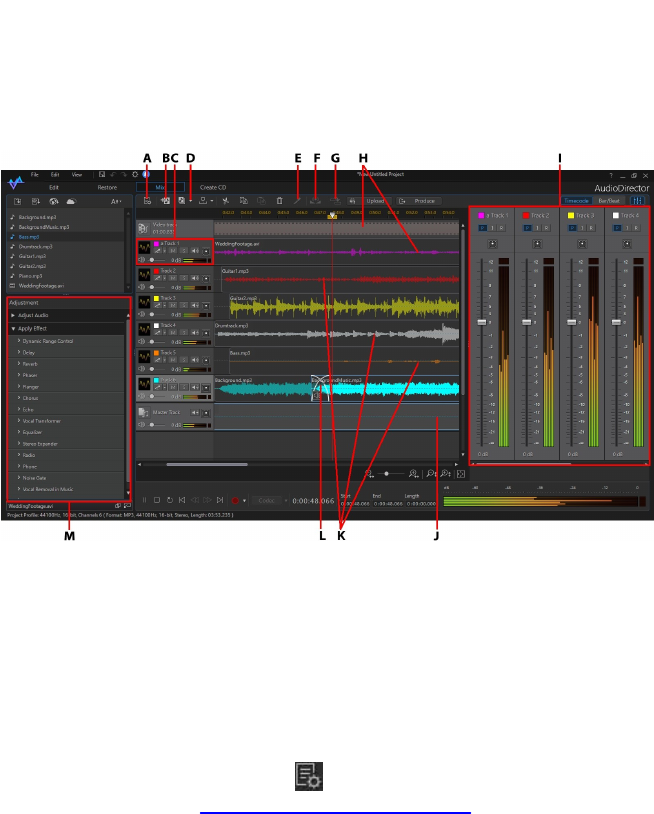
95
CyberLink AudioDirector Help
Mix Room
Chapter 9:
In the Mix room you can mix audio together to create customized audio files. You
can also create soundtracks for videos, by mixing audio with videos added to the
video track. Click the Mix button to open the Mix room.
A - Configure Audio Profile Settings for Mix Room, B - Add Track, C - Mixing Tools, D - Create/Edit
Group, E - Split Audio, F - Normalize Audio Across Multiple Tracks, G - Automated Dialogue
Alignment, H - Video Track and its Corresponding Audio, I - Audio Mixer Panel, J - Master Track, K -
Audio on Other Tracks, L - Audio Transition, M - Mix Room Adjustments and Effects
Creating an Audio Mix
To create an audio mix, do this:
1. Click the Mix button to enter the Mix room.
2. Before getting started, click the button to configure your audio mix's
profile settings. See Configuring Audio Profile Settings for a description of
each profile setting.
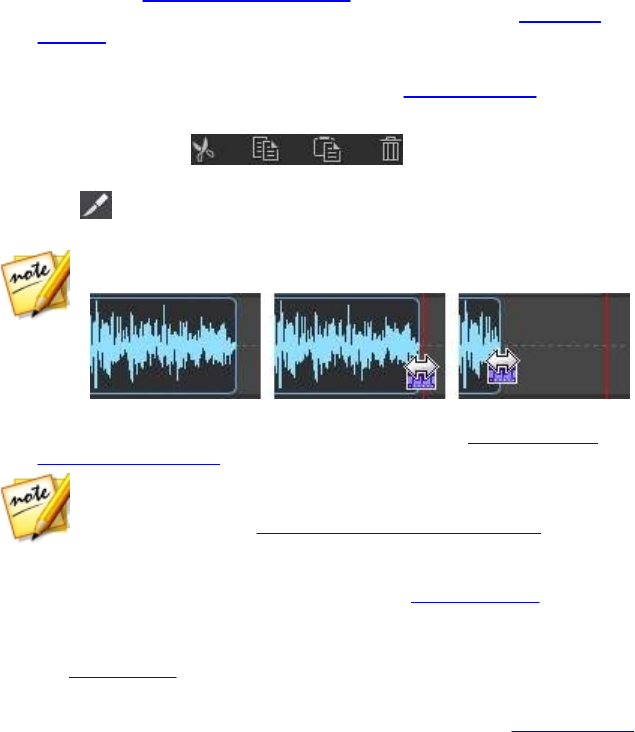
96
Mix Room
3. Add the audio files that you want to include in the mix to the Mix room
timeline. See Adding Media to Your Mix for more detailed information. For
detailed information about the timeline in the Mix room, see Mix Room
Timeline.
4. Position each added audio file to start precisely when you want it by dragging
it to the desired starting position. You can use timeline markers to make this
task easier.
5. If required, use the buttons to cut, copy, paste, or
delete the audio on the tracks. You can also select an audio file on a track and
click to split it at the timeline slider position into two separate parts that
can be moved separately among tracks.
Note: if required, you can click an audio clip on the timeline and drag the
beginning or end to quickly trim the audio file length.
6. If required, right click on an audio clip and then select Edit Clip in Edit Room
to adjust audio and apply effects in the Edit room. See Adjusting Audio and
Applying Audio Effects for detailed information.
Note: you can also click on the Adjust Audi o option in the Adjustment
panel and adjust the audio right in the Mix room, however there are fewer
options available. See Applying Adjustments in the Mix Room for more
information.
7. If required, right click on an audio clip on a track and then select Edit Clip in
R estore R oom to fix it in the Restore room. See Restoring Audio for detailed
information on editing audio clips.
8. Mix all of the audio together using the mixing tools, mixer panel, and more.
See Mixing Audio for detailed information.
9. Preview your audio mix and once you are satisfied with the result, you are
ready to mix it down and produce it as a new audio file. See Producing Audio
for more information.

97
CyberLink AudioDirector Help
Configuring Audio Profile Settings
Before creating your mix, click the button to configure the audio profile, or the
quality and number of channels, of the audio file you are creating in the Mix room.
The available options are as follows:
Sample rate: select the sample rate from the drop-down that CyberLink
AudioDirector will use by default when previewing audio in the mix room.
Bit depth: select the bit depth from the drop-down that CyberLink
AudioDirector will use when previewing audio in the mix room.
Channels: select the number of channels you want in the audio preview. If you
select 5.1 Channels or 7.1 Channels, you can use the Track Panner to
customize the panning of each track in your mix.
Adding Media to Your Mix
Add media to your mix by dragging audio files that are in the library to any of the
tracks in the Mix room timeline, and at any position. If the audio that you want to
include in the mix is not in library, see Importing Media into the Library for
information on importing it.
You can also add a video file to your mix. When added, CyberLink AudioDirector
displays a video track in the timeline and shows the corresponding audio track.
Note: you can only have one video track in the timeline, but you can place
more than one video file on this track.
When adding media to the Mix room timeline, if you drop it on to an existing clip
on the timeline, you are asked if you want to split the clip and Insert the new clip
between the two portions, or Overwrite the existing clip. The other options include
using a transition between the clip you are adding and the existing clip on the
timeline. See Using Audio Transitions for more information.
Mix Room Timeline
The following is some information that you may find helpful about the Mix room
timeline:

98
Mix Room
by default, the Mix room timeline includes four tracks, one of which is the
Master Track. To hide the Master Track, just right click on it and then select
Hide Master Track.
you cannot add audio to the Master Track directly, as it works as a guide for
your audio mix project. It is visual representation for all the audio that is in
your mix.
if you want to apply audio effects to your entire mix, you can do so by
selecting the Master Track. You can also use range selection to apply the
effects to just a selected range. See Range Selection for more information on
selecting a range of audio.
you can add up to 100 audio tracks in the Mix room timeline. To add a new
track, click the button.
once a video file is added to your mix, you can right-click to the left of the
video track and then select Remove Video Track if you only want the video's
audio in the mix. You can also remove it by right clicking on the video file on
the track and then selecting Remove.
if you don't want to include a video file's audio in your mix, you can just
remove it from the corresponding audio track.
Mixing Audio
Once you have all of the audio in the tracks of the Mix room, the next step is to mix
all of the audio together. Creating your mix is the most important part of the
process, and CyberLink AudioDirector provides several mixing tools to assist in the
creation.
Grouping Tracks
You can group two or more tracks together in the Mix room. Adding tracks to
groups makes it easier to mix the audio on the tracks, as the volume level, balance,
and other mixing tools can be modified simultaneously.
To create a new group, do this:
1. In the Mix room, click .
2. Set a unique Gr oup ID for each group.
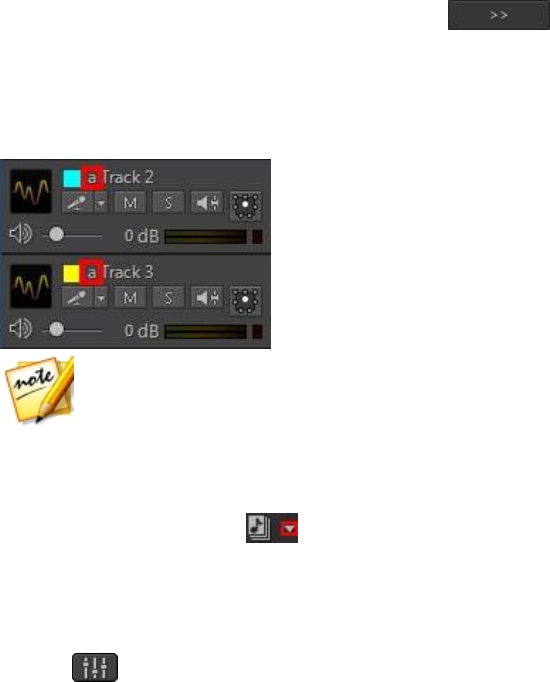
99
CyberLink AudioDirector Help
3. Give the group a Name.
4. As required, select an available track and then click to add it to
the new group.
5. When you are done, click Apply to save your changes and create the group.
Tracks that were added to a group are indicated by the group ID next to the track
name.
Note: if you want to modify volume level and other mixing options for the
audio on mixed tracks simultaneously, you must first press the letter on your
keyboard that corresponds to the Group ID to enable this option. After you
are finished, click a track that's not in the group to disable.
Editing Groups
To edit an existing group, click and then select Create/Edit Group. Edit the
group as required, and then click Apply to save your changes.
Mixer Panel
Click the button located in the top right above the timeline to open the mixer
panel.
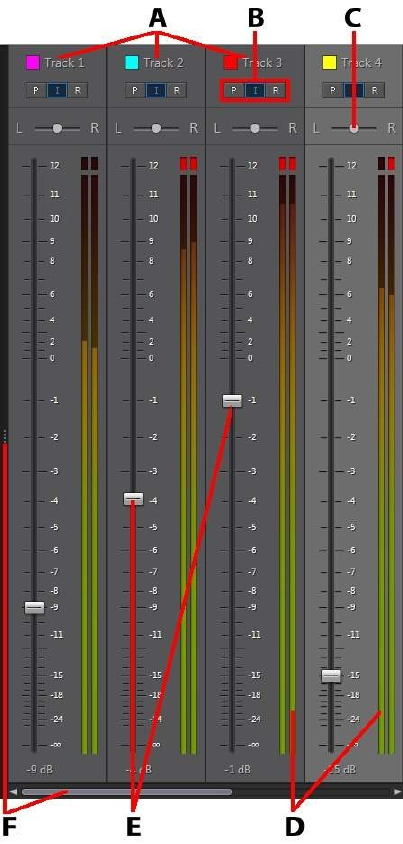
100
Mix Room

101
CyberLink AudioDirector Help
A - Audio Tracks in the Timeline, B - Audio Track Mode, C - Audio Track Balance, D - Audio Level
Meter, E - Master Volume Control, F - Expand and Scroll
To use the mixer panel to mix your audio, do this:
each track in your Mix room timeline has corresponding controls in the mixer
panel. If you cannot find an audio track, you can click and drag on the left
edge of the mixer panel to expand it, or use the scroll bar at the bottom to
find the track controls. The master track is always the last control (on the right)
in the mixer panel.
to mix your audio, ensure that audio track mode R is selected for all the tracks
that you want to alter the volume levels on. If R is not selected, you cannot
change the volume level in that track.
ensure that audio track mode I is selected to lock any audio tracks whose
volume levels you don't want changed.
click the play button and then use the master volume controls in each track to
mix your audio.
Note: you can continually alter the volume levels on each track throughout
the entire duration of the mix. When R is selected, CyberLink AudioDirector
records and remembers the changes you made to the volume at each
moment of your mix.
click the play button and then use the track balance controls in each track to
pan the audio left or right in the mix.
ensure that audio track mode P is selected and then preview your mix by
playing it back. This allows you to listen to and watch the recorded volume
levels (and track balance) change.
Using the Mixing Tools
The mixing tools are available for each of the tracks in the mix room timeline,
except the video and master track. The tools that are available are outline in the
below table.
Mixing Tools
If required, click this button and select a label for the track. Select
an icon that closely matches the type of audio in the track.
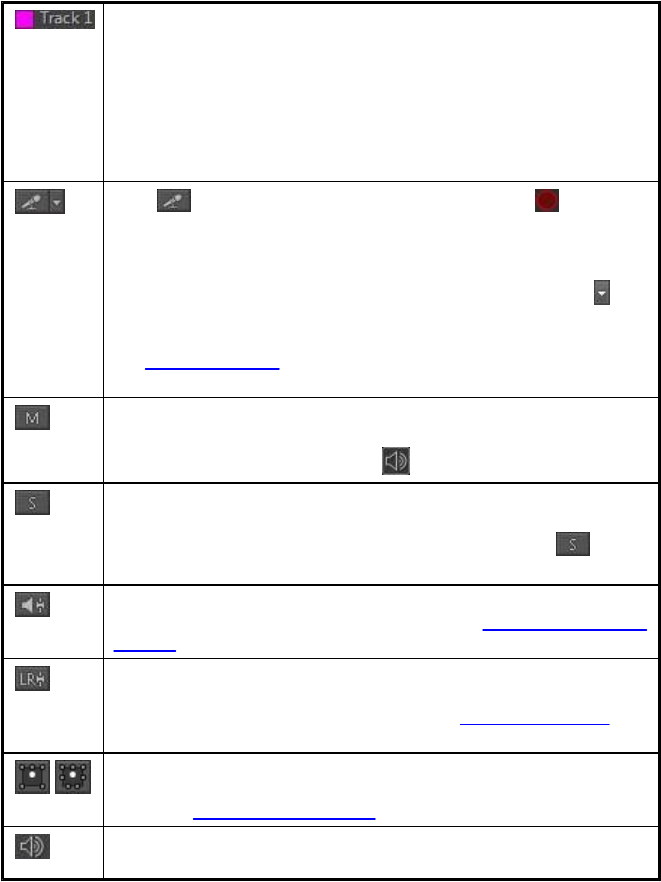
102
Mix Room
Click the colored square next to a track number to add a color label
to the track. You can select one of the basic colors, or click in the
color picker or use the slider to choose a color. You can also
manually enter the color code in the HSB, RGB, or # fields to set the
color. Once you set the color, click OK to close the Color Picker
window. The color label is applied to the audio's wavelength and
the mixer panel, so you can more easily identify the audio in your
mix.
Click to enable this track for recording. Click the button at
the bottom of the CyberLink AudioDirector window when you are
ready to begin recording. You can enable multiple tracks at once,
recording from multiple sources. All their inputs will be recorded
and added to the corresponding track, simultaneously. Click to
configure the recording settings by selecting the import source for
the recorded audio, and whether you want to monitor the input.
See Recording Audio for more detailed information about
recording audio in CyberLink AudioDirector.
Click this button to mute the corresponding audio track. If you only
want to mute one single clip on an audio track, just right click on it
and then select Mute Clip (or click on the selected clip).
Click the solo button if you only want to hear the audio in the
corresponding track when previewing the audio mix. You can
enable as many tracks as you want. All the tracks where is not
selected are muted during the preview.
Click to modify the master volume for the audio file on the selected
track using volume keys at specific points. See Adjusting the Master
Volume for detailed information on modifying master volume keys.
If your audio profile channel settings is set to mono or stereo, click
this button to modify the balance of the audio file on the selected
track by panning the audio left or right. See Panning Audio L/R for
detailed information on panning audio.
If your audio profile channel settings is set to 5.1 or 7.1, click this
button to access the track panner to pan the audio on the selected
track. See Using the Track Panner for detailed information.
Use the slider to the right of this icon to set the audio input level
for the entire duration of the track.
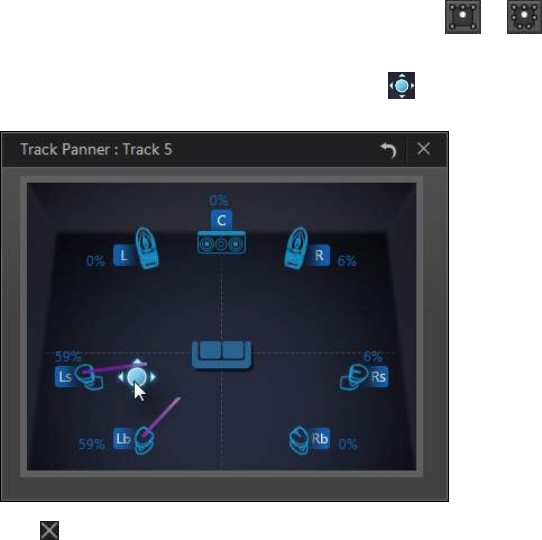
103
CyberLink AudioDirector Help
Using the Track Panner
When mixing audio with an audio profile set to 5.1 or 7.1 channels, you can
customize which channel each track is panned to in the Track Panner.
To use the Track Panner, do this.
1. On the mix track where you want to pan the audio, click or ,
depending how many channels are selected in your audio profile.
2. In the Track Panner window, click and drag to the channel you want
the audio on that track to be panned to.
3. Click to close the window and save your changes.
Normalizing Audio Across Multiple Tracks
If you find that some of the audio in your mix is much louder than the audio on the
other tracks, you can normalize the volume across multiple tracks. Normalizing is
the process of applying a constant amount of gain to your mix to bring the average
or peak amplitude (volume levels) to a same level.
104
Mix Room
To normalize the audio across multiple tracks, do this:
Note: this section is for normalizing the audio across multiple tracks in the
Mix room. For information on normalizing the audio in the Edit and Restore
rooms see Normalizing Audio Channels.
1. Select the all of the tracks in the mix that you want to normalize.
2. If required, use range selection to select the portion of audio you want to
normalize. See Range Selection for more information on selecting a range of
an audio file.
Note: be sure to select the entire audio file's waveform if you want to
normalize the audio in the entire track.
3. Click the button to normalize the volume of the selected audio tracks.
Using Audio Transitions
When adding more than one audio clip onto a timeline track, you can use a
transition to mix the two clips together.
To use an audio transition, do this:
1. Drag an audio clip to a timeline track, and then drag and drop a second clip to
the position on the first clip where you want the transition to begin, i.e. the
duration you want the two audio clips to overlap. You can also drag an
existing clip on the timeline and drop it on the audio clip you want to
transition it with.
Note: make sure you drag and drop the second clip to the exact time
position where you want the transition between the two clips to begin. You
can use timeline markers to make this task easier. See Timeline Markers for
more information.
2. In the pop-up that displays, select one of the following transition options:
Note: if you don't want to use a transition, select Insert to split the clip and
insert the new clip between the two portions, or Overwrite to place it over
the existing clip.
Crossfade: select this option if you want the first audio clip to gradually fade
into the second clip. Once selected, choose the fade type from the available
options. Use the Preview button to help you pick the fade type that best suits
your requirements.

105
CyberLink AudioDirector Help
Note: select the Always use selected type check box to set the selected
fade type as the default. Once selected, CyberLink AudioDirector will use
this fade type automatically the next time you use a crossfade transition. To
change the transition type, just right click on the transition and select Edit
Crossfade Transition.
Smart Transition: select this option to use a more customized transition.
Select from the available transition effects and then adjust its properties. See
Adjusting Smart Transition Properties for a detailed description of the
available properties.
Note: the maximum length of a smart audio transition is 30 seconds. If the
duration of the overlap between the first and second audio clip is more than
30 seconds, then the Smart Transition option is not available.
3. Click OK to apply the audio transition between the two clips.
Note: you can change the length of the audio transition by dragging the
second clip and moving it to a new position. When using a crossfade,
double-click on the transition area to edit the transition's properties. For
smart transitions, just click , , or (depending on the transition
type) to edit the properties.
Adjusting Smart Transition Properties
When you use a smart transition you can choose one of the following transition
effects between the two clips: Tempo Transition, DJ Scratch, or Smart Repeat.
Note: click the Preview button while adjusting the transition properties to
preview the results and help you fine tune them to fit your requirements. If
required, click the Reset to Defaults button at any time to reset the edited
properties back to the original settings.
Tempo Transition
Creates a smooth transition between the audio clips based on the tempo of each.
Once selected, edit the properties as follows:
Tempo adjustment:
First clip's estimated tempo: if required, use to adjust the tempo of the first
clip. You can speed up or slow down the tempo, depending on the tempo of
the second clip. Use 2X to double the clip's tempo, or 0.5X to halve it.

106
Mix Room
Second clip's estimated tempo: if required, use to adjust the tempo of the
second clip. You can speed up or slow down the tempo, depending on the
tempo of the second clip. Use 2X to double the clip's tempo, or 0.5X to halve
it.
DJ Scratch
Creates a transition using the scratching of a record and the tempo of each audio
clip. Once selected, edit the properties as follows:
Scratch strength ratio: use the slider to set the strength of the record scratch
during the transition.
Tempo adjustment:
First clip's estimated tempo: if required, use to adjust the tempo of the first
clip. You can speed up or slow down the tempo, depending on the tempo of
the second clip. Use 2X to double the clip's tempo, or 0.5X to halve it.
Second clip's estimated tempo: if required, use to adjust the tempo of the
second clip. You can speed up or slow down the tempo, depending on the
tempo of the second clip. Use 2X to double the clip's tempo, or 0.5X to halve
it.
Smart Repeat
Creates a transition that repeats the last portion of the original clip a set amount
times, giving the transition a skipping effect. Once selected, edit the properties as
follows:
Number of repeats: select the number of times you want the end of the first
clip to repeat.
Tempo adjustment:
First clip's estimated tempo: if required, use to adjust the tempo of the first
clip. You can speed up or slow down the tempo, depending on the tempo of
the second clip. Use 2X to double the clip's tempo, or 0.5X to halve it.
Second clip's estimated tempo: if required, use to adjust the tempo of the
second clip. You can speed up or slow down the tempo, depending on the
107
CyberLink AudioDirector Help
tempo of the second clip. Use 2X to double the clip's tempo, or 0.5X to halve
it.
Applying Adjustments in the Mix Room
While mixing audio in the Mix room you can apply any of the adjustments and
effects in the Adjustment panel on the left, to an audio clip in the mix.
Note: in the Mix room, audio adjustments and effects can only be applied to
one audio clip on a track at a time, or to all the audio in the mix by selecting
the Master Track. If you select more than one audio clip, the adjustments
and effects are not available.
Click the Adjust Audio option to apply the available adjustments to your mix. See
the relevant sections in Adjusting Audio for a detailed description of these
adjustments. For the Adjust Length (auto remix) feature, which is only available in
the Mix room, see Using Adjust Length (Auto Remix).
Click Apply Effect for a list of the available effects in the Mix room, and see
Applying Audio Effects for a detailed description of these effects. For information
on the use of the Surround Sound Panner, see Using the Surround Sound Panner
section below.
Note: once an effect is applied to an audio clip, click on to view the
Effect List for the click. In the Effect List you can deselect or click to
remove the effect from the clip.
Using Adjust Length (Auto Remix)
Use the Adjust Length (auto remix) feature to change the length of audio by
remixing the selected audio clip.
To adjust the length of audio, do this:
1. Select the media file in the Mix room that you want to adjust.
2. Click the Adjust Length (auto remix) under the Adjust Audio section.
3. Enter in the New audio length in the field provided, and then press the Enter
key on your keyboard.
Note: the new audio length cannot be shorter than 10 seconds.
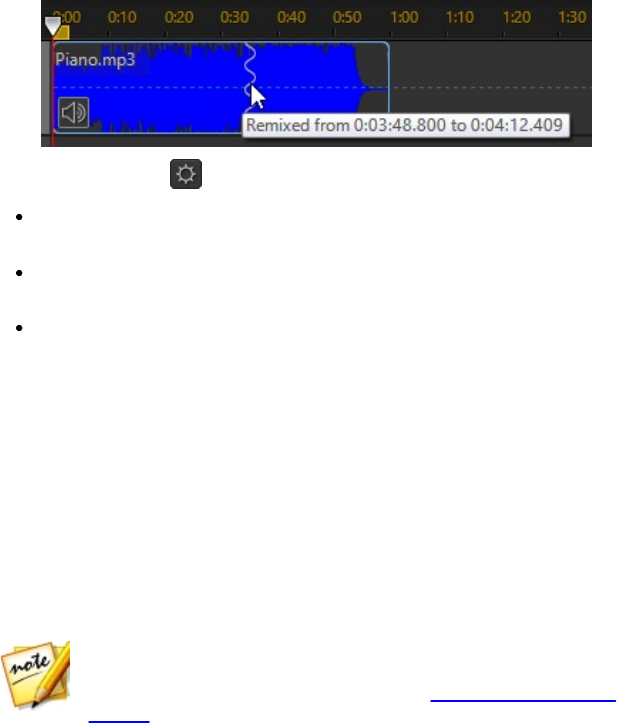
108
Mix Room
CyberLink AudioDirector will adjust the audio to the specified length. You can
hover your mouse over the curvy line to view the remix details.
4. If required, click to modify the advanced options as follows:
Stretch to exact duration: if making the clip longer, select this option to
stretch the audio to the exact duration you entered.
Segments: use this slider to adjust the content and sound of the remix.
Making the segments shorter, will loop more of the audio in the remix.
Max slack (seconds): adjusting this slider essentially changes the speed of the
remix. For example, if you're making an audio clip longer, the remix will be a
slower rendition of the audio.
5. If required, you can preview the adjusted audio by selecting Adjusted result
and then clicking the play button on the playback controls. Select Original
audio if you want to play the audio at its original length.
6. Click Apply to adjust the length of the audio.
Using the Surround Sound Panner
You can use the Surround Sound Panner to pan the audio of a selected audio clip
to any or all of the available channels. You can do this manually, or select from one
of the panning templates.
Note: if you haven't configured the audio profile settings yet, it is
recommended that you set the desired number of channels in your mix
before using the Surround Sound Panner. See Configuring Audio Profile
Settings for more information.
To use the Surround Sound Panner on an audio clip in your mix, do this:
1. Select the audio clip in the Mix room timeline to use, or select the Master
Track if want to pan all of the audio in the mix.

109
CyberLink AudioDirector Help
2. Click Surround Sound Panner under the Apply Effect section.
3. If you selected the Master Track you can use range selection to select the
portion of the audio mix you want to apply the effect to. See Range Selection
for more information on selecting a range of an audio file. If you don't select a
range, the effect is applied to the entire audio mix.
4. Select one of the following panner options:
Manually set channel output: select this option if you want the selected audio
to be panned to a specific channel, and not move. Once selected, click and
drag to the channel you want the audio to be panned to.
Use panning template: select this option if you want the selected audio clip to
pan across multiple channels. Select from one of the available templates. If
the panning template contains the icon, you can click and drag its path to
achieve the pan you require.
Note: you can select the Pan the audio twice (forward and backward)
option if you want the audio to pan forward then backward along the template
path. You can also indicated how many times you want the pan to Repeat by
entering in the number of times in the field provided.
5. If required, click the Preview button to listen to how the applied effect will
sound.
6. Click Apply to apply the pan effect to the audio.
Using Automated Dialogue
Alignment
When using CyberLink AudioDirector to fix and enhance the audio in your video
production, Automated Dialogue Alignment can be a very useful tool for you. If
you have video clips that have dialogue that was recorded in a noisy environment,
use this feature to dub in/replace the audio, syncing it in the video clip.
To use this feature, you need to prepare some clips beforehand and go through
several steps to successfully dub audio in a clip.
110
Mix Room
Prepared Clips
Before using the Automated Dialogue Alignment tool, you must prepare some
audio clips beforehand. You will need:
Original video clip with audio (base clip): the video clip with the dialogue
recorded in the noisy environment.
New dialogue audio clip (target clip): re-recorded audio clips for all of the
dialogue you need replaced. You can use CyberLink AudioDirector to re-
record the dialogue and create the clips you need. See Recording Audio for
more information.
Note: for the best results, when recording the new dialogue audio, ensure
the timing/length of the new dialogue is similar to the original video clip. You
can use Loop Recording to do multiple takes in succession to ensure you
get the timing as close as possible.
Background noise clips (optional): when the dubbed dialogue audio is
replaced in the original video clip, any background noise or ambient sounds
are also removed. It is recommended that you add back the "noise" in the
original video clip to ensure your video's authenticity. For example, if you shot
a video on a train or in a music hall, you can add these sounds back manually
in the Mix room, but at a lower audible level underneath the dubbed in
dialogue.
Note: CyberLink AudioDirector does not add the ambient and background
noise in for you. You'd need to re-record it or get it from another source if you
want to include this suggested option in your final produced video clip.
Dubbing Audio in a Clip
To use Automated Dialogue Alignment to dub audio in a video clip, do this:
1. Click on the Mix button to enter the Mix room.
2. Add the video clip that contains the dialogue you want to dub on the first
track in the timeline.
3. For best results, drag the timeline slider to just before the dialogue and then
click the button to split the audio in the video clip.
4. Drag the timeline slider to the end of the dialogue, and then click again.

111
CyberLink AudioDirector Help
Note: if the dialogue you want to dub in the video clip runs the entire duration
of the clip, then there is no need to split the clip. However, please note that
each dialogue audio clip used in Automated Dialogue Alignment can be a
maximum of two minutes in length.
5. Add the new dialogue audio clip on the second track in the timeline,
underneath the split clip.
6. Hold down the Ctrl key on your keyboard and then use the mouse to select
both the split portion of the video clip and the new dialogue audio clip.
7. Click the button and then modify the options as follows:
Base clip: ensure that the original video clip with audio is selected in the drop-
down. If it's not, select it from the drop-down.
Reference channel: use this option to select the channel where the original
dialogue audio is playing from.
Base clip contains noise: select this option if the original video clip contains a
lot of background noise.
Target clip: ensure that the new dialogue audio clip is selected in the drop-
down. If it's not, select it from the drop-down.
Reference channel: use this option to select the channel where the new
dialogue audio is playing from.
Add aligned clip to new track: select this option if you want the aligned
dubbed audio added to a new track in the Mix room timeline. If you don't
select this option, CyberLink AudioDirector will just adjust the position of the
target clip.
8. Click the Apply button in the Automated Dialogue Alignment window.
CyberLink AudioDirector will analyze the clips, and then align the audio in the
target clip with the audio in the original video clip.
9. Right click on the split audio in track 1 and then select Remove to remove it
from the mix.
10. If required, add the prepared background noise clips to the other tracks in the
timeline and then use the Mix room controls to set the levels. See Creating an
Audio Mix for more information on mixing all the new audio in your video
clip.


113
CyberLink AudioDirector Help
Producing the Audio
Chapter 10:
The last step when editing, restoring, and mixing audio files is to save and produce
it to a new file. CyberLink AudioDirector uses the original media and then applies all
the specified changes to it, creating a new file, either in the same format, or in a
new file format if you prefer.
Note: if you have CyberLink PowerDirector 11 or above installed on your
computer, you can also select an edited file in the library and then File >
Export Audio to PowerDirector from the menu to quickly produce and
export just the audio to PowerDirector.
Supported Output Formats
CyberLink AudioDirector supports the production and export of audio files into the
following formats:
Audio: APE, FLAC, M4A, MP3, WAV, WMA.
Video: H.264 AVC (.M2TS, .MP4), H.265 HEVC (.MKV, .MP4), MPEG-2 (.MPG), Windows
Media Video (.WMV).
Producing Audio
When you are finished performing edits, adding effects, or restoring an audio file in
the library, you can save the changes and produce it as a new audio file. This
produce feature is also used when mixing down all the tracks in the Mix room,
combining them into a single audio file.
Note: you can also convert audio files in the library into other formats using
this feature.
To produce your audio file as a new file, do this:
1. Select the audio file in the library you want to save/produce, and then click
Produce in the AudioDirector quick bar above the timeline. The Produce
Audio window opens.

114
Producing the Audio
Note: if there is a video file in the Mix room, or you are editing a video file's
audio track (and you only want to output the edited audio), select Produce
Audio after clicking the Produce button.
2. Set the File information as follows:
File name: enter in a new file name for the file.
Location: click on to set the location of the folder where the produced
audio is saved.
Note: if you have a CyberLink Cloud subscription you can select the
Upload a copy to CyberLink Cloud option if you also want the program to
upload the produced file to your CyberLink Cloud storage space after
production.
3. Use the Audio profile settings to set the quality of the produce file as follows:
Note: the default settings for Format, Bitrate, and Sample rate are copied
from the audio output preview options, if you enabled codec preview.
Format: select the format you want for the newly produced audio file from
the drop-down. See Supported Formats for information on the supported
audio file formats.
Bitrate/Compression level: if required, set the bitrate for the produced file by
selecting it from the drop-down. For FLAC and APE files, you can set the
Com pr ession lev el applied to the produced file. The higher the compression
level, the smaller the resulting file will be, but the longer it will take for it to be
produced.
Sample rate: set the sample rate of the produced file by selecting it from the
drop-down.
Bit depth: set the bit depth of the produced file by selecting it from the drop-
down.
Channels: set the number of channels the produced file will have. If you are
producing it as a WAV or FLAC file, you can produce it with 5.1 or 7.1
channels, if required.
CyberLink TrueTheater Surround: if increasing the number of channels in the
audio, select this option to use CyberLink TrueTheater Surround to enhance
the quality of the expanded audio. Choose from Living Room, Theater, or
Stadium.
4. Click on Produce. The file is saved to the folder location specified.

115
CyberLink AudioDirector Help
Note: the new file is also added to the library and is available for use in
other projects in CyberLink AudioDirector.
Producing Video
After you have edited the audio tracks of an imported video file, use the produce
video function to re-render the video with the updated audio applied. This produce
feature is also used when mixing down all the tracks in the Mix room, including a
video track, and then combining them into a single video file with the mixed audio.
To produce a video file, do this:
1. Select the video file in the library you want to produce, click Produce in the
AudioDirector quick bar above the timeline, and then select Produce Video.
The Produce Video window opens.
2. Set the File information as follows:
File name: enter in a new file name for the file.
Location: click on to set the location of the folder where the produced
video is saved.
Note: if you have a CyberLink Cloud subscription you can select the
Upload a copy to CyberLink Cloud option if you also want the program to
upload the produced file to your CyberLink Cloud storage space after
production.
3. Use the Video profile settings to set the quality of the produce file as follows:
Video format: select the format you want for the newly produced video file
from the drop-down. See Supported Formats for information on the
supported video file formats.
Video profile: select the video profile, or video quality, of the produced file
from the drop-down.
Note: when outputting video in the H.264 and H.265 formats, video profiles
with resolutions as high as 2K and 4K (64-bit version only) are available if
the original video file is compatible.
4. Use the Audio profile settings to set the quality of the produce file as follows:
Audio codec: select the audio used on the audio portion of the file from the
drop-down.

116
Producing the Audio
Bitrate: if required, set the bitrate for the video's audio by selecting it from the
drop-down.
Sample rate: set the sample rate of the video's audio by selecting it from the
drop-down.
Bit depth: set the bit depth of the video's audio by selecting it from the drop-
down.
Channels: set the number of channels the video's audio will have. Depending
on the video file format and audio codec specified, you can produce it with
up to 5.1 channels, if required.
5. Click on Produce. The file is saved to the folder location specified and is also
available in the media library.
Note: if you selected to upload a copy of the produced file to CyberLink
Cloud, AudioDirector will ask you if you want to convert it before uploading.
Click Yes to convert it to an .MP4 file that is playable on a portable device, or
No if you want to upload the original produced file.

117
CyberLink AudioDirector Help
Sharing and Backing Up
Audio
Chapter 11:
You can share the sound clips you create with other users by uploading them to
DirectorZone. If you have a CyberLink Cloud subscription you can back up all your
sound clips by storing them on CyberLink Cloud.
The sound clips are first converted to 44100Hz, 16bit .MP3 stereo audio files before
they are uploaded. The sound clips you upload to DirectorZone are shared with
other users, who can download and use them in their own audio creations.
Note: the maximum length allowed of sound clips shared on DirectorZone is
30 seconds. There is no length limitation on sound clips uploaded to
CyberLink Cloud.
To share and back up your sound clips, do this:
1. Select it in the library and then click and then click Upload in the CyberLink
AudioDirector quick bar above the timeline.
2. In the upload window, enter the information as follows:
Destination: select where you want to upload the sound clip.
Title: name of the sound clip as it will display once uploaded.
Style: select the style or category for the sound clip.
Tags: enter some keyword search tags that will help users find the sound clip
when searching.
Note: separate each tag you enter with a comma. If you want to use two
words as the tag, just put quotes around them, e.g. "dollar bill".
Collection: enter the name of the collection you want the sound clip added to.
Description: enter a short description of your sound clip.
3. Click Next to proceed.
4. If required, confirm the copyright disclaimer, and then click Next to proceed
with the upload.
118
Sharing and Backing Up Audio
5. Click on Close to close the upload window.
119
CyberLink AudioDirector Help
Creating CDs
Chapter 12:
Once you are done editing, restoring, and mixing your media files, you can use
them to create CDs that are burned in the audio CD format.
Note: you can add both audio and video files to the CD, however just the
video file's audio is burned to the disc.
To create a CD, do this:
1. Click the Create CD button to open the Create CD room.
2. Add tracks to the CD by dragging media from the media library to the CD
track list view window. You can preview them in the media library before
adding them by clicking beside the file.
Note: if you added a media file by mistake, select it and then click to
remove it. Click if you want to remove all the media files on the CD.
3. Use the and buttons to order the tracks on the CD to your
preference.
4. If required, click on to edit the track information for each added media file.
When editing the CD-Text, you can add the song title, artist, album, and writer
information, and more. If adding the Album title and the Artist name, and
they are the same for each track, select the Apply album information to all
tracks and Apply artist information to all tracks options so you don't need to
add them for each track.
Note: this track information will only be visible on disc players that support
CD-Text reading.
5. Before burning the CD, click on to edit the CD properties as follows:
Normalize volume in all tracks of the CD: select this option to set the volume
of all of the audio tracks on the CD to the same level.

120
Creating CDs
Insert audio gap between tracks: select this option if you want to include gaps
of silence between each track on the CD. You can specify the length of the
gap in the field provided.
6. If required, use the playback controls at the bottom of the window to preview
the entire CD before burning it to a disc.
7. When you are ready, put a blank CD in your burning drive, and then click the
Burn Now button.
8. In the Burn Settings window, set the following options:
Recording drive: select the burning drive CyberLink AudioDirector will use to
burn the tracks to the CD.
Recording speed: set the recording speed used when burning the CD. If you
encounter errors during the burning process, try lowering the burning speed.
Number of copies: in the field provided, enter the number of CDs you want
CyberLink AudioDirector to burn for you in succession.
Note: if the disc you want to use is not blank and is rewritable, click the
Erase Disc option to erase it To erase a disc, select the Quick erase option
to erase the disc index contained on the disc, or the Ful l era se option to
erase all of the content the disc contains. Next, click Erase to erase the
disc.
9. Click Burn to finish creating your CD and burn it to a disc.

121
CyberLink AudioDirector Help
AudioDirector Preferences
Chapter 13:
Use the CyberLink AudioDirector preferences to select a UI language, set the default
profile settings for audio files, and more.
To configure your preferences in CyberLink AudioDirector, click the button.
General Preferences
Click the button to open the Preferences window, and then select the General
tab. The available options are as follows:
Internet
Automatically check for software updates: select to periodically check for
updates or new versions of AudioDirector automatically.
Language
Use system default language (if supported): select this option for the language
display to be the same as the language of your operating system. This feature
is only available if your operating system's language is one of the supported
user defined languages.
User defined: select this option and then select the language from the drop-
down list that you want to use.
Editing
Snap to reference: select this option if you want the timeline slider and clips
to snap to reference points during the editing and mixing process. The
reference points include timeline markers and other clips on the timeline.
Timebase display
use this option to set the default timebase display used. The timebase display
sets the value used at the top of the AudioDirector timeline. Timecode
displays the audio by playback time, while Bar/Beats displays it by tempo, or
beats per minute. Click the Tempo button to manually set the tempo used in
the timeline. See the instructions in Determining Tempo for more information
on using this feature.

122
AudioDirector Preferences
Messages
Click the Reset button to reset the all the "Never show again" confirmation
dialogs back to the default settings. All of the confirmation dialogs will
display again once selected.
File Preferences
Click the button to open the Preferences window, and then select the File tab.
The available options are as follows:
File default profile settings:
Sample rate: select the sample rate from the drop-down that CyberLink
AudioDirector will use by default when producing audio.
Bit depth: select the default bit depth from the drop-down that CyberLink
AudioDirector will use when producing audio.
Channels: select the default number of channels you want in the audio files
produced by CyberLink AudioDirector.
Project Preferences
Click the button to open the Preferences window, and then select the Project
tab. The available options are as follows:
Project default profile settings:
Sample rate: select the default sample rate from the drop-down of the audio
in newly created projects.
Bit depth: select the default bit depth from the drop-down of the audio in
newly created projects.
Channels: select the default number of channels of the audio in newly created
projects.
123
CyberLink AudioDirector Help
Default project folder:
Project folder: set the folder where CyberLink AudioDirector project files are
saved by default. To change this folder, click and then select a new
folder.
Working folder: set the folder that CyberLink AudioDirector uses to store the
working files it creates when editing, mixing, and adding effects to your
audio. To change this folder, click and then select a new folder.
DirectorZone Preferences
Click the button to open the Preferences window, and then select the
DirectorZone tab. The available options are as follows:
Sign in:
enter in your E-mail address and Password, and then click the Sign in button
to sign in to DirectorZone. If you do not have a DirectorZone account, click on
the Get an Account link.
Auto sign in to DirectorZone: select this option to automatically sign in to
DirectorZone when the program is opened.
Note: you can sign out from DirectorZone at any time by returning to this tab,
and then clicking the Sign out button.
Privacy rules:
Allow DirectorZone to gather editing information: select this option to allow
DirectorZone to collect information about how you edited the sound clips
you are uploading to DirectorZone.
Audio Settings Preferences
Click the button to open the Preferences window, and then select the Audio
Setting tab. The available options are as follows:
Audio hardware settings
124
AudioDirector Preferences
Default input: from the drop-down select the audio hardware device, such as
a microphone, that you want to use by default when recording audio in
CyberLink AudioDirector.
Default output: from the drop-down, select the connected audio device you
want the audio to be outputted to during playback.
Hardware Acceleration
Preferences
Click the button to open the Preferences window, and then select the
Hardware Acceleration tab. The available options are as follows:
Hardware acceleration:
Enable hardware acceleration for video decoding: if your computer supports
NVIDIA CUDA/AMD Accelerated Parallel Processing/Intel Core Processor
Family technology, select this option to use hardware acceleration to decode
the video during the editing process and when previewing videos.
CyberLink Cloud Preferences
Click the button to open the Preferences window, and then select the
CyberLink Cloud tab. The available options are as follows:
Back up and restore your preferences: if you have a CyberLink Cloud
subscription you can click Back up to CyberLink Cloud to back up program
preferences to CyberLink Cloud. Click Restore from CyberLink Cloud to
replace your current program preferences with the ones you previously
backed up on CyberLink Cloud.
Download folder: click the button to change the folder where CyberLink
Cloud sound clips, projects, and media are stored when downloaded.
Clear CyberLink Cloud cache: click the Clear Offline Cache button to free up
some disk space by emptying the temp files stored when downloading
content from CyberLink Cloud.
Sign out from CyberLink Cloud service: if you are currently signed in to
CyberLink Cloud, click the button to sign yourself out.

125
CyberLink AudioDirector Help
Note: click the Account Information link in the bottom right corner of the
preferences windows if you want to know your CyberLink Cloud subscription
expiry date, how much storage space you have, and more.

126
AudioDirector Hotkeys
AudioDirector Hotkeys
Chapter 14:
The following is a list of the hotkeys available in CyberLink AudioDirector for your
convenience:
Hotkey
Description
File/Project Features
Ctrl+N
New project
Ctrl+O
Open project
Ctrl+S
Save project
Ctrl+Shift+S
Save project as
Ctrl+Q
Import media
Space bar / Num 0
Play/Pause
Num 1
Fast forward
Num 2
Rewind
F12 / Num 3
Start/Stop recording
, / Enter
Jump to beginning
.
Jump to end
* (then number and Tab
keys)
Jump to inputted timecode in Start field
Ctrl+Shift+L / Num 4
Toggle play once/repeat
Num 7
Enable/Disable metronome
Ctrl+C
Copy
Ctrl+V
Paste
Ctrl+X
Cut
Ctrl+Y
Redo
Ctrl+Z
Undo
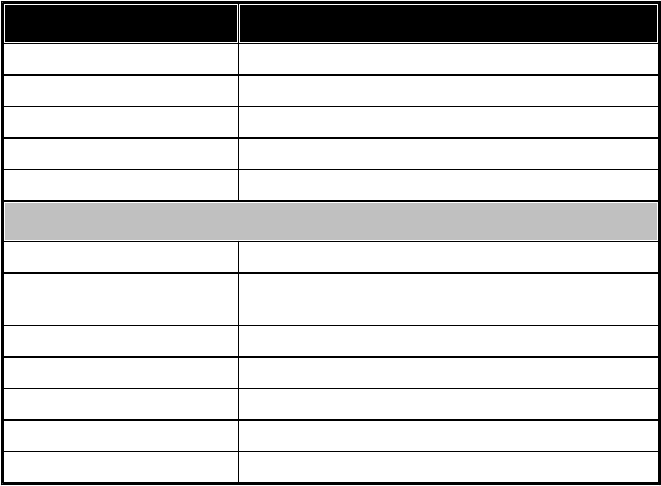
127
CyberLink AudioDirector Help
Hotkey
Description
Delete
Remove
Alt+C
Open AudioDirector preferences
F1
Open help
Esc
Exit countdown timer
Alt+F4
Close AudioDirector
Mix Room
Ctrl+Shift+W
New workspace (Mix room only)
Ctrl+T
Split audio at timeline slider position on selected
track
Shift+S
Enable/Disable solo on selected track
Shift+M
Enable/Disable mute on selected track
Alt+L / Num 5
Enable/Disable loop recording
Ctrl+K
Enable/Disable pre and post roll
Ctrl+M
Display/Hide mixer panel

128
Licensing and Copyright Information
Licensing and Copyright
Information
Chapter 15:
This section contains the AudioDirector licensing and copyright information.
Dolby Laboratories
Manufactured under license from Dolby Laboratories. Dolby and the double-D
symbol are registered trademarks of Dolby Laboratories. Confidential unpublished
works. Copyright 2003-2005 Dolby Laboratories. All rights reserved.

129
CyberLink AudioDirector Help
Technical Support
Chapter 16:
If you require technical support, then this chapter can help. It includes all the
information you need to find the answers you are looking for. You may also find
answers quickly by contacting your local distributor/dealer.
Before Contacting Technical
Support
Before contacting CyberLink technical support, please take advantage of one or
more of the following free support options:
consult the user’s guide or the online help installed with your program.
refer to the Knowledge Base at the following link on the CyberLink web site:
https://www.cyberlink.com/support/search-product-result.do
check the Help Resources page in this document.
When contacting technical support by e-mail or phone, please have the following
information ready:
registered pr oduct key (your product key can be found on the software disc
envelope, the box cover, or in the e-mail received after you purchased
CyberLink products on the CyberLink store).
the product name, version and build number, which generally can be found
by clicking on the product name image on the user interface.
the version of Windows installed on your system.
list of hardware devices on your system (capture card, sound card, VGA card)
and their specifications. For fastest results, please generate and attach your
system info using the DxDiag.txt.
Note: here are the steps to generate the system info DxDiag.txt file: Click
Windows (start) button, and then search for "dxdiag". Click Save All
Information button to save the DxDiag.txt file.
the wording of any warning messages that were displayed (you may want to
write this down or take a screen capture).
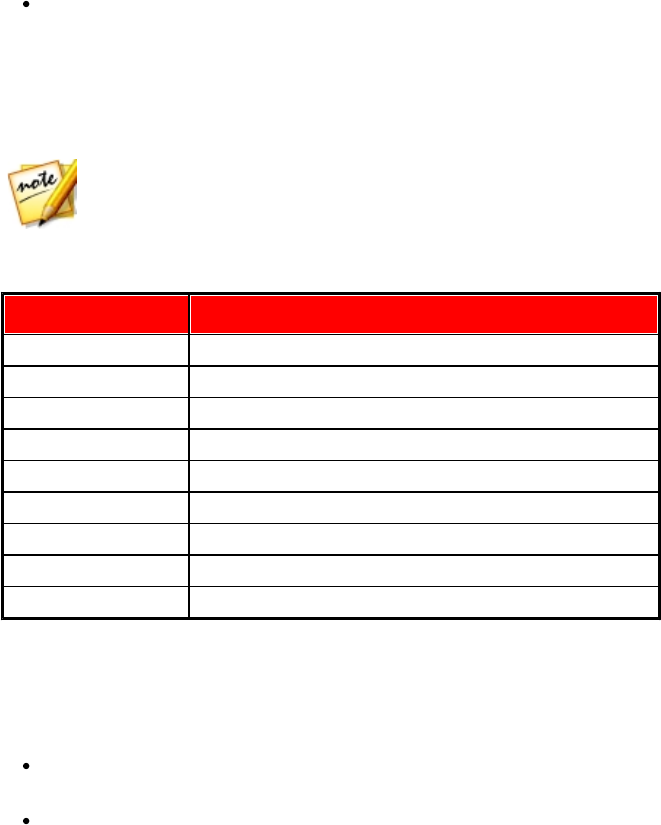
130
Technical Support
a detailed description of the problem and under what circumstances it
occurred.
Web Support
Solutions to your problems are available 24 hours a day at no cost on the CyberLink
web site:
Note: you must first register as a member before using CyberLink web
support.
CyberLink provides a wide range of web support options, including FAQs, in the
following languages:
Language
Web Support URL
English
https://www.cyberlink.com/cs-help
Traditional Chinese
https://tw.cyberlink.com/cs-help
Japanese
https://jp.cyberlink.com/cs-help
Spanish
https://es.cyberlink.com/cs-help
Korean
https://kr.cyberlink.com/cs-help
Simplified Chinese
https://cn.cyberlink.com/cs-help
German
https://de.cyberlink.com/cs-help
French
https://fr.cyberlink.com/cs-help
Italian
https://it.cyberlink.com/cs-help
Help Resources
The following is a list of help resources that may assist you when using any of
CyberLink's products.
Access CyberLink's Knowledge base and FAQ (frequently asked questions):
https://www.cyberlink.com/cs-resource
View video tutorials for your software:
https://directorzone.cyberlink.com/tutorial/

131
CyberLink AudioDirector Help
Ask questions and get answers from our users on the CyberLink Community
Forum: https://forum.cyberlink.com/forum/forums/list/ENU.page
Note: CyberLink’s user community forum is only available in English and
German.
132
Index
Index
3
360 videos 18
4
4K/2K 115
5
5.1 8, 26
7
7.1 8, 26
A
Ambience
adding 48
extracting 48
presets 48
Ambience match 47
Attack time 68
Attenuate
ratio 92
visual repair 82
Audio
adding markers 12
attenuate 82
background noise 47
boosting 38
channels 35
converting 35, 113
creating 95
cropping 10
CyberLink Cloud 117
downloading 27
dubbing 109
editing 35
effects 53
exporting 113
fading 39
importing 26
input 123
inserting noise 46
inserting silence 45
length 42, 107
level meter 20
master track 97
mixer panel 99
mixing 98
mixing down 113
noise reduction 84
normalizing 36, 103
output 123
output preview 21
panning 51, 108
pitch 43
playback controls 16
producing 113
recording 29
remixing 107
removing clicks 88
CyberLink AudioDirector Help
133
Audio
removing vocals 69
repairing 71
restoring 71
reversing 46
saving 113
sharing 117
speed 42
supported formats, export 113
supported formats, import 26
trimming 41
TrueTheater surround 35
uploading 114, 117
volume 50
AudioDirector
Live 2
patches 2
upgrading 2
Auto remix 107
Automated Dialogue Alignment 109
B
Background noise
adding 48
Bar/Beat 7
Base frequency 91
Bit depth 35
Boost 38
C
CDs
creating 119
Change speed 42
Channels
editing 10
normalizing 36
overview 8
panning 108
setting number of 35
Chorus effect 60
Click removal 88
Clipping removal 87
Codec
preview 21
Color label 101
Compressor 54
Controls
playback 16
zoom 13
Convert 113
audio 35
Create
audio mix 95
CDs 119
discs 5
Crop 10
Crossfade 104
CyberLink Cloud
account information 124
backing up sound clips 117
downloading sound clips 28
overview 2
pack project materials 33
preferences 124
projects 34
signing out 124
uploading audio 114
134
Index
D
Decay 61
Delay depth
chorus effect 61
flanger 59
phaser 58
Delays
adding 54
DirectorZone
downloading sound clips 27
overview 2
preferences 123
shaing sound clips 117
Discs
creating 119
DJ scratch 105
Dry-wet mix
auto denoise 85
chrous effect 61
delays 55
flanger 59
noise reduction 86
phaser 58
reverb 56
Dubbing 109
Dynamic range control 53
E
Echo 56
adding 61
Edit
audio 5, 35
tools 36
Effects 24
applying 53
chorus 60
echo 61
flanger 58
importing 70
noise gate 68
phaser 57
VST 70
Equalizer 62, 64
Expander 54
Export 113
projects 33
to CyberLink Cloud 33
F
Fades 39
Feedback
delays 55
echo 62
flanger 59
phaser 58
Filter bandwidth 91
Flanger 58
Frequency smoothing 92
G
Gate 54
Groups 98
CyberLink AudioDirector Help
135
H
Hardware acceleration
preferences 124
Harmonic slope 91
Harmonics 91
Help 130
Hiss removal 92
Hold time 68
Hotkeys 126
Hum removal 88
I
Import
audio 26
effects 70
supported formats 26
video 26
Initial delay time
chorus effect 61
echo 62
flanger 59
Insert 95
L
Language
changing 121
Levels 20
Library 6
sorting 6
Limiter 54
Loop recording 31
Loopback recording 30
M
Markers
timeline 12
Master track 97
Master volume 50
Media
editing 35
importing 26
playback controls 16
sorting 6
Meter 20
Metronome 13
Microphone 30
Mix 95
audio 5
master track 97
timeline 8
Mix down 113
Mixer panel 99
Modulation rate
chorus effect 61
flanger 59
phaser 58
Mono 8
N
New features 1
Noise
136
Index
Noise
inserting 46
reducing 84
Noise gate 68
Noise level threshold 92
Normalize
across tracks 103
audio channels 36
volume on CD 119
O
Output
preview 21
Output gain 53
Overwrite 95
P
Panning 51, 108
Phase diff 59
Phaser 57
Phone 67
Pitch
bender 44
shifting 43
vocals 63
Playback 16
Plosive removal 93
Plug-ins 70
PowerDirector 113
Preferences 121
Produce 113
audio 113
preview 21
video 115
Projects 33
CyberLink Cloud 34
exporting 33
Q
Quick bar 15
R
Radio 66
Range selection 10
Record 29
loopback 30
settings 30
what you hear 30
Recording
loop 31
multiple takes 31
Release time 68
Remix 107
Restore 71
Reverb 56
Reverse 46
Room size 56
Room width 56
S
Sample rate 35
Save
CyberLink AudioDirector Help
137
Save
projects 33
Shape 59
Share 117
Silence 45
Slider 8
Smart repeat 105
Smart transition 104
Solo 101
Sort 6
Sound clips
CyberLink Cloud 28
DirectorZone 27
library 29
Sparkle 56
Spectral frequency view 12
Speed 42
Split 95
Stage count 58
Stereo 8
Stereo expander 65
Surround sound panner 108
System requirements 4
T
Technical support 129
Tempo
determining 13
Tempo transition 105
Temporal smoothing 92
Threshold
noise gate 68
noise level 92
Timbre 63
Timecode 7
Timeline
adding tracks 97
markers 12
master track 97
mix audio 8
overview 7
slider 8
Track
color 101
label 101
Tracks
adding 97
grouping 98
normalizing 103
panner 103
Transitions 104
Trim 41
range 10
TrueTheater surround 35
U
UI language 121
V
Videos
360 18
decoding 124
dubbing audio 109
editing audio 35
importing 26
