frogparking SENSOR Wireless parking space occupancy sensor User Manual 1
frogparking Ltd Wireless parking space occupancy sensor Users Manual 1
Contents
- 1. Users Manual 1
- 2. Users Manual 2
Users Manual 1

Frogparking Site Hardware Installation
Instructions
Frogparking Limited
36 Victoria Avenue
Palmerston North
www.frogparking.com

Frogparking Limited – Proprietary and Confidential July 2013 2
FROGPARKING SITE HARDWARE INSTALLATION INSTRUCTIONS
This document is for authorized Frogparking installers only.
The instructions detailed below are for installing the following Frogparking hardware:
1. Wireless Link (a Frogparking gateway)
2. Surface mount Frog sensors
Each piece of hardware is covered in detail in a dedicated section. Review the tools required and then visit the
appropriate hardware section for further instructions.
Tools required
The following tools will be required to successfully install your Frogparking hardware.
General
Samsung Galaxy S3 or S4 with data services and the latest installer app. loaded (contact Frogparking for the
app).
Laptop (if checking system status on site). Requires WIFI or data services but could be tethered to
smartphone for web access.
Wireless Link Installation
SIM card with data services and details of required settings for the data service.
No1. Philips screwdriver
No2. Philips screwdriver
‘Band-it’ strapping, buckles and strapping tensioning tool (http://www.band-it-
idex.com/en/products/Tools/BAND-IT%20Tool.html)
Note that the Band-it strapping hardware to fix the wireless link bracket to a pole is listed here as it is not
included as part of the Wireless Link and is up to the installer to supply.
Tin snips
Pliers
Hammer
Ladder or alternative to reach installation height safely.
Frog Installation

Frogparking Limited – Proprietary and Confidential July 2013 3
Cordless Hammer drill with 2 batteries (Recommended by Frog: Ramset R28 Lithium Ion)
5mm masonry drill bits (standard, approximately 1 per 100 frogs with space markers)
6mm masonry drill bits (for concrete and paving stones only, alternatively use 5mm masonry bit and 30mm
masonry screws)
Brush
Cordless power drill with 2 batteries (18V minimum, recommended by Frog: Hitachi 18V Lithium Ion)
On site power for charging batteries e.g. generator. Ensure enough hot points for all chargers/devices!
T30 Torx driver bits
Drilling jig
With all the required tools ready to go, you can now begin installation.
Frogparking Limited – Proprietary and Confidential July 2013 4
1. Wireless Link Installation
The Wireless Link is an essential part of the Frogparking system, providing the bridge between the sensors and the
web based management system.
Installing a Wireless Link involves several key steps:
1. Fit the SIM Card
2. Register the Wireless Link on the Frogparking system
3. Mount the Wireless Link
Instructions for each step are given below.
Fitting the SIM Card
If you are supplying your own SIM card for the Wireless Link data services, this will need to be fitted.
Follow the below steps to fit the SIM card…
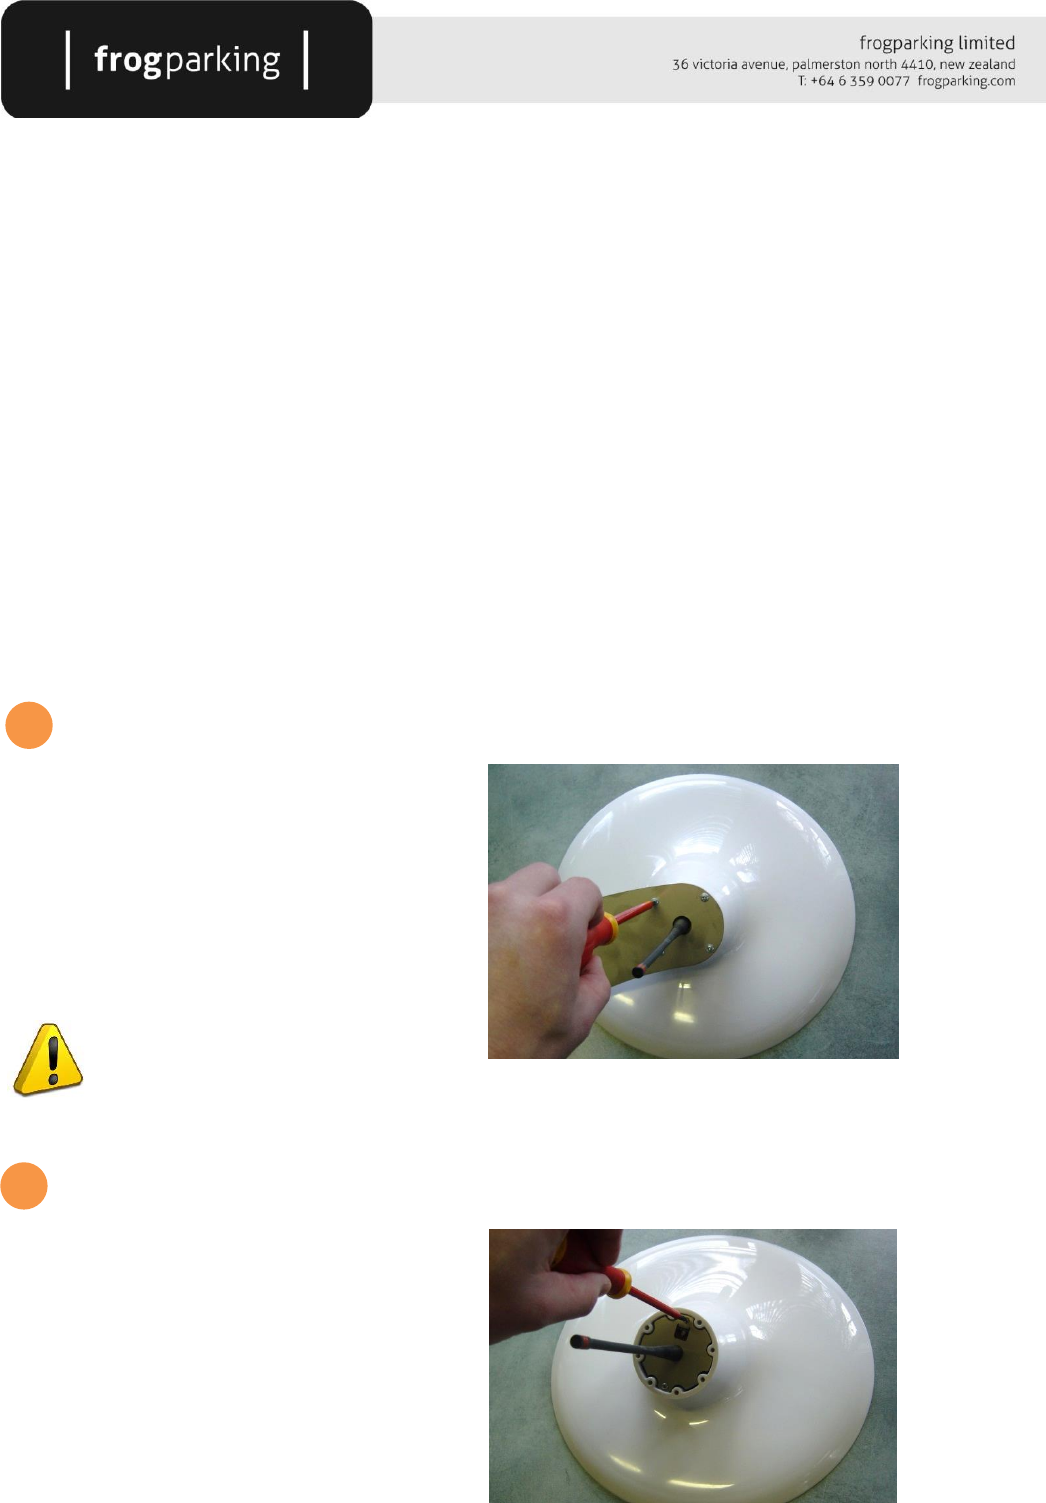
Remove the mounting bracket
If the Wireless Link was shipped with its mounting
bracket attached, use a No.2 Philips screwdriver to
remove the 4 screws holding the bracket in place.
Remove the bracket taking care not to damage the
antenna (if fitted).
If the antenna is not fitted – fit it now.
Remove the circuit board and battery sub assembly
Using a No.1 Philips screwdriver, remove the 2
screws holding the sub assembly in place.
1
2
Frogparking Limited – Proprietary and Confidential July 2013 5
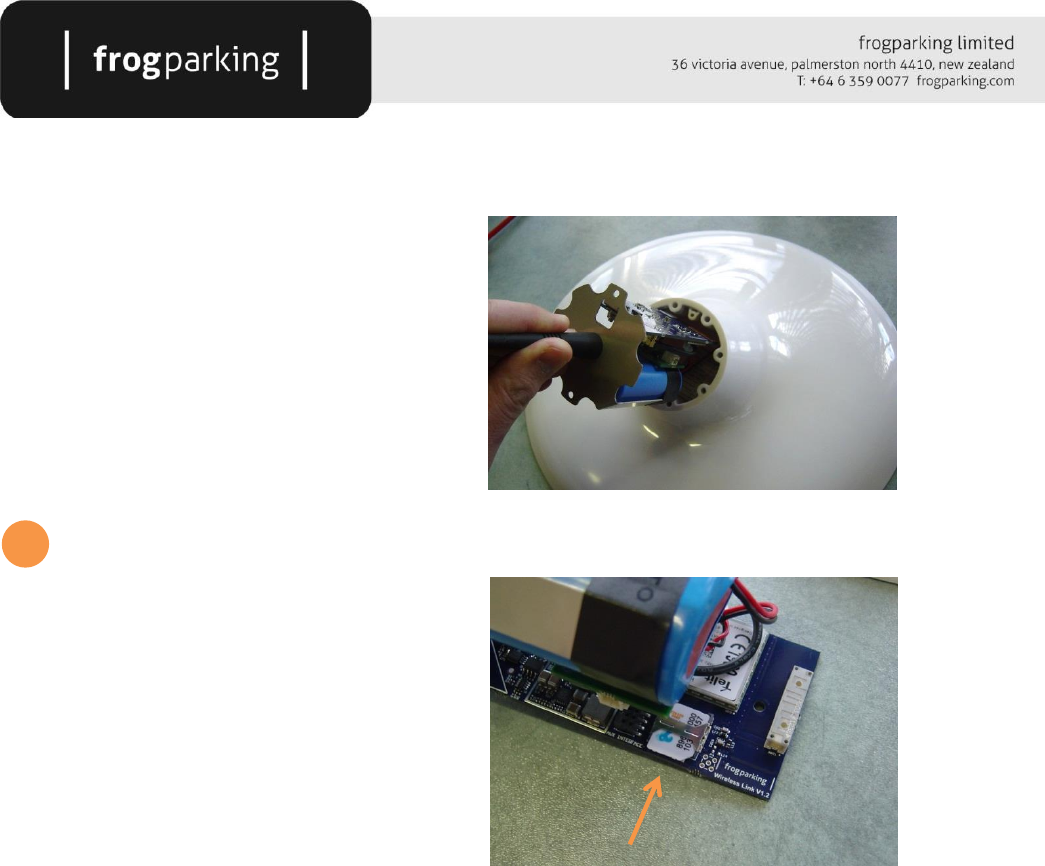
Carefully slide out the sub assembly taking care not
to damage the circuit board.
Insert the SIM card
The SIM card holder is located near the end of the
board on the side facing in towards the battery.
Insert the SIM card so that the contacts are facing
down and the chamfer on the corner of the card is
to the outside of the board.
It is a good idea to check the operation of the Wireless Link with the SIM card prior to mounting the Wireless Link, as
once mounted it will be more difficult to reach and the LED’s are not visible. See the later section on Registering the
Wireless Link for further details.
Registering the Wireless Link
To register a Wireless Link on the Frogparking system, the Frogparking installer app. is required on a Galaxy Samsung
S3 or S4.
Follow the below steps to register, setup and activate the Wireless Link. These steps presume the SIM card has
already been fitted and the Wireless Link is ready for operation. If the Wireless Link’s antenna has not yet been
fitted, fit the antenna now.
3
Frogparking Limited – Proprietary and Confidential July 2013 6
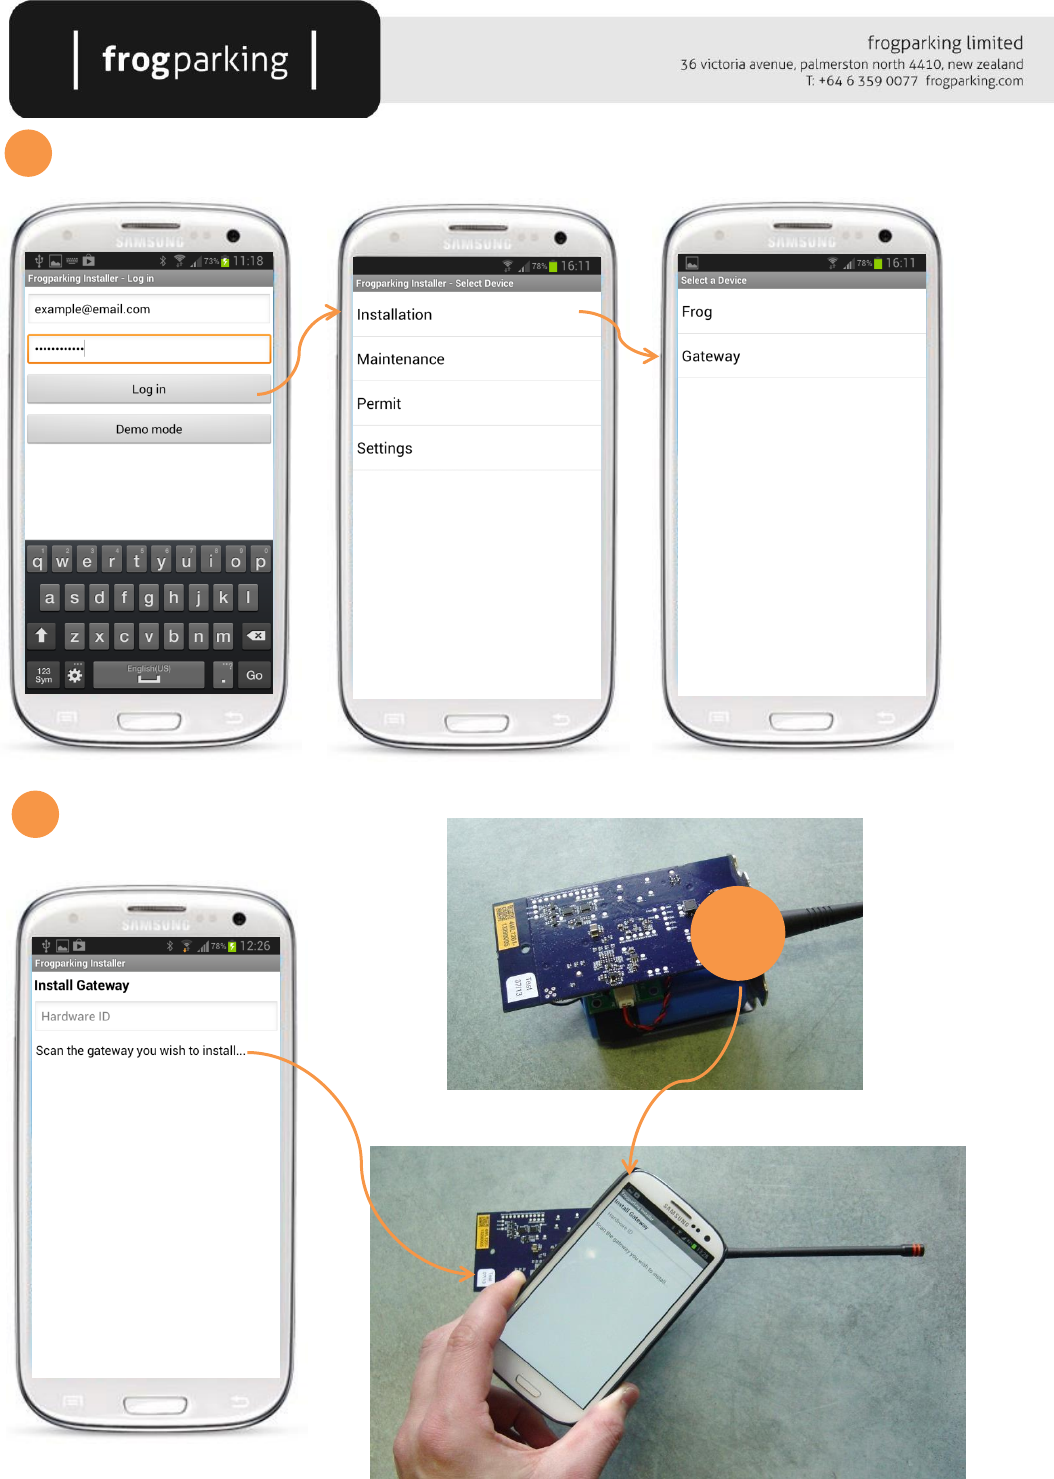
Start the Frogparking Installer app, log in and navigate to the install gateway screen
Scan the gateway…
1
2
scan
here
Frogparking Limited – Proprietary and Confidential July 2013 7
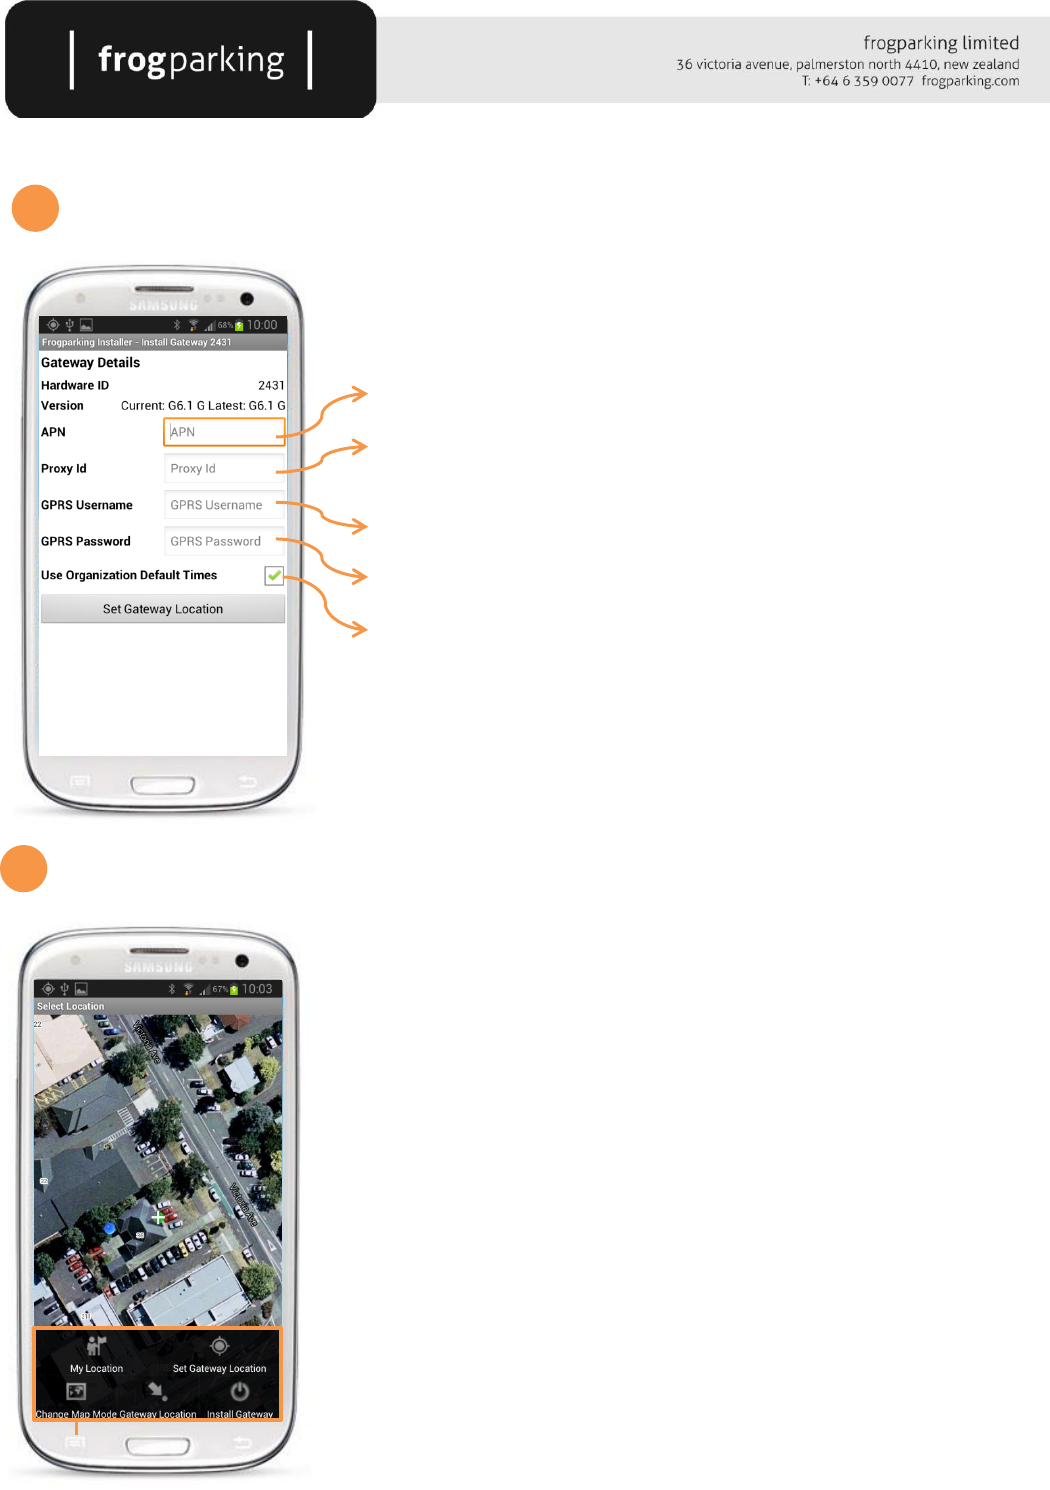
Enter the settings…
The appropriate APN to access the SIM cards data services
An ID number to identify the SIM card, typically the number printed on the
SIM card.
The user name for the data services (if any)
The password for the data services (if any)
If it is desirable for the gateway to have custom operational hours outside
of the default settings for the organization, un-tick the ‘Default Times’ box
and use the ‘Set Wake Up Time’ and ‘Set Sleep Time’ buttons to define the
appropriate times.
Set the Gateway Location
Next, press the ‘Set Gateway Location’ button to go to the map screen for
locating the gateway in the system. A blue dot will show your current
location.
Scroll the map until the white cross is positioned where the gateway is
located and then activate the menu and press ‘Set Gateway Location’. A
green dot will now show the marked position.
The ‘My Location’ button will centre the map on the current GPS position.
‘Gateway Location’ will centre the map on the existing gateway location if
one has previously been entered. ‘Change Map Mode’ will toggle on and off
the satellite images displayed on the map.
When done, press the back button to return to the previous screen to check
details, or ‘Install Gateway’ to proceed with the installation without double
checking details.
3
4
Frogparking Limited – Proprietary and Confidential July 2013 8
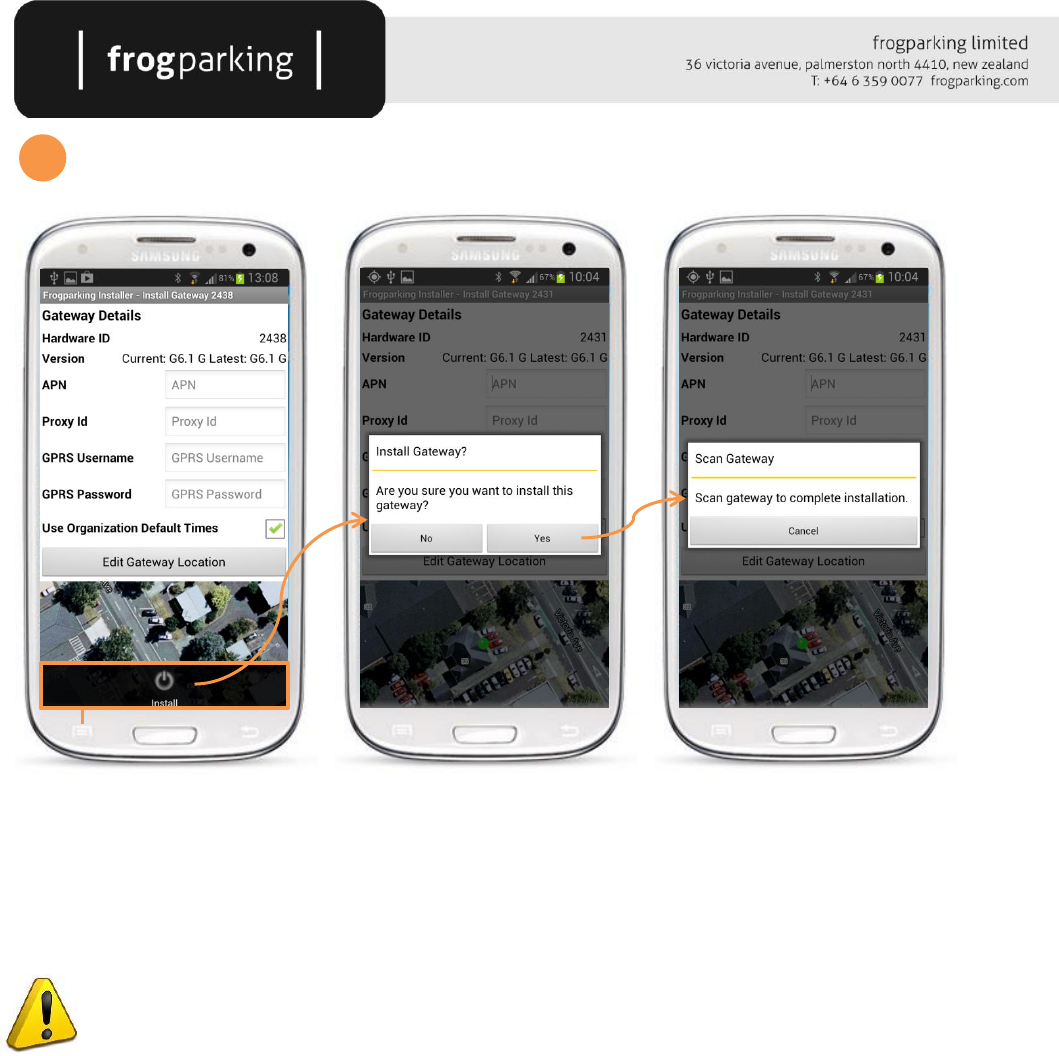
‘Install’ the Gateway
Now that a location has been entered, the map is shown below the details and the button has changed to ‘Edit
Gateway Location’. Check all details and then select install under the menu, follow the prompts and scan the
gateway to complete the installation.
It is critical that the gateway is successfully scanned to complete the installation. This scanning activates
the main processor and instructs the gateway to start normal operation. This will take approximately 4 or 5
seconds after the ‘beep’ indicating the app has started communicating with the gateway.
5
Frogparking Limited – Proprietary and Confidential July 2013 9
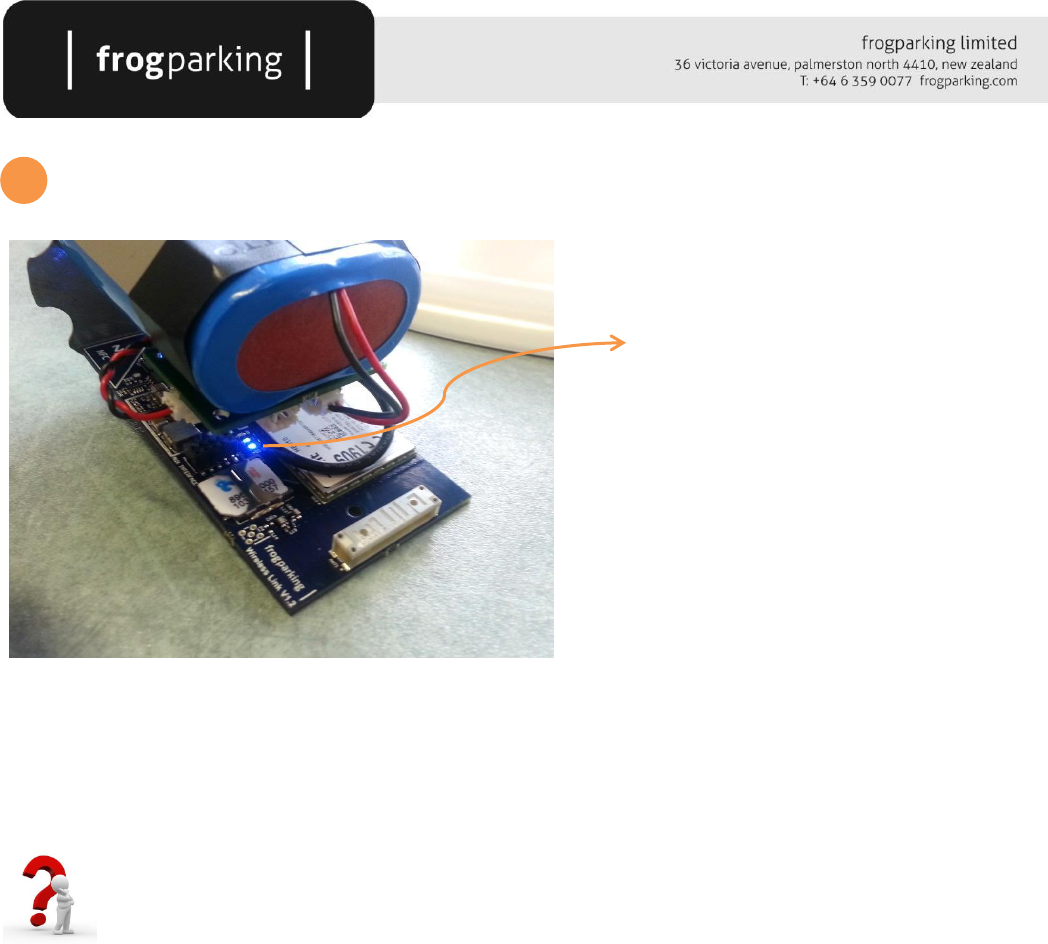
Check the Operation
Green and Blue LED’s pulsing
Within a few minutes, after the Wireless Link has booted and completed its self-check, the blue LED will start
pulsing. The Wireless Link is then in normal operation and is trying to contact the Frogparking webserver. When the
green LED starts pulsing in synchronisation with the blue LED, the Wireless Link has connected with the Frogparking
webserver and is ready to work i.e. the SIM card and settings are correct.
LED’s not blinking correctly?
Check the following if the LED’s do not start blinking together:
Hours of operation. The gateway may have contacted the web server and been instructed to sleep as the
current time is outside the normal hours of operation.
SIM card correctly inserted
APN settings
Power level
All power connections
That the Wireless Link has been activated
If these things are all okay, contact Frogparking for further assistance.
6
Frogparking Limited – Proprietary and Confidential July 2013 10
Reassemble the Wireless Link
Reverse the steps described earlier to reassemble the Wireless Link, taking care not to damage the circuit board
when inserting the sub assembly.
Ensure the solar panel has been connected to the charge controller
The Wireless Link is now ready for mounting in an appropriate location. However, the details registered on the
system can be edited.
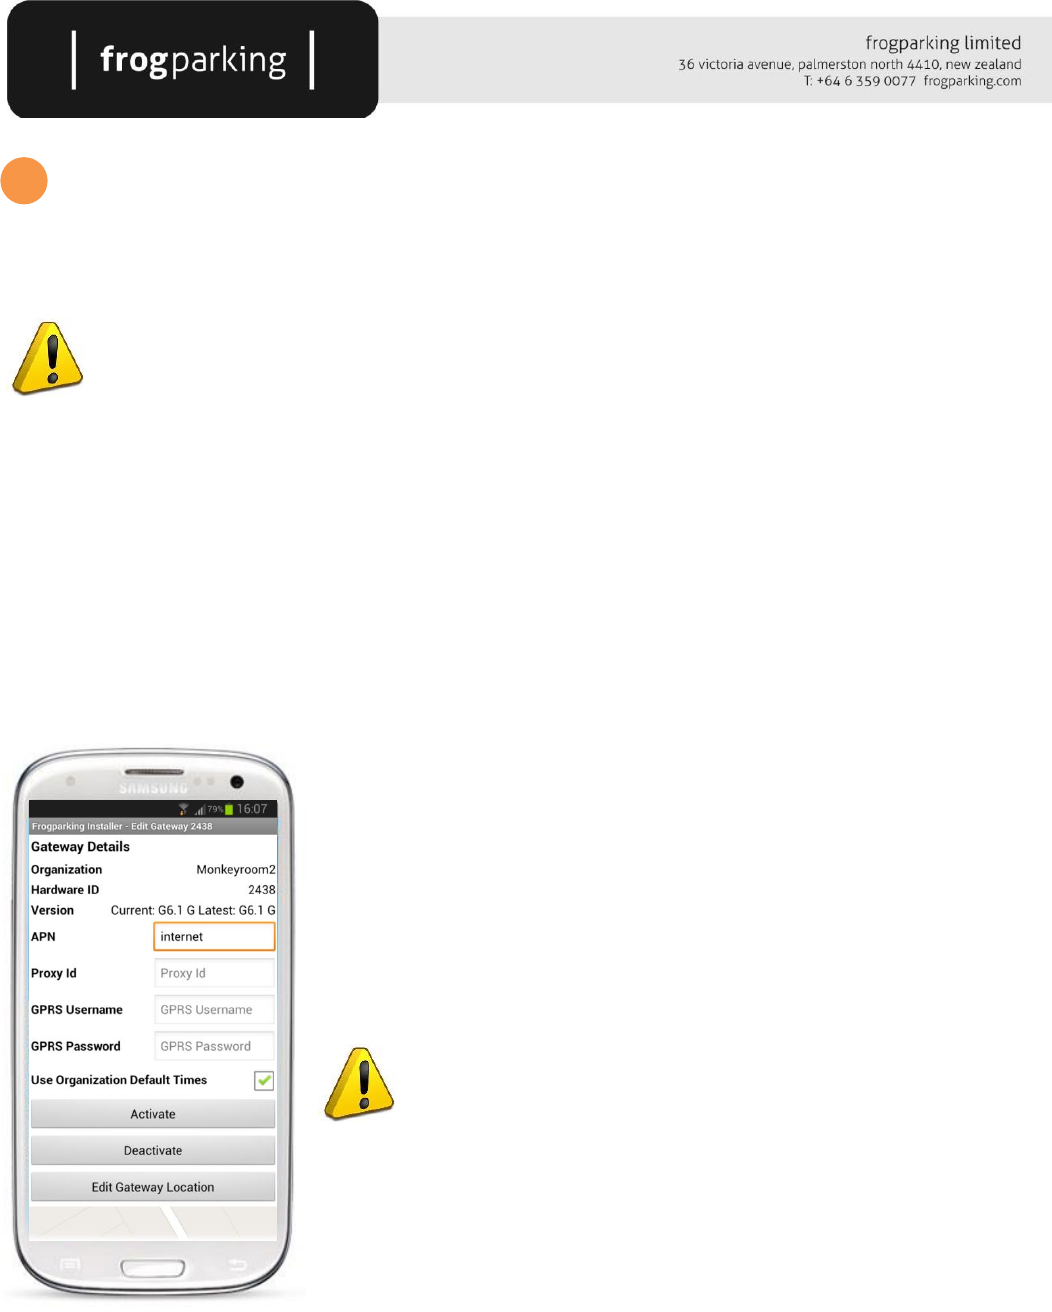
Editing the Wireless Links Details
At any stage the details of the wireless link can be edited using the installer app. Start the app, log in and navigate to
the gateway installation page as per the first steps of installing a new gateway. Scan the gateway or enter the
gateways Hardware ID…
Edit the details as desired and then select save from the menu. Some changes will
require scanning of the gateway to take effect, scan the gateway as prompted by
the app.
If the gateway will not be in use for some time, it can be deactivated. Once
deactivated, the gateway will be in a deep sleep state until activated again by the
app.
Changing the APN settings and Activating/Deactivating a Wireless Link
cannot be done remotely, ensure these settings are correct and that
the Wireless Link is in the correct state before leaving the site.
7

Frogparking Limited – Proprietary and Confidential July 2013 11
Mount the Wireless Link
There are several key factors to be considered when mounting the Wireless Link.
Range
The Wireless Link should be mounted in relative close proximity to the Frog sensors it is required to service.
Interference
The antenna on the Wireless Link should be no closer to a metal object than the supplied mounting bracket
allows. Also, it should not be positioned in close proximity to other antennas.
Security
The Wireless Link should be at a height of no less than 3.2m from the ground to minimize the risk of
vandalism.
Solar Exposure
The Wireless Link is solar powered and therefore should be positioned to optimise exposure to sunlight.
Orientation of the solar panel and potential shading from nearby objects should both be considered when
choosing the optimum mounting position.
The Wireless Link enclosure can be mounted to its bracket in 40 degree rotational increments to assist in
positioning to maximise solar exposure.
The position for the Wireless Link is a balance of these factors and all factors should be optimised to ensure the
reliable operation of the Wireless Link.
Frogparking Limited – Proprietary and Confidential July 2013 12
2. Frog Sensor Installation
The Frog Sensor detects the occupational state of a parking space and communicates this information to the
Frogparking website via the Wireless Link or other suitable Frogparking gateway.
Installing a Frog Sensor involves the following steps
1. Mounting the sensor to the surface
2. Mounting the space number marker
3. Registering/activating the sensor on the Frogparking system
Details on each step are given below. However, before beginning, determine the appropriate position for the sensor
and space marker based on the space type.
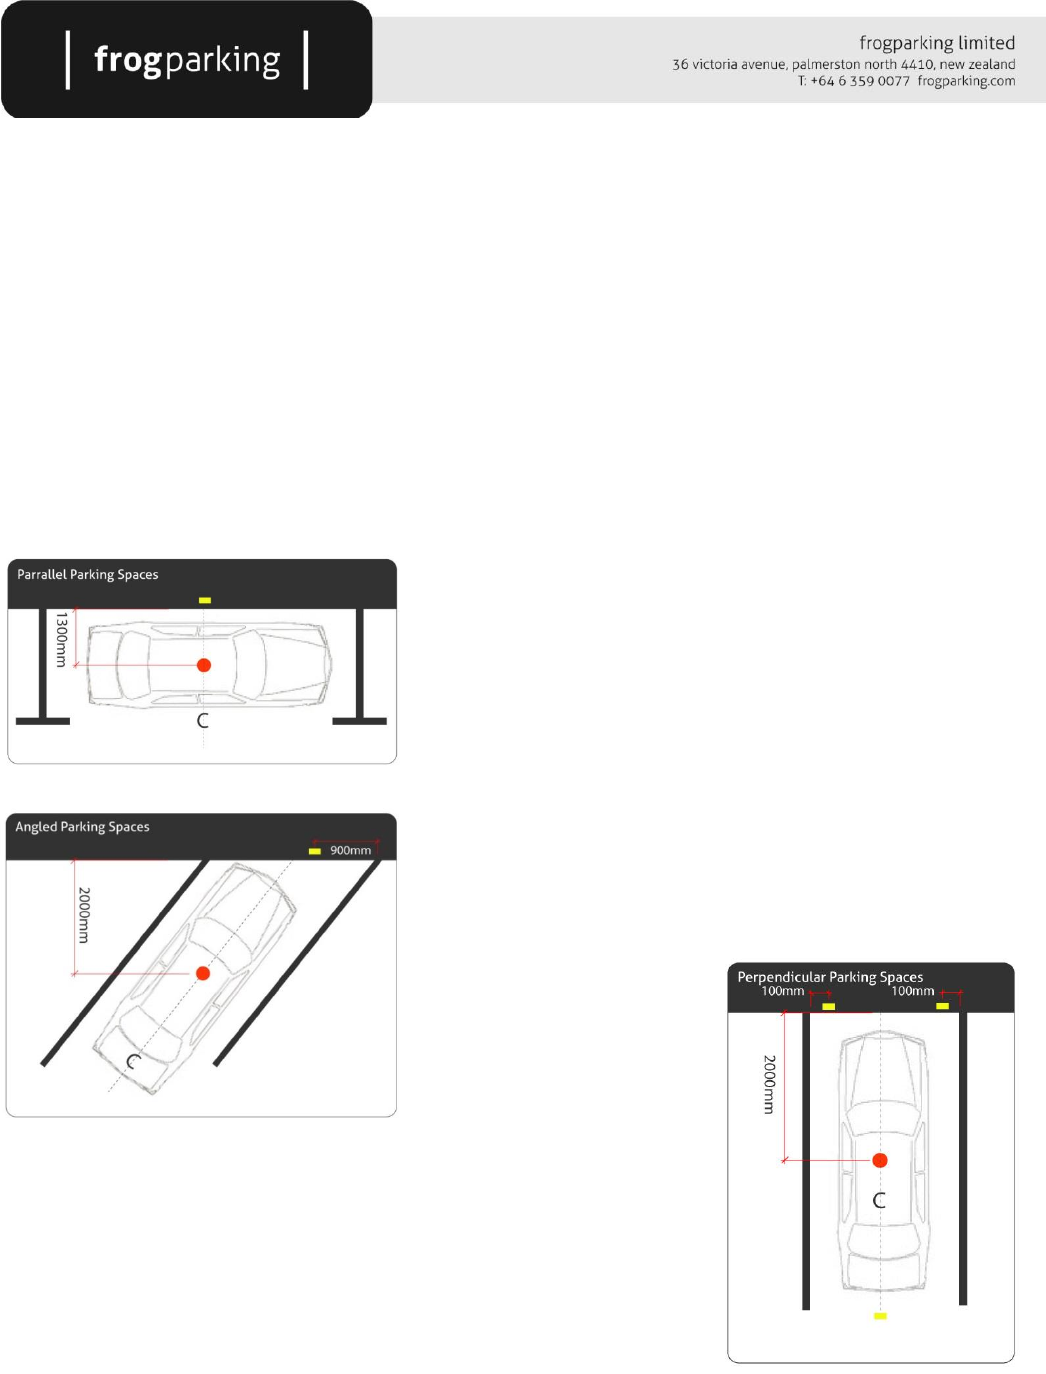
For parallel parking spaces, the sensor should be mounted in the
centre of the parking space 1300mm from the curb, which
corresponds to one extended ‘click’ from the closed position on the
sensor drilling jig.
The space marker should be mounted on the curb/pavement centred
on the park in line with the sensor. In cases where there is no curb or
pavement, and vehicle occupants are expected to move away from
the vehicle along the ‘road’, it is acceptable to mount the space
marker on the ‘road’ side of the parking space.
For angled or perpendicular/straight car parks, the correct sensor
position is in the centre of the parking space 2000m straight out from
the curb. 2000m corresponds
to the last click before full
extension on the sensor drilling
jig.
Position the space marker as
shown for the corresponding
space type. In perpendicular parking spaces, the space marker should be
positioned relative to the driver’s side of the vehicle.
Again, if there is no curb or pavement and vehicle occupants will typically
move away from the vehicle along the ‘road’, mounting at the rear of the car
park is acceptable. In this case, the space marker should be mounted in the
centre in line with the sensor.
Now that you have determined the correct position for the sensor and space
marker, you are ready to proceed.
Frogparking Limited – Proprietary and Confidential July 2013 13
1
2
Mounting the Frog Sensor
Follow the below steps to mount the sensor to the road surface…
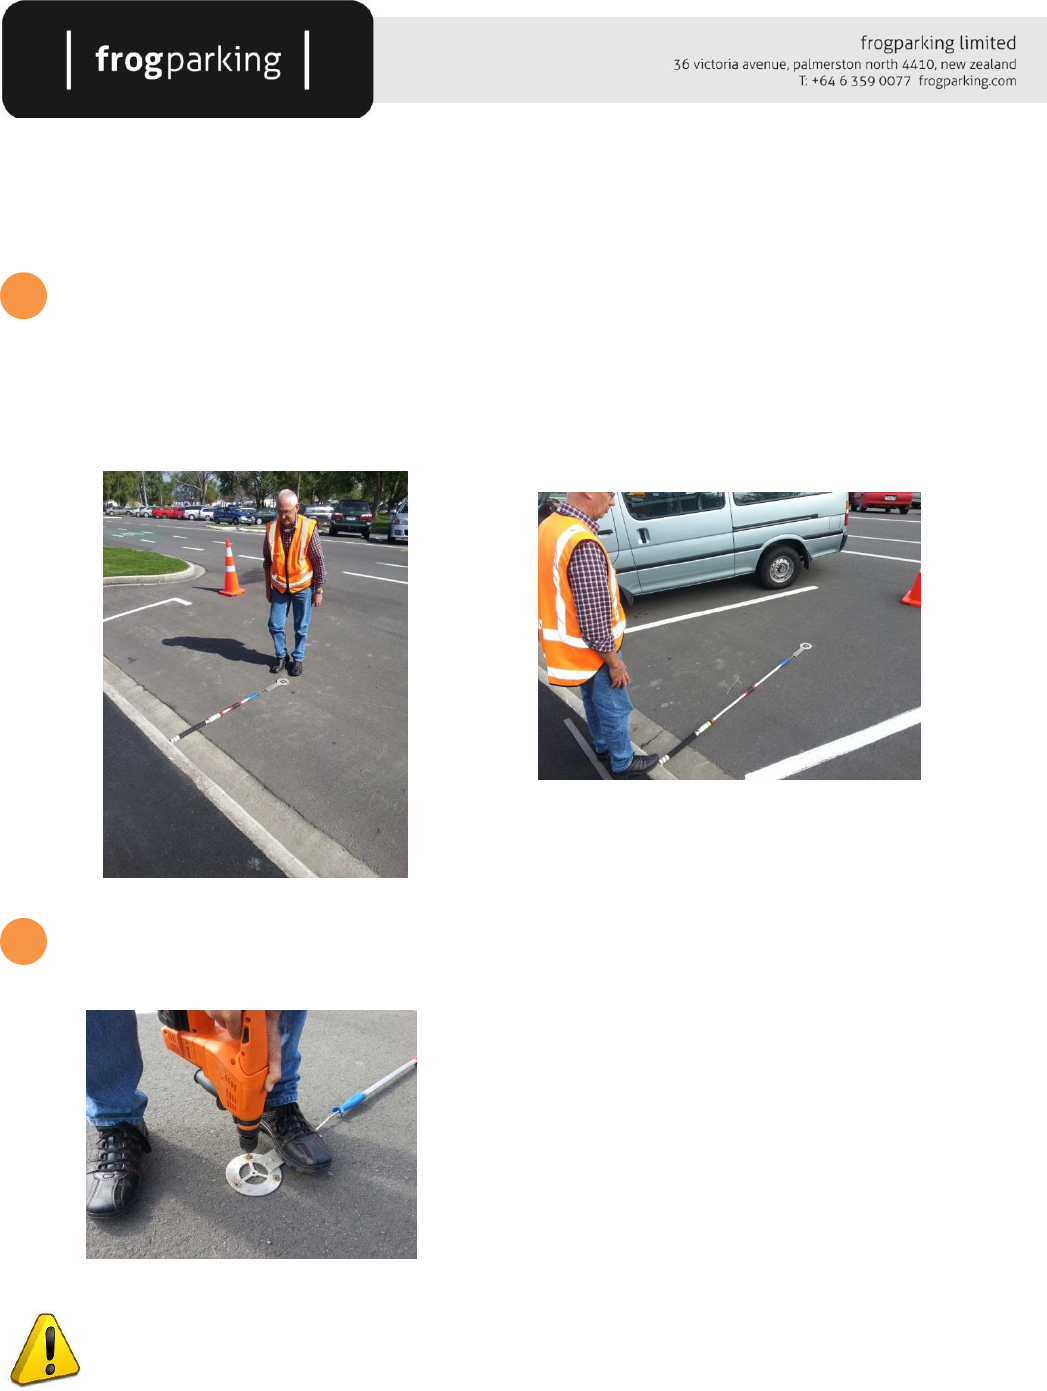
Place the jig
Check the jig is at the correct extension for the parking space type as described above. Place the end against the curb
and judge the centre position of the drilling head by eye. Note that the drilling jig should be square to the curb even
on angled parks to ensure the correct mounting position.
Drill the sensor mounting holes
Using a 5mm masonry drill bit and an appropriate hammer drill, drill
through the drilling holes on the jig.
On extremely hard to drill surfaces, it might be necessary to
alternate holes, drilling only a small amount on each hole and
clearing the drillbit between holes. This will prevent the drillbit from
damage due to overheating.
There are two sets of holes in the drilling jig, one set of holes for the solar sensor, the other for the
battery sensor. Ensure you use the correct hole pattern for the sensor you are mounting.
Frogparking Limited – Proprietary and Confidential July 2013 14
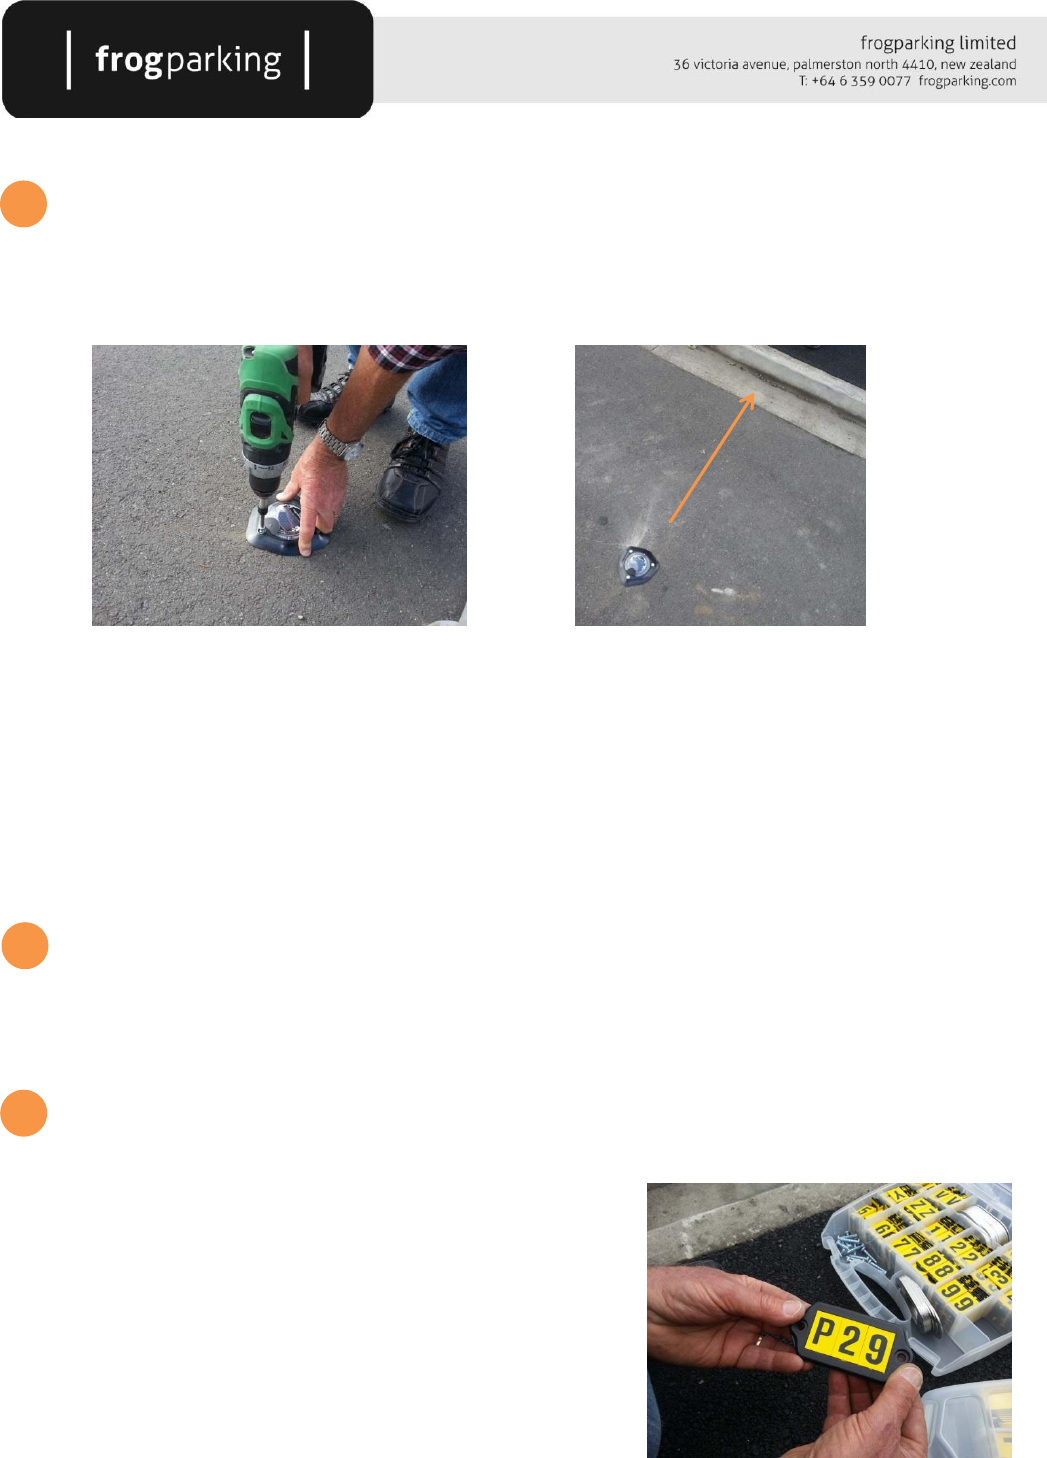
3
1
2
Screw down the sensor
Position the sensor over the drilled holes and with a powerdrill, screw down the three 6mm x 50mm mounting
screws. Note the frog’s head on the sensor must face the curb.
This completes the physical mounting of the sensor, now mount the space marker and register the frog on the
system.
Mounting the Space Marker
The space marker mounting steps are similar to the sensors…
Drill the mounting holes
The same size drill bit (5mm masonry drill bit) as the sensor is used for drilling the space marker mounting holes.
Using the space marker drilling jig, drill the mounting holes in the position determined earlier.
Assemble the space marker
Assemble the desired space marker numbers into the mounting
frame.
To avoid confusion to users and enforcers, the system will not allow
the same space numbers in close proximity to each other. If in doubt,
register the sensor with the desired space number on the system first,
then if the space number breaks the proximity rules, the installer app.
will flag the error and stop the registration to enable the selection of
a different space number.

Frogparking Limited – Proprietary and Confidential July 2013 15
Screw down the space marker
Using two 6mm x 30mm mounting screws, screw down the space marker
assembly with a power drill.
Note that if the space marker is mounted on the curb, it should be readable
from the pavement.
With the sensor and space marker securely fastened, the sensor is ready for registering on the system.
Register the Frog Sensor
Before the sensor can become operational, it needs to be registered on the system and activated. To register a
sensor on the Frogparking system, the Frogparking installer app. is required on a Galaxy Samsung S3 or S4.
These steps presume the sensor and space number have been mounted to the road. However, it is also possible to
mount the space number after registering to ensure the space number is compatible with other sensors and space
numbers in the nearby area.
Start the Frogparking Installer app, log in and navigate to the install frog screen
1
3
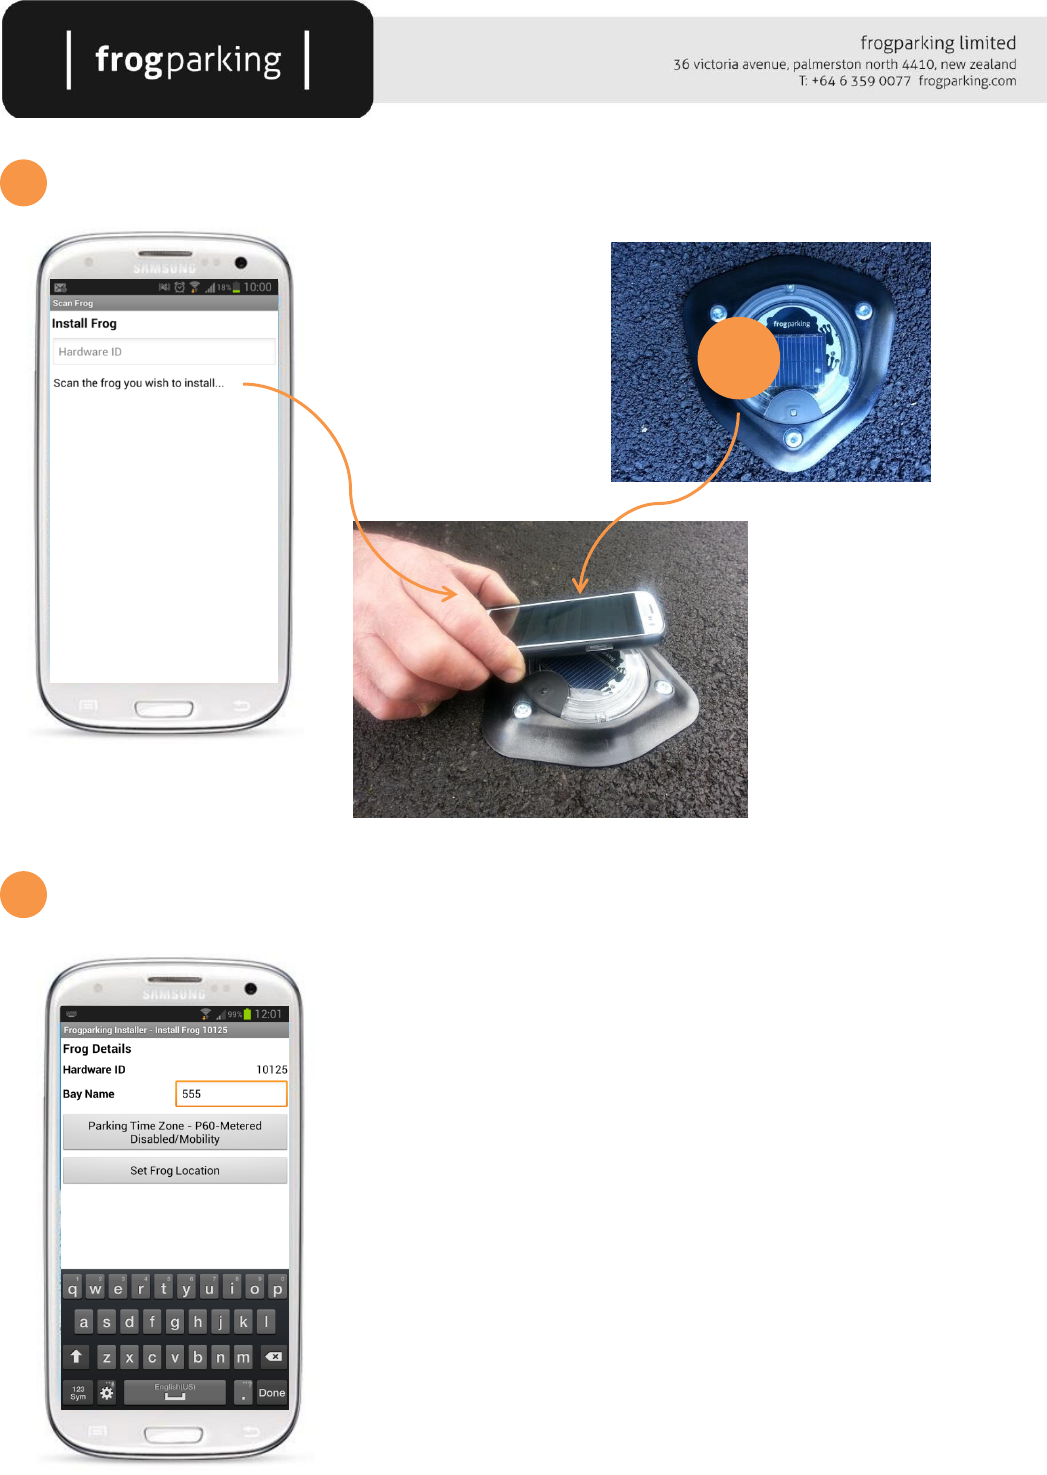
Frogparking Limited – Proprietary and Confidential July 2013 16
Scan the frog…
Enter the desired ’Bay Name’ (space number)
Note that the system will not check the proximity of other spaces with the same
number until the install button is pressed in the final step.
2
scan
here
3
Frogparking Limited – Proprietary and Confidential July 2013 17
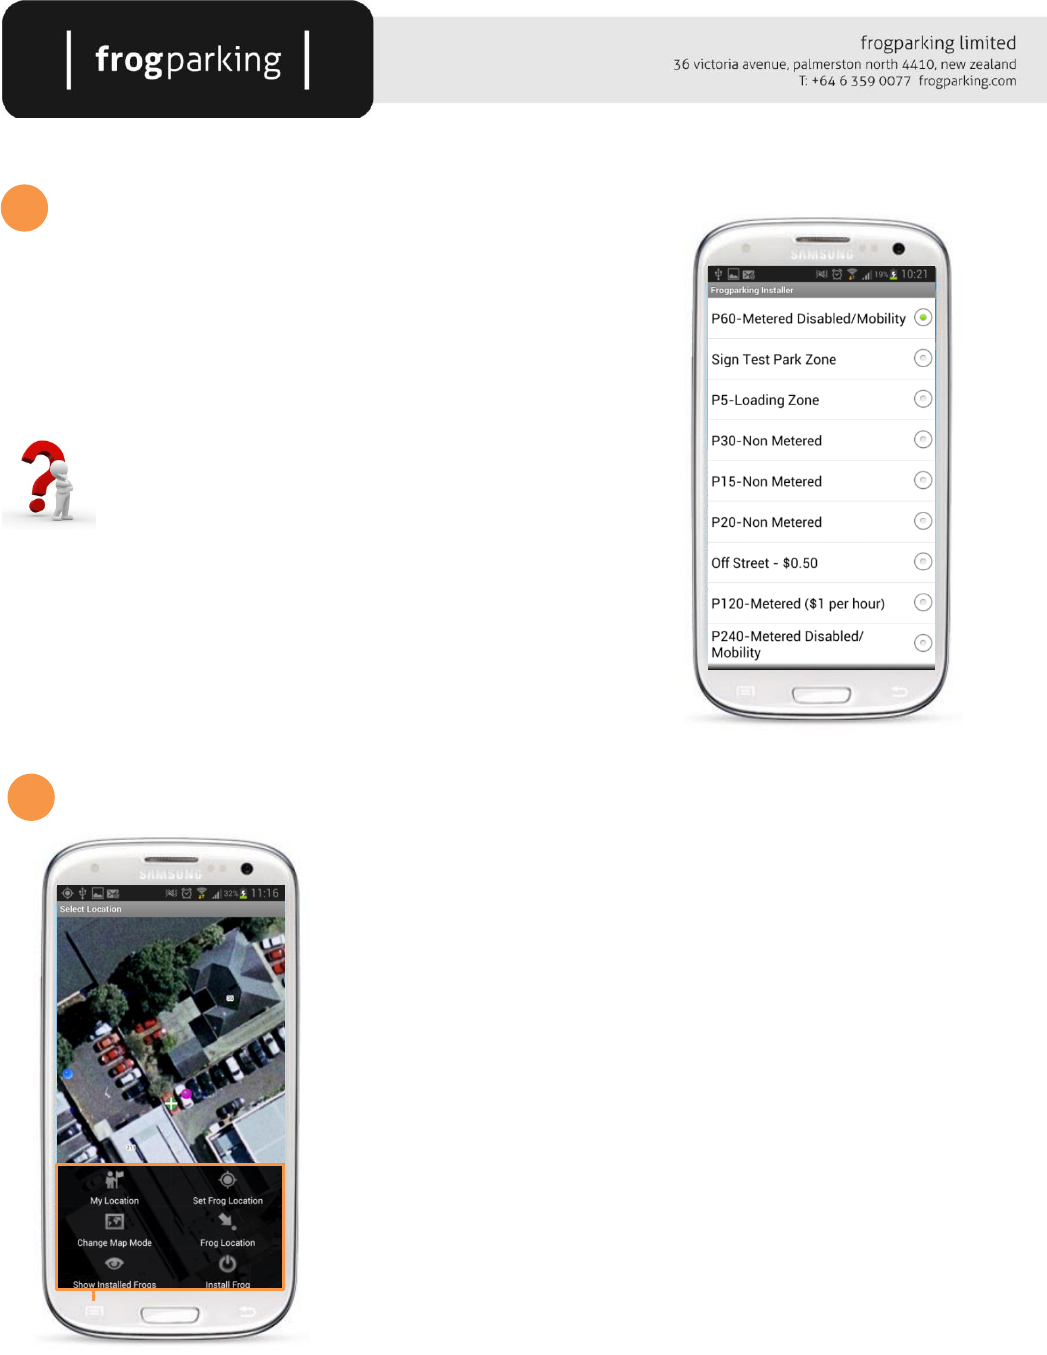
Check the time zone
If the correct time zone is not shown (the first time zone on the list is the
default), then press the ‘Parking Time Zone’ button and select the correct
time zone.
Time zones for a sensor can be edited remotely via the website.
No time zones showing on the list?
Adding and setting up time zones is done via the website,
contact the system administrator to setup the required time
zones. The list of time zones on the phone will automatically update when
they are added on the website.
Set the Frog sensor location
Press the ‘Set Frog Location’ button to go to the map screen for locating the
sensor in the system.
Some coloured dots are shown on the map. Blue is the current position of the
Samsung, a pink dot is the last installed frog, red dots are previously installed
frogs (which can be toggled on and off) and the current sensor location will
show as a green dot once set.
Scroll the map until the white cross is positioned where the frog is located and
then activate the menu and press ‘Set Frog Location’. A green dot will now show
in the selected location.
The ‘My Location’ button will centre the map on the current GPS position. ‘Frog
Location’ will centre the map on the existing frog location if one has previously
been entered. ‘Change Map Mode’ will toggle on and off the satellite images
displayed on the map. ‘Show Installed Frogs’ will show all the frogs installed in
the nearby area. Note the number of frogs shown is set in the settings menu.
When done, press the back button to return to the previous screen to check details, or ‘Install Frog’ to proceed with
the installation without double checking details.
4
5
Frogparking Limited – Proprietary and Confidential July 2013 18
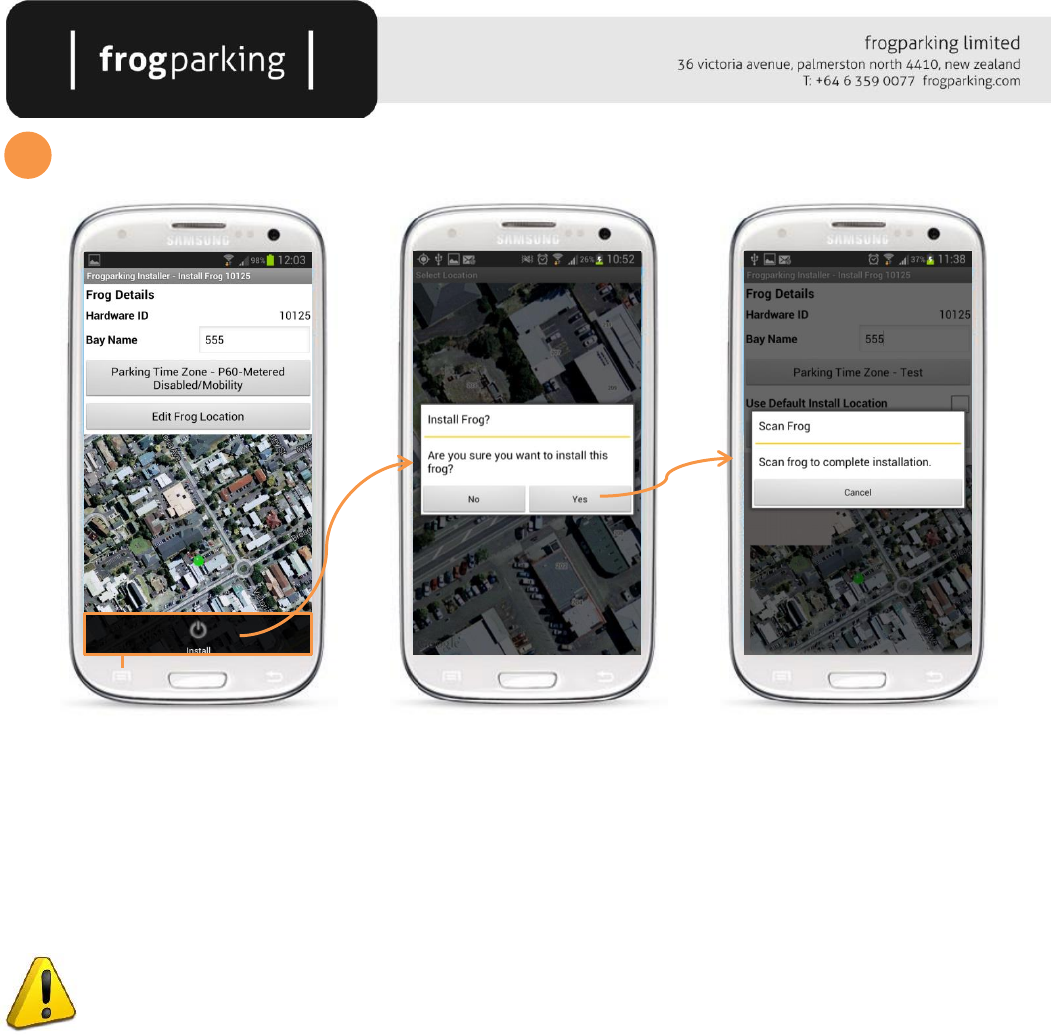
‘Install’ the Frog
Now that a location has been entered, the map is shown below the details and the button has changed to ‘Edit Frog
Location’. Check all details and then select install under the menu, follow the prompts and scan the frog to complete
the installation.
It is critical that the sensor is successfully scanned to complete the installation. This scanning activates the
main processor and instructs the frog to start its initial processing and system synchronization, after which
it will resume normal operation. Sensor activation can’t be completed remotely.
The installation for the Frog sensor has now been completed. Note that after activating a Frog sensor, it may take up
to 24 hours for the sensor to be ready for normal operation.
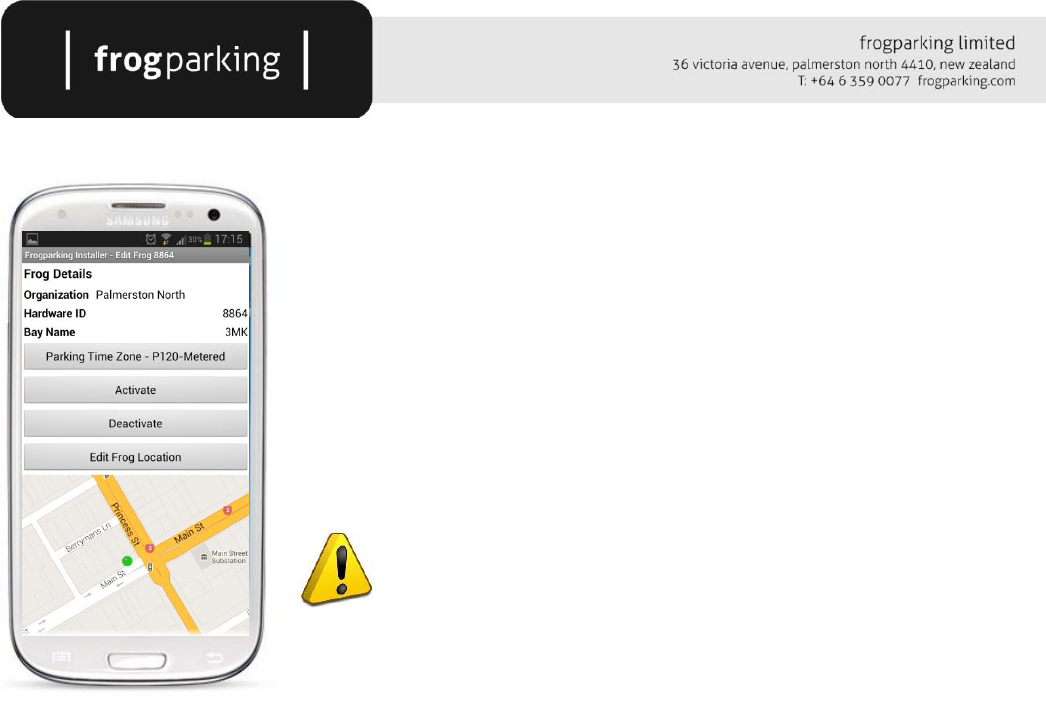
Editing the Frog Sensor Details
At any stage on site, the details of the sensor can be edited using the installer app. Start the app, log in and navigate
to the frog installation page as done previously. Scan the frog whose details you wish to change or enter the Frog’s
Hardware ID. A similar screen as per initial installation will show…
6
Frogparking Limited – Proprietary and Confidential July 2013 19
Edit the details as desired and then select save from the menu. Activating or
Deactivating will require scanning of the frog to take effect, other changes are
simply saved to the website. The app will prompt for scanning if required.
If the sensor will not be in use for some time, it can be deactivated. Once
deactivated, the sensor will be in a deep sleep state until activated again by the
app.
Activating/Deactivating a sensor cannot be done remotely, ensure these
settings are correct and that the sensor is in the correct state before
leaving the site.

Frogparking Limited – Proprietary and Confidential July 2013 20
3. FCC Compliance Documentation
Frog Sensor and Wireless Link:
This device complies with Part 15 of the FCC Rules. Operation is subject to the following two conditions: (1)
this device may not cause harmful interference, and (2) this device must accept any interference received,
Note: This equipment has been tested and found to comply with the limits for a Class A digital device,
pursuant to part 15 of the FCC Rules. These limits are designed to provide reasonable protection against
harmful interference when the equipment is operated in a commercial environment. This equipment
generates, uses, and can radiate radio frequency energy and, if not installed and used in accordance with the
instruction manual, may cause harmful interference to radio communications. Operation of this equipment in
a residential area is likely to cause harmful interference in which case the user will be required to correct the
interference at his own expense.
Warning: Changes or modifications not expressly approved by Frogparking Ltd could void the user’s
authority to operate the equipment.