goodbetterbest EX-11 EX Wireless Dongle User Manual part 1 of 2
Goodbetterbest Limited EX Wireless Dongle Users Manual part 1 of 2
Contents
- 1. Users Manual - part 1 of 2
- 2. Users Manual - Part 2 of 2
Users Manual - part 1 of 2
EX-06
WIRELESS HD
STEREO HEADSET
PS3 | XBOX | PC | MAC
IPOD | MP3 PLAYERS
EX6UNI-wireless-manual-book.indb 1 11/09/2013 10:24

EX6UNI-wireless-manual-book.indb 2 11/09/2013 10:24
EN
1
IMPORTANT : READ & UNDERSTAND THESE INSTRUCTIONS BEFORE USE.
WARNINGS
This symbol indicates important
installation, operational or
maintenance instructions.
Always follow these
instructions very closely.
ENVIRONMENT
Please help to conserve the
environment by recycling
the cardboard packaging
of this product.
This product should NOT be
disposed of in normal household
waste. It should be disposed of
separately. Please take it to an
electrical waste collection point.
PRECAUTIONS
This product has been designed with
the highest concern for safety. However,
any electrical device if used improperly
has the potential to cause harm. To help
ensure risk-free operation please pay
attention to the following guidelines:
• Use only as intended. This is a
precision product, handle with care.
• Contains small parts. Not suitable for
children under three years of age.
• Store in a dry and dust free area.
• Do not store in areas of extreme
heat or cold, and avoid direct sunlight
or heat sources e.g. heaters.
• Do not allow the product to get wet
or dirty; doing so may cause damage.
• Do not clean with benzene,
paint thinner, acetone, alcohol,
or other such solvents.
• Do not take the product apart; doing
so will void your warranty and may
cause electrical shock on your console.
FOR ADDITIONAL CUSTOMER SUPPORT &
TO VIEW THIS MANUAL ONLINE VISIT:
WWW.GIOTECK.COM
EX6UNI-wireless-manual-book.indb 1 11/09/2013 10:24
EN
2
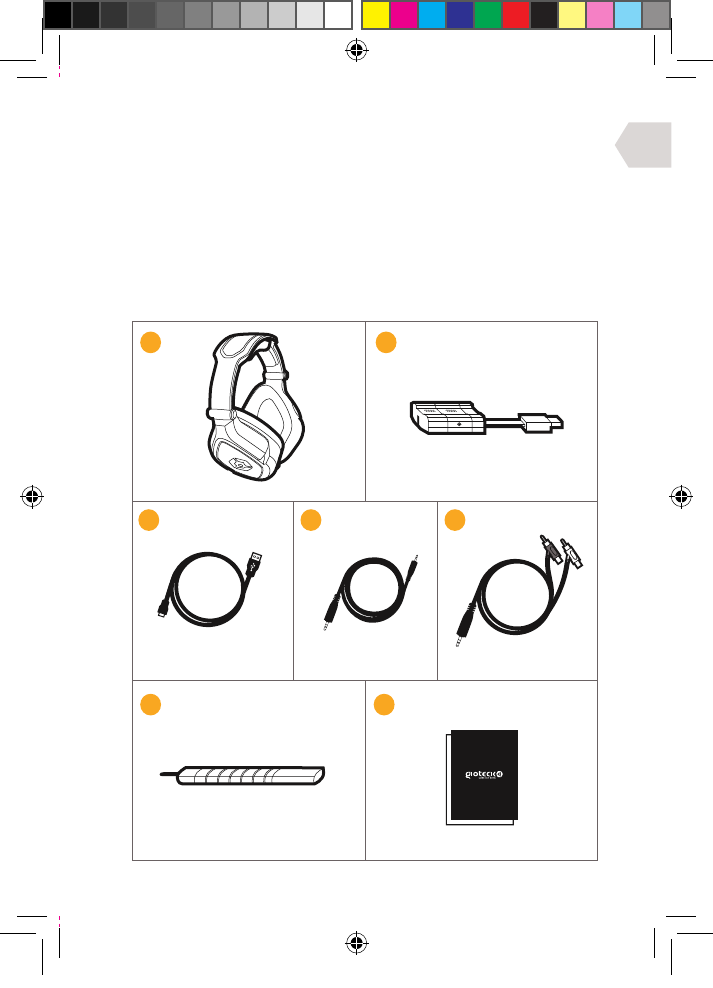
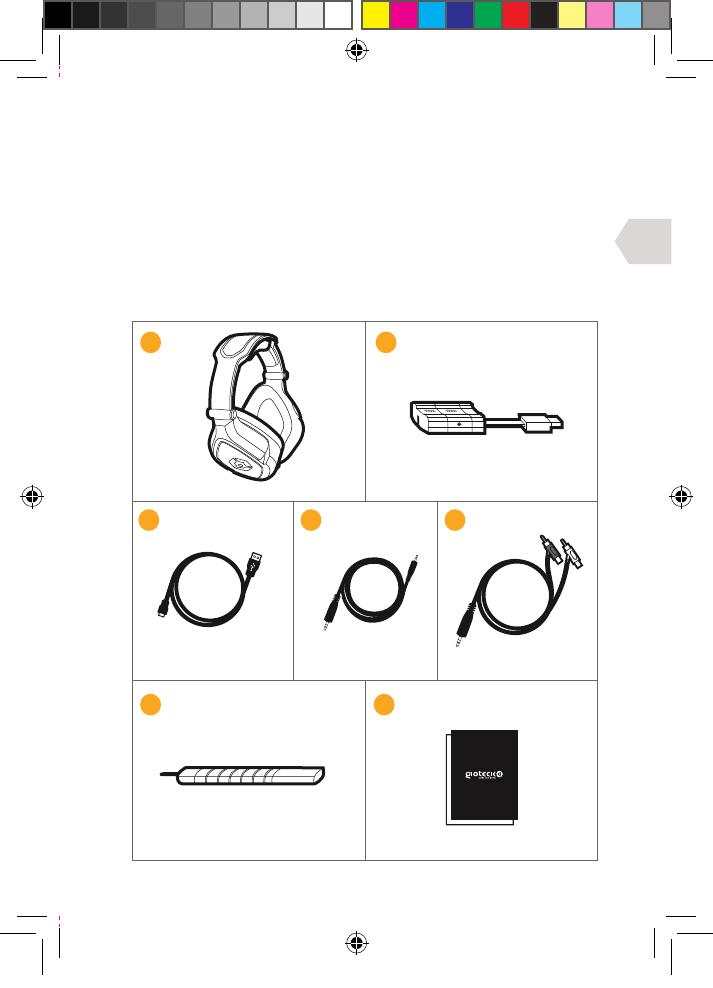
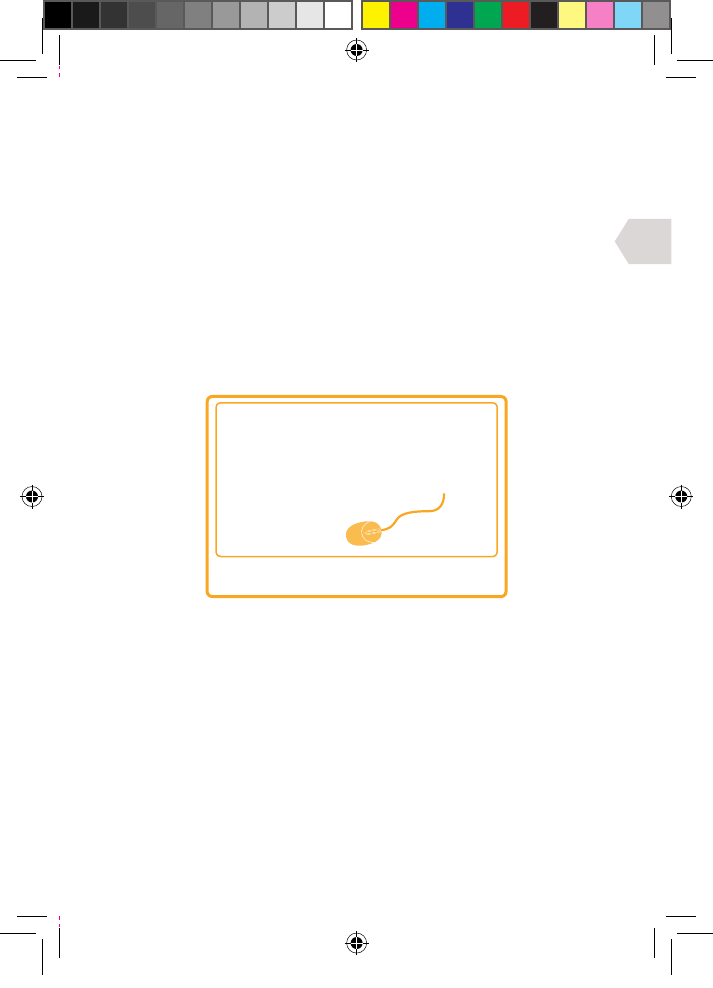
PARTS LIST
i] Headset
ii] Wireless Transmitter
iii] USB Charging Cable
iv] Audio / Xbox Chat Cable
v] RCA to Audio Cable
vi] Removable Mic Boom
vii] User Manual
iii
iii iv
vi
v
vii
EX6UNI-wireless-manual-book.indb 2 11/09/2013 10:24
EN
3
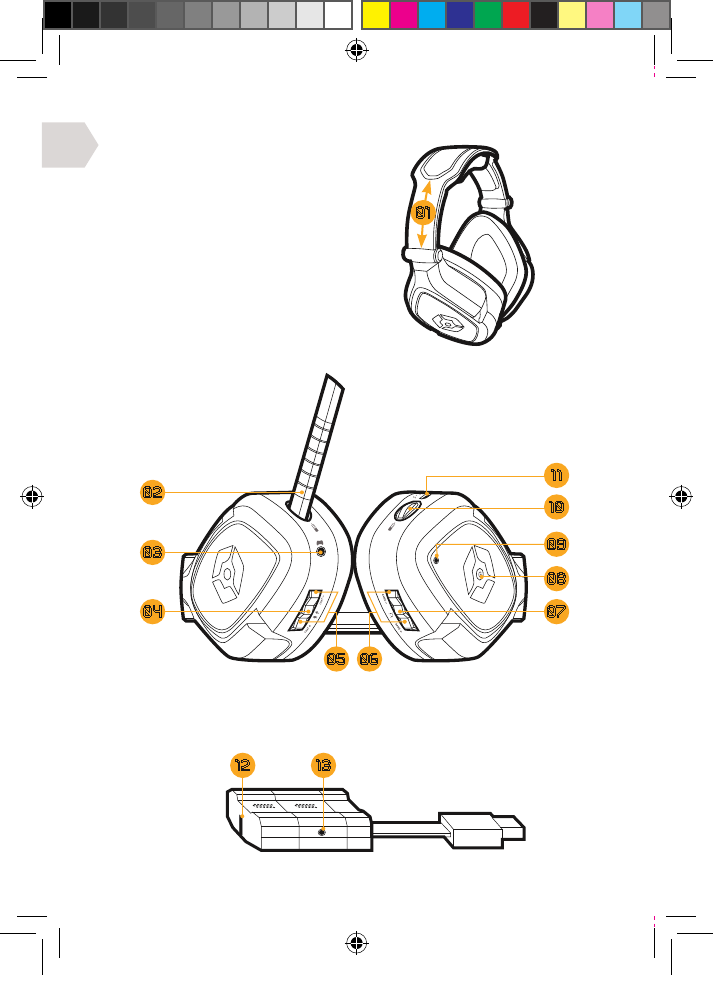
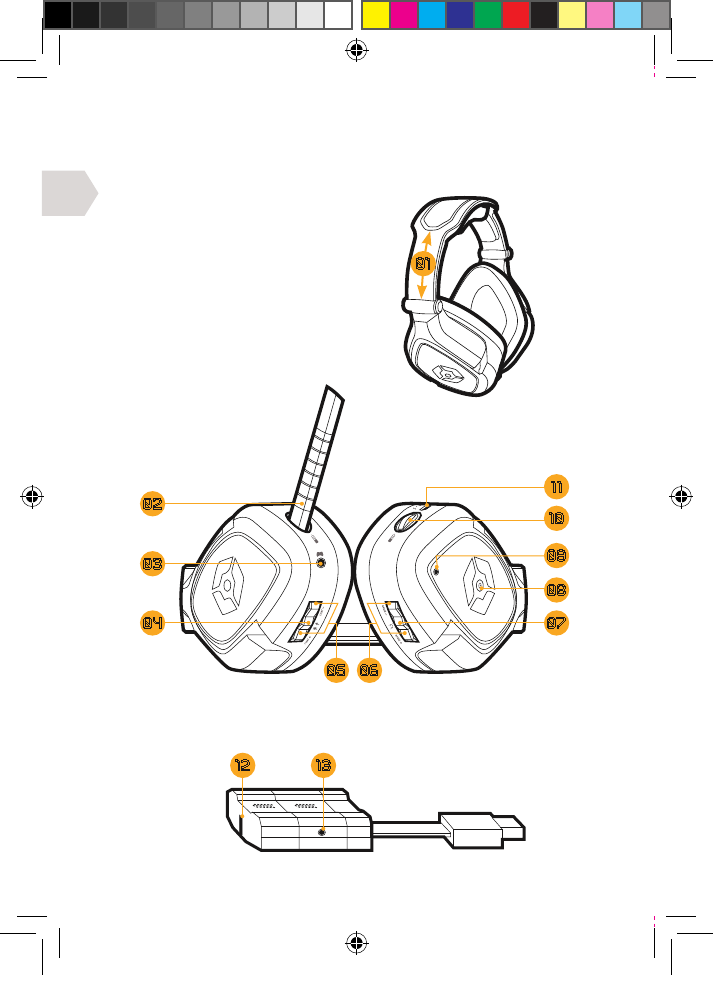
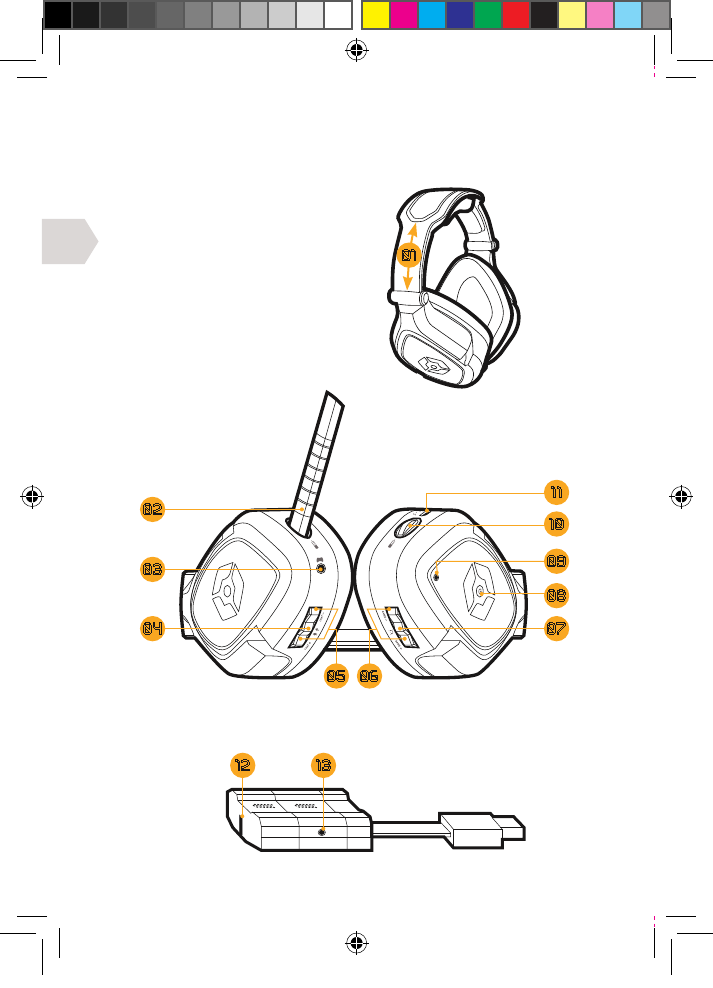
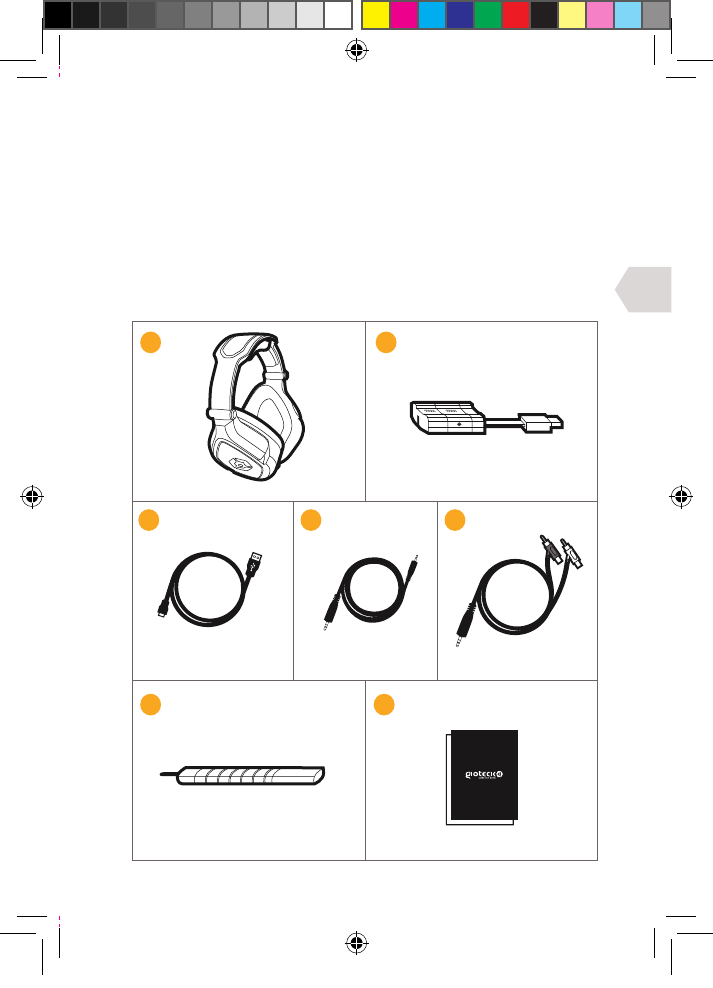
PRODUCT DETAILS
HEADSET
01 | Headband Adjusters
02 | Removable Mic Boom
03 | Xbox Chat Input
04 | Mute/Pairing Button
05 | Chat Volume –/+
06 | Game Volume –/+
07 | Surround sound button
08 | Power Button
09 | LED Indicator
10 | Mic Boom Port
11 | USB Charging Port
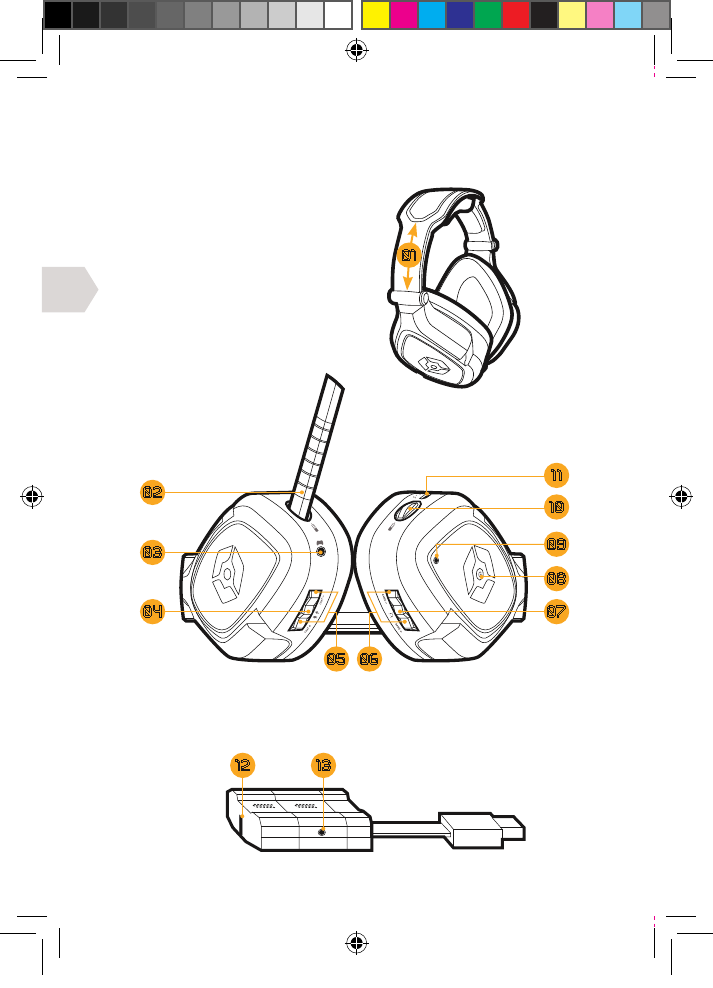
WIRELESS TRANSMITTER
12 | LED Indicator
13 | Audio input
1312
08
09
02
11
03
10
04 07
05 06
01
EX6UNI-wireless-manual-book.indb 3 11/09/2013 10:24
EN
4
GETTING STARTED
CHARGING
It is recommended to fully charge the headset before first use.
1] Plug the small connector end of the charging cable into
the charging port on the headset and the other end into
a port on the front of your console, PC or MAC.
2] The LED on the headset will turn RED while charging and be OFF
when fully charged. The headset will take approximately 4-5 hours
to fully recharge from a drained state. The charging cycle will
take longer If the headset is in use during charging.
When there is only 20 minutes of battery le, the LED on the
headset will flash blue continuously. This will continue until the
headset is charged or until the battery is completely drained.
QUICK-START SETUP
1] Connect the Wireless Transmitter into a USB port on your
console, PC or MAC. The Transmitter LED will flash Red.
2] Turn the headset ON by pressing the Power Button and the LED will flash
blue. Connection between the transmitter and headset has been successful
if the Headset LED turns solid blue and the Transmitter LED is solid red.
3] Turn the headset OFF by pressing the Power Button
and the LED will turn o.
Please read the next few pages for more in-depth set-up instructions.
PAIRING
The headset should pair automatically. However, if your
headset has not paired successfully the LED on the Headset
and the Wireless Transmitter will flash intermittently.
To re-pair your headset, press and hold the mute button on the headset
until the LED on the headset and the LED on the transmitter both turn solid.
The headset should pair automatically on the next usage.
WIRELESS RANGE
The headset is eective up to a distance of 20-30 metres.
PLEASE NOTE: You may need to make some adjustments
to your TV/Monitor’s settings to enable the audio to
come through the headset (Consult your TV manual).
EX6UNI-wireless-manual-book.indb 4 11/09/2013 10:24

EN
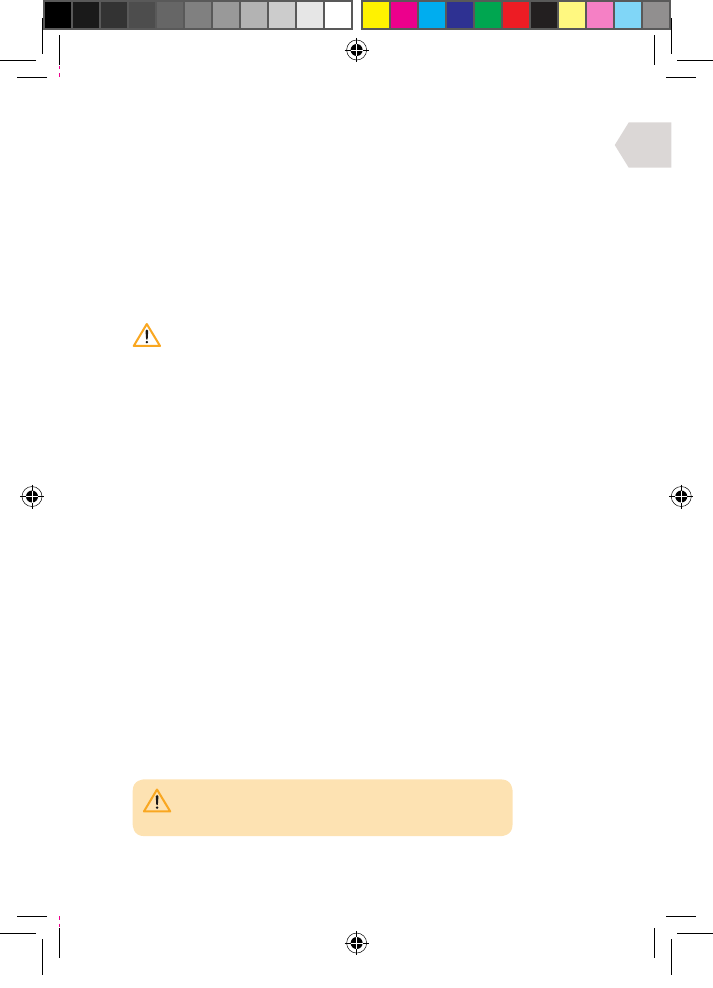
AV MULTI OUT
AV RCA CABLE
(SUPPLIED WITH
PS3 CONSOLE)
YELLOW/
VIDEO
CONNECT INTO
THE FRONT
OF PS3
TV / MONITOR
AUDIO OUT
03
02
01
04
05
5
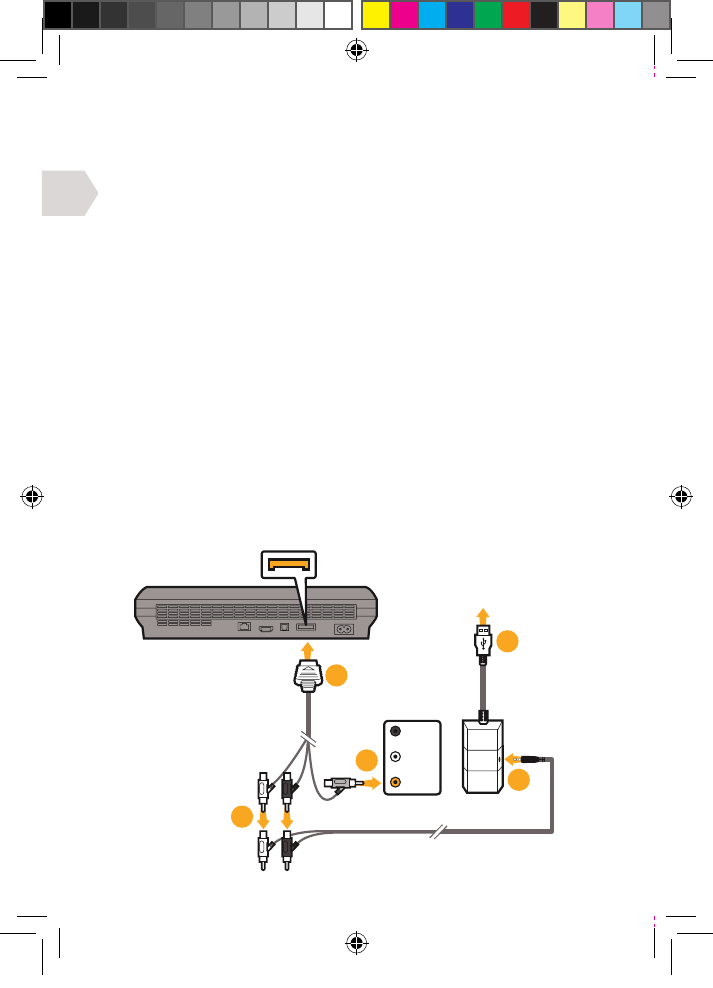
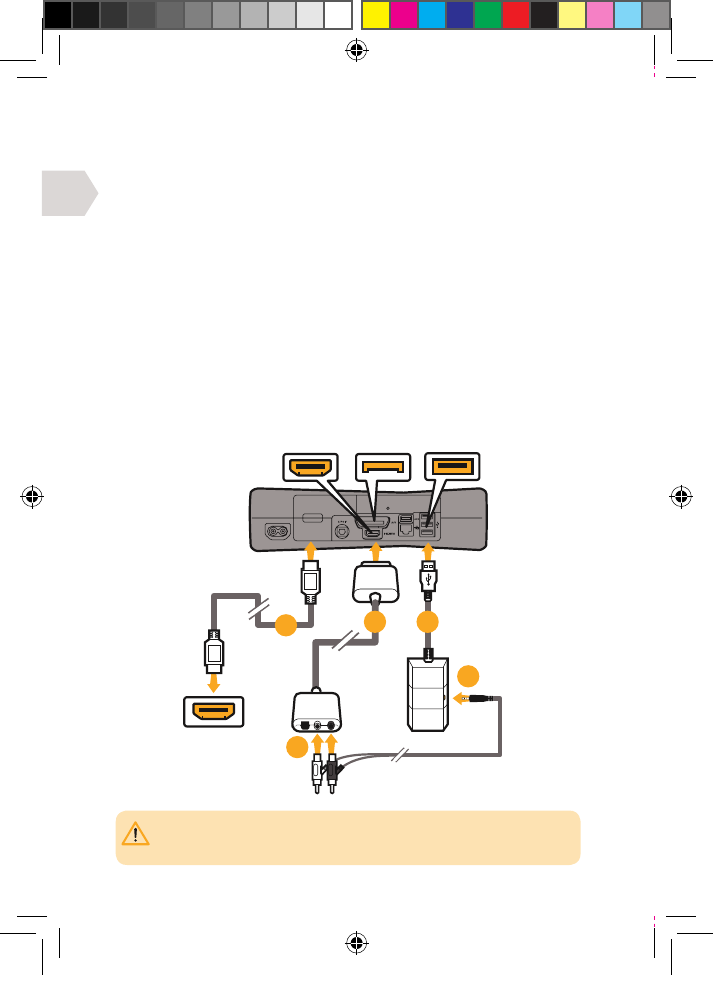
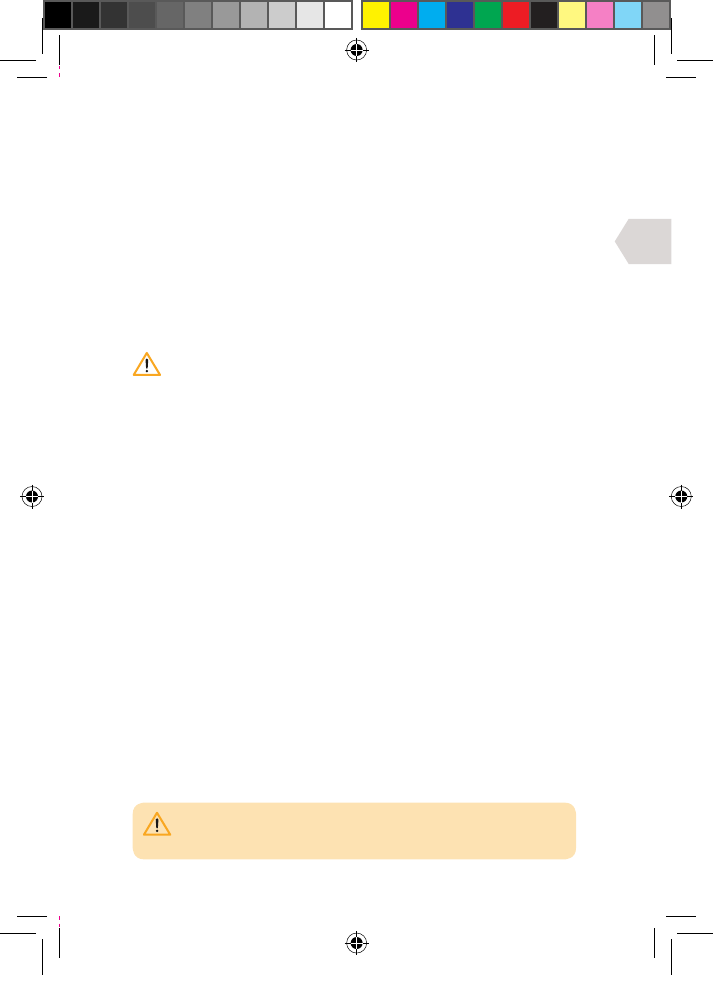
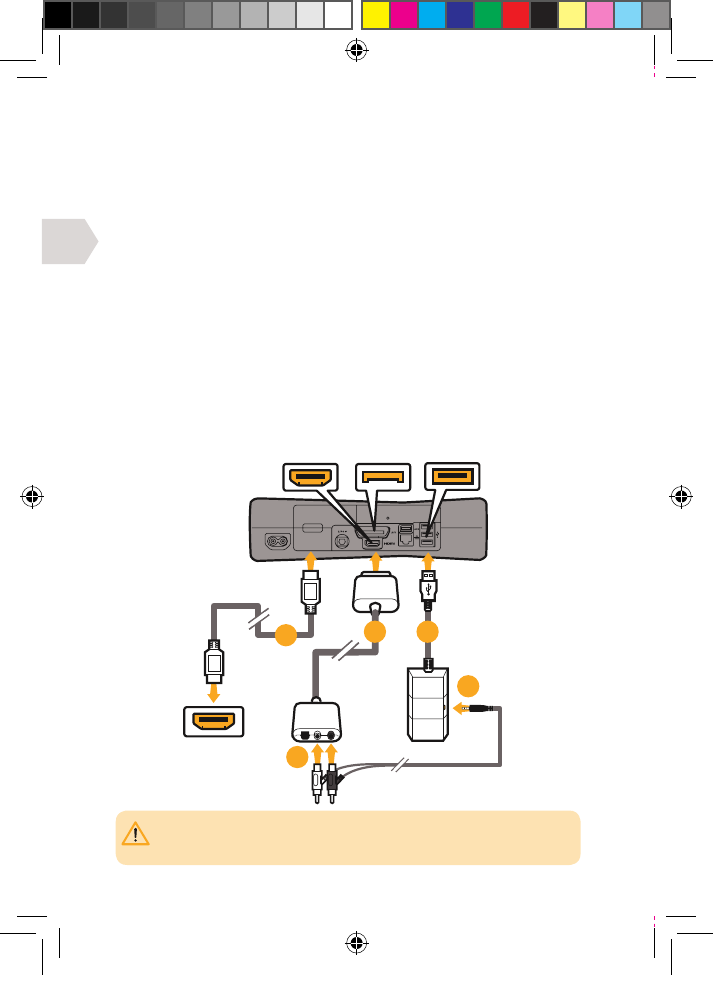
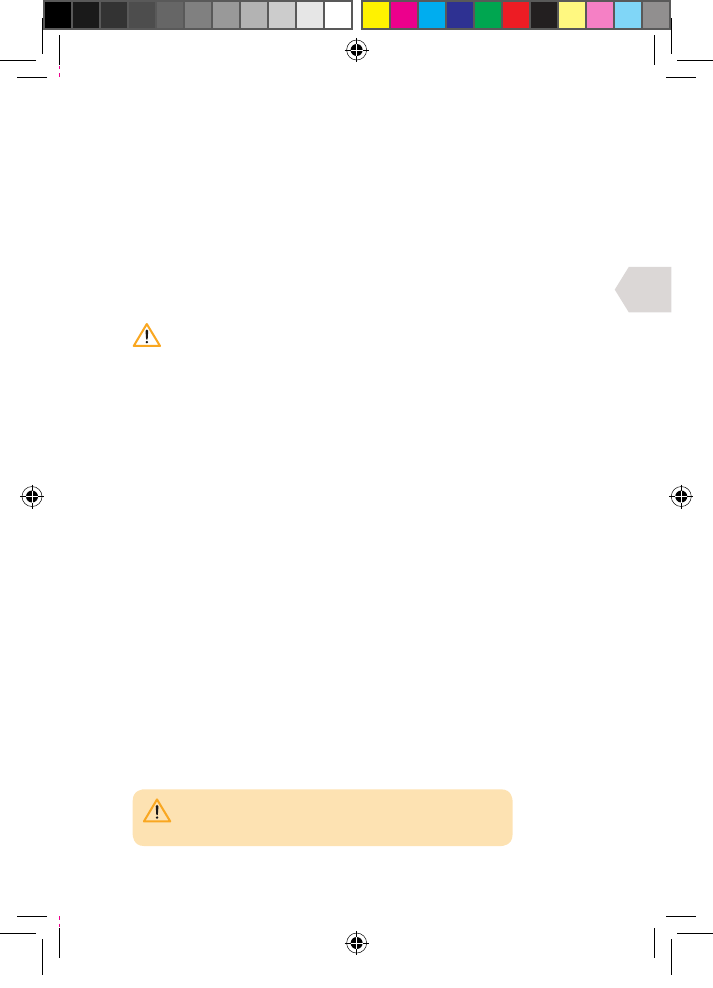
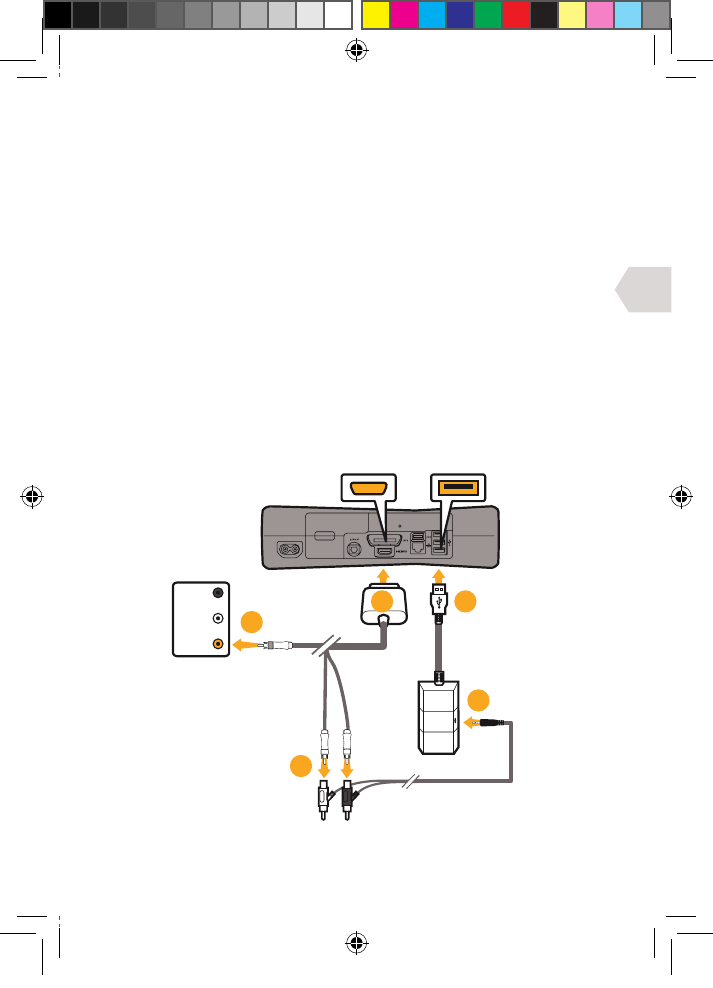
CONNECTION GUIDE
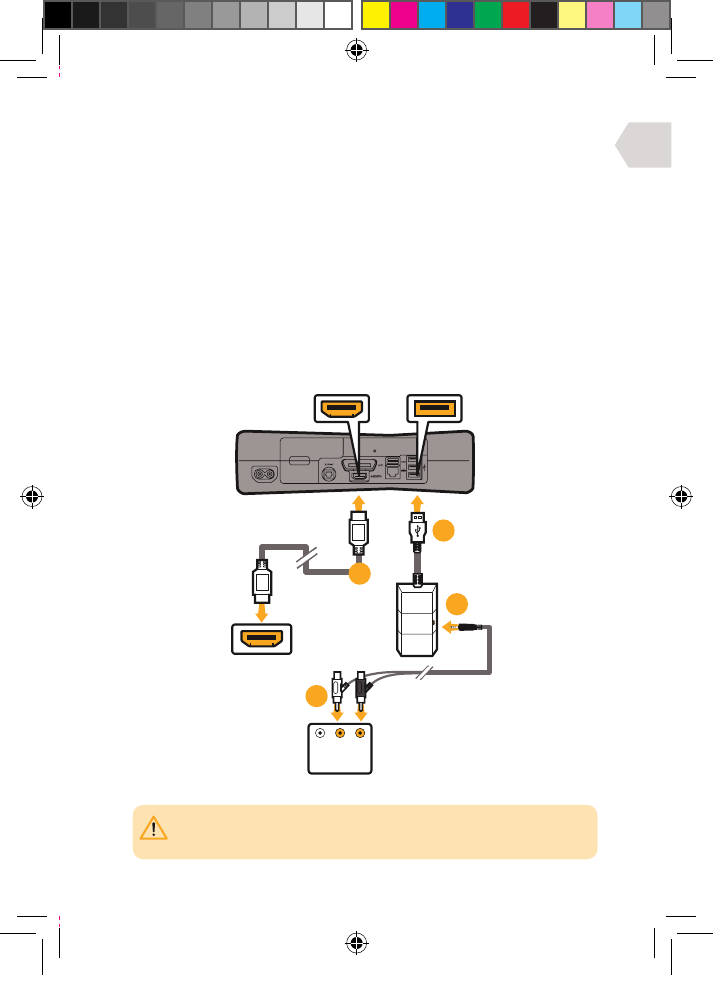
PS3 SET UP : WITH A/V CABLES (WITHOUT HDMI)
1] Connect the AV RCA cable into the back of your PS3.
2] Connect the RED/WHITE connectors from the AV RCA Cable into the
corresponding RED/WHITE sockets on the RCA to Audio cable.
3] Connect the yellow VIDEO connector into the
Video IN socket of your TV/Monitor.
4] Connect the the wireless transmitter into an available
USB port on the front of your PS3 console.
5] Connect the audio cable into the wireless transmitter.
6] Turn on your PS3 console.
7] Turn your Headset ON by pressing the Power Button. Pairing with the
wireless transmitter should happen automatically. However, if pairing is
unsuccessful, please refer to the Pairing section in ‘Getting Started’.
8] Make sure that microphone mute is OFF.
9] Go to Settings > Accessory Settings > Audio Device Settings
and select EX-06 Headset for both the Input and Output.
You will be able to hear yourself talking into the microphone
through the headset earcups. Set the desired volume level
10] Go to Settings > Sound Settings > Audio Output Settings,
choose Audio Input Connector/ Scart / AV Multi.
EX6UNI-wireless-manual-book.indb 5 11/09/2013 10:24
EN
TV/MONITOR
HDMI INPUT
HDMI OUTPUT AV MULTI OUT
AV RCA CABLE
(SUPPLIED WITH
PS3 CONSOLE)
HDMI CABLE
(NOT SUPPLIED)
CONNECT INTO
THE FRONT
OF PS3
05
04
03
0201
6
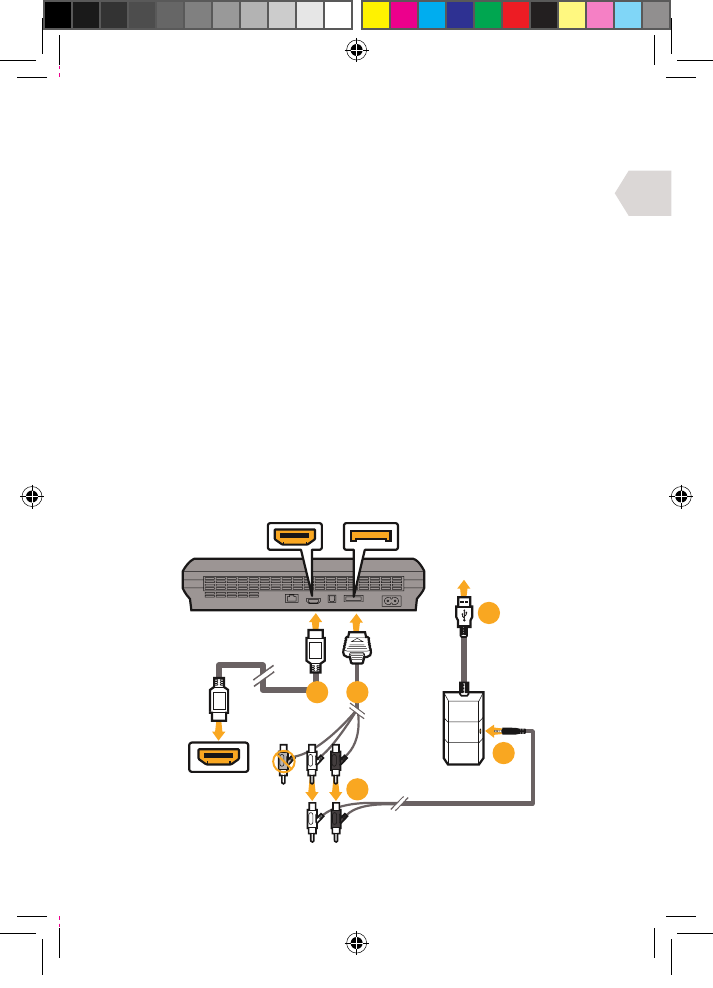
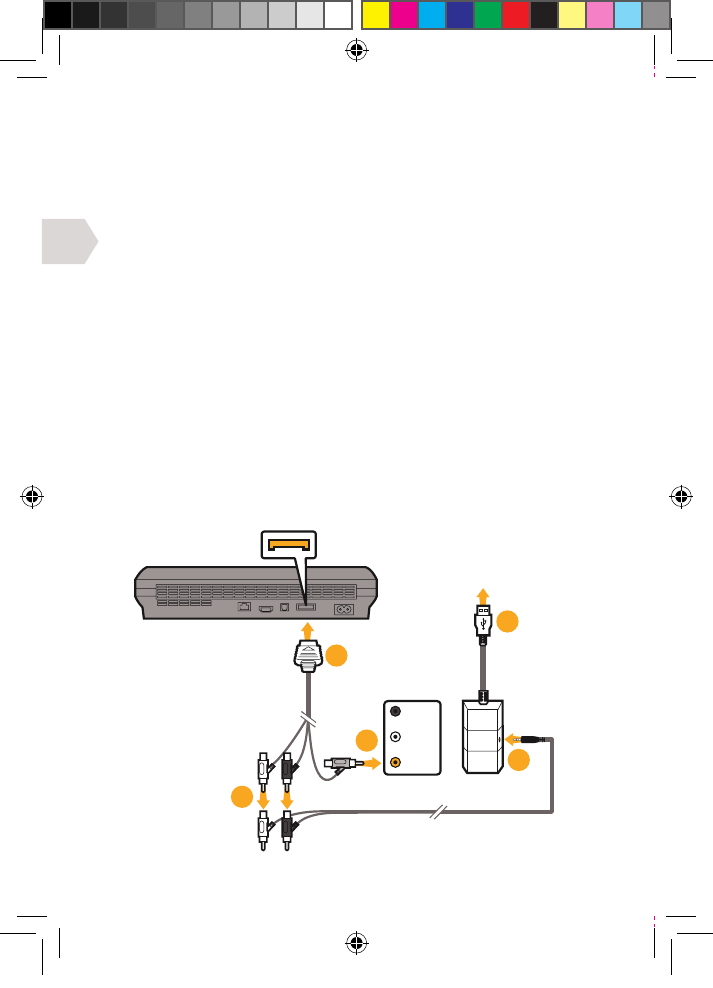
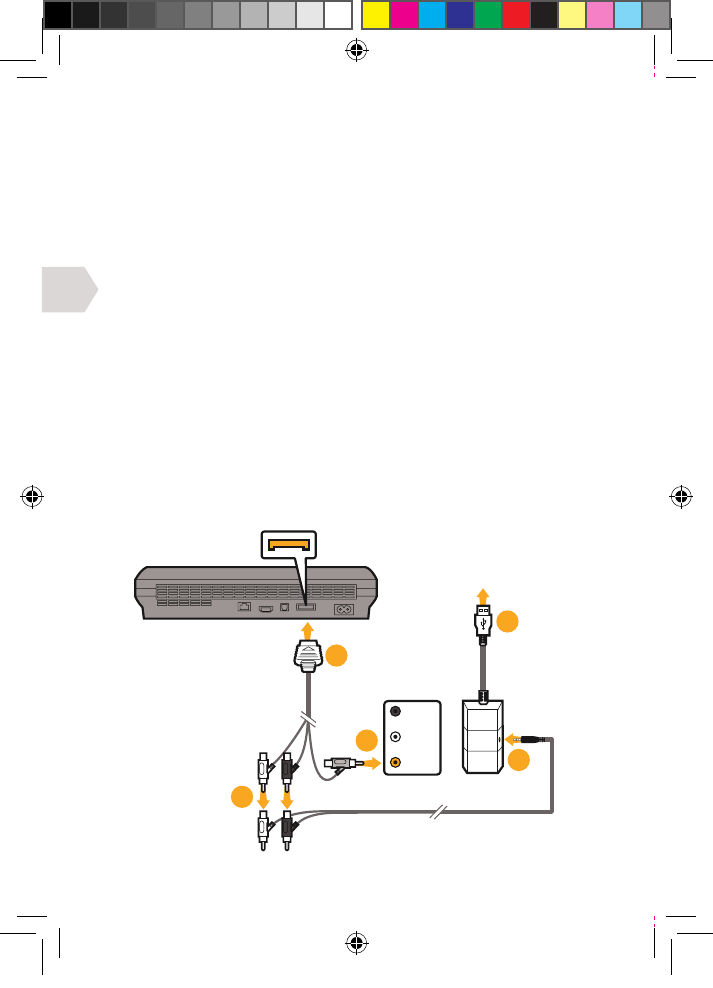
PS3 SET UP : WITH HDMI (OPTION A)
1] Connect the HDMI lead between the PS3 console and your TV/Monitor.
2] Connect the AV RCA cable into the back of your PS3.
3] Connect the RED/WHITE connectors from the AV RCA Cable into the
corresponding RED/WHITE sockets on the RCA to Audio cable.
4] Connect the the wireless transmitter into an available
USB port on the front of your PS3 console.
5] Connect the audio cable into the wireless transmitter.
6] Turn on your PS3 console.
7] Turn your Headset ON by pressing the Power Button. Pairing with the
wireless transmitter should happen automatically. However, if pairing is
unsuccessful, please refer to the Pairing section in ‘Getting Started’.
8] Make sure that microphone mute is OFF.
9] Go to Settings > Accessory Settings > Audio Device Settings
and select EX-06 Headset for both the Input and Output. You
will be able to hear yourself talking into the microphone through
the headset earcups. Set the desired volume level.
10] Go to Settings > Sound Settings > Audio Output Settings,
choose Audio Input Connector/ Scart / AV Multi.
EX6UNI-wireless-manual-book.indb 6 11/09/2013 10:24

EN
RED
WHITE
HDMI OUTPUT CONNECT INTO
THE FRONT
OF PS3
HDMI CABLE
(NOT SUPPLIED)
TV/MONITOR
HDMI INPUT
TV / MONITOR
AUDIO OUT
01
03
04
02
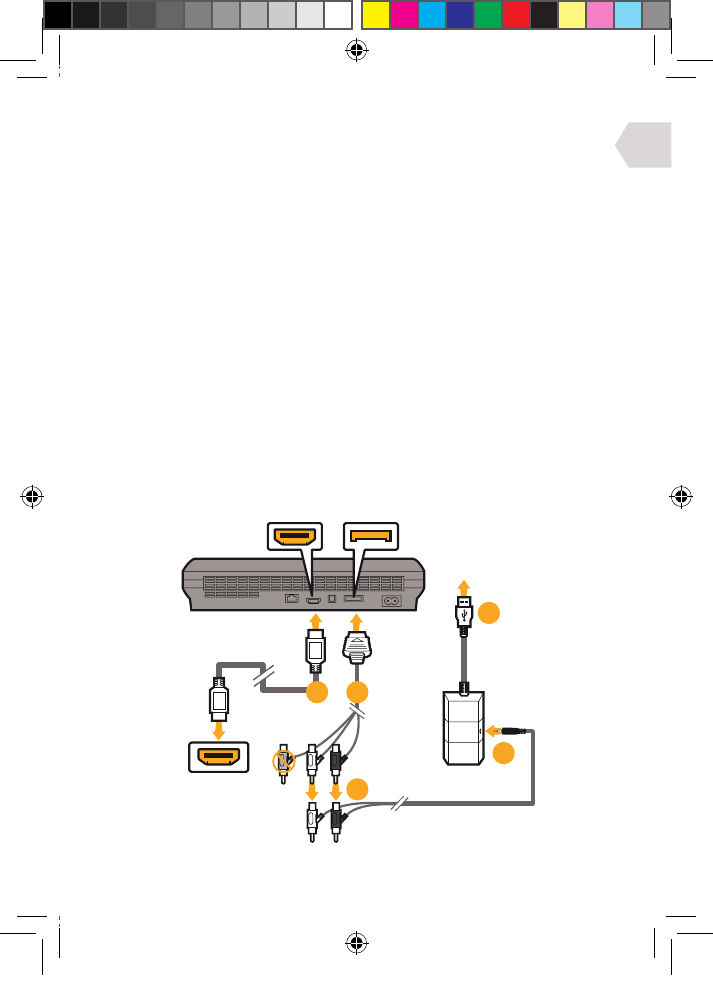
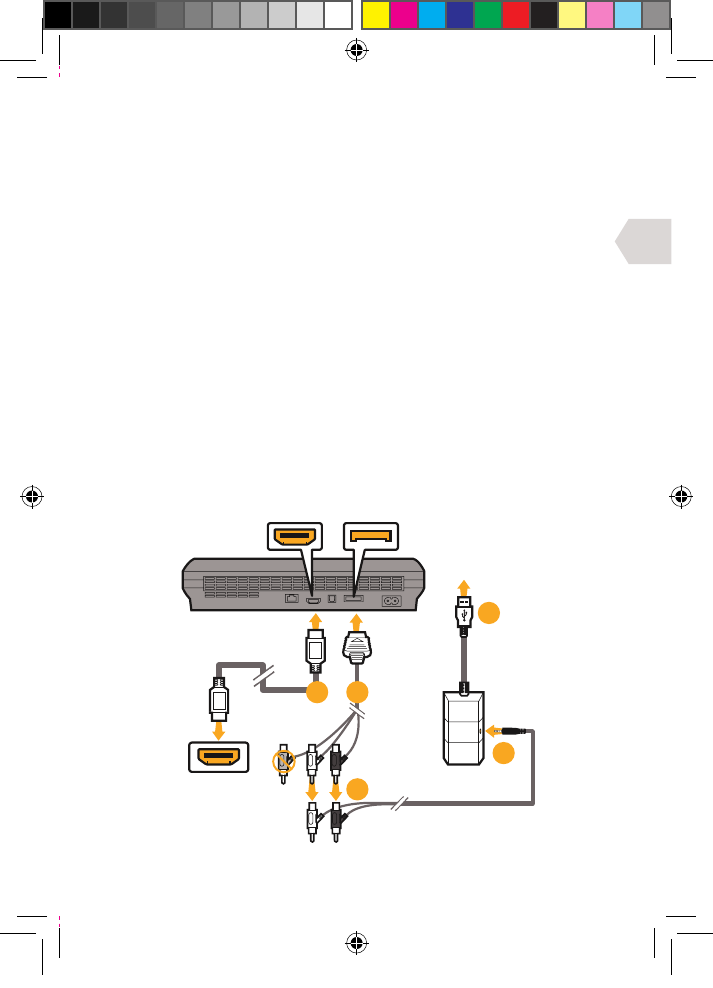
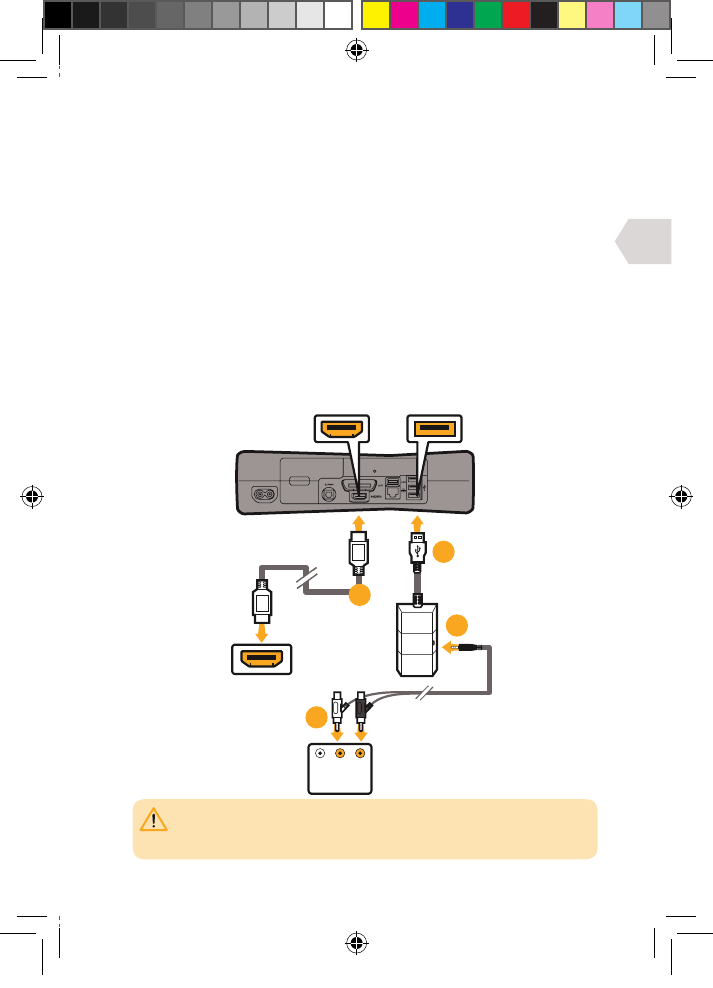
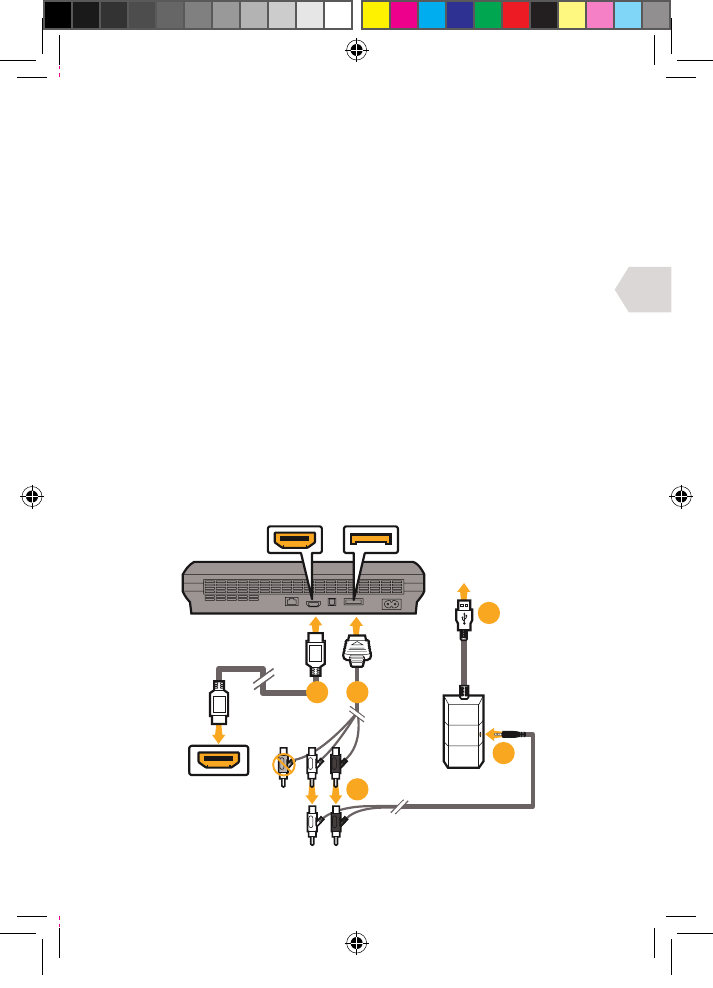
PLEASE NOTE: Your TV/Monitor will need to have Audio Out (RED/WHITE) sockets.
Most, but not all TVs/Monitors have RED/WHITE Audio IN and YELLOW Video IN sockets
but not all TV’s, and even fewer monitors have RED/WHITE Audio OUT sockets.
7
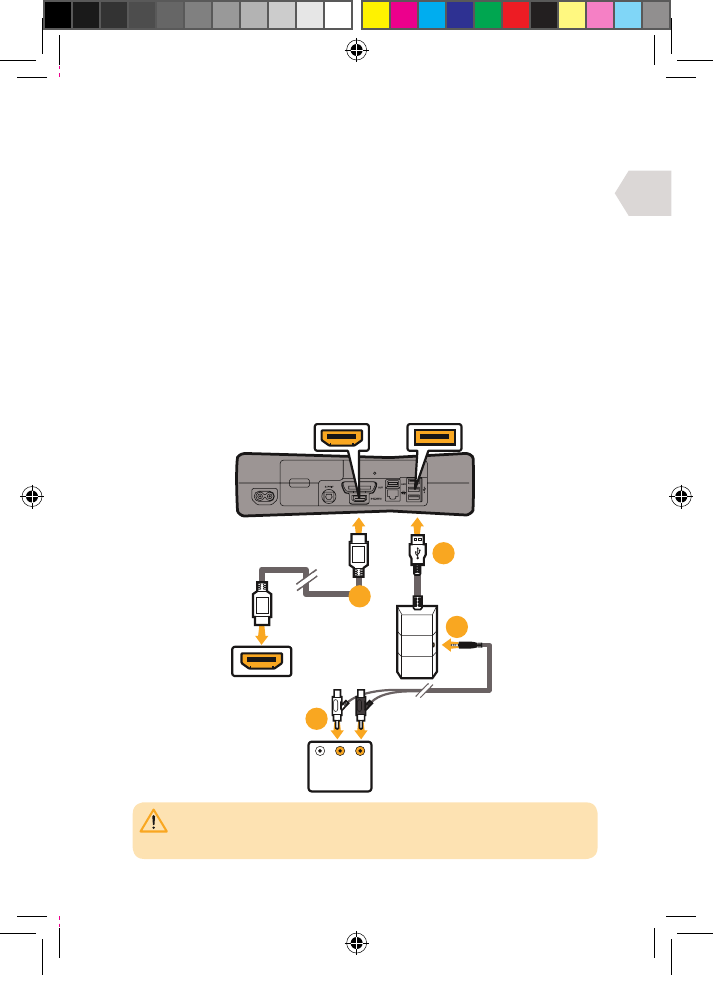
PS3 SET UP : WITH HDMI (OPTION B)
1] Connect the HDMI between the PS3 console and TV/Monitor.
2] Connect the RED/WHITE connectors on the RCA to Audio cable
into the Audio OUT RED/WHITE sockets on your TV/Monitor.
3] Connect the the wireless transmitter into an available
USB port on the front of your PS3 console.
4] Connect the audio cable into the wireless transmitter.
5] Turn on your PS3 console.
6] Turn your Headset ON by pressing the Power Button. Pairing with the
wireless transmitter should happen automatically. However, if pairing is
unsuccessful, please refer to the Pairing section in ‘Getting Started’.
7] Make sure that microphone mute is OFF.
8] Go to Settings > Accessory Settings > Audio Device Settings
and select EX-06 Headset for both the Input and Output. You
will be able to hear yourself talking into the microphone through
the headset earcups. Set the desired volume level.
9] Go to Settings > Sound Settings > Audio Output Settings,
choose Audio Input Connector/ Scart / AV Multi.
EX6UNI-wireless-manual-book.indb 7 11/09/2013 10:24
EN
AV MULTI OUT USB PORT
AV RCA CABLE
(SUPPLIED WITH
XBOX CONSOLE)
YELLOW/
VIDEO
TV / MONITOR
AUDIO OUT
03
02
05
01 04
8
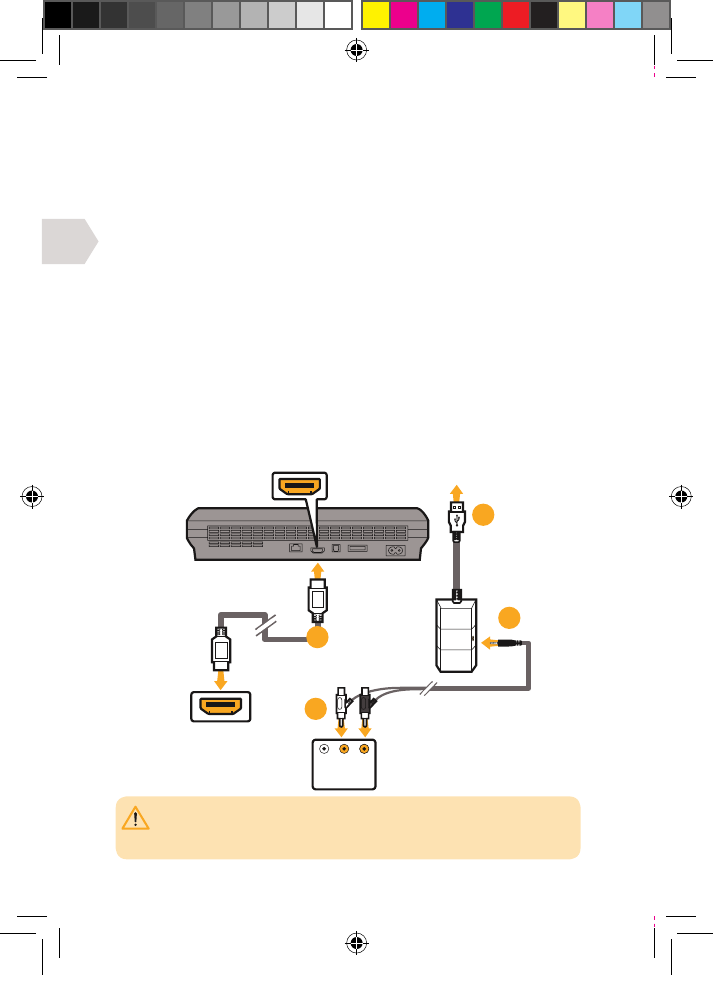
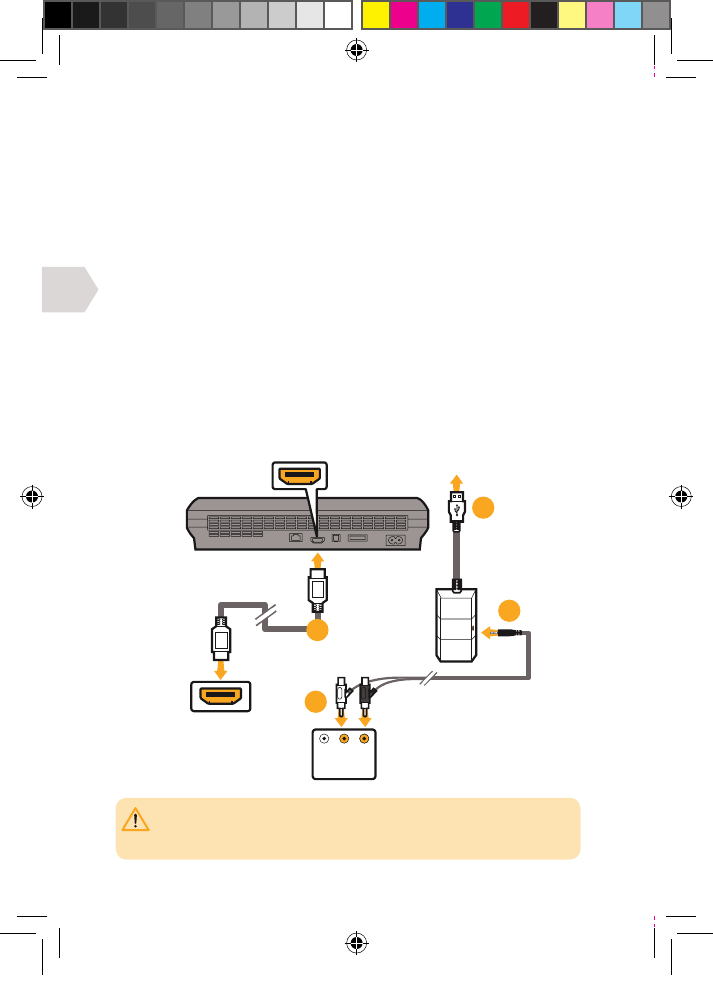
XBOX SET UP : WITH A/V CABLES (WITHOUT HDMI)
1] Connect the AV RCA Cable into the back of your Xbox.
2] Connect the RED/WHITE connectors from the AV RCA Cable into the
corresponding RED/WHITE sockets on the RCA to Audio cable.
3] Connect the yellow VIDEO connector into the
Video IN socket on your TV/Monitor.
4] Connect the the wireless transmitter into an available
USB port on the front of your Xbox console.
5] Connect the audio cable into the wireless transmitter.
6] Turn on your Xbox and make sure that your controller is wirelessly
connected to your console (do not leave the controller charging
or it will transfer electrical noise into your headset).
7] Turn your Headset ON by pressing the Power Button. Pairing with the
wireless transmitter should happen automatically. However, if pairing is
unsuccessful, please refer to the Pairing section in ‘Getting Started’.
8] Make sure that microphone mute is OFF.
9] Go to chat set up.
EX6UNI-wireless-manual-book.indb 8 11/09/2013 10:24
EN
HDMI CABLE
(NOT SUPPLIED)
TV/MONITOR
HDMI INPUT
AV RCA CABLE
(NOT SUPPLIED)
AV MULTI OUT USB PORTHDMI OUTPUT
05
04
03
02
01
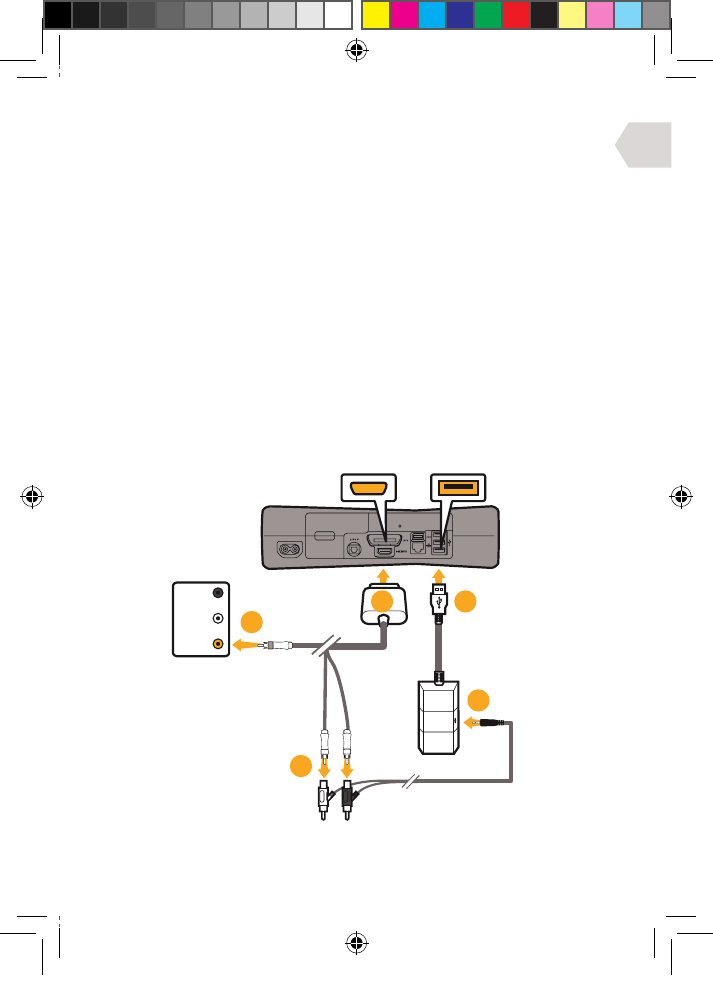
IMPORTANT: The AV cable supplied with the Xbox 360 does not allow for simultaneous
use with a HDMI cable, as the shape of the AV connector covers the HDMI socket.
You will need to purchase one for this set up method.
9
XBOX SET UP : WITH HDMI (OPTION A)
1] Connect the HDMI (not included) between the Xbox and TV/Monitor.
2] Connect the AV RCA Adaptor Cable (not included) into the Xbox.
3] Connect the RED/WHITE connectors from the RCA to Audio cable into
the corresponding inputs of the AV RCA Adaptor Cable (not included).
4] Connect the the wireless transmitter into an available
USB port on the front of your Xbox console.
5] Connect the audio cable into the wireless transmitter.
6] Turn on your Xbox and make sure that your controller is wirelessly
connected to your console (do not leave the controller charging
or it will transfer electrical noise into your headset).
7] Turn your Headset ON by pressing the Power Button. Pairing with the
wireless transmitter should happen automatically. However, if pairing is
unsuccessful, please refer to the Pairing section in ‘Getting Started’.
8] Make sure that microphone mute is OFF.
9] Go to chat set up.
EX6UNI-wireless-manual-book.indb 9 11/09/2013 10:24
EN
RED
WHITE
HDMI CABLE
(NOT SUPPLIED)
TV/MONITOR
HDMI INPUT
TV / MONITOR
AUDIO OUT
USB PORTHDMI OUTPUT
04
01
03
02
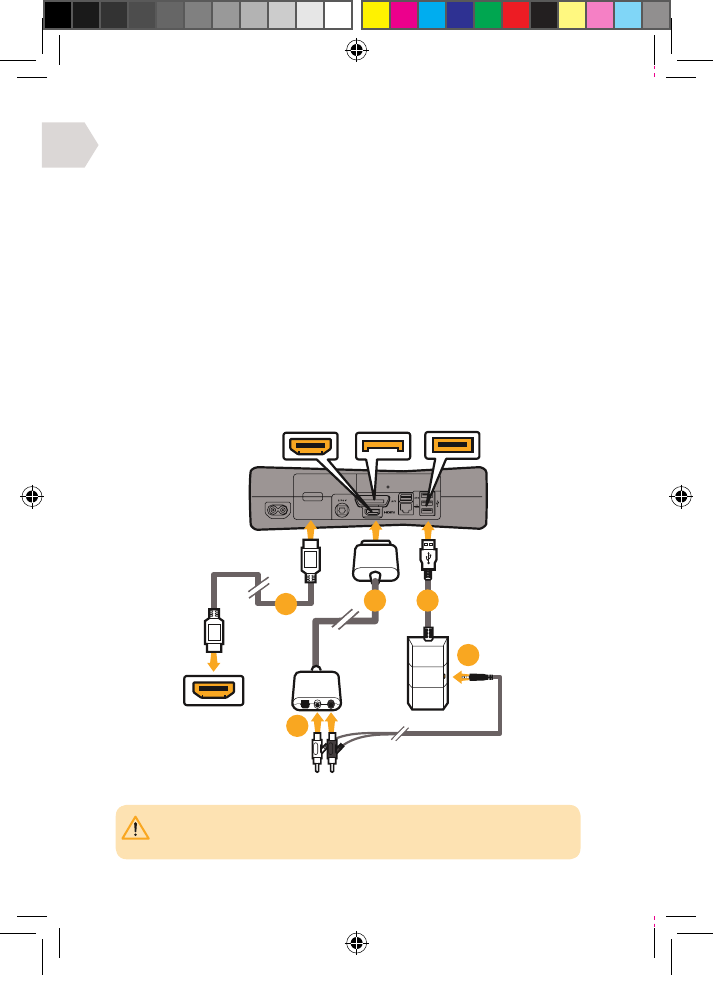
PLEASE NOTE: Your TV/Monitor will need to have Audio Out (RED/WHITE) sockets.
Most, but not all TVs/Monitors have RED/WHITE Audio IN and YELLOW Video IN sockets
but not all TV’s, and even fewer monitors have RED/WHITE Audio OUT sockets.
10
XBOX SET UP : WITH HDMI (OPTION B)
1] Connect the HDMI (not included) between your Xbox and TV/Monitor.
2] Connect the RED/WHITE connectors from the RCA to Audio cable
into the Audio OUT RED/WHITE sockets on your TV/Monitor.
3] Connect the the wireless transmitter into an available
USB port on the front of your Xbox console.
4] Connect the audio cable into the wireless transmitter.
5] Turn on your Xbox and make sure that your controller is wirelessly
connected to your console (do not leave the controller charging
or it will transfer electrical noise into your headset).
6] Turn your Headset ON by pressing the Power Button. Pairing with the
wireless transmitter should happen automatically. However, if pairing is
unsuccessful, please refer to the Pairing section in ‘Getting Started’.
7] Make sure that microphone mute is OFF.
8] Go to chat set up.
EX6UNI-wireless-manual-book.indb 10 11/09/2013 10:24
EN
02
01
11
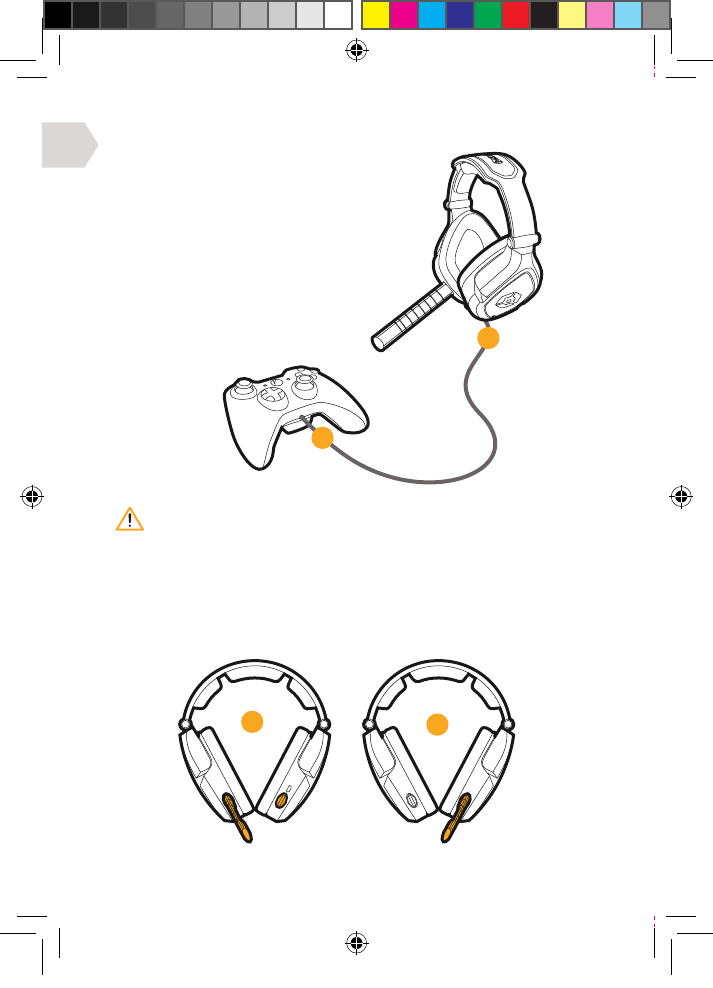
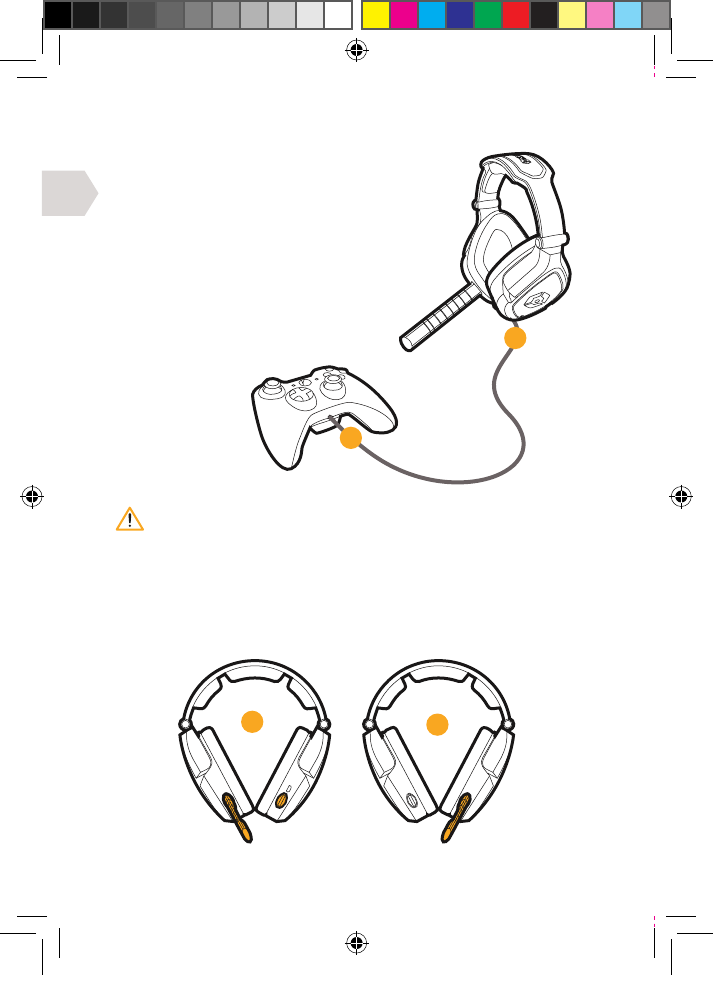
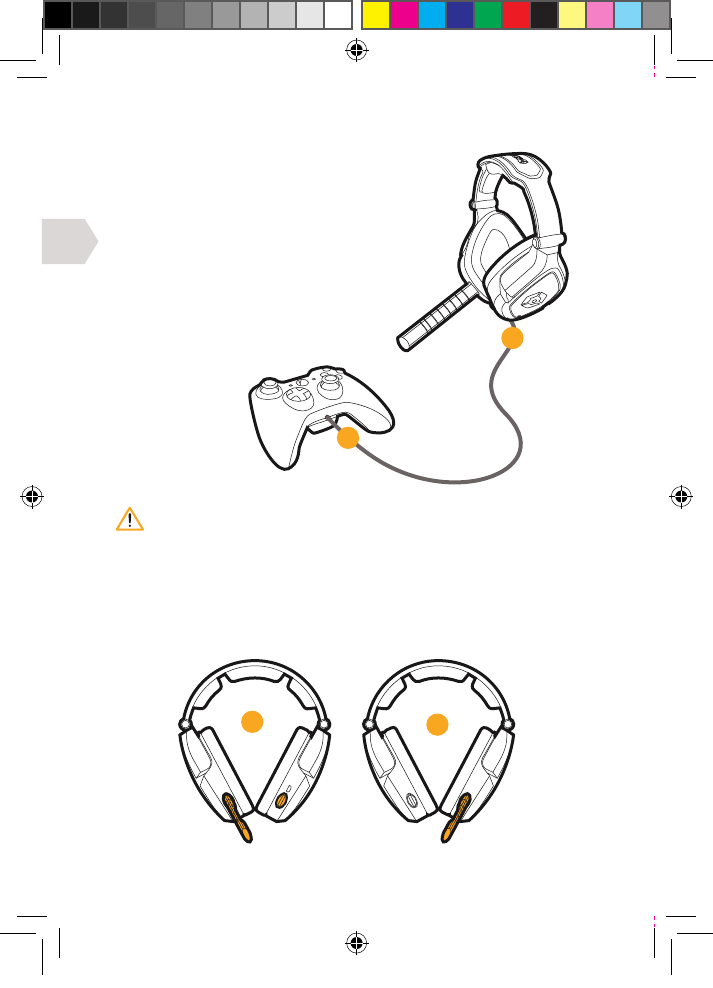
XBOX LIVE : CHAT SET UP
1] Connect the mini jack cable between
your headset and Xbox controller.
2] Go to Settings > Preferences > Voice.
Voice Output: Play through Headset.
3] Set the desired volume for Game Sound
and Voice. (You should now hear sound
from your console through your headset.)
4] To test the microphone go to messages
then record and play back a message.
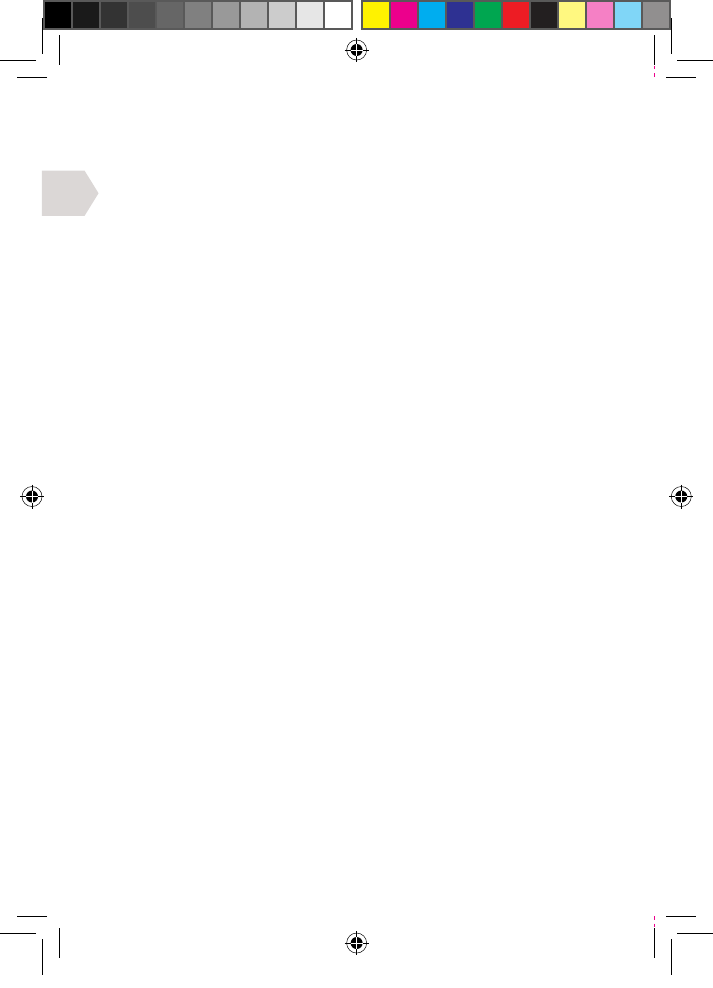
MICROPHONE ADJUSTMENT
Remove the Mic boom and place it on your preferred side. Then replace
the cover on the exposed side to avoid any dust or dirt build up.
It is important to do this in the correct order to ensure that the console
connects to the headset’s microphone.
02
01
EX6UNI-wireless-manual-book.indb 11 11/09/2013 10:24
EN
CONNECT INTO
PC/MAC/CONSOLE
12
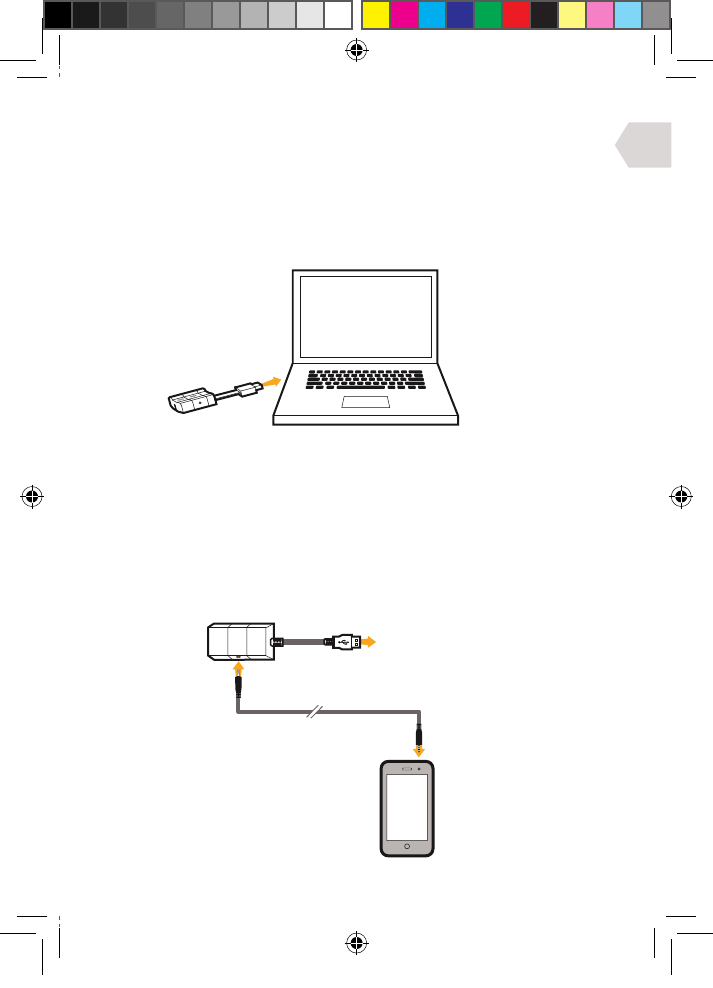
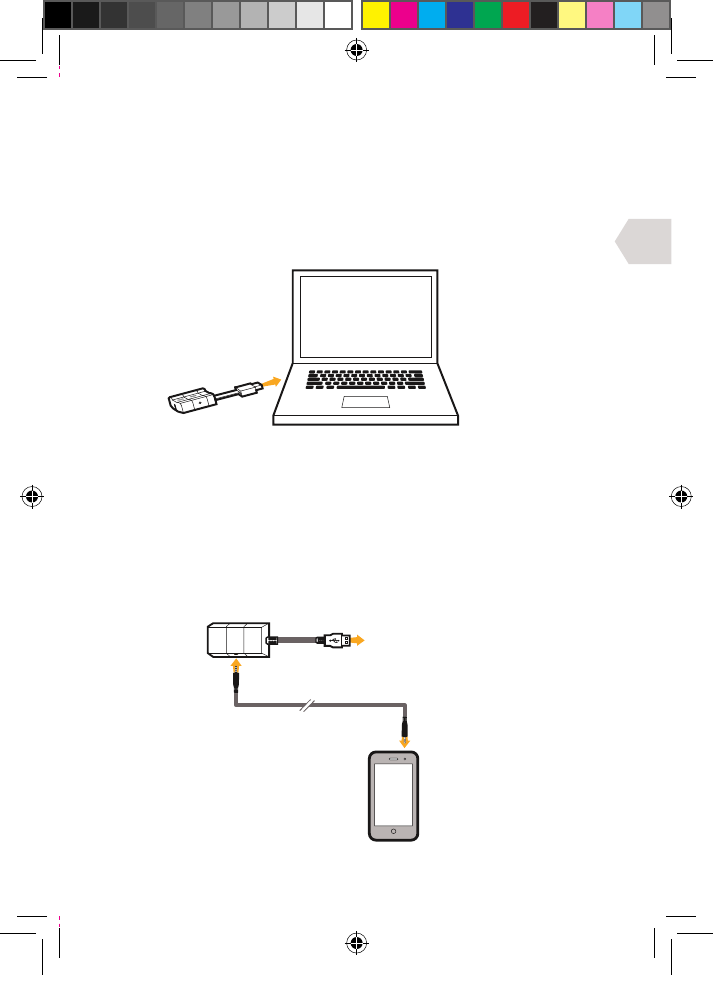
PC, MAC SET UP
1] Plug the USB cable into an available port on your PC or Mac.
2] Your PC (windows 7) will automatically find the Headset
and assign it as the device for audio output.
3] For Mac, open system preferences and go to sound. (You can
then assign the audio output to the Gioteck EX-06 Headset.)
4] Make sure the microphone is not set to mute.
HANDHELD DEVICE SET UP
1] Plug the USB cable on the wireless transmitter into an available port
on your console/computer/or any other device with a USB port.
2] Plug one end of the audio cable into your handheld device (mobile phone,
ipod, mp3 player etc.) and the other end into the wireless transmitter.
3] You can now listen to music on the move!
EX6UNI-wireless-manual-book.indb 12 11/09/2013 10:24

EN
13
LIMITED WARRANTY
This product warranty covers against any defects in materials and
workmanship for a period of ninety (90) days from the date of purchase.
This warranty does not cover damage caused by accident, misuse, or neglect
such as tears in fabric, and is limited to replacement or product repair at
our discretion. Damage caused by the use of harsh chemicals is not covered
under the warranty. If there is a defect with 90 days of purchase please
contact us to obtain authorization to return the product. The customer will
be responsible for shipping charges, but Goodbetterbest Limited will cover
the shipping charges on the replacement product. You will need to pack
the product securely and include with the product (1) a copy of the original
proof of purchase (retail receipt) showing the date of purchase, and (b) a
detailed explanation of the problem(s) requiring service. This statement of
warranty prevails over any other statement by the seller specified or implied.
EX6UNI-wireless-manual-book.indb 13 11/09/2013 10:24
EN
14
LEGALS
This product complies with the following legal regulations.
For further information go to www.gioteck.com
This device complies with Industry Canada licence-exempt RSS standard(s). Operation
is subject to the following two conditions: (1) this device may not cause
interference, and (2) this device must accept any interference, including
interference that may cause undesired operation of the device.
Caution: The user is cautioned that changes or modifications not expressly
approved by the party responsible for compliance could void the user’s authority
to operate the equipment. This device complies with Part 15 of the FCC Rules.
Operation is subject to the following two conditions: (1) this device may not cause
harmful interference,and (2) this device must accept any interference received,
including interference that may cause undesired operation. However, there is no
guarantee that interference will not occur in a particular installation. The device
and its antenna must not be co-located or operating in conjunction with any other
antenna or transmitter. Gioteck are not responsible for any interference caused
by un-authorized changes to this equipment. This equipment generates, uses,
and can radiate radio frequency energy and, if not installed correctly, may cause
harmful interference to radio communications. This equipment has been tested and
found to comply with the limits for a Class B digital device, pursuant to part 15 of
the FCC Rules. These limits are designed to provide reasonable protection against
harmful interference in a residential installation. If this equipment does cause
harmful interference to radio/television reception try the following: • Reorient or
relocate the receiving antenna. • Increase the separation between the equipment
to which the receiver is connected. • Consult the dealer or an experienced radio/TV
technician for help. This equipment complies with FCC radiation exposure limits set
forth for an uncontrolled environment. End user must follow the specific operating
instructions for satisfying RF exposure compliance. This transmitter must not be
co-located or operating in conjunction with any other antenna or transmitter.
Gioteck hereby declares that this product is in compliance with the essential
requirements and other provisions of Directive 2004/108/EC and R&TTe 1999/5/EC.
To view the full version of the Declaration of Conformity go online to doc.gioteck.com
Complies with
IDA Standards
DB100398
EX6UNI-wireless-manual-book.indb 14 11/09/2013 10:24

FR
15
IMPORTANT : LIRE ATTENTIVEMENT LA NOTICE AVANT D’UTILISER LE PRODUIT.
MISES EN GARDE
Ce symbole indique des consignes
importantes pour l’installation,
l’utilisation ou l’entretien du
produit. Toujours suivre à
la lettre ces consignes.
ENVIRONNEMENT
Merci de contribuer à
préserver l’environnement
en recyclant l’emballage en
carton de ce produit.
Ce produit ne doit PAS être
jeté dans les déchets ménagers
habituels. Il doit être traité à
part. Merci de le déposer dans
un point de collecte des déchets
électriques et électroniques.
PRÉCAUTIONS
Ce produit a été conçu dans un souci
absolu de sécurité. Cependant, tout
appareil électrique mal utilisé peut être
dangereux. Pour faire en sorte d’utiliser
ce produit sans risques, merci de prêter
attention aux directives suivantes :
• Utiliser le produit uniquement de la
manière prévue. Il s’agit d’un matériel
de précision, manipulez-le avec soin.
• Contient de petites pièces.
Ne convient pas à des enfants
de moins de trois ans.
• Ranger le produit dans un endroit
sec et non poussiéreux.
• Ne pas le ranger dans des endroits
exposés à une chaleur ou à un froid
extrêmes et éviter l’ensoleillement
direct ou les sources de chaleur telles
que les appareils de chauage.
• Ne pas mouiller le produit et
ne pas le laisser se salir : ceci
pourrait l’endommager.
• Ne pas utiliser de benzène, de
diluant pour peintures, d’acétone,
d’alcool ou d’autres solvants
similaires pour le nettoyer.
• Ne pas démonter le produit :
ceci annulerait la garantie et
pourrait occasionner un choc
électrique sur votre console.
EX6UNI-wireless-manual-book.indb 15 11/09/2013 10:24

FR
16
CONTENU
i] Casque
ii] Émetteur sans fil
iii] Câble de mise en charge USB
iv] Câble audio/conversation Xbox
v] Câble RCA vers Audio
vi] Perche micro amovible
vii] Manuel d’utilisation
iii
iii iv
vi
v
vii
EX6UNI-wireless-manual-book.indb 16 11/09/2013 10:24
FR
17
CARACTÉRISTIQUES DU PRODUIT
CASQUE
01 | Réglages du serre-tête
02 | Perche micro amovible
03 | Entrée pour conversation Xbox
04 | Bouton de sourdine/jumelage
05 | Volume de conversation –/+
06 | Volume de jeu –/+
07 | Bouton de son surround
08 | Bouton marche/arrêt
09 | DEL témoin
10 | Port pour perche micro
11 | Port de mise en charge USB
ÉMETTEUR SANS FIL
12 | DEL témoin
13 | Entrée audio
1312
08
09
02
11
03
10
04 07
05 06
01
EX6UNI-wireless-manual-book.indb 17 11/09/2013 10:24
FR
18
PRISE EN MAIN
MISE EN CHARGE
Il est recommandé de charger entièrement le casque avant la
première utilisation.
1] Brancher le petit connecteur du câble de mise en charge sur le
port de mise en charge du casque et l’autre extrémité sur un port
en façade de votre console, de votre PC ou de votre MAC.
2] La DEL du casque s’allume en rouge pendant la mise en charge et s’éteint
lorsque le casque est entièrement chargé. Il faut environ 4 à 5 heures pour
recharger entièrement le casque s’il est entièrement déchargé. Le cycle
de mise en charge sera plus long si l’on utilise le casque en même temps.
Lorsqu’il ne reste plus que 20 minutes d’autonomie, la DEL du casque
clignote en bleu sans interruption. Ceci se poursuit jusqu’à ce que le casque
soit rechargé ou jusqu’à ce que la batterie soit entièrement épuisée.
TALLATION ET MISE EN ROUTE RAPIDE
1] Brancher l’émetteur sans fil sur un port USB de votre console, de
votre PC ou de votre MAC. La DEL de l’émetteur clignote en rouge.
2] Allumer le casque en appuyant sur le bouton marche/arrêt ; la DEL
clignote en bleu. Si la connexion entre l’émetteur et le casque est établie,
la DEL du casque passe au bleu fixe et la DEL de l’émetteur au vert fixe.
3] Éteindre le casque en appuyant sur le bouton marche/arrêt ; la DEL s’éteint.
Lire les quelques pages suivantes pour obtenir
des renseignements plus détaillés.
JUMELAGE
Le casque doit se jumeler automatiquement. Cependant, si le jumelage
ne s’opère pas correctement, la DEL du casque et celle de l’émetteur
sans fil clignotent lentement.
Pour refaire le jumelage, appuyer de façon prolongée sur le bouton
de mise en sourdine du casque jusqu’à ce que la DEL du casque et
la DEL de l’émetteur restent allumées de manière fixe. Le casque
devrait se jumeler automatiquement à la prochaine utilisation.
PORTÉE SANS FIL
Le casque fonctionne ecacement jusqu’à une distance de 20 à 30 mètres.
REMARQUE : vous devrez peut-être procéder à quelques réglages
sur votre téléviseur ou moniteur pour que le son puisse passer
par le casque (consulter la notice de votre téléviseur).
EX6UNI-wireless-manual-book.indb 18 11/09/2013 10:24
FR
AV MULTI OUT
CÂBLE AV RCA
(FOURNI AVEC LA
CONSOLE PS3)
JAUNE/
VIDEO
CONNECTER EN
FAÇADE DE LA PS3
AUDIO OUT
TV/MONITEUR
03
02
01
04
05
19
GUIDE DE RACCORDEMENT
CONFIGURATION PS3 : AVEC CÂBLES A/V (SANS HDMI)
1] Connecter le câble AV RCA à l’arrière de votre PS3.
2] Brancher les connecteurs ROUGE/BLANC du câble AV RCA dans les
prises ROUGE/BLANCHE correspondantes du câble RCA vers Audio.
3] Brancher le connecteur VIDEO jaune dans la prise
Video IN de votre téléviseur ou moniteur.
4] Connecter l’émetteur sans fil sur un port USB disponible en
façade de votre console PS3.
5] Connecter le câble audio à l’émetteur sans fil.
6] Allumer votre console PS3.
7] Allumer votre casque en appuyant sur le bouton marche/arrêt.
Le jumelage avec l’émetteur sans fil doit s’opérer automatiquement.
Toutefois, si le jumelage ne s’établit pas, reportez-vous au
paragraphe concernant le jumelage au chapitre « Prise en main ».
8] Vérifier que la sourdine du microphone est coupée.
9] Aller dans Paramètres > Paramètres accessoires > Paramètres
périphériques audio et sélectionner le Casque EX-06 à la fois
comme Périphérique d’entrée et comme Périphérique de sortie.
Par les écouteurs du casque, vous allez alors pouvoir vous entendre
parler dans le microphone. Régler le volume sonore souhaité.
10] Aller dans Paramètres > Paramètres son > Paramètres de sortie
audio, choisir Connecteur d’entrée audio / Péritel / AV Multi.
EX6UNI-wireless-manual-book.indb 19 11/09/2013 10:24
FR
ENTRÉE HDMI
TV/MONITEUR
SORTIE HDMI AV MULTI OUT
CÂBLE AV RCA
(FOURNI AVEC LA
CONSOLE PS3)
CÂBLE HDMI
(NON FOURNI)
CONNECTER EN
FAÇADE DE LA PS3
05
04
03
0201
20
CONFIGURATION PS3 : AVEC HDMI (OPTION A)
1] Raccorder le câble HDMI entre la console PS3
et votre téléviseur ou moniteur.
2] Connecter le câble AV RCA à l’arrière de votre PS3.
3] Brancher les connecteurs ROUGE/BLANC du câble AV RCA dans les
prises ROUGE/BLANCHE correspondantes du câble RCA vers Audio.
4] Connecter l’émetteur sans fil sur un port USB disponible en
façade de votre console PS3.
5] Connecter le câble audio à l’émetteur sans fil.
6] Allumer votre console PS3.
7] Allumer votre casque en appuyant sur le bouton marche/arrêt. Le
jumelage avec l’émetteur sans fil doit s’opérer automatiquement.
Toutefois, si le jumelage ne s’établit pas, reportez-vous au
paragraphe concernant le jumelage au chapitre « Prise en main ».
8] Vérifier que la sourdine du microphone est coupée.
9] Aller dans Paramètres > Paramètres accessoires > Paramètres
périphériques audio et sélectionner le Casque EX-06 à la fois
comme Périphérique d’entrée et comme Périphérique de sortie.
Par les écouteurs du casque, vous allez alors pouvoir vous entendre
parler dans le microphone. Régler le volume sonore souhaité.
10] Aller dans Paramètres > Paramètres son > Paramètres de sortie
audio, choisir Connecteur d’entrée audio / Péritel / AV Multi.
EX6UNI-wireless-manual-book.indb 20 11/09/2013 10:24

FR
ROUGE
BLANC
SORTIE HDMI CONNECTER EN
FAÇADE DE LA PS3
CÂBLE HDMI
(NON FOURNI)
ENTRÉE HDMI
TV/MONITEUR
AUDIO OUT
TV/MONITEUR
01
03
04
02
REMARQUE : votre téléviseur ou moniteur doit posséder des prises Audio Out (ROUGE/
BLANCHE). La plupart des téléviseurs et moniteurs, à quelques exceptions près, possèdent
des prises Audio IN ROUGE/BLANCHE et Video IN JAUNE mais peu de téléviseurs et encore
moins de moniteurs possèdent des prises Audio OUT ROUGE/BLANCHE.
21
CONFIGURATION PS3 : AVEC HDMI (OPTION B)
1] Raccorder le câble HDMI entre la console PS3 et le téléviseur ou moniteur.
2] Brancher les connecteurs ROUGE/BLANC du câble RCA vers Audio dans
les prises Audio OUT, ROUGE/BLANCHE de votre téléviseur ou moniteur.
3] Connecter l’émetteur sans fil sur un port USB
disponible en façade de votre console PS3.
4] Connecter le câble audio à l’émetteur sans fil.
5] Allumer votre console PS3.
6] Allumer votre casque en appuyant sur le bouton marche/arrêt. Le
jumelage avec l’émetteur sans fil doit s’opérer automatiquement.
Toutefois, si le jumelage ne s’établit pas, reportez-vous au
paragraphe concernant le jumelage au chapitre « Prise en main ».
7] Vérifier que la sourdine du microphone est coupée.
8] Aller dans Paramètres > Paramètres accessoires > Paramètres
périphériques audio et sélectionner le Casque EX-06 à la fois
comme Périphérique d’entrée et comme Périphérique de sortie.
Par les écouteurs du casque, vous allez alors pouvoir vous entendre
parler dans le microphone. Régler le volume sonore souhaité.
9] Aller dans Paramètres > Paramètres son > Paramètres de sortie
audio, choisir Connecteur d’entrée audio / Péritel / AV Multi.
EX6UNI-wireless-manual-book.indb 21 11/09/2013 10:24

FR
AV MULTI OUT PORT USB
CÂBLE AV RCA
(FOURNI AVEC LA
CONSOLE XBOX)
JAUNE /
VIDEO
AUDIO OUT
TV/MONITEUR
03
02
05
01 04
22
CONFIGURATION XBOX : AVEC CÂBLES A/V (SANS HDMI)
1] Connecter le câble AV RCA à l’arrière de votre Xbox.
2] Brancher les connecteurs ROUGE/BLANC du câble AV RCA dans les
prises ROUGE/BLANCHE correspondantes du câble RCA vers Audio.
3] Brancher le connecteur VIDEO jaune dans la prise
Video IN de votre téléviseur ou moniteur.
4] Connecter l’émetteur sans fil sur un port USB
disponible en façade de votre console Xbox.
5] Connecter le câble audio à l’émetteur sans fil.
6] Allumer votre Xbox et vérifier que la manette est connectée sans
fil à la console (ne pas laisser la manette en charge, sans quoi elle
risque de transmettre un bruit de fond électrique dans le casque).
7] Allumer votre casque en appuyant sur le bouton marche/arrêt. Le
jumelage avec l’émetteur sans fil doit s’opérer automatiquement.
Toutefois, si le jumelage ne s’établit pas, reportez-vous au
paragraphe concernant le jumelage au chapitre « Prise en main ».
8] Vérifier que la sourdine du microphone est coupée.
9] Passer à la configuration de la conversation.
EX6UNI-wireless-manual-book.indb 22 11/09/2013 10:24
FR
CÂBLE HDMI
(NON FOURNI)
ENTRÉE HDMI
TV/MONITEUR
CÂBLE AV RCA
(NON FOURNI)
AV MULTI OUT PORT USBSORTIE HDMI
05
04
03
02
01
IMPORTANT: le câble AV fourni avec la Xbox 360 ne permet pas l’utilisation simultanée
avec un câble HDMI, la forme du connecteur AV obstruant en eet la prise HDMI. Vous
devrez acheter un autre câble pour installer votre système selon cette méthode.
23
CONFIGURATION XBOX : AVEC HDMI (OPTION A)
1] Raccorder le câble HDMI (non inclus) entre la
Xbox et le téléviseur ou moniteur.
2] Brancher le câble adaptateur AV RCA (non inclus) sur la Xbox.
3] Brancher les connecteurs ROUGE/BLANC du câble RCA vers Audio sur
les entrées correspondantes du câble adaptateur AV RCA (non inclus).
4] Connecter l’émetteur sans fil sur un port USB
disponible en façade de votre console Xbox.
5] Connecter le câble audio à l’émetteur sans fil.
6] Allumer votre Xbox et vérifier que la manette est connectée sans
fil à la console (ne pas laisser la manette en charge, sans quoi elle
risque de transmettre un bruit de fond électrique dans le casque).
7] Allumer votre casque en appuyant sur le bouton marche/arrêt. Le
jumelage avec l’émetteur sans fil doit s’opérer automatiquement.
Toutefois, si le jumelage ne s’établit pas, reportez-vous au
paragraphe concernant le jumelage au chapitre « Prise en main ».
8] Vérifier que la sourdine du microphone est coupée.
9] Passer à la configuration de la conversation.
EX6UNI-wireless-manual-book.indb 23 11/09/2013 10:24
FR
ROUGE
BLANC
CÂBLE HDMI
(NON FOURNI)
ENTRÉE HDMI
TV/MONITEUR
AUDIO OUT
TV/MONITEUR
PORT USBHDMI OUTPUT
04
01
03
02
REMARQUE: votre téléviseur ou moniteur doit posséder des prises Audio Out (ROUGE/
BLANCHE). La plupart des téléviseurs et moniteurs, à quelques exceptions près, possèdent
des prises Audio IN ROUGE/BLANCHE et Video IN JAUNE mais peu de téléviseurs et encore
moins de moniteurs possèdent des prises Audio OUT ROUGE/BLANCHE.
24
CONFIGURATION XBOX : AVEC HDMI (OPTION B)
1] Raccorder le câble HDMI (non inclus) entre votre
Xbox et le téléviseur ou moniteur.
2] Brancher les connecteurs ROUGE/BLANC du câble RCA vers Audio dans
les prises Audio OUT, ROUGE/BLANCHE de votre téléviseur ou moniteur.
3] Connecter l’émetteur sans fil sur un port USB
disponible en façade de votre console Xbox.
4] Connecter le câble audio à l’émetteur sans fil.
5] Allumer votre Xbox et vérifier que la manette est connectée sans
fil à la console (ne pas laisser la manette en charge, sans quoi elle
risque de transmettre un bruit de fond électrique dans le casque).
6] Allumer votre casque en appuyant sur le bouton marche/arrêt. Le
jumelage avec l’émetteur sans fil doit s’opérer automatiquement.
Toutefois, si le jumelage ne s’établit pas, reportez-vous au
paragraphe concernant le jumelage au chapitre « Prise en main ».
7] Vérifier que la sourdine du microphone est coupée.
8] Passer à la configuration de la conversation.
EX6UNI-wireless-manual-book.indb 24 11/09/2013 10:24
FR
02
01
25
XBOX LIVE : CONFIGURATION DE LA CONVERSATION
1] Raccorder le câble à fiche mini entre
votre casque et la manette Xbox.
2] Aller dans Paramètres > Préférences > Voix.
Sortie voix : Son via le casque.
3] Régler le volume souhaité pour le son du jeu et
la voix. (Vous devez maintenant entendre le son
provenant de votre console dans votre casque.)
4] Pour tester le microphone, aller dans les
messages et enregistrer et lire un message.
RÉGLAGE DU MICROPHONE
Retirer la perche micro et la placer du côté que vous préférez.
Ensuite, remettre le couvercle en place du côté sans perche
pour éviter toute accumulation de poussière ou de saleté.
Il est important d’eectuer ceci dans le bon ordre pour la console
se connecte au microphone du casque.
02
01
EX6UNI-wireless-manual-book.indb 25 11/09/2013 10:24

FR
CONNECTER SUR
PC/MAC/CONSOLE
26
CONFIGURATION PC, MAC
1] Brancher le câble USB sur un port disponible de votre PC ou Mac.
2] Votre PC (Windows 7) va automatiquement détecter le casque
et l’assigner comme périphérique de sortie audio.
3] Pour Mac, ouvrir les préférences du système et aller au son. (Vous
pourrez alors assigner la sortie audio au casque Gioteck EX-06.)
4] Vérifier que le microphone n’est pas en sourdine.
CONFIGURATION APPAREIL PORTABLE
1] Brancher le câble USB de l’émetteur sans fil sur un port disponible de
votre console/ordinateur/ou autre appareil possédant un port USB.
2] Brancher une extrémité du câble audio sur l’appareil portable (téléphone
mobile, iPod, lecteur mp3, etc.) et l’autre extrémité sur l’émetteur sans fil.
3] Vous pouvez maintenant écouter de la musique dans vos déplacements !
EX6UNI-wireless-manual-book.indb 26 11/09/2013 10:24
FR
27
GARANTIE LIMITÉE
La garantie couvre ce produit contre tout vice de matière ou défaut de
fabrication pendant une période de quatre-vingt-dix (90) jours à compter
de la date d’achat. Cette garantie ne couvre pas les dommages causés par
un accident, un abus ou une négligence, notamment les déchirures dans le
tissu, et se limite au remplacement ou à la réparation du produit à notre
discrétion. Les dommages provoqués par l’utilisation de produits chimiques
agressifs ne sont pas couverts au titre de la garantie. Si vous constatez
un défaut dans les 90 jours qui suivent l’achat, merci de prendre contact
avec nous pour obtenir une autorisation de réexpédition du produit. Le
client prendra à sa charge les frais d’envoi mais Goodbetterbest Limited
couvrira les frais d’expédition du produit de rechange. Vous devez emballer
solidement le produit et y joindre (a) une copie de la preuve d’achat d’origine
(ticket de caisse) indiquant la date d’achat et (b) une explication détaillée du
problème constaté. Cette déclaration de garantie prévaut sur toute autre
déclaration formulée de manière expresse ou implicite par le vendeur.
EX6UNI-wireless-manual-book.indb 27 11/09/2013 10:24
28
CONSEILS DE DEPANNAGE & MANUEL
D’UTILISATION EN LIGNE SUR
WWW.GIOTECK.COM
EX6UNI-wireless-manual-book.indb 28 11/09/2013 10:24
DE
29
WICHTIG: BITTE LESEN SIE VOR GEBRAUCH DIESE
BEDIENUNGSANLEITUNG SORGFÄLTIG.
SICHERHEITSHINWEISE
Dieses Produkt wurde unter
Beachtung der strengsten
Sicherheitsvorschrien entwickelt.
Jedoch kann jedes elektrische Gerät
bei unsachgemäßem Einsatz Schaden
verursachen. Um einen gefahrlosen
Betrieb zu garantieren, beachten
Sie bitte die folgenden Richtlinien:
• Verwenden Sie das Produkt nur
für den beabsichtigten Zweck.
Dies ist ein Präzisionsprodukt,
behandeln Sie es sorgsam.
• Das Produkt enthält Kleinteile. Nicht
für Kinder unter 3 Jahren geeignet.
• An einem trockenen, staubfreien
Ort aufbewahren
• Nicht übermäßiger Wärme oder Kälte
aussetzen und direktes Sonnenlicht oder
Wärmequellen wie Heizungen vermeiden.
• Vermeiden Sie, dass das Produkt
feucht oder schmutzig wird, da dies
zu Beschädigungen führen kann.
• Nicht mit Benzol, Farbverdünner,
Azeton, Spiritus oder ähnlichen
Lösungsmitteln reinigen.
• Bauen Sie dieses Produkt nicht
auseinander, da dies zum Erlöschen Ihrer
Garantie führt und einen Stromschlag
an Ihrer Konsole verursachen kann.
WARNHINWEISE
Dieses Symbol weist auf wichtige
Installations-, Betriebs- und
Wartungsanweisungen hin.
Diese Anweisungen sind immer
genauestens einzuhalten.
UMWELT
Bitte helfen Sie, die Umwelt zu
schützen, und recyceln Sie die
Kartonverpackung dieses Produkts.
Dieses Produkt darf NICHT
im normalen Haushaltsabfall
entsorgt werden. Es muss separat
entsorgt werden. Bitte bringen
Sie es zu einer Abfallsammelstelle
für Elektroabfall.
EX6UNI-wireless-manual-book.indb 29 11/09/2013 10:24
DE
30
TEILELISTE
i] Headset
ii] Drahtlossender
iii] USB-Ladekabel
iv] Audio / Xbox Chat-Kabel
v] Audio-Cinchkabel
vi] Abnehmbarer Mikrofonbügel
vii] Bedienungsanleitung
iii
iii iv
vi
v
vii
EX6UNI-wireless-manual-book.indb 30 11/09/2013 10:24
DE
31
EINZELHEITEN ZUM PRODUKT
HEADSET
01 | Kopfbandregler
02 | Abnehmbarer Mikrofonbügel
03 | Xbox Chat-Eingang
04 | Lautlos-/Verbindungsknopf
05 | Chat-Lautstärke –/+
06 | Spiellautstärke –/+
07 | Surround-Sound-Knopf
08 | Einschalttaste
09 | LED-Anzeige
10 | Kopfmikrofon-Anschluss
11 | USB-Ladeanschluss
DRAHTLOSSENDER
12 | LED-Anzeige
13 | Audio-Eingang
1312
08
09
02
11
03
10
04 07
05 06
01
EX6UNI-wireless-manual-book.indb 31 11/09/2013 10:24
DE
32
ERSTE SCHRITTE
LADEN
Es wird empfohlen, das Headset vor dem ersten Gebrauch
vollständig aufzuladen.
1] Stecken Sie das kleine Verbinderende des Ladekabels in den
Ladeanschluss des Headsets und das andere Ende in einen
Anschluss auf der Vorderseite Ihrer Konsole, Ihres PC oder MAC.
2] Die LED am Headset leuchtet während des Ladevorgangs ROT
und geht AUS, wenn der Vorgang vollständig abgeschlossen ist.
Das Headset benötigt im völlig entleerten Zustand ca. 4-5 Stunden,
bis es wieder vollständig aufgeladen ist. Wenn das Headset während
des Ladevorgangs benutzt wird, dauert der Ladezyklus länger.
Wenn nur noch 20 Minuten Batteriedauer verbleiben, leuchtet die
LED am Headset kontinuierlich blau. Dies hält so lange an, bis das
Headset geladen wird oder die Batterie völlig entleert ist.
SCHNELLINSTALLATION
1] Verbinden Sie den Drahtlossender mit einem USB-Anschluss an Ihrer
Konsole, Ihrem PC oder MAC. Die Transmitter-LED beginnt, ROT zu leuchten.
2] Schalten Sie nun das Headset durch Betätigung der Einschalttaste
EIN, und die LED beginnt, blau zu leuchten. Die Verbindung zwischen dem
Transmitter und dem Headset war erfolgreich, wenn die Headset-LED
dauerha blau leuchtet und die Transmitter-LED dauerha rot.
3] Das Ausschalten des Headsets erfolgt ebenfalls durch
Betätigung der Einschalttaste, und die LED geht aus.
Auf den folgenden Seiten erhalten Sie detailliertere Installationsanleitungen.
VERBINDUNG
Die Verbindung des Headsets sollte automatisch erfolgen.
Wenn Ihr Headset keine Verbindung herstellen konnte,
blinken die LED am Headset und der Drahtlossender.
Um Ihr Headset erneut zu verbinden drücken Sie die Lautlostaste am
Headset, und halten Sie diese so lange gedrückt, bis die LED am Headset
und die LED am Transmitter dauerha leuchten. Das Headset sollte bei
der nächsten Benutzung automatisch eine Verbindung herstellen.
KABELLOSER BEREICH
Das Headset kann in einem Abstand von bis zu 20-30 m verwendet werden.
BITTE BEACHTEN SIE: Sie müssen gegebenenfalls Ihren Fernseher/
Monitor konfigurieren, damit das Audiosignal an den Kopfhörer
übertragen wird (siehe Handbuch des Fernsehgeräts).
EX6UNI-wireless-manual-book.indb 32 11/09/2013 10:24
DE
AV MULTI AUSGANG
AV-CINCHKABEL
(MIT DER PS3-KONSOLE
GELIEFERT)
GELB/
VIDEO
AN DIE VORDERSEITE
DES PS3
ANSCHLIESSEN
TV/MONITOR
AUDIO-AUSGANG
03
02
01
04
05
33
ANSCHLUSSANLEITUNG
PS3 EINRICHTEN: MIT A/V-KABELN (OHNE HDMI)
1] Schließen Sie das AV-Cinchkabel an der Rückseite Ihrer PS3 an.
2] Verbinden Sie die Stecker ROT/WEISS des AV-Cinchkabels mit den
entsprechenden ROTEN/WEISSEN Anschlüssen am Audio-Cinchkabel.
3] Schließen Sie den gelben VIDEO-Stecker an der
Video IN-Buchse an Ihrem TV/Monitor an.
4] Schließen Sie den Drahtlossender an einen freien USB-Anschluss
an der Vorderseite Ihrer PS3-Konsole an.
5] Stecken Sie das Audiokabel in den Drahtlossender.
6] Schalten Sie Ihre PS3-Konsole ein.
7] Schalten Sie Ihr Headset durch Drücken der Einschalttaste
EIN. Die Verbindung mit dem Drahtlossender sollte
automatisch erfolgen. Wenn keine Verbindung erfolgt ist,
siehe Abschnitt Verbindung unter ‘Erste Schritte’.
8] Stellen Sie sicher, dass die Lautlostaste am Mikrofon AUS ist.
9] Gehen Sie auf Einstellungen > Zubehöreinstellungen > Einstellungen
Audiogerät, und wählen Sie EX-06 Headset für den Ein- und Ausgang aus.
Sie können sich selbst in den Ohrmuscheln des Headsets hören, wenn Sie
in das Mikrofon sprechen. Stellen Sie die gewünschte Lautstärke ein.
10] Gehen Sie auf Einstellungen > Klangeinstellungen > Einstellungen
Audioausgang, wählen Sie Audioeingangsstecker/ Scart / AV Multi.
EX6UNI-wireless-manual-book.indb 33 11/09/2013 10:24
DE
TV/MONITOR
HDMI-EINGANG
HDMI-AUSGANG AV MULTI AUSGANG
HDMI-KABEL
(NICHT MITGELIEFERT)
AV-CINCHKABEL
(MIT DER
PS3-KONSOLE
GELIEFERT)
AN DIE VORDERSEITE
DES PS3
ANSCHLIESSEN
05
04
03
0201
34
PS3 EINRICHTEN : MIT HDMI (OPTION A)
1] Schließen Sie das HDMI-Kabel an die PS3-Konsole
und Ihren Fernseher/Monitor an.
2] Schließen Sie das AV-Cinchkabel an der Rückseite Ihrer PS3 an.
3] Verbinden Sie die Stecker ROT/WEISS des AV-Cinchkabels mit den
entsprechenden ROTEN/WEISSEN Anschlüssen am Audio-Cinchkabel.
4] Schließen Sie den Drahtlossender an einen freien USB-Anschluss
an der Vorderseite Ihrer PS3-Konsole an.
5] Stecken Sie das Audiokabel in den Drahtlossender.
6] Schalten Sie Ihre PS3-Konsole ein.
7] Schalten Sie Ihr Headset durch Drücken der Einschalttaste
EIN. Die Verbindung mit dem Drahtlossender sollte
automatisch erfolgen. Wenn keine Verbindung erfolgt ist,
siehe Abschnitt Verbindung unter ‘Erste Schritte’.
8] Stellen Sie sicher, dass die Lautlostaste am Mikrofon AUS ist.
9] Gehen Sie auf Einstellungen > Zubehöreinstellungen > Einstellungen
Audiogerät, und wählen Sie EX-06 Headset für den Ein- und Ausgang aus.
Sie können sich selbst in den Ohrmuscheln des Headsets hören, wenn
Sie in das Mikrofon sprechen. Die gewünschte Lautstärke einstellen.
10] Gehen Sie auf Einstellungen > Klangeinstellungen > Einstellungen
Audioausgang, wählen Sie Audioeingangsstecker/ Scart / AV Multi.
EX6UNI-wireless-manual-book.indb 34 11/09/2013 10:24
DE
ROT
WEISS
HDMI-AUSGANG
HDMI-KABEL
(NICHT MITGELIEFERT)
AN DIE VORDERSEITE DES
PS3 ANSCHLIESSEN
TV/MONITOR
HDMI-EINGANG
TV/MONITOR
AUDIO-AUSGANG
01
03
04
02
BITTE BEACHTEN SIE: Ihr Fernseher/Monitor muss mit Audio Ausgangsbuchsen (ROT/
WEISS) ausgestattet sein. Die meisten, aber nicht alle Fernseher/Monitore verfügen
über Audio IN-(ROT/WEISS) und Video IN-(GELB)-Buchsen, aber nicht alle Fernsehgeräte
und noch weniger Monitore sind mit Audio-OUT-Buchsen (ROT/WEISS) ausgestattet.
35
PS3 EINRICHTEN : MIT HDMI (OPTION B)
1] Schließen Sie das HDMI-Kabel an die PS3-Konsole
und Ihren Fernseher/Monitor an.
2] Schließen Sie die Stecker ROT/WEISS des Audio-Cinchkabels an die
entsprechenden ROTEN/WEISSEN Anschlüsse an Ihrem TV/Monitor an.
3] Schließen Sie den Drahtlossender an einen freien USB-Anschluss
an der Vorderseite Ihrer PS3-Konsole an.
4] Stecken Sie das Audiokabel in den Drahtlossender.
5] Schalten Sie Ihre PS3-Konsole ein.
6] Schalten Sie Ihr Headset durch Drücken der Einschalttaste
EIN. Die Verbindung mit dem Drahtlossender sollte
automatisch erfolgen. Wenn keine Verbindung erfolgt ist,
siehe Abschnitt Verbindung unter ‘Erste Schritte’.
7] Stellen Sie sicher, dass die Lautlostaste am Mikrofon AUS ist.
8] Gehen Sie auf Einstellungen > Zubehöreinstellungen > Einstellungen
Audiogerät, und wählen Sie EX-06 Headset für den Ein- und Ausgang aus.
Sie können sich selbst in den Ohrmuscheln des Headsets hören, wenn
Sie in das Mikrofon sprechen. Die gewünschte Lautstärke einstellen.
9] Gehen Sie auf Einstellungen > Klangeinstellungen > Einstellungen
Audioausgang, wählen Sie Audioeingangsstecker/ Scart / AV Multi.
EX6UNI-wireless-manual-book.indb 35 11/09/2013 10:24

DE
AV MULTI AUSGANG USB-ANSCHLUSS
AV-CINCHKABEL
(MIT DER
XBOX-KONSOLE
GELIEFERT)
TV/MONITOR
AUDIO-AUSGANG
GELB/
VIDEO
03
02
05
01 04
36
XBOX EINRICHTEN : MIT A/V-KABELN (OHNE HDMI)
1] Schließen Sie das AV-Cinchkabel an der Rückseite Ihrer Xbox an.
2] Verbinden Sie die Stecker ROT/WEISS des AV-Cinchkabels mit den
entsprechenden ROTEN/WEISSEN Anschlüssen am Audio-Cinchkabel.
3] Den gelben VIDEO-Stecker an der Video IN-Buchse
an Ihrem TV/Monitor anschließen.
4] Schließen Sie den Drahtlossender an einen freien USB-Anschluss
an der Vorderseite Ihrer PS3-Konsole an.
5] Stecken Sie das Audiokabel in den Drahtlossender.
6] Schalten Sie die Xbox ein, und stellen Sie sicher, dass Ihr Controller drahtlos
an Ihrer Konsole angeschlossen ist (den Controller nicht im Ladevorgang
lassen, da er sonst Störgeräusche an Ihren Kopfhörer überträgt).
7] Schalten Sie Ihr Headset durch Drücken der Einschalttaste
EIN. Die Verbindung mit dem Drahtlossender sollte
automatisch erfolgen. Wenn keine Verbindung erfolgt ist,
siehe Abschnitt Verbindung unter ‘Erste Schritte’.
8] Stellen Sie sicher, dass die Lautlostaste am Mikrofon AUS ist.
9] Chat einrichten.
EX6UNI-wireless-manual-book.indb 36 11/09/2013 10:24
DE
TV/MONITOR
HDMI-EINGANG
AV-CINCHKABEL
(NICHT MITGELIEFERT)
AV MULTI OUT USB PORTHDMI OUTPUT
HDMI-KABEL
(NICHT MITGELIEFERT)
05
04
03
02
01
WICHTIG: Das mit der Xbox 360 mitgelieferte AV-Kabel kann nicht gleichzeitig mit
einem HDMI-Kabel verwendet werden, da der AV-Stecker die HDMI-Buchse verdeckt.
Für diese Einstellung müssen Sie ein Audioadapterkabel kaufen.
37
XBOX EINRICHTEN: MIT HDMI (OPTION A)
1] Schließen Sie das HDMI-Kabel (nicht im Lieferumfang
enthalten) an die Xbox und Ihren Fernseher/Monitor an.
2] Schließen Sie das AV-Cinch-Adapterkabel (nicht im
Lieferumfang enthalten) an die Xbox an.
3] Stecken Sie die Stecker ROT/WEISS des Audio-Cinchkabels in
die entsprechenden Eingänge des AV-Cinch-Adapterkabels
(nicht im Lieferumfang enthalten).
4] Schließen Sie den Drahtlossender an einen freien USB-Anschluss
an der Vorderseite Ihrer PS3-Konsole an.
5] Stecken Sie das Audiokabel in den Drahtlossender.
6] Schalten Sie die Xbox ein, und stellen Sie sicher, dass Ihr Controller drahtlos
an Ihrer Konsole angeschlossen ist (den Controller nicht im Ladevorgang
lassen, da er sonst Störgeräusche an Ihren Kopfhörer überträgt).
7] Schalten Sie Ihr Headset durch Drücken der Einschalttaste
EIN. Die Verbindung mit dem Drahtlossender sollte
automatisch erfolgen. Wenn keine Verbindung erfolgt ist,
siehe Abschnitt Verbindung unter ‘Erste Schritte’.
8] Stellen Sie sicher, dass die Lautlostaste am Mikrofon AUS ist.
9] Chat einrichten.
EX6UNI-wireless-manual-book.indb 37 11/09/2013 10:24
DE
ROT
WEISS
USB-ANSCHLUSSHDMI-AUSGANG
HDMI-KABEL
(NICHT MITGELIEFERT)
TV/MONITOR
HDMI-EINGANG
TV/MONITOR
AUDIO-AUSGANG
04
01
03
02
BITTE BEACHTEN SIE: Ihr Fernseher/Monitor muss mit Audio Ausgangsbuchsen (ROT/
WEISS) ausgestattet sein. Die meisten, aber nicht alle Fernseher/Monitore verfügen
über Audio IN-(ROT/WEISS) und Video IN-(GELB)-Buchsen, aber nicht alle Fernsehgeräte
und noch weniger Monitore sind mit Audio-OUT-Buchsen (ROT/WEISS) ausgestattet.
38
XBOX EINRICHTEN: MIT HDMI (OPTION B)
1] Schließen Sie das HDMI-Kabel (nicht im Lieferumfang
enthalten) an Ihre Xbox und Ihren Fernseher/Monitor an.
2] Schließen Sie die Stecker ROT/WEISS des Audio-Cinchkabels an die
entsprechenden ROTEN/WEISSEN Anschlüsse an Ihrem TV/Monitor an.
3] Schließen Sie den Drahtlossender an einen freien USB-Anschluss
an der Vorderseite Ihrer PS3-Konsole an.
4] Stecken Sie das Audiokabel in den Drahtlossender.
5] Schalten Sie die Xbox ein, und stellen Sie sicher, dass Ihr Controller drahtlos
an Ihrer Konsole angeschlossen ist (den Controller nicht im Ladevorgang
lassen, da er sonst Störgeräusche an Ihren Kopfhörer überträgt).
6] Schalten Sie Ihr Headset durch Drücken der Einschalttaste
EIN. Die Verbindung mit dem Drahtlossender sollte
automatisch erfolgen. Wenn keine Verbindung erfolgt ist,
siehe Abschnitt Verbindung unter ‘Erste Schritte’.
7] Stellen Sie sicher, dass die Lautlostaste am Mikrofon AUS ist.
8] Chat einrichten.
EX6UNI-wireless-manual-book.indb 38 11/09/2013 10:24
DE
02
01
39
XBOX LIVE : CHAT EINRICHTEN
1] Schließen Sie das Mini-Klinkenkabel zwischen
Ihrem Headset und dem Xbox-Controller an.
2] Gehen Sie auf Einstellungen >
Voreinstellungen > Stimme. Sprachausgang:
Über Kopfhörer wiedergeben.
3] Stellen Sie die gewünschte Lautstärke
für Spielton und Stimme ein. (Sie sollten
den von Ihrer Konsole erzeugten Sound
nun über den Kopfhörer hören.)
4] Um das Mikrofon zu prüfen, gehen Sie auf
Mitteilungen, nehmen Sie eine Mitteilung
auf, und geben Sie diese wieder.
MIKROFONANPASSUNG
Nehmen Sie den Mikrofonbügel ab, und bringen Sie ihn auf der gewünschten
Seite an. Setzen Sie dann die Abdeckung auf der freiliegenden Seite
wieder ein, damit sich kein Staub oder Schmutz ansammelt.
Wichtig ist, dass der Anschluss in der richtigen Reihenfolge erfolgt,
damit sich die Konsole mit dem Mikrofon des Kopfhörers verbindet.
02
01
EX6UNI-wireless-manual-book.indb 39 11/09/2013 10:24
DE
AN PC/MAC/KONSOLE
ANSCHLIESSEN
40
PC, MAC EINRICHTEN
1] Stecken Sie das USB-Kabel in einen freien Anschluss an Ihrem PC oder Mac.
2] Ihr PC (Windows 7) wird das Headset automatisch
finden und als Audioausgabegerät zuweisen.
3] Beim MAC önen Sie die Systemvoreinstellungen önen und gehen auf Ton.
(Sie können dem Gioteck EX-06 Headset den Audioausgang zuweisen.)
4] Stellen Sie sicher, dass das Mikrofon nicht lautlos geschaltet ist.
HANDGERÄT EINRICHTEN
1] Stecken Sie das USB-Kabel des Drahtlossenders in einen freien
USB-Anschluss an Ihrer Konsole/Computer/oder einem anderen
Gerät mit USB-Anschluss.
2] Schließen Sie ein Ende des Audiokabels an Ihr Handgerät (Mobiltelefon,
iPod, MP3-Player etc.) und das andere an den Drahtlossender an.
3] Jetzt können Sie die Musik auf dem Sprung zu hören!
EX6UNI-wireless-manual-book.indb 40 11/09/2013 10:24
DE
41
EINGESCHRÄNKTE GARANTIE
Diese Produktgarantie bezieht sich auf alle Defekte in Material und Ausführung
für einen Zeitraum von neunzig (90) Tagen ab Kaufdatum. Diese Garantie
umfasst keine Schäden durch Unfall, unsachgemäßen Gebrauch oder
Versäumnisse, wie Risse im Material, und beschränkt sich auf den Austausch
oder die Reparatur des Produkts nach unserem Ermessen. Schäden aufgrund
der Verwendung von aggressiven Chemikalien werden nicht von der Garantie
abgedeckt. Bei einem Defekt innerhalb von 90 Tagen ab Kaufdatum setzen Sie
sich bitte mit uns in Verbindung, um eine Berechtigung zur Rücksendung des
Produkts zu erhalten. Der Kunde ist für die Versandkosten verantwortlich.
Goodbetterbest Limited übernimmt jedoch die Versandkosten für das
Austauschprodukt. Das Produkt muss sicher verpackt sein, und es müssen
folgende Dokumente enthalten sein: (1) eine Kopie des ursprünglichen
Kaufbelegs mit dem Kaufdatum und (2) eine detaillierte Beschreibung des
Problems/der Probleme. Diese Garantieerklärung hat Vorrang vor allen
anderen ausdrücklichen oder implizierten Erklärungen des Verkäufers.
EX6UNI-wireless-manual-book.indb 41 11/09/2013 10:24
DE
42
TIPPS ZUR FEHLERBEHEBUNG
& DAS ONLINE-HANDBUCH
FINDEN SIE UNTER
WWW.GIOTECK.COM
EX6UNI-wireless-manual-book.indb 42 11/09/2013 10:24

IT
43
IMPORTANTE : LEGGERE E COMPRENDERE LE PRESENTI ISTRUZIONI PRIMA
DI UTILIZZARE IL DISPOSITIVO
PRECAUZIONI D’USO
Questo prodotto è stato progettato
in base ai più elevati standard di
sicurezza. Tuttavia, se usato in modo
errato, è potenzialmente in grado
di causare danni. Per contribuire a
un utilizzo privo di rischi, prestare
attenzione alle seguenti linee guida:
• Utilizzare il prodotto solo per lo
scopo cui è destinato. Si tratta
di un prodotto di precisione,
maneggiarlo con cura.
• Contiene componenti di piccole
dimensioni. Non adatto per bambini
di età inferiore ai tre anni.
• Conservare in un luogo
asciutto e privo di polvere.
• Non conservare in luoghi soggetti
a calore o freddo estremi, ed
evitare la luce diretta del sole o
le fonti di calore, come le stufe.
• Evitare che il prodotto si bagni
o sporchi; in caso contrario
si potrebbe danneggiare;
• Non pulire il prodotto con benzene,
solventi per vernici, acetone,
alcol o altri solventi simili.
• Non smontare il prodotto; in
caso contrario si annullerà la
garanzia e si potrebbero causare
shock elettrici alla console.
AVVERTENZE
Questo simbolo indica istruzioni
di installazione, operazione
e manutenzione importanti.
Attenersi molto scrupolosamente
a queste istruzioni.
AMBIENTE
Contribuire a preservare
l’ambiente riciclando la confezione
in cartone del prodotto.
Questo prodotto NON può
essere smaltito tra i normali
rifiuti domestici. Smaltirlo
separatamente. Portarlo presso un
punto di raccolta di rifiuti elettrici.
EX6UNI-wireless-manual-book.indb 43 11/09/2013 10:24
IT
44
ELENCO DEI COMPONENTI
i] Cue
ii] Trasmettitore wireless
iii] Cavo di caricamento USB
iv] Cavo chat Audio / Xbox
v] RCA a cavo audio
vi] Asta per il microfono smontabile
vii] Manuale d’uso
iii
iii iv
vi
v
vii
EX6UNI-wireless-manual-book.indb 44 11/09/2013 10:24
IT
45
INFORMAZIONI SUL PRODOTTO
CUFFIE
01 | Regolatori stringitesta
02 | Asta per il microfono smontabile
03 | Ingresso chat Xbox
04 | Pulsante silenziamento/allineamento
05 | Volume chat –/+
06 | Volume gioco –/+
07 | Pulsante surround
08 | Pulsante Power
09 | Indicatore LED
10 | Porta asta per microfono
11 | Porta di caricamento USB
TRASMETTITORE WIRELESS
12 | Indicatore LED
13 | Ingresso audio
1312
08
09
02
11
03
10
04 07
05 06
01
EX6UNI-wireless-manual-book.indb 45 11/09/2013 10:24
IT
46
INTRODUZIONE
CARICAMENTO
Si raccomanda di caricare completamente le cue prima del primo utilizzo.
1] Inserire l’estremità più piccola del cavo di caricamento
nella porta di caricamento sulle cue e l’altra estremità in
una porta sul lato frontale della console, PC o MAC.
2] Il LED sulle cue si illuminerà di ROSSO durante il caricamento e si
spegnerà al termine del caricamento. Le cue impiegheranno circa
4-5 ore per ricaricarsi completamente, una volta scaricate. Il ciclo di
caricamento durerà di più se le cue sono in uso durante il caricamento.
Quando la batteria avrà rimasto solo 20 minuti di carica, la luce blu
del LED sulle cue lampeggerà continuamente. Il LED continuerà a
lampeggiare finché la batteria non sarà completamente scarica.
IMPOSTAZIONE PER AVVIO RAPIDO
1] Collegare il trasmettitore wireless alla porta USB sulla console,
PC o MAC. Sul trasmettitore lampeggerà la luce rossa del LED.
2] Accendere le cue premendo il pulsante Power e la luce blu del
LED comincerà a lampeggiare. Il collegamento tra il trasmettitore
e le cue è avvenuto correttamente se sulle cue è acceso
il LED blu fisso e sul trasmettitore il LED rosso fisso.
3] Spegnere le cue premendo il pulsante Power e il LED si spegnerà.
Leggere le pagine successive per ottenere istruzioni di regolazione
più dettagliate.
ALLINEAMENTO
Le cue si allineano automaticamente. Tuttavia, se l’allineamento
delle cue non avviene correttamente, il LED sulle cue e quello
sul trasmettitore wireless lampeggiano ad intermittenza.
Per riallineare le cue, premere e tenere premuto il pulsante silenziamento
sulle cue finché non si accendono fissi sia il LED sulle cue che il LED sul
trasmettitore. Le cue si allineeranno automaticamente all’utilizzo successivo.
GAMMA WIRELESS
Le cue funzionamento fino ad una distanza di 20-30 metri.
NOTA: può essere necessario eettuare delle regolazioni
alle impostazioni della TV/Monitor per consentire l’uscita
dell’audio dalle cue (fare riferimento al manuale TV).
EX6UNI-wireless-manual-book.indb 46 11/09/2013 10:24
IT
AV MULTI OUT
CAVO AV RCA
(IN DOTAZIONE CON
CONSOLE PS3)
GIALLO/
VIDEO
COLLEGARE SUL
LATO FRONTALE
DELLA PS3
TV / MONITOR
AUDIO OUT
03
02
01
04
05
47
GUIDA AL COLLEGAMENTO
IMPOSTAZIONE PS3 : CON CAVI A/V (SENZA HDMI)
1] Collegare il cavo AV RCA sul retro della PS3.
2] Collegare i connettori ROSSO/BIANCO dal cavo AV RCA alla presa
ROSSA/BIANCA corrispondente sull’RCA al cavo audio.
3] Collegare il connettore VIDEO giallo alla presa Video IN della TV/Monitor.
4] Collegare il trasmettitore wireless ad una porta USB
disponibile sul lato frontale della console PS3.
5] Collegare il cavo audio al trasmettitore wireless.
6] Accendere la console PS3.
7] Accendere le cue premendo il pulsante Power. L’allineamento
con il trasmettitore wireless avviene automaticamente.
Tuttavia, se ciò non dovesse avvenire, vedere la sezione
relativa all’allineamento nel capitolo ‘Introduzione’.
8] Assicurarsi che il silenziamento microfono sia spento.
9] Andare a Impostazioni > Impostazioni accessori > Impostazioni
Dispositivi Audio e selezionare le cue EX-06 sia per
ingresso che uscita. Ora vi sentirete parlare al microfono
tramite le cue. Impostare il volume desiderato
10] Andare a Impostazioni > Impostazioni audio > Impostazioni uscita
audio, selezionare Connettore ingresso audio / Scart / AV Multi.
EX6UNI-wireless-manual-book.indb 47 11/09/2013 10:24
IT
INGRESSO HDMI
TV/MONITOR
USCITA HDMI AV MULTI OUT
CAVO AV RCA
(IN DOTAZIONE CON
CONSOLE PS3)
COLLEGARE SUL
LATO FRONTALE
DELLA PS3
CAVO HDMI
(NON IN DOTAZIONE)
05
04
03
0201
48
IMPOSTAZIONE PS3 : CON HDMI (OPZIONE A)
1] Collegare il cavo HDMI tra la console PS3 e la TV/Monitor.
2] Collegare il cavo AV RCA sul retro della PS3.
3] Collegare i connettori ROSSO/BIANCO dal cavo AV RCA alla presa
ROSSA/BIANCA corrispondente sull’RCA al cavo audio.
4] Collegare il trasmettitore wireless ad una porta USB
disponibile sul lato frontale della console PS3.
5] Collegare il cavo audio al trasmettitore wireless.
6] Accendere la console PS3.
7] Accendere le cue premendo il pulsante Power. L’allineamento
con il trasmettitore wireless avviene automaticamente.
Tuttavia, se ciò non dovesse avvenire, vedere la sezione
relativa all’allineamento nel capitolo ‘Introduzione’.
8] Assicurarsi che il silenziamento microfono sia spento.
9] Andare a Impostazioni > Impostazioni accessori > Impostazioni
Dispositivi Audio e selezionare le cue EX-06 sia in
ingresso che uscita. Ora vi sentirete parlare al microfono
tramite le cue. Impostare il volume desiderato.
10] Andare a Impostazioni > Impostazioni audio > Impostazioni uscita
audio, selezionare Connettore ingresso audio / Scart / AV Multi.
EX6UNI-wireless-manual-book.indb 48 11/09/2013 10:25
IT
ROSSO
BIANCO
TV / MONITOR
AUDIO OUT
INGRESSO HDMI
TV/MONITOR
USCITA HDMI
CAVO HDMI
(NON IN DOTAZIONE)
COLLEGARE SUL LATO
FRONTALE DELLA PS3
01
03
04
02
NOTA: La TV/Monitor deve disporre di prese Audio Out (ROSSO/BIANCO). La maggior
parte, ma non tutte le TV/Monitor dispongono di prese ROSSA/BIANCA Audio IN e
GIALLA Video IN, ma non tutte le TV e un numero ancora più ridotto di monitor hanno
prese ROSSA/BIANCA Audio OUT..
49
IMPOSTAZIONE PS3 : CON HDMI (OPZIONE B)
1] Collegare il cavo HDMI tra la console PS3 e la TV/Monitor.
2] Collegare i connettori ROSSO/BIANCO sull’RCA al cavo audio
delle prese ROSSA/BIANCA Audio della TV/Monitor.
3] Collegare il trasmettitore wireless ad una porta USB
disponibile sul lato frontale della console PS3.
4] Collegare il cavo audio al trasmettitore wireless.
5] Accendere la console PS3.
6] Accendere le cue premendo il pulsante Power. L’allineamento
con il trasmettitore wireless avviene automaticamente.
Tuttavia, se ciò non dovesse avvenire, vedere la sezione
relativa all’allineamento nel capitolo ‘Introduzione’.
7] Assicurarsi che il silenziamento microfono sia spento.
8] Andare a Impostazioni > Impostazioni accessori > Impostazioni
Dispositivi Audio e selezionare le cue EX-06 sia in
ingresso che uscita. Ora vi sentirete parlare al microfono
tramite le cue. Impostare il volume desiderato.
9] Andare a Impostazioni > Impostazioni audio > Impostazioni uscita
audio, selezionare Connettore ingresso audio / Scart / AV Multi.
EX6UNI-wireless-manual-book.indb 49 11/09/2013 10:25
IT
AV MULTI OUT PORTA USB
CAVO AV RCA
(IN DOTAZIONE CON
CONSOLE XBOX)
GIALLO/
VIDEO
TV / MONITOR
AUDIO OUT
03
02
05
01 04
50
IMPOSTAZIONE XBOX : CON CAVI A/V (SENZA HDMI)
1] Collegare il cavo AV RCA al retro dell’Xbox.
2] Collegare i connettori ROSSO/BIANCO dal cavo AV RCA alla presa
ROSSA/BIANCA corrispondente sull’RCA al cavo audio.
3] Collegare il connettore VIDEO giallo alla presa Video IN della TV/Monitor.
4] Collegare il trasmettitore wireless ad una porta USB
disponibile sul lato frontale della console Xbox.
5] Collegare il cavo audio al trasmettitore wireless.
6] Accendere la console Xbox e verificare che il controller sia
connesso in wireless ad essa (non lasciare il controller in
carica o trasferirà il rumore elettrico alle cue).
7] Accendere le cue premendo il pulsante Power. L’allineamento
con il trasmettitore wireless avviene automaticamente.
Tuttavia, se ciò non dovesse avvenire, vedere la sezione
relativa all’allineamento nel capitolo ‘Introduzione’.
8] Assicurarsi che il silenziamento microfono sia spento.
9] Andare alla configurazione della chat.
EX6UNI-wireless-manual-book.indb 50 11/09/2013 10:25