i MOBIL de C V 08SG-88 Mobile Cam User Manual F868
i-MOBIL S.A. DE C.V. Mobile Cam F868
UserManual.wiki
>
i MOBIL de C V
>
08SG 88 User Manual
users manual
Navigation menu
Upload a User Manual
Namespaces
Wiki Guide
HTML
PDF
Info
Views
User Manual
Discussion / Help
Navigation
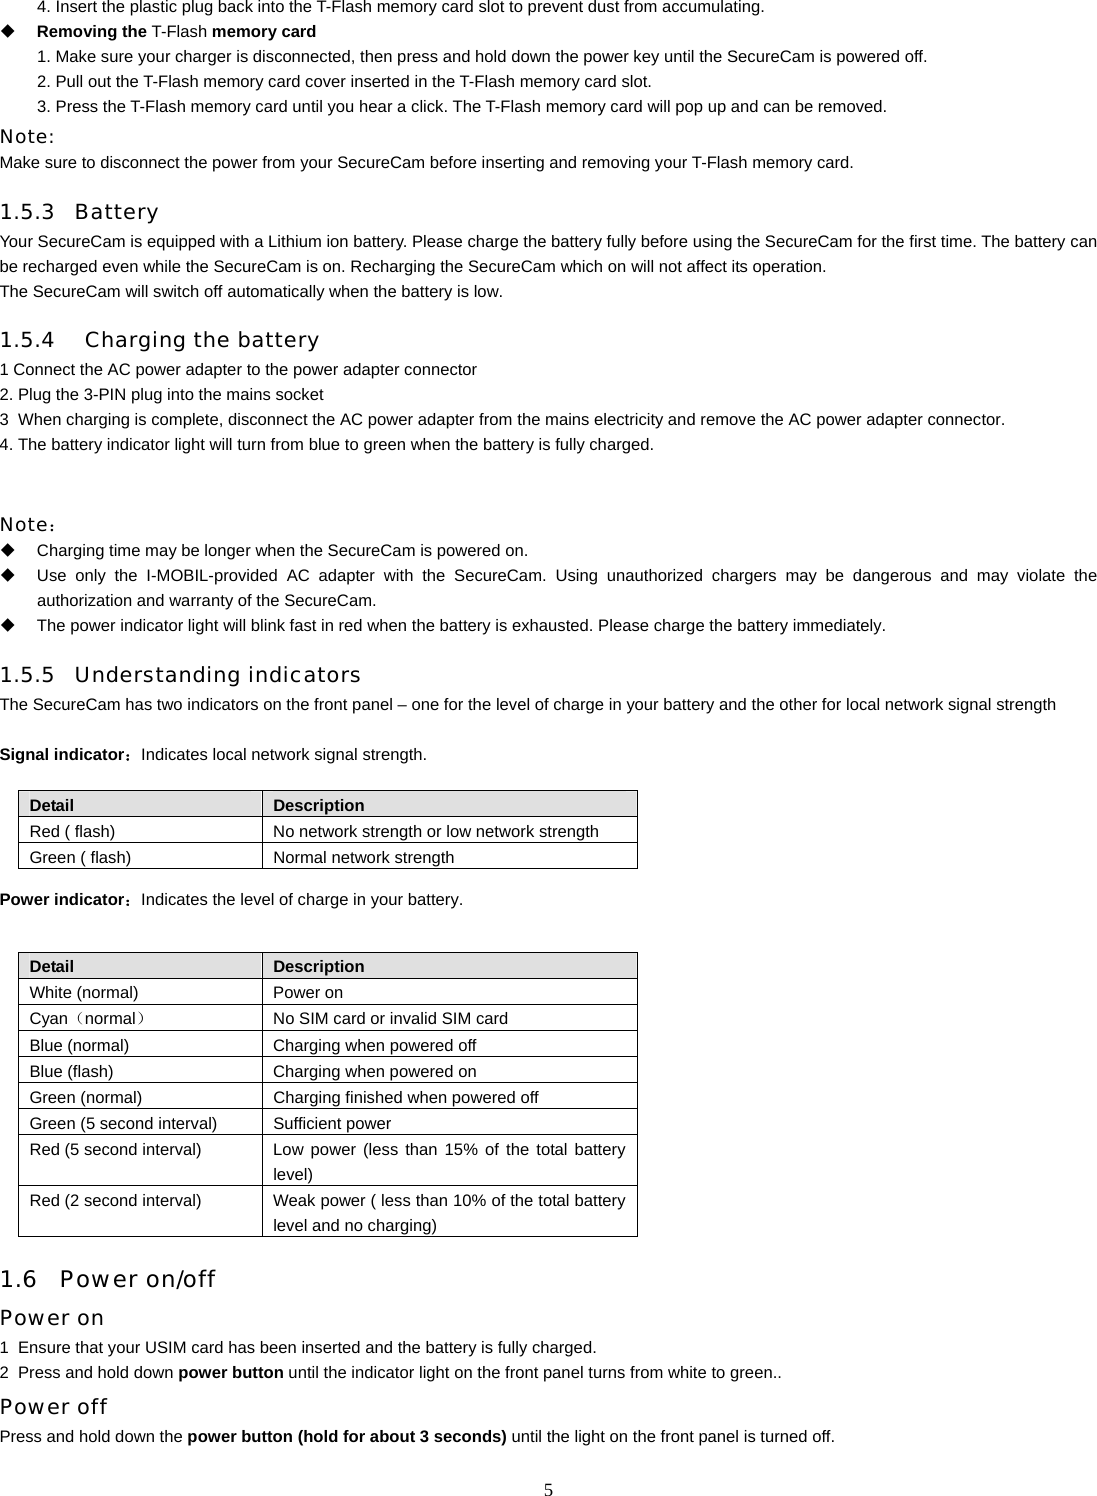
![105.3 SecureCam SMS commands The administrator can also administer the SecureCam by sending SMS commands. Some functions can only be operated by SMS commands – e.g. time setting and BEEP switch setting. Command SMS COMMAND Adding a new user #adduser*[number]#[pin]# Deleting a user #deluser*[number]#[pin]# Modifying user PIN code #modpin*[newpin]#[pin]# Modifying administrator number #modad*[oldnumber]*[newnumber]#[pin]# Setting the language #setlanguage*[en|sp]#[pin]# The default is English. en—English sp—Spanish Getting white name list #getwl#[pin]# BEEP on/off when video call is connected #beep*on|off#[pin]# Default is “on” Help help A list of available SMS commands will be sent to the Administrator, through multiple SMS messages. Setting time #settime*[yyyymmddhhmm]#[pin]# Getting time #gettime#[pin]# Setting the switch to control whether user needs to input PIN code every time #pin*on|off#[pin]# The default is “off”. If the command is set as “on”, the caller has to input the PIN code every time, whether his number is in the white list or not. If the command is set as “off” and the caller’s number is in the white list, he does not need to input the PIN code. Setting the switch of infrared mode #nightmode*on|off#[pin]# The default is “on”. Setting the switch of the led indicators #led*on|off#[pin]# The default is “on”. Setting the validation of non-white list user #owner*on|off#[pin]# The default is “on”. If the command is set as “on”, the SecureCam will prompt the user to input his number for authentication purposes: 1. the incoming call doesn’t carry a caller ID number (may be the caller is roaming or the caller disables caller ID), or 2. the incoming number exceeds 20 digits, or 3. the white list reaches its limit of 20 users and the incoming number isn’t in the white list. If the entered number is in the white list, then the user will be further prompted for the PIN and video call will proceed if the PIN is correct. If the number is not in the white list or the PIN has been entered incorrectly 3 times, the call will be](https://usermanual.wiki/i-MOBIL-de-C-V/08SG-88/User-Guide-930132-Page-10.png)
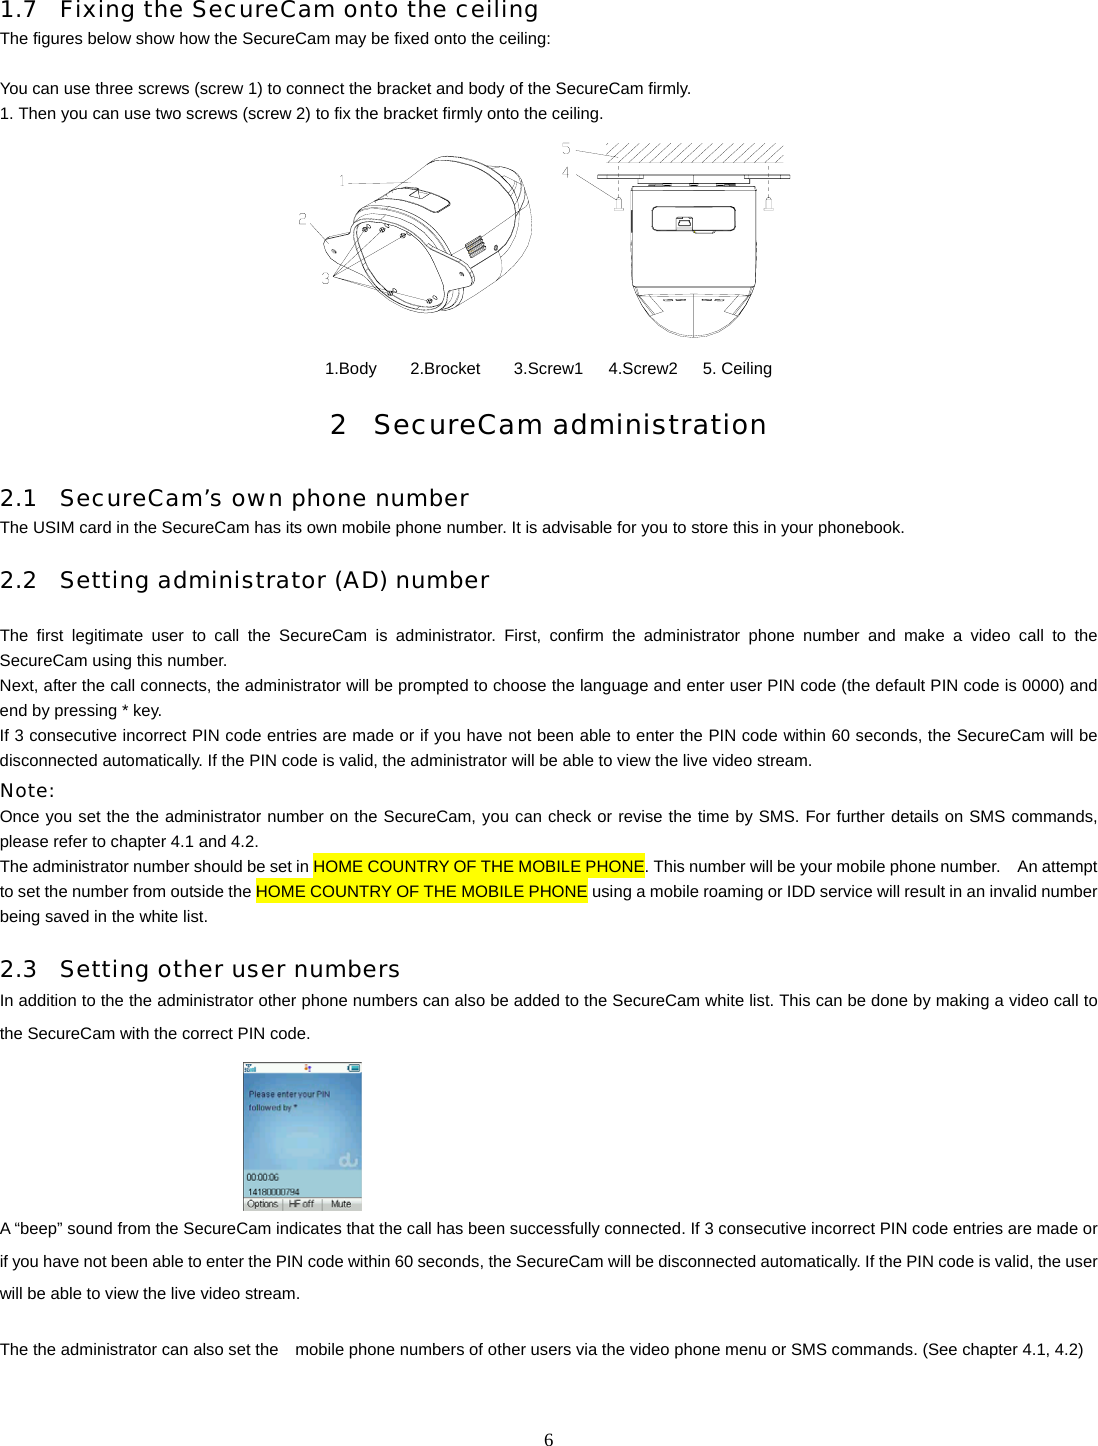
![11disconnected. If the command is set as “off”. The SecureCam won’t allow the video call in the following situations: 1. the incoming call doesn’t carry a caller ID number (may be the caller is roaming or the caller disables caller ID), or 2. the incoming number exceeds 20 digits, or 3. the white list reaches its limit of 20 users and the incoming number isn’t in the white list. Get phone status #getstatus#[pin]# Clear the white list users #clearwl#[pin]# Clear all the white list users except AD Set power ring volume level #powerringvolume*[x]#[PIN]# X=0,1,2,3 Note: 1) SMS commands can only be sent by the administrator’s mobile phone number. These commands will not be recognized if they are sent from another mobile phone number. 2) All commands can be in lower-case or upper case. 3) Description of SMS Commands: [number]:Indicates a valid mobile phone number. The phone number’s maximum length is 20 digits . ( “+” and numbers can be included) . [oldnumber]:Indicates old administrator number [newnumber]:Indicates new administrator number |:Indicates “or” [yyyymmddhhmm]:Indicates year, month, day, hour, minute. For example: 12:30, May 1, 2006 is displayed as 200605011230 Note: Please use a 3G mobile phone to make sure the SMS center number in your SIM card is correct. 6 SecureCam operational modes The SecureCam has two operational modes – daylight mode and infrared mode – and is able to switch between the two automatically, according to lighting conditions in the surrounding environment. In low light conditions, the SecureCam will shut down daylight mode and start the infrared mode automatically. Conversely, when lighting conditions are bright ), the SecureCam will switch from infrared mode to daylight mode. 7 Warning and precautions 7.1 Precautions The SecureCam contains delicate electronic circuitry and battery systems. You should treat it with care and pay particular attention to the following points: Do not allow the SecureCam, battery or accessories to be exposed to liquids or moisture at any time. Do not immerse in any liquid. SecureCam does not support video calls over 3 hours continuously. If the time is over 3 hours, it will shut off automatically. Do not place the SecureCam alongside computer disks, credit cards, travel cards or other magnetic media. Do not leave the SecureCam in places where the temperature could exceed 60°C – e.g. on a car’s dashboard or a windowsill or behind glass in direct sunlight. Do not dispose of the SecureCam in fire. This equipment is fitted with an internal battery that can only be replaced by a qualified du engineer so used batteries must be safely disposed of at a recycling point. Do not attempt to dismantle the SecureCam or any of its accessories. The SecureCam may become warm during normal use. The SecureCam may also become warm while the battery is being charged.](https://usermanual.wiki/i-MOBIL-de-C-V/08SG-88/User-Guide-930132-Page-11.png)