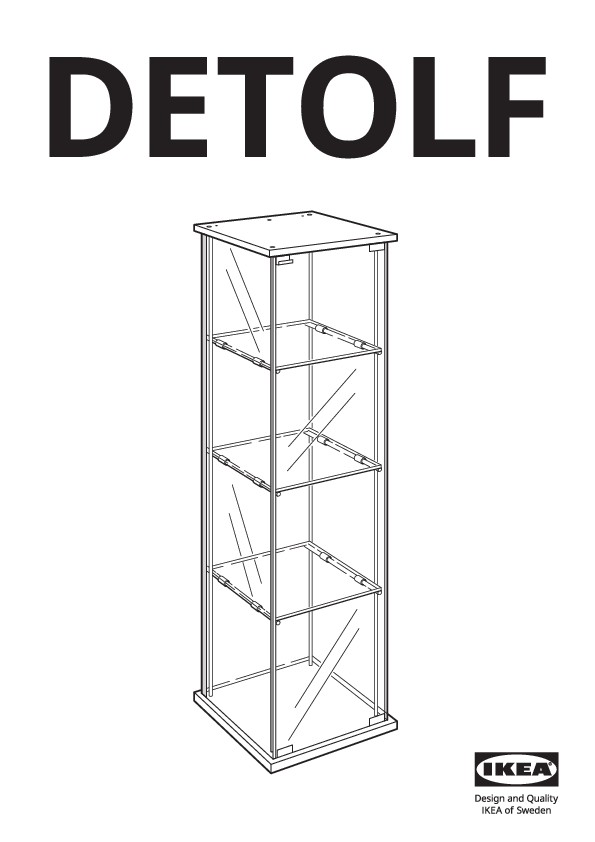
DETOLF Glass-Door Cabinet Assembly Instructions
Product Model: DETOLF
Manufacturer: IKEA
Important Safety Information
WARNING!
Serious or fatal crushing injuries can occur from furniture tip over. To prevent tip over, this furniture must be used with the wall attachment device(s) provided.
Screw(s) and plug(s) for the wall are not included. Use screw(s) and plug(s) suitable for your walls. If you are uncertain, seek professional advice. Read and follow each step of the instruction carefully.
Parts List
The following parts are included in the package:
- 4x Screw (Part 109562)
- 2x Screw (Part 109049)
- 8x Plastic Cap (Part 100600)
- 12x Shelf Support Pin (Part 102433)
- 2x Plastic Foot (Part 147208)
- 2x Wall Bracket (Part 109842)
- 4x Washer (Part 100823)
- 2x Base/Top Panel Connector (Part 101649)
- 1x L-shaped Bracket (Part 10004736)
- 1x Round Foot (Part 113290)
- 1x Allen Key (Part 100002)
- 2x Door Hinge Assembly (Part 102039)
- 1x Door Hinge Assembly (Part 102047)
Assembly Steps
Step 1: Prepare Base Frame
Diagram shows two side panels and a base panel being joined. A close-up shows using the Allen key (100002) ? to screw a plastic cap (100600) into place.
Step 2: Attach Vertical Supports
Diagram shows the frame from Step 1 with vertical support rods being attached to the side panels using screws (Part 100002 and 100600). A close-up shows using the Allen key (100002) ? to screw a plastic cap (100600) into place.
Step 3: Install Base Feet
Diagram shows the frame with vertical supports and the bottom panel. A close-up shows screwing in the round feet (Part 113290) with screws (Part 109562) ?.
Step 4: Insert Side Glass Panels
Diagram shows two people holding a large glass side panel (labeled '1') and guiding it into the frame. Icons indicate: ⚠️ [fragile glass symbol], ❌ [do not tilt], ❌ [do not lay flat].
Step 5: Secure Side Glass Panels
Diagram shows two people inserting clips into the grooves of the glass panels and frame. A close-up shows a clip being inserted into the groove, with an arrow ➡️ indicating the direction of insertion.
Step 6: Insert Back Glass Panel
Diagram shows two people guiding the back glass panel (labeled '2') into the frame. A close-up shows the bottom edge of the panel being seated into a groove.
Step 7: Secure Back Glass Panel
Diagram shows two people inserting clips into the top of the back glass panel and frame. A close-up shows the detail of the clip insertion.
Step 8: Attach Top Panel
Diagram shows two people positioning the top panel and pressing it down onto the assembled frame.
Step 9: Secure Top Panel
Diagram shows the assembled unit with the top panel in place. A close-up shows using the Allen key (100002) ? to insert and tighten plastic caps (Part 100600) into the top panel. An informational icon ℹ️ shows a diagram of how to use the Allen key to tighten a screw.
Step 10: Attach Door Hinges
Diagram shows the cabinet with the door open. Close-ups show attaching hinge assemblies (Part 101649) to the frame and the door.
Step 11: Prepare Door Panel
Diagram shows a door panel being prepared. A close-up shows attaching two hinge components (Part 101649) to the edge of the door panel.
Step 12: Attach Door to Cabinet
Diagram shows a person attaching the door to the cabinet. A close-up shows using a screwdriver ? to attach a hinge component (Part 101649) to the door.
Step 13: Final Door Attachment
Diagram shows the door being attached. A close-up shows a bracket (Part 10004736) being inserted into the bottom of the door frame.
Step 14: Install Door Hinges (Detail)
Diagram shows two people attaching the door. Close-ups show the hinge mechanism (Part 101649) being secured to the door and the frame, with screws being tightened ?.
Step 15: Final Check and Cleanup
The diagram shows the cabinet with the door attached. A close-up shows a bracket (Part 10004736) being placed into a trash receptacle ?️, likely indicating disposal of packaging or excess material.
Step 16: Attach Door Stops
Diagram shows the cabinet with the door open. Close-ups show attaching the top door stop (Part 102047) and the bottom door stop (Part 102039) to the door frame.
Step 17: Install Door Handle/Knob
Diagram shows the cabinet with the door open. A close-up shows the door handle assembly (Part 109842) being attached to the door.
Step 18: Attach Base Feet
Diagram shows the cabinet. A close-up shows inserting the plastic feet (Part 147208) into the bottom corners of the cabinet base. The second part of this step shows the completed cabinet and a trash receptacle ?️ with instructions to discard packaging.
Step 19: Insert Shelf Pins
Diagram shows the cabinet with the door open. A close-up shows inserting the shelf support pins (Part 102433) into the pre-drilled holes on the side panels.
Step 20: Place Shelves
Diagram shows the cabinet with the door open. Shelves are shown being placed onto the installed shelf support pins.
Step 21: Wall Attachment (Crucial Safety Step)
Diagram shows the cabinet and the wall attachment hardware. Close-ups show attaching the wall brackets (Part 109842) to the top of the cabinet using screws (Part 109049) and washers (Part 100823). A warning icon ⚠️ and cross mark ❌ indicate that wall screws and plugs are not included and must be suitable for your wall type.
Step 22: Final Door Adjustment
Diagram shows a person adjusting the door. Close-ups show the adjustment screws on the door hinges, indicating how to align the door.
Care and Maintenance
Wipe clean with a cloth dampened in a mild cleaner. Wipe dry with a clean cloth.
