Introduction
Thank you for purchasing your new Onn. Soundbar. This manual provides essential information to help you understand the operational features, offers tips and hints, and provides troubleshooting guidance. Please read this manual carefully and keep it for future reference.
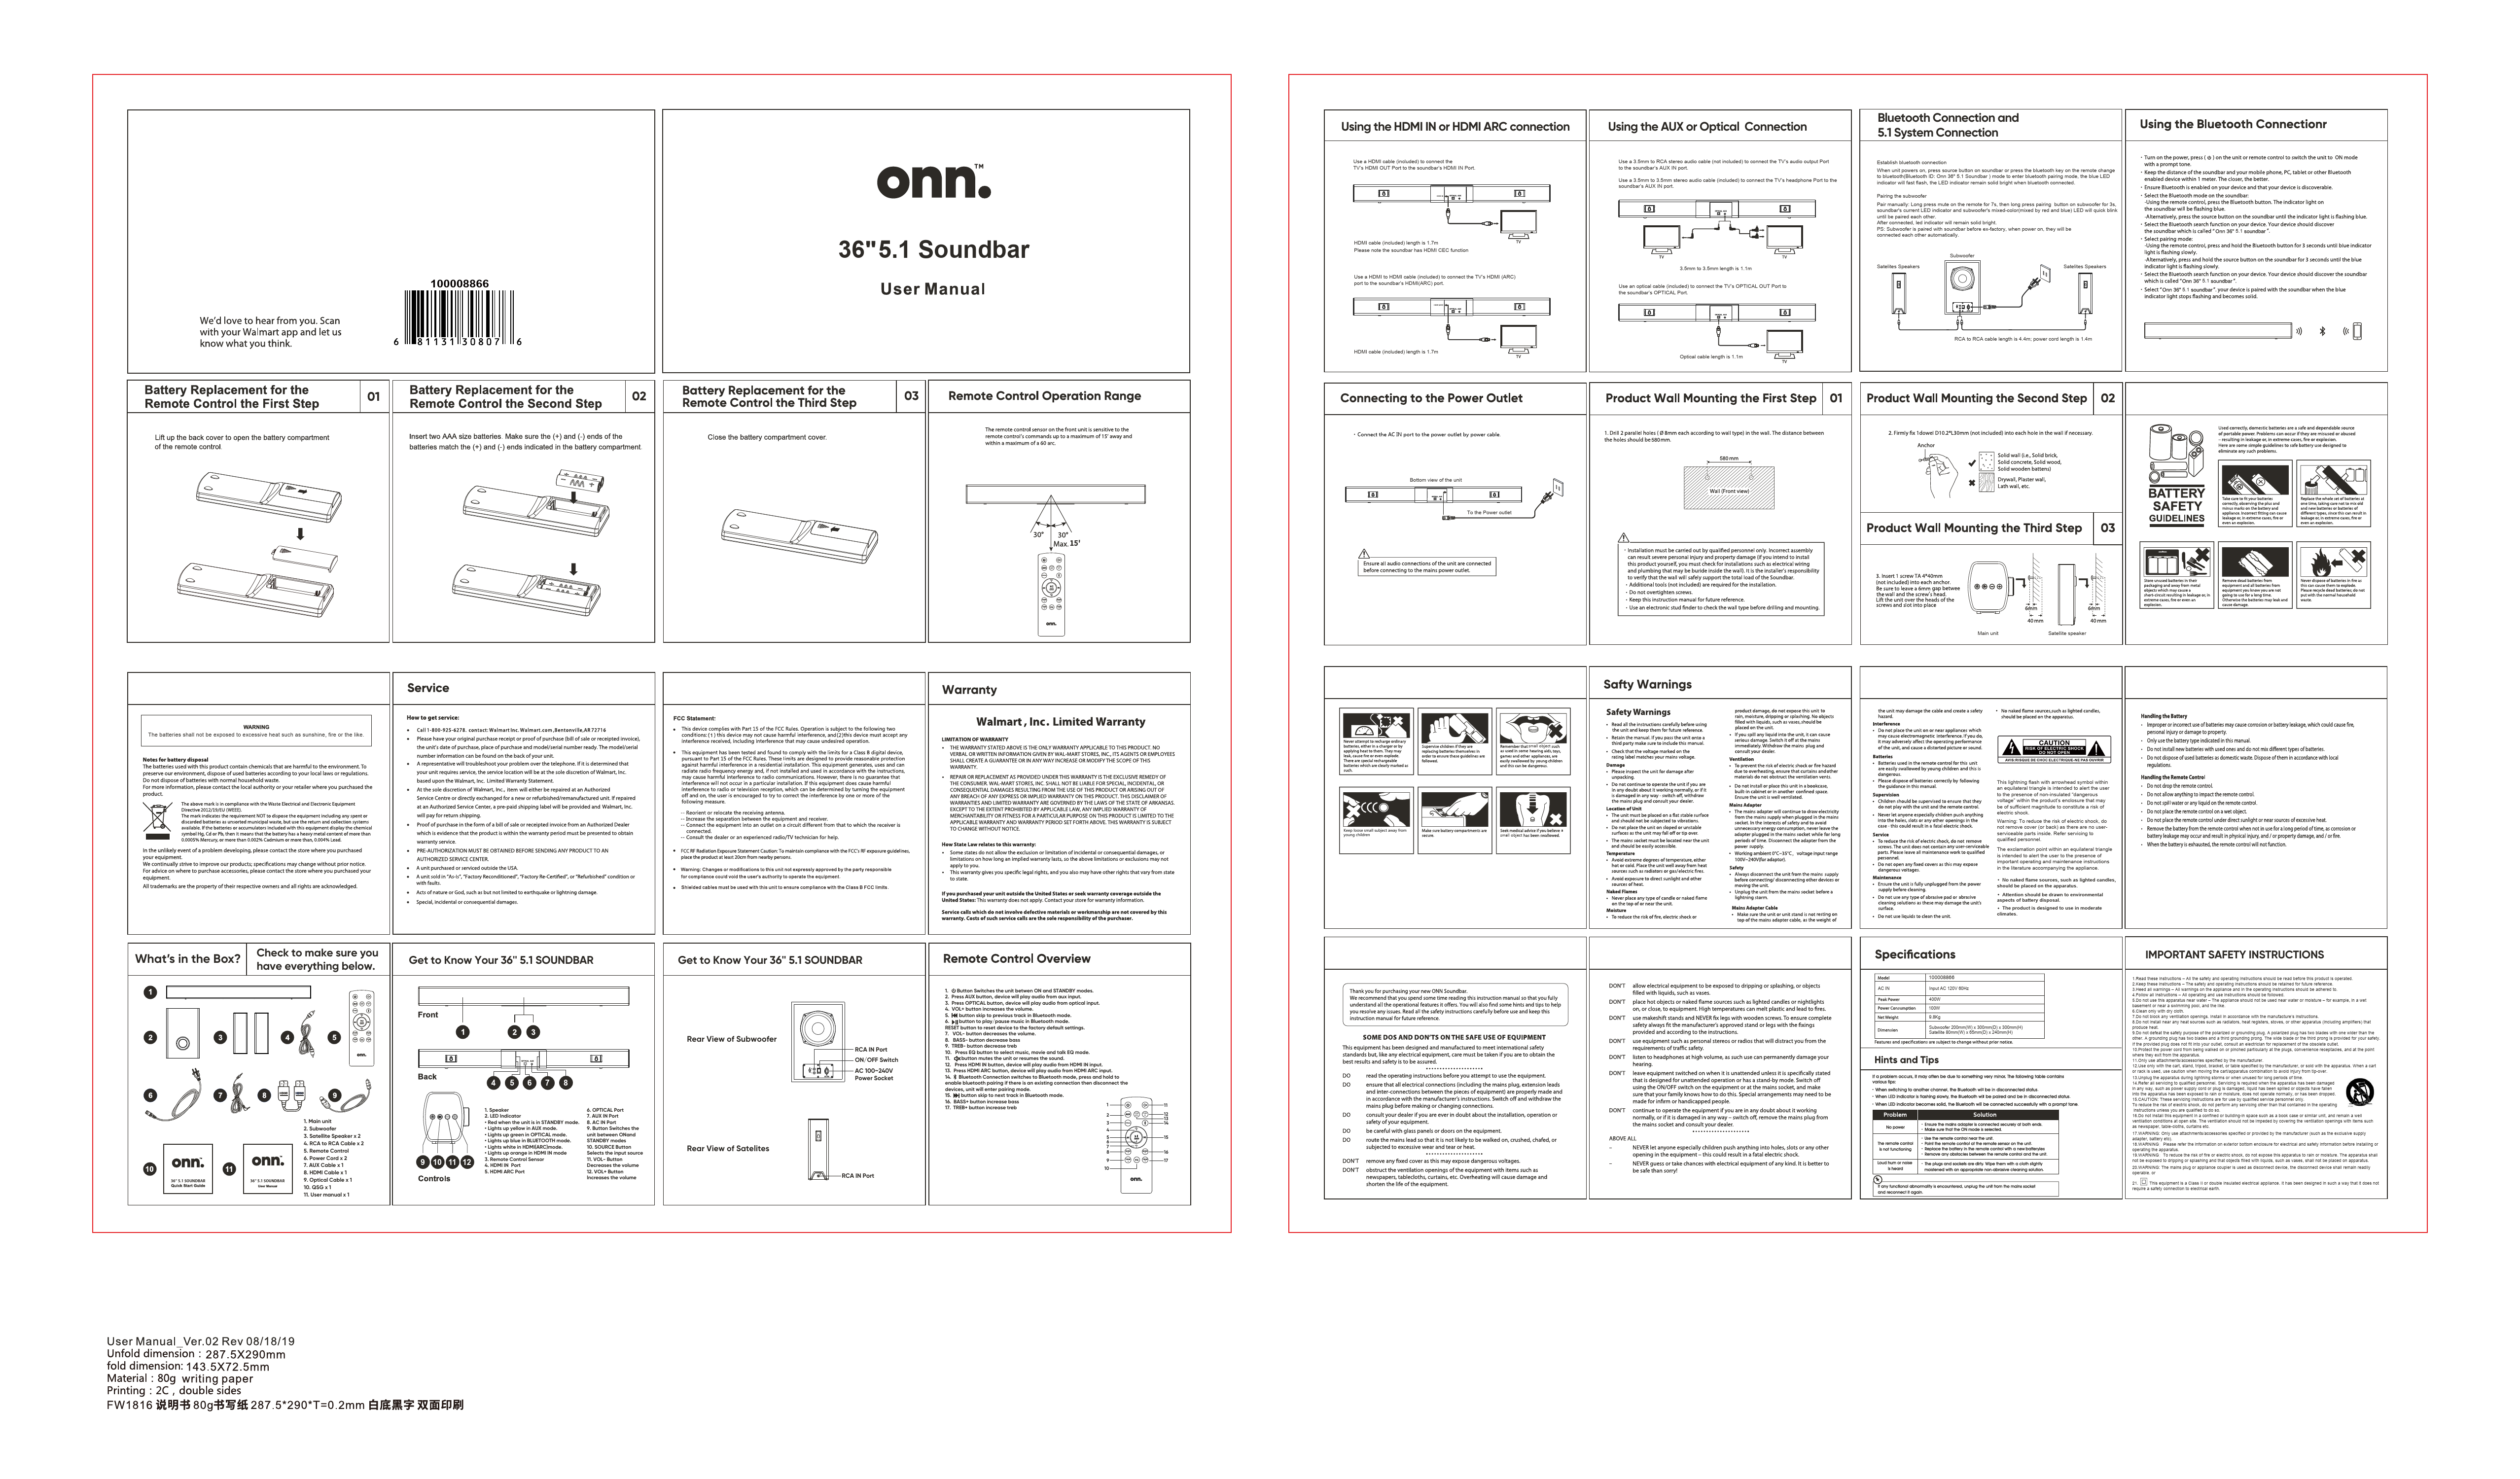
We'd love to hear from you. Scan with your Walmart app and let us know what you think.
Battery Replacement for the Remote Control
Step 01: Lift up the back cover to open the battery compartment of the remote control.
Diagram shows a remote control with its back cover being lifted to reveal the battery compartment.
Step 02: Insert two AAA size batteries. Make sure the (+) and (-) ends of the batteries match the (+) and (-) ends indicated in the battery compartment.
Diagram shows two AAA batteries being inserted into the remote control's battery compartment, aligning positive and negative terminals correctly.
Step 03: Close the battery compartment cover.
Diagram shows the battery compartment cover being closed on the remote control.
Remote Control Operation Range
The remote control sensor on the unit is sensitive to the remote control's commands. It can receive commands up to a distance of 15 feet away and within a maximum of a 60° arc.
Diagram illustrates the soundbar with lines indicating a 15-foot reception range and a 60-degree arc.
Audio Connections
Using the HDMI IN or HDMI ARC Connection
Use a HDMI cable (included) to connect the TV's HDMI OUT Port to the soundbar's HDMI IN Port.
Diagram shows a TV's HDMI OUT port connected to a soundbar's HDMI IN port using an HDMI cable. HDMI cable length is 1.7m. Note: The soundbar has HDMI CEC function.
Use a HDMI to HDMI cable (included) to connect the TV's HDMI (ARC) port to the soundbar's HDMI(ARC) port.
Diagram shows a TV's HDMI (ARC) port connected to a soundbar's HDMI (ARC) port using an HDMI cable. HDMI cable length is 1.7m.
Using the AUX or Optical Connection
Use a 3.5mm to RCA stereo audio cable (not included) to connect the TV's audio output Port to the soundbar's AUX IN port.
Use a 3.5mm to 3.5mm stereo audio cable (included) to connect the TV's headphone Port to the soundbar's AUX IN port.
Diagram shows a TV's audio output (RCA) connected to the soundbar's AUX IN port with a 3.5mm to RCA cable. Cable length is 1.1m.
Use an optical cable (included) to connect the TV's OPTICAL OUT Port to the soundbar's OPTICAL Port.
Diagram shows a TV's OPTICAL OUT port connected to the soundbar's OPTICAL port with an optical cable. Cable length is 1.1m.
Connecting to the Power Outlet
Connect the AC IN port to the power outlet by power cable.
Diagram shows the bottom view of the unit with the AC IN port connected to a power outlet via a power cable.
Ensure all audio connections of the unit are connected before connecting to the main power outlet.
Product Wall Mounting
Step 01: Drill Pilot Holes
Drill 2 pilot holes (8mm each according to drill type) in the wall. The distance between the holes is 500mm.
Diagram shows a wall with two pilot holes drilled 500mm apart. A ruler graphic indicates the 500mm distance. Text 'Wall (Front View)' is present.
Drilling into wall studs is recommended for secure mounting. If unsure, consult a professional. Ensure the wall can support the total load of the unit. Do not overtighten screws.
Step 02: Insert Dowels (if necessary)
Firmly fix Dowel (D10x30mm) (not included) into each hole in the wall if necessary.
Diagram shows a dowel being inserted into a wall hole. Icons indicate 'Solid Concrete', 'Solid Wood', 'Brick Wall' are suitable materials, while 'Hollow Wall', 'Dry Wall' require additional support.
Step 03: Mount the Unit
Diagram shows the main unit and satellite speakers being mounted on the wall using brackets. Text indicates 'Main unit' and 'Satellite speaker'.
Bluetooth Connection and 5.1 System Connection
Establish Bluetooth Connection
When the unit powers on, press the SOURCE button on the soundbar or press the Bluetooth key on the remote to change to Bluetooth mode (Bluetooth ID: Onn 36" 5.1 Soundbar). The blue LED indicator will flash rapidly. The LED indicator remains solid bright when Bluetooth is connected.
Pairing the Subwoofer
Pair manually: Long press the MUTE button on the remote for 7 seconds, then long press the pairing button on the subwoofer for 3 seconds. The soundbar's current LED indicator and the subwoofer's mixed-color (red and blue) LED will blink quickly until they are paired. After connection, the LED indicators will remain solid bright. Note: The subwoofer is paired with the soundbar before ex-factory; when powered on, they will connect automatically.
Diagram shows connections for the Subwoofer and Satellite Speakers using RCA to RCA cables. Text indicates RCA to RCA cable length is 4.4m; power cord length is 1.4m.
What's in the Box?
Check to make sure you have everything below:
- 1. Main unit
- 2. Subwoofer
- 3. Satellite Speaker x 2
- 4. RCA to RCA Cable x 2
- 5. Remote Control
- 6. Power Cord x 2
- 7. AUX Cable x 1
- 8. HDMI Cable x 1
- 9. Optical Cable x 1
- 10. QSG x 1
- 11. User manual x 1
Get to Know Your 36" 5.1 SOUNDBAR
Front View
Diagram shows the front of the soundbar with numbered controls: 1. Speaker, 2. LED Indicator, 3. Remote Control Sensor, 4. HDMI IN Port, 5. HDMI ARC Port.
Back View of Subwoofer
Diagram shows the rear of the subwoofer with controls: RCA IN Port, ON/OFF Switch, AC 100~240V Power Socket.
Rear View of Satellites
Diagram shows the rear of the satellite speakers with RCA IN Port.
Controls
LED Indicator:
- Red: Unit is in STANDBY mode.
- Yellow: AUX mode.
- Green: OPTICAL mode.
- Blue: BLUETOOTH mode.
- White: HDMI(ARC) mode.
- Orange: HDMI IN mode.
Buttons:
- Button: Switches the unit between ON and STANDBY modes.
- AUX Button: Device plays audio from AUX input.
- OPTICAL Button: Device plays audio from OPTICAL input.
- VOL+ Button: Increases the volume.
- Previous Track Button (Bluetooth): Skips to the previous track in Bluetooth mode.
- Play/Pause Button (Bluetooth): Plays or pauses music in Bluetooth mode.
- RESET Button: Resets the device to factory default settings.
- VOL- Button: Decreases the volume.
- BASS- Button: Decreases bass.
- TREB- Button: Decreases treble.
- EQ Button: Selects music, movie, and talk EQ mode.
- Mute Button: Mutes the unit or resumes the sound.
- HDMI IN Button: Device plays audio from HDMI IN input.
- HDMI ARC Button: Device plays audio from HDMI ARC input.
- Bluetooth Connection Button: Switches to Bluetooth mode. Press and hold to enable Bluetooth pairing. If there is an existing connection, it disconnects the devices and enters pairing mode.
- Next Track Button (Bluetooth): Skips to the next track in Bluetooth mode.
- BASS+ Button: Increases bass.
- TREB+ Button: Increases treble.
Remote Control Overview
Buttons:
- Button: Switches the unit between ON and STANDBY modes.
- AUX Button: Press to play audio from AUX input.
- OPTICAL Button: Press to play audio from OPTICAL input.
- VOL+ Button: Increases the volume.
- Previous Track Button (Bluetooth): Skip to previous track in Bluetooth mode.
- Play/Pause Button (Bluetooth): Play/pause music in Bluetooth mode.
- RESET Button: Reset device to the factory default settings.
- VOL- Button: Decreases the volume.
- BASS- Button: Decrease bass.
- TREB- Button: Decrease treble.
- EQ Button: Select music, movie, and talk EQ mode.
- Mute Button: Mutes the unit or resumes the sound.
- HDMI IN Button: Device will play audio from HDMI IN input.
- HDMI ARC Button: Device will play audio from HDMI ARC input.
- Bluetooth Connection Button: Switches to Bluetooth mode. Press and hold to enable Bluetooth pairing. If there is an existing connection, it disconnects the devices and enters pairing mode.
- Next Track Button (Bluetooth): Skip to next track in Bluetooth mode.
- BASS+ Button: Increase bass.
- TREB+ Button: Increase treble.
Specifications
| Model | 100008866 |
|---|---|
| Input | AC 120V ~ 60Hz |
| Power Consumption | 400W |
| Output Power | 100W |
| Weight | 9.8Kg |
| Subwoofer Dimensions | 200mm(W) x 300mm(D) x 300mm(H) |
| Satellite Dimensions | 80mm(W) x 65mm(D) x 240mm(H) |
Safety Warnings
WARNING: To reduce the risk of electric shock, do not remove cover (or back) as there are no userserviceable parts inside. Refer servicing to qualified personnel.
The exclamation point within an equilateral triangle is intended to alert the user to the presence of important operating and maintenance instructions in the literature accompanying the appliance.
General Safety:
- Do not use this apparatus near water or moisture.
- Clean only with a dry cloth.
- Do not block any ventilation openings. Install in accordance with the manufacturer's instructions.
- Do not install near any heat sources such as radiators, heat registers, stoves, or other apparatus (including amplifiers) that produce heat.
- Do not defeat the safety purpose of the polarized or grounding plug.
- Protect the power cord from being walked on or pinched.
- Only use attachments/accessories specified by the manufacturer.
- Use only with the cart, stand, tripod, bracket, or table specified by the manufacturer, or sold with the apparatus.
- Unplug the apparatus during lightning storms or when unused for long periods of time.
- Refer all servicing to qualified personnel.
- Do not install this equipment in a confined or building-in space such as a bookcase or similar unit.
- The ventilation should not be impeded by covering the ventilation openings with items such as newspaper, table-cloths, curtains etc.
WARNING: Only use attachments/accessories specified or provided by the manufacturer.
WARNING: Please refer the information on exterior bottom enclosure for electrical and safety information before installing or operating the apparatus.
WARNING: To reduce the risk of fire or electric shock, do not expose this apparatus to rain or moisture. The apparatus shall not be exposed to dripping or splashing and that objects filled with liquids, such as vases, shall not be placed on apparatus.
WARNING: The mains plug or appliance coupler is used as a disconnect device; the disconnect device shall remain readily operable.
This equipment is a Class II or double insulated electrical appliance. It has been designed in such a way that it does not require a safety connection to electrical earth.
Battery Safety:
- The batteries shall not be exposed to excessive heat such as sunshine, fire or the like.
- Dispose of batteries with due regard to the environmental regulations.
- Keep batteries away from children.
- Do not mix old and new batteries.
- Do not mix battery types (e.g., alkaline, carbon-zinc, rechargeable).
- Remove batteries if the device is not to be used for a long period.
- Batteries disposed of in fire may explode.
- In the unlikely event of a problem developing, please contact the store where you purchased the product.
Lightning Flash Symbol Warning: This lightning flash with arrowhead symbol within an equilateral triangle is intended to alert the user to the presence of non-insulated "dangerous voltage" within the product's enclosure that may be of sufficient magnitude to constitute a risk of electric shock.
Exclamation Point Symbol Warning: The exclamation point within an equilateral triangle is intended to alert the user to the presence of important operating and maintenance instructions in the literature accompanying the appliance.
Fire Hazard Warning: No naked flame sources, such as lighted candles, should be placed on the apparatus.
Environmental Warning: Attention should be drawn to environmental aspects of battery disposal.
Climate Warning: The product is designed to use in moderate climates.
WARNING: Do not allow electrical equipment to be exposed to dripping or splashing, or objects filled with liquids, such as vases.
WARNING: Do not place any sources of naked flames, such as lighted candles or night-lights, on or close to the equipment. The equipment should not be used near water or moisture.
CAUTION: Do not operate the equipment if it is damaged in any way – switch off, remove the mains plug from the wall socket and contact qualified personnel.
Above All: NEVER let anyone especially children push anything into holes, slots or any other opening on the unit; doing so can result in electric shock or damage to the unit.
Never guess or take chances with electrical equipment. If in any doubt, it is better to be safe than sorry.
Important Safety Instructions
- Read these instructions.
- Keep these instructions.
- Heed all warnings.
- Follow all instructions.
- Do not use this apparatus near water.
- Clean only with dry cloth.
- Do not block any ventilation openings.
- Do not install near any heat sources.
- Do not defeat the safety purpose of the polarized or grounding plug.
- Protect the power cord from being walked on or pinched.
- Only use attachments/accessories specified by the manufacturer.
- Use only with the cart, stand, tripod, bracket, or table specified by the manufacturer, or sold with the apparatus.
- Unplug the apparatus during lightning storms or when unused for long periods of time.
- Refer all servicing to qualified personnel.
- Servicing is required when the apparatus has been damaged in any way, such as power supply cord or plug is damaged, liquid has been spilled or objects have fallen into the apparatus, has been exposed to rain or moisture, does not operate normally, or has been dropped.
- CAUTION: These servicing instructions are for use by qualified service personnel only. To reduce the risk of electric shock, do not perform any servicing other than that contained in the operating instructions unless you are qualified to do so.
- Do not install this equipment in a confined or building-in space such as a book case or similar unit, and remain a well ventilation conditions at open site.
- The ventilation should not be impeded by covering the ventilation openings with items such as newspaper, table-cloths, curtains etc.
- WARNING: Only use attachments/accessories specified or provided by the manufacturer (such as the exclusive supply adapter, battery etc).
- WARNING: Please refer the information on exterior bottom enclosure for electrical and safety information before installing or operating the apparatus.
- WARNING: To reduce the risk of fire or electric shock, do not expose this apparatus to rain or moisture. The apparatus shall not be exposed to dripping or splashing and that objects filled with liquids, such as vases, shall not be placed on apparatus.
- WARNING: The mains plug or appliance coupler is used as disconnect device, the disconnect device shall remain readily operable.
- This equipment is a Class II or double insulated electrical appliance. It has been designed in such a way that it does not require a safety connection to electrical earth.
Hints and Tips
For problem solving, it may be due to something very minor. The following table contains
Hints and Tips:
- When switching to another channel, the Bluetooth connected device may be disconnected.
- When you switch to another channel, the Bluetooth connected device may be disconnected.
- When you switch to another channel, the Bluetooth connected device may be disconnected.
- When Bluetooth indicates it is connected, but no sound is heard:
- Press the VOL+ button on the remote control or on the unit to increase the volume.
- Press the MUTE button on the remote control or on the unit to ensure the unit is not muted.
- Check the Bluetooth device to ensure it is playing audio and that the volume is turned up.
- When the soundbar does not respond to the remote control:
- Make sure the remote control is within the operational range.
- Ensure the remote control sensor on the unit is not obstructed.
- Replace the batteries in the remote control.
- When the soundbar does not respond to the remote control:
- Press the MUTE button on the remote control or on the unit to ensure the unit is not muted.
- Check the Bluetooth device to ensure it is playing audio and that the volume is turned up.
Service, Warranty, and FCC Statement
Service
How to get service: Call 1-888-935-4278, contact Walmart.com, Bentonville AR 72716. Please provide your original purchase proof or bill of sale (or receipt) indicating the unit's date of purchase, place of purchase and serial number ready. The material under this warranty may be used for repair or replacement.
Disclaimer: The batteries shall not be exposed to excessive heat such as sunshine, fire or the like.
Warranty
Walmart, Inc. Limited Warranty
This product is warranted against defects in manufacturing and workmanship when used in accordance with the instructions. The warranty is valid for one (1) year from the original date of purchase.
This warranty is limited to the repair or replacement of defective parts and does not cover damage due to misuse, abuse, accidents, or unauthorized modifications.
Limitation of Warranty: THE WARRANTY STATED ABOVE IS THE ONLY WARRANTY APPLICABLE TO THIS PRODUCT. NO OTHER WARRANTY, EXPRESS OR IMPLIED, IS MADE BY WALMART INC. THIS DISCLAIMER OF ALL OTHER WARRANTIES, INCLUDING IMPLIED WARRANTIES OF MERCHANTABILITY AND FITNESS FOR A PARTICULAR PURPOSE, IS HEREBY MADE. ANY IMPLIED WARRANTY IS LIMITED TO THE APPLICABLE WARRANTY PERIOD SET FORTH ABOVE. THIS WARRANTY IS SUBJECT TO THE LIMITATIONS SET FORTH ABOVE.
How States Law Relates to this Warranty: Some states do not allow the exclusion or limitation of incidental or consequential damages, or limitations on how long an implied warranty lasts, so the above limitations or exclusion may not apply to you.
This warranty gives you specific legal rights, and you also may have other rights which vary from state to state.
If you purchased your unit outside the United States or seek warranty coverage outside the United States, please contact the retailer or distributor for warranty information.
Service calls which do not involve defective materials or workmanship are not covered by this warranty. Costs of such service calls are the sole responsibility of the purchaser.
FCC Statement
This device complies with part 15 of the FCC Rules. Operation is subject to the following two conditions: (1) This device may not cause harmful interference, and (2) this device must accept any interference received, including interference that may cause undesired operation.
This equipment has been tested and found to comply with the limits for a Class B digital device, pursuant to Part 15 of the FCC Rules. These limits are designed to provide reasonable protection against harmful interference in a residential installation. This equipment generates, uses, and can radiate radio frequency energy and, if not installed and used in accordance with the instructions, may cause harmful interference to radio communications. However, there is no guarantee that interference will not occur in a particular installation. If this equipment does cause harmful interference to radio or television reception, which can be determined by turning the equipment off and on, the user is encouraged to try to correct the interference by one or more of the following measures:
- Reorient or relocate the receiving antenna.
- Increase the separation between the equipment and receiver.
- Connect the equipment into an outlet on a circuit different from that to which the receiver is connected.
- Consult the dealer or an experienced radio/TV technician for help.
FCC Radiation Exposure Statement: To maintain compliance with FCC's RF exposure guidelines, this equipment should be installed and operated with minimum distance 20cm between the radiator and your body. Only use supplied antennas. Unauthorized antennas, modifications or attachments could damage the unit and will void your warranty and your right to operate this device.
Warning: Changes or modifications to this unit not expressly approved by the party responsible for compliance could void the user's authority to operate the equipment.
Shielded cables must be used with this unit to comply with the Class B FCC rules.
