20170907 iOptron StarFi Manual
File info: application/pdf · 4 pages · 729.49KB
20170907 iOptron StarFi Manual
iOptron StarFi Manual
iOptron StarFi Manual. iOptron StarFi provides the Wi-Fi connection capability to the following iOptron telescope mounts: • iOptron CEM60/CEM60-EC. • iOptron ...
20170907 iOptron StarFi Manual - nimax-img.de
iOptron StarFi Manual iOptron StarFi provides the Wi-Fi connection capability to the following iOptron telescope mounts: iOptron CEM60/CEM60-EC iOptron iEQ45/30 Pro iOptron iEQ45/30 w/8407 HC iOptron iEQ45 w/8406 HC iOp…
Full PDF Document

If the inline viewer fails, it will open the original document in compatibility mode automatically. You can also open the file directly.
Extracted Text
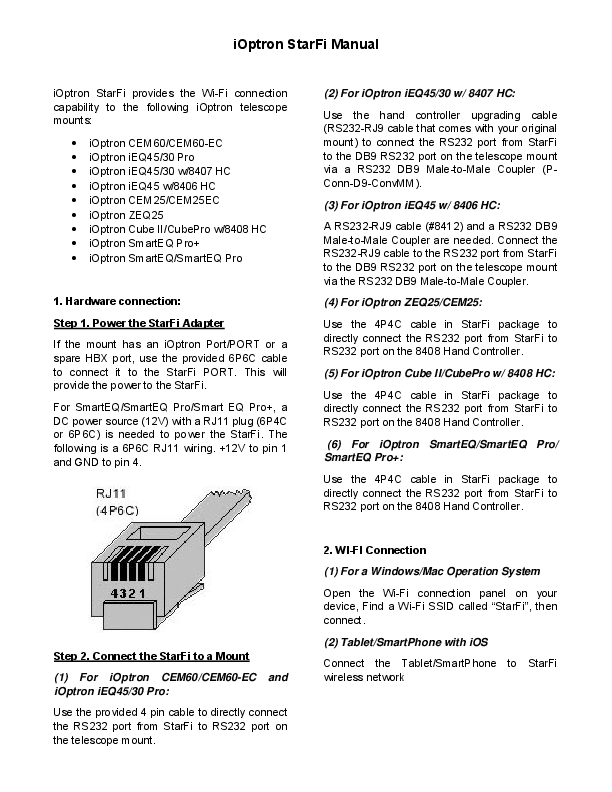
iOptron StarFi Manual

iOptron StarFi provides the Wi-Fi connection capability to the following iOptron telescope mounts:
 iOptron CEM60/CEM60-EC  iOptron iEQ45/30 Pro  iOptron iEQ45/30 w/8407 HC  iOptron iEQ45 w/8406 HC  iOptron CEM25/CEM25EC  iOptron ZEQ25  iOptron Cube II/CubePro w/8408 HC  iOptron SmartEQ Pro+  iOptron SmartEQ/SmartEQ Pro
1. Hardware connection: Step 1. Power the StarFi Adapter If the mount has an iOptron Port/PORT or a spare HBX port, use the provided 6P6C cable to connect it to the StarFi PORT. This will provide the power to the StarFi. For SmartEQ/SmartEQ Pro/Smart EQ Pro+, a DC power source (12V) with a RJ11 plug (6P4C or 6P6C) is needed to power the StarFi. The following is a 6P6C RJ11 wiring. +12V to pin 1 and GND to pin 4.
Step 2. Connect the StarFi to a Mount (1) For iOptron CEM60/CEM60-EC and iOptron iEQ45/30 Pro: Use the provided 4 pin cable to directly connect the RS232 port from StarFi to RS232 port on the telescope mount.

(2) For iOptron iEQ45/30 w/ 8407 HC:
Use the hand controller upgrading cable (RS232-RJ9 cable that comes with your original mount) to connect the RS232 port from StarFi to the DB9 RS232 port on the telescope mount via a RS232 DB9 Male-to-Male Coupler (PConn-D9-ConvMM).
(3) For iOptron iEQ45 w/ 8406 HC:
A RS232-RJ9 cable (#8412) and a RS232 DB9 Male-to-Male Coupler are needed. Connect the RS232-RJ9 cable to the RS232 port from StarFi to the DB9 RS232 port on the telescope mount via the RS232 DB9 Male-to-Male Coupler.
(4) For iOptron ZEQ25/CEM25:
Use the 4P4C cable in StarFi package to directly connect the RS232 port from StarFi to RS232 port on the 8408 Hand Controller.
(5) For iOptron Cube II/CubePro w/ 8408 HC:
Use the 4P4C cable in StarFi package to directly connect the RS232 port from StarFi to RS232 port on the 8408 Hand Controller.
(6) For iOptron SmartEQ/SmartEQ Pro/ SmartEQ Pro+:
Use the 4P4C cable in StarFi package to directly connect the RS232 port from StarFi to RS232 port on the 8408 Hand Controller.
2. WI-FI Connection
(1) For a Windows/Mac Operation System
Open the Wi-Fi connection panel on your device, Find a Wi-Fi SSID called "StarFi", then connect.
(2) Tablet/SmartPhone with iOS
Connect the Tablet/SmartPhone to StarFi wireless network

Step 1. Click settings.

(3) Tablet/SmartPhone with Other OS
Open the Wi-Fi connection panel on your device, Find a Wi-Fi SSID called "StarFi", then connect.
3. Connect the Mount
(1) Windows
After connect the computer to the StarFi WIFI network, launch iOptron Commander to connect the mount to your computer via StarFi. Then you can use your favorite ASCOM compatible software to control the mount.

Step 2. Click Setup.

(2) Tablet/SmartPhone with SkySafari The App needs be configured first.

Step 3. Mount Type should be Equatorial GoTo (German) or Alt-Az. GoTo (only for iEQ45 Pro AA mode), Scope Type should be
 iOptron iEQ45 & 8406 for iEQ45 w/8406  iOptron SmartEQ/iEQ/ZEQ & 8407/8 for
iEQ30/45 w/8407, ZEQ25, and SmartEQ/SmartEQ Pro  iOptron CEM/iEQPro /AZ mount Pro for CEM60/CEM60EC, CEM25/CEM25EC, iEQ30 Pro/iEQ45 Pro, Cube II, Cube Pro w/8408, and SmartEQ Pro +.
Step 4. Turn off Auto-Detect SkyFi. Change the IP Address to 10.10.100.254 and Port Number to 8899. Click Done.

This procedure only needs to be performed once unless you have changed settings of your StarFi.
Then click Scope and Connect to connect the mount.

3. Currently Supported Software:
(1) Microsoft Windows Platform (Windows XP, Windows Vista, Windows 7, Windows 8, Windows 8.1, Windows 10, Windows Server 2003, Windows Server 2008, Windows Server 2008 R2, Windows Server 2012, Windows Server 2012 R2):
(1.1) For iOptron CEM60/CEM60-EC, iEQ45/30 Pro, CEM25/CEM25EC, Cube II, CubePro w/8408 and SmartEQ Pro+
Using the iOptron Commander and ASCOM Driver 4.0 or later version to connect your PC to the telescope mount.
(1.2) For iOptron iEQ45 w/8406HC, iEQ45/30 w/8407 HC, ZEQ25GT and SmartEQ/SmartEQ Pro
Using the iOptron Commander and ASCOM Driver 3.1 or later version for 2013 and earlier products to connect your PC to the telescope mount.

(2) Apple Mac OS X Platform (OS X 10.6 Snow Leopard or later):
Check SkySafari from Simulation Curriculum Corp.

(3) Apple iOS Platform
Check SkySafari from Simulation Curriculum Corp.

(4) Google Android platform (app version and android version unknown):
Check SkySafari from Simulation Curriculum Corp.

4. StarFi configuration:
The StarFi Wi-Fi adapter is shipped with no password protection. You can change the StarFi SSID and enable password protection so only you can make the connection.
To change the StarFi settings:

(1) Turn on the StarFi adapter by connect it

to a mount and turn the mount power on;

(2) Connect

the

computer/tablet/SmartPhone to StarFi;

(3) Open the internet browser and type in

http://10.10.100.254;

(4) A login window will open. Enter "admin"

as both User Name and Password;

(5) Go to AP Settings;

(6) Now you can change the SSID name

from StarFi to Your Name, enable

WPA2 encryption, etc.;

(7) You may also go to account to change

login name and password;

(8) Then restart the StarFi adapter by

power off/on the mount or press the

RESTART button with a sharp tip, such

as a tooth pick, on the StarFi adapter.

Note: 1. Please keep the StarFi at AP (access point) mode 2. If ever you forgot your password, use a sharp tip to Press and Hold the RESET button to reset the WI-FI adapter to factory default settings.