OMOTE OM-1205 Vacuum Sealer User Manual
Model: OM-1205
Power: 120V/60Hz, 160W
Contact: https://omote.afterservice.com | +1 (833) 986 3257 | omote.afterservice@gmail.com (9:00 AM - 5:00 PM Monday-Friday)
Made in China
Contents
IMPORTANT POINTS FOR YOUR SAFETY -- 2
START ENJOYING THE BENEFITS OF YOUR VACUUM SEALER SYSTEM -- 3
KEY FEATURES OF YOUR NEW VACUUM SEALER -- 4
MAIN PARTS OF YOUR NEW VACUUM SEALER -- 5
HOW TO MAKE CUSTOM SIZED BAGS -- 6
HOW TO VACUUM SEAL WITH THE VACUUM BAGS -- 7
HOW TO USE THE PULSE VACUUM BUTTON (PULSE VAC) -- 7
HOW TO VACUUM CANISTERS -- 8
CARE & CLEANING -- 8
TROUBLE SHOOTING -- 9
WARRANTY -- 10
Introduction
Thank you for purchasing this product. By doing so, you now have an excellent product. All products delivered to you are manufactured according to the highest standards for performance and safety. As part of our philosophy, we also provide excellent customer service, backed by our comprehensive warranty. We hope you will enjoy using this product for many years to come.
Important Points for Your Safety
Read and obey all instructions and warnings prior to using this product. Your safety is most important.
- Read all instructions before operating.
- This appliance should not be operated by children.
- Do not operate the appliance with a damaged power cord or plug.
- Do not use the appliance on a wet or damp surface or near a heat source.
- Always use the appliance on a stable surface.
- Do not immerse any part of the appliance, power cord, or plug into water or other liquids.
- To disconnect, turn the power off, then unplug the power cord from the electrical outlet. Do not disconnect by pulling the cord.
- Always unplug the appliance when not in use and before cleaning.
- Do not operate the appliance in unintended situations or if the cord or plug is damaged. Please inform our service department for replacement.
- Close supervision is required when this product is used near children.
- The appliance is not intended for commercial use.
- Do not attempt to repair this product. Service should be performed by an authorized service representative.
- A short power-supply cord is provided to reduce the risk resulting from becoming entangled in or tripping over a longer cord. Extension cords are not prohibited from being used where care is exercised in their use. When an extension cord is used, the marked electrical rating of the extension cord shall be at least as marked electrical rating of the appliance. The longer cord shall be arranged so that it does not drape over the counter-top or table-top where it is susceptible to being tripped over, snagged, or pulled on unintentionally, especially by children.
This appliance is for household use only.
Start Enjoying the Benefits of Your Vacuum Sealer System
You can become a satisfied user by following the steps below:
- OM-1205 Vacuum Sealer
- Accessory hose
- Vacuum sealer bags
- Vacuum sealer roll
- Cord wrap
- Accessory base
1. Food Storage & Safety
Vacuum packing helps to extend the life of foods. It is important to vacuum pack foods that are fresh. Once food has begun to deteriorate, vacuum packing may only slow the deterioration process. Vacuum sealing cannot prevent the growth of mold or other disease-causing microorganisms; they can still grow in low oxygen environments and may require refrigeration to be eliminated.
IMPORTANT: Vacuum packaging is NOT a substitute for refrigeration or freezing. Any perishable foods that require refrigeration must still be refrigerated or frozen after vacuum packaging.
2. Food Preparation Tips
- Cooking, thawing, and reheating: Simmering in a vacuum bag helps food retain its flavor and also helps with the clean-up. No dirty saucepans. When reheating foods in the microwave or oven, always open the bag to allow hot air to escape. You can also reheat foods in the vacuum bags by placing them in water at a low simmer or low heat.
IMPORTANT: Always thaw foods in either refrigerator or microwave - do not thaw perishable foods at room temperature.
3. Preparation Tips for Meat & Fish
Tender-feel meat and fish for 1-2 hours before vacuum packaging. This helps maintain the juice and shape and provides for a better seal. Place a folded paper towel between the food and the top of the bag, below the seal area. Lay a paper towel in the bag to absorb excess moisture and juices during the vacuum packaging process.
4. Preparation Tips for Cheeses
Vacuum package cheese after each use. Do not make packaging larger than needed. Re-seal the bag after each use.
IMPORTANT: Open to the risk of aerobic, anaerobic, or acid-producing bacteria, certain soft cheeses should never be vacuum packaged.
5. Preparation Guidelines for Vegetables
Blanching is a process that should be done before vacuum packaging vegetables. This process slows the enzyme action that could lead to loss of flavor, color, and texture for blanched vegetables. To blanch vegetables, place them in simmering water or in a microwave until they are cooked but still crisp. Blanching times can range from 1 to 4 minutes for leafy greens and peas to 4 to 5 minutes for root vegetables or broccoli. After blanching, immerse vegetables in cold water to stop the cooking process. All vegetables (including broccoli, Brussels sprouts, cabbage, carrots, cauliflower, kale, leeks, parsnips, peas, spinach, and squash) naturally emit gases during storage. Therefore, it is essential to blanch, then freeze them, before vacuum packaging. This is the best way to prevent gas buildup.
6. More on Vegetables
Vegetables are more susceptible to oxidation. When storing vegetables, it is best to freeze them first in a few layers, then separate them into meal portions within vacuum bags. After freezing, then vacuum package them, then return them to the freezer. IMPORTANT: Due to the risk of botulism, most mushrooms, onions & garlic should never be vacuum packed.
7. Preparation Tips for Powdery Foods
When vacuum packaging powders, such as flour or spices, it's best to use first-generation packaging inside the vacuum bags. This prevents powders from being sucked into the machine and causing enough damage to shorten the life of the seal.
8. Preparation Tips for Liquids
Before you vacuum package liquids, such as soup, pasta, or pre-cooked rice, freeze them in a casserole dish or on a tray to a semi-solid state. Then vacuum package in vacuum bags. You can also stack them in the freezer. When you are ready to reheat, cut one corner of the bag and place it in either a microwave dish or a double boiler at a low simmer, below 70°C (158°F).
Key Features of Your New Vacuum Sealer
- Separate vacuum modes for DRY and MOIST food
- PULSE button to control vacuum time and degree
- CANISTER button to vacuum air from a canister
- Built-in roll storage chamber and bag cutter
- Sealing time control for 10-20 inches of sealing
- Seal only function for creating a bag
- Sealing length MAX 11.8 inches
- Vacuum pressure: -0.50--0.70 bar
- High-grade stainless steel construction
- Detachable power cord
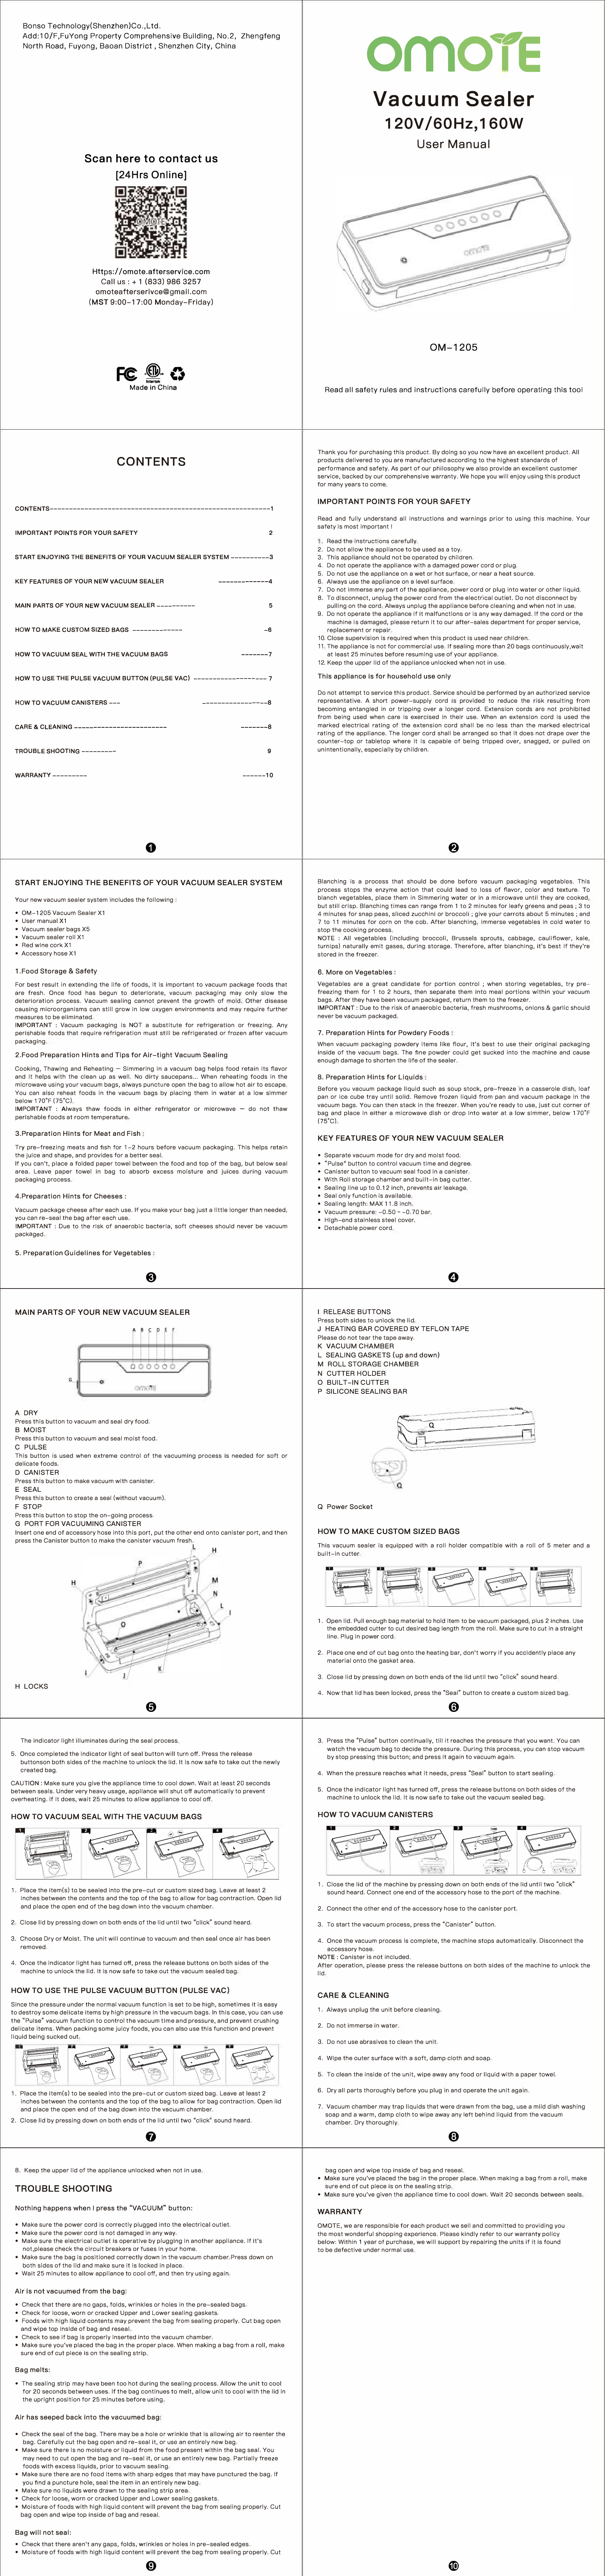
Main Parts of Your New Vacuum Sealer
- A DRY Button: This button is used to vacuum and seal dry food.
- B MOIST Button: This button is used to vacuum and seal moist food.
- C PULSE Button: This button is used when extreme control of the vacuuming process is needed for sealing delicate foods.
- D CANISTER Button: This button is used to make vacuum with canisters.
- E SEAL Button: Press this button to create a seal (without vacuum).
- F STOP Button: Press this button to stop any on-going process.
- G PORT FOR VACUUMING CANISTER: Insert one end of accessory hose into this port, and the other end into canisters to make the canisters vacuum.
- H LOCKS: The locking mechanisms on both sides of the machine secure the lid.
- I RELEASE BUTTONS: Press both sides to unlock the lid.
- J HEATING BAR COVERED BY TEFLON TAPE: Please do not touch the tip, it is very hot.
- K VACUUM CHAMBER: The area where the bag is placed for vacuuming.
- L SEALING GASKETS (top and down): These help create a tight seal.
- M ROLL STORAGE CHAMBER: Compartment for storing vacuum sealer rolls.
- N CUTTER HOLDER: Holds the built-in cutter.
- O BUILT-IN CUTTER: Used to cut custom-sized bags from the roll.
- P SILICONE SEALING BAR: The bar that presses against the bag to create the seal.
- Q Power Socket: Port for connecting the power cord.
The indicator lights show the progress during the seal process. The seal indicator light turns off when the seal is complete. Release the buttons on both sides of the machine to unlock the lid. You can now safely take out the newly sealed bag.
CAUTION: Make sure you press the appliance lid completely down and release 20 seconds between seals. Under heavy usage, the appliance will shut off automatically to prevent overheating. Wait 15 minutes to allow the appliance to cool off.
How to Make Custom Sized Bags
This vacuum sealer is equipped with a built-in cutter compatible with a roll of 5 meters and a roll-holder.
- Open the lid. Pull out enough bag material from the roll for the item to be sealed, plus at least 2 inches for sealing. Use the embedded cutter to cut a desired bag length from the roll. Make sure to cut in a straight line.
- Place one end of the cut bag material onto the sealing bar, ensuring it is flat and centered over the gasket area.
- Close the lid by pressing down on both sides until two 'click' sounds are heard.
- Press the 'SEAL' button. You can watch the vacuum bag to decide the pressure. During this process, you can stop vacuuming by stopping pressing the button and press 'SEAL' again to vacuum again.
- When the process reaches what you need, press 'SEAL' button to stop sealing.
- Once the indicator light turns off, press the release buttons on both sides of the machine to unlock the lid. It is now safe to take out the vacuum-sealed bag.
How to Vacuum Seal with the Vacuum Bags
- Place the item(s) into the sealed or custom sized bag. Leave at least 2 inches between the contents and the top of the bag to allow for bag contraction. Open lid and place the open end of the bag down into the vacuum chamber.
- Close lid by pressing down on both sides of the lid until two 'click' sounds are heard.
- Choose DRY or MOIST. The unit will continue to vacuum and then seal once air has been removed.
- Once the seal indicator light turns off, press the release buttons on both sides of the machine to unlock the lid. Now it is safe to take out the vacuum-sealed bag.
How to Use the Pulse Vacuum Button (PULSE VAC)
Since the process is under the normal recommendation, it is not recommended for delicate items. For delicate items, press PULSE to control the vacuuming time and pressure, and prevent crushing delicate items. When packing major food items, STOP can also be used to control the vacuuming time and pressure, and prevent crushing delicate items.
- Place the item(s) into the sealed or custom sized bag. Leave at least 2 inches between the contents and the top of the bag to allow for bag contraction. Open lid and place the open end of the bag down into the vacuum chamber.
- Close lid by pressing down on both sides of the lid until two 'click' sounds are heard.
- Press the PULSE button repeatedly to control the vacuuming time and pressure.
- When the desired vacuum level is reached, press the SEAL button to seal the bag.
- Once the seal indicator light turns off, press the release buttons on both sides of the machine to unlock the lid. It is now safe to take out the vacuum-sealed bag.
How to Vacuum Canisters
- Close the lid of the machine by pressing down on both ends of the lid until two 'click' sounds are heard. Connect one end of the accessory hose to the port of the machine.
- Connect the other end of the accessory hose to the canister port.
- To start vacuum, press the 'CANISTER' button.
- When the vacuum process is complete, the machine stops automatically.
NOTE: Canisters must be purchased separately.
After operation, press the release buttons on both sides of the machine to unlock the lid.
Care & Cleaning
- Always clean the exterior of the appliance.
- Do not immerse in water.
- Do not use abrasive cleaners or scouring pads.
- Wipe the outer surface with a soft, damp cloth and soap.
- To clean the inside of the machine, wipe away any food or liquid with a clean towel.
- Only all parts thoroughly before you plug in or operate the unit.
- Vacuum chamber may trap liquids that were not from the bag; use a mild dishwashing soap and a warm damp cloth to wipe away any liquid from the vacuum chamber. Dry thoroughly.
Trouble Shooting
Nothing happens when I press the "VACUUM" button
- Make sure the power cord is securely plugged into the electrical outlet.
- Make sure the power cord is not damaged. Try plugging in another appliance to test the outlet.
- Check that the bag is correctly inserted into the vacuum chamber. Press down on both sides of the lid and make sure it is locked in place.
- Wait for the appliance to cool off if it has shut off automatically due to overheating.
Air is not removed from the bag
- Check that there are no gaps, folds, wrinkles, or holes in the pre-sealed bags.
- Check for loose, worn, or cracked upper and lower sealing gaskets.
- Foods with high liquid content may prevent the bag from sealing properly. Open bag and wipe the top inside of the bag and re-seal.
- Check to see if the bag is properly inserted into the vacuum chamber. When making a bag from a roll, make sure the end of the roll piece is on the sealing strip.
Bag melts
- The sealing bar may have been too hot during the sealing process. Allow the unit to cool for 20 seconds between seals. If the bag continues to melt, allow it to cool with the lid in the upright position for 2 minutes before using.
Air has seeped back into the vacuum-sealed bag
- Create a clean seal on the bag, or make a new seal, allowing air to escape the bag. Control the vacuum, open bag and re-seal using a correctly sized new bag.
- Make sure there is no moisture or liquid from the food product, which will prevent the bag seal. You may need to cut the bag end and re-seal it, or use an entirely new bag. Carefully freeze foods with excess liquids prior to vacuum sealing.
- Make sure to place items with sharp edges near a heat source or make sure proper protection is used to create a clean seal.
- Melts or liquids were drawn to the sealing strip area. Clean the food with a dried cloth and lower sealing gaskets. Moisture of foods with high liquid content will prevent the bag from sealing properly. Open bag and wipe top inside of bag and re-seal.
Bag will not seal
- Ensure the bag is properly inserted into the vacuum chamber.
- Make sure the bag material is not wrinkled or creased.
- Ensure the sealing area is clean and dry.
- Allow the appliance time to cool down. Wait 20 seconds between seals.
- Moisture or liquids with high liquid content will prevent the bag from sealing properly. Open bag and wipe top inside of bag and re-seal.
Warranty
OMOTE warrants all products to be manufactured to the most wood-working shopping capabilities, and is kindly reminded to our warranty policy below. Within one year of purchase, we will support by repair, be or not, if found to be defective under normal use.