Preparation. • Remove original factory handguard components if installed. Reattach the original screws with the flanged spaces and nuts to the handlebar.
HONDA CRF1000L AFRICA TWIN -DCT & non DCT ('18 on). X. Bar Side View. ✓. INS-BHG-072-00-NP. Preparation. • Remove original factory handguard components if ...
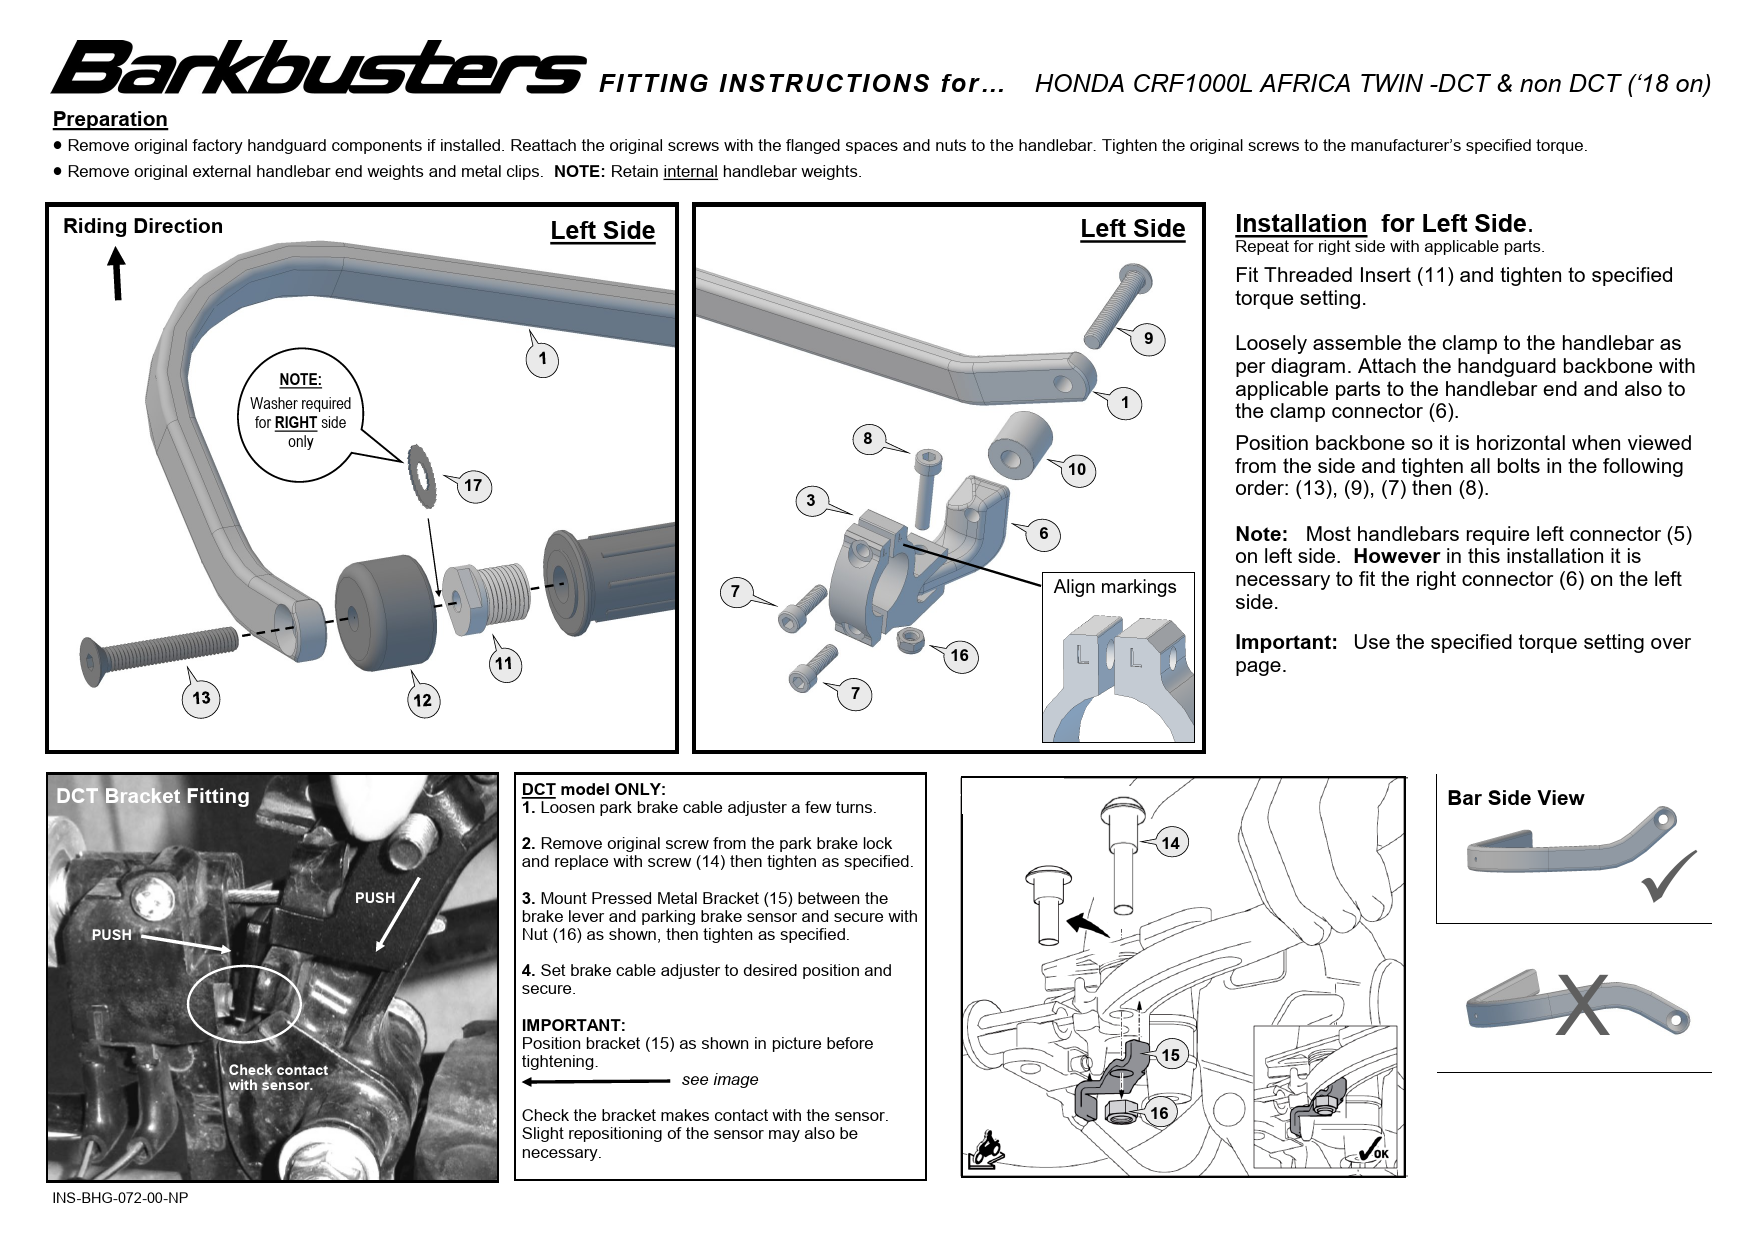
FITTING INSTRUCTIONS for ... HONDA CRF1000L AFRICA TWIN -DCT & non DCT (`18 on) Preparation · Remove original factory handguard components if installed. Reattach the original screws with the flanged spaces and nuts to the handlebar. Tighten the original screws to the manufacturer's specified torque. · Remove original external handlebar end weights and metal clips. NOTE: Retain internal handlebar weights. Riding Direction NOTE: Washer required for RIGHT side only Left Side 17 8 3 7 7 Left Side Installation for Left Side. Repeat for right side with applicable parts. Fit Threaded Insert (11) and tighten to specified torque setting. 9 1 10 Loosely assemble the clamp to the handlebar as per diagram. Attach the handguard backbone with applicable parts to the handlebar end and also to the clamp connector (6). Position backbone so it is horizontal when viewed from the side and tighten all bolts in the following order: (13), (9), (7) then (8). 6 Align markings Note: Most handlebars require left connector (5) on left side. However in this installation it is necessary to fit the right connector (6) on the left side. Important: Use the specified torque setting over 16 page. DCT Bracket Fitting DCT model ONLY: 1. Loosen park brake cable adjuster a few turns. 2. Remove original screw from the park brake lock 14 and replace with screw (14) then tighten as specified. PUSH PUSH 3. Mount Pressed Metal Bracket (15) between the brake lever and parking brake sensor and secure with Nut (16) as shown, then tighten as specified. 4. Set brake cable adjuster to desired position and secure. IMPORTANT: Position bracket (15) as shown in picture before Check contact with sensor. tightening. see image 15 Check the bracket makes contact with the sensor. 16 Slight repositioning of the sensor may also be necessary. INS-BHG-072-00-NP Bar Side View X 1 Aluminium Bar - LEFT 2 Aluminium Bar - RIGHT 3 Multi Fit Clamp 4 LEFT Multi Fit Clamp 5 Connector 6 Connector 7 Socket Head Bolt 20mm 8 Socket Head Bolt 30mm RIGHT PN: BAR-V-039-L Pcs. 1 PN: BAR-V-039 R Pcs. 1 PN: MFC-L Pcs. 1 set PN: MFC-R Pcs. 1 set PN: CP8-L Pcs. PN: CP8-R 1 Pcs. PN: M6x20SHCSZP PN: M6x30SHCSZP 1 Pcs. 4 Pcs. 2 9 Button Head Bolt 45mm 10 Spacer 20mm 11 Threaded Insert 12 Bar End Weight 13 Flat Head Bolt 40mm 14 Shoulder Bolt 30mm 15 Pressed Metal Bracket 16 Nylock Nut 6mm PN: M8x45BHCSZP PN: BSSRT20 PN: BESF4 PN: BEW35 PN: M8x40FHCSZP PN: M6x30SB PN: BPM1 Pcs. 2 Pcs. 2 Pcs. 2 Pcs. 2 Pcs. 2 Pcs. 1 Pcs. PN: M6LN 1 Pcs. 3 17 M8 Flat Washer PN: M8FW Pcs. 1 Personalise Your Protection Guard options sold separately JET-003 VPS-003 STM-003 BCF-003 Recommended Torque Settings M6 10 Nm (7.4 lbf ft) M8 20 Nm (14.8 lbf ft) M18 (item 8) 21Nm (15.5 lbf ft) NOTE: Part Numbers 14, 15 & one of 16, required for DCT models only. CAUTION: Installation of the handguard is safety-relevant work and can be complicated. We recommend the installation be performed by a motorcycle service technician. Rideworx accepts no liability for damages caused by improper mounting. All screws, bolts and nuts, including all replacement hardware provided by Rideworx, should be tightened to the torque specified in the table. After the first 50km of riding check all screws, bolts and nuts are tightened to the correct torque. We recommend a medium strength liquid thread lock product on all fasteners. WARNING: Check operation of all handlebar controls, specifically the throttle, front brake, kill switch and clutch to ensure they are operating correctly and are in accordance with the OEM specifications. Do not ride the motorcycle if any controls are not operating correctly or if rear view mirror vision is obscured. Check periodically that all bolts are tight. Phone: +61 (0)2 4271 8244 Email: info@barkbusters.net Web: www.barkbusters.net Disclaimer: A failure to follow these fitting instructions could cause serious injury, death or property damage. These handguards are intended solely for use with motorcycles/ATV/snowmobiles/scooters that have not been modified. They are not designed to prevent injury or death while riding or in an accident or crash. The user must ensure that all controls are free of the handguards every time that they ride. By installing and/ or using this product you acknowledge that you accept these terms and have followed the fitting instructions. INS-BHG-072-00-NPMicrosoft Publisher 2016