USER'S MANUAL
Brand: PowerLocus
Model: P2
Contact Information:
- Facebook: @PowerLocus
- Email: info@powerlocus.com
- WhatsApp: +31643824122
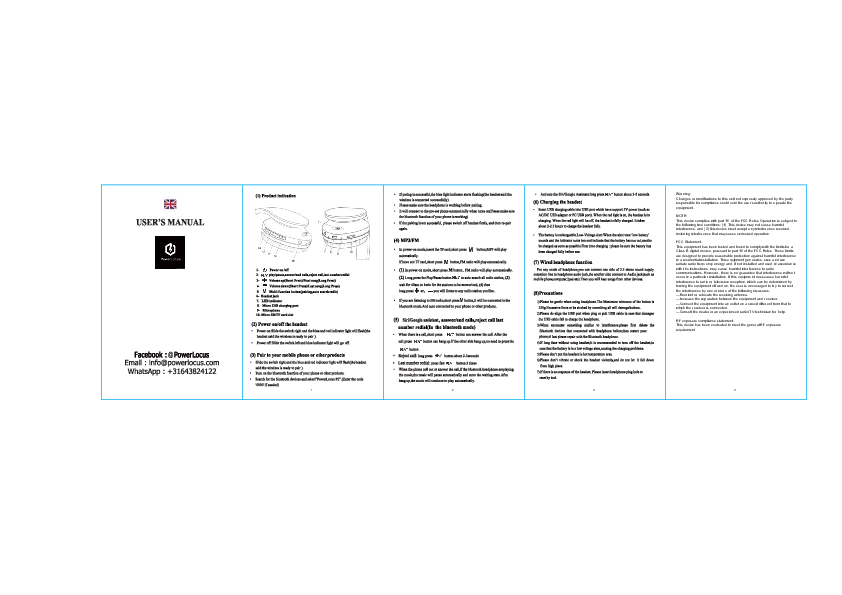
(1) Product Indication
Diagram showing the parts of the PowerLocus P2 headphones:
- 1. Power on/off switch
- 2. Volume up (Short Press) / Next song (Long Press)
- 3. Volume down (Short Press) / Last song (Long Press)
- 4. Multi-function button (pairing, auto search radio, play/pause, answer/end calls, reject call, last number redial)
- 5. Micro USB charging port
- 6. Headset jack
- 7. LED indicator
- 8. Microphone
- 9. Micro SD/TF card slot
(2) Power on/off the headset
Power on: Slide the switch to the right. The blue and red indicator lights will flash, indicating the headset is ready to pair.
Power off: Slide the switch to the left. The blue indicator light will go off.
(3) Pair to your mobile phone or other products
- Ensure the headset is in power-on mode (blue and red lights flashing).
- Turn on the Bluetooth function on your phone or other device.
- Search for Bluetooth devices and select "PowerLocus P2". Enter '0000' if a code is required.
- Successful pairing is indicated by the blue light flashing and an audio confirmation.
- The headset will automatically connect to the last paired device when turned on, provided Bluetooth is enabled on that device.
- If pairing fails, turn off the headset and try pairing again.
(4) MP3/FM
MP3 Playback: In power-on mode, insert a TF card and short press the multi-function button to play music.
FM Radio: If no TF card is inserted, short press the multi-function button to activate FM radio.
FM Radio Operation:
- In power-on mode, short press the multi-function button to play FM radio.
- Long press the multi-function button to auto-search radio stations. Wait for 40 seconds to 1 minute for stations to be memorized.
- Long press the volume up/down buttons (or next/last song buttons) to switch between memorized radio stations.
- Short press the multi-function button while listening to FM radio to switch to Bluetooth mode and automatically connect to your phone or other devices.
(5) Siri/Google Assistant, Call Handling, Last Number Redial (Bluetooth Mode)
Answer/End Call: Short press the multi-function button.
Reject Call: Long press the multi-function button for 2-3 seconds.
Last Number Redial: Press the multi-function button twice quickly.
Music Interruption: When a call comes in or is made, music playback will pause automatically. Music resumes after the call ends.
Activate Siri/Google Assistant: Long press the multi-function button for 3-5 seconds.
(6) Charging the headset
Connect the USB charging cable to a 5V power source (e.g., AC/DC USB adapter or PC USB port). The red indicator light shows the headset is charging. The red light turns off when fully charged. Charging takes approximately 2-2.5 hours.
Low-Voltage Alert: A "low battery" tone and a red indicator light signal that the battery needs charging.
First Use: Ensure the battery is fully charged before the first use.
(7) Wired Headphone Function
Connect one end of a 3.5mm stereo audio cable to the headset's audio jack and the other end to an audio source (e.g., mobile phone, computer, iPad) to listen to audio from those devices.
(8) Precautions
- Handle the headphones gently. Excessive force on buttons can cause damage.
- Align the USB port correctly when plugging or unplugging the USB cable to avoid damage.
- If experiencing interference, delete the headphone's Bluetooth pairing from your device, restart your phone, and then re-pair the headset.
- If the headset will not be used for an extended period, turn it off to prevent the battery from reaching a low-voltage state, which can cause charging issues.
- Do not expose the headset to high temperatures.
- Avoid strong vibrations, shocks, or dropping the headset from a height.
- If the headset becomes unresponsive, insert a tool into the headphone plug hole to reset it.
Warning
Changes or modifications not expressly approved by the party responsible for compliance could void the user's authority to operate the equipment.
NOTE
This device complies with Part 15 of the FCC Rules. Operation is subject to the following two conditions: (1) this device may not cause harmful interference, and (2) this device must accept any interference received, including interference that may cause undesired operation.
FCC Statement
This equipment has been tested and found to comply with the limits for a Class B digital device, pursuant to Part 15 of the FCC Rules. These limits are designed to provide reasonable protection against harmful interference in a residential installation. This equipment generates, uses, and can radiate radio frequency energy and, if not installed and used in accordance with the instructions, may cause harmful interference to radio communications. However, there is no guarantee that interference will not occur in a particular installation. If this equipment does cause harmful interference to radio or television reception, which can be determined by turning the equipment off and on, the user is encouraged to try to correct the interference by one or more of the following measures:
- Reorient or relocate the receiving antenna.
- Increase the separation between the equipment and receiver.
- Connect the equipment into an outlet on a circuit different from that to which the receiver is connected.
- Consult the dealer or an experienced radio/TV technician for help.
RF Exposure Compliance Statement
This device has been evaluated to meet the general RF exposure requirement.


