Lark Max Firmware Update
1. Version Introduce
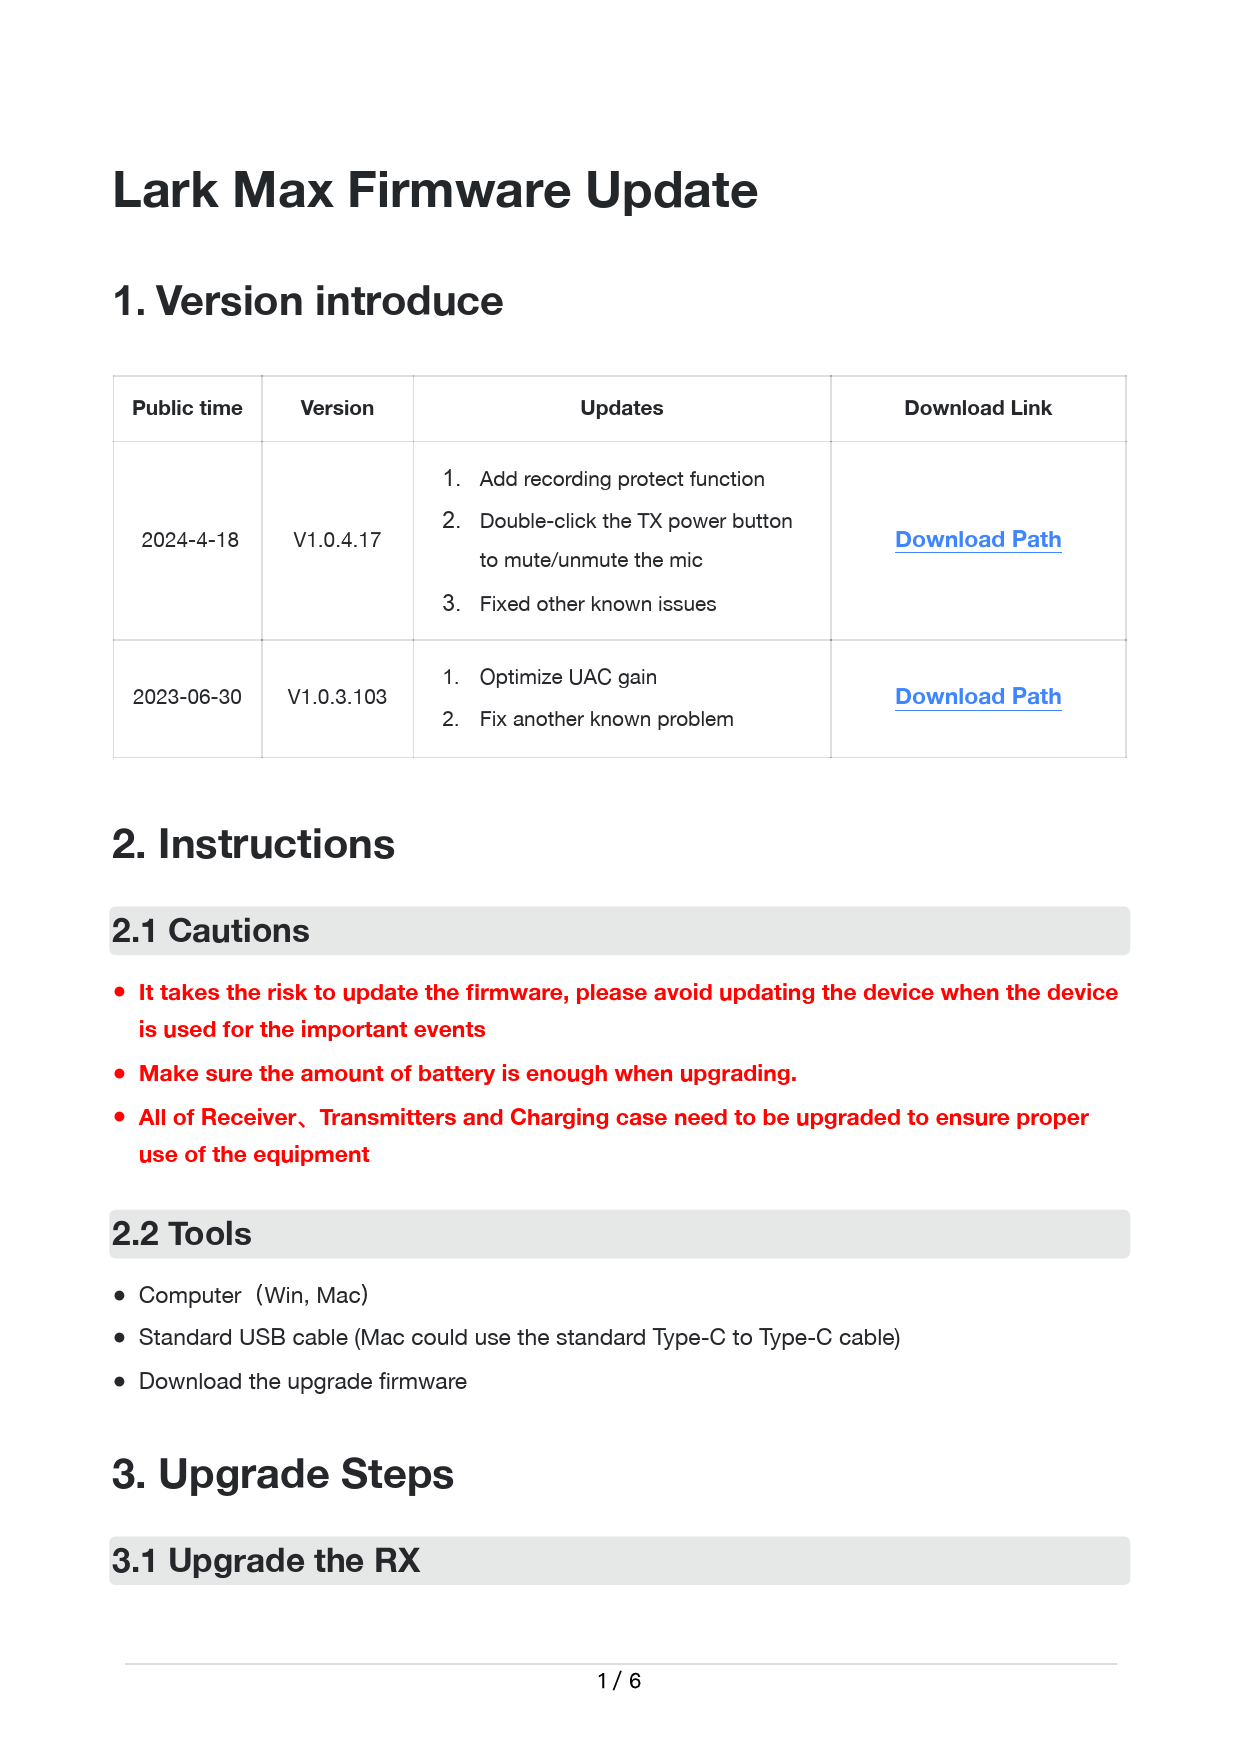
| Public time | Version | Updates | Download Link |
|---|---|---|---|
| 2024-04-18 | V1.0.4.17 | 1. Add recording protect function 2. Double-click the TX power button to mute/unmute the mic 3. Fixed other known issues | Download Path |
| 2023-06-30 | V1.0.3.103 | 1. Optimize UAC gain 2. Fix another known problem | Download Path |
2. Instructions
2.1 Cautions
- It is important to note that updating firmware carries a risk. Avoid updating the device during critical events.
- Ensure the device has sufficient battery charge before upgrading.
- All components (Receiver, Transmitters, and Charging Case) must be upgraded to ensure proper equipment functionality.
2.2 Tools
- Computer (Windows, macOS)
- Standard USB cable (Type-C to Type-C cable is compatible with Mac)
- Download the firmware upgrade file
3. Upgrade Steps
3.1 Upgrade the RX
1. Click the RX's Menu button, navigate to 'System Settings', then select 'Upgrade Mode'.
[⚙️ System Settings] → [⬆️ Upgrade Mode]
2. Press the button and click 'Yes' to confirm.
Dialog: "Go to the upgrade mode?" [No] [Yes]
3. Connect the receiver to the computer and copy the firmware file (e.g., HLD_A6902_H000_S1.0.X.XX__RX.ota) to the receiver.
[Image description: A Hollyland receiver, a USB-C cable, a laptop displaying a file explorer, and a smaller Hollyland device (likely the transmitter or charging case).] The file is copied to the receiver.
4. After successful copying, unplug the USB cable. The receiver will automatically begin the upgrade process.
[Image description: A sequence of status indicators. First: "Upgrading... Wait for the upgrade". Second: "→ Upgraded successfully. The device will restart soon.". Third: "→ Go to check the firmware". The final status shows "Firmware Version V1.0.0".]
3.2 Upgrade the TX
1. Turn on the transmitter, then connect it to the computer and copy the firmware file (e.g., HLD_A6902_H000_S1.0.X.XX_TX.ota) to the transmitter.
[Image description: A Hollyland transmitter, a USB-C cable, a laptop displaying a file explorer, and a smaller Hollyland device (likely the receiver or charging case).] The file is copied to the transmitter.
2. After successful copying, unplug the USB cable. The transmitter will automatically begin the upgrade process.
3. During the upgrade, the transmitter's indicator light will turn purple.
[Image description: A sequence showing the transmitter. First: "Normal" state with a blue indicator light. Second: "→ Upgrading" state with a purple indicator light.]
4. After a successful upgrade, the transmitter will reboot. You can verify the firmware version on the receiver.
[Image description: A screen display from the receiver showing "Mic1 Version V1.0.0" and "Mic2 Version V1.0.0".]
3.3 Upgrade the Charging Case
Note: Upgrade the second transmitter using the same steps. If the upgrade fails, repeat the process.
Note: The upgrade procedure for the charging case differs between Windows and macOS. Follow the specific steps for your operating system.
Win PC Upgrade
1. Connect the charging case to the computer via a USB cable. It will be recognized as a USB flash drive. Copy the upgrade file [A6902Box.bin] from the [Box_for_Win] folder to the charging case drive.
[Image description: A Hollyland charging case, a USB-C cable, a laptop, and a file explorer window showing the "A6902Box.bin" file in a USB Drive (F:).]
2. After successful copying, do not unplug the USB cable. The upgrade will commence automatically. The charging case indicator light will turn off for approximately 5-10 seconds.
3. Upon successful upgrade, the PC will recognize the charging case again, and the upgrade file will disappear, indicating a successful process.
Mac PC Upgrade
Note: Do not unplug the USB cable until the upgrade is complete. If the upgrade file remains in the directory, the upgrade has failed; delete it and try again.
1. Open the upgrade tool [LarkMax_CASE_Upgrade] located in the [Box_for_Mac] folder.
[Image description: A Hollyland splash screen titled "Creativity Together" with a button "Please click to start scanning...".]
2. Connect the charging case to the Mac PC.
[Image description: A Hollyland charging case, a USB-C cable, and a MacBook.]
3. After connecting the charging case, it will be recognized. Click 'Yes' to proceed with the upgrade.
[Image description: A dialog box asking "Does it need to be upgraded?" showing current firmware versions (e.g., APP v1.0.1.27, Boot v1.0.0.4) and options [YES] [NO].]
The firmware version will upgrade to v1.0.1.27.
[Image description: A progress bar indicating "Upgrade the firmware version to v1.0.1.27" at 75%.]
Note: Do not unplug the USB cable until the upgrade is fully successful. The charging case indicator light will be off for approximately 5-10 seconds during the upgrade process.
[Image description: A final confirmation screen for the Lark Max charging case showing "Firmware version: v1.0.1.27" and "Currently the latest version".]
Full PDF Document

If the inline viewer fails, it will open the original document in compatibility mode automatically. You can also open the file directly.