Insignia 13.8 Cu. Ft. Upright Convertible Freezer/Refrigerator
Quick Setup Guide
Package Contents
- 13.8 Cu. Ft. upright freezer
- Door handle, screws, and hex wrench
- Quick Setup Guide
Find your user guide online at www.insigniaproducts.com. Enter your model number in the search box, then navigate to Support & Downloads to find the User Guide in your preferred language.
Setting Up Your Freezer
Before Using Your Freezer
- Remove all exterior and interior packing materials.
- Allow the freezer to stand upright for approximately two hours before connecting it to power.
- Wipe the inside of the freezer.
- When moving the freezer, do not tilt it beyond 45° from upright.
Finding a Suitable Location
- This freezer is designed for free-standing installation only and should not be recessed or built-in.
- Place the freezer on a floor strong enough to support its full weight.
- Ensure adequate ventilation: allow 7.9 inches (20 cm) space on the sides, 3.9 inches (10 cm) at the back, and 11.8 inches (30 cm) at the top.
- If placing next to a wall, allow enough space on the hinge side for the door to open fully.
- Locate the freezer away from direct sunlight and heat sources (stoves, heaters, radiators).
- Avoid extremely cold temperatures that may affect performance.
- Avoid locating the freezer in moist areas.
Leveling Your Freezer
Proper leveling is crucial for the doors to close and seal correctly, preventing cooling, frost, or moisture issues. Rotate the leveling feet clockwise (to raise) or counter-clockwise (to lower). The front of the freezer can be slightly higher than the back.
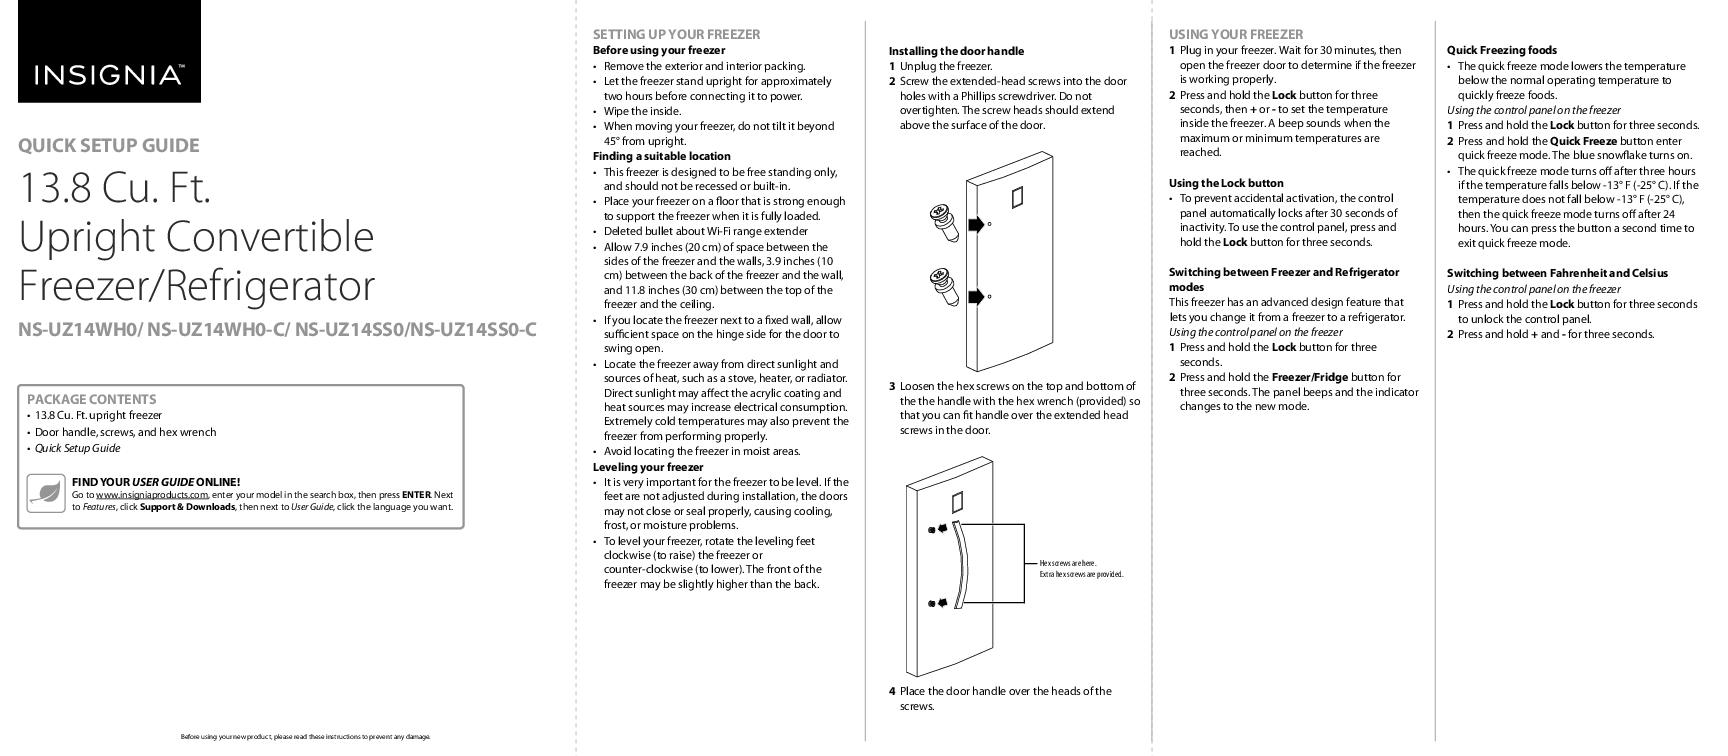
Installing the Door Handle
- Unplug the freezer.
- Screw the extended-head screws into the door holes using a Phillips screwdriver. Do not overtighten.
- Loosen the hex screws on the top and bottom of the handle using the provided hex wrench.
- Fit the handle over the extended head screws.
- Tighten the hex screws to secure the handle.
Diagram shows screw placement for the door handle and the location of hex screws.
Using Your Freezer
Initial Operation
- Plug in the freezer.
- Wait 30 minutes, then open the door to confirm the freezer is operating.
Control Panel Overview
The control panel features buttons for temperature adjustment, mode selection, and quick freezing. The panel locks automatically after 30 seconds of inactivity to prevent accidental changes. Press and hold the 'Lock' button for three seconds to unlock.
Diagram shows the control panel with labels for Lock, Freezer/Fridge, Quick Freeze, Temperature (+/-), Fahrenheit/Celsius indicators, and various status indicators (High Temp, Door Open, Temp).
Adjusting Temperature
Press and hold the 'Lock' button for three seconds, then use the '+' or '-' buttons to set the desired temperature. A beep indicates when maximum or minimum temperatures are reached.
Switching Between Freezer and Refrigerator Modes
- Press and hold the 'Lock' button for three seconds.
- Press and hold the 'Freezer/Fridge' button for three seconds. The panel will beep, and the indicator will change to reflect the new mode.
Quick Freezing Foods
The Quick Freeze mode lowers the temperature below the normal operating range to rapidly freeze food.
- Press and hold the 'Lock' button for three seconds.
- Press and hold the 'Quick Freeze' button to enter quick freeze mode. The blue snowflake indicator will turn on.
Quick Freeze mode automatically turns off after three hours if the temperature drops below -13°F (-25°C), or after 24 hours if the temperature does not reach that level. Pressing the button again will exit the mode.
Switching Between Fahrenheit and Celsius
- Press and hold the 'Lock' button for three seconds to unlock the control panel.
- Press and hold the '+' and '-' buttons simultaneously for three seconds.
Features
Diagram illustrates the interior of the freezer, highlighting features such as glass shelves, air flow outlets/inlets, crispers, door trays, leveling feet, and wheels.
Troubleshooting
For troubleshooting information, please refer to your online User Guide.
Specifications
For detailed specifications, please refer to your online User Guide.
Safety Information
Read, keep, and follow all instructions and warnings provided. Do not use near water. Clean only with a damp cloth. Ensure proper ventilation and installation according to manufacturer instructions. Avoid heat sources and direct sunlight. Do not tamper with the power cord or plug. Unplug during lightning storms or long periods of non-use. Ensure correct voltage. Do not handle the plug with wet hands. Refer servicing to qualified personnel. Protect the appliance from rain, moisture, and liquids. Do not use extension cords or ungrounded adapters. This appliance is not intended for use by persons with reduced capabilities unless supervised. Supervise children to ensure they do not play with the appliance. If the power cord is damaged, it must be replaced by the manufacturer or a qualified person. Before disposing of an old freezer, remove the doors and leave shelves in place to prevent child entrapment.
Grounding Requirement
This freezer must be grounded. Use a properly installed and grounded outlet. Consult a qualified electrician if you have any doubts about grounding.
Legal Notices
Dispose of waste electrical products responsibly, recycling where facilities exist. Check with your Local Authority or retailer for recycling advice (WEEE Directive). Features and specifications are subject to change without prior notice due to continuous improvement.
Warranty
A one-year limited warranty is provided. Visit www.insigniaproducts.com for details.
Contact Insignia
For customer service, call 1-877-467-4289 (U.S. and Canada) or 01-800-926-3000 (Mexico).
Website: www.insigniaproducts.com
Insignia is a trademark of Best Buy and its affiliated companies. Distributed by Best Buy Purchasing, LLC, 7601 Penn Ave South, Richfield, MN 55423 U.S.A. ©2019 Best Buy. All rights reserved. V2 ENGLISH 19-0732