DSL-G2452GR MU-MIMO Wireless Dual Band VDSL2 Router with. ASDL2 /3G/ LTE/Gigabit Ethernet WAN Support, 2 FXS Ports and USB Port. User Manual.
User Manual
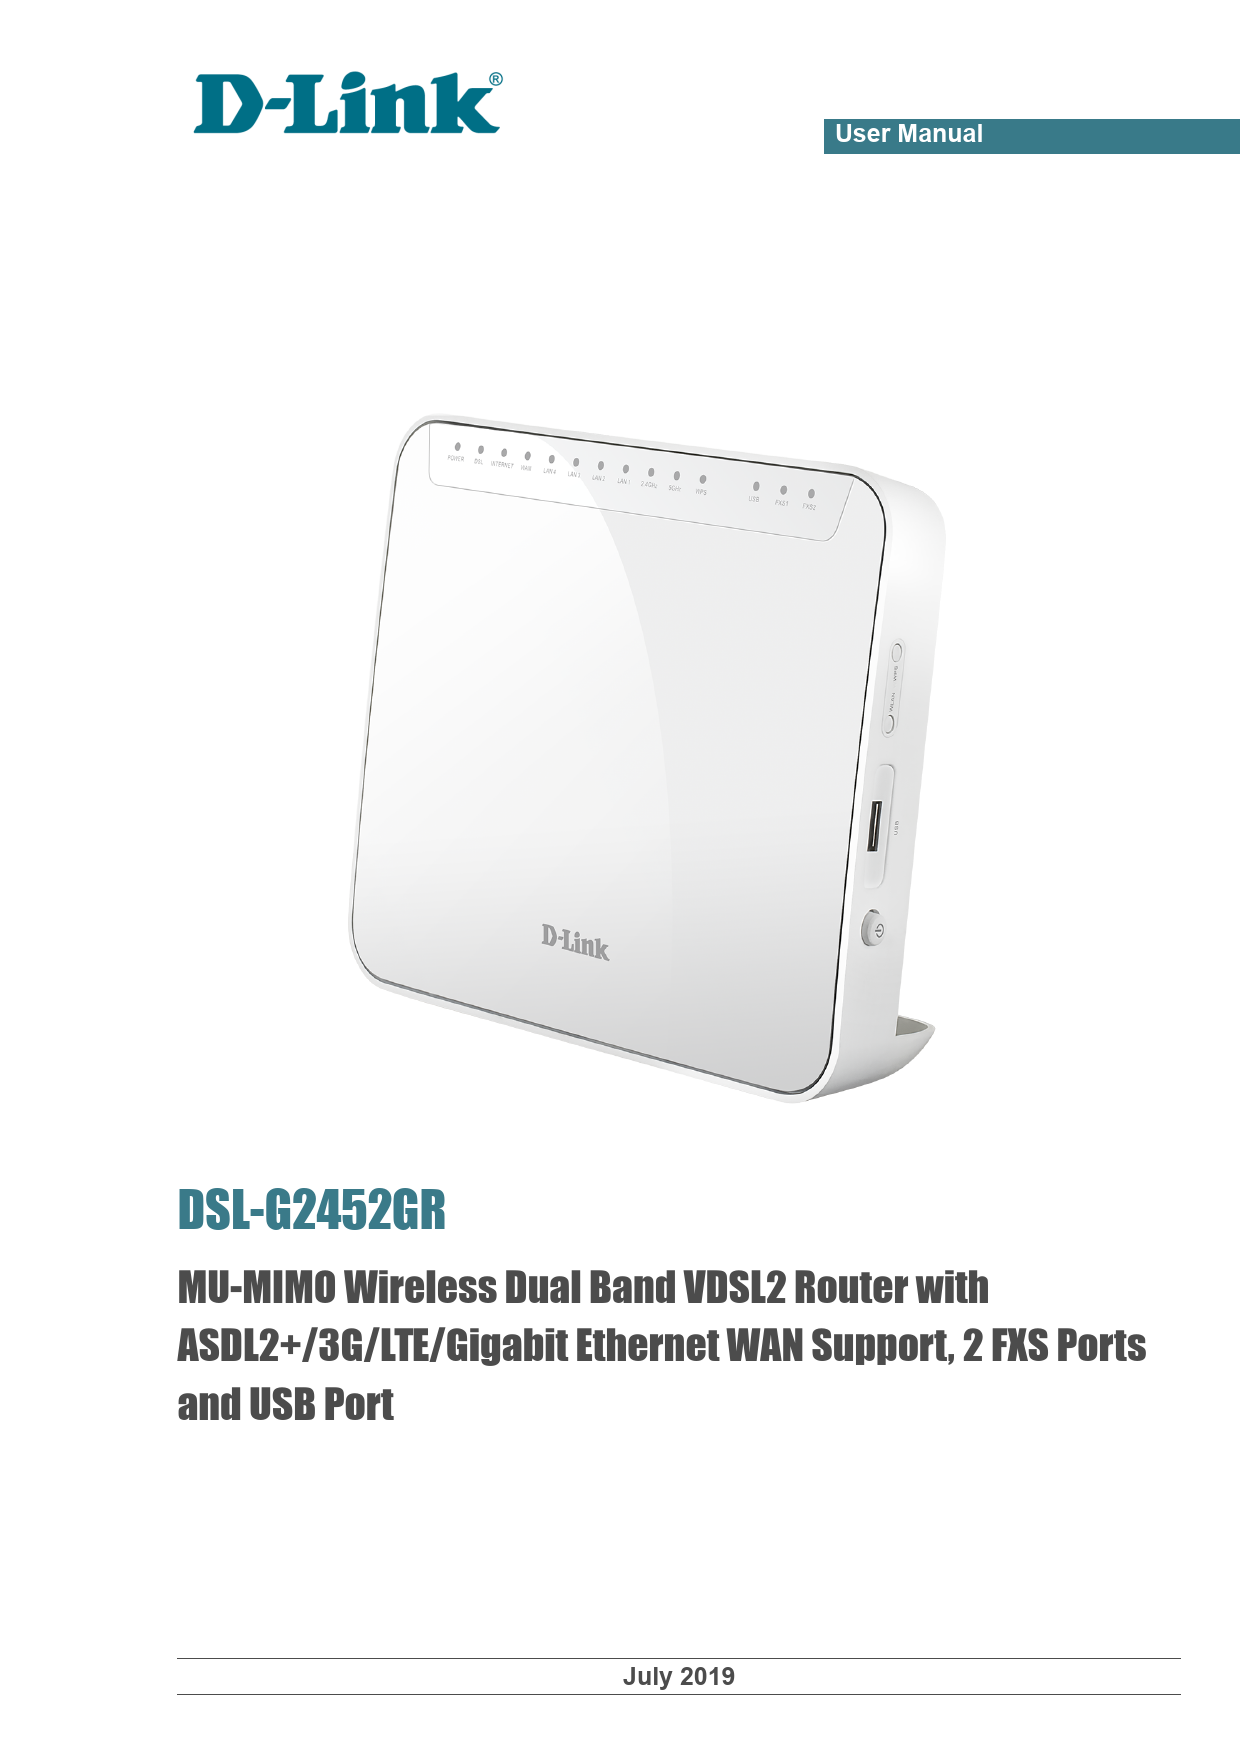
DSL-G2452GR
MU-MIMO Wireless Dual Band VDSL2 Router with ASDL2+/3G/LTE/Gigabit Ethernet WAN Support, 2 FXS Ports and USB Port
July 2019
DSL-G2452GR MU-MIMO Wireless Dual Band VDSL2 Router with ASDL2+/3G/LTE/Gigabit Ethernet WAN Support, 2 FXS Ports and USB Port
User Manual
Contents
Chapter 1. Introduction..........................................5
Contents and Audience.......................................................5 Conventions.................................................................5 Document Structure..........................................................5
Chapter 2. Overview..............................................6
General Information.........................................................6 Specifications..............................................................8 Product Appearance.........................................................15
Front Panel..............................................................15 Side Panel...............................................................17 Back Panel...............................................................18 Delivery Package...........................................................19
Chapter 3. Installation and Connection..........................20
Before You Begin...........................................................20 Connecting to PC...........................................................22
PC with Ethernet Adapter.................................................22 Obtaining IP Address Automatically (OS Windows 7)........................23 PC with Wi-Fi Adapter....................................................28 Obtaining IP Address Automatically and Connecting to Wireless Network (OS Windows 7)...........................................................29 Connecting to Web-based Interface..........................................32 Web-based Interface Structure..............................................34 Summary Page.............................................................34 Home Page................................................................36 Menu Sections............................................................37 Notifications............................................................38
Chapter 4. Configuring via Web-based Interface..................39
Initial Configuration Wizard...............................................39 Selecting Operation Mode.................................................41 Creating LTE WAN Connection..............................................43 Wi-Fi Client.............................................................44 Configuring LAN Port as WAN Port.........................................46 Creating Wired WAN Connection............................................47 Static IPv4 or IPoA Connection.........................................48 Static IPv6 Connection.................................................49 PPPoE, PPPoA, IPv6 PPPoE, PPPoE Dual Stack, PPPoE + Dynamic IP (PPPoE Dual Access) Connections.....................50 PPPoE + Static IP (PPPoE Dual Access) Connection.......................51 PPTP + Dynamic IP or L2TP + Dynamic IP Connection......................52 PPTP + Static IP or L2TP + Static IP Connection........................53 Configuring Wireless Network.............................................54 Configuring LAN Ports for IPTV/VoIP......................................56 Changing Web-based Interface Password....................................58
Connection of Multimedia Devices...........................................60 Statistics.................................................................64
Network Statistics.......................................................64 DHCP.....................................................................65 Routing Table............................................................66 Clients and Session......................................................67 Multicast Groups.........................................................68 DSL Status...............................................................69
Page 2 of 262
DSL-G2452GR MU-MIMO Wireless Dual Band VDSL2 Router with ASDL2+/3G/LTE/Gigabit Ethernet WAN Support, 2 FXS Ports and USB Port
User Manual
Connections Setup..........................................................70 WAN......................................................................70 Creating Dynamic IPv4, Static IPv4, or IPoA WAN Connection.............72 Creating Dynamic IPv6 or Static IPv6 WAN Connection....................81 Creating PPPoE or PPPoA WAN Connection.................................89 Creating PPTP or L2TP WAN Connection...................................98 Creating PPPoE IPv6 or PPPoE Dual Stack WAN Connection................102 Creating Bridge WAN Connection........................................112 Creating 3G WAN Connection............................................118 Creating LTE WAN Connection...........................................122 LAN.....................................................................126 IPv4..................................................................126 IPv6..................................................................130 WAN Reservation.........................................................133
Wi-Fi.....................................................................135 Basic Settings..........................................................135 Client Management.......................................................143 WPS.....................................................................144 Using WPS Function via Web-based Interface............................146 Using WPS Function without Web-based Interface........................147 WMM.....................................................................148 Client..................................................................151 Additional..............................................................153 MAC Filter..............................................................156
Print Server..............................................................158 USB Storage...............................................................159
Information.............................................................159 USB Users...............................................................160 Samba...................................................................161 FTP.....................................................................163 Filebrowser.............................................................164 DLNA....................................................................165 Torrent Client..........................................................167 USB Modem.................................................................171 Basic Settings..........................................................172 PIN.....................................................................173 Advanced..................................................................175 Interface Grouping......................................................176 WAN Remapping...........................................................178 DNS.....................................................................179 DDNS....................................................................181 Redirect................................................................183 Routing.................................................................184 TR-069 Client...........................................................186 Remote Access...........................................................188 UPnP IGD................................................................190 xDSL....................................................................191 IGMP....................................................................192 ALG/Passthrough.........................................................193 IPsec...................................................................195
Page 3 of 262
DSL-G2452GR MU-MIMO Wireless Dual Band VDSL2 Router with ASDL2+/3G/LTE/Gigabit Ethernet WAN Support, 2 FXS Ports and USB Port User Manual
VoIP......................................................................201 Basic Settings..........................................................201 Advanced................................................................207 Fax Settings............................................................212 Audio Settings..........................................................214 Call Routing............................................................217 Call Feature Codes......................................................219 Call Logging............................................................222 Text Messages...........................................................224 Security................................................................226
Firewall..................................................................227 IP Filter...............................................................227 Virtual Servers.........................................................231 DMZ.....................................................................234 MAC Filter..............................................................235 URL Filter..............................................................237
System....................................................................238 Configuration...........................................................239 Firmware Update.........................................................241 Local Update..........................................................242 Remote Update.........................................................243 Log.....................................................................244 Ping....................................................................247 Traceroute..............................................................249 Telnet..................................................................251 System Time.............................................................252
Yandex.DNS................................................................254 Settings................................................................254 Devices and Rules.......................................................256
Chapter 5. Operation Guidelines................................258
Safety Rules and Conditions...............................................258 Wireless Installation Considerations......................................259
Chapter 6. Abbreviations and Acronyms..........................260
Page 4 of 262
DSL-G2452GR MU-MIMO Wireless Dual Band VDSL2 Router with ASDL2+/3G/LTE/Gigabit Ethernet WAN Support, 2 FXS Ports and USB Port
User Manual
Introduction
CHAPTER 1. INTRODUCTION
Contents and Audience
This manual describes the router DSL-G2452GR and explains how to configure and operate it. This manual is intended for users familiar with basic networking concepts, who create an in-home local area network, and system administrators, who install and configure networks in offices.
Conventions
Example text Before You Begin "Quick Installation Guide"
Change
192.168.1.1
Description The body text of the manual. A reference to a chapter or section of this manual. A reference to a document. A name of a menu, menu item, control (field, checkbox, dropdown list, button, etc.). Data that you should enter in the specified field.
! Information
An important note.
Document Structure
Chapter 1 describes the purpose and structure of the document. Chapter 2 gives an overview of the router's hardware and software features and describes its appearance and the package contents. Chapter 3 explains how to install the wireless router DSL-G2452GR and configure a PC in order to access its web-based interface. Chapter 4 describes all pages of the web-based interface in detail. Chapter 5 includes safety instructions and tips for networking. Chapter 6 introduces abbreviations and acronyms used in this manual.
Page 5 of 262
DSL-G2452GR MU-MIMO Wireless Dual Band VDSL2 Router with ASDL2+/3G/LTE/Gigabit Ethernet WAN Support, 2 FXS Ports and USB Port
User Manual
Overview
CHAPTER 2. OVERVIEW
General Information
DSL-G2452GR is a multifunction LTE/3G/VDSL/ADSL/Ethernet router with Wi-Fi and built-in switch. The router allows accessing the Internet via LTE or 3G network (with a USB modem1 connected). In addition, the device allows accessing the Internet via VDSL/ADSL technology and via Ethernet technology.
The router is equipped with a DSL port to connect to a high-speed VDSL line and 4 Ethernet ports to connect workstations. Due to this feature, DSL-G2452GR represents a moderate-priced solution for creating wired networks without an additional switch. Any Ethernet port of the device can be used to connect to a private Ethernet line. In addition, Gigabit Ethernet WAN port enables you to connect the device to a high-speed Ethernet line. Also the router has a USB port designed to connect a USB modem, printer, or USB storage.
Using the DSL-G2452GR device, you are able to quickly create a high-speed wireless network at home or in your office, which lets computers and mobile devices access the Internet virtually anywhere (within the operational range of your wireless network). Simultaneous activity of 2.4GHz band and 5GHz band allows performing a wide range of tasks. The router can operate as a base station for connecting wireless devices of the standards 802.11a, 802.11b, 802.11g, 802.11n, and 802.11ac (at the wireless connection rate up to 1167Mbps2).
The router supports multiple functions for the wireless interface: several security standards (WEP, WPA/WPA2), MAC address filtering, WPS, WMM.
In addition, the device is equipped with a button for switching the Wi-Fi network off/on. If needed, for example, when you leave home, you can easily switch the router's WLAN by pressing the button, and devices connected to the LAN ports of the router will stay online.
Multi-user MIMO technology allows to distribute the router's resources to let multiple wireless clients use the Wi-Fi network efficiently, keeping high rates for HD media streaming, lag-free gaming, and fast transfer of large files.
Support of guest Wi-Fi network allows you to create a separate wireless network with individual security settings and maximum rate limitation. Devices connected to the guest network will be able to access the Internet, but will be isolated from the devices and resources of the router's LAN.
The wireless router DSL-G2452GR includes a built-in firewall. The advanced security functions minimize threats of hacker attacks, prevent unwanted intrusions to your network, and block access to unwanted websites for users of your LAN.
The device is equipped with two FXS ports which allow connection of analog phones for calls via Internet.
In addition, the router supports IPsec and allows to create secure VPN tunnels.
1 Not included in the delivery package. D-Link does not guarantee compatibility with all USB modems. For the list of supported USB modems, see the Specifications section, page 8.
2 Up to 300Mbps for 2.4GHz and up to 867Mbps for 5GHz.
Page 6 of 262
DSL-G2452GR MU-MIMO Wireless Dual Band VDSL2 Router with ASDL2+/3G/LTE/Gigabit Ethernet WAN Support, 2 FXS Ports and USB Port
User Manual
Overview
Built-in Yandex.DNS service protects against malicious and fraudulent web sites and helps to block access to adult content on children's devices.
You can configure the settings of the wireless router DSL-G2452GR via the user-friendly webbased interface (the interface is available in two languages in Russian and in English).
The fast and easy configuration wizard allows you to specify all needed parameters in several simple steps.
Also DSL-G2452GR supports configuration and management via mobile application for Android and iPhone smartphones.
You can simply update the firmware: the router itself finds approved firmware on D-Link update server and notifies when ready to install it.
Page 7 of 262
DSL-G2452GR MU-MIMO Wireless Dual Band VDSL2 Router with ASDL2+/3G/LTE/Gigabit Ethernet WAN Support, 2 FXS Ports and USB Port
User Manual
Overview
Specifications*
Hardware
Processor RAM Flash Interfaces
LEDs
Buttons
Antenna MIMO Power connector
DSL Parameters
VDSL/ADSL Standards
ATM/PPP Protocols
· RTL8685PB (1GHz)
· 128MB, DDR2, built in processor
· 16MB, SPI
· 10/100/1000BASE-T WAN port · 4 10/100/1000BASE-T LAN ports · 1 RJ-11 DSL port · 2 RJ-11 FXS ports · USB 2.0 port
· POWER · DSL · INTERNET · WAN · LAN 1-4 · 2.4GHz · 5GHz · WPS · USB · FXS 1-2
· Power button · RESET button to restore factory default settings · WPS button to set up wireless connection · WLAN button to enable/disable wireless network
· Two internal antennas for 2.4GHz band (2dBi gain) · Two internal antennas for 5GHz band (2dBi gain)
· 2 x 2, MU-MIMO
· Power input connector (DC)
· VDSL2: ITU G.993.2, support of 8a, 8b, 8c, 8d, 12a, 12b, 17a, 30a, 35b · ADSL: Multi-mode, ANSI T1.413 Issue 2, ITU-T G.992.1 (G.dmt) Annex A, ITU-
T G.992.2 (G.lite) Annex A, ITU-T G.994.1 (G.hs) · ADSL2: ITU-T G.992.3 (G.dmt.bis) Annex A/L/M, ITU-T G.992.4 (G.lite.bis)
Annex A · ADSL2+: ITU-T G.992.5 Annex A/L/M
· Bridged and routed Ethernet encapsulation · VC-based or LLC-based multiplexing · ATM Forum UNI3.1/4.0 PVC (up to 8 PVCs) · ATM Adaptation Layer Type 5 (AAL5) · ITU-T I.610 OAM F4/F5 loopback · ATM QoS · PPP over ATM (RFC 2364) · PPP over Ethernet (PPPoE) · Keep-alive for PPP connections
* The device features are subject to change without notice. For the latest versions of the firmware and relevant documentation, visit www.dlink.ru.
Page 8 of 262
DSL-G2452GR MU-MIMO Wireless Dual Band VDSL2 Router with ASDL2+/3G/LTE/Gigabit Ethernet WAN Support, 2 FXS Ports and USB Port
User Manual
Overview
Software
WAN connection types
Network functions
Firewall functions
VPN QoS USB interface functions
· LTE / 3G · PPPoE / IPv6 PPPoE / PPPoE Dual Stack / PPPA · Static IPv4 / Dynamic IPv4 / IPoA · Static IPv6 / Dynamic IPv6 · PPPoE + Static IP (PPPoE Dual Access) · PPPoE + Dynamic IP (PPPoE Dual Access) · PPTP/L2TP + Static IP · PPTP/L2TP + Dynamic IP · Bridge
· Support of IEEE 802.1X for Internet connection · DHCP server/relay · Stateful/Stateless mode for IPv6 address assignment, IPv6 prefix delegation · DNS relay · Dynamic DNS · Static IP routing · Static IPv6 routing · IGMP Proxy · IGMP snooping · RIP · Support of UPnP IGD · Support of VLAN · WAN ping respond · Support of SIP ALG · Support of RTSP · WAN failover · LAN/WAN conversion
· Network Address Translation (NAT) · Stateful Packet Inspection (SPI) · IPv4/IPv6 filter · MAC filter · URL filter · DMZ · Prevention of ARP and DDoS attacks · Virtual servers · Built-in Yandex.DNS web content filtering service
· IPsec/PPTP/L2TP/PPPoE pass-through · IPsec tunnels
· Interface grouping · VLAN priority (802.1p)
· USB modem Auto connection to available type of supported network (4G/3G/2G) Auto configuration of connection upon plugging in USB modem Enabling/disabling PIN code check, changing PIN code3
· USB storage File browser Print server Access to storage via accounts Built-in Samba/FTP/DLNA server Built-in Transmission torrent client; uploading/downloading files from/to USB storage
3 For some models of USB modems.
Page 9 of 262
DSL-G2452GR MU-MIMO Wireless Dual Band VDSL2 Router with ASDL2+/3G/LTE/Gigabit Ethernet WAN Support, 2 FXS Ports and USB Port
User Manual
Overview
Software
Management and monitoring
Wireless Module Parameters
Standards Frequency range Wireless connection security Advanced functions
Wireless connection rate
· Local and remote access to settings through TELNET/WEB (HTTP/HTTPS) · Bilingual web-based interface for configuration and management
(Russian/English) · Support of D-Link Assistant application for Android and iPhone smartphones · Notification on connection problems and auto redirect to settings · Firmware update via web-based interface · Automatic notification on new firmware version · Saving/restoring configuration to/from file · Support of logging to remote host/connected USB storage · Automatic synchronization of system time with NTP server and manual
time/date setup · Ping utility · Traceroute utility · TR-069 client
· IEEE 802.11a/n/ac · IEEE 802.11b/g/n
· 2400 ~ 2483.5MHz · 5150 ~ 5350MHz · 5650 ~ 5850MHz
· WEP · WPA/WPA2 (Personal/Enterprise) · filter · WPS (PBC/PIN)
· Support of client mode · WMM (Wi-Fi QoS) · Information on connected Wi-Fi clients · Advanced settings · Guest Wi-Fi / support of MBSSID · Limitation of wireless network rate · Periodic scan of channels, automatic switch to least loaded channel · Autonegotiation of channel bandwidth in accordance with environment
conditions (20/40 Coexistence) · Support of 802.11ac (5GHz) TX Beamforming
· IEEE 802.11a: 6, 9, 12, 18, 24, 36, 48, and 54Mbps · IEEE 802.11b: 1, 2, 5.5, and 11Mbps · IEEE 802.11g: 6, 9, 12, 18, 24, 36, 48, and 54Mbps · IEEE 802.11n (2.4GHz/5GHz): from 6.5 to 300Mbps (from MCS0 to MCS15) · IEEE 802.11ac (5GHz): from 6.5 to 867Mbps (from MCS0 to MSC9)
Page 10 of 262
DSL-G2452GR MU-MIMO Wireless Dual Band VDSL2 Router with ASDL2+/3G/LTE/Gigabit Ethernet WAN Support, 2 FXS Ports and USB Port
User Manual
Overview
Wireless Module Parameters
Transmitter output power The maximum value of the transmitter output power depends upon the radio frequency regulations applied in your country
Receiver sensitivity
Modulation schemes
· 802.11a 16dBm at 6, 54Mbps
· 802.11b 18dBm at 1, 11Mbps
· 802.11g 17dBm at 6, 54Mbps
· 802.11n HT20/HT40 16dBm at MCS0, 7
· 802.11ac HT20 16dBm at MCS0, 8 HT40 16dBm at MCS0, 9 HT80 15dBm at MCS0, 9
· 802.11a -86dBm at 6Mbps -65dBm at 54Mbps
· 802.11b -90dBm at 1Mbps -76dBm at 11Mbps
· 802.11g -86dBm at 6Mbps -68dBm at 54Mbps
· 802.11n 2.4GHz HT20 -85dBm at MCS0 -67dBm at MCS7 HT40 -82dBm at MCS0 -64dBm at MCS7 5GHz HT20 -85dBm at MCS0 -65dBm at MCS7 HT40 -82dBm at MCS0 -61dBm at MCS7
· 802.11ac HT20 -82dBm at MCS0 -59dBm at MCS8 HT40 -79dBm at MCS0 -54dBm at MCS9 HT80 -76dBm at MCS0 -51dBm at MCS9
· 802.11a: BPSK, QPSK, 16 QAM, 64 QAM with OFDM · 802.11b: DQPSK, DBPSK, DSSS, and CCK · 802.11g: BPSK, QPSK, 16 QAM, 64 QAM with OFDM · 802.11n: BPSK, QPSK, 16 QAM, 64 QAM with OFDM · 802.11ac: BPSK, QPSK, 16 QAM, 64 QAM, 256 QAM with OFDM
Page 11 of 262
DSL-G2452GR MU-MIMO Wireless Dual Band VDSL2 Router with ASDL2+/3G/LTE/Gigabit Ethernet WAN Support, 2 FXS Ports and USB Port
User Manual
Overview
Phone
General SIP Features
Call Features
Voice Features
Physical Parameters
Dimensions (L x W x H) Weight
· Individual account per port · Invite with Challenge · Register by IP address or domain name of SIP server · Backup proxy support · Support of DHCP option 120 · RFC3986 SIP URI format support · Outbound proxy support · STUN client · NAT public IP address · NAT keep-alive · Session timer (re-invite/update) · Call types: voice/modem/fax · User programmable Dial Plan · Manual peer table (for P2P calls) · Handling numbers in E.164 format
· Direct IP-to-IP all without SIP proxy (P2P) · Call hold/retrieve · Call awaiting · Forwarding (unconditional, busy, no answer) · Do Not Disturb · Anonymous call blocking · Speed/abbreviated dialing · PIN code before dialing · Hotline · Vertical service codes · CLIR · Intercom (internal calls without SIP server) · Filtering SIP packets by IP address/domain name (white/black list) · Logging and recording calls · Sending text messages to VoIP gateways/IP phones
· Codecs: G.711 a/-law, G.729A, G.726, G.722, G.723.1, GSMFR, ILBC, SPEEX
· DTMF detection and generation · In-band DTMF, out-of-band DTMF (RFC2833, SIP-INFO) · Comfort Noise Generation (CNG) · Voice Activity Detection (VAD) · Dynamic Jitter Buffer · Echo Cancellation (LEC/NLP) · Call progress tone generation (FXS) · DTMF/PULSE dial support · Caller ID detection and generation · T.30 FAX bypass to G.711, T.38 Real Time FAX Relay, V.152 · Adjustable Flash Time · Advanced call transfer · Volume control (speaker/microphone)
· 198 x 59 x 168 mm (7.8 x 2.3 x 6.6 in)
· 340 g (0.75 lb)
Page 12 of 262
DSL-G2452GR MU-MIMO Wireless Dual Band VDSL2 Router with ASDL2+/3G/LTE/Gigabit Ethernet WAN Support, 2 FXS Ports and USB Port
User Manual
Operating Environment
Power Temperature Humidity
Supported USB modems4
GSM
· Output: 12V DC, 1.5A
· Operating: from 5 to 40 °C · Storage: from -20 to 70 °C
· Operating: from 10% to 90% (non-condensing) · Storage: from 5% to 95% (non-condensing)
· Alcatel X500 · D-Link DWM-152C1 · D-Link DWM-156A6 · D-Link DWM-156A7 · D-Link DWM 156A8 · D-Link DWM-156C1 · D-Link DWM-157B1 · D-Link DWM-157B1 (Velcom) · D-Link DWM-158D1 · D-Link DWR-710 · Huawei E150 · Huawei E1550 · Huawei E156G · Huawei E160G · Huawei E169G · Huawei E171 · Huawei E173 (Megafon) · Huawei E220 · Huawei E3131 (MTS 420S) · Huawei E352 (Megafon) · Prolink PHS600 · Prolink PHS901 · ZTE MF112 · ZTE MF192 · ZTE MF626 · ZTE MF627 · ZTE MF652 · ZTE MF667 · ZTE MF668 · ZTE MF752
Overview
4 The manufacturer does not guarantee proper operation of the router with every modification of the firmware of USB modems.
Page 13 of 262
DSL-G2452GR MU-MIMO Wireless Dual Band VDSL2 Router with ASDL2+/3G/LTE/Gigabit Ethernet WAN Support, 2 FXS Ports and USB Port
User Manual
Supported USB modems
LTE
Smartphones in USB tethering mode
· Alcatel IK40V · D-Link DWM-222 · Huawei E3131 · Huawei E3272 · Huawei E3351 · Huawei E3372 · Huawei E367 · Huawei E392 · Megafon M100-1 · Megafon M100-2 · Megafon M100-3 · Megafon M100-4 · Megafon M150-1 · Megafon M150-2 · Quanta 1K6E (Beeline 1K6E) · MTS 824F · MTS 827F · Yota LU-150 · Yota WLTUBA-107 · ZTE MF823 · ZTE MF827
· Some models of Android smartphones
Overview
Page 14 of 262
DSL-G2452GR MU-MIMO Wireless Dual Band VDSL2 Router with ASDL2+/3G/LTE/Gigabit Ethernet WAN Support, 2 FXS Ports and USB Port User Manual
Product Appearance
Front Panel
Overview
LED
POWER DSL
Mode
Solid green Blinking green No light Solid green Blinking green No light
Figure 1. Front panel view.
Description The router is powered on. Firmware update is in progress. The router is powered off. DSL has been synchronized. Detecting a carrier signal and synchronizing DSL. No carrier signal.
Page 15 of 262
DSL-G2452GR MU-MIMO Wireless Dual Band VDSL2 Router with ASDL2+/3G/LTE/Gigabit Ethernet WAN Support, 2 FXS Ports and USB Port
User Manual
Overview
LED
INTERNET
WAN
LAN 1-4
2.4GHz 5GHz WPS USB FXS 1-2
Mode
Description
Solid green
The default WAN connection is active.
Solid red
The default WAN connection is not active or reboot is required for correct operation of a WAN connection.
No light
There are no WAN connections created or the router is being rebooted.
Solid green
The cable is connected to the port.
Blinking green
Data transfer through the WAN port.
No light
The cable is not connected.
Solid green
A device is connected to the port of the router (for the LAN port configured as the WAN port: the router is connected to an Ethernet line).
Blinking green
Data transfer through the relevant LAN port.
No light
The cable is not connected to the relevant port.
Solid green
The router's WLAN of the relevant band is on.
Blinking green
Data transfer through the Wi-Fi network of the relevant band.
No light
The router's WLAN of the relevant band is off.
Blinking green
Attempting to add a wireless device via the WPS function.
No light
The WPS function is not in use.
Solid green
A USB device is connected to the router's USB port.
No light
No USB device.
Solid green
The phone is registered on the SIP server.
Blinking green
An attempt to register on the SIP server.
Fast blinking green An incoming call or talking.
No light
The phone is not registered on the SIP server.
Page 16 of 262
DSL-G2452GR MU-MIMO Wireless Dual Band VDSL2 Router with ASDL2+/3G/LTE/Gigabit Ethernet WAN Support, 2 FXS Ports and USB Port User Manual
Side Panel
Overview
Figure 2. Side panel view.
Name
Description
USB
A port for connecting a USB device (modem, storage, printer).
WLAN
A button to enable/disable the router's wireless network. Press the button and immediately release it.
WPS
A button to set up a wireless connection (the WPS function).
To use the WPS function: with the device turned on, press the button and immediately release it. The WPS LED should start blinking.
Also, a button to turn the router on/off is located on the side panel of the router.
Page 17 of 262
DSL-G2452GR MU-MIMO Wireless Dual Band VDSL2 Router with ASDL2+/3G/LTE/Gigabit Ethernet WAN Support, 2 FXS Ports and USB Port User Manual
Back Panel
Overview
Figure 3. Back panel view.
Port
Description
POWER
Power connector.
RESET
A button to restore the factory default settings.
To restore the factory defaults, push the button (with the device turned on), hold it for 10 seconds, and then release the button.
PHONE 1-2 Ports to connect analog phones.
LAN 1-4
4 Ethernet ports to connect Ethernet devices.
WAN
A port to connect to a private Ethernet line (it is recommended to use the cable included in the delivery package).
DSL
A DSL port to connect the router to the telephone line.
The device is also equipped with four internal Wi-Fi antennas.
Page 18 of 262
DSL-G2452GR MU-MIMO Wireless Dual Band VDSL2 Router with ASDL2+/3G/LTE/Gigabit Ethernet WAN Support, 2 FXS Ports and USB Port
User Manual
Overview
Delivery Package
The following should be included: · Router DSL-G2452GR · Power adapter DC 12V/1.5A · RJ-11 telephone cable · Ethernet cable · Splitter · "Quick Installation Guide" (brochure).
The "User Manual" and "Quick Installation Guide" documents are available on D-Link website (see www.dlink.ru).
! Using a power supply with a different voltage rating than the one included will cause damage and void the warranty for this product.
Page 19 of 262
DSL-G2452GR MU-MIMO Wireless Dual Band VDSL2 Router with ASDL2+/3G/LTE/Gigabit Ethernet WAN Support, 2 FXS Ports and USB Port
User Manual
Installation and Connection
CHAPTER 3. INSTALLATION AND CONNECTION
Before You Begin
Please, read this manual prior to installing the device. Make sure that you have all the necessary information and equipment.
Operating System Configuration of the LTE/3G/VDSL/ADSL/Ethernet router DSL-G2452GR with Wi-Fi and built-in switch (hereinafter referred to as "the router") is performed via the built-in web-based interface. The web-based interface is available from any operating system that supports a web browser.
Web Browser
The following web browsers are recommended: · Apple Safari 8 and later · Google Chrome 48 and later · Microsoft Internet Explorer 10 and later · Microsoft Edge 20.10240 and later · Mozilla Firefox 44 and later · Opera 35 and later.
For successful operation, JavaScript should be enabled on the web browser. Make sure that JavaScript has not been disabled by other software (such as virus protection or web user security packages) running on your computer.
Wired or Wireless NIC (Ethernet or Wi-Fi Adapter)
Any computer that uses the router should be equipped with an Ethernet or Wi-Fi adapter (NIC). If your computer is not equipped with such a device, install an Ethernet or Wi-Fi adapter prior to using the router.
Wireless Connection
Wireless workstations from your network should be equipped with a wireless 802.11a, b, g, n, or ac NIC (Wi-Fi adapter). In addition, you should specify the values of SSID, channel number and security settings defined in the web-based interface of the router for all these wireless workstations.
VoIP
On order to use VoIP over SIP, you need to connect an analog phone to an FXS port of the router. Then access the web-based interface of the router, and you will be able to configure all needed settings.
Page 20 of 262
DSL-G2452GR MU-MIMO Wireless Dual Band VDSL2 Router with ASDL2+/3G/LTE/Gigabit Ethernet WAN Support, 2 FXS Ports and USB Port
User Manual
Installation and Connection
USB Modem
To connect to an LTE or 3G network, you should use a USB modem. Connect it to the USB port of the router, then access the web-based interface of the router, and you will be able to configure a connection to the Internet.5
Your USB modem should be equipped with an active SIM card of your operator.
Some operators require subscribers to activate their USB modems prior to using them.
! Please, refer to connection guidelines provided by your operator when concluding the agreement or placed on its website.
For some models of USB modems, it is required to disable the PIN code check on the SIM card prior to connecting the USB modem to the router.
5 Contact your operator to get information on the service coverage and fees. Page 21 of 262
DSL-G2452GR MU-MIMO Wireless Dual Band VDSL2 Router with ASDL2+/3G/LTE/Gigabit Ethernet WAN Support, 2 FXS Ports and USB Port
User Manual
Installation and Connection
Connecting to PC
PC with Ethernet Adapter
1. Connect an Ethernet cable between any of LAN ports located on the back panel of the router and the Ethernet port of your PC.
2. To connect via USB modem: connect your USB modem to the USB port6 located on the right side panel of the router.
! In some cases you will need to reboot the router after connection of the USB modem.
3. To connect the device to a DSL line: connect a phone cable between the DSL port of the router and the MODEM port of the splitter. Connect your phone to the PHONE port of the splitter. Then connect another phone cable between a phone jack and the LINE port of the splitter.
4. To connect the device to an Ethernet line: connect an Ethernet cable between the WAN port of the router and the Ethernet line.
5. Connect another phone cable between an FXS port of the router and the phone. 6. Connect the power cord to the power connector port on the back panel of the router, then
plug the power adapter into an electrical outlet or power strip. 7. Turn on the router by pressing the power button on its right side panel. Then make sure that your PC is configured to obtain an IP address automatically (as DHCP client).
6 It is recommended to use a USB extension cable to connect a USB modem to the router. Page 22 of 262
DSL-G2452GR MU-MIMO Wireless Dual Band VDSL2 Router with ASDL2+/3G/LTE/Gigabit Ethernet WAN Support, 2 FXS Ports and USB Port
User Manual
Installation and Connection
Obtaining IP Address Automatically (OS Windows 7)
1. Click the Start button and proceed to the Control Panel window.
2. Select the Network and Sharing Center section. (If the Control Panel has the category view (the Category value is selected from the View by drop-down list in the top right corner of the window), choose the View network status and tasks line under the Network and Internet section.)
Figure 4. The Control Panel window. Page 23 of 262
DSL-G2452GR MU-MIMO Wireless Dual Band VDSL2 Router with ASDL2+/3G/LTE/Gigabit Ethernet WAN Support, 2 FXS Ports and USB Port
User Manual
Installation and Connection
3. In the menu located on the left part of the window, select the Change adapter settings line.
Figure 5. The Network and Sharing Center window. Page 24 of 262
DSL-G2452GR MU-MIMO Wireless Dual Band VDSL2 Router with ASDL2+/3G/LTE/Gigabit Ethernet WAN Support, 2 FXS Ports and USB Port
User Manual
Installation and Connection
4. In the opened window, right-click the relevant Local Area Connection icon and select the Properties line in the menu displayed.
Figure 6. The Network Connections window.
Page 25 of 262
DSL-G2452GR MU-MIMO Wireless Dual Band VDSL2 Router with ASDL2+/3G/LTE/Gigabit Ethernet WAN Support, 2 FXS Ports and USB Port
User Manual
Installation and Connection
5. In the Local Area Connection Properties window, on the Networking tab, select the Internet Protocol Version 4 (TCP/IPv4) line. Click the Properties button.
Figure 7. The Local Area Connection Properties window. Page 26 of 262
DSL-G2452GR MU-MIMO Wireless Dual Band VDSL2 Router with ASDL2+/3G/LTE/Gigabit Ethernet WAN Support, 2 FXS Ports and USB Port
User Manual
Installation and Connection
6. Make sure that the Obtain an IP address automatically and Obtain DNS server address automatically choices of the radio buttons are selected. Click the OK button.
Figure 8. The Internet Protocol Version 4 (TCP/IPv4) Properties window.
7. Click the OK button in the connection properties window.
Page 27 of 262
DSL-G2452GR MU-MIMO Wireless Dual Band VDSL2 Router with ASDL2+/3G/LTE/Gigabit Ethernet WAN Support, 2 FXS Ports and USB Port
User Manual
Installation and Connection
PC with Wi-Fi Adapter
1. To connect via USB modem: connect your USB modem to the USB port7 located on the right side panel of the router.
! In some cases you will need to reboot the router after connection of the USB modem.
2. To connect the device to a DSL line: connect a phone cable between the DSL port of the router and the MODEM port of the splitter. Connect your phone to the PHONE port of the splitter. Then connect another phone cable between a phone jack and the LINE port of the splitter.
3. To connect the device to an Ethernet line: connect an Ethernet cable between the WAN port of the router and the Ethernet line.
4. Connect another phone cable between an FXS port of the router and the phone.
5. Connect the power cord to the power connector port on the back panel of the router, then plug the power adapter into an electrical outlet or power strip.
6. Turn on the router by pressing the power button on its right side panel.
7. Make sure that your Wi-Fi adapter is on. As a rule, modern notebooks with built-in wireless NICs are equipped with a button or switch that turns on/off the wireless adapter (refer to your PC documents). If your PC is equipped with a pluggable wireless NIC, install the software provided with your Wi-Fi adapter.
Then make sure that your Wi-Fi adapter is configured to obtain an IP address automatically (as DHCP client).
7 It is recommended to use a USB extension cable to connect a USB modem to the router. Page 28 of 262
DSL-G2452GR MU-MIMO Wireless Dual Band VDSL2 Router with ASDL2+/3G/LTE/Gigabit Ethernet WAN Support, 2 FXS Ports and USB Port
User Manual
Installation and Connection
Obtaining IP Address Automatically and Connecting to Wireless Network (OS Windows 7)
1. Click the Start button and proceed to the Control Panel window.
2. Select the Network and Sharing Center section. (If the Control Panel has the category view (the Category value is selected from the View by drop-down list in the top right corner of the window), choose the View network status and tasks line under the Network and Internet section.)
Figure 9. The Control Panel window.
3. In the menu located on the left part of the window, select the Change adapter settings line.
4. In the opened window, right-click the relevant Wireless Network Connection icon. Make sure that your Wi-Fi adapter is on, then select the Properties line in the menu displayed.
5. In the Wireless Network Connection Properties window, on the Networking tab, select the Internet Protocol Version 4 (TCP/IPv4) line. Click the Properties button.
Page 29 of 262
DSL-G2452GR MU-MIMO Wireless Dual Band VDSL2 Router with ASDL2+/3G/LTE/Gigabit Ethernet WAN Support, 2 FXS Ports and USB Port
User Manual
Installation and Connection
6. Make sure that the Obtain an IP address automatically and Obtain DNS server address automatically choices of the radio buttons are selected. Click the OK button.
Figure 10. The Internet Protocol Version 4 (TCP/IPv4) Properties window.
7. Click the OK button in the connection properties window. 8. To open the list of available wireless networks, select the icon of the wireless network
connection and click the Connect To button or left-click the network icon in the notification area located on the right side of the taskbar.
Figure 11. The notification area of the taskbar.
Page 30 of 262
DSL-G2452GR MU-MIMO Wireless Dual Band VDSL2 Router with ASDL2+/3G/LTE/Gigabit Ethernet WAN Support, 2 FXS Ports and USB Port
User Manual
Installation and Connection
9. In the opened Wireless Network Connection window, select the wireless network DSL-G2452GR (for operating in the 2.4GHz band) or DSL-G2452GR-5G (for operating in the 5GHz band) and click the Connect button.
Figure 12. The list of available networks.
10. In the opened window, enter the network key (see WPS PIN on the barcode label on the back panel of the device) in the Security key field and click the OK button.
11. Wait for about 20-30 seconds. After the connection is established, the network icon will be displayed as the signal level scale. If you perform initial configuration of the router via Wi-Fi connection, note that
! immediately after changing the wireless default settings of the router you will need to reconfigure the wireless connection using the newly specified settings.
Page 31 of 262
DSL-G2452GR MU-MIMO Wireless Dual Band VDSL2 Router with ASDL2+/3G/LTE/Gigabit Ethernet WAN Support, 2 FXS Ports and USB Port
User Manual
Installation and Connection
Connecting to Web-based Interface
When you have configured your computer, you can access the web-based interface and configure needed parameters (create a WAN connection, change the parameters of the wireless network, specify the settings of the firewall, etc.)
Start a web browser (see the Before You Begin section, page 20). In the address bar of the web browser, enter the domain name of the router (by default, dlinkrouter.local) with a dot at the end and press the Enter key. Also you can enter the IP address of the device (by default, 192.168.1.1).
Figure 13. Connecting to the web-based interface of the DSL-G2452GR device.
If the error "The page cannot be displayed" (or "Unable to display the page"/"Could not
! connect to remote server") occurs upon connecting to the web-based interface of the router, make sure that you have properly connected the router to your computer.
If the device has not been configured previously or the default settings have been restored, after access to the web-based interface the Initial Configuration Wizard opens (see the Initial Configuration Wizard section, page 39).
Figure 14. The page for running the Initial Configuration Wizard.
Page 32 of 262
DSL-G2452GR MU-MIMO Wireless Dual Band VDSL2 Router with ASDL2+/3G/LTE/Gigabit Ethernet WAN Support, 2 FXS Ports and USB Port
User Manual
Installation and Connection
If you configured the device previously, after access to the web-based interface the login page opens. Enter the username (admin) in the Username field and the password you specified in the Password field, then click the LOGIN button.
Figure 15. The login page.
If you enter a wrong password several times, the web-based interface will be blocked for a while. Please wait for one minute and reenter the password you specified.
Page 33 of 262
DSL-G2452GR MU-MIMO Wireless Dual Band VDSL2 Router with ASDL2+/3G/LTE/Gigabit Ethernet WAN Support, 2 FXS Ports and USB Port
User Manual
Installation and Connection
Web-based Interface Structure
Summary Page
On the Summary page, detailed information on the device state is displayed.
Figure 16. The summary page. Page 34 of 262
DSL-G2452GR MU-MIMO Wireless Dual Band VDSL2 Router with ASDL2+/3G/LTE/Gigabit Ethernet WAN Support, 2 FXS Ports and USB Port
User Manual
Installation and Connection
The Device Information section displays the model and hardware version of the router, the firmware version, and other data.
To contact the technical support group (to send an e-mail), left-click the support e-mail address. After clicking the line, the e-mail client window for sending a new letter to the specified address opens.
The Wi-Fi 2.4 GHz and Wi-Fi 5 GHz sections display data on the state of the device's wireless network, its name and the authentication type, and availability of an additional wireless network in the relevant band.
In the WAN section, data on the type and status of the existing WAN connection are displayed.
In the LAN section, the IPv4 and IPv6 address of the router and the number of wired and wireless clients of the device are displayed.
The LAN Ports section displays the state of the device's LAN ports.
In the DSL Status section, data on the DSL connection state is displayed.
The USB Devices section displays the device connected to the USB port of the router.
In the VoIP Line 1 and VoIP Line 2 sections, data on the status of registration on the SIP proxy server and the phone status are displayed.
The Yandex.DNS section displays the Yandex.DNS service state and operation mode. To enable the Yandex.DNS service, move the Enable switch to the right. If needed, change the operation mode of the service.
Page 35 of 262
DSL-G2452GR MU-MIMO Wireless Dual Band VDSL2 Router with ASDL2+/3G/LTE/Gigabit Ethernet WAN Support, 2 FXS Ports and USB Port
User Manual
Installation and Connection
Home Page
The Home page displays links to the most frequently used pages with device's settings.
Figure 17. The Home page.
Other settings of the router are available in the menu in the left part of the page.
Page 36 of 262
DSL-G2452GR MU-MIMO Wireless Dual Band VDSL2 Router with ASDL2+/3G/LTE/Gigabit Ethernet WAN Support, 2 FXS Ports and USB Port
User Manual
Installation and Connection
Menu Sections
To configure the router use the menu in the left part of the page.
In the Initial Configuration section you can run the Initial Configuration Wizard. The Wizard allows you to configure the router for operation in the needed mode and specify all parameters necessary for getting started (for the description of the Wizard, see the Initial Configuration Wizard section, page 39).
The pages of the Statistics section display data on the current state of the router (for the description of the pages, see the Statistics section, page 64).
The pages of the Connections Setup section are designed for configuring basic parameters of the LAN interface of the router and creating a connection to the Internet (for the description of the pages, see the Connections Setup section, page 70).
The pages of the Wi-Fi section are designed for specifying all needed settings of the router's wireless network (for the description of the pages, see the Wi-Fi section, page 135).
The Print Server section is designed for configuring the router as a print server (see the Print Server section, page 158).
The pages of the USB Storage section are designed for operating the connected USB storage (for the description of the pages, see the USB Storage section, page 159).
The pages of the USB Modem section are designed for operating the connected 3G or LTE USB modem (for the description of the pages, see the USB Modem section, page 171).
The pages of the Advanced section are designed for configuring additional parameters of the router (for the description of the pages, see the Advanced section, page 175).
The pages of the VoIP section are designed for specifying all settings needed for VoIP (for the description of the pages, see the VoIP section, page 201).
The pages of the Firewall section are designed for configuring the firewall of the router (for the description of the pages, see the Firewall section, page 227).
The pages of the System section provide functions for managing the internal system of the router (for the description of the pages, see the System section, page 238).
The pages of the Yandex.DNS section are designed for configuring the Yandex.DNS web content filtering service (for the description of the pages, see the Yandex.DNS section, page 254).
To exit the web-based interface, click the Logout line of the menu.
Page 37 of 262
DSL-G2452GR MU-MIMO Wireless Dual Band VDSL2 Router with ASDL2+/3G/LTE/Gigabit Ethernet WAN Support, 2 FXS Ports and USB Port
User Manual
Installation and Connection
Notifications
The router's web-based interface displays notifications in the top right part of the page.
Figure 18. The web-based interface notifications.
Click the icon displaying the number of notifications to view the complete list and click the relevant button.
Page 38 of 262
DSL-G2452GR MU-MIMO Wireless Dual Band VDSL2 Router with ASDL2+/3G/LTE/Gigabit Ethernet WAN Support, 2 FXS Ports and USB Port
User Manual
Configuring via Web-based Interface
CHAPTER 4. CONFIGURING VIA WEB-BASED INTERFACE
Initial Configuration Wizard
To start the Initial Configuration Wizard, go to the Initial Configuration section. On the opened page, click the OK button and wait until the factory default settings are restored.
Figure 19. Restoring the default settings in the Wizard.
If you perform initial configuration of the router via Wi-Fi connection, please make sure that you are connected to the wireless network of DSL-G2452GR and click the NEXT button.
Figure 20. Checking connection to the wireless network.
Click the START button.
Figure 21. Starting the Wizard.
Page 39 of 262
DSL-G2452GR MU-MIMO Wireless Dual Band VDSL2 Router with ASDL2+/3G/LTE/Gigabit Ethernet WAN Support, 2 FXS Ports and USB Port
User Manual
Configuring via Web-based Interface
On the opened page, click YES in order to leave the current language of the web-based interface or click NO to select the other language.
Figure 22. Selecting a language.
You can finish the wizard earlier and go to the menu of the web-based interface. To do this, click the ADVANCED SETTINGS button. On the opened page, change the default settings: specify the administrator password in the Admin password and Password confirmation fields and the name of the wireless network in the 2.4GHz and 5GHz bands in the Network name 2.4 GHz (SSID) and Network name 5 GHz (SSID) fields correspondingly. Then click the APPLY button.
Figure 23. Changing the default settings.
To continue the configuration of the router via the Wizard, click the CONTINUE button.
Page 40 of 262
DSL-G2452GR MU-MIMO Wireless Dual Band VDSL2 Router with ASDL2+/3G/LTE/Gigabit Ethernet WAN Support, 2 FXS Ports and USB Port
User Manual
Configuring via Web-based Interface
Selecting Operation Mode
In order to connect your device to a VDSL or ADSL line, on the Device mode page, from the Connection method list, select the VDSL or ADSL value correspondingly. In this mode you can configure a WAN connection, set your own settings for the wireless network in the 2.4GHz and 5GHz bands, configure LAN ports to connect an STB or VoIP phone, and set your own password for access to the web-based interface of the device.
Figure 24. Selecting an operation mode. The VDSL mode.
In order to connect your device to a wired ISP, on the Device mode page, from the Connection method list, select the Ethernet (WAN) value. In this mode you can configure a WAN connection, set your own settings for the wireless network in the 2.4GHz and 5GHz bands, configure LAN ports to connect an STB or VoIP phone, and set your own password for access to the web-based interface of the device. If you want to use one of the LAN ports to connect your device to a private Ethernet line, select the Ethernet (LAN) value.
Figure 25. Selecting an operation mode. The Ethernet (WAN) mode. Page 41 of 262
DSL-G2452GR MU-MIMO Wireless Dual Band VDSL2 Router with ASDL2+/3G/LTE/Gigabit Ethernet WAN Support, 2 FXS Ports and USB Port
User Manual
Configuring via Web-based Interface
In order to connect your device to the network of a 3G or LTE operator, on the Device mode page, from the Connection method list, select the 3G/LTE modem value. In this mode you can configure a 3G/LTE WAN connection, set your own settings for the wireless network in the 2.4GHz and 5GHz bands, and set your own password for access to the web-based interface of the device.
Figure 26. Selecting an operation mode. The 3G/LTE modem mode.
In order to connect your device to a wireless ISP (WISP), on the Device mode page, from the Connection method list, select the Wi-Fi value. In this mode you can connect your device to another access point, configure a WAN connection, set your own settings for the wireless network in the 2.4GHz and 5GHz bands, configure LAN ports to connect an STB or VoIP phone, and set your own password for access to the web-based interface of the device.
Figure 27. Selecting an operation mode. The Wi-Fi mode.
When the operation mode is selected, click the NEXT button.
Page 42 of 262
DSL-G2452GR MU-MIMO Wireless Dual Band VDSL2 Router with ASDL2+/3G/LTE/Gigabit Ethernet WAN Support, 2 FXS Ports and USB Port
User Manual
Configuring via Web-based Interface
Creating LTE WAN Connection
This configuration step is available for the 3G/LTE modem mode. 1. If the PIN code check is enabled for the SIM card inserted into the built-in modem, enter the PIN code in the PIN field and click the APPLY button.
Figure 28. The page for entering the PIN code.
2. Please wait while the router automatically creates a WAN connection for your mobile operator.
Figure 29. The page for creating LTE connection.
3. Click the NEXT button to continue or click the BACK button to return to the previous page. If the router failed to create a WAN connection automatically, click the CONFIGURE MANUALLY button. On the Internet connection type page, configure all needed settings and click the NEXT button.
Page 43 of 262
DSL-G2452GR MU-MIMO Wireless Dual Band VDSL2 Router with ASDL2+/3G/LTE/Gigabit Ethernet WAN Support, 2 FXS Ports and USB Port
User Manual
Configuring via Web-based Interface
Wi-Fi Client
This configuration step is available for the Wi-Fi mode. 1. On the Wi-Fi lient page, click the WIRELESS NETWORKS button and select the network to which you want to connect in the opened window. When you select a network, the Network name (SSID) and BSSID fields are filled in automatically.
If you cannot find the needed network in the list, click the UPDATE LIST icon ( ).
2. If a password is needed to connect to the selected network, fill in the relevant field. Click the Show icon ( ) to display the entered password.
Figure 30. The page for configuring the Wi-Fi client.
If you connect to a hidden network, select the band where the hidden network operates from the Frequency band list and enter the network name in the Network name (SSID) field. Then select a needed value from the Network authentication list and then, if needed, enter the password in the relevant field.
When the Open or WEP authentication type is selected, the following settings are displayed on the page:
Parameter
Description
For Open authentication type only.
Enable encryption WEP
The checkbox activating WEP encryption. When the checkbox is selected, the Default key ID drop-down list, the Encryption key WEP as HEX checkbox, and four Encryption key fields are displayed on the page.
Default key ID
The number of the key (from first to fourth) which will be used for WEP encryption.
Encryption key WEP as Select the checkbox to set a hexadecimal number as a key for
HEX
encryption.
Page 44 of 262
DSL-G2452GR MU-MIMO Wireless Dual Band VDSL2 Router with ASDL2+/3G/LTE/Gigabit Ethernet WAN Support, 2 FXS Ports and USB Port
User Manual
Configuring via Web-based Interface
Parameter
Description
Encryption key (1-4)
Keys for WEP encryption. The router uses the key selected from the Default key ID drop-down list. It is required to specify all the fields. Click the Show icon ( ) to display the entered key.
When the WPA-PSK, WPA2-PSK, or WPA-PSK/WPA2-PSK mixed authentication type is selected, the following fields are displayed:
Parameter
Description
Password PSK
A password for WPA encryption. Click the Show icon ( ) to display the entered password.
Encryption type
An encryption method: TKIP, AES, or TKIP+AES.
3. Click the NEXT button to continue or click the BACK button to return to the previous page.
Page 45 of 262
DSL-G2452GR MU-MIMO Wireless Dual Band VDSL2 Router with ASDL2+/3G/LTE/Gigabit Ethernet WAN Support, 2 FXS Ports and USB Port
User Manual
Configuring via Web-based Interface
Configuring LAN Port as WAN Port
This configuration step is available for the Ethernet (LAN) mode. 1. On the Device connection page, select a free LAN port which will be used as the WAN port.
Figure 31. The page for configuring a LAN port as the WAN port.
2. Click the NEXT button to continue or click the BACK button to return to the previous page.
Page 46 of 262
DSL-G2452GR MU-MIMO Wireless Dual Band VDSL2 Router with ASDL2+/3G/LTE/Gigabit Ethernet WAN Support, 2 FXS Ports and USB Port
User Manual
Configuring via Web-based Interface
Creating Wired WAN Connection
This configuration step is available for the ADSL, VDSL, Ethernet (WAN), Ethernet (LAN), and Wi-Fi modes.
You should configure your WAN connection in accordance with data provided by your
! Internet service provider (ISP). Make sure that you have obtained all necessary information prior to configuring your connection. Otherwise contact your ISP.
1. On the Internet connection type page, from the Connection type list, select the connection type used by your ISP and fill in the fields displayed on the page.
2. Specify the settings necessary for the connection of the selected type.
3. For the VDSL, Ethernet (WAN), Ethernet (LAN) modes: If your ISP uses MAC address binding, select the Clone MAC address of your device checkbox.
4. For the VDSL, Ethernet (WAN), Ethernet (LAN) modes: If the Internet access is provided via a VLAN channel, select the Use VLAN checkbox and fill in the VLAN ID field.
5. For the ADSL mode: Specify the VPI and VCI values in the relevant fields. 6. Click the NEXT button to continue or click the BACK button to return to the previous page.
Page 47 of 262
DSL-G2452GR MU-MIMO Wireless Dual Band VDSL2 Router with ASDL2+/3G/LTE/Gigabit Ethernet WAN Support, 2 FXS Ports and USB Port User Manual
Static IPv4 or IPoA Connection
Configuring via Web-based Interface
Figure 32. The page for configuring Static IPv4 WAN connection.
The IPoA connection type is available for the ADSL mode only. Fill in the following fields: IP address, Subnet mask, Gateway IP address, and DNS IP address.
Page 48 of 262
DSL-G2452GR MU-MIMO Wireless Dual Band VDSL2 Router with ASDL2+/3G/LTE/Gigabit Ethernet WAN Support, 2 FXS Ports and USB Port User Manual
Static IPv6 Connection
Configuring via Web-based Interface
Figure 33. The page for configuring Static IPv6 WAN connection.
Fill in the following fields: IP address, Prefix, Gateway IP address, and DNS IP address.
Page 49 of 262
DSL-G2452GR MU-MIMO Wireless Dual Band VDSL2 Router with ASDL2+/3G/LTE/Gigabit Ethernet WAN Support, 2 FXS Ports and USB Port
User Manual
Configuring via Web-based Interface
PPPoE, PPPoA, IPv6 PPPoE, PPPoE Dual PPPoE + Dynamic IP (PPPoE Dual Access) Connections
Stack,
Figure 34. The page for configuring PPPoE WAN connection.
The PPPoA connection type is available for the ADSL mode only. The PPPoE + Dynamic IP (PPPoE Dual Access) connection type is available for the Ethernet (WAN) and Ethernet (LAN) modes only. In the Username field enter the login and in the Password field enter the password provided by your ISP. Click the Show icon ( ) to display the entered password. If authorization is not required, select the Without authorization checkbox.
Page 50 of 262
DSL-G2452GR MU-MIMO Wireless Dual Band VDSL2 Router with ASDL2+/3G/LTE/Gigabit Ethernet WAN Support, 2 FXS Ports and USB Port
User Manual
Configuring via Web-based Interface
PPPoE + Static IP (PPPoE Dual Access) Connection
Figure 35. The page for configuring PPPoE + Static IP (PPPoE Dual Access) WAN connection.
The PPPoE + Static IP (PPPoE Dual Access) connection type is available for the Ethernet (WAN) and Ethernet (LAN) modes only. In the Username field enter the login and in the Password field enter the password provided by your ISP. Click the Show icon ( ) to display the entered password. If authorization is not required, select the Without authorization checkbox. Also fill in the following fields: IP address, Subnet mask, Gateway IP address, and DNS IP address.
Page 51 of 262
DSL-G2452GR MU-MIMO Wireless Dual Band VDSL2 Router with ASDL2+/3G/LTE/Gigabit Ethernet WAN Support, 2 FXS Ports and USB Port
User Manual
Configuring via Web-based Interface
PPTP + Dynamic IP or L2TP + Dynamic IP Connection
Figure 36. The page for configuring PPTP + Dynamic IP WAN connection.
The PPTP + Dynamic IP or L2TP + Dynamic IP connection type is available for the Ethernet (WAN), Ethernet (LAN), and Wi-Fi modes only. In the Username field enter the login and in the Password field enter the password provided by your ISP. Click the Show icon ( ) to display the entered password. If authorization is not required, select the Without authorization checkbox. In the VPN server address field, enter the IP or URL address of the PPTP or L2TP authentication server.
Page 52 of 262
DSL-G2452GR MU-MIMO Wireless Dual Band VDSL2 Router with ASDL2+/3G/LTE/Gigabit Ethernet WAN Support, 2 FXS Ports and USB Port User Manual
PPTP + Static IP or L2TP + Static IP Connection
Configuring via Web-based Interface
Figure 37. The page for configuring PPTP + Static IP WAN connection.
The PPTP + Static IP or L2TP + Static IP connection type is available for the Ethernet (WAN), Ethernet (LAN), and Wi-Fi modes only. In the Username field enter the login and in the Password field enter the password provided by your ISP. Click the Show icon ( ) to display the entered password. If authorization is not required, select the Without authorization checkbox. In the VPN server address field, enter the IP or URL address of the PPTP or L2TP authentication server. Also fill in the following fields: IP address, Subnet mask, Gateway IP address, and DNS IP address.
Page 53 of 262
DSL-G2452GR MU-MIMO Wireless Dual Band VDSL2 Router with ASDL2+/3G/LTE/Gigabit Ethernet WAN Support, 2 FXS Ports and USB Port
User Manual
Configuring via Web-based Interface
Configuring Wireless Network
1. On the Wireless Network 2.4 GHz page, in the Network name field, specify your own name for the wireless network in the 2.4GHz band or leave the value suggested by the router.
2. In the Password field, specify your own password for access to the wireless network or leave the value suggested by the router (WPS PIN of the device, see the barcode label).
3. If the router is used as a Wi-Fi client, you can specify the same parameters of the wireless network as specified for the network to which you are connecting. To do this, click the USE button (available for the Wi-Fi mode only).
4. You can restore the parameters of the wireless network specified before resetting to factory defaults. To do this, click the RESTORE button.
Figure 38. The page for configuring the wireless network.
Page 54 of 262
DSL-G2452GR MU-MIMO Wireless Dual Band VDSL2 Router with ASDL2+/3G/LTE/Gigabit Ethernet WAN Support, 2 FXS Ports and USB Port
User Manual
Configuring via Web-based Interface
5. If you want to create an additional wireless network isolated from your LAN in the 2.4GHz band, select the Enable guest network checkbox.
Figure 39. The page for configuring the wireless network.
6. In the Network name field, specify your own name for the guest wireless network or leave the value suggested by the router.
7. If you want to create a password for access to the guest wireless network, deselect the Open network checkbox and fill in the Password field.
8. If you want to limit the bandwidth of the guest wireless network, select the Enable shaping checkbox and fill in the Shaping field.
9. Click the NEXT button to continue or click the BACK button to specify other settings. 10. On the Wireless Network 5 GHz page, specify needed settings for the wireless network
in the 5GHz band and click the NEXT button.
Page 55 of 262
DSL-G2452GR MU-MIMO Wireless Dual Band VDSL2 Router with ASDL2+/3G/LTE/Gigabit Ethernet WAN Support, 2 FXS Ports and USB Port
User Manual
Configuring via Web-based Interface
Configuring LAN Ports for IPTV/VoIP
This configuration step is available for the ADSL, VDSL, Ethernet (WAN), Ethernet (LAN), and Wi-Fi modes.
1. On the IPTV page, select the Is an STB connected to the device checkbox.
Figure 40. The page for selecting a LAN port to connect an IPTV set-top box.
2. Select a free LAN port for connecting your set-top box. 3. For the VDSL, Ethernet (WAN), Ethernet (LAN), Wi-Fi modes: If the IPTV service is
provided via a VLAN channel, select the Use VLAN ID checkbox and fill in the VLAN ID field. 4. For the ADSL mode: Specify the VPI and VCI values in the relevant fields. 5. Click the NEXT button to continue or click the BACK button to specify other settings.
Page 56 of 262
DSL-G2452GR MU-MIMO Wireless Dual Band VDSL2 Router with ASDL2+/3G/LTE/Gigabit Ethernet WAN Support, 2 FXS Ports and USB Port
User Manual
Configuring via Web-based Interface
6. On the VoIP page, select the Is an IP phone connected to the device checkbox.
Figure 41. The page for selecting a LAN port to connect a VoIP phone.
7. Select a free LAN port for connecting your IP phone. 8. For the VDSL, Ethernet (WAN), Ethernet (LAN), Wi-Fi modes: If the IPTV service is
provided via a VLAN channel, select the Use VLAN ID checkbox and fill in the VLAN ID field. 9. For the ADSL mode: Specify the VPI and VCI values in the relevant fields. 10. Click the NEXT button to continue or click the BACK button to specify other settings.
Page 57 of 262
DSL-G2452GR MU-MIMO Wireless Dual Band VDSL2 Router with ASDL2+/3G/LTE/Gigabit Ethernet WAN Support, 2 FXS Ports and USB Port
User Manual
Configuring via Web-based Interface
Changing Web-based Interface Password
On this page, you should change the default administrator password. To do this, enter a new password in the Admin password and Password confirmation fields. You may set any password except admin. Use digits, Latin letters (uppercase and/or lowercase), and other characters available in the US keyboard layout.8
Figure 42. The page for changing the web-based interface password.
Remember or write down the new password for the administrator account. In case of losing
! the new password, you can access the settings of the router only after restoring the factory default settings via the hardware RESET button. This procedure wipes out all settings that you have configured for your router. Click the NEXT button to continue or click the BACK button to return to the previous page. On the next page, check all specified settings. Also you can save a text file with parameters set by the Wizard to your PC. To do this, click the SAVE CONFIGURATION FILE button and follow the dialog box appeared. To finish the Wizard, click the APPLY button. The router will apply settings and reboot. Click the BACK button to specify other settings.
8 0-9, A-Z, a-z, space, !"#$%&'()*+,-./:;<=>?@[\]^_`{|}~. Page 58 of 262
DSL-G2452GR MU-MIMO Wireless Dual Band VDSL2 Router with ASDL2+/3G/LTE/Gigabit Ethernet WAN Support, 2 FXS Ports and USB Port
User Manual
Configuring via Web-based Interface
If the Wizard has configured a WAN connection, after clicking the APPLY button, the page for checking the Internet availability opens.
Figure 43. Checking the Internet availability.
If the router has been successfully connected to the Internet, click the FINISH button.
If problems appeared when connecting to the Internet, click the CHECK AGAIN button to recheck the state of the WAN connection.
If problems of connection have not been solved, contact the technical support of your ISP (as a rule, the technical support phone is provided with the agreement) or the D-Link technical support (the phone number will be displayed on the page after several attempts of checking the connection).
To specify other settings, click the ADVANCED SETTINGS button. After clicking the ADVANCED SETTINGS button, the Home page opens (see the Home Page section, page 36).
Page 59 of 262
DSL-G2452GR MU-MIMO Wireless Dual Band VDSL2 Router with ASDL2+/3G/LTE/Gigabit Ethernet WAN Support, 2 FXS Ports and USB Port
User Manual
Configuring via Web-based Interface
Connection of Multimedia Devices
The Multimedia Devices Connection Wizard helps to configure LAN ports or available wireless interfaces of the router for connecting additional devices, for example, an IPTV set-top box or IP phone. Contact your ISP to clarify if you need to configure DSL-G2452GR in order to use these devices.
To start the Wizard, on the Home page, select the Connection of Multimedia Devices section.
Figure 44. The Multimedia Devices Connection Wizard. Page 60 of 262
DSL-G2452GR MU-MIMO Wireless Dual Band VDSL2 Router with ASDL2+/3G/LTE/Gigabit Ethernet WAN Support, 2 FXS Ports and USB Port User Manual
In the WAN section, click the Add icon ( ).
Configuring via Web-based Interface
Figure 45. Adding a connection.
You can specify the following parameters:
Parameter
Description
Name
A name for the connection for easier identification (you can specify any name).
Interface
Select the WAN value or the value corresponding to the LAN port specified as the WAN port for connection to an Ethernet line.
Select the PTM value for connection to a VDSL line or the ATM value for connection to an ADSL line.
For the ATM value only. VPI
Virtual Path Identifier. The valid range is from 0 to 255.
For the ATM value only. VCI
Virtual Circuit Identifier. The valid range is from 32 to 65535.
Encapsulation
For the ATM value only. Select LLC or VCMUX from the drop-down list.
QoS class
For the ATM value only.
A class of traffic for this connection.
UBR
(Unspecified Bit Rate): The UBR service is used for applications that allow various delays and losses of packets. It is appropriate to use the UBR service for text/data/image transfer applications, as well as messaging, distribution, retrieval, and remote terminal applications.
Page 61 of 262
DSL-G2452GR MU-MIMO Wireless Dual Band VDSL2 Router with ASDL2+/3G/LTE/Gigabit Ethernet WAN Support, 2 FXS Ports and USB Port
User Manual
Configuring via Web-based Interface
Parameter
VLAN ID VLAN priority
Allowed Click the SAVE button.
Description
UBR with PCR
(Unspecified Bit Rate with Peak Cell Rate): The UBR service is used for applications that allow various delays and losses of packets. The Peak Cell Rate is a determining factor in how often cells are sent in an effort to minimize lag or jitter caused by traffic inconsistencies. When you select this value from the drop-down list, the Peak cell rate field is displayed. Specify a required value (in cells per second).
CBR
(Constant Bit Rate): This service is used for applications that require a constant data rate. It is mostly used for transferring uncompressed audio and video, e.g. videoconferencing, interactive audio (telephony), audio/video distribution (television, distance education, e-shops), and retrieval (video-on demand, audio libraries). When you select this value from the drop-down list, the Peak cell rate field is displayed. Specify a required value (in cells per second).
Non Realtime VBR
(Non-Real-time Variable Bit Rate): This service can be used for transferring data that have critical response-time requirements, e.g. air ticket booking, bank transactions, and process monitoring. When you select this value from the drop-down list, the Peak cell rate, Sustainable cell rate, and Maximum burst size fields are displayed. Specify required values.
Realtime VBR
(Real-time Variable Bit Rate): This service is used for delay-sensitive applications such as real time video. The Rt-VBR provides higher network flexibility than the CBR service. When you select this value from the drop-down list, the Peak cell rate, Sustainable cell rate, and Maximum burst size fields are displayed. Specify required values.
If the service used by your additional equipment is provided via a VLAN channel with a tag (VLAN ID), specify the needed value.
A priority tag for the type of traffic transmitted.
Move the switch to the right to enable the connection.
Move the switch to the left to disable the connection.
Page 62 of 262
DSL-G2452GR MU-MIMO Wireless Dual Band VDSL2 Router with ASDL2+/3G/LTE/Gigabit Ethernet WAN Support, 2 FXS Ports and USB Port
User Manual
Configuring via Web-based Interface
Then in the LAN section, from the Bridged with drop-down list of the element corresponding to the LAN port or wireless interface to which the additional device is connected, select the created connection. Click the APPLY button.
! The selected port or wireless interface cannot use the default connection to access the Internet.
To deselect the port or wireless interface, select the No value from the Bridged with drop-down list of the element corresponding to the needed LAN port or interface. Then in the WAN section, select the connection which will not be used any longer and click the REMOVE button. Then click the APPLY button.
Page 63 of 262
DSL-G2452GR MU-MIMO Wireless Dual Band VDSL2 Router with ASDL2+/3G/LTE/Gigabit Ethernet WAN Support, 2 FXS Ports and USB Port
User Manual
Configuring via Web-based Interface
Statistics
The pages of this section display data on the current state of the router: · network statistics
· IP addresses leased by the DHCP server
· the routing table
· data on devices connected to the router's network and its web-based interface, and information on current sessions of these devices
· addresses of active multicast groups
· DSL connection status.
Network Statistics
On the Statistics / Network Statistics page, you can view statistics for all connections existing in the system (WAN connections, LAN, WLAN). For each connection the following data are displayed: name and state (when the connection is on, its name is highlighted in green, when the connection is off, its name is highlighted in red), IP address and subnet mask, gateway (if the connection is established), MAC address, and volume of data received and transmitted (with increase of the volume the units of measurement are changed automatically: byte, Kbyte, Mbyte, Gbyte).
Figure 46. The Statistics / Network Statistics page.
To view data on a connection, click the line corresponding to this connection.
Page 64 of 262
DSL-G2452GR MU-MIMO Wireless Dual Band VDSL2 Router with ASDL2+/3G/LTE/Gigabit Ethernet WAN Support, 2 FXS Ports and USB Port
User Manual
Configuring via Web-based Interface
DHCP
The Statistics / DHCP page displays the information on computers that have been identified by hostnames and MAC addresses and have got IP addresses from the DHCP server of the device.
Figure 47. The Statistics / DHCP page.
Page 65 of 262
DSL-G2452GR MU-MIMO Wireless Dual Band VDSL2 Router with ASDL2+/3G/LTE/Gigabit Ethernet WAN Support, 2 FXS Ports and USB Port
User Manual
Configuring via Web-based Interface
Routing Table
The Statistics / Routing Table page displays the information on routes. The table contains destination IP addresses, gateways, subnet masks, and other data.
Figure 48. The Statistics / Routing Table page.
Page 66 of 262
DSL-G2452GR MU-MIMO Wireless Dual Band VDSL2 Router with ASDL2+/3G/LTE/Gigabit Ethernet WAN Support, 2 FXS Ports and USB Port
User Manual
Configuring via Web-based Interface
Clients and Session
On the Statistics / Clients and Session page, you can view the list of devices connected to the local network of the router and information on current sessions of each device.
Figure 49. The Statistics / Clients and Session page.
For each device the following data are displayed: the IP address, the MAC address, and the network interface to which the device is connected.
To view the information on current sessions of a device, select this device in the table. On the opened page, the following data for each session of the selected device will be displayed: the protocol for network packet transmission, the source IP address and port, and the destination IP address and port.
Page 67 of 262
DSL-G2452GR MU-MIMO Wireless Dual Band VDSL2 Router with ASDL2+/3G/LTE/Gigabit Ethernet WAN Support, 2 FXS Ports and USB Port
User Manual
Configuring via Web-based Interface
Multicast Groups
The Statistics / Multicast Groups page displays addresses of active multicast groups (including IPTV channels and groups for transferring service information) to which the device is subscribed, and the interface through which the device is subscribed.
Figure 50. The Statistics / Multicast Groups page.
Page 68 of 262
DSL-G2452GR MU-MIMO Wireless Dual Band VDSL2 Router with ASDL2+/3G/LTE/Gigabit Ethernet WAN Support, 2 FXS Ports and USB Port
User Manual
Configuring via Web-based Interface
DSL Status
The information shown on the Statistics / DSL Status page can be used for troubleshooting and diagnosing connection problems.
In the DSL Status and Line sections you can view data on your DSL line: the line state, data transfer rate (downstream/upstream traffic), physical parameters of the line (SNR, output power). The Framing section displays information on transmitted DSL frames.
Figure 51. The Statistics / DSL Status page.
Page 69 of 262
DSL-G2452GR MU-MIMO Wireless Dual Band VDSL2 Router with ASDL2+/3G/LTE/Gigabit Ethernet WAN Support, 2 FXS Ports and USB Port
User Manual
Configuring via Web-based Interface
Connections Setup
In this menu you can configure basic parameters of the router's local area network and configure connection to the Internet (a WAN connection).
WAN
On the Connections Setup / WAN page, you can create and edit connections used by the router. By default, Ethernet, VDSL, and ADSL connections of the Dynamic IPv4 type are configured in the system. They are assigned to the WAN and DSL ports of the router correspondingly. You can edit these connections or delete them.
! Please reboot the router after creating, editing, or removing an ADSL WAN connection.
Figure 52. The Connections Setup / WAN page. The advanced mode.
To create a new connection, click the ADD button ( ) in the Connections List section. Upon that the connection creation page opens. To edit an existing connection, in the Connections List section, left-click the relevant line in the table. On the opened page, on the Basic tab, the mandatory settings of this WAN connection will be displayed. To view all available settings of the WAN connection, go to the All Settings tab. Change the needed parameters and click the APPLY button. To disconnect a connection and establish it again, select the checkbox located to the left of the relevant line in the table and click the RECONNECT button. To remove a connection, in the Connections List section, select the checkbox located to the left of the relevant line in the table and click the DELETE button ( ). Also you can remove a connection on the editing page.
Page 70 of 262
DSL-G2452GR MU-MIMO Wireless Dual Band VDSL2 Router with ASDL2+/3G/LTE/Gigabit Ethernet WAN Support, 2 FXS Ports and USB Port
User Manual
Configuring via Web-based Interface
To allow multicast traffic (e.g. streaming video) for a connection, click the IGMP link (for the description of the page, see the IGMP section, page 192).
To use one of existing WAN connections as the default IPv4 or IPv6 connection, in the Default Gateway section, select the choice of the radio button which corresponds to this connection.
To return to the simplified mode, click the SIMPLIFIED MODE button (the button is unavailable if several WAN connections are created).
Figure 53. The Connections Setup / WAN page. The simplified mode.
To edit an existing connection, click the EDIT button. On the opened page, on the Basic tab, the mandatory settings of this connection will be displayed. To view all available settings of the WAN connection, go to the All Settings tab. Change the needed parameters and click the APPLY button.
To disconnect a connection and establish it again, click the RECONNECT button.
To remove an existing connection and create a new one, click the CHANGE CONFIGURATION button. Upon that the connection creation page opens.
To create several WAN connections, go to the advanced mode. To do this, click the ADVANCED MODE button.
! When connections of some types are created, the Connections Setup / WAN page is automatically displayed in the advanced mode.
Page 71 of 262
DSL-G2452GR MU-MIMO Wireless Dual Band VDSL2 Router with ASDL2+/3G/LTE/Gigabit Ethernet WAN Support, 2 FXS Ports and USB Port
User Manual
Configuring via Web-based Interface
Creating Dynamic IPv4, Static IPv4, or IPoA WAN Connection
On the connection creation page, go to the All Settings tab. Then select the relevant value from the Connection type drop-down list and specify the needed values.
Figure 54. The page for creating a new Static IPv4 connection. Selecting a connection type.
Parameter
Description
Interface
For the Dynamic IPv4 and Static IPv4 types only.
A physical interface to which the new connection will be assigned.
In order to create an Ethernet WAN connection, select the WAN value or the value corresponding to the LAN port specified as the WAN port.
In order to create a VDSL WAN connection, select the PTM value.
In order to create an ADSL WAN connection, select the value corresponding to the existing interface or the Add new ATM PVC value for creating a new interface at the physical layer.
Enable connection
Move the switch to the right to enable the connection. Move the switch to the left to disable the connection.
Connection name
Available for the advanced mode only. A name for the connection for easier identification.
Page 72 of 262
DSL-G2452GR MU-MIMO Wireless Dual Band VDSL2 Router with ASDL2+/3G/LTE/Gigabit Ethernet WAN Support, 2 FXS Ports and USB Port
User Manual
Configuring via Web-based Interface
The Ethernet section is displayed for Ethernet WAN connections.
Figure 55. The page for creating a new Static IPv4 connection. The Ethernet section.
Parameter
Description
Ethernet
MAC address
A MAC address assigned to the interface. This parameter is mandatory if your ISP uses MAC address binding. In the field, enter the MAC address registered by your ISP upon concluding the agreement.
To set the MAC address of the network interface card (of the computer that is being used to configure the router at the moment) as the MAC address of the WAN interface, move the Clone MAC address of your NIC switch to the right. When the switch is moved to the right, the field is unavailable for editing.
To set the router's MAC address, click the RESTORE DEFAULT MAC ADDRESS button (the button is available when the switch is moved to the right).
MTU
The maximum size of units transmitted by the interface.
Page 73 of 262
DSL-G2452GR MU-MIMO Wireless Dual Band VDSL2 Router with ASDL2+/3G/LTE/Gigabit Ethernet WAN Support, 2 FXS Ports and USB Port User Manual
The PTM section is displayed for VDSL WAN connections.
Configuring via Web-based Interface
Figure 56. The page for creating a new Static IPv4 connection. The PTM section.
Parameter
Description
PTM
MAC address
A MAC address assigned to the interface. This parameter is mandatory if your ISP uses MAC address binding. In the field, enter the MAC address registered by your ISP upon concluding the agreement.
To set the MAC address of the network interface card (of the computer that is being used to configure the router at the moment) as the MAC address of the WAN interface, move the Clone MAC address of your NIC switch to the right. When the switch is moved to the right, the field is unavailable for editing.
To set the router's MAC address, click the RESTORE DEFAULT MAC ADDRESS button (the button is available when the switch is moved to the right).
Page 74 of 262
DSL-G2452GR MU-MIMO Wireless Dual Band VDSL2 Router with ASDL2+/3G/LTE/Gigabit Ethernet WAN Support, 2 FXS Ports and USB Port User Manual
The ATM section is displayed for ADSL WAN connections.
Configuring via Web-based Interface
Figure 57. The page for creating a new Static IPv4 connection. The ATM section.
Parameter
Description
ATM
VPI
Virtual Path Identifier. The valid range is from 0 to 255.
VCI
Virtual Circuit Identifier. The valid range is from 32 to 65535.
Encapsulation Mode Select LLC or VCMUX from the drop-down list.
QoS class
A class of traffic for this connection.
UBR
(Unspecified Bit Rate): The UBR service is used for applications that allow various delays and losses of packets. It is appropriate to use the UBR service for text/data/image transfer applications, as well as messaging, distribution, retrieval, and remote terminal applications.
UBR with PCR
(Unspecified Bit Rate with Peak Cell Rate): The UBR service is used for applications that allow various delays and losses of packets. The Peak Cell Rate is a determining factor in how often cells are sent in an effort to minimize lag or jitter caused by traffic inconsistencies. When you select this value from the drop-down list, the Peak Cell Rate field is displayed. Specify a required value (in cells per second).
CBR
(Constant Bit Rate): This service is used for applications that require a constant data rate. It is mostly used for transferring uncompressed audio and video, e.g. videoconferencing, interactive audio (telephony), audio/video distribution (television, distance education, e-shops), and retrieval (video-on demand, audio
Page 75 of 262
DSL-G2452GR MU-MIMO Wireless Dual Band VDSL2 Router with ASDL2+/3G/LTE/Gigabit Ethernet WAN Support, 2 FXS Ports and USB Port
User Manual
Configuring via Web-based Interface
Parameter
Description
libraries). When you select this value from the drop-down list, the Peak Cell Rate field is displayed. Specify a required value (in cells per second).
Non Realtime VBR
(Non-Real-time Variable Bit Rate): This service can be used for transferring data that have critical response-time requirements, e.g. air ticket booking, bank transactions, and process monitoring. When you select this value from the drop-down list, the Peak Cell Rate, Sustainable Cell Rate, and Maximum Burst Size fields are displayed. Specify required values.
Realtime VBR
(Real-time Variable Bit Rate): This service is used for delaysensitive applications such as real time video. The Rt-VBR provides higher network flexibility than the CBR service. When you select this value from the drop-down list, the Peak Cell Rate, Sustainable Cell Rate, and Maximum Burst Size fields are displayed. Specify required values.
Page 76 of 262
DSL-G2452GR MU-MIMO Wireless Dual Band VDSL2 Router with ASDL2+/3G/LTE/Gigabit Ethernet WAN Support, 2 FXS Ports and USB Port
User Manual
Configuring via Web-based Interface
The Authorization via 802.1x Protocol section is displayed for the Dynamic IPv4 and Static IPv4 types.
Figure 58. The page for creating a new Static IPv4 connection. The Authorization via 802.1x Protocol section.
Parameter
Description
Authorization via 802.1x Protocol
Enable authorization Move the switch to the right to allow authorization in the ISP's via 802.1x protocol network via the 802.1x protocol.
Authentication method
Select a needed authentication method from the drop-down list.
Username
Enter the username provided by your ISP.
Password
Enter the password provided by your ISP.
Page 77 of 262
DSL-G2452GR MU-MIMO Wireless Dual Band VDSL2 Router with ASDL2+/3G/LTE/Gigabit Ethernet WAN Support, 2 FXS Ports and USB Port
User Manual
Configuring via Web-based Interface
Figure 59. The page for creating a new Static IPv4 connection. The IPv4 section.
Parameter
Description
IPv4
For Static IPv4 and IPoA types
IP address
Enter an IP address for this WAN connection.
Subnet mask
Enter a subnet mask for this WAN connection.
Gateway IP address Enter an IP address of the gateway used by this WAN connection.
Primary DNS / Secondary DNS
Enter addresses of the primary and secondary DNS servers in the relevant fields.
For Dynamic IPv4 type
Obtain DNS server addresses
automatically
Move the switch to the right to configure automatic assignment of DNS server addresses. Upon that the Primary DNS and Secondary DNS fields are not available for editing.
Primary DNS / Secondary DNS
Enter addresses of the primary and secondary DNS servers in the relevant fields.
Vendor ID
The identifier of your ISP. Optional.
Hostname
A name of the router specified by your ISP. Optional.
Page 78 of 262
DSL-G2452GR MU-MIMO Wireless Dual Band VDSL2 Router with ASDL2+/3G/LTE/Gigabit Ethernet WAN Support, 2 FXS Ports and USB Port
User Manual
Configuring via Web-based Interface
Figure 60. The page for creating a new Static IPv4 connection. The Miscellaneous section.
Parameter
Description
Miscellaneous
NAT
If the switch is moved to the right, the network address translation function is enabled. Do not disable the function unless your ISP requires this.
Firewall
If the switch is moved to the right, protection against external connections for the LAN devices is enabled (for example, against attempts to get information about the LAN devices or to hack a device from the LAN). For security reasons, it is recommended not to disable this function.
RIP
Move the switch to the right to allow using RIP for this connection.
Ping
If the switch is moved to the right, the router responds to ping requests from the external network through this connection. For security reasons, it is recommended to disable this function.
Page 79 of 262
DSL-G2452GR MU-MIMO Wireless Dual Band VDSL2 Router with ASDL2+/3G/LTE/Gigabit Ethernet WAN Support, 2 FXS Ports and USB Port
User Manual
Configuring via Web-based Interface
The VLAN section is displayed for the Dynamic IPv4 and Static IPv4 types.
Figure 61. The page for creating a new Static IPv4 connection. The VLAN section.
Parameter
Description
VLAN
Use VLAN
Move the switch to the right to allow the router to use tagged VLAN connections.
VLAN ID
An identifier for the VLAN. The field is displayed when the Use VLAN switch is moved to the right.
VLAN priority
A priority tag for the type of traffic transmitted. The field is displayed when the Use VLAN switch is moved to the right.
When all needed settings are configured, click the APPLY button.
Page 80 of 262
DSL-G2452GR MU-MIMO Wireless Dual Band VDSL2 Router with ASDL2+/3G/LTE/Gigabit Ethernet WAN Support, 2 FXS Ports and USB Port
User Manual
Configuring via Web-based Interface
Creating Dynamic IPv6 or Static IPv6 WAN Connection
On the connection creation page, go to the All Settings tab. Then select the relevant value from the Connection type drop-down list and specify the needed values.
Figure 62. The page for creating a new Static IPv6 connection. Selecting a connection type.
Parameter
Description
Interface
A physical interface to which the new connection will be assigned.
In order to create an Ethernet WAN connection, select the WAN value or the value corresponding to the LAN port specified as the WAN port.
In order to create a VDSL WAN connection, select the PTM value.
In order to create an ADSL WAN connection, select the value corresponding to the existing interface or the Add new ATM PVC value for creating a new interface at the physical layer.
Enable connection
Move the switch to the right to enable the connection. Move the switch to the left to disable the connection.
Connection name
Available for the advanced mode only. A name for the connection for easier identification.
Page 81 of 262
DSL-G2452GR MU-MIMO Wireless Dual Band VDSL2 Router with ASDL2+/3G/LTE/Gigabit Ethernet WAN Support, 2 FXS Ports and USB Port
User Manual
Configuring via Web-based Interface
The Ethernet section is displayed for Ethernet WAN connections.
Figure 63. The page for creating a new Static IPv6 connection. The Ethernet section.
Parameter
Description
Ethernet
MAC address
A MAC address assigned to the interface. This parameter is mandatory if your ISP uses MAC address binding. In the field, enter the MAC address registered by your ISP upon concluding the agreement.
To set the MAC address of the network interface card (of the computer that is being used to configure the router at the moment) as the MAC address of the WAN interface, move the Clone MAC address of your NIC switch to the right. When the switch is moved to the right, the field is unavailable for editing.
To set the router's MAC address, click the RESTORE DEFAULT MAC ADDRESS button (the button is available when the switch is moved to the right).
MTU
The maximum size of units transmitted by the interface.
Page 82 of 262
DSL-G2452GR MU-MIMO Wireless Dual Band VDSL2 Router with ASDL2+/3G/LTE/Gigabit Ethernet WAN Support, 2 FXS Ports and USB Port User Manual
The PTM section is displayed for VDSL WAN connections.
Configuring via Web-based Interface
Figure 64. The page for creating a new Static IPv6 connection. The PTM section.
Parameter
Description
PTM
MAC address
A MAC address assigned to the interface. This parameter is mandatory if your ISP uses MAC address binding. In the field, enter the MAC address registered by your ISP upon concluding the agreement.
To set the MAC address of the network interface card (of the computer that is being used to configure the router at the moment) as the MAC address of the WAN interface, move the Clone MAC address of your NIC switch to the right. When the switch is moved to the right, the field is unavailable for editing.
To set the router's MAC address, click the RESTORE DEFAULT MAC ADDRESS button (the button is available when the switch is moved to the right).
Page 83 of 262
DSL-G2452GR MU-MIMO Wireless Dual Band VDSL2 Router with ASDL2+/3G/LTE/Gigabit Ethernet WAN Support, 2 FXS Ports and USB Port User Manual
The ATM section is displayed for ADSL WAN connections.
Configuring via Web-based Interface
Figure 65. The page for creating a new Static IPv6 connection. The ATM section.
Parameter
Description
ATM
VPI
Virtual Path Identifier. The valid range is from 0 to 255.
VCI
Virtual Circuit Identifier. The valid range is from 32 to 65535.
Encapsulation Mode Select LLC or VCMUX from the drop-down list.
QoS class
A class of traffic for this connection.
UBR
(Unspecified Bit Rate): The UBR service is used for applications that allow various delays and losses of packets. It is appropriate to use the UBR service for text/data/image transfer applications, as well as messaging, distribution, retrieval, and remote terminal applications.
UBR with PCR
(Unspecified Bit Rate with Peak Cell Rate): The UBR service is used for applications that allow various delays and losses of packets. The Peak Cell Rate is a determining factor in how often cells are sent in an effort to minimize lag or jitter caused by traffic inconsistencies. When you select this value from the drop-down list, the Peak Cell Rate field is displayed. Specify a required value (in cells per second).
CBR
(Constant Bit Rate): This service is used for applications that require a constant data rate. It is mostly used for transferring uncompressed audio and video, e.g. videoconferencing, interactive audio (telephony), audio/video distribution (television, distance education, e-shops), and retrieval (video-on demand, audio
Page 84 of 262
DSL-G2452GR MU-MIMO Wireless Dual Band VDSL2 Router with ASDL2+/3G/LTE/Gigabit Ethernet WAN Support, 2 FXS Ports and USB Port
User Manual
Configuring via Web-based Interface
Parameter
Description
libraries). When you select this value from the drop-down list, the Peak Cell Rate field is displayed. Specify a required value (in cells per second).
Non Realtime VBR
(Non-Real-time Variable Bit Rate): This service can be used for transferring data that have critical response-time requirements, e.g. air ticket booking, bank transactions, and process monitoring. When you select this value from the drop-down list, the Peak Cell Rate, Sustainable Cell Rate, and Maximum Burst Size fields are displayed. Specify required values.
Realtime VBR
(Real-time Variable Bit Rate): This service is used for delaysensitive applications such as real time video. The Rt-VBR provides higher network flexibility than the CBR service. When you select this value from the drop-down list, the Peak Cell Rate, Sustainable Cell Rate, and Maximum Burst Size fields are displayed. Specify required values.
Page 85 of 262
DSL-G2452GR MU-MIMO Wireless Dual Band VDSL2 Router with ASDL2+/3G/LTE/Gigabit Ethernet WAN Support, 2 FXS Ports and USB Port
User Manual
Configuring via Web-based Interface
Figure 66. The page for creating a new Static IPv6 connection. The IPv6 section.
Parameter
Description
IPv6
For Static IPv6 type
IPv6 Address
Enter an IPv6 address for this WAN connection.
Prefix
The length of the subnet prefix. The value 64 is used usually.
Gateway IPv6 address Enter an IPv6 address of the gateway used by this WAN connection.
Primary IPv6 DNS server/Secondary IPv6
DNS server
Enter addresses of the primary and secondary IPv6 DNS servers in the relevant fields.
For Dynamic IPv6 type
Get IPv6
Select a method for IPv6 address assignment from the drop-down list or leave the Automatically value.
Gateway by SLAAC
Move the switch to the right to automatically assign the IPv6 gateway address with help of SLAAC (Stateless Address Autoconfiguration).
Gateway IPv6 address
The address of the IPv6 gateway. The field is available for editing, if the Gateway by SLAAC switch is moved to the left.
Obtain DNS server addresses
automatically
Move the switch to the right to configure automatic assignment of IPv6 DNS server addresses. Upon that the Primary IPv6 DNS server and Secondary IPv6 DNS server fields are not available for editing.
Page 86 of 262
DSL-G2452GR MU-MIMO Wireless Dual Band VDSL2 Router with ASDL2+/3G/LTE/Gigabit Ethernet WAN Support, 2 FXS Ports and USB Port
User Manual
Configuring via Web-based Interface
Parameter
Description
Primary IPv6 DNS server/Secondary IPv6
DNS server
Enter addresses of the primary and secondary IPv6 DNS servers in the relevant fields.
Figure 67. The page for creating a new Static IPv6 connection. The Miscellaneous section.
Parameter
Description
Miscellaneous
Firewall
If the switch is moved to the right, protection against external connections for the LAN devices is enabled (for example, against attempts to get information about the LAN devices or to hack a device from the LAN). For security reasons, it is recommended not to disable this function.
RIP
Move the switch to the right to allow using RIP for this connection.
Ping
If the switch is moved to the right, the router responds to ping requests from the external network through this connection. For security reasons, it is recommended to disable this function.
Page 87 of 262
DSL-G2452GR MU-MIMO Wireless Dual Band VDSL2 Router with ASDL2+/3G/LTE/Gigabit Ethernet WAN Support, 2 FXS Ports and USB Port
User Manual
Configuring via Web-based Interface
Figure 68. The page for creating a new Static IPv6 connection. The VLAN section.
Parameter
Description
VLAN
Use VLAN
Move the switch to the right to allow the router to use tagged VLAN connections.
VLAN ID
An identifier for the VLAN. The field is displayed when the Use VLAN switch is moved to the right.
VLAN priority
A priority tag for the type of traffic transmitted. The field is displayed when the Use VLAN switch is moved to the right.
When all needed settings are configured, click the APPLY button.
Page 88 of 262
DSL-G2452GR MU-MIMO Wireless Dual Band VDSL2 Router with ASDL2+/3G/LTE/Gigabit Ethernet WAN Support, 2 FXS Ports and USB Port
User Manual
Configuring via Web-based Interface
Creating PPPoE or PPPoA WAN Connection
On the connection creation page, go to the All Settings tab. Then select the relevant value from the Connection type drop-down list and specify the needed values.
Figure 69. The page for creating a new PPPoE connection. Selecting a connection type.
Parameter
Description
Interface
For the PPPoE type only.
A physical interface to which the new connection will be assigned.
In order to create an Ethernet WAN connection, select the WAN value or the value corresponding to the LAN port specified as the WAN port.
In order to create a VDSL WAN connection, select the PTM value.
In order to create an ADSL WAN connection, select the value corresponding to the existing interface or the Add new ATM PVC value for creating a new interface at the physical layer.
Enable connection
Move the switch to the right to enable the connection. Move the switch to the left to disable the connection.
Connection name
Available for the advanced mode only. A name for the connection for easier identification.
Page 89 of 262
DSL-G2452GR MU-MIMO Wireless Dual Band VDSL2 Router with ASDL2+/3G/LTE/Gigabit Ethernet WAN Support, 2 FXS Ports and USB Port
User Manual
Configuring via Web-based Interface
The Ethernet section is displayed for Ethernet WAN connections.
Figure 70. The page for creating a new PPPoE connection. The Ethernet section.
Parameter
Description
Ethernet
MAC address
A MAC address assigned to the interface. This parameter is mandatory if your ISP uses MAC address binding. In the field, enter the MAC address registered by your ISP upon concluding the agreement.
To set the MAC address of the network interface card (of the computer that is being used to configure the router at the moment) as the MAC address of the WAN interface, move the Clone MAC address of your NIC switch to the right. When the switch is moved to the right, the field is unavailable for editing.
To set the router's MAC address, click the RESTORE DEFAULT MAC ADDRESS button (the button is available when the switch is moved to the right).
MTU
The maximum size of units transmitted by the interface.
Page 90 of 262
DSL-G2452GR MU-MIMO Wireless Dual Band VDSL2 Router with ASDL2+/3G/LTE/Gigabit Ethernet WAN Support, 2 FXS Ports and USB Port User Manual
The PTM section is displayed for VDSL WAN connections.
Configuring via Web-based Interface
Figure 71. The page for creating a new PPPoE connection. The PTM section.
Parameter
Description
PTM
MAC address
A MAC address assigned to the interface. This parameter is mandatory if your ISP uses MAC address binding. In the field, enter the MAC address registered by your ISP upon concluding the agreement.
To set the MAC address of the network interface card (of the computer that is being used to configure the router at the moment) as the MAC address of the WAN interface, move the Clone MAC address of your NIC switch to the right. When the switch is moved to the right, the field is unavailable for editing.
To set the router's MAC address, click the RESTORE DEFAULT MAC ADDRESS button (the button is available when the switch is moved to the right).
Page 91 of 262
DSL-G2452GR MU-MIMO Wireless Dual Band VDSL2 Router with ASDL2+/3G/LTE/Gigabit Ethernet WAN Support, 2 FXS Ports and USB Port User Manual
The ATM section is displayed for ADSL WAN connections.
Configuring via Web-based Interface
Figure 72. The page for creating a new PPPoE connection. The ATM section.
Parameter
Description
ATM
VPI
Virtual Path Identifier. The valid range is from 0 to 255.
VCI
Virtual Circuit Identifier. The valid range is from 32 to 65535.
Encapsulation Mode Select LLC or VCMUX from the drop-down list.
QoS class
A class of traffic for this connection.
UBR
(Unspecified Bit Rate): The UBR service is used for applications that allow various delays and losses of packets. It is appropriate to use the UBR service for text/data/image transfer applications, as well as messaging, distribution, retrieval, and remote terminal applications.
UBR with PCR
(Unspecified Bit Rate with Peak Cell Rate): The UBR service is used for applications that allow various delays and losses of packets. The Peak Cell Rate is a determining factor in how often cells are sent in an effort to minimize lag or jitter caused by traffic inconsistencies. When you select this value from the drop-down list, the Peak Cell Rate field is displayed. Specify a required value (in cells per second).
CBR
(Constant Bit Rate): This service is used for applications that require a constant data rate. It is mostly used for transferring uncompressed audio and video, e.g. videoconferencing, interactive audio (telephony), audio/video distribution (television, distance education, e-shops), and retrieval (video-on demand, audio
Page 92 of 262
DSL-G2452GR MU-MIMO Wireless Dual Band VDSL2 Router with ASDL2+/3G/LTE/Gigabit Ethernet WAN Support, 2 FXS Ports and USB Port
User Manual
Configuring via Web-based Interface
Parameter
Description
libraries). When you select this value from the drop-down list, the Peak Cell Rate field is displayed. Specify a required value (in cells per second).
Non Realtime VBR
(Non-Real-time Variable Bit Rate): This service can be used for transferring data that have critical response-time requirements, e.g. air ticket booking, bank transactions, and process monitoring. When you select this value from the drop-down list, the Peak Cell Rate, Sustainable Cell Rate, and Maximum Burst Size fields are displayed. Specify required values.
Realtime VBR
(Real-time Variable Bit Rate): This service is used for delaysensitive applications such as real time video. The Rt-VBR provides higher network flexibility than the CBR service. When you select this value from the drop-down list, the Peak Cell Rate, Sustainable Cell Rate, and Maximum Burst Size fields are displayed. Specify required values.
Page 93 of 262
DSL-G2452GR MU-MIMO Wireless Dual Band VDSL2 Router with ASDL2+/3G/LTE/Gigabit Ethernet WAN Support, 2 FXS Ports and USB Port
User Manual
Configuring via Web-based Interface
Figure 73. The page for creating a new PPPoE connection. The PPP section.
Parameter
Description
PPP
Without authorization
Move the switch to the right if you don't need to enter a username and password to access the Internet.
Username
A username (login) to access the Internet.
Password
A password to access the Internet. Click the Show icon ( ) to display the entered password.
Service name
For the PPPoE type only. The name of the PPPoE authentication server.
MTU
The maximum size of units transmitted by the interface.
Authentication protocol
Select a required authentication method from the drop-down list or leave the AUTO value.
Page 94 of 262
DSL-G2452GR MU-MIMO Wireless Dual Band VDSL2 Router with ASDL2+/3G/LTE/Gigabit Ethernet WAN Support, 2 FXS Ports and USB Port
User Manual
Configuring via Web-based Interface
Parameter Keep Alive
Dial on demand PPP IP extension
PPP debug
Description
Move the switch to the right if you want the router to keep you connected to your ISP even when the connection has been inactive for a specified period of time. If the switch is moved to the right, the LCP interval and LCP fails fields are available. Specify the required values.
Move the switch to the right if you want the router to establish connection to the Internet on demand. In the Maximum idle time field, specify a period of inactivity (in seconds) after which the connection should be terminated.
This option is used by some ISPs. Contact your ISP to clarify if this option needs to be enabled. If it is required, move the switch to the right.
Move the switch to the right if you want to log all data on PPP connection debugging.
Page 95 of 262
DSL-G2452GR MU-MIMO Wireless Dual Band VDSL2 Router with ASDL2+/3G/LTE/Gigabit Ethernet WAN Support, 2 FXS Ports and USB Port
User Manual
Configuring via Web-based Interface
Figure 74. The page for creating a new PPPoE connection. The Miscellaneous section.
Parameter
Description
Miscellaneous
NAT
If the switch is moved to the right, the network address translation function is enabled. Do not disable the function unless your ISP requires this.
Firewall
If the switch is moved to the right, protection against external connections for the LAN devices is enabled (for example, against attempts to get information about the LAN devices or to hack a device from the LAN). For security reasons, it is recommended not to disable this function.
RIP
Move the switch to the right to allow using RIP for this connection.
Ping
If the switch is moved to the right, the router responds to ping requests from the external network through this connection. For security reasons, it is recommended to disable this function.
Page 96 of 262
DSL-G2452GR MU-MIMO Wireless Dual Band VDSL2 Router with ASDL2+/3G/LTE/Gigabit Ethernet WAN Support, 2 FXS Ports and USB Port User Manual
The VLAN section is displayed for the PPPoE type.
Configuring via Web-based Interface
Figure 75. The page for creating a new PPPoE connection. The VLAN section.
Parameter
Description
VLAN
Use VLAN
Move the switch to the right to allow the router to use tagged VLAN connections.
VLAN ID
An identifier for the VLAN. The field is displayed when the Use VLAN switch is moved to the right.
VLAN priority
A priority tag for the type of traffic transmitted. The field is displayed when the Use VLAN switch is moved to the right.
When all needed settings are configured, click the APPLY button.
Page 97 of 262
DSL-G2452GR MU-MIMO Wireless Dual Band VDSL2 Router with ASDL2+/3G/LTE/Gigabit Ethernet WAN Support, 2 FXS Ports and USB Port
User Manual
Configuring via Web-based Interface
Creating PPTP or L2TP WAN Connection
On the connection creation page, go to the All Settings tab. Then select the relevant value from the Connection type drop-down list and specify the needed values.
Figure 76. The page for creating a new PPTP connection. Selecting a connection type.
Parameter
Description
Enable connection
Move the switch to the right to enable the connection. Move the switch to the left to disable the connection.
Connection name
Available for the advanced mode only. A name for the connection for easier identification.
Page 98 of 262
DSL-G2452GR MU-MIMO Wireless Dual Band VDSL2 Router with ASDL2+/3G/LTE/Gigabit Ethernet WAN Support, 2 FXS Ports and USB Port
User Manual
Configuring via Web-based Interface
Figure 77. The page for creating a new PPTP connection. The PPP section.
Parameter
Description
PPP
Without authorization
Move the switch to the right if you don't need to enter a username and password to access the Internet.
Username
A username (login) to access the Internet.
Password
A password to access the Internet. Click the Show icon ( ) to display the entered password.
VPN server address The IP or URL address of the PPTP or L2TP authentication server.
MTU
The maximum size of units transmitted by the interface.
Authentication protocol
Select a required authentication method from the drop-down list or leave the AUTO value.
Page 99 of 262
DSL-G2452GR MU-MIMO Wireless Dual Band VDSL2 Router with ASDL2+/3G/LTE/Gigabit Ethernet WAN Support, 2 FXS Ports and USB Port
User Manual
Configuring via Web-based Interface
Parameter
Encryption protocol
Keep Alive Dial on demand
Extra options PPP debug
Enable MPPC
Description
Select a method of MPPE encryption.
· No encryption: MPPE encryption is not applied.
· MPPE 40/128 bit: MPPE encryption with a 40-bit or 128bit key is applied.
· MPPE 40 bit: MPPE encryption with a 40-bit key is applied.
· MPPE 128 bit: MPPE encryption with a 128-bit key is applied.
MPPE encryption can be applied only if the MS-CHAP, MSCHAPV2, or AUTO value is selected from the Authentication protocol drop-down list.
Move the switch to the right if you want the router to keep you connected to your ISP even when the connection has been inactive for a specified period of time. If the switch is moved to the right, the LCP interval and LCP fails fields are available. Specify the required values.
Move the switch to the right if you want the router to establish connection to the Internet on demand. In the Maximum idle time field, specify a period of inactivity (in seconds) after which the connection should be terminated.
Advanced options of the pppd daemon which need to be specified for this connection. Optional.
Move the switch to the right if you want to log all data on PPP connection debugging.
(Microsoft Point-to-Point Compression)
For the PPTP type only.
Move the switch to the right if it is necessary to use the data compression function in order to configure the connection.
Move the switch to the left to disable the function.
Page 100 of 262
DSL-G2452GR MU-MIMO Wireless Dual Band VDSL2 Router with ASDL2+/3G/LTE/Gigabit Ethernet WAN Support, 2 FXS Ports and USB Port
User Manual
Configuring via Web-based Interface
Figure 78. The page for creating a new PPTP connection. The Miscellaneous section.
Parameter
Description
Miscellaneous
NAT
If the switch is moved to the right, the network address translation function is enabled. Do not disable the function unless your ISP requires this.
Firewall
If the switch is moved to the right, protection against external connections for the LAN devices is enabled (for example, against attempts to get information about the LAN devices or to hack a device from the LAN). For security reasons, it is recommended not to disable this function.
RIP
Move the switch to the right to allow using RIP for this connection.
Ping
If the switch is moved to the right, the router responds to ping requests from the external network through this connection. For security reasons, it is recommended to disable this function.
When all needed settings are configured, click the APPLY button.
After clicking the button, the window for additional configuration of the connection opens.
If you want to use this WAN connection to access the Internet, select the to the Internet choice of the radio button. Then select the existing connection which will be used to access the PPTP/L2TP server or select the create a new connection choice of the radio button.
Click the OK button.
Page 101 of 262
DSL-G2452GR MU-MIMO Wireless Dual Band VDSL2 Router with ASDL2+/3G/LTE/Gigabit Ethernet WAN Support, 2 FXS Ports and USB Port
User Manual
Configuring via Web-based Interface
Creating PPPoE IPv6 or PPPoE Dual Stack WAN Connection
On the connection creation page, go to the All Settings tab. Then select the relevant value from the Connection type drop-down list and specify the needed values.
Figure 79. The page for creating a new PPPoE IPv6 connection. Selecting a connection type.
Parameter
Description
Interface
A physical interface to which the new connection will be assigned.
In order to create an Ethernet WAN connection, select the WAN value or the value corresponding to the LAN port specified as the WAN port.
In order to create a VDSL WAN connection, select the PTM value.
In order to create an ADSL WAN connection, select the value corresponding to the existing interface or the Add new ATM PVC value for creating a new interface at the physical layer.
Enable connection
Move the switch to the right to enable the connection. Move the switch to the left to disable the connection.
Connection name
Available for the advanced mode only. A name for the connection for easier identification.
Page 102 of 262
DSL-G2452GR MU-MIMO Wireless Dual Band VDSL2 Router with ASDL2+/3G/LTE/Gigabit Ethernet WAN Support, 2 FXS Ports and USB Port
User Manual
Configuring via Web-based Interface
The Ethernet section is displayed for Ethernet WAN connections.
Figure 80. The page for creating a new PPPoE IPv6 connection. The Ethernet section.
Parameter
Description
Ethernet
MAC address
A MAC address assigned to the interface. This parameter is mandatory if your ISP uses MAC address binding. In the field, enter the MAC address registered by your ISP upon concluding the agreement.
To set the MAC address of the network interface card (of the computer that is being used to configure the router at the moment) as the MAC address of the WAN interface, move the Clone MAC address of your NIC switch to the right. When the switch is moved to the right, the field is unavailable for editing.
To set the router's MAC address, click the RESTORE DEFAULT MAC ADDRESS button (the button is available when the switch is moved to the right).
MTU
The maximum size of units transmitted by the interface.
Page 103 of 262
DSL-G2452GR MU-MIMO Wireless Dual Band VDSL2 Router with ASDL2+/3G/LTE/Gigabit Ethernet WAN Support, 2 FXS Ports and USB Port User Manual
The PTM section is displayed for VDSL WAN connections.
Configuring via Web-based Interface
Figure 81. The page for creating a new PPPoE IPv6 connection. The PTM section.
Parameter
Description
PTM
MAC address
A MAC address assigned to the interface. This parameter is mandatory if your ISP uses MAC address binding. In the field, enter the MAC address registered by your ISP upon concluding the agreement.
To set the MAC address of the network interface card (of the computer that is being used to configure the router at the moment) as the MAC address of the WAN interface, move the Clone MAC address of your NIC switch to the right. When the switch is moved to the right, the field is unavailable for editing.
To set the router's MAC address, click the RESTORE DEFAULT MAC ADDRESS button (the button is available when the switch is moved to the right).
Page 104 of 262
DSL-G2452GR MU-MIMO Wireless Dual Band VDSL2 Router with ASDL2+/3G/LTE/Gigabit Ethernet WAN Support, 2 FXS Ports and USB Port User Manual
The ATM section is displayed for ADSL WAN connections.
Configuring via Web-based Interface
Figure 82. The page for creating a new PPPoE IPv6 connection. The ATM section.
Parameter
Description
ATM
VPI
Virtual Path Identifier. The valid range is from 0 to 255.
VCI
Virtual Circuit Identifier. The valid range is from 32 to 65535.
Encapsulation Mode Select LLC or VCMUX from the drop-down list.
QoS class
A class of traffic for this connection.
UBR
(Unspecified Bit Rate): The UBR service is used for applications that allow various delays and losses of packets. It is appropriate to use the UBR service for text/data/image transfer applications, as well as messaging, distribution, retrieval, and remote terminal applications.
UBR with PCR
(Unspecified Bit Rate with Peak Cell Rate): The UBR service is used for applications that allow various delays and losses of packets. The Peak Cell Rate is a determining factor in how often cells are sent in an effort to minimize lag or jitter caused by traffic inconsistencies. When you select this value from the drop-down list, the Peak Cell Rate field is displayed. Specify a required value (in cells per second).
CBR
(Constant Bit Rate): This service is used for applications that require a constant data rate. It is mostly used for transferring uncompressed audio and video, e.g. videoconferencing, interactive audio (telephony), audio/video distribution (television, distance education, e-shops), and retrieval (video-on demand, audio
Page 105 of 262
DSL-G2452GR MU-MIMO Wireless Dual Band VDSL2 Router with ASDL2+/3G/LTE/Gigabit Ethernet WAN Support, 2 FXS Ports and USB Port
User Manual
Configuring via Web-based Interface
Parameter
Description
libraries). When you select this value from the drop-down list, the Peak Cell Rate field is displayed. Specify a required value (in cells per second).
Non Realtime VBR
(Non-Real-time Variable Bit Rate): This service can be used for transferring data that have critical response-time requirements, e.g. air ticket booking, bank transactions, and process monitoring. When you select this value from the drop-down list, the Peak Cell Rate, Sustainable Cell Rate, and Maximum Burst Size fields are displayed. Specify required values.
Realtime VBR
(Real-time Variable Bit Rate): This service is used for delaysensitive applications such as real time video. The Rt-VBR provides higher network flexibility than the CBR service. When you select this value from the drop-down list, the Peak Cell Rate, Sustainable Cell Rate, and Maximum Burst Size fields are displayed. Specify required values.
Page 106 of 262
DSL-G2452GR MU-MIMO Wireless Dual Band VDSL2 Router with ASDL2+/3G/LTE/Gigabit Ethernet WAN Support, 2 FXS Ports and USB Port
User Manual
Configuring via Web-based Interface
Figure 83. The page for creating a new PPPoE IPv6 connection. The PPP section.
Parameter
Description
PPP
Without authorization
Move the switch to the right if you don't need to enter a username and password to access the Internet.
Username
A username (login) to access the Internet.
Password
A password to access the Internet. Click the Show icon ( ) to display the entered password.
Service name
The name of the PPPoE authentication server.
MTU
The maximum size of units transmitted by the interface.
Authentication protocol
Select a required authentication method from the drop-down list or leave the AUTO value.
Keep Alive
Move the switch to the right if you want the router to keep you connected to your ISP even when the connection has been inactive for a specified period of time. If the switch is moved to the right, the LCP interval and LCP fails fields are available. Specify the required values.
Page 107 of 262
DSL-G2452GR MU-MIMO Wireless Dual Band VDSL2 Router with ASDL2+/3G/LTE/Gigabit Ethernet WAN Support, 2 FXS Ports and USB Port
User Manual
Configuring via Web-based Interface
Parameter Dial on demand
PPP IP extension PPP debug
Description
Move the switch to the right if you want the router to establish connection to the Internet on demand. In the Maximum idle time field, specify a period of inactivity (in seconds) after which the connection should be terminated.
This option is used by some ISPs. Contact your ISP to clarify if this option needs to be enabled. If it is required, move the switch to the right.
Move the switch to the right if you want to log all data on PPP connection debugging.
Page 108 of 262
DSL-G2452GR MU-MIMO Wireless Dual Band VDSL2 Router with ASDL2+/3G/LTE/Gigabit Ethernet WAN Support, 2 FXS Ports and USB Port
User Manual
Configuring via Web-based Interface
Figure 84. The page for creating a new PPPoE Pv6 connection. The IP section.
Parameter
Description
IP
Get IPv6
Select a method for IPv6 address assignment from the drop-down list or leave the Automatically value.
Gateway by SLAAC
Move the switch to the right to automatically assign the IPv6 gateway address with help of SLAAC (Stateless Address Autoconfiguration).
Gateway IPv6 address
The address of the IPv6 gateway. The field is available for editing, if the Gateway by SLAAC switch is moved to the left.
Obtain DNS server addresses
automatically
Move the switch to the right to configure automatic assignment of IPv6 DNS server addresses. Upon that the Primary IPv6 DNS server and Secondary IPv6 DNS server fields are not available for editing.
Primary IPv6 DNS server/Secondary IPv6
DNS server
Enter addresses of the primary and secondary IPv6 DNS servers in the relevant fields.
Page 109 of 262
DSL-G2452GR MU-MIMO Wireless Dual Band VDSL2 Router with ASDL2+/3G/LTE/Gigabit Ethernet WAN Support, 2 FXS Ports and USB Port
User Manual
Configuring via Web-based Interface
Figure 85. The page for creating a new PPPoE IPv6 connection. The Miscellaneous section.
Parameter
Description
Miscellaneous
NAT
For the PPPoE Dual Stack type only.
If the switch is moved to the right, the network address translation function is enabled. Do not disable the function unless your ISP requires this.
Firewall
If the switch is moved to the right, protection against external connections for the LAN devices is enabled (for example, against attempts to get information about the LAN devices or to hack a device from the LAN). For security reasons, it is recommended not to disable this function.
RIP
Move the switch to the right to allow using RIP for this connection.
Ping
If the switch is moved to the right, the router responds to ping requests from the external network through this connection. For security reasons, it is recommended to disable this function.
Page 110 of 262
DSL-G2452GR MU-MIMO Wireless Dual Band VDSL2 Router with ASDL2+/3G/LTE/Gigabit Ethernet WAN Support, 2 FXS Ports and USB Port
User Manual
Configuring via Web-based Interface
Figure 86. The page for creating a new PPPoE IPv6 connection. The VLAN section.
Parameter
Description
VLAN
Use VLAN
Move the switch to the right to allow the router to use tagged VLAN connections.
VLAN ID
An identifier for the VLAN. The field is displayed when the Use VLAN switch is moved to the right.
VLAN priority
A priority tag for the type of traffic transmitted. The field is displayed when the Use VLAN switch is moved to the right.
When all needed settings are configured, click the APPLY button.
Page 111 of 262
DSL-G2452GR MU-MIMO Wireless Dual Band VDSL2 Router with ASDL2+/3G/LTE/Gigabit Ethernet WAN Support, 2 FXS Ports and USB Port
User Manual
Configuring via Web-based Interface
Creating Bridge WAN Connection
On the connection creation page, go to the All Settings tab. Then select the relevant value from the Connection type drop-down list and specify the needed values.
Figure 87. The page for creating a new Bridge connection. Selecting a connection type.
Parameter
Description
Interface
A physical interface to which the new connection will be assigned.
In order to create an Ethernet WAN connection, select the WAN value or the value corresponding to the LAN port specified as the WAN port.
In order to create a VDSL WAN connection, select the PTM value.
In order to create an ADSL WAN connection, select the value corresponding to the existing interface or the Add new ATM PVC value for creating a new interface at the physical layer.
Enable connection
Move the switch to the right to enable the connection. Move the switch to the left to disable the connection.
Connection name
Available for the advanced mode only. A name for the connection for easier identification.
Page 112 of 262
DSL-G2452GR MU-MIMO Wireless Dual Band VDSL2 Router with ASDL2+/3G/LTE/Gigabit Ethernet WAN Support, 2 FXS Ports and USB Port
User Manual
Configuring via Web-based Interface
The Ethernet section is displayed for Ethernet WAN connections.
Figure 88. The page for creating a new Bridge connection. The Ethernet section.
Parameter
Description
Ethernet
MAC address
A MAC address assigned to the interface. This parameter is mandatory if your ISP uses MAC address binding. In the field, enter the MAC address registered by your ISP upon concluding the agreement.
To set the MAC address of the network interface card (of the computer that is being used to configure the router at the moment) as the MAC address of the WAN interface, move the Clone MAC address of your NIC switch to the right. When the switch is moved to the right, the field is unavailable for editing.
To set the router's MAC address, click the RESTORE DEFAULT MAC ADDRESS button (the button is available when the switch is moved to the right).
MTU
The maximum size of units transmitted by the interface.
Page 113 of 262
DSL-G2452GR MU-MIMO Wireless Dual Band VDSL2 Router with ASDL2+/3G/LTE/Gigabit Ethernet WAN Support, 2 FXS Ports and USB Port User Manual
The PTM section is displayed for VDSL WAN connections.
Configuring via Web-based Interface
Figure 89. The page for creating a new Bridge connection. The PTM section.
Parameter
Description
PTM
MAC address
A MAC address assigned to the interface. This parameter is mandatory if your ISP uses MAC address binding. In the field, enter the MAC address registered by your ISP upon concluding the agreement.
To set the MAC address of the network interface card (of the computer that is being used to configure the router at the moment) as the MAC address of the WAN interface, move the Clone MAC address of your NIC switch to the right. When the switch is moved to the right, the field is unavailable for editing.
To set the router's MAC address, click the RESTORE DEFAULT MAC ADDRESS button (the button is available when the switch is moved to the right).
Page 114 of 262
DSL-G2452GR MU-MIMO Wireless Dual Band VDSL2 Router with ASDL2+/3G/LTE/Gigabit Ethernet WAN Support, 2 FXS Ports and USB Port User Manual
The ATM section is displayed for ADSL WAN connections.
Configuring via Web-based Interface
Figure 90. The page for creating a new Bridge connection. The ATM section.
Parameter
Description
ATM
VPI
Virtual Path Identifier. The valid range is from 0 to 255.
VCI
Virtual Circuit Identifier. The valid range is from 32 to 65535.
Encapsulation Mode Select LLC or VCMUX from the drop-down list.
QoS class
A class of traffic for this connection.
UBR
(Unspecified Bit Rate): The UBR service is used for applications that allow various delays and losses of packets. It is appropriate to use the UBR service for text/data/image transfer applications, as well as messaging, distribution, retrieval, and remote terminal applications.
UBR with PCR
(Unspecified Bit Rate with Peak Cell Rate): The UBR service is used for applications that allow various delays and losses of packets. The Peak Cell Rate is a determining factor in how often cells are sent in an effort to minimize lag or jitter caused by traffic inconsistencies. When you select this value from the drop-down list, the Peak Cell Rate field is displayed. Specify a required value (in cells per second).
CBR
(Constant Bit Rate): This service is used for applications that require a constant data rate. It is mostly used for transferring uncompressed audio and video, e.g. videoconferencing, interactive audio (telephony), audio/video distribution (television, distance education, e-shops), and retrieval (video-on demand, audio
Page 115 of 262
DSL-G2452GR MU-MIMO Wireless Dual Band VDSL2 Router with ASDL2+/3G/LTE/Gigabit Ethernet WAN Support, 2 FXS Ports and USB Port
User Manual
Configuring via Web-based Interface
Parameter
Description
libraries). When you select this value from the drop-down list, the Peak Cell Rate field is displayed. Specify a required value (in cells per second).
Non Realtime VBR
(Non-Real-time Variable Bit Rate): This service can be used for transferring data that have critical response-time requirements, e.g. air ticket booking, bank transactions, and process monitoring. When you select this value from the drop-down list, the Peak Cell Rate, Sustainable Cell Rate, and Maximum Burst Size fields are displayed. Specify required values.
Realtime VBR
(Real-time Variable Bit Rate): This service is used for delaysensitive applications such as real time video. The Rt-VBR provides higher network flexibility than the CBR service. When you select this value from the drop-down list, the Peak Cell Rate, Sustainable Cell Rate, and Maximum Burst Size fields are displayed. Specify required values.
Page 116 of 262
DSL-G2452GR MU-MIMO Wireless Dual Band VDSL2 Router with ASDL2+/3G/LTE/Gigabit Ethernet WAN Support, 2 FXS Ports and USB Port
User Manual
Configuring via Web-based Interface
Figure 91. The page for creating a new Bridge connection. The VLAN section.
Parameter
Description
VLAN
Use VLAN
Move the switch to the right to allow the router to use tagged VLAN connections.
VLAN ID
An identifier for the VLAN. The field is displayed when the Use VLAN switch is moved to the right.
VLAN priority
A priority tag for the type of traffic transmitted. The field is displayed when the Use VLAN switch is moved to the right.
When all needed settings are configured, click the APPLY button.
Page 117 of 262
DSL-G2452GR MU-MIMO Wireless Dual Band VDSL2 Router with ASDL2+/3G/LTE/Gigabit Ethernet WAN Support, 2 FXS Ports and USB Port
User Manual
Configuring via Web-based Interface
Creating 3G WAN Connection
If the PIN code check is enabled for the SIM card inserted into your USB modem, then prior to creating a 3G WAN connection, go to the USB Modem menu and enter the PIN code9 on the page displayed (see the USB Modem section, page 171). Then on the connection creation page, go to the All Settings tab, select the relevant value from the Connection type drop-down list, and specify the needed values.
Figure 92. The page for creating a new 3G connection. Selecting a connection type.
Parameter
Description
Enable connection
Move the switch to the right to enable the connection. Move the switch to the left to disable the connection.
Connection name
Available for the advanced mode only. A name for the connection for easier identification.
9 For some models of 3G USB modems it is required to disable the PIN code check on the SIM card prior to connecting the USB modem to the router.
Page 118 of 262
DSL-G2452GR MU-MIMO Wireless Dual Band VDSL2 Router with ASDL2+/3G/LTE/Gigabit Ethernet WAN Support, 2 FXS Ports and USB Port
User Manual
Configuring via Web-based Interface
Figure 93. The page for creating a new 3G connection. The USB Modem section.
Parameter
Description
USB Modem
Mode
The value of the field specifies the type of the network to which the router connects. Leave the Auto value to let the router connect automatically to an available type of network, or select a needed value from the drop-down list.
APN
An access point name.
Dial number
A number dialed to connect to the authorization server of the operator.
Figure 94. The page for creating a new 3G connection. The PPP section. Page 119 of 262
DSL-G2452GR MU-MIMO Wireless Dual Band VDSL2 Router with ASDL2+/3G/LTE/Gigabit Ethernet WAN Support, 2 FXS Ports and USB Port
User Manual
Configuring via Web-based Interface
Parameter
Description
PPP
Without authorization
Move the switch to the right if your operator does not require authorization.
Username
A username (login) to connect to the network of the operator.
Password
A password to connect to the network of the operator. Click the Show icon ( ) to display the entered password.
MTU
The maximum size of units transmitted by the interface.
Authentication protocol
Select a required authentication method from the drop-down list or leave the AUTO value.
Keep Alive
Move the switch to the right if you want the router to keep you connected to the network of your operator even when the connection has been inactive for a specified period of time. When the checkbox is selected, the LCP interval and LCP fails fields are available. Specify the required values.
Dial on demand
Move the switch to the right if you want the router to establish connection to the Internet on demand. In the Maximum idle time field, specify a period of inactivity (in seconds) after which the connection should be terminated.
PPP debug
Move the switch to the right if you want to log all data on PPP connection debugging.
Page 120 of 262
DSL-G2452GR MU-MIMO Wireless Dual Band VDSL2 Router with ASDL2+/3G/LTE/Gigabit Ethernet WAN Support, 2 FXS Ports and USB Port
User Manual
Configuring via Web-based Interface
Figure 95. The page for creating a new 3G connection. The Miscellaneous section.
Parameter
Description
Miscellaneous
NAT
If the switch is moved to the right, the network address translation function is enabled. Do not disable the function unless your ISP requires this.
Firewall
If the switch is moved to the right, protection against external connections for the LAN devices is enabled (for example, against attempts to get information about the LAN devices or to hack a device from the LAN). For security reasons, it is recommended not to disable this function.
Ping
If the switch is moved to the right, the router responds to ping requests from the external network through this connection. For security reasons, it is recommended to disable this function.
When all needed settings are configured, click the APPLY button.
Page 121 of 262
DSL-G2452GR MU-MIMO Wireless Dual Band VDSL2 Router with ASDL2+/3G/LTE/Gigabit Ethernet WAN Support, 2 FXS Ports and USB Port
User Manual
Configuring via Web-based Interface
Creating LTE WAN Connection
If the PIN code check is enabled for the SIM card inserted into your USB modem, then prior to creating an LTE WAN connection, go to the USB Modem menu and enter the PIN code10 on the page displayed (see the USB Modem section, page 171). Then on the connection creation page, go to the All Settings tab, select the relevant value from the Connection type drop-down list, and specify the needed values.
Figure 96. The page for creating a new LTE connection. Selecting a connection type.
Parameter
Description
Enable connection
Move the switch to the right to enable the connection. Move the switch to the left to disable the connection.
Connection name
Available for the advanced mode only. A name for the connection for easier identification.
10 For some models of LTE USB modems it is required to disable the PIN code check on the SIM card prior to connecting the USB modem to the router.
Page 122 of 262
DSL-G2452GR MU-MIMO Wireless Dual Band VDSL2 Router with ASDL2+/3G/LTE/Gigabit Ethernet WAN Support, 2 FXS Ports and USB Port
User Manual
Configuring via Web-based Interface
Figure 97. The page for creating a new LTE connection. The USB Modem section.
Parameter
Description
USB Modem
Mode
The value of the field specifies the type of the network to which the router connects. Leave the Auto value to let the router connect automatically to an available type of network, or select a needed value from the drop-down list.11
APN
An access point name.
Without authorization
Move the switch to the right if your operator does not require authorization.
Authentication protocol
Select a required authentication method from the drop-down list.
Username
A username (login) to connect to the network of the operator.
Password
A password to connect to the network of the operator. Click the Show icon ( ) to display the entered password.
11 Some LTE USB modems do not support network type selection and work in the Auto mode regardless of the value selected from the drop-down list.
Page 123 of 262
DSL-G2452GR MU-MIMO Wireless Dual Band VDSL2 Router with ASDL2+/3G/LTE/Gigabit Ethernet WAN Support, 2 FXS Ports and USB Port
User Manual
Configuring via Web-based Interface
Figure 98. The page for creating a new LTE connection. The IPv4 section.
Parameter
Description
IPv4
Obtain DNS server addresses
automatically
Move the switch to the right to configure automatic assignment of DNS server addresses. Upon that the Primary DNS and Secondary DNS fields are not available for editing.
Primary DNS/ Secondary DNS
Enter addresses of the primary and secondary DNS servers in the relevant fields.
Vendor ID
The identifier of your ISP. Optional.
Hostname
A name of the router specified by your ISP. Optional.
Page 124 of 262
DSL-G2452GR MU-MIMO Wireless Dual Band VDSL2 Router with ASDL2+/3G/LTE/Gigabit Ethernet WAN Support, 2 FXS Ports and USB Port
User Manual
Configuring via Web-based Interface
Figure 99. The page for creating a new LTE connection. The Miscellaneous section.
Parameter
Description
Miscellaneous
NAT
If the switch is moved to the right, the network address translation function is enabled. Do not disable the function unless your ISP requires this.
Firewall
If the switch is moved to the right, protection against external connections for the LAN devices is enabled (for example, against attempts to get information about the LAN devices or to hack a device from the LAN). For security reasons, it is recommended not to disable this function.
Ping
If the switch is moved to the right, the router responds to ping requests from the external network through this connection. For security reasons, it is recommended to disable this function.
When all needed settings are configured, click the APPLY button.
Page 125 of 262
DSL-G2452GR MU-MIMO Wireless Dual Band VDSL2 Router with ASDL2+/3G/LTE/Gigabit Ethernet WAN Support, 2 FXS Ports and USB Port
User Manual
Configuring via Web-based Interface
LAN
To configure the router's local interface, go to the Connections Setup / LAN page.
IPv4 Go to the IPv4 tab to change IPv4 address, configure the built-in DHCP server, or specify MAC address and IP address pairs.
Figure 100. Configuring the local interface. The IPv4 tab. The Local IP Address section.
Parameter
Description
Local IP Address
IP address Mask
The IP address of the router in the local subnet. By default, the following value is specified: 192.168.1.1.
The mask of the local subnet. By default, the following value is specified: 255.255.255.0.
Hostname
The name of the device attached to its IP address in the local subnet.
Figure 101. Configuring the local interface. The IPv4 tab. The Dynamic IP Addresses section. Page 126 of 262
DSL-G2452GR MU-MIMO Wireless Dual Band VDSL2 Router with ASDL2+/3G/LTE/Gigabit Ethernet WAN Support, 2 FXS Ports and USB Port
User Manual
Configuring via Web-based Interface
Parameter
Description
Dynamic IP Addresses
An operating mode of the router's DHCP server.
Disable: the router's DHCP server is disabled, clients' IP addresses are assigned manually.
Mode of dynamic IP address assignment
DHCP server: the router assigns IP addresses to clients automatically in accordance with the specified parameters. When this value is selected, the Start IP, End IP, Lease time fields and the DNS relay switch are displayed on the tab.
DHCP relay: an external DHCP server is used to assign IP addresses to clients. When this value is selected, the External DHCP server IP and Option 82 Remote ID fields are displayed on the tab.
Start IP
The start IP address of the address pool used by the DHCP server to distribute IP addresses to clients.
End IP
The end IP address of the address pool used by the DHCP server to distribute IP addresses to clients.
Lease time
The lifetime of IP addresses leased by the DHCP server. At the end of this period the leased IP address is revoked and can be distributed to another device, unless the previous device has confirmed the need to keep the address.
DNS Relay
Move the switch to the right so that the devices connected to the router obtain the address of the router as the DNS server address.
Move the switch to the left so that the devices connected to the router obtain the address transmitted by the ISP or specified on the Advanced / DNS page as the DNS server address.
The IP address of the external DHCP server which assigns IP addresses to the router's clients.
External DHCP server IP
To specify several IP addresses, click the ADD button, and in the line displayed, enter an IP address.
To remove the IP address, click the Delete icon ( ) in the line of the address.
Option 82 Remote ID
The value of the Remote ID field of DHCP option 82 in accordance with RFC3046.
Do not fill in the field unless your ISP or the administrator of the external DHCP server provided this value.
When all needed settings are configured, click the APPLY button.
Page 127 of 262
DSL-G2452GR MU-MIMO Wireless Dual Band VDSL2 Router with ASDL2+/3G/LTE/Gigabit Ethernet WAN Support, 2 FXS Ports and USB Port
User Manual
Configuring via Web-based Interface
In the DHCP Options section, you can change default values for some options of DHCP protocol (IP address, subnet mask, DNS servers) or specify additional parameters which the built-in DHCP server should send to clients to configure the local network.
Figure 102. The section for configuring DHCP options.
To do this, click the ADD button ( ).
Figure 103. The window for configuring a DHCP option.
In the opened window, you can specify the following parameters:
Parameter
Description
Known DHCP options
From the drop-down list, select an option which you want to configure.
Options value
Specify the value for the selected option.
Force
Move the switch to the left to let the DHCP server send the selected option only when the client requests it.
After specifying the needed parameters, click the APPLY button.
To edit the parameters of an option, left-click the relevant line in the table. In the opened window, change the needed parameters and click the APPLY button.
To remove the value of an option, select the checkbox located to the left of the relevant line in the
table and click the DELETE button ( ). Then click the APPLY button.
Page 128 of 262
DSL-G2452GR MU-MIMO Wireless Dual Band VDSL2 Router with ASDL2+/3G/LTE/Gigabit Ethernet WAN Support, 2 FXS Ports and USB Port
User Manual
Configuring via Web-based Interface
In the Static IP Addresses section, you can specify MAC address and IPv4 address pairs (set a fixed IPv4 address in the local area network for a device with a certain MAC address). The router assigns IPv4 addresses in accordance with the specified pairs only when the DHCP server is enabled (in the Dynamic IP Addresses section, the DHCP server value is selected from the Mode of dynamic IP address assignment drop-down list).
Figure 104. The section for creating MAC-IPv4 pairs.
To create a MAC-IPv4 pair, click the ADD button ( ). In the opened window, in the IP address field, enter an IPv4 address which will be assigned to the device from the LAN, then in the MAC address field, enter the MAC address of this device. In the Hostname field, specify a network name of the device for easier identification (optional). Click the APPLY button.
In order to view MAC addresses of the devices connected to the router at the moment, click the CLIENTS LIST button. In the opened window, select the needed device and click the OK button. To view the latest list of the connected devices, click the REFRESH button.
To edit the settings for the existing MAC-IPv4 pair, left-click the relevant line in the table. In the opened window, change the needed parameters and click the APPLY button.
To remove a MAC-IPv4 pair, select the checkbox located to the left of the relevant line in the table
and click the DELETE button ( ). Then click the APPLY button. Also you can remove a MACIPv4 pair in the editing window.
Page 129 of 262
DSL-G2452GR MU-MIMO Wireless Dual Band VDSL2 Router with ASDL2+/3G/LTE/Gigabit Ethernet WAN Support, 2 FXS Ports and USB Port
User Manual
Configuring via Web-based Interface
IPv6
Go to the IPv6 tab to change IPv6 address of the router and configure IPv6 addresses assignment settings.
Figure 105. Configuring the local interface. The IPv6 tab. The Local IPv6 Address section.
Parameter
Description
Local IPv6 Address
Mode of local IPv6 address assignment
IPv6 address
Prefix
Select the needed value from the drop-down list.
Static: an IPv6 address and a prefix are specified manually.
Prefix delegation: the router requests a prefix to configure an IPv6 address from a delegating router.
The IPv6 address of the router in the local subnet. By default, the following value is specified: fd01::1. The field is available for editing if the Static value is selected from the Mode of local IPv6 address assignment drop-down list.
The length of the prefix subnet. By default, the value 64 is specified. The field is available for editing if the Static value is selected from the Mode of local IPv6 address assignment drop-down list.
Page 130 of 262
DSL-G2452GR MU-MIMO Wireless Dual Band VDSL2 Router with ASDL2+/3G/LTE/Gigabit Ethernet WAN Support, 2 FXS Ports and USB Port
User Manual
Configuring via Web-based Interface
Figure 106. Configuring the local interface. The IPv6 tab. The Dynamic IPv6 Addresses section.
Parameter
Description
Dynamic IPv6 Addresses
Select the needed value from the drop-down list.
Disable: clients' IPv6 addresses are assigned manually.
Mode of dynamic IPv6 address assignment
Stateful: the built-in DHCPv6 server of the router allocates addresses from the range specified in the Start IPv6 and End IPv6 fields.
Stateless: clients themselves configure IPv6 addresses using the prefix.
Start IPv6
The start IPv6 address of the address pool used by the DHCPv6 server to distribute addresses to clients.
End IPv6
The end IPv6 address of the address pool used by the DHCPv6 server to distribute addresses to clients.
Lease time
The lifetime of IPv6 addresses provided to clients. The field is available for editing if the Static value is selected from the Mode of local IPv6 address assignment list in the Local IPv6 Address section.
When all needed settings are configured, click the APPLY button.
Page 131 of 262
DSL-G2452GR MU-MIMO Wireless Dual Band VDSL2 Router with ASDL2+/3G/LTE/Gigabit Ethernet WAN Support, 2 FXS Ports and USB Port
User Manual
Configuring via Web-based Interface
In the Static IP Addresses section, you can specify MAC address and IPv6 address pairs (set a fixed IPv6 address in the local area network for a device with a certain MAC address). The router assigns IPv6 addresses in accordance with the specified pairs only when the Stateful value is selected from the Mode of dynamic IPv6 address assignment drop-down list in the Dynamic IPv6 Addresses section.
Figure 107. The section for creating MAC-IPv6 pairs.
To create a MAC-IPv6 pair, click the ADD button ( ). In the opened window, in the IP address field, enter an IPv6 address which will be assigned to the device from the LAN, then in the MAC address field, enter the MAC address of this device. In the Hostname field, specify a network name of the device for easier identification (optional). Click the APPLY button.
In order to view MAC addresses of the devices connected to the router at the moment, click the CLIENTS LIST button. In the opened window, select the needed device and click the OK button. To view the latest list of the connected devices, click the REFRESH button.
To edit the settings for the existing MAC-IPv6 pair, left-click the relevant line in the table. In the opened window, change the needed parameters and click the APPLY button.
To remove a MAC-IPv6 pair, select the checkbox located to the left of the relevant line in the table
and click the DELETE button ( ). Then click the APPLY button. Also you can remove a MACIPv6 pair in the editing window.
Page 132 of 262
DSL-G2452GR MU-MIMO Wireless Dual Band VDSL2 Router with ASDL2+/3G/LTE/Gigabit Ethernet WAN Support, 2 FXS Ports and USB Port
User Manual
Configuring via Web-based Interface
WAN Reservation
On the Connections Setup / WAN Reservation page, you can enable the WAN backup function, which provides you with uninterrupted access to the Internet. When your main connection breaks down, the router activates the backup connection; and when the main channel is recovered, the router switches to it and disconnects the reserve one.
Figure 108. The Connections Setup / WAN Reservation page.
To activate the backup function, create the main and the reserve WAN connections. After that go to the Connections Setup / WAN Reservation page, move the Enable switch to the right, and specify the needed values in the fields displayed on the page.
Parameter
Description
Basic connection Backup connection
Test host
From the drop-down list, select a WAN connection which will be used as the main one.
From the drop-down list, select a WAN connection which will be used as the reserve one.
An IP address that the router will check for availability via ICMP ping mechanism.
Check interval
A time period (in seconds) between attempts to check the status of the main connection. By default, the value 10 is specified.
Timeout check
A time period (in seconds) for an attempt to check the status of the main connection. At the end of this period the router's internal system makes a decision to enable/disable the reserve channel. By default, the value 3 is specified.
Number of inspections of active connection
A number of requests that will be sent in order to analyze the status of the main connection when the connection is active (the router uses the main connection as a default gateway).
Page 133 of 262
DSL-G2452GR MU-MIMO Wireless Dual Band VDSL2 Router with ASDL2+/3G/LTE/Gigabit Ethernet WAN Support, 2 FXS Ports and USB Port
User Manual
Configuring via Web-based Interface
Parameter
Description
Number of inspections of inactive connection
A number of requests that will be sent in order to analyze the status of the main connection when the connection is inactive (the router uses the reserve connection as a default gateway).
When all needed settings are configured, click the APPLY button.
Page 134 of 262
DSL-G2452GR MU-MIMO Wireless Dual Band VDSL2 Router with ASDL2+/3G/LTE/Gigabit Ethernet WAN Support, 2 FXS Ports and USB Port
User Manual
Configuring via Web-based Interface
Wi-Fi
In this menu you can specify all needed settings for your wireless network.
Basic Settings
In the Wi-Fi / Basic Settings section, you can change basic parameters for the wireless interface of the router and configure the basic and additional wireless networks. To configure the 2.4GHz band or 5GHz band, go to the relevant tab.
Figure 109. Basic settings of the wireless LAN in the 2.4GHz band.
In the General Settings section, the following parameters are available:
Parameter
Description
Enable Wireless
To enable Wi-Fi connection, move the switch to the right. To disable Wi-Fi connection, move the switch to the left.
Page 135 of 262
DSL-G2452GR MU-MIMO Wireless Dual Band VDSL2 Router with ASDL2+/3G/LTE/Gigabit Ethernet WAN Support, 2 FXS Ports and USB Port
User Manual
Configuring via Web-based Interface
Parameter
Description
Country
The country you are in. Select a value from the drop-down list.
Wireless mode
Operating mode of the wireless network of the router. This parameter defines standards of the devices that will be able to use your wireless network. Select a value from the drop-down list.
Select channel automatically
Move the switch to the right to let the router itself choose the channel with the least interference.
Enable additional channels
If the switch is moved to the left, the device automatically selects one of available standard channels. To use additional channels (the 12th and 13th in the 2.4 GHz band, the 100th and higher in the 5 GHz band), move the switch to the right.
Channel
The wireless channel number. Left-click to open the window for selecting a channel (the action is available, when the Select channel automatically switch is moved to the left).
Enable periodic scanning
Move the switch to the right to let the router search for a free channel in certain periods of time. When the switch is moved to the right, the Scanning period field is available for editing.
Scanning period
Specify a period of time (in seconds) after which the router rescans channels.
When you have configured the parameters, click the APPLY button.
Page 136 of 262
DSL-G2452GR MU-MIMO Wireless Dual Band VDSL2 Router with ASDL2+/3G/LTE/Gigabit Ethernet WAN Support, 2 FXS Ports and USB Port
User Manual
Configuring via Web-based Interface
To edit the settings of the basic wireless network, in the Wi-Fi Network section, change the needed parameters and click the APPLY button.
Also you can create an additional wireless network. To do this, click the ADD WI-FI NETWORK button. On the opened page, specify the relevant parameters.
Figure 110. Creating a wireless network. Page 137 of 262
DSL-G2452GR MU-MIMO Wireless Dual Band VDSL2 Router with ASDL2+/3G/LTE/Gigabit Ethernet WAN Support, 2 FXS Ports and USB Port
User Manual
Configuring via Web-based Interface
Parameter
Description
Wi-Fi Network
Network name (SSID)
A name for the wireless network. The name can consist of digits and Latin characters.
Hide SSID
If the switch is moved to the right, other users cannot see your Wi-Fi network. It is recommended not to hide the network in order to simplify initial configuration of the wireless network.
BSSID
The unique identifier for this wireless network. You cannot change the value of this parameter, it is determined in the device's internal settings. The field is displayed in the settings of the existing wireless network.
The maximum number of devices connected to the wireless network. Max associated clients When the value 0 is specified, the device does not limit the number
of connected clients.
Enable shaping
Move the switch to the right to limit the maximum bandwidth of the wireless network. In the Shaping field displayed, specify the maximum value of speed (Mbit/s).
Move the switch to the left not to limit the maximum bandwidth.
Broadcast wireless network
If the switch is moved to the left, devices cannot connect to the wireless network. Upon that the router can connect to another access point as a wireless client.
Clients isolation
Move the switch to the right to forbid wireless clients of this wireless network to communicate to each other.
Enable guest network
This function is available for the additional network. Move the switch to the right if you want the devices connected to the additional network to be isolated from the devices and resources of the router's LAN.
Page 138 of 262
DSL-G2452GR MU-MIMO Wireless Dual Band VDSL2 Router with ASDL2+/3G/LTE/Gigabit Ethernet WAN Support, 2 FXS Ports and USB Port
User Manual
Configuring via Web-based Interface
In the Security Settings section, you can change security settings of the wireless network.
By default, the WPA2-PSK network authentication type of both bands of the wireless network is specified. WPS PIN from the barcode label is used as the network key.
Figure 111. Network authentication types supported by the router.
The router supports the following authentication types:
Authentication type
Description
Open WEP
Open authentication (with WEP encryption for wireless network modes not supporting 802.11n or 802.11ac devices).
Authentication with a shared key with WEP encryption. This authentication type is not available when a mode supporting 802.11n or 802.11ac devices is selected from the Wireless mode dropdown list on the Wi-Fi / Basic Settings page.
WPA
WPA-based authentication using a RADIUS server.
WPA-PSK
WPA-based authentication using a PSK.
WPA2
WPA2-based authentication using a RADIUS server.
WPA2-PSK
WPA2-based authentication using a PSK.
WPA/WPA2 mixed
WPA-PSK/WPA2-PSK mixed
A mixed type of authentication. When this value is selected, devices using the WPA authentication type and devices using the WPA2 authentication type can connect to the wireless network.
A mixed type of authentication. When this value is selected, devices using the WPA-PSK authentication type and devices using the WPA2-PSK authentication type can connect to the wireless network.
! The WPA, WPA2, and WPA/WPA2 mixed authentication types require a RADIUS server.
Page 139 of 262
DSL-G2452GR MU-MIMO Wireless Dual Band VDSL2 Router with ASDL2+/3G/LTE/Gigabit Ethernet WAN Support, 2 FXS Ports and USB Port
User Manual
Configuring via Web-based Interface
When the Open or WEP value is selected, the following settings are displayed on the page (unavailable for the wireless network operating modes which support the standard 802.11n or 802.11ac):
Figure 112. The Open value is selected from the Network authentication drop-down list.
Parameter
Description
For Open authentication type only.
To activate WEP encryption, move the switch to the right. Upon that Enable encryption WEP the Default key ID drop-down list, the Encryption key WEP as
HEX switch, and four Encryption key fields are displayed on the page.
Default key ID
The number of the key (from first to fourth) which will be used for WEP encryption.
Encryption key WEP as Move the switch to the right to set a hexadecimal number as a key
HEX
for encryption.
Encryption key (1-4)
Keys for WEP encryption. The router uses the key selected from the Default key ID drop-down list. It is required to specify all the fields. Click the Show icon ( ) to display the entered key.
Page 140 of 262
DSL-G2452GR MU-MIMO Wireless Dual Band VDSL2 Router with ASDL2+/3G/LTE/Gigabit Ethernet WAN Support, 2 FXS Ports and USB Port
User Manual
Configuring via Web-based Interface
When the WPA-PSK, WPA2-PSK, or WPA-PSK/WPA2-PSK mixed value is selected, the following fields are displayed on the page:
Figure 113. The WPA2-PSK value is selected from the Network authentication drop-down list.
Parameter
Description
Password PSK
A password for WPA encryption. The password can contain digits, Latin letters (uppercase and/or lowercase), and other characters available in the US keyboard layout.12 Click the Show icon ( ) to display the entered password.
Encryption type
An encryption method: TKIP, AES, or TKIP+AES.
Group key update interval
The time period (in seconds), at the end of which a new key for WPA encryption is generated. When the value 0 is specified for this field, the key is not renewed.
12 0-9, A-Z, a-z, space, !"#$%&'()*+,-./:;<=>?@[\]^_`{|}~. Page 141 of 262
DSL-G2452GR MU-MIMO Wireless Dual Band VDSL2 Router with ASDL2+/3G/LTE/Gigabit Ethernet WAN Support, 2 FXS Ports and USB Port
User Manual
Configuring via Web-based Interface
When the WPA, WPA2, or WPA/WPA2 mixed value is selected, the following settings are displayed on the page:
Figure 114. The WPA2 value is selected from the Network authentication drop-down list.
Parameter
Description
WPA2 Pre-authentication
Move the switch to the right to activate preliminary authentication (displayed only for the WPA2 and WPA/WPA2 mixed authentication types).
IP address RADIUS server
The IP address of the RADIUS server.
RADIUS server port A port of the RADIUS server.
The password which the router uses for communication with the RADIUS encryption key RADIUS server (the value of this parameter is specified in the
RADIUS server settings).
Encryption type
An encryption method: TKIP, AES, or TKIP+AES.
Group key update interval
The time period (in seconds), at the end of which a new key for WPA encryption is generated. When the value 0 is specified for this field, the key is not renewed.
When you have configured the parameters, click the APPLY button.
To edit the basic or additional wireless network, left-click the relevant line in the table. On the opened page, change the needed parameters and click the APPLY button.
To remove the additional network, select the checkbox located to the left of the relevant line in the
table and click the DELETE button ( ). Then click the APPLY button.
Page 142 of 262
DSL-G2452GR MU-MIMO Wireless Dual Band VDSL2 Router with ASDL2+/3G/LTE/Gigabit Ethernet WAN Support, 2 FXS Ports and USB Port
User Manual
Configuring via Web-based Interface
Client Management
On the Wi-Fi / Client Management page, you can view the list of wireless clients connected to the router.
Figure 115. The page for managing the wireless clients.
If you want to disconnect a wireless device from your WLAN, select the checkbox in the line containing the MAC address of this device and click the DISCONNECT button.
To view the latest data on the devices connected to the WLAN, click the REFRESH button.
To view the latest data on a connected device, left-click the line containing the MAC address of this device.
Page 143 of 262
DSL-G2452GR MU-MIMO Wireless Dual Band VDSL2 Router with ASDL2+/3G/LTE/Gigabit Ethernet WAN Support, 2 FXS Ports and USB Port
User Manual
Configuring via Web-based Interface
WPS
On the Wi-Fi / WPS page, you can enable the function for configuration of the WLAN and select a method for connection to the WLAN. The WPS function helps to configure the protected wireless network automatically. Devices connecting to the wireless network via the WPS function must support the WPS function.
! The WPS function allows adding devices only to the basic wireless network of the router.
Before using the function you need to configure one of the following authentication types:
! Open with no encryption, WPA2-PSK or WPA-PSK/WPA2-PSK mixed with the AES encryption method. When other security settings are specified, controls of the WPS page on the tab of the relevant band are not available.
Figure 116. The page for configuring the WPS function.
You can activate the WPS function via the web-based interface or the hardware WPS button on the cover of the device.
To activate the WPS function via the hardware button, move the Enable Wi-Fi when WPS function is activated with hardware button switch to the right on the tabs of both bands. Then, with the device turned on, press the WPS button and release. The WPS LED should start blinking. In addition, upon pressing the button, the wireless interfaces of the device are enabled if they were disabled before.
If you want to disable activating the WPS function via the hardware button, on the tabs of both bands, move the Enable Wi-Fi when WPS function is activated with hardware button switch to the left and make sure that the WPS function is not activated via the web-based interface.
Page 144 of 262
DSL-G2452GR MU-MIMO Wireless Dual Band VDSL2 Router with ASDL2+/3G/LTE/Gigabit Ethernet WAN Support, 2 FXS Ports and USB Port
User Manual
Configuring via Web-based Interface
To activate the WPS function via the web-based interface, on the tab of the relevant band, click the ENABLE WPS button.
When the WPS function is enabled, the Information section is available on the page.
Parameter
Description
WPS state Default PIN code
The state of the WPS function:
· Configured (all needed settings are specified; these settings will be used upon establishing the wireless connection)
· Unconfigured (after activating the WPS function, the SSID and the encryption key will be configured automatically, the network authentication type will be changed to WPA2-PSK).
The PIN code of the router. This parameter is used when connecting the router to a registrar to set the parameters of the WPS function.
Network name (SSID) The name of the router's wireless network.
Network Authentication The network authentication type specified for the wireless network.
Encryption
The encryption type specified for the wireless network.
Password PSK
The encryption password specified for the wireless network.
UPDATE
Click the button to update the data on the page.
RESET TO UNCONFIGURED
Click the button to reset the parameters of the WPS function.
Page 145 of 262
DSL-G2452GR MU-MIMO Wireless Dual Band VDSL2 Router with ASDL2+/3G/LTE/Gigabit Ethernet WAN Support, 2 FXS Ports and USB Port
User Manual
Configuring via Web-based Interface
Using WPS Function via Web-based Interface
To connect to the basic wireless network via the PIN method of the WPS function, follow the next steps:
1. Click the ENABLE WPS button. 2. In the WPS Control section, click the ESTABLISH CONNECTION button. 3. In the opened window, select the PIN value from the WPS method drop-down list.
4. Select the PIN method in the software of the wireless device that you want to connect to the router's WLAN.
5. Click the relevant button in the software of the wireless device that you want to connect to the WLAN.
6. Right after that, enter the PIN code specified on the cover of the wireless device or in its software in the PIN Code field.
7. Click the CONNECT button in the web-based interface of the router.
To connect to the basic wireless network via the PBC method of the WPS function, follow the next steps:
1. Click the ENABLE WPS button. 2. In the WPS Control section, click the ESTABLISH CONNECTION button. 3. In the opened window, select the PBC value from the WPS method drop-down list.
4. Select the PBC method in the software of the wireless device that you want to connect to the router's WLAN.
5. Click the relevant button in the software or press the WPS button on the cover of the wireless device that you want to connect to the WLAN.
6. Right after that, click the CONNECT button in the web-based interface of the router.
Page 146 of 262
DSL-G2452GR MU-MIMO Wireless Dual Band VDSL2 Router with ASDL2+/3G/LTE/Gigabit Ethernet WAN Support, 2 FXS Ports and USB Port
User Manual
Configuring via Web-based Interface
Using WPS Function without Web-based Interface
You can use the WPS function without accessing the web-based interface of the router. To do this, you need to configure the following router's settings:
1. Specify relevant security settings for the wireless network of the router.
2. Make sure that the Enable Wi-Fi when WPS function is activated with hardware button switch is moved to the right on the tabs of both bands.
3. Click the ENABLE WPS button.
4. Close the web-based interface (click the Logout line of the menu).
Later you will be able to add wireless devices to the WLAN by pressing the WPS button of the router.
1. Select the PBC method in the software of the wireless device that you want to connect to the router's WLAN.
2. Click the relevant button in the software or press the WPS button on the cover of the wireless device that you want to connect to the WLAN.
3. Press the WPS button of the router and release. The WPS LED should start blinking.
Page 147 of 262
DSL-G2452GR MU-MIMO Wireless Dual Band VDSL2 Router with ASDL2+/3G/LTE/Gigabit Ethernet WAN Support, 2 FXS Ports and USB Port
User Manual
Configuring via Web-based Interface
WMM
On the Wi-Fi / WMM page, you can enable the Wi-Fi Multimedia function. The WMM function implements the QoS features for Wi-Fi networks. It helps to improve the quality of data transfer over Wi-Fi networks by prioritizing different types of traffic. Select the needed action from the Work mode drop-down list to configure the WMM function:
· Auto: the settings of the WMM function are configured automatically (the value is specified by default).
· Manual: the settings of the WMM function are configured manually. When this value is selected, the Access Point and Station sections are displayed on the page.
· Disabled: the WMM function is disabled.
Figure 117. The page for configuring the WMM function.
! All needed settings for the WMM function are specified in the device's system. Changing parameters manually may negatively affect your WLAN!
Page 148 of 262
DSL-G2452GR MU-MIMO Wireless Dual Band VDSL2 Router with ASDL2+/3G/LTE/Gigabit Ethernet WAN Support, 2 FXS Ports and USB Port
User Manual
Configuring via Web-based Interface
The WMM function allows assigning priorities for four Access Categories (AC): · BK (Background), low priority traffic (print jobs, file downloads, etc.).
· BE (Best Effort), traffic from legacy devices or devices/applications that do not support QoS.
· VI (Video).
· VO (Voice).
Parameters of the Access Categories are defined for both the router itself (in the Access Point section) and wireless devices connected to it (in the Station section). To edit the parameters of an Access Category, left-click the relevant line. In the opened window, change the needed parameters.
Figure 118. The window for changing parameters of the WMM function.
Parameter
Description
AIFSN
Arbitrary Inter-Frame Space Number. This parameter influences time delays for the relevant Access Category. The lower the value, the higher is the Access Category priority.
CWMin/CWMax
Contention Window Minimum/Contention Window Maximum. Both fields influence time delays for the relevant Access Category. The CWMax field value should not be lower, than the CWMin field value. The lower the difference between the CWMax field value and the CWMin field value, the higher is the Access Category priority.
Page 149 of 262
DSL-G2452GR MU-MIMO Wireless Dual Band VDSL2 Router with ASDL2+/3G/LTE/Gigabit Ethernet WAN Support, 2 FXS Ports and USB Port
User Manual
Configuring via Web-based Interface
Parameter TXOP ACM
ACK Click the SAVE button.
Description
Transmission Opportunity. The higher the value, the higher is the Access Category priority.
Admission Control Mandatory. If the switch is moved to the right, the device cannot use the relevant Access Category.
Acknowledgment. Answering response requests while transmitting. Displayed only in the Access Point section. If the switch is moved to the left, the router answers requests. If the switch is moved to the right, the router does not answer requests.
Page 150 of 262
DSL-G2452GR MU-MIMO Wireless Dual Band VDSL2 Router with ASDL2+/3G/LTE/Gigabit Ethernet WAN Support, 2 FXS Ports and USB Port
User Manual
Configuring via Web-based Interface
Client
On the Wi-Fi / Client page, you can configure the router as a client to connect to a wireless access point or to a WISP.
Figure 119. The page for configuring the client mode.
To configure the router as a client, move the Enable switch to the right. Upon that the following fields are displayed on the page:
Parameter
Description
Broadcast wireless network 2.4 GHz / Broadcast wireless
network 5 GHz
If the switch is moved to the left, devices cannot connect to the router's WLAN. Upon that the router can connect to another access point as a wireless client.
Connecting to network A method for connecting to another access point.
In the Wireless Networks section, the list of available wireless networks is displayed. To view the latest data on available wireless networks, click the UPDATE LIST button.
To connect to a wireless network from the list, select the needed network. Move the Network options switch to the right to view more detailed information on the network to which the router connects. If a password is required, enter it in the relevant field. Click the CONNECT button.
To connect to a hidden network, select the Connect to hidden network value from the Connecting to network drop-down list. Then select the band where the hidden network operates from the Frequency band list and enter the network name in the Network name (SSID) field. If needed, fill in the BSSID field. Then select the needed type of authentication from the Network authentication drop-down list.
Page 151 of 262
DSL-G2452GR MU-MIMO Wireless Dual Band VDSL2 Router with ASDL2+/3G/LTE/Gigabit Ethernet WAN Support, 2 FXS Ports and USB Port
User Manual
Configuring via Web-based Interface
When the Open or WEP authentication type is selected, the following settings are displayed on the page:
Parameter
Description
For Open authentication type only.
Enable encryption WEP
To activate WEP encryption, move the switch to the right. Upon that the Default key ID drop-down list, the Encryption key WEP as HEX switch, and four Encryption key fields are displayed on the page.
Default key ID
The number of the key (from first to fourth) which will be used for WEP encryption.
Encryption key WEP as Move the switch to the right to set a hexadecimal number as a key
HEX
for encryption.
Encryption key (1-4)
Keys for WEP encryption. The router uses the key selected from the Default key ID drop-down list. It is required to specify all the fields. Click the Show icon ( ) to display the entered key.
When the WPA-PSK, WPA2-PSK, or WPA-PSK/WPA2-PSK mixed authentication type is selected, the following fields are displayed:
Parameter
Description
Password PSK
A password for WPA encryption. Click the Show icon ( ) to display the entered key.
Encryption type
An encryption method: TKIP, AES, or TKIP+AES.
When you have configured the parameters, click the APPLY button.
When connecting to a wireless access point, the wireless channel of DSL-G2452GR will switch to the channel of the access point to which you have connected.
In addition, the Connection Information section in which you can view the connection status and the network basic parameters is displayed.
If you want to connect to the WISP network, after configuring the device as a client, you need to create a WAN connection with relevant parameters for the WLAN interface.
Page 152 of 262
DSL-G2452GR MU-MIMO Wireless Dual Band VDSL2 Router with ASDL2+/3G/LTE/Gigabit Ethernet WAN Support, 2 FXS Ports and USB Port
User Manual
Configuring via Web-based Interface
Additional
On page of the Wi-Fi / Additional section, you can define additional parameters for the WLAN of the router. To configure the 2.4GHz band or 5GHz band, go to the relevant tab.
! Changing parameters presented on this page may negatively affect your WLAN!
Figure 120. Additional settings of the WLAN. Page 153 of 262
DSL-G2452GR MU-MIMO Wireless Dual Band VDSL2 Router with ASDL2+/3G/LTE/Gigabit Ethernet WAN Support, 2 FXS Ports and USB Port
User Manual
Configuring via Web-based Interface
The following fields are available on the page:
Parameter
Description
Bandwidth
The channel bandwidth for 802.11n standard in the 2.4GHz band (the 2.4 GHz tab).
20MHz: 802.11n clients operate at 20MHz channels.
20/40MHz: 802.11n clients operate at 20MHz or 40MHz channels.
The channel bandwidth for 802.11n and 802.11ac standards in 5GHz band (the 5 GHz tab).
20MHz: 802.11n and 802.11ac clients operate at 20MHz channels.
20/40MHz: 802.11n and 802.11ac clients operate at 20MHz or 40MHz channels.
20/40/80MHz: 802.11ac clients operate at 20MHz, 40MHz, or 80MHz channels.
Autonegotiation 20/40 (Coexistence)
Available on the 2.4 GHz tab.
Move the switch to the right to let the router to automatically choose the most suitable channel bandwidth (20MHz or 40MHz) for the connected devices (this setting can substantially lower the data transfer rate of your wireless network). The switch is displayed when the 20/40 MHz value is selected from the Bandwidth drop-down list.
TX power
The transmit power (in percentage terms) of the router.
Drop multicast
Move the switch to the right to disable multicasting for the router's WLAN. Move the switch to the left to enable multicasting from the WAN connection selected on the Advanced / IGMP page.
Enable TX Beamforming
Available on the 5 GHz tab.
TX Beamforming is the signal processing/directing technique which helps to support a high enough transfer rate in the areas with difficult conditions for the signal propagation.
Move the switch to the right to improve the signal quality.
Adaptivity mode
Move the switch to the right to prevent your wireless network from interfering with radars and other mobile or stationary radio systems. Such a setting can slow down the router's WLAN.
Reduce power on OFDM modulation
Available on the 5 GHz tab.
Move the switch to the right to lower service signals strength for improving the quality of their transmission. Use the setting in case of problems with connecting wireless clients to the router.
Page 154 of 262
DSL-G2452GR MU-MIMO Wireless Dual Band VDSL2 Router with ASDL2+/3G/LTE/Gigabit Ethernet WAN Support, 2 FXS Ports and USB Port
User Manual
Configuring via Web-based Interface
Parameter
Description
B/G protection
Available on the 2.4 GHz tab.
The 802.11b and 802.11g protection function is used to minimize collisions between devices of your wireless network.
Select a value from the drop-down list.
Auto: The protection function is enabled and disabled automatically depending on the state of the network (this value is recommended if your wireless local area network consists of both 802.11b and 802.11g devices).
Always On: The protection function is always enabled (this setting can substantially lower the efficiency of your wireless network).
Always Off: The protection function is always disabled.
Short GI
Guard interval (in nanoseconds). This parameter defines the interval between symbols transmitted when the router is communicating to wireless devices.
Enable: the router uses the 400 ns short guard interval. Only for the wireless network operating modes which support 802.11n and 802.11ac standards (see the value of the Wireless mode dropdown list on the Wi-Fi / Basic Settings page).
Disable: the router uses the 800 ns standard guard interval.
Beacon Period
The time interval (in milliseconds) between packets sent to synchronize the wireless network.
RTS threshold
The minimum size (in bytes) of a packet for which an RTS frame is transmitted.
Frag threshold
The maximum size (in bytes) of a non-fragmented packet. Larger packets are fragmented (divided).
DTIM period
The number of beacon frames between sending DTIM messages (messages notifying on broadcast or multicast transmission).
Station Keep Alive
The time interval (in seconds) between keep alive checks of wireless devices from your WLAN. When the value 0 is specified, the checking is disabled.
When you have configured the parameters, click the APPLY button.
Page 155 of 262
DSL-G2452GR MU-MIMO Wireless Dual Band VDSL2 Router with ASDL2+/3G/LTE/Gigabit Ethernet WAN Support, 2 FXS Ports and USB Port
User Manual
Configuring via Web-based Interface
MAC Filter
On the Wi-Fi / MAC Filter page, you can define a set of MAC addresses of devices which will be allowed to access the WLAN, or define MAC addresses of devices which will not be allowed to access the WLAN.
! It is recommended to configure the Wi-Fi MAC filter through a wired connection to DSLG2452GR.
Figure 121. The page for configuring the MAC filter for the wireless network.
By default, the Wi-Fi MAC filter is disabled. To configure the MAC filter, first you need to create rules (specify MAC addresses of devices for which the specified filtering modes will be applied). To do this, click the ADD button ( ).
Figure 122. The window for adding a rule for the MAC filter. Page 156 of 262
DSL-G2452GR MU-MIMO Wireless Dual Band VDSL2 Router with ASDL2+/3G/LTE/Gigabit Ethernet WAN Support, 2 FXS Ports and USB Port
User Manual
Configuring via Web-based Interface
You can specify the following parameters:
Parameter
Description
Frequency band
From the drop-down list, select a band of the wireless network.
SSID
A wireless network to which the rule will be applied. Select the needed value from the drop-down list.
MAC address
In the field, enter the MAC address to which the selected filtering mode will be applied.
Hostname
The name of the device for easier identification. You can specify any name.
Enable
If the switch is moved to the right, the rule is active. Move the switch to the left to disable the rule.
When you have configured the parameters, click the SAVE button.
To edit the parameters of the existing rule, in the Filters section, left-click the needed rule. In the opened window, change the settings and click the SAVE button.
To remove the rule from the page, in the Filters section, select the checkbox located to the left of
the relevant rule and click the DELETE button ( ).
After creating the rules you need to configure the filtering modes.
To open the basic or additional wireless network for the devices which MAC addresses are specified on this page and to close the wireless network for all other devices, in the section corresponding to the band (2.4 GHz or 5 GHz), left-click the line of the wireless network. In the opened window, move the Enable MAC filter switch to the right. Upon that the MAC filter restrict mode drop-down list will be displayed. Select the Allow value from the drop-down list and click the SAVE button.
To close the wireless network for the devices which MAC addresses are specified on this page, select the Deny value from the MAC filter restrict mode drop-down list and click the SAVE button.
Page 157 of 262
DSL-G2452GR MU-MIMO Wireless Dual Band VDSL2 Router with ASDL2+/3G/LTE/Gigabit Ethernet WAN Support, 2 FXS Ports and USB Port
User Manual
Configuring via Web-based Interface
Print Server
On the Print Server page, you can configure the router as a print server. Being configured in this way, the router will allow your LAN users to share the printer connected to the USB port of the router. To connect a printer to the router, power off both devices. Connect the printer to the USB port of the router, power on the printer, then power on the router.
Figure 123. The Print Server page.
To configure the router as a print server, click the ENABLE button. Upon that the Status of printer field is displayed on the page. If you don't want to use the router as a print server, click the DISABLE button.
Page 158 of 262
DSL-G2452GR MU-MIMO Wireless Dual Band VDSL2 Router with ASDL2+/3G/LTE/Gigabit Ethernet WAN Support, 2 FXS Ports and USB Port
User Manual
Configuring via Web-based Interface
USB Storage
This menu is designed to operate USB storages. Here you can do the following: · view data on the connected USB storage · create accounts for users to allow access to the content of the USB storage · enable the built-in Samba server of the router · enable the built-in FTP server of the router · view content of the connected USB storage · enable the built-in DLNA server of the router · configure the built-in Transmission torrent client and manage distributing and downloading processes.
Information
On the USB Storage / Information page, you can view data on the USB storage connected to the router.
Figure 124. The USB Storage / Information page.
The following data are presented on the page: the name, total and free space of the storage, and the type of its file system (supported file systems: FAT16/32, NTFS, and ext2/3). If the USB storage is divided into volumes, a section for every volume (partition) of the USB storage is displayed on the page. To safely disconnect the USB storage or a volume of the USB storage, click the UNMOUNT button in the relevant section and wait for several seconds. To disconnect all volumes of the USB storage, click the UNMOUNT ALL STORAGES button.
Page 159 of 262
DSL-G2452GR MU-MIMO Wireless Dual Band VDSL2 Router with ASDL2+/3G/LTE/Gigabit Ethernet WAN Support, 2 FXS Ports and USB Port
User Manual
Configuring via Web-based Interface
USB Users
On the USB Storage / USB Users page, you can create user accounts to provide access to data on the USB storage connected to the router.
Figure 125. The USB Storage / USB users page.
To create a new user account, click the ADD button ( ).
Figure 126. The window for adding a user.
In the opened window, in the Login field, specify a username, and in the Password field the password for the account. Use digits, Latin letters (uppercase and/or lowercase), and other characters available in the US keyboard layout.13
! You cannot create accounts with the following usernames: admin, support, user, nobody. For ext2, ext3, or FAT storages or storage partitions, it is possible to create users with limited rights. Move the Read only switch to the right not to let the user create, change, or delete files. Click the SAVE button. To change the password of an account, select the relevant line in the table. In the opened window, enter a new value in the Password field, and then click the SAVE button. To remove an account, select the checkbox located to the left of the relevant line in the table and click the DELETE button ( ).
13 0-9, A-Z, a-z, space, !"#$%&'()*+,-./:;<=>?@[\]^_`{|}~. Page 160 of 262
DSL-G2452GR MU-MIMO Wireless Dual Band VDSL2 Router with ASDL2+/3G/LTE/Gigabit Ethernet WAN Support, 2 FXS Ports and USB Port
User Manual
Configuring via Web-based Interface
Samba
On the USB Storage / Samba page, you can enable the built-in Samba server of the router to provide access to the USB storage for users of your LAN.
Figure 127. The USB Storage / Samba page.
To enable the Samba server, move the Enable Samba server switch to the right. The Anonymous login switch (by default, the switch is moved to the right) allows anonymous access to the content of the USB storage for users of your LAN. If you want to provide authorized access to the content of the USB storage for users of your LAN, move the switch to the left. After applying the parameters on this page, go to the USB Storage / USB Users page and create needed accounts. In the Work group field, leave the value specified by default (WORKGROUP) or specify a new name of a workgroup which participants will have access to the content of the USB storage. In the Short description field, you can specify an additional description for the USB storage. This value will be displayed in some operating systems. Use digits and/or Latin characters. In the NetBIOS field, specify a name of the USB storage which will be displayed for users of your LAN. Use digits and/or Latin characters.
Page 161 of 262
DSL-G2452GR MU-MIMO Wireless Dual Band VDSL2 Router with ASDL2+/3G/LTE/Gigabit Ethernet WAN Support, 2 FXS Ports and USB Port
User Manual
Configuring via Web-based Interface
To allow access only to a certain folder of the USB storage, click the ADD ( ) button in the Directories section.
Figure 128. Specifying a folder.
In the opened window, locate a folder containing files. To do this, click the Search icon ( ) in the Path field. Then go to the needed folder and click the SELECT button. In the Name field, specify a name of the selected folder which will be displayed for users of your LAN. Use digits and/or Latin characters. Click the SAVE button. To remove a folder from the list in the Directories section, select the checkbox located to the left
of the relevant line in the table and click the DELETE button ( ).
After specifying the needed parameters, click the APPLY button. To disable the built-in Samba server of the router, move the Enable Samba server switch to the left and click the APPLY button.
Page 162 of 262
DSL-G2452GR MU-MIMO Wireless Dual Band VDSL2 Router with ASDL2+/3G/LTE/Gigabit Ethernet WAN Support, 2 FXS Ports and USB Port
User Manual
Configuring via Web-based Interface
FTP
On the USB Storage / FTP page, you can enable the built-in FTP server of the router to provide access to the USB storage for users of your LAN.
Figure 129. The USB Storage / FTP page.
To enable the FTP server, move the Enable FTP server switch to the right. Move the Anonymous login switch to the right to allow anonymous access to the content of the USB storage for users of your LAN. If you want to provide authorized access to the content of the USB storage for users of your LAN, move the switch to the left. After applying the parameters on this page, go to the USB Storage / USB Users page and create needed accounts. If needed, change the router's port used by the FTP server in the Port field (by default, the standard port 21 is specified). To allow access only to a certain folder of the USB storage for users of your LAN, locate a folder containing files. To do this, click the Search icon ( ) in the Directory field. Then go to the needed folder and click the SELECT button. After specifying the needed parameters, click the APPLY button. To allow access to all the content of the USB storage for users of your LAN again, remove the value specified in the Directory field and click the APPLY button. To disable the built-in FTP server of the router, move the Enable FTP server switch to the left and click the APPLY button.
Page 163 of 262
DSL-G2452GR MU-MIMO Wireless Dual Band VDSL2 Router with ASDL2+/3G/LTE/Gigabit Ethernet WAN Support, 2 FXS Ports and USB Port
User Manual
Configuring via Web-based Interface
Filebrowser
On the USB Storage / Filebrowser page, you can view the content of your USB storage connected to the router and remove separate folders and files from the USB storage.
Figure 130. The USB Storage / Filebrowser page.
To view the content of the USB storage, click the icon of the storage or storage partition. The list of folders and files will be displayed on the page. To go to a folder, click the line corresponding to this folder.
To refresh the folder contents, click the Actions icon ( ) in the line corresponding to this folder and select the Refresh value.
To remove a folder or file, click the Actions icon ( ) in the line corresponding to this folder or file and select the Delete value.
Page 164 of 262
DSL-G2452GR MU-MIMO Wireless Dual Band VDSL2 Router with ASDL2+/3G/LTE/Gigabit Ethernet WAN Support, 2 FXS Ports and USB Port
User Manual
Configuring via Web-based Interface
DLNA
On the USB Storage / DLNA page, you can enable the built-in DLNA server of the router to provide access to the USB storage for users of your LAN.
The built-in media server allows DLNA certified devices of your LAN to play multimedia content of the USB storage. Multimedia content can be played only when a USB storage is connected to the router.
Figure 131. The USB Storage / DLNA page.
To enable the DLNA server, move the Enable switch to the right. In the Update interval field, specify the time period (in seconds), at the end of which the media server updates the file list of the USB storage, or leave the value specified by default (900). In the DLNA server name field, specify a name of the DLNA server which will be displayed for users of your LAN or leave the value specified by default (D-Link DLNA Server). Use digits and/or Latin characters.
Page 165 of 262
DSL-G2452GR MU-MIMO Wireless Dual Band VDSL2 Router with ASDL2+/3G/LTE/Gigabit Ethernet WAN Support, 2 FXS Ports and USB Port
User Manual
Configuring via Web-based Interface
To allow access to the content of the USB storage for users of your LAN, click the ADD ( ) button in the Media Folders section.
Figure 132. Specifying a media folder.
In the opened window, locate a folder containing files. To do this, click the Search icon ( ) in the Path field. Then go to the needed folder and click the SELECT button. For each folder you can define the type of files which will be available for users of your LAN. To do this, select the needed type of files from the Type drop-down list. To share all files of a folder, select the All value from the Type drop-down list. Click the SAVE button. To remove a folder from the list in the Media Folders section, select the checkbox located to the
left of the relevant line in the table and click the DELETE ( ) button.
After specifying all needed settings on the USB Storage / DLNA page, click the APPLY button. To disable the built-in DLNA server of the router, move the Enable switch to the left and click the APPLY button.
Page 166 of 262
DSL-G2452GR MU-MIMO Wireless Dual Band VDSL2 Router with ASDL2+/3G/LTE/Gigabit Ethernet WAN Support, 2 FXS Ports and USB Port
User Manual
Configuring via Web-based Interface
Torrent Client
On the USB Storage / Torrent Client page, you can configure all needed settings for the built-in Transmission client.
Figure 133. The USB Storage / Torrent Client page.
You can specify the following parameters:
Parameter
Description
Transmission
Enable
Move the switch to the right to activate the Transmission client.
Main Settings
Port
The router's port which will be used by the Transmission client.
Path
Locate data of the Transmission client. To do this, click the Search icon ( ), select the needed value, and click the SELECT button.
Directory
The folder on the USB storage where data of the Transmission client will be stored.
Page 167 of 262
DSL-G2452GR MU-MIMO Wireless Dual Band VDSL2 Router with ASDL2+/3G/LTE/Gigabit Ethernet WAN Support, 2 FXS Ports and USB Port
User Manual
Configuring via Web-based Interface
Parameter
Description
Move the switch to the right if you want to limit the number of simultaneous downloads. Upon that the Download queue size Enable download queue field will be displayed.
Move the switch to the left not to limit the number of simultaneous downloads.
Download queue size
The maximum number of simultaneous downloads. By default, the value 1 is specified.
Peer limit
The maximum number of the service users from which you can download files.
Use uTP
Move the switch to the right to enable TP (Micro Transport Protocol, a transport protocol for file sharing). Such a setting can increase the load on the router.
Move the switch to the left to disable TP.
Web interface port
The port on which the web-based interface of the Transmission client is available.
Authorization
Enable
Move the switch to the right if you want the Transmission client to request for username and password when accessing its web-based interface. Then fill in the Username and Password fields.
Username
The username to access the web-based interface of the Transmission client.
Password
The password to access the web-based interface of the Transmission client.
After specifying the needed parameters, click the SAVE button.
In the Web-interface page field, the address of the web-based interface of the Transmission client is displayed. To access the web-based interface of the Transmission client, click the link.
Page 168 of 262
DSL-G2452GR MU-MIMO Wireless Dual Band VDSL2 Router with ASDL2+/3G/LTE/Gigabit Ethernet WAN Support, 2 FXS Ports and USB Port
User Manual
Configuring via Web-based Interface
Figure 134. The web-based interface of the Transmission torrent client.
Using the web-based interface of the built-in Transmission torrent client you can manage the process of downloading files to the USB storage connected to the router.
The following buttons are available on the page:
Parameter
Description
Open Torrent
Click the button to add a new torrent file (a metadata file according to which the Transmission client downloads files) to the download queue. In the dialog box appeared, select a file stored on your PC and click the Upload button.
Remove Selected Torrents
Select the torrent file which you want to remove from the download queue and click the button.
Select the torrent file corresponding to the download which should be restarted and click the button. Start Selected Torrents
Page 169 of 262
DSL-G2452GR MU-MIMO Wireless Dual Band VDSL2 Router with ASDL2+/3G/LTE/Gigabit Ethernet WAN Support, 2 FXS Ports and USB Port
User Manual
Configuring via Web-based Interface
Parameter Start All Torrents
Description
Click the button to restart all downloads. If you limited the maximum number of simultaneous downloads, the Transmission client starts processing of the specified number of torrent files; after completing download of the first one, the client proceeds to the next file in the queue.
Pause Selected Torrents
Select the torrent file corresponding to the download which should be stopped and click the button.
Pause All Torrents
Click the button to stop all downloads.
Toggle Inspector
Select a torrent file and click the button to view its data.
Page 170 of 262
DSL-G2452GR MU-MIMO Wireless Dual Band VDSL2 Router with ASDL2+/3G/LTE/Gigabit Ethernet WAN Support, 2 FXS Ports and USB Port
User Manual
Configuring via Web-based Interface
USB Modem
This menu is designed to operate USB modems. If the PIN code check for the SIM card inserted into your USB modem is not disabled, the relevant notification will be displayed in the top right corner of the page.
Figure 135. The notification on the PIN code check.
Click the ENTER button. When the USB Modem / PIN page opens, enter the PIN code in the Authorization section.14 Click the Show icon ( ) to display the entered code. Then click the APPLY button.
Figure 136. Entering the PIN code.
Some USB modems in the router mode and Android smartphones in the modem mode have an IP address from the subnet which coincides with the router's local subnet. In this case, the router's web-based interface can be unavailable. For correct operation, disconnect the device from the USB port and reboot the router. Then access the web-based interface, go to the Connections Setup / LAN page, and change the value of the IP address field on the IPv4 tab (for example, specify the value 192.168.2.1). Wait until the router is rebooted.
14 For some models of USB modems it is required to disable the PIN code check on the SIM card prior to connecting the USB modem to the router.
Page 171 of 262
DSL-G2452GR MU-MIMO Wireless Dual Band VDSL2 Router with ASDL2+/3G/LTE/Gigabit Ethernet WAN Support, 2 FXS Ports and USB Port
User Manual
Configuring via Web-based Interface
Basic Settings
On the USB Modem / Basic Settings page, you can view data on the USB modem connected to the router and enable/disable the function for automatic creation of 3G/LTE WAN connection upon plugging a USB modem into the router.
Figure 137. The USB Modem / Basic Settings page.
If the Automatic creation of connection switch is moved to the right and the PIN code check for the SIM card inserted into your USB modem is disabled, then an active WAN connection with default settings (for LTE modems) or the operator's settings (for GSM modems) will be automatically created when plugging the USB modem into the router. The connection will be displayed on the Connections Setup / WAN page.
If you don't want to use this function, move the Automatic creation of connection switch to the left and click the APPLY button.
When a USB modem is connected to the router, the following data are displayed in the Information section:
Parameter
Description
Vendor
The manufacturer of your USB modem.
Model
The alphanumeric code of the model of your USB modem.
Revision
The revision of the firmware of your USB modem.
IMSI
The code stored in the SIM card inserted to your USB modem.
IMEI
The code stored in the memory of the USB modem.
Signal level
The signal level at the input of the modem's receiver. The zero signal level shows that you are out of the coverage area of the selected operator's network.
Page 172 of 262
DSL-G2452GR MU-MIMO Wireless Dual Band VDSL2 Router with ASDL2+/3G/LTE/Gigabit Ethernet WAN Support, 2 FXS Ports and USB Port
User Manual
Configuring via Web-based Interface
Parameter Operator name
Mode
Description
When the needed network is available, the name of the operator is displayed in this field.
A type of the network to which the USB modem is connected.
PIN
On the USB Modem / PIN page, you can change the PIN code of the SIM card inserted into your USB modem, disable or enable the check of the PIN code.
! The operations presented on this page are unavailable for some models of USB modems.
The current state of the SIM card inserted into your USB modem is displayed in the Status field. If the PIN code is entered incorrectly or the PIN code is not entered when the PIN code check is enabled, the Device is locked value is displayed in the Status field. If the PIN code is entered correctly or the PIN check is disabled, the Device is unlocked value is displayed in the Status field.
If the PIN code check for the SIM card inserted into your USB modem is not disabled, the Yes value is displayed in the PIN code request field. If the PIN check is disabled, the No value is displayed in the PIN code request field.
Figure 138. The USB Modem / PIN page.
To disable the PIN code check, in the PIN Code Request section, enter the current PIN code in the PIN code field and click the DISABLE button (the button is displayed if the PIN code check is enabled). To enable the PIN code check, in the PIN Code Request section, enter the PIN code used before disabling the check in the PIN code field and click the ENABLE button (the button is displayed if the PIN code check is disabled).
Page 173 of 262
DSL-G2452GR MU-MIMO Wireless Dual Band VDSL2 Router with ASDL2+/3G/LTE/Gigabit Ethernet WAN Support, 2 FXS Ports and USB Port
User Manual
Configuring via Web-based Interface
To change the PIN code, in the Changing PIN Code section, enter the current code in the PIN code field, then enter a new code in the New PIN code and New PIN code confirmation fields and click the SAVE button.
If you have exceeded the permissible amount of errors upon entering a value in the PIN code field (the number of remaining attempts is displayed on the page), the SIM card inserted into your USB modem is blocked.
Figure 139. The USB Modem / PIN page. The PUK code request.
For further use of the card, in the Authorization section, enter the PUK code in the relevant field, and then specify a new PIN code for your SIM card in the New PIN code and New PIN code confirmation field. Click the APPLY button.
Page 174 of 262
DSL-G2452GR MU-MIMO Wireless Dual Band VDSL2 Router with ASDL2+/3G/LTE/Gigabit Ethernet WAN Support, 2 FXS Ports and USB Port
User Manual
Configuring via Web-based Interface
Advanced
In this menu you can configure advanced settings of the router: · define interface groups · allow the router to connect to a private Ethernet line · add name servers · configure a DDNS service · configure notifications on the reason of the Internet connection failure · define static routes · configure TR-069 client · create rules for remote access to the web-based interface · enable the UPnP IGD protocol · edit the VDSL/ADSL connection parameters · allow the router to use IGMP · allow the router to use RTSP, enable the SIP ALG, the PPPoE/PPTP/L2TP/IPsec pass through functions for the router · configure VPN tunnels based on IPsec protocol.
Page 175 of 262
DSL-G2452GR MU-MIMO Wireless Dual Band VDSL2 Router with ASDL2+/3G/LTE/Gigabit Ethernet WAN Support, 2 FXS Ports and USB Port
User Manual
Configuring via Web-based Interface
Interface Grouping
On the Advanced / Interface Grouping page, you can create groups consisting of interfaces and ports of the router, for example, for distinguishing different types of traffic. Such a function is mostly used in Triple-play networks.
The DEFAULT group is created in the router's system. You cannot edit or delete this group.
Figure 140. The Advanced / Interface Grouping page.
To create a new rule for interface grouping (a group of ports), click the ADD button ( ).
Figure 141. The page for adding a new group of ports. Page 176 of 262
DSL-G2452GR MU-MIMO Wireless Dual Band VDSL2 Router with ASDL2+/3G/LTE/Gigabit Ethernet WAN Support, 2 FXS Ports and USB Port
User Manual
Configuring via Web-based Interface
On the opened page, you can specify the following parameters:
Parameter
Description
Name
A name for the group for easier identification. You can specify any name.
Type of group
The type of the group.
NAT. The group of this type is an external connection with address translation. It is mostly used to connect to the Internet.
Transparent bridge. The group of this type is a transparent connection between the router's port and an external connection. It is mostly used to connect IPTV set-top boxes.
Local. The group of this type is an internal connection of the router's ports. It is mostly used to join devices from the LAN to an isolated network with no access to the Internet.
LAN Ports
In this section the LAN ports and the WLAN interface of the router are displayed.
To add an element to the group, select the relevant checkbox.
To remove an element from the group, deselect the relevant checkbox.
Displayed for the NAT and Transparent bridge types only.
WAN Ports
In this section WAN connections of the router are displayed.
To add a connection to the group, select the choice of the radio button which corresponds to this connection.
Click the APPLY button.
To edit the parameters of a group you created, select the relevant line in the table. On the opened page, change the needed parameters and click the APPLY button.
To remove a group you created, select the checkbox located to the left of the relevant line of the
table and click the DELETE button ( ). Also you can remove a group on the editing page. When you delete a group, ports and interfaces assigned to it are reassigned to the DEFAULT group.
Page 177 of 262
DSL-G2452GR MU-MIMO Wireless Dual Band VDSL2 Router with ASDL2+/3G/LTE/Gigabit Ethernet WAN Support, 2 FXS Ports and USB Port
User Manual
Configuring via Web-based Interface
WAN Remapping
On the Advanced / WAN Remapping page, you can configure the router to connect to a private Ethernet line.
Figure 142. The Advanced / WAN Remapping page.
To use one of the router's LAN port as the WAN port, click the icon corresponding to this port and click the APPLY button. The port configured as the WAN port is highlighted in teal.
If in the future you need to disconnect the LAN port from the private Ethernet line, click the icon highlighted in teal and click the APPLY button.
To use the router's WAN port as a LAN port, click the icon corresponding to this port and click the APPLY button. The port configured as a LAN port is not highlighted.
If in the future you need to connect the WAN port to the private Ethernet line, click the icon corresponding to this port and click the APPLY button. The WAN port will be highlighted in teal again.
Page 178 of 262
DSL-G2452GR MU-MIMO Wireless Dual Band VDSL2 Router with ASDL2+/3G/LTE/Gigabit Ethernet WAN Support, 2 FXS Ports and USB Port
User Manual
Configuring via Web-based Interface
DNS
On the Advanced / DNS page, you can add DNS servers to the system.
Figure 143. The Advanced / DNS page.
DNS servers are used to determine the IP address from the name of a server in Intranets or the Internet (as a rule, they are specified by an ISP or assigned by a network administrator). You can specify the addresses of DNS servers manually on this page or configure the router to obtain DNS servers addresses automatically from your ISP upon installing a connection.
! When you use the built-in DHCP server, the network parameters (including DNS servers) are distributed to clients automatically.
If you want to configure automatic obtainment of DNS servers addresses, move the Manual switch to the left (use the DNS IPv4 section for IPv4 and the DNS IPv6 section for IPv6). Then move the Default gateway switch to the left and from the Interface drop-down list select a WAN connection which will be used to obtain addresses of DNS servers automatically. If you want the router to use the default WAN connection to obtain addresses of DNS servers, move the Default gateway switch to the right. Then click the APPLY button. To specify a DNS server manually, move the Manual switch to the right (use the DNS IPv4 section for IPv4 and the DNS IPv6 section for IPv6). In the Name Servers IPv4 or Name Servers IPv6 section, click the ADD SERVER button, and in the line displayed, enter an IP address of the DNS server. Then click the APPLY button.
Page 179 of 262
DSL-G2452GR MU-MIMO Wireless Dual Band VDSL2 Router with ASDL2+/3G/LTE/Gigabit Ethernet WAN Support, 2 FXS Ports and USB Port
User Manual
Configuring via Web-based Interface
To remove a DNS server from the page, click the Delete icon ( ) in the line of the address and then click the APPLY button.
If needed, you can add your own address resource record. To do this, click the ADD button ( ) in the Hosts section.
Figure 144. The window for adding a DNS record.
In the IP address field, specify a host from the internal or external network. You can choose a device connected to the router's LAN at the moment. To do this, select the relevant IP address from the drop-down list (the field will be filled in automatically). In the Name field, specify the domain name to which the specified IP address will correspond. Click the SAVE button.
To edit an existing record, select the relevant line in the table. In the opened window, change the needed parameters and click the SAVE button.
To remove a record, in the Hosts section, select the checkbox located to the left of the relevant line
in the table and click the DELETE button ( ).
After completing the work with records, click the APPLY button.
Page 180 of 262
DSL-G2452GR MU-MIMO Wireless Dual Band VDSL2 Router with ASDL2+/3G/LTE/Gigabit Ethernet WAN Support, 2 FXS Ports and USB Port
User Manual
Configuring via Web-based Interface
DDNS
On the Advanced / DDNS page, you can define parameters of the DDNS service, which allows associating a domain name with dynamic IP addresses.
Figure 145. The Advanced / DDNS page.
To add a new DDNS service, click the ADD button ( ).
Figure 146. The page for adding a DDNS service.
On the opened page, you can specify the following parameters:
Parameter
Description
Hostname
The full domain name registered at your DDNS provider.
DDNS service
Select a DDNS provider from the drop-down list.
Username
The username to authorize for your DDNS provider.
Password
The password to authorize for your DDNS provider. Click the Show icon ( ) to display the entered password.
Update period
An interval (in minutes) between sending data on the router's external IP address to the relevant DDNS service.
After specifying the needed parameters, click the SAVE button.
Page 181 of 262
DSL-G2452GR MU-MIMO Wireless Dual Band VDSL2 Router with ASDL2+/3G/LTE/Gigabit Ethernet WAN Support, 2 FXS Ports and USB Port
User Manual
Configuring via Web-based Interface
To edit parameters of the existing DDNS service, select the relevant line in the table. On the opened page, change the needed parameters and click the SAVE button.
To remove an existing DDNS service, select the checkbox located to the left of the relevant line in
the table and click the DELETE button ( ).
Page 182 of 262
DSL-G2452GR MU-MIMO Wireless Dual Band VDSL2 Router with ASDL2+/3G/LTE/Gigabit Ethernet WAN Support, 2 FXS Ports and USB Port
User Manual
Configuring via Web-based Interface
Redirect
On the Advanced / Redirect page, you can enable notifications on the reason of the Internet connection failure. Notifications will be displayed in the browser window when a user is attempting to open a web site on the Internet.
Figure 147. The Advanced / Redirect page.
To configure notifications, in the Common Settings section, move the Enable redirect switch to the right. Then, in the Reasons for Redirect section, move the needed switches to the right.
Parameter
Description
Reasons for Redirect
Physical connection error
Notifications in case of physical connection problems (the ISP's cable is not connected, an additional device needed to access the Internet is not connected).
The device is not configured
Notifications in case when the device works with default settings.
No connection
Notifications in case of problems of the default WAN connection (authorization error, the IPS's server does not respond, etc.).
When you have configured the parameters, click the APPLY button.
To disable notifications, move the Enable redirect switch to the left and click the APPLY button.
Page 183 of 262
DSL-G2452GR MU-MIMO Wireless Dual Band VDSL2 Router with ASDL2+/3G/LTE/Gigabit Ethernet WAN Support, 2 FXS Ports and USB Port
User Manual
Configuring via Web-based Interface
Routing
On the Advanced / Routing page, you can specify static (fixed) routes.
Figure 148. The Advanced / Routing page.
To specify a new route, click the ADD button ( ).
Figure 149. The window for adding a new route. Page 184 of 262
DSL-G2452GR MU-MIMO Wireless Dual Band VDSL2 Router with ASDL2+/3G/LTE/Gigabit Ethernet WAN Support, 2 FXS Ports and USB Port
User Manual
Configuring via Web-based Interface
In the opened window, you can specify the following parameters:
Parameter
Description
Protocol
An IP version.
Interface
From the drop-down list, select an interface (connection) through which the device will communicate with the remote network. If you have selected the Auto value, the router itself sets the interface according to the data on the existing dynamic routes.
Destination network Destination netmask
A remote network which can be accessed with help of this route. You can specify an IPv4 or IPv6 address.
The format of a host IPv6 address is 2001:db8:1234::1, the format of a subnet IPv6 address is 2001:db8:1234::/64.
For IPv4 protocol only.
The remote network mask.
Gateway
An IP address through which the destination network can be accessed.
Metric
A metric for the route. The lower the value, the higher is the route priority. Optional.
After specifying the needed parameters, click the SAVE button.
To edit an existing route, select a relevant line of the table. In the opened window, change the needed parameters and click the SAVE button.
To remove an existing route, select the checkbox located to the left of the relevant line in the table
and click the DELETE button ( ).
Page 185 of 262
DSL-G2452GR MU-MIMO Wireless Dual Band VDSL2 Router with ASDL2+/3G/LTE/Gigabit Ethernet WAN Support, 2 FXS Ports and USB Port
User Manual
Configuring via Web-based Interface
TR-069 Client
On the Advanced / TR-069 Client page, you can configure the router for communication with a remote Auto Configuration Server (ACS).
The TR-069 client is used for remote monitoring and management of the device.
Figure 150. The page for configuring the TR-069 client.
You can specify the following parameters:
Parameter
Description
Interface Enable TR-069 Client
On Interval
TR-069 Client
The interface which the router uses for communication with the ACS. Leave the Automatic value to let the device select the interface basing on the routing table or select another value if required by your ISP.
Move the switch to the right to enable the TR-069 client.
Inform settings
Move the switch to the right so the router may send reports (data on the device and network statistics) to the ACS.
Specify the time period (in seconds) between sending reports.
Page 186 of 262
DSL-G2452GR MU-MIMO Wireless Dual Band VDSL2 Router with ASDL2+/3G/LTE/Gigabit Ethernet WAN Support, 2 FXS Ports and USB Port
User Manual
Configuring via Web-based Interface
Parameter
Description
Auto Configuration Server Settings
URL address
The URL address of the ACS provided by the ISP.
Username
The username to connect to the ACS.
Password
The password to connect to the ACS.
Connection Request Settings
Username
The username used by the ACS to transfer a connection request to the router.
Password
The password used by the ACS.
Request port
The port used by the ACS. By default, the port 8999 is specified.
Request path
The path used by the ACS.
When you have configured the parameters, click the APPLY button.
Page 187 of 262
DSL-G2452GR MU-MIMO Wireless Dual Band VDSL2 Router with ASDL2+/3G/LTE/Gigabit Ethernet WAN Support, 2 FXS Ports and USB Port
User Manual
Configuring via Web-based Interface
Remote Access
On the Advanced / Remote Access page, you can configure access to the web-based interface of the router. By default, the access from external networks to the router is closed. If you need to allow access to the router from the external network, create relevant rules.
Figure 151. The Advanced / Remote Access page.
To create a new rule, click the ADD button ( ).
Figure 152. The window for adding a rule for remote management. Page 188 of 262
DSL-G2452GR MU-MIMO Wireless Dual Band VDSL2 Router with ASDL2+/3G/LTE/Gigabit Ethernet WAN Support, 2 FXS Ports and USB Port
User Manual
Configuring via Web-based Interface
In the opened window, you can specify the following parameters:
Parameter
Description
Name
A name for the rule for easier identification. You can specify any name.
Interface
Select a WAN connection to which this rule will be assigned. When the Automatic value is selected, the router uses the default connection.
IP version
An IP version to which the rule will be applied. Select the relevant value from the drop-down list.
Open access from any Move the switch to the right to allow access to the router for any
external host
host. Upon that the IP address and Mask fields are not displayed.
IP address
A host or a subnet to which the rule is applied. You can specify an IPv4 or IPv6 address.
Mask
For the IPv4-based network only. The mask of the subnet.
Public port
For the IPv4-based network only. An external port of the router. You can specify only one port.
Protocol
The protocol available for remote management of the router.
After specifying the needed parameters, click the SAVE button.
To edit a rule for remote access, left-click the relevant rule. In the opened window, change the needed parameters and click the SAVE button.
To remove a rule for remote access, select the checkbox located to the left of the relevant line in the
table and click the DELETE button ( ).
Page 189 of 262
DSL-G2452GR MU-MIMO Wireless Dual Band VDSL2 Router with ASDL2+/3G/LTE/Gigabit Ethernet WAN Support, 2 FXS Ports and USB Port
User Manual
Configuring via Web-based Interface
UPnP IGD
On the Advanced / UPnP IGD page, you can enable the UPnP IGD protocol. The router uses the UPnP IGD protocol for automatic configuration of its parameters for network applications requiring an incoming connection to the router.
Figure 153. The Advanced / UPnP IGD page.
If you want to manually specify all parameters needed for network applications, move the Enable switch to the left. Then go to the Firewall / Virtual Servers page and specify needed settings.
If you want to enable the UPnP IGD protocol in the router, move the Enable switch to the right.
When the protocol is enabled, the router's parameters configured automatically are displayed on the page:
Parameter
Description
Protocol
A protocol for network packet transmission.
IP address
The IP address of a client from the local area network.
Private port Public port
A port of a client's IP address to which traffic is directed from a public port of the router.
A public port of the router from which traffic is directed to a client's IP address.
Description
Information transmitted by a client's network application.
Page 190 of 262
DSL-G2452GR MU-MIMO Wireless Dual Band VDSL2 Router with ASDL2+/3G/LTE/Gigabit Ethernet WAN Support, 2 FXS Ports and USB Port
User Manual
Configuring via Web-based Interface
xDSL
The Advanced / xDSL page includes the set of ADSL and VDSL standards that should be defined by an ISP. Contact your ISP to set proper parameters. Select the relevant options and click the APPLY button.
Figure 154. The Advanced / xDSL page. Page 191 of 262
DSL-G2452GR MU-MIMO Wireless Dual Band VDSL2 Router with ASDL2+/3G/LTE/Gigabit Ethernet WAN Support, 2 FXS Ports and USB Port
User Manual
Configuring via Web-based Interface
IGMP
On the Advanced / IGMP page, you can allow the router to use IGMP.
IGMP is used for managing multicast traffic (transferring data to a group of destinations). This protocol allows using network resources for some applications, e.g., for streaming video, more efficiently.
Figure 155. The Advanced / IGMP page.
The following elements are available on the page:
Parameter
Description
Enable
Move the switch to the right to enable IGMP.
IGMP version
Select a version of IGMP from the drop-down list.
Interface
From the drop-down list, select a connection of the Dynamic IPv4 or Static IPv4 type for which you need to allow multicast traffic (e.g. streaming video).
After specifying the needed parameters, click the APPLY button.
Page 192 of 262
DSL-G2452GR MU-MIMO Wireless Dual Band VDSL2 Router with ASDL2+/3G/LTE/Gigabit Ethernet WAN Support, 2 FXS Ports and USB Port
User Manual
Configuring via Web-based Interface
ALG/Passthrough
On the Advanced / ALG/Passthrough page, you can allow the router to use RTSP, enable the SIP ALG and PPPoE/PPTP/L2TP/IPsec pass through functions.
SIP is used for creating, modifying, and terminating communication sessions. This protocol allows telephone calls via the Internet.
RTSP is used for real-time streaming multimedia data delivery. This protocol allows some applications to receive streaming audio/video from the Internet.
The PPPoE pass through function allows PPPoE clients of computers from your LAN to connect to the Internet through connections of the router.
The PPTP pass through, L2TP pass through and IPsec pass through functions allow VPN PPTP, L2TP and IPsec traffic to pass through the router so that clients from your LAN can establish relevant connections with remote networks.
Figure 156. The Advanced / ALG/Passthrough page.
Page 193 of 262
DSL-G2452GR MU-MIMO Wireless Dual Band VDSL2 Router with ASDL2+/3G/LTE/Gigabit Ethernet WAN Support, 2 FXS Ports and USB Port
User Manual
Configuring via Web-based Interface
The following elements are available on the page:
Parameter
Description
SIP RTSP PPPoE pass through
Move the switch to the right to enable SIP. Such a setting allows using the SIP ALG function. This function allows VoIP traffic to pass through the NAT-enabled router.15
Move the switch to the right to enable RTSP. Such a setting allows managing media stream: fast forward streaming audio/video, pause and start it.
Move the switch to the right to enable the PPPoE pass through function.
IPsec pass through
Move the switch to the right to enable the IPsec pass through function.
L2TP pass through
Move the switch to the right to enable the L2TP pass through function.
PPTP pass through
Move the switch to the right to enable the PPTP pass through function.
After specifying the needed parameters, click the APPLY button.
15 On the Connections Setup / WAN page, create a WAN connection, move the SIP switch to the right on the Advanced / ALG/Passthrough page, connect an Ethernet cable between a LAN port of the router and the IP phone. Specify SIP parameters on the IP phone and configure it to obtain an IP address automatically (as DHCP client).
Page 194 of 262
DSL-G2452GR MU-MIMO Wireless Dual Band VDSL2 Router with ASDL2+/3G/LTE/Gigabit Ethernet WAN Support, 2 FXS Ports and USB Port
User Manual
Configuring via Web-based Interface
IPsec
On the Advanced / IPsec page, you can configure VPN tunnels based on IPsec protocol. IPsec is a protocol suite for securing IP communications.
Figure 157. The Advanced / IPsec page.
To allow IPsec tunnels, move the Enable switch to the right. Upon that the Tunnels and Status sections are displayed on the page.
In the Status section, the current state of an existing tunnel is displayed.
Page 195 of 262
DSL-G2452GR MU-MIMO Wireless Dual Band VDSL2 Router with ASDL2+/3G/LTE/Gigabit Ethernet WAN Support, 2 FXS Ports and USB Port
User Manual
Configuring via Web-based Interface
To create a new tunnel, click the ADD button ( ) in the Tunnels section.
! Setting for both devices which establish the tunnel should be the same.
Figure 158. The page for adding an IPsec tunnel. The General settings section.
You can specify the following parameters:
Parameter
Description
General settings
Dynamic IPsec
Move the switch to the right to allow a remote host with any public IP address to connect to the router via IPsec protocol. Such a setting can be specified for one tunnel only. Connection requests via this tunnel can be sent by a remote host only.
Remote host
A remote subnet VPN gateway IP address. The field is available if the Dynamic IPsec switch is moved to the left.
Local identifier Identifier value
Select an identification method for the local host (router) from the drop-down list:
Address: The local host is identified by its IP address.
FQDN: The local host is identified by its domain name. The value is unavailable if the Main value is selected from the Exchange mode list.
Specify the local host identifier.
Pre-shared key
A key for mutual authentication of the parties.
Page 196 of 262
DSL-G2452GR MU-MIMO Wireless Dual Band VDSL2 Router with ASDL2+/3G/LTE/Gigabit Ethernet WAN Support, 2 FXS Ports and USB Port
User Manual
Configuring via Web-based Interface
Parameter Interface
NAT Traversal
Exchange mode
Enable DPD DPD delay The maximum number of failures
DPD
Description
Select a WAN connection through which the tunnel will pass. When the Automatic value is selected, the router uses the default WAN connection.
The NAT Traversal function allows VPN traffic to pass through the NAT-enabled router.
Select the Disabled value to disable the function.
Select the Enabled value to enable the function if it is supported by a remote host.
Select the Force value to make the function be always on even if it is not supported by a remote host.
Select the mode of negotiation from the drop-down list:
Main: The mode provides the most secure communication between the parties in the course of negotiation of the authentication procedures.
Base: The draft negotiation mode with preliminary authentication of a host.
Aggressive: The mode provides faster operation as it skips several stages of negotiation of the authentication procedures.
Move the switch to the right to enable using DPD protocol for this tunnel. Such a setting allows to check the status of a remote host: if encrypted packets exchange between the router and the remote host breaks down, the router starts sending DPD messages to the remote host. If the switch is moved to to the left, the DPD delay and The maximum number of failures DPD fields are not available for editing.
A time period (in seconds) between attempts to check the status of a remote host. By default, the value 5 is specified.
A number of DPD messages that were sent to check the status of a remote host and left unanswered. By default, the value 3 is specified. If a remote host does not answer the specified number of messages, the router breaks down the tunnel connection, removes the encryption keys, and tries to activate the connection.
Page 197 of 262
DSL-G2452GR MU-MIMO Wireless Dual Band VDSL2 Router with ASDL2+/3G/LTE/Gigabit Ethernet WAN Support, 2 FXS Ports and USB Port
User Manual
Configuring via Web-based Interface
Parameter
Description
TCP MSS
Maximum Segment Size of a TCP packet. This parameter influences the size of a TCP packet which will be sent from a remote host to the router.
If the Manual value is selected, you can specify the parameter in the TCP MSS Value field.
If the Path MTU discovery value is selected, the parameter will be configured automatically.
TCP MSS Value
The maximum size (in bytes) of a non-fragmented packet. The field is available for editing when the Manual value is selected from the TCP MSS drop-down list.
Allow traffic between Move the switch to the right to allow data exchange between subnets tunneled networks with which IPsec tunnels have been created.
Page 198 of 262
DSL-G2452GR MU-MIMO Wireless Dual Band VDSL2 Router with ASDL2+/3G/LTE/Gigabit Ethernet WAN Support, 2 FXS Ports and USB Port
User Manual
Configuring via Web-based Interface
Figure 159. The page for adding an IPsec tunnel. The First Phase / The Second Phase sections.
Parameter
Description
The First Phase
First phase encryption algorithm
Select encryption algorithm from the drop-down list.
Hashing algorithm Select hashing algorithm from the drop-down list.
First phase DHgroup A Diffie-Hellman key group for Phase 1. Select a value from the drop-
type
down list.
IKE-SA lifetime
The lifetime of IKE-SA keys in seconds. After the specified period it is required to renegotiate the keys. The value specified in this field should exceed the value specified in the IPsec-SA lifetime field. Specify 0 if you don't want to limit the lifetime of the keys.
The Second Phase
Second phase encryption algorithm
Select encryption algorithm from the drop-down list.
Authentication algorithm
Select authentication algorithm from the drop-down list.
Enable PFS
Move the switch to the right to enable the PFS option (Perfect Forward Secrecy). If the switch is moved to the right, a new encryption key exchange will be used for Phase 2. This option increases the security level of data transfer.
Second phase PFSgroup type
A Diffie-Hellman key group for Phase 2. Select a value from the dropdown list. The field is available if the Enable PFS switch is moved to the right.
IPsec-SA lifetime
The lifetime of IPsec-SA keys in seconds. After the specified period it is required to renegotiate the keys. Specify 0 if you don't want to limit the lifetime of the keys.
Page 199 of 262
DSL-G2452GR MU-MIMO Wireless Dual Band VDSL2 Router with ASDL2+/3G/LTE/Gigabit Ethernet WAN Support, 2 FXS Ports and USB Port
User Manual
Configuring via Web-based Interface
If you need to specify IP addresses of local and remote subnets for creating a tunnel, click the ADD button ( ) in the Tunneled Networks section.
Figure 160. The page for adding an IPsec tunnel. The window for adding a tunneled network.
In the opened window, you can specify the following parameters:
Parameter
Description
Local network
A local subnet IP address and mask.
Remote subnet
A remote subnet IP address and mask.
To edit fields in the Tunneled Networks section, select the relevant line in the table. In the opened window, change the needed parameters and click the SAVE button.
To remove a subnet, select the checkbox located to the left of the relevant line in the table and click
the DELETE button ( ). Also you can remove a subnet in the editing window.
After configuring all needed settings for the IPsec tunnel, click the APPLY button.
To edit the parameters of an existing tunnel, in the Tunnels section, select the relevant tunnel in the table. On the opened page, change the needed parameters and click the APPLY button.
To remove an existing tunnel, select the checkbox located to the left of the relevant line in the table
and click the DELETE button ( ). Also you can remove a tunnel on the editing page.
To disable VPN tunnels based on IPsec protocol, move the Enable switch to the left.
Page 200 of 262
DSL-G2452GR MU-MIMO Wireless Dual Band VDSL2 Router with ASDL2+/3G/LTE/Gigabit Ethernet WAN Support, 2 FXS Ports and USB Port
User Manual
Configuring via Web-based Interface
VoIP
In this menu you can configure all parameters essential for VoIP via SIP and specify all needed settings for the phones connected to the router.
Basic Settings
On the VoIP / Basic Settings page, you can configure all needed settings for VoIP via SIP.
Parameter Address
Port
Address Port
Figure 161. The VoIP / Basic Settings page.
Description
SIP Proxy
An IP or URL address of the SIP proxy server. A port of the SIP proxy server. Unless another setting is given by your ISP, it is recommended to leave the default value (5060).
SIP Outbound Proxy
An IP or URL address of the SIP outbound proxy server. A port of the SIP outbound proxy server. Unless another setting is given by your ISP, it is recommended to leave the default value (5060).
Page 201 of 262
DSL-G2452GR MU-MIMO Wireless Dual Band VDSL2 Router with ASDL2+/3G/LTE/Gigabit Ethernet WAN Support, 2 FXS Ports and USB Port
User Manual
Configuring via Web-based Interface
Parameter
Description
SIP Domain
Move the switch to the right if your ISP requires to specify a domain Use domain to register name upon registration on the SIP proxy server. Then fill in the SIP
domain name field.
SIP domain name
When this field is filled in, the router registers on the SIP proxy server using the specified domain name. When the field is blank, the router uses the IP address assigned to it.
Misc
Use default gateway
If the switch is moved to the right, the default IPv4 WAN connection will be used for VoIP.
If the switch is moved to the left, you can manually select an interface which will be used for VoIP from the Bound interface name drop-down list.
Bound interface name
From the drop-down list, select an interface (the local interface or an IPv4 WAN connection) which will be used for VoIP. The drop-down list is displayed if the Use default gateway switch is moved to the left.
Enable DHCP option 120
Move the switch to the right to allow using DHCP option 120. When the option is enabled, the Address field in the SIP Proxy section and the Backup SIP proxy address field in the SIP Backup section are filled in automatically.
Local RTP port (minimum/maximum)
A range of ports for voice traffic receipt/transfer via RTP. Unless another setting is given by your ISP, it is recommended to leave the default value (9000 and 9015).
SIP Backup
Backup SIP proxy address
Unregister when switching
An IP address of the backup SIP proxy server. The router uses the backup SIP proxy server in case of no response from the main SIP proxy server.
If the switch is moved to the right, upon switching between the main SIP proxy server and the backup SIP proxy server and backwards, the router unregisters on the current registration server by sending special SIP packets in order to complete the registration session before it expires.
If the switch is moved to the right, upon switching between the main SIP proxy server and the backup SIP proxy server and backwards, the router is registered until the registration session expires.
Page 202 of 262
DSL-G2452GR MU-MIMO Wireless Dual Band VDSL2 Router with ASDL2+/3G/LTE/Gigabit Ethernet WAN Support, 2 FXS Ports and USB Port
User Manual
Configuring via Web-based Interface
Parameter
Description
Allow call without registration
Move the switch to the right to allow calls without registration on the main SIP proxy server.
Backup route
An IP address to which calls will be forwarded if the main or backup SIP proxy servers are unavailable.
Also on this page, you can specify incoming/outgoing call settings for the SIP lines.
Figure 162. The VoIP / Basic Settings page. The list of the SIP lines.
To change parameters of a SIP line, select the relevant line in the table.
Figure 163. The page for editing SIP line parameters. Page 203 of 262
DSL-G2452GR MU-MIMO Wireless Dual Band VDSL2 Router with ASDL2+/3G/LTE/Gigabit Ethernet WAN Support, 2 FXS Ports and USB Port
User Manual
Configuring via Web-based Interface
On the opened page, you can specify the following parameters:
Parameter
Description
General
Registration SIP ID / Number
Username
Move the switch to the right to register the line on the SIP proxy server.
A number for this line.
The called party sees the specified value as the caller number.
A username for this line. For most SIP proxy servers the username coincides with the phone number.
Password
A user password for this line.
PIN code to dial
Fill in the field to allow the user of the phone to make calls only after dialing the PIN code.
DND
DND DND on schedule
Do Not Disturb. Move the switch to the right to reject all incoming calls (the busy tone will be heard).
Move the switch to the right to reject all incoming calls in a certain time of day. If the switch is moved to the right, the Time period field is available. Specify the needed period as HH:MM-HH:MM, where HH:MM is time in 24-hour format.
Forwarding
Forwarding
From the drop-down list, select a forwarding mode for the current line. Leave the Off value if forwarding is not needed.
Call forwarding number
A number to which the router redirects calls in accordance with the mode selected from the Forwarding list.
The forwarding delay
A time period (in seconds) after which the router redirects calls to the number specified in the Call forwarding number field. The field is available for editing if the If no answer value is selected from the Forwarding list.
Advanced
Call waiting
Anonymous call blocking
Move the switch to the right to accept incoming calls when the line is busy. To switch between calls, press the FLASH key on the phone.
Move the switch to the right to reject calls when the calling party conceals its number.
Page 204 of 262
DSL-G2452GR MU-MIMO Wireless Dual Band VDSL2 Router with ASDL2+/3G/LTE/Gigabit Ethernet WAN Support, 2 FXS Ports and USB Port
User Manual
Configuring via Web-based Interface
Parameter
Description
Anonymous calling
Move the switch to the right to conceal your number from the called party.
Enable pound key
Move the switch to the right to speed up dialing with pressing # (the pound key) immediately after dialing numbers.
Flash Settings
Flash time / Flash time minimum
The maximum and minimum value for flash time (the user hangs up the receiver and lifts it again) which the router will regard as pressing the FLASH key.
Extended flash
Move the switch to the right to use combination of the FLASH key and keys of the phone in order to organize three-party calls or transfer calls.
By default, each action is assigned to a certain key of the phone set. To change this value, in the line corresponding to the action, select the needed value from the drop-down list.
Use of FLASH key
· The function is enabled. The phone connected to this line has an incoming call in the standby mode and an outgoing call in the talk mode. It's needed to press the FLASH key, hear the dial tone, and then press the key corresponding to your action.
· The function is not enabled. The phone connected to this line has an incoming call in the standby mode and an outgoing call in the talk mode. It's needed:
to press the FLASH key in order to put the second call on hold and continue the first call,
to hang up the receiver in order to end both calls and connect the first and second speakers to each other.
Attended transfer
Move the switch to the right if you want to transfer calls when a called party's receiver is lifted.
Alert transfer
Move the switch to the right if you want to transfer calls when a dial tone is heard.
Page 205 of 262
DSL-G2452GR MU-MIMO Wireless Dual Band VDSL2 Router with ASDL2+/3G/LTE/Gigabit Ethernet WAN Support, 2 FXS Ports and USB Port
User Manual
Configuring via Web-based Interface
Parameter
Description
Enable hotline Number
Connect after
Hotline
Move the switch to the right to make the phone connected to this line dial the number specified in the Number field after the receiver is lifted.
A number dialed by the phone connected to this line after the receiver is lifted. Also you can specify a number in the format phone_number@IP_address for direct IP calls bypassing the SIP proxy server. The field is available for editing if the Enable hotline switch is moved to the right.
A time period (in seconds) between lifting up the receiver and dialing the hotline number. The field is available for editing if the Enable hotline switch is moved to the right.
When all needed settings are configured, click the APPLY button ( ).
Page 206 of 262
DSL-G2452GR MU-MIMO Wireless Dual Band VDSL2 Router with ASDL2+/3G/LTE/Gigabit Ethernet WAN Support, 2 FXS Ports and USB Port
User Manual
Configuring via Web-based Interface
Advanced
On the VoIP / Advanced page, you can specify additional settings for VoIP via SIP.
Figure 164. The VoIP / Advanced page.
Parameter
DTMF relay setting Payload type
Enable internal calls
Description
Common Settings
From the drop-down list, select a mode for DTMF signal transmission.
· InBand: transmission with voice data.
· RFC2833: transmission in accordance with RFC2833.
· SIPInfo: transmission in the relevant SIP messages.
Select a data type from the drop-down list. The list is displayed if the RFC2833 value is selected from the DTMF relay setting dropdown list.
Move the switch to the right to allow calls from the phones connected to the FXS ports to pass through the router without the SIP server.
Page 207 of 262
DSL-G2452GR MU-MIMO Wireless Dual Band VDSL2 Router with ASDL2+/3G/LTE/Gigabit Ethernet WAN Support, 2 FXS Ports and USB Port
User Manual
Configuring via Web-based Interface
Parameter Support PRACK Replace # with %23 Locale selection
Before the first call
Detection mode
Codec Payload type Registration expire
timeout Registration retry
interval
Description
Move the switch to the right to enable the PRACK method (Provisional Response ACKnowledgement). The PRACK method provides reliable transmission of packets with provisional responses to an initiating request upon setting a session in accordance with RFC3262.
RFC3261 doesn't support # (pound) for a phone number. If a phone number has the character, move the switch to the right to replace the character # with the special sequence %23.
Select your country from the drop-down list. By default, the value RU (Russia) is specified. This setting defines the parameters of the phone signals traditional for the specific country.
CallerID
Move the switch to the right to deliver a phone number to the phones connected to the FXS ports of the router before the first phone ring when receiving an incoming call.
From the drop-down list, select an operation mode of the automatic caller identification function for the phones connected to the FXS ports of the router.
To disable the automatic caller identification function for the phones connected to the FXS ports of the router, select the Do not use value from the drop-down list.
RTP Redundancy
The RTP Redundancy function allows restoring a part of lost RTP packets while transmitting audio data.
From the drop-down list, select a codec to which the function should be applied.
To disable the function, select the None value from the drop-down list.
Payload data type.
Registration
A time period (in seconds) after which the router changes the registration status in case of no response from the SIP proxy server.
A time period (in seconds) after which the registration will be repeated.
Page 208 of 262
DSL-G2452GR MU-MIMO Wireless Dual Band VDSL2 Router with ASDL2+/3G/LTE/Gigabit Ethernet WAN Support, 2 FXS Ports and USB Port
User Manual
Configuring via Web-based Interface
Parameter
Description
Session expires
A time period (in seconds) between attempts to check the status of the voice session.
Session refresher
From the drop-down list, select the preferred choice of checking the Internet connection state during the voice session:
Local: The router sends special SIP packets for checking the Internet connection state.
Remote: The SIP proxy server sends special SIP packets for checking the Internet connection state.
Auto: The SIP proxy server defines which party checks the Internet connection state.
Session update method
The voice session update method. Contact your ISP to clarify which value needs to be selected.
NAT Traversal
Mode
The NAT Traversal function allows VoIP traffic to pass through the NAT-enabled router.
Select the Disabled value to disable the function.
Select the STUN value to enable the STUN client (Session Traversal Utilities for NAT). The STUN client sends requests to a STUN server. On the basis of the received replies, the client allows VoIP traffic to pass through the NAT-enabled router. When this value is selected, the Server address, Port and Binding period fields are available for editing.
Select the NAT Public IP value to manually specify a public ("white") IP address of an upper-level router which exchanges service messages with the SIP proxy server. When this value is selected, the Public address and Port fields are available for editing.
Server address
An IP or URL address of a STUN server to which a connection is established.
Public address
A public ("white") IP address of an upper-level router which exchanges service messages with the SIP proxy server.
Page 209 of 262
DSL-G2452GR MU-MIMO Wireless Dual Band VDSL2 Router with ASDL2+/3G/LTE/Gigabit Ethernet WAN Support, 2 FXS Ports and USB Port
User Manual
Configuring via Web-based Interface
Parameter
Description
Port
If the STUN value is selected from the Mode drop-down list, a port of a STUN server to which a connection is established is displayed. By default, the port 3478 is specified.
If the NAT Public IP value is selected from the Mode drop-down list, a port of an upper-level router which exchanges service messages with the SIP proxy server is displayed. By default, the port 5060 is specified.
Binding period
The time interval between service messages. Specify a needed value.
Jitter Buffer
Delay / Maximal delay
Factor
The Jitter Buffer parameter improves the quality of voice transmission: received voice packets are specially delayed, which allows their reproducing in the order they were sent from the transmitting side.
Specify the minimal and maximal packets waiting period (in milliseconds) in the relevant fields.
This parameter enhances efficiency of jitter buffer operation. When the minimal value is selected, the delay value will tend to be lower. Select the relevant value from the drop-down list.
Flash Settings
The FLASH action type.
· Transfer: switching between calls.
Flash type
· RFC2833: sending a service message in the RTP flow in
accordance with RFC2833. The value is available if the RFC2833 or SIPInfo value is selected from the DTMF relay setting drop-down list.
· SIPInfo: sending a service SIP message. The value is available if the SIPInfo value is selected from the DTMF relay setting drop-down list.
Content-Type for flash button
If the SIPInfo value is selected from the Flash type drop-down list, you can select the type of data transferred in SIP INFO messages upon pressing the FLASH key.
Page 210 of 262
DSL-G2452GR MU-MIMO Wireless Dual Band VDSL2 Router with ASDL2+/3G/LTE/Gigabit Ethernet WAN Support, 2 FXS Ports and USB Port
User Manual
Configuring via Web-based Interface
Parameter
Description
Network Settings
RTP DSCP / SIP DSCP
Differentiated Services Codepoint.
From the relevant drop-down list, select tags for voice and signaling traffic.
Timeout settings
Dial delay time Waiting for first digit
The delay time before the next digit is dialed (from 3 to 9 seconds). When this time expires, the router regards that the dialing is completed and sends the request to the server. Select a needed value from the drop-down list.
The delay time before the first digit is dialed (in seconds). Specify a needed value.
NAT
Support rport NAT keep alive
Move the switch to the right to enable the Symmetric Response Routing function in accordance with RFC3581. This function allows sending responses to a request to the port and IP address from which the request was received via the NAT-enabled router. The SIP proxy server must support the function.
Move the switch to the right to allow the router to support the state of automatically forwarded ports by periodic exchange of service messages. If the switch is moved to the right, the NAT support interval field is available for editing.
NAT support interval The time interval between service messages. Specify a needed value.
RTCP
Send RTCP Send RTCP XR
Real-Time Transport Control Protocol.
Move the switch to the right to allow sending RTCP packets. RTCP packets exchange allows receiving statistics on RTP packets delivery.
Move the switch to the right to allow sending RTCP packets of the XR (Extended Report) type. Packets of this type allows more service information to be sent.
Sending interval
Specify the time period (in seconds) between sending packets.
When all needed settings are configured, click the APPLY button ( ).
Page 211 of 262
DSL-G2452GR MU-MIMO Wireless Dual Band VDSL2 Router with ASDL2+/3G/LTE/Gigabit Ethernet WAN Support, 2 FXS Ports and USB Port
User Manual
Configuring via Web-based Interface
Fax Settings
On the VoIP / Fax Settings page, you can specify settings of data receipt/transfer for the fax machines connected to the FXS ports of the router.
Figure 165. The VoIP / Fax Settings page.
Parameter
Enable T.38 support Support SoftX3000
Port
Description
T.38
Move the switch to the right to allow support of the T.38 protocol. If the switch is moved to the right, the Support SoftX3000 switch, the Port field, the Fax/Modem determination drop-down list, and the Enable custom parameters switch are displayed on the page.
Move the switch to the right to let the router support operation with SoftX3000. If the switch is moved to the right, the Port field is unavailable for editing.
The router's port for data transfer via T.38.
Page 212 of 262
DSL-G2452GR MU-MIMO Wireless Dual Band VDSL2 Router with ASDL2+/3G/LTE/Gigabit Ethernet WAN Support, 2 FXS Ports and USB Port
User Manual
Configuring via Web-based Interface
Parameter
Description
Fax/Modem determination
Enable custom parameters
From the drop-down list, select a mode of fax/modem signal detection.
Move the switch to the right to specify additional parameters for T.38. Upon that the Custom parameters T.38 section is displayed on the page.
Custom parameters T.38
Maximal buffer
The maximum buffer size for data received by the router.
Rate management
From the drop-down list, select a method for facsimile data transfer rate management: Local or Remote.
Maximal rate
From the drop-down list, select the maximum rate for facsimile data receipt/transfer.
Error correction mode
Move the switch to the right to enable the error correction mode. When the switch is moved to the right, the ECC signal and ECC data fields are available for editing.
Enable spoofing
Move the switch to the right to let the router simulate facsimile data receipt/transfer in case of delays.
Duplicate number Specify number of packet duplications.
V.152
Enable V.152 support
Move the switch to the right to allow support of the V.152 recommendation. Upon that the Payload type field and the Codec type drop-down list are displayed on the page.
Payload type
Payload data type.
Codec type
From the drop-down list, select a codec for data transfer in accordance with V.152.
When all needed settings are configured, click the APPLY button.
Page 213 of 262
DSL-G2452GR MU-MIMO Wireless Dual Band VDSL2 Router with ASDL2+/3G/LTE/Gigabit Ethernet WAN Support, 2 FXS Ports and USB Port
User Manual
Configuring via Web-based Interface
Audio Settings
On the VoIP / Audio settings page, you can configure audio parameters, volume and voice codecs.
Figure 166. The VoIP / Audio Settings page.
To change the parameters for a SIP line, select the relevant line in the table.
Figure 167. The VoIP / Audio Settings page. The Audio Settings and Volume Settings sections.
On the opened page, you can specify the following parameters:
Parameter
Description
Common settings
CNG
Comfort Noise Generation. Move the switch to the right to enable the function.
Page 214 of 262
DSL-G2452GR MU-MIMO Wireless Dual Band VDSL2 Router with ASDL2+/3G/LTE/Gigabit Ethernet WAN Support, 2 FXS Ports and USB Port
User Manual
Configuring via Web-based Interface
Parameter CNG Amp
VAD VAD Amp
LEC NLP Echo Tail
iLBC mode
SPEEX bitrate
Speaker Microphone
Description
Signal amplitude threshold to start comfort noise generation. Specify a value from 0 to 200. If 0 is specified, the threshold is not set.
Voice Activity Detection. Move the switch to the right to enable the function.
Signal amplitude threshold to start silence compression. Specify a value from 0 to 200.
Line Echo Cancellation. Move the switch to the right to enable the function.
Nonlinear Processing. Move the switch to the right to enable the function.
Maximum echo tail length (in milliseconds). Select the needed value from the drop-down list.
Internet Low Bitrate Codec. The value of the field specifies the operation mode of the codec. Select the needed value from the drop-down list.
· mode 20ms the speech signal transfer rate is 15.20Kbps for 20ms frames.
· mode 30ms the speech signal transfer rate is 13.33Kbps for 30ms frames.
A speech signal compression codec for VoIP traffic transmission. Select the needed value from the drop-down list.
Volume Settings
Specify the earphone volume for the phone connected to the FXS port of the router.
Specify the microphone sensitivity for the phone connected to the FXS port of the router.
Page 215 of 262
DSL-G2452GR MU-MIMO Wireless Dual Band VDSL2 Router with ASDL2+/3G/LTE/Gigabit Ethernet WAN Support, 2 FXS Ports and USB Port
User Manual
Configuring via Web-based Interface
In the Codecs Settings section, you can configure work of voice codecs in use.
Figure 168. The VoIP / Audio Settings page. The Codecs Settings section.
To change parameters of a codec, left-click the relevant line in the table.
Figure 169. The window for changing the codec parameters.
In the opened window, you can specify the following parameters:
Parameter
Description
Enable codec Priority
To enable the codec, move the switch to the right. To disable the codec, move the switch to the left.
Priority of the codec upon setting a voice session. Select the needed value from the drop-down list.
Period of packetization
Quantity of milliseconds transmitted in one packet. Select the needed value from the drop-down list.
Click the SAVE button.
When all needed settings are configured, click the APPLY button.
Page 216 of 262
DSL-G2452GR MU-MIMO Wireless Dual Band VDSL2 Router with ASDL2+/3G/LTE/Gigabit Ethernet WAN Support, 2 FXS Ports and USB Port
User Manual
Configuring via Web-based Interface
Call Routing
On the VoIP / Call Routing page, you can fill in the phone book for a devices connected to the FXS ports of the router. To do this, go to the relevant tab (the Line 1 or Line 2).
Figure 170. The VoIP / Call Routing page. The Line 1 tab.
In the Speed Dial section, you can assign phone numbers to the digital keys of the phone set connected to this line. To do this, left-click the line corresponding to the key of the phone set. In the opened window, enter the needed number in the Number field and click the SAVE button. Also you can specify a number in the format phone_number@IP_address for direct IP calls bypassing the SIP proxy server. To change or delete the number assigned to the digital key, left-click the line corresponding to the key of the phone set, in the opened window, edit or remove the value of the Number field and click the SAVE button. To use a number specified in the Speed Dial section, press # (the pound key) on the phone set, then press the relevant digital key. In the Abbreviated Dial section, you can assign short numbers (as a rule, such numbers consist of two or three digits) to frequently used phone numbers. To do this, click the ADD button ( ). In the opened window, enter a short number in the Source number field, then enter the actual phone number in the Destination number field. Click the SAVE button. Also in the Destination number field you can specify a number in the format phone_number@IP_address for direct IP calls bypassing the SIP proxy server.
Page 217 of 262
DSL-G2452GR MU-MIMO Wireless Dual Band VDSL2 Router with ASDL2+/3G/LTE/Gigabit Ethernet WAN Support, 2 FXS Ports and USB Port
User Manual
Configuring via Web-based Interface
To change a short or actual phone number, select of the relevant line in the table. In the opened window, change needed parameters and click the SAVE button.
To remove a phone number, select the checkbox located to the left of the relevant line in the table
and click the DELETE button ( ).
To use a number specified in the Abbreviated Dial section, dial the needed short number on the phone set.
In the Dialplan Settings section, you can configure the dial plan for VoIP. To do this, move the Use dialplan switch to the right and in the Dialplan field displayed, specify the needed rule. You can specify several rules separated by the character | (vertical bar). You can use digits (0-9), the characters * (asterisk) and # (pound), and the following characters:
Parameter
Description
[]
Digits and/or the characters * and # within square brackets specify a range of values for a certain position in the number.
X
Any digit, the character * or #.
.
Any number of repetitions (including none) of the previous digit or character.
<>
Angle brackets containing digits separated by : (colon) allow to substitute the digit after the colon for the digit before the colon.
In the Misc section, fill in the PIN code to dial field to allow the user of the phone to make calls only after dialing the PIN code.
When all needed settings are configured, click the APPLY button.
Page 218 of 262
DSL-G2452GR MU-MIMO Wireless Dual Band VDSL2 Router with ASDL2+/3G/LTE/Gigabit Ethernet WAN Support, 2 FXS Ports and USB Port
User Manual
Configuring via Web-based Interface
Call Feature Codes
On the VoIP / Call Feature Codes page, you can allow changing some parameters of the router directly from the phone sets connected to the FXS ports of the router.
Figure 171. The VoIP / Call Feature Codes page.
To enable or disable all the codes for the phones connected to the FXS ports of the router, in the Line 1 and/or Line 2 section, in the Dialing from Phone subsection, click the ALLOW or DENY button correspondingly. To inform or not to inform the SIP server when a user dials the codes on the phones, in the Sending to Server subsection, click the ALLOW or DENY button correspondingly. To specify a call feature code for transferring a call to another phone, in the Line 1 and/or Line 2 section, enter a code in the Transfer code field and click the APPLY button ( ). Use digits (0-9), the characters * (asterisk) and # (pound).
Page 219 of 262
DSL-G2452GR MU-MIMO Wireless Dual Band VDSL2 Router with ASDL2+/3G/LTE/Gigabit Ethernet WAN Support, 2 FXS Ports and USB Port
User Manual
Configuring via Web-based Interface
Also the following call feature codes are available on the page:
Parameter
Description
Disable Call Waiting
Disables the call waiting function.
Enable Call Waiting
Enables the call waiting function.
Disable Do Not Disturb
Disables rejection of incoming calls.
Enable Do Not Disturb
Enable Call Forwarding No Answer
Disable Call Forwarding No Answer
Enables rejection of all incoming calls (the busy tone will be heard). Enables call forwarding when this line gives no reply.
Disables call forwarding when this line gives no reply.
Enable Call Forwarding On Busy Enables call forwarding when this line is busy.
Disable Call Forwarding On Busy Disables call forwarding when this line is busy.
Enable Unconditional forwarding Enables forwarding for all calls.
Disable Unconditional forwarding Disables forwarding for all calls.
Disable Hot Line
Disables the hotline.
Enable Hot Line
Enables the hotline.
Enable alarm clock
Enables the alarm clock for the time specified for this line.
Disable alarm clock
Disables the alarm clock.
Save configuration Reboot device
Enables saving the router's settings to the non-volatile memory.
Enables rebooting the router. All unsaved changes will be lost after the device's reboot.
Page 220 of 262
DSL-G2452GR MU-MIMO Wireless Dual Band VDSL2 Router with ASDL2+/3G/LTE/Gigabit Ethernet WAN Support, 2 FXS Ports and USB Port
User Manual
Configuring via Web-based Interface
To change parameters of a code, select the relevant line in the table.
Figure 172. The VoIP / Call Feature Codes page. The window for editing the code parameters.
In the opened window, specify the needed parameters:
Parameter
Description
VSC
The value of the code. If the code ends with * (the asterisk key), further you can enter a value for the function in use (a number for call forwarding or time for the alarm clock). For example, the code for enabling the alarm clock: *55*HHMM#, where HHMM is time in 24-hour format.
Dialing from Phone
Line 1 / Line 2
Move the switch of the relevant line to the right to enable the code for the phone connected to the FXS port of the router.
Move the switch of the relevant line to the left to disable the code for this phone.
Sending to Server
Line 1 / Line 2 Click the SAVE button.
Move the switch of the relevant line to the right to inform the SIP server when a user dials the code on the phone.
Move the switch of the relevant line to the left if the server should not be informed.
Page 221 of 262
DSL-G2452GR MU-MIMO Wireless Dual Band VDSL2 Router with ASDL2+/3G/LTE/Gigabit Ethernet WAN Support, 2 FXS Ports and USB Port
User Manual
Configuring via Web-based Interface
Call Logging
On the VoIP / Call Logging page, you can configure the call log parameters, sending the log and conversation records to a USB storage connected to the router and view information on all calls.
Figure 173. The VoIP / Call Logging page.
To enable logging of calls, move the Enable logging switch to the right. Then specify the needed parameters.
Parameter
Description
Select a location for the call log from the drop-down list.
Storage for call history
· USB storage: the call log is stored in the memory of the USB storage connected to the router.
· Internal memory: the call log is stored in the router's RAM. The call log is removed when the device is rebooted or powered off.
Storage for recording conversations
Select the USB storage value to store conversation records in the memory of the USB storage connected to the router or leave the Don't save value if conversation records needn't be stored.
Encrypt audio files
Move the switch to the right to activate the DES (Data Encryption Standard) encryption algorithm in the CBC (Cipher Block Chaining) mode. The switch is displayed if the USB storage value is selected from the Storage for recording conversations drop-down list.
Page 222 of 262
DSL-G2452GR MU-MIMO Wireless Dual Band VDSL2 Router with ASDL2+/3G/LTE/Gigabit Ethernet WAN Support, 2 FXS Ports and USB Port
User Manual
Configuring via Web-based Interface
Parameter
Description
Password for encrypting audio files
Enter a password which will be used for conversation records encryption. Use digits, Latin letters (uppercase and/or lowercase), and other characters.16 Click the Show icon ( ) to display the entered password. The field is displayed if the Encrypt audio files switch is moved to the right.
Contact the D-Link technical support to get the utility for conversation records decryption (the e-mail address and the phone number are displayed on the Summary page).
After specifying the needed parameters, click the APPLY button.
In the Call History section, the detailed information on all calls are displayed: date and time, call duration, and a caller or called party number.
To sort the log records, in the Call History section, left-click the name of a column and click the
Sort icon ( (ascending), (descending)) displayed. To remove the call log, click the CLEAR ENTRIES button. To remove conversation records saved on the USB storage, click the CLEAR FILES button.
16 Space, #%&()*+,-./:;<=>?@[]^_{|}~.
Page 223 of 262
DSL-G2452GR MU-MIMO Wireless Dual Band VDSL2 Router with ASDL2+/3G/LTE/Gigabit Ethernet WAN Support, 2 FXS Ports and USB Port
User Manual
Configuring via Web-based Interface
Text Messages
On the VoIP / Text Messages page, you can send text messages to other VoIP devices and also view the message history.
Figure 174. The VoIP / Text Messages page.
In the Receiving messages section, you can allow receiving messages. Move the Allow receiving messages for line 1 switch to the right to allow receiving messages for a phone connected to the FXS 1 port of the router. Move the Allow receiving messages for line 2 switch to the right to allow receiving messages for a phone connected to the FXS 2 port of the router. In the Sending messages section, you can create and send a text message. From the Line drop-down list, select a relevant line. In the Destination field, enter the recipient's phone number. Also you can specify a number in the format phone_number@IP_address for direct message transfer by IP or in the format phone_number@domain_name for P2P (Peer-to-Peer) transfer bypassing the SIP proxy server. Enter the text of the message in the Message field and click the SEND button. In the Message History section, you can read outgoing and incoming messages, and also sort the message history and remove it. To sort the message history, in the Message History section, left-click the name of a column and
click the Sort icon ( (ascending), (descending)) displayed.
Page 224 of 262
DSL-G2452GR MU-MIMO Wireless Dual Band VDSL2 Router with ASDL2+/3G/LTE/Gigabit Ethernet WAN Support, 2 FXS Ports and USB Port
User Manual
Configuring via Web-based Interface
To remove the message history, click the CLEAR ENTRIES button. The message history is also removed when the device is rebooted or powered off.
Page 225 of 262
DSL-G2452GR MU-MIMO Wireless Dual Band VDSL2 Router with ASDL2+/3G/LTE/Gigabit Ethernet WAN Support, 2 FXS Ports and USB Port
User Manual
Configuring via Web-based Interface
Security
On the VoIP / Security page, you can configure filtering rules for incoming calls of the phones connected to the FXS ports of the router.
Figure 175. The VoIP / Security page.
In the Filtering policy section, select the needed choice of the radio button. · White list: the router accepts incoming calls only from IP addresses or domains specified in the White list section; · Black list: the router accepts incoming calls from any IP addresses or domains except for those specified in the Black list section; · Filtering is turned off: filtering by IP addresses or domain names is not performed.
To add an IP address or domain name, click the ADD RULE button in the White list or Black list section correspondingly. In the line displayed, specify the needed value. To remove an IP address or domain name from the white or black list, click the Delete icon ( ) in the relevant line. After specifying the needed parameters, click the APPLY button.
Page 226 of 262
DSL-G2452GR MU-MIMO Wireless Dual Band VDSL2 Router with ASDL2+/3G/LTE/Gigabit Ethernet WAN Support, 2 FXS Ports and USB Port
User Manual
Configuring via Web-based Interface
Firewall
In this menu you can configure the firewall of the router: · add rules for IP filtering · create virtual servers · define a DMZ · configure the MAC filter · specify restrictions on access to certain web sites.
IP Filter
On the Firewall / IP Filter page, you can create new rules for filtering IP packets and edit or remove existing rules.
Figure 176. The Firewall / IP Filter page.
To create a new rule, click the ADD button ( ).
Page 227 of 262
DSL-G2452GR MU-MIMO Wireless Dual Band VDSL2 Router with ASDL2+/3G/LTE/Gigabit Ethernet WAN Support, 2 FXS Ports and USB Port
User Manual
Configuring via Web-based Interface
Figure 177. The page for adding a rule for IP filtering.
You can specify the following parameters:
Parameter
Description
General settings
Enable rule Name Action
Protocol
Move the switch to the right to enable the rule.
Move the switch to the left to disable the rule.
A name for the rule for easier identification. You can specify any name.
Select an action for the rule.
Allow: Allows packet transmission in accordance with the criteria specified by the rule.
Deny: Denies packet transmission in accordance with the criteria specified by the rule.
A protocol for network packet transmission. Select a value from the drop-down list.
Page 228 of 262
DSL-G2452GR MU-MIMO Wireless Dual Band VDSL2 Router with ASDL2+/3G/LTE/Gigabit Ethernet WAN Support, 2 FXS Ports and USB Port
User Manual
Configuring via Web-based Interface
Parameter IP version
Description
An IP version to which the rule will be applied. Select the relevant value from the drop-down list.
Source IP Address
Set as
Select the needed value from the drop-down list.
Start IPv4 address / Start IPv6 address
End IPv4 address / End IPv6 address Subnet IPv4 address / Subnet IPv6 address
The source host start IPv4 or IPv6 address. If it is necessary to specify a single address, leave the End IPv4 address / End IPv6 address field blank. You can choose a device connected to the router's LAN at the moment. To do this, select the relevant IPv4 or IPv6 address from the drop-down list (the field will be filled in automatically).
The source host end IPv4 or IPv6 address.
The source subnet IPv4 or IPv6 address. The field is displayed when the Subnet value is selected from the Set as drop-down list.
Destination IP Address
Set as
Select the needed value from the drop-down list.
Start IPv4 address / Start IPv6 address
End IPv4 address / End IPv6 address Subnet IPv4 address / Subnet IPv6 address
The destination host start IPv4 or IPv6 address. If it is necessary to specify a single address, leave the End IPv4 address / End IPv6 address field blank. You can choose a device connected to the router's LAN at the moment. To do this, select the relevant IPv4 or IPv6 address from the drop-down list (the field will be filled in automatically).
The destination host end IPv4 or IPv6 address.
The destination subnet IPv4 or IPv6 address. The field is displayed when the Subnet value is selected from the Set as drop-down list.
Ports
Destination port
Set source port manually
A port of the destination IP address. You can specify one port, several ports separated by a comma, or a range of ports separated by a colon.
Move the switch to the right to specify a port of the source IP address manually. Upon that the Source port field is displayed.
Page 229 of 262
DSL-G2452GR MU-MIMO Wireless Dual Band VDSL2 Router with ASDL2+/3G/LTE/Gigabit Ethernet WAN Support, 2 FXS Ports and USB Port
User Manual
Configuring via Web-based Interface
Parameter
Description
Source port
A port of the source IP address. You can specify one port, several ports separated by a comma, or a range of ports separated by a colon.
Click the APPLY button.
To edit a rule for IP filtering, select the relevant line in the table. On the opened page, change the needed parameters and click the APPLY button.
To remove a rule, select the checkbox located to the left of the relevant line of the table and click
the DELETE button ( ). Also you can remove a rule on the editing page.
Page 230 of 262
DSL-G2452GR MU-MIMO Wireless Dual Band VDSL2 Router with ASDL2+/3G/LTE/Gigabit Ethernet WAN Support, 2 FXS Ports and USB Port
User Manual
Configuring via Web-based Interface
Virtual Servers
On the Firewall / Virtual Servers page, you can create virtual servers for redirecting incoming Internet traffic to a specified IP address in the local area network.
Figure 178. The Firewall / Virtual Servers page.
To create a new virtual server, click the ADD button ( ).
Figure 179. The page for adding a virtual server. Page 231 of 262
DSL-G2452GR MU-MIMO Wireless Dual Band VDSL2 Router with ASDL2+/3G/LTE/Gigabit Ethernet WAN Support, 2 FXS Ports and USB Port
User Manual
Configuring via Web-based Interface
You can specify the following parameters:
Parameter
Description
General Settings
Name Template
A name for the virtual server for easier identification. You can specify any name.
Select a virtual server template from the drop-down list, or select Custom to specify all parameters of the new virtual server manually.
Interface
A WAN connection to which this virtual server will be assigned.
Protocol NAT Loopback
A protocol that will be used by the new virtual server. Select a value from the drop-down list.
Move the switch to the right in order to let the users of the router's LAN access the local server using the external IP address of the router or its DDNS name (if a DDNS service is configured). Users from the external network access the router using the same address (or DDNS name).
Public Network Settings
Remote IP
Public port (start)/ Public port (end)
The IP address of the host/subnet of the client that will connect to the virtual server.
To add one more IP address, click the ADD REMOTE IP button and enter the address in the displayed line.
To remove the IP address, click the Delete icon ( ) in the line of the address.
A port of the router from which traffic is directed to the IP address specified in the Private IP field in the Private Network Settings section. Specify the start and the end value for the port range. If you need to specify one port, enter the needed value in the Public port (start) field and leave the Public port (end) field blank.
Private Network Settings
Private IP
The IP address of the server from the local area network. To choose a device connected to the router's LAN at the moment, select the relevant value from the drop-down list (the field will be filled in automatically).
Page 232 of 262
DSL-G2452GR MU-MIMO Wireless Dual Band VDSL2 Router with ASDL2+/3G/LTE/Gigabit Ethernet WAN Support, 2 FXS Ports and USB Port
User Manual
Configuring via Web-based Interface
Parameter
Description
Private port (start)/ Private port (end)
A port of the IP address specified in the Private IP field to which traffic is directed from the Public port. Specify the start and the end value for the port range. If you need to specify one port, enter the needed value in the Private port (start) field and leave the Private port (end) field blank.
Click the APPLY button.
To edit the parameters of an existing server, select the relevant line in the table. On the opened page, change the needed parameters and click the APPLY button.
To remove a server, select the checkbox located to the left of the relevant line of the table and click
the DELETE button ( ). Also you can remove a server on the editing page.
Page 233 of 262
DSL-G2452GR MU-MIMO Wireless Dual Band VDSL2 Router with ASDL2+/3G/LTE/Gigabit Ethernet WAN Support, 2 FXS Ports and USB Port
User Manual
Configuring via Web-based Interface
DMZ
A DMZ is a host or network segment located "between" internal (local) and external (global) networks. In the router, the DMZ implements the capability to transfer a request coming to a port of the router from the external network to a specified host of the internal network.
On the Firewall / DMZ page, you can specify the IP address of the DMZ host.
Figure 180. The Firewall / DMZ page.
To enable the DMZ, move the Enable switch to the right. Enter the IP address of a host from your network in the IP address field. To choose a device connected to the router's LAN at the moment, select the relevant value from the drop-down list (the field will be filled in automatically). Move the Enable NAT Loopback switch to the right in order to let the users of the router's LAN access the DMZ host using the external IP address of the router or its DDNS name (if a DDNS service is configured). Users from the external network access the router using the same address (or DDNS name). Click the APPLY button. Note that when the DMZ is enabled, all traffic coming to a port of the WAN interface of the router is directed to the same port of the specified IP address. Also note that virtual servers have higher priority than the DMZ host. In other words, if there has been created a virtual server that directs traffic from external port 80 to a port of the device from the router's local network, then entering http://router_WAN_IP in the address bar, users of the external network are directed to the specified port and IP address configured for the virtual server, but not to port 80 of the device with the IP address specified on the Firewall / DMZ page. To disable the DMZ, move the Enable switch to the left and click the APPLY button.
Page 234 of 262
DSL-G2452GR MU-MIMO Wireless Dual Band VDSL2 Router with ASDL2+/3G/LTE/Gigabit Ethernet WAN Support, 2 FXS Ports and USB Port
User Manual
Configuring via Web-based Interface
MAC Filter
On the Firewall / MAC Filter page, you can configure MAC-address-based filtering for computers of the router's LAN.
Figure 181. The Firewall / MAC Filter page.
Select the needed action from the drop-down list in the Default mode section to configure filtering for all devices of the router's network:
· Allow: Allows access to the router's network and to the Internet for devices (the value is specified by default);
· Deny: Blocks access to the router's network for devices.
! You can use the Deny mode only if an active rule which allows access to the device's network is created on the page.
To create a rule (specify a MAC address of a device for which the specified filtering mode will be applied), click the ADD button ( ).
Figure 182. The window for adding a rule for the MAC filter. Page 235 of 262
DSL-G2452GR MU-MIMO Wireless Dual Band VDSL2 Router with ASDL2+/3G/LTE/Gigabit Ethernet WAN Support, 2 FXS Ports and USB Port
User Manual
Configuring via Web-based Interface
In the opened window, you can specify the following parameters:
Parameter
Description
Enable rule
Move the switch to the right to enable the rule. Move the switch to the left to disable the rule.
Action
Select an action for the rule.
Deny: Blocks access to the Internet for the device with the specified MAC address even if the default mode allows access for all devices.
Allow: Allows access to the router's network and to the Internet for the device with the specified MAC address even if the default mode denies access for all devices.
MAC address
The MAC address of a device from the router's LAN. You can enter the MAC address of a device connected to the router's LAN at the moment. To do this, select the relevant device from the drop-down list (the field will be filled in automatically).
Hostname
The name of the device for easier identification. You can specify any name.
After specifying the needed parameters, click the SAVE button.
To edit a rule, select the relevant line in the table. In the opened window, change the needed parameters and click the SAVE button.
To remove a rule, select the checkbox located to the left of the relevant line of the table and click
the DELETE button ( ). Also you can remove a rule in the editing window.
Page 236 of 262
DSL-G2452GR MU-MIMO Wireless Dual Band VDSL2 Router with ASDL2+/3G/LTE/Gigabit Ethernet WAN Support, 2 FXS Ports and USB Port
User Manual
Configuring via Web-based Interface
URL Filter
On the Firewall / URL Filter page, you can specify restrictions on access to certain web sites.
Figure 183. The Firewall / URL Filter page.
To enable the URL filter, in the General Settings section, move the Enable switch to the right, then select the needed mode from the Type drop-down list:
· Block listed URLs: when this value is selected, the router blocks access to all addresses specified in the Filters section;
· Block all URLs except listed: when this value is selected, the router allows access to addresses specified in the Filters section and blocks access to all other web sites.
Click the APPLY button. To specify URL addresses to which the selected filtering mode will be applied, in the Filters section, click the ADD button and enter a relevant address in the displayed line. Then click the APPLY button. To remove an address from the list of URL addresses, click the Delete icon ( ) in the line of the relevant URL address. Then click the APPLY button.
Page 237 of 262
DSL-G2452GR MU-MIMO Wireless Dual Band VDSL2 Router with ASDL2+/3G/LTE/Gigabit Ethernet WAN Support, 2 FXS Ports and USB Port
User Manual
Configuring via Web-based Interface
System
In this menu you can do the following: · change the password used to access the router's settings · restore the factory default settings · create a backup of the router's configuration · restore the router's configuration from a previously saved file · save the current settings to the non-volatile memory · reboot the router · change the web-based interface language · update the firmware of the router · configure automatic notification on new firmware version · view the system log; configure sending the system log to a remote host and/or a USB storage connected to the router · check availability of a host on the Internet through the web-based interface of the router · trace the route to a host · allow or forbid access to the router via TELNET · configure automatic synchronization of the system time or manually configure the date and time for the router.
Page 238 of 262
DSL-G2452GR MU-MIMO Wireless Dual Band VDSL2 Router with ASDL2+/3G/LTE/Gigabit Ethernet WAN Support, 2 FXS Ports and USB Port
User Manual
Configuring via Web-based Interface
Configuration
On the System / Configuration page, you can change the password for the administrator account used to access the web-based interface of the router and to access the device settings via TELNET, restore the factory defaults, backup the current configuration, restore the router's configuration from a previously created file, save the changed settings to the non-volatile memory, reboot the device, or change the web-based interface language.
Figure 184. The System / Configuration page.
In order to change the password for the administrator account, in the User section, enter a new password in the New password and Password confirmation fields. Use digits, Latin letters (uppercase and/or lowercase), and other characters available in the US keyboard layout.17 Click the Show icon ( ) to display the entered values. Then click the SAVE button.
Remember or write down the new password for the administrator account. In case of losing
! the new password, you can access the settings of the router only after restoring the factory default settings via the hardware RESET button. This procedure wipes out all settings that you have configured for your router. To change the web-based interface language, select the needed value from the Language dropdown list.
17 0-9, A-Z, a-z, space, !"#$%&'()*+,-./:;<=>?@[\]^_`{|}~. Page 239 of 262
DSL-G2452GR MU-MIMO Wireless Dual Band VDSL2 Router with ASDL2+/3G/LTE/Gigabit Ethernet WAN Support, 2 FXS Ports and USB Port
User Manual
Configuring via Web-based Interface
The following buttons are also available on the page:
Control
Description
Factory
Click the button to restore the factory default settings. Also you can restore the factory defaults via the hardware RESET button (see the Back Panel section, page 18).
Backup
Click the button to save the configuration (all settings of the router) to your PC. The configuration backup will be stored in the download location of your web browser.
Restore
Click the button and follow the dialog box appeared to select a previously saved configuration file (all settings of the router) located on your PC and upload it.
Save
Click button to save settings to the non-volatile memory.
The router saves changed settings automatically. If changed settings have not been saved automatically, a notification is displayed in the top right part of the page.
Reboot
Click the button to reboot the device. All unsaved changes will be lost after the device's reboot.
In the Idle time field specify a period of inactivity (in minutes) after which the router completes the session of the interface. By default, the value 5 is specified. Then click the SAVE button.
Page 240 of 262
DSL-G2452GR MU-MIMO Wireless Dual Band VDSL2 Router with ASDL2+/3G/LTE/Gigabit Ethernet WAN Support, 2 FXS Ports and USB Port
User Manual
Configuring via Web-based Interface
Firmware Update
On the System / Firmware Update page, you can update the firmware of the router and configure the automatic check for updates of the router's firmware.
!
Update the firmware only when the router is connected to your PC via a wired connection.
Figure 185. The System / Firmware Update page.
The current version of the router's firmware is displayed in the Current firmware version field.
By default, the automatic check for the router's firmware updates is enabled. If a firmware update is available, a notification will be displayed in the top right corner of the page.
To disable the automatic check for firmware updates, in the Remote Update section, move the Check for updates automatically switch to the left and click the APPLY SETTINGS button.
To enable the automatic check for firmware updates, in the Remote Update section, move the Check for updates automatically switch to the right and click the APPLY SETTINGS button. By default, in the Remote server URL field, the D-Link update server address (fwupdate.dlink.ru) is specified.
You can update the firmware of the router locally (from the hard drive of your PC) or remotely (from the update server).
Page 241 of 262
DSL-G2452GR MU-MIMO Wireless Dual Band VDSL2 Router with ASDL2+/3G/LTE/Gigabit Ethernet WAN Support, 2 FXS Ports and USB Port
User Manual
Configuring via Web-based Interface
Local Update
!
Attention! Do not turn off the router before the firmware update is completed. This may cause the device breakdown.
To update the firmware of the router locally, follow the next steps:
1. Download a new version of the firmware from www.dlink.ru.
2. Click the CHOOSE FILE button in the Local Update section on the System / Firmware Update page to locate the new firmware file.
3. Click the UPDATE FIRMWARE button.
4. Wait until the router is rebooted (about one and a half or two minutes).
5. Log into the web-based interface using the login (admin) and the current password.
If after updating the firmware the router doesn't work correctly, please restore the factory default settings. To do this, click the Factory button on the System / Configuration page. Wait until the router is rebooted.
Page 242 of 262
DSL-G2452GR MU-MIMO Wireless Dual Band VDSL2 Router with ASDL2+/3G/LTE/Gigabit Ethernet WAN Support, 2 FXS Ports and USB Port
User Manual
Configuring via Web-based Interface
Remote Update
!
Attention! Do not turn off the router before the firmware update is completed. This may cause the device breakdown.
To update the firmware of the router remotely, follow the next steps:
1. On the System / Firmware Update page, in the Remote Update section, click the CHECK FOR UPDATES button to check if a newer firmware version exists.
2. Click the UPDATE FIRMWARE button (the button is displayed if a newer version of the firmware is available).
3. Wait until the router is rebooted (about one and a half or two minutes).
4. Log into the web-based interface using the login (admin) and the current password.
If after updating the firmware the router doesn't work correctly, please restore the factory default settings. To do this, click the Factory button on the System / Configuration page. Wait until the router is rebooted.
Page 243 of 262
DSL-G2452GR MU-MIMO Wireless Dual Band VDSL2 Router with ASDL2+/3G/LTE/Gigabit Ethernet WAN Support, 2 FXS Ports and USB Port
User Manual
Configuring via Web-based Interface
Log
On the System / Log page, you can set the system log options and configure sending the system log to a remote host and/or a USB storage connected to the router.
Figure 186. The System / Log page. The Settings tab.
To enable logging of the system events, go to the Settings tab and move the Enable switch to the right. Then specify the needed parameters.
Page 244 of 262
DSL-G2452GR MU-MIMO Wireless Dual Band VDSL2 Router with ASDL2+/3G/LTE/Gigabit Ethernet WAN Support, 2 FXS Ports and USB Port
User Manual
Configuring via Web-based Interface
Parameter
Description
Logging
Type
Select a type of logging from the drop-down list.
· Local: the system log is stored in the router's memory. When this value is selected, the Server and Port fields are not displayed.
· Remote: the system log is sent to the remote host specified in the Server field.
· Remote and local: the system log is stored in the router's memory and sent to the remote host specified in the Server field.
Level
Select a type of messages and alerts/notifications to be logged.
Server Port
The IP or URL address of the host from the local or global network, to which the system log will be sent.
A port of the host specified in the Server field. By default, the value 514 is specified.
Record to USB
USB Storage
Save log to a USB storage
If a USB storage is connected to the router, its name is displayed in the field.
To safely disconnect the USB storage, click the UNMOUNT button.
Move the switch to the right so that the device could send the system log to the USB storage connected to it. Upon that the Path, The maximum size of one file, File name, and Number of files to keep fields are displayed.
Path
The maximum size of one file
Click the Search icon ( ) located to the right of the field in order to locate the folder where system log files will be stored.
The maximum size (in kilobytes) of one system log file.
File name
A name for system log files.
Number of files to keep
The maximum number of files allowed to be recorded on the USB storage. When this number is exceeded, the file containing the oldest data will be deleted. The field is available for editing if the value specified in the The maximum size of one file field is greater than zero.
After specifying the needed parameters, click the APPLY button.
Page 245 of 262
DSL-G2452GR MU-MIMO Wireless Dual Band VDSL2 Router with ASDL2+/3G/LTE/Gigabit Ethernet WAN Support, 2 FXS Ports and USB Port
User Manual
Configuring via Web-based Interface
To disable logging of the system events, move the Enable switch to the left and click the APPLY button.
To view the system log, go to the Log tab.
Figure 187. The System / Log page. The Log tab.
To view the latest system events, click the REFRESH button.
To save the system log to your PC, click the EXPORT button. The file will be stored in the download location of your web browser.
Page 246 of 262
DSL-G2452GR MU-MIMO Wireless Dual Band VDSL2 Router with ASDL2+/3G/LTE/Gigabit Ethernet WAN Support, 2 FXS Ports and USB Port
User Manual
Configuring via Web-based Interface
Ping
On the System / Ping page, you can check availability of a host from the local or global network via the Ping utility. The Ping utility sends echo requests to a specified host and receives echo replies.
Figure 188. The System / Ping page.
To check availability of a host, enter the IP address or name of this host in the Host field and specify a number of requests that will be sent in order to check its availability in the Count of packets field. If availability check should be performed with IPv6, move the IPv6 switch to the right.
Page 247 of 262
DSL-G2452GR MU-MIMO Wireless Dual Band VDSL2 Router with ASDL2+/3G/LTE/Gigabit Ethernet WAN Support, 2 FXS Ports and USB Port
User Manual
Configuring via Web-based Interface
To specify additional settings, click the MORE SETTINGS button.
Figure 189. The System / Ping page. The additional settings window.
In the opened window, in the Packet size field, specify the volume of data sent in a request. In the Time to wait for a response field, specify the response waiting period in seconds. To restore the default field values, click the DEFAULT SETTINGS button.
After specifying the additional parameters, click the OK button.
To run the check, click the START button. After a while, the results will be displayed on the page.
To remove the check result from the page, click the CLEAR button.
Page 248 of 262
DSL-G2452GR MU-MIMO Wireless Dual Band VDSL2 Router with ASDL2+/3G/LTE/Gigabit Ethernet WAN Support, 2 FXS Ports and USB Port
User Manual
Configuring via Web-based Interface
Traceroute
On the System / Traceroute page, you can determine the route of data transfer to a host via the traceroute utility.
Figure 190. The System / Traceroute page.
To determine the route, enter the name or IP address of a host in the Host field. If the route should be determined using IPv6, move the IPv6 switch to the right.
Page 249 of 262
DSL-G2452GR MU-MIMO Wireless Dual Band VDSL2 Router with ASDL2+/3G/LTE/Gigabit Ethernet WAN Support, 2 FXS Ports and USB Port
User Manual
Configuring via Web-based Interface
To specify additional settings, click the MORE SETTINGS button.
Figure 191. The System / Traceroute page. The additional settings window.
In the opened window, you can specify the following parameters:
Parameter
Description
Maximum TTL value
Specify the TTL (Time to live) parameter value. The default value is 30.
Number of probes The number of attempts to hit an intermediate host.
Wait time
A period of waiting for an intermediate host response.
To restore the default field values, click the DEFAULT SETTINGS button.
After specifying the additional parameters, click the OK button.
To run the check, click the START button. After a while, the results will be displayed on the page.
To remove the check result from the page, click the CLEAR button.
Page 250 of 262
DSL-G2452GR MU-MIMO Wireless Dual Band VDSL2 Router with ASDL2+/3G/LTE/Gigabit Ethernet WAN Support, 2 FXS Ports and USB Port
User Manual
Configuring via Web-based Interface
Telnet
On the System / Telnet page, you can enable or disable access to the device settings via TELNET from your LAN. Access via TELNET is disabled by default. It is automatically enabled after changing the default administrator password.
Figure 192. The System / Telnet page.
To disable access via TELNET, move the Enable Telnet switch to the left and click the APPLY button.
To enable access via TELNET again, move the Enable Telnet switch to the right. In the Port field, enter the number of the router's port through which access will be allowed (by default, the port 23 is specified). Then click the APPLY button.
Page 251 of 262
DSL-G2452GR MU-MIMO Wireless Dual Band VDSL2 Router with ASDL2+/3G/LTE/Gigabit Ethernet WAN Support, 2 FXS Ports and USB Port
User Manual
Configuring via Web-based Interface
System Time
On the System / System Time page, you can manually set the time and date of the router or configure automatic synchronization of the system time with a time server on the Internet.
Figure 193. The System / System Time page.
To set the system time manually, follow the next steps: 1. Move the Enable NTP switch to the left. 2. In the Time Settings section, specify needed values. To specify the time set on your PC or portable device, click the SET LOCAL TIME button. 3. Click the APPLY button. The System date and System time fields will be filled in automatically.
To enable automatic synchronization with a time server, follow the next steps: 1. Move the Enable NTP switch to the right. 2. Specify the needed NTP server or leave the value specified by default in the NTP Servers section. If you need to specify several servers, click the ADD SERVER button. 3. Select your time zone from the Main time zone drop-down list. To set the time zone in accordance with the settings of your operating system or portable device, click the DETERMINE TIMEZONE button. 4. Click the APPLY button. The System date and System time fields will be filled in automatically.
Page 252 of 262
DSL-G2452GR MU-MIMO Wireless Dual Band VDSL2 Router with ASDL2+/3G/LTE/Gigabit Ethernet WAN Support, 2 FXS Ports and USB Port
User Manual
Configuring via Web-based Interface
To enable the router to automatically adjust to daylight saving time, move the Daylight saving time switch to the right. From the Daylight saving time zone drop-down list, select the time zone that will be used during summer time and specify the needed values in the Beginning of daylight saving time and End of daylight saving time sections. Click the APPLY button.
In some cases NTP servers addresses are provided by your ISP. In this case, you need to move the Get NTP server addresses using DHCP switch to the right and click the APPLY button. Contact your ISP to clarify if this setting needs to be enabled. If the Get NTP server addresses using DHCP switch is moved to the right, the NTP Servers section is not displayed.
To allow connected devices to use the IP address of the router in the local subnet as a time server, move the Run as a server for the local network switch to the right and click the APPLY button.
When the router is powered off or rebooted, the system time is reset to the default value.
!
If you have set automatic synchronization for the system time, the internal clock of the device will be configured after connecting to the Internet. If you have set the system time
manually, you need to set the time and date again (see above).
Page 253 of 262
DSL-G2452GR MU-MIMO Wireless Dual Band VDSL2 Router with ASDL2+/3G/LTE/Gigabit Ethernet WAN Support, 2 FXS Ports and USB Port
User Manual
Configuring via Web-based Interface
Yandex.DNS
This menu is designed to configure the Yandex.DNS service. Yandex.DNS is a web content filtering service which provides the DNS server, protects a computer against malicious web sites, and blocks access to adult web sites.
Settings
On the Yandex.DNS / Settings page, you can enable the Yandex.DNS service and configure its operating mode.
Figure 194. The Yandex.DNS / Settings page.
To get detailed information on the service, click the About Yandex.DNS link. To enable the Yandex.DNS service, move the Enable switch to the right.
Page 254 of 262
DSL-G2452GR MU-MIMO Wireless Dual Band VDSL2 Router with ASDL2+/3G/LTE/Gigabit Ethernet WAN Support, 2 FXS Ports and USB Port
User Manual
Configuring via Web-based Interface
When the service is enabled, the Default mode section is displayed on the page. Select the needed choice of the radio button to configure filtering for all devices of the router's network:
· Protection off: when this value is selected, the service provides the DNS server with no restrictions on access to unsafe web sites;
· Safe: when this value is selected, the service blocks access to malicious and fraudulent web sites;
· Child: when this value is selected, the service blocks access to malicious and fraudulent web sites and blocks access to adult content.
Also the selected filtering mode will be applied to all devices newly connected to the router's network.
After specifying all needed parameters, click the APPLY button.
To disable the Yandex.DNS service, move the Enable switch to the left and click the APPLY button.
Page 255 of 262
DSL-G2452GR MU-MIMO Wireless Dual Band VDSL2 Router with ASDL2+/3G/LTE/Gigabit Ethernet WAN Support, 2 FXS Ports and USB Port
User Manual
Configuring via Web-based Interface
Devices and Rules
On the Yandex.DNS / Devices and Rules page, you can specify a filtering mode for each device separately.
Figure 195. The Yandex.DNS / Devices and Rules page.
In the Known Clients section, the devices connected to the local network of the router at the moment and their relevant filtering mode are displayed.
To create18 a new filtering rule for a device, click the ADD button ( ) in the Rules section, or left-click the name of the filtering mode in the line of the device for which a rule should be created in the Known Clients section.
Figure 196. Adding a new rule for the Yandex.DNS service.
18 When a new rule for filtering is created, a MAC address and IP address pair is displayed on the Connections Setup / LAN page. The created pair will be deleted with the relevant rule. Page 256 of 262
DSL-G2452GR MU-MIMO Wireless Dual Band VDSL2 Router with ASDL2+/3G/LTE/Gigabit Ethernet WAN Support, 2 FXS Ports and USB Port
User Manual
Configuring via Web-based Interface
In the opened window, you can specify the following parameters:
Parameter
Description
MAC address
The MAC address of a device from the router's LAN.
IP address
The IP address of a device from the router's LAN.
To assign several fixed IP addresses to a device with a certain MAC address, click the ADD button, and in the line displayed, enter an IP address. A device of your LAN can have one IPv4 address and several IPv6 addresses.
To remove the IP address, click the Delete icon ( ) in the line of the address.
Name
Enter a name for the rule for easier identification. Optional.
Select an operating mode of the Yandex.DNS service for this rule.
Protection off: when this value is selected, the service provides the DNS server with no restrictions on access to unsafe web sites.
Mode
Safe: when this value is selected, the service blocks access to malicious and fraudulent web sites.
Child: when this value is selected, the service blocks access to malicious and fraudulent web sites and blocks access to adult content.
After specifying the needed parameters, click the SAVE button.
To edit a rule for filtering, select a relevant line of the table, in the opened window, change the needed values and click the SAVE button.
To remove a rule for filtering, select the checkbox located to the left of the relevant rule and click
the DELETE button ( ). Also you can remove a rule in the editing window.
After completing the work with rules, click the APPLY button.
Page 257 of 262
DSL-G2452GR MU-MIMO Wireless Dual Band VDSL2 Router with ASDL2+/3G/LTE/Gigabit Ethernet WAN Support, 2 FXS Ports and USB Port
User Manual
Operation Guidelines
CHAPTER 5. OPERATION GUIDELINES
Safety Rules and Conditions
Please carefully read this section before installation and connection of the device. Make sure that the power adapter and cables are not damaged. The device should be used only as intended in accordance with the documents.
The device is intended for use in dry, clean, dust-free, and well ventilated areas with normal humidity away from strong heat sources. Do not use the device outdoors or in the areas with high humidity. Do not place foreign objects on the device. Do not obstruct the ventilation openings of the device. The environmental temperature near the device and the temperature inside the device's cover should be within the range from 0 ° to +40 °.
Only use the power adapter supplied with the device. Do not plug in the adapter, if its case or cable are damaged. Plug the adapter only into working electrical outlets with parameters indicated on the adapter.
Do not open the cover of the device! Unplug the device before dusting and cleaning. Use a damp cloth to clean the device. Do not use liquid/aerosol cleaners or magnetic/static cleaning devices. Prevent moisture getting into the device or the power adapter.
The service life of the device is 2 years.
Page 258 of 262
DSL-G2452GR MU-MIMO Wireless Dual Band VDSL2 Router with ASDL2+/3G/LTE/Gigabit Ethernet WAN Support, 2 FXS Ports and USB Port
User Manual
Operation Guidelines
Wireless Installation Considerations
The DSL-G2452GR device lets you access your network using a wireless connection from virtually anywhere within the operating range of your wireless network. Keep in mind, however, that the number, thickness and location of walls, ceilings, or other objects that the wireless signals must pass through, may limit the range. Typical ranges vary depending on the types of materials and background RF noise in your home or office. To maximize your wireless range, follow the guidelines below.
1. Keep the number of walls and ceilings between the DSL-G2452GR device and other network devices to a minimum each wall or ceiling can reduce your wireless network range by 3-90 feet (1-30 meters).
2. Be aware of the direct line between network devices. Place your devices so that the signal travels straight through a wall or ceiling (instead of at an angle) for better reception.
3. Building materials make a difference. A solid metal door or aluminum studs may have a negative effect on your wireless range. Try to position your router, access points, and computers so that the signal passes through drywalls or open doorways. Materials and objects such as glass, steel, metal, walls with insulation, water (fish tanks), mirrors, file cabinets, brick, and concrete will degrade your wireless signal.
4. Keep your router away (at least 3-6 feet or 1-2 meters) from electrical devices or appliances that generate RF noise.
5. If you are using 2.4 GHz cordless phones or X-10 equipment (wireless devices such as ceiling fans, lights, and home security systems), your wireless connection may degrade dramatically or drop completely. Make sure your 2.4 GHz phone base is as far away from your wireless devices as possible. Note, that the base transmits a signal even if the phone in not in use.
Page 259 of 262
DSL-G2452GR MU-MIMO Wireless Dual Band VDSL2 Router with ASDL2+/3G/LTE/Gigabit Ethernet WAN Support, 2 FXS Ports and USB Port
User Manual
Abbreviations and Acronyms
CHAPTER 6. ABBREVIATIONS AND ACRONYMS
3G AC AES ARP BSSID CRC DDNS DDoS DHCP DMZ DNS DTIM GMT GSM IGD IGMP IMEI IMSI IP IPsec IPoA ISP L2TP LAN LLC LCP
Third Generation Access Category Advanced Encryption Standard Address Resolution Protocol Basic Service Set Identifier Cyclic Redundancy Check Dynamic Domain Name System Distributed Denial of Service Dynamic Host Configuration Protocol DeMilitarized Zone Domain Name System Delivery Traffic Indication Message Greenwich Mean Time Global System for Mobile Communications Internet Gateway Device Internet Group Management Protocol International Mobile Equipment Identity International Mobile Subscriber Identity Internet Protocol Internet Protocol Security Internet Protocol over ATM Internet Service Provider Layer 2 Tunneling Protocol Local Area Network Logical Link Control Link Control Protocol
Page 260 of 262
DSL-G2452GR MU-MIMO Wireless Dual Band VDSL2 Router with ASDL2+/3G/LTE/Gigabit Ethernet WAN Support, 2 FXS Ports and USB Port
User Manual
LTE MAC MTU NAT NTP OFDM PBC PIN PPPoA PPPoE PPTP PSK PUK QoS RADIUS RIP RTS RTSP SIP SIM SMB SSID TKIP UDP UPnP URL USB VC
Long Term Evolution Media Access Control Maximum Transmission Unit Network Address Translation Network Time Protocol Orthogonal Frequency Division Multiplexing Push Button Configuration Personal Identification Number Point-to-Point Protocol over ATM Point-to-point protocol over Ethernet Point-to-point tunneling protocol Pre-shared key PIN Unlock Key Quality of Service Remote Authentication in Dial-In User Service Routing Information Protocol Request To Send Real Time Streaming Protocol Session Initiation Protocol Subscriber Identification Module Server Message Block Service Set Identifier Temporal Key Integrity Protocol User Datagram Protocol Universal Plug and Play Uniform Resource Locator Universal Serial Bus Virtual Circuit
Page 261 of 262
Abbreviations and Acronyms
DSL-G2452GR MU-MIMO Wireless Dual Band VDSL2 Router with ASDL2+/3G/LTE/Gigabit Ethernet WAN Support, 2 FXS Ports and USB Port
User Manual
VCI VLAN VPI VPN WAN WEP Wi-Fi WLAN WMM WPA WPS
Virtual Circuit Identifier Virtual Local Area Network Virtual Path Identifier Virtual Private Network Wide Area Network Wired Equivalent Privacy Wireless Fidelity Wireless Local Area Network Wi-Fi Multimedia Wi-Fi Protected Access Wi-Fi Protected Setup
Abbreviations and Acronyms
Page 262 of 262
Writer LibreOffice 5.1