TELUS Indoor Wi-Fi Security Camera
Installation Guide
Model: ADC-V523
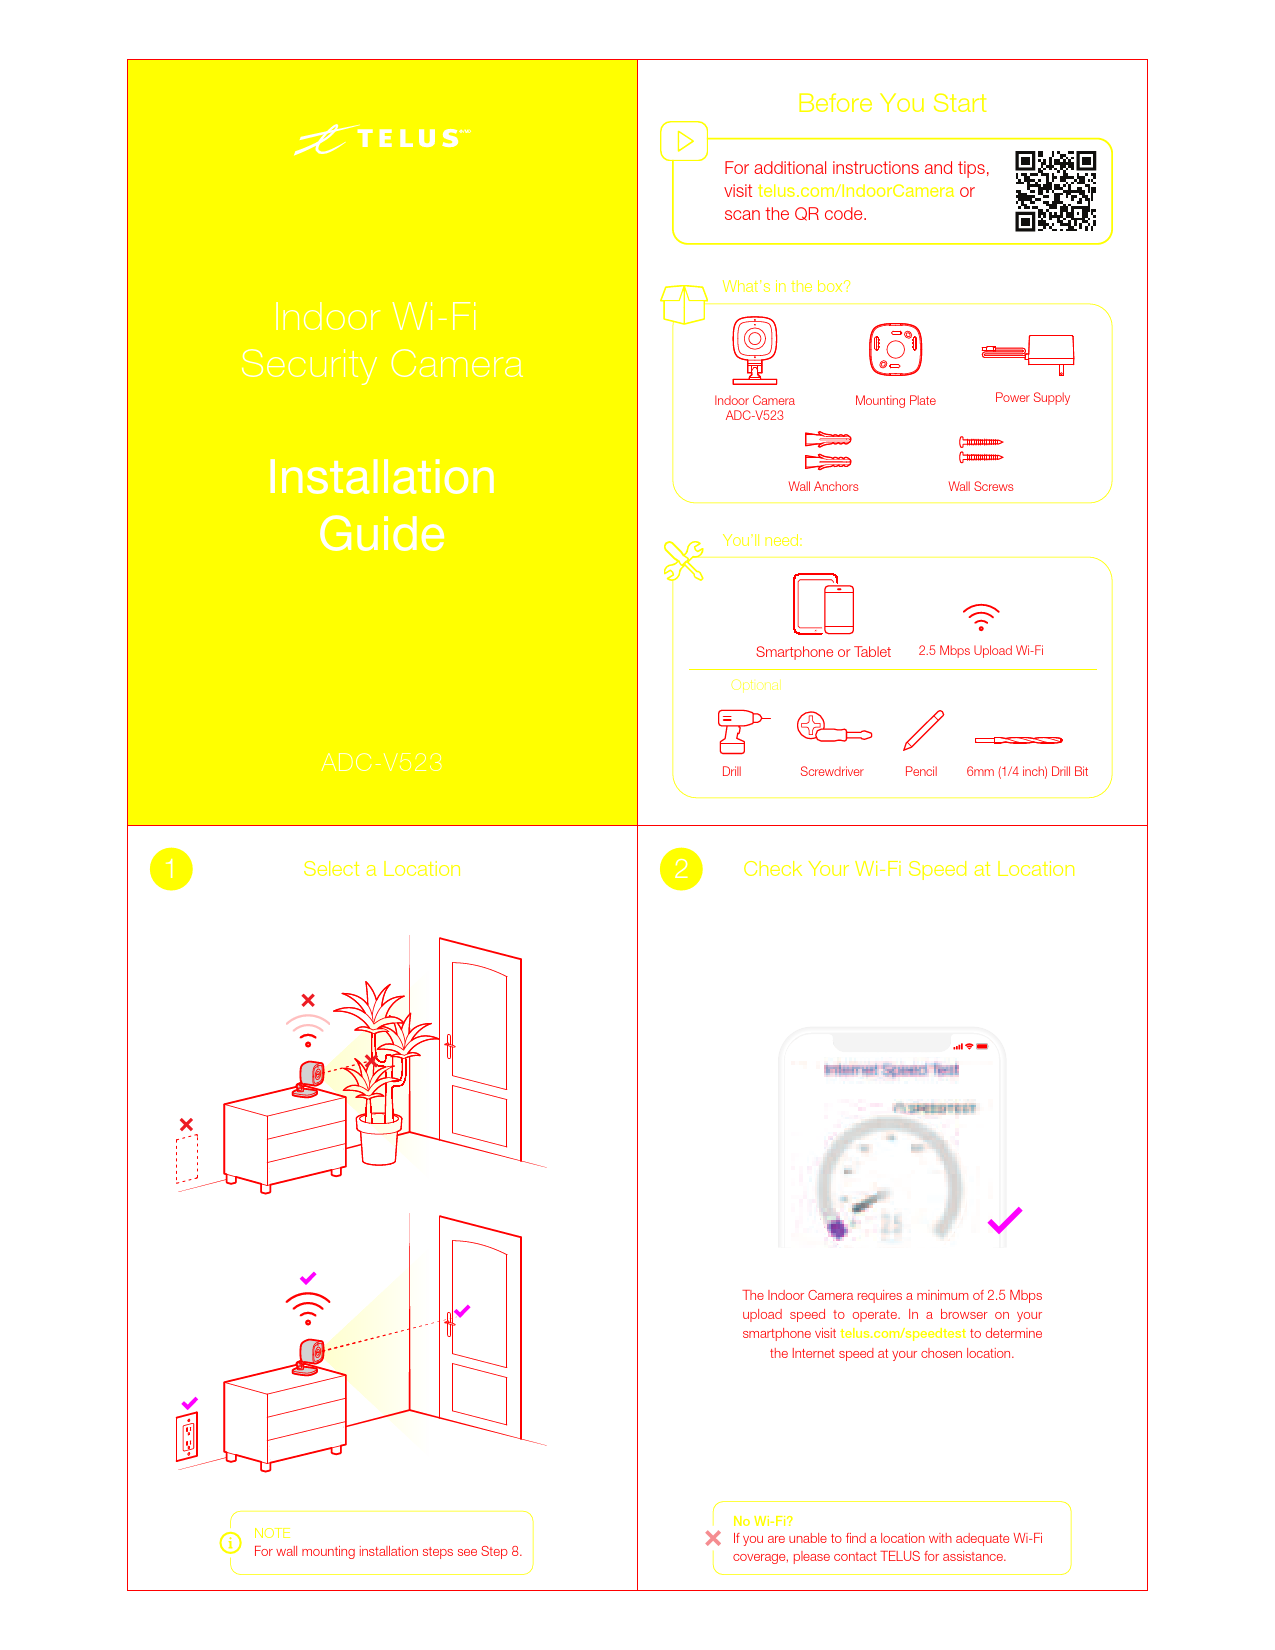
Before You Start
For additional instructions and tips, visit telus.com/IndoorCamera or scan the QR code.
What's in the box?
- Indoor Camera (ADC-V523)
- Mounting Plate
- Power Supply
- Wall Anchors
- Wall Screws
You'll need:
- Smartphone or Tablet
- 2.5 Mbps Upload Wi-Fi
- Drill
- Screwdriver
- Pencil
- 6mm (1/4 inch) Drill Bit
Step 1: Select a Location
Choose a location for your camera. Ensure adequate Wi-Fi coverage. If you are unable to find a location with adequate Wi-Fi coverage, please contact TELUS for assistance.
Note: For wall mounting installation steps, see Step 8.
Step 2: Check Your Wi-Fi Speed at Location
The Indoor Camera requires a minimum of 2.5 Mbps upload speed to operate. In a browser on your smartphone, visit telus.com/speedtest to determine the Internet speed at your chosen location.
No Wi-Fi?
If you are unable to find a location with adequate Wi-Fi coverage, please contact TELUS for assistance.
Step 3: Turn on Camera
Connect the power supply to the camera. The LED indicator will flash white when the camera is ready for setup. If the LED is not flashing white, press and hold the WPS/RESET button on the bottom of the device for 6 seconds until the light starts flashing white.
Step 4: Get the TELUS SmartHome App
Download the TELUS SmartHome app from the Google Play Store or Apple App Store. Log in with your My TELUS credentials.
Step 5: Add Camera to Your Account
In the TELUS SmartHome app, navigate to 'Add Device' and select 'Video Camera'. Follow the on-screen prompts to add your Indoor Camera.
Step 6: Connect to Camera's Temporary Wi-Fi Network
Your camera will create a temporary Wi-Fi network to assist with setup. Go to your smartphone's Wi-Fi settings and connect to the network named 'ADC-V523 (XX:XX:XX)'.
Step 7: Follow Steps in App
Once connected to the temporary network, return to the TELUS SmartHome app. The app will guide you through selecting your home Wi-Fi network and entering the password. The camera will then connect to your home Wi-Fi.
Step 8: Optional: Wall Mount Installation
- Attach the mounting bracket to the desired location. You can also attach the mounting bracket by drilling holes and using the drywall anchors provided.
- Adjust the camera angle as needed.
- Remove inserts from the camera.
- Route the cable.
- Attach the camera to the mounting bracket.
Step 9: Calibrate Camera
IMPORTANT: Without completing this step, the Indoor Camera will not function properly. Follow the on-screen prompts in the TELUS SmartHome app to calibrate your camera. This may involve taking photos or defining zones. If the camera is moved in the future, repeat the calibration process.
Step 10: Customize Smart Video Alerts and Recording Rules
In the TELUS SmartHome app, you can customize video alerts and recording rules. This includes setting up motion detection zones, tripwires, and recording schedules based on detected activity or specific times.
Nice Work, You're All Done!
Your camera is now set up and ready to use. You can access live video feeds, review recordings, and manage settings through the TELUS SmartHome app.
LED Reference Guide
- Off: Power off
- Solid (Grey): Power off
- Solid (Green): Connected to TELUS SmartHome
- Flashing (Green): Local network connection
- Flashing (Yellow): Factory reset
- Solid (Red): No local or Internet connection
- Flashing (Red): Power on, camera booting
- Flashing (Blue): WPS mode
- Flashing (Blue/White): Wi-Fi access point mode
Troubleshooting
- If you have issues connecting the camera to a TELUS account, unplug the power cable from the camera and plug it back in.
- If issues persist, reset the camera to factory defaults and try again.
- If the camera was previously installed on a TELUS account, it will need to be deleted before it can be installed again.
Additional Support
Our customer support agents are available 24/7 at 1-855-255-8828. For additional installation instructions, videos, and troubleshooting, please visit telus.com/IndoorCamera or scan the QR code.