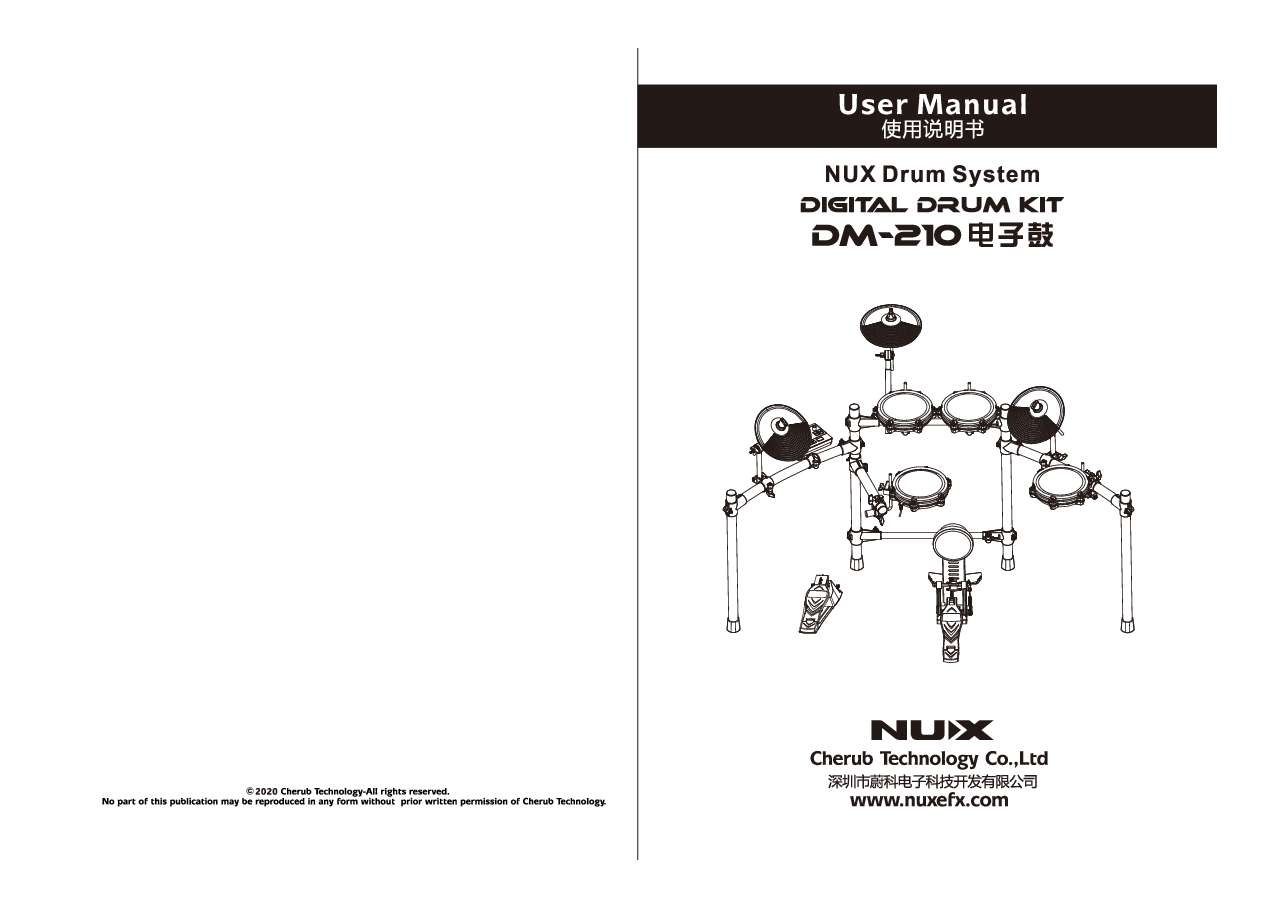
NUX DM-210 Digital Drum Kit User Manual
Brand: NUX
Manufacturer: Cherub Technology Co., Ltd.
Safety Instructions
About WARNING and CAUTION Notices
AWARNING: Used for instructions intended to alert the user to the risk of death or severe injury should the unit be used improperly.
CAUTION: Used for instructions intended to alert the user to the risk of injury or material damage should the unit be used improperly.
Material damage refers to damage or other adverse effects caused with respect to the home and all its furnishings, as well to domestic animals or pets.
Always Observe the Following
AWARNING
- Before using this unit, make sure to read the instructions below and the Owner's Manual.
- Do not open (or modify in any way) the unit or its AC adaptor.
- Do not attempt to repair the unit, or replace parts within it (except when this manual provides specific instructions directing you to do so). Refer all servicing to your retailer, the nearest NUX Service Center.
- Never use or store the unit in places that are:
- Subject to temperature extremes (e.g., direct sunlight in an enclosed vehicle, near a heating duct, on top of heat-generating equipment); or are
- Damp (e.g., baths, washrooms, on wet floors); or Are
- Humid; or Are
- Exposed to rain; or Are
- Dusty; or Are
- Subject to high levels of vibration.
AWARNING
- Be sure to use only the AC adaptor supplied with the unit. Also, make sure the line voltage at the installation matches the input voltage specified on the AC adaptor's body. Other AC adaptors may use a different polarity, or be designed for a different voltage, so their use could result in damage, malfunction, or electric shock.
- Do not excessively twist or bend the power cord, nor place heavy objects on it. Doing so can damage the cord, producing severed elements and short circuits. Damaged cords are fire and shock hazards!
- This unit, either alone or in combination with an amplifier and headphones or speakers, may be capable of producing sound levels that could cause permanent hearing loss. Do not operate for a long period of time at a high volume level, or at a level that is uncomfortable. If you experience any hearing loss or ringing in the ears, you should immediately stop using the unit, and consult an Audiologist.
CAUTION
- Immediately turn the power off, remove the AC adaptor from the outlet, and request servicing by your retailer, the nearest NUX Service Center.
- The AC adaptor or the power-supply cord has been damaged; or
- If smoke or an unusual odor occurs
- Objects have fallen into, or liquid has been spilled onto the unit; or
- The unit has been exposed to rain (or otherwise has become wet); or
- The unit does not appear to operate normally or exhibits a marked change in performance.
CAUTION
- The unit and the AC adaptor should be located so their location or position does not interfere with their proper ventilation.
- Always grasp only the output plug or the body of the AC adaptor when plugging into, or unplugging from, this unit or an outlet.
- Any accumulation of dust between the AC adaptor and the power outlet can result in poor insulation and lead to fire. Periodically wipe away such dust with a dry cloth. Also, disconnect the power plug from the power outlet whenever the unit is to remain unused for an extended period of time.
General Precautions
- In households with small children, an adult should provide supervision until the child is capable of following all the rules essential for the safe operation of the unit.
- Protect the unit from strong impact. (Do not drop it!)
- Try to prevent cords and cables from becoming entangled. Also, all cords and cables should be placed so they are out of the reach of children.
- Never climb on top of, nor place heavy objects on the unit.
- Never handle the AC adaptor body, or its output plugs, with wet hands when plugging into, or unplugging from, an outlet or this unit.
- If you need to move the instrument, take note of the precautions listed below. Make sure to have a firm grip, to protect yourself from injury and the instrument from damage.
- Check to make sure that the clamp that fixes the unit to the stand has not become loose. Fasten them again securely whenever you notice any loosening.
- Disconnect the power cord.
- Disconnect all cords coming from external devices.
- Do not allow any objects (e.g., flammable material, coins, pins); or liquids of any kind (water, soft drinks, etc.) to penetrate the unit.
Stand Installation
This unit may be installed on a stand using a Clamp.
When installing the unit on a stand with a clamp, the stand must not be placed in an unstable location or on an incline, but in a level and stable position. Even if a stand is not used, make sure that the unit is placed in a stable location.
Power Connection
Do not force the unit's power-supply cord to share an outlet with an unreasonable number of other devices. Be especially careful when using extension cords—the total power used by all devices you have connected to the extension cord's outlet must never exceed the power rating (watts/amperes) for the extension cord. Excessive loads can cause the insulation on the cord to heat up and eventually melt through.
Foreign Country Use
Before using the unit in a foreign country, consult with your retailer, the nearest NUX Service Center.
Cleaning and Maintenance
Before cleaning the unit, turn off the power and unplug the AC adaptor from the outlet.
Lightning Protection
Whenever you suspect the possibility of lightning in your area, disconnect the AC adaptor from the outlet.
Security Screws
Should you remove security screws, make sure to put them in a safe place out of children's reach, so there is no chance of them being swallowed accidentally.
Assembly Diagram
The assembly process involves connecting various parts to form the complete drum kit structure.
Drum Stand Assembly
Diagram Description: Illustrations show the assembly of the drum stand components.
- Drum stand front: Shows the front vertical support.
- Drum stand back (left): Shows the left rear support.
- Drum stand back (right): Shows the right rear support.
- Drum stand arm: Shows the curved arms that attach to the vertical supports.
- Drum stand upper beam: Shows the horizontal beam connecting parts of the rack.
- Lower beam of drum stand: Shows the lower horizontal beam.
Component Assembly
Diagram Description: Illustrations show how to attach specific components.
- Snare holder: Shows the clamp mechanism for attaching the snare drum.
- Cymbals: Shows the cymbal mounts.
Build-up Drum Rack
Diagram Description: A sequence of images shows the drum rack being assembled from individual poles and beams.
- Assemble the drum rack structure.
Install Module and Pad
Diagram Description: Shows the drum pads and the sound module being attached to the assembled rack.
- Attach the sound module and drum pads to the rack.
Install Cymbals
Diagram Description: Shows the cymbals being mounted onto the rack.
- Mount the cymbals onto their respective stands.
Install Hi-hat Control and Kick
Diagram Description: Shows the hi-hat control pedal and the kick pedal being connected to the rack.
- Attach the hi-hat control pedal and the kick pedal.
Cable Connection
Diagram Description: Illustrates how to connect the various drum pads, pedals, and the sound module.
- Connect the cable to the module: A cable with a connector is shown being plugged into the sound module. The label on the cable indicates the drum pad to be connected.
- Connect the drum pad: Shows a drum pad with its cable.
- Connect the cymbal pad: Shows a cymbal pad with its cable.
- Connect the hi-hat control and kick: Shows the pedals being connected to the module.
Note: In order to prevent equipment damage, please shut down during the connection process.
Component Names
Diagram Description: An illustration of the complete NUX DM-210 drum kit with all components labeled.
- Hi-hat: The pair of cymbals controlled by the hi-hat pedal.
- Crash: A cymbal typically used for accents.
- Ride: A larger cymbal, often used for rhythmic patterns.
- Tom 1, Tom 2, Tom 3: Tom-tom drums.
- Snare: The snare drum.
- Kick: The bass drum.
- HH Ctrl: The hi-hat control pedal.
- Kick Pedal: The pedal for the bass drum.
Module Control Panel
Diagram Description: A detailed view of the NUX DM-210 sound module's front panel, showing buttons, knobs, and the display screen.
- 1. Screen display: Shows current settings and parameters.
- 2. Power on/off: Button to turn the unit on or off.
- 3. Click on/off: Button to toggle the metronome.
- 4. Drum kit mode: Button to select drum kit presets.
- 5. Reverb on/off: Button to enable or disable reverb effect.
- 6. Coach on/off: Button to activate coaching functions.
- 7. Parameter adjustment: Buttons for adjusting parameters.
- 8. Menu: Button to access the main menu.
- 9. Volume adjustment: Rotary knob for overall volume.
- 10. Recording: Button to start or stop recording.
- 11. Play/stop: Button to play or pause recordings/demo songs.
- 12. Mute the drum sound into demo song: Button to mute the drum sounds in demo songs.
- 13. Demo song: Button to access demo songs.
- 14. Parameter adjustment: Buttons for fine-tuning parameters.
- 15. OK: Button to confirm selections.
- 16. Phone: Headphone jack.
- 17. Cymbal trigger: Input jack for cymbal pads.
- 18. USB interface: For connecting to a computer (USB MIDI).
- 19. AUX IN interface: Audio input for external devices.
- 20. OUTPUT (L/MONO, R): Audio outputs for speakers or amplifiers.
- 21. DC-9V: Power input jack.
Module Control Panel Screen Display
Diagram Description: Shows the display screen of the DM-210 module.
- 1. Power display: Indicates power status.
- 2. Parameter name display: Shows the name of the current parameter being adjusted (e.g., TEMPO, VOLUME).
- 3. Tempo display: Shows the current tempo (BPM).
- 4. Part display: Indicates which drum pad or parameter is selected.
- 5. Parameter value display: Shows the current value of the selected parameter.
- 6. Bluetooth display: Indicates Bluetooth connection status.
- 7. Beat display: Shows the current beat or metronome click.
Connecting External Devices
Diagram Description: Illustrates various external devices that can be connected to the DM-210.
- Power: Connection for the AC adaptor.
- Speaker: Audio output to external speakers.
- Audio devices: Input for external audio sources via AUX IN.
- Computer: Connection via USB for MIDI and computer recognition.
- Expanded cymbals: Input for additional cymbal pads.
- Phone: Headphone output for private practice.
Note: To prevent equipment damage, please lower the volume and turn off the power of connected devices before connecting or turning on the unit.
Ready to Play
Turn on Power
- Adjust the VOLUME knob to the lowest setting.
- Adjust the external device's volume (e.g., amplifier) to the lowest setting.
- Turn on the power of the DM-210.
Note: When the power is turned on, a weak sound may be heard, which is normal.
Turn off Power
- Adjust the external device's volume (e.g., amplifier) to the lowest setting.
- Turn off the external device's power.
- Turn off the power of the DM-210.
Playing the Drums
Diagram Description: Illustrations show how to strike different drum pads and cymbals.
- Snare:
- Head shot: Hit the center of the drum head.
- Cross stick: Hit the rim of the drum.
- Rim click: Hit the rim of the drum.
- Kick: Strike down the kick pedal.
- Crash Ride:
- Bow shot: Hit the bow (main surface) of the cymbal.
- Edge shot: Hit the edge of the cymbal.
- Choke: Immediately after hitting the cymbal, grasp its edge with your hand to mute the sound. This function only works when grasping the designated area.
- Tom:
- Head shot: Hit the center of the drum head.
- Edge shot: Hit the edge of the drum head.
- Hi-hat:
- Bow shot: Hit the bow (main surface) of the cymbal.
- Choke: Immediately after hitting the cymbal, grasp its edge with your hand to mute the sound. This function only works when grasping the designated area.
- HH Ctrl (Hi-hat Control Pedal):
- Open hi-hat: Hit the hi-hat without pressing the pedal.
- Close hi-hat: Hit the hi-hat while pressing the pedal down.
After striking the cymbal, immediately grasp its edge with your hand to mute the sound. The choke function only works when you grasp the designated area.
Diagram Description: Illustrates the 'Choke' action on a cymbal, showing the hand grasping the edge.
Ready to Play Steps
- Adjust the VOLUME knob to the lowest setting.
- Adjust the external device's volume (e.g., amplifier) to the lowest setting.
- Turn on the power.
Note: When the power is turned on, a weak sound may be heard, which is normal.
Diagram Description: Shows the DM-210 module screen displaying basic information like TEMPO, BPM, and BEAT.
- Strike the drum pads and cymbals, and adjust the volume as needed. Increase the volume of external devices according to your requirements.
Function Operation
Switch the Drum Kit
Boot into Drum Kit Mode
- Use the + button to switch the drum kit.
- Press the DRUM button to enter the drum kit mode from any other mode.
Diagram Description: Shows the screen displaying different drum kit selections like 'PITCH 02' and 'ROCK 003'.
Drum Pad Setup
Diagram Description: Shows the interface for setting up drum pads, including VOICE and TRIGGER parameters.
- Press the MENU button to enter the menu function in drum kit mode.
- Use the + button to select VOICE or TRIG (trigger) to adjust the drum pad parameters. Press the OK button to confirm, and press the MENU button to return to the main menu.
VOICE Menu
Diagram Description: Shows the VOICE adjustment screen, allowing selection of pitch and volume.
- In the VOICE function, hit any drum pad to choose the pad you need to adjust.
- Use the OK button to select the parameter you want to adjust (e.g., PITCH, VOLUME).
- Adjust the parameters through the - / + keys. Press the MENU key to return after adjustment; the parameters are automatically saved.
TRIG (Trigger) Menu
Diagram Description: Shows the TRIGGER adjustment screen for drum pads.
- In the TRIG interface, hit any pad to select the pad you want to adjust.
- Use the OK button to select the parameter you want to adjust.
- Adjust the parameters through the - / + keys. Press the MENU key to return after adjustment; the parameters are automatically saved.
Reverb Function
Diagram Description: Shows the Reverb adjustment interface.
- Press the REVERB button to enter the reverb function interface.
- Use the - / + button to adjust the mix (reverb depth).
- Press the REVERB button again to turn off the reverb.
Demo Song
Diagram Description: Shows the Demo Song interface.
- Press the SONG button to enter the DEMO song function interface.
- Press - / + keys to select a track. Press PLAY/STOP to play or pause the music. Press the DRUM OFF button to mute the demo song drum sound.
- In SONG mode, press the MENU button to enter the SONG setting interface.
- In the SONG setting interface, press OK to switch the parameter you want to adjust, and press - / + to adjust the parameter value.
Diagram Description: Shows screens for adjusting BACKING TRACK VOLUME and DRUM VOLUME.
Metronome
Diagram Description: Shows the Metronome (CLICK) interface.
- Press the CLICK button to enter the metronome function and turn on the metronome.
- In the metronome interface, press OK to switch the parameter you want to adjust (TEMPO, Rhythm, Beat, Volume).
- Use - / + button to adjust the parameter value. The parameter value range is as follows:
- TEMPO: 40-280bpm
- Rhythm: Quarter note, Eighth note, Triplet, 16th note
- Beat: 1-9
- Volume: 1-9
- Press the CLICK button again to turn off the metronome.
Recording
Diagram Description: Shows the Recording (REC) interface.
- Press the REC button to enter the recording mode, which is ready to record. Press REC again in the ready state to exit the recording.
- In the ready state, hit any drum to start recording.
- During the recording process, press the REC button or stop playing for five seconds, and the recording ends.
Diagram Description: Shows the recording process screen and the END state.
Coach Function
Press the COACH key to enter the coach function. Press - / + keys to switch the type, and press the OK key to enter.
| Type | Function |
|---|---|
| TIME | TIME CHECK |
| C-UP | CHANGE UP |
| Q-CO | QUIET COUNT |
| S-CO | STROKE COUNT |
TIME CHECK
Diagram Description: Shows the TIME CHECK interface.
- In the TIME 0 interface, press OK to enter the TIME CHECK preparation mode; the screen display changes to TIME 1.
- In the TIME 1 interface, press the CLICK button, and the practice will begin after one measure of preparation. During the exercise, the interface display changes to TIME 3. (If scoring is turned on in the settings, the score will appear after the practice is over).
Diagram Description: Shows TIME 0, TIME 1, TIME 3 screens.
CHANGE UP
Diagram Description: Shows the CHANGE UP interface.
- In C-UP 0 mode, press OK to enter the change up preparation mode; the screen display changes to C-UP 1.
- In C-UP 1 mode, press the CLICK button, after one measure of pre-beat, the practice starts. Interface display during practice becomes C-UP 3.
- In the C-UP 1 interface, press MENU to enter the CHANGE UP setting interface. Use the OK key to switch the parameter to be adjusted, the selected item flashes, and use - / + to adjust the parameter value. (BAR=Bar=Rhythm change after X bar, BPM=Practicing speed).
Diagram Description: Shows C-UP 0, C-UP 1, C-UP 3 screens.
QUIET COUNT
Diagram Description: Shows the QUIET COUNT interface.
- In the Q-CO 0 interface, press OK to enter the quiet count practice preparation mode; the screen display changes to Q-CO 1.
- In Q-CO 1 mode, click CLICK, after one measure of pre-beat, the practice starts. Interface display during practice becomes Q-CO 3.
- In the Q-CO 1 interface, press MENU to enter the QUIET COUNT setting interface. Use the OK key to switch the parameter to be adjusted, the selected item flashes, and use - / + to adjust the parameter value. (BAR=bar=silent bar, BPM=practice speed).
Diagram Description: Shows Q-CO 0, Q-CO 1, Q-CO 3 screens.
STROKE COUNT
Diagram Description: Shows the STROKE COUNT interface.
- This mode is used to calculate the drummer's speed in a fixed time.
- In S-CO mode, press OK to enter the STROKE COUNT practice preparation mode; the screen display changes to PREP 1.
- In the PREP 1 interface, hit the drums directly; the counting practice starts. After the practice is over, press CLICK to return to PREP 1 state.
- In the PREP 1 interface, press MENU to enter the stroke count setting interface, and adjust the parameter value through - / + to run the system (TIME=counting duration).
Diagram Description: Shows S-CO, PREP 1, and the final TIME setting screen.
System Settings
RESET (RSET)
Diagram Description: Shows the RESET interface.
- In DRUM mode, press MENU to enter the setting. Press - / + key to select RESET, press OK key to enter. After entering, it will display RSET ALL. Press OK key again, the screen will directly return to the main interface, and the factory reset is complete.
SYSTEM (SYST)
Diagram Description: Shows the SYSTEM interface.
- In DRUM mode, press MENU to enter the setting. Press - / + key to select SYST, press OK key to enter. In the SYST interface, press OK to switch the parameter you need to adjust, and press - / + to adjust the parameter value.
AUX IN Recording
Diagram Description: Shows the AUX IN connection.
- Connect the mobile phone/iPad to the DM-210 host through the AUX IN interface.
- Open the recording APP on the mobile phone/iPad, click the recording button on the mobile phone and start playing; the content of the performance will be recorded into the mobile phone/iPad.
*When you need to use this function, please use a 1/8" TRRS cable.
Bluetooth
Diagram Description: Shows the Bluetooth connection status.
- Connect DM-200SERIES with Bluetooth:
- Turn on the phone's Bluetooth.
- Find DM-200SERIES under Bluetooth device and connect.
- After the connection is successful, you can use your phone to play music on DM-210.
MIDI Execution List
Diagram Description: A table detailing MIDI functions, transmitted and recognized values, and remarks.
| Function | Transmitted | Recognized | Remarked | |
|---|---|---|---|---|
| Basic default | 10 | 10 | ||
| Channel changed | No | No | ||
| Note | 0-127 | 0-127 | ||
| Velocity: | Note on | Yes | Yes | |
| Note off | No | Yes | ||
| After Key's | No | No | ||
| Touch Channel's | No | No | ||
| 0 | No | No | Bank select | |
| 1 | No | No | Modulation | |
| 5 | No | No | Portamento time | |
| Control change: | 7 | No | No | Volume |
| 10 | No | No | Pan | |
| 11 | No | No | Expression | |
| 64 | No | No | Sustain pedal | |
| 65 | No | No | Portamento on/off | |
| 66 | No | No | Sostenuto pedal | |
| 67 | No | No | Soft pedal | |
| 120 | No | No | All sound off | |
| 121 | No | No | Reset all controllers | |
| 123 | No | No | All note off | |
| Program change | No | No | ||
| System exclusive | No | No |
Drum Kit Names
Diagram Description: A table listing different drum kit names and their corresponding numbers.
| No. | Name | No. | Name |
|---|---|---|---|
| 01 | STAD = STANDARD | 09 | METL = METAL |
| 02 | ORIG = ORIGINAL | 10 | ELEC = ELECTRIC |
| 03 | ROCK = ROCK | 11 | DANC = DANCE |
| 04 | STUD = STUDIO | 12 | TECH = TECHNOLOGY |
| 05 | FUNK = FUNK | 13 | PERC = PERCUSSION |
| 06 | HYBD = HYBIRD | 14 | SESS = SESSION |
| 07 | BLUE = BLUES | 15 | CHN = CHINA |
| 08 | JAZZ = JAZZ |
Specifications
- Display: Negative display segment code LCD
- Drum set: 15 presets
- DEMO song: 10
- Recording: 1
- CLICK: speed, rhythm, beat, volume
- MIDI: USB MIDI, automatic computer recognition
- Effects: Reverb
- Trigger: 3TOM (dual-trigger), 1SNARE (dual-trigger), 1HIHAT (dual-trigger, with choke), 1CRASH (dual-trigger, with choke), 1RIDE (dual-trigger, with choke), 1KICK
- Interface: POWER, OUTPUT (L/MONO, R), AUX IN, USB, CYMBAL TRIGGER, PHONE
- Power: DC 9V external positive and internal negative, working current 200mA
*Technical specifications are subject to change without notice.
Environment temperature: 0-40 degree.
Compliance and Warranty
FCC Compliance
This device complies with part 15 of the FCC Rules. Operation is subject to the following two conditions: (1) this device may not cause harmful interference, and (2) this device must accept any interference received, including interference that may cause undesired operation. Any changes or modifications not expressly approved by the party responsible for compliance could void the user's authority to operate the equipment.
NOTE: This equipment has been tested and found to comply with the limits for a Class B digital device, pursuant to Part 15 of the FCC Rules. These limits are designed to provide reasonable protection against harmful interference in a residential installation. This equipment generates, uses and can radiate radio frequency energy and, if not installed and used in accordance with the instructions, may cause harmful interference to radio communications. However, there is no guarantee that interference will not occur in a particular installation. If this equipment does cause harmful interference to radio or television reception, which can be determined by turning the equipment off and on, the user is encouraged to try to correct the interference by one or more of the following measures:
- Reorient or relocate the receiving antenna.
- Increase the separation between the equipment and receiver.
- Connect the equipment into an outlet on a circuit different from that to which the receiver is connected.
- Consult the dealer or an experienced radio/TV technician for help. To maintain compliance with FCC's RF Exposure guidelines, This equipment should be installed and operated with minimum distance between 20cm the radiator your body.
Low-Power Radio Frequency Equipment
According to the technical specifications of low-power radio frequency equipment: For low-power radio frequency equipment that has been certified, companies, firms, or users are not allowed to change the frequency, increase the power, or change the characteristics and functions of the original design without approval. The use of low-power radio frequency equipment must not affect flight safety and interfere with legal communications; if interference is found, it should be stopped immediately and improved to no interference before continuing to use. The aforementioned legal communication refers to radio communication operated in accordance with the provisions of the Telecommunications Administration Law. Low-power radio frequency equipment must endure the interference of legal communications or industrial, scientific and medical radio wave radiation electrical equipment.
Copyright and Reproduction
© Cherub Technology Co., Ltd.
All Rights Reserved. No part of this publication may be reproduced, stored in a retrieval system, or transmitted, in any form or by any means, electronic, mechanical, photocopying, recording, or otherwise, without the prior written permission of Cherub Technology Co., Ltd.
Quality Commitment
Dear NUX User:
When using NUX products, please read the product manual carefully. For any questions or difficulties, please call the customer service hotline:
400-990-9866
- Quality issues within one week: Return or refund.
- Quality issues within one month: Exchange.
- Quality issues within one year: Free repair.
- Lifetime consultation and repair services.
[Please request a valid invoice from the seller and keep it.]
Repair Policy
Exchange Policy:
- For products purchased through authorized channels, if non-human performance failures occur within one month of purchase under normal use, and the product's appearance and packaging are intact, you can exchange it with the dealer where you purchased it.
- Consumers must present the purchase receipt issued by the dealer when exchanging the product; otherwise, the dealer may refuse the exchange.
Warranty Policy:
- For products purchased through authorized channels (as per the sales invoice), if non-human damage occurs within one year of purchase, you are entitled to free repair services.
- For products damaged beyond one year, or due to human factors or force majeure, paid repair services can be provided.
*This after-sales policy is only applicable to mainland China. For other countries and regions, please refer to local after-sales policies and legal regulations.
Manufacturer Information
Manufacturer: Cherub Technology Co., Ltd.
Manufacturer Address: Room 507, Building 1, Nanhai Yiku, No. 6 Xinghua Road, Shekou, Nanshan District, Shenzhen City.
Phone: 0755-2686 9866
Website: www.nuxefx.com
Production Plant: Zhuhai Cherub Technology Co., Ltd.
Production Plant Address: No. 10, Keji Jiu Road, Tangjiawan Town, High-tech Zone, Zhuhai City.
Phone: 0756-3689 866
Standard: Q/WKDZ 003-2020
Certificate of Conformity
Diagram Description: A certificate of conformity document.
- Name: Electronic Drum
- Model: DM-210
- Inspector: [Blank field]
- Date of Production: [Blank field]
- This product has passed inspection.
- Standard Implemented: Q/WKDZ 003-2020
