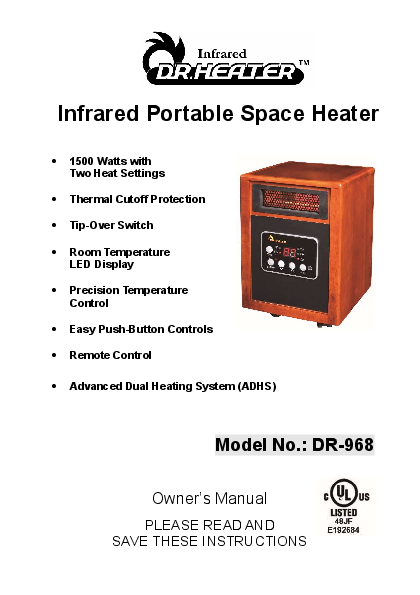
Dr. Infrared Heater DR-968 Portable Space Heater
Owner's Manual
Introduction
Congratulations on your purchase of the Dr. Infrared Heater. This safe and powerful heater is designed to heat a room quickly using its far-infrared Quartz-PTC heating system, offering an excellent choice for efficiently heating whole rooms while saving on costs. It includes an overheat protection system and an inlet air overheat protection system for your safety. This heater does not reduce humidity or oxygen, promoting a healthier environment. Please take a few minutes to read these instructions and review the product's limited warranty.
Key Features:
- 1500 Watts with Two Heat Settings
- Thermal Cutoff Protection
- Tip-Over Switch
- Room Temperature LED Display
- Precision Temperature Control
- Easy Push-Button Controls
- Remote Control
- Advanced Dual Heating System (ADHS)
Model No.: DR-968
Visual Description: The heater features a wooden-style cabinet with a black front panel. The front panel includes an LED display showing temperature, various buttons (POWER, MODE, SET, ROOM, STANDBY), and indicator lights (ECO, HIGH, LOW, STANDBY). A prominent logo for "Infrared DR.HEATER" is at the top. A UL Listed mark is also present.
Important Safety Instructions
WARNING! To reduce the risk of fire, electric shock, or personal injury, read all instructions before using this heater. This appliance is intended for household or personal use only. Any other use, including commercial, agricultural, or outdoor use, is not recommended by the manufacturer and may cause fire, electric shock, injury, and/or damages. The use of unauthorized attachments, accessories, or extension cords may cause hazards and void the warranty.
CAUTION: High temperature! Keep electrical cords, drapery, and other furnishings at least 3 feet (0.9 m) from the front and rear of the heater.
When using this appliance, basic precautions should always be followed to reduce the risk of fire, electric shock, and injury to persons:
- Read all instructions before using this heater.
- This heater is hot when in use. To avoid burns, do not let bare skin touch hot surfaces. Keep combustible materials, such as furniture, pillows, bedding, papers, clothes, and curtains, at least 3 feet (0.9 m) from the front of the heater and away from the sides and rear.
- Extreme caution is necessary when any heater is used by or near children or persons with physical challenges, and whenever the heater is left operating and unattended.
- Do not operate the heater with a damaged cord or plug, or after it malfunctions, has been dropped, or damaged. Return the heater to an authorized service facility for examination, electrical or mechanical adjustment, or repair.
- Do not use outdoors.
- This heater is not intended for use in bathrooms, laundry areas, or similar locations. Never locate the unit where it may fall into a bathtub or other water container.
- Do not run the cord under carpeting and do not cover the cord with throw rugs, runners, or the like. Arrange the cord away from traffic areas to avoid a tripping hazard.
- To disconnect the heater, turn controls to OFF, then remove the plug from the outlet.
- Do not insert or allow foreign objects to enter any ventilation or exhaust opening, as this may cause an electric shock, fire, or damage to the heater.
- Connect to properly grounded outlets only.
- To prevent a possible fire, do not block air intakes or exhaust openings in any manner. Do not use on soft surfaces, like a bed, where openings may become blocked. Use the heater on flat, dry surfaces only.
- A heater has hot and arcing or sparking parts inside. Do not use the heater in areas where gasoline, paint, or flammable liquids are used or stored.
- Use this heater only as described in this manual. Any other use not recommended by the manufacturer may cause fire, electric shock, or injury to persons.
- Never clean this heater while it is plugged in. Do not immerse in water. To disconnect, turn control to OFF, then remove the plug from the outlet by grasping it and pulling it from the outlet. Never yank on the cord.
- Always unplug the heater when it is not in use.
- Always plug the heater directly into a wall outlet/receptacle. Never use with an extension cord or relocatable power tap (outlet/power strip).
- It is normal for the heater's plug and cord to feel warm to the touch. A plug or cord which becomes hot to the touch or becomes distorted in shape may be a result of a worn electrical outlet. Worn outlets or receptacles should be replaced prior to further use of the heater. Plugging this heater into a worn outlet may result in overheating of the power cord or fire.
- Make sure the plug is fully inserted into an appropriate receptacle. Be mindful that receptacles also deteriorate due to aging and continuous use. Check periodically for signs of overheating or deformations of the plug. If any overheating or deformation occurs, immediately discontinue using the heater and contact Dr. Infrared Heater Authorized Service Center.
- CHECK YOUR HEATER CORD AND PLUG CONNECTIONS. Faulty wall outlet connections or loose plugs can cause the outlets or plug to overheat. During use, please check frequently to determine if your plug outlet or faceplate is HOT! If it is hot, discontinue using the heater and/or make certain a qualified electrician checks and replaces the faulty outlet(s).
CAUTION: This appliance is not intended for use by persons (including children) with reduced physical, sensory or mental capabilities, or lack of experience and knowledge, unless they have been given supervision or instruction concerning use of the appliance by a person responsible for their safety.
SAVE THESE INSTRUCTIONS
Product Specifications
| Voltage Rating | 120V (60Hz) |
|---|---|
| Power Consumption | 1500W |
| Unit Size | 15.5 in. (H) X 11.0 in. (W) X 13.0 in. (D) |
| Unit Weight | 23.5 lbs. |
| Model No. | DR-968 |
|---|---|
| Voltage | 120V, 60Hz |
| Current (Maximum continuous draw) | 12.5 amps |
| Output | 5200 BTUs |
| Power | 1500 Watts |
| Blower | Multi-blade; Low Noise, High Pressure |
Special Features
- LED Display: Shows room temperature. In ECO mode, displays set value 2 minutes after desired temperature is set.
- Overheat Cut-Off Protection System: Shuts off the unit if it overheats.
- Inlet Air Overheat Protection System: Automatically cuts off if the inlet air duct becomes obstructed and causes overheating.
- Safety Tip-Over Switch: Automatically cuts off when the heater is tipped in any direction. Place on a flat, smooth, stable surface.
Operating Instructions
1. Plug the power supply cord into a grounded wall outlet (120VAC, 60Hz).
Important: This heater comes with a grounded (three-prong) plug and must be used with a grounded outlet. Do not use an adapter in a two-slot wall outlet unless the ground plug of the adapter properly connects to a building ground. Using the heater without a properly grounded outlet or adapter could result in an electric shock hazard. The cord has a plug as shown in diagrams. An adapter (diagram C) is available for connecting three-blade grounding type plugs to two-slot receptacles. The green grounding lug extending from the adapter must be connected to a permanent ground, such as a properly grounded outlet box. The adapter should not be used if a three-slot grounded receptacle is available.
Visual Description: Diagrams show grounding methods for wall outlets and adapters, illustrating proper connection to a grounded outlet box.
2. Turning the Heater ON: Press the [POWER button]; the power LED will turn on, and the heater will wait in STANDBY Mode.
3. Heating Modes: Press the [MODE button] to toggle between modes: ECO, HIGH, LOW, and STANDBY. Exit any mode to standby by pressing the [STANDBY button].
4. ECO Mode (1500W/1000W): A computerized mode to optimize energy efficiency. It programmatically selects between HIGH and LOW power to heat the room effectively. Once the desired temperature is achieved, it maintains it. This is an environmentally friendly operating mode.
5. HIGH Power Mode (1500W): Operates at high power until the set temperature is reached. The heater stops heating and initiates a cooling process before turning off the fan. It then maintains the room at the set temperature.
6. LOW Power Mode (1000W): Operates at low power until the set temperature is reached. Similar to HIGH mode, it initiates a cooling process before turning off the fan and maintains the set temperature.
7. Setting the Temperature: Choose the desired Mode (ECO, HIGH, or LOW). To set the desired temperature:
- Press the [▲ button] once until the numeric temperature starts flashing.
- Press the [▲ button] again to increase the temperature or the [▼ button] to decrease the temperature.
Once the temperature is set, the heater will warm the room using the selected Mode. The heater samples the room temperature every 4 minutes after the desired temperature is reached.
8. Night Mode: Designed for quiet operation. Press and hold the [MODE button] and then press the [▲ button] to set night mode. The display will show "ni". In this mode, the heater samples room temperature less frequently (every 30 minutes). Press and hold the [MODE button] and then press the [▲ button] again to cancel night mode. The display will show the set temperature.
9. Display the Room Temperature: The display normally shows the set temperature. To view the room temperature, press and hold the [MODE button] and then press the [▼ button]. The room temperature will display for 30 seconds before returning to the set temperature.
Remote Controller
How to Insert Batteries:
Visual Description: Diagrams show four steps for battery insertion: 1. Press, 2. Pull, 3. Insert --AAA-- batteries, 4. Push Down.
Note: Remove batteries if the remote is not used for a month or more. Do not mix old and new batteries, or mix alkaline, standard (carbon-zinc), or rechargeable (nickel-cadmium) batteries.
Instructions for the Use of the IR Remote Control: Buttons function the same as on the control panel. The timer can be set using the remote control.
Setting the Timer:
- Press the [TIMER button] until Set Time starts flashing. Default value is 3 hours.
- Press the [+] button to increase or the [-] button to decrease the set time. The timer can be set from 1 to 12 hours. The timer will execute after the LED display stops flashing. The heater will shut OFF automatically when the set time is reached.
- To turn the timer OFF, follow step 1, then press the [-] button to set the time to 0. The timer feature will turn off when the LED stops flashing.
Maintenance
General Cleaning:
- Always turn OFF the heater and disconnect the power cord from the electrical outlet before cleaning.
- Light dust accumulation can be removed with a soft cloth or vacuum cleaner.
- Wipe exterior surfaces occasionally with a damp cloth (not dripping wet), using a mild detergent solution. Dry the case thoroughly before operating.
- Caution: Do not allow water to run into the interior of the heater, as this could create a fire or electric shock hazard.
- The fan motor is factory-lubricated for life and requires no further lubrication.
- Store the heater in a clean, dry place when not in use.
Cleaning the Electrostatic Filter
The heater has an electrostatic filter located at the rear. Clean it once per month or as needed (when dust is visible) to ensure efficient operation.
- Power the heater OFF using the [POWER button].
- Unplug the heater's power cord.
- Release the filter by pushing it up from below (refer to Figure 1).
- Remove the filter by pulling down and out (refer to Figure 2).
- Clean the filter by vacuuming.
- Replace the filter by sliding the top upwards into the spring-loaded slot on the back of the heater (Figure 2), then gently push the bottom of the filter into place (Figure 1).
Visual Description: Figure 1 and Figure 2 show images of the electrostatic filter being removed and replaced.
Warning: Any other servicing needed must be performed by an authorized service representative. Do not attempt to service the unit yourself.
In The Box
- DR Infrared Portable Space Heater
- Remote control (2 AAA batteries)
- User's Manual
Warranty Information
Register your product at our website: DrHeaterUSA.com/register-your-heater
Feedback: Love it? Help us make the product more for you. Let us know with a customer review. Please visit: https://www.amazon.com/review/review-your-purchases#
At Dr. Heater USA, we are committed to bringing top quality alternative & supplemental heating products to our customers.
Troubleshooting and FAQs
Note: There may be a trace of smoke or odor when the unit is first operated. Do not be alarmed. This indicates a drop of oil fell on the interior coils during manufacturing; it will quickly evaporate and should not recur.
How long is the warranty?
This heater comes with a THREE-YEAR LIMITED COMPONENT WARRANTY. If your unit does not appear to be working properly, please contact our service center by calling 1-800-317-1688. Prior to your call, we encourage you to visit our service-related website www.DrHeaterUSA.com for troubleshooting tips and service instructions if needed.
Contact Information:
Dr. Infrared Heater
9293 Beatty Dr, Sacramento, CA 95826
Tel: 1-800-317-1688
EMAIL: SERVICE@DRHEATERUSA.COM
Follow us: ? Dr Heater USA ? @DrHeaterUSA ▶️ Dr. Heater USA ▶️ Dr. Heater USA
If the heater cycles ON/OFF without heating:
Please note: This is a smart heater that monitors the room temperature and produces heat only when needed. You can set the desired room temperature with the heater in ECO mode (factory default is 68 °F). For example, if you set the temperature for 70 °F, the heater will run on HIGH until the room temperature reaches 70°F, then switch to LOW for 10 minutes. It may then enter NAP mode for energy saving, turning off if the room temperature is equal to or greater than 69°F. It will run on HIGH again when the temperature drops to 68°F. The heater remains on STANDBY as long as you do not POWER OFF. While on STANDBY, it reads room temperature every 5 minutes (heating for 40 seconds, fan for 60 seconds) to ensure accurate readings. If the room temperature is 72°F or higher, it remains on STANDBY. If the room temperature drops 2 degrees lower than the set temperature, the heating function turns ON, and the fan blows warm air.
If the heater cycles but doesn't produce heat for hours:
If the temperature is set lower than the room temperature, the heater will perform only the sensing cycle and will not turn on the heating function. To have the heater turn on, always set the desired temperature higher (2°+) than the room temperature.
How to turn off the heater:
Switch to STANDBY mode or POWER OFF the heater.
Does the blower cycle use much electricity?
The blower fan runs for 60 seconds every 5 or 30 (night mode) minutes to clear residual heat and measure room temperature. This does not use much power.
Why does the blower fan keep running after I have pressed the power OFF button?
The blower fan will continue to run until the heat chambers cool down. After approximately 90 seconds, the fan will shut off automatically.
What if the heater's airflow seems to have diminished?
Please ensure the rear intake is not blocked and that the filter is clean. Follow the filter maintenance procedure to clean the filter.
Once the heater is turned on, how long will it take to heat my room?
This heater can heat a large room. However, heating time depends on variables such as room size, insulation, number of doors/windows, concrete surfaces (heat sinks), exterior door usage, and outside temperature. This is a zone heater meant to be used as a supplemental heating source only.
Can I use the heater to heat multiple rooms at the same time?
Heating effectiveness varies based on floor plan openness and room size. Customers have reported success heating multiple rooms simultaneously by placing the unit in a central room and using ceiling fans. Experiment to find what works best.
My home is not well insulated; will this heater help me?
Yes, but it may take longer to heat the room. Outside temperature also impacts heating time. Once the room reaches the desired temperature, it will cycle on and off accordingly.
Can the heater be used in a bathroom?
It is not recommended due to the high level of moisture in bathrooms.
Can the heater be used in a basement or garage?
Yes, but rooms with little insulation retain heat less efficiently. Bare concrete floors absorb heat. Placing the heater a few feet above the floor may allow for more efficient heating.
Can I use more than one heater at a time?
Yes, but ensure heaters are not on the same circuit. Each heater and appliance should be on its own circuit.
Can I use the heater and another appliance at the same time?
Yes, as long as they are not on the same circuit. This heater is considered an appliance. Do not run more than one large appliance on a single circuit breaker. Appliances like freezers, refrigerators, microwave ovens, washing machines, and dryers should not share a circuit breaker.
Can I use the heater on a job or construction site?
This heater is not designed for high dust construction environments. Using it for this purpose will void your warranty.
Can I move the heater around while it is operating?
It is not recommended. Move the heater only once the fan has completely turned off.
What is the life expectancy for the heater?
This heater uses an infrared tube rated for 20,000 hours and up, and a PTC element rated for 80,000 hours and up.
What is zone heating?
Zone heating focuses heat where people spend the most time, avoiding heating unused areas to a high temperature.
Can I use an extension cord, surge protector, or power strip with my heater?
No. The DR. INFRARED HEATER is designed to plug directly into a grounded 120V 15 Amp or higher circuit receptacle. Never use with an extension cord or relocatable power tap (outlet/power strip).
How many kilowatts per hour does the heater use?
The DR. INFRARED HEATER MODEL DR-968 uses approximately 1.35 kilowatts per hour.
What is the BTU Rating for the heater?
The DR. INFRARED HEATER MODEL DR-968 is approximately 5200 BTUs.
The power cord feels warm to the touch; should I be concerned?
It is normal for the heater's plug and cord to feel warm. However, if a plug or cord becomes hot to the touch or distorted, it may indicate a worn electrical outlet. Worn outlets should be replaced. Plugging the heater into a worn outlet may result in overheating of the power cord or fire.
I don't have a grounded outlet; can I use a cord adapter or remove the grounding plug?
NO. If you don't have a grounded outlet, contact a licensed electrician for advice. Removing or altering any part of the heater is unsafe and will void your warranty.
