SAM D21 Curiosity Nano: MPLAB Harmony v3 PLIBs Setup and Evaluation
File info: application/pdf · 38 pages · 2.31MB
SAM D21 Curiosity Nano: MPLAB Harmony v3 PLIBs Setup and Evaluation
AN3563, SAM D21 Curiosity Nano: MPLAB Harmony v3 PLIBs Setup and Evaluation Application Note, SAM D21 Curiosity Nano:, MPLAB Harmony v3 PLIBs Setup and Evaluation Application Note, AN, SAM, SAMD, SAM D21, DS00003563A, DS00003563, 00003563
SAM D21 Curiosity Nano: MPLAB Harmony v3 PLIBs Setup ...
2020-07-30 —
The Microchip's MPLAB Harmony Configurator (MHC) is a valuable tool to quickly configure Microchip's 32-bit devices and peripherals with a small efficient ...
Full PDF Document

If the inline viewer fails, it will open the original document in compatibility mode automatically. You can also open the file directly.
Extracted Text
AN3563
SAM D21 Curiosity Nano: MPLAB Harmony v3 PLIBs Setup and Evaluation
Introduction
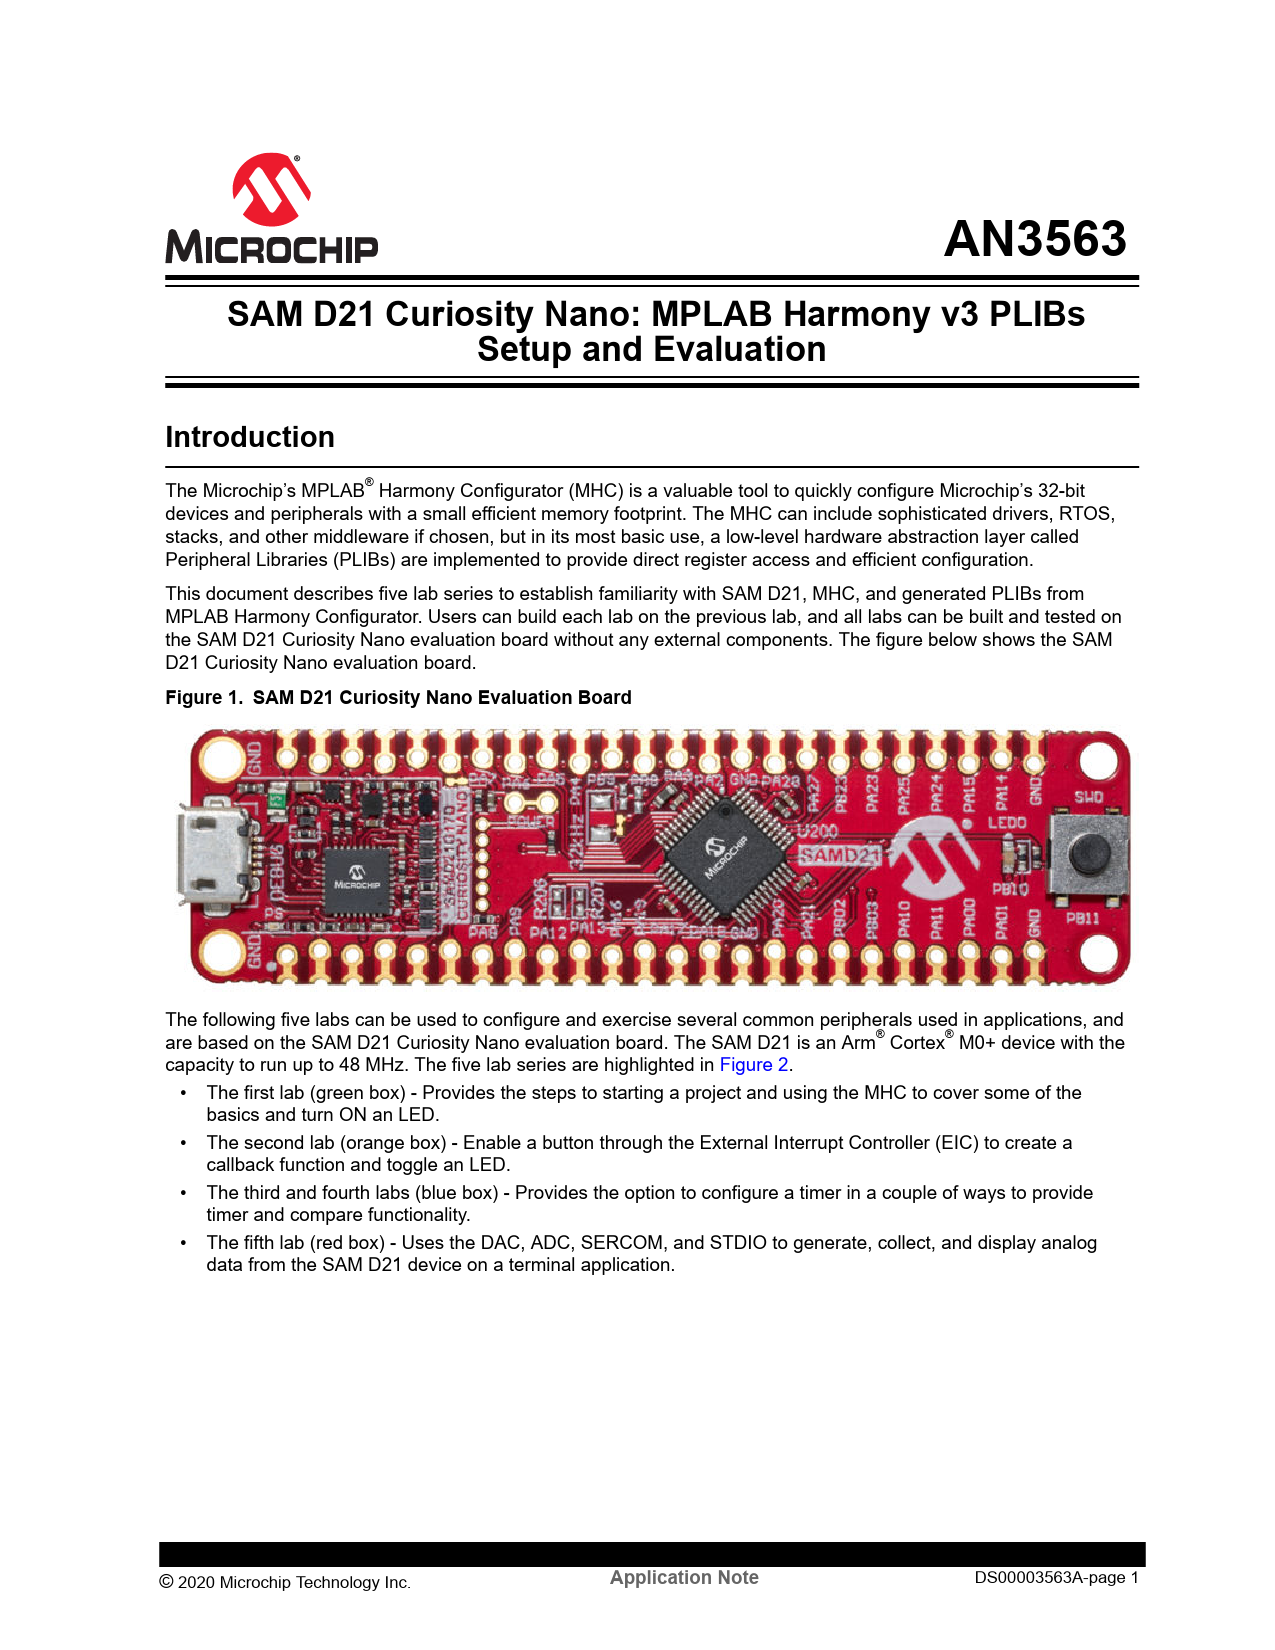
The Microchip's MPLAB� Harmony Configurator (MHC) is a valuable tool to quickly configure Microchip's 32-bit devices and peripherals with a small efficient memory footprint. The MHC can include sophisticated drivers, RTOS, stacks, and other middleware if chosen, but in its most basic use, a low-level hardware abstraction layer called Peripheral Libraries (PLIBs) are implemented to provide direct register access and efficient configuration. This document describes five lab series to establish familiarity with SAM D21, MHC, and generated PLIBs from MPLAB Harmony Configurator. Users can build each lab on the previous lab, and all labs can be built and tested on the SAM D21 Curiosity Nano evaluation board without any external components. The figure below shows the SAM D21 Curiosity Nano evaluation board. Figure 1.SAM D21 Curiosity Nano Evaluation Board
The following five labs can be used to configure and exercise several common peripherals used in applications, and are based on the SAM D21 Curiosity Nano evaluation board. The SAM D21 is an Arm� Cortex� M0+ device with the capacity to run up to 48 MHz. The five lab series are highlighted in Figure 2.
� The first lab (green box) - Provides the steps to starting a project and using the MHC to cover some of the basics and turn ON an LED.
� The second lab (orange box) - Enable a button through the External Interrupt Controller (EIC) to create a callback function and toggle an LED.
� The third and fourth labs (blue box) - Provides the option to configure a timer in a couple of ways to provide timer and compare functionality.
� The fifth lab (red box) - Uses the DAC, ADC, SERCOM, and STDIO to generate, collect, and display analog data from the SAM D21 device on a terminal application.
� 2020 Microchip Technology Inc.
Application Note
DS00003563A-page 1
Figure 2.Project Graph Window Showing Labs
AN3563
� 2020 Microchip Technology Inc.
Application Note
DS00003563A-page 2
AN3563
Table of Contents
Introduction.....................................................................................................................................................1 1. Creating and Setting up the Project........................................................................................................ 4 2. Lab1: Turn on LED................................................................................................................................ 10 3. Lab2: Setup IRQ................................................................................................................................... 15 4. Lab3: Timer - Blink an LED................................................................................................................... 21 5. Lab4: PWM - Blink an LED................................................................................................................... 24 6. Lab5: ADC - Read and Display a Value................................................................................................ 28 7. Migration from MCC.............................................................................................................................. 32 8. References............................................................................................................................................35 The Microchip Website.................................................................................................................................36 Product Change Notification Service............................................................................................................36 Customer Support........................................................................................................................................ 36 Microchip Devices Code Protection Feature................................................................................................ 36 Legal Notice................................................................................................................................................. 36 Trademarks.................................................................................................................................................. 37 Quality Management System....................................................................................................................... 37 Worldwide Sales and Service.......................................................................................................................38
� 2020 Microchip Technology Inc.
Application Note
DS00003563A-page 3
AN3563
Creating and Setting up the Project
1. Creating and Setting up the Project
To create and set up the project, users need to create the following sequence of labs. This section can be skipped if the user is familiar with starting a Microchip MPLAB Harmony v3 project. Prerequisites: To create the labs, the following must be installed:
� MPLABX (version 5.30 is used in these labs) � Microchip MPLAB Harmony v3 � XC32 Compiler (version 2.30 is used in these labs) 1. Creating a New Project
1.1. Open MPLAB X IDE and select File > New Project. The New Project window will be displayed. 1.2. Under Steps, select Choose Project, and in the Choose Project section:
� Categories: select Microchip Embedded � Projects: select 32-bit MPLAB Harmony v3 Project Figure 1-1.Create New Project
1.3. Click Next. 2. Verifying Minimum MPLAB Harmony Requirements
2.1. Under Steps, select Framework Selection. 2.2. In the Manage Framework, click Launch Content Manager to open the MPLAB Harmony Content
Manager as shown in the following figure.
� 2020 Microchip Technology Inc.
Application Note
DS00003563A-page 4
Figure 1-2.Launch Content Manager
AN3563
Creating and Setting up the Project
Ensure that the csp, dev_packs, and mhc are up to date on the machine used for the following labs. These three packages are the minimum installation required to use the MPLAB Harmony v3 Configurator.
Figure 1-3.Checking for Updates to CSP, Dev_Packs and MHC
2.3. If the csp, dev_packs, and mhc are included and up to date, then return to the New Project Window and click Next.
3. Naming the project and creating the Project location
3.1. Under Steps, select Project Settings.
3.2. In the Name and Location section, perform these actions:
� Location: Create the location for the project. The default location is in the same directory where MPLAB Harmony v3 is installed.
� Folder: Enter folder name.
� Name: Enter Project name.
� Path: shows newly created path and project name. Note: If the Folder field is populated, it will automatically populate the Name field as shown in the following figure. Because the SAM D21 Curiosity Nano board is the hardware used in the upcoming labs, hence the name D21_nano is used for the project.
� 2020 Microchip Technology Inc.
Application Note
DS00003563A-page 5
AN3563
Creating and Setting up the Project
Figure 1-4.Project Name and Location
3.3. Click Next. 4. Selecting the Target Device
4.1. Under Steps, select Configuration Settings. 4.2. In the Configuration Setting, follow these steps:
� Name: Default � Device Family: To narrow the list of devices, select `ATSAM' � Target Device: ATSAMD21G17D
Note: The SAM D21 Curiosity Nano evaluation board is populated with ATSAMD21G17D, hence it is selected for the Target Device. Figure 1-5.Select Target Device
4.3. Click Finish.
4.4. Now that the project is created, the Dashboard for the project will be opened and available for review. If the tools are installed correctly, the compiler and version can be seen in the middle of the window, as shown in the following figure.
� 2020 Microchip Technology Inc.
Application Note
DS00003563A-page 6
Figure 1-6.D21 Nano Dashboard
AN3563
Creating and Setting up the Project
4.5. Notice the Simulator is selected as the default Debug Tool (bottom red box). Attach the SAM D21 Curiosity Nano board to the computer and select the wrench icon (top left red box) to open the Project Properties.
4.6. The Project Properties window is displayed. In the Connected Hardware Tool drop-down menu the default selection of Simulator will be populated. Use the drop-down menu to select the connected Curiosity Nano evaluation board.
Figure 1-7.Project Properties Window
4.7. Expand the XC32 in the Compiler Toolchain window and select the latest installed version of the XC32 compiler.
� 2020 Microchip Technology Inc.
Application Note
DS00003563A-page 7
AN3563
Creating and Setting up the Project
4.8. Select xc32-gcc in the Categories window. For Option Categories, select Optimization in the Option categories window the code size can be optimized for size.
4.9. Select s in the optimization-level drop-down menu. Figure 1-8.Select the XC32 Compiler
4.10.
This concludes the initial project setup. Now the MPLAB Harmony v3 Configurator can be used to create the project content. From the MPLAB X IDE, Tools > Embedded and then select the MPLAB Harmony 3 Configurator. Note: The MPLAB Harmony v3 Content Manager is located here. The Content Manager can be launched here at any time to check if new updates are available.
Figure 1-9.Selecting MPLAB Harmony v3 Configurator
4.11.
Every time the MPLAB Harmony v3 Configurator is launched, the following window will be displayed to verify the correct path to the MPLAB Harmony v3 installation. Verify whether the path is correct, and then click Launch.
� 2020 Microchip Technology Inc.
Application Note
DS00003563A-page 8
AN3563
Creating and Setting up the Project
Figure 1-10.MPLAB Harmony v3 Launcher
4.12.
The verification of the required Device Firmware Pack (DFP) and CMSIS packs are also requested each time the MPLAB Harmony v3 Configurator is launched.
Figure 1-11.Configuration Database Setup
4.13. 4.14.
If the pack paths are correct, click Launch. The following figure shows the space to begin starting the project configuration. Figure 1-12.MPLAB Harmony v3 Configurator Project Graph
� 2020 Microchip Technology Inc.
Application Note
DS00003563A-page 9
AN3563
Lab1: Turn on LED
2. Lab1: Turn on LED
Lab1 shows how to turn on the LED mounted to the SAM D21 Curiosity Nano evaluation board. To change the LED status from OFF to ON requires configuring the GPIO. Figure 2-1.Project Graph Window
MPLAB Harmony Configurator provides default features in lab1, such as clock configurations etc.,. lab2 provides configurations of the clock tree. Follow these steps to configure and turn on the LED..
1. In the MPLAB Harmony v3 Configurator, configure the clock by selecting Tools > Pin Configuration as shown in the following figure. Figure 2-2.Selecting Pin Configuration Tool
2. After selecting the Pin Configuration tool, the following three windows will be displayed (on top of each other), which can be used to configure all pin functions of the application.
� The Pin Settings Window
� The Pin Table Window
� The Pin Diagram
3. To turn ON the LED, the schematic (silkscreen below the LED on the PCB) of the SAM D21 Curiosity Nano board defines the pin PB10 as the connection to the onboard LED. In the following figure, PB10 is configured as a GPIO output with the pull-down menu in the Function column. Additionally, a custom name of the LED is given to the pin for naming the functions or macros generated by the configuration tool.
� 2020 Microchip Technology Inc.
Application Note
DS00003563A-page 10
Figure 2-3.Pin Settings
AN3563
Lab1: Turn on LED
4. After Pin Settings are updated with pin properties for PB10, the custom name can be seen in the Pin Table window. The highlighted box indicates these pins are defined to use as a GPIO.
Figure 2-4.Pin Table
5. The Pin Diagram window will display the modification for a package orientation to assist in layout type decisions.
� 2020 Microchip Technology Inc.
Application Note
DS00003563A-page 11
Figure 2-5.Pin Diagram Window
AN3563
Lab1: Turn on LED
6. With the LED pin defined in the Pin Settings window, users can generate the project by clicking the highlighted icon shown in the figure below.
Figure 2-6.Generating the Project
7. Once the Generate Code button is selected, the system prompts a message to save the configuration file created by the MPLAB Harmony v3 Configurator. To relocate the project to another computer or to close MPLAB X IDE, users must save the configuration file to ensure that the configuration is not lost.
� 2020 Microchip Technology Inc.
Application Note
DS00003563A-page 12
AN3563
Lab1: Turn on LED
8. Make required selection and return to MPLAB X IDE to view the new files created by the MPLAB Harmony v3 Configurator. The following figure has the new project files expanded to view the new files generated by the MPLAB Harmony v3 Configurator. Currently, only the plib_port.h file is viewed to identify what is required to turn on the LED for this lab. Double click on the plib_port.h file to open it in the workspace. Figure 2-7.New Project Files Expanded View
9. Near to the top of the plib_port.h file, a set of macros are created to help control the LED. The custom name implemented in the Pin Settings window is carried to the listed macros for the application.
/*** Macros for LED pin ***/ #define LED_Set() #define LED_Clear() #define LED_Toggle() #define LED_Get() #define LED_OutputEnable() #define LED_InputEnable() #define LED_PIN
(PORT_REGS->GROUP[1].PORT_OUTSET = 1 << 10) (PORT_REGS->GROUP[1].PORT_OUTCLR = 1 << 10) (PORT_REGS->GROUP[1].PORT_OUTTGL = 1 << 10) (((PORT_REGS->GROUP[1].PORT_IN >> 10)) & 0x01) (PORT_REGS->GROUP[1].PORT_DIRSET = 1 << 10) (PORT_REGS->GROUP[1].PORT_DIRCLR = 1 << 10)
PORT_PIN_PB10
� 2020 Microchip Technology Inc.
Application Note
DS00003563A-page 13
AN3563
Lab1: Turn on LED
10. To complete lab1, users need to call the LED_Toggle function in main, that is after the SYS_Initialize. int main ( void ) { /* Initialize all modules */ SYS_Initialize ( NULL ); LED_Toggle(); while ( true ) { /* Maintain state machines of all polled MPLAB Harmony modules. */ SYS_Tasks ( ); } /* Execution should not come here during normal operation */ return ( EXIT_FAILURE ); }
11. Build and run the project to see the LED turn ON.
� 2020 Microchip Technology Inc.
Application Note
DS00003563A-page 14
AN3563
Lab2: Setup IRQ
3. Lab2: Setup IRQ
Lab2 will demonstrate the setting and implementing the External Interrupt Controller (EIC) to be used with the button on the SAM D21 Curiosity Nano evaluation board. The button is used to generate an interrupt where the LED_Toggle function will be called. Figure 3-1.Project Graph Showing the EIC
Follow these steps to setup and implement the External Interrupt Controller. 1. Open the MPLAB Harmony v3 Configurator. In the Available Components window expand the Peripherals group. Figure 3-2.Available Components
2. Expand the EIC selection and then double click or drag the EIC tag into the Project Graph window. Verify whether the EIC icon is in the Project Graph window.
� 2020 Microchip Technology Inc.
Application Note
DS00003563A-page 15
Figure 3-3.Verifying EIC
AN3563
Lab2: Setup IRQ
3. Open the Pin Configurator tool and select the Pin Settings window. 4. Refer to the schematic for the SAM D21 Curiosity Nano board to ensure that the on-board button is connected
to PB11 and is a switch to ground. 5. Scroll down to PB11 and use the Function pull-down menus to select the EIC as shown in the following figure.
Make sure to select the Pull-Up option to enable internal pull-up on PB11, as the button switches ground. Then add the custom name `BUTTON' to use in the application. Figure 3-4.Selecting BUTTON in Pin Settings
6. The Clock Configuration tool will be used to set the desired speed for EIC operation. Navigate to the Tools menu where the Pin Configurator tool is located. The Clock Configuration tool can be found at the top of the menu. The default settings of the MPLAB Harmony v3 Configurator is for all selected peripherals to run at a maximum speed. The internal ultra-low power 32 kHz oscillator must be selected for the EIC source clock to slow down the response, hence the button does not give false triggers over long duration.
7. Enable GCLK Generator 1 and select OSCULP32K from the pull-down menu. 8. To connect GCLK1 to the EIC module, click the Peripheral Clock Configuration button.
� 2020 Microchip Technology Inc.
Application Note
DS00003563A-page 16
Figure 3-5.Location of Source Clock and GCLK to be Selected
AN3563
Lab2: Setup IRQ
9. Scroll down to the EIC peripheral and select GCLK1 for the source. Ensure that the Enable box is checked. Figure 3-6.Peripheral Clock Configuration Window
10. Go to the Project Graph window and click the EIC icon. When the EIC icon is selected in the Project Graph window, the EIC Configuration Options will appear. When the pin function was selected in the previous step, the only EIC selection available for PB11 was `EIC_EXTINT11'. This means EIC Channel 11 requires configuration to complete the setup for the EIC module.
11. Select the `Enable EIC Channel11' and configure it as shown in the following figure. The lab requires the button to generate an interrupt, hence select the `Enable Interrupt' box. Because the button will pull the signal to ground the Falling-edge detection is selected for the trigger to generate the interrupt.
12. Select the Enable filter in the EIC which will help to debounce the button.
� 2020 Microchip Technology Inc.
Application Note
DS00003563A-page 17
Figure 3-7.EIC Configuration Options
AN3563
Lab2: Setup IRQ
13. Because the Enable Interrupt option is selected for the button in the application, it is important to know that the name of the callback function that will be connected to the interrupt. Go to the Project Graph window and select the System icon. Once selected, the information below will be populated in the Configuration Options window.
� 2020 Microchip Technology Inc.
Application Note
DS00003563A-page 18
Figure 3-8.Configuration Options Window
AN3563
Lab2: Setup IRQ
14. Select `Enable External Interrupt Controller Interrupt' and expand the menu. 15. In the Handler text field type BUTTON_Handler. This will be the name of the callback routine associated with
the button to be defined after the project is regenerated. Note: All 16 channels of the External Interrupt Controller (EIC) use the same interrupt vector. If multiple EIC channels are enabled, the origin of an interrupt must be determined by referring to the INTFLAG register. 16. Generate the project and go to MPLAB X IDE. 17. To implement the button in the application, the callback handler can be created with the name defined in System Configuration Options below the main function as shown in the following code example. In the BUTTON_Handler the LED_Toggle call will be used to toggle the LED every time the button is pressed. At the end of BUTTON_Handler the interrupt flag will be cleared. If the flag is not cleared, the interrupt will be called again after completing the current interrupt execution. The PLIB does not have a function call to clear the flag, hence a direct register write is done.
int main ( void ) {
/* Initialize all modules */ SYS_Initialize ( NULL );
// LED_Toggle();
while ( true ) {
/* Maintain state machines of all polled MPLAB Harmony modules. */ SYS_Tasks ( ); }
/* Execution should not come here during normal operation */
return ( EXIT_FAILURE ); }
void BUTTON_Handler()
� 2020 Microchip Technology Inc.
Application Note
DS00003563A-page 19
{ LED_Toggle(); EIC_REGS->EIC_INTFLAG |= EIC_INTFLAG_EXTINT11_Msk;
}
AN3563
Lab2: Setup IRQ
� 2020 Microchip Technology Inc.
Application Note
DS00003563A-page 20
AN3563
Lab3: Timer - Blink an LED
4. Lab3: Timer - Blink an LED
In Lab3, the button setup created in the previous lab will be used to turn ON and OFF a 500 ms timer. The timer in turn will blink the on-board LED for a consistent interval. The BUTTON_Handler callback will be modified to Start and Stop the timer, and the LED_Toggle call will be removed. The timer implemented in this exercise will trigger an interrupt every 500 ms. The Timer callback will then call the LED_Toggle function to toggle the on-board LED. Figure 4-1.Selecting TC5 in the Project Graph
To blink asn LED follow these steps: 1. Open the MPLAB Harmony Configurator and go to the Available Components window. 2. Expand the Timer/Counter (TC) menu, and then double-click or drag the TC5 tag into the Project Graph window.
� 2020 Microchip Technology Inc.
Application Note
DS00003563A-page 21
Figure 4-2.Select TC5 in the Available Components Window
AN3563
Lab3: Timer - Blink an LED
3. Click on the TC5 icon in the Project Graph window and review the Configuration Options.
4. If the Operating Mode menu is expanded, a Timer Period text box is available to define the duration between overflow events. Due to default settings typing 500 in the Timer Period will not work at this time as the scale of the timer is exceeded. In other words, the 16-bit timers overflow will occur before 500 ms. Notice the tool provides the timer resolution for the clock provided to the TC module. To achieve the 500 ms duration for this lab: The clock supplied to TC5 can be changed to a slower clock source as was done for the button, or the prescaler can be adjusted to enable the needed overflow duration.
Figure 4-3.Configuration Options
� 2020 Microchip Technology Inc.
Application Note
DS00003563A-page 22
AN3563
Lab3: Timer - Blink an LED
In this case the prescaler option will be implemented. To achieve a 500 ms overflow on a 16-bit timer that is supplied by 48 MHz, the highest prescaler value of GCLK_TC/1024 is required. Also, the timer resolution is automatically recalculated when the prescaler is changed. If the prescaler cannot provide the needed overflow duration, the maximum value can be calculated with the timer resolution information, therefore an informed adjustment can be made in the clock configurator. The Timer Period Interrupt check defaults to `enabled'. 5. As completed for the button lab, navigate to the System Configuration Options and rename the Handler for the Timer/Counter 5 Interrupt to TIMER_Handler. Once the handler is renamed, regenerate the project. 6. In the main file of the lab project, there are two updates from the last lab. First, the BUTTON_Handler should be modified to match the following code. In the BUTTON_Handler check the Enable bit of the timer. If the Enable bit is ON the timer will be disabled. If the timer is OFF, when the button is pressed the timer will be turned ON. The toggling of the LED will be removed from the BUTTON_Handler and placed in the TIMER_Handler. Clear the overflow interrupt flag before exiting the callback.
int main ( void ) {
/* Initialize all modules */ SYS_Initialize ( NULL );
// LED_Toggle();
while ( true ) {
/* Maintain state machines of all polled MPLAB Harmony modules. */ SYS_Tasks ( ); }
/* Execution should not come here during normal operation */
return ( EXIT_FAILURE ); }
void BUTTON_Handler() { // LED_Toggle();
if(TC5_REGS->COUNT16.TC_CTRLA & TC_CTRLA_ENABLE_Msk) TC5_TimerStop();
else TC5_TimerStart();
EIC_REGS->EIC_INTFLAG |= EIC_INTFLAG_EXTINT11_Msk; }
void TIMER_Handler() {
LED_Toggle();
TC5_REGS->COUNT16.TC_INTFLAG |= TC_INTFLAG_OVF_Msk; }
7. The on-board button is now an ON or OFF switch to enable toggling of the LED on a 500 ms duration.
� 2020 Microchip Technology Inc.
Application Note
DS00003563A-page 23
AN3563
Lab4: PWM - Blink an LED
5. Lab4: PWM - Blink an LED
In the lab4, the TC5 pin is reconfigured to operate in Compare mode and the LED pin is repurposed to be controlled by the TC5 pin rather than an independent GPIO. The BUTTON_Handler will continue to enable and disable the operation of the timer. Because the LED will be controlled by the TC hardware, the LED_Toggle function will not be valid and will be removed from the project. Figure 5-1.Project Graph Showing TC5
Follow these steps to PWM blink as LED: 1. Open MPLAB Harmony Configurator and navigate to the Pin Table window. 2. The Pin Table window displays the names given to the pins in previous labs. Scroll down to locate the timers on the left of the window (TCx and TCCx peripherals). The LED column has several greyed-out blocks indicating the peripherals can be mixed with the LED pin. Because the TC5 pin is used previously for timer functions, TC5_WO0 can be selected to provide the LED control for this lab.
� 2020 Microchip Technology Inc.
Application Note
DS00003563A-page 24
Figure 5-2.Pin Table
AN3563
Lab4: PWM - Blink an LED
3. In the Pin Settings window, scroll down to previously defined LED pin as shown in the figure below. In the Function pull down menu, change the defined function from GPIO to TC5_WO0, after this the Custom Name will be overwritten to TC5_WO0. Change the Custom Name to LED.
Figure 5-3.Locating LED Pin in Pin Settings
4. This will conclude the changes that must be done to the LED pin for this lab. Go to the Project Graph and select the TC5 icon to update the TC5 Configuration Options.
5. Change the Operating Mode from Timer to Compare and expand the menu. New options will be populated in the menu due to the new mode. Select Match Frequency (MFRQ) option from the Waveform Mode pull-down menu. The next lab will require a 500 ms interrupt, hence the timer prescaler will remain unchanged, but the Compare 0 value will be updated to provide the required timing.
� 2020 Microchip Technology Inc.
Application Note
DS00003563A-page 25
AN3563
Lab4: PWM - Blink an LED
6. Disable the Period Interrupt, and enable the Compare Match 0 Interrupt. Figure 5-4.Configuration Options
7. In the TIMER_Handler the LED_Toggle function will be commented out and the MC0 interrupt flag will be cleared at the end of the function. Note: When the LED pin was redefined from GPIO to the TC5 function, the LED_Toggle function is removed from the project. The Toggle/Set/Clear functions are associated with GPIO function only.
8. The TC5_TimerStart and TC5_TimerStop functions are underlined in red. When TC5 was repurposed for Compare functionality, the PLIB APIs changed to support the newly selected mode. Open plib_tc5.c to view the compare mode functions. As shown in the callback code example below, add TC5_CompareStart and TC5_CompareStop in place of the corresponding timer functions previously used.
int main ( void ) {
/* Initialize all modules */ SYS_Initialize ( NULL );
// LED_Toggle();
ADC_Enable();
while ( true ) {
/* Maintain state machines of all polled MPLAB Harmony modules. */ SYS_Tasks ( ); }
/* Execution should not come here during normal operation */
return ( EXIT_FAILURE ); }
void BUTTON_Handler() { // LED_Toggle();
if(TC5_REGS->COUNT16.TC_CTRLA & TC_CTRLA_ENABLE_Msk)
//
TC5_TimerStop();
TC5_CompareStop();
� 2020 Microchip Technology Inc.
Application Note
DS00003563A-page 26
AN3563
Lab4: PWM - Blink an LED
else
//
TC5_TimerStart();
TC5_CompareStart();
EIC_REGS->EIC_INTFLAG |= EIC_INTFLAG_EXTINT11_Msk; }
void TIMER_Handler() { // LED_Toggle();
// TC5_REGS->COUNT16.TC_INTFLAG |= TC_INTFLAG_OVF_Msk;
TC5_REGS->COUNT16.TC_INTFLAG |= TC_INTFLAG_MC0_Msk; }
9. Build and run the project.
� 2020 Microchip Technology Inc.
Application Note
DS00003563A-page 27
AN3563
Lab5: ADC - Read and Display a Value
6. Lab5: ADC - Read and Display a Value
Lab5 will add the Digital-to-Analog Converter (DAC), Analog-to-Digital Converter (ADC), Serial Communication Module (SERCOM), and Standard Input/Output (STDIO) peripherals to project. The DAC will be configured and used to provide an internal analog value to the ADC, hence the value can sampled and transmitted using the SERCOM to send the value through the nEDBG to a terminal program, like Teraterm. The ADC will be triggered to begin a conversion every 500 ms by the TC5 Match/Compare callback. After a message is transmitted by the UART, the DAC output will be incremented. This will produce an increasing analog voltage to be sampled by the ADC and displayed by transmission to a remote terminal. The STDIO block added here will provide printf functionality and will be useful to set the data in a format that will easily be read. The values displayed in the terminal will be representative of millivolts. Figure 6-1.Project Graph
Follow these steps to ADC read and display values: 1. Open MPLAB Harmony Configurator and expand the ADC, DAC, SERCOM menu items. Double-click or drag each of these menu items into the Project Graph window.
� 2020 Microchip Technology Inc.
Application Note
DS00003563A-page 28
Figure 6-2.Available Components
AN3563
Lab5: ADC - Read and Display a Value
2. As the ADC and DAC can use an internal connection for producing and sampling the analog voltage, the only pins that require configuration in this lab will be those used for the SERCOM. Refer to the schematic to determine which pin is used for TX and which is used for RX. Use the Pin Setting window to setup PA22 and PB22 for SERCOM5 as done in the previous labs. This will only require changing the function pull-down option to SERCOM5 selections for each of the two pins. Make note of the PADx value when the SERCOM5 option is selected from the pull-down, this value is required in the next step to configure the SERCOM5 module.
3. Once the Pin Settings are updated for the SERCOM, go to the Project Graph and select the SERCOM5 icon. Go to the Configuration Options window to configure the SERCOM5 module.
4. The SERCOM can be used for USART, SPI, and I2C functions. In this LAB the UART function will be used and is the default mode in MPLAB Harmony v3. Because the ADC result will be used to start the transmission of data, the SERCOM interrupts will not be required and are deselected in the configuration options.
� 2020 Microchip Technology Inc.
Application Note
DS00003563A-page 29
Figure 6-3.Configuration Options
AN3563
Lab5: ADC - Read and Display a Value
5. When using the Pin Settings tool, the PA22 is muxed with SERCOM5 PAD0, and PB22 is muxed with SERCOM5 PAD2. By reviewing the schematic, PB22 is the TX pin and PA22 is the RX pin. This requires a change for the RX pinout to select PAD2 for data transmission. The remainder of the SERCOM5 configuration can remain unchanged. The default baud rate is 115,200, which can be used when setting up the Terminal application for the display of ADC values.
6. Go to the Project Graph and click on the DAC icon. The options for configuration will appear in the Configuration Options window, and select the options as shown in the following figure.
Figure 6-4.DAC Configuration Options
7. Once the DAC is configured, go to the Project Graph and select the ADC icon. Move to the Configuration Options window to configure the ADC. Follow the configuration below to set the ADC parameters. The Gain is set to �, as the maximum reference voltage available is � VDDANA. This was chosen as the SAM D21 does not have a full VDDANA internal reference like the DAC to match the DAC output voltage up to 50% this was needed. Ensure the SW Trigger is selected for Conversion Trigger as this will be called from within the TIMER_Handler. For the positive input select the DAC Output and enable the Result Ready Interrupt. The Result Ready Interrupt will be where the UART message is transmitted, as well as the update to the DAC output voltage level.
� 2020 Microchip Technology Inc.
Application Note
DS00003563A-page 30
Figure 6-5.ADC Configuration Options
AN3563
Lab5: ADC - Read and Display a Value
8. Generate the project and go to MPLAB X IDE. 9. Two modifications will be done to the main.c file to complete this lab. First add the ADC trigger to start the
ADC conversion inside the TIMER_Handler. Second, create a new callback called ADC_Handler and populate the function as seen in the following code.
void TIMER_Handler() { // LED_Toggle();
ADC_ConversionStart();
// TC5_REGS->COUNT16.TC_INTFLAG |= TC_INTFLAG_OVF_Msk;
TC5_REGS->COUNT16.TC_INTFLAG |= TC_INTFLAG_MC0_Msk; }
void ADC_Handler() {
uint16_t result = 0;
result = (ADC_ConversionResultGet() * 0.805);
DAC_DataWrite(data++); if(data >= 1024) data = 0;
printf("%d\n\r", result); }
� 2020 Microchip Technology Inc.
Application Note
DS00003563A-page 31
AN3563
Migration from MCC
7. Migration from MCC
Using a configuration tool enables the user to provide a proof of concept to evaluate the device and reduce the need to understand every setting in a peripheral's operation for proper function. The APIs generated by a configuration tool are largely determined by the requirements of the peripheral's configured, the architecture of the device, and design decisions for API continuity, especially when associated with a framework. Therefore, an API for one device can be significantly different in size and system content from another.
To show a comparison of several 8, 16, and 32-bit devices, the APIs used in the previous labs are listed in the following table. The following table shows the size, in bytes of several functions for ADC, PWM, WDT, and the Timer with an interrupt from 8-bit through 32-bit devices. All the following data was collected using the XC8/16/32 compiler with optimizations set at `s' for code density optimization.
Table 7-1.Comparison of Devices
Peripheral ADC TMR PWM WDT
TMR w/ IRQ
MCU8 MCC
ADC_Init
29
ADCC_GetSingleConversion
26
Total ADC
55
TMR1_Init
25
TMR1_StartTimer
6
TMR1_StopTimer
6
TMR1_Reload
12
Total Timer
49
TMR2_Init
17
PWM1_Init
16
TMR2_StartTimer
6
TMR2_StopTimer
7
PWM1_LoadDutyValue
25
Total PWM
71
WWDT_Init
9
Total WDT
9
TMR0_Init
23
TMR0_SetInterruptHandler
8
Total Timer
31
MCU16 MCC ADC_Init ADC1_Enable ADC1_Disable ADC1_ConversionResultGet Total ADC TMR1_Init TMR1_Start TMR1_Stop
Total Timer TMR_Init OC2_Init OC2_Start OC2_Stop
Total PWM
WDT_WatchdogtimerSoftwareEnable WDT_WatchdogtimerSoftwareDisable
Total WDT TMR3_Init TMR3_Start TMR3_Stop TMR3_SetInterruptHandler Total Timer
MCU32 PLIB
88
ADC_Init
4
ADC_Enable
4
ADC_Disable
26
ADC_ConversionResultGet
122
Total ADC
14
TC3_Init
8
TC3_TimerStart
4
TC3_TimerStop
PIC32MX 40 20 20 28 108 40 20 20
SAM D21 92 24 24 12 152 48 24 24
26
Total Timer
14
TCC0_Init
28
OC_Init
16
TCC0_PWMStart
6
TCC0_PWMStop
80
96
40
68
28
20
24
20
24
64
Total PWM
108
116
4
WDT_Enable
4
WDT_Disable
8
Total WDT
26
TC5_Init
10
TC5_TimerStart
6
TC5_TimerStop
8
50
Total Timer
28
36
28
20
56
56
40
60
20
24
20
24
80
108
The code requirements for each peripheral are not expected to be the same from 8-bit to 32-bit. Each of the devices will have different features to support the devices intended market and overall device capabilities. More specifically, there could be architectural differences that result in different configuration procedures. For example, review the SAM D21 ADC initialization function. The SAM D21 requires the calibration of the ADC to be managed before the ADC is initialized. This is done to provide linearity across process variation, voltage, and temperature. The following code shows the ADC initialization function used in the previous labs. The decision to handle the ADC calibration in a
� 2020 Microchip Technology Inc.
Application Note
DS00003563A-page 32
AN3563
Migration from MCC
different area of the startup code can be done to decrease the ADC initialization time and size, but that would only make the necessary information harder to find and create other issues when creating the code configuration tool. Additionally, if the ADC is not used for an application, then the need to calibrate is not necessary and inefficiencies are introduced at that point.
void ADC_Initialize( void ) {
/* Reset ADC */ ADC_REGS->ADC_CTRLA = ADC_CTRLA_SWRST_Msk;
while(ADC_REGS->ADC_STATUS & ADC_STATUS_SYNCBUSY_Msk) {
/* Wait for Synchronization */ }
uint32_t adc_linearity0 = (((*(uint64_t*)OTP4_ADDR) & (uint64_t)ADC_LINEARITY0_Msk) >> ADC_LINEARITY0_POS);
uint32_t adc_linearity1 = (((*(uint64_t*)(OTP4_ADDR + 4)) & ADC_LINEARITY1_Msk) >> ADC_LINEARITY1_POS);
/* Write linearity calibration and bias calibration */ ADC_REGS->ADC_CALIB = (uint32_t)(ADC_CALIB_LINEARITY_CAL(adc_linearity0 | (adc_linearity1 << 5))) \
| ADC_CALIB_BIAS_CAL((((*(uint64_t*)(OTP4_ADDR + 4)) & ADC_BIASCAL_Msk) >> ADC_BIASCAL_POS));
/* Sampling length */ ADC_REGS->ADC_SAMPCTRL = ADC_SAMPCTRL_SAMPLEN(32U);
/* reference */ ADC_REGS->ADC_REFCTRL = ADC_REFCTRL_REFSEL_INTVCC1;
/* positive and negative input pins */ ADC_REGS->ADC_INPUTCTRL = (uint32_t) ADC_POSINPUT_DAC | (uint32_t) ADC_NEGINPUT_GND \
| ADC_INPUTCTRL_INPUTSCAN(0) | ADC_INPUTCTRL_INPUTOFFSET(0) | ADC_INPUTCTRL_GAIN_DIV2;
/* Prescaler, Resolution & Operation Mode */ ADC_REGS->ADC_CTRLB = ADC_CTRLB_PRESCALER_DIV32 | ADC_CTRLB_RESSEL_12BIT ;
/* Clear all interrupt flags */ ADC_REGS->ADC_INTFLAG = ADC_INTFLAG_Msk; /* Enable interrupts */ ADC_REGS->ADC_INTENSET = ADC_INTENSET_RESRDY_Msk;
while(ADC_REGS->ADC_STATUS & ADC_STATUS_SYNCBUSY_Msk) {
/* Wait for Synchronization */ } }
Another item in the ADC initialization code that can be identified is the sync loops required for some registers. Due to the flexibility of the SAM D21 clocking scheme, there is an architectural requirement to synchronize between clock domains to avoid asynchronous write/read errors. Every peripheral in the SAM D21 will have registers that require synchronization. The ADC_Initialize function has two synchronization sequences. The software reset at the beginning of the function is a design requirement for PLIBs to ensure the peripheral is initialized and requires a synchronization step to verify whether the reset has completed. The synchronization at the end of the ADC_Initialize function is present to allow the registers that require synchronization time before moving to the next step in system initialization. In terms of code size, the sync requirements can represent 50% of the peripheral initialization code size at the stated optimization levels.
From the table above it can be seen that the 32-bit section for the SAM D21 requires 92-bytes for its initialization code, but the PIC32 MX requires half of that, at around 40 bytes for initialization. The fact is, the PIC32 MX does not require the synchronization and calibration of the ADC are the difference. When comparing the 8-bit solution to the PIC32 MX, there is only 11 bytes difference for initialization.
The remainder of the API's will not be reviewed in this document. The main take away is that the configuration tools provide a valuable method to quickly establish an efficient and optimized code base to meet the devices architectural requirements as well as organizing the necessary peripheral information in a single location to ensure understanding
� 2020 Microchip Technology Inc.
Application Note
DS00003563A-page 33
AN3563
Migration from MCC
of the peripheral requirements to the user. The Microchip configuration tools provide a solid foundation through PLIBs to build complex applications to use the full extent of the selected Microchip devices.
� 2020 Microchip Technology Inc.
Application Note
DS00003563A-page 34
AN3563
References
8. References
For additional information on the SAM D21 device, refer to the following documents: � SAM D21 Curiosity Nano User's Guide: ww1.microchip.com/downloads/en/DeviceDoc/SAM%20D21G17D_Curiosity_Nano_Evalutio_ %20Kit_User's_Guide_DS70005409B.pdf � SAM D21 Family Data Sheet: ww1.microchip.com/downloads/en/DeviceDoc/SAM_D21_DA1_Family_DataSheet_DS40001882F.pdf � MPLAB X IDE: www.microchip.com/mplab/mplab-x-ide � Microchip MPLAB Harmony v3 repository: github.com/Microchip-MPLAB-Harmony � MPLAB X C32 Compiler: www.microchip.com/mplab/compilers
For other information which are not listed here, go to the Microchip Website, or contact your local Microchip sales office.
� 2020 Microchip Technology Inc.
Application Note
DS00003563A-page 35
AN3563
The Microchip Website
Microchip provides online support via our website at www.microchip.com/. This website is used to make files and information easily available to customers. Some of the content available includes:
� Product Support � Data sheets and errata, application notes and sample programs, design resources, user's guides and hardware support documents, latest software releases and archived software
� General Technical Support � Frequently Asked Questions (FAQs), technical support requests, online discussion groups, Microchip design partner program member listing
� Business of Microchip � Product selector and ordering guides, latest Microchip press releases, listing of seminars and events, listings of Microchip sales offices, distributors and factory representatives
Product Change Notification Service
Microchip's product change notification service helps keep customers current on Microchip products. Subscribers will receive email notification whenever there are changes, updates, revisions or errata related to a specified product family or development tool of interest. To register, go to www.microchip.com/pcn and follow the registration instructions.
Customer Support
Users of Microchip products can receive assistance through several channels: � Distributor or Representative � Local Sales Office � Embedded Solutions Engineer (ESE) � Technical Support
Customers should contact their distributor, representative or ESE for support. Local sales offices are also available to help customers. A listing of sales offices and locations is included in this document. Technical support is available through the website at: www.microchip.com/support
Microchip Devices Code Protection Feature
Note the following details of the code protection feature on Microchip devices: � Microchip products meet the specification contained in their particular Microchip Data Sheet. � Microchip believes that its family of products is one of the most secure families of its kind on the market today, when used in the intended manner and under normal conditions. � There are dishonest and possibly illegal methods used to breach the code protection feature. All of these methods, to our knowledge, require using the Microchip products in a manner outside the operating specifications contained in Microchip's Data Sheets. Most likely, the person doing so is engaged in theft of intellectual property. � Microchip is willing to work with the customer who is concerned about the integrity of their code. � Neither Microchip nor any other semiconductor manufacturer can guarantee the security of their code. Code protection does not mean that we are guaranteeing the product as "unbreakable."
Code protection is constantly evolving. We at Microchip are committed to continuously improving the code protection features of our products. Attempts to break Microchip's code protection feature may be a violation of the Digital Millennium Copyright Act. If such acts allow unauthorized access to your software or other copyrighted work, you may have a right to sue for relief under that Act.
Legal Notice
Information contained in this publication regarding device applications and the like is provided only for your convenience and may be superseded by updates. It is your responsibility to ensure that your application meets with
� 2020 Microchip Technology Inc.
Application Note
DS00003563A-page 36
AN3563
your specifications. MICROCHIP MAKES NO REPRESENTATIONS OR WARRANTIES OF ANY KIND WHETHER EXPRESS OR IMPLIED, WRITTEN OR ORAL, STATUTORY OR OTHERWISE, RELATED TO THE INFORMATION, INCLUDING BUT NOT LIMITED TO ITS CONDITION, QUALITY, PERFORMANCE, MERCHANTABILITY OR FITNESS FOR PURPOSE. Microchip disclaims all liability arising from this information and its use. Use of Microchip devices in life support and/or safety applications is entirely at the buyer's risk, and the buyer agrees to defend, indemnify and hold harmless Microchip from any and all damages, claims, suits, or expenses resulting from such use. No licenses are conveyed, implicitly or otherwise, under any Microchip intellectual property rights unless otherwise stated.
Trademarks
The Microchip name and logo, the Microchip logo, Adaptec, AnyRate, AVR, AVR logo, AVR Freaks, BesTime, BitCloud, chipKIT, chipKIT logo, CryptoMemory, CryptoRF, dsPIC, FlashFlex, flexPWR, HELDO, IGLOO, JukeBlox, KeeLoq, Kleer, LANCheck, LinkMD, maXStylus, maXTouch, MediaLB, megaAVR, Microsemi, Microsemi logo, MOST, MOST logo, MPLAB, OptoLyzer, PackeTime, PIC, picoPower, PICSTART, PIC32 logo, PolarFire, Prochip Designer, QTouch, SAM-BA, SenGenuity, SpyNIC, SST, SST Logo, SuperFlash, Symmetricom, SyncServer, Tachyon, TempTrackr, TimeSource, tinyAVR, UNI/O, Vectron, and XMEGA are registered trademarks of Microchip Technology Incorporated in the U.S.A. and other countries.
APT, ClockWorks, The Embedded Control Solutions Company, EtherSynch, FlashTec, Hyper Speed Control, HyperLight Load, IntelliMOS, Libero, motorBench, mTouch, Powermite 3, Precision Edge, ProASIC, ProASIC Plus, ProASIC Plus logo, Quiet-Wire, SmartFusion, SyncWorld, Temux, TimeCesium, TimeHub, TimePictra, TimeProvider, Vite, WinPath, and ZL are registered trademarks of Microchip Technology Incorporated in the U.S.A.
Adjacent Key Suppression, AKS, Analog-for-the-Digital Age, Any Capacitor, AnyIn, AnyOut, BlueSky, BodyCom, CodeGuard, CryptoAuthentication, CryptoAutomotive, CryptoCompanion, CryptoController, dsPICDEM, dsPICDEM.net, Dynamic Average Matching, DAM, ECAN, EtherGREEN, In-Circuit Serial Programming, ICSP, INICnet, Inter-Chip Connectivity, JitterBlocker, KleerNet, KleerNet logo, memBrain, Mindi, MiWi, MPASM, MPF, MPLAB Certified logo, MPLIB, MPLINK, MultiTRAK, NetDetach, Omniscient Code Generation, PICDEM, PICDEM.net, PICkit, PICtail, PowerSmart, PureSilicon, QMatrix, REAL ICE, Ripple Blocker, SAM-ICE, Serial Quad I/O, SMART-I.S., SQI, SuperSwitcher, SuperSwitcher II, Total Endurance, TSHARC, USBCheck, VariSense, ViewSpan, WiperLock, Wireless DNA, and ZENA are trademarks of Microchip Technology Incorporated in the U.S.A. and other countries.
SQTP is a service mark of Microchip Technology Incorporated in the U.S.A.
The Adaptec logo, Frequency on Demand, Silicon Storage Technology, and Symmcom are registered trademarks of Microchip Technology Inc. in other countries.
GestIC is a registered trademark of Microchip Technology Germany II GmbH & Co. KG, a subsidiary of Microchip Technology Inc., in other countries.
All other trademarks mentioned herein are property of their respective companies.
� 2020, Microchip Technology Incorporated, Printed in the U.S.A., All Rights Reserved.
ISBN: 978-1-5224-6488-4
Quality Management System
For information regarding Microchip's Quality Management Systems, please visit www.microchip.com/quality.
� 2020 Microchip Technology Inc.
Application Note
DS00003563A-page 37
AMERICAS
Corporate Office 2355 West Chandler Blvd. Chandler, AZ 85224-6199 Tel: 480-792-7200 Fax: 480-792-7277 Technical Support: www.microchip.com/support Web Address: www.microchip.com Atlanta Duluth, GA Tel: 678-957-9614 Fax: 678-957-1455 Austin, TX Tel: 512-257-3370 Boston Westborough, MA Tel: 774-760-0087 Fax: 774-760-0088 Chicago Itasca, IL Tel: 630-285-0071 Fax: 630-285-0075 Dallas Addison, TX Tel: 972-818-7423 Fax: 972-818-2924 Detroit Novi, MI Tel: 248-848-4000 Houston, TX Tel: 281-894-5983 Indianapolis Noblesville, IN Tel: 317-773-8323 Fax: 317-773-5453 Tel: 317-536-2380 Los Angeles Mission Viejo, CA Tel: 949-462-9523 Fax: 949-462-9608 Tel: 951-273-7800 Raleigh, NC Tel: 919-844-7510 New York, NY Tel: 631-435-6000 San Jose, CA Tel: 408-735-9110 Tel: 408-436-4270 Canada - Toronto Tel: 905-695-1980 Fax: 905-695-2078
Worldwide Sales and Service
ASIA/PACIFIC
Australia - Sydney Tel: 61-2-9868-6733 China - Beijing Tel: 86-10-8569-7000 China - Chengdu Tel: 86-28-8665-5511 China - Chongqing Tel: 86-23-8980-9588 China - Dongguan Tel: 86-769-8702-9880 China - Guangzhou Tel: 86-20-8755-8029 China - Hangzhou Tel: 86-571-8792-8115 China - Hong Kong SAR Tel: 852-2943-5100 China - Nanjing Tel: 86-25-8473-2460 China - Qingdao Tel: 86-532-8502-7355 China - Shanghai Tel: 86-21-3326-8000 China - Shenyang Tel: 86-24-2334-2829 China - Shenzhen Tel: 86-755-8864-2200 China - Suzhou Tel: 86-186-6233-1526 China - Wuhan Tel: 86-27-5980-5300 China - Xian Tel: 86-29-8833-7252 China - Xiamen Tel: 86-592-2388138 China - Zhuhai Tel: 86-756-3210040
ASIA/PACIFIC
India - Bangalore Tel: 91-80-3090-4444 India - New Delhi Tel: 91-11-4160-8631 India - Pune Tel: 91-20-4121-0141 Japan - Osaka Tel: 81-6-6152-7160 Japan - Tokyo Tel: 81-3-6880- 3770 Korea - Daegu Tel: 82-53-744-4301 Korea - Seoul Tel: 82-2-554-7200 Malaysia - Kuala Lumpur Tel: 60-3-7651-7906 Malaysia - Penang Tel: 60-4-227-8870 Philippines - Manila Tel: 63-2-634-9065 Singapore Tel: 65-6334-8870 Taiwan - Hsin Chu Tel: 886-3-577-8366 Taiwan - Kaohsiung Tel: 886-7-213-7830 Taiwan - Taipei Tel: 886-2-2508-8600 Thailand - Bangkok Tel: 66-2-694-1351 Vietnam - Ho Chi Minh Tel: 84-28-5448-2100
EUROPE
Austria - Wels Tel: 43-7242-2244-39 Fax: 43-7242-2244-393 Denmark - Copenhagen Tel: 45-4485-5910 Fax: 45-4485-2829 Finland - Espoo Tel: 358-9-4520-820 France - Paris Tel: 33-1-69-53-63-20 Fax: 33-1-69-30-90-79 Germany - Garching Tel: 49-8931-9700 Germany - Haan Tel: 49-2129-3766400 Germany - Heilbronn Tel: 49-7131-72400 Germany - Karlsruhe Tel: 49-721-625370 Germany - Munich Tel: 49-89-627-144-0 Fax: 49-89-627-144-44 Germany - Rosenheim Tel: 49-8031-354-560 Israel - Ra'anana Tel: 972-9-744-7705 Italy - Milan Tel: 39-0331-742611 Fax: 39-0331-466781 Italy - Padova Tel: 39-049-7625286 Netherlands - Drunen Tel: 31-416-690399 Fax: 31-416-690340 Norway - Trondheim Tel: 47-72884388 Poland - Warsaw Tel: 48-22-3325737 Romania - Bucharest Tel: 40-21-407-87-50 Spain - Madrid Tel: 34-91-708-08-90 Fax: 34-91-708-08-91 Sweden - Gothenberg Tel: 46-31-704-60-40 Sweden - Stockholm Tel: 46-8-5090-4654 UK - Wokingham Tel: 44-118-921-5800 Fax: 44-118-921-5820
� 2020 Microchip Technology Inc.
Application Note
DS00003563A-page 38