Sparx Skate Sharpener 3
Operating Manual
1. Safety
Safety Precautions
- Before operating the Sparx™ Skate Sharpener, familiarize yourself with the product and read and understand all applicable instructions and warnings in this manual.
- Use personal protective equipment. Always wear eye protection and a dust mask while operating the sharpener.
- For emergencies: press the Cancel Button two times. This will stop the Grinding Ring in its place. Do not stop the Grinding Ring unless it is an emergency, as this may damage the skate blade.
- Children under 13 years of age are not recommended to use the Sparx™ Skate Sharpener.
- The Sparx™ Skate Sharpener is not intended for use by persons (including children 13 years and over) with reduced physical, sensory or mental capabilities, or lack of experience and knowledge, unless they have been given supervision or instruction by a qualified adult.
- Children should be supervised to ensure they do not play with the Sparx™ Skate Sharpener.
- The Sparx™ Skate Sharpener may only be used for sharpening skates.
- Only Sparx™ Grinding Rings may be used with this machine.
- Set up the product securely on a stable surface and in a protected location, away from foot traffic and potential cord damage.
- Always use the Sparx™ Skate Sharpener in a dry, well-lit, and non-condensing environment. Do not use in wet or damp conditions to avoid electric shock.
- Use caution when operating or changing the Grinding Ring to avoid injury.
- Do not attempt to touch the Grinding Ring, Carriage, or Skate Clamp while the Grinding Ring is moving. Wait for them to come to a complete stop before making adjustments or replacements.
- Ensure the Thumb Nut is tightened onto the Grinding Ring before starting any grinding operation.
- Do not leave the Sparx™ Skate Sharpener running unattended.
- Never disconnect the Power Cord by pulling the wire.
- Store the Sparx™ Skate Sharpener in a dry place, out of the reach of children.
- Maintain the sharpener according to the Maintenance section. Cleaning the Sharpener Base and Replacing the Air Filter are necessary steps for performance and safety.
- If the product does not operate normally, see the Troubleshooting section.
- There are no user-serviceable parts on the sharpener. Repairs should only be performed by a professional Sparx™ Hockey technician using original spare parts. Unauthorized repairs could lead to hazardous conditions or void the warranty.
- For questions, contact Sparx™ Hockey Support at 1-855-SPARXHQ (1-855-772-7947) or email help@sparxhockey.com.
Warning: Please see the manual for operating instructions.
Caution: Pinch point hazard. Keep hands, hair, and other body parts clear of the Skate Clamp area.
FCC Notice (for U.S. Customers)
This device complies with Part 15 of the FCC Rules. Operation is subject to the following conditions:
- This device may not cause harmful interference.
- This device must accept any interference received, including interference that may cause undesired operation.
Changes and Modifications not expressly approved by Velasa Sports, Inc. can void your authority to operate this equipment under Federal Communications Commissions rules.
ISED RSS-GEN Notice
This device contains license-exempt transmitter(s)/receiver(s) that comply with Innovation, Science and Economic Development Canada's licence-exempt RSS(s). Operation is subject to the following two conditions: (1) This device may not cause interference. (2) This device must accept any interference, including interference that may cause undesired operation of the device.
Environmental Protection
Waste electrical products should not be disposed of with household waste. Please recycle where facilities exist. Check with your Local Authority or retailer for recycling advice.
Conformity with Directives
This product is CE marked to denote conformity with: Low Voltage Directive 2014/35/EC, EMC Directive 2014/30/EU, RoHS Directive 2015/863, Radio Equipment Directive 2014/53/EU, WEEE Directive 2012/19/EU.
2. Introduction
Technical Specifications
Skate Compatibility
- Hockey Skates
- Goalie Skates
- Figure Skates* (*Requires an additional adapter, which is sold separately.)
Dimensions and Weight
- Width: 26.5 Inches / 673 mm
- Height: 5.0 Inches / 127 mm
- Depth: 11.9 Inches / 303 mm
- Weight: 22.1 Pounds / 10 kg
Electrical
- Line Voltage: 100-240 Volts AC (50-60 Hz single phase)
- Maximum Power Consumption: 140 W
For detailed videos on the individual steps of the sharpening process, head to: sparxhockey.com/howto
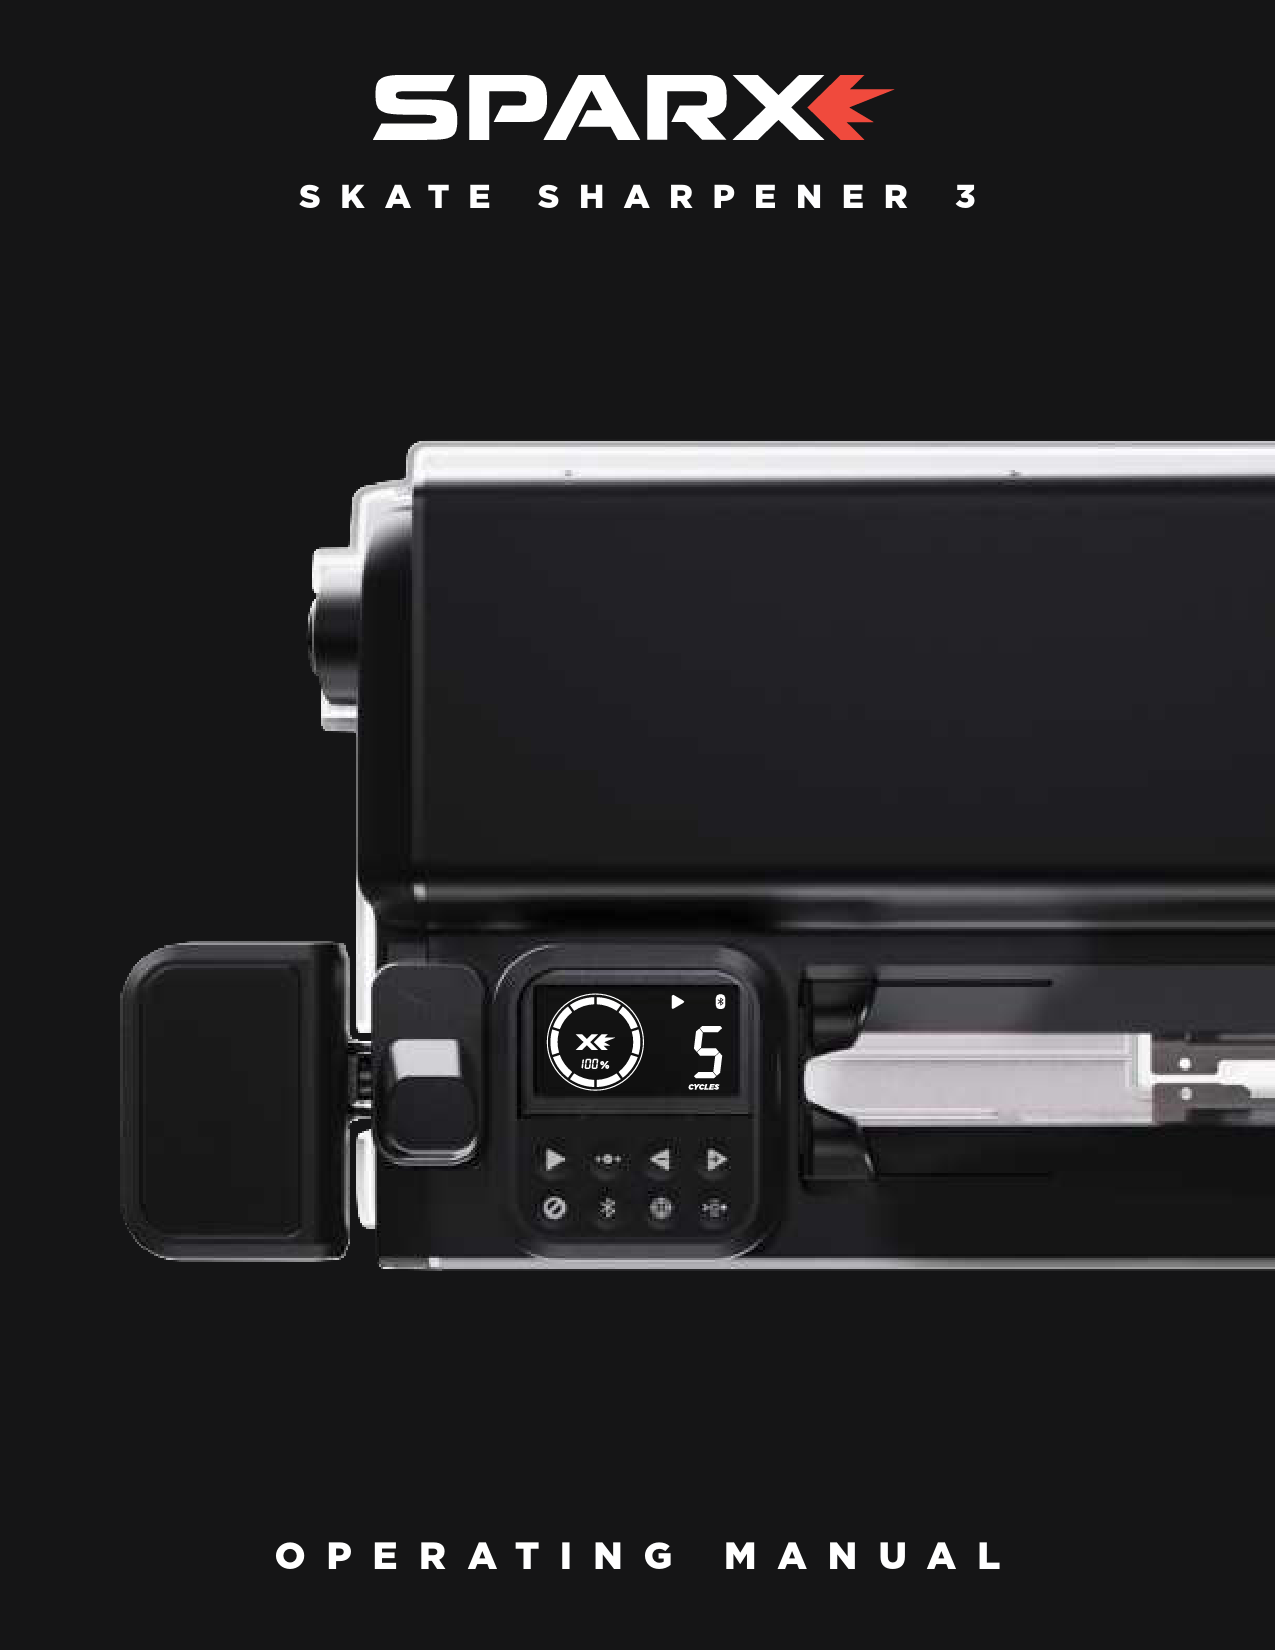
Getting to Know Your Sparx Sharpener 3
The Sparx Sharpener 3 is designed for efficient and precise skate sharpening. Familiarize yourself with its components:
Main Unit Components:
- A: Skate Clamp: Holds the skate blade securely.
- B: Keypad: Interface for controlling the sharpener's functions.
- C: Clamp Lever: Used to open and close the Skate Clamp.
- D: Triggers: Located on the top of the head unit, used to lift and lower the head.
- E: Slot Covers: Cover the blade area during sharpening.
- F: Sharpener Base: The main body of the unit where accessories are stored.
Head Unit Components:
- G: Lever Dock: Where the Clamp Lever attaches.
- H: Power Switch: Turns the unit on and off.
- J: Power Input Port: Connects the power cord.
Grinding Ring Assembly Components:
- K: Height Adjustment Knob: Adjusts the grinding ring height.
- L: Alignment Adjustment Driver Slot: For use with the alignment driver.
- M: Grinding Ring Arbor: Mounts the grinding ring.
- N: Thumb Nut: Secures the grinding ring to the arbor.
What's In the Box?
Your Sparx Skate Sharpener 3 package includes:
- 1 x Travel Guard
- 1 x Power Cord
- 2 x Goalie Risers (for skates with cowlings)
- 1 x Clamp
- 1 x Adjustment Driver
- 1 x Honing Kit
- 1 x Sparx BEAM™
- 1 x BEAM Protective Case
- 1 x BEAM Charging Pad
- 1 x BEAM Charging Cord
- 1 x BEAM Reference Gauge
Getting to Know the Keypad
The keypad is your primary interface for operating the Sparx Sharpener. Keypad buttons and indicators include:
| Button/Indicator | Function | Description |
|---|---|---|
| A: Mode Indicator | Indicates Grinding Ring is in Alignment, Sharpening, or Move mode. | |
| B: Bluetooth Connection Indicator | Displays Bluetooth connection status. | |
| C: Grinding Ring Life Indicator | Indicates remaining Grinding Ring life. | |
| D: Cycle Count Indicator | Indicates the number of cycles set and remaining for sharpening. | |
| E: Filter Indicator | Indicates Filter status. See Sparx Hockey App or online manual at sparxhockey.com. | |
| F: Alert Indicator | Refer to alert codes in Sparx Hockey App or online manual at sparxhockey.com. | |
| G: Play Button | ▶️ | Initiates Skate Sharpening. |
| H: Move Button | ↔️ | Used to locate skate blade contact point to set Grinding Ring Height. |
| J: Reduce Sharpening Cycles / Move Left | ◀️ | Reduces cycles or moves Grinding Ring to the Left in Move Mode. |
| K: Add Sharpening Cycles / Move Right | ▶️ | Adds cycles or moves Grinding Ring to the Right in Move Mode. |
| L: Cancel/Clear | ❌ | Press once to stop sharpening at the conclusion of the current pass. Press twice to stop sharpening immediately. Clears active alert indicator. |
| M: Bluetooth Connection | <0xF0><0x9F><0x92><0xAF> | Press to pair sharpener with Sparx Hockey App. |
| N: Alignment | ⚙️ | Press to initiate Alignment Mode. |
| O: Filter Status Button | Press to display remaining filter life. |
3. Setup
Before setting up your new Sparx Sharpener, it is recommended to download the Sparx Hockey App for enhanced sharpening features. Scan the QR code to download.
To begin setup, you must retrieve the included accessories stored within the Sharpener Base. Lift the head unit as explained below.
For a video guide, visit sparxhockey.com/howto.
Lifting Head Unit
- Locate the Triggers: Two Triggers (A) are located on the top of the sharpener head unit, one on each side.
- Slide the Triggers and Lift Head Unit: Slide the triggers down as shown. With the triggers slid down, raise the head unit and remove the contents inside.
- Close the Head Unit: Slide the triggers down and place the head unit back into position.
Assembling the Sharpener
- Install the Clamp Lever: Slide the Clamp Lever (A) onto the Lever Dock (B). Press the lever down until it clicks into place. When engaged, the Clamp Lever will lay at a slight angle.
- Remove the Travel Guard: Open the Skate Clamp by pressing and holding down the Clamp Lever. Remove the Travel Guard. Release the Clamp Lever.
- Plug in the Power Cord: Plug the Power Cord into the Power Input Port on the side of the sharpener. Plug the other end into a wall outlet. Toggle the switch on the Power Input Port to the 'on' position (I=on, O=off).
- Install the Grinding Ring: While holding the Grinding Ring Arbor (C), slide the Grinding Ring (B) onto the arbor with the label facing out. Replace and tighten the Thumb Nut (A) until hand-tight. Close the Head Unit.
Transporting or moving the Sharpener without the Travel Guard installed voids your Warranty and/or Extended Service Plan. Always remove the Travel Guard before operating the Sparx Sharpener.
Edge Deburring
For a video guide, visit sparxhockey.com/howto.
We recommend using protective gloves when deburring the skate blade.
When deburring coated steel, use only the Leather Strop or the Coated Steel Kit (sold separately) to avoid removing or damaging the coating.
- Deburr the Blade with the Stone: Press the Honing Stone (A) against the face of the skate blade (B). Do not put pressure on the side of the stone closest to the blade edge. With light pressure, press down on the lower side of the stone (C) and slowly run the stone back and forth along the length of the blade for four full passes.
- Repeat on the Opposite Side: Turn the skate over and repeat step 1 on the opposite side of the blade.
- Deburr the Blade with the Strop: Press the Leather Strop (A) against the edge of the skate blade (B) at a 45-degree angle. With light pressure, slowly run the strop back and forth along the length of the edge for four full passes.
- Repeat on the Opposite Side: Turn the skate over and repeat step 3 on the opposite edge of the blade.
5. Using Sparx BEAM™
The Sparx BEAM™ is used to ensure your Sparx Sharpener is perfectly aligned. This is important for your first sharpening and future sharpenings to ensure consistent alignment. While the sharpener is factory aligned, it's important to check edges after the first sharpening in case alignment shifts during transit.
For enhanced sharpening features and to proceed, download the Sparx Hockey app. Scan the QR code to download.
Before proceeding with the Sparx BEAM, we recommend downloading the Sparx Hockey App for enhanced sharpening features. Scan the QR Code to download now.
For a video guide, visit sparxhockey.com/howto.
- Turn the BEAM On and Connect: Press the power button on the Sparx BEAM and open the Sparx Hockey app. Navigate to the BEAM section of the App to begin the connection process.
- Place BEAM on Skate: With the skate toe pointing towards you, place the Sparx BEAM on the middle of the skate blade. Tighten the screw (A) on the BEAM.
- Reading the BEAM: Flick the tilt bar up and down to ensure it is settled on the steel. The three lights on the front of the BEAM will indicate an even edge or which side is high. For an exact reading and recommendations, consult the Sparx Hockey app.
- Adjusting the Alignment: If the BEAM indicates "EDGES GOOD", your sharpener is aligned. If not, the Sparx BEAM and App will provide recommendations to align your sharpener and even your skate edges. Press the align button on the keypad and insert the Adjustment Driver (A) into the Adjustment Driver Slot (B). Adjust in the direction recommended by the app.
- Sharpen Your Skates: Enter the number of cycles recommended by the Sparx Hockey app and resharpen your skates.
- Deburr Your Skates: Repeat the deburring process to ensure your BEAM gives you a proper reading.
- Recheck Your Edges: Repeat steps 2-7 until you achieve "EDGES GOOD" in the Sparx Hockey app. Once you have an even reading, your edges are even and the Sparx Sharpener is properly aligned.
6. Additional Sharpening
Goalie Skates
Goalie risers are necessary only if your skate has a cowling. Goalie skates without a cowling can be sharpened normally without risers. If your skate has a cowling, follow these steps:
For a video guide, visit sparxhockey.com/howto.
- Install the Goalie Risers: Align the Anchor Pins (A) of the Goalie Risers to the Anchor Slots of the Skate Clamp. Once aligned, press down firmly until the Goalie Risers snap into place.
- Continue the Sharpening Process: Refer to "Loading a Skate" in the Operation section. When adjusting the Grinding Ring Height, refer to the graphic in step 3.
- Adjust the Grinding Ring Height: Refer to "Adjusting the Grinding Ring Height" in the Operation section, using the provided figure as a guide. Contact point A is desired, B is too high, and C is too low.
- Continue the Sharpening Process: Refer to "Sharpening Skates" in the Operation section.
- Remove the Goalie Risers: Pull up on each end of the Goalie Risers to remove them from the Skate Clamp.
Figure Skates
* Figure Skate Adapters are sold separately.
Before loading a figure skate, Figure Skate Adapters must be installed onto each end of the skate steel.
For a video guide, visit sparxhockey.com/howto.
- Place Adapter Over Tail and Toe Pick: Using the included wrench, tighten the set screw until finger tight. Do not over-tighten; the adapter should still be able to pivot. Ensure the drag pick is covered. After installing both adapters, perform a visual check to ensure they are on a level horizontal plane.
- Adjust the Grinding Ring Height: Set the grinding ring height setting to Figure (1). Use the move button to find the contact point where the grinding ring starts to roll on the skate. If the contact point leaves some of the skate blade untouched, you may need to adjust the adapter slightly higher.
- Insert Skate into Skate Clamp: It is recommended to have the toe pointing right. Ensure the adapters are sitting flush with the top surface of the sharpener.
- Continue the Sharpening Process: Refer to "Sharpening Skates" in the Operation section of the manual.
Sharpening New Steel
Before loading new steel, take a dark-colored marker and fill in three strips (1 inch in length, full width of the blade) on the toe, heel, and middle of the bottom surface of the skate blade. To ensure the entire blade is sharpened, inspect the blade after running the cycles. If sharpening is complete, all marker on the skating surface will be removed.
For a video guide, visit sparxhockey.com/howto.
- Load the Skate: After applying the marker (A in the example), follow the instructions in "Loading a Skate" in the Operation section.
- Adjust Grinding Ring Height: Follow the instructions in "Adjust the Grinding Ring Height" in the Operation section.
- Select Ten Cycles: Using the Left (J) and Right (K) Buttons, select ten cycles on the Cycle Counter.
- Continue the Sharpening Process: Refer to the Operation section of the manual.
- Inspect Blade Surface: If the marker is gone (C in the example), your edges are successfully set. If marker remains on the blade (B), continue running cycles until it is completely gone. Variations in blade thickness, steel quality, and edge height difference may require more or fewer than 10 cycles.
7. Troubleshooting
Error Codes
For all errors, an error code is displayed on the Display. The troubleshooting table below suggests corrective actions to resolve the error. Please contact Sparx Hockey at help@sparxhockey.com with any questions regarding error codes.
| ERROR CODE | CAUSE | CORRECTIVE ACTION |
|---|---|---|
| 22 | Door open. | Close Door. |
| 24 | Grinding Ring has insufficient life remaining for selected sharpening operation. | You will need to reduce your cycles or install a different ring. |
| 28 | Door open during sharpening. | Close the door then press Cancel button to reset sharpener. |
| 29 | Air filter full (0% remaining) | Replace air filter. |
| 30 | Air filter missing | Install air filter. |
| 31 | Grinding Ring not found. | Install a valid Grinding Ring. |
| 33 | Sharpener failed to detect skate | Load a skate into Sharpener. |
| 34 | Emergency stop: Cancel button pressed twice. | Make sure machine is safe before resetting. |
| 38 | Grinding ring read/write error | Error reading/writing grinding ring. Please try a different grinding ring. |
| 40 | Bluetooth failed to connect | Please check Bluetooth settings on your phone. |
| 41 | Hardware circuit failure | Please contact Sparx support. |
| 44 | Grinding Motor Fault (Undercurrent) | Please contact Sparx support. |
| 45 | Grinding Motor Fault (Overcurrent) | Please contact Sparx support. |
| 48 | FileSystem Incompatibility | Commercial and Cross Grind rings are not supported on this machine. |
| 49 | Team Machine: XG ring installed | Cross grind rings are not supported on this machine. |
| 52 | Grinding ring did not reach the right limit switch. | Remove skate, power machine off, open top, ensure bucket is clear of foreign objects, close top, power on and restart. |
| 53 | Grinding ring did not reach the left limit switch. | Remove skate, power machine off, open top, ensure bucket is clear of foreign objects, close top, power on and restart. |
8. Maintenance
Removing the Head Unit
For a video guide, visit sparxhockey.com/howto.
- Lift the Head Unit: Slide the Triggers down and lift the Head Unit to its furthest open position.
- Remove Head Unit Thumb Screws: Locate the two thumb screws (A) on the sides of the sharpener. Unscrew them and lift the Head Unit straight up.
- Separate Head Unit from Sharpener Base: Firmly grasp the Head Unit with two hands and lift it out of the Sharpener Base. Place the Head Unit on a clear surface.
- Replace Head Unit: Place the Head Unit back onto the Sharpener Base, maintaining the same angled position. Screw the two thumb screws back into the hinges.
Removing and Emptying the Sharpener Base
Maintenance Frequency: Perform these steps after every 1½ Grinding Ring of sharpener use (160 cycles on Radius Ring™ and FIRE Ring™) and before moving or traveling with the sharpener.
For a video guide, visit sparxhockey.com/howto.
- Remove and Empty the Sharpener Base: Remove the Head Unit. Wipe the Sharpener Base completely clean with a damp cloth (water).
- Vacuum Sharpener: Without removing the Air Filter, thoroughly vacuum the top, sides, and around the Air Filter Housing. A HEPA certified vacuum is recommended.
- Close the Head Unit: Install the Head Unit back onto the top of the Sharpener.
Do not use any solvents or cleaning chemicals in and around the Skate Sharpener.
Replacing the Air Filter
To order a replacement Air Filter, visit sparxhockey.com/new-filter.
For a video guide, visit sparxhockey.com/howto.
Standard Grinding Ring Use (Radius Rings™ and FIRE Rings™): The Air Filter should be replaced every 4 Grinding Rings (1,280 cycles).
Maintenance Frequency: Air Filter replacement limits are related to the type of Grinding Rings used and refer to the maximum usage an Air Filter should have. The Air Filter Button will light up to remind you to replace the Air Filter at the Standard Grinding Ring Use interval ONLY.
Detailed information regarding Air Filter life is also available in the Sparx Hockey App.
- Enter Filter Replacement Mode: Power the sharpener on and click the Air Filter Button. The carriage will reposition itself away from the Air Filter.
- Open Head Unit and Clean Base: Open the Head Unit. Wipe the Sharpener Base completely clean with a damp cloth (water).
- Vacuum Sharpener: Before removing the Air Filter, thoroughly vacuum the top, sides, and around the Air Filter Housing. A HEPA certified vacuum is recommended.
- Remove the Old Filter: Pivot the Filter Clamps (A) to release the Air Filter. Pull up on the Air Filter Pull-Tab to lift the filter out.
- Insert the New Air Filter: Vacuum any remaining dust from the Filter Housing area. Insert the new Air Filter with the pull-tab on the left-hand side and black seal going into the sharpener. Pivot the Filter Clamps into their original positions.
- Reset the Air Filter Button: Hold down the Air Filter Button for two seconds until an audible tone is heard to reset the system and extinguish the button light.
Traveling with the Sharpener
For a video guide, visit sparxhockey.com/howto.
- Empty the Sharpener Base: Lift the Head Unit and wipe the Sharpener Base completely clean with a damp cloth (water).
- Vacuum Sharpener: Without removing the Air Filter, vacuum the top of and around the Air Filter Housing. A HEPA certified vacuum is recommended.
- Install the Travel Guard: Open the Skate Clamp by pressing and holding the Clamp Lever. Place the claw of the Travel Guard behind the Grinding Ring Arbor's impeller. Release the Clamp Lever. Ensure the middle section of the Travel Guard is held securely in the Skate Clamp.
- Remove the Clamp Lever: Slide the Clamp Lever (A) off the Lever Dock.
- Travel with the Sparx Travel Case: For the highest level of protection and safety when traveling with your Sparx Skate Sharpener and accessories, use the Sparx Travel Case (sold separately).
When setting up the Sparx Sharpener after travel, wipe down the Grinding Ring Arbor's face and threaded arbor to remove any unwanted steel shavings that may have gathered during transit. This will ensure a proper fit between the Grinding Ring Arbor and the Grinding Ring.
Installing the Sparx Sharpener 3 Pro Base
* Sparx Sharpener Base Pro is sold separately.
For a video guide, visit sparxhockey.com/howto.
- Remove the Head Unit: Lift the Head Unit upright, unscrew the Thumb Nuts on the side of the Sharpener Head, and separate the Head Unit from the Sharpener Base. Set aside the Thumb Nuts.
- Place Head Unit on the Base Pro: Gently place the Sharpener Head Unit onto the top of the Sparx Sharpener 3 Pro Base.
- Tighten Thumb Nuts: Reinstall the Thumb Nuts (A) back into the Sharpener Head Unit and the Sparx Sharpener 3 Pro Base.
- Lock the Base: Lower the Head Unit into the home position and slide the latches on each side of the base into the lock position (A).
9. Warranty
Any purchase of a Sparx Hockey product is covered under the associated product warranty posted at sparxhockey.com/warranties from the date of shipment of the Sparx Hockey product.
Velasa Sports may, at any time and in its sole discretion, modify any of the terms and conditions contained in the warranty policy.
