Manfrotto MVG300XM Modular Gimbal Instructions
File info: application/pdf · 39 pages · 17.46MB
PDF Catalogue
MVG300XM is a professional 3-axis Gimbal specially designed for DSLR and mirrorless cameras and compatible with the most popular cameras on the market. It is designed with a detachable versatile...
INSTRUCTIONS MVG300XM
Extracted Text
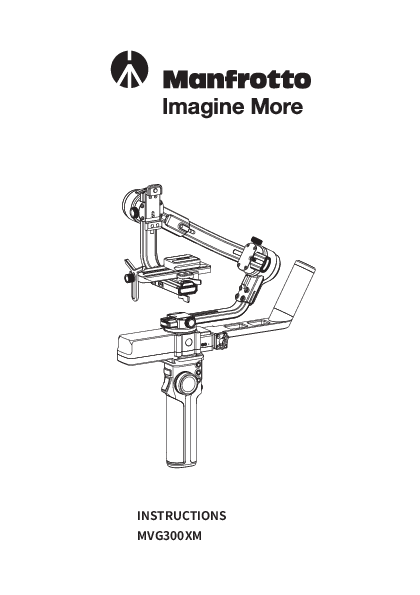
INSTRUCTIONS MVG300XM

Catalogue
1. Product overview ........................................................................ 2
2. Getting started .............................................................................. 5 2.1 Charging ............................................................................................. 5 2.2 Installing the tripod .............................................................................. 5 2.3 Installing the handle(Remote control) ...................................................... 6 2.4 Installing the versatile handle ............................................................... 6 2.5 Motor lock .......................................................................................... 6
3. Installing the camera ..................................................................... 7 3.1 Attaching the quick release plate and higher block (optional) ..................... 7 3.2 Installing the lens holder (optional) ......................................................... 8 3.3 Mounting the camera on the gimbal ......................................................... 8
4. Gimbal balancing ........................................................................10 4.1 Balancing the tilt axis ........................................................................... 11 4.2 Balancing the roll axis ........................................................................... 12 4.3 Balancing the pan axis ........................................................................... 12
5. Power ON/OFF & Wake up ............................................................13 5.1 Power ON/ OFF .................................................................................... 13 5.2 Lock & Unlock ....................................................................................... 14 5.3 Standby & Wake up .............................................................................. 14
6. Function / Modes introduction ......................................................14 6.1 Follow mode introduction ..................................................................... 14 6.2 Other function introduction .................................................................. 15
7. Connecting the App .....................................................................16 8. Operation ....................................................................................18
8.1 Button operation ................................................................................. 18 8.2 Remote control .................................................................................... 22 8.3 USB ports ............................................................................................. 25 8.4 Touch screen introduction ..................................................................... 26 8.5 Function operation .............................................................................. 27 8.6 Firmware update ................................................................................. 34
8. Disclaimer ....................................................................................35

Introduction
MVG300XM is a professional 3-axis Gimbal specially designed for DSLR and mirrorless cameras and compatible with the most popular cameras on the market. It is designed with a detachable versatile arm handle, supporting single hand and low angle shooting, and can be mounted on a tripod and other accessories. MVG300XM features function buttons and an LCD touch screen, which can switch the Gimbal working mode, control rotation and allow parameter setting with one hand. The camera shutter cable supplied can be used to control photography, video recording and electronic follow focus directly on the Gimbal.
Download the Manfrotto Gimbal 300XM App

Please read the manual carefully before using.
TIPS
(1) Install the camera before you power on the gimbal. (2) Gimbal and handle must be set to power off before connecting or disconnecting them. (3) When the battery is low, please charge the gimbal. (4) In case of prolonged periods of disuse, power off the gimbal.

1. Product overview

Detachable, multi-function, professional three-axis gimbal with touch screen designed for DSLR and mirrorless cameras.

Roll axis motor lock
1/4 inch thread hole

Cross arm extending position screw
Cross arm

Tilt motor lock

Touch Screen Joystick
Handle

Sliding arm Fixed plate slider Fixed plate slider set screw Vertical arm Type-C charging port Pan motor lock Handle lock
Handle power button Shutter button Mode button
Handle Type-C charging port 3/8 inch thread hole 1/4 inch thread hole

- 2 -

Fixed plate safety lock

Tilt axis Slider knob Anti-drop column Higher block Quick Release plate Lens holder Lens holder
screw
Vertical arm fixed screw
Pan axis
Fast follow button Trigger button

Vertical mounting plate Cross extension arm
Cross arm knob Roll axis

Quick release plate safety lock
Anti-drop column

Versatile handle

Versatile handle knob
Gimbal power button
Multifunction switch button A Button B Button Multifunction knob

Specification

Max. Tilt Range Max. Roll Range Max. Pan Range

340� 340� 360�

Weight

About 2000g

Payload Capability 3400g

Battery Life

10 Hours

Tilt Follow Speed

2�/s ~ 75�/s Battery

2500mAh

Pan Follow Speed
Compatible Cameras

3�/s ~ 150�/s Charging Time

>2.6 Hours, supports quick charging 18W

Sony, Canon, Nikon, Panasonic, etc.

 In centre of gravity balanced state.  Please refer to the list of compatible cameras and lenses.

* This product does not include the camera.

- 3 -

Accessories

USB 2.0 to Type-C �1

Type-C to Micro(A03) �1

Type-C to Mini (B02) �1

Type-C to Type-C (C02) �1

Type-C to TRS2.5 (T02) �1

Type-C to Multi Sony shutter cable
�1

Type-C to 2.5mm Panasonic shutter cable (DC2.5mm)
�1

Versatile handle �1

Tripod �1

Quick release plate �1

Higher block �1

Lens holder �1

Lens holder screw �1

Short quick release plate (GimBoom)
�1

Short quick release plate screw
�1

Camera fixed screw �3

3/8 to 1/4 inch transition screw (In the tripod)
�1

- 4 -

2. Getting started
2.1 Charging
Be sure to fully charge the gimbal before the first use. If the battery is very low, we suggest you charge it straight away.
Charging with USB . to Type-C supports fast charging. 1 2 The charging ports can be charged simultaneously.

1

1

2

Gimbal and handle

For handle

charging when connected.

charging only

2

If disconnected, for gimbal

charging only

2.2 Install the tripod
Install the 3/8 - 1/4 inch thread insert on the 1/4 inch screw on the top of the tripod (The thread insert is factory mounted). Mount the tripod to the bottom of the gimbal or handle, then deploy the tripod and place the gimbal on a flat surface.

1 2
- 5 -

2.3 Installing the handle (remote control)

Slide the metal contact part at the bottom of the gimbal part toward the handle and tighten the handle safety lock after sliding it into the corresponding groove.
When unloading the handle, unlock the safety lock, release the anti-detachment column, and slowly push out the gimbal.

Install:

Unload:

2 1
3

3 2
1

2.4 Installing the versatile handle
Unlock the versatile handle screw, insert the versatile handle into the base of the gimbal (proceed as shown in the figure), then tighten the setting screw.
Lock: clockwise direction Unlock: counterclockwise direction

2

1

3

2.5 Motor lock
Each of the three rotating axes has one positioning lock for convenient positioning and storage purposes.
The gimbal is folded by default, please toggle the tilt lock, roll lock, and pan lock levers to the unlocked position and adjust the gimbal position to Balanced lock status (see Figure 2.5-1), and then toggle the three locks to the locked position.
Be sure to unlock them before using the gimbal.
- 6 -

Lock Unlock

Figure 2.5-1
Balanced lock

Figure 2.5-2
Stored lock

3. Installing the camera
Before Installing the camera, make sure it is ready for shooting (Install the camera lens, remove the lens cap, ensure the memory card and battery are inserted in the camera, and the battery is fully charged), complete all the steps mentioned in chapter "2. Getting started" and make sure the gimbal is adjusted to Balanced lock status (see Figure 2.5-1). Make sure the gimbal is powered off or in sleep mode before installing the camera.
3.1 Attaching the quick release plate and higher block (optional)
Attach the quick release plate to the camera by tightening the screw. The user can choose to attach the higher block as needed (e.g. when using a long or heavy lens). Attach the higher block to the camera, then attach it to the quick release plate by tightening the 2 screws.

Attach with quick release plate only

Attach with higher block and quick release plate

- 7 -

3.2 Installing the lens holder (optional)
Install the lens holder on the quick release plate as needed, the lens holder rubber mount must be directly under the lens. It is recommended to use the lens holder when using a long or heavy lens.

3.3 Mounting the camera on the gimbal
Horizontal Installation
Unlock quick release plate safety lock  , push the plate with the mounted camera into the slot  in the direction of the arrow, lock safety lock  once the camera is approximately balanced. The sliding block position can be adjusted according to the size of the camera and the higher block selected  . Unlock slider lock  to move the camera left or right according to its width, then secure slider lock  . It is recommended to push the camera as close as possible to the tilt axis.

2 1

3

4

5 6
- 8 -

Removal: unlock quick release plate safety lock  , remove the quick release plate while pressing anti-drop column  .
2 1
Vertical Installation
Unlock quick release plate safety lock  located on the vertical mounting plate, push the plate with the camera mounted into slot  , lock safety lock  once the camera is approximately balanced.
3 1 2
Removal: unlock quick release plate safety lock  located on the vertical mounting plate, remove the quick release plate while pressing anti-drop column  .
1
2
- 9 -

Horizontal configuration

Vertical configuration

4. Gimbal balancing
Before balancing the gimbal, please lock it at balanced lock status, then unlock each axis position lock in stages.
TIPS
(1) The lens cap should be removed from the camera and the memory card inserted to complete all the connections. This ensures the camera is ready for shooting. (2) While balancing the gimbal, make sure the camera and gimbal are powered off. (3) If you need to add accessories after balancing is completed, the gimbal must be re-balanced. (4) Standard balanced mode: the camera will remain stable at any angle. (5) It is recommended to hold up the camera first, then move the sliding arm, cross arm and vertical arm.
Use the horizontal balancing adjustment as an example.

- 10 -

4.1 Balancing the tilt axis
4.1.1 Adjusting the sliding arm
 Unlock the tilt axis, turn the camera lens upwards.  Unscrew the sliding arm screw.  Slide the vertical arm to balance it until the camera remains in place at any angle: balancing successful.  Tighten the sliding arm screw.

2

4

3 1

4.1.2 Adjusting the quick release plate
 Push the camera lens forward, unlock the quick release plate safety lock.  Move the quick release plate to the camera balancing position.  Lock the quick release plate with the fixed plate safety lock.

2

3

1

- 11 -

4.2 Balancing the roll axis
 Unlock the roll axis motor lock.  Unscrew the cross arm screw.  Move the cross arm to the balancing position.  Tighten the cross arm screw.

2

4

3 1

Use the red memory dot to mark the balancing position

4.3 Balancing the pan axis
 Unlock the pan axis motor lock.  Hold the handle and tilt it (15�), position the vertical arm horizontally, unscrew the vertical arm screw.  Move the vertical arm to the balancing position.  Tighten the vertical arm screw.

1

- 12 -

2

4

3

15�

Use the red memory dot to mark the balancing position

5. Power ON/OFF & Wake up
5.1 Power ON/ OFF
Be sure to unlock the position lock before using the gimbal.
Long press the power button to power on/off.
On the first use, connect the gimbal to the handle then power it on. It can automatically generate pairing information, when separate, the handle can remote control the gimbal.
After successful pairing: - Any power button can power off the gimbal. - When combined, any power button can power on the gimbal. When separate, power on each component separately.

Gimbal power button

- 13 -

Handle power button

5.2 Lock & Unlock
Lock the screen: single tap any power button to lock the touch screen. Unlock the screen: single tap any power button again to unlock it.

Motor power Follow speed Screen locked.Press Power
button to unlock

PTF

Scenario

Lock the screen

Motor power Follow speed Screen unlock

PTF

Scenario

Unlock the screen

5.3 Standby & Wake up
Standby mode: double tap any power button for standby mode.
Wake up mode: in standby mode, single tap any power button or tap the icon on the touch screen to wake up the gimbal.

Follow speed

PTF

Scenario

6. Function / Modes introduction
6.1 Follow mode introduction
 PF mode: pan follow (Default mode)
Only the pan axis follows the movement of the user's hand
 PTF mode: Pan and tilt follow
Both the pan and tilt axes follow the movement of the user's hand, but the roll axis does not.
 FPV mode: pan, tilt and roll follow
All 3 axes follow the movement of the user's hand.
 Lock mode
None of the 3 axes follow the movement of the user's hand, the gimbal keeps the camera direction fixed
- 14 -

 Recentre
Three axes return to default position.

 PF

 PTF

 FPV

 Lock

 Recentre

6.2 Other function introduction
Gyro mode (refer to chapter 8.2) When the gimbal and handle are successfully paired and separated press and hold the M button to enter gyro mode, the handle can simulate the joystick to control the tilt and pan angle. Release the M button to exit.
Inception mode (refer to chapter 8.5.5) The camera can shoot auto rotation and shoot inception effects according to the rotation speed and direction setting.
Portrait mode (refer to chapter 8.5.7) Camera portrait shooting. This mode can be used for portrait shooting, video or live streaming.
Selfie mode (refer to chapter 8.5.8) The camera lens rotates 180�horizontally for selfies.
- 15 -

Track video (refer to chapter 8.5.9) Generate track video according to the set multiple waypoints.
Manual lock (refer to chapter 8.5.11) Manually move the camera to the desired position and hold it for at least half a second. New tilt and/or pan positions are saved automatically.
7. Connecting the App
Download the Manfrotto Gimbal 300XM App

Connect Manfrotto Gimbal 300XM App

(1) Power on the Gimbal.

(2) On a smartphone, enable Bluetooth and open the Manfrotto Gimbal 300XM App, click the top of the home page to connect to the gimbal.

Once the connection is successful, the gimbal can be controlled via the App, including remote direction, switching mode, setting motor power/camera parameters/follow speed, and setting other functions and parameters, updating the firmware and so forth.

[2]

[12]

[13]

Connected

[3]

Click to operate device

Connected

[1] 300XM_XX

300XM_XX

Trigger button settings

[11] [10]

Timelapse
Motor power settings

settings
Follow speed

[9]
settings

Horizon calibration

Reset

Device

[4] [5] [6]
[7] [8]
- 16 -

[14] [15]
[16]

Lock

PF

PTF

FPV

[17]

[1] Gimbal control operation interface Displays the currently connected product name; click to enter the gimbal operation interface: you can simulate the joystick, switch on the gimbal follow mode, manually adjust the roll angle, etc. When not connected, you will be prompted to connect to the gimbal.
[2] Switch the connected device Refresh the connected device or switch to connect to other compatible devices.
[3] Exit the current connection Click to exit the currently connected gimbal.
[4] Trigger button settings The trigger button function can be set as PTF/FPV/Lock/Fast follow.
[5] Joystick function settings The joystick can be set to pan/tilt reverse, and pan/tilt speed.
[6] Follow speed settings The follow speed can be set to slow/med/fast, or custom speed.
[7] Reset Restore all settings to the factory defaults.
[8] Horizon calibration Manual or auto calibration.
[9] Camera settings You can set the camera aperture, shutter and ISO parameters.
[10] Motor power settings The pan, tilt and roll power can be set, respectively, or you can click "Adapt" to adapt to the motor power automatically.
If the camera is used for the first time or has been replaced, adjust motor power adaptation after power on.
[11] Timelapse Timelapse can be set according to the waypoint. Adjust the gimbal to the angle you want and click "+" to record the current waypoint. Up to 10 waypoints can be added. Smoothness/ Time/Frame rate/Interval can be set. Once the parameters have been set, tap the "Start shooting" button to start shooting.
[12] Return Return to the previous level.
- 17 -

[13] Firmware update Firmware upgrades to the device.
[14] Horizontal Angle Settings Move the slider to adjust the roll axis angle, i.e. the current horizontal angle.
[15] Recenter Click to return the 3 axes to their default positions.
[16] Simulated joystick The simulated joystick controls the tilt, roll angle of the gimbal.
[17] Follow mode settings. Setting the current follow mode.
8. Operation
8.1 Button operation
8.1.1 Gimbal power button
Long press: Power on/off the combined system (Handle connected to gimbal) Power on/off the gimbal (Handle and gimbal are separate) Single tap: Wake up Double tap: Enter standby mode
8.1.2 Handle power button
Long press: Power the combined system on/off (Handle connected to gimbal) Power the handle on/off (Handle and gimbal are separate) Power the combined system off (After successful pairing) Single tap: Wake up Double tap: Enter standby mode
- 18 -

8.1.3 Joystick

Up Camera lens up

Move to left Camera lens left

Move to right

M

Camera lens right

Down Camera lens down

8.1.4 Mode button (M button)

Single tap: PF mode/Lock mode (Switch in turn)

Double tap: PTF mode

Triple tap: FPV mode

M

Press and hold*: Gyro mode (Release to exit)

*Handle and gimbal are separate

8.1.5 Shutter button*

Press half-way: Focus

Single tap (full press): Start/stop recording

Long press (full press): Take photo

M

*Must be connected via the camera shutter cable. Refer to the list of compatible cameras.

- 19 -

8.1.6 Trigger button
Double tap: Recentre Triple tap: Enter/Exit selfie mode (Pan axis 180� turn) Press and hold: Enter PTF mode* (Release to exit)
*You can customize the function via the APP
8.1.7 Knob function switching button
Long press: switch the multifunction knob control options between electronic follow focus and movement of the 3 axes. Single tap: after selecting with a long press, movement of the 3 axes switches between the pan, tilt, and roll axes.(when it is set up to control one of the movements of the 3 axes)

8.1.8 Multifunction knob
Turn: (1) Control movement of the roll, tilt and pan axes (when it is set up to control one of the movements of the 3 axes). (2) Control electronic follow focus* (when it is set up to control the electronic follow focus). (3) Adjust the parameter on the touch screen.
*After connecting your camera. Refer to the list of compatible cameras.

Home Page

Motor power Follow speed

PTF

Scenario

Multifunction knob settings

Slide up

Electronic follow focus

Pan

Tilt

Roll

Turn the knob to control the electronic follow focus
Turn the knob to control the direction

Knob settings

- 20 -

Knob settings:
Slide up to select the "Knob settings" option. Here, you can set knob damping/speed/ smoothness.

Electronic follow focus

Pan

Tilt

Roll

Knob settings

Damp Speed Smooth Sound

8.1.9 Fast follow button
Press and hold: Enter fast follow mode (Release to exit)

8.1.10 A/B button

The A/B button can record the Mark

A

point: once recorded, the motion

tracks from A to B will be generated

B

automatically.

Steps:
(1) Record point A: confirm the tilt, roll and pan angle position with the joystick or manually pull the camera to the desired position and remain there for 1s. At this point, a long press of button A will record the current position as point A. The screen shows "Mark current position as A". (2) Record point B: a long press of the button B will record the point B position as described above. The screen shows "Mark current position as B". (3) Single tap button A, the track motion will return to point A. The screen shows "Return to mark A". (4) Single tap button B, the track motion will return to point B. The screen shows "Return to mark B"
The A/B button, which can be overwritten, records only the location of the last setting.
- 21 -

A/B button settings:
Slide from right to left, select the "A/B settings" option to set the time for the gimbal to return to point A/B.

Gimbal settings

A

A/B settings

More

Return to mark A/B(Gimbal)

Return to mark A/B(Gimbal)
in 1s

8.2 Remote control
The handle is a remote control. Powering on the gimbal when combined with the handle automatically generates matching information.
The next time they are used separately, the handle can remotely control the gimbal directly.
Gimbal and handle must be set to power OFF before connecting or disconnecting them If the pairing information is lost, please reconnect the handle to the gimbal.

- 22 -

Steps for use of the remote control handle
(1)Unloading the handle: the gimbal can be separated from the handle only when the gimbal is set to power off (Refer to chapter 2.3 to unload the handle)
(2)Install the tripod: after unloading the handle, a support, like a tripod, must be installed at the bottom of the gimbal (Refer to chapter 2.2 to install the tripod).
(3)Power on: after installing the gimbal on the support, power on the gimbal and the handle
(4)Use the remote control handle: wireless remote control the gimbal (within 20 meters)

The handle when detached from the gimbal can be used in combination

with the Manfrotto GimBoom (MVGBF-CF not included) using the short

quick release plate.

1

2

Mount the short quick release plate screw in the short release plate.
Connect the short quick release plate to the bottom of the GimBoom via the 3/8 thread.

Slide the handle toward the short quick release plate and tighten the handle safety lock after sliding it into the corresponding groove.
1 2
- 23 -

Connect the gimbal to the top of the GimBoom using the 3/8 screw.

Note: To remove the handle from the short release plate, unlock the safety lock, release the anti-detachment column, and slowly push out the handle.
3 1 2
Gyro mode
When the gimbal and handle are successfully paired and separated, press and hold M button to enter the gyro mode, the handle can simulate the joystick to control the tilt and pan angle, release the M button to exit.

Motor power Follow speed

PTF

Scenario

Gyro calibration: You can calibrate the gyro mode when: (1) The first time using the gyro mode. (2) If not used for a long period of time. (3) In case of extreme temperature variations.
Slide from right to left, select the "More" - "Remote control settings" - "gyro calibration" option, follow the screen instructions to calibrate the gyro mode.

Gimbal settings

A

A/B settings

More

Silent Remote control settings
Language

Gyro calibration

- 24 -

8.3 USB ports
With the camera shutter control interface, and two expansion interfaces, you can connect your camera and other future expansion devices.

1

2

3

 Camera control port

 Extension port 1  Extension port 2

- 25 -

8.4 Touch screen introduction

[1]

[4]

[2]

[5]

Motor power Follow speed

[3]

[6]

PTF

Scenario

[1] Handle battery level Shows the current battery level of the handle.
[2] Motor power settings Use auto tune to adjust the motor power automatically or adjust motor power for each axis manually.
[3] Follow mode settings Select gimbal follow mode
[4] Gimbal battery level Show the current battery level of the gimbal.
[5] Follow speed settings The user can select different gimbal follow speed profiles or custom follow speed.
[6] Scenario Select usage scenario.

Joystick settings

Gimbal settings

A

A/B settings

Slide from right to left
Joystick, gimbal, knob and more settings

F

ISDOisabSlehsuettlfiere

1.6 1800

/

240M0anu1al/lo6c0k

2.2 3200

/

Horiz calibration

DPI

FPS

Slide from left to right
Shooting parameter settings*

- Return to previous menu: Slide to right

*Please refer to the list of compatible cameras. - 26 -

Electronic follow focus

Pan

Tilt

Roll

Knob settings
Slide up Multifunction knob settings

8.5 Function operation
8.5.1 Motor power settings
If the camera is used for the first time or replaced, please adjust motor power adaptation after power on. Select the "Motor power" option, select "Auto tune", or adjust the motor power for each axis.

Motor power Follow speed

PTF

Scenario

Auto tune Pan axis Tilt axis Roll axis

Motor power adaptation
Adjust the motor power for each axis

8.5.2 Follow speed settings
Select the "Follow speed" option, you can select slow/med/fast speed, or custom follow speed and dead zone.

Motor power Follow speed

PTF

Scenario

Slow Med Fast Custom

- 27 -

8.5.3 Follow mode settings
Select the option in the lower right corner. Select one of these follow modes.

Motor power Follow speed

PTF

Scenario

PTF

PF

Lock

FPV

PF: Pan follow: only the pan axis follows the movement of user's hand
PTF: Pan and tilt follow: both the pan and tilt axes follow the movement of user's hand, but the roll axis does not.
FPV: Pan, tilt and roll follow: all 3 axes follow the movement of user's hand.
Lock: None of the 3 axes follow the movement of user's hand, the gimbal keeps the camera direction fixed.

8.5.4 Timelapse mode settings
Select the "Scenario" -"Timelapse" option. Select one of the following timelapse modes to shoot automatically and synthesize the timelapse video. *A compatible camera must be successfully connected

Timelapse Inception mode Panorama

Motionlapse Static timelapse
Hyperlapse

Time 5m 10m 15m

FPS Interval

25

4S

30

5S

60

6S

Clip length 8s Photos 120 Next

Select timelapse mode
Motionlapse: Track timelapse shooting by the set waypoint. Static timelapse: Timelapse shooting at the defined fixed angle. Hyperlapse: Moving timelapse shooting.

Setting parameters

- 28 -

8.5.5 Inception mode settings
Select the "Scenario" - "Inception Mode" option. The tilt axis turn 90� counterclockwise, at this time, the camera lens is up, after setting the rotation speed, select the rotation direction and number of circles, then press the top left return button to exit.

Timelapse Inception mode Panorama

Rotation speed

CCW *1 CCW *N

CW *1 CW *N

CCW: Counterclockwise CW: Clockwise
*1: Turn a circle *N: Infinite rotation

8.5.6 Panorama mode settings
Select the "Scenario" -"Panorama" option. Users can choose different panorama modes: 3x3/ 180�/ Custom.

Timelapse Inception mode Panorama

3*3 panorama 180�
Custom

3x3: 3 images above in every three layers combine to form one image.
180�: 4 lateral images combine to form one image.
Custom: Users can customize setting parameters like hora/vert angle, focal length, overlap, interval, press settings to combine to create one image.

8.5.7 Portrait mode settings
Select the "Scenario" -"Portrait mode" option. The tilt axis and pan axis both turn 90� counterclockwise, with the camera lens facing up. Hold the versatile handle parallel to the ground to create a portrait. Click the button to exit the mode.

Panorama Portrait mode Selfie mode

Exit portrait mode

- 29 -

8.5.8 Selfie mode settings
Select the "Scenario" - "Selfie mode" option. Take a selfie by turning the pan axis 180� counterclockwise, with the camera lens facing at you. Click the button to exit the mode.

Panorama

Portrait mode

Selfie mode

Exit selfie mode

Disable selfie
Slide from right to left, select the "Gimbal settings" - "Disable selfie" option, to set selfie mode on/off.

Joystick settings

Disable selfie

Gimbal settings

Manual lock

A KnAo/Bb settings

Horiz calibratioionn

8.5.9 Track video settings
Select the "Scenario" -"Track video" option, multiple waypoints can be set by the user to generate a track video.

Portrait mode Selfie mode Track video

Waypoints
Horizon angle

2

3

+

Add waypoints

Smoothness

Delete waypoints

Horiz 0�

Vert 0�

Preview Start shooting

Vertical angle

Use the joystick or manually pull the tilt axis and pan axis to the angle you need, click "+" to record the current position as a waypoint. Continuing in this manner, add the next waypoint. The system supports recording of up to 10 waypoints. Select a location point, you can quickly view the record location, and click " " to delete the waypoint in question. Click the "Start shooting" button to start shooting after setting the smoothness.
- 30 -

1+
Smoothness

Horiz 0�

Vert 0�

Preview Start shooting

12+
Smoothness

Horiz 0�

Vert 0�

Preview Start shooting

The screen shows shooting progress. If you need to stop while shooting, click "Stop shooting". After shooting, click "Confirm and return" to exit.

ShShootoitnpgrporgorgersesss

50%

Shooting complete

Stop shooting

Confirm and return

8.5.10 Joystick settings
Slide from right to left, select the "Joystick settings" option to set joystick speed and direction reverse to on/off.

Joystick speed

Pan

Joystick direction Tilt
Joystick settings

Gimbal settings

A

A/B settings

Joystick speed Joystick direction

Pan Reverse Tilt Reverse

- 31 -

8.5.11 Manual lock
Slide from right to left, select the "Gimbal settings" -"Manual Lock" option, to set the manual lock direction.
Manually move the camera to the desired position and hold for a second. New tilt and/or pan positions are saved automatically.

Joystick settings

Disable selfie

Pan

Gimbal settings

Manual lock

Tilt

A

A/B settings

Horiz calibration

8.5.12 Horizon calibration
Slide from right to left, select the "Gimbal settings" - "Horiz calibration" option. It is recommended to select "Auto calibration" or manual calibration.

Joystick settings

Gimbal settings

A

A/B settings

Disable selfie Manual lock Horiz calibration

You should perform horizon calibration when:
(1) The camera is not balanced. (2) Following prolonged disuse. (3) In case of extreme temperature variations.
- 32 -

Auto calibration
0�

-

+

8.5.13 More settings
Slide from right to left, select the "More" option to set silent/ remote control settings/ language/ restore the default settings/ version information.

Gimbal settings

A

A/B settings

More

Silent Remote control settings
Language Restore the default settings
Version information

Gimbal Motor Remote Knob

1.0.0 1.0.0 1.0.0 1.0.0

- 33 -

8.6 Firmware update
Update the firmware via the Manfrotto Gimbal 300XM App. After connecting the gimbal, click the top of the home page to operate the device, select the icon in the upper left corner, select the "Firmware update" option, follow the prompts to upgrade the firmware.

Connected
300XM_XX

Firmware update Software information

Connected
300XM_XX

300XM_XX

Lock

PF

PTF

FPV

New firmware:xxxxx Update

Firmware: 1/4 progress: 19%
New firmware:xxxxx Update

- 34 -

Disclaimer
Thanks for using Manfrotto gimbal. The information in this document affects your safety and your legal rights and responsibilities. Read the entire document carefully to ensure proper configuration before use, Failure to read and follow instructions and warnings in this document may result in serious injury to yourself or others, or damage to your products or damage to other objects in the vicinity. By using this product, you hereby signify that you have read this disclaimer and warning carefully and that you understand and agree to abide by the terms and conditions herein. You agree that you are solely responsible for your own conduct while using this product, and for any consequences thereof. You agree to use this product only for purposes that are proper and in accordance with all applicable laws, rules, and regulations, and all terms, precautions, practices, policies and guideline Manfrotto has made and may make available. Manfrotto accepts no liability for damage, injury or any legal responsibility incurred directly or indirectly from the use of product. Manfrotto will not provide any service for any product obtained from abnormal channels.
Notice 1. Make sure motor spinning is not blocked by external force when gimbal is power on. 2. Gimbal DO NOT contact water or other liquid if the gimbal is not mark waterproof or splashproof. Waterproof and splash-proof product DO NOT contact sea water or other corrosive liquid. 3. DO NOT disassembly the gimbal except is detachable available. It need send to Manfrotto aftersales or authorized service center to fix it if you accidently disassembly and cause abnormal work. The relevant costs are borne by user. 4. Prolonged continuous operation may cause the motor surface temperature to rise, please operate carefully.
Storage and Maintenance 1.Keep the gimbal and battery out of the reach of children and pets. 2. DO NOT leave the gimbal and battery near heat sources such as a furnace or heater. DO NOT leave the gimbal and battery inside of a vehicle on hot days. 3. Please storage the battery in dry environment. 4.DO NOT overcharge or overuse the battery, otherwise it will cause damage to the battery core. 5.Never use the gimbal and battery when the temperature is too high or too low. 6. Please take out batteries from gimbal if long time without using gimbal.
Battery Safety Guidelines 1. To avoid fire, serious injury, and property damage, observe the following safety guidelines when using, charging or storing the battery. (1)DO NOT allow the battery to come into contact with any kind of liquid. DO NOT leave the battery out in the rain or near a source of moisture. DO NOT drop the battery into water. (2) If the battery falls into water by accident, put it in a safe and open area immediately. Maintain a safe distance from the battery from the battery until it is completely dry. Never use the battery again. (3) If batteries catch fire, use water, water mister, sand, fire blanket, dry powder, carbon dioxide fire extinguisher to extinguish the fire immediately. It is prone to explosion after a large fire. Please choose the fire extinguishing method according to above recommended order according to the actual situation. (4)DO NOT use or charge swollen, leaky or damage battery. (5)DO NOT disassemble or pierce the batteries in any way or the battery may leak. (6)DO NOT drop or strike batteries. DO NOT place heavy objects on the battery or charger. (7) DO NOT use the battery if it falls. (8) DO NOT heat batteries. (9)DO NOT use the batteries in strong electrostatic or electromagnetic environments. Otherwise, the battery may occur short circuit. (10)Electrolytes in the battery are highly corrosive. If any electrolytes make contact with your skin or eyes, immediately wash the affected area with fresh running water for at least 15 minutes, and then see a doctor immediately. (11)Please use official batteries are provided by Manfrotto. If you need replace the battery, please purchase at Manfrotto official website or authorized dealer. Manfrotto will not be responsible for the battery accident and devices malfunction cause by batteries use from unofficial provided. 2. DO NOT drop or strike batteries. If the battery is abnormal, contact Manfrotto After-sales support.
- 35 -

Disclaimer The information contained in this document is subject to change without notice. Vitec Imaging Solutions makes no warranty and shall not be liable for any errors on information contained in this document. Any changes or modifications not expressly approved by Vitec Imaging Solutions could void the user's authority to operate this equipment. Information for users
In accordance with Artide 10 of Directive 2012/19/UE of the 04/07/2012 concerning Waste Electrical and Electronic Equipment (WEEE). The above Symbol, also present on equipment, indicates that, at such time as the user should decide to dispose of the equipment, it must NOT be disposed of as unsorted municipal waste, but must be collected separately. The same applies to all components of the equipment and any recharge or refill elements that the product may comprise. For information on the waste collection systems suitable for this equipment, contact Vitec Imaging Solutions or any authorised member of the National Registers in EU countries. Household (or similar) waste may be disposed of via standard municipal differentiated waste collection schemes. If you purchase a new version of this model or similar equipment - or if your existing equipment measures less than 25 cm - you may return th� items you no longer require to your retailer who will take care of contacting the company or organization handling the proper collection and management of used equipment. Correct separate collection and specific treatment of WEEE are necessary to avoid potential damage to human health and the environment, and favour the recycling and recovery of component materials. Improper or illegal disposai of this product by the user will result in punishments or fines being applied in accordance with national Decrees based on Directive 91/156/EC and 2008/98/EC.
- 36 -

GB_V1 - 10/21

Copyright � 2021 Vitec Imaging Solutions Spa Via Valsugana, 100 - 36022 Cassola (VI) Italy