LEAB 0043881 24V Champ Pro Compact Battery Charger User Manual
File info: application/pdf · 24 pages · 678.19KB
Charger Champ Pro 24 V
Charger Champ Pro 24 V - LEAB Automotive GmbH
1 About this Manual................................................................................................................ 3. 2 Safety.
2.1 Intended Use The charger is designed for permanent installation in vehicles with 12 or 24 V on-board power systems for charging Lead-acid batteries (wet, gel, AGM).
19 août 2021 ... 1 About this Manual................................................................................................................ 3.
Full PDF Document

If the inline viewer fails, it will open the original document in compatibility mode automatically. You can also open the file directly.
Extracted Text
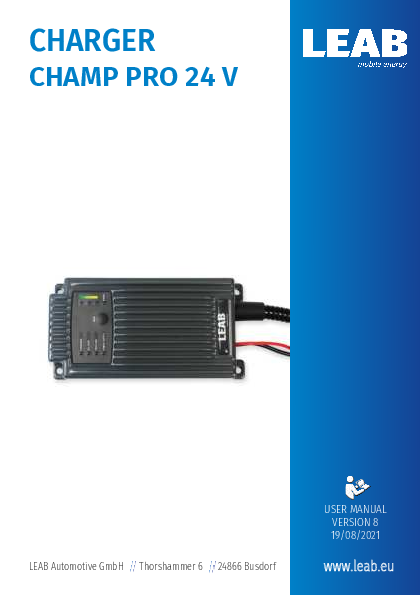
CHARGER
CHAMP PRO 24 V

LEAB Automotive GmbH Thorshammer 6 24866 Busdorf

USER MANUAL VERSION 8 19/08/2021
www.leab.eu

Table of Contents

LEAB Automotive GmbH

Table of Contents
1 About this Manual ................................................................................................................ 3 2 Safety ......................................................................................................................................... 4
2.1 Intended Use............................................................................................................... 5 2.2 Foreseeable Misuse.................................................................................................. 6 3 About this Product ............................................................................................................... 7 4 Technical specifications..................................................................................................... 8 5 Package Contents ................................................................................................................. 12 6 Charging Characteristics.................................................................................................... 13 7 Assembly .................................................................................................................................. 15 8 Installation .............................................................................................................................. 16 9 Operation................................................................................................................................. 17 9.1 Charging the battery ................................................................................................ 17 9.2 Charging the battery ................................................................................................ 17 9.3 Change charging characteristic ........................................................................... 17 9.4 Temperature Sensor ................................................................................................ 18 10 Maintenance ........................................................................................................................... 19 11 Disposal .................................................................................................................................... 19 12 EU Declaration of Conformity.......................................................................................... 19 13 Appendix .................................................................................................................................. 20 13.1 Information on outdoor use of the PowerSystem 12/24 V ...................... 20 13.2 MagCodePowerPort installation instructions................................................ 21 13.3 MagCodePowerClip assembly instructions..................................................... 21

LEAB Automotive GmbH

1 About this Manual

1 About this Manual
Read this manual carefully and keep it in a safe place. This manual is aimed at Skilled workers in the field of automotive electrics.
Any modifications to the product or its components are prohibited and do not conform to its intended use. Only use original LEAB or LEAB-approved accessories.
Throughout the manual, you will be alerted to warnings and safety notices about potential hazards associated with handling the device. The colours and signal words indicate the severity of the hazard:

Notice
Possibility of material damage
The signal word Attention indicates that there is a possibility of material damage. To avoid material damage, follow the instruction.

CAUTION
Danger that can lead to minor injuries
Safety instructions with the signal word CAUTION indicate a hazard which, if not avoided, can result in minor or moderate injury. Read the safety instructions carefully and follow them to avoid the hazard.

WARNING
Hazards that can lead to severe injuries or death
Safety instructions with the signal word WARNING indicate a hazard which, if not avoided, can result in death or severe injury. Read the safety instructions carefully and follow them to avoid the hazard.

LEAB Automotive GmbH

Thorshammer 6

24866 Busdorf

3

2 Safety

LEAB Automotive GmbH

DANGER
Danger that will lead to severe injury or death Safety instructions with the signal word Danger indicate a hazard which, if not avoided, will result in death or severe injury. Read the safety instructions carefully and follow them to avoid the hazard.
You will find useful tips and tricks in certain parts of the manual. These appear as follows:
TIP
Tips provides additional, useful information. Read the tip carefully and follow the instructions where applicable.
2 Safety
This manual will help you to handle the device safely. Use the device solely in accordance with its intended use. Observe the safety instructions. The charger is a trickle and battery charger for permanent installation in vehicles. This charger can be used to charge all types ofLead-acid batteries (wet, gel, AGM). Any modifications to the device or its components are prohibited and do not conform to its intended use. Keep this manual is a place where it can be accessed quickly.

4

LEAB Automotive GmbH

Thorshammer 6

24866 Busdorf

LEAB Automotive GmbH

2 Safety

2.1 Intended Use
The charger is designed for permanent installation in vehicles with 12 or 24 V on-board power systems for charging Lead-acid batteries (wet, gel, AGM). It is suitable for charging and trickle charging auxiliary batteries. The device is designed for a temperature range of -30 �C ... 60 �C. Do not charge batteries with this charger outside the specified temperature range. At higher temperatures, the output power of the charger automatically decreases.

WARNING
Risk of fire from overheated battery Flammable gases can escape if the battery overheats.
1. Always charge batteries in well-ventilated rooms and away from ignition sources.

WARNING
Risk of injury from damaged, frozen or deformed batteries Damaged, frozen or deformed batteries can cause injuries.
1. Before using the battery, make sure that the battery is undamaged and the electrolyte is not frozen.

WARNING
Burns from escaping acid Acid can leak out when handling batteries.
1. Wear acid-proof clothing when handling batteries.

Notice
Device defects from incorrect installation Incorrect installation can result in device defects.
1. Install the device in a dry and cool location.

LEAB Automotive GmbH

Thorshammer 6

24866 Busdorf

5

2 Safety

LEAB Automotive GmbH

2.2 Foreseeable Misuse
The charger is designed for permanent installation in vehicles. Do not mount the device outside the vehicle. Only charge lead-acid batteries (wet, gel/AGM) and traction batteries with this charger.
The negative lead of the charger may contain a temperature sensor, do not shorten or lengthen the lead under any circumstances.
Never pinch the leads of the charger to avoid damage. In the event of damage, unplug the charger immediately and contact your dealer or LEAB.

6

LEAB Automotive GmbH

Thorshammer 6

24866 Busdorf

LEAB Automotive GmbH

3 About this Product

3 About this Product
The Champ charger is a trickle and battery charger for permanent installation in vehicles. This charger can be used to charge all types of Lead-acid batteries (wet, gel, AGM). With the Champ charger, the charging characteristic can be adjusted to ensure optimum charging of the battery.
1 2

Fig. 1: Champ Pro charger
1 Display 3 DC cable

3
2 AC cable

4

5

Fig. 2: Champ Pro charger display

4 Charging characteristic indicator 6 Charge status indicator

6

7

5 Mode button 7 Error indicator

LEAB Automotive GmbH

Thorshammer 6

24866 Busdorf

7

4 Technical specifications

LEAB Automotive GmbH

4 Technical specifications

Part no. 0101043982 Part no. 0101043881

Modell

Champ Pro 2412

Champ Pro 2412

Battery type

Lead acid (wet, gel/AGM)/ Lead acid (wet, gel/AGM) traction

Charging characteristics Choice of 4 charging char- Choice of 4 charging char-

acteristics

acteristics

Battery capacity

40 Ah ... 120 Ah

65 Ah ... 200 Ah

Temperature sensor

No

Yes

AC cable

2.0 m, two-pin earthed 2.0 m, two-pin earthed

plug

plug

DC cable

1,5 m, ring terminal, M8 1,5 m, ring terminal, M8

Charging current

12 A

12 A

Ripple

< 3 %

< 3 %

Main charging

28.4 V/28.8 V

28.4 V/28.8 V

Equalisation charging 32.0 V

32.0 V

Trickle charging

27.0 V/27.6 V

27.0 V/27.6 V

Mains part function

27.4 V

27.4 V

Input voltage

230 V

230 V

Input values

195 V ... 250 V

195 V ... 250 V

Input frequency

40 Hz ... 60 Hz

40 Hz ... 60 Hz

Quiescent current (from < 1 mA the battery)

< 1 mA

Mains fuse

B16 A or C16 A

B16 A or C16 A

Degree of efficiency, max. > 88 %

> 88 %

International Protection IP67

IP67

(IP class)

Protection class

I

I

Operating temperature -30 �C ... +60 �C

-30 �C ... +60 �C

Dimensions (L x W x H) 195 mm x 98 mm x 47 mm 195 mm x 98 mm x 47 mm

Weight

1.5 kg

1.5 kg

8

LEAB Automotive GmbH

Thorshammer 6

24866 Busdorf

LEAB Automotive GmbH

4 Technical specifications

Part no. 0101043891 Part no. 0101043999

Modell

Champ Pro 2420

Champ Pro 2420

Battery type

Lead acid (wet, gel/AGM)/ Lead acid (wet, gel/AGM)/

traction

traction

Charging characteristics Choice of 4 charging char- Choice of 4 charging char-

acteristics

acteristics

Battery capacity

65 Ah ... 200 Ah

65 Ah ... 200 Ah

Temperature sensor

Yes

Yes

AC cable

2.0 m, two-pin earthed 1.5 m, two-pin earthed

plug

plug

DC cable

1.5 m ring terminal, M8 3 m, ring terminal, M8

Charging current

20 A

20 A

Ripple

< 3 %

< 3 %

Main charging

28.4 V/28.8 V

28.4 V/28.8 V

Equalisation charging 32.0 V

32.0 V

Trickle charging

27.0 V/27.6 V

27.0 V/27.6 V

Mains part function

27.4 V

27.4 V

Input voltage

230 V

230 V

Input values

195 V ... 250 V

195 V ... 250 V

Input frequency

40 Hz ... 60 Hz

40 Hz ... 60 Hz

Quiescent current (from < 1 mA the battery)

< 1 mA

Mains fuse

B16 A or C16 A

B16 A or C16 A

Degree of efficiency, max. > 88 %

> 88 %

International Protection IP67

IP67

(IP class)

Protection class

I

I

Operating temperature -30 �C ... +60 �C

-30 �C ... +60 �C

Dimensions (L x W x H) 195 mm x 98 mm x 47 mm 195 mm x 98 mm x 47 mm

Weight

1.5 kg

1.5 kg

LEAB Automotive GmbH

Thorshammer 6

24866 Busdorf

9

4 Technical specifications

LEAB Automotive GmbH

Part no. 0101056901 Part no. 0101056005

Modell

Champ Pro 2420

Champ Pro 2420

Battery type

Lead acid (wet, gel/AGM)/ Lead acid (wet, gel/AGM) traction

Charging characteristics Choice of 4 charging char- Choice of 4 charging char-

acteristics

acteristics

Battery capacity

65 Ah ... 200 Ah

65 Ah ... 200 Ah

Temperature sensor

Yes

No

AC cable

1.5 m, two-pin earthed 1.5 m, Neutrik plug

DC cable

0.5 m, MTA connector, 3 5.0 m, without plug pin

Charging current

20 A

20 A

Ripple

< 3 %

< 3 %

Main charging

28.4 V/28.8 V

28.4 V/28.8 V

Equalisation charging 32.0 V

32.0 V

Trickle charging

27.0 V/27.6 V

27.0 V/27.6 V

Mains part function

27.4 V

27.4 V

Input voltage

230 V

230 V

Input values

195 V ... 250 V

195 V ... 250 V

Input frequency

40 Hz ... 60 Hz

40 Hz ... 60 Hz

Quiescent current (from < 1 mA the battery)

< 1 mA

Mains fuse

B16 A or C16 A

B16 A or C16 A

Degree of efficiency, max. > 88 %

> 88 %

International Protection IP67

IP67

(IP class)

Protection class

I

I

Operating temperature -30 �C ... +60 �C

-30 �C ... +60 �C

Dimensions (L x W x H) 195 mm x 98 mm x 47 mm 195 mm x 98 mm x 47 mm

Weight

1.5 kg

1.5 kg

10

LEAB Automotive GmbH

Thorshammer 6

24866 Busdorf

LEAB Automotive GmbH

4 Technical specifications

Modell Battery type Charging characteristics Battery capacity Temperature sensor AC cable DC cable Charging current Ripple Main charging Equalisation charging Trickle charging Mains part function Input voltage Input values Input frequency Quiescent current (from the battery) Mains fuse Degree of efficiency, max. International Protection (IP class) Protection class Operating temperature Dimensions (L x W x H) Weight

Part no. 0101043981 Champ Pro 2420 Lead acid (wet, gel/AGM) Choice of 4 charging characteristics 65 Ah ... 200 Ah No 2.0 m, two-pin earthed plug 3,0 m, ring terminal, M8 20 A < 3 % 28.4 V/28.8 V 32.0 V 27.0 V/27.6 V 27.4 V 230 V 195 V ... 250 V 40 Hz ... 60 Hz < 1 mA B16 A or C16 A > 88 % IP67 I -30 �C ... +60 �C 195 mm x 98 mm x 47 mm 1.5 kg

LEAB Automotive GmbH

Thorshammer 6

24866 Busdorf

11

5 Package Contents
5 Package Contents Name
Battery charger User manual
Accessories Name Connection cable and sensor (3 m) Connection cable and sensor (4.7 m)

LEAB Automotive GmbH
No. 1x 1x
Part number 1019003005 1019003004

12

LEAB Automotive GmbH

Thorshammer 6

24866 Busdorf

LEAB Automotive GmbH

6 Charging Characteristics

6 Charging Characteristics
Battery charging is fully automatic and micro-processor controlled with a 3stage IU1U2 characteristic curve for gentle and optimum charging of the batteries. The charging phase of the charger is indicated by the LEDs on the display of the unit (About this Product [} 7], Fig. 2, no. 7).

Fig. 3: Charging characteristic of lead-acid battery (wet, gel/AGM)

Fig. 4: Charging characteristic of traction battery

LEAB Automotive GmbH

Thorshammer 6

24866 Busdorf

13

6 Charging Characteristics

LEAB Automotive GmbH

I phase: Charging with constant current
Depending on the battery charge state, the battery is charged with maximum charging current to store as much energy as possible in the battery. After reaching the set main charging voltage, the charger switches to the next charging phase (U1). If the set main voltage is not reached within max. 10 h, the device enters the U2 phase and reports an error.
NOTE! Deep discharged batteries with a voltage below 6 V are not charged for safety reasons.

U1 phase: Main charging with constant voltage
In the main charging phase, the voltage is kept at a constant value. As the battery increasingly charges, the current decreases continuously and approaches a lower limit.

Battery
Gel/AGM battery
Wet cell batterie (standard)

Type 24 V 24 V

Main charge voltage 28.8 V 28.4 V

U2 phase: Trickle charge with reduced voltage
In this phase, the charging voltage is reduced in order to maintain the battery charge for an unlimited period and counteract self-discharge. Additionally connected consumers are supplied via the charger in this phase without loading the battery.

Battery
Gel/AGM batterie
Wet cell battery (standard)

Type 24 V 24 V

Charge Voltage 27.6 V 27.0 V

14

LEAB Automotive GmbH

Thorshammer 6

24866 Busdorf

LEAB Automotive GmbH

7 Assembly

Charging characteristic: POWER SUPPLY
Champ Pro chargers In the "Power Supply" setting can also be used without the battery connected to supply DC consumers. This setting can be used, for example, when replacing the battery in the vehicle to avoid on board computer and radio data loss due to the loss of power and having to be reprogrammed.
Note that the power required must be no higher than the output power of the charger. In the "Power Supply" setting, the charger gives off a constant voltage of 13.7 V or 27.4 V. The green LED of the charge status indicator is continuously lit. The "Power Supply" setting also allows deeply discharged batteries to be reactivated so that they be identified and recharged by one of the automatic loaders. After reaching the minimum voltage, switch to the appropriate charging characteristic.

7 Assembly
To assemble the device, perform the following steps: � Choose a cool, dry and well-ventilated assembly site. � Do not mount the device directly next to or above batteries. � Optimum cooling is achieved by mounting the unit vertically on a flat sur-
face.
1. Fasten the device to the 4 holes on the side (� 5 mm) � The device is assembled.

Setting the charging characteristic for the first time
To select a charging characteristic, perform the following steps:
1. Connect the mains plug to a 230 V mains supply.
2. Within 3 to 6 seconds, press the Mode button repeatedly until the LED next to the desired charging characteristic is lit on the display (4).
3. Disconnect the charger from the 230 V mains. � The charging characteristic is set.

LEAB Automotive GmbH

Thorshammer 6

24866 Busdorf

15

8 Installation

LEAB Automotive GmbH

8 Installation
The charger is designed for permanent installation in vehicles. When installing the charger, note the following:

Notice
Incorrect installation can damage the device The negative lead of the unit may contain a temperature sensor.
1. Never shorten or extend the negative cable with a temperature sensor.
To install the charger in the vehicle, proceed as follows:
1. Disconnect the battery from the vehicle power circuit.
WARNING! Disconnect the negative cable first. 2. Connect the plug of the DC cable to the connection cable that is connected
to the battery. NOTE! Use the appropriate connection cable for the connection. � The device is installed.
Connection to 230 V mains
To install the device to the 230 V mains, proceed as follows:
NOTE! The charger is only suitable for connection to fused, earthed 230 V mains supplies.
1. Connect the mains plug to a 230 V mains supply. � One of the 4 charging LED flashes orange while the device is connecting to the battery. There is no voltage output at this stage. � After 2 seconds, the LEDs of the charge status indicator flash, the charging process starts. � The charging progress is indicated in the charge status indicator via the illuminated LEDs. � If the green LED on the charge status indicator is lit, the charge is complete and the battery can be disconnected from charger.
� The charger is connected to the 230-V mains supply.

16

LEAB Automotive GmbH

Thorshammer 6

24866 Busdorf

LEAB Automotive GmbH

9 Operation

9 Operation

9.1 Charging the battery
To start the charging operation, proceed as follows: � The device is installed. � The battery is connected.
1. Connect the mains plug to a 230 V mains supply. � Charging starts automatically, the yellow LED of the charge status indicator lights up. � If the charging current is 15% below the maximum value, the yellow and green LEDs of the charging status indicator light up. � When the battery is fully charged, the green LED on the charging status indicator lights up and indicates the trickle charge
� The battery is charged.

9.2 Charging the battery
To start the charging operation, proceed as follows: � The device is installed. � The battery is connected.
1. Connect the mains plug to a 115 V mains supply. � Charging starts automatically, the yellow LED of the charge status indicator lights up. � If the charging current is 15% below the maximum value, the yellow and green LEDs of the charging status indicator light up. � When the battery is fully charged, the green LED on the charging status indicator lights up and indicates the trickle charge.
� The battery is charged.

9.3 Change charging characteristic
To change the charging characteristic, proceed as follows: � The device is installed. � The battery is connected.

LEAB Automotive GmbH

Thorshammer 6

24866 Busdorf

17

9 Operation

LEAB Automotive GmbH

1. Connect the mains plug to a 230 V/115 V mains supply.
� One of the 4 charging characteristic LEDs lights up orange while the unit is establishing a connection to the battery. There is no voltage output yet.
2. Press the Mode button repeatedly until the LED next to the desired charging characteristic lights up.
� After 2 seconds, the LEDs of the charging status display flashes and the charging process starts.
� The charging progress is indicated in the charging status display by illuminated LEDs.
� If the green LED of the charging status indicator lights up, charging is complete and the battery can be disconnected from the charger.
� The charging characteristic has been changed and the battery is being charged.

9.4 Temperature Sensor
Depending on the model, the Champ charger has a temperature sensor located in the negative lead. The temperature sensor corrects the charging voltage as a function of the temperature in order to provide an optimal, effective and gentle battery charge.

18

LEAB Automotive GmbH

Thorshammer 6

24866 Busdorf

LEAB Automotive GmbH

12 EU Declaration of Conformity

10 Maintenance
Check the device as follows before using it each time: � Check the mains cable and mains plug for damage. � Check charging cables and connections for damage. � Check the charger for external damage. � Ensure that the wiring between the charging cable and the charger is se-
cure.

TIP
Battery maintenance
For battery maintenance, refer to the battery manufacturer's instructions.

11 Disposal

Dispose of the device in accordance with the Waste Electrical and Electronic Equipment Regulations (WEEE).
The system must not be disposed of with household waste. Take it to a recycling point or return it to your point of sale.

12 EU Declaration of Conformity
The Champ Pro charger complies with the requirements of the following directives:
� 2014/30/EU: EMV
� 2014/35/EU: NRL
� 2011/65/EU: RoHS

LEAB Automotive GmbH

Thorshammer 6

24866 Busdorf

19

13 Appendix

LEAB Automotive GmbH

13 Appendix

13.1 Information on outdoor use of the PowerSystem 12/24 V
MagCode PowerSystems were originally developed for vehicle interiors. However, in Germany, the BGS, DRK, fire brigade, police and THW now use these systems in addition to the DIN plug as an outdoor socket for charge maintenance on their emergency vehicles. With regard to outdoor use, please note:
Port (socket) When installed with a sealing ring on the front (contacting side to the clip), the port is tight in accordance with IP5K9K. If the rear of the port comes into contact with water, it must be sealed.
Clip (pick-up/connector) The clip (IP40) is not waterproof. Keep the clip protected from water.
Clip to port connection This connection is also not waterproof. At best, it is protected against dripping water (IP42). To prolong the life of the product, the following measures should also be taken:
� After outdoor use, clean the port briefly with a cloth.
� Remove possible deposits of metal chips on the contact side of the port and clip with an adhesive strip from time to time.
� Spray contact spray on port and clip contacts every 1 to 2 months.

TIP
Device defect due to faulty release under load
The MagCode PowerSystemPro 12/24 V has a mechanical bayonet lock. It can be disconnected under load without unlocking, which can damage the system or cause the system to fail completely.
1. Always unlock the system manually.

20

LEAB Automotive GmbH

Thorshammer 6

24866 Busdorf

LEAB Automotive GmbH

13 Appendix

13.2 MagCodePowerPort installation instructions

Fig. 5: MagCode PowerSystems clip and port

NOTE! An existing car socket can easily be replaced by a MagCode PowerPort, as both have the same diameter. If installing elsewhere, we recommend visiting a specialist workshop.
To install the MagCodePowerPort in place of an existing car socket, proceed as follows:
DANGER! Short circuit hazard - Remove the fuse before starting work.

1. Pull out the existing car socket.

NOTE! Note the polarity of the wires.

2. Cut the cable. OR...

3. Drill a new installation opening (� 28 mm). � The installation opening is prepared.

4. Slide the MagCodePowerPort, with or without spacer ring, into the installation opening.

5. Screw the MagCodePowerPort on the back with a nut (M28).

6. Connect the cables with each other by soldering, crimping or with connection terminals.

7. Put the fuse back in place. � The MagCodePowerPort is installed.

13.3 MagCodePowerClip assembly instructions
To install the device, proceed as follows: 1. Cut off the old connector. NOTE! Note the polarity of the wires. 2. Screw on the MagCodePowerClip. 3. Select the appropriate strain relief for the cable thickness. 4. If necessary, shorten the cable grommet by passing the cables through the
grommet and the strain relief and attaching the wire end ferrules.

LEAB Automotive GmbH

Thorshammer 6

24866 Busdorf

21

13 Appendix
5. Screw the cables into the terminals. NOTE! Note the polarity of the wires. 6. Screw the housing together. � The device is assembled.

LEAB Automotive GmbH

22

LEAB Automotive GmbH

Thorshammer 6

24866 Busdorf

LEAB Automotive GmbH

13 Appendix

LEAB Automotive GmbH

Thorshammer 6

24866 Busdorf

23

We make energy mobile.
LEAB Automotive GmbH Thorshammer 6 DE-24866 Busdorf Tel: +49 (0) 4621 9 78 60-0 Fax: +49 (0) 4621 9 78 60-260 info@leab.eu It is prohibited to copy, duplicate, translate or otherwise pass on the content of this guide to third parties without the express written permission of LEAB.