The Applied Biosystems™ TrueMark™ MSI Assay detects the presence of microsatellite instability in DNA samples through multiplex PCR.
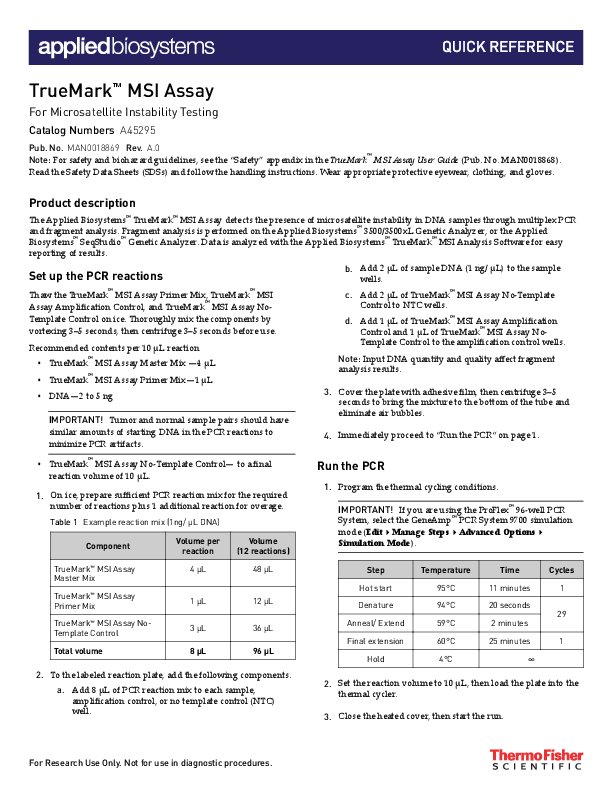
QUICK REFERENCE TrueMarkTM MSI Assay For Microsatellite Instability Testing Catalog Numbers A45295 Pub. No. MAN0018869 Rev. A.0 Note: For safety and biohazard guidelines, see the "Safety" appendix in the TrueMarkTM MSI Assay User Guide (Pub. No. MAN0018868). Read the Safety Data Sheets (SDSs) and follow the handling instructions. Wear appropriate protective eyewear, clothing, and gloves. Product description The Applied BiosystemsTM TrueMarkTM MSI Assay detects the presence of microsatellite instability in DNA samples through multiplex PCR and fragment analysis. Fragment analysis is performed on the Applied BiosystemsTM 3500/3500xL Genetic Analyzer, or the Applied BiosystemsTM SeqStudioTM Genetic Analyzer. Data is analyzed with the Applied BiosystemsTM TrueMarkTM MSI Analysis Software for easy reporting of results. Set up the PCR reactions Thaw the TrueMarkTM MSI Assay Primer Mix, TrueMarkTM MSI Assay Amplification Control, and TrueMarkTM MSI Assay NoTemplate Control on ice. Thoroughly mix the components by vortexing 35 seconds, then centrifuge 35 seconds before use. Recommended contents per 10 µL reaction · TrueMarkTM MSI Assay Master Mix --4 µL · TrueMarkTM MSI Assay Primer Mix--1 µL · DNA--2 to 5 ng IMPORTANT! Tumor and normal sample pairs should have similar amounts of starting DNA in the PCR reactions to minimize PCR artifacts. b. Add 2 µL of sample DNA (1 ng/ µL) to the sample wells. c. Add 2 µL of TrueMarkTM MSI Assay No-Template Control to NTC wells. d. Add 1 µL of TrueMarkTM MSI Assay Amplification Control and 1 µL of TrueMarkTM MSI Assay NoTemplate Control to the amplification control wells. Note: Input DNA quantity and quality affect fragment analysis results. 3. Cover the plate with adhesive film, then centrifuge 35 seconds to bring the mixture to the bottom of the tube and eliminate air bubbles. 4. Immediately proceed to "Run the PCR" on page 1. · TrueMarkTM MSI Assay No-Template Control-- to a final reaction volume of 10 µL. 1. On ice, prepare sufficient PCR reaction mix for the required number of reactions plus 1 additional reaction for overage. Table 1 Example reaction mix (1ng/ µL DNA) Component Volume per Volume reaction (12 reactions) Run the PCR 1. Program the thermal cycling conditions. IMPORTANT! If you are using the ProFlexTM 96-well PCR System, select the GeneAmpTM PCR System 9700 simulation mode (Edit4Manage Steps4Advanced Options4 Simulation Mode). TrueMarkTM MSI Assay 4 µL Master Mix TrueMarkTM MSI Assay Primer Mix 1 µL TrueMarkTM MSI Assay NoTemplate Control 3 µL Total volume 8 µL 48 µL 12 µL 36 µL 96 µL Step Hot start Denature Anneal/ Extend Final extension Hold Temperature 95°C 94°C 59°C 60°C 4°C Time 11 minutes 20 seconds 2 minutes 25 minutes Cycles 1 29 1 2. To the labeled reaction plate, add the following components. a. Add 8 µL of PCR reaction mix to each sample, amplification control, or no template control (NTC) well. 2. Set the reaction volume to 10 µL, then load the plate into the thermal cycler. 3. Close the heated cover, then start the run. For Research Use Only. Not for use in diagnostic procedures. 4. When the run is complete, remove the plate from the thermal cycler. IMPORTANT! Protect the amplified DNA from light. Amplified DNA can be stored at 2°C to 8°C for up to 2 weeks, or at 25°C to 15°C for long-term storage. Prepare your genetic analyzer The TrueMarkTM MSI Assay can be run on the 3500/3500xL Genetic Analyzer or the SeqStudioTM Genetic Analyzer. 1. Download and install the appropriate software. Instrument 3500/3500xL Genetic Analyzer SeqStudioTM Genetic Analyzer Required software 3500 Series Data Collection Software SeqStudioTM Plate Manager 2. Perform spectral calibration with the DS-36 (Dye Set J6) Matrix Standard Kit. 3. Setup the TrueMarkTM MSI Assay run parameters for your system (one time only). · 3500/3500xL Genetic Analyzer--Create the instrument protocol, size standards, size standards protocol, and assay. · SeqStudioTM Genetic Analyzer--Create the run module, size standards, and plate setup. See the TrueMarkTM MSI Assay User Guide (Pub. No. MAN0018868) for more detailed setup parameters. Prepare samples for electrophoresis Prepare the samples for electrophoresis immediately before loading. 1. Prepare the mix of Hi-DiTM Formamide and GeneScanTM 600 LIZTM Size Standard v2.0 for the required number of reactions plus 1 additional reaction for overage. Component GeneScanTM 600 LIZTM Size Standard v2.0 HiDiTM Formamide Total volume Volume per reaction 1 L Volume (12 reactions) 12 µL 17 L 18 µL 204 µL 216 µL IMPORTANT! The volume of size standard is a suggested amount. Determine the appropriate amount based on your experiments and results. 2. Thoroughly mix the components by vortexing 35 seconds, then centrifuge 35 seconds before use. 3. Prepare the fragment analysis reactions. To a MicroAmpTM Optical 96-Well Reaction Plate, add the following components. Component HiDiTM Formamide and GeneScanTM 600 LIZTM Size Standard v2.0 mix PCR product (see "Run the PCR" on page 1) Total volume Volume per reaction 18 µL Volume (12 reactions) 216 µL 2 µL 20 µL 24 µL 240 µL Note: For blank wells, add 10 µL of Hi-DiTM Formamide. 4. Seal the reaction plate with MicroAmpTM Clear Adhesive Film. 5. Thoroughly mix the components by vortexing 35 seconds, then centrifuge 1020 seconds before use. 6. Denature the DNA fragments: a. Incubate the mixture at 95°C for 3 minutes. b. Incubate the mixture at 4°C, or on ice, for 2 minutes. 7. Centrifuge the plate for 1020 seconds to ensure that all sample mixtures are at the bottom of the wells. 8. Remove the MicroAmpTM Clear Adhesive Film, then seal the plate with a septa. 9. Assemble the plate with the retainer and base, then load on the instrument. Reactions can be run on the 3500/3500xL Genetic Analyzer or the SeqStudioTM Genetic Analyzer. See the instrument user guide for specifics on setting up the run. Analyze the data with the TrueMarkTM MSI Analysis Software For information on data analysis or troubleshooting with GeneMapperTM Software, see the TrueMarkTM MSI Assay User Guide (Pub. No. MAN0018868). Sign in to the TrueMarkTM MSI Analysis Software 1. Launch the TrueMarkTM MSI Analysis Software. · In the WindowsTM desktop, click 4Applied Biosystems 4MSI Client. 2. · On the computer desktop, double-click CommonCalloutsandArrows 1. Copy-paste a callout or arrow to use in this SVG. Note: If you need more advanced callouts or arrows use the TechComm_Inkscape_Callout&Arrow_Libary. 2. Edit number and/or line-length, as needed. 3. Delete this text, this rectangle, and unused callouts, arrows, or other SVG elements before adding this SVG to the repository. 1 1 1 1 Enter the Username, then Password. (MSI Client). 3. Click Log in. 2 TrueMarkTM MSI Assay Quick Reference Guide Import sample data 1. In the TrueMarkTM MSI Analysis Software home screen, click Import Samples. 2. Select the FSA files you want to import, or copy, then paste, the filepath to a folder of files in the File name field. 3. Click Import. 4. (Optional) Enter the Batch Name, Instrument ID, and Operator information. 5. Click Save. Sample naming requirements for TrueMarkTM MSI Analysis Software To be successfully imported into the TrueMarkTM MSI Analysis Software, the sample file (FSA) names must follow the correct naming conventions. In the following examples, "SpecimenID" becomes the main name for identifying the specimen within the software and exports. SpecimenID text cannot contain an underscore (_), because only the text before the first underscore is imported as the specimen ID. Paired samples convention: · SpecimenID_T _*.fsa (tumor tissue sample) · SpecimenID_N _*.fsa (normal adjacent tissue sample from same individual) Sample file (FSA) names must meet the following conventions. Sample type Specimen Negative control File naming conventions For paired samples, the naming convention is: · <SpecimenID>_T _<*>.fsa--Tumor tissue sample · <SpecimenID>_N _<*>.fsa--Normal tissue sample from the same individual, adjacent to the Tumor tissue sample where: · <SpecimenID> is user-defined, but is identical in the Normal (N) and Tumor (T) tissue samples · <*> is user-defined For unpaired samples, the naming convention is: <SpecimenID>_<*>.fsa where: <SpecimenID> and <*> are user-defined Guidelines · The <SpecimenID> prefix identifies the specimen within the TrueMarkTM MSI Analysis Software and exported file names. Ensure that the <SpecimenID> text does not include an underscore (_). · Within a batch, each <SpecimenID> must be unique, unless two files will be analyzed as a Tumor-Normal sample pair. If <SpecimenID> duplicates are detected, the software imports only the last file, in alphanumeric sort order. For example, if the files are named "SpecimenIDBlue_aaa.fsa" and "SpecimenIDBlue_zzz.fsa", the software imports only "SpecimenIDBlue_zzz.fsa". · IMPORTANT! The TrueMarkTM MSI Analysis Software will not import a <SpecimenID>_N_<*>.fsa file if there is no matching <SpecimenID>_T_<*>.fsa file to import. However, a <SpecimenID>_T_<*>.fsa file will be imported even if there is no <SpecimenID>_N_<*> .fsa file to import. · IMPORTANT! If you are running replicate reactions on the same plate, assign the replicates a unique <SpecimenID> before the _T or _N to ensure that the replicates are processed correctly within the software. For example: "Spec1.rep1_T" and "Spec1.rep1_N" "Spec1.rep2_T" and "Spec1.rep2_N" NEG<*>.fsa where: <*> is user-defined Note: The TrueMarkTM MSI Assay Amplification Control sample file name must begin with "NEG" to be properly analyzed. For example, "NEGAmp.1_A12_daytimestamp.fsa". File names that begin with "NEG" are analyzed as negative control samples. The TrueMarkTM MSI Analysis Software displays a (Warning) Review Flag if it assigns an Unstable call to any reportable marker for a negative control sample. No template control NTC<*>.fsa where: <*> is user-defined File names that begin with "NTC" are no template control samples. The TrueMarkTM MSI Analysis Software displays a (Warning) Review Flag if it assigns a call other than No Call to any reportable marker for a no template control sample. Common Callouts and Arrows 1. Copy-paste a callout or arrow to use in this SVG. TrueMarkTM MSI Assay Quick ReferenNcoeteG:uiIdf eyou need more advanced callouts or arrows 3 use the TechComm_Inkscape_Callout&Arrow_Libary. Table 2 Examples of files that will or will not import Files selected for import Import result 20190917.plate1.tst123_T_A01_datetime.fsa 20190917.plate1.tst123_N_A02_datetime.fsa Tumor/Normal pair of files imported as <SpecimenID> "20190917.plate1.tst123" 20190924.plate1.sample1.tumor_T_A02.fsa Unpaired Tumor file imported as <SpecimenID> "20190924.plate1.sample1.tumor" 20190924.plate1.sample1.normal_N_A01.fsa Unpaired Normal file is not imported 20190924.plate1.sample1.normal_A01.fsa Unpaired file imported as <SpecimenID> "20190924.plate1.sample1.normal" specimen1_injection1.fsa specimen1_injection2.fsa Both files have the same <SpecimenID>, "specimen1". The software imports only the last file, in alphanumeric sort order. In this example, the software imports only "specimen1_injection2.fsa". specimen2_something.fsa, from the 3500/3500xL Genetic Analyzer Both files imported as <SpecimenIDs> "specimen2" and "specimen3", because each <SpecimenID> is unique. A single batch can contain specimen3_something.fsa, from the SeqStudioTM Genetic Analyzer specimens from different plates and instrument types. specimen4_T_something.fsa, from the 3500/3500xL Genetic Analyzer Neither file imported, because Tumor/Normal pair of files from different instrument types is not supported. specimen4_N_something.fsa, from the SeqStudioTM Genetic Analyzer HiDi_something.fsa Files with HiDi prefix in filename are rejected Note: Files are resized upon import. The failure of one file to meet the sizing quality threshold may prevent any file in the batch from being imported. Open the Import Manager for more information on the files reporting errors. View and interpret the results Open the Batch Summary tab. The Batch Summary is populated when data import is complete. The Overall Call for the specimen is based on the percentage of markers reporting instability. 1. View the Overall Call for each specimen. · MSS--Miscrosatellite stable · MSILow--Low levels of microsatellite instability · MSIHigh--High levels of microsatellite instability · No Call--At least one marker had no call. Note: If every marker No Call is manually changed to a call of either Unstable or Stable, then the overall call will be adjusted from No Call to MSS, MSI-Low, or MSI-High. 2. View the number of Unstable, Stable, or No Call markers. 4 TrueMarkTM MSI Assay Quick Reference Guide Interpret the results 1 2 3 4 5 1 Overall Call for the specimen 2 Number of Unstable markers 3 Number of Stable markers 4 Number of No Call markers 5 Total number of markers used for the Overall Call See the TrueMarkTM MSI Analysis Software User Guide (Pub. No. MAN0018874) for more detailed information on viewing individual markers and changing calls. Generate a report 1. In the Batch Summary pane of the batch of interest, click PDF Report. 2. Select Batch Summary or Specimen. A message is generated stating Report generated successfully. Click Open folder location to see where the report was saved, then click OK. Limited product warranty Life Technologies Corporation and/or its affiliate(s) warrant their products as set forth in the Life Technologies' General Terms and Conditions of Sale at www.thermofisher.com/us/en/home/global/ terms-and-conditions.html. If you have any questions, please contact Life Technologies at www.thermofisher.com/support. Export results 1. In the Batch Summary pane of the batch of interest, click Export Results. 2. Select the results format to export (Batch Summary or Specimen). Batch Summary results is available in CSV format. Specimen results are available in CSV or VCF formats. A message is generated stating Export(s) generated successfully. Click Open folder location to see where the results were saved, then click OK. TrueMarkTM MSI Assay Quick Reference Guide 5 Life Technologies Ltd | 7 Kingsland Grange | Woolston, Warrington WA1 4SR | United Kingdom For descriptions of symbols on product labels or product documents, go to thermofisher.com/symbols-definition. The information in this guide is subject to change without notice. DISCLAIMER: TO THE EXTENT ALLOWED BY LAW, THERMO FISHER SCIENTIFIC INC. AND/OR ITS AFFILIATE(S) WILL NOT BE LIABLE FOR SPECIAL, INCIDENTAL, INDIRECT, PUNITIVE, MULTIPLE, OR CONSEQUENTIAL DAMAGES IN CONNECTION WITH OR ARISING FROM THIS DOCUMENT, INCLUDING YOUR USE OF IT. Revision history: Pub. No. MAN0018869 Revision A.0 Date 13 December 2019 Description New quick reference guide for the TrueMarkTM MSI Assay. Important Licensing Information: These products may be covered by one or more Limited Use Label Licenses. By use of these products, you accept the terms and conditions of all applicable Limited Use Label Licenses. ©2019 Thermo Fisher Scientific Inc. All rights reserved. All trademarks are the property of Thermo Fisher Scientific and its subsidiaries unless otherwise specified. thermofisher.com/support | thermofisher.com/askaquestion thermofisher.com 13 December 2019Antenna House PDF Output Library 6.5.1119 (Windows (x64))