Breville BOV900 Smart Oven Air Fryer Pro Instructions
File info: application/pdf · 100 pages · 4.65MB
the Smart Oven Air Fryer Pro - breville-production-aem ...
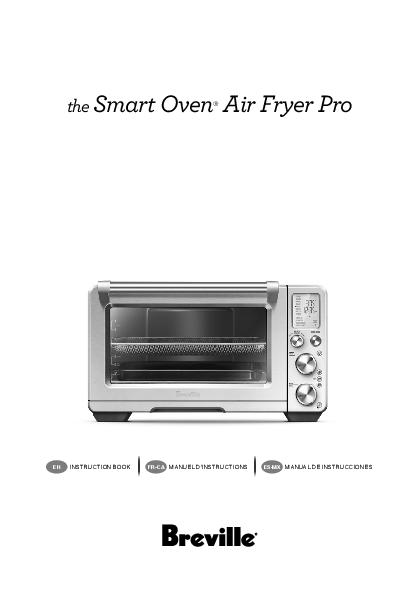
the smart oven air fryer pro en instruction book fr-ca manuel d'instructions es-mx manual de instrucciones
PDF the Smart Oven Air Fryer Pro - breville-production-aem ...
the smart oven air fryer pro en instruction book fr-ca manuel d'instructions es-mx manual de instrucciones
Extracted Text
the Smart Oven� Air Fryer Pro

EN INSTRUCTION BOOK

FR-CA MANUEL D'INSTRUCTIONS

ES-MX MANUAL DE INSTRUCCIONES

Contents

2 Breville recommends safety first

7 Components

9 Before first use

12 Functions

� OPERATING YOUR

BREVILLE OVEN

12

� DOOR SENSOR

13

� AUTO EJECT RACK

13

� BUZZER VOLUME

13

� ROTATE REMIND

13

� TOAST

14

� BAGEL

15

� BROIL

16

� BAKE

16

� ROAST

18

� WARM

19

� PIZZA

20

� PROOF

21

� AIR FRY

22

� REHEAT

23

� COOKIES

24

� SLOW COOK

25

� DEHYDRATE

26

� PHASE COOK

27

� REPLACING THE

OVEN LIGHT

28

29 Care & Cleaning

31 Troubleshooting

BREVILLE RECOMMENDS SAFETY FIRST
At Breville we are very safety conscious. We design and manufacture consumer products with the safety of you, our valued customer, foremost in mind. In addition we ask that you exercise a degree of care when using any electrical appliance and adhere to the following precautions.
IMPORTANT SAFEGUARDS
READ ALL INSTRUCTIONS BEFORE USE AND SAVE FOR FUTURE REFERENCE When using electrical appliances, basic safety precautions should always be followed including: � Remove and safely discard any packing materials and promotional labels before using the oven for the first time. � To avoid choking hazard for young children, remove and safely dispose the protective cover fitted on the power plug.

2

� Do not use the appliance near the edge of a countertop or table. Ensure the surface is stable, level, heatresistant and clean. � Do not use on a cloth-covered surface, near curtains or other flammable materials. � A fire may occur if the oven is covered or touches flammable material, including curtains, draperies, walls, and the like, when in operation. � Do not use the appliance on (or close to) a hot gas or electric burner, or where it could touch a heated oven or surface. � Do not let the power cord hang over the edge of a table or counter, or touch hot surfaces. � To avoid electric shock, do not immerse the cord, plug or motor base in water (or other liquids). � When operating the oven, keep a minimum distance of 4" (10cm) of space on both sides of the appliance and 6" (15cm) above. � Do not touch hot surfaces. To avoid burns, use extreme caution when removing pans, dishes and accessories such as the included broiling rack and roasting pan, that contain hot oil or other hot liquids.

� Do not lay cooking utensils, roasting pans or dishes on the glass door. � Do not leave the door standing open for extended periods of time. � Do not store any item on top of the oven when in operation except those described on page 7 of this book. � Do not place cardboard, plastic, paper, or other flammable materials in the oven. � Do not cover crumb tray or any part of the oven with metal foil. This will cause overheating of the oven. � Caution should be exercised when using pans and dishes constructed of materials other than metal. Ensure pans and dishes are oven safe before using in the oven. � Caution should be exercised when using lids in the oven, as pressure build up in a covered pan or dish may cause hot ingredients to expel or the dish to crack. Do not place sealed or airtight containers in the oven. � Oversized foods and metal utensils must not be inserted in the oven as they may create fire or risk of electric shock.

3

� The use of accessories and attachments not recommended or supplied with this oven may cause injuries. � Do not store any materials, other than manufacturers recommended accessories, in this oven when not in use. � This appliance is for household use only. Do not use in any type of moving vehicles. Do not use the appliance outdoors, or for anything other than its intended use. Misuse can cause injury. � If the appliance is to be: cleaned, moved, assembled or stored, always switch the unit off and unplug the cord from the power outlet and allow to cool completely. � Do not clean with metal scouring pads. Pieces can break off the pad and touch electrical parts, creating a risk of electric shock. � This appliance is not intended for use by persons (including children) with reduced physical, sensory or mental capabilities or lack of experience and knowledge, unless they have been given supervision or instruction concerning use of the appliance by a person responsible for their safety.
4

� Close supervision is necessary when the appliance is used by or near children. � Longer detachable powersupply cords or extension cords are available and may be used if care is exercised in their use. � It is recommended to regularly inspect the appliance and power cord. Do not use the appliance if there is damage to the power cord or plug, or after the appliance malfunctions or has been damaged in any way. Immediately stop use and call Breville Consumer Support. � Servicing should be performed by an authorized service representative. � The appliance is not intended to be operated by means of an external timer or separate remote control system.
WARNING To prevent electric shock, unplug before cleaning.

SPECIFIC INSTRUCTIONS FOR BOV900
� We recommend operating the oven on a dedicated circuit separated from other appliances. Consult a licensed and qualified electrician if you are unsure. � The oven is in standby mode when the LCD screen backlight turns off. Interacting with any of the controls will take the oven out of standby mode. � Regularly clean the crumb tray. To clean the crumb tray please see page 29.

WARNING To reduce the risk of FIRE, ELECTRIC SHOCK, EXPOSURE TO EXCESSIVE UV RADIATION, OR INJURY TO PERSONS: � Always unplug the oven and let all parts (including the bulb housing, glass cover and enclosure) cool completely before replacing bulb. � Only use a 25W maximum, 120V, Type G9 oven bulb with UV filter. � Always use a soft cloth when handling the bulb and do not directly touch the surface as oil from your skin can damage the bulb. � Do not look directly at a glowing bulb. � Keep bulb away from materials that may burn. � The bulb gets hot quickly. Only ever use the light button to turn on the light. � Do not operate the light if the bulb housing, glass cover, UV filter or enclosure are missing or damaged.

5

SHORT CORD INSTRUCTIONS Your Breville appliance is fitted with a short power supply cord to reduce personal injury or property damage resulting from pulling, tripping or becoming entangled with a longer cord. If an extension cord is used, (1) the marked electrical rating of the cord set or extension cord should be at least as great as the electrical rating of the appliance, (2) the cord should be arranged so that it will not drape over the countertop or table-top where it can be pulled on by children or tripped over unintentionally and (3) the extension cord must include a 3-prong grounding plug.

NOTICE TO CUSTOMERS REGARDING MEMORY STORAGE Please note that in order to better serve our customers, internal memory storage has been imbedded into your appliance. This memory storage consists of a small chip to collect certain information about your appliance including the frequency of use of the appliance and the manner in which your appliance is being used. In the event your appliance is returned for service, the information collected from the chip enables us to quickly and efficiently service your appliance. The information collected also serves as a valuable resource in developing future appliances to better serve the needs of our consumers. The chip does not collect any information regarding the individuals who use the product or the household where the product is used. If you have any questions regarding the memory storage chip please contact us at privacy@breville.com.

FOR HOUSEHOLD USE ONLY SAVE THESE INSTRUCTIONS
6

Components

A

B

F

G

H

C D

E

I

A. 13" non-stick pizza pan B. Wire rack (x 2)
Reversible for 8 different rack positions. C. 9" x 13" broiling rack D. 9" x 13" enamel roasting pan E. Air fry/dehydrate basket

F. Oven light G. Door handle H. Ventilation slots I. Crumb tray

Rating Information 120 V ~ 60 Hz 1800 W
7

J K L M
Accessories sold separately:

J. LCD screen

K. SELECT/CONFIRM dial and ROTATE REMIND button

L. TEMPERATURE dial/toast and bagel darkness control

M. TIME dial/toast and bagel slice selection

N

N. START/STOP button

O. OVEN LIGHT button

P. CONVECTION button

O

Q. PHASE COOK button

R. FROZEN FOOD button

S. TEMPERATURE CONVERSION button

P

and volume adjustment button

Q

R

S

Bamboo Cutting Board

Air fry/dehydrate basket

Pizza Stone 8

Pizza Crisper Pan

Before first use

This guide is designed for first time use.
For safety and more information, refer to the rest of the Instruction Book.
PREPARING THE OVEN
In order to remove any protective substances on the heating elements, it is necessary to run the oven empty for 20 minutes. Ensure the area is well ventilated as the oven may emit vapors. These vapors are safe and are not detrimental to the performance of the oven.
1. Remove and safely discard any packing material, promotional labels and tape from the oven.
2. Remove the crumb tray, wire racks, broiling rack, roasting pan, air fry/dehydrate basket and pizza pan from the polyfoam packaging. Wash them with a soft sponge in warm, soapy water then rinse and dry thoroughly.
3. Wipe the interior of the oven with a soft, damp sponge. Dry thoroughly.
4. Place the oven on a flat, dry surface. Ensure there is a minimum distance of 4" (10cm) of space on both sides of the appliance and 6" (15cm) above.
5. Insert the crumb tray into the oven.
6. Unwind the power cord completely and insert the power plug into a grounded power outlet.
7. The oven alert will sound and the LCD screen will illuminate. The function options will appear with an indicator on the TOAST setting.
8. Turn the SELECT/CONFIRM dial to the right until the indicator reaches the PIZZA function.

SELECT
CONFIRM
ROTATE
9. Press the START/STOP button. The button backlight will illuminate red, the LCD screen will illuminate orange and the oven alert will sound.
10. The LCD screen will indicate a blinking `PREHEATING'. Once the oven has completed the preheating cycle, an alert will sound.
11. The timer will be displayed and automatically begin to count down.
12. At the end of the cooking cycle, the oven alert will sound, the START/STOP button backlight will go out and the LCD screen will illuminate white.
13. The oven is now ready to use.
ELEMENT iQ The Breville Smart Oven Air Fryer Pro features Element iQ, a cooking technology that adjusts the power of the heating elements to cook food more evenly and quickly. Each of the oven's functions is preset with our recommended setting, however we suggest experimenting with these depending on the recipe, amount of food and your personal taste. Your customized setting will remain in the memory of the oven until changed or you reset the oven to the factory defaults, even if the power cord is unplugged. To do this, press and hold the FROZEN and TEMPERATURE CONVERSION buttons together for 5 seconds.

9

OVEN FUNCTIONS OVERVIEW

FUNCTION
TOAST BAGEL BROIL

SUGGESTED OPTIONAL

RACK

SETTINGS

POSITION

PRESETS

4

FROZEN FOODS Darkness 4

Slices 4

4

FROZEN FOODS Darkness 4

Slices 4

1 � 2

HIGH

BAKE

6

ROAST

6

WARM

Various

PIZZA

7

PROOF

7

CONVECTION
TEMPERATURE CONVERSION
ROTATE REMINDER

325�F 30 MIN
CONVECTION

CONVECTION
TEMPERATURE CONVERSION
ROTATE REMINDER

400�F 1:00 HR CONVECTION

CONVECTION
TEMPERATURE CONVERSION
ROTATE REMINDER

160�F 1:00 HR CONVECTION

CONVECTION 375�F
TEMPERATURE 20 MIN CONVERSION CONVECTION FROZEN FOODS FROZEN FOODS ROTATE REMINDER

CONVECTION
TEMPERATURE CONVERSION
ROTATE REMINDER

85�F 1:00 HR CONVECTION

PREHEAT RANGE

No

Darkness 1�7

Slices 1�9

No

Darkness 1�7

Slices 1�10

No

LOW, MED, HIGH

Up to 20 MIN

Yes

>390�F up to 4 hours

300�F � 390�F up to 8 hours

210�F � 300�F up to 12 hours

<210�F up to 72 hours

Yes

>390�F up to 4 hours

300�F � 390�F up to 8 hours

210�F � 300�F up to 12 hours

<210�F up to 72 hours

No

>390�F up to 4 hours

300�F � 390�F up to 8 hours

210�F � 300�F up to 12 hours

<210�F up to 72 hours

Yes

120�F � 480�F

Up to 1:00 HR

No

80�F � 100�F

Up to 2:00 HR

10

FUNCTION SUGGESTED OPTIONAL

RACK

SETTINGS

POSITION

PRESETS

PREHEAT RANGE

AIR FRY

3

CONVECTION 400�F

Yes

TEMPERATURE 18 MIN CONVERSION SUPER CONVECTION FROZEN FOODS FROZEN FOODS ROTATE REMINDER

120�F � 480�F Up to 1:00 HR

REHEAT

Various

CONVECTION 325�F

No

TEMPERATURE 15 MIN

CONVERSION CONVECTION

FROZEN FOODS

ROTATE

REMINDER

120�F � 480�F Up to 2:00HR

COOKIES 5

CONVECTION 325�F

Yes

TEMPERATURE 11 MIN CONVERSION CONVECTION FROZEN FOODS

ROTATE REMINDER

120�F � 480�F Up to 1:00 HR

SLOW

8

COOK

CONVECTION HIGH

Yes

4:00 HR

CONVECTION

HI, 2:00 � 12:00 HR LO, 4:00 � 72:00 HR
Automatic KEEP WARM for 2:00 HR

DEHYDRATE 3

CONVECTION 125�F

No

TEMPERATURE CONVERSION
ROTATE REMINDER

12:00 HR SUPER CONVECTION

86�F � 176�F Up to 72:00 HR

11

Functions
OPERATING YOUR BREVILLE OVEN
1. Insert the wire rack into the desired rack position. The rack positions are conveniently printed on the left-hand side of the oven door window. There are four groove positions. The rack can be inserted either facing upwards or downwards to allow two rack positions for each groove.

4. The bottom figure on the LCD screen indicates the preset cooking time for the selected setting. For the TOAST and BAGEL settings it indicates the number of slices. Turn the TIME dial to the left to reduce the cooking time or to the right to increase the cooking time. TIME DIAL
ROTATE

2. Turn the SELECT/CONFIRM dial until the indicator on the LCD screen reaches the desired setting.
3. The top figure on the LCD screen indicates the preset cooking temperature for the selected setting. For the TOAST and BAGEL settings it indicates the darkness level. Turn the TEMPERATURE dial to the left to reduce the temperature or to the right to increase the temperature.
TEMPERATURE
DIAL

ROTATE

REDUCE TEMPERATURE
12

INCREASE TEMPERATURE

REDUCE TIME

INCREASE TIME

5. For settings without a preheat cycle (TOAST, BAGEL, BROIL, WARM, PROOF, REHEAT, DEHYDRATE), place the food directly on the wire rack or on the included air fry/dehydrate basket, pizza pan, broiling rack and/or roasting pan. Ensure the food is centered in the oven for the most even cooking.

a) Close the oven door.

b) Press the START/STOP button. The button backlight will illuminate red, the oven alert will sound, and the LCD screen will illuminate orange.

c) The timer will be displayed and begin to count down. The cooking temperature and time can be adjusted during the cooking cycle.

6. For settings that feature a preheat cycle (BAKE, ROAST, PIZZA, AIR FRY, COOKIES, SLOW COOK), press the START/STOP button before placing food in the oven (with the exception of SLOW COOK. Place the food before the preheat cycle for SLOW COOK). The button backlight will illuminate red, the oven alert will sound and the LCD screen will indicate a blinking `PREHEATING' while the oven is heating up.

a) When the oven is ready for use, the blinking `PREHEATING' will go out, the oven alert will sound and the timer will start counting down. Place the food directly on the wire rack, or on the included air fry/dehydrate

basket, pizza pan, broiling rack and/or roasting pan. Ensure the food is centered in the oven for the most even cooking.
b) Close the oven door.
c) The timer will continue to count down. The cooking temperature and time can be adjusted during the cooking cycle.
7. At the end of the cooking cycle, the oven alert will sound, the START/STOP button backlight will go out and the LCD screen will illuminate white.

Always open the door slowly when the wire rack is in this position to prevent the rack from ejecting too quickly.
BUZZER VOLUME
Press and hold the TEMPERATURE CONVERSION button for 3 seconds to enter the buzzer volume control mode.

NOTE
The cooking cycle can be stopped at any time by pressing the START/STOP button. This will cancel the cycle and the button backlight will illuminate white.

NOTE Press the CONVECTION button to choose between no convection, convection and super convection. Convection and super convection may adjust the temperature to compensate. Super convection will deliver crispier food result.
DOOR SENSOR If the door is opened during cooking, the timer will pause and the light will turn on. When the door is closed, the timer will resume counting down and the light will stay on for 30 seconds before turning off. If the door is open for longer than 10 minutes during cooking the heaters will turn off.
MAGNETIC AUTO-EJECT RACK When the wire rack is inserted into rack position 3 or 4, it will automatically eject halfway out of the oven when the door is opened so you can easily remove your food.

Press the TEMPERATURE CONVERSION button to select the desired volume. To confirm press any button.
ROTATE REMIND
When cooking food on multiple racks at one time, use the Rotate Remind feature to remind you to switch the position of food in the oven for the most even, consistent results. Rotate Remind is available for the following functions: BAKE, ROAST, WARM, PROOF, PIZZA, AIR FRY, REHEAT, COOKIES and DEHYDRATE.
1. Turn the SELECT/CONFIRM dial until the indicator on the LCD screen reaches your desired function.
2. Press the SELECT/CONFIRM dial. `Rotate Remind' will display on the LCD screen.
3. Follow the steps for the function you selected and begin cooking your food.
4. When it is time to switch rack positions, the Rotate Remind alert will sound and `Rotate Remind' will flash on the screen. The Rotate Remind alert will continue to sound every 30 seconds until the door is opened or the SELECT/CONFIRM dial is pressed to disable the feature.
13

NOTE
When cooking food on baking pans or other cooking vessels on multiple wire racks, it is suggested to leave sufficient room between racks and avoid using the top rack position due to proximity to the heating elements.
In most cases, rack positions 3 and 7 or 4 and 8 will give the best results. When using air fry/ dehydrate baskets it is not necessary to leave space between rack positions.
TOAST FUNCTION
The TOAST function browns and crisps the outside of your bread while keeping the inside soft and moist. This function is also ideal for English muffins and frozen waffles.
1. Insert the wire rack into rack position 4.
2. Position bread slices as close to the center of the wire rack as possible for optimum toasting results.
3. Close the oven door.
4. Turn the SELECT/CONFIRM dial until the indicator on the LCD screen reaches the TOAST function. The top figure on the LCD screen indicates the preset darkness setting `4', while the bottom figure indicates the preset number of slices `4'.

a) The darkness setting is indicated by the row of circles at the top of the LCD screen. Turn the TEMPERATURE dial to the left to reduce the darkness setting, or to the right to increase it. The triangle above the circles will move according to the selected setting.

As general guide: Desired toast color Light Medium Dark

Setting 1 or 2 3, 4 or 5 6 or 7

b) The number of slices is displayed as the bottom figure on the LCD screen. Turn the TIME dial to the left to reduce the number of slices, or to the right to increase it. The number of slices ranges from `1' to `9'.
6. Press the START/STOP button to start the TOAST function. The button backlight will illuminate red, the oven alert will sound, and the LCD screen will illuminate orange.
7. The timer will be displayed and automatically begin to count down. The time can be adjusted during the toasting cycle by turning the TIME dial. The cycle can be stopped at any time by pressing the START/STOP button.

PRESS

5. The darkness setting and number of slices can be adjusted before or during the toasting cycle.
14

8. At the end of the TOAST cycle, the oven alert will sound. The START/STOP button backlight will go out and the LCD screen will illuminate white.
NOTE
The cooking time is dependent on a number of variables including the temperature in the oven, so the time may vary, even with the same color and slices settings. This is in order to achieve consistent results.

BAGEL FUNCTION
The BAGEL function crisps the insides of your cut bagel while only lightly toasting the outside. This function is also ideal for toasting crumpets or thick sliced specialty breads which require one side to be toasted more than the other.
1. Insert the wire rack into rack position 4.
2. Position bagel halves with cut side facing upwards as close to the center of the wire rack as possible for optimum toasting results.
3. Close the oven door.
4. Turn the SELECT/CONFIRM dial until the indicator on the LCD screen reaches the BAGEL function. The top figure on the LCD screen indicates the preset darkness setting `4', while the bottom figure indicates the preset number of bagel halves `4'.

As general guide:

Desired bagel color

Setting

Light

1 or 2

Medium Dark

3, 4 or 5 6 or 7

b) The number of bagel halves is displayed as the bottom figure on the LCD screen. Turn the TIME dial to the left to reduce the number of bagel halves, or to the right to increase it. The number of bagel halves ranges from `1' to `10'.
6. Press the START/STOP button to start the BAGEL function. The button backlight will illuminate red, the oven alert will sound, and the LCD screen will illuminate orange.
7. The timer will be displayed and automatically begin to count down. The time can be adjusted during the bagel cycle by turning the TIME dial. The cycle can be stopped at any time by pressing the START/STOP button.

PRESS

5. The darkness setting and number of bagel halves can be adjusted before or during the toasting cycle.
a) The darkness setting is indicated by the row of triangles at the top of the LCD screen. Turn the TEMPERATURE dial to the left to reduce the darkness setting, or to the right to increase it. The circle below the triangles will move according to the selected setting.

8. At the end of the BAGEL cycle, the oven alert will sound. The START/STOP button backlight will go out and the LCD screen will illuminate white.
NOTE
The inside (cut side) of the bagel must always face upwards towards the top heating elements. This allows the cut side to get crisp while the crust is only lightly toasted.
If you like your bagel halves equally crisp on both the top and bottom, we recommend using the TOAST function to toast your cut bagel.

15

BROIL FUNCTION
The BROIL function is ideal for cooking open-faced sandwiches, thin cuts of meat, poultry and fish, sausages and vegetables. Broiling can also be used to brown the tops of casseroles, gratins and desserts.
1. Insert the wire rack into either rack position 1 or 2.
2. Insert the included broiling rack into the roasting pan. Place food on the assembled broiling rack or in an oven-proof dish, then place on the center of the wire rack so air flows around the sides of the food.
3. Close the oven door.
4. Turn the SELECT/CONFIRM dial until the indicator on the LCD screen reaches the BROIL function. The top figure on the LCD screen indicates the preset power level `HIGH', while the bottom figure indicates the preset time of `10:00 MIN/SEC'.

7. The timer will be displayed and automatically begin to count down. The power level and time can be adjusted during the broiling cycle by turning the corresponding TEMPERATURE and TIME dial. The cycle can be stopped at any time by pressing the START/STOP button.
8. At the end of the BROIL cycle, the oven alert will sound. The START/STOP button backlight will go out and the LCD screen will illuminate white.
BAKE FUNCTION
The BAKE function cooks food evenly throughout. This function is ideal for baking cakes, muffins, brownies and pastries. The BAKE function is also ideal for cooking prepackaged frozen meals such as lasagna and pot pies.
1. Insert the wire rack into rack position 6. Note that some baked goods, such as brownies or pastries, may be more suited to rack position 5.
2. Close the oven door.
3. Turn the SELECT/CONFIRM dial until the indicator on the LCD screen reaches the BAKE function. The top figure on the LCD screen indicates the preset BAKE temperature of `325�F', while the bottom figure indicates the preset time of `30:00 MIN/SEC'. The preset CONVECTION setting will also be displayed.

5. The broiling power level and time can be adjusted before or during the broiling cycle.
a) The broiling power level is displayed as the top figure on the LCD screen. Turn the TEMPERATURE dial to adjust broiling to one of three power levels: `HIGH', 'MED' and `LOW' broil.
b) The broiling time is displayed as the bottom figure on the LCD screen. Turn the TIME dial to adjust the time up to 20 minutes.
6. Press the START/STOP button to activate the BROIL function. The button backlight will illuminate red, the oven alert will sound and the LCD screen will illuminate orange.
16

4. The baking temperature, time and convection settings can be adjusted before or during the baking cycle.
a) The baking temperature is displayed as the top figure on the LCD screen. Turn the TEMPERATURE dial to adjust the baking temperature from 120�F/50�C to a maximum of 480�F/250�C.
b) Turn the TIME dial to select the cooking time. Maximum cooking times can be set as follows:

>390�F/200�C

up to 4 hours

300�F/150�C � 390�F/200�C up to 8 hours

210�F/100�C � 300�F/150�C up to 12 hours

<210�F/100�C

up to 72 hours

5. Press the START/STOP button to activate the BAKE function. The button backlight will illuminate red, the oven alert will sound and the LCD screen will illuminate orange. The LCD screen will indicate a blinking `PREHEATING'.
6. Once the oven has finished preheating, an alert will sound and food can be inserted into the oven.
7. Place food, positioned on the included roasting pan or other oven-proof dish, on the center of the wire rack so air will flow around all sides of the food. Close the oven door.

8. After the PREHEATING alert has sounded, the timer will automatically begin to count down. The temperature and time can be adjusted during the baking cycle by turning the corresponding TEMPERATURE and TIME dial. The cycle can be stopped at any time by pressing the START/STOP button.
PRESS
WHEN AT TEMPERATURE
9. At the end of the BAKE cycle, the oven alert will sound. The START/STOP button backlight will go out and the LCD screen will illuminate white.

17

ROAST FUNCTION
The ROAST function is ideal for cooking a variety of meats and poultry. Food will be tender and juicy on the inside and roasted to perfection on the outside.
1. Insert the wire rack into rack position 6.
2. Close the oven door.
3. Turn the SELECT/CONFIRM dial until the indicator on the LCD screen reaches the ROAST function. The top figure on the LCD screen indicates the preset ROAST temperature of `400�F', while the bottom figure indicates the preset time of `1:00HR/ MIN'. The preset CONVECTION setting will also be displayed.

5. Press the START/STOP button to activate the ROAST function. The button backlight will illuminate red, the oven alert will sound and the LCD screen will illuminate orange. The LCD screen will indicate a blinking `PREHEATING'.
6. Once the oven has finished preheating, an alert will sound and food can be inserted into the oven.
7. Place food, positioned on the included roasting pan or other oven-proof dish, on the center of the wire rack so air will flow around all sides of the food. Close the oven door.
8. After the PREHEATING alert has sounded, the timer will automatically begin to count down. The temperature and time can be adjusted during the roasting cycle by turning the corresponding TEMPERATURE and TIME dial. The cycle can be stopped at any time by pressing the START/ STOP button.

PRESS

4. The roasting temperature, time and convection settings can be adjusted before or during the roasting cycle.
a) The roasting temperature is displayed as the top figure on the LCD screen. Turn the TEMPERATURE dial to adjust the roasting temperature from 120�F/50�C to a maximum of 480�F/250�C.
b) Turn the TIME dial to select the cooking time. Maximum cooking times can be set as follows:

>390�F/200�C

up to 4 hours

300�F/150�C � 390�F/200�C up to 8 hours

210�F/100�C � 300�F/150�C up to 12 hours

<210�F/100�C

up to 72 hours

WHEN AT TEMPERATURE
9. At the end of the ROAST cycle, the oven alert will sound. The START/STOP button backlight will go out and the LCD screen will illuminate white.

18

WARM FUNCTION
The WARM function maintains hot foods at the recommended temperature to prevent bacterial growth, 160�F/70�C or above.
1. Insert the wire rack into a rack position that best suits the type of food you are keeping warm.
2. Place food, positioned on the included roasting pan, pizza pan or other oven-proof dish, on the center of the wire rack so air will flow around all sides of the food.
3. Close the oven door.
4. Turn the SELECT/CONFIRM dial until the indicator on the LCD screen reaches the WARM function. The top figure on the LCD screen indicates the preset temperature of `160�F', while the bottom figure indicates the preset time of `1:00 HR/MIN'. The preset CONVECTION setting will also be displayed.

5. The temperature, time and convection settings can be adjusted before or during the warming cycle.
a) The warming temperature is displayed as the top figure on the LCD screen. Turn the TEMPERATURE dial to adjust the temperature from 110�F/45�C to a maximum of 480�F/250�C.
b) Turn the TIME dial to select the cooking time. Maximum cooking times can be set as follows:

>390�F/200�C

up to 4 hours

300�F/150�C � 390�F/200�C up to 8 hours

210�F/100�C � 300�F/150�C up to 12 hours

<210�F/100�C

up to 72 hours

6. Press the START/STOP button to activate the WARM function. The button backlight will illuminate red, the oven alert will sound and the LCD screen will illuminate orange.
7. The timer will be displayed and automatically begin to count down. The temperature and time can be adjusted during the warming cycle by turning the corresponding TEMPERATURE and TIME dial. The cycle can be stopped at any time by pressing the START/STOP button.
8. At the end of the WARM cycle, the oven alert will sound. The START/STOP button backlight will go out and the LCD screen will illuminate white.

19

PIZZA FUNCTION
The PIZZA function melts and browns cheese and toppings, while crisping up the pizza crust.
1. Insert the wire rack into rack position 7.
2. Close the oven door.
3. Turn the SELECT/CONFIRM dial until the indicator on the LCD screen reaches the PIZZA function. The top figure on the LCD screen indicates the preset PIZZA temperature of `375�F', while the bottom figure indicates the preset time of `20:00 MIN/SEC'. The preset CONVECTION and FROZEN settings will also be displayed.

5. Press the START/STOP button to activate the PIZZA function. The button backlight will illuminate red, the oven alert will sound and the LCD screen will illuminate orange. The LCD screen will indicate a blinking `PREHEATING'.
6. Once the oven has reached the set temperature, the temperature alert will sound.
7. Place food, positioned on the included pizza pan if using, on the center of the wire rack so air will flow around all sides of the food. Close the oven door.
8. After the PREHEATING alert has sounded, the timer will automatically begin to count down. The temperature and time can be adjusted during the PIZZA cycle by turning the corresponding TEMPERATURE and TIME dial. The cycle can be stopped at any time by pressing the START/STOP button.

PRESS

4. The pizza temperature, time, convection, and frozen settings can be adjusted before or during the cycle.
a) The pizza temperature is displayed as the top figure on the LCD screen. Turn the TEMPERATURE dial to adjust the temperature from 120�F/50�C to a maximum of 480�F/250�C.
b) Turn the TIME dial to select the cooking time. Maximum cooking times can be set as follows:
120�F/50�C � 480�F/250�C up to 1:00 HR

9. At the end of the PIZZA cycle, the oven alert will sound. The START/STOP button backlight will go out and the LCD screen will illuminate white.
NOTE
If using the included pizza pan, place it in the oven during the preheating cycle for the best result. Carefully place pizza on the heated pizza pan.

20

A note on pizza stones
When using a pizza stone, it is necessary to preheat the stone, without a pizza, for optimum results.
1. Insert the wire rack into rack position 7.
2. Place pizza stone on the center of the wire rack so air will flow around all sides of the stone.
3. Close the door.
4. Turn the SELECT/CONFIRM dial until the indicator on the LCD screen reaches the PIZZA function. The top figure on the LCD screen indicates the preset PIZZA temperature of `375�F', while the bottom figure indicates the preset time of `20:00 MIN/SEC'. The preset CONVECTION and FROZEN settings will also be displayed.
5. Turn the TIME dial to the set the time to 15:00 MIN/SEC.
6. Press the START/STOP button to activate the PIZZA function. The button backlight will illuminate red, the oven alert will sound and the LCD screen will illuminate orange. The LCD screen will indicate a blinking `PREHEATING'.
7. Once the oven has finished preheating, an alert will sound.
8. After the PREHEATING alert has sounded, the timer will automatically begin to count down.
9. At the end of the cycle, the oven alert will sound. The START/STOP button backlight will go out and the LCD screen will illuminate white.
10. Open the oven door and carefully place pizza on the heated pizza stone.
11. Select desired PIZZA temperature, time, convection, and fresh/frozen settings and press the START/STOP button to restart the PIZZA cycle.

PROOF FUNCTION The PROOF function is designed to precisely hold low temperatures, providing an ideal environment for proofing bread, rolls, pizza and other doughs. 1. Insert the wire rack into rack position 8. 2. Place dough in an oven-proof vessel, cover
and place on center of wire rack. 3. Close the oven door. 4. Turn the SELECT/CONFIRM dial until
the indicator on the LCD screen reaches the PROOF function. The top figure on the LCD screen indicates the preset PROOF setting of `85�F',while the bottom figure indicates the preset time of `1:00HR/MIN'. The preset CONVECTION setting will also be displayed.
5. The proofing temperature, time and convection settingss can be adjusted before or during the proof cycle.
a) The proofing temperature is displayed as the top figure on the LCD screen. Turn the TEMPERATURE dial to adjust the proofing temperature from 80�F/27�C to a max of 100�F/38�C.
b) The proofing time is displayed as the bottom figure on the LCD screen. Turn the TIME dial to adjust the time up to 2:00 HR/MIN.
6. Press the START/STOP button to activate the PROOF function. The button backlight will illuminate red, the oven alert will sound and the LCD screen will illuminate orange.

21

7. The timer will be displayed and begin to count down. The temperature and time can be adjusted during the proofing cycle by turning the corresponding TEMPERATURE and TIME dial. The cycle can be stopped at any time by pressing the START/STOP button
8. At the end of the PROOF cycle, the oven alert will sound. The START/STOP button backlight will go out and the LCD screen will illuminate white.
AIR FRY FUNCTION
The AIR FRY function combines intense heat and maximized airflow to cook foods crispy and brown.
1. Ensure rack position 3, or other desired position for the air fry/dehydrate basket, is empty.
2. Close the oven door.
3. Turn the SELECT/CONFIRM dial until the indicator on the LCD screen reaches the AIR FRY function. The top figure on the LCD screen indicates the preset AIR FRY setting of `400�F', while the bottom figure indicates the preset time of '18:00 MIN/ SEC'. The preset SUPER CONVECTION setting will also be displayed.

b) The AIR FRY time is displayed as the bottom figure on the LCD screen. Turn the TIME dial to adjust the time up to a maximum of 1 hour.
5. Press the START/STOP button to activate the AIR FRY function. The button backlight will illuminate red, the oven alert will sound and the LCD screen will illuminate orange. The LCD screen will indicate a blinking `PREHEATING'.
6. Once the oven has finished preheating, an alert will sound and food can be inserted into the oven.
7. Arrange food evenly on the included air fry/ dehydrate basket. For best results, place food in a single layer and leave space between pieces. Insert the air fry/dehydrate basket into rack position Close the oven door.
8. After the PREHEATING alert has sounded, the timer will automatically begin to count down. The temperature and time can be adjusted during the AIR FRY cycle by turning the corresponding TEMPERATURE and TIME dial. The cycle can be stopped at any time by pressing the START/ STOP button.
9. At the end of the AIR FRY cycle, the oven alert will sound. The START/STOP button backlight will go out and the LCD screen will illuminate white.

IMPORTANT
When cooking fatty foods (e.g. chicken wings) use roasting pan instead of air fry/dehydrate basket to prevent the oil dripping. Discard excess oil in between the batches.

4. The AIR FRY temperature, time, convection and frozen settings can be adjusted before or during the AIR FRY cycle.
a) The AIR FRY temperature is displayed as the top figure on the LCD screen. Turn the TEMPERATURE dial to adjust the AIR FRY temperature from 120�F/50�C to a max of 480�F/250�C.
22

NOTE
You can fit a total of 4 air frying/dehydrating baskets in this oven. Visit www.breville.com for more information on purchasing additional air fry/dehydrate baskets.

REHEAT FUNCTION
The REHEAT function is ideal for gently reheating leftovers without browning or drying them out.
1. Insert the wire rack into a rack position that best suits the type of food you are reheating.
2. Place food, positioned on the included roasting pan, pizza pan or other oven-proof dish, on the center of the wire rack so air will flow around all sides of the food.
3. Close the oven door.
4. Turn the SELECT/CONFIRM dial until the indicator on the LCD screen reaches the REHEAT function. The top figure on the LCD screen indicates the preset REHEAT temperature of `325�F', while the bottom figure indicates the preset time of `15:00 MIN/SEC'. The preset CONVECTION setting will also be displayed.

5. The reheating temperature, time, convection and frozen settings can be adjusted before or during the reheating cycle.
a) The reheating temperature is displayed as the top figure on the LCD screen. Turn the TEMPERATURE dial to adjust the temperature from 120�F/50�C to a maximum of 480�F/250�C.
The reheating time is displayed as the bottom figure on the LCD screen. Turn the TIME dial to adjust the time up to 2 hours for temperatures 120�F/50�C � 480�F/250�C.
6. Press the START/STOP button to activate the REHEAT function. The button backlight will illuminate red, the oven alert will sound and the LCD screen will illuminate orange.
7. The timer will be displayed and begin to count down. The temperature and time can be adjusted during the reheating cycle by turning the corresponding TEMPERATURE and TIME dial. The cycle can be stopped at any time by pressing the START/STOP button.
8. At the end of the REHEAT cycle, the oven alert will sound. The START/STOP button backlight will go out and the LCD screen will illuminate white.

23

COOKIES FUNCTION
The COOKIES function is ideal for baking homemade or commercially prepared cookies and other baked treats.
1. Insert the wire rack into rack position 6.
2. Close the oven door.
3. Turn the SELECT/CONFIRM dial until the indicator on the LCD screen reaches the COOKIES function. The top figure on the LCD screen indicates the preset COOKIES temperature of `325�F', while the bottom figure indicates the preset time of `11:00 MIN/SEC'. The preset CONVECTION setting will also be displayed.

5. Press the START/STOP button to activate the COOKIES function. The button backlight will illuminate red, the oven alert will sound and the LCD screen will illuminate orange. The LCD screen will indicate a blinking `PREHEATING'.
6. Once the oven has finished preheating, an alert will sound and food can be inserted into the oven.
7. Place food, positioned on the included roasting pan, pizza pan or other oven-proof dish, on the center of the wire rack so air will flow around all sides of the food. Close the oven door.
8. After the PREHEATING alert has sounded, the timer will automatically begin to count down. The temperature and time can be adjusted during the COOKIES cycle by turning the corresponding TEMPERATURE and TIME dial. The cycle can be stopped at any time by pressing the START/STOP button.
9. At the end of the COOKIES cycle, the oven alert will sound. The START/STOP button backlight will go out and the LCD screen will illuminate white.

4. The COOKIES temperature, time, convection and frozen settings can be adjusted before or during the cookie cycle.
a) The COOKIES temperature is displayed as the top figure on the LCD screen. Turn the TEMPERATURE dial to adjust the baking temperature from 120�F/50�C to a maximum of 480�F/250�C.
b) The COOKIES time is displayed as the bottom figure on the LCD screen. Turn the TIME dial to adjust the time up to 1 hour for temperatures 120�F/50�C - 480�F/250�C.

24

SLOW COOK FUNCTION
The SLOW COOK function has cooking profiles designed for long cook times at low temperatures.
1. Insert the wire rack into rack position 8.
2. Close the oven door.
3. Turn the SELECT/CONFIRM dial until the indicator on the LCD screen reaches the SLOW COOK function. The top figure on the LCD screen indicates the preset SLOW COOK temperature of `HIGH', while the bottom figure indicates the preset time of `4:00HR/MIN'. The preset CONVECTION setting will also be displayed.

5. Place food, inside covered oven-proof cookware, on the center of the wire rack so air will flow around all sides of the food. Close the oven door.
6. Press the START/STOP button to activate the SLOW COOK function. The button backlight will illuminate red, the oven alert will sound and the LCD screen will illuminate orange. The LCD screen will indicate a blinking `PREHEATING'.
7. After the PREHEATING alert has sounded, the timer will automatically begin to count down. The temperature and time can be adjusted during the cycle by turning the corresponding TEMPERATURE and TIME dial. The cycle can be stopped at any time by pressing the START/CANCEL button.
8. At the end of the SLOW COOK cycle, the oven will automatically switch to the WARM function. The LCD screen will display `WARM' and a keep warm time of `2:00 HR/MIN' will automatically count down. The keep warm cycle can be stopped at any time by pressing the START/STOP button.

4. The slow cook temperature, time and convection settings can be adjusted before or during the slow cook cycle.
a) The temperature is displayed as the top figure on the LCD screen. Turn the TEMPERATURE dial to adjust slow cooking to one of two preset temperatures: `LOW' or `HIGH'.
b) The time is displayed as the bottom figure on the LCD screen. Turn the TIME dial to adjust the time between 4 and 72 hours for `LOW' and between 2 and 12 hours for `HIGH'.

NOTE
Do not pull the wire rack further than halfway out when inserting or removing cookware from the oven.
Do not allow heavy cookware to rest on the glass when the door is open.

25

TIPS
TIPS FOR SLOW COOKING
1. Ensure cookware is oven-proof and does not exceed 13 pounds when empty.
2. Fill cookware to a minimum of � and maximum of � full to avoid over or under-cooking. To prevent spillover, do not fill cookware more than � full.
3. Always slow cook with the lid on to prevent food from drying out. Cover cookware with a layer of aluminum foil before covering with lid to keep even more moisture in.
4. Follow cooking temperatures and times prescribed in traditional slow cooker recipes. One hour on `HIGH' is equivalent to approximately one-and-a-half to two hours on `LOW'.
5. Cold food will take longer to cook than food that has been pre-seared or heated so adjust cooking times as appropriate. Do not slow cook frozen foods.
6. Cut large pieces of meat in half to allow heat to penetrate more evenly.

DEHYDRATE FUNCTION
The DEHYDRATE function combines low and stable heat with maximized airflow to evenly dry out foods without cooking or overheating.
1. Arrange food evenly on the included air fry/dehydrate basket. For best results, place food in a single layer and leave space between pieces. Insert air fry/dehydrate basket into rack position 3.
2. Close the oven door.
3. Turn the SELECT/CONFIRM dial until the indicator on the LCD screen reaches the DEHYDRATE function. The top figure on the LCD screen indicates the preset DEHYDRATE temperature of `125�F', while the bottom figure indicates the preset time of `12:00HR/MIN'. The preset SUPER CONVECTION setting will also be displayed.

4. The dehydrating temperature, time and convection settings can be adjusted before or during the dehydrate cycle.
a) The dehydrating temperature is displayed as the top figure on the LCD screen. Turn the TEMPERATURE dial to adjust the dehydrating temperature from `86�F/30�C to a maximum of 176�F/80�C'.
b) The time is displayed as the bottom figure on the LCD screen. Turn the TIME dial to adjust the time up to 72 hours.
5. Press the START/STOP button to activate the DEHYDRATE function. The button backlight will illuminate red, the oven alert will sound and the LCD screen will illuminate orange.
26

6. The timer will be displayed and begin to count down. The temperature and time can be adjusted during the dehydrating cycle by turning the corresponding TEMPERATURE and TIME dial. The cycle can be stopped at any time by pressing the START/STOP button
7. At the end of the DEHYDRATE cycle, the oven alert will sound. The START/STOP button backlight will go out and the LCD screen will illuminate white.
TIPS
� Use baking paper on top of the air fry/ dehydrate basket when dehydrating foods with strong color to prevent staining.
� When dehydrating foods that may drip, such as marinated jerky, use the included roasting pan to catch any dripping liquid. Insert a wire rack into rack position 8 and center the roasting pan on the wire rack.
PHASE COOK
Use the PHASE COOK button to program 2 back to back cooking functions. The functions available for Phase Cook are BROIL, BAKE, ROAST, WARM and PIZZA.
1. Press the PHASE COOK button. `PHASE COOK' will appear on the LCD screen, along with the available functions.
2. An arrow will blink above the `1', indicating you are programming the first phase of cooking.
a) Turn the SELECT/CONFIRM dial until the indicator on the LCD screen reaches your desired function.
b) Turn the TEMPERATURE dial to adjust the cooking temperature. Turn the TIME dial to adjust the cooking time.
c) Press the SELECT/CONFIRM or START/STOP dial to confirm the first cooking phase.

3. The arrow will now blink above the `2', indicating you are programming the second phase of cooking.
a) Turn the SELECT/CONFIRM dial until the indicator on the LCD screen reaches your desired function.
b) Turn the TEMPERATURE dial to adjust the cooking temperature. Turn the TIME dial to adjust the cooking time.
c) Press the SELECT/CONFIRM dial to confirm the second cooking phase.
4. Press the START|STOP button to activate the first function. The button backlight will illuminate red, the oven alert will sound and the LCD screen will illuminate orange. The functions for both phases will display on the LCD screen with an arrow next to the first phase.
5. When the first cooking phase completes, the second one will automatically start. At the end of the second cooking phase, the oven alert will sound. The START|STOP button backlight will go out and the LCD screen will illuminate white.

27

REPLACING THE OVEN LIGHT
WARNING Always unplug oven and let cool before replacing bulb. Only use a 25 Watt, 120V, G9 type oven bulb.

4. Use a soft cloth to insert the new bulb. Do not directly touch the surface of the bulb with your fingers as oil from your skin can damage the bulb.

1. Remove the wire rack from the oven before replacing the light.
2. The light is positioned on the lefthand side of the oven cavity. Position your fingers on the outside of the light housing and gently pull the glass cover away from the oven wall to remove it. If you are unable to pull the cover off, slide a spoon into the left side of the light housing and gently lever the glass cover off. Always hold the glass cover with the other hand to prevent the cover from falling and breaking.

5. To reattach the glass cover, align the metal hook with the left side of the light housing. Slide the opposite end of the glass cover into the metal bracket on the right side of the housing, then push the metal hook into the left side of the housing until it snaps securely into position.

3. Remove the used bulb by pulling it directly out of its holder.

USING THE WARMING TRAY
The top of the oven is very hot during and after operation. As a result, storing items on top of the oven is not recommended.
The only exception is the optional Breville Bamboo Cutting Board and Serving Tray that fits in the ribbed section on top of the oven. Visit www.breville.com for more information.

28

Care & Cleaning
Before cleaning, ensure the oven is turned off by removing the power plug from the power outlet.
Allow the oven and all accessories to cool completely before disassembling and cleaning.
Cleaning the outer body and door
1. Wipe the outer body with a soft, damp sponge. A non-abrasive liquid cleanser or mild spray solution may be used to avoid build-up of stains. Apply the cleanser to the sponge, not the oven surface, before cleaning.
2. To clean the glass door, use a glass cleaner or mild detergent and a soft, damp sponge or soft plastic scouring pad. Do not use an abrasive cleanser or metal scouring pad as these will scratch the oven surface.
3. Wipe the LCD screen with a soft damp cloth. Apply cleanser to the cloth and not the LCD surface. Cleaning with dry cloth or abrasive cleaners may scratch the surface.
4. Let all surfaces dry thoroughly prior to inserting the power plug into a power outlet and turning the oven on.
WARNING
Do not immerse the body, power cord or power plug in water or any other liquid as this may cause electrocution.

Cleaning the interior
The walls on the inside of the oven feature a non-stick coating for easy cleaning. To clean any splattering that may occur while cooking, wipe the walls with a soft, damp sponge. A nonabrasive liquid cleanser or mild spray solution may be used to avoid build-up of stains. Apply the cleanser to the sponge, not the oven surface, before cleaning. Avoid touching the quartz heating elements.
WARNING
Use extreme caution when cleaning the quartz heating elements. Allow the oven to cool completely, then gently rub a soft, damp sponge or cloth along the length of the heating element.
Do not use any type of cleanser or cleaning agent. Do not use any standard oven cleaner to clean the interior of the oven as this will deteriorate the metal surface.
Let all surfaces dry thoroughly prior to inserting the power plug into a power outlet and turning the oven on.
Cleaning the crumb tray
1. After each use, slide out the crumb tray and discard crumbs. Wipe the tray with a soft, damp sponge. A non-abrasive liquid cleanser may be used to avoid build-up of stains. Apply the cleanser to the sponge, not the tray, before cleaning. Dry thoroughly.
2. To remove baked-on grease, soak the tray in warm soapy water then wash with a soft sponge or soft plastic scouring pad. Rinse and dry thoroughly.
3. Always reinsert the crumb tray into the oven after cleaning and prior to inserting the power plug into a power outlet and turning the oven on.

29

Cleaning the wire rack, broiling rack, roasting pan and pizza pan 1. Wash all accessories in warm soapy water
with a soft sponge or soft plastic scouring pad. Rinse and dry thoroughly. Do not use abrasive cleansers, metal scouring pads or metal utensils to clean any of the accessories as they may damage the surfaces. 2. To extend the life of your accessories, we do not recommend that these be placed in the dishwasher. Storage 1. Ensure the oven is turned off by removing the power plug from the power outlet. 2. Allow the oven and all accessories to cool completely before disassembling and cleaning. 3. Ensure the oven and all accessories are clean and dry. 4. Ensure the crumb tray is inserted into the oven; the broiling rack is inserted into the roasting pan and resting on the wire rack in the middle rack height position. 5. Ensure the door is closed. 6. Store the appliance in an upright position standing level on its support legs. Do not store anything on top. The only exception is the optional Breville Bamboo Cutting Board and Serving Tray.
30

Troubleshooting

POSSIBLE PROBLEM Oven will not switch "ON"
I would like to have the default LCD settings back
The LCD display light has gone out
The pizza does not cook evenly
The Magnetic Auto-Rack Eject comes out too far when I open the door I cannot select the FROZEN FOODS button Steam is coming out from the oven door The heating elements appear to be pulsing
Water is dripping onto counter from under door
The temperature reading on the LCD screen doesn't match the temperature measured inside the oven

EASY SOLUTION
� Check that the power plug is securely inserted into the outlet. � Insert the power plug into an independent outlet. � Insert the power plug into a different outlet. � Reset the circuit breaker if necessary. � The oven will remember the last setting used for each function even if you
remove the plug from the power outlet.
� To restore the oven's default settings for each function, press and hold the TEMPERATURE CONVERSION and FROZEN buttons at the same time for 5 seconds.
� The oven goes into standby mode if not used for 10 minutes. When in standby mode, the LCD screen will cease to illuminate, however all function options will still be visible.
� To re-activate the oven out of standby mode, press the START/STOP button on the control panel, or turn any dial. The LCD screen will re-illuminate.
� Some large pizzas may brown unevenly in compact ovens. Open the oven door half way through the cooking time and turn the pizza 180 degrees for more even darkness. Try using ROTATE REMIND.
� Always open the door slowly and in a controlled manner when the wire rack is inserted into rack position 3 or 4 to prevent the wire rack from ejecting too quickly.
� The FROZEN FOODS button is only selectable for the following functions: TOAST, BAGEL, PIZZA, AIRFY, REHEAT and COOKIES.
� This is normal. The door is vented to release steam created from high moisture content foods such as frozen breads.
� Element iQ accurately controls the heat inside the oven by pulsing the power and adjusting the power level in the heating elements in short bursts to give accurate temperature control. This is normal.
� This is normal. The condensation created from high moisture content foods such as frozen breads will run down the inside of the door and can drip onto the counter.
� To ensure the measurements are standardized, the oven temperatures have been calibrated in the TOAST position (center of the middle rack with no tray in place). Re-check the temperature in this position, ensuring not to open the oven door for 30 minutes as heat will escape each time the door is opened. Note that the `preheat' alert sounds at 75% of the target temperature.

31

POSSIBLE PROBLEM The `preheat' alert sounds at a lower temperature than what is displayed on the LCD screen
The LCD screen displays 'E01'
The LCD screen displays 'E02'
The LCD screen displays 'E03'
The LCD screen displays 'E06'
The temperature changes when the convection button is pressed. Noise from control panel

EASY SOLUTION
� The `preheat' alert sounds at 75% of the target temperature. This provides the fastest, combined preheating and cooking time.
� This is because when the `preheating' alert sounds, signaling the user to open the oven door and insert food, there is dramatic temperature loss inside the oven. If the alert sounded at 100% of the target temperature, opening the door would mean a lot of this waiting time is "wasted". We have calculated that by sounding the alert at 75% of the target temperature, followed by the oven door being opened to place food inside the oven, that we still recover to the target temperature up to 2 minutes faster. This is why the temperature on the LCD screen does not match the target temperature at the `preheat' alert. Depending on the set temperature, it can take the oven approximately 8�10 minutes from start-up, including opening the oven door when the `preheat' alert sounds, to reach the target temperature.
� The LCD screen will display 'E01' when there is a non-resettable issue with the appliance. Should this occur, immediately remove the power cord from the power outlet and call Breville Consumer Support.
� The LCD screen will display 'E02' when there is a non-resettable issue with the appliance. Should this occur, immediately remove the power cord from the power outlet and call Breville Consumer Support.
� The LCD screen will display 'E03' if the oven temperature is above the set maximum limit. Remove the plug from the power outlet, allow the oven to
� cool for 15 minutes, then plug back in. Call Breville Consumer Support if the 'E03' message continues.
� The LCD screen will display 'E06' when there is a non-resettable issue with the appliance. Should this occur, immediately remove the power cord from the power outlet and call Breville Consumer Support.
� This is normal. The temperature is calibrated to compensate for the convection fan increasing cooking rates.
� During cooking, a cooling fan turns on to protect sensitive electronic components from overheating. This fan can sometimes remain on for a few minutes after cooking has finished.

32

the Smart Oven� Air Fryer Pro
FR-CA MANUEL D'INSTRUCTIONS

Tables des mati�res

2 Breville recommande la

s�curit� avant tout

7 Composants

9 Avant la premi�re utilisation

12 Fonctions

� FONCTIONNEMENT DE

VOTRE FOUR BREVILLE

12

� CAPTEUR DE LA PORTE

13

� GRILLE AUTO-�JECTABLE 13

� VOLUME DE L'AVERTISSEUR 13

� ROTATION

14

� TOAST

14

� BAGEL

15

� GRILLER

16

� CUIRE

17

� R�TIR

18

� GARDER CHAUD

19

� PIZZA

20

� LEVER

22

� FRIRE � AIR CHAUD

23

� R�CHAUFFER

24

� BISCUITS

25

� MIJOTER

26

� D�SHYDRATER

27

� PHASES DE CUISSON

28

� REMPLACER LA LAMPE

DE FOUR

29

30 Entretien & nettoyage

32 Guide de d�pannage

BREVILLE VOUS RECOMMANDE LA S�CURIT� AVANT TOUT
Chez Breville, la s�curit� occupe une place de choix. Nous concevons et fabriquons des produits destin�s aux consommateurs sans jamais perdre de vue la s�curit� de notre pr�cieuse client�le. De plus, nous vous demandons d'�tre tr�s vigilant lorsque vous utilisez un appareil �lectrom�nager et de respecter les mesures de s�curit� suivantes:
IMPORTANTES MESURES DE S�CURIT�
LISEZ TOUTES LES INSTRUCTIONS AVANT USAGE ET CONSERVEZLES � TITRE DE R�F�RENCE Lorsque vous utilisez un appareil �lectrique, des pr�cautions �l�mentaires s'imposent, incluant: � Retirez et jetez en lieu s�r tout mat�riel d'emballage et

2

promotionnel avant d'utiliser le four pour la premi�re fois. � Afin d'�viter tout risque de suffocation chez les jeunes enfants, retirez et jetez en lieu s�r l'enveloppe protectrice recouvrant la fiche de l'appareil. � N'utilisez pas l'appareil sur le bord d'un comptoir ou d'une table. Assurez-vous que le plan de travail est stable, de niveau, r�sistant � la chaleur et propre. � N'utilisez pas l'appareil sur une surface recouverte de tissu, pr�s des rideaux ou de tout autre mat�riau inflammable. � Un risque d'incendie peut survenir si le four est recouvert ou touche � du mat�riel inflammable, incluant rideaux, draperies, murs ou autre lorsqu'il est en marche. � N'utilisez pas l'appareil sur (ou pr�s de) un br�leur � gaz ou �lectrique ou l� o� il pourrait toucher un four chaud ou une surface chaude. � Ne laissez pas le cordon d'alimentation pendre d'une table ou d'un comptoir ni toucher des surfaces chaudes. � Pour �viter tout risque d'�lectrocution, n'immergez pas le cordon, la fiche ou la base motoris�e dans l'eau (ou tout autre liquide).

� Lorsque l'appareil est en marche, gardez une distance minimale de 10 cm (4 po) de chaque c�t� de l'appareil et 15 cm (6 po) au-dessus. � Ne touchez pas les surfaces chaudes de l'appareil. Pour �viter de vous br�ler, soyez extr�mement prudent lorsque vous retirez les casseroles, plats, accessoires, grilloir et l�chefrite qui contiennent de l'huile ou des liquides chauds. � Ne d�posez aucun d'ustensile de cuisine, l�chefrite ou plat sur la porte en verre. � Ne laissez pas la porte ouverte durant une p�riode de temps prolong�e. � Ne d�posez aucun objet sur le dessus du four lorsqu'il est en marche, sauf les articles d�crits en page 7 de ce manuel. � Ne mettez aucun objet en carton, plastique, papier ou autre mat�riau inflammable dans le four. � Ne recouvrez pas le plateau ramasse-miettes ou toute autre partie du four de papier m�tallique, car cela entra�nera une surchauffe du four. � Faites preuve de prudence lorsque vous utilisez des casseroles ou plats faits de mat�riaux autres que le m�tal. Assurez-vous que les

3

casseroles et plats r�sistent au four avant de les utiliser. � Soyez prudent lorsque vous utilisez des couvercles dans le four, car la pression accumul�e dans le plat peut faire expulser des ingr�dients ou fissurer le plat. Ne placez pas de contenants scell�s ou �tanches dans le four. � Les aliments surdimensionn�s et les ustensiles m�talliques ne doivent pas �tre ins�r�s dans le four, car ils peuvent entra�ner un risque d'incendie ou d'�lectrocution. � L'utilisation d'accessoires non recommand�s ou fournis avec ce four peut causer des blessures. � Ne rangez aucun objet dans le four autre que les accessoires recommand�s par le fabricant lorsqu'il n'est pas utilis�. � Cet appareil est con�u pour un usage domestique seulement. Ne l'utilisez dans aucun type de v�hicule en mouvement ni � l'ext�rieur ou � d'autres fins que son usage pr�vu. Une mauvaise utilisation peut causer des blessures. � Si l'appareil doit �tre : nettoy�, d�plac�, assembl� ou rang�, �teignez-le toujours au pr�alable et d�branchez-le de la prise �lectrique, puis laissez-le refroidir compl�tement.
4

� Ne nettoyez pas le four avec un tampon � r�curer m�tallique, car des particules peuvent briser et s'en d�tacher, provoquant un risque d'�lectrocution. � Cet appareil n'est pas con�u pour �tre utilis� par des personnes (incluant les enfants) avec facult�s physiques, sensorielles ou mentales r�duites, ou manque d'exp�rience ou de connaissances, � moins d'avoir �t� initi�s � l'usage de l'appareil et surveill�s par une personne responsable de leur s�curit�. � Une surveillance �troite est requise lorsque l'appareil est utilis� par ou � approxim� des enfants. � L'utilisation de cordons d'alimentation plus longs ou de rallonges est permise, mais doit �tre effectu�e avec pr�caution. � Il est recommand� de v�rifier r�guli�rement l'appareil et le cordon d'alimentation. N'utilisez pas l'appareil si le cordon ou la fiche d'alimentation ont �t� endommag�s, si l'appareil pr�sente des d�fauts de fonctionnement ou a �t� endommag� de quelque fa�on. Cessez imm�diatement l'usage et contactez le Soutien aux consommateurs de Breville.

� L'entretien doit �tre effectu� par un repr�sentant de service autoris�. � Cet appareil n'est pas con�u pour fonctionner � l'aide d'une minuterie externe ou d'un syst�me de contr�le � distance.
AVERTISSEMENT Pour pr�venir le risque d'�lectrocution, d�branchez l'appareil avant de le nettoyer.
INSTRUCTIONS SP�CIFIQUES POUR LE BOV900
� Nous recommandons de brancher le four sur un circuit d�di� s�par� des autres appareils. Consultez un �lectricien agr�� si un doute persiste quant � l'installation. � Le four est en mode veille lorsque le r�tro�clairage de l'�cran ACL est �teint. Toute interaction avec l'une des commandes d�sactivera le mode veille. � Nettoyez r�guli�rement le ramasse-miettes. Pour ce faire, consultez la page 30.

AVERTISSEMENT Pour r�duire le risque D'INCENDIE, D'�LECTROCUTION, D'EXPOSITION EXCESSIVE AUX RAYONS UV OU DE BLESSURES : � D�branchez toujours le four et laissez les pi�ces (incluant le bo�tier de l'ampoule, son enveloppe de verre et son contenu) refroidir compl�tement avant de remplacer l'ampoule. � Utilisez uniquement une ampoule de 25W maximum, 120V, de type G9 avec filtre UV. � Utilisez toujours un chiffon doux lorsque vous manipulez l'ampoule et n'y touchez pas directement, car l'huile de votre peau peut l'endommager. � Ne regardez pas directement une ampoule allum�e. � �loignez-vous de la lumi�re si vous sentez une chaleur. � Ne mettez pas de mat�riaux inflammables pr�s de l'ampoule. � L'ampoule devient chaude rapidement. Utilisez uniquement le bouton d'�clairage pour allumer la lampe. � Ne faites pas fonctionner la lampe de four si le bo�tier de l'ampoule, l'enveloppe de verre, le filtre UV ou le contenu sont manquants ou endommag�s.
5

COURT CORDON D'ALIMENTATION Votre appareil Breville est muni d'un court cordon d'alimentation tr�s s�curitaire qui r�duit les risques de blessures ou de dommages pouvant r�sulter du fait de tirer, tr�bucher ou s'enchev�trer dans un cordon plus long. Si une rallonge est utilis�e : (1) la puissance nominale inscrite sur la corde doit �tre au moins �quivalente � celle de l'appareil; (2) la rallonge ne doit pas pendre d'un comptoir ou d'une table o� des enfants pourraient involontairement s'y suspendre ou tr�bucher; (3) la rallonge doit �tre munie d'une fiche � 3 broches reli�e � la terre.

AVIS AUX CLIENTS CONCERNANT LA M�MOIRE DE STOCKAGE Dans le but de mieux servir notre client�le, nous avons int�gr� une m�moire de stockage dans votre appareil. Il s'agit d'une puce m�moire permettant de recueillir certaines informations sur votre appareil, y compris la fr�quence d'utilisation et la mani�re dont il est utilis�. Par exemple, si vous retournez votre appareil pour le faire r�parer, les informations recueillies sur la puce nous permettent d'y rem�dier rapidement et efficacement. De plus, ces informations constituent une ressource pr�cieuse pour le d�veloppement de futurs produits qui sauront r�pondre aux besoins de nos clients. Cette puce ne recueille aucune information personnelle sur les utilisateurs du produit ou le domicile o� il est utilis�. Pour toutes informations au sujet de la puce m�moire, veuillez nous contacter � privacy@breville.com.

USAGE DOMESTIQUE SEULEMENT CONSERVEZ CES INSTRUCTIONS
6

Composants

A

B

F

G

H

C D

E

I

A. Plaque � pizza antiadh�sive de 33 cm B. Grilles m�talliques (x2)
R�versibles pour 8 diff�rentes positions. C. Grilloir de 23 x 33 cm D. L�chefrite en �mail de 23 x 33 cm E. Panier pour frire � air chaud/d�shydrater

F. Lampe de four G. Poign�e de la porte H. �vents I. Ramasse-miettes

Informations �nerg�tiques 120 V ~ 60 Hz 1800 W
7

J

J. �cran ACL

K. Cadran S�LECTION/CONFIRMER et bouton RAPPEL ROTATION

L. Cadran de TEMP�RATURE/coloration de toast & bagel

M. Cadran de TEMPS/nombre de tranches de

K

N

toast & bagel

N. Bouton MARCHE/ARR�T

O

O. Bouton pour LAMPE DE FOUR

P. Bouton de CONVECTION

Q. Bouton de PHASES DE CUISSON

L

R. Bouton pour ALIMENTS CONGEL�S

P

S. Bouton de CONVERSION DE

TEMP�RATURE et bouton de r�glage de

Q

volume

R

M

S

Accessoires vendus s�par�ment:

Planche � d�couper en bambou

Panier pour frire � air chaud/d�shydrater

Pierre � pizza 8

Plaque � pizza trou�e antiadh�sive

Avant la premi�re utilisation

Ce guide est con�u pour la premi�re utilisation.
Pour plus d'information et de s�curit�, consultez le reste du manuel d'instructions.
PR�PARER LE FOUR
Afin d'�liminer toutes les substances protectrices sur les �l�ments chauffants, il est n�cessaire de faire fonctionner le four � vide durant 20 minutes. Assurez-vous que l'espace environnant est bien a�r�, car le four peut �mettre des vapeurs. Ces vapeurs sont s�curitaires et ne sont pas nuisibles au rendement du four.
1. Retirez et jetez en lieu s�r tout mat�riel d'emballage, �tiquettes promotionnelles et collants du four.
2. Retirez le plateau ramasse-miettes, le grilloir, la l�chefrite, le panier pour frire � air chaud/d�shydrater et la plaque � pizza de leur emballage en polymousse. Lavez-les � l'eau chaude savonneuse avec une �ponge douce, puis rincez et s�chez soigneusement.
3. Essuyez l'int�rieur du four avec une �ponge douce et humide. S�chez soigneusement.
4. Placez le four sur une surface plane et s�che. Assurez-vous de laisser une distance d'au moins 10 cm (4 po) de chaque c�t� du four et de 15 cm (6 po) au-dessus.
5. Ins�rez le ramasse-miettes dans le four.
6. D�roulez compl�tement le cordon d'alimentation et branchez-le dans une prise �lectrique reli�e � la terre.
7. Le signal sonore se fera entendre et l'�cran ACL s'illuminera. Le menu de fonctions appara�tra avec une fl�che indiquant le r�glage TOAST.

8. Tournez le cadran S�LECTION/ CONFIRMER vers la droite jusqu'� ce que la fl�che indique la fonction PIZZA.
S�LECTION
CONFIRMER
TOURNER
9. Appuyez sur le bouton MARCHE/ARR�T qui deviendra r�tro�clair� en rouge, l'�cran ACL s'illuminera en orange et le signal sonore se fera entendre.
10. Le message 'PREHEATING' (pr�chauffage) clignotera sur l'�cran ACL. D�s que le cycle de pr�chauffage sera termin�, un signal sonore se fera entendre.
11. La minuterie s'affichera et le compte � rebours d�butera automatiquement.
12. � la fin du cycle de cuisson, le signal sonore se fera entendre, le bouton MARCHE/ ARR�T ne sera plus r�tro�clair� et l'�cran ACL s'illuminera en blanc.
13. Le four est maintenant pr�t � �tre utilis�. ELEMENT iQ Le Smart Oven� Air Fryer Pro de Breville dispose de la technologie ELEMENT iQ� qui ajuste la puissance des �l�ments chauffants et assure une cuisson uniforme et rapide des aliments. Chacune des fonctions du four est pr�r�gl�e selon nos recommandations. Cependant, nous vous sugg�rons d'en faire l'exp�rience en fonction des recettes, de la quantit� d'aliments et de vos go�ts personnels. Le four gardera en m�moire votre r�glage personnalis� jusqu'� ce qu'il soit chang� ou que vous r�initialisiez le four aux r�glages par d�faut, et ce m�me si le four est d�branch�. Pour ce faire, appuyez et maintenez simultan�ment les boutons ALIMENTS CONGEL�S et CONVERSION DE TEMP�RATURE durant 5 secondes.
9

SURVOL DES FONCTIONS DU FOUR

FONCTION TOAST BAGEL BROIL (GRILLER) BAKE (CUIRE)
ROAST (R�TIR)
WARM (CHAUD)
PIZZA

POSITION DE GRILLE SUGG�R�E 4 4 1 � 2 6
6
Vari�e
7

R�GLAGES PR�R�GLAGES OPTIONNELS

FROZEN (CONGEL�S)
FROZEN (CONGEL�S)

Coloration 4 Tranches 4
Coloration 4 Tranches 4
HIGH (HAUT)

CONVECTION TEMP�RATURE CONVERSION ROTATE (ROTATION)

325�F (160�C) 30 MIN CONVECTION

CONVECTION TEMP�RATURE CONVERSION ROTATE (ROTATION)

400�F (205�C) 1:00 HR CONVECTION

CONVECTION TEMP�RATURE CONVERSION ROTATE (ROTATION)

160�F (70�C) 1:00 HR CONVECTION

CONVECTION
TEMP�RATURE
CONVERSION
FROZEN (CONGEL�S)
ROTATE (ROTATION)

375�F (190�C) 20 MIN CONVECTION FROZEN (CONGEL�S)

PR�-

�CHELLE

CHAUFFAGE

Non

Coloration 1-7

Tranches 1-9

Non

Coloration 1-7

Tranches 1-10

Non

BAS, MED, HAUT

Jusqu'� 20 MIN

Oui

>390�F/200�C jusqu'�

4 heures

300�F/150�C �

390�F/200�C jusqu'�

8 heures

210�F/100�C �

300�F/150�C jusqu'�

12 heures

<210�F/100�C jusqu'�

72 heures

Oui

>390�F/200�C jusqu'�

4 heures

300�F/150�C �

390�F/200�C jusqu'�

8 heures

210�F/100�C �

300�F/150�C jusqu'�

12 heures

<210�F/100�C jusqu'�

72 heures

Non

>390�F/200�C jusqu'�

4 heures

300�F/150�C �

390�F/200�C jusqu'�

8 heures

210�F/100�C �

300�F/150�C jusqu'�

12 heures

<210�F/100�C jusqu'�

72 heures

Oui

120�F/50�C -

480�F/250�C jusqu'�

1:00 HR

10

FONCTION PROOF (LEVER)

POSITION DE GRILLE SUGG�R�E
7

AIR FRY (FRIRE 3 � AIR CHAUD)

REHEAT

Vari�e

(R�CHAUFFER)

COOKIES

5

(BISCUITS)

SLOW COOK

8

(MIJOTER)

DEHYDRATE

3

(D�SHYDRATER)

R�GLAGES PR�R�GLAGES OPTIONNELS

CONVECTION TEMP�RATURE CONVERSION ROTATE (ROTATION)
CONVECTION TEMP�RATURE CONVERSION FROZEN (CONGEL�S) ROTATE (ROTATION)
CONVECTION TEMP�RATURE CONVERSION FROZEN (CONGEL�S) ROTATE (ROTATION)
CONVECTION TEMP�RATURE CONVERSION FROZEN (CONGEL�S) ROTATE (ROTATION)
CONVECTION

85�F (30�C) 1:00 HR CONVECTION
400�F (205�C) 18 MIN SUPER CONVECTION ALIMENTS CONGEL�S
325�F (160�C) 15 IN CONVECTION
325�F (160�C) 11 MIN CONVECTION
HIGH (haut) 4:00 HR CONVECTION

CONVECTION TEMP�RATURE CONVERSION ROTATE (ROTATION)

125�F (52�C)
12:00 HR
SUPER CONVECTION

PR�-

�CHELLE

CHAUFFAGE

Non

80�F/27�C -

100�F/38�C

Jusqu'� 2:00 HR

Oui

120�F/50�C -

480�F/250�C

Jusqu'� 1:00 HR

Non

120�F/50�C -

480�F/250�C

Jusqu'� 2:00 HR

Oui

120�F/50�C -

480�F/250�C

Jusqu'� 1:00 HR

Oui

HI, 2:00 - 12:00 HR

LO, 4:00 - 72:00 HR

WARM (CHAUD)

automatique

Jusqu'� 2:00 HR

Non

86�F/30�C -

176�F/80�C

Jusqu'� 72:00 HR

11

Fonctions
FONCTIONNEMENT DE VOTRE FOUR BREVILLE
1. Ins�rez la grille � la position d�sir�e. Les positions de la grille sont imprim�es sur le c�t� gauche de la porte vitr�e. La grille peut �tre ins�r�e dans l'une ou l'autre des quatre rainures, � l'endroit ou � l'envers, doublant ainsi le nombre de positions disponibles.

2. Tournez le cadran S�LECTION/ CONFIRMER jusqu'� ce que la fl�che indique le r�glage d�sir� sur l'�cran ACL.
3. Le chiffre du haut apparaissant sur l'�cran ACL indique la temp�rature de cuisson pr�r�gl�e pour le r�glage s�lectionn�. Pour les r�glages TOAST et BAGEL, il indique le niveau de coloration. Tournez le cadran de TEMP�RATURE vers la gauche pour r�duire la temp�rature ou vers la droite pour l'augmenter.
CADRAN DE
TEMP�RATURE

TOURNER

R�DUIRE LA TEMP�RATURE

AUGMENTER LA TEMP�RATURE

4. Le chiffre du bas apparaissant sur l'�cran ACL indique le temps pr�r�gl� pour le r�glage s�lectionn�. Pour les r�glages TOAST et BAGEL, il indique le nombre de tranches. Tournez le cadran de TEMPS vers la gauche pour r�duire le temps de cuisson ou vers la droite pour l'augmenter.
CADRAN
DE TEMPS

TOURNER

R�DUIRE LE TEMPS

AUGMENTER LE TEMPS

5. Pour les r�glages sans cycle de pr�chauffage (TOAST, BAGEL, GRILLER, GARDER CHAUD, LEVER, R�CHAUFFER, D�SHYDRATER), d�posez les aliments directement sur la grille ou dans le panier pour frire � air chaud/ d�shydrater, sur la plaque � pizza, le grilloir et/ou la l�chefrite. Assurez-vous de bien centrer les aliments dans le four pour obtenir une cuisson uniforme.
a) Fermez la porte du four.
b) Appuyez sur le bouton MARCHE/ARR�T. Le bouton sera r�tro�clair� en rouge, le signal sonore se fera entendre et l'�cran ACL s'illuminera en orange.
c) La minuterie s'affichera et le compte � rebours d�butera. La temp�rature et le temps de cuisson peuvent �tre ajust�s durant le cycle de cuisson.
6. Pour les r�glages avec cycle de pr�chauffage (CUIRE, R�TIR, PIZZA, FRIRE � AIR CHAUD, BISCUITS, MIJOTER), appuyez sur le bouton MARCHE/ARR�T avant d'ins�rer les aliments dans le four (� l'exception de MIJOTER - pour cette fonction, ins�rez les aliments avant le cycle de pr�chauffage). Le bouton sera r�tro�clair� en rouge, le signal sonore se fera entendre et le message 'PREHEATING' (PR�CHAUFFAGE) clignotera sur l'�cran ACL pendant que le four se r�chauffe.

12

a) Lorsque le four sera pr�t � �tre utilis�, le message 'PREHEATING' (PR�CHAUFFAGE) dispara�tra, le signal sonore se fera entendre et le compte � rebours d�butera. D�posez les aliments directement sur la grille ou dans le panier pour frire � air chaud/d�shydrater, sur la plaque � pizza, le grilloir et/ou la l�chefrite. Assurez-vous de bien centrer les aliments dans le four pour obtenir une cuisson uniforme.
b) Fermez la porte du four.
c) Le compte � rebours se poursuivra. La temp�rature et le temps de cuisson peuvent �tre ajust�s durant le cycle de cuisson.
7. � la fin du cycle de cuisson, le signal sonore se fera entendre, le bouton MARCHE/ ARR�T ne sera plus r�tro�clair� et l'�cran ACL s'illuminera en blanc.
NOTE
Le cycle de cuisson peut �tre arr�t� en tout temps en appuyant sur le bouton MARCHE/ ARR�T. Le cycle s'annulera et le bouton sera r�tro�clair� en blanc.

GRILLE MAGN�TIQUE AUTO-�JECTABLE
Lorsque la grille est ins�r�e en position 3 ou 4 et que vous ouvrez la porte, la grille s'�jectera automatiquement � moiti� hors du four pour permettre le retrait facile des aliments.
Ouvrez toujours la porte lentement lorsqu'elle est dans une telle position pour emp�cher la grille d'�tre �ject�e trop rapidement.
VOLUME DE L'AVERTISSEUR
Appuyez et maintenez le bouton de CONVERSION DE TEMP�RATURE durant 3 secondes pour activer le mode de contr�le de l'avertisseur.

NOTE
Appuyez sur le bouton CONVECTION. Trois choix s'offrent � vous: aucune convection, convection ou super convection. Convection et super convection peuvent ajuster la temp�rature pour compenser. Super convection donnera des r�sultats plus croustillants.
CAPTEUR DE LA PORTE
Si la porte est ouverte durant la cuisson, la minuterie fera une pause et la lampe de four s'allumera.
Une fois la porte ferm�e, le compte � rebours reprendra et la lampe de four restera allum�e 30 secondes avant de s'�teindre. Si la porte reste ouverte plus de 10 minutes durant la cuisson, les �l�ments chauffants s'�teindront.

Appuyez sur le bouton CONVERSION DE TEMP�RATURE pour choisir le volume d�sir�. Pour confirmer, appuyez sur n'importe quel bouton.

13

ROTATE REMIND (ROTATION)
Lorsque vous faites cuire des aliments sur plusieurs grilles � la fois, utilisez la fonction Rotate Remind (Rotation) pour vous rappeler de changer la position des aliments dans le four afin d'obtenir des r�sultats uniformes et constants. Rotate Remind (Rotation) convient aux fonctions suivantes : CUIRE, R�TIR, GARDER CHAUD, LEVER, PIZZA, FRIRE � AIR CHAUD, R�CHAUFFER, BISCUITS et D�SHYDRATER.
1. Tournez le cadran S�LECTION/ CONFIRMER jusqu'� ce que la fl�che indique la fonction d�sir�e sur l'�cran ACL.
2. Appuyez sur le cadran S�LECTION/ CONFIRMER. Le message 'Rotate Remind' (Rotation) appara�tra sur l'�cran ACL.
3. Suivez les �tapes de la fonction s�lectionn�e et commencez la cuisson.
4. Lorsqu'il sera temps d'interchanger la position des grilles, le signal sonore se fera entendre et le message 'Rotate Remind' (Rotation) clignotera sur l'�cran ACL. Le signal sonore se fera entendre toutes les 30 secondes jusqu'� ce que la porte soit ferm�e ou que vous appuyiez sur le cadran S�LECTION/CONFIRMER pour d�sactiver la fonction.

FONCTION TOAST
La fonction TOAST colore et rend la cro�te de votre pain croustillante pendant que l'int�rieur est tendre et moelleux. Cette fonction convient parfaitement aux muffins anglais et gaufres congel�es.
1. Ins�rez la grille en position 4.
2. D�posez les tranches de pain aussi pr�s que possible du centre de la grille afin d'assurer un grillage optimal.
3. Fermez la porte du four.
4. Tournez le cadran S�LECTION/ CONFIRMER jusqu'� ce que la fl�che indique la fonction TOAST sur l'�cran ACL. Le chiffre du haut apparaissant sur l'�cran ACL indique le r�glage de coloration '4', tandis que le chiffre du bas indique le nombre de tranches pr�r�gl� de '4'.

NOTE
Lorsque vous faites cuire des aliments dans des plats de cuisson sur plusieurs grilles, il est sugg�r� de laisser assez d'espace entre les grilles et d'�viter d'utiliser la position sup�rieure, due � la proximit� des �l�ments chauffants.
Dans la plupart des cas, les positions 3 et 7 ou 4 et 8 donneront les meilleurs r�sultats. Si vous utilisez les paniers pour frire � air chaud/ d�shydrater, il ne sera pas n�cessaire de laisser de l'espace entre les grilles.

5. Le r�glage de coloration et le nombre de tranches peuvent �tre modifi�s avant ou durant le cycle de grillage.
a) Le r�glage de coloration est indiqu� par une s�rie de cercles apparaissant au haut de l'�cran ACL. Tournez le cadran de TEMP�RATURE vers la gauche pour r�duire la coloration, ou vers la droite pour l'augmenter. Le triangle au-dessus des cercles se d�placera en fonction du r�glage choisi.

14

� titre indicatif :

Coloration d�sir�e P�le Moyenne Fonc�e

R�glage 1 ou 2 3, 4 ou 5 6 ou 7

b) Le nombre de tranches est indiqu� par le chiffre du bas sur l'�cran ACL. Tournez le cadran de TEMPS vers la gauche pour r�duire le nombre de tranches, ou vers la droite pour l'augmenter. Le nombre de tranches varie de '1' � '9'.
6. Appuyez sur le bouton MARCHE/ARR�T pour activer la fonction TOAST. Le bouton sera r�tro�clair� en rouge, le signal sonore se fera entendre et l'�cran ACL s'illuminera en orange.
7. La minuterie s'affichera et le compte � rebours d�butera automatiquement. Le temps peut �tre ajust� durant le cycle de grillage en tournant le cadran de TEMPS. Le cycle peut �tre interrompu en tout temps en appuyant sur le bouton MARCHE/ARR�T.

FONCTION BAGEL
La fonction BAGEL rend l'int�rieur (c�t� coup�) du bagel croustillant tout en grillant l�g�rement la cro�te. Cette fonction est id�ale pour griller les crumpets ou tranches �paisses de pain de sp�cialit� qui requi�rent plus de coloration d'un c�t� que de l'autre.
1. Ins�rez la grille en position 4.
2. D�posez les moiti�s de bagel, c�t� coup� orient� vers le haut, aussi pr�s que possible du centre de la grille afin d'assurer un grillage optimal.
3. Fermez la porte du four.
4. Tournez le cadran S�LECTION/ CONFIRMER jusqu'� ce que la fl�che indique BAGEL sur l'�cran ACL. Le chiffre du haut apparaissant sur l'�cran ACL indique le r�glage de coloration pr�r�gl� '4', tandis que le chiffre du bas indique le nombre pr�r�gl� de moiti�s de bagel '4'.

MARCHE ARR�T APPUYER

8. � la fin du cycle TOAST, le signal sonore se fera entendre, le bouton MARCHE/ ARR�T s'�teindra et l'�cran ACL sera illumin� en blanc.
NOTE
Le temps de cuisson d�pend d'un certain nombre de facteurs, incluant la temp�rature dans le four. Le temps peut alors varier, m�me si les r�glages de coloration et de nombre de tranches sont les m�mes, et ce dans le but d'obtenir des r�sultats coh�rents.

5. Les r�glages de coloration et de nombre de moiti�s de bagel peuvent �tre ajust�s avant ou durant le cycle de grillage.
a) Le r�glage de coloration est indiqu� par la s�rie de triangles au haut de l'�cran ACL. Tournez le cadran de TEMP�RATURE vers le gauche pour r�duire la coloration, ou vers la droite pour l'augmenter. Le cercle sous les triangles se d�placera en fonction du r�glage choisi.

15

� titre indicatif :

Coloration d�sir�e

R�glage

P�le

1 ou 2

Moyenne Fonc�e

3, 4 ou 5 6 ou 7

b) Le chiffre du bas sur l'�cran ACL indique le nombre de moiti�s de bagel. Tournez le cadran de TEMPS vers la gauche pour r�duire le nombre de moiti�s de bagels, et vers la droite pour l'augmenter. Le nombre de bagels varie de '1' � '10'.
6. Appuyez sur le bouton MARCHE/ ARR�T pour activer la fonction BAGEL. Le bouton sera r�tro�clair� en rouge, le signal sonore se fera entendre et l'�cran ACL s'illuminera en orange.
7. La minuterie s'affichera et le compte � rebours d�butera automatiquement. Le temps peut �tre ajust� durant le cycle de bagel en tournant le cadran de TEMPS. Le cycle peut �tre interrompu en tout temps en appuyant sur le bouton MARCHE/ARR�T.

FONCTION BROIL (GRILER)
La fonction BROIL (GRILLER) est id�ale pour cuire les sandwichs ouverts, les coupes de viande minces, le poulet, le poisson, les saucisses et les l�gumes. Elle peut aussi servir � gratiner les plats en cocotte ou les desserts.
1. Ins�rez la grille en position 1 ou 2.
2. Ins�rez le grilloir fourni dans la l�chefrite. D�posez les aliments sur le grilloir (ou dans un plat allant au four) et placez-le au centre de la grille pour faciliter la circulation d'air tout autour des aliments.
3. Fermez la porte du four.
4. Tournez le cadran S�LECTION/ CONFIRMER jusqu'� ce que la fl�che indique BROIL (GRILLER) sur l'�cran ACL. Le chiffre du haut sur l'�cran ACL indique le niveau de puissance pr�r�gl� 'HIGH' (HAUT), tandis que le chiffre du bas indique le temps pr�r�gl� '10:00 MIN/SEC'.

MARCHE ARR�T APPUYER

8. � la fin du cycle de BAGEL, le signal sonore se fera entendre. Le bouton MARCHE/ ARR�T s'�teindra et l'�cran ACL sera illumin� en blanc.
NOTE
L'int�rieur (c�t� coup�) du bagel doit toujours �tre orient� vers le haut en direction des �l�ments chauffants. Cela permet d'obtenir un c�t� coup� croustillant et une cro�te l�g�rement grill�e. Si vous pr�f�rez vos moiti�s de bagel croustillantes des deux c�t�s, nous vous recommandons d'utiliser la fonction TOAST.
16

5. Les r�glages de puissance et de temps peuvent �tre ajust�s avant ou durant le cycle de grillage.
a) Le chiffre du haut sur l'�cran ACL indique le niveau de puissance de grillage. Tournez le cadran de TEMP�RATURE pour choisir le niveau entre 'HIGH', 'MED' ou 'LOW' (HAUT, MOYEN OU BAS).
b) Le chiffre du bas sur l'�cran ACL indique le temps de grillage. Tournez le cadran de TEMPS pour ajuster le temps jusqu'� 20 minutes.
6. Appuyez sur le bouton MARCHE/ARR�T pour activer la fonction BROIL (GRILLER). Le bouton sera r�tro�clair� en rouge, le signal sonore se fera entendre et l'�cran ACL s'illuminera en orange.
7. La minuterie s'affichera et le compte � rebours d�butera automatiquement. Le niveau de puissance et le temps peuvent �tre ajust�s durant le cycle de grillage en tournant les cadrans respectifs de TEMP�RATURE et de TEMPS. Le cycle peut �tre interrompu en tout temps en appuyant sur le bouton MARCHE/ARR�T.
8. � la fin du cycle de grillage, le signal sonore se fera entendre, le bouton MARCHE/ ARR�T s'�teindra et l'�cran ACL sera illumin� en blanc.
FONCTION BAKE (CUIRE)
La fonction BAKE (CUIRE) cuit uniform�ment les aliments. Elle est id�ale pour cuire les g�teaux, muffins, brownies et p�tisseries, de m�me que les mets surgel�s comme les lasagnes et les p�t�s.
1. Ins�rez la grille en position 6. Notez que certains aliments, comme les brownies ou les p�t�s, peuvent mieux convenir � la position 5.
2. Fermez la porte du four.

3. Tournez le cadran S�LECTION/ CONFIRMER jusqu'� ce que la fl�che indique BAKE (CUIRE) sur l'�cran ACL. Le chiffre du haut sur l'�cran ACL indique la temp�rature de cuisson pr�r�gl�e de '325�F', tandis que le chiffre du bas indique le temps pr�r�gl� '30:00 MIN/SEC'. Le pr�r�glage CONVECTION appara�tra �galement.

4. Les r�glages de temp�rature, de temps et de convection peuvent �tre ajust�s avant ou durant le cycle de cuisson.
a) Le chiffre du haut sur l'�cran ACL indique le niveau de temp�rature. Tournez le cadran de TEMP�RATURE pour choisir la temp�rature de 120�F/50�C � un maximum de 480�F/250�C
b) Tournez le cadran de TEMPS pour choisir le temps de cuisson. Le temps maximal peut �tre r�gl� comme suit :

>390�F/200�C
300�F/150�C � 390�F/200�C
210�F/100�C � 300�F/150�C

jusqu'� 4 heures jusqu'� 8 heures jusqu'� 12 heures

<210�F/100�C

jusqu'� 72 heures

5. Appuyez sur le bouton MARCHE/ARR�T pour activer la fonction BAKE (CUIRE). Le bouton sera r�tro�clair� en rouge, le signal sonore se fera entendre et l'�cran ACL s'illuminera en orange. Le message 'PREHEATING' (PR�CHAUFFAGE) clignotera sur l'�cran ACL.

17

6. Une fois le pr�chauffage termin�, un signal sonore se fera entendre, signifiant que les aliments peuvent �tre ins�r�s dans le four.
7. D�posez les aliments dans la l�chefrite (ou tout autre plat allant au four) et placez-la au centre de la grille pour faciliter une bonne circulation d'air autour des aliments. Fermez la porte du four.
8. Apr�s que le signal sonore de PR�CHAUFFAGE se sera fait entendre, le compte � rebours d�butera automatiquement. La temp�rature et le temps peuvent �tre ajust�s durant le cycle de cuisson en tournant les cadrans respectifs de TEMP�RATURE et de TEMPS. Le cycle peut �tre interrompu en tout temps en appuyant sur le bouton MARCHE/ARR�T.

FONCTION ROAST (R�TIR)
La fonction ROAST (R�TIR) est id�ale pour cuire une vari�t� de viande ou de poulet. Les aliments seront tendres et juteux � l'int�rieur et r�tis � la perfection � l'ext�rieur.
1. Ins�rez la grille en position 6.
2. Fermez la porte du four.
3. Tournez le cadran S�LECTION/ CONFIRMER jusqu'� ce que la fl�che indique ROAST (R�TIR) sur l'�cran ACL. Le chiffre du haut sur l'�cran ACL indique la temp�rature pr�r�gl�e de '400�F', tandis que le chiffre du bas indique le temps pr�r�gl� de '1:00 HR/MIN'. Le pr�r�glage CONVECTION s'affichera �galement.

MARCHE ARR�T APPUYER

TEMP�RATURE ATTEINTE
9. � la fin du cycle de cuisson (BAKE), le signal sonore se fera entendre, le bouton MARCHE/ARR�T s'�teindra et l'�cran ACL sera illumin� en blanc.

4. Les r�glages de puissance, de temps et de convection peuvent �tre ajust�s avant ou durant le cycle de r�tissage.
a) Le chiffre du haut sur l'�cran ACL indique la temp�rature de r�tissage. Tournez le cadran de TEMP�RATURE pour ajuster la temp�rature de 120�F/50�C � un maximum de 480�F/250�C.
b) Tournez le cadran de TEMPS pour choisir le temps de cuisson. Le temps maximal peut �tre r�gl� comme suit :

>390�F/200�C
300�F/150�C � 390�F/200�C
210�F/100�C � 300�F/150�C
<210�F/100�C

jusqu'� 4 heures jusqu'� 8 heures
jusqu'� 12 heures jusqu'� 72 heures

18

5. Appuyez sur le bouton MARCHE/ARR�T pour activer la fonction ROAST (R�TIR). Le bouton sera r�tro�clair� en rouge, le signal sonore se fera entendre et l'�cran ACL s'illuminera en orange. Le message 'PREHEATING' (PR�CHAUFFAGE) clignotera sur l'�cran ACL.
6. Une fois le cycle de pr�chauffage termin�, un signal sonore se fera entendre, signifiant que les aliments peuvent �tre ins�r�s dans le four.
7. Disposez les aliments dans la l�chefrite (ou tout autre plat allant au four) et placez-la au centre de la grille pour faciliter une bonne circulation d'air autour des aliments. Fermez la porte du four.
8. Apr�s que le signal sonore de PR�CHAUFFAGE se sera fait entendre, le compte � rebours d�butera automatiquement. La temp�rature et le temps peuvent �tre ajust�s durant le cycle de r�tissage en tournant les cadrans respectifs de TEMP�RATURE et de TEMPS. Le cycle peut �tre interrompu en tout temps en appuyant sur le bouton MARCHE/ARR�T.

FONCTION WARM (GARDER CHAUD)
La fonction WARM (GARDER CHAUD) maintient les aliments � la temp�rature recommand�e pour pr�venir la croissance bact�rienne, soit 160�F/70�C ou plus.
1. Ins�rez la grille � la position ad�quate selon le type d'aliments que vous d�sirez garder chauds.
2. D�posez les aliments dans la l�chefrite incluse ou sur la plaque � pizza (ou tout autre plat allant au four) et et placez-la au centre de la grille pour faciliter une bonne circulation d'air tout autour.
3. Fermez la porte du four.
4. Tournez le cadran S�LECTION/ CONFIRMER jusqu'� ce que la fl�che indique WARM (GARDER CHAUD) sur l'�cran ACL. Le chiffre du haut sur l'�cran ACL indique la temp�rature pr�r�gl�e de 160�F, tandis que le chiffre du bas indique le temps pr�r�gl� de '1:00 HR/ MIN'. Le pr�r�glage CONVECTION appara�tra �galement.

MARCHE ARR�T APPUYER

TEMP�RATURE ATTEINTE
9. � la fin du cycle de r�tissage (ROAST), le signal sonore se fera entendre, le bouton MARCHE/ARR�T s'�teindra et l'�cran ACL sera illumin� en blanc.
19

5. Les r�glages de temp�rature, de temps et de convection peuvent �tre ajust�s avant ou durant le cycle de maintien au chaud.
a) Le chiffre du haut sur l'�cran ACL indique la temp�rature de maintien au chaud. Tournez le cadran de TEMP�RATURE pour ajuster la temp�rature de 110�F/45�C � un maximum de 480�F/250�C.
b) Tournez le cadran de TEMPS pour choisir le temps de cuisson. Le temps maximal peut �tre r�gl� comme suit :

>390�F/200�C
300�F/150�C � 390�F/200�C
210�F/100�C � 300�F/150�C
<210�F/100�C

jusqu'� 4 heures jusqu'� 8 heures
jusqu'� 12 heures jusqu'� 72 heures

6. Appuyez sur le bouton MARCHE/ARR�T pour activer la fonction WARM (GARDER CHAUD). Le bouton sera r�tro�clair� en rouge, le signal sonore se fera entendre et l'�cran ACL s'illuminera en orange.
7. La minuterie s'affichera et le compte � rebours d�butera automatiquement. La temp�rature et le temps peuvent �tre ajust�s durant le cycle de maintien au chaud en tournant les cadrans respectifs de TEMP�RATURE et de TEMPS. Le cycle peut �tre interrompu en tout temps en appuyant sur le bouton MARCHE/ARR�T.
8. � la fin du cycle GARDER CHAUD, le signal sonore se fera entendre, le bouton MARCHE/ARR�T s'�teindra et l'�cran ACL sera illumin� en blanc.

FONCTION PIZZA
La fonction PIZZA faire fondre et brunit le fromage et les garnitures et fait simultan�ment croustiller la cro�te de la pizza.
1. Ins�rez la grille en position 7.
2. Fermez la porte du four.
3. Tournez le cadran S�LECTION/ CONFIRMER jusqu'� ce que la fl�che indique PIZZA sur l'�cran ACL. Le chiffre du haut sur l'�cran ACL indique la temp�rature pr�r�gl�e de '375�F' tandis que le chiffre du bas indique le temps pr�r�gl� de '20:00 MIN/SEC'. Les pr�r�glages CONVECTION et FROZEN (CONGEL�S) seront �galement affich�s.

4. Les r�glages de temp�rature, de temps, de convection et pour aliments congel�s peuvent �tre ajust�s avant ou durant le cycle de PIZZA.
a) Le chiffre du haut sur l'�cran ACL indique la temp�rature de pizza. Tournez le cadran de TEMP�RATURE pour ajuster la temp�rature de 120�F/50�C � un maximum de 480�F/250�C.
b) Tournez le cadran de TEMPS pour s�lectionner le temps de cuisson. Le temps maximal peut �tre r�gl� comme suit :

120�F/50�C � 480�F/250�C

jusqu'� 1:00 HR

20

5. Appuyez sur le bouton MARCHE/ARR�T pour activer la fonction PIZZA. Le bouton sera r�tro�clair� en rouge, le signal sonore se fera entendre et l'�cran ACL s'illuminera en orange. Le message 'PREHEATING' (PR�CHAUFFAGE) clignotera sur l'�cran ACL.
6. Une fois la temp�rature atteinte, le signal sonore se fera entendre.
7. D�posez la pizza sur la plaque � pizza fournie et placez-la au centre de la grille pour faciliter une bonne circulation d'air tout autour. Fermez la porte.
8. Apr�s que le signal sonore de PR�CHAUFFAGE se sera fait entendre, le compte � rebours d�butera automatiquement. La temp�rature et le temps peuvent �tre ajust�s durant le cycle de PIZZA en tournant les cadrans respectifs de TEMP�RATURE et de TEMPS. Le cycle peut �tre interrompu en tout temps en appuyant sur le bouton MARCHE/ARR�T.
MARCHE ARR�T
APPUYER
9. � la fin du cycle de PIZZA, le signal sonore se fera entendre, le bouton MARCHE/ ARR�T s'�teindra et l'�cran ACL sera illumin� en blanc.
NOTE
Si vous utilisez la plaque � pizza incluse, ins�rez-la dans le four durant le cycle de pr�chauffage pour obtenir de meilleurs r�sultats. Soyez prudent lorsque vous d�posez la pizza sur la plaque chaude.

Une note sur les pierres � pizza
Lorsque vous utilisez une pierre � pizza, il est n�cessaire de la pr�chauffer, sans pizza, pour obtenir de meilleurs r�sultats.
1. Ins�rez la grille en position 7.
2. D�posez la pierre � pizza au centre de la grille pour faciliter une bonne circulation d'air tout autour.
3. Fermez la porte du four.
4. Tournez le cadran S�LECTION/ CONFIRMER jusqu'� ce que la fl�che indique PIZZA sur l'�cran ACL. Le chiffre du haut sur l'�cran ACL indique la temp�rature pr�r�gl�e de '375�F', tandis que le chiffre du bas indique le temps pr�r�gl� de '20:00 MIN/SEC'. Les pr�r�glages CONVECTION et FROZEN (CONGEL�S) s'afficheront �galement.
5. Tournez le cadran de TEMPS pour r�gler le temps � 15:00 MIN/SEC.
6. Appuyez sur le bouton MARCHE/ARR�T pour activer la fonction PIZZA. Le bouton sera r�tro�clair� en rouge, le signal sonore se fera entendre et l'�cran ACL s'illuminera en orange. Le message 'PREHEATING' (PR�CHAUFFAGE) clignotera sur l'�cran ACL.
7. � la fin du cycle de pr�chauffage, un signal sonore se fera entendre.
8. Apr�s que le signal de PR�CHAUFFAGE se sera fait entendre, le compte � rebours d�butera automatiquement.
9. � la fin du cycle, le signal sonore se fera entendre. Le bouton MARCHE/ARR�T s'�teindra et l'�cran ACL s'illuminera en blanc.
10. Ouvrez la porte du four et d�posez d�licatement la pizza sur la pierre � pizza.
11. Choisissez les r�glages de temp�rature, de temps, de convection et pour aliments frais/congel�s et appuyez sur le bouton MARCHE/ARR�T pour d�buter le cycle de PIZZA.

21

FONCTION PROOF (LEVER)
La fonction PROOF (LEVER) est con�ue pr�cis�ment pour maintenir des temp�ratures basses, cr�ant un environnement id�al pour faire lever le pain, les petits pains, la p�te � pizza et autres p�tes.
1. Ins�rez la grille en position 8.
2. D�posez la p�te dans un plat allant au four, couvrez et placez au centre de la grille.
3. Fermez la porte du four.
4. Tournez le cadran S�LECTION/ CONFIRMER jusqu'� ce que la fl�che indique PROOF (LEVER) sur l'�cran ACL. Le chiffre du haut sur l'�cran ACL indique la temp�rature pr�r�gl�e de '85�F, tandis que le chiffre du bas indique le temps pr�r�gl� de '1:00 HR/MIN'. Le pr�r�glage CONVECTION appara�tra �galement.

5. Les r�glages de temp�rature, de temps et de convection peuvent �tre ajust�s avant ou durant le cycle de lever.
a) Le chiffre du haut sur l'�cran ACL indique la temp�rature de lev�e. Tournez le cadran de TEMP�RATURE pour l'ajuster de 80�F/278�C � un maximum de 100�F/38�C.
b) Le chiffre du bas sur l'�cran ACL indique le temps de lev�e. Tournez le cadran de TEMPS pour ajuster le temps jusqu'� 2:00 HR/MIN.
6. Appuyez sur le bouton MARCHE/ARR�T pour activer la fonction PROOF (LEVER). Le bouton sera r�tro�clair� en rouge, le signal sonore se fera entendre et l'�cran ACL s'illuminera en orange.
7. La minuterie s'affichera et le compte � rebours d�butera. La temp�rature et le temps peuvent �tre ajust�s durant le cycle de lev�e en tournant les cadrans respectifs de TEMP�RATURE et de TEMPS. Le cycle peut �tre interrompu en tout temps en appuyant sur le bouton MARCHE/ARR�T.
8. � la fin du cycle LEVER, le signal sonore se fera entendre. Le bouton MARCHE/ ARR�T s'�teindra et l'�cran ACL sera illumin� en blanc.

22

FONCTON AIR FRY (FRIRE � AIR CHAUD)
La fonction AIR FRY (FRITE � AIR CHAUD) combine une chaleur intense et une circulation d'air maximale, id�al pour faire croustiller et brunir les aliments.
1. Assurez-vous que la position 3, ou toute autre position convenant au panier pour frire � air chaud/d�shydrater, est libre.
2. Fermez la porte du four.
3. Tournez le cadran S�LECTION/ CONFIRMER jusqu'� ce que la fl�che indique AIR FRY (FRIRE � AIR CHAUD) sur l'�cran ACL. Le chiffre du haut sur l'�cran ACL indique la temp�rature pr�r�gl�e de '400�F', tandis que le chiffre du bas indique le temps pr�r�gl� de '18:00 MIN/SEC'. Le pr�r�glage SUPER CONVECTION appara�tra sur l'�cran ACL.

5. Appuyez sur le bouton MARCHE/ ARR�T pour activer la fonction AIR FRY (FRIRE � AIR CHAUD). Le bouton sera r�tro�clair� en rouge, le signal sonore se fera entendre et l'�cran ACL s'illuminera en orange. Le message, PREHEATING (PR�CHAUFFAGE) clignotera sur l'�cran ACL.
6. Une fois le pr�chauffage termin�, un signal sonore se fera entendre, signifiant que les aliments peuvent �tre ins�r�s dans le four.
7. D�posez les aliments uniform�ment dans le panier pour frire � air chaud/d�shydrater. Pour de meilleurs r�sultats, placez les aliments en une seule couche en laissant un peu d'espace entre chaque morceau. Ins�rez le panier � friture dans la position ad�quate de la grille et fermez la porte du four.
8. Apr�s que le signal sonore de PR�CHAUFFAGE se sera fait entendre, le compte � rebours d�butera automatiquement. La temp�rature et le temps peuvent �tre ajust�s durant le cycle AIR FRY en tournant les cadrans respectifs de TEMP�RATURE et de TEMPS. Le cycle peut �tre interrompu en tout temps en appuyant sur le bouton MARCHE/ARR�T.
9. � la fin du cycle FRIRE � AIR CHAUD, le signal sonore se fera entendre, le bouton MARCHE/ARR�T s'�teindra et l'�cran ACL sera illumin� en blanc.

4. Les r�glages de temp�rature, de temps, de convection et pour aliments congel�s peuvent �tre ajust�s avant ou durant le cycle AIR FRY (FRIRE � AIR CHAUD).
a) Le chiffre du haut sur l'�cran ACL indique la temp�rature pour FRIRE � AIR CHAUD. Tournez le cadran de TEMP�ATURE pour l'ajuster de 120�F/50�C � un maximum de 480�F/250�C.
b) Le chiffre du bas sur l'�cran ACL indique le temps de FRITURE � AIR CHAUD. Tournez le cadran de TEMPS pour ajuster le temps jusqu'� un maximum d'une heure.

IMPORTANT
Lorsque vous faites cuire des aliments gras (comme les ailes de poulet), utilisez la l�chefrite au lieu du panier � friture pour emp�cher le gras de d�gouliner. Jetez l'exc�s de gras entre chaque portion.
NOTE
Vous pouvez utiliser jusqu'� 4 paniers pour frire � air chaud/d�shydrater dans ce four. Si vous d�sirez vous procurer des paniers suppl�mentaires, visitez www.breville.com pour plus d'informations.

23

FONCTION REHEAT (R�CHAUFFER)
La fonction REHEAT (R�CHAUFFER) est id�ale pour r�chauffer lentement les restes d'aliments sans les brunir ni les dess�cher.
1. Ins�rez la grille � la position qui convient le mieux au type d'aliment que vous d�sirez r�chauffer.
2. D�posez les aliments dans la l�chefrite fournie, la plaque � pizza (ou un plat allant au four) et placez-la au centre de la grille pour faciliter une bonne circulation d'air tout autour.
3. Fermez la porte du four.
4. Tournez le cadran S�LECTION/ CONFIRMER jusqu'� ce que la fl�che indique REHEAT (R�CHAUFFER) sur l'�cran ACL. Le chiffre du haut sur l'�cran ACL indique la temp�rature pr�r�gl�e de '325�F', tandis que le chiffre du bas indique le temps pr�r�gl� de '15:00 MIN/ SEC'. Le pr�r�glage CONVECTION appara�tra �galement.

5. Les r�glages de temp�rature, de temps, de convection et pour aliments congel�s peuvent �tre ajust�s avant ou durant le cycle de r�chauffage.
a) Le chiffre du haut sur l'�cran ACL indique la temp�rature de r�chauffage. Tournez le cadran de TEMP�ATURE pour ajuster la temp�rature de 120�F/50�C � un maximum de 480�F/250�C.
b) Le chiffre du bas sur l'�cran ACL indique le temps de r�chauffage. Tournez le cadran de TEMPS pour ajuster le temps jusqu'� un maximum de 2 heures � des temp�ratures de 120�F/50�C - 480�F/250�C.
6. Appuyez sur le bouton MARCHE/ ARR�T pour activer la fonction REHEAT (R�CHAUFFAGE). Le bouton sera r�tro�clair� en rouge, le signal sonore se fera entendre et l'�cran ACL s'illuminera en orange.
7. La minuterie s'affichera et le compte � rebours d�butera. La temp�rature et le temps peuvent �tre ajust�s durant le cycle de r�chauffage en tournant les cadrans respectifs de TEMP�RATURE et de TEMPS. Le cycle peut �tre interrompu en tout temps en appuyant sur le bouton MARCHE/ARR�T.
8. � � fin du cycle de R�CHAUFFAGE, le signal sonore se fera entendre, le bouton MARCHE/ARR�T s'�teindra et l'�cran ACL sera illumin� en blanc.

24

FONCTION COOKIES (BISCUITS) La fonction COOKIES (BISCUITS) est id�ale pour cuire les biscuits maison ou achet�s, ou autres p�tisseries. 1. Ins�rez la grille en position 6. 2. Fermez la porte du four. 3. Tournez le cadran S�LECTION/
CONFIRMER jusqu'� ce que la fl�che indique COOKIES sur l'�cran ACL. Le chiffre du haut sur l'�cran ACL indique la temp�rature pr�r�gl�e de '325�F', tandis que le chiffre du bas indique le temps pr�r�gl� de '11:00 MIN/SEC'. Le pr�r�glage CONVECTION sera aussi affich�.
4. Les r�glages de temp�rature, de temps, de convection et pour aliments congel�s peuvent �tre ajust�s avant ou durant le cycle COOKIES (BISCUITS).
a) Le chiffre du haut sur l'�cran ACL indique la temp�rature de cuisson. Tournez le cadran de TEMP�RATURE pour l'ajuster de 120�F/50�C � un maximum de 480�F/250�C.
b) Le chiffre du bas sur l'�cran ACL indique le temps de cuisson. Tournez le cadran de TEMPS pour ajuster le temps jusqu'� une heure � des temp�ratures de 120�F/50�C 480�F/250�C.

5. Appuyez sur le bouton MARCHE/ ARR�T pour activer la fonction COOKIES (BISCUITS). Le bouton sera r�tro�clair� en rouge, le signal sonore se fera entendre et l'�cran ACL s'illuminera en orange. Le message 'PREHEATING' (PR�CHAUFFAGE) clignotera sur l'�cran ACL.
6. Une fois le pr�chauffage termin�, un signal sonore se fera entendre, signifiant que les aliments peuvent �tre ins�r�s dans le four.
7. D�posez les aliments dans la l�chefrite fournie, la plaque � pizza (ou tout autre plat allant au four) et placez-la au centre de la grille pour faciliter une bonne circulation d'air autour des aliments. Fermez la porte du four.
8. Apr�s que le signal sonore de PR�CHAUFFAGE se sera fait entendre, le compte � rebours d�butera automatiquement. La temp�rature et le temps peuvent �tre ajust�s durant le cycle COOKIES (BISCUITS) en tournant les cadrans respectifs de TEMP�RATURE et de TEMPS. Le cycle peut �tre interrompu en tout temps en appuyant sur le bouton MARCHE/ARR�T.
9. � la fin du cycle BISCUITS, le signal sonore se fera entendre, le bouton MARCHE/ ARR�T s'�teindra et l'�cran ACL sera illumin� en blanc.

25

FONCTION SLOW COOK (MIJOTER) La fonction SLOW COOK (MIJOTER) dispose de profils con�us pour cuire � long terme � basse temp�rature. 1. Ins�rez la grille en position 8. 2. Fermez la porte du four. 3. Tournez le cadran S�LECTION/
CONFIRMER jusqu'� ce que la fl�che indique SLOW COOK (MIJOTER) sur l'�cran ACL. Le chiffre du haut sur l'�cran ACL indique la temp�rature pr�r�gl�e de 'HIGH' (HAUT), tandis que le chiffre du bas indique le temps pr�r�gl� de '4:00 MIN/ SEC'. Le pr�r�glage CONVECTION sera aussi affich�.
4. Les r�glages de temp�rature, de temps et de convection peuvent �tre ajust�s avant ou durant le cycle de mijotage.
a) Le chiffre du haut sur l'�cran ACL indique la temp�rature de mijotage. Tournez le cadran de TEMP�RATURE pour ajuster la temp�rature � l'un des deux pr�r�glages : 'LOW' (BAS) ou 'HIGH' (HAUT).
b) Le chiffre du bas sur l'�cran ACL indique le temps de mijotage. Tournez le cadran de TEMPS pour l'ajuster entre 4 et 72 heures pour le r�glage BAS et entre 2 et 12 heures pour le r�glage HAUT.

5. D�posez les aliments dans un plat de cuisson couvert allant au four, et placezle au centre de la grille pour faciliter une bonne circulation d'air autour des aliments. Fermez la porte du four.
6. Appuyez sur le bouton MARCHE/ ARR�T pour activer la fonction SLOW COOK (MIJOTER). Le bouton sera r�tro�clair� en rouge, le signal sonore se fera entendre et l'�cran ACL s'illuminera en orange. Le message 'PREHEATING' (PR�CHAUFFAGE) clignotera sur l'�cran ACL.
7. Apr�s que le signal sonore de PR�CHAUFFAGE se sera fait entendre, le compte � rebours d�butera automatiquement. La temp�rature et le temps peuvent �tre ajust�s durant le cycle de mijotage en tournant les cadrans respectifs de TEMP�RATURE et de TEMPS. Le cycle peut �tre interrompu en tout temps en appuyant sur le bouton MARCHE/ARR�T.
8. � la fin du cycle de mijotage, le four passera automatiquement � la fonction 'WARM' (GARDER CHAUD) et le restera jusqu'� la fin du compte � rebours de '2:00 HR/MIN'. Le cycle de maintien au chaud peut �tre interrompu en tout temps en appuyant sur le bouton MARCHE/ARR�T.
NOTE
Ne retirez pas plus de la moiti� de la grille lorsque vous ins�rez ou retirez le plat de cuisson du four.
Ne d�posez aucun plat de cuisson lourd sur la vitre de la porte lorsqu'elle est ouverte.

26

TRUCS
TRUCS DE MIJOTAGE
1. Assurez-vous que votre plat r�siste au four et ne p�se pas plus de 6 kg/13 lb lorsque vide.
2. Remplissez le plat � un minimum de � et un maximum de � pour �viter une surcuisson ou une cuisson insuffisante. Pour pr�venir le d�goulinage, ne remplissez pas le plat au-del� des �.
3. Laissez toujours mijoter les aliments avec couvercle pour �viter qu'ils ne dess�chent. Couvrez-les d'une feuille de papier m�tallique avant de mettre le couvercle, cela contribuera � maintenir l'humidit�.
4. Respectez les temp�ratures et temps sugg�r�s dans les recettes traditionnelles de mijoteuse. Une heure � 'HAUT' �quivaut � environ une heure et demie � deux heures � 'BAS'.
5. Les aliments froids prendront plus de temps � cuire que ceux saisis ou r�chauff�s au pr�alable; il faudra donc ajuster le temps de cuisson en cons�quence. Ne faites pas mijoter de produits congel�s.
6. Coupez les gros morceaux de viande en deux pour laisser la chaleur p�n�trer uniform�ment.
FONCTION DEHYDRATE (D�SHYDRATER)
La fonction DEHYDRATE (D�SHYDRATER) combine une chaleur basse et stable � une circulation d'air maximale pour d�shydrater les aliments sans les cuire ni les surchauffer.
1. D�posez les aliments uniform�ment dans le panier pour frire � air chaud/d�shydrater. Pour de meilleurs r�sultats, placez les aliments en une seule couche et laissez un peu d'espace entre chaque morceau. Ins�rez le panier pour frire � air chaud/d�shydrater � la position de grille 3.
2. Fermez la porte du four.

3. Tournez le cadran S�LECTION/ CONFIRMER jusqu'� ce que la fl�che indique DEHYDRATE (D�SHYDRATER) sur l'�cran ACL. Le chiffre du haut sur l'�cran ACL indique la temp�rature pr�r�gl�e de '125�F', tandis que le chiffre du bas indique le temps pr�r�gl� de '12:00 MIN/SEC'. Le pr�r�glage SUPER CONVECTION sera aussi affich�.
4. Les r�glages de temp�rature, de temps et de convection peuvent �tre ajust�s avant ou durant le cycle de d�shydratation.
a) Le chiffre du haut sur l'�cran ACL indique la temp�rature de d�shydratation. Tournez le cadran de TEMP�RATURE pour ajuster la temp�rature de '86�F/30�C � un maximum de 176�F/80�C.
b) Le chiffre du bas sur l'�cran ACL indique le temps de d�shydratation. Tournez le cadran de TEMPS pour ajuster le temps jusqu'� 72 heures.
5. Appuyez sur le bouton MARCHE/ARR�T pour activer la fonction DEHYDRATE (D�SHYDRATER). Le bouton sera r�tro�clair� en rouge, le signal sonore se fera entendre et l'�cran ACL s'illuminera en orange.
6. La minuterie s'affichera et le compte � rebours d�butera. La temp�rature et le temps peuvent �tre ajust�s durant le cycle de d�shydratation en tournant les cadrans respectifs de TEMP�RATURE et de TEMPS. Le cycle peut �tre interrompu en tout temps en appuyant sur le bouton MARCHE/ARR�T.

27

7. � la fin du cycle de d�shydratation, le signal sonore se fera entendre, le bouton MARCHE/ARR�T s'�teindra et l'�cran ACL sera illumin� en blanc.
TRUCS
� Afin de pr�venir la d�coloration du panier � friture, recouvrez-le de papier parchemin lorsque vous d�shydratez des aliments tr�s color�s.
� Lorsque vous faites d�shydrater des aliments qui peuvent d�gouliner, comme le jerky marin�, utilisez la l�chefrite fournie pour r�cup�rer les gras de cuisson. Ins�rer la grille en position 8 et d�posez la l�chefrite au centre de la grille.
PHASES DE CUISSON
Utilisez le bouton PHASE COOK (PHASES DE CUISSON) pour programmer deux fonctions de cuisson, l'une apr�s l'autre. Les fonctions qui conviennent � ce r�glage sont: BROIL, BAKE, ROAST, WARM et PIZZA (GRILLER, CUIRE, R�TIR, GARDER CHAUD et PIZZA).
1. Appuyez sur le bouton PHASE COOK (PHASES DE CUISSON). 'PHASE COOK' appara�tra sur l'�cran ACL, de m�me que les fonctions disponibles.
2. Une fl�che clignotera au-dessus du '1', indiquant que vous programmez la premi�re phase de cuisson.
a) Tournez le cadran S�LECTION/ CONFIRMER jusqu'� ce que la fl�che indique votre fonction d�sir�e sur l'�cran ACL.
b) Pour ajuster la temp�rature et le temps de cuisson, tournez les cadrans respectifs de TEMP�RATURE et de TEMPS.
c) Appuyez sur le cadran S�LECTION/ CONFIRMER ou MARCHE/ARR�T pour confirmer votre premi�re phase.

3. La fl�che clignotera alors au-dessus du '2', indiquant que vous programmez la seconde phase de cuisson.
a) Tournez le cadran S�LECTION/ CONFIRMER jusqu'� ce que la fl�che indique votre fonction d�sir�e sur l'�cran ACL.
b) Pour ajuster la temp�rature et le temps de cuisson, tournez les cadrans respectifs de TEMP�RATURE et de TEMPS.
c) Appuyez sur le cadran S�LECTION/ CONFIRMER pour confirmer votre premi�re phase.
4. Appuyez sur le bouton MARCHE/ARR�T pour activer la premi�re fonction. Le bouton sera r�tro�clair� en rouge, le signal sonore se fera entendre et l'�cran ACL s'illuminera en orange. Les deux phases s'afficheront sur l'�cran ACL avec une fl�che pointant sur la premi�re phase.
5. Lorsque la premi�re phase sera compl�t�e, la seconde d�butera automatiquement. � la fin de la seconde phase, le signal sonore se fera entendre, le bouton MARCHE/ ARR�T s'�teindra et l'�cran ACL sera illumin� en blanc.

28

REMPLACER LA LAMPE DE FOUR
AVERTISSEMENT D�branchez toujours le four et laissez-le refroidir avant de remplacer l'ampoule. Utilisez uniquement une ampoule de four de 25W, 120V, de type G9.

4. Utilisez un chiffon doux pour ins�rer la nouvelle ampoule. Ne touchez pas � l'ampoule, car l'huile de vos doigts pourrait l'endommager.

1. Retirez la grille du four avant de remplacer l'ampoule.
2. La lampe de four est plac�e sur le c�t� gauche de la cavit� du four. Agrippez l'ext�rieur du bo�tier de la lampe avec vos doigts et tirez doucement le couvercle en verre hors du four. Si vous �tes incapable d'enlever le couvercle, faites glisser une cuill�re dans le c�t� gauche du bo�tier et soulevez d�licatement le couvercle de verre. Maintenez toujours de couvercle en verre avec l'autre main pour l'emp�cher de tomber et de se briser.

5. Pour replacer le couvercle en verre, alignez le crochet m�tallique avec le c�t� gauche du bo�tier. Faites glisser le c�t� oppos� du couvercle en verre dans le support en m�tal sur le c�t� droit du bo�tier, puis poussez le crochet m�tallique sur le c�t� gauche du bo�tier jusqu'� ce qu'il s'enclenche en place.

3. Retirez l'ampoule usag�e en la tirant directement hors de son support.

UTILISER LE R�CHAUD
Le dessus du four devient tr�s chaud durant et apr�s l'utilisation. En cons�quence, il n'est pas recommand� d'y ranger des objets.
La seule exception est la planche � d�couper/ plateau de service en bambou de Breville con�ue pour reposer parfaitement dans la partie nervur�e sur le dessus du four. Visitez www.breville.com pour plus d'informations.

29

Entretien & nettoyage
Avant de nettoyer le four, assurez-vous qu'il est �teint en le d�branchant de la prise �lectrique. Laissez le four et les accessoires refroidir compl�tement avant le retrait des pi�ces et le nettoyage.
Nettoyer le bo�tier et la porte 1. Essuyez l'ext�rieur du four avec une �ponge
douce et humide. Vous pouvez utiliser un nettoyant liquide non abrasif ou une solution douce en pulv�risateur pour �liminer les taches tenaces. Appliquez le nettoyant sur l'�ponge, et non sur la surface du four, avant le nettoyage. 2. Pour nettoyer la porte en verre, utilisez un nettoyant � vitre ou un d�tergent tr�s doux et une �ponge douce et humide, ou encore un tampon � r�curer en plastique souple. N'utilisez pas de nettoyant abrasif ou de tampon � r�curer m�tallique, car ils �gratigneront la surface en verre. 3. Essuyez l'�cran ACL avec un chiffon doux et humide. Appliquez le nettoyant directement sur le chiffon et non sur la surface de l'�cran. N'utilisez pas de chiffon sec ou de nettoyant abrasif qui pourraient �gratigner la surface de l'�cran. 4. Laissez toutes les surfaces s�cher soigneusement avant de brancher le cordon d'alimentation et mettre le four sous tension.
AVERTISSEMENT
N'immergez pas le bo�tier, le cordon ou la fiche d'alimentation dans l'eau ou tout autre liquide, car cela pourrait entra�ner un risque d'�lectrocution.
30

Nettoyer l'int�rieur
Les parois internes du four sont recouvertes d'un mat�riau antiadh�sif qui facilite le nettoyage. Pour nettoyer les �claboussures qui peuvent survenir durant la cuisson, essuyez les parois avec une �ponge douce et humide. Un liquide non abrasif ou une solution de pulv�risation l�g�re peuvent �tre utilis�s pour �viter l'accumulation de taches. Appliquez le nettoyant sur l'�ponge et non sur les parois avant de les nettoyer. �vitez de toucher les �l�ments chauffants � quartz.
AVERTISSEMENT
Soyez extr�mement prudent lorsque vous nettoyez les �l�ments chauffants � quartz. Laissez le four refroidir compl�tement, puis frottez doucement les �l�ments sur la longueur � l'aide d'une �ponge ou d'un chiffon doux et humide.
N'utilisez aucun type de nettoyant ou d'agent de nettoyage. N'utilisez pas de nettoyant standard pour le four afin de nettoyer l'int�rieur du four, car cela endommage le surface m�tallique.
Laissez toutes les surfaces s�cher compl�tement avant de brancher le cordon d'alimentation dans la prise �lectrique et de mettre l'appareil sous tension.
Nettoyer le ramasse-miettes
1. Avant chaque usage, retirez le ramassemiettes en le glissant hors du four. Essuyezle avec une �ponge douce et humide. Un nettoyant liquide non abrasif peut �tre utilis� pour �viter l'accumulation de taches. Appliquez le nettoyant sur l'�ponge, et non sur le plateau, avant de le nettoyer. S�cher correctement.
2. Pour enlever les r�sidus graisseux de cuisson, faites tremper le ramasse-miettes dans l'eau chaude savonneuse, puis lavez-le avec une �ponge douce ou un tampon � r�curer en plastique souple. Rincez et s�chez compl�tement.
3. R�ins�rez toujours le ramasse-miettes dans le four apr�s le nettoyage, mais avant de brancher l'appareil dans la prise �lectrique et le faire fonctionner.

Nettoyer la grille, le grilloir, la l�chefrite et la plaque � pizza 1. Lavez tous les accessoires � l'eau chaude
savonneuse � l'aide d'une �ponge douce ou d'un tampon � r�curer en plastique souple. Rincez et s�chez compl�tement. Ne nettoyez aucun des accessoires avec un nettoyant abrasif, un tampon � r�curer m�tallique et des ustensiles en m�tal qui pourraient endommager la surface. 2. Pour prolonger la dur�e de vie des accessoires, nous ne recommandons pas qu'ils soient nettoy�s dans le lave-vaisselle
Rangement 1. Assurez-vous que le four est �teint en le
d�branchant de la prise �lectrique. 2. Laissez le four et tous les accessoires
refroidir compl�tement avant de d�monter et de nettoyer l'appareil. 3. Assurez-vous que le four et tous les accessoires sont propres et secs. 4. Assurez-vous que le ramasse-miettes est ins�r� dans le four et que le grilloir est ins�r� dans la l�chefrite et plac� sur la grille plac�e en position centrale. 5. Assurez-vous que la porte est bien ferm�e. 6. Assurez-vous que l'appareil est en position verticale, de niveau et reposant sur ses pieds. Ne rangez aucun objet sur le dessus du four, la seule exception �tant la planche � d�couper/plateau de service en bambou de Breville.
31

Guide de d�pannage

PROBL�ME POSSIBLE Le four ne se met pas sous tension
J'aimerais restaurer les r�glages par d�faut de l'�cran ACL
L'�clairage de l'�cran ACL a disparu
La pizza ne cuit pas uniform�ment
La grille magn�tique auto-�jectable sort trop loin quand j'ouvre la porte Je ne peux s�lectionner le bouton ALIMENTS CONGEL�S De la vapeur s'�chappe de la porte du four
Les �l�ments chauffants semblent clignoter
De l'eau coule sous la porte coule et sur le comptoir

SOLUTION FACILE
� V�rifiez si la fiche d'alimentation est bien ins�r�e dans la prie �lectrique. � Branchez le cordon d'alimentation dans une prise ind�pendante. � Branchez le cordon d'alimentation dans une autre prise. � R�initialisez le disjoncteur, si n�cessaire. � Le four m�morisera le dernier r�glage utilis� pour chacune des fonctions,
m�me si vous le d�branchez de la prise �lectrique.
� Pour restaurer les r�glages par d�faut pour chaque fonction, appuyez et maintenez simultan�ment les boutons de CONVERSION DE TEMP�RATURE et ALIMENTS CONGEL�S durant 5 secondes.
� Le four passe en mode veille s'il n'est pas utilis� pendant 10 minutes. Durant le mode veille, l'�cran ACL cessera d'�tre illumin�, bien que toutes les options de fonctions restent visibles.
� Pour r�activer le four hors du mode veille, appuyez sur le bouton MARCHE/ARR�T ou tournez n'importe quel cadran. L'�cran ACL s'illuminera � nouveau.
� Certaines pizzas de grand format ne colorent pas uniform�ment dans un four de comptoir. Ouvrez la porte du four � mi-temps de la cuisson et retournez la pizza sur 180 degr�s pour qu'elle colore plus �galement. Faites l'essai de la fonction ROTATE REMIND (ROTATION).
� Ouvrez toujours la porte lentement et avec pr�caution lorsque la grille est ins�r�e en position 3 ou 4, pour emp�cher qu'elle ne s'�jecte trop rapidement.
� Le bouton pour ALIMENTS CONGEL�S ne peut �tre s�lectionn� que pour les fonctions suivantes: GRILLER, BAGEL, PIZZA, FRIRE � AIR CHAUD, R�CHAUFFER et BISCUITS.
� Cela est normal. La porte est munie d'�vents pour laisser �chapper la vapeur g�n�r�e par certains aliments � forte teneur en humidit�, comme le pain congel�.
� Element iQ� contr�le avec pr�cision la chaleur � l'int�rieur du four en pulsant la puissance par courts jets et ajustant le niveau de puissance des �l�ments chauffants pour fournir un contr�le pr�cis de la temp�rature. Cela est normal.
� Cela est normal. La condensation cr��e par la forte teneur en humidit� de certains aliments comme le pain congel� s'�coulera le long des parois internes du four et pourrait d�goutter sur le comptoir.

32

PROBL�ME POSSIBLE La temp�rature apparaissant sur l'�cran ACL ne correspond pas � la temp�rature mesur�e � l'int�rieur du four
Le signal sonore de 'pr�chauffage' se fait entendre � une temp�rature plus basse que celle affich�e sur l'�cran ACL
L'�cran ACL affiche 'EO1'
L'�cran ACL affiche 'EO2'
L'�cran ACL affiche 'EO3'
L'�cran ACL affiche 'EO6'
La temp�rature change quand le bouton de conversion est enfonc� Du bruit �mane du panneau de commande

SOLUTION FACILE
� Pour s'assurer que les mesures sont standardis�es, les temp�ratures du four ont �t� calibr�es � la position TOAST (au centre de la grille centrale et sans plateau en place). V�rifiez � nouveau la temp�rature � cette position, en vous assurant de ne pas ouvrir la porte du four durant 30 minutes, car la chaleur s'�chappera chaque fois que vous ouvrirez la porte. Notez que le signal sonore de 'pr�chauffage' se fait entendre � 75% de la temp�rature cible.
� Le signal sonore de 'pr�chauffage' se fait entendre � 75% de la temp�rature cible. Cela assure un combinaison rapide de pr�chauffage et de temps de
� cuisson. Cela s'explique par le fait que, lorsque le signal de 'pr�chauffage' se fait entendre pour signaler � l'utilisateur d'ouvrir la porte et ins�rer les aliments, une perte dramatique de chaleur survient � l'int�rieur du four. Si le signal se faisait entendre � 100% de la temp�rature cible, le fait d'ouvrir la porte signifierait que tout ce temps d'attente serait 'gaspill�'. Nous avons calcul� que, lorsque le signal se fait entendre � 75% de la temp�rature cible et qu'on ins�re imm�diatement les aliments dans le four en ouvrant la porte, la temp�rature cible est atteinte jusqu'� 2 minutes plus rapidement. Cela explique pourquoi la temp�rature sur l'�cran ACL ne correspond pas � la temp�rature cible lorsque l'alerte de 'pr�chauffage' se fait entendre. Selon la temp�rature r�gl�e, le four peut prendre environ 8-10 minutes � partir du r�glage initial, incluant l'ouverture de la porte lorsque le signal de 'pr�chauffage' se fait entendre, pour atteindre la temp�rature cible.
� L'�cran ACL affiche 'EO1' si l'appareil ne peut �tre r�initialis�. Si cela se produit, d�branchez imm�diatement le cordon d'alimentation de la prise �lectrique et appelez le Soutien aux consommateurs de Breville.
� L'�cran ACL affiche 'EO2' si l'appareil ne peut �tre r�initialis�. Si cela se produit, d�branchez imm�diatement le cordon d'alimentation de la prise �lectrique et appelez le Soutien aux consommateurs de Breville.
� L'�cran ACL affiche 'EO3' si la temp�rature exc�de la limite maximale r�gl�e. D�branchez le cordon d'alimentation de la prise �lectrique, laissez le four refroidir 15 minutes, puis rebranchez-le.
� Appelez le Soutien aux consommateurs de Breville si le message 'EO3' persiste.
� L'�cran ACL affiche 'EO6' si l'appareil ne peut �tre r�initialis�. Si cela se produit, d�branchez imm�diatement le cordon d'alimentation de la prise �lectrique et appelez le Soutien aux consommateurs de Breville.
� Cela est normal. La temp�rature est calibr�e pour compenser pour la vitesse de cuisson major�e par le ventilateur � convection.
� Durant la cuisson, un ventilateur de refroidissement se met en marche pour prot�ger les composants �lectroniques sensibles contre la surchauffe. Ce ventilateur peut parfois rester en marche quelques minutes apr�s la cuisson.

33

Notes
34

the Smart Oven� Air Fryer Pro
ES-MX MANUAL DE INSTRUCCIONES

Contenido

2 Breville recomienda anteponer

la seguridad

7 Componentes

9 Tenga en cuenta lo siguiente antes del primer uso

12 Funciones

- C�MO USAR SU

HORNO BREVILLE

12

- SENSOR DE LA PUERTA

13

- REJILLA MAGN�TICA DE EXPULSI�N AUTOM�TICA 13

- VOLUMEN DEL TIMBRE

14

- RECORDATORIO DE GIRAR 14

- FUNCI�N TOAST (TOSTAR) 14

- FUNCI�N BAGEL

15

- FUNCI�N BROIL (ASAR)

17

- FUNCI�N BAKE (HORNEAR) 17

- FUNCI�N ROAST (ROSTIZAR) 19

- FUNCI�N WARM (CALENTAR) 20

- FUNCI�N PIZZA

20

- FUNCI�N PROOF (LEVANTAR) 22

- FUNCI�N AIRFRY

(FRE�R CON AIRE)

23

- FUNCI�N REHEAT

(RECALENTAR)

24

- FUNCI�N COOKIES

(GALLETAS)

25

- FUNCI�N SLOW COOK

(COCCI�N LENTA)

25

- FUNCI�N DEHYDRATE

(DESHIDRATAR)

27

- PHASE COOK

(COCCI�N POR ETAPAS)

28

- REEMPLAZAR EL FOCO

DEL HORNO

29

30 Cuidado y limpieza

32 Soluci�n de problemas

2

BREVILLE RECOMIENDA ANTEPONER LA SEGURIDAD
En Breville somos muy conscientes de lo importante que es la seguridad. La seguridad es nuestra prioridad a la hora de dise�ar y fabricar productos para clientes como usted. En pos de su seguridad, le pedimos que ejerza suma precauci�n al usar cualquier aparato el�ctrico y que cumpla con las siguientes precauciones.
CONSIDERACIONES IMPORTANTES
ANTES DE USAR ESTE EQUIPO, LEA TODAS LAS INSTRUCCIONES Y GU�RDELAS PARA FUTURAS CONSULTAS Al usar equipos electr�nicos, siempre se deben seguir las precauciones b�sicas de seguridad, incluyendo lo siguiente:

� Retire y deseche de forma segura cualquier material de empaque o etiquetas promocionales antes de usar el horno por primera vez. � Para evitar el peligro de asfixia en ni�os peque�os, retire y deseche de forma segura la cubierta protectora instalada en el enchufe. � No use el equipo cerca del borde de una mesa o mostrador. Aseg�rese de que la superficie sea estable, nivelada, resistente al calor y limpia. � No use el equipo sobre una superficie cubierta de tela ni cerca de cortinas u otros materiales inflamables. � Se puede producir un incendio si el horno est� cubierto o toca materiales inflamables (como cortinas, pa�os, paredes y otros) cuando est� en funcionamiento. � No deje el equipo cerca o sobre un quemador el�ctrico o a gas ni donde pueda tocar un horno u otra superficie caliente. � No permita que el cable de alimentaci�n cuelgue del borde de una mesa o mostrador ni que toque superficies calientes. � Para evitar descargas el�ctricas, no sumerja el cable de alimentaci�n el enchufe o el motor en agua u otros l�quidos. � Aseg�rese de que exista

un espacio m�nimo de 10 cent�metros a ambos lados del equipo y 15 cm por encima de �l. � No toque las superficies calientes. Para evitar quemaduras, tenga mucho cuidado al retirar bandejas, platos y accesorios (como la rejilla para asar incluida con el horno o la asadera) que pudiesen contener aceite u otros l�quidos calientes. � No ponga utensilios de cocina, bandejas para asar o platos sobre la puerta de vidrio. � No deje la puerta abierta por largos per�odos de tiempo. � No almacene ning�n art�culo encima del horno cuando est� en funcionamiento, excepto los descritos en la p�gina 29 de este manual. � No ponga cart�n, pl�stico, papel u otros materiales inflamables en el horno. � No cubra la bandeja para migajas ni ninguna parte del horno con papel aluminio. Esto provocar� que el horno se sobrecaliente. � Se debe tener precauci�n al usar bandejas y platos de materiales distintos al metal. Aseg�rese de que las bandejas y los platos sean aptos para el horno antes de usarlos.

3

� Se debe tener precauci�n cuando se usan tapas en el horno, ya que la presi�n acumulada en una bandeja o en un plato cubierto puede hacer que los alimentos salgan expulsados o que el plato se quiebre. No ponga recipientes herm�ticos en el horno. � No se debe poner alimentos de gran tama�o o utensilios de metal en el horno, ya que pueden crear incendios o riesgos de descarga el�ctrica. � El uso de cualquier accesorio o aditamento no recomendado o incluido en este horno puede causar lesiones. � No almacene ning�n material en este horno cuando no est� en uso, excepto los accesorios recomendados por los fabricantes. � El equipo es para uso exclusivo en el hogar. No use el equipo en ning�n tipo de veh�culos en movimiento. No use este equipo al aire libre o para otro fin distinto al previsto. El mal uso puede causar lesiones. � Si se va a limpiar, mover, ensamblar o almacenar el equipo, siempre ap�guelo y descon�ctelo del tomacorriente y deje que se enfr�e completamente.

� No limpie el equipo con esponjas met�licas. Se pueden desprender fibras de la esponja y tocar las partes el�ctricas, creando un riesgo de descarga el�ctrica. � Este aparato no se destina para utilizarse por personas (incluyendo ni�os) cuyas capacidades f�sicas, sensoriales o mentales sean diferentes o est�n reducidas, o carezcan de experiencia o conocimiento, a menos que dichas personas reciban una supervisi�n o capacitaci�n para el funcionamiento del aparato por una persona responsable de su seguridad. � Supervise atentamente el uso del equipo por ni�os o en su presencia. � Hay cables de alimentaci�n y de extensi�n desmontables m�s largos disponibles, los que se pueden usar con la debida precauci�n. � Se recomienda inspeccionar el equipo y el cable de alimentaci�n regularmente. No use el equipo si hay da�os en el cable de alimentaci�n o el enchufe, si dej� de funcionar correctamente o si se da�� de alguna manera. En ese caso, detenga inmediatamente el uso del equipo y contacte al Centro de servicios de Breville.

4

� El servicio debe ser realizado por un representante del servicio autorizado. � El aparato no se destina para ponerse en funcionamiento por medio de un temporizador externo o sistema de control separado.
ADVERTENCIA Para evitar descargas el�ctricas, desenchufe el equipo antes de limpiarlo.
INSTRUCCIONES ESPEC�FICAS PARA EL MODELO BOV900
� Recomendamos operar el horno en un circuito propio y separado de otros aparatos. Consulte a un electricista calificado y con licencia si no est� seguro. � El horno est� en modo de espera cuando la luz de la pantalla LCD se apaga. La interacci�n con cualquiera de los controles sacar� el horno del modo de espera. � Limpie regularmente la bandeja de migajas. Para limpiar la bandeja de migajas, consulte la p�gina 30.

ADVERTENCIA
Para reducir el riesgo de INCENDIO, DESCARGA EL�CTRICA, EXPOSICI�N A RADIACI�N UV EXCESIVA O LESIONES A LAS PERSONAS: � Siempre desenchufe el horno y deje que todas las partes (incluida la carcasa del foco, la cubierta de vidrio y la carcasa del equipo) se enfr�en por completo antes de reemplazar el foco. � Utilice solo un foco de horno tipo G9 de 120 Vca, con un m�ximo de 25 W y filtro UV. � Siempre use un pa�o suave al manipular el foco y no toque directamente la superficie ya que el aceite de su piel puede da�ar el foco. � No mire directamente a un foco incandescente. � Mantenga el foco alejado de materiales que puedan arder. � El foco se calienta r�pidamente. Solo use el bot�n de luz para encender la luz. � No opere la luz si la carcasa del foco, la cubierta de vidrio, el filtro UV o la carcasa del horno no est�n o est�n da�ados.

5

INSTRUCCIONES DE CABLE DE ALIMENTACI�N CORTO Su equipo Breville est� equipado con un cable de alimentaci�n corto para disminuir el riesgo de lesiones a personas o da�os a la propiedad que pudieran suceder si alguien lo tira o se tropieza con �l, o si se enreda con otro cable m�s largo. Si se usa un cable de extensi�n, (1) la clasificaci�n el�ctrica marcada del juego de cables o de la extensi�n debe al menos igualar la clasificaci�n el�ctrica del equipo, (2) el cable debe disponerse de tal forma que no caiga sobre una superficie donde un ni�o pudiera tirar de �l o tropezar accidentalmente y (3) el cable de extensi�n debe incluir un enchufe de conexi�n a tierra de 3 clavijas.

AVISO A LOS CLIENTES SOBRE EL ALMACENAMIENTO DE MEMORIA Tenga en cuenta que el equipo incluye almacenamiento de memoria interna a fin de dar un mejor servicio a nuestros clientes. Este almacenamiento de memoria consta de un peque�o chip que recopila cierta informaci�n sobre su dispositivo, incluida la frecuencia de uso del dispositivo y la forma en que se utiliza. La informaci�n que recopila el chip nos permite brindarle un servicio r�pido y eficiente en caso de que su equipo necesite ser reparado. La informaci�n recopilada tambi�n sirve como un recurso valioso en el desarrollo de dispositivos futuros para satisfacer mejor las necesidades de nuestros consumidores. El chip no recopila ninguna informaci�n sobre las personas que usan el producto ni sobre el hogar donde se usa. Si tiene alguna pregunta sobre el chip de almacenamiento de memoria, cont�ctenos en privacy@breville.com.

PARA USO EXCLUSIVO EN EL HOGAR GUARDE ESTE MANUAL
6

Componentes

A

B

F

G

H

C D

E

I

A. Bandeja antiadherente para pizza de 33 cm (13")
B. Rejilla (x 2) Reversible para 8 posiciones diferentes.
C. Rejilla para asar de 22.8 cm x 33 cm (9" x 13")
D. Asadera enlozada para asar de 22.8 cm x 33 cm (9" x 13")
E. Rejilla para fre�r por aire/deshidratar

F. Luz del horno G. Mango de la puerta H. Ranuras de ventilaci�n I. Bandeja de migajas

Datos t�cnicos 120 V ~ 60 Hz 1 800 W
7

J. Pantalla LCD

J

K. Selector SELECT/CONFIRM (Seleccionar/

Confirmar) y bot�n ROTATE REMIND

(Recordatorio de girar)

L. Selector TEMPERATURE/DARKNESS (Temperatura/Tostado) controla el nivel de tostado de bagels y tostadas

M. Selector Time/toast (Tiempo/tostadas)

K

N

y selecci�n de rebanadas de bagel

N. Bot�n START/STOP (Iniciar/Detener)

O

O. Bot�n OVEN LIGHT (Luz del horno)

P. Bot�n CONVECTION (Convecci�n)

L

Q. Bot�n PHASE COOK (Cocci�n por etapas)

R. Bot�n FROZEN FOODS

P

(Comidas congeladas)

Q

S. Bot�n TEMPERATURE CONVERSION

(Conversi�n de temperatura) y bot�n

R

de ajuste de volumen

M

S

Accesorios que se venden por separado:

Tabla de cortar de bamb�

Rejilla para fre�r por aire/deshidratar

Bandeja de piedra para pizza 8

Molde con agujeros para pizza

Tenga en cuenta lo siguiente antes del primer uso

Este manual est� dise�ado para el primer uso.
Para mayor seguridad y m�s informaci�n, consulte el resto del manual de instrucciones.
C�MO PREPARAR EL HORNO
Es necesario hacer funcionar el horno vac�o durante 20 minutos para eliminar cualquier sustancia protectora de los elementos de calefacci�n. Aseg�rese de que el �rea est� bien ventilada, ya que el horno puede emitir vapores. La emanaci�n de vapores es segura y no perjudica el funcionamiento del horno.
1. Retire y deseche de forma segura cualquier material de empaque y etiquetas promocionales del horno.
2. Retire la bandeja de migajas, las rejillas, la rejilla para asar, la asadera, la rejilla para fre�r/deshidratar y la bandeja para pizza del empaque de espuma de polietileno. Lave los accesorios con una esponja suave y agua jabonosa tibia y luego enjuague y seque completamente.
3. Limpie el interior del horno con una esponja suave y humedecida. Seque bien.
4. Ponga el horno sobre una superficie plana y seca. Aseg�rese de que exista un espacio m�nimo de 10 cent�metros a ambos lados del equipo y 15 cm por encima de �l.
5. Inserte la bandeja de migajas en el horno.
6. Desenrolle el cable de alimentaci�n por completo e inserte el enchufe en un tomacorriente con conexi�n a tierra.
7. La alerta del horno sonar� y la pantalla LCD se iluminar�. Las opciones de funci�n aparecer�n con un indicador en la funci�n TOAST (Tostar).
8. Gire el selector SELECT/CONFIRM (Seleccionar/Confirmar) hacia la derecha hasta que el indicador est� en la funci�n PIZZA.

SELECCIONAR
CONFIRMAR
ROTAR
9. Presione el bot�n START/STOP (Iniciar/ Detener). La luz del bot�n se iluminar� de color rojo, la pantalla LCD se iluminar� de color naranja y la alerta del horno sonar�.
10. La pantalla LCD mostrar� el mensaje `PREHEATING' (Precalentando) mientras parpadea. Una vez que el horno haya completado el ciclo de precalentamiento, sonar� una alerta.
11. Se mostrar� el temporizador y comenzar� la cuenta regresiva autom�ticamente.
12. Una vez terminado el ciclo de cocci�n, sonar� una alerta, la luz del bot�n START/ STOP (Iniciar/Detener) desaparecer� y la pantalla LCD se iluminar� de color blanco.
13. El horno ahora est� listo para usar.
ELEMENT iQ El Breville Smart Oven Air Fryer Pro incluye Element iQ, una tecnolog�a de cocci�n que ajusta la potencia de los elementos calefactores para cocinar los alimentos de manera m�s r�pida y uniforme. Cada una de las funciones del horno est� preestablecida con nuestra configuraci�n recomendada; sin embargo, sugerimos experimentar con ellas dependiendo de la receta, cantidad de comida y su gusto personal. Su configuraci�n personalizada permanecer� en la memoria del horno hasta que se cambie o restablezca el horno a los valores predeterminados de f�brica, incluso si se desconecta el cable de alimentaci�n. Para hacer esto, presione y mantenga presionados los botones FROZEN (Congelados) y TEMPERATURE CONVERSION (Conversi�n de temperatura) al mismo tiempo durante 5 segundos.
9

DESCRIPCI�N GENERAL DE LAS FUNCIONES DEL HORNO

FUNCI�N
TOAST (Tostar) BAGEL BROIL (Asar) BAKE (Hornear)
ROAST (Rostizar)
WARM (Calentar)
PIZZA
PROOF (Levantar)

POSICI�N CONFIGURACI�N SUGERIDA OPCIONAL DE LA REJILLA

AJUSTES PREVIOS

PRECA- RANGO LENTAR

4

FROZEN FOODS

Tostado 4

No

Tostado 1 � 7

(Comidas congeladas)

Rebanadas 4

Rebanadas 1 � 9

4

FROZEN FOODS

Tostado 4

No

Tostado 1 � 7

(Comidas congeladas)

Rebanadas 4

Rebanadas 1 � 10

1 � 2

ALTA

No

BAJA, MEDIA, ALTA

Hasta 20 min

6

CONVECTION (Convecci�n) 163 �C

S�

>199 �C hasta por 4 horas

TEMPERATURE CONVERSION 30 min

(Conversi�n de temperatura)

CONVECTION

ROTATE REMINDER

(Convecci�n)

(Recordatorio de girar)

149 �C � 199 �C hasta por 8 horas
99 �C � 149 �C hasta por 12 horas

<99 �C hasta por 72 horas

6

CONVECTION (Convecci�n) 204 �C

S�

>199 �C hasta por 4 horas

TEMPERATURE CONVERSION 1 hora

(Conversi�n de temperatura)

CONVECTION

ROTATE REMINDER

(Convecci�n)

(Recordatorio de girar)

149 �C � 199 �C hasta por 8 horas
99 �C � 149 �C hasta por 12 horas

<99 �C hasta por 72 horas

Varios

CONVECTION (Convecci�n) 71 �C

No

TEMPERATURE CONVERSION 1 hora

(Conversi�n de temperatura)

CONVECTION

ROTATE REMINDER

(Convecci�n)

(Recordatorio de girar)

>199 �C hasta por 4 horas 149 �C � 199 �C hasta por 8 horas 99 �C � 149 �C hasta por 12 horas <99 �C hasta por 72 horas

7

CONVECTION (Convecci�n) 190 �C

S�

49 �C � 249 �C

TEMPERATURE CONVERSION 20 min

(Conversi�n de temperatura)

CONVECTION

FROZEN FOODS

(Convecci�n)

(Comidas congeladas)

FROZEN FOODS

ROTATE REMINDER

(Comidas

(Recordatorio de girar)

congeladas)

Hasta por 1 hora

7

CONVECTION (Convecci�n) 29 �C

No

27 �C � 38 �C

TEMPERATURE CONVERSION 1 hora

(Conversi�n de temperatura)

CONVECTION

ROTATE REMINDER

(Convecci�n)

(Recordatorio de girar)

Hasta por 2 horas

10

FUNCI�N

POSICI�N CONFIGURACI�N SUGERIDA OPCIONAL DE LA REJILLA

AJUSTES PREVIOS

PRECA- RANGO LENTAR

AIRFRY

3

(Fre�r con

aire)

CONVECTION (Convecci�n) 204 �C

S�

TEMPERATURE CONVERSION 18 min

(Conversi�n de temperatura)

SUPER

FROZEN FOODS

CONVECTION

(Comidas congeladas)

(Superconvecci�n)

ROTATE REMINDER (Recordatorio de girar)

FROZEN FOODS (Comidas congeladas)

49 �C � 249 �C Hasta por 1 hora

REHEAT Varios (Recalentar)

CONVECTION (Convecci�n) 163 �C

No

TEMPERATURE CONVERSION 15 min

(Conversi�n de temperatura)

CONVECTION

FROZEN FOODS

(Convecci�n)

(Comidas congeladas)

ROTATE REMINDER (Recordatorio de girar)

49 �C � 249 �C Hasta por 2 horas

COOKIES 5 (Galletas)

CONVECTION

163 �C

S�

(CONVECCI�N)

11 min

TEMPERATURE CONVERSION CONVECTION

(Conversi�n de temperatura)

(Convecci�n)

FROZEN FOODS

(Comidas congeladas)

ROTATE REMINDER (Recordatorio de girar)

49 �C � 249 �C Hasta por 1 hora

SLOW

8

COOK

(Cocci�n

lenta)

CONVECTION (Convecci�n)

ALTA

S�

4 horas

CONVECTION (Convecci�n)

Alta, 2 � 12 horas Baja, 4 � 72 horas Mantener caliente por 2 horas (autom�tico)

DEHYD- 3 RATE (Deshidratar)

CONVECTION (Convecci�n) 52 �C

No

TEMPERATURE CONVERSION 12 horas

(Conversi�n de temperatura)

SUPER

ROTATE REMINDER

CONVECTION

(Recordatorio de girar)

(Superconvecci�n)

30 �C � 80 �C Hasta por 72 horas

11

Funciones
C�MO USAR SU HORNO BREVILLE
1. Inserte la rejilla en la posici�n deseada. Para su conveniencia, las posiciones de las rejillas est�n impresas en el lado izquierdo del vidrio de la puerta del horno. Hay cuatro posiciones de la ranura. La rejilla se puede insertar mirando hacia arriba o hacia abajo, lo que permite que haya dos posiciones para cada ranura.

3. La cifra en la parte superior en la pantalla LCD indica la temperatura de cocci�n preestablecida para la configuraci�n seleccionada. Para las funciones TOAST (Tostar) y BAGEL se indica el nivel de tostado. Gire el selector TEMPERATURE (Temperatura) hacia la izquierda para reducir la temperatura o hacia la derecha para aumentarla. SELECTOR DE TEMPERATURA
ROTAR

DISMINUYE LA TEMPERATURA

AUMENTA LA TEMPERATURA

4. La cifra en la parte inferior de la pantalla LCD indica el tiempo de cocci�n preestablecido para la configuraci�n seleccionada. Para las funciones TOAST (Tostar) y BAGEL se indica la cantidad de rebanadas. Gire el selector TIME (Tiempo) hacia la izquierda para reducir el tiempo de cocci�n o hacia la derecha para aumentarlo.

SELECTOR DE TIEMPO

2. Gire el selector SELECT/CONFIRM (Seleccionar/Confirmar) hasta que el indicador en la pantalla LCD est� en la funci�n deseada.

ROTAR

DISMINUYE EL TIEMPO

AUMENTA EL TIEMPO

5. Para funciones sin un ciclo de precalentamiento (TOAST (Tostar), BAGEL, BROIL (Asar), WARM (Calentar), PROOF (Levantar), REHEAT (Recalentar), DEHYDRATE (Deshidratar)), ponga los alimentos directamente en la rejilla o en la rejilla para fre�r por aire/deshidratar, la bandeja para pizza, la rejilla para asar y/o la asadera. Aseg�rese de que la comida est� centrada en el horno para una cocci�n m�s pareja.

12

a) Cierre la puerta del horno.
b) Presione el bot�n START/STOP (Iniciar/ Detener). La luz del bot�n se iluminar� de color rojo, la alerta del horno sonar� y la pantalla LCD se iluminar� de color naranja.
c) Se mostrar� el temporizador y comenzar� la cuenta regresiva. La temperatura y el tiempo de cocci�n se pueden ajustar durante el ciclo.
6. Para funciones que cuentan con un ciclo de precalentamiento (BAKE (Hornear), ROAST (Rostizar), PIZZA, AIRFRY (Fre�r con aire), COOKIES (Galletas), SLOW COOK (Cocci�n lenta)), presione el bot�n START/ STOP (Iniciar/Detener) antes de poner los alimentos en el horno (con la excepci�n de la funci�n SLOW COOK (Cocci�n lenta)). Ponga la comida antes del ciclo de precalentamiento para la funci�n SLOW COOK (Cocci�n lenta). La luz del bot�n se iluminar� de color rojo, la alerta del horno sonar� y la pantalla LCD mostrar� el mensaje `PREHEATING' (Precalentando) mientras se calienta el horno.
a) Cuando el horno est� listo para usarse, se apagar� el mensaje `PREHEATING' (Precalentando), sonar� la alerta del horno y el temporizador comenzar� la cuenta regresiva. Ponga los alimentos directamente en la rejilla o en la rejilla para fre�r por aire/ deshidratar, la bandeja para pizza, la rejilla para asar y/o la asadera. Aseg�rese de que la comida est� centrada en el horno para una cocci�n m�s pareja.
b) Cierre la puerta del horno.
c) El temporizador seguir� con la cuenta regresiva. La temperatura y el tiempo de cocci�n se pueden ajustar durante el ciclo.

7. Una vez terminado el ciclo de cocci�n, sonar� una alerta, la luz del bot�n START/ STOP (Iniciar/Detener) desaparecer� y la pantalla LCD se iluminar� de color blanco.
NOTA
El ciclo de cocci�n se puede detener en cualquier momento presionando el bot�n START/STOP (Iniciar/Detener). Esto cancelar� el ciclo y la luz del bot�n se iluminar� de color blanco.
NOTA
Presione el bot�n CONVECTION (Convecci�n) para elegir entre sin convecci�n, convecci�n y superconvecci�n. La convecci�n y la superconvecci�n pueden ajustar la temperatura para compensar. La superconvecci�n har� que los alimentos queden mas crujientes.
SENSOR DE LA PUERTA Si la puerta se abre durante la cocci�n, el temporizador se pausar� y la luz se encender�. Cuando la puerta est� cerrada, el temporizador reanudar� la cuenta regresiva, y la luz permanecer� encendida durante 30 segundos antes de apagarse. Si la puerta est� abierta durante m�s de 10 minutos durante la cocci�n, los calentadores se apagar�n.
REJILLA MAGN�TICA DE EXPULSI�N AUTOM�TICA Cuando se inserta la rejilla en la posici�n de rejilla 3 o 4, se expulsar� autom�ticamente a la mitad del horno cuando se abra la puerta para que pueda retirar f�cilmente sus alimentos. Siempre abra la puerta lentamente cuando la rejilla est� en esta posici�n para evitar que salga demasiado r�pido.

13

VOLUMEN DEL TIMBRE
Para hacer esto, presione y mantenga presionado el bot�n TEMPERATURE CONVERSION (Conversi�n de temperatura) durante 3 segundos para entrar al modo de control de volumen.

3. Siga los pasos para la funci�n que seleccion� y comience a cocinar sus alimentos.
4. Cuando llegue el momento de cambiar las posiciones de las rejillas, sonar� la alerta del Recordatorio de girar y el mensaje `Rotate Remind' (Recordatorio de girar) parpadear� en la pantalla. El recordatorio de girar continuar� sonando cada 30 segundos hasta que se abra la puerta o se presione el selector SELECT/ CONFIRM (Seleccionar/Confirmar) para desactivar la funci�n.

Presione el bot�n TEMPERATURE CONVERSION (Conversi�n de temperatura) para seleccionar el volumen deseado. Presione cualquier bot�n para confirmar.
RECORDATORIO DE GIRAR
Cuando cocine alimentos en varias rejillas a la vez, use el Recordatorio de girar para que recuerde cambiar la posici�n de los alimentos en el horno y as� obtener los resultados m�s uniformes y constantes. La caracter�stica Recordatorio de girar est� disponible para las siguientes funciones: BAKE (Hornear), ROAST (Rostizar), WARM (Calentar), PROOF (Asentar), PIZZA, AIRFRY (Fre�r con aire), REHEAT (Recalentar), COOKIES (Galletas) y DEHYDRATE (Deshidratar).
1. Gire el selector SELECT/CONFIRM (Seleccionar/Confirmar) hasta que el indicador en la pantalla LCD est� en la funci�n deseada.
2. Presione el selector SELECT/CONFIRM (Seleccionar/Confirmar). El mensaje `Rotate Remind' (Recordatorio de girar) aparecer� en la pantalla LCD.

NOTA
Cuando cocine alimentos en bandejas para hornear u otros recipientes de cocci�n en varias rejillas, se sugiere dejar suficiente espacio entre ellas y evitar usar la rendija superior debido a la proximidad a los elementos de calefacci�n.
En la mayor�a de los casos, las posiciones 3 y 7 o 4 y 8 dar�n los mejores resultados. Al usar la rejilla para fre�r con aire/deshidratar, no es necesario dejar espacio entre las posiciones de la parrilla.
FUNCI�N TOAST (TOSTAR)
La funci�n TOAST (Tostar) dora y deja crujiente el exterior de su pan, mientras mantiene el interior suave y h�medo. Esta funci�n tambi�n es ideal para muffins ingleses y wafles congelados.
1. Inserte la rejilla en la posici�n n�mero 4.
2. Ponga las rebanadas de pan lo m�s cerca posible del centro de la rejilla para obtener resultados de tostado �ptimos.
3. Cierre la puerta del horno.
4. Gire el selector SELECT/CONFIRM (Seleccionar/Confirmar) hasta que el indicador en la pantalla LCD est� en la funci�n TOAST (Tostar). La cifra en la parte superior de la pantalla LCD indica el nivel de tostado preestablecido en `4', mientras que la cifra en la parte inferior representa el n�mero de rebanadas preestablecidas en `4'.

14

7. Se mostrar� el temporizador y la cuenta regresiva comenzar� autom�ticamente. Se puede ajustar el tiempo durante el ciclo de tostado girando el selector TIME (Tiempo). Se puede detener el ciclo en cualquier momento presionando el bot�n START/STOP (Iniciar/Detener).

5. La configuraci�n del nivel de tostado y el n�mero de rebanadas se pueden ajustar antes o durante el ciclo de tostado.
a) La configuraci�n del nivel de tostado se indica mediante la l�nea de c�rculos en la parte superior de la pantalla LCD. Gire el selector TEMPERATURE (Temperatura) hacia la izquierda para reducir el nivel de tostado o hacia la derecha para aumentarlo. El tri�ngulo sobre los c�rculos se mover� seg�n la configuraci�n seleccionada.

Siga estas instrucciones generales:

Color deseado del tostado Configuraci�n

Leve

1 o 2

Medio

3, 4 o 5

Tostado

6 o 7

b) La cifra en la parte inferior de la pantalla LCD muestra el n�mero de rebanadas. Gire el selector TIME (Tiempo) hacia la izquierda para reducir la cantidad de rebanadas o hacia la derecha para aumentarlo. El n�mero de rebanadas va desde 1 a 9.
6. Presione el bot�n START/STOP (Iniciar/ Detener) para iniciar la funci�n TOAST (Tostar). La luz del bot�n se iluminar� de color rojo, la alerta del horno sonar� y la pantalla LCD se iluminar� de color naranja.

COMENZAR DETENER
PRESIONAR
8. Al final del ciclo de tostado sonar� la alerta del horno. La luz del bot�n START/STOP (Iniciar/Detener) desaparecer� y la pantalla LCD se iluminar� de color blanco.
NOTA
El tiempo de cocci�n depende de una serie de variables, incluida la temperatura del horno, por lo que el tiempo puede variar, incluso con la misma configuraci�n del nivel de tostado y la cantidad de rebanadas. Esto es para lograr resultados consistentes.
FUNCI�N BAGEL La funci�n BAGEL har� que el interior de su bagel cortado est� crujiente mientras tuesta ligeramente el exterior. Esta funci�n tambi�n es ideal para tostar bollos o panes rebanados especiales gruesos que requieren tostar un lado m�s que el otro. 1. Inserte la rejilla en la posici�n n�mero 4. 2. Ponga las rebanadas de bagel con el lado
cortado hacia arriba lo m�s centrado posible en la rejilla, para as� obtener resultados �ptimos de tostado. 3. Cierre la puerta del horno.

15

4. Gire el selector SELECT/CONFIRM (Seleccionar/Confirmar) hasta que el indicador en la pantalla LCD est� en la funci�n BAGEL. La cifra en la parte superior de la pantalla LCD indica el nivel de tostado preestablecido en `4', mientras que la cifra en la parte inferior representa el n�mero de mitades de bagel preestablecidas en `4'.

b) La cifra en la parte inferior de la pantalla LCD muestra la cantidad de mitades de bagel. Gire el selector TIME (Tiempo) hacia la izquierda para reducir la cantidad de mitades de bagel o hacia la derecha para aumentarlo. El n�mero de mitades va desde 1 a 10.
6. Presione el bot�n START/STOP (Iniciar/ Detener) para iniciar la funci�n BAGEL. La luz del bot�n se iluminar� de color rojo, la alerta del horno sonar� y la pantalla LCD se iluminar� de color naranja.
7. Se mostrar� el temporizador y comenzar� la cuenta regresiva autom�ticamente. Se puede ajustar el tiempo durante el ciclo bagel girando el selector TIME (Tiempo). Se puede detener el ciclo en cualquier momento presionando el bot�n START/ STOP (Iniciar/Detener).

5. La configuraci�n del nivel de tostado y el n�mero de mitades de bagel se pueden ajustar antes o durante el ciclo de tostado.
a) La configuraci�n del nivel de tostado est� indicada por la l�nea de tri�ngulos en la parte superior de la pantalla LCD. Gire el selector TEMPERATURE (Temperatura) hacia la izquierda para reducir el nivel de tostado o hacia la derecha para aumentarlo. El c�rculo bajo los tri�ngulos se mover� seg�n la configuraci�n seleccionada.
Siga estas instrucciones generales:

Color deseado del tostado del bagel
Leve
Medio
Tostado

Configuraci�n
1 o 2 3, 4 o 5 6 o 7

COMENZAR DETENER
PRESIONAR
8. Al final del ciclo BAGEL sonar� la alerta del horno. La luz del bot�n START/STOP (Iniciar/Detener) desaparecer� y la pantalla LCD se iluminar� de color blanco.
NOTA
El interior (lado cortado) del bagel siempre debe mirar hacia arriba, hacia los elementos superiores de calefacci�n. Esto permite que el lado cortado se vuelva crujiente mientras que la corteza queda ligeramente tostada. Si le gustan sus mitades de bagel igualmente crujientes por fuera y por dentro, le recomendamos utilizar la funci�n TOAST (Tostar) para tostar su bagel.

16

FUNCI�N BROIL (ASAR) La funci�n BROIL (Asar) es ideal para cocinar s�ndwiches abiertos, cortes finos de carne, pollo, pescado, salchichas y vegetales. La funci�n BROIL (Asar) tambi�n se puede usar para dorar la parte superior de guisos, gratinados y postres. 1. Inserte la rejilla en la posici�n n�mero 1 o 2. 2. Inserte la rejilla para asar incluida en la
asadera. Ponga los alimentos en la rejilla para asar o en una fuente apta para el horno, luego col�quela en el centro de la rejilla para que el aire fluya por los costados de los alimentos. 3. Cierre la puerta del horno. 4. Gire el selector SELECT/CONFIRM (Seleccionar/Confirmar) hasta que el indicador en la pantalla LCD est� en la funci�n BROIL (Asar). La cifra en la parte superior de la pantalla LCD indica el nivel preestablecido en `HIGH' (Alto), mientras que la cifra en la parte inferior muestra el tiempo preestablecido en 10:00 MIN/SEG.
5. El nivel y el tiempo de potencia de asado se pueden ajustar antes o durante el ciclo Broil (Asar).
a) La cifra en la parte superior de la pantalla LCD muestra el nivel de potencia de asado. Gire el dial TEMPERATURE (Temperatura) para ajustar el nivel de asado a uno de los tres niveles de potencia: `HIGH' (Alta), `MED' (Mediana) y `LOW' (Baja).

b) La cifra en la parte inferior de la pantalla LCD muestra el tiempo de asado. Gire el selector TIME (Tiempo) para ajustar el tiempo en hasta 20 minutos.
6. Presione el bot�n START/STOP (Iniciar/ Detener) para activar la funci�n BROIL (Asar). La luz del bot�n se iluminar� de color rojo, la alerta del horno sonar� y la pantalla LCD se iluminar� de color naranja.
7. Se mostrar� el temporizador y comenzar� la cuenta regresiva autom�ticamente. El tiempo y la potencia se pueden ajustar durante el ciclo de asado girando el selector correspondiente de TEMPERATURE (Temperatura) o TIME (Tiempo). Se puede detener el ciclo en cualquier momento presionando el bot�n START/STOP (Iniciar/Detener).
8. Al final del ciclo BROIL (Asar) sonar� la alerta del horno. La luz del bot�n START/ STOP (Iniciar/Detener) desaparecer� y la pantalla LCD se iluminar� de color blanco.
FUNCI�N BAKE (HORNEAR)
La funci�n BAKE (Hornear) cocina los alimentos de manera uniforme. Esta funci�n es ideal para hornear pasteles, muffins, brownies y masas. La funci�n BAKE (Hornear) tambi�n es �til para cocinar comidas congeladas preenvasadas, como lasa�a y pasteles.
1. Inserte la rejilla en la posici�n n�mero 6. Tenga en cuenta que algunos productos horneados, como brownies o masas, pueden ser m�s adecuados para la posici�n de la rejilla n�mero 5.
2. Cierre la puerta del horno.

17

3. Gire el selector SELECT/CONFIRM (Seleccionar/Confirmar) hasta que el indicador en la pantalla LCD est� en la funci�n BAKE (Hornear). La cifra en la parte superior de la pantalla LCD indica la temperatura preestablecida para el ciclo BAKE (Hornear) en 325 �F (167 �C), mientras que la cifra en la parte inferior muestra el tiempo preestablecido en 30:00 min/s. Tambi�n se mostrar� la configuraci�n del ajuste CONVECTION (Convecci�n) preestablecida.

4. La temperatura de horneado, el tiempo y la configuraci�n de convecci�n se pueden ajustar antes o durante el ciclo de horneado.
a) La cifra en la parte superior en la pantalla LCD muestra la temperatura de horneado. Gire el selector TEMPERATURE (Temperatura) para ajustar la temperatura de horneado de 50 �C a un m�ximo de 250 �C.
b) Gire el selector TIME (Tiempo) para seleccionar el tiempo de cocci�n. Los tiempos m�ximos de cocci�n se pueden configurar de la siguiente manera:

>200 �C 150 �C � 200 �C 100 �C � 150 �C <100 �C

Hasta por 4 horas Hasta por 8 horas Hasta por 12 horas Hasta por 72 horas

5. Presione el bot�n START/STOP (Iniciar/ Detener) para activar la funci�n BAKE (Hornear). La luz del bot�n se iluminar� de color rojo, la alerta del horno sonar� y la pantalla LCD se iluminar� de color naranja. La pantalla LCD mostrar� el mensaje `PREHEATING' (Precalentando) mientras parpadea.
6. Una vez que el horno haya completado el ciclo de precalentamiento, sonar� una alerta que indica que ya se pueden poner los alimentos en el horno.
7. Ponga los alimentos en asadera o en una fuente apta para el horno y luego col�quela en el centro de la rejilla para que el aire fluya por los costados de los alimentos. Cierre la puerta del horno.
8. Luego de que la alerta de precalentamiento haya sonado, el temporizador comenzar� la cuenta regresiva autom�ticamente. La temperatura y el tiempo se pueden ajustar durante el ciclo de horneado girando el selector correspondiente de TEMPERATURE (Temperatura) o TIME (Tiempo). Se puede detener el ciclo en cualquier momento presionando el bot�n START/STOP (Iniciar/Detener).
COMENZAR DETENER
PRESIONAR
CUANDO EST� A TEMPERATURA
9. Al final del ciclo BAKE (Hornear) sonar� la alerta del horno. La luz del bot�n START/ STOP (Iniciar/Detener) desaparecer� y la pantalla LCD se iluminar� de color blanco.

18

FUNCI�N ROAST (ROSTIZAR) La funci�n ROAST (Rostizar) es ideal para cocinar una variedad de carnes y aves. La comida quedar� tierna y jugosa por dentro y rostizada a la perfecci�n por fuera. 1. Inserte la rejilla en la posici�n n�mero 6. 2. Cierre la puerta del horno. 3. Gire el selector SELECT/CONFIRM
(Seleccionar/Confirmar) hasta que el indicador en la pantalla LCD est� en la funci�n ROAST (Rostizar). La cifra en la parte superior de la pantalla LCD indica la temperatura preestablecida para el ciclo ROAST (Rostizar) en 400 �F (204 �C), mientras que la cifra en la parte inferior muestra el tiempo preestablecido en 1:00 h/min. Tambi�n se mostrar� la configuraci�n del ajuste CONVECTION (Convecci�n) preestablecida.
4. La temperatura de rostizado, el tiempo y la configuraci�n de convecci�n se pueden ajustar antes o durante el ciclo de rostizado.
a) La cifra en la parte superior en la pantalla LCD muestra la temperatura de rostizado. Gire el selector TEMPERATURE (Temperatura) para ajustar la temperatura de rostizado de 50 �C a un m�ximo de 250 �C.
b) Gire el selector TIME (Tiempo) para seleccionar el tiempo de cocci�n. Los tiempos m�ximos de cocci�n se pueden configurar de la siguiente manera:

>200 �C 150 �C � 200 �C 100 �C � 150 �C <100 �C

Hasta por 4 horas Hasta por 8 horas Hasta por 12 horas Hasta por 72 horas

5. Presione el bot�n START/STOP (Iniciar/ Detener) para activar la funci�n ROAST (Rostizar). La luz del bot�n se iluminar� de color rojo, la alerta del horno sonar� y la pantalla LCD se iluminar� de color naranja. La pantalla LCD mostrar� el mensaje `PREHEATING' (Precalentando) mientras parpadea.
6. Una vez que el horno haya completado el ciclo de precalentamiento, sonar� una alerta que indica que ya se pueden poner los alimentos en el horno.
7. Ponga los alimentos en asadera o en una fuente apta para el horno y luego col�quela en el centro de la rejilla para que el aire fluya por los costados de los alimentos. Cierre la puerta del horno.
8. Luego de que la alerta de precalentamiento haya sonado, el temporizador comenzar� la cuenta regresiva autom�ticamente. La temperatura y el tiempo se pueden ajustar durante el ciclo de rostizado girando el selector correspondiente de TEMPERATURE (Temperatura) o TIME (Tiempo). Se puede detener el ciclo en cualquier momento presionando el bot�n START/STOP (Iniciar/Detener).

COMENZAR DETENER PRESIONAR

CUANDO EST� A TEMPERATURA

19

9. Al final del ciclo ROAST (ROSTIZAR) sonar� la alerta del horno. La luz del bot�n START/ STOP (Iniciar/Detener) desaparecer� y la pantalla LCD se iluminar� de color blanco.
FUNCI�N WARM (CALENTAR)
La funci�n WARM (CALENTAR) mantiene los alimentos calientes a la temperatura recomendada para evitar el crecimiento de bacterias, 70 �C o m�s.
1. Inserte la rejilla en la posici�n que mejor se adapte al tipo de comida que quiere mantener caliente.
2. Ponga los alimentos en asadera, en la bandeja para pizza o en una fuente apta para el horno, luego col�quela en el centro de la rejilla para que el aire fluya por los costados de los alimentos.
3. Cierre la puerta del horno.
4. Gire el selector SELECT/CONFIRM (Seleccionar/Confirmar) hasta que el indicador en la pantalla LCD est� en la funci�n WARM (CALENTAR). La cifra en la parte superior de la pantalla LCD indica la temperatura preestablecida en 75 �C, mientras que la cifra en la parte inferior muestra el tiempo preestablecido en 1:00 h/min. Tambi�n se mostrar� la configuraci�n del ajuste CONVECTION (Convecci�n) preestablecida.

5. La temperatura, el tiempo y la configuraci�n de convecci�n se pueden ajustar antes o durante el ciclo de calentamiento.
a) La cifra en la parte superior en la pantalla LCD muestra la temperatura del ciclo de calentamiento. Gire el selector TEMPERATURE (Temperatura) para ajustar la temperatura de 45 �C a un m�ximo de 250 �C.
b) Gire el selector TIME (Tiempo) para seleccionar el tiempo de cocci�n. Los tiempos m�ximos de cocci�n se pueden configurar de la siguiente manera:

>200 �C

Hasta por 4 horas

150 �C � 200 �C

Hasta por 8 horas

100 �C � 150 �C

Hasta por 12 horas

<100 �C

Hasta por 72 horas

6. Presione el bot�n START/STOP (Iniciar/ Detener) para activar la funci�n WARM (Calentar). La luz del bot�n se iluminar� de color rojo, la alerta del horno sonar� y la pantalla LCD se iluminar� de color naranja.
7. Se mostrar� el temporizador y comenzar� la cuenta regresiva autom�ticamente. La temperatura y el tiempo se pueden ajustar durante el ciclo de calentamiento girando el selector correspondiente de TEMPERATURE (Temperatura) o TIME (Tiempo). Se puede detener el ciclo en cualquier momento presionando el bot�n START/STOP (Iniciar/Detener).
8. Al final del ciclo WARM (Calentar) sonar� la alerta del horno. La luz del bot�n START/ STOP (Iniciar/Detener) desaparecer� y la pantalla LCD se iluminar� de color blanco.

FUNCI�N PIZZA
La funci�n PIZZA derrite y dora el queso y los ingredientes, mientras hace que la masa de la pizza quede crujiente.
1. Inserte la rejilla en la posici�n n�mero 7.
2. Cierre la puerta del horno.

20

3. Gire el selector SELECT/CONFIRM (Seleccionar/Confirmar) hasta que el indicador en la pantalla LCD est� en la funci�n PIZZA. La cifra en la parte superior de la pantalla LCD indica la temperatura preestablecida para el ciclo BAKE (pizza) en 190 �C, mientras que la cifra en la parte inferior muestra el tiempo preestablecido en 20:00 min/s. Tambi�n se mostrar� la configuraci�n preestablecida de CONVECTION (Convecci�n) y de FROZEN (Congelados).

6. Una vez que el horno haya alcanzado la temperatura establecida, sonar� una alerta de temperatura.
7. Ponga los alimentos en la bandeja para pizza en el centro de la rejilla para que el aire fluya por los costados de los alimentos. Cierre la puerta del horno.
8. Luego de que la alerta de precalentamiento haya sonado, el temporizador comenzar� la cuenta regresiva autom�ticamente. La temperatura y el tiempo se pueden ajustar durante el ciclo para pizzas girando el selector correspondiente de TEMPERATURE (Temperatura) o TIME (Tiempo). Se puede detener el ciclo en cualquier momento presionando el bot�n START/STOP (Iniciar/Detener).

COMENZAR DETENER PRESIONAR

4. La temperatura, el tiempo y la configuraci�n de convecci�n se pueden ajustar antes o durante el ciclo para pizzas.
a) La cifra en la parte superior en la pantalla LCD muestra la temperatura del ciclo para pizzas. Gire el selector TEMPERATURE (Temperatura) para ajustar la temperatura de 50 �C a un m�ximo de 250 �C.
b) Gire el selector TIME (Tiempo) para seleccionar el tiempo de cocci�n. Los tiempos m�ximos de cocci�n se pueden configurar de la siguiente manera:

50 �C � 250 �C

hasta por 1 hora

5. Presione el bot�n START/STOP (Iniciar/ Detener) para activar la funci�n PIZZA. La luz del bot�n se iluminar� de color rojo, la alerta del horno sonar� y la pantalla LCD se iluminar� de color naranja. La pantalla LCD mostrar� el mensaje `PREHEATING' (Precalentando) mientras parpadea.

9. Al final del ciclo para pizzas sonar� la alerta del horno. La luz del bot�n START/STOP (Iniciar/Detener) desaparecer� y la pantalla LCD se iluminar� de color blanco.
NOTA
Si usa la bandeja para pizza que viene incluida, p�ngala en el horno durante el ciclo de precalentamiento para obtener los mejores resultados. Coloque cuidadosamente la pizza en la bandeja para pizza precalentada.
Informaci�n sobre las piedras para pizza
Cuando se utiliza una piedra para pizza, es necesario precalentar la piedra, sin la pizza, para obtener resultados �ptimos. 1. Inserte la rejilla en la posici�n n�mero 7. 2. Ponga la piedra para pizza en el centro de la
rejilla para que el aire fluya por los costados de la piedra.

21

3. Cierre la puerta del horno.
4. Gire el selector SELECT/CONFIRM (Seleccionar/Confirmar) hasta que el indicador en la pantalla LCD est� en la funci�n PIZZA. La cifra en la parte superior de la pantalla LCD indica la temperatura preestablecida para el ciclo BAKE (pizza) en 190 �C, mientras que la cifra en la parte inferior muestra el tiempo preestablecido en 20 min / s. Tambi�n se mostrar� la configuraci�n preestablecida de CONVECTION (Convecci�n) y de FROZEN (Congelados).
5. Gire el selector TIME (Tiempo) para ajustar el tiempo en 15 min / s.
6. Presione el bot�n START/STOP (Iniciar/ Detener) para activar la funci�n PIZZA. La luz del bot�n se iluminar� de color rojo, la alerta del horno sonar� y la pantalla LCD se iluminar� de color naranja. La pantalla LCD mostrar� el mensaje `PREHEATING' (Precalentando) mientras parpadea.
7. Una vez que el horno haya terminado el precalentamiento, sonar� una alerta.
8. Luego de que la alerta de precalentamiento haya sonado, el temporizador comenzar� la cuenta regresiva autom�ticamente.
9. Al final del ciclo sonar� la alerta del horno. La luz del bot�n START/STOP (Iniciar/ Detener) desaparecer� y la pantalla LCD se iluminar� de color blanco.
10. Abra la puerta del horno y coloque cuidadosamente la pizza en la piedra para pizza precalentada.
11. Seleccione la temperatura, la convecci�n y el tiempo deseados para la pizza, como tambi�n la configuraci�n fresco/congelado y presione el bot�n START/STOP (Iniciar/ Detener) para volver a iniciar el ciclo para pizzas.
FUNCI�N PROOF (LEVANTAR)
La funci�n PROOF (Levantar) est� dise�ada para mantener temperaturas bajas con precisi�n, proporcionando un ambiente ideal para preparar pan, panecillos, pizzas y otras masas.

1. Inserte la rejilla en la posici�n n�mero 8. 2. Ponga la masa en un recipiente apto para
el horno, cubra y coloque en el centro de la rejilla. 3. Cierre la puerta del horno. 4. Gire el selector SELECT/CONFIRM (Seleccionar/Confirmar) hasta que el indicador en la pantalla LCD est� en la funci�n PROOF (Levantar). La cifra en la parte superior de la pantalla LCD indica la temperatura preestablecida para el ciclo PROOF (Levantar) en 29 �C, mientras que la cifra en la parte inferior muestra el tiempo preestablecido en 1 h / min. Tambi�n se mostrar� la configuraci�n del ajuste CONVECTION (Convecci�n) preestablecida.
5. La temperatura, el tiempo y la configuraci�n de convecci�n se pueden ajustar antes o durante el ciclo de prueba.
a) La cifra en la parte superior en la pantalla LCD muestra la temperatura del ciclo de prueba. Gire el selector TEMPERATURE (Temperatura) para ajustar la temperatura de asentamiento de 27 �C a un m�ximo de 38 �C.
b) La cifra en la parte inferior de la pantalla LCD muestra el tiempo del ciclo de prueba. Gire el selector TIME (Tiempo) para ajustar el tiempo en hasta 2 h / min.
6. Presione el bot�n START/STOP (Iniciar/ Detener) para activar la funci�n PROOF (Levantar). La luz del bot�n se iluminar� de color rojo, la alerta del horno sonar� y la pantalla LCD se iluminar� de color naranja.

22

7. Se mostrar� el temporizador y comenzar� la cuenta regresiva. La temperatura y el tiempo se pueden ajustar durante el ciclo de prueba girando el selector correspondiente de TEMPERATURE (Temperatura) o TIME (Tiempo). El ciclo se puede detener en cualquier momento presionando el bot�n START/STOP (Iniciar/Detener).
8. Al final del ciclo PROOF (Levantar) sonar� la alerta del horno. La luz del bot�n START/ STOP (Iniciar/Detener) desaparecer� y la pantalla LCD se iluminar� de color blanco.
FUNCI�N AIRFRY (FRE�R CON AIRE)
La funci�n AIRFRY (Fre�r con aire) combina calor intenso y flujo de aire maximizado para cocinar alimentos y dejarlos crujientes y dorados.
1. Aseg�rese de que la posici�n 3 u otra posici�n deseada est� vac�a para la rejilla para fre�r por aire/deshidratar.
2. Cierre la puerta del horno.
3. Gire el selector SELECT/CONFIRM (Seleccionar/Confirmar) hasta que el indicador en la pantalla LCD est� en la funci�n AIRFRY (Fre�r con aire). La cifra en la parte superior de la pantalla LCD indica la configuraci�n preestablecida para la funci�n AIRFRY (Fre�r con aire) en 400 �F (204 �C), mientras que la cifra en la parte inferior muestra el tiempo preestablecido 18:00 min / s. Tambi�n se mostrar� la configuraci�n de SUPERCONVECTION (Superconvecci�n) preestablecida.

4. La temperatura, el tiempo y la configuraci�n de convecci�n y de congelados se pueden ajustar antes o durante el ciclo AIRFRY (Fre�r con aire).
a) La cifra en la parte superior en la pantalla LCD muestra la temperatura del ciclo AIRFRY (Fre�r con aire). Gire el selector TEMPERATURE (Temperatura) para ajustar la temperatura del ciclo AIRFRY (Fre�r con aire) de 50 �C a un m�ximo de 250 �C.
b) La cifra en la parte inferior de la pantalla LCD muestra el tiempo del ciclo AIRFRY (Fre�r con aire). Gire el selector TIME (Tiempo) para ajustar el tiempo en hasta un m�ximo de 1 hora.
5. Presione el bot�n START/STOP (Iniciar/ Detener) para activar la funci�n AIRFRY (Fre�r con aire). La luz del bot�n se iluminar� de color rojo, la alerta del horno sonar� y la pantalla LCD se iluminar� de color naranja. La pantalla LCD mostrar� el mensaje `PREHEATING' (Precalentando) mientras parpadea.
6. Una vez que el horno haya completado el ciclo de precalentamiento, sonar� una alerta que indica que ya se pueden poner los alimentos en el horno.
7. Organice los alimentos de manera uniforme en la rejilla para fre�r por aire/deshidratar incluida con el horno. Para obtener mejores resultados, ponga los alimentos en una sola capa y deje espacio entre las piezas. Inserte la rejilla para fre�r por aire/deshidratar y cierre la puerta del horno.
8. Luego de que la alerta de precalentamiento haya sonado, el temporizador comenzar� la cuenta regresiva autom�ticamente. La temperatura y el tiempo se pueden ajustar durante el ciclo AIRFRY (Fre�r con aire) girando el selector correspondiente de TEMPERATURE (Temperatura) o TIME (Tiempo). Se puede detener el ciclo en cualquier momento presionando el bot�n START/STOP (Iniciar/Detener).

23

9. Al final del ciclo AIRFRY (Fre�r con aire) sonar� la alerta del horno. La luz del bot�n START/STOP (Iniciar/Detener) desaparecer� y la pantalla LCD se iluminar� de color blanco.

IMPORTANTE

Cuando cocine alimentos con grasa, por ejemplo, alitas de pollo, use una asadera en vez de la rejilla para fre�r por aire/deshidratar para evitar que el aceite gotee. Deseche el exceso de aceite entre las tandas que cocine.
NOTA
En este horno caben un total de 4 rejillas para fre�r por aire/deshidratar. Visite www.breville.com para obtener m�s informaci�n sobre la compra de rejillas adicionales para fre�r por aire/ deshidratar.
FUNCI�N REHEAT (RECALENTAR)
La funci�n REHEAT (Recalentar) es ideal para recalentar suavemente las sobras sin dorarlas ni resecarlas.
1. Inserte la rejilla en la posici�n que mejor se adapte al tipo de comida que est� recalentando.
2. Ponga los alimentos en asadera, en la bandeja para pizza o en una fuente apta para el horno, luego col�quela en el centro de la rejilla para que el aire fluya por los costados de los alimentos.
3. Cierre la puerta del horno.
4. Gire el selector SELECT/CONFIRM (Seleccionar/Confirmar) hasta que el indicador en la pantalla LCD est� en la funci�n REHEAT (Recalentar). La cifra en la parte superior de la pantalla LCD indica la temperatura preestablecida para el ciclo REHEAT (Recalentar) en 325 �F (163 �C), mientras que la cifra en la parte inferior muestra el tiempo preestablecido en 15:00 min / s. Tambi�n se mostrar� la configuraci�n del ajuste CONVECTION (Convecci�n) preestablecida.

5. La temperatura, el tiempo, la configuraci�n de convecci�n y de congelados se pueden ajustar antes o durante el ciclo para recalentar.
a) La cifra en la parte superior en la pantalla LCD muestra la temperatura del ciclo para recalentar. Gire el selector TEMPERATURE (Temperatura) para ajustar la temperatura de 50 �C a un m�ximo de 250 �C.
b) La cifra en la parte inferior de la pantalla LCD muestra el tiempo del ciclo para recalentar. Gire el selector TIME (Tiempo) para ajustar el tiempo en hasta 2 horas para temperaturas de 50 �C � 250 �C.
6. Presione el bot�n START/STOP (Iniciar/ Detener) para activar la funci�n REHEAT (Recalentar). La luz del bot�n se iluminar� de color rojo, la alerta del horno sonar� y la pantalla LCD se iluminar� de color naranja.
7. Se mostrar� el temporizador y comenzar� la cuenta regresiva. La temperatura y el tiempo se pueden ajustar durante el ciclo para recalentar girando el selector correspondiente de TEMPERATURE (Temperatura) o TIME (Tiempo). Se puede detener el ciclo en cualquier momento presionando el bot�n START/STOP (Iniciar/Detener).
8. Al final del ciclo para recalentar sonar� la alerta del horno. La luz del bot�n START/ STOP (Iniciar/Detener) desaparecer� y la pantalla LCD se iluminar� de color blanco.

24

FUNCI�N COOKIES (GALLETAS) La funci�n COOKIES (Galletas) es ideal para hornear galletas caseras o preparadas comercialmente, adem�s de otras golosinas horneadas. 1. Inserte la rejilla en la posici�n n�mero 6. 2. Cierre la puerta del horno. 3. Gire el selector SELECT/CONFIRM
(Seleccionar/Confirmar) hasta que el indicador en la pantalla LCD est� en la funci�n COOKIES (Galletas). La cifra en la parte superior de la pantalla LCD indica la temperatura preestablecida para el ciclo COOKIES (Galletas) en 325 �F (163 �C), mientras que la cifra en la parte inferior muestra el tiempo preestablecido en 11:00 min / s. Tambi�n se mostrar� la configuraci�n del ajuste CONVECTION (Convecci�n) preestablecida.
4. La temperatura, el tiempo y la configuraci�n de convecci�n y de congelados se pueden ajustar antes o durante el ciclo para galletas.
a) La cifra en la parte superior en la pantalla LCD muestra la temperatura del ciclo para galletas. Gire el selector TEMPERATURE (Temperatura) para ajustar la temperatura de horneado de 50 �C a un m�ximo de 250 �C.
b) La cifra en la parte inferior de la pantalla LCD muestra el tiempo del ciclo para galletas. Gire el selector TIME (Tiempo) para ajustar el tiempo en hasta 1 hora para temperaturas de 50 �C � 250 �C.

5. Presione el bot�n START/STOP (Iniciar/ Detener) para activar la funci�n COOKIES (Galletas). La luz del bot�n se iluminar� de color rojo, la alerta del horno sonar� y la pantalla LCD se iluminar� de color naranja. La pantalla LCD mostrar� el mensaje `PREHEATING' (Precalentando) mientras parpadea.
6. Una vez que el horno haya completado el ciclo de precalentamiento, sonar� una alerta que indica que ya se pueden poner los alimentos en el horno.
7. Ponga los alimentos en asadera, en la bandeja para pizza o en una fuente apta para el horno, luego col�quela en el centro de la rejilla para que el aire fluya por los costados de los alimentos. Cierre la puerta del horno.
8. Luego de que la alerta de precalentamiento haya sonado, el temporizador comenzar� la cuenta regresiva autom�ticamente. La temperatura y el tiempo se pueden ajustar durante el ciclo para galletas girando el selector correspondiente de TEMPERATURE (Temperatura) o TIME (Tiempo). Se puede detener el ciclo en cualquier momento presionando el bot�n START/STOP (Iniciar/Detener).
9. Al final del ciclo para galletas sonar� la alerta del horno. La luz del bot�n START/ STOP (Iniciar/Detener) desaparecer� y la pantalla LCD se iluminar� de color blanco.
FUNCI�N SLOW COOK (COCCI�N LENTA)
La funci�n SLOW COOK (Cocci�n lenta) tiene perfiles de cocci�n dise�ados para largos tiempos de cocci�n a temperaturas bajas.
1. Inserte la rejilla en la posici�n n�mero 8.
2. Cierre la puerta del horno.

25

3. Gire el selector SELECT/CONFIRM (Seleccionar/Confirmar) hasta que el indicador en la pantalla LCD est� en la funci�n SLOW COOK (Cocci�n lenta). La cifra en la parte superior de la pantalla LCD indica la temperatura preestablecida para la funci�n SLOW COOK (Cocci�n lenta) en `HIGH' (Alta), mientras que la cifra en la parte inferior muestra el tiempo preestablecido en 4 h / min. Tambi�n se mostrar� la configuraci�n del ajuste CONVECTION (Convecci�n) preestablecida.
4. La temperatura, el tiempo y la configuraci�n de convecci�n se pueden ajustar antes o durante el ciclo de cocci�n lenta.
a) La cifra en la parte superior en la pantalla LCD muestra la temperatura. Gire el selector TEMPERATURE (Temperatura) para ajustar el nivel del ciclo de cocci�n lenta a una de las dos temperaturas prestablecidas: LOW (`Baja') o HIGH (`Alta')
b) La cifra en la parte inferior de la pantalla LCD muestra el tiempo. Gire el selector TIME (Tiempo) para ajustar el tiempo de 4 a 72 horas para la temperatura LOW (Baja) y de 2 a 12 horas para la temperatura HIGH (Alta).
5. Ponga los alimentos dentro del contenedor cubierto apto para el horno en el centro de la rejilla para que el aire fluya por los costados de la comida. Cierre la puerta del horno.

6. Presione el bot�n START/STOP (Iniciar/ Detener) para activar la funci�n SLOW COOK (Cocci�n lenta). La luz del bot�n se iluminar� de color rojo, la alerta del horno sonar� y la pantalla LCD se iluminar� de color naranja. La pantalla LCD mostrar� el mensaje `PREHEATING' (Precalentando) mientras parpadea.
7. Luego de que la alerta de precalentamiento haya sonado, el temporizador comenzar� la cuenta regresiva autom�ticamente. La temperatura y el tiempo se pueden ajustar durante el ciclo girando el selector correspondiente de TEMPERATURE (Temperatura) o TIME (Tiempo). El ciclo se puede detener en cualquier momento presionando el bot�n START/STOP (Iniciar/Detener).
8. Al final del ciclo SLOW COOK (Cocci�n lenta) el horno cambiar� autom�ticamente al modo WARM (Calentar). La pantalla LCD mostrar� el mensaje WARM (Calentar) y se iniciar� una cuenta regresiva de forma autom�tica de 2 h / min. El ciclo para mantener calientes los alimentos se puede detener en cualquier momento presionando el bot�n START/STOP (Iniciar/Detener).
NOTA
No tire de la rejilla m�s de la mitad cuando inserte o retire utensilios de cocina del horno.
No ponga utensilios pesados sobre el vidrio cuando la puerta est� abierta.
CONSEJOS
CONSEJOS PARA EL CICLO DE COCCI�N LENTA
1. Aseg�rese de que los contenedores sean aptos para horno y que no excedan los 6 kilos cuando est�n vac�os.
2. Llene los contenedores a un m�nimo de � y un m�ximo de � para evitar cocinar en exceso o de forma insuficiente. Para evitar derrames, no llene los contenedores en m�s de � de su capacidad.

26

3. Siempre que use la funci�n SLOW COOK (Cocci�n lenta) use la tapa para evitar que los alimentos se resequen. Cubra los contenedores con papel de aluminio antes de cubrirlos con una tapa para mantener a�n m�s la humedad.
4. Siga las temperaturas y tiempos de cocci�n que aparecen en las recetas tradicionales para el modo SLOW COOK (Cocci�n lenta). Una hora en el nivel HIGH (Alta) es equivalente a aproximadamente de una hora y media a dos horas en LOW (Baja).
5. Los alimentos fr�os tardar�n m�s en cocinarse que los alimentos que han sido sellados previamente o calentados, por lo tanto, ajuste los tiempos de cocci�n apropiadamente. No use la funci�n SLOW COOK (Cocci�n lenta) para cocinar alimentos congelados.
6. Los trozos grandes de carne deben ser cortados por la mitad para permitir que el calor penetre de forma uniforme.
FUNCI�N DEHYDRATE (DESHIDRATAR)
La funci�n de DEHYDRATE (Deshidratar) combina un calor bajo y estable con un flujo de aire maximizado para secar los alimentos de forma uniforme sin cocinarlos ni sobrecalentarlos.
1. Ordene los alimentos de manera uniforme en la rejilla para fre�r por aire/deshidratar incluida con el horno. Para obtener mejores resultados, ponga los alimentos en una sola capa y deje espacio entre las piezas. Inserte la rejilla para fre�r por aire/deshidratar en la posici�n 3 del horno.
2. Cierre la puerta del horno.
3. Gire el selector SELECT/CONFIRM (Seleccionar/Confirmar) hasta que el indicador en la pantalla LCD est� en la funci�n DEHYDRATE (Deshidratar). La cifra en la parte superior de la pantalla LCD indica la temperatura preestablecida para el ciclo DEHYDRATE (Deshidratar) en 125 �F (52 �C), mientras que la cifra en la parte inferior muestra el tiempo preestablecido en 12:00 h / min. Tambi�n se mostrar� la configuraci�n de SUPERCONVECTION (Superconvecci�n) preestablecida.

4. La temperatura, el tiempo y la configuraci�n de convecci�n se pueden ajustar antes o durante el ciclo de deshidrataci�n.
a) La cifra en la parte superior en la pantalla LCD muestra la temperatura del ciclo de deshidrataci�n. Gire el selector TEMPERATURE (Temperatura) para ajustar la temperatura del ciclo de deshidrataci�n de 30 �C a un m�ximo de 80 �C.
b) La cifra en la parte inferior de la pantalla LCD muestra el tiempo. Gire el selector TIME (Tiempo) para ajustar el tiempo en hasta 72 minutos.
5. Presione el bot�n START/STOP (Iniciar/Detener) para activar la funci�n DEHYDRATE (DESHIDRATAR). La luz del bot�n se iluminar� de color rojo, la alerta del horno sonar� y la pantalla LCD se iluminar� de color naranja.
6. Se mostrar� el temporizador y comenzar� la cuenta regresiva. La temperatura y el tiempo se pueden ajustar durante el ciclo de deshidrataci�n girando el selector correspondiente de TEMPERATURE (Temperatura) o TIME (Tiempo). El ciclo se puede detener en cualquier momento presionando el bot�n START/STOP (Iniciar/Detener).
7. Al final del ciclo DEHYDRATE (Deshidratar) sonar� la alerta del horno. La luz del bot�n START/STOP (Iniciar/ Detener) desaparecer� y la pantalla LCD se iluminar� de color blanco.
27

CONSEJOS
� Use papel para hornear encima de la rejilla para fre�r por aire/deshidratar al deshidratar alimentos con colores fuertes para evitar manchas.
� Al deshidratar alimentos que puedan gotear, como la cecina marinada, use la asadera incluida para atrapar cualquier l�quido que gotee. Inserte la rejilla en la posici�n n�mero 8 y centre la asadera en la rejilla.
PHASE COOK (COCCI�N POR ETAPAS)
Use el bot�n PHASE COOK (Cocci�n por etapas) para programar 2 funciones de cocci�n consecutivas. Las funciones disponibles para el modo PHASE COOK (Cocci�n por etapas) son BROIL (Asar), BAKE (Hornear), ROAST (Rostizar), WARM (Calentar) y PIZZA.
1. Presione el bot�n PHASE COOK (Cocci�n por etapas). El mensaje `PHASE COOK' (Cocci�n por etapas) aparecer� en la pantalla LCD, junto con las otras funciones disponibles.
2. Una flecha parpadear� sobre el numero `1', indicando que se est� programando la primera etapa de cocci�n.
a) Gire el selector SELECT/CONFIRM (Seleccionar/Confirmar) hasta que el indicador en la pantalla LCD est� en la funci�n deseada.
b) Gire el selector TEMPERATURE (Temperatura) para ajustar la temperatura de cocci�n. Gire el selector TIME (Tiempo) para ajustar el tiempo de cocci�n.
c) Presione el selector SELECT/CONFIRM (Seleccionar/Confirmar) o START/STOP (Iniciar/Detener) para confirmar la primera etapa de cocci�n.

3. Una flecha parpadear� sobre el n�mero `2', indicando que se est� programando la segunda etapa de cocci�n.
a) Gire el selector SELECT/CONFIRM (Seleccionar/Confirmar) hasta que el indicador en la pantalla LCD est� en la funci�n deseada.
b) Gire el selector TEMPERATURE (Temperatura) para ajustar la temperatura de cocci�n. Gire el selector TIME (Tiempo) para ajustar el tiempo de cocci�n.
c) Presione el selector SELECT/CONFIRM (Seleccionar/Confirmar) para confirmar la segunda etapa de cocci�n.
4. Presione el bot�n START/STOP (Iniciar/ Detener) para activar la primera funci�n. La luz del bot�n se iluminar� de color rojo, la alerta del horno sonar� y la pantalla LCD se iluminar� de color naranja. Las funciones para ambas etapas se mostrar�n en la pantalla LCD con una flecha al lado de la primera etapa.
5. Cuando se complete la primera etapa de cocci�n, la segunda comenzar� autom�ticamente. Al final del segunda etapa de cocci�n sonar� la alerta del horno. La luz del bot�n START|STOP (Iniciar|Detener) desaparecer� y la pantalla LCD se iluminar� de color blanco.

28

REEMPLAZAR EL FOCO DEL HORNO
ADVERTENCIA
Siempre desenchufe el horno y deje enfriar antes de reemplazar el foco. Utilice solo un foco de horno de 25 W, 120 Vca, tipo G9.

4. Use un pa�o suave para insertar el foco nuevo. No toque directamente la superficie del foco con sus dedos, ya que el aceite en ellos puede da�arlo.

1. Retire la rejilla del horno antes de reemplazar el foco.
2. El foco se encuentra en el lado izquierdo de la abertura del horno. Coloque sus dedos en el exterior de la carcasa del foco y retire suavemente la cubierta de vidrio de la pared del horno para retirarla. Si no puede quitar la cubierta, deslice una cuchara en el lado izquierdo de la carcasa del foco y retire suavemente la cubierta de vidrio. Siempre sostenga la cubierta de vidrio con la otra mano para evitar se caiga y se rompa.

5. Para volver a colocar la cubierta de vidrio, alinee el gancho de metal con el lado izquierdo de la carcasa del foco. Deslice el extremo opuesto de la cubierta de vidrio en el soporte de metal en el lado derecho de la carcasa, luego empuje el gancho de metal en el lado izquierdo de la carcasa hasta que encaje en su posici�n.

3. Retire el foco usado sac�ndolo directamente de su soporte.

USO DE LA BANDEJA DE CALENTAMIENTO
La parte superior del horno est� muy caliente durante y despu�s de la cocci�n. Por esta raz�n no se recomienda almacenar art�culos en la parte superior del horno.
La �nica excepci�n es la tabla de cortar de bamb� Breville opcional y la bandeja de servir que caben en la secci�n acanalada en la parte superior del horno. Visite www.breville.com para m�s informaci�n.

29

Cuidado y limpieza
Antes de limpiar, aseg�rese de que el horno est� apagado quitando el enchufe del tomacorriente.
Deje que el horno y todos sus accesorios se enfr�en por completo antes de desarmarlo y limpiarlo.
Limpieza de la parte exterior y la puerta
1. Limpie la parte exterior con una esponja suave y h�meda. Se puede usar un limpiador l�quido no abrasivo o una soluci�n de aerosol suave para evitar la acumulaci�n de manchas. Aplique el limpiador a la esponja y no a la superficie del horno, antes de limpiar.
2. Para limpiar la puerta de vidrio, use un limpiavidrios o un detergente suave y una esponja suave y h�meda o una almohadilla de pl�stico suave. No use un limpiador abrasivo o una esponja met�lica para limpiar, ya que rayar�n la superficie del horno.
3. Limpie la superficie de la pantalla LCD con un pa�o suave y h�medo. Aplique limpiador al pa�o y no a la superficie de la pantalla LCD. La limpieza con un pa�o seco o limpiadores abrasivos puede rayar la superficie.
4. Deje que todas las superficies se sequen bien antes de insertar el enchufe en un tomacorriente y encender el horno.
ADVERTENCIA
No sumerja el conjunto de la plancha, el cable de alimentaci�n o el enchufe en agua u otro l�quido, ya que podr�a provocar una electrocuci�n.

Limpieza del interior
Las paredes del interior del horno cuentan con un revestimiento antiadherente para facilitar la limpieza. Para limpiar cualquier salpicadura que pueda ocurrir mientras cocina, limpie las paredes con una esponja suave y h�meda. Se puede usar un limpiador l�quido no abrasivo o una soluci�n de aerosol suave para evitar la acumulaci�n de manchas. Aplique el limpiador a la esponja, y no a la superficie del horno, antes de limpiar. Evite tocar los elementos de calefacci�n de cuarzo.
ADVERTENCIA
Tenga mucho cuidado al limpiar los elementos de calefacci�n de cuarzo. Deje que el horno se enfr�e por completo, luego frote suavemente con una esponja o pa�o suave y h�medo a lo largo del elemento de calefacci�n. No use ning�n tipo de limpiador o agente de limpieza. Deje que todas las superficies se sequen bien antes de insertar el enchufe en un tomacorriente y encender el horno.
Limpieza de la bandeja de migajas
1. Despu�s de cada uso, retire la bandeja de migajas y deseche el contenido. Limpie la bandeja con una esponja suave y h�meda. Se puede usar un limpiador l�quido no abrasivo para evitar la acumulaci�n de manchas. Aplique el limpiador a la esponja, y no a la bandeja, antes de limpiar. Seque bien.
2. Para quitar grasa endurecida, deje remojar la bandeja en agua jabonosa tibia y luego lave con una esponja suave o una almohadilla de pl�stico suave. Enjuague y seque completamente.
3. Siempre vuelva a insertar la bandeja de migajas en el horno despu�s de limpiarla y antes de insertar el enchufe en un tomacorriente y encender el horno.

30

Limpieza de la rejilla, rejilla para asar, asadera y bandeja para pizza 1. Lave todos los accesorios en agua
jabonosa tibia con una esponja suave o una almohadilla de pl�stico suave. Enjuague y seque completamente. No utilice limpiadores abrasivos, esponjas met�licas ni utensilios met�licos para limpiar ninguno de los accesorios, ya que pueden da�ar las superficies. 2. Para extender la vida �til de sus accesorios, no recomendamos que se limpien en el lavavajillas. Almacenamiento 1. Aseg�rese de que el horno est� apagado quitando el enchufe del tomacorriente. 2. Deje que el horno y todos sus accesorios se enfr�en por completo antes de desarmarlo y limpiarlo. 3. Aseg�rese de que horno y todos los accesorios est�n limpios y secos. 4. Aseg�rese de que la bandeja de migajas est� en el horno; que la rejilla para asar est� inserta en la asadera y sobre la rejilla en la posici�n central del horno. 5. Aseg�rese de que la puerta est� cerrada. 6. Guarde el equipo en posici�n vertical y de pie sobre sus patas de apoyo. No guarde nada encima. La �nica excepci�n es la tabla de cortar de bamb� Breville opcional y la bandeja de servir.
31

Soluci�n de problemas

POSIBLES PROBLEMAS El horno no se enciende
Me gustar�a recuperar la configuraci�n predeterminada de la pantalla LCD
La pantalla LCD se apag�
La pizza no se cocina de manera uniforme
La rejilla magn�tica de expulsi�n autom�tica sale demasiado lejos cuando abro la puerta No puedo seleccionar el bot�n CONGELADOS
Sale vapor por la puerta del horno
Los elementos de calefacci�n parecen estar pulsando
Gotea agua por debajo de la puerta hacia el mostrador

SOLUCI�N SENCILLA
� Compruebe que el enchufe de alimentaci�n est� bien insertado en el tomacorriente.
� Enchufe el cable de alimentaci�n en un tomacorriente independiente. � Enchufe el cable de alimentaci�n en un tomacorriente distinto. � Restablezca el disyuntor si es necesario. � El horno recordar� la �ltima configuraci�n utilizada para cada funci�n,
incluso si retira el enchufe del tomacorriente.
� Para restaurar la configuraci�n predeterminada del horno para cada funci�n, presione y mantenga presionados los botones de TEMPERATURE CONVERSION (Conversi�n de temperatura) y FROZEN (Congelados) al mismo tiempo durante 5 segundos.
� El horno entra en modo de espera si no se usa durante 10 minutos. Cuando est� en modo de espera, la pantalla LCD dejar� de iluminarse, sin embargo, todas las opciones de funci�n seguir�n siendo visibles.
� Para reactivar el horno y sacarlo del modo de espera, presione el bot�n START/STOP (Iniciar/Detener) en el panel de control o gire cualquier selector. La pantalla LCD se volver� a iluminar.
� Algunas pizzas grandes pueden dorarse de manera desigual en hornos compactos. Abra la puerta del horno a la mitad del tiempo de cocci�n y gire la pizza 180 grados para obtener un dorado m�s uniforme. Intente usar la funci�n ROTATE REMIND (Recordatorio de girar).
� Siempre abra la puerta lentamente controlando la forma cuando la rejilla est� en la posici�n 3 o 4 para as� evitar que salga demasiado r�pido.
� El bot�n FROZEN (Congelados) solo se puede seleccionar para las siguientes funciones: TOAST (Tostar), BAGEL, PIZZA, AIRFY (Fre�r por aire), REHEAT (Recalentar) y COOKIES (Galletas).
� Esto es normal. La puerta tiene un respiradero para liberar el vapor que se crea a partir de los alimentos con alto contenido de humedad, como el pan congelado.
� Element iQ controla con precisi�n el calor dentro del horno pulsando la potencia y ajustando el nivel de potencia en los elementos de calefacci�n en r�fagas cortas para proporcionar un control preciso de la temperatura. Esto es normal.
� Esto es normal. La condensaci�n creada a partir del alto contenido de humedad de algunos alimentos, como el pan congelado, pueden gotear por debajo de la puerta del horno y caer en el mostrador.

32

POSIBLES PROBLEMAS La lectura de temperatura en la pantalla LCD no coincide con la temperatura medida dentro del horno
La alerta de precalentamiento suena a una temperatura inferior a la que se muestra en la pantalla LCD
La pantalla LCD muestra el mensaje `E01'
La pantalla LCD muestra el mensaje `E02'
La pantalla LCD muestra el mensaje `E03'
La pantalla LCD muestra el mensaje `E06'
La temperatura cambia al presionar el bot�n de convecci�n Ruido del panel de control

SOLUCI�N SENCILLA
� Para garantizar que las medidas est�n estandarizadas, las temperaturas del horno se han calibrado en la posici�n para pan tostado (centro de la rejilla en la posici�n central sin la bandeja en su lugar). Vuelva a verificar la temperatura en esta posici�n asegur�ndose de no abrir la puerta del horno durante 30 minutos, ya que el calor escapar� cada vez que lo haga. Tenga en cuenta que la alerta de precalentamiento suena cuando se ha alcanzado el 75% de la temperatura objetivo.
� La alerta de precalentamiento suena cuando se ha alcanzado el 75% de la temperatura objetivo. Esto proporciona los tiempos de precalentamiento y de cocci�n haciendo que todo sea m�s r�pido.
� Esto se debe a que cuando suena la alerta de precalentamiento, que le indica al usuario que abra la puerta del horno e inserte los alimentos, se produce una p�rdida importante de temperatura dentro del horno. Si la alerta sonara al 100% de la temperatura objetivo, abrir la puerta significar�a que se "perder�a" mucho del tiempo de espera. Hemos calculado que al hacer sonar la alerta al 75% de la temperatura objetivo, seguido de la apertura de la puerta del horno para poner los alimentos dentro, a�n es posible recuperar la temperatura objetivo hasta 2 minutos m�s r�pido. Es por eso que la temperatura en la pantalla LCD no coincide con la temperatura objetivo en la alerta de precalentamiento. Dependiendo de la temperatura establecida, el horno puede tardar aproximadamente 8-10 minutos desde que se encendi�, incluida la apertura de la puerta del horno cuando suena la alerta de precalentamiento, para alcanzar la temperatura objetivo.
� La pantalla LCD mostrar� el mensaje `E01' cuando haya un problema no reiniciable con el equipo. Si esto ocurre, quite inmediatamente el cable de alimentaci�n del tomacorriente y llame al Centro de servicios de Breville.
� La pantalla LCD mostrar� el mensaje `E02' cuando haya un problema no reiniciable con el equipo. Si esto ocurre, quite inmediatamente el cable de alimentaci�n del tomacorriente y llame al Centro de servicios de Breville.
� La pantalla LCD mostrar� `E03' si la temperatura del horno est� por encima del l�mite m�ximo establecido. Retire el enchufe del tomacorriente, deje que
� el horno se enfr�e durante 15 minutos y luego vuelva a enchufarlo. Si el mensaje `E03' contin�a apareciendo en la pantalla, llame al Centro de servicios de Breville.
� La pantalla LCD mostrar� el mensaje `E06' cuando haya un problema no reiniciable con el equipo. Si esto ocurre, quite inmediatamente el cable de alimentaci�n del tomacorriente y llame al Centro de servicios de Breville.
� Esto es normal. La temperatura est� calibrada para compensar que el ventilador de convecci�n aumente las velocidades de cocci�n.
� Durante la cocci�n, los ventiladores de enfriamiento se encienden para proteger los componentes electr�nicos sensibles del sobrecalentamiento. A veces, este ventilador puede permanecer encendido durante unos minutos despu�s de que la cocci�n haya terminado.

33

Breville Consumer Support

USA

Mail: Breville USA

19400 S. Western Ave, Torrance CA

90501-1119

Phone: 1-866-273-8455 1-866-BREVILLE

Web: breville.com/us/support

Canada

Mail:
Phone: Web:

Breville Canada 9800 Boulevard Cavendish, Suite 250, Saint-Laurent Qu�bec, H4M 2V9 1-855-683-3535 breville.ca/support

Atenci�n al Consumidor Breville

Mexico

Dir.:

Breville M�xico, S.A. de C.V.

Blvd. Miguel de Cervantes Saavedra

#169 Piso 10, Oficina 119,

Col. Granada, C.P. 11520,

Alc. Miguel Hidalgo,

Ciudad de M�xico, M�xico

Tel.:

1-800-953-1668

Sitio web: breville.mx/support

�
Breville is a registered trademark of Breville Pty. Ltd. A.B.N. 98 000 092 928. Copyright Breville Pty. Ltd. 2021.
� Due to continued product improvement, the products illustrated/photographed in this brochure may vary slightly from the actual product. � En raison de son am�lioration continue, le produit repr�sent� sur cet emballage peut diff�rer l�g�rement du produit r�el.
� Perfeccionamos nuestros productos continuamente, por lo que el art�culo podr�a diferir ligeramente de la ilustraci�n o imagen en este documento.
BOV900 Series � S�ries � Serie
USCM � K21