tuya MS-104Z ZigBee+RF Switch Module User Manual
File info: application/pdf · 6 pages · 11.54MB
MS-104Z英德说明书(中性) 201107
MS-104Z英德说明书 - Banggood
The Zigbee switch module terminal reserves the access of manual override function for the end-user to switch on/off.
Click here.
MoesHouse Tuya ZigBee3.0 Smart Light Switch Zigbee RF Switch Module SmartThings Required APP Remote Control Work with Alexa Google Home for Voice Control - VORDEO 7. Manual:
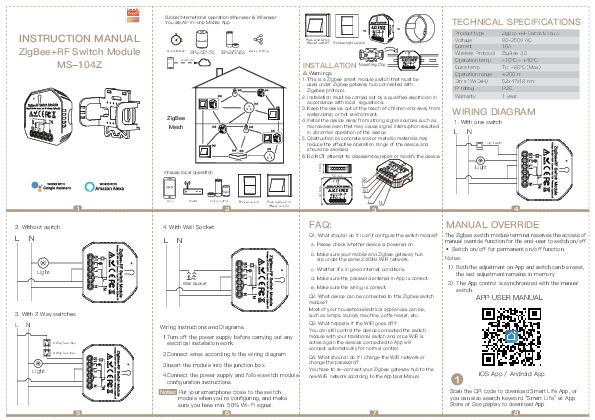
Extracted Text
Powered By
INSTRUCTION MANUAL ZigBee+RF Switch Module
MS-104Z
1 2. Without switch
LN
Light
3. With 2 Way switches LN
2 Way Switches 2 Way Switches
Light
5

Global international operation Whenever & Wherever You are,All-in-one Mobile App

Schedule timer Voice control-work with Google Home
Anywhere APP

Voice control-work Device Sharing with Amazon Alexa

ZigBee Mesh

ZigBee Hub
Inhouse local operation

APP

App

Router

Voice control

Rocker switch

Push wall switch

2

(Reset switch)

Push wall switch (Reset switch) Rocker light switch

INSTALLATION Mounting Clip
Warnings: 1. This is a Zigbee smart module switch that must be
used under Zigbee gateway hub connected with Zigebee protocol. 2. Installation must be carried out by a qualified electrician in accordance with local regulations. 3. Keep the device out of the reach of children and away from water,damp or hot environment.
4. Install the device away from strong signal sources such as microwave oven that may cause signal interruption resulted in abnormal operation of the device.
5. Obstruction by concrete wall or metallic materials may reduce the effective operation range of the device and should be avoided.
6. Do NOT attempt to disassemble,repair or modify the device.

18 mm

47 mm

52 mm

S2 L2 S1 L1
LN
3

TECHNICAL SPECIFICATIONS

Product type Voltage Current Wireless Protocol Operation temp. Case temp. Operation range Dims (WxDxH) IP rating Warranty

ZigBee +RF Switch Module 90-250V AC 10A
ZigBee 3.0 -10�C - +40�C
Tc: +80�C (Max.) 200 m 52x47x18 mm IP20
1 year

WIRING DIAGRAM
1. With one switch
LN
Light switch

Light

4

4. With Wall Socket
LN
Wall Socket
Wiring Instructions and Diagrams 1.Turn off the power supply before carrying out any electrical installation work. 2.Connect wires according to the wiring diagram. 3.Insert the module into the junction box. 4.Connect the power supply and follow switch module configuration instructions. Notes: Put your smartphone close to the switch module when you're configuring, and make sure you have min. 50% Wi-Fi signal. 6

FAQ:
Q1: What should I do if I can't configure the switch module?
a. Please check whether device is powered on.
b. Make sure your mobile and Zigbee gataway hub are under the same 2.4GHz WiFi network.
c. Whether it's in good internet conditions.
d. Make sure the password entered in App is correct.
e. Make sure the wiring is correct.
Q2: What device can be connected to this Zigbee switch module? Most of your household electrical appliances can be, such as lamps, laundry machine, coffe maker, etc. Q3: What happens if the WiFi goes off? You can still control the device connected the switch module with your traditional switch and once WiFi is active again the devices connected to App will connect automatically for normal control.
Q4: What should I do if I change the WiFi network or change the password? You have to re-connect your Zigbee gateway hub to the new WiFi network according to the App User Manual.

MANUAL OVERRIDE
The Zigbee switch module terminal reserves the access of manual override fu nction for the end-user to switch on/off. � Switch on/off for permanent on/off function. Notes:
1) Both the adjustment on App and switch can be reset, the last adjustment remains in memory.
2) The App control is synchronized with the manual switch.
APP USER MANUAL
iOS App / Android App

Scan the QR code to download Smart Life App, or you can also search keyword "Smart Life" at App Store or Googleplay to download App.

7

8

Fit for the two switches

Region Mobile number/e-mail address Obtain verification code
Log in or register your account with your mobile number or e-mail address. Type in the verification code sent to your mobile or mail box, then set your login password. Click "Create Family" to enter into the App.

Push wall switch Rocker switch (Reset switch)
Zigbee Link/Reset:
a. For reset switch: press the switch button for 10 times to hear the beep sounds continuously. b. For rocker light switch: press the switch button for 20 times(ON/OFF cycle for 10 times) to hear the beep sounds continuously. c. For reset button: long press the button on the module to hear the beep sounds as Di-Di(2 times) and long press the button again to hear the beep sounds continuously.

9

10

Add Device

(Wi-Fi)

Add Device

the indicator blinks rapidly

Open the App, select "+" on top right,choose "Switch (Zigbee)" to add device.And select the right Gateway to confirm the connection.
Note: Make sure you have successfully connected one Zigbee gateway hub.

Confirm indicator blinks rapidly
Confirm the Zigbee switch module is beeper rapidly. (twice a second).

11

12

Connecting
Make sure your router,mobile,and device are as close as possible
2%
Device found Register device to the smart cloud initializing device

All Device
Device added successfully Switch Zigbee

The connecting will take about 10-120 seconds to complete depending on your network condition.
13

When pairing is done, the Zigbee switch will be shown on the App.
14

More
Basic information about the device Device Name Device Location Check Network

Supported Third-party Control

Amazon Alexa

Google Assistant

Others

Others
Share Device Create Group Device information Feedback

Connect to Amazon Alexa or Google Assistant for voice control, or share the devices with your families or friends.

APP

App control

Voice control

Enjoy your smart life of home automation for lighting control by using our All-in-one mobile App wherever you are in the world or simply by voice control when you are sitting at home comfortably.

15

16

Pair and clear up the RF code
1. How to pair the RF code
1.1 For reset switch: press the switch for 5 times to hear the beep sounds as Di-Di(2 times) for successful pairing.
1.2 For rocker light switch: press the switch for 10 times (ON/OFF cycle for 5 times) to hear the beep sounds as Di-Di(2 times) for successful pairing.
1.3 For reset button: long press the button on the module to hear the beep sounds as Di-Di(2 times) for successful paring.

2.2 For rocker light switch: press the switch for 10 times (ON/OFF cycle for 5 times) to hear the beep sounds as Di-Di(2 times),and press the switch for 10 times (ON/OFF cycle for 5 times) again after 5 seconds to hear the beep sounds as Di-Di-Di-Di(4 times) for successful clearing.
2.3 For reset button: long press the button on the module to hear beep sounds as Di-Di(2 times),release your finger for 5 seconds and long press the button again to hear
the beep sounds as Di-Di-Di-Di(4 times) for
successful clearing.

3.3 How to achieve multi-control association
Note:Please confirm you have successfully finished the ZigBee link method above for adding this switch to your Smart Life App before the association.
1.WiFi add another smart switch to the same Smart Life/Tuya App.(If there is a smart switch having been added before to the app,just go to next step.) Note:There is no need to wire the new added switch to the light,only L and N are required for

2. How to clear up the RF code
2.1 For reset switch: press the switch for 5 times to hear the beep sounds as Di-Di(2 times),and press the switch for 5 times again after 5 seconds to hear the beep sounds as Di-Di-Di-Di(4 times) for successful clearing.

New Added Switch Main Switch

2.Then you will see two devices in the app and click the main switch(as One gang switch as below) by entering into the next operation. 3.Click in the upper right corner and choose"Multi-Control Association, and then click "+" in the right corner
4.Choose the switch that you want to associate to and then choose the switch button that you want to control the same light.

17

18

19

20

5.Then go back to previous page,you will see two items in the page,one is your main switch,the other is the one you associate just now. Note:Please confirm the associated switch is
enabled.

7.If you want to add another third or more smart switches to control your light,just repeat the steps above.And you will see the result as below when
you associate another new switch.

MS-104Z Light Switch

Switch 1

6.Now you are able to control your light with two switches.Do not associate another button in the same switch for multi-control.

Switch 1 Switch 1

Main Switch Associated 1 Associated 2

21

22

23

24

Powered By
BEDIENUNGSANLEITUNG ZigBee+RF Schaltermodul
MS-104Z
1 2. Ohne Schalter
LN
Licht
3. Mit 2 Way Schaltern LN
2 Way Schaltern 2 Way Schaltern
Licht
5

Weltweiter internationaler Betrieb Wann und wo immer Sie sind, Alles-in-Einem Mobile App

Timer planen

Sprachsteuerung - Arbeit mit Google Home

Irgendwo APP

Sprachsteuerung -Arbeit mit Amazon Alexa

Ger�tefreigabe

Zigbee-Netz

ZigBee Hub

Taste Wandschalter (Zur�cksetzungsschalter) Wipplichtschalter

INSTALLATION

Warnungen:

Mounting Clip

1. Dies ist ein ZigBee Intelligenter Schaltermodul, der unter dem mit

dem Zigebee Protokoll verbundenen ZigBee Gateway Hub

verwendet werden muss.

2. Die Installation muss von einem qualifizierten Elektriker gem��

den �rtlichen Vorschriften durchgef�hrt werden.

3. Bewahren Sie das Ger�t au�erhalb der Reichweite von Kindern

auf. Und halten Sie das Ger�t von Wasser, Feuchtigkeit oder

hei�er Umgebung fern.

4. Stellen Sie das Ger�t nicht in der N�he der starker

Signalquellen wie Mikrowellenherde auf, die zu

Signalunterbrechungen f�hren k�nnen, und die zu einem

abnormalen Betrieb des Ger�ts f�hren.

5. Verstopfungen durch Betonw�nde oder metallische Materialien

k�nnen den effektiven Betriebsbereich des Ger�ts verringern und

sollten vermieden werden.

6. Versuchen Sie nicht, das Ger�t zu zerlegen, zu reparieren oder zu modifizieren.

18 mm

Inhouse lokaler Betrieb

APP
App

Router

Stimmenkontrolle
2

Wipplichtschalter Taste Wandschalter (Zur�cksetzungsschalter)

47 mm

52 mm

S2 L2 S1 L1
LN
3

TECHNISCHE SPEZIFIKATIONEN

Produktart

ZigBee +RF Switch Module

Stromspannung Strom

90-250V AC 10A

Drahtloses Protokoll ZigBee 3.0

Betriebstemp.

-10�C - +40�C

Geh�usetemp.

Tc: +80�C (Max.)

Betriebsbereich 200 m

Dims (WxDxH)

52x47x18 mm

IP Bewertung

IP20

Garantie

1 Jahre

SCHALTPLAN
1. Mit einem Schalter
LN
Lichtschalter

Licht

4

4. Mit Wandssteckdosen
LN
Wandssteckdose
Verdrahtungsanweisungen und Diagramme 1.Schalten Sie die Stromversorgung aus, bevor Sie elektrische Installationsarbeiten durchf�hren. 2.Schlie�en Sie die Kabel gem�� dem Schaltplan an. 3.Setzen Sie das Modul in die Anschlussdose ein. 4.Schlie�en Sie die Energieversorgung an und befolgen Sie die Konfigurationsanweisungen des Schaltermodul. Hinweis: Stellen Sie Ihr Smartphone bei der Konfiguration in die N�he des Schaltermodul und stellen Sie sicher, dass Sie min. 50% WiFi Signal haben. 6

FAQ:
F1:Was kann ich tun, wenn ich das Schaltermudul nicht konfigurieren kann? a.Bitte �berpr�fen Sie, ob das Ger�t eingeschaltet ist. b.Stellen Sie sicher, dass sich Ihr Mobiltelefon und Ihr Zigbee
gataway hub im selben 2,4 GHz WLAN Netzwerk befinden. c.Ob es unter guten Internetbedingungen ist. d.Stellen Sie sicher, dass das in der App eingegebene
Passwort korrekt ist. e.Stellen Sie sicher, dass die Verkabelung korrekt ist F2:Welches Ger�t kann an dieses Zigbee Schaltermodul angeschlossen werden? Die meisten Elektroger�te Ihres Haushalts k�nnen es verbinden werden,wie z.B Lampen, Waschmaschinen, Kaffeemaschinen usw. F3:Was passiert, wenn das WLAN ausgeht? Sie k�nnen die Ger�te weiterhin mit Ihrem herk�mmlichen Schalter steuern, die verbindt zu das Schaltermodul. Sobald das WLAN wieder aktiv ist, stellt das mit dem Modul verbundene Ger�t automatisch eine Verbindung zu Ihrem WLAN Netzwerk her. F4:Was kann ich tun, wenn ich das WLAN oder das Passwort �ndere? Sie m�ssen Ihren ZigBee Gateway Hub gem�� dem App Benutzerhandbuch erneut mit dem neuen WLAN Netzwerk verbinden.
7

HANDBUCH �BERFAHREN
Das Terminal des Zigbee Schaltermodul beh�lt sich den Zugriff auf die manuelle �bersteuerungsfunktion f�r den Endbenutzer zum Ein- und Ausschalten vor. � Ein-/Ausschalten f�r permanente Ein / Aus-Funktion.
Hinweis: 1) Sowohl die Einstellung an der App als auch der Schalter k�nnen zur�ckgesetzt werden, und die letzte Einstellung bleibt im Speicher. 2) Die App Steuerung ist mit dem manuellen Schalter synchronisiert.
APP Benutzhandbuch

iOS App / Android App

Scannen Sie den QR Code, um die Smart Life App

herunterzuladen, oder suchen Sie im App Store oder bei

Googleplay nach dem Stichwort ,,Smart Life", um die App

herunterzuladen.

8

Passend f�r die beiden Schalter

Region
Mobile number/e-mail address Obtain verification code
Melden Sie sich an oder registrieren Sie Ihr Konto mit Ihrer Handynummer oder E-Mail Adresse. Geben Sie den Best�tigungscode ein, der an Ihr Mobiltelefon oder Ihre Mailbox gesendet wurde, und legen Sie dann Ihr Anmeldekennwort fest. Klicken Sie auf ,, Create Family ", um die App aufzurufen.

Taste Wandschalter Wipplichtschalter (Zur�cksetzungsschalter)
Zigbee Verbindung/Zur�cksetzung:
a. F�r Zur�cksetzungsschalter: Dr�cken Sie die Schaltertaste 10 Mal, um den Piepton kontinuierlich zu h�ren. b. F�r Wipplichtschalter: Dr�cken Sie die Schaltertaste 20 Mal (EIN/AUS Zyklus 10 Mal), um den Piepton kontinuierlich zu h�ren. c. F�r Zur�cksetzungstaste: Dr�cken Sie lange die Taste am Modul, um den Piepton als Di-Di (2 Mal) zu h�ren, und dr�cken Sie die Taste erneut lange, um den Piepton kontinuierlich zu h�ren.

(Wi-Fi)
�ffnen Sie die App, w�hlen Sie oben rechts ,,+", w�hlen Sie ,,Switch (ZigBee)", um das Ger�t hinzuzuf�gen. W�hlen Sie das richtige Gateway aus, um die Verbindung zu best�tigen. Hinweis: Stellen Sie sicher, dass Sie einen ZigBee Gateway Hub erfolgreich verbunden haben.

9

10

11

Add Device Add Device
the indicator blinks rapidly
Confirm indicator blinks rapidly
Vergewissern Sie sich, dass das ZigBee Schaltermodul schnell piept (zweimal pro Sekunde).
12

Connecting
Make sure your router,mobile,and device are as close as possible
2%
Device found Register device to the smart cloud initializing device

All Device
Device added successfully Switch Zigbee

Die Verbindung dauert je nach Netzwerkzustand ca. 10-120 Sekunden.
13

Wenn das Pairing abgeschlossen ist, wird der ZigBee Schalter in der App angezeigt.
14

More
Basic information about the device Device Name Device Location Check Network

Supported Third-party Control

Amazon Alexa

Google Assistant

Others

Others
Share Device Create Group Device information Feedback

Stellen Sie eine Verbindung zu Amazon Alexa oder Google Assistant zur Sprachsteuerung her oder teilen Sie die Ger�te mit Ihren Familien oder Freunden.
15

APP

App Steuerung

Stimmenkontrolle

Genie�en Sie Ihr intelligentes Leben in der Hausautomation f�r die Lichtsteuerung, indem Sie unsere Alles-in-Einem Mobileapp �berall auf der Welt verwenden oder einfach per Sprachsteuerung, wenn Sie bequem zu Hause sitzen.
16

Koppeln und l�schen Sie den RF Code
1. So koppeln Sie den RF Code
1.1 F�r Zur�cksetzungsschalter: Dr�cken Sie den Schalter 5 Mal, um den Signalton als Di-Di (2 Mal) f�r eine erfolgreiche Kopplung zu h�ren.
1.2 F�r Wipplichtschalter: Dr�cken Sie den Schalter 10 Mal (EIN / AUS Zyklus 5 Mal), um den Signalton als Di-Di (2 Mal) f�r eine erfolgreiche Kopplung zu h�ren. 1.3 F�r die Zur�cksetzungstaste: Dr�cken Sie lange die Taste am Modul, um die Signalt�ne als Di-Di (2 Mal) f�r eine erfolgreiche Sch�lung zu h�ren
2. So l�schen Sie den RF Code
2.1 F�r Zur�cksetzungsschalter: Dr�cken Sie den Schalter 5 Mal, um die Signalt�ne als Di-Di (2 Mal) zu h�ren, und dr�cken Sie den Schalter nach 5 Sekunden erneut 5 Mal, um die Signalt�ne als Di-Di-Di-Di zu h�ren ( 4 Mal ) f�r eine erfolgreiche L�schung.

2.2 F�r Wipplichtschalter: Dr�cken Sie den Schalter 10 Mal (EIN / AUS Zyklus 5 Mal), um den Signalton als Di-Di (2 Mal) zu h�ren, und dr�cken Sie den Schalter erneut 10 Mal (EIN / AUS Zyklus 5 Mal) nach 5 Sekunden bis H�ren Sie den Signalton als Di-Di-Di-Di (4 Mal) f�r eine erfolgreiche L�schung.
2.3 F�r die Zur�cksetzungstaste: Dr�cken Sie lange die Taste am Modul, um Signalt�ne als Di-Di (2 Mal) zu h�ren, lassen Sie Ihren Finger 5 Sekunden lang los und dr�cken Sie die Taste erneut lange, um die Signalt�ne als Di-Di-Di-Di (4 Mal) f�r eine erfolgreiche L�schung.

3.3 So erreichen Sie eine Multi-Control Assoziation
Hinweis: Bitte best�tigen Sie, dass Sie die oben
beschriebene ZigBee Verbindungsmethode erfolgreich abgeschlossen haben, um diesen Schalter vor der Assoziation zu Ihrer Smart Life App hinzuzuf�gen. 1.WiFi f�gt derselben Smart Life / Tuya App einen weiteren Intelligenter Schalter hinzu. (Wenn der App zuvor ein Intelligenter Schalter hinzugef�gt wurde, fahren Sie einfach mit dem n�chsten Schritt
fort.) Hinweis: Der neu hinzugef�gte Schalter muss nicht an die Leuchte angeschlossen werden. F�r

Neu hinzugef�gter Schalter
Hauptschalter

2.Dann sehen Sie zwei Ger�te in der App und klicken auf den Hauptschalter (als 1 Gang Schalter wie unten), indem Sie in den n�chsten Vorgang eintreten. 3.Klicken Sie auf in die obere rechte Ecke und w�hlen Sie ,,Multi-Control Association", und dann klicken Sie in der rechten Ecke auf ,,+".
4.W�hlen Sie den Schalter aus, dem Sie assoziieren m�chten, und w�hlen Sie dann die Schaltertaste, mit der Sie dasselbe Licht steuern m�chten.

17

18

19

20

5.Kehren Sie dann zur vorherigen Seite zur�ck. Auf der Seite werden zwei Elemente angezeigt. Eines ist Ihr Hauptschalter, das andere ist das, das Sie gerade assoziieren.
Hinweis: Bitte best�tigen Sie, dass der zugeh�rige
Schalter aktiviert ist.

7.Wenn Sie einen weiteren dritten oder mehrere intelligente Schalter hinzuf�gen m�chten, um Ihr Licht zu steuern, wiederholen Sie einfach die
obigen Schritte. Wenn Sie einen weiteren neuen Schalter assoziieren, werden Sie das Ergebnis wie
folgt sehen.

MS-104Z Light Switch

Switch 1

6.Jetzt k�nnen Sie Ihr Licht mit zwei Schaltern steuern. Assoziieren Sie keine weitere Taste im
selben Schalter f�r die Mehrfachsteuerung.

Switch 1 Switch 1

Hauptschalter Assoziiert 1 Assoziiert 2

21

22

23

24