energy meter user manual. 1.Overview of products. 1.1 Applicable range. The DTSU666 meter mainly applied into the measurement and ...
energy meter user manual 1.Overview of products 1.1 Applicable range The DTSU666 meter mainly applied into the measurement and display for the photovoltaic system parameters in the electric circuit including voltage, current, power, frequency, power ... 2/10/2020 11:44:34 PM ...
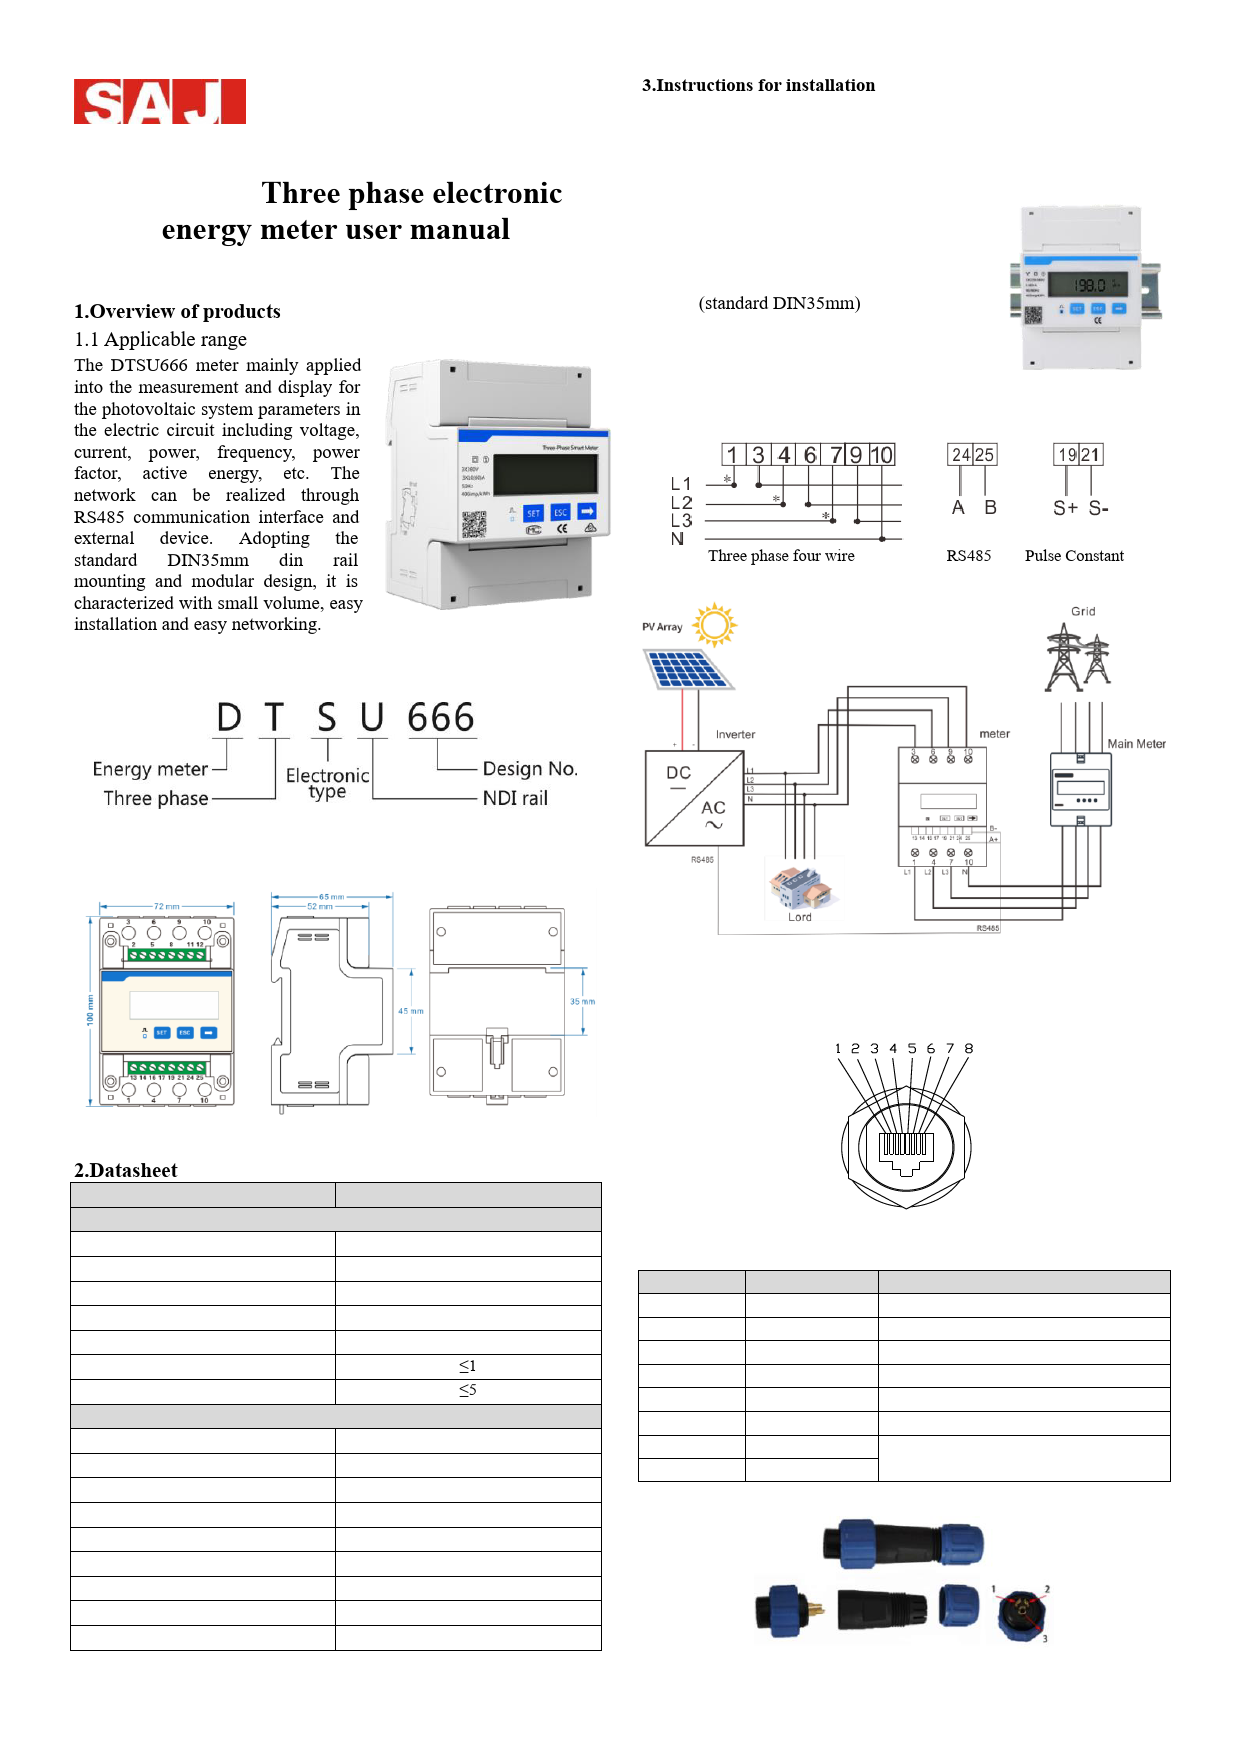
DTSU666 Three phase electronic energy meter user manual
1.Overview of products 1.1 Applicable range The DTSU666 meter mainly applied into the measurement and display for the photovoltaic system parameters in the electric circuit including voltage, current, power, frequency, power factor, active energy, etc. The network can be realized through RS485 communication interface and external device. Adopting the standard DIN35mm din rail mounting and modular design, it is characterized with small volume, easy installation and easy networking.
1.2 Specification for product model

3.Instructions for installation
3.1 Check the Package Check whether the product shell in the carton is damaged, if is, please contact the supplier
3.2 Installation Directly clip the instrument on the rail and install it on the distribution box. (1)When installing, firstly clip one terminal of the slot and then clip to the rail with power. (standard DIN35mm) (2)When disassembling, press the movable card with a screwdriver and take out the instrument.
Figure 3.1 Meter installation
3.3 Instruction of wiring terminal

Three phase four wire

RS485

Figure 3.2 Direct connection

Pulse Constant

1.3 Outline & Mounting Dimension Figure 1.1 Configuration

Figure 3.3 Meter connection diagram
3.4 RS485 interface of inverte

2.Datasheet
Type Electrical Characteristics Application Nominal Voltage[V] Operating range Max. Current [A] Frequency/Range [Hz] Power Consumption[W] Max. Instant Consumption [VA] Physical Parameters Display Communication Operating Temperature Range Ambient Humidity Ingress Protection Installation method Dimensions[H*W*D][mm] Weight [kg] Applicable Standard

DTSU666
Three phase 3×220/380 0.7~1.2Un
80 50,60/±5
1 5
LCD RS485 -40°C~60°C 0-95% Non-condensing IP54 mounting rack 98*72*65
0.4 CE, RoHS

Figure 3.4 RS485 pin of R5series

PinNumber 1 2 3 4 5 6 7 8

Description NC
GND_W +7V_W
NC NC NC RS485-A RS485-B

Effect Ground wire Power supply
Transmission RS485 differential signal

Table 3.1 RS485 pin port definition

Figure 3.4 RS485 connector of Suntrio Plus series

Number of connector 1 2 3

Description BA+
Metal-shielded wire

Table 3.2 RS485 pin port definition

4.Fault and troubleshooting

Fault phenomenon

Reason analysis

Display fault

1.Incorrect wiring 2.Abnormal voltage for the instrument

Communication fault

1.RS485 communication cable is opened, short circuit or reversely connected. 2.Address, baud rate, data bit and check bit is not in accordance with the host computer.

Abnormal data for the electrical parameter

Wrong wiring

Elimination
1.If it is wrongly connected, please reconnect based on the right wiring mode (see the wiring diagram). 2.If the supplied voltage is abnormal, please choose the specified voltage.
1.If there is any problem with the communication cable, please change it. 2.Set the address, baud rate, data bit and check bit through buttons and confirm it is the same with the host computer, then set the operation to be "parameter settings".
If wrongly connected, please connect the voltage of phase A, B and C to the wiring terminal of the instrument

5. Meter setting Button description: "SET" button represents "confirmation", or "cursor shift" (when input digits), "ESC" button represents "exit", "" button represents "add". The input code is (default 701). The factory default value of the baud rate is 9600adress is 1. There
is no need to set, if you need to change as follows:

When input digits, " " can be used as cursor " "motion button; " "is "add" button, " "is Exit the programming operation interface or switch to the character interface from digit modification interface, add from the beginning after setting the digit to the maximum value.
6.Export limitation function setting 6.1 The steps for matching R5 series (1)Download eSolar O&M APP Web to eSolar website https://fop.saj-electric.com to scan the QR code and download "eSolar O&M" APP (or download it from Google Play or App Store by searching "eSolar O&M"). After the installation on your phone, please login it with your installer account.
(2)Log in APP Click "My"  Click "Remote control"  Click "WiFi" /"Bluetooth" Click "Next step". as shown in Figure6.1. Please refer to WiFi/GPRS/4G module manual for detailed connection operation.
(3)Enter "local connect" page and select "Export limitation setting"  input password201561 as shown in Figure6.2.

Current Mode

Power Mode

Export Limit

Figure 6.1 Local connect Figure 6.2 Export limitation setting
(4)Turn on "export limitation", Wait for 15s countdown seconds to set successfullysupply the power mode and current modeas shown in Figure6.3 and Figure6.4

Figure6.3 Countdown interface Figure6.4 Power limit/Current limit setting

6.2 The steps for matching Suntrio Plus series

LCD Display

Operation Steps

Export Limitation Function

Graph

kW 10.8 9.6

8.4

7.2

6.0

4.8

3.6

2.4

1.2

0

3

5

Normal

Setting

Run-Info

Grid Complance Clear Errors Clear Energy LCD Setting Factory Reset Change Password PV Mode Setting Authorization
Export Limit

7

9 11 13 15 17

E-Today 11.33 kWh

About

Power 1230W

E-Today 11.33 kWh

E-Total 14.35 kWh

T-today 1.7 h

19 21h

T-Total 4.6 h

19-07-20 1547

1. In the main LCD interface, press "ENT" button, then press "" key to enter into "Setting". 2. Press "" key to select export limitation, and then press "ENT" button to enter.
Password201561

Graph

Setting

Run-Info

About

Limit enable On Off

Power 1230W

Limit mode

Power mode

E-Today 11.33 kWh

Limit power Limit current
OK

0

%

0.0A

Return

E-Total 14.35 kWh
T-Today 1.7 h
T-Total 4.6 h

Normal

Export Limit

19-07-20 1547

1. Turn on the "Limit enable". 2. Select the "Power mode". 3. Please set the percentage limited by the export limitation power according to practical situation. Click "OK" when completing the setting.

Graph

Setting

Run-Info

About

Limit enable On Off

Power 1230W

Limit mode

Current mode

E-Today 11.33 kWh

Limit power

0

Limit current

0.0A

OK

Return

Normal

Export Limit

%

E-Total

14.35 kWh

T-Today 1.7 h
T-Total 4.6 h
19-07-20 1547

1.Turn on the "Limit enable". 2. Select the "Current mode". 3. Please set export limitation current value according to practical situation. 4. Click "OK" when completing the setting.

Note: 1. Power mode and current mode could be alternatively selected; 2.When the setting is completed, the export limitation system will begin to run.