File info: application/pdf · 48 pages · 1.37MB
Frequently Asked Questions
Bluetooth mode. NOTE: Logitech Gaming Software (LGS) does not detect the G603 gaming mouse while connected to a computer in Bluetooth mode.
Click here to download the manual
logitech g603 manual – Manual Libs
Extracted Text
Frequently Asked Questions
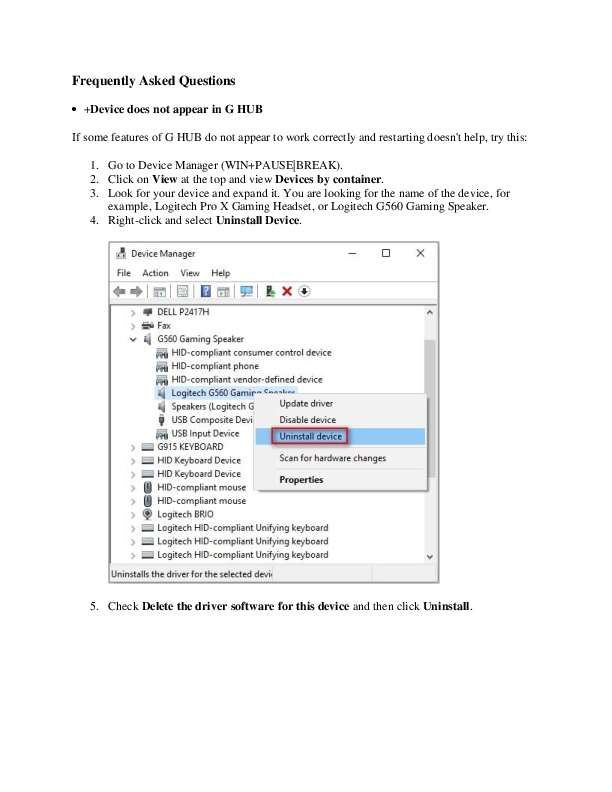
+Device does not appear in G HUB If some features of G HUB do not appear to work correctly and restarting doesn't help, try this:
1. Go to Device Manager (WIN+PAUSE|BREAK). 2. Click on View at the top and view Devices by container. 3. Look for your device and expand it. You are looking for the name of the device, for
example, Logitech Pro X Gaming Headset, or Logitech G560 Gaming Speaker. 4. Right-click and select Uninstall Device.
5. Check Delete the driver software for this device and then click Uninstall.
6. Unplug the device and plug it back into a different USB port. It should re-enumerate and be detected in G HUB.
7. G HUB should then download the driver for your device.
If issues persist:
Run G HUB with the default settings:
1. Exit G HUB by right-clicking the applet in the task tray and selecting Quit. 2. Navigate to C:\Users\[USERNAME]\AppData\Local\LGHUB, where [USERNAME]
will specific to your account. 3. Find settings.json and make a copy and back this up somewhere on your computer. The
Desktop is a good place so you can find it easily. 4. Navigate to C:\Users\[USERNAME]\AppData\Local\LGHUB, where [USERNAME]
will be specific to your account. 5. Delete the settings.json file in the LGHUB folder. 6. Run G HUB. You will notice that all the settings have been set back to default and the
settings.json file has been rebuilt.
Restoring your old settings If you want to restore your old settings:
1. Quit G HUB. 2. Copy and paste the backup of settings.json that you saved earlier into the
C:\Users\[USERNAME]\AppData\Local\LGHUB folder. 3. Run G HUB -- your old settings should be restored.
+G HUB freezes while loading and logo animation loops
If G HUB seems to be stuck while trying to load and the logo animation loops, try the following:
1. Exit G HUB by right-clicking the applet in the task tray and selecting Quit.
2. Navigate to Task Manager (CTRL+ALT+DEL). NOTE: You may also need to click More Details at the bottom of the window Look for LGHUB, LGHUB Agent and LGHUB Updater, right-click and choose End task on each.
3. Once those processes are ended, navigate to C:\Program Files\LGHUB and run these in order: o Lghub_updater.exe o Lghub_agent.exe o Lghub.exe
This should resolve the logo spinning issue. If it doesn't, then make sure you're running with admin privileges. G HUB might need to update and needs admin privileges to do this. If you're using an administrator account and the issue persists, please follow the steps in G HUB Install/Uninstall/Update Troubleshooting.
+Audio device not recognized
If you have problems with a headset or speaker, the following: Revert back to Microsoft drivers:
1. Go to Device Manager (WIN+PAUSE|BREAK). 2. Click on the View tab at the top and select Devices by container. 3. Look for your headset/speaker and expand it. You are looking for the named device, for
example, Logitech G560 Gaming Speaker or Logitech Pro X Gaming Headset.
4. Right-click and click Properties and then select the Driver tab. The Driver Provider should be Logitech -- if it's Microsoft you don't need to change the driver.
5. If the driver is Logitech, click Update Driver and then Browse my computer for driver software > Let me pick from a list... > and choose USB Audio Device.
6. Click Next. This should update back to Microsoft's standard drivers.
Update to latest Logitech Audio Driver:
1. On the same device in Device Manager, right-click on Properties and then click the Driver tab.
2. Click Update Driver > Browse my computer for driver software. 3. Click the Browse button to the right of Search for drivers in this location:
Navigate to: C:\ProgramData\LGHUB\depots\2xxxx\driver_audio\ (note that although the five-digit number might be different, you are looking for a folder containing the driver audio folder).
4. Click Next to update to the latest audio driver.
If issues persist:
1. Go to Device Manager (WIN+PAUSE|BREAK). 2. Click on View at the top and select View devices by container. 3. Look for your device in the list and expand it. You are looking for the named device, for
example, Logitech Pro X Gaming Headset, or Logitech G560 Gaming Speaker. 4. Right-click and select Uninstall device.
5. Check Delete the driver software for this device and then click Uninstall.
6. Unplug the device and plug it back into a different USB port. It should re-enumerate and be detected in G HUB.
7. G HUB should then download the driver for your device. +Connect the G603 gaming mouse to a compatible device
You can connect the G603 gaming mouse to your computer, phone or tablet with the included LIGHTSPEED USB receiver or using Bluetooth. Before you connect your mouse, make sure you've installed one or two AA batteries.
Installing the batteries USB (LIGHTSPEED) mode Bluetooth mode Switching between USB and Bluetooth modes Installing the batteries 1. Position your thumb below the DPI Cycling button as shown.
2. Use your index finger to lift the keyplate, leaving the battery cage exposed.
3. Install one or both of the included AA batteries in the battery cage. If you want to use only one battery, you can install it in either of the available slots.
4. Hold the keyplate above its original position on top of the mouse -- the magnets will help guide it into place.
USB (LIGHTSPEED) Mode 1. Make sure at least one battery is installed in the mouse. 2. Connect the receiver extension cable to a USB port on your computer. Connect the LIGHTSPEED receiver to the other end of the extension cable.
NOTE: You can also connect the LIGHTSPEED receiver directly to a USB port on your computer. 3. Use your thumb to push the power switch at the bottom of the mouse upwards into the LO (endurance mode) or HI (performance mode) position:
o Endurance mode: The report rate of the mouse is fixed at 8 ms (125 Hz) to maximize battery life. The report rate in endurance mode cannot be adjusted using Logitech Gaming Software (LGS).
o Performance mode: By default, the mouse report rate is set to 1 ms (1000 Hz). After installing LGS, you can increase the report rate in performance mode to 2 ms (500 Hz), 4 ms (250 Hz) or 8 ms (125 Hz).
4. The mouse and LIGHTSPEED receiver connect automatically. If you lift the mouse, the LED at the bottom turns solid white for 2 seconds. For more information about the LED indicators, see LED Indicators on the G603 gaming mouse.
TIPS: Keep the mouse and receiver at least 2 m from wireless routers or other 2.4GHz wireless devices to minimize environmental noise. To ensure optimal performance in noisy wireless environments, we recommend that you keep the receiver within 20 cm of the mouse.
Bluetooth mode NOTE: Logitech Gaming Software (LGS) does not detect the G603 gaming mouse while connected to a computer in Bluetooth mode.
1. Make sure at least one battery is installed in the mouse. 2. Use your thumb to push the power switch at the bottom of the mouse upwards into the
LO (endurance mode) position. In endurance mode, the mouse report rate is set to 8 ms (125 Hz) and cannot be adjusted. Hold the easy-switch button for 3 seconds to enter Bluetooth pairing mode.
NOTE: The LED above the easy-switch button starts blinking blue to indicate that the mouse is ready to pair. 3. Follow the instructions in the support articles below to connect a Bluetooth device to your computer, phone or tablet:
o Windows 10: https://support.microsoft.com/help/17156/windows-10-connect-tobluetooth-devices
o macOS Sierra: https://support.apple.com/kb/PH25090 o Chrome OS: https://support.google.com/chromebook/answer/2587653 o Android: https://support.google.com/nexus/answer/2819579
4. If you lift the mouse, the LED at the bottom turns solid blue for 2 seconds. For more information about the LED indicators, see LED Indicators on the G603 gaming mouse.
Switching between USB and Bluetooth modes You can switch between USB and Bluetooth modes at any time by pressing the easy-switch button underneath the mouse.
+G603 gaming mouse performance and endurance modes when using Bluetooth
When your G603 gaming mouse is connected to a device using Bluetooth, the performance is the same whether you're using performance mode (HI position on the power switch) or endurance mode (LO position on the power switch). The mouse report rate is fixed at 8 ms (125 Hz) and cannot be increased.
If you want to change the report rate of the mouse, use the included LIGHTSPEED receiver instead. For more information, see Connect the G603 gaming mouse to a computer.
+LED Indicators on the G603 gaming mouse
There are two LED indicators on the G603 gaming mouse, one on top and the other on the bottom of the mouse.
LED on top of the G603 gaming mouse
LED color
Status
Duration
Mouse is switched from USB
Blue
(LIGHTSPEED) to Bluetooth mode or is turned on while in Bluetooth
5 seconds
mode.
Green
Mouse is switched from Bluetooth mode to USB (LIGHTSPEED) or is 5 seconds turned on while in endurance mode.
Cyan
Mouse is switched from Bluetooth mode to USB (LIGHTSPEED) or is 5 seconds turned on while in performance mode.
Red Battery level below 15%
Blinks for 30 seconds after mouse is turned on in either mode or connection type.
Yellow Sensitivity level 1 active
3 seconds
White Sensitivity level 2 active
3 seconds
Orange Sensitivity level 3 active
3 seconds
Magenta Sensitivity level 4 active
3 seconds
Blue Sensitivity level 5 active
3 seconds
NOTE: The sensitivity level indicators are prioritized over the power on, mode switch, connection switch, and battery level indicators.
For more information about the LIGHTSPEED (USB) and Bluetooth connections or Performance and Endurance modes, see Connect the G603 gaming mouse to a computer.
LED on bottom of the G603 gaming mouse
LED Color
Status
Duration
Solid blue
Mouse is connected to a device in Bluetooth mode.
2 seconds
Solid white
Mouse is connected to a device in USB (LIGHTSPEED) mode.
2 seconds
Slowly blinking blue
Mouse is in Bluetooth mode, not connected to a device.
2 seconds
Slowly
Mouse is in USB (LIGHTSPEED) mode,
blinking white not connected to a device.
2 seconds
Quickly blinking blue
Ready to pair to a Bluetooth device.
3 minutes
+Finding the correct .exe file for a gaming-mouse profile
If you're having trouble with profile detection, you may not have the profile associated with the correct or active game .exe file.
To find the active .exe for a game, you can either:
Associate automatically using a G-Series keyboard with an LCD screen (see 360023243694). OR
Find the .exe through Windows Task Manager (see 360023243694).
NOTE: You only need to do one of the above if the profile is not associated correctly. If you can point to the correct .exe when creating a profile, you don't need to do either one.
+Troubleshooting gaming mouse profile detection using Logitech Gaming Software
You can configure your gaming mouse separately for each game or application on your computer (see 360023406553 for instructions). When a game is launched, the profile associated with it should activate. Sometimes, the profile doesn't activate properly, which can prevent gamespecific settings from being applied.
When a game profile isn't activating properly:
Try using a Persistent Profile (see answer 360023406553 for instructions).
NOTE: Using a persistent profile will help you determine if the Logitech Gaming Software is working properly.
Make sure the correct .exe file is selected for the game (see answer 360023406553 for help).
Check that both the single player and multiplayer .exe files have profiles (see answer 360023406553 for help).
+Troubleshooting mouse button assignments and macros using Logitech Gaming Software
When your button assignments and macros aren't working the way you configured them, the problem usually has to do with the active profile.
Here are some ways to try and resolve this issue:
Lock the profile while the game is running (see answer 360023406013 for instructions). Try using a Persistent Profile to determine if the software is working properly (see
answer 360023406013 for instructions). Check that the correct .exe is selected for the game (see answer 360023406013 for help). Make sure both the single player and multiplayer .exes have profiles (see
answer 360023406013 for help).
+Linking profiles between a G-Series keyboard and gaming mouse using Logitech Gaming Software
Logitech Gaming Software (LGS) shares the profiles between your G-Series keyboard and your gaming mouse, so no manual profile linking is needed. Macros and keystrokes you configured for your G-Series keyboard can be assigned to your gaming mouse, and mouse button presses you configured for your gaming mouse can be assigned to your G-Series keyboard.
NOTE: Certain mouse-specific buttons, like DPI Shift, can only be used with LGS-compatible mice. If you assign a G-Key on your keyboard as DPI Shift with a non-LGS mouse, the button will have no effect. Most other button presses, like Left and Right Click, can be assigned to your G-Keys.
+Gaming mouse profile stops working in the middle of a game
When a profile stops working in the middle of a game, there are two possible causes. Either the profile is:
Not associated with the correct .exe file The profile is detected in the game launcher or menu, but stops working while playing the game. This happens when the profile isn't associated to the correct .exe file. You can fix this by assigning the game's .exe file to the profile and not the launcher's .exe file. See 360023405833 for instructions.
OR
Reverted to the Default Profile Another application running on your computer may come to the foreground, causing the active profile to revert to the Default Profile. You can fix this by locking the profile assigned to the game. See 360023405833 for instructions.
+Cursor does not follow gaming mouse movements
If the cursor isn't following the movements of your mouse, try the following:
Make sure your mouse is firmly connected to a USB port on your computer (not to a USB hub).
Try a different mouse pad. Check the sensor port (on the bottom of the mouse) for dust or lint. Avoid using your mouse on:
o Glass or other see-through surfaces o Reflective surfaces, such as mirrors and metal desks o Wood grains and grooved surfaces o Very high gloss finished surfaces Try the mouse on a piece of white paper to make sure it isn't a tracking issue on a particular surface you're using.
If the above steps don't resolve your problem, the erratic movement may be caused by software (for example, if the cursor speed is set too fast).
+My gaming-mouse profile stopped working after a game update
Each profile is associated with a specific .exe file. Sometimes, when you install a game update or expansion pack, the location of the correct.exe may change.
If you recently installed a game update and then your game profile stopped working, see answer 360023405693 for help with finding the current game .exe.
+Gaming mouse and keyboard compatibility with USB hubs and KVM switches
We don't support the use of third-party devices with our mice and keyboards. They can interfere with communication between a mouse or keyboard and the computer.
Unsupported third-party devices include:
KVM switch boxes Port replicators Docking stations USB hubs
NOTE: The manufacturers of these third-party devices implement keyboard and mouse support in different ways. There is currently no industry standard. +Setting different DPIs for gaming-mouse profiles using Logitech Gaming Software Logitech Gaming Software (LGS) configures DPI and other mouse pointer adjustments to work on all profiles by default. Using LGS, you can set different DPIs and pointer behavior for each game profile. NOTE: This is an advanced setting and each game's profile will have to be individually configured, but it allows for maximum flexibility and configurability. To set up different DPI settings for profiles:
1. Open the Logitech Gaming Software: Start > All Programs > Logitech > Logitech Gaming Software 8.x NOTE: Make sure Logitech Gaming Software is set to "Automatic Game Detection".
2. Click Customize Pointer Settings.
The Pointer Settings window will appear.
3. Select the "Enable per profile pointer settings" check box under the Advanced section. The Profiles area will appear in your window.
You can now set different DPI levels and report rates for each profile. The settings will stay as long as "Enable per profile pointer settings" is selected. If you:
Clear this check box -- the software will revert back to a single DPI setting for all applications.
Select this check box again -- the pointer settings you set up for each profile will be restored.
+Purchase a new gaming mouse receiver If you've lost or misplaced the receiver for your gaming mouse:
1. Go to support.logitech.com. 2. Search for your gaming mouse or use the drop-down menus to locate the product's
support page.
3. If there is a spare receiver for your gaming mouse, it'll be listed under "Spare Parts". Select the part and then click Add to cart.
If there isn't a spare receiver listed for your gaming mouse, please contact Logitech Support. +Gaming mouse compatibility with Logitech Unifying receivers The Logitech G403 Wireless, G304, G305, G603, G703, G903 are built on the LIGHTSPEED architecture and connect to proprietary LIGHTSPEED receivers. They are not compatible and cannot be paired with the Unifying receiver. +Pair Logitech G gaming mouse to a LIGHTSPEED receiver If your gaming mouse becomes unpaired or if you receive a replacement LIGHTSPEED receiver, follow these instructions to pair your mouse with the receiver:
1. Connect the LIGHTSPEED receiver to a USB port on the computer. 2. Download the Logitech Connection Utility from the Downloads page. 3. Launch the Logitech Connection Utility. 4. Press Next to start the pairing process.
5. Turn the mouse OFF and then ON using the power switch on the bottom of the mouse.
6. Your gaming mouse should now be paired with the receiver. Click Yes and then Next. 7. Click Finish to exit the Logitech Connection Utility.
+Gaming mouse double-clicks when clicked once
If your gaming mouse clicks two or more times when clicked once, try the troubleshooting steps below:
1. Disable the single-click to open option in Windows: o Windows 8 or Windows 10 Click on the magnifying glass to bring up the Search menu, type `singleclick', and then select Specify single- or double-click to open. Select the General tab, and under Click items as follows, make sure Double-click to open an item (single-click to select) is selected.
2. Windows 7 or Windows Vista: o Click on Computer.
o On the menu bar, click Organize then Folder and Search Options.
o Under the General tab, make sure that the option Double-click to open an item (single-click to select) is selected.
o Click OK to save and exit. 3. Test the mouse in multiple programs and components such as Control Panel or Windows
Explorer on Windows, and Disk Utility or Finder on Mac OS. If the double-click is specific to one program, check the application settings or command assignments for the specific profile in Logitech Gaming Software. 4. Bypass any power hubs or extenders and connect your mouse cable or receiver to a different USB port on the computer's motherboard, if possible. 5. Test the mouse on a different computer that is functional. 6. Contact Logitech Support if the double-click issue appears on a different computer. Let us know what troubleshooting steps have been attempted.
+Inconsistent gaming mouse tracking behavior
If the cursor for your gaming mouse stutters, or skips during general usage, try these troubleshooting steps:
1. If you have Logitech Gaming Software (LGS) installed: o Lower your DPI sensitivity in the Customize Pointer Settings tab. o If your gaming mouse supports surface tuning, tune your mouse to the surface in use. See Surface Tuning your gaming mouse for more information.
2. If you don't have LGS installed, lower your Pointer Speed in Control Panel > Mouse > Pointer Options:
3. If your mouse is wireless: o Recharge the mouse using the included cable or replace the batteries. o Make sure the mouse and USB receiver are at least 2 meters away from wireless routers and other 2.4 GHz wireless devices. o Keep the USB receiver within 20 cm of the mouse. o Temporarily disconnect any other wireless devices and observe the effect on the tracking performance.
4. The sensor lens may be dirty. Turn your mouse over and thoroughly clean any dirt or lint covering the lens.
5. Try using the mouse on a piece of white paper to make sure it isn't a tracking issue on a particular surface you're using.
If none of these suggestions work, please contact Logitech Support and let us know what troubleshooting steps you've tried. +Inconsistent tracking behavior between gaming mouse performance and endurance modes If you notice inconsistent tracking behavior with the same sensitivity (DPI) levels between the performance and endurance modes on your gaming mouse, you need to disable the Enhance pointer precision mouse setting in Windows. Here's how:
1. Open the Control Panel. 2. Click Mouse to open the Mouse Properties window. 3. Click the Pointer Options tab. 4. Uncheck Enhance pointer precision.
5. Click OK to save your changes. +Customize G603 gaming mouse command assignments with Logitech Gaming Software
You can use Logitech Gaming Software (LGS) 8.96 or later to customize command assignments for the buttons on your G603 gaming mouse:
Automatic Game Detection On-Board Memory NOTE: For help choosing between the two modes, see Choose between gaming mouse OnBoard Memory and Automatic Game Detection modes. LGS does not detect to the G603 gaming mouse while connected to a computer in Bluetooth mode. Left and right mouse button commands can only be swapped. Automatic Game Detection 1. Open LGS. 2. In the Home window, make sure the blue toggle marker is set to Automatic Game
Detection, and then click the glowing Customize buttons icon.
3. Click on the profile you want to customize command assignments for. The active profile will have a blue highlight bar above its name.
4. To assign a command to a mouse button, do one of the following: o Double-click on the listed assignment to begin assigning a new command. o Drag and drop an existing command from the Commands list in the left pane onto a mouse button. When you drag a command over the button, the area will become highlighted.
5. You can also right-click on a button or its assignment for additional options:
o Assign New Command -- click to open the Command Editor window. o Edit Command -- click to open the Command Editor window. o Use Generic -- click to revert the command assignment to its original state. o Unassign -- click to remove all command assignments from the selected mouse
button.
On-Board Memory 1. Open LGS.
2. In the Home window, make sure the blue toggle marker is set to On-Board Memory, and then click the Customize on-board profile icon.
3. To assign a command to a mouse button, double-click on the listed assignment or right click on any mouse button for additional options: o Assign New Command -- click to open the Command Editor window. o Edit Command -- click to open the Command Editor window. o Use Generic -- click to revert the command assignment to its original state. o Unassign -- click to remove all command assignments from the selected mouse button.
Command Editor 1. You can create or edit a command using the following customization options: o Keystroke -- assign a single key press or a key press with modifiers. o Multi Key -- assign a "macro'd" series of keystrokes (either with or without recorded time delays). o Text Block -- create a block of text to be typed out when the mouse button is pressed. o Mouse Function -- assign a mouse button to use any of the available mouse functions. o Media -- set a mouse button to control media playback or volume. o Hotkeys -- use a predefined keystroke command. o Shortcut -- assign a mouse button to launch a file, folder, drive, or Web page on your computer.
o Function -- assign a mouse button to act like a Microsoft function key (ex. to open your web browser).
o Ventrilo -- assign a mouse button for Ventrilo commands, if installed on your computer.
NOTE: Certain customization options are only available while the mouse is in Automatic Game Detection mode.
2. Click OK to assign the desired command to the mouse button.
+Customize G603 pointer settings with Logitech Gaming Software
You can use Logitech Gaming Software (LGS) 8.96 or later to customize pointer settings on the G603 gaming mouse in two different modes:
Automatic Game Detection On-Board Memory
NOTE: For help choosing between the two modes, see Choose between gaming mouse OnBoard Memory and Automatic Game Detection modes. LGS does not detect the G603 gaming mouse while connected to a computer in Bluetooth mode.
Automatic Game Detection
1. Open LGS 2. In the Home window, make sure the blue toggle marker is set to Automatic Game
Detection, and then click the glowing pointer-gear icon.
The Pointer Settings window appears:
Your gaming mouse supports the following pointer customizations in Automatic Game Detection mode:
DPI levels -- Configure up to five levels, from 200-12000 in 50 DPI increments. Report rate (performance mode only) -- Update from 125/sec (8ms response time) to
1000/sec (1ms response time). Per profile pointer settings -- Enable different pointer behavior for each game profile. Acceleration -- Enhance pointer precision � the mouse pointer increases speed when
you move it. For some games, this can be turned off to improve accuracy.
To configure your pointer settings:
1. Under DPI Sensitivity Levels, drag the tick marks along the graph. For each DPI level, you'll see a tick mark with a unique color. The LED on top of the mouse shows the unique color of the active level while using DPI Cycling command. You can set up to five sensitivity levels. NOTE: If you prefer, you can edit the list of DPI values to the left of the graph from 20012000. For each DPI level you set, you'll see a tick mark rounded to the nearest 50. For example: If you type in "682", the software will round to 700 DPI. o Assign Default -- One DPI level must always be the default. To change the default, click a DPI level that doesn't have a blue diamond above it, and then click Assign Default. This is the DPI level the mouse will return to when you: Press the default DPI button Switch between profiles Power up the computer Wake the computer from sleep mode o Assign Shift -- You can quickly activate a DPI level when you press the DPI Shift button. For example, you can set Assign Shift to a low DPI value, which will temporarily give you extreme precision. When you release the button, the mouse will revert back to the current DPI level. To set the Shift DPI, select a DPI level that doesn't have an orange rectangle above it, and then click Assign Shift. TIP: Buttons you assign as DPI Up, DPI Down, DPI Shift and DPI Cycling will enable you to change between DPI levels rapidly.
2. In Performance Mode, change the Report Rate, if you prefer something other than the default of 1000 reports/second (1ms response time). The Report Rate controls how often your mouse updates its position to the computer. NOTE: The report rate setting cannot be changed while the G603 gaming mouse is in endurance mode. Switch to performance mode if you want to increase the report rate. The possible range is from 125/sec (8ms response time) to 1000/sec (1ms response time). You can: o Decrease processor use by reducing the report rate. o Increase the mouse response by raising the report rate. o Extend battery life by reducing the report rate.
3. Make your preferred selections under Advanced. The options are: o Enable per profile pointer settings -- Select this option to enable each profile in LGS to have different pointer behavior (see Setting different DPIs for gamingmouse profiles using Logitech Gaming Software for help). o Acceleration (Enhance Pointer Precision) -- Select this option to use Window's "Enhance Pointer Precision" acceleration.
TIP: For gaming accuracy, we recommend leaving this unchecked, but you can enable it if you prefer the feel of default Windows acceleration. On-Board Memory In On-Board Memory mode, all of the customizations you make will be written directly to the mouse. You can utilize the on-board memory customizations while the mouse is connected over Bluetooth. Your gaming mouse supports these pointer customizations in On-Board Memory mode: DPI levels -- Configure up to five levels, from 200-12000 in 50 DPI increments. Report rate (Performance mode only) -- Update from 125/sec (8ms response time) to 1000/sec (1ms response time). To customize pointer settings: 1. Open LGS 2. In the Home window, make sure the blue toggle marker is set to On-Board Memory, and then click the glowing pointer-gear icon.
The customize on-board profile window appears:
3. Under DPI Sensitivity Levels, drag the tick marks along the graph. For each DPI level, you'll see a tick mark with a unique color. The LED on top of the mouse shows the unique color of the active level while using the DPI Cycling mouse function. You can set up to five sensitivity levels. o Assign Default -- One DPI level must always be the default. To change the default, click a DPI level that doesn't have a blue diamond above it, and then click Assign Default. This is the DPI level the mouse will return to when you: Press the default DPI button Switch between profiles Power up the computer Wake the computer from sleep mode o Assign Shift -- You can quickly activate a DPI level when you press the DPI Shift button. For example, you can set Assign Shift to a low DPI value, which will temporarily give you extreme precision. When you release the button, the mouse will revert back to the current DPI level. To set the Shift DPI, select a DPI level that doesn't have an orange rectangle above it, and then click Assign Shift. TIP: Buttons you assign as DPI Up, DPI Down, DPI Shift and DPI Cycling will enable you to change between DPI levels rapidly.
4. In Performance Mode, change the Report Rate, if you prefer something other than the default of 1000 reports/second (1ms response time). The Report Rate controls how often your mouse updates its position to the computer. NOTE: The report rate setting cannot be adjusted while the G603 gaming mouse is in endurance mode. Switch to performance mode if you want to change the report rate. The possible range is from 125/sec (8ms response time) to 1000/sec (1ms response time). You can:
o Decrease processor use by reducing the report rate. o Increase the mouse response by raising the report rate. o Extend battery life by reducing the report rate.
+Solved - Issue with USB devices after Windows 10 update KB4074588
Logitech is aware of a Microsoft update (OS Build 16299.248) which is reported to affect USB support on Windows 10 computers.
Support statement from Microsoft "After installing the February 13, 2018 security update, KB4074588 (OS Build 16299.248), some USB devices and onboard devices, such as a built-in laptop camera, keyboard or mouse, may stop working for some users."
If you are using Microsoft Windows 10, (OS Build 16299.248) and are having USB-related issues. Microsoft has released a new update KB4090913 (OS Build 16299.251) to resolve this issue.
We recommend you follow Microsoft Support recommendations and install the latest Microsoft Windows 10 update: https://support.microsoft.com/en-gb/help/4090913/march52018kb4090913osbuild16299-251.
This update was released by Microsoft on March 5th in order to address the USB connection issues and should be downloaded and installed automatically using Windows Update.
For instructions on installing the latest Microsoft update, please see below:
If you have a working keyboard/mouse If you have a non-working keyboard/mouse
If you have a working keyboard/mouse:
1. Download the latest Windows update from Microsoft. 2. If your operating system is 86x-based, click on the second option. If your operating
system is 64x-based, click on the third option.
3. Once you have downloaded the update, double-click on the downloaded file and follow the on-screen instructions to complete the update installation.
NOTE: If you wish to install the update manually, you can download the 86x and 64x versions of the update from http://www.catalog.update.microsoft.com/360023357433.aspx?q=KB4090913 If you currently have no working keyboard/mouse: For more information, see the Microsoft article on how to start and use the Windows 10 Recovery Environment (WinRE): https://support.microsoft.com/en-us/help/4091240/usb-devices-may-stop-working-afterinstalling-the-february-13-2018-upd Do the following:
1. Restart the system before Windows finishes loading the desktop three times in a row. Windows should automatically start the Windows 10 Recovery Environment (WinRE).
2. Once in WinRE select Troubleshoot > Advanced Options > Startup Settings. 3. In the bottom right corner of the window, click Restart.
4. Press 5 on your keyboard to select Enable Safe Mode with Networking.
5. In Windows Safe Mode, navigate to Windows Settings (Win+I) > Update and Security > Windows Update and install the latest updates.
+Logitech Gaming Software for Mac Release Notes Version 8.98.306 Version 8.96.40 Version 8.96.38 Version 8.96.36 Version 8.94.35 Version 8.92.37 Version 8.89.38 Version 8.87.92
Version 8.98.306 Post Date: 1-MAY-2018 OS: Mac OS X 10.11.x, Mac OS X 10.12.x, Mac OS X 10.13.x Why Update? o Added support for: G560 LIGHTSYNC PC Gaming Speaker (DTS-X Surround Sound and Audio Visualizer not supported) G513 Silver RGB Mechanical Gaming Keyboard G513 Carbon RGB Mechanical Gaming Keyboard G512 Carbon RGB Mechanical Gaming Keyboard G430 Gaming Headset (Dolby 7.1 Surround Sound not supported)
G433 Gaming Headset (DTS Headphone:X� 7.1 Surround Sound not supported)
G533 Wireless Gaming Headset (DTS Headphone:X� 7.1 Surround Sound not supported)
G633 Artemis Spectrum (DTS Headphone:X� 7.1 and Dolby 7.1 Surround Sound not supported)
G933 Artemis Spectrum and Artemis Spectrum Snow Wireless Gaming Headset (DTS Headphone:X� 7.1 and Dolby 7.1 Surround Sound not supported)
o Improved the UI for C920 & C922 cameras to be more consistent with other supported cameras
Version 8.96.40
Post Date: 12-MAR-2018 OS: Mac OS X 10.10.x, Mac OS X 10.11.x, Mac OS X 10.12.x Why Update?
o Added support for: G603 Wireless Gaming Mouse G613 Wireless Mechanical Gaming Keyboard BRIO 4K STREAM EDITION Camera
o Added a firmware update for the G102 and G203 to increase the max sensor DPI to 8000
o Added option to gather anonymous data to help us understand how LGS is used so we can improve it in future releases
o Minor bug fixes
Version 8.96.38
Post Date: 18-OCT-2017 OS: Mac OS X 10.10.x, Mac OS X 10.11.x, Mac OS X 10.12.x Why Update?
o Added support for: G603 Wireless Gaming Mouse G613 Wireless Mechanical Gaming Keyboard BRIO 4K STREAM EDITION Camera
o Added a firmware update for the G102 and G203 to increase the max sensor DPI to 8000
o Added option to gather anonymous data to help us understand how LGS is used so we can improve it in future releases
o Minor bug fixes
Version 8.96.36
Post Date: 19-SEP-2017 OS: Mac OS X 10.10.x, Mac OS X 10.11.x, Mac OS X 10.12.x Why Update?
o Added support for: G603 Wireless Gaming Mouse G613 Wireless Mechanical Gaming Keyboard BRIO 4K STREAM EDITION Camera
o Added a firmware update for the G102 and G203 to increase the max sensor DPI to 8000
o Added option to gather anonymous data to help us understand how LGS is used so we can improve it in future releases
o Minor bug fixes
Version 8.94.35
Post Date: 1-AUG-2017 OS: Mac OS X 10.10.x, Mac OS X 10.11.x, Mac OS X 10.12.x Why Update?
o Support added for: POWERPLAY Wireless Charging System G703 LIGHTSPEED Wireless Gaming Mouse G903 LIGHTSPEED Wireless Gaming Mouse
o Minor bug fixes
Version 8.92.37
Post Date: 19-APR-2017 OS: Mac OS X 10.10.x, Mac OS X 10.11.x, Mac OS X 10.12.x Why Update?
o Support added for: G90 Gaming Mouse Pro Mechanical Gaming Keyboard G413 Mechanical Gaming Keyboard
o Firmware Update: LogiProGamingKeyboardUpdate_v13 - Optimizes key response rates for faster gaming performance.
o Minor bug fixes
Version 8.89.38
Post Date: 16-FEB-2017
OS: Mac OS X 10.10.x, Mac OS X 10.11.x, Mac OS X 10.12.x Why Update?
o Support added for: G102 Prodigy Gaming Mouse G203 Prodigy Gaming Mouse (black only) C922 Pro Stream Webcam
o New Features: Custom Lighting Effects Editor added to the Lighting view for per-key RGB keyboards G410 Altas Spectrum G810 Orion Spectrum G910 Orion Spectrum G910 Orion Spark Optional firmware update for the G610 Orion keyboard to address a high pitch whine on some keyboards
o Firmware Update: G410Update_v14 - Enhanced lighting effects performance for use with Lighting Editor features. G610Update_v12 - Eliminates noise that occurred at some lighting levels and settings. G810Update_v31 - Enhanced lighting effects performance for use with Lighting Editor features. G910Update_v26 - Enhanced lighting effects performance for use with Lighting Editor features. G910R2Update_v7 - Enhanced lighting effects performance for use with Lighting Editor features.
o Minor bug fixes
Version 8.87.92
Post Date: 12-OCT-2016 OS: Mac OS X 10.10.x, Mac OS X 10.11.x, Mac OS X 10.12.x Why Update?
o Support added for: G403 Prodigy Gaming Mouse G403 Prodigy Wireless Gaming Mouse G213 Prodigy Gaming Keyboard Pro Gaming Mouse C920 HD Pro Webcam C930e Pro Webcam G29 Driving Force G920 Driving Force G610 Orion US-International Keyboard (PID_338)
G810 Orion Spectrum US-International Keyboard (PID_337) o Firmware Update:
G910Update_v22: Fixed an issue where the Caps, Num, and Scroll Lock indicator lights may not show the correct status.
G810Update_v27: Fixed an issue where the Caps, Num, and Scroll Lock indicator lights may not show the correct status.
G920Update_96_3_49: Fixed an issue with missing forces in rFactor 2. Removed single-sided damping effect at low forces. Fixed various minor issues with Force Feedback on PC. Wheel range no longer resets to 900 degrees when entering XBox One
dashboard. o Release Notes:
G920 Driving Force is not supported in Euro Truck Simulator 2 and American Truck Simulator
G29 Driving Force is not supported in GRID Autosport
+Create and scan for profiles with Logitech Gaming Software
Logitech Gaming Software (LGS) includes support for approximately six hundred games as of release 8.91. When you run the software for the first time, it should scan and automatically set up game profiles for you. If you install more games later, you can rescan for supported games and have profiles imported for them. You use profiles to customize pointer, lighting or Gkey/function key command assignments for every individual game and application. If you prefer, you can also just use one profile for all your games and applications.
There are two ways to set up profiles for your games or applications:
Scan for new games Create new profiles
Scan For New Games
Logitech Gaming Software's game profiles are created using registry entries from either Steam, uPlay, Battle.net, or Origin. Certain game profiles are associated with multiple publisher's registry entries, but the majority are linked to the Steam registry entry, excluding the games that are available exclusively on Battle.net or Origin. See a complete list of games here.
1. Open Logitech Gaming Software (LGS). 2. Navigate to the Home window for your mouse, keyboard or headset. 3. Select Customize buttons, Customize Function keys or Customize G-keys depending
on the device. 4. In the Profiles pane, click Scan For New Games.
5. Once the profiler has completed its scan, click OK to add the profiles to your list. NOTE: A profile for the selected game should appear in the Profiles pane.
If you own a game that is not automatically detected by the Scan for New Games feature, you can make a few minor adjustments to set up the profile. For more information, please see Scan For New Games does not detect game in Logitech Gaming Software.
Create new profiles
If the Scan For New Games list does not contain the game you want, LGS offers the ability to create your own profile. Here's how: TIP: LGS can store profiles for any program executable (.exe) file. Use this to customize commands assignments for productivity programs.
1. Open Logitech Gaming Software (LGS). 2. Navigate to the Home window for your mouse, keyboard or headset. 3. Select Customize buttons, Customize Function keys or Customize G-keys depending
on the device. 4. In the Profiles pane, click Create new profile ("+").
The New Profile window appears:
5. Type distinct names for your profile in the Name and Description boxes.
6. Click "+" and use the Windows Explorer window that appears to navigate to and open your executable (.exe) file. NOTE: You can assign multiple executable files to the same LGS profile.
7. Select the checkbox to Lock profile while game is running to prevent other profiles from becoming active while your game or application is running.
8. If you prefer to use another profile's lighting, command assignment or pointer settings as a starting point, select the checkbox to Copy from an existing profile. Use the dropdown menu to select a profile to copy settings from.
9. Click OK to save changes and add the new profile. NOTE: A new profile for the game or application should appear in the Profiles pane.
+View current profiles in Logitech Gaming Software To see your current gaming profiles in Logitech Gaming Software (LGS) for your gaming mouse, keyboard or headset:
1. Open Logitech Gaming Software 2. Select your product by using the arrows at the bottom left of the LGS window.
3. Do one of the following, depending upon your device type: o Mouse -- click Customize Buttons if your mouse is in Automatic Game Detection mode. Click Customize on-board profile if your mouse is in OnBoard Memory mode.
o Keyboard -- click Customize Function Keys or Customize G-Keys.
o Headset -- click Customize G-Keys.
4. The profiles you've created will show in alphabetical order in the Profiles area at the top of the window.
+Digital signature error when Logitech Gaming Software is installed on Windows 7 computers
You may see a digital signature error when you install Logitech Gaming Software (LGS) on some Windows 7 computers. All recent versions of LGS require the following Microsoft Windows security update to be installed prior to installing LGS:
Security Update for Windows 7 Systems (KB3033929)
The security update adds support for SHA-2 driver signing and verification functionality. There are two versions -- one for Windows 7 32-bit (x86) and one for Windows 7 64-bit (x64). Make sure you've downloaded and installed the correct version for your computer before you install LGS. +Logitech Gaming Software for Windows Release Notes
Version 8.98.234 Version 8.96.88 Version 8.94.108 Version 8.92.67 Version 8.91.48 Version 8.90.117 Version 8.89.68
Version 8.98.234
Post Date: 18-APR-2018 OS: Windows 8, Windows 7, Windows 10 Why Update?
Added support for: o G560 LIGHTSYNC PC Gaming Speaker o G513 Silver RGB Mechanical Gaming Keyboard o G513 Carbon RGB Mechanical Gaming Keyboard o G512 Carbon RGB Mechanical Gaming Keyboard
Improved the UI for C920 & C922 cameras to be more consistent with other supported cameras
New game profiles: o Assassin's Creed Origins o Call of Duty: WWII o Destiny 2 o Fortnite o Kingdom Come: Deliverance o Metal Gear Survive
o Middle-earth: Shadow of War o Project Cars 2 o South Park The Fractured But Whole o Star Wars: Battlefront II o The Evil Within 2 o Wolfenstein II: The New Colossus Minor bug fixes.
Version 8.96.88
Post Date: 21-AUG-2017 OS: Windows 8, Windows 7, Windows 10 Why Update?
o Support added for: G603 Wireless Gaming Mouse G613 Wireless Mechanical Gaming Keyboard Brio 4K Streaming Edition Webcam
o Added a firmware update for the G102 and G203 to increase the max sensor DPI to 8000
o Added option to gather anonymous data to help us understand how LGS is used so we can improve it in future releases
o New game profiles for: Agents of Mayhem Gigantic LawBreakers
o Minor bug fixes
Version 8.94.108
Post Date: 19-JUN-2017 OS: Windows 8, Windows 7, Windows 10 Why Update?
o Added support for G433 Gaming Headset POWERPLAY Wireless Charging System G903 LIGHTSPEED Wireless Gaming Mouse G703 LIGHTSPEED Wireless Gaming Mouse
o New game profiles: Prey (2017) PLAYERUNKNOWN'S BATTLEGROUNDS
o Added a firmware update for the G403 and G900 to optimize clock tuning parameter
o Fixed an issue with localized layouts not being correctly displayed for the G413 o Fixed an issue where a user's custom lighting would be reverted to the HW
default when locking their system o Minor bug fixes
Version 8.92.67
Post Date: 19-APR-2017 OS: Windows 8, Windows 7, Windows 10 Why Update?
o Added support for the G413 Mechanical Gaming Keyboard o New game profiles:
For Honor Ghost Recon Wildlands Mass Effect: Andromeda Resident Evil 7 o Minor bug fixes
Version 8.91.48
Post Date: 4-JAN-2017 OS: Windows 8, Windows 7, Windows 10 Why Update?
o Added support for the G90 gaming mouse o Added a link to Overwolf in the LGS user interface o Minor bug fixes. o Added support for the Pro mechanical gaming keyboard
Version 8.90.117
Post Date: 4-JAN-2017 OS: Windows 8, Windows 7, Windows 10 Why Update?
o Support added for G533 Gaming Headset o Minor bug fixes
Version 8.89.68
Post Date: 15-DEC-2016 OS: Windows 8, Windows 7, Windows 10 Why Update?
o Custom Lighting Effects Editor added to the Lighting View for per-key RGB keyboards.
o Fix to address stuck mic mute issue on G933 headset. o New game profiles:
Battlefield 1 Call of Duty: Infinite Warfare Mafia III Watch Dogs 2 Elder Scrolls V: Skyrim Special Edition Sid Meier's: Civilization VI Titanfall 2 Dishonored 2 Tyranny o Optional G610 Orion keyboard firmware update to address a high-pitched whine on some keyboards. o Firmware updates for the following keyboards to enhance lighting performance with the new Lighting Effects Editor: G410 Altas Spectrum G810 Orion Spectrum G910 Orion Spectrum G910 Orion Spark o Added an option to the G933 FW update tool allowing the user to choose between G933 and G933 Snow, so that the proper device image will show in LGS after a firmware update. o Minor bug fixes.