FREEMANS Laser Distance Meter
Model Series: PRO-L40, PRO-L60, PRO-L100
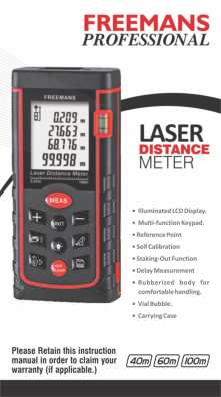
Product Overview
The FREEMANS Laser Distance Meter is a versatile tool designed for accurate distance measurements. It features an illuminated LCD display, a multi-function keypad, and a rubberized body for comfortable handling. The device supports various measurement modes including single, continuous, area, volume, and Pythagorean indirect measurements. It also includes features like self-calibration, delay measurement, and staking-out functions.
Key Features:
- Illuminated LCD Display
- Multi-function Keypad
- Reference Point selection
- Self Calibration
- Staking-Out Function
- Delay Measurement
- Rubberized body for comfortable handling
- Vial Bubble [Vial Bubble]
- Carrying Case
This manual provides comprehensive instructions for operation, maintenance, and troubleshooting. Please retain this instruction manual to claim your warranty (if applicable).
Available models support measurements up to 40m, 60m, and 100m.
Keyboard Layout and Basic Operations
Single Measurement
Press the [MEAS] button. The laser will be emitted to shoot the measuring location.
Continuous Measurement
Long press the [MEAS] button to enter continuous measurement mode. Maximum and minimum measurement results will be displayed. Press the [MEAS] button again to exit continuous measurement mode.
Area Measurement
Press a designated key to enter Area mode, indicated by a rectangle with one edge flashing on the display. Measure the first edge (length) using [MEAS]. Then, measure the second edge (width) using [MEAS]. The area will be calculated automatically. Press [OFF/CLEAR] to remove the previous result and prepare for the next measurement.
Volumetric Measurement
Double press a designated key to enter Volume mode, indicated by a cube with one edge flashing. Measure the first edge (length) using [MEAS], the second edge (width) using [MEAS], and the third edge (height) using [MEAS]. Volume will be calculated automatically. Press [OFF/CLEAR] to reset.
Pythagorean Proposition Indirect Measurement
This function allows indirect measurement of lengths using triangles.
Mode 1: Measuring one side
Press the [UNIT] key to enter Pythagorean mode. Press the [UNIT] key again, and a triangle with its hypotenuse flashing will appear on the display. Measure the length (a) of the dotted line hypotenuse using [MEAS]. Then, measure the length (b) of the dotted line base using [MEAS]. The length (x) of the solid line right side will be calculated automatically.
Mode 2: Measuring one side
Double press the [UNIT] key. A triangle with a vertical leg flashing will appear. Measure the length (a) of the dotted line vertical leg using [MEAS]. Then, measure the length (b) of the other dotted line base using [MEAS]. The length (x) of the solid line hypotenuse will be calculated automatically.
Mode 3: Measuring two sides
Press the [UNIT] key 3 times. A triangle with hypotenuse flashing will appear. Measure the length (a) of the dotted line hypotenuse using [MEAS]. Measure the length (b) of the dotted line hypotenuse (of the smaller triangle) using [MEAS]. Measure the length (c) of another dotted line, the base of both triangles, using [MEAS]. The length (x) of the solid line right side will be calculated automatically.
Mode 4: Measuring two sides
Press the [UNIT] key 4 times. A triangle with hypotenuse flashing will appear. Measure the length (a) of the dotted line using [MEAS]. Measure the length (b) of the dotted line using [MEAS]. Measure the length (c) of the dotted line using [MEAS]. The length (x) of the solid line right side will be calculated automatically.
Important Notes for Pythagorean Measurement:
- The length of the right side of the triangle must be shorter than the hypotenuse length for accurate calculation. Otherwise, an error signal will be displayed.
- Measurements must be made from the same starting point.
- The hypotenuse must be measured first, followed by the side, to ensure accurate measurements.
Advanced Functions
Delay Measurement
This function allows for delayed measurements. Press the [OFF/CLEAR] key (or a dedicated delay button), and 'sec' will appear on the display, followed by the number of seconds for the delay. Adjust the delay time using the [+] or [-] keys. The minimum delay time is 3 seconds, and the maximum is 60 seconds.
Reference Point
Press the [UNIT] key (or a dedicated reference point button) to switch between available reference points:
- (i) Front End
- (ii) Screw
- (iii) Back End
- (iv) End Piece (used for 'dead corner' measurements, e.g., measuring the distance from one corner of a wall to another angle of the wall).
Add and Subtract Measurements
Use the FREEMANS Laser Distance Meter for addition and subtraction of linear measurements. Press the [+] key for addition mode (a "+" sign appears) to add multiple measurements. Press the [-] key for subtraction mode (a "-" sign appears) to subtract multiple measurements. You can also add or subtract Area measurements after calculating them.
Self Calibration
To calibrate the FREEMANS Laser Distance Meter:
- With the device powered off, press and hold the [UNIT] key.
- Press and release the [MEAS] key.
- Release the [UNIT] key once "CAL" appears on the screen. The device is now in Self calibration mode.
Staking-Out Function
Long press a designated function key to switch to staking-out mode. Users can set two different values, 'a' and 'b', by pressing the [+] or [-] keys. Long press [+] or [-] to adjust values 'a' or 'b' more quickly. Press [MEAS] after setting the values to enter staking-out mode. The device provides guidance via sound and icons: [Go Back] (⬇️) indicates the device needs to move backward, and [Go Forward] (⬆️) indicates it needs to move forward. When the device is very near the target point, it will display a specific indicator.
Measurements Storage and Browsing
Under measurement mode, press and hold the [Memory] key (represented by a memory icon) for 3 seconds to store the current reading in the FREEMANS Laser Distance Meter's memory.
To access stored data, press the [Memory] key. Use the [+] or [-] keys to browse forwards or backwards through stored readings.
To delete an individual record, short press the [OFF/CLEAR] key. To delete all stored records, long press the [OFF/CLEAR] key.
Tips and Troubleshooting
The following table explains how to interpret and solve error messages that may appear on the display screen:
| Information | Causes | Solutions |
|---|---|---|
| [Error 1] | Signal too weak | Measure targets with stronger reflective properties. |
| [Error 2] | Signal too strong | Measure targets with weaker reflective properties. |
| [Error 3] | Battery voltage low | Replace battery. |
| [Error 4] | Beyond working temperature | Carry out measurement in specified temperature scope. |
| [Error 5] | Improper measurement on Pythagorean proposition | Re-measure and ensure the length of the hypotenuse is longer than that of the right side. |
| [Error 6] | Memory damage | Contact supplier. |
Technical Specifications
| Product Features | Size | ||
|---|---|---|---|
| 40m | 60m | 100m | |
| Measurement Accuracy | +/- 1.5mm | ||
| Measurement Units | mm/in/ft | ||
| Least Count | 0.05mm | ||
| Measurement Time | <0.5s | ||
| Continuous Measurement Function | Yes | ||
| Outdoor Target Reflection Board | No | No | Yes |
| Area Measurement Function | Yes | ||
| Volume Measurement Function | Yes | ||
| Pythagorean Measurement Function | Yes | ||
| Self Calibration | Yes | ||
| Delay Measurement | Yes | ||
| Staking Out | Yes | ||
| Continuous Distance (Tracking) Measurement | Yes | ||
| Add/Subtract Function | Yes | ||
| Add/Subtract Area | Yes | ||
| Min/Max Value | Yes | ||
| Maximum Storage | 99 units | ||
| Automatic Backlight | Yes | ||
| Button/Key Sound | Yes | ||
| Laser Level | Class II, 635nm, <1mW | ||
| Laser Type | 635nm, <1mW | ||
| Automatic Laser Cut-off | 20s | ||
| Automatic Unit Shutdown | 150s | ||
| Storage Temperature | -20°C to 60°C | ||
| Working Temperature | 0°C to 40°C | ||
| Storage Humidity | RH85% | ||
| Battery | 2 x 1.5V AAA | ||
| Battery Life | Upto 8,000 Measurements | ||
| Weight (Battery Included) | 160g | ||
| Dimensions | 118 x 54 x 26.5mm | ||
| Vial Bubble | Yes | ||
| End Piece | Yes | ||
| 1 Year Warranty | Yes | ||
| Protection | IP 54 | ||
| Carrying Pouch | Yes | ||
| CE Certification | Yes | ||
Maintenance
- Store the FREEMANS Laser Distance Meter in a cool, dry place. Avoid storing it in high temperature or high humidity for extended periods.
- If the instrument is not used for a long time, please remove the battery to prevent fluid leakage.
- Keep the device surface clean using a wet soft cloth. Never use erosive liquids to clean the meter.
Packing List
| No. | Item | Unit | Qty. | Note |
|---|---|---|---|---|
| 1 | Laser Distance Meter Body | Unit | 1 | |
| 2 | Carry Bag | Piece | 1 | |
| 3 | Holding Rope | Piece | 1 | |
| 4 | AAA Battery | Set | 2 | |
| 5 | Manual | Copy | 1 | |
| 6 | Gift Box | Set | 1 | |
| 7 | Outdoor Target Reflection Board | Set | 1 | Only 100m |
Precautions and FAQs
- (i) Do not aim the laser at your eyes or other body parts.
- (ii) Do not aim the laser at any surface with strong reflective properties.
- (iii) Please do not disassemble or attempt to repair the FREEMANS Laser Distance Meter.
- (iv) Keep out of reach of children.
- (v) Do not use around medical equipment, inflammables, or explosives.
- (vi) Respect your environment; please discard used batteries in recycling boxes.
Installation and Replacement of Battery
To install or replace the battery:
- Remove the battery door on the back of the device. Place the batteries (1.5V AAA alkaline) according to the correct polarity, then refit the battery door.
- If the FREEMANS Laser Distance Meter is likely to be unused for a long time, remove the batteries to avoid leakage and corrosion.
Instructions for Area, Volume and Indirect Measurement
Other FREEMANS Measuring Tools
The FREEMANS product line includes other precision measuring instruments:
- Digital Spirit Level: A tool for accurately determining horizontal and vertical levels.
- Digital Measuring Tape: A portable tape measure with digital readout capabilities.
- Digital Measuring Wheel: Used for measuring distances over large areas, such as construction sites or roads.