TruVision Navigator 8.0 SP2 Quick Start Guide
TruVision Navigator 8.0 SP2 Quick Start Guide
5
7. Follow all instructions in the subsequent windows until installation is complete. 8. Click Finish and then click Closeto complete the installation. A TruVision Navigator icon appears on the computer desktop and in th…
Help. Contact information. TruVision Navigator 8.0 SP2 Quick Start Guide. This document provides basic instructions for installing TruVision Navigator and adding a single recorder or camera to enable view ing of video.…
For the minimum software and hardware requirements, see the TruVision Navigator User Manual. Installation (standalone or client/server). Note: ...
Full PDF Document

If the inline viewer fails, it will open the original document in compatibility mode automatically. You can also open the file directly.
Extracted Text
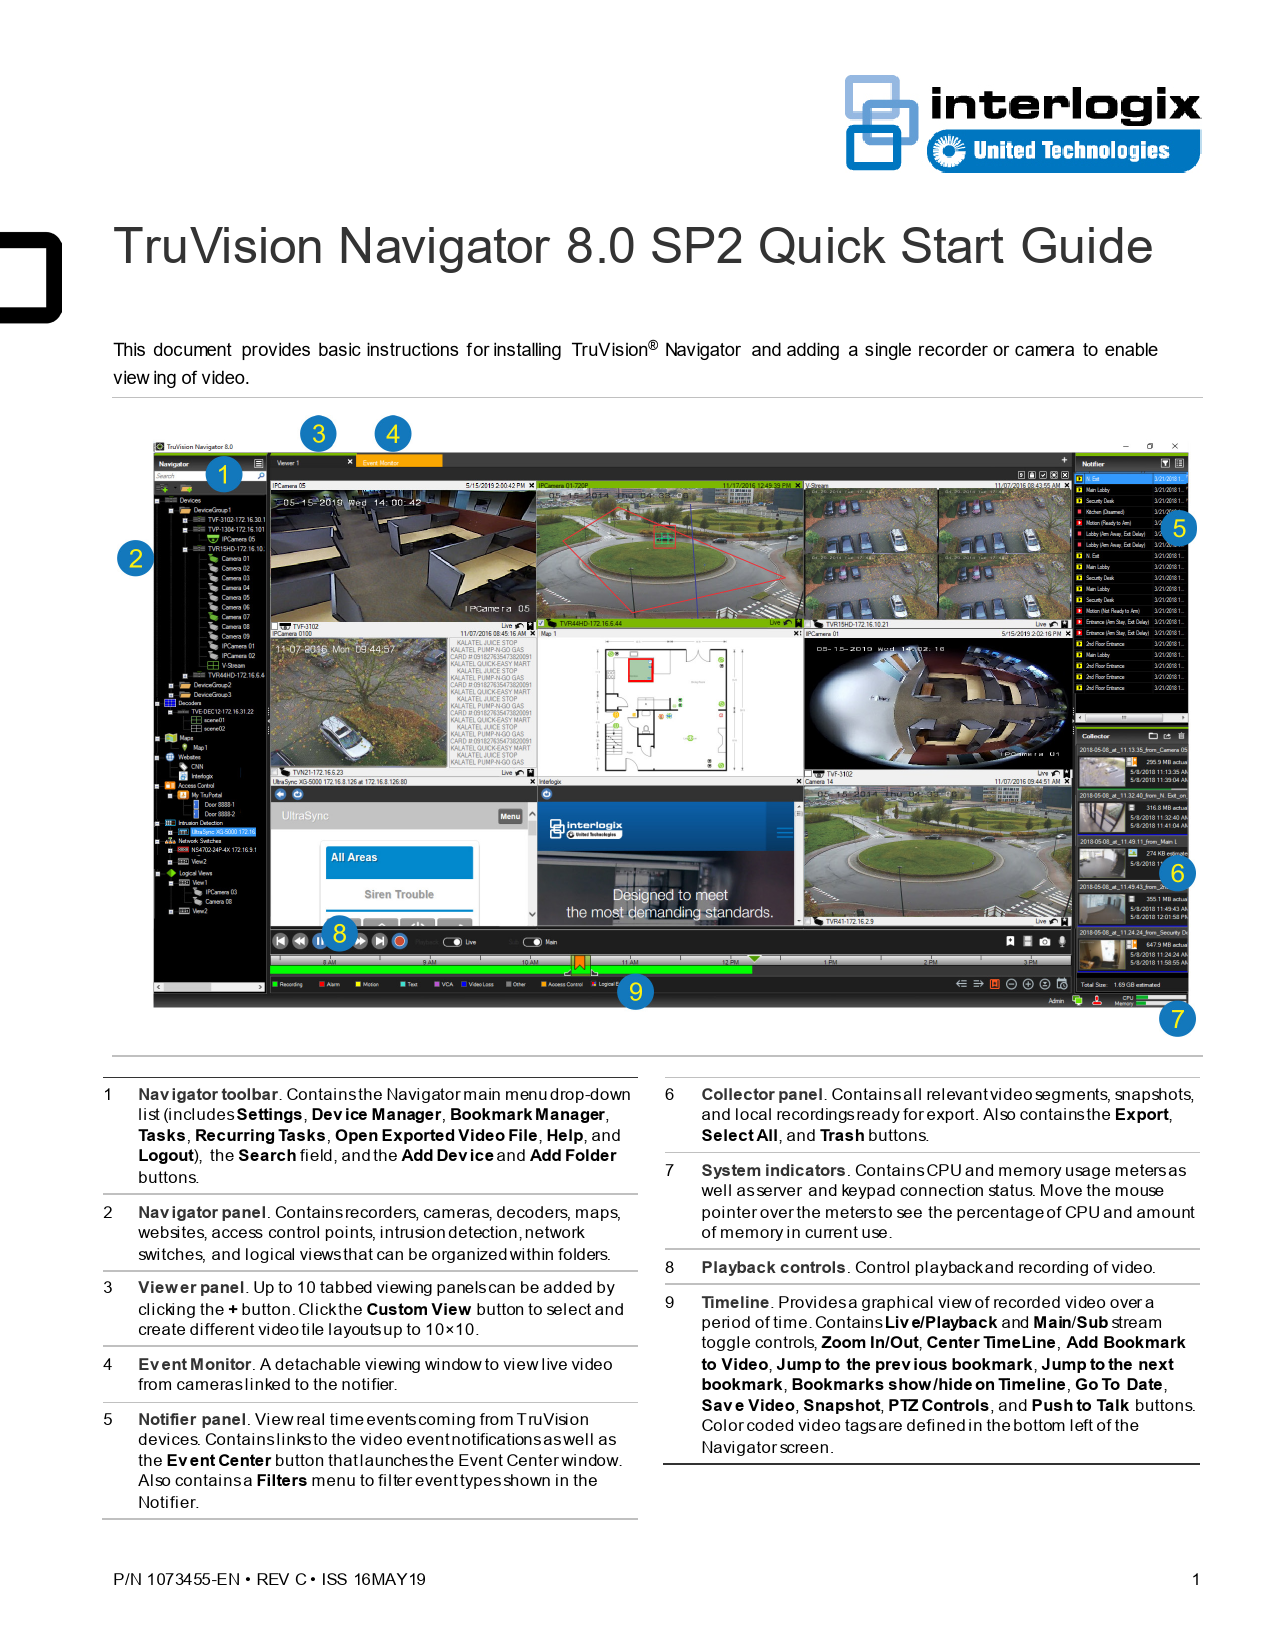
TruVision Navigator 8.0 SP2 Quick Start Guide
This document provides basic instructions for installing TruVision� Navigator and adding a single recorder or camera to enable view ing of video.

1 Nav igator toolbar. Contains the Navigator main menu drop-down list (includesSettings, Dev ice Manager, Bookmark Manager, Tasks, Recurring Tasks, Open Exported Video File, Help, and Logout), the Search field, and the Add Dev ice and Add Folder buttons.
2 Nav igator panel. Contains recorders, cameras, decoders, maps, websites, access control points, intrusion detection, network switches, and logical views that can be organized within folders.
3 View er panel. Up to 10 tabbed viewing panels can be added by clicking the + button. Click the Custom View button to select and create different video tile layouts up to 10�10.
4 Ev ent Monitor. A detachable viewing window to view live video from cameraslinked to the notifier.
5 Notifier panel. View real time events coming from TruVision devices. Containslinksto the video event notifications as well as the Ev ent Center button that launches the Event Center window. Also containsa Filters menu to filter event typesshown in the No ti fi e r.

6 Collector panel. Contains all relevant video segments, snapshots, and local recordings ready for export. Also containsthe Export, Select All, and Trash buttons.
7 System indicators. Contains CPU and memory usage metersas well as server and keypad connection status. Move the mouse pointer over the meters to see the percentage of CPU and amount of memory in current use.
8 Playback controls. Control playback and recording of video.
9 Timeline. Providesa graphical view of recorded video over a period of time. Contains Liv e/Playback and Main/Sub stream toggle controls, Zoom In/Out, Center TimeLine, Add Bookmark to Video, Jump to the prev ious bookmark, Jump to the next bookmark, Bookmarks show /hide on Timeline, Go To Date, Sav e Video, Snapshot, PTZ Controls, and Push to Talk buttons. Color coded video tagsare defined in the bottom left of the Navigator screen.

P/N 1073455-EN � REV C � ISS 16MAY19

1

Installation options
There are tw o installation options for TruVision Navigator. The core features and functions remain the same regardless of w hich of the tw o installation options are selected:
 Standalone m odel � This installation option permits the client and database to reside on the same computer. No other clients on the netw ork can connect to the database on this computer. This installation option is ideal for small, standalone systems.
 Multi-Client Model (traditional client/server) � This installation option permits the client and server to reside on the same or separate computers. This installation option is ideal for larger systems w ith many geographically dispersed users, computers, and recording devices.
Installation prerequisites
For each computer:
� Dow nload the latest version of TruVision Navigator from w ww.interlogix.com/video.
� Dow nload the latest operating system service pack from the Microsoft� Dow nload Center.
� Check for Window s� updates at update.microsoft.com. � Dow nload the latest video driver. � For the minimum softw are and hardw are requirements,
see the TruVision Navigator User Manual.
Installation (standalone or client/server)
Note: Administrator rights are required to install Navigator on a computer, but the application is available to any user that successfully logs in to a Window s account on that computer. To install TruVision Navigator on a computer:
1. Double-click the TruVision Navigator Setup.exe installer to begin the installation. If prompted, right-click on the Setup.exe file and select Run as Adm inistrator.
2. If necessary, click Yes in the User Account Control w indow to make changes to the computer.
3. The End User License Agreement w indow appears. Select the I Accept these terms and conditions check box and then click Next to continue.
4. The Welcome w indow appears. Select Typical (standalone installation) or Advanced (for a client/server installation or to change the default installation location), and then click Next.

5. Advanced installation only: The Installation Folder w indow appears. Click the Next button to accept the default installation folder or click ... to select a different location.
6. Advanced installation only: The Configuration w indow appears. Select Standalone Mode or Client/Server Mode.
7. Follow all instructions in the subsequent w indow s until installation is complete.
8. Click Finish and then click Close to complete the installation. A TruVision Navigator icon appears on the computer desktop and in the Start menu.
Note: See the TruVision Navigator User Manual for detailed installation instructions.
Logging in for the first time
1. After successful installation, launch TruVision Navigator using one of the follow ing methods: � Double-click the TruVision Navigator icon on the desktop. � Go to Start > All Program s > TruVision Navigator.
2. When TruVision Navigator launches, a login w indow appears. Log in as the default administrator by typing in the follow ing default credentials: � User Nam e � admin � Passw ord � admin
3. Click Login. After initial login, the Change Passw ord w indow displays and prompts to change the default passw ord for security purposes.

2

4. Type the new passw ord in the Passw ord field. 5. Re-type the passw ord in the Confirm Passw ord field. 6. Select a question from the Challenge Question drop-
dow n list. 7. Type the answ er to the challenge question in the
Challenge Answ er field. 8. Click OK.
Adding a single device
After successful login, add a single device to the Navigator panel by doing the follow ing: Click the Add Device button and then select Add Manually or Add via Discovery Tool. IMPORTANT: A w ired netw ork connection is required for device discovery. Do not use a Wi-Fi netw ork connection w hen follow ing these steps.
Add via discovery tool
1. Using the mouse, select one or more devices from the discovered devices list and then click Add.
2. Type the Usernam e and Passw ord. 3. Click OK. The device appears under the Devices node in
the Navigator panel.
Add manually
1. Select the appropriate model from the Device Type dropdow n list.
Note: Select TruVision Recorder or TruVision Cam era from the drop-dow n list for any TruVision device. Using

one of these drivers enables the device's brow ser-based configuration page.
2. Type a name in the Device Title field. Values are alphanumeric.
3. Based on the device type, a selection from the Stream ing Type drop-dow n list may be required. For some devices, there is only one option for the Stream ing Type so it is selected by default.
4. Type the device's IP address or the EzDDNS URL (e.g., http://hostname.tvr-ddns.net) in the Device Address field.
5. The Port field is pre-populated w ith a default value based on the type of device selected. If the port assigned to the device is dif f erent f rom the def ault value, type the correct port value in this field.
6. Type the Usernam e and Passw ord.
7. Click OK. The device appears under the Devices node in the Navigator panel.
Note: After clicking OK, fields highlighted w ith a red exclamation point indicate rejected values. Hover over the exclamation points for tips on w hy the values w ere invalid. All fields must be valid to successfully add a device.
Viewing video from an added camera
1. Expand the icon for the added device to view cameras.
2. Double-click on a camera icon or drag a camera icon from the Navigator panel to a video tile in the View er panel to display video.
Updates
Click the Navigator main menu button and select Check for Updates... Click Restart Navigator to restart the application and apply updates.
Help
Click the Navigator main menu button and select Help. Click Launch Help to open the TruVision Navigator User Manual, w here more detailed instructions are available on all topics.
Contact information
w ww.interlogix.com or w ww.firesecurityproducts.com. For customer support, go to w ww.interlogix.com/support. � 2019 United Technologies Corporation
Interlogix is part of UTC Climate, Controls & Security, a unit of United Technologies Corporation. All rights reserved. All trademarks are the property of their respective ow ners. Information in this document is subject to change w ithout notice.

3