RCA Universal Remote Control
Quick Start Guide
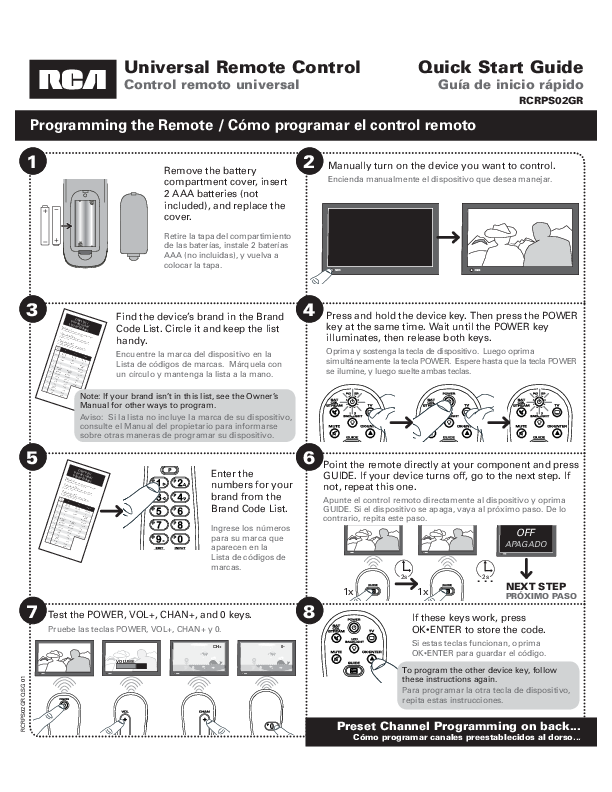
Programming the Remote
Step 1: Remove the battery compartment cover, insert 2 AAA batteries (not included), and replace the cover.
Visual Description: A diagram shows the back of the remote control with the battery compartment cover detached, revealing two AA battery slots. The batteries are depicted as being inserted, and the cover is shown ready to be reattached.
Step 2: Manually turn on the device you want to control.
Visual Description: An illustration shows a television set with its screen displaying content, and the RCA remote control held in a hand, aimed directly at the television screen.
Step 3: Find the device's brand in the Brand Code List. Circle it and keep the list handy. Note: If your brand isn't in this list, see the Owner's Manual for other ways to program.
Visual Description: An image displays a booklet labeled 'Brand Code List' or similar, containing columns of brand names and associated numerical codes. The instruction text advises the user to locate and circle their device's brand name within this list.
Step 4: Press and hold the device key. Then press the POWER key at the same time. Wait until the POWER key illuminates, then release both keys.
Visual Description: A close-up view of the remote control highlights the device selection buttons (e.g., TV, SAT, CBL, STREAM) and the POWER button. The text indicates pressing and holding a device button, then pressing the POWER button simultaneously, and observing the POWER button illuminate.
Step 5: Enter the numbers for your brand from the Brand Code List.
Visual Description: The 'Brand Code List' booklet is shown again, emphasizing the numerical codes. The user is instructed to find the specific code corresponding to their device's brand from this list.
Step 6: Point the remote directly at your component and press GUIDE. If your device turns off, go to the next step. If not, repeat this one.
Visual Description: A diagram illustrates the remote control being pointed at a component (e.g., TV). The GUIDE button is shown being pressed. A visual cue, such as a darkened TV screen or an 'OFF' indicator, signifies that the component has turned off, confirming successful code entry.
Step 7: Test the POWER, VOL+, CHAN+, and 0 keys.
Visual Description: The remote control is shown with the POWER, VOL+, CHAN+, and 0 buttons highlighted, indicating that these buttons should be tested to verify the remote is controlling the device.
Step 8: If these keys work, press OK ENTER to store the code. To program the other device key, follow these instructions again.
Visual Description: The remote control is depicted with the OK-ENTER button highlighted. The instruction states that if the tested buttons (POWER, VOL+, CHAN+, 0) function correctly, pressing OK-ENTER will save the programming code. It also notes that the process can be repeated for other device keys.
Programming Your Preset Channels
You can program up to 10 of your favorite channels on both of your components for instant access using the Channel Preset keys. First, put info for your favorite channels in the following tables.
Visual Description: Two tables are presented: 'TV Preset Channels' and 'SAT/CBL/STREAM Preset Channels'. Each table has columns for 'Key' (P1 through P0), 'Channel Name', and 'Channel Number'. Users are instructed to fill in their favorite channels' names and numbers.
Step 2: Press and hold the P key. The POWER key illuminates. Keep holding the P key down until the POWER key blinks once and stays on. Then release it.
Visual Description: A diagram shows the remote control with the 'P' button being pressed and held. The POWER button is depicted as illuminating, then blinking, and finally remaining steadily lit, indicating the start of preset channel programming mode.
Step 3: Press the 1 key to program your first preset channel.
Visual Description: A diagram of the remote control with the number '1' button highlighted, indicating it is pressed to begin programming the first preset channel.
Step 4: Press the device key for this preset channels list.
Visual Description: A device selection button (TV, SAT, CBL, or STREAM) on the remote is highlighted, showing that the user should press the button corresponding to the device for which the preset channel is being programmed.
Step 5: Enter the channel number for your first preset channel from the table you filled out in step 1.
Visual Description: A sequence of number buttons on the remote is shown being pressed, representing the entry of a specific channel number, as found in the previously filled 'Preset Channels' table.
Step 6: When you've finished entering the channel number, press the P key to save it.
Visual Description: The 'P' button on the remote is highlighted, indicating that it should be pressed after entering the channel number to save the programmed preset channel.
To program more presets: Repeat steps 2–6 for the next channel in your list.
To start using your presets: See Accessing Your Preset Channels below.
Accessing Your Preset Channels
Step 1: Press the device key (TV or SAT/CBL/STREAM) for the preset channel.
Visual Description: A diagram shows a device selection button (TV or SAT/CBL/STREAM) being pressed on the remote.
Step 2: Press the P key. The POWER key lights up and stays lit.
Visual Description: A diagram shows the 'P' button being pressed, causing the POWER button to illuminate and stay lit, signaling that the remote is ready to access a preset channel.
Step 3: Press the number for the preset you want to access.
Visual Description: A number button (e.g., '1' for P1) on the remote is pressed. The text clarifies: 'While POWER is lit, just press the number to go to a preset.'
