YOLINK FlexFob 4-Button Smart Fob User Guide
File info: application/pdf · 32 pages · 1.58MB
YS3604-UC YoLink Fob User Guide 20210818
Thank you for purchasing YoLink products and for entrus ng us with your smart home needs! Your 100% sa sfac on is our goal. If you experience any problems ...
[PDF] YS3604-UC YoLink Fob User Guide 20210818 www.yosmart.com › YS3604-UC
Full PDF Document

If the inline viewer fails, it will open the original document in compatibility mode automatically. You can also open the file directly.
Extracted Text
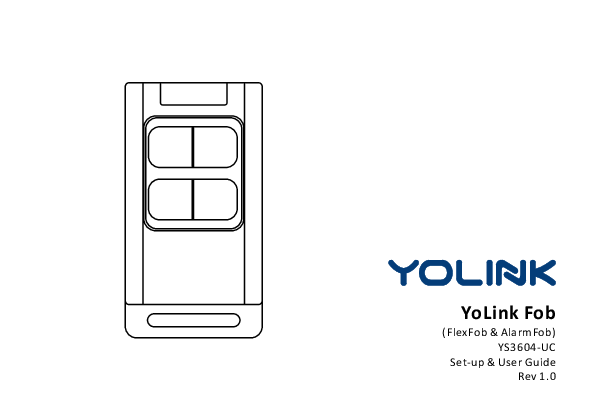
YoLink Fob
(FlexFob & AlarmFob) YS3604-UC
Set-up & User Guide Rev 1.0

Thank you for purchasing YoLink products and for entrus ng us with your smart home needs! Your 100% sa sfac on is our goal. If you experience any problems with se ng up your new YoLink Fob (FlexFob or AlarmFob), please give us a chance to assist you, before returning your purchase. We at Customer Support are here for you.If you need any assistance installing, se ng up or using a YoLink product or our app.
Find addi onal support and ways to reach us at:
www.yosmart.com/support-and-service
Or scan this QR code with your smartphone
Email us, 24/7 at:
service@yosmart.com
Call us, 9AM to 5PM Pacific Standard Time at:
(949) 825-5958
You may chat with us on Facebook (non-urgent ma ers):
w w w. f a c e b o o k . c o m / Yo L i n k b y Yo S m a r t
Sincerely,
Queenie, Clair, James, Eric Customer Support Team

Contents
A. In the Box ���������������������������������������������������������������������������������������������������1 B. Introduc on �����������������������������������������������������������������������������������������������2 C. Set Up ��������������������������������������������������������������������������������������������������������5 D. Using the YoLink App �����������������������������������������������������������������������������������9 E . About Garage Door Control With Fobs ��������������������������������������������������������15 F . Maintenance ��������������������������������������������������������������������������������������������20 G. Specifica ons �������������������������������������������������������������������������������������������23 H. Troubleshoo ng ���������������������������������������������������������������������������������������25 I . Warning ���������������������������������������������������������������������������������������������������26 J . Customer Service & Warranty ��������������������������������������������������������������������28
Revised: 09/02/2021 Copyright � 2021 YoSmart Inc. All rights reserved

A. In the Box

A-1. YoLink FlexFob

A.

B.

A. YoLink FlexFob

B. Visor Clip & Wall-Mount Bracket

C. Quick Start Guide

A-2. YoLink AlarmFob

A.

B.

A. YoLink AlarmFob

B. Visor Clip & Wall-Mount Bracket

C. Quick Start Guide

C.
C. 1

B. Introduc on
B-1. FlexFob
The YoLink FlexFob is a smart remote that can flexibly design ac ons* for each bu on through YoLink app, control desired ac ons with the YoLink app on your smartphone or tablet or using the associated bu on on the device. * Desired ac ons includes enable/disable alarm strategy, scene control (Away, Home, Arm, Disarm, etc.), trigger ac on devices, etc.

Status LEDs
LEDs are off when the fob is in a normal status

1-4 Bu ons
short press (click) / long-press the associated bu on to run the ac ons - Audible Status Feedback One Beep: Ac on Successfully Ran Three Beeps: Ac on Not Successfully Ran
Key Ring Slot
A ach the fob to a key ring, if desired

Ba ery Compartment Screw
Compartment houses two LR44 non-rechargeable bu on ba eries

2

B-2. AlarmFob
The YoLink AlarmFob is a smart remote with four programmable bu ons, each capable of performing two pre-set ac ons*, as defined by the user, using the YoLink app. The ac ons assigned to each bu on can be ini ated from the app, as well as from the fob (refer to "Using the YoLink App" sec on for addi onal informa on) *Examples of ac ons include enabling or disabling an alarm strategy, scene control (Home, Away, Arm, Disarm, etc.), and triggering ac on devices, etc.

Status LEDs
LEDs are off when the fob is in a normal status Four Bu ons with Pre-Set Ac ons Short press (click) or long-press the associated bu on to run the ac ons There are four pre-set behaviors for each bu on - Audible Status Feedback One Beep: Ac on Successfully Ran Three Beeps: Ac on Not Successfully Ran

Ba ery Compartment Screw
Compartment houses two LR44 non-rechargeable bu on ba eries
Key Ring Slot
A ach the fob to a key ring, if desired
3

The LED light indicates the current status of the YoLink Fob (FlexFob / AlarmFob): Blinking Red Once, Then Green Once
Device Turned On
Blinking Red And Green Alternately
Restoring to Factory Defaults
Blinking Green Once
One-click/Long Press (0.5-2s) a Key
Slow Blinking Green Once
Ac ons Run Succeeded
Blinking Green
Connec ng to Cloud
Slow Blinking Green
Upda ng
Slow Blinking Red Once
Ac ons Run Failed
Fast Blinking Red Every 30 Seconds
Ba eries are Low; Please Replace the Ba eries (see page 22)
4

C. Set Up

C-1. Set Up - First-Time YoLink Users (Exis ng users proceed to C-2. Add Device, next page)

1 Download the YoLink app through Apple App Store or Google Play Store (Search in the store or use the QR code on the right)

Apple iPhone or tablet that is iOS 9.0 or higher, or an Android phone or tablet that is Android 4.4 or higher

2 Log in to the YoLink app
Create a new account if required

3 The YoLink Hub is required to set up your YoLink Fob (FlexFob / AlarmFob). Please set up your YoLink Hub first (refer to YoLink Hub manual)

YoLink Hub

Power Adapter

1. Make sure your Hub is connected to the internet (green LED indicator is blinking, blue LED indicator is always on) 2. Ethernet patch cable (included) to your network (router, switch, etc.), recommended. Otherwise connect your Hub to your home 2.4 GHz Wi-Fi network (only when necessary). Refer to the Hub set up manual for more informa on:
YS1603-UC User Guide
5

C-2. Add Device
1 Tap " " bu on, then scan QR Code on the device. Follow the steps to add the device

2 Press any of the four bu ons once to turn on the device. The Status LED will blink red once, then green several mes, indica ng your device has connected to the cloud and is ready to use

Any of the four bu ons

1. You will need to press any of the four bu ons once again if the device failed to connect to the cloud 2. Pressing any of the four bu ons at any other me a er this ini al process will result in the LED blinking green once, only. This indicates the device is connected to the cloud and is func oning normally 3. If the red LED does NOT blink as noted this may indicate a problem with the Fob. Please see the troubleshoo ng sec on and the contact sec on for technical support
6

C-3. Device Placement
Do not place the fob on or near sources of extreme heat or cold
Your fob is designed to be portable, but in addi on to its common use on a keyring, your fob comes with a wall-mount bracket as well as a car visor clip
b. Add the fob to your keyring, so that it is always with your keys

a. Wall-moun ng: The wall-mount bracket allows for placing the fob on a wall or other ver cal loca on (e.g. side of nightstand or bed). Securely a ach the bracket to the surface using suitable fasteners or material such as 3M brand moun ng tape

(Bracket of visor clip)

Depress here to release the fob from the bracket

7

c. Use the visor clip with the wall-mount bracket to place your fob on your car's visor

1 Insert the fob into the bracket

3 Place the visor clip on to your car visor

(Bracket of visor clip)
2 Insert visor clip into the slot on the back of the bracket, as shown
8

D. Using the YoLink App

D-1. Device Page

- Tap to get device manual link, feedback, contact us informa on, etc.

Details
- Tap to go to Details page(refer to page 11)

Ba ery Level of YoLink Fob
- Shown red if ba ery level is low

Control the Bu ons
- There are two control methods: a. Press the bu on to ac vate the related ac on b. Long press the bu on to ac vate the related ac on

(FlexFob)

Edit the Bu ons
- Tap to edit the bu ons (refer to page 12)
Device Ac on History
Historical log of bu on-controlled, logged with associated bu on and the ac on, date & me
Before using the fob, please choose "confirm" to confirm the ini al se ngs
9

- Tap to get device manual link, feedback, contact us informa on, etc.
Details
- Tap to go to Details page(refer to page 11)
Ba ery Level of YoLink Fob
- Shown red if ba ery level is low
Control the Bu ons
- There are two control methods: a. Press the bu on to ac vate the related ac on b. Long press the bu on to ac vate the related ac on

(AlarmFob)

Edit the Bu ons
- Tap to edit the bu ons (refer to page 12)
Device Ac on History
Historical log of bu on-controlled, logged with associated bu on and the ac on, date & me
Before using the fob, please choose "confirm" to confirm the ini al se ngs
10

D-2. Details Page

- Tap to get device manual link, feedback, contact us informa on, etc.

a. Device Type

b. Rename the Device c. Choose a Room for device

d. Add/Remove from favorites

e. Device Ac on History
Historical log of bu on-controlled, logged with associated bu on and the ac on, date & me

f. Device Model

g. Device EUI (unique)

h. Device SN (unique)

I. Temperature Value
- Updates when: 1. SET bu on pressed; 2. On a device alert; 3. Ba eries are replaced; 4. Automa cally within 4 hours maximum

j. Connec on Signal Intensity of sensor and Hub

k. Current Ba ery Level

- Shown red if ba ery level is low

l. Firmware Version

- "#### ready now" indicates a new update is available (refer to page 20)

m. Remove Device From Current Account

- Tap to delete the device from your YoLink account

11

D-3. Edit the Bu ons
You can assign a scene or automa on assigned to any of the four bu ons in the app, but you can not add the garage controller as an ac on. This is for safety reasons, to prevent accidental opera on of the door

a. b.
c. d.
FlexFob

a. b. c.
d.
AlarmFob

a. Tap the fob bu on that you want to edit
(bs.hToarpt-tphree"s+s)"biceohnavtoioardd a click
pc.rTeasps btheeha"v+i"oircon to add a long
d. Tap to save the se ngs
-Tap "Reset" to restore the se ngs to factory default (any changes you've made will not be saved); Tap "Cancel" to exit changing se ngs (any changes you've made will not be saved)
For AlarmFob: Fob is pre-configured with a click behavior for each of the four bu ons. You can edit each behavior in the associated scene (refer to page 13)
12

D-4. Scene
Go to the "Smart" screen (default view is "Scene" screen)
There are four pre-set scenes, you can choose to either edit or delete each of them

b-5 b-1
c. b-2 b-3 b-4

Swipe Le

b. Add a scene

c. Click to edit the scene

b-1 Edit name b-2 Select an icon b-3 Add/remove from favorites b-4 Edit behavior (You must

1. Tap " " bu on to run the scene 2. Tap " " bu on to edit the scene 3. Swipe le to edit or to delete the scene

a. Tap the "+" icon to add

have at least one ac on device, or you cannot set a behavior)

a scene

b-5 Tap to save the se ngs

13

D-5. Third-Party Services
With third-party services connected to your YoLink account, your fob can trigger automa ons, rou nes and applets with smart home/IoT devices and services from third-party (non-YoLink) brands
Tap " " in the upper le corner to go to My Profile Go to Se ngs > Third-Party Services and select the applicable service Follow the instruc ons, to authorize and add the connec on to your YoLink account
Refer to the associated app or website for addi onal informa on specific to the third-party service. Addi onal informa on may also be found on our website at www.yosmart.com/support-and-service or by contac ng Customer Support (refer to page 28 for contact informa on)
D-5-1. IFTTT The YoLink Fob bu ons can be used as a trigger for custom applets. Visit www.i .com for more informa on and pricing
D-5-2. Alexa
The Alexa integra on is under development as of the date this manual was produced
14

E. About Garage Door Control With Fobs (Physical Bu on Control, Only)
Pair your YoLink Fob with the YS4906-UC Garage Door Controller or YS4908-UC YoLink F i n ge r. W h e n yo u p re s s t h e a s s o c i ate d b u o n , t h e Yo L i n k F i n ge r w i l l o p e rate ( i t w i l l o p e n or close, depending on the current status of the door)
You can assign a scene or automa on assigned to any of the four bu ons in the app, but you can not add the garage controller as an ac on. This is for safety reasons, to prevent accidental opera on of the door

E-1. Pair YoLink Fob with YS4906-UC Garage Door Controller

E-1-1. Pairing

1 Choose the fob bu on you will use for co nt ro l o f t h e G a ra ge D o o r C o nt ro l l e r. Hold this bu on for 5-10 seconds un l the LED quickly blinks green. Then, release the bu on

a. Any of the four bu ons (5-10 seconds)

15

2 Press and hold the SET bu on on the YoLink Finger for 5-10 seconds un l the LED quickly blinks green. Then, release the bu on
3 Upon pairing, the LED will stop blinking (this may happen a er only blinking two or three mes)
Holding the bu on longer than 10 seconds will ABORT the pairing opera on

b. SET bu on (5-10 seconds)

E-1-2. Opera on When you press the associated bu on, the Garage Door Controller will operate (it will open or close, depending on the current status of the door)
To avoid injury or damage, only press the bu on when the garage door area is clear of people and objects

16

E-1-3. Unpairing
1 Press and hold the associated bu on on the YoLink Fob that you paired with the garage door controller for 10-15 seconds un l the LED quickly blinks green, then red, release the bu on
2 Press and hold the SET bu on on the paired Garage Door Controller for 10-15 seconds un l the LED quickly blinks green, then red, release the bu on
3 Upon up-pairing, the LED will stop blinking (this may happen a er only blinking two or three mes)
4 The Garage Door Controller will no longer open or close the garage door when you press the associated bu on

a. Any of the four bu ons (10-15seconds)
b. SET bu on (10-15 seconds)

Holding the bu on longer than 15 seconds will ABORT the unpairing opera on

17

E-2. Pair YoLink Fob with YS4908-UC YoLink Finger (Garage Controller)
E-2-1. Pairing

1 Choose the fob bu on you will use for co nt ro l o f t h e F i n ge r. H o l d t h i s b u o n for 5-10 seconds un l the LED quickly blinks green. Then, release the bu on
2 Press and hold the SET bu on on the YoLink Finger for 5-10 seconds un l the LED quickly blinks green. Then, release the bu on
3 Upon pairing, the LED will stop blinking (this may happen a er only blinking two or three mes)
Holding the bu on longer than 10 seconds will ABORT the pairing opera on

a. Any of the four bu ons (5-10 seconds)

SET

DOWN

UP

b. SET bu on (5-10 seconds)

18

E-2-2. Opera on When you press the associated bu on, the YoLink Finger will operate (it will open or close, depending on the current status of the door)
E-2-3. Unpairing
1 Press and hold the associated bu on on the YoLink Fob that you paired with the YoLink Finger for 10-15 seconds un l the LED quickly blinks green, then red, release the bu on
2 Press and hold the SET bu on on the paired YoLink Finger for 10-15 seconds un l the LED quickly blinks green, then red, release the bu on
3 Upon up-pairing, the LED will stop blinking (this may happen a er only blinking two or three mes)
4 The YoLink Finger will no longer open or close the garage door when you press the associated bu on

To avoid injury or damage, only press the bu on when the garage door area is clear of people and objects

a. Any of the four bu ons (10-15seconds)

SET

DOWN

UP

b. SET bu on (10-15 seconds)

19

F. Maintenance
F-1. Firmware Update
To ensure our customers have the best user experience, we highly recommend you update to the newest version firmware when an update is available
In "Firmware", if a new version is listed as available (#### ready now), click it to start the firmware update process The device's firmware will be updated automa cally within 4 hours (maximum). To force an immediate update, press the SET bu on on the device once to make the device enter update mode You may use your device during the update as it is performed in the background. The LED light will slowly blink green during the update and the process will be complete within 2 minutes a er the light stops blinking
20

F-2. Factory Reset
Factory reset will erase all of your se ngs and restore it to factory defaults. A er the factory reset, your device will remain in your Yolink account
Holding the le bo om bu on for 20-25 seconds un l the status light blinks red and green alternately, then, release the bu on (Hold the bu on longer than 25 seconds will ABORT the factory reset opera on) Factory reset will be complete when the status light stops blinking
The le bo om bu on (20-25 seconds)
21

F-3. Replace the Ba eries
1 Remove the housing screw, carefully place it aside
4 Observing polarity (keep the "+" mark above), insert two new LR44 ba eries and push the ba eries completely inside the compartment

2 Remove the back shell

3 Take out the hardware from the back shell, then remove the two LR44 ba eries using a screwdriver

Before removing the ba eries, for reference, refer to the correct installa on
5 Reassemble the fob and ghten the screw

Do not mix old and new ba eries

2 x LR44

6 Using the app, check the online status of the fob and verify there is no low-ba ery indicator 22

G. Specifica ons
Ba ery: Device Current Draw: Environment:

3V DC (two LR44 bu on ba eries)  135mA (on),  2uA (standby)
Working Temperature: -4�F - 122�F (-20�C - 50�C) (op mal for 2+ year ba ery life: 50�F - 122�F (10�C - 50�C) ) Working Humidity: 95%, non-condensing

23

Dimensions: Unit: inches (millimeters)
1.46 (37.0)

1.46 (13.0)

2.72 (69.0)
FRONT

2.72 (69.0)
SIDE

0.51 (13.0)

2.83 (37.0)
TOP

24

H. Troubleshoo ng
Symptom: 1. Bu ons not working or not working consistently
- If fob is not connected to the cloud, press the associated bu on on YoLink Fob once - If Hub is offline, reconnect the Hub to the Internet and press the associated bu on on YoLink Fob once - If Hub is not on, power on the Hub again and the associated bu on on YoLink Fob once - If fob is out of range with Hub, reloca ng the Hub may be required - For a device with low-ba ery indicators or alerts or if the condi on of the ba eries is in ques on, replace the ba eries with two new LR44 bu on ba eries 2. Other issues, contact customer service, 1-949-825-5958 (M-F 9am - 5pm PST) or email 24/7 at service@yosmart.com
25

I. Warning
Please install, operate and maintain the YoLink Fob only as outlined in this manual. Improper use may damage the unit and/or void the warranty Use only new, name brand, LR44 bu on ba eries Do not use zinc blend ba eries Do not mix new and old ba eries Do not puncture or damage ba eries. Leakage can cause harm on skin contact, and is toxic if ingested Do not dispose of ba eries in fire as they may explode! Please follow local ba ery disposal procedures It is recommended to use the device in an indoor temperature environment, only. Ba ery life can be significantly reduced if the device is used in environments below 50�F (10�C) This device is not waterproof and is designed and intended only for indoor use. Subjec ng this device to outdoor environment condi ons such as direct sunlight, extreme hot or cold temperatures, rain, water and/or condensa on can damage the device and will void the warranty Do not install or use this device where it will be subjected to high temperatures and/or open flame Install or use this device only in clean environments. Extremely dusty or dirty environments may prevent the proper opera on of this device, and will void the warranty
26

If your YoLink Fob does get dirty, please clean it by wiping it down with a clean, dry cloth. Do not use strong chemicals or detergents, which may discolor or damage the exterior and/or damage the electronics, voiding the warranty Do not install or use this device where it will be subjected to physical impacts and/or strong vibra on. Physical damage is not covered by the warranty Please contact Customer Service before a emp ng to repair disassemble or modify the device, any of which can void the warranty and permanently damage the device
27

If you have any difficul es installing or using YoLink products, please contact our Customer Service department during business hours:
US Live Tech Support: 1-949-825-5958 M-F 9am - 5pm PST Email: service@yosmart.com YoSmart Inc. 15375 Barranca Parkway, Ste G-105 Irvine, CA 92618, USA
Warranty 2 Year Limited Electrical Warranty
YoSmart warrants to the original residen al user of this product that it will be free from defects in materials and workmanship, under normal use, for 2 year from the date of purchase. User must provide a copy of original purchase receipt. This warranty does not cover abuse or misused products or products used in commercial applica ons. This warranty does not apply to devices that have been improperly installed, modified, put to a use other than designed, or subjected to acts of God (such as floods, lightning, earthquakes, etc.). This warranty is limited to repair or replacement of the device only at YoSmart's sole discre on. YoSmart will NOT be liable for the cost of installing, removing, nor reinstalling this product, nor direct, indirect, or consequen al damages to persons or property resul ng from the use of this product. This warranty only covers the cost of replacement parts or replacement units, it does not cover shipping & handling fees To implement this warranty please give us a call during business hours at 1-949-825-5958, or visit www.yosmart.com
28

FCC Cau on
This device complies with part 15 of the FCC Rules. Opera on is subject to the following two condi ons: (1) This device may not cause harmful interference, and (2) this device must accept any interference received, including interference that may cause undesired opera on.
Any Changes or modifica ons not expressly approved by the party responsible for compliance could void the user 's authority to operate the equipment.
Note: This equipment has been tested and found to comply with the limits for a Class B digital device, pursuant to part 15 of the FCC Rules. These limits are designed to provide reasonable protec on against harmful interference in a residen al installa on. This equipment generates uses and can radiate radio frequency energy and, if not installed and used in accordance with the instruc ons, may cause harmful interference to radio communica ons. However, there is no guarantee that interference will not occur in a par cular installa on. If this equipment does cause harmful interference to radio or television recep on, which can be determined by turning the equipment off and on, the user is encouraged to try to correct the interference by one or more of the following measures: -Reorient or relocate the receiving antenna. -Increase the separa on between the equipment and receiver. -Connect the equipment into an outlet on a circuit different from that to which the receiver is connected. -Consult the dealer or an experienced radio/TV technician for help.
The device has been evaluated to meet general RF exposure requirement. The device can be used in portable exposure condi on without restric on.