LightPix Labs FlashQ Q20II Camera Flash - Quick Manual
Thanks for choosing FlashQ! Happy shooting with FlashQ System.
Key Features
- Off-camera flash any time, with detachable Transmitter design
- Remote control flash power ratio
- FlashQ Transmitter with built-in rechargeable li-ion battery
- USB charging for both FlashQ Transmitter and Q20II body (using rechargeable Ni-MH batteries)
- Pairing multiple Transmitters to multiple Q20II flashes / FlashQ Receivers (sold separately)
- Tiltable flash head
- Built-in color gel holder
- LED video / modeling light
Package Contents
- 1 x FlashQ Q20II main body (Battery is not included)
- 1 x FlashQ Transmitter (model T2, with built-in lithium battery)
- 1 x Color gel pack (6 colors)
- 1 x USB charging cable (two micro-USB outputs)
- 1 x Protective pouch
- 1 x User manual
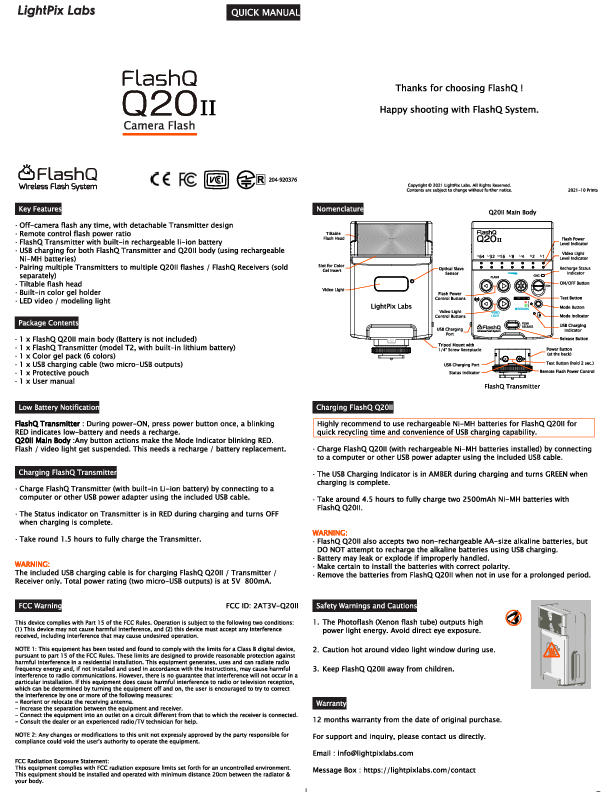
Nomenclature
Q20II Main Body:
- Tiltable Flash Head
- Slot for Color Gel Insert
- Optical Slave Sensor
- Flash Power Level Indicator (1/64 to 1/1)
- Video Light Level Indicator
- Recharge Status Indicator
- ON/OFF Button
- Flash Power Control Buttons
- Video Light Control Buttons
- USB Charging Port
- Tripod Mount with 1/4" Screw Receptacle
- Test Button
- Mode Button
- Release Button
- Power Button (at the back)
FlashQ Transmitter:
- USB Charging Port
- Status Indicator
- USB Charging Indicator
- Test Button (hold 2 sec.)
- Mode Button
- Power Button
Low Battery Notification
FlashQ Transmitter: During power-ON, press power button once; a blinking RED indicates low battery and needs a recharge.
Q20II Main Body: Any button actions make the Mode Indicator blinking RED. Flash/video light get suspended. This needs a recharge / battery replacement.
Charging
Charging FlashQ Transmitter
Charge FlashQ Transmitter (with built-in Li-ion battery) by connecting to a computer or other USB power adapter using the included USB cable. The Status indicator on Transmitter is in RED during charging and turns OFF when charging is complete. It takes approximately 1.5 hours to fully charge the Transmitter.
Charging FlashQ Q20II
It is highly recommended to use rechargeable Ni-MH batteries for FlashQ Q20II for quick recycling time and convenience of USB charging capability. Charge FlashQ Q20II (with rechargeable Ni-MH batteries installed) by connecting to a computer or other USB power adapter using the included USB cable. The USB Charging Indicator is in AMBER during charging and turns GREEN when charging is complete. It takes around 4.5 hours to fully charge two 2500mAh Ni-MH batteries with FlashQ Q20II.
WARNING: FlashQ Q20II also accepts two non-rechargeable AA-size alkaline batteries, but DO NOT attempt to recharge the alkaline batteries using USB charging. Battery may leak or explode if improperly handled. Make certain to install the batteries with correct polarity. Remove the batteries from FlashQ Q20II when not in use for a prolonged period.
Safety Warnings and Cautions
- The Photoflash (Xenon flash tube) outputs high power light energy. Avoid direct eye exposure.
- Caution: Hot around video light window during use.
- Keep FlashQ Q20II away from children.
FCC Warning
This device complies with Part 15 of the FCC Rules. Operation is subject to the following two conditions: (1) This device may not cause harmful interference, and (2) this device must accept any interference received, including interference that may cause undesired operation.
NOTE 1: This equipment has been tested and found to comply with the limits for a Class B digital device, pursuant to part 15 of the FCC Rules. These limits are designed to provide reasonable protection against harmful interference in a residential installation. This equipment generates, uses and can radiate radio frequency energy and, if not installed and used in accordance with the instructions, may cause harmful interference to radio communications. However, there is no guarantee that interference will not occur in a particular installation. If this equipment does cause harmful interference to radio or television reception, which can be determined by turning the equipment off and on, the user is encouraged to try to correct the interference by one or more of the following measures:
- Reorient or relocate the receiving antenna.
- Increase the separation between the equipment and receiver.
- Connect the equipment into an outlet on a circuit different from that to which the receiver is connected.
- Consult the dealer or an experienced radio/TV technician for help.
NOTE 2: Any changes or modifications to this unit not expressly approved by the party responsible for compliance could void the user's authority to operate the equipment.
FCC Radiation Exposure Statement: This equipment complies with FCC radiation exposure limits set forth for an uncontrolled environment. This equipment should be installed and operated with minimum distance 20cm between the radiator & your body.
Operation
FlashQ Transmitter Operation
- Press the Power button for 2 seconds to turn on/off FlashQ Transmitter. Special LED blink pattern indicates POWER ON.
- On FlashQ Transmitter, press either one button to remote control Q20II's flash power level / video light level.
- On FlashQ Transmitter, press the Test button for 2 seconds to have pilot test.
Notes: FlashQ Transmitter gets Auto Power OFF after 30 minutes idle. To disable Auto Power OFF, press and hold the Power button for 5 seconds to turn on FlashQ Transmitter.
Flash Mode
- Turn on FlashQ Q20II and Transmitter.
- Toggle button MODELING turns OFF. Set the Mode Indicator to NORMAL.
- Press button once, switch to Flash Mode.
- Press button to control flash power level.
- Press button for a pilot test.
- On FlashQ Transmitter, press either one button to remote control Q20II's flash power level. And FlashQ Transmitter can trigger the Q20II remotely.
S1 Mode
- Toggle button MODELING turns RED. Set the Mode Indicator to S1.
- Press button to control flash power level.
- Press button for a pilot test.
- On FlashQ Transmitter, press either one button to remote control Q20II's flash power level. In this mode, FlashQ Transmitter cannot trigger the Q20II remotely.
In S1 mode, FlashQ Q20II synchronizes to the traditional single flash system (common in film camera). FlashQ Q20II just synchronizes to the first flash.
S2 Mode
- Toggle button MODELING turns GREEN. Set the Mode Indicator to S2.
- Press button to control flash power level.
- Press button for a pilot test.
- On FlashQ Transmitter, press either one button to remote control Q20II's flash power level. In this mode, FlashQ Transmitter cannot trigger the Q20II remotely.
In S2 mode, FlashQ Q20II synchronizes to the digital / TTL flash system. The master flash fires a pre-flash (for TTL metering / red eye reduction) and then a main flash. FlashQ Q20II (in S2 mode) can ignore the pre-flash, and synchronizes to the main flash.
Video Mode
- Toggle button MODELING turns BLUE. Set the Mode Indicator to VIDEO.
- Press button once, switch to Video Mode.
- Press button to control video light level.
- On FlashQ Transmitter, press either one button to remote control Q20II's video light level.
Modeling Mode
(Video light is always ON for modeling purpose. Both Flash and Video light turn ON during fire triggering.)
- Toggle button MODELING turns OFF. Set the Mode Indicator to MODELING.
- Press button to control flash power level.
- Press button for a pilot test.
- On FlashQ Transmitter, press either one button to remote control Q20II's flash power level. And FlashQ Transmitter can trigger the Q20II remotely.
Pairing Up FlashQ Q20II and Transmitter
- Turn on FlashQ Q20II and Transmitter.
- On FlashQ Transmitter, hold both buttons [UP and DOWN arrows] for 3 seconds to enter Pairing Mode (Blue LED blinking).
- Repeat Step 2 on the second Transmitter (sold separately); two Transmitters should register to the same channel. The second Transmitter goes back to operation mode automatically.
- On Q20II Main Body, hold button [POWER] for 3 seconds to enter Pairing Mode (Blue LED row blinking in special pattern).
- The system goes pairing and selects a new clear channel automatically.
- When pairing gets success, Q20II Main Body quits Pairing mode and back to operation mode automatically. Press either one button on FlashQ Transmitter to complete Pairing.
Technical Specifications
- Guide Number: 20 (at ISO 100)
- Focal length coverage: 32mm (on 35mm format)
- Manual flash power ratio control: 7 steps adjustable, 1/64 to 1/1
- LED video light: 7 steps adjustable, Max. 60 lux output at 1m
- Wireless System: 2.4GHz low-power digital radio, 10 meters wireless operating range
- Tiltable flash head: up to 90° and with click-stops at 0°, 45°, 60°, 75°, 90°
- Other functions: S1 / S2 optical slave, modeling light (LED)
- Transmitter battery life: 80 hours operation and 120 days standby
- Q20II batteries: Two AA-size alkaline / rechargeable Ni-MH batteries
- Recycling time (1/1 full power output): 6 sec. by Ni-MH batteries / 7 sec. by fresh alkaline batteries
- Number of flashes: 100 - 2000 flashes
- LED lighting time: approx. 1 hour (at full power LED output and by Ni-MH batteries)
- Flash color temperature: 5600K±200K (same as daylight)
- LED color temperature: 5500K±300K, CRI 95
- Dedicated socket for FlashQ Transmitter attachment
- Dimensions: 59(W) x 99(H) x 29(D) mm (including FlashQ Transmitter)
- Weight: 115g (without battery)
Warranty
12 months warranty from the date of original purchase.
For support and inquiry, please contact LightPix Labs directly.
Email: info@lightpixlabs.com
Message Box: https://lightpixlabs.com/contact