AOSTIRMOTOR S18 Electric Bike Manual
Product Description
The AOSTIRMOTOR S18 is a powerful electric bike featuring a 750W motor and a 48V 11.6Ah lithium battery.
| Component | Specification |
|---|---|
| Frame | 6061 aluminum alloy |
| Motor | 750W Rear motor TRUCK |
| Battery | 48V 11.6Ah lithium battery Samsung |
| Controller | 48V 22A |
| Charge Time | 4-6 hours |
| Max Speed | 45 km/h |
| Range | 25-35 km |
| Brake | F/R disc brake |
| Light | F:Light R:Reflector |
| Display | SW-U-LCD display |
| Fork | Al alloy suspension fork |
| Tire | 26x4.0 |
| Derailleur | Outer 7 speed SHIMANO |
| Packing Size | 163*28*82cm |
Diagram showing the various components of the electric bike, including the leather seat, 48V 11.6Ah battery, S-U-LCD display, rear spring shock, front shock absorption, headlight, pedal, 750W motor, frame, and 26"x4.0" tire.
Installation Instructions
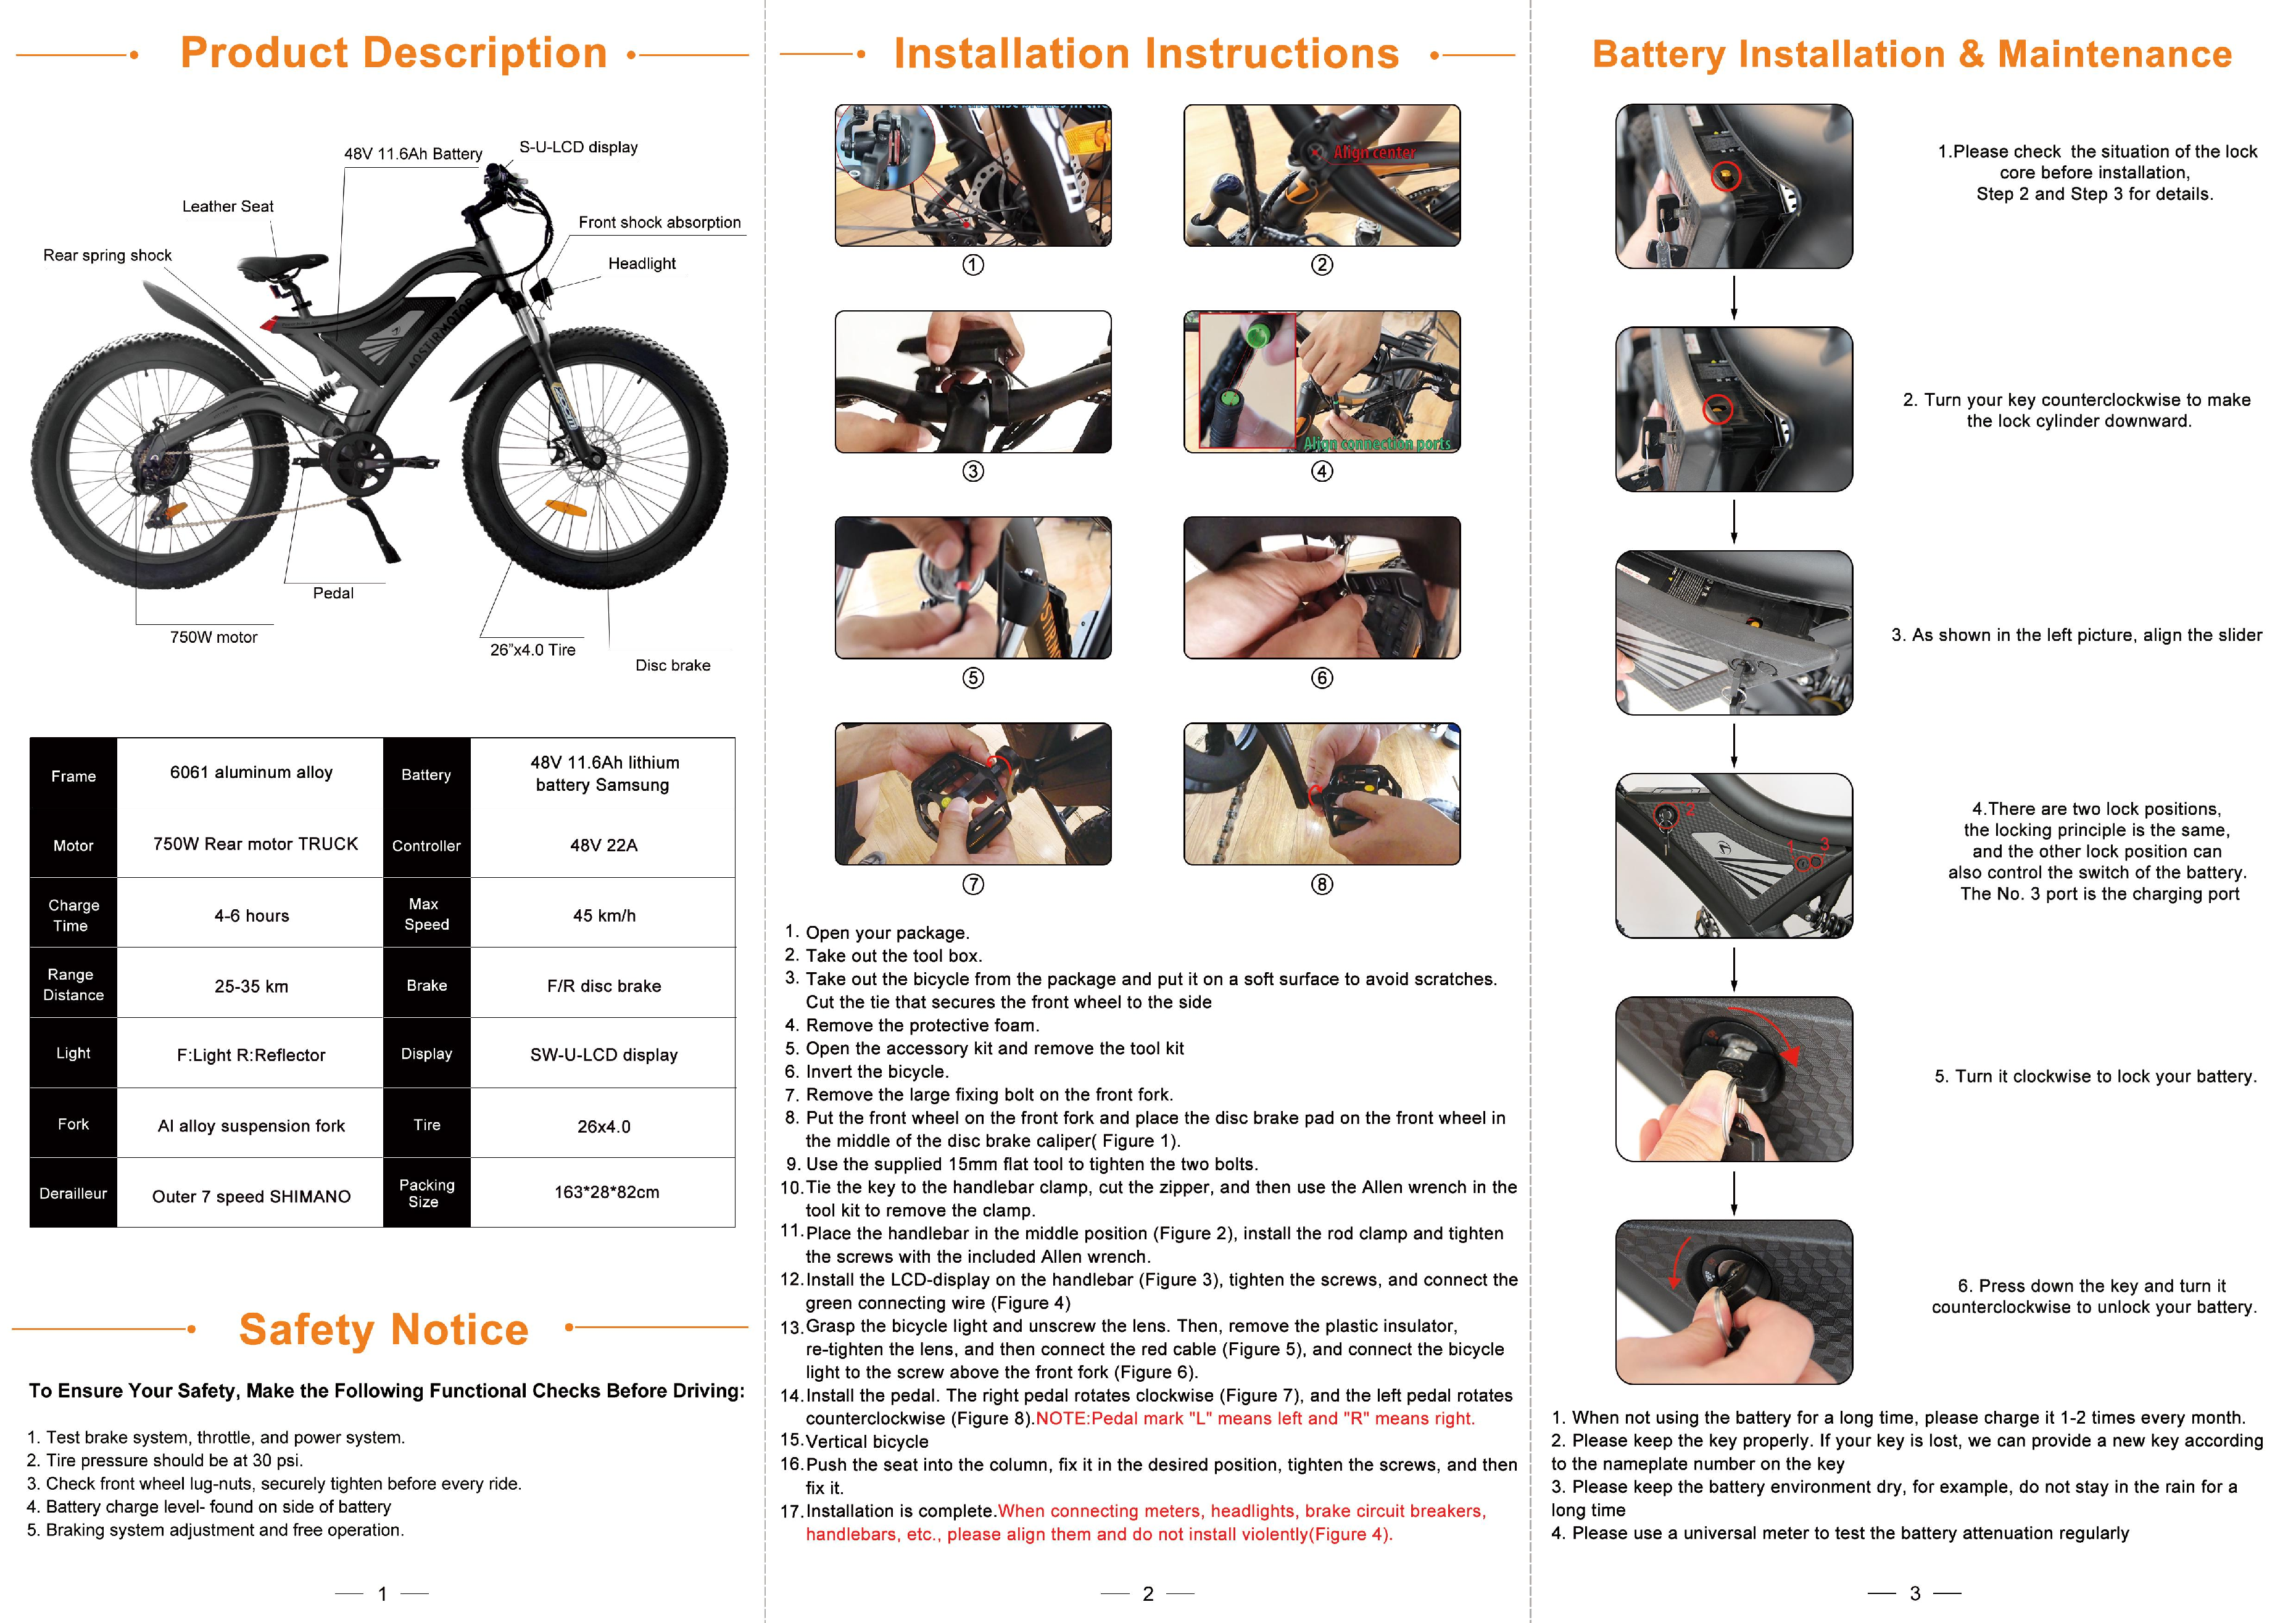
- Open your package.
- Take out the tool box.
- Take out the bicycle from the package and put it on a soft surface to avoid scratches.
- Cut the tie that secures the front wheel to the side.
- Remove the protective foam.
- Open the accessory kit and remove the tool kit.
- Invert the bicycle.
- Remove the large fixing bolt on the front fork.
- Put the front wheel on the front fork and place the disc brake pad on the front wheel in the middle of the disc brake caliper (Figure 1).
- Use the supplied 15mm flat tool to tighten the two bolts.
- Tie the key to the handlebar clamp, cut the zipper, and then use the Allen wrench in the tool kit to remove the clamp.
- Place the handlebar in the middle position (Figure 2), install the rod clamp and tighten the screws with the included Allen wrench.
- Install the LCD-display on the handlebar (Figure 3), tighten the screws, and connect the green connecting wire (Figure 4).
- Grasp the bicycle light and unscrew the lens. Then, remove the plastic insulator, re-tighten the lens, and then connect the red cable (Figure 5), and connect the bicycle light to the screw above the front fork (Figure 6).
- Install the pedal. The right pedal rotates clockwise (Figure 7), and the left pedal rotates counterclockwise (Figure 8). NOTE: Pedal mark "L" means left and "R" means right.
- Vertical bicycle.
- Push the seat into the column, fix it in the desired position, tighten the screws, and then fix it.
- Installation is complete. When connecting meters, headlights, brake circuit breakers, handlebars, etc., please align them and do not install violently (Figure 4).
Diagrams illustrating the step-by-step installation process of the electric bike's front wheel, handlebars, display, headlight, and pedals.
Battery Installation & Maintenance
- Please check the situation of the lock core before installation, Step 2 and Step 3 for details.
- Turn your key counterclockwise to make the lock cylinder downward.
- As shown in the left picture, align the slider.
- There are two lock positions, the locking principle is the same, and the other lock position can also control the switch of the battery. The No. 3 port is the charging port.
- Turn it clockwise to lock your battery.
- Press down the key and turn it counterclockwise to unlock your battery.
Maintenance Tips:
- When not using the battery for a long time, please charge it 1-2 times every month.
- Please keep the key properly. If your key is lost, AOSTIRMOTOR can provide a new key according to the nameplate number on the key.
- Please keep the battery environment dry, for example, do not stay in the rain for a long time.
- Please use a universal meter to test the battery attenuation regularly.
Diagrams showing how to install and lock the battery, and illustrations related to battery maintenance.
Safety Notice
To Ensure Your Safety, Make the Following Functional Checks Before Driving:
- Test brake system, throttle, and power system.
- Tire pressure should be at 30 psi.
- Check front wheel lug-nuts, securely tighten before every ride.
- Battery charge level - found on side of battery.
- Braking system adjustment and free operation.
Display Use & Maintenance
SW-LCD display
Basic Operation:
- Turn on/off: Long press the power button for 3 seconds.
- Switch display: Short press the power button.
- Adjusting assist level: Press UP or DOWN buttons.
- Turn on/off headlight: Long press the UP button for 3 seconds.
Parameter Settings:
- Enter setting mode: Long press UP and DOWN buttons simultaneously for 3 seconds.
- Exit setting mode: Long press UP and DOWN buttons simultaneously for 3 seconds.
- Select parameter: Short press the power button.
- Adjust parameter: Press UP or DOWN buttons.
Screenshots of the SW-LCD display showing various settings and information, including speed, battery level, assist level, and distance.
Controller Use & Maintenance
Controller Connections:
- Power cable
- Motor cable
- Brake lever sensor
- Display cable
- Throttle cable
- Headlight cable
Controller Maintenance:
- Please regularly check whether the motor's wiring harness is damaged.
- If the motor's wiring harness is damaged, please replace it immediately.
- Please check the motor and the controller's connection after each ride.
- If the motor's power is insufficient, please check the controller's parameters.
- If the motor's power is insufficient, please check the controller's parameters.
Diagram showing the various cables connected to the controller, including power, motor, brake sensor, display, throttle, and headlight.
Motor Maintenance
1. Please regularly check whether the motor's wiring harness is damaged.
2. If the motor's wiring harness is damaged, please replace it immediately.
3. Please check the motor and the controller's connection after each ride.
4. If the motor's power is insufficient, please check the controller's parameters.
5. If the motor's power is insufficient, please check the controller's parameters.
Image of the electric bike's rear motor.
FAQ
Q: Is there a power usage or battery gauge on the bike?
A: Yes, the bike has a battery indicator on the SW-LCD display. It shows the remaining battery life.
Q: How do I check the battery level?
A: The battery level can be checked on the SW-LCD display. It is represented by a series of bars.
Q: How do I turn on/off the headlight?
A: To turn on/off the headlight, long press the UP button for 3 seconds.
Q: What is the maximum speed of the bike?
A: The maximum speed of the bike is 45 km/h.
Q: How do I troubleshoot if the bike is not working?
A: First, check all connections and ensure the battery is charged. Refer to the manual for specific troubleshooting steps.
Q: How do I adjust the assist level?
A: You can adjust the assist level by pressing the UP or DOWN buttons on the handlebar display.
AOSTIRMOTOR S18 750W
POWER BRINGS JOY
www.aostirmotor.com
aostirmotor@gmail.com
