GGBOND G10 Operation Manual
(Suitable for wide indoor environments operation)
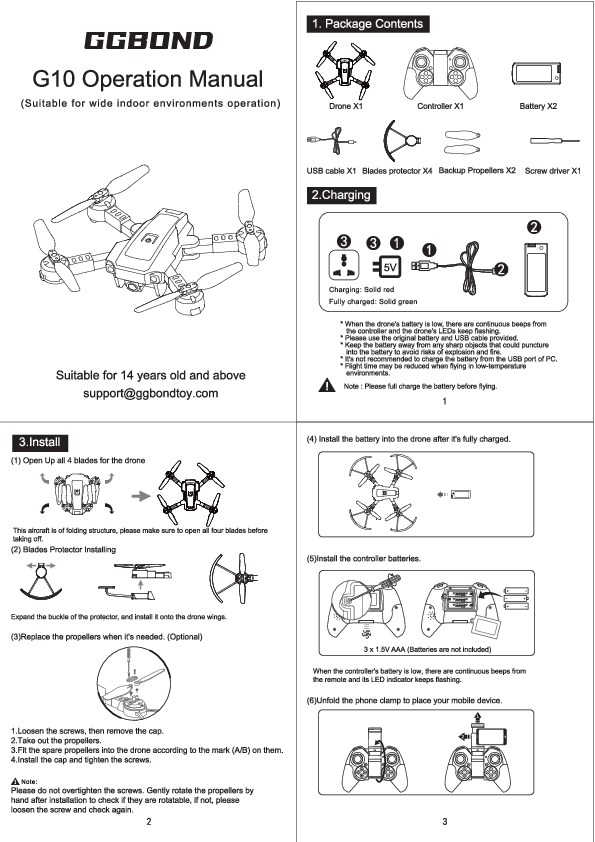
1. Package Contents
- Drone X1
- Controller X1
- Battery X2
- USB cable X1
- Blades protector X4
- Backup Propellers X2
- Screw driver X1
2. Charging
Charging Status: Solid red light indicates charging; Solid green light indicates fully charged.
Important Notes:
- Low battery warning: Continuous beeps from the controller and flashing drone LEDs.
- Use only the original battery and USB cable provided.
- Keep batteries away from sharp objects to prevent puncture, explosion, or fire.
- Charging from a PC USB port is not recommended.
- Flight time may be reduced in low-temperature environments.
- Ensure the battery is fully charged before flying.
3. Install
- Open Up Blades: Unfold all 4 blades for the drone. This aircraft has a folding structure; ensure all four blades are open before taking off.
- Blades Protector Installing: Expand the buckle of the protector and install it onto the drone wings.
-
Replace Propellers (Optional):
- Loosen the screws and remove the cap.
- Take out the propellers.
- Fit the spare propellers into the drone according to the mark (A/B) on them.
- Install the cap and tighten the screws.
Note: Do not overtighten screws. Gently rotate propellers by hand after installation to check if they are rotatable. If not, loosen the screw and check again.
- Install Battery: Install the battery into the drone after it's fully charged.
-
Install Controller Batteries: Insert 3 x 1.5V AAA batteries (not included) into the controller.
Note: Low controller battery warning: Continuous beeps from the remote and flashing LED indicator.
- Unfold Phone Clamp: Unfold the phone clamp to place your mobile device.
4. Remote Controller
Controller Layout:
- 1. Phone Clamp
- 2. Left Control Stick (Controls ascent/descent, rotation)
- 3. ON/OFF Button
- 4. One Key Take-off/Landing Button
- 5. Circle Fly Button
- 6. Headless Mode (short press) / One Key Return (long press)
- 7. High-speed Rotation Button
- 8. LED Indicator
- 9. Right Control Stick (Controls forward/backward, left/right movement)
- 10. Drone's LED Indicators
- 11. Forward Trim
- 12. Rightward Trim
- 13. Backward Trim
- 14. Leftward Trim
5. How To Fly
-
Switch On the Power:
- Power on the drone by pressing its button for 2 seconds and place it on a flat ground.
- Press and hold the controller's ON/OFF button to turn it on. You will hear a beep, and the controller's LED indicator will start flashing.
- Frequency Matching: After turning on the drone and controller, both indicator lights on the drone and controller will flash. Push the left throttle stick to the top, then down to the lowest. After 2 seconds, the indicators will turn solid, indicating successful frequency matching.
- Compasses Calibration: Move both control sticks to the lower left at a 45° angle. You will hear a beep from the remote. Calibration completes when the drone's LEDs turn solid from flashing.
-
Flight Instructions (Take-off):
- Option 1: Press the take-off button.
- Option 2: Simultaneously push the Left Control Stick to the lower left at 45° and the Right Control Stick to the lower right at 45° (or vice versa) until propellers rotate, then slowly push the Left Control Stick forward to take off.
- Option 3: Throw-to-fly function. After frequency matching and calibration, hold the aircraft horizontally and throw it out. The aircraft will automatically unlock blades and fly. Note: It is recommended to recalibrate after using this function several times for better stability.
6. Using the Remote Controller
Left Control Stick:
- Push forward: Drone ascends.
- Pull backward: Drone descends.
- Pull leftward: Drone rotates left.
- Pull rightward: Drone rotates right.
Right Control Stick:
- Push forward: Drone flies forward.
- Pull backward: Drone flies backward.
- Pull leftward: Drone flies left.
- Pull rightward: Drone flies right.
7. Aircraft Functions
Speed Switch
The drone defaults to low speed. Press the SPEED button once for medium speed (two beeps). Press again for high speed (three beeps). Press a third time to return to low speed (one beep).
Headless Mode
Short press the button to activate Headless Mode (drone LEDs flash). In this mode, the drone follows the direction of the Right Control Stick regardless of the drone's orientation. Press the same button to exit (drone LEDs turn solid).
360° Flip
Fly the drone to a height over 2 meters, then press the 3D FLIP button. Move the Right Control Stick to perform a flip in the desired direction. Note: This function will be cancelled if the stick is not moved within 5 seconds after pressing the button, and the remote will stop beeping. It cannot be activated when the drone battery is low.
One Key Return
Press and hold the button to make the drone fly back towards its takeoff point, following a path parallel to its original takeoff path. Drone LEDs flash during return. Press and hold the button again or move the Right Control Stick forward to cancel this mode.
High-Speed Rotation
Press the button to make the drone rotate at high speed. Press the button again or move the Right Control Stick in any direction to exit this mode. Note: This function cannot be activated when the drone battery is low.
Circle Fly
In a barrier-free area within a 5-meter radius, press the button to fly the drone in a circle. Press the button again or move the Right Control Stick in any direction to exit this mode. Note: This function is not recommended for landing, as it may cause serious damage to the drone.
Altitude Hold/Hover
This is a default setting. When the Left Control Stick is released after an ascent/descent, the drone will hover at the current height. Use trim buttons for stability. Note: This function cannot be activated when the drone battery is low.
Emergency Stop
Press and hold the SPEED button to stop the drone in the air and let it fall.
Photo / Video
Connect the drone to your mobile device. Check photos and videos in the 'Media' section of the app or your device's album. Press the button to take a photo. Press the button to start recording video; press again to stop and save.
8. Aircraft Parameters
| Parameter | Value |
|---|---|
| Length of main wing | 83mm |
| Aircraft Dimensions | 98X120X33mm |
| Total weight | 54g±2g |
| Battery | 3.7V 380mAh |
| Charging time | About 50 mins |
| Flight time | 7-8 mins |
| Gyroscope | Built-in |
| Working temperature | -10°C to 40°C |
| Remote controller | 2.4G |
| Motor | 7*16 4pcs |
Remote Controller Parameters
| Parameter | Value |
|---|---|
| Wifi Transmission Range | 30-40 meters (in a wide open area with no electromagnetic interference) |
| Working frequency | 2.4G |
| Battery | 3xAAA |
9. FAQ
| Issue | Cause | Suggestion |
|---|---|---|
| After battery insertion, drone indicator lights flash, no response to operations. | Frequency matching between controller and receiver is not successful. | Reoperate the frequency matching for controller and drone (refer to P.4 for details). |
| No response after battery is inserted in the drone. | 1. Check if power for controller and drone is fully charged. 2. Connection of the poles are not good. |
1. Open the remote battery case and ensure the battery is inserted in the correct position. 2. Use a fully charged battery. 3. Reinstall the battery and confirm good connection with the poles. |
| Motor does not run when operating the throttle stick and drone indicator lights flash. | Power for the Li-Poly battery is not enough. | Charge the battery or replace it with a fully charged battery. |
| Main motor blades spin but the drone won't fly. | 1. Some blades are deformed. 2. Battery power is not enough. |
1. Replace the main blades. 2. Charge the battery or replace it with a fully charged battery. |
10. Battery Using Attention
Matters needing attention:
- Rechargeable batteries must be removed from the toy before charging.
- Non-rechargeable batteries are not to be recharged.
- Rechargeable batteries are only to be charged under adult supervision.
- Only use for charging 2S Li-ion or Li-polymer battery packs; otherwise, the charger or battery may be damaged.
- During charging, place the charger in a dry, ventilated area away from heat sources and flammable substances.
- Never charge the battery immediately after flight if it hasn't cooled down, as this may cause swelling or fire.
- Ensure correct polarity before connecting the battery to the charger.
- Avoid dropping or applying force during charging, as this can cause internal short circuits.
- For safety, use original charging equipment and battery packs. Replace batteries when flight time significantly decreases.
- Leaving a battery in the charger for extended periods after saturation can lead to automatic discharge. If cell voltage drops below the rated voltage, the charger will recharge it. Frequent charging/discharging shortens battery life. It is advised to disconnect power and remove the battery after charging is complete.
Maintenance of battery pack:
- Store battery packs in a dry, ventilated place with an ambient temperature between 18°C and 25°C.
- Avoid frequent charging and excessive discharging to prolong battery life.
- Maintain the battery pack before long-term storage by charging it to 50-60% capacity.
- If storage exceeds 1 month, check cell voltage monthly. If any cell voltage is below 3V, refer to the charging instructions.
- For optimal performance, new battery packs should be "motivated" before use by charging and discharging 3-5 times, with discharge not less than 70% capacity. This improves battery life and voltage stability.
SAFETY AND PRECAUTIONS
General Caution: Remote-control quadcopters are potentially dangerous. Operate flights away from crowds. Improper assembly, mechanical damage, poor electronic control, or unfamiliar manipulation can lead to accidents like uncontrolled flight or aircraft damage. Users are responsible for flight safety and any accidents caused by negligence.
FORBIDDEN: Special drone for Indoor and outdoor use: Stay away from barriers. This product is suitable for indoor and outdoor environments (wind power less than Force 2). Choose obstacle-free sites with proper distance from crowds or pets. Do not operate in unsafe environments (heat, wires, power supply) to prevent fire or electric shock.
FORBIDDEN: Safe usage of the lithium battery: Lithium batteries are dangerous. Use only factory-provided chargers. Do not impact, dismantle, reverse connect poles, or burn batteries. Prevent metal objects from contacting poles to avoid short circuits. Do not pierce batteries with sharp items to avoid fire risk. Charge batteries under supervision, out of reach of children. Do not charge heated batteries. Dispose of batteries according to local laws and regulations.
FORBIDDEN: Away from moist environments: Aircraft contain sophisticated electronic components and must be kept away from moisture or water vapor. Do not operate in bathrooms or on rainy days, as moisture can cause malfunctions.
FORBIDDEN: Never misuse the product: Do not disassemble or modify the product. Use specified parts for upgrades, repairs, or maintenance. Operate within limits and do not overload. Do not use in illegal ways.
CAUTION: Keep away from source of heat: Aircraft materials (PA fiber, polyethylene) can deform or melt at high temperatures. Keep away from heat sources and direct sunlight.
WARNING: Never operate the product alone: This product is suitable for users over 14 years old. Due to the learning curve, operation under the guidance of experienced individuals is recommended for safe flight.
FCC Compliance
NOTE: This equipment has been tested and found to comply with the limits for a Class B digital device, pursuant to Part 15 of the FCC Rules. These limits are designed to provide reasonable protection against harmful interference in a residential installation. This equipment generates, uses, and can radiate radio frequency energy and, if not installed and used in accordance with the instructions, may cause harmful interference to radio communications. However, there is no guarantee that interference will not occur in a particular installation. If this equipment does cause harmful interference to radio or television reception, which can be determined by turning the equipment off and on, the user is encouraged to try to correct the interference by one or more of the following measures:
- Reorient or relocate the receiving antenna.
- Increase the separation between the equipment and receiver.
- Connect the equipment into an outlet on a circuit different from that to which the receiver is connected.
- Consult the dealer or an experienced radio/TV technician for help.
Changes or modifications not expressly approved by the party responsible for compliance could void the user's authority to operate the equipment.
This device complies with Part 15 of the FCC Rules. Operation is subject to the following two conditions: (1) this device may not cause harmful interference, and (2) this device must accept any interference received, including interference that may cause undesired operation.