Rola Roof Racks & Cargo Carriers Installation Instructions
File info: application/pdf · 2 pages · 904.43KB
Rola Roof Racks & Cargo Carriers Installation Instructions
roof racks, cargo boxes, carriers, luggage rack, crossbars, rail bars, cargo bags, cargo nets, baskets, ski racks, snowboard racks, canoe carriers, kayak carriers
"roof racks, cargo boxes, carriers, luggage rack, crossbars, rail bars, cargo bags, cargo nets, baskets, ski racks, snowboard racks, canoe carriers, kayak carriers"
165 Lbs Parts list Fitting Instructions - Hitch Warehouse
Loads should be evenly distributed and secured. Check the function of all doors and sunroof before driving.
Pg 1 of 2 75Kgs/ 165 Lbs Parts list Fitting Instructions
Full PDF Document

If the inline viewer fails, it will open the original document in compatibility mode automatically. You can also open the file directly.
Extracted Text
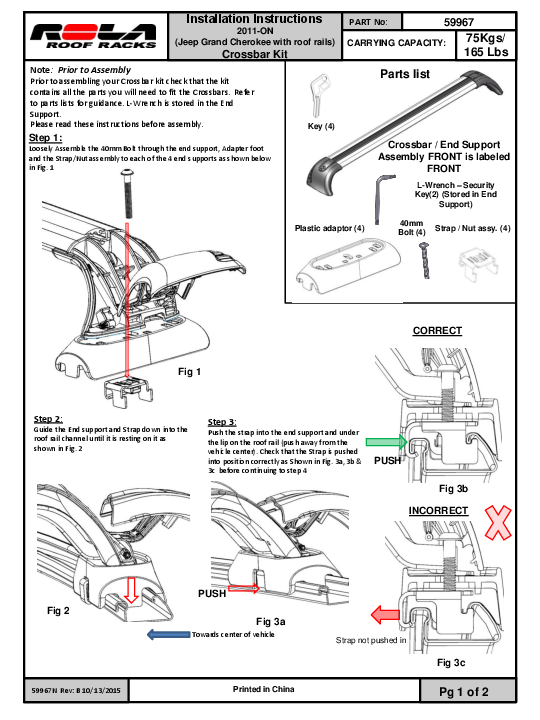
Installation Instructions
2011-ON (Jeep Grand Cherokee with roof rails)
Crossbar Kit

Note: Prior to Assembly Prior to assembling your Crossbar kit check that the kit contains all the parts you will need to fit the Crossbars. Refer to parts lists for guidance. L-Wrench is stored in the End Support. Please read these instructions before assembly.
Step 1:
Loosely Assemble the 40mm Bolt through the end support, Adapter foot and the Strap/Nut assembly to each of the 4 end supports as shown below in Fig. 1

Key (4)

PART No:

59967

CARRYING CAPACITY: 75Kgs/ 165 Lbs

Parts list

Crossbar / End Support Assembly FRONT is labeled
FRONT
L-Wrench � Security Key(2) (Stored in End
Support)

Plastic adaptor (4)

40mm Bolt (4)

Strap / Nut assy. (4)

Fig 1

CORRECT

Step 2:
Guide the End support and Strap down into the roof rail channel until it is resting on it as shown in Fig. 2

Step 3:
Push the strap into the end support and under the lip on the roof rail (push away from the vehicle center). Check that the Strap is pushed into position correctly as Shown in Fig. 3a, 3b & 3c before continuing to step 4

PUSH

Fig 3b

INCORRECT

Fig 2
59967N Rev: B 10/13/2015

PUSH Fig 3a
Towards center of vehicle
Printed in China

Strap not pushed in

Fig 3c
Pg 1 of 2

Installation Instructions
2011-ON Jeep Grand Cherokee (with factory roof rails)
Crossbar Kit

PART No:

59967

CARRYING CAPACITY: 75Kgs/ 165 Lbs

Step 4:
While Taking care to ensure that the strap stays oriented in the roof rail correctly as shown in step 3 above. Use the L-Wrench Security Key to tighten the Bolt to approximately 5Nm ( 44 in/lbs) of torque or a firm hand-tightness. Fig. 4a. Repeat Steps 2 though 4 for the opposite side end support and then then the remaining Crossbar assembly assuring proper fit and alignment.Replace the supplied torx L-wrench to its stowed position in the end support. Fig 4b

Note: The FRONT and REAR Crossbars are NOT the

same length. The FRONT Crossbar is longer. The

Crossbar labeled "FRONT" on the underside of the

Crossbar, belongs to the front location. The remaining

bar, without the label, belongs to the rear location. It is

recommended the spacing between the front and rear

bar is 700mm. Some accessories my require a different

spacing.

L-Wrench

Step 5: Attaching Covers to End Supports

Fig 4b

Should you need to remove your GTX covers the following describes the replacement and use. Locate the ends of the Hinge with the Cover hinge holes. Flex the Hinge ends in and push through the Cover holes until the capped ends engage. (you'll hear and audible click) (Fig 6, 7)
To fully extend the Covers away from the Support (to access the Accessory Channel or mounting hardware) pivot the Cover on the Hinge while pushing down on the top of the Cover. (Fig 10, 11)
Step 6: Closing the End Support Covers
Close the End Support Covers by moving the cover up, over, and then down on the End Support. Push Cover against the End Support until you hear an audible "click", indicating the Cover is fully engaged with the End Support. (fig 13, 14) . Lock all four covers into place using the keys provided. (Fig 12) Store your keys in a safe place such as the glove box or key ring. Replacement locks and keys are available as service items.
Step 7: Mounting Accessories
You are now ready to mount your accessories examples: Bike, Kayak, luggage carriers by using the Accessory Channel if applicable (fig 11). "T" bolts are available to mount accessories. Be sure to cut your buffer strips to size to completely cover your channel once the accessories are mounted. Replacement Buffer Strips are available as service items.
General Usage Information
* It is essential for the proper assembly, operation and use of the Roof Rack that the instructions and safety precautions supplied are strictly observed.
* The maximum permissible load for your roof rack is the lower of the maximum load capacity specified in your vehicle owner's manual or specified on your roof rack load label. Do NOT exceed the maximum load capacity.
Maximum load capacity equals the weight of the rack + accessories + weight of cargo. Ensure your vehicle's function is not impaired before driving.

End Support Cover
Fig 6
Fig 8

Fig 4a

CLICK

End Support

Fig 7

Accessory Channel Access

Fig 9

Fig 10
CLICK

Fig 11

Fig 12

REGULARLY CHECK THE TIGHTNESS OF CROSSBAR ATTACHMENTS.
Loads should be evenly distributed and secured.
Check the function of all doors and sunroof before driving. Any weight carried on the vehicle will adversely affect its handling particularly in cornering or in a cross wind and the vehicle
should therefore be driven with increased caution.
Only use NON-STRETCH tie down straps.
A number of accessories for carrying special loads are available.

Discover other roof racks and cargo carriers on our website.