九号平衡车 卡丁改装套件使用说明书(欧洲临时) 181010.ai
File info: application/pdf · 4 pages · 3.01MB
九号平衡车 卡丁改装套件使用说明书(欧洲临时) 181010.ai
1 2 Welcome Riding Safety - assets.segway-cdn.com
Ninebot Gokart Kit User Manual Welcome WARNINGS Thanks for choosing the Ninebot Gokart Kit, hereinafter referred to as the Gokart Kit. The Gokart Kit is an accessory developed specifically for the Ninebot by Segway produ…
Ninebot Gokart Kit User Manual
Thanks for choosing the Ninebot Gokart Kit, hereinafter referred to as the Gokart Kit. The Gokart Kit is an accessory developed specifically for the Ninebot ...
Extracted Text
www.segway.com
1 Welcome
Ninebot Gokart Kit User Manual V1.0
2
Riding Safety
Thanks for choosing the Ninebot Gokart Kit, hereinafter referred to as the Gokart Kit.
The Gokart Kit is an accessory developed specifically for the Ninebot by Segway products listed below. When the Gokart Kit is attached to the appropriate Ninebot by Segway product it becomes an electric Gokart. You must read and follow these instructions as well as the instructions provided with the applicable Ninebot by Segway product.
1. The Gokart is a recreational product. Before mastering riding skills, you need to practice. Neither Ninebot (Ninebot (Beijing) Tech Co., Ltd. or its subsidiaries and affiliates) nor Segway Inc. is responsible for injuries or damage caused by a driver's inexperience or failure to follow the instructions in this User Manual or in the New Rider Tutorial.
2. Remember as with any mode of transportation, that whenever you drive the Gokart, you risk injury or death from loss of control, collisions, and falls. You can reduce the risk by following all the instructions and warnings in this manual, but you cannot eliminate all the risks.
3. The Gokart kit contains small parts which can create a choking hazard. Keep small children away from the Gokart.
The Gokart Kit is only suitable for use with the Ninebot by Segway miniPRO (hereinafter collectively referred to as the miniPRO) and Ninebot S.
Other Ninebot and Segway self-balancing models are not supported.
WARNINGS
No Loose long Hair
To reduce the risk of injury, adult supervision is required. Never use in roadways, near motor vehicles, on or near steep inclines or steps, swimming pools or other bodies of water; always wear shoes, and never allow more than one rider. Always fasten seat belt, wear a helmet with long hair tucked inside and wear protective gear. Loose clothing or hair can become stuck in wheels or block your vision. Wear appropriate closed toed, secure footwear. No loose clothing. Do not drive in rain or snow. When not in use, park the Gokart indoors to avoid water entering and damaging the vehicle. Comply with all local laws and regulations.
Risk of death or serious injury from collisions and falls. To reduce the risk of injury user and/or adult must read and follow the user manual.
Correct dress code
Wear protective gear
Wear a helmet Tie up long hair (if any) Zip up the zipper
No long skirts
Wear flat shoes
Pre-Ride Checklist and Preparing for Your Drive:
1. Before each drive check and tighten any loose parts, fasteners, straps, and replace damaged components.
2. To avoid accidents caused by improperly inflated or worn tires, check the tire pressure on the miniPRO tires and wear on all tires before each ride. Do not touch moving or spinning tires.
3. Ensure that the battery level and vehicle operating status are within the specifications contained in the manual of the model being used with the Gokart Kit.
4. Carefully read, understand and follow all instructions in this User Manual and watch and understand the New Rider Tutorial in the App before your first drive. Do not attempt to drive the Gokart if you are not able to drive in accordance with the instructions in this Manual or you risk serious injury or death.
5. Always wear appropriate shoes, clothing, and protective gear when riding. Protective gear includes the use of a helmet, knee pads, and elbow pads (not included). Use an approved bicycle or skateboard helmet that fits properly with the chin strap in place, and provides protection for the back of your head. Remove or tie back anything loose (i.e. clothing, hair, jewelry, etc.) that could be caught in any moving parts. Always fasten the seat belt before riding and ensure it is securely tightened. Loose seat belt can get stuck in the wheels.
6. Do not turn the Gokart on unless it is parked on flat ground.
Where to Drive:
1. When entering public spaces, always comply with the local laws and regulations. Only ride in areas where you have first obtained permission from the property owner.
2. The Gokart is designed to be driven on a dry, flat, hard-surface, free of obstacles, bumps, holes, and other hazards.
3. The kinds of surfaces which are appropriate for safe use of the toy.
4. Do not drive on roadways, near motor vehicles, pedestrians, bicyclists, animals, on or near steep inclines or steps, curbs, near swimming pools, through puddles or other bodies of water. Use caution when riding in areas with trees, posts, or fences. You must leave sufficient space between you and those
items to be able to safely pass them. 5. The Gokart is never to be ridden indoors. 6. Do not ride the Gokart at night. 7. Do not ride on any ramp or incline that exceeds the maximum slope. 8. Do not ride in the snow, rain, or on roads which are wet, muddy, icy, or that are slippery for any reason. Do not ride over obstacles (including, but not limited to, sand, loose gravel, or sticks). Doing so could result in a loss of balance or traction and could cause a collision. 9. Do not allow the Gokart to get wet. You risk damage to the batteries and potential for a fire or explosion due to a wet battery pack.
How to Drive: 1. As with other vehicles, faster speeds require longer braking distance. Sudden acceleration or braking on smooth surfaces could lead to wheel slip and collisions. 2. Be cautious and always keep a safe distance between you and others when driving. Be alert and slow down when entering unfamiliar areas. 3. Do not allow anyone to drive your Gokart on his/her own unless he/she has carefully read this manual, and followed the New Rider Tutorial. The safety of new riders is your responsibility. Assist new riders until they are comfortable with the basic operation of the Gokart and make sure each new rider wears a helmet and other protective gear. 4. To avoid distraction when driving your Gokart, do not use a cell phone, camera, headphones, ear buds or perform any other activities while driving. 5. Be alert! Scan both far ahead and in front of you. Your eyes are your best tool for safely avoiding obstacles and low traction surfaces (including, but not limited to, wet ground, loose sand, loose gravel, and ice). Use caution when transitioning over differing terrain. 6. When approaching or crossing an intersection, road, corner, or gate of any kind, always slow down and yield to others. 7. Do not drive at unsafe speeds. You must always use good judgment based on your driving skills and the surrounding environment. 8. Always slow down when turning. Turning at a high speed can cause loss of control, possible vehicle turn-over, and risk of injury or death. 9. Do not perform stunts of any kind. All four tires must remain on the ground at all times. 10. While driving the Gokart, always remain seated with arms and legs inside the Gokart. 11. Do not carry cargo of any kind. 12. If the Gokart makes an abnormal sound or signals an alarm while driving, stop immediately and do not use the Gokart or miniPRO until the cause of the noise/alarm has been identified and corrected. Contact after-sales service for assistance.
Who Should Drive: The manufacturer recommends drivers be at least 14 years old. Children under the age of 16 should only drive under adult supervision. Always follow these safety instructions: A. People who should not drive the Gokart include: i. Anyone under the influence of alcohol, drugs, or intoxicants. ii. Anyone who suffers from disease that puts himself/herself at risk if he/she engages in strenuous physical activity. iii. Anyone whose weight is outside the stated limits (see Specifications). iv. Pregnant women. B. The Gokart is intended for one person only. C. To drive safely, you must be able to clearly see what is in front of you and you must be clearly visible to others. D. Drivers must be able to hear the environment around them.
After Each Drive: 1. Park the Gokart on flat ground and power it off. Failure to do so could cause the Gokart to move when exiting potentially causing injury to you and others around you. 2. Allow the Gokart to cool down before charging. Do not attempt to charge the Gokart, if it, the charger, or the power outlet is wet. Follow instructions in the miniPRO User Manual. 3. As with any electronic device, use a surge protector when charging to help protect your Gokart from damage due to power surges and voltage spikes. 4. Only use the charger specified by the manufacturer. Do not use a charger from any other product. 5. Only use Ninebot or Segway approved parts and accessories. Do not modify your Gokart. Modifications to your Gokart could interfere with the operation and performance of the Gokart, which may result in serious injury and/or damage, and could void the Limited Warranty.
Maintenance and Storage: 1. Be sure the Gokart is powered off before performing any maintenance or when installing or replacing parts. 2. When installing components, use proper and sufficient force until the component is secure. If the installation is too loose or too tight, the Gokart may not function properly resulting in the potential for injury to you or others or damage to, or malfunction of, the Gokart. 3. Install batteries for the Gokart in accordance with the instructions and ensure that the positive and negative electrodes of the batteries are installed correctly. Only use the batteries specified by the manufacturer. Do not charge the batteries as this may cause a risk of fire or explosion. Do not mix old and new batteries. Do not mix alkaline, standard (carbon-zinc), or rechargeable batteries. When the batteries are dead, purchase and replace them yourself. 4. Follow all instructions contained in the miniPRO User Manual when performing maintenance on the miniPRO.
5. Do not use a strong water flow or high-pressure hoses to clean the Gokart. Avoid getting water in the charge port. If your Gokart has been exposed to heavy rain store it outdoors away from buildings and people but protected from the elements until it is dry. 6. Store your Gokart indoors. The miniPRO should be stored in an environment where the temperature is no higher than 122�F (50�C) or lower than -4�F (-20�C). If the temperature of the storage environment is lower than 32�F (0�C), do not charge it until after placing it in a warm environment (over 50�F (10�C).
The data and parameters of the Ninebot Gokart vary with different models. They are subject to change without prior notice. Go to www.segway.com for updated information.
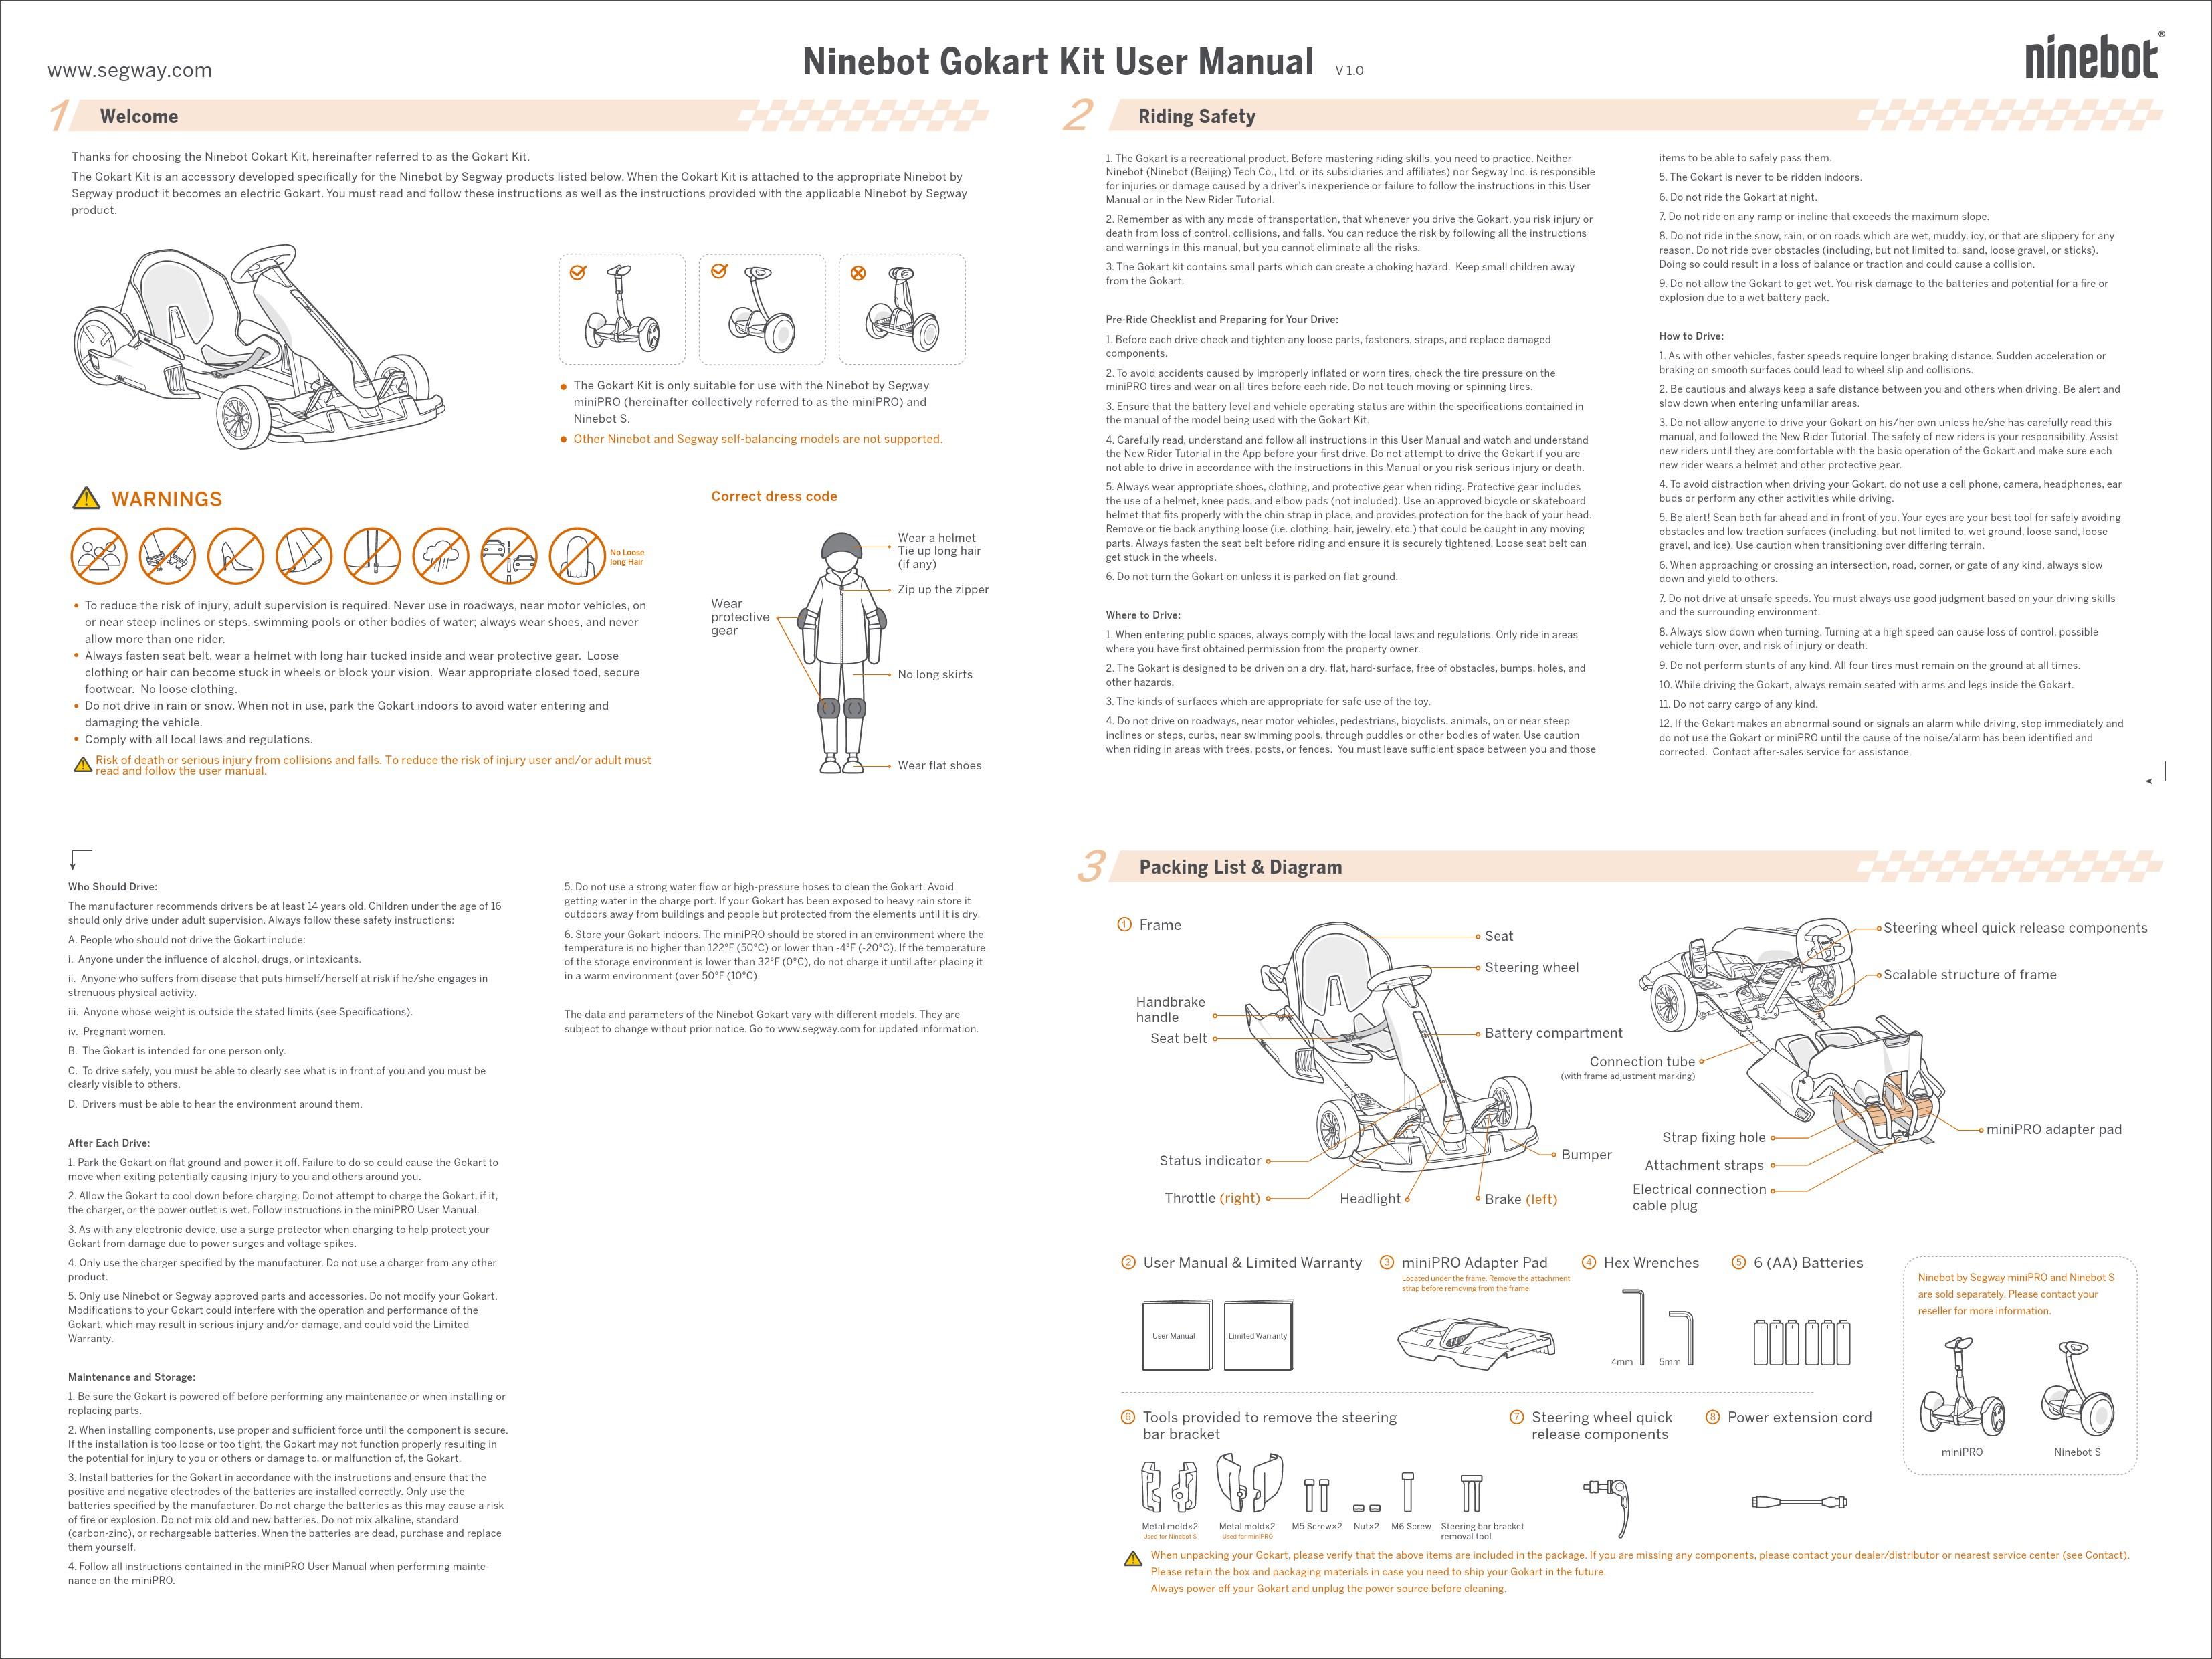
3 Packing List & Diagram
1 Frame
Handbrake handle
Seat belt
Status indicator Throttle (right)
Headlight
Seat Steering wheel
Battery compartment
Connection tube
(with frame adjustment marking)
Bumper Brake (left)
Strap fixing hole
Attachment straps Electrical connection cable plug
Steering wheel quick release components Scalable structure of frame
miniPRO adapter pad
2 User Manual & Limited Warranty
3 miniPRO Adapter Pad
Located under the frame. Remove the attachment strap before removing from the frame.
4 Hex Wrenches
5 6 (AA) Batteries
User Manual
Limited Warranty
4mm
5mm
Ninebot by Segway miniPRO and Ninebot S are sold separately. Please contact your reseller for more information.
6 Tools provided to remove the steering bar bracket
7 Steering wheel quick release components
8 Power extension cord
miniPRO
Ninebot S
Metal mold�2
Used for Ninebot S
Metal mold�2
Used for miniPRO
M5 Screw�2 Nut�2 M6 Screw Steering bar bracket removal tool
When unpacking your Gokart, please verify that the above items are included in the package. If you are missing any components, please contact your dealer/distributor or nearest service center (see Contact). Please retain the box and packaging materials in case you need to ship your Gokart in the future. Always power off your Gokart and unplug the power source before cleaning.
4
Assembling your Gokart (Requires two adults to assemble)
Operating the miniPRO
The Gokart is assembled by attaching the Gokart Kit to a miniPRO. Before assembly of the Gokart, please review the miniPRO User Manual and follow all instructions contained in it. Once the miniPRO has been properly activated and charged you can begin assembly of the Gokart.
1 Update the miniPRO firmware
Install the app
Download the Segway-Ninebot app (hereinafter referred to as the app) by any of the following methods:
Scan the QR code below
Download in Google Play Store or Apple's App Store
Segway-Ninebot App
Segway-Ninebot App
* Your mobile phone requires Bluetooth 4.0 or later, iOS system 8.0 or later, or AndroidTM 4.3 or later.
Pair your mobile phone and the miniPRO
Turn on the phone's Bluetooth. Press the power button to turn on the miniPRO. Open the app to search for and connect your miniPRO.
Searching MiniPro0001
Update firmware and switch modes
In the upper right corner of the app, tap Settings On the Ninebot settings page, tap "Gokart mode". Enable "Gokart mode".
Firmware Update.
Vehicle
Vehicle
Firmware Update Gokart Mode
Gokart Mode Gokart Mode
Gokart Kit installation tutorial About Gokart
* This firmware update does not involve activation of the miniPRO. If you need to use the miniPRO, please refer to the miniPRO User Manual for related operations.
2 Remove the steering bar from the miniPRO
Scan the QR code on the
right to review Assembly
Instructions.
miniPRO Assembly Instructions
Ninebot S Assembly Instructions
This manual uses the miniPRO as an example. If you have a Ninebot S, please watch the
video by scanning the right QR code.
a. Press the power button to turn off the miniPRO.
b. Unlock the steering bar tool-free release, remove the steering bar.
d. Use a 4 mm hex wrench to remove the screws in the steering bar bracket and pull off the bracket. Disassembly is completed after removing the steering bar bracket. If you cannot remove the bracket by hand, continue to step e.
c. Remove the rubber plug on the steering bar bracket.
e. Use the tools provided to remove the steering bar bracket from the miniPRO. The steps are as follows:
Assembling and disassembling the Gokart
This assembly is for adults only. Do not power on the miniPRO during assembly or disassembly.
Before assembly, update the app's firmware and turn on Gokart mode.
Assembly
1 Plug the power extension cord into the charging port of the miniPRO, tighten by turning clockwise.
2 Install the miniPRO adapter pad.
Located under the frame. Remove the attachment strap before removing from the frame.
Power extension cord
Power button
Do not plug the power extension cord into the miniPRO if the power extension cord or charge port is wet.
9 Once fully assembled, make sure:
The miniPRO adapter pad and the miniPRO are facing the correct direction. The attachment straps are properly attached and tightened. The electrical connection cable is plugged into the power extension cord. The body length and steering wheel height is appropriate for the rider. The battery compartment is closed. If anything appears to be incorrect, stop using the Gokart and contact after-sales service.
a
c
b
3 Place the Gokart frame on the miniPRO. The installation direction is as shown below. Be sure to align the steel frame with the adapter pad as shown in the enlarged view.
8 Install the Gokart batteries
Unscrew the battery compartment cover and insert batteries into the compartment. Close and tighten the cover.
To avoid issues that may be caused by corrosion, remove the batteries if not using the Gokart for an extended period of time.
7 Adjust the steering wheel height:
a Raise the steering wheel to a suitable height.
b Insert the quick release
b
d
screw into the hole of the
corresponding height.
c Tighten the quick release nut.
d Press to fix the steering wheel quick release components.
e Ensure the steering wheel does not shake. Otherwise, repeat the steps b, c, d, e.
d
Power button
a
b c
Four screws already inserted into the screw holes.
Place the steering bar bracket removal tool into the screw holes on the steering bar bracket.
Fasten the two metal molds onto the lower part of the steering bar bracket by inserting the two nuts from the right and the two M5 screws from the left; tighten with a 4mm hex wrench.
Insert the M6 screw into the screw hole on the front of metal molds, tightening with a 5mm hex wrench, continue tightening the screw until the steering bar bracket falls off the miniPRO.
3 Check the status of the miniPRO
Refer to the chapter "Maintenance" in the miniPRO User Manual to ensure that the tire performance, the battery level, and the running status of the miniPRO are normal.
< 19� If lifting the frame by yourself, do not lift the backside more than 19� or you may damage the bumper.
Disassembly
Press the miniPRO's power button to turn off the Gokart.
4 Pass the attachment straps through the bottom of the miniPRO and the strap fixing holes. Tighten the straps. Please make sure the location of the logo is correct on the straps. If not, return to step 3 for adjustment.
5 Plug the electrical connection cable of the Gokart into the power extension cord. Align the groove and do not force the cord in. Charge ports must be dry.
Disconnect the electrical connection cable.
Refer to the assembly procedure and carry it out in reverse order.
6 Stretch the frame and adjust the length of the body:
a With both hands holding the steering wheel and the seat, stretch the frame out to a suitable position along the horizontal direction of the connection tube.
b Align the scalable structure of the frame with the marking on the connection tube.
c Positioning: Use a 5mm hex wrench to press the two screws into the holes on the left and right connection tube in order, as shown in the figure above (The screw is set to a depth of about 1cm for successful position).
d Tighten the 4 screws.
5 Driving the Gokart
Activate the Gokart
Press the power button on the miniPRO to turn on the Gokart. The Gokart will automatically power off when idle for 10 minutes.
Open the Segway-Ninebot APP and connect your Gokart.
Searching Gokart0001
Follow the instructions in the app to activate the Gokart and complete the corresponding tutorial and exercises.
Activate the Gokart
For your safety, the default values of the Gokart speed and sensitivity are set to low. Use the app to learn how to drive safely, then the speed limit can be gradually raised.
Use and charging
1
2
1 Fastening the seat belt
Sitting on the seat, buckle the left and
right parts of the seat belt in front of you.
5
3
2 Driving
Acceleration: lightly press the throttle (right
pedal) to go forward.
Deceleration: lightly press the brake (left
pedal) to decelerate.
Steering: steer the Gokart by slightly turning the
steering wheel clockwise or counterclockwise.
6
4
Do not pump the brake pedal to decelerate.
3 Reversing When the Gokart is stopped, double-press the brake (left pedal). After you hear a beep, the Gokart has switched to reverse mode. Press the throttle to drive the Gokart in reverse. Double-press the brake (left pedal) again to return to forward mode.
4 Emergency braking In the event of a situation that requires an emergency stop, pull the hand brake handle on the right side of the Gokart to engage the emergency brake.
5 Shutdown Make sure the vehicle is completely stopped before getting off. Press the miniPRO's power button to turn off the Gokart.
6 Charging Charge the Gokart by plugging the miniPRO power cord into the power extension cord.
Do not connect the charger if the charge port or power cable is wet.
Follow the relevant charging instructions in the manual and the common battery maintenance and safety knowledge for maintenance. Ninebot products are designed with overheat protection. If the vehicle temperature exceeds 104 �F (40�C), the vehicle cannot be charged as normal. Wait until the vehicle cools to below 104 �F (40�C) before charging.
6
Specifications
Product
Supported models
Name Model
Name and model
Size Weight Driving
Vehicle size
Package size Max payload Net weight Height requirement Recommended Age
Speed limit
Novice speed limit
Machine Parameters
Reversing speed limit Typical Range[1] Steering ratio Ground clearance Maximum slope [2]
Traversable Terrain
Operating temperature
Storage temperature
Front compartment battery[3]
Tires
IP rating ModelQuantity Front tires Type
Light
Headlight Status indicator
Brake
Braking method Braking distance[4]
Ninebot Gokart Kit N4MZ98
Ninebot by Segway miniPRO (Model: N3M260, N3M320) NinebotS (Model:N3M240)
After extension (Max status): 54�32�24 in (1383�822�600 mm); before extension (Min status): 40�32�18 in (1004�822�459 mm)
43.1�34.1�20.1 in (1095�865�510 mm) 220 lbs (100 kg) 61.3 lbs (27.8 kg) 51-75 in (130-190 cm) 14+ years old 15 mph (24 km/h) 5 mph (8 km/h) 2 mph (3 km/h) 9 mile (15km) 2.1:1 1.6 in (40 mm) 15� Hardened road, flat road surface, slopes below 15� 14�F~ 104�F (-10j40) -4�F~ 122�F (-2050) IPX4
6 AA Batteries
Tire width: 3 in (80 mm); flatness ratio: 60%; hub diameter: 5 in (127 mm) Non-inflatable hollow tire 0.2 Watt white LED light bar
The indicator comes in three colors: blue, yellow, and red. Blue means that the vehicle is in normal condition. Yellow means that the vehicle needs to be activated or the batteries in the front compartment need to bereplaced. Red means that the vehicle has a performance failure, and you need to open the app to check the cause of the failure and contact the after-sales service.
Electronic brake + mechanical handbrake 20 ft (6 m)
[1] Typical Range : Under the circumstances of full power, 154 lbs (70kg) load, and 77�F(25) ambient temperature, and measured on a flat road at an average speed of 9 mph (15 km/h).
[2] Maximum slope: Refers to the maximum slope that a 220 lbs (100 kg) driver can climb at a speed not faster than 3 mph (5 km/h).
[3] Front compartment battery: The battery compartment inside the frame that is used to power the frame indicator/headlight. When the battery is low, the blue indicator light turns yellow and blinks. You need to replace the batteries yourself.
[4] Braking distance: Under the circumstances of full power, 154 lbs (70kg) load, and measured on a flat hard road at an average speed of 12.4 mph (20 km/h).
Note: You can also open the App for more specific tips.
7 Certification
European Union Compliance Statement Battery recycling information for the European Union
Batteries or packaging for batteries are labeled in accordance with European Directive 2006/66/EC concerning batteries and accumulators and waste batteries and accumulators. The Directive determines the framework for the return and recycling of used batteries and accumulators as applicable throughout the European Union. This label is applied to various batteries to indicate that the battery is not to be thrown away, but rather reclaimed upon end of life per this Directive.
In accordance with the European Directive 2006/66/EC, batteries and accumulators are labeled to indicate that they are to be collected separately and recycled at end of life. The label on the battery may also include a chemical symbol for the metal concerned in the battery (Pb for lead, Hg for mercury, and Cd for cadmium). Users of batteries and accumulators must not dispose of batteries and accumulators as unsorted municipal waste, but use the collection framework available to customers for the return, recycling, and treatment of batteries and accumulators. Customer participation is important to minimize any potential e ects of batteries and accumulators on the environment and human health due to the potential presence of hazardous substances.
Restriction of Hazardous Substances Directive (RoHS) Ninebot products sold in the European Union, on or after 3 January 2013 meet the requirements of Directive 2011/65/EU on the restriction of the use of certain hazardous substances in electrical and electronic equipment ("RoHS recast" or "RoHS 2").
Radio and Telecommunications Terminal Equipment Directive
Segway Europe B.V. EU Contact Address for regulatory topics only: Hogehilweg 8, 1101CC, Amsterdam, The Netherlands
Hereby, Ninebot (Changzhou) Tech Co., Ltd, declares that the wireless equipment listed in this section are in compliance with the essential requirements and other relevant provisions of Directive 2014/53/EU.
8 Trademark and Legal Statement
Ninebot is registered trademark of Ninebot (Tianjin) Tech. Co., Ltd; Ninebot miniPRO, miniPLUS, and miniLITE are trademarks of Ninebot (Tianjin) Tech. Co., Ltd; Segway is registered trademark of Segway Inc; Apple and Apple Logo are registered trademark of Apple Inc in the United States and elsewhere. App Store is service mark of Apple Inc; Android is trademark of Google Inc, Android robots was originally created by Google Inc; The respective owners reserve the rights of their trademarks referred to in this manual.
The Ninebot Gokart Kit is covered by relevant patents. For patent information go to http://www.segway.com. We have attempted to include descriptions and instructions for all the functions of the Gokart Kit at the time of printing. However, your Gokart Kit may differ slightly from the one shown in this document. Please note that there are multiple Ninebot models with different functions, and some of the functions mentioned herein may not be applicable to your unit. The manufacturer reserves the right to change the design and functionality of the Gokart Kit product and documentation without prior notice.
� 2018 Ninebot (Beijing) Tech Co., Ltd. All rights reserved.
9 Contact
Contact us if you experience issues relating to riding, maintenance and safety, or errors/faults with your Gokart Kit.
Europe, Middle East and Africa: Segway Europe B.V. Hogehilweg 8, 1101CC, Amsterdam, The Netherlands Email service: service@segway.eu.com Website: www.segway.com
Have your Gokart Kit's serial number on hand when contacting Segway. You can find your serial number on the exterior of the shipping box, on the Product or in the Segway-Ninebot App, while connected to the Product.