Ortur LU2-2 Laser Module Focusing Guide
This manual provides instructions for focusing the Ortur LU2-2 Laser Module.
Product Specifications
- Product Name: Laser Module
- Model No.: LU2-2
- Brand: Ortur
- Wavelength: 450±5nm
- Light Path: Focused Beam
- Focal Length: 50mm
- Max Input (Laser Diode): 6V 1.35A
- Max Input (Laser Module): 24V 2A
- Maximum Luminous Power: 1600mW
- Laser Classification: CLASS IV LASER
- Safety Warning: Avoid eye or skin exposure to direct or scattered radiation.
Focusing Methods
Method 1: Using the Laser Shield (for new users)
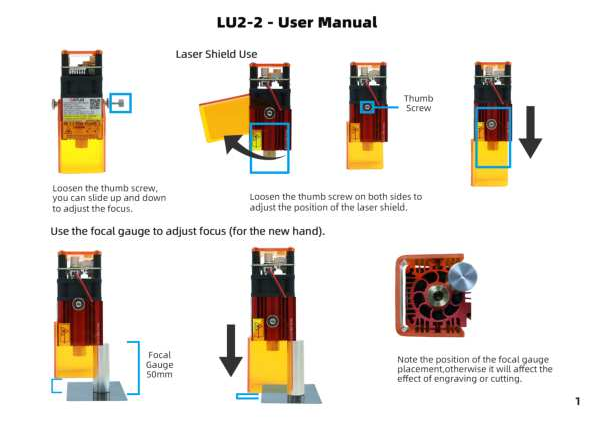
This method involves adjusting the laser shield using a thumb screw to achieve the correct focus.
Step 1: Loosen the Thumb Screw
Locate the thumb screw on the laser module. Loosen it to allow the laser shield to slide up and down for focus adjustment.
Visual Description: The laser module is shown with a yellow protective shield. A thumb screw is highlighted, with an arrow indicating it should be loosened to allow vertical movement of the shield.
Step 2: Adjust Laser Shield Position
Loosen the thumb screws on both sides of the laser shield. This allows you to adjust the position of the laser shield itself for optimal beam clearance.
Visual Description: The laser module is shown with the yellow shield. Thumb screws on both sides of the shield are highlighted, indicating they should be loosened to adjust the shield's position.
Method 2: Using the Focal Gauge (for new users)
This method uses a dedicated 50mm focal gauge to set the correct distance for focusing.
Step 1: Position the Focal Gauge
Place the 50mm focal gauge directly beneath the laser module.
Step 2: Adjust Module Height
Carefully lower the laser module until its protective shield rests on the focal gauge. The bottom of the shield should be flush with the top of the gauge.
Visual Description: The laser module is shown positioned above a 50mm focal gauge. An arrow indicates lowering the module onto the gauge. The gauge is labeled "Focal Gauge 50mm".
Important Note: Ensure the focal gauge is placed correctly. Incorrect placement will affect engraving or cutting performance.
Method 3: Using an Aluminum Plate (for adept users)
This method involves finding the smallest possible light spot on a surface, requiring precise adjustment.
Step 1: Prepare the Surface
Place an aluminum plate or a similar flat, non-reflective surface beneath the laser module.
Step 2: Adjust Focus for Smallest Spot
Slide the laser module up and down to adjust the focus. Observe the light spot on the aluminum plate. Adjust until you find the position where the light spot is smallest and sharpest. This may require patience, especially due to the module's power level.
Visual Description: An image shows a hand adjusting the laser module over an aluminum plate. A small, focused light spot on the plate is highlighted. Another image shows the laser module with a 50mm dimension indicated, suggesting the target distance.
Focusing Tutorial Video
For a visual demonstration, watch the tutorial video:


