FOXEER Falkor Camera System
User Manual and Settings Guide
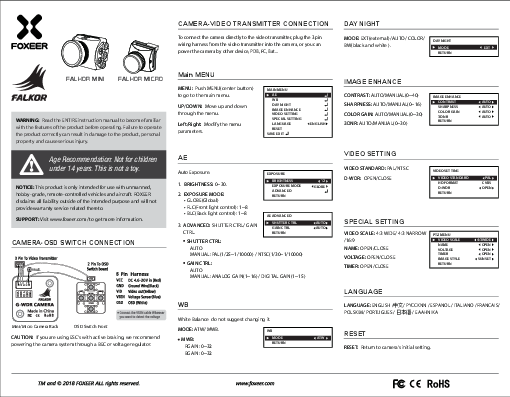
Camera-Video Transmitter Connection
To connect the camera directly to the video transmitter, plug the 3-pin wiring harness from the video transmitter into the camera. Alternatively, you can power the camera by other devices like a PDB, FC, or battery.
Day Night Mode
MODE: EXT (external) / AUTO / COLOR / BW (black and white).
Menu Navigation Example:
- DAY NIGHT
- MODE
- RETURN
Main Menu Navigation
MENU: Push MENU (center button) to go to the main menu.
UP/DOWN: Move up and down through the menu.
Left/Right: Modify the menu parameters.
Menu Structure:
- MAIN MENU
- AE
- WB
- DAY NIGHT
- IMAGE ENHANCE
- VIDEO SETTING
- SPECIAL SETTING
- LANGUAGE
- RESET
- SAVE EXIT
AE (Auto Exposure)
Settings for auto exposure.
1. Brightness
Range: 0~30.
2. Exposure Mode
- GLOBE (Global)
- FLC (Front light control): 1~8
- BLC (Back light control): 1~8
3. Advanced: Shutter Ctrl / Gain Ctrl
Shutter Control
AUTO
MANUAL: PAL (1/25 ~ 1/10000) / NTSC (1/30 ~ 1/10000)
Gain Control
AUTO
MANUAL: ANALOG GAIN (1~16) / DIGITAL GAIN (1~15)
Menu Navigation Example:
- EXPOSURE
- BRIGHTNESS <12>
- EXPOSURE MODE
- ADVANCED
- RETURN
- AE ADVANCED
- SHUTTER CTRL
- GAIN CTRL
- RETURN
WB (White Balance)
White Balance settings. It is recommended not to change these settings.
MODE: ATW/MWB.
MWB (Manual White Balance):
RGAIN: 0~32
BGAIN: 0~32
Menu Navigation Example:
- WB
- MODE
- RETURN
Image Enhance
CONTRAST: AUTO/MANUAL (0~40)
SHARPNESS: AUTO/MANUAL (0~16)
COLOR GAIN: AUTO/MANUAL (0~30)
3DNR: AUTO/MANUAL (0~30)
Menu Navigation Example:
- IMAGE ENHANCE
- CONTRAST
- SHARPNESS
- COLOR GAIN
- 3DNR
- RETURN
Video Setting
VIDEO STANDARD: PAL/NTSC
D-WDR: OPEN/CLOSE
Menu Navigation Example:
- VIDEO SETTING
- VIDEO STANDARD
- HD FORMAT
- D-WDR
- RETURN
Special Setting
VIDEO SCALE: 4:3 WIDE / 4:3 NARROW / 16:9
NAME: OPEN/CLOSE
VOLTAGE: OPEN/CLOSE
TIMER: OPEN/CLOSE
Menu Navigation Example:
- PTZ MENU
- VIDEO SCALE <4:3WIDE>
- NAME
- VOLTAGE
- TIMER
- IMAGE STYLE
- RETURN
Language
Available languages: ENGLISH / 中文 (Chinese) / Русский (Russian) / ESPANOL (Spanish) / ITALIANO (Italian) / FRANCAIS (French) / POLSKIM (Polish) / PORTUGUES (Portuguese) / 日本語 (Japanese) / Ελληνικά (Greek)
Reset
RESET: Return to camera's initial setting.
Camera-OSD Switch Connection
This section describes the connection between the FOXEER G-WDR CAMERA and the OSD Switch Front.
Camera Back Connections (Mini/Micro Camera Back)
- VBAT+ (Red wire): Connects to DC 4.6-20V input.
- GND (Black wire): Connects to Ground.
- VSEN (Blue wire): Connects to Voltage Senser.
- VID (Yellow wire): Connects to Video out.
- OSD (White wire): Connects to OSD.
Note: Connect the VSEN cable to the point where you want to detect the voltage.
OSD Switch Front Connections
The OSD switch front has a 2-pin connection to the OSD switch and a 5-pin harness.
The 5-pin harness includes:
- UP
- LEFT
- RIGHT
- MENU
- DOWN
CAUTION: If you are using ESC's with active braking, it is recommended to power the camera system through a BEC or voltage regulator.